

Page 1

400mm (16")
400mm (16")
VARIABLE SPEED SCROLL SAW
VARIABLE SPEED SCROLL SAW
Model No. CSS16V
Part No. 6460112
Operating and Maintenance
Instructions
©
0407
Page 2

PARTS DIAGRAM
© Copyright Clarke International. All rights reserved. August 1999
2
15
Page 3
PARTS LIST
No. Description Part No. No. Description Part No.
1 PCB DDCSS16V01
2 Power Cable complete DDCSS16V02
4 Hex Nut M6 DDCSS16V04
5 Pan Head Screw M5x10 DDCSS16V05
4 6 Plate Cover DDCSS16V06
8 Hex Head Screw M8x25 DDCSS16V08
9 Base DDCSS16V09
10 Hex Head Screw M6x16 DCSS16V010
11 Housing Complete DDCSS16V11
12 Table Support DDCSS16V12
13 Indicator DDCSS16V13
14 Pan Head Screw M6x12 DDCSS16V14
15 Quadrant DDCSS16V15
17 Spring DDCSS16V17
19 Hex Head Bolt M6x40 DDCSS16V19
20 Spring DDCSS16V20
21 Bolt Tension Knob DDCSS16V21
22 Lower Arm DDCSS16V22
24 Hex Head Bolt M4xl0 DDCSS16V24
25 Bearing Flange DDCSS16V25
26 Pan Head Screw M5x6 DDCSS16V26
27 Round Hd Screw M6x25 DDCSS16V27
28 Retainer DDCSS16V28
29 Upper Arm DDCSS16V29
30 Hex Nut M6 DDCSS16V30
31 Hex Head Bolt M5x20 DDCSS16V31
32 Spacer Bearing DDCSS16V32
33 Big Plate Washer DDCSS16V33
34 Link Assembly DDCSS16V34
35 Allen Wrench DDCSS16V35
36 Cord Clamp DDCSS16V36
37 Upper Blade Holder DDCSS16V37
38 Hex Head Bolt M5x25 DDCSS16V38
40 Tube DDCSS16V40
41 Pan Head Screw DDCSS16V41
42 Hex Head Bolt M4x16 DDCSS16V42
43 Table Insert DDCSS16V43
44 Knob DDCSS16V44
45 Blade
46 Pan Hd Screw M4xl0 DDCSS16V46
See Accessories
47 Blade Box DDCSS16V47
49 Fuse Holder DDCSS16V49
50 Switch Cover DDCSS16V50
51 Motor DDCSS16V51
52 Eccentric DDCSS16V52
53 Table DDCSS16V53
54 Hex Hd Bolt M6x35 DDCSS16V54
55 PVC Pipe DDCSS16V55
56 Support Rod DDCSS16V56
57 Bellows Top DDCSS16V57
58 Bellows DDCSS16V58
59 Tooth Washer DDCSS16V59
60 Set Screw M8x8 DDCSS16V60
61 Pan Hd Screw St4.2x8 DDCSS16V61
62 Fuse DDCSS16V62
63 Pan Hd Screw M5x8 DDCSS16V63
64 Pan Hd Screw M4x6 DDCSS16V64
65 Pan Hd Screw M5x35 DDCSS16V65
66 Pan Hd Screw M5x30 DDCSS16V66
67 Blower Tube DDCSS16V67
68 Knob DDCSS16V68
69 Bearing Fence DDCSS16V69
70 Set Plate DDCSS16V70
71 Switch Case DDCSS16V71
72 Switch DDCSS16V72
73 Hex Nut M5 DDCSS16V73
74 Pan Head Screw DDCSS16V74
75 Back Plate Cover DDCSS16V75
77 Hex Head Bolt M4xl6 DDCSS16V77
78 Guard Blade DDCSS16V78
79 Speed Switch DDCSS16V79
81 Knob DDCSS16V81
82 Pan Hd Screw M5x25 DDCSS16V82
83 Carbon Brush DDCSS16V83
84 Brush Screw DDCSS16V84
85 Tooth Washer DDCSS16V85
87 Drop Foot DDCSS16V87
88 Bearing DDCSS16V88
89 Hex Nut Ml2 DDCSS16V89
Thank you for purchasing this CLARKE 400mm (16") Scroll Saw, designed for DIY or hobby use.
Before operating this machine, please read this manual thoroughly and carefully follow the
instructions given. In doing so you will ensure the safety of yourself and that of others around you,
and you can look forward to the Scroll Saw giving you long and satisfactory service.
GUARANTEE
This CLARKE product is guaranteed against faulty manufacture for a period of 12 months from the
date of purchase. Please keep your receipt as proof of purchase.
This guarantee is invalid if the product is found to have been abused or tampered with in any way,
or not used for the purpose for which it was intended.
Faulty goods should be returned to their place of purchase, no product can be returned to us
without prior permission.
This guarantee does not effect your statutory rights.
CONTENTS Page
Safety Precautions General ....................................................................... 4
Additional precautions for Scroll Saws ...................................................... 5
Electrical Connections ............................................................................... 6
Principal Parts .............................................................................................. 7
Assembly ...................................................................................................... 7
Installation .................................................................................................... 8
Blade Alignment .......................................................................................... 8
Bevel Alignment .......................................................................................... 9
Blade Renewal ............................................................................................ 9
Operation ..................................................................................................... 9
Operating Characteristics .......................................................................... 10
Straight Line Cutting .................................................................................... 10
Cutting Intricate patterns ........................................................................... 10
Saw Blade Notes ......................................................................................... 11
Maintenance ............................................................................................... 12
Trouble Shooting .......................................................................................... 12
Specifications .............................................................................................. 13
Accessories .................................................................................................. 13
Parts &Service Contacts ............................................................................. 13
Parts list ......................................................................................................... 14
Parts Diagram .............................................................................................. 15
14
3
Page 4
SAFETY PRECAUTIONS
SPECIFICATIONS
GENERAL SAFETY RULES FOR OPERATING MACHINERY
WARNING:
As with all machinery, there are certain hazards involved with their operation and use. Exercising
respect and caution will considerably lessen the risk of personal injury. However, if normal safety
precautions are overlooked or ignored, personal injury to the operator may result.
✔ ALWAYS read and become familiar with the entire operating manual. Learn the machines’
applications and limitations as well as the specific potential hazards peculiar to it.
✔ ALWAYS ensure that adequate lighting is available. A minimum intensity of 300 lux should be
provided. Ensure that lighting is placed so that you will not be working in your own shadow.
✔ ALWAYS check for damage. Before using the machine, any damaged part, such as a guard
etc., should be checked to ensure that it will operate properly, and perform its intended
function. Check for alignment of moving parts, breakage of parts, mountings, and any other
condition that may affect the machines’ operation. Any damage should be properly repaired
or the part replaced. If in doubt, do not use the machine. Consult your local dealer.
✔ ALWAYS disconnect the machine from the power supply before servicing and when changing
accessories such as blades, etc.
✔ ALWAYS keep guards in place and in working order.
✔ ALWAYS wear safety goggles, manufactured to the latest European safety standards and
also use face or dust mask if cutting operation is dusty. Everyday eyeglasses do not have
impact resistant lenses, they are not safety glasses.
✔ ALWAYS keep work area clean. Cluttered areas and benches invite accidents.
✔ ALWAYS remove adjusting keys and wrenches. Form the habit of checking to see that keys
and adjusting wrenches are removed from the machine before switching on.
✔ ALWAYS use recommended accessories. The use of improper accessories could be hazardous.
✔ ALWAYS remove plug from the electrical outlet when adjusting, changing parts, or working on machine.
✔ ALWAYS earth all machines. If the machine is equipped with three-pin plug, it should be
plugged into a three-pin electrical socket. NEVER remove the earth pin.
✔ ALWAYS avoid dangerous environment. Don’t use power machines in damp or wet locations
or expose them to rain. Keep your work area well illuminated. Do not use in explosive
atmosphere (around paint, flammable liquids etc.).
✔ ALWAYS keep children away. All visitors should be kept a safe distance from the work area,
especially whilst operating the unit.
✔ ALWAYS maintain machine in top condition. Keep tools sharp and clean for the best and
safest performance. Follow maintenance instructions.
✔ ALWAYS wear proper apparel. Loose clothing or jewellery may get caught in moving parts.
Wear protective hair covering to contain long hair.
✔ ALWAYS make workshop childproof. Cover the saw adequately when not in use, to prevent
children from damaging themselves by tampering with it.
✔ ALWAYS handle with extreme care whenever transporting or installing machinery, and always
use a lifting tool.
✔ ALWAYS avoid accidental starting. Ensure the switch is off before plugging in to mains.
✔ ALWAYS be aware that accidents are caused by carelessness due to familiarity. Always
concentrate on the job in hand, no matter how trivial it may seem.
Mains Voltage: ............................................................................. 230V, 50Hz, 1 phase.
Rating: ................................................................................ 120 Watts
Maximum thickness of cut: ......................................................... 50mm (2")
Throat: ............................................................................................ 400mm (16")
Blade length: ................................................................................. 133mm (5¼")
Strokes per minute:....................................................................... 400 - 1700
Stroke length: ................................................................................ 15mm
Table size: ...................................................................................... 413 x 250mm
Machine dimensions (LxWxH): .................................................... 625x285x320mm
O
Table tilt: ........................................................................................ 0
Base size: .......................................................................................400 x 245mm
Blade Type: ................................................................................... Pin
Gross / Net weight: ....................................................................... 14 / 16kg
Please note that the details and specifications contained herein, are correct at the time of going to print. However, CLARKE
International reserve the right to change specifications at any time without prior notice. Always consult the machine’s data plate
When disposing of this product, do not dispose of with general household waste. It must be disposed of according to law,
at a proper disposal facility
- 45O left
ACCESSORIES
Replacement saw blades are available from you Clarke dealer, in packs of 10, as follows:
10 TPI .................................... Part No. 6470067
15 TPI .................................... Part No. 6460110
20TPI ..................................... Part No. 6470072
PARTS & SERVICE CONTACTS
For Spare Parts and Service, please contact your nearest dealer,
or CLARKE International, on one of the following numbers.
PARTS & SERVICE TEL: 020 8988 7400
PARTS & SERVICE FAX: 020 8558 3622
or e-mail as follows:
PARTS: [email protected]
SERVICE: [email protected]
4
13
Page 5
MAINTENANCE
A. Apply a thin coat of paste wax on the work table from time to time. This will help
the wood glide across the table more smoothly.
B. The motor is permanently lubricated. Do not try to oil the motor bearings or service any
internal parts of the motor. If the power cord is worn, frayed, cut or damaged, replace
it. Do not try to patch it up with electrical tape this could lead to more trouble.
TROUBLESHOOTING
IMPORTANT! Whenever carrying ouit repairs, or Troubleshooting - ALWAYS ensure the electric
plug is disconnected from the mains supply.
PROBLEM PROBABLE CAUSES SUGGESTED REMEDY
Breaking Blades. 1. Incorrect tension. 1. Adjust blade tension.
2. Overworked (worn out) blade. 2. Reduce feed rate or replace
blade.
3. Wrong blade being used. 3. Use narrow blades for thin
wood, wider blades for
thicker wood.
4. Twisting blade in wood. 4. Avoid side pressure on blade.
Motor Will Not Run. 1. 5 Amp fuse blown 1. Check fuses - on front panel.
and elec. plug. Replace where
necessary.If problem persists
contact your Clarke dealer
2. Defective cord, plug or outlet. 2. Unplug saw, replace
defective parts.
3. Defective motor. 3. Repairs MUST be made by a
qualified technician. Call
Clarke Service dept. for
advice.
Excessive Vibration 1. Improper mounting of saw. 1. See proper mounting
instructions (p7)
(Some vibration is 2. Unsuitable mounting surface. 2. Replace plywood
inevitable when the workbench surface with solid
saw and motor are lumber surface.
running) 3. Loose table or table rubbing 3. Tighten table adjuster knob.
against motor.
4. Motor mount is loose. 4. Tighten motor mount screws.
Blade Runout 1. Blade holders not aligned. 1. Loosen screws holding
blade holder to rocker arms.
Adjust position of blade
holders. Use metal strip
to verify alignment. Retighten
holder screws
2. Insufficient Blade tension 2. Increase Blade tension
3. Dull Blade causing excesive 3. Renew Blade and correctly
force to be used at workpiece tension.
✗ NEVER force the machine. It will do a better and safer job at the rate for which it was designed.
✗ NEVER operate machine while under the influence of drugs, alcohol or any medication.
✗ NEVER leave machine running unattended. Turn power off. Do not leave machine until it
comes to a complete stop.
✗ NEVER overreach. Keep your proper footing and balance at all times. For best footing,
wear rubber soled footwear. Keep floor clear of oil, scrap wood, etc.
✗ NEVER stand on the machine. Serious injury could occur if the machine is tipped or if a
cutting tool is accidentally contacted. Do not store materials above or near a machine,
such that it is necessary to stand on the machine to reach them.
ADDITIONAL SAFETY INSTRUCTIONS FOR SCROLL SAWS
1. Wear safety goggles as protection against flying wood chips and saw dust. In many cases, a
full face shield is even better protection. A dust mask is also recommended to keep saw dust
out of your lungs.
2. The scroll saw must be bolted securely to a stand or workbench. If the saw has a tendency to
move during certain operations, bolt the stand or workbench to the floor.
3. A solid wood workbench is stronger and more stable than a workbench with a plywood table.
4. This scroll saw is for indoor use only.
5. Do not cut pieces of material which are to small to be held by hand.
6. Clear the work table of all objects except the workpiece (tools, scraps ,rulers etc.) before
turning the saw on .
7. Make sure the blades’ teeth are pointing down, toward the table, and that the blade tension
is correct.
8. When cutting a large piece of material, support it at the height of the table.
9. Do not feed the workpiece through the blade too fast. Feed only as fast as the blade will cut.
10. Keep your fingers away from the blade. Use a push stick as you near the end of the cut.
11. Take care when cutting a workpiece which is irregular in cross section. Moulding for example must
lie flat, and not ‘rock’ on the table as it is being cut. A suitable support must be used.
12. Take care when ‘backing off’ a workpiece from the blade, as the blade may bind in the
‘kerf’. In this event, switch OFF the machine and disconnect from the supply. Wedge open
the kerf, and withdraw the workpiece.
13. Switch off the saw, and make sure the blade has come to a complete stop before clearing
sawdust or off-cuts from the table.
14. Make sure there are no nails or foreign objects in the part of the workpiece to be sawn.
15. Be extra cautious with very large or small, or irregularly shaped workpieces.
16. Set up the machine and make all adjustments with the power OFF, and disconnected from
the supply.
17. DO NOT operate the machine with the covers off. They must all be in place and securely
fastened when performing any operation
18. Be sure to use the correct blade size and type.
19. Use ONLY approved replacement saw blades. Contact your local CLARKE dealer for advice.
The use of inferior blades may increase the risk of injury.
12
5
Page 6
ELECTRICAL CONNECTIONS
NOTES ON SAW BLADES
Connect the mains lead to a standard, 230 Volt (50Hz) electrical supply through an
approved 13 amp BS 1363 plug, or a suitably fused isolator switch.
WARNING! THIS APPLIANCE MUST BE EARTHED
IMPORTANT: The wires in the mains lead are coloured in accordance with the following
code:
Green & Yellow - Earth
Blue - Neutral
Brown - Live
As the colours of the flexible lead of this appliance may not correspond with the coloured
markings identifying terminals in your plug proceed as follows:
• Connect GREEN & YELLOW coloured cord to plug terminal marked with a letter “E”
or Earth symbol “ ” or coloured GREEN or GREEN & YELLOW.
• Connect BROWN coloured cord to plug terminal marked with a letter “L” or coloured
RED.
• Connect BLUE coloured cord to plug terminal marked with a letter “N” or coloured
BLACK.
If this appliance is fitted with a plug which is moulded onto the electric cable (i.e. nonrewirable) please note:
1. The plug must be thrown away if it is cut from the electric cable. There is a danger of
electric shock if it is subsequently inserted into a socket outlet.
2. Never use the plug without the fuse cover fitted.
3. Should you wish to replace a detachable fuse carrier, ensure that the correct
replacement is used (as indicated by marking or colour code).
4. Replacement fuse covers can be obtained from your local dealer or most electrical
stockists.
IMPORTANT: ALWAYS USE GOOD QUALITY BLADES
BLADES BREAK FOR FIVE PRINCIPAL REASONS:
1. Too much tension or too little tension on the blade.
2. Overworking the blade by feeding the workpiece too fast.
3. Twisting or bending the blade by feeding the workpiece off-centre.
4. Over use - the blade has reached the end of its useful life.
5. Feeding too much material into the saw, - more than the maximum 2" depth for
which it was designed.
HOW TO DETERMINE THE RIGHT BLADE FOR THE JOB
This scroll saw accepts a wide variety of blade widths and thicknesses. The width of the
blade , the thickness of the blade, and the number of teeth per inch (TPI) are determined
by the type of material and size of the radius being cut. Here are several examples:
TPI WIDTH THICKNESS MATERIAL
10 2.8mm 0.5mm Medium curves on 1/4" to 1-3/4" wood, wallboard,
0.11" 0.020" hardboard.
15 2.8mm 0.5mm Same as above, plus wood 1/8" to 1-1/2" thick
0.11" 0.020"
18 2.4mm 0.25mm Extra thin cuts on soft woods to 1/4" and parquetry
0.095" 0.011
As a general rule, select the narrowest blades recommended for intricate curve cutting
and widest blades for straight and large curve operations.
FUSE RATING
The fuse in the plug must be replaced with one of the same rating (5 amps) and this
replacement must be ASTA approved to BS1362.
The fuse on the front panel of the machine must also be replaceed with one of the same
rating (5 amps) and this replacement must be ASTA approved to BS1362.
6
11
Page 7
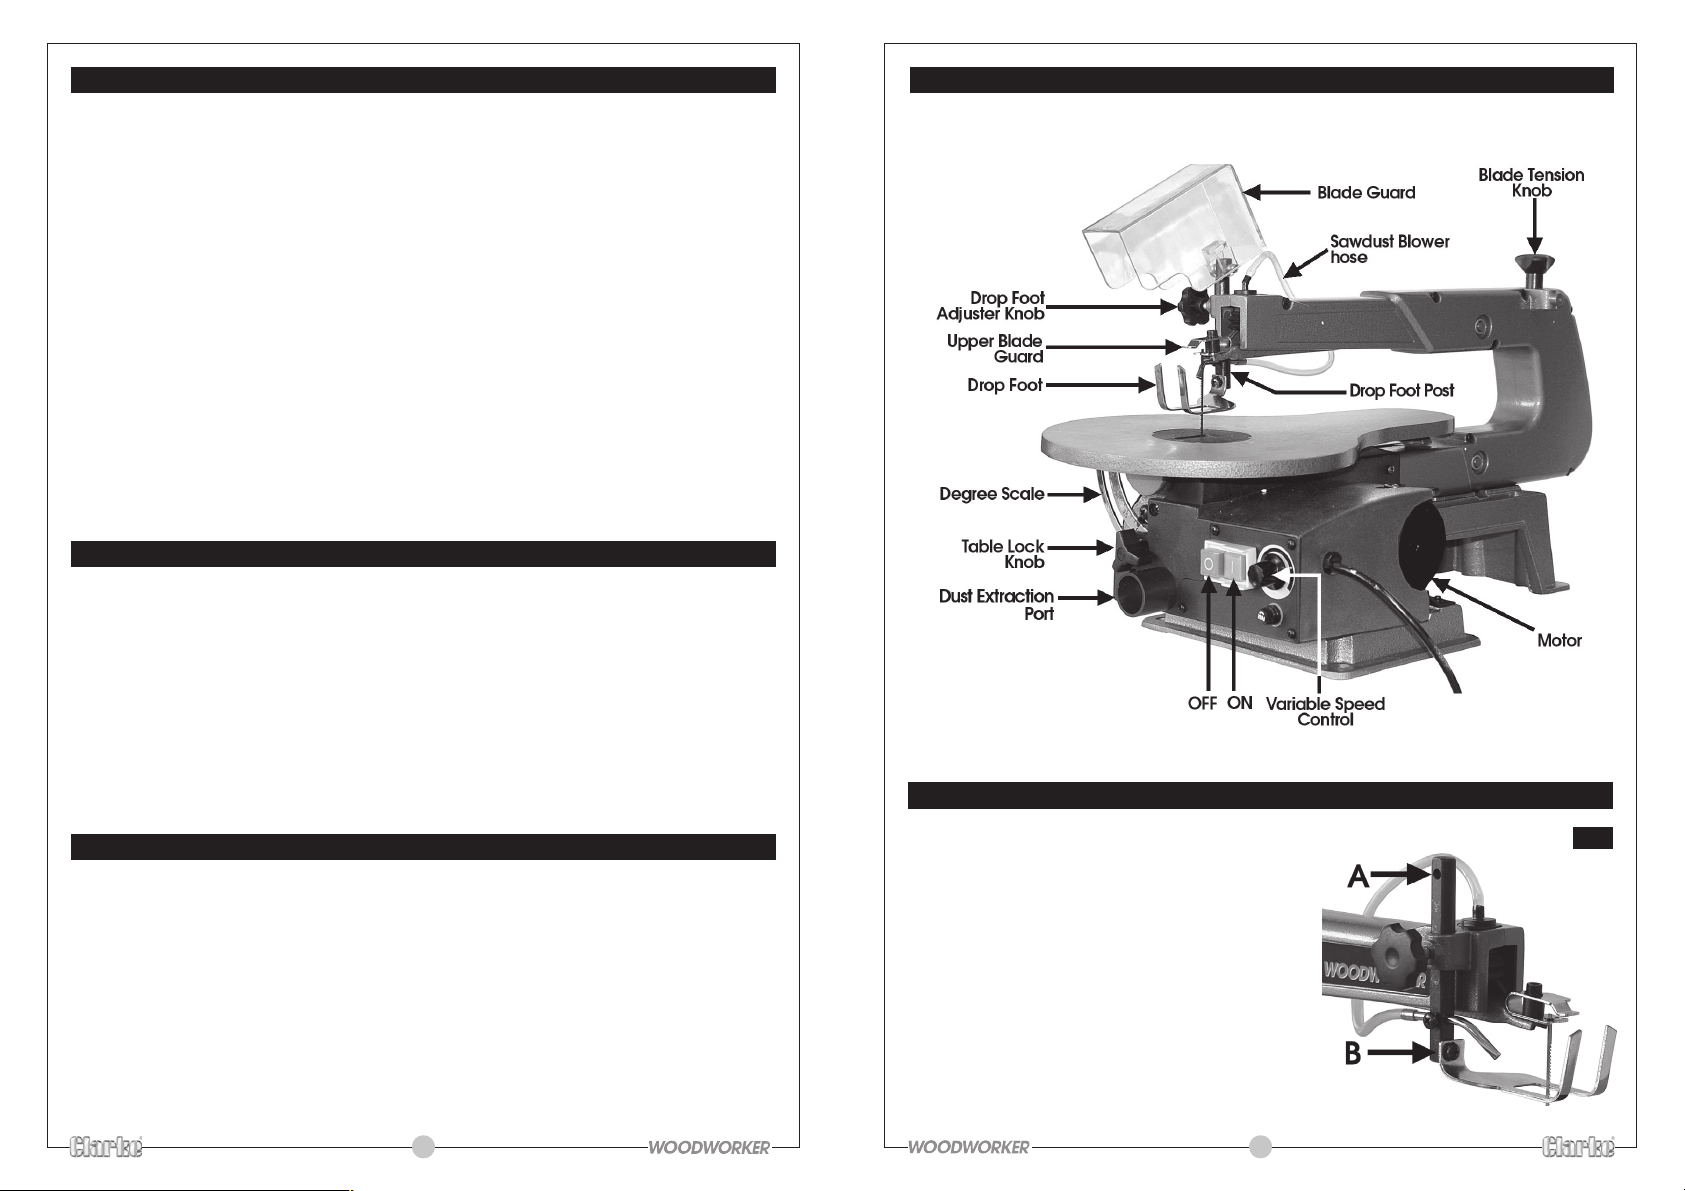
SCROLL SAW OPERATING CHARACTERISTICS
The scroll saw’s unique ability is cutting intricate curves which other saws cannot do. A scroll saw
can also be used for straight line cutting such as cross cuts, ripping and bevels. The following is a list
of points to remember when using a Scroll Saw.
1. The saw does not cut wood by itself. You feed the workpiece into the blade, letting the blade
cut the wood as you move the piece ahead.
2. You must guide the wood into the blade SLOWLY, because the teeth are very small, and cut
ONLY on the down stroke. If you push the wood into the blade too rapidly, you can easily break
the blade.
3. Although the capacity of the saw accepts wood up to 40mm thick, better results are obtained
with wood no more than 25mm thick. For wood thicker than 25mm, you must guide the wood
into the blade very slowly, taking care not to bend or twist the blade.
4. The teeth on the blade will wear out sooner or later. The blade must therefore be replaced
often to obtain the best cutting results. A blade will stay sharp for ½ hour to 2 hours of continuous
running, depending on the material being cut.
5. Be aware that the blade has a tendency to follow the grain of the wood - the line of least
resistance. You can compensate for this by watching the grain carefully and guiding the wood
past the saw blade.
6. If you are not familiar with scroll saws, there will naturally be a learning period - a period to learn
the saw itself, and a period to learn how the wood and saw work together. Expect some blade
breakages, Scroll Saw blades are fairly fragile - not the same types of blade you find on a
handsaw or circular saw.
STRAIGHT LINE CUTTING
A little practice will be necessary in order to create a straight line cut. This is due to the very design
and nature of the machine itself. The saw blade is quite fragile and due to several different influences,
will tend to wander off line. These influences include the following:
1. Blade tension. A slack blade will naturally wander off line.
2. Condition of the blade. A dull blade requires a greater effort to guide it through the work,
thereby tending to force it off line.
3. Blade holders misaligned. The holders are secured with a single hex. socket head screw.
Slacken the screw and adjust the holder so as to align correctly. The blade should be in line with
the table, and not twisted.
IMPORTANT! Always lower the Drop Foot to make light contact with the work surface, and secure in place
before cutting. The Drop Foot may be swivelled so that it may be used when Bevel Cutting.
CUTTING INTRICATE PATTERNS
One capability a scroll saw has that other saws do not, is cutting intricate patterns inside a workpiece.
To do this, you should adopt the following procedure.
1. Drill a 1/4" hole in the middle of the workpiece, in a area which will not be a part of the finished object.
2. Switch off and unplug the machine from the supply.
3. Remove the blade from the machine.
4. Place the workpiece on the table, with the 1/4" hole over the access hole in the table.
5. Replace the blade, through the hole in the workpiece, (teeth downwards), and re-tension the blade.
6. Plug the saw back in. Check to ensure that the workpiece is not touching the blade before switching
ON.
When you are finished doing the work inside the workpiece, turn the saw off, unplug it, remove the
blade, remove the workpiece, reinstall the blade, and plug the saw back in.
PRINCIPAL PARTS OF THE SCROLL SAW
ASSEMBLY
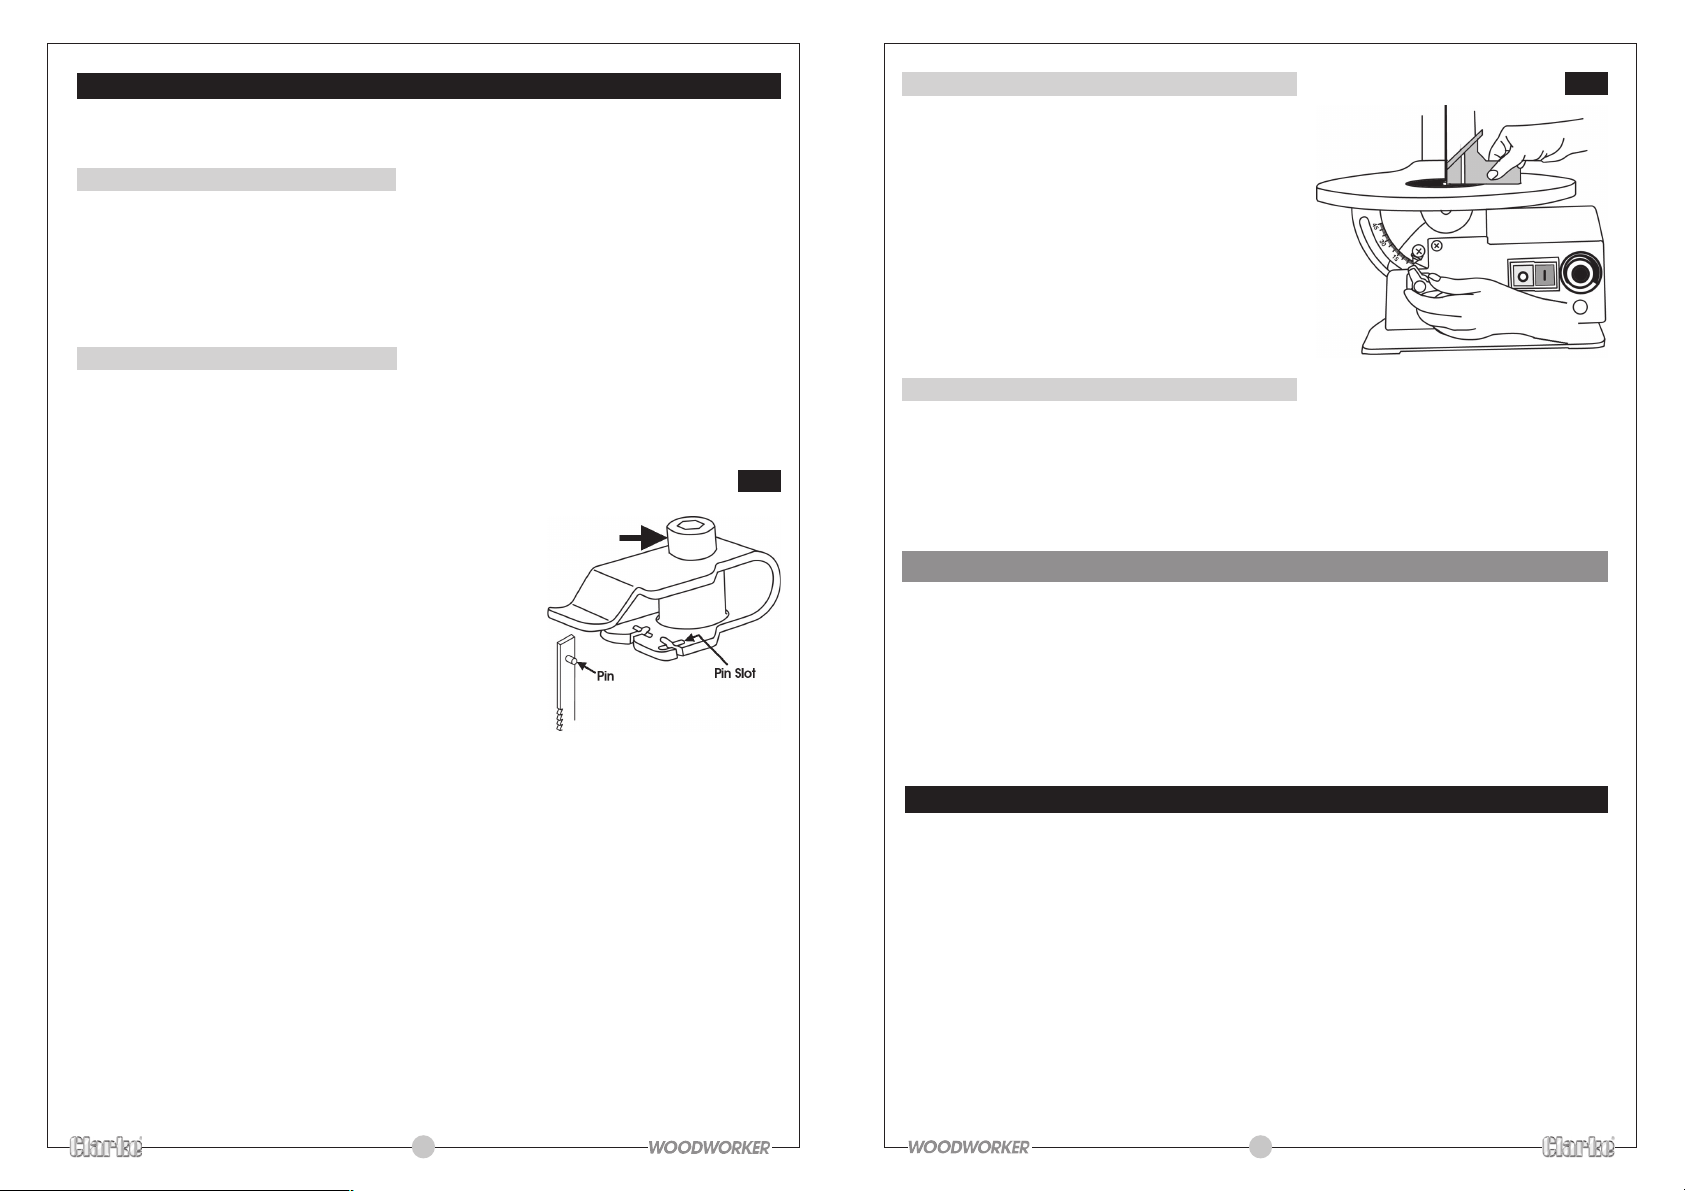
1. Should the sawdust blower hose not be fitted,
attach as shown in Fig.2
2. Line up the hole in the blade guard with the
hole at the top of the Drop Foot Post, arrowed
at ‘A’ in Fig. 2. Insert the bolt and screw on the
nut. Tighten sufficiently for the nut to be secure
with the guard capable of pivoting and
dropping under its own weight.
3. It will also be necessary to tighten the Drop Foot
securing screw, arrowed at ‘B’, Fig.2, so that the
Drop Foot lies flat/parallel with the table.
4. Check to ensure the Blade Guard is capable
of moving fully to its lowest position when the
Drop Foot is secure.
Fig. 2
10
7
Page 8
INSTALLATION (All parts referred to are shown in Fig. 1)
Plan your installation. Ensure adequate space is available, with good lighting and
ventilation, and an adequate electrical supply is close at hand.
1. MOUNTING THE SAW
Your Scroll Saw is provided with 4 mounting holes, and it is strongly recommended that for
safety and stability, you mount the machine either directly to a solid workbench, or to a
solid sheet pf ply, the best dimensions being - 24" x 14" x ½”. The Ply base must then be
clamped to a workbench before use.
Ensure you use flat washers between the bolt head and the mounting hole, and do not
over tighten the bolts.
2.BLADE HOLDER ALIGNMENT
It is important that the blade holders are checked for alignment before use. Misaligned
holders will cause the blade to wander, and reduce the blades’ life expectancy.
To check the alignment,
2.1 Loosen the tension on the blade by turning the
blade tension knob, two full turns anticlockwise.
2.2 Prise out the table insert, by pushing it from
beneath the table with your fingers.
2.3 Apply a slight downward pressure on the upper
arm whilst holding the blade firmly, allowing the
pins at the top of the blade to be disengaged
from the recesses in the upper blade holder see fig 3. It is now a simple matter to disengage
the blade pins from the lower blade holder and
lift the blade out through the access hole in the
table.
2.4 Remove the side cover, by unscrewing the two
retaining screws, (one of which is within the tool
holder), to give access to the lower holder.
2.5 Slacken off the single hex. socket head screws securing the upper and lower
blade holders, (arrowed in fig 3), so that the holders move freely, using the hex
socket wrench supplied.
2.6 Turn the blade holders, so that they are completely in line with each other and with
the table axis. Carefully tighten each holder in turn, taking great care not to alter
their positions as you do so.
On completion, replace the side cover, table insert and blade by reversing the
procedure above.
NOTE: If the blade tends to wander during use, re-check this adjustment as it may take
one or two attempts to get it right. Also see page 11 - Straight Line Cutting, for other
causes of blade wander.
8
Fig. 3
3. BEVEL ALIGNMENT (see fig. 4)
Fig. 4
To align the bevel indicator, loosen the table bevel
lock knob, and level the table until it is at right
angles to the blade. Use a small square to be sure
that the angle between blade and table is 90
o
.
When the table is perpendicular to the blade,
tighten the bevel lock knob.
Loosen the screw holding the pointer, adjust the
pointer to 0
O
, then retighten the screw.
The bevel scale is a convenient indicator, but it is
not guaranteed to be 100% accurate. Where
absolute accuracy is required, always double
check with a protractor before starting a cut.
4. BLADE INSTALLATION / RENEWAL
4.1 Before installing or removing blades, turn OFF the saw and disconnect it from the
supply. Remove the blade as described in 2.
NOTE:
The blade slots and pin recesses are made so you can position the blade for cutting from
the front, or from the side (see figs. 3). Cutting from the side is necessary when your
workpiece is over 16" long.
IMPORTANT: Side cutting can only be performed when the table is level, i.e. set to 0O.
4.2 With the blade teeth pointing DOWNWARDS, slot the new blade into the lower
housing so that the pins on the end of the blade, engage in the recess in the
housing. Holding the blade firmly, apply downward pressure to the upper arm
whilst slotting the upper end of the blade into the slot in the upper housing, again,
making sure the blade pins correctly engage in the recess in the housing.
4.3 Replace the Table Insert, and re-tension to the blade, by turning the tension
knob clockwise until you feel the blade is firm. Check to ensure that the blade
pins are properly seated, top and bottom.
OPERATION
Ensure the machine is completely stable...either bolted to a workbench, or with the
mounting board clamped firmly to a workbench.
Ensure the table is perfectly secure and at the desired angle and the blade tensioned
correctly...ie. tight but not excessively so.
Plug in the mains cable and set the variable speed control to zero..fully anticlockwise.
Place the workpiece on the table and bring the Drop Foot into light contact with the
work surface, then tighten the securing screw.
Switch ON by pressing the green knob ‘I’. Turn the variable speed control to a desired
speed....generally, the harder or thicker the wood, the slower the speed.
Feed the workpiece into the blade gently....do not force it. If there is a need to stop
cutting, switch OFF by pressing the red knob ‘O’, and allow the blade to stop
completely before gently working the blade out of the workpiece.
NOTE: A Dust Port is provided so that a vacuum extraction device may be used.
9
 Loading...