

Page 1

SOLAR POWERED /
ARC ACTIV A TED HEADSHIELD
Model No: CWS1
Part No: 6000689
ASSEMBLY & OPERATING
INSTRUCTIONS
GC06/12
Page 2

INTRODUCTION
Thank you for purchasing this CLARKE Headshield.
Please read this manual thoroughly and follow the instructions carefully. In
doing so you will ensure the safety of yourself and that of others around you,
and you can look forward to the product giving you long & satisfactory
service.
GUARANTEE
This product is guaranteed against faulty manufacture for a period of 12
months from the date of purchase. Please keep your receipt which will be
required as proof of purchase.
This guarantee is invalid if the product is found to have been abused or
tampered with in any way, or not used for its intended purpose. Faulty goods
should be returned to their place of purchase. No product can be returned
to us without prior permission. This guarantee does not effect your statutory
rights.
ENVIRONMENTAL PROTECTION
If broken, do not dispose of this product with general household waste. This
product contains valuable raw materials and should be disposed of
appropriately at a recognised disposal facility.
TECHNICAL DATA
Viewing Field (W x H) 90 X 40 mm
Shade Number in Light State DIN4
Shade Number in Dark State DIN 9-13 Outside Adjustment
UV/IR Protection max shade DIN16 at all times
o
Operating Temperature Range -5
Weight 0.4 kg
Switching Time from light to dark 0.6 msec
Delay Time from dark to light 0.1 - 0.8 seconds
Lens Power Control Auto-on, Auto-off after 15 min idle time
Power Supply Solar Cells / Lithium Battery
Construction material Polypropylene (fireproof)
C - +55oC
Please keep these instructions in a safe place for future reference.
2
Parts & Service: 020 8988 7400/E-mail:[email protected] or [email protected]
Page 3
GENERAL SAFETY WARNINGS
• This headshield is not suitable for laser welding, laser cutting or overhead
welding applications or for oxy-acetylene.
• The protective plate in this headshield is breakable and will not protect
against impact hazards.
• This headshield is designed for use in arc welding or cutting applications
such as MIG/MAG, TIG, MMA, Plasma Arc, and Carbon Arc.
• Use this headshield for face and eye protection against harmful rays,
sparks and spatter from welding and cutting.
• Never place this product on a hot surface.
• In the event of failure, the headshield remains protected against UV and
IR radiation.
• Do not make any modifications to this product. Protection can be seriously
impaired if modifications are made.
• When necessary, use identical replacement parts. This will ensure that the
safety of the product is maintained.
• Only trained welders should use this product.
• Do not use without protective plate installed. Do not use if any part of the
headshield is cracked or broken.
• Do not use this headshield for welding outside the range of DIN 9-13. Harm
to the eyes and impaired eyesight may result. Always select the correct
setting before use.
PREPARATION & USE
ASSEMBLY
Refer to the part numbers on page 6.
1. Install headband (8) by removing the thumbscrews (3) individually, and
fasten again after passing each spindle (12) through the holes on the sides
of the hood. Ensure the square lugs of the spacer (15) and back washer
(13) seat in the headshield and the adjustment tab (9) is locked in position.
2. Remove protective film from lens before use.
ADJUST HEADBAND TO FIT
1. The headband (8) should be adjusted both in diameter and height to fit
the wearer’s head. To do this, press the adjustment knob (10) on the back
of the headband and turn the nut either left or right to expand or contract
the headband.
3
Parts & Service: 020 8988 7400/E-mail:[email protected] or [email protected]
Page 4
2. The top headband can be adjusted by bending the strap and positioning
the peg in the appropriate hole.
3. When the thumbscrews (3) are tight, the angle of tilt can be quickly and
repeatably adjusted using the adjusting tab (9), by placing it on the
chosen peg on the headband.
USING THE HEADSHIELD
1. Remove the protective film from both sides of the cartridge (1).
• The window will be set to Light DIN 4 state, and you will be able to see the
workpiece. The lens will automatically darken when an arc is struck.
2. Test the lens by striking an arc on the workpiece for the first time. Check
also that the outer screen and lens are clean and clear at all times.
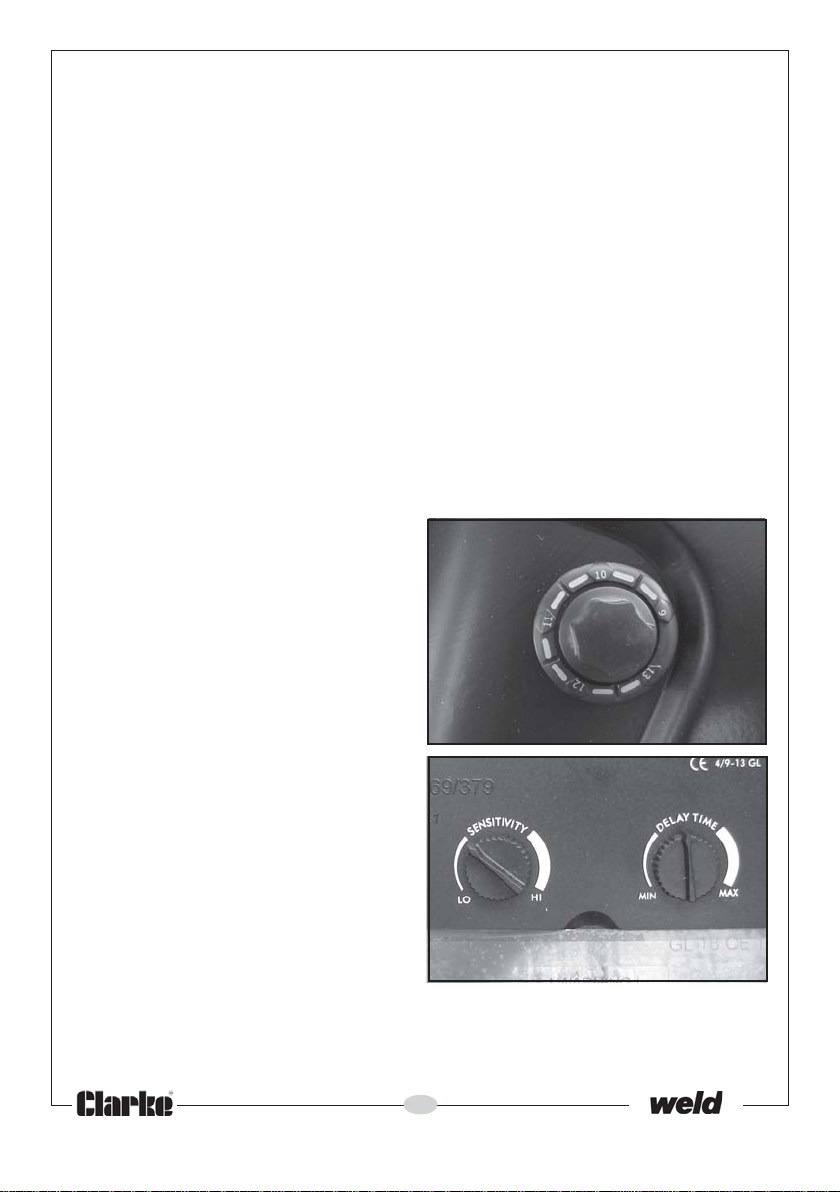
3. Change the shade of setting as required using the shade adjustment knob
(4). Refer to the table opposite.
4. When the helmet is not used for 15 minutes, the power will automatically
shut off. There is no OFF switch.
SELECT THE SHADE SETTING
On striking an arc, the light created
will activate the solar cell and the
window will automatically darken to
a preset level. The lithium battery will
provide the necessary energy to
operate the head shield when there
is no arc light. Because the cartridge
assembly is a sealed unit, the battery
cannot be replaced. You can adjust
this shade level using the shade knob
(4) on the side of the headshield,
corresponding to the type of welding
process.
• There are five levels available;
9, 10, 11, 12 and 13. Check the
table to determine which value
you should select.
1. Set the shade selector (4) to the
required setting.
2. During the welding operation the
lens will automatically darken to
the pre-set shade. On removal of the arc, the lens will return to the light
state.
3. Adjust the ‘Sensitivity’ and ‘Delay Time’ as desired by using the adjustment
knob.
4
Parts & Service: 020 8988 7400/E-mail:[email protected] or [email protected]
Page 5
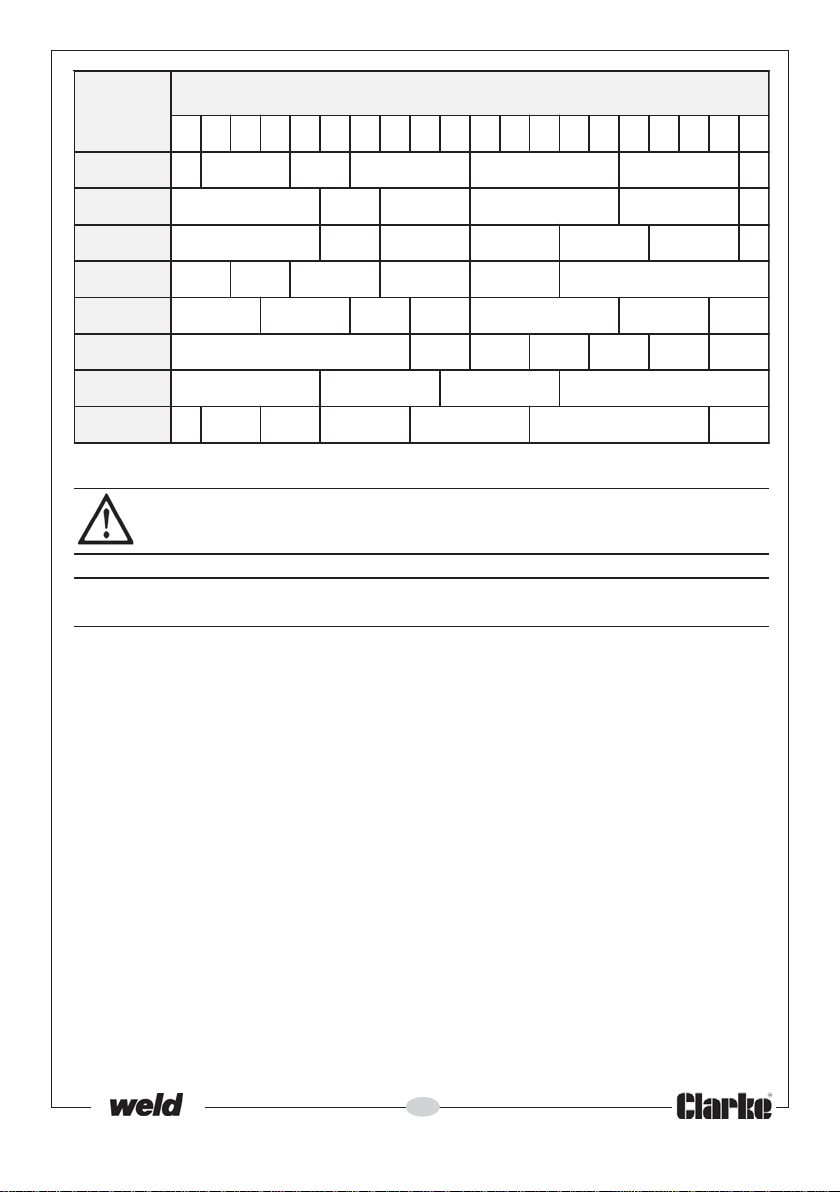
gnidleW
ssecorP
010203040608001521051571002522052572003053004054005
)serepmA(tnerruCcrA
WAMS
)yvaeh(GIM
)thgil(GIM
GATG,GIT
2OC/GAM
WAS
CAP
9011121314151
WAP
90111213141
0111213141
011121314151
90111213141
011121314151
011121314151
112131
Shade numbers according to BS 379, DIN 4647-1 and EN 169
WARNING: DO NOT USE FOR WELDING OUTSIDE THE RANGE OF DIN 9-
13. INJURY TO THE EYES & LOSS OF EYESIGHT MAY BE CAUSED.
CARE AND MAINTENANCE
GENERAL
Damaged components must be replaced immediately to avoid risk of eye
and face injuries. Periodically inspect the filter cartridge and lenses. Cracked,
pitted or scratched lenses reduce vision and seriously reduce the level of
protection and should be replaced with genuine, certified spare parts. The
outer screen can be removed for cleaning or replacement by prising it away
at its lower edge with the thumb. When replacing, take care it lays evenly on
the lips provided. Due to the small size of the components, the lithium battery
cannot be replaced.
CLEANING & STORAGE
The cartridge (5) can be wiped with a household glass cleaner when dirty.
Apply the cleaner with a clean cloth or paper towel. DO NOT USE ALCOHOL
TO CLEAN. DO NOT APPLY CLEANER DIRECTLY TO THE CARTRIDGE. The
headshield should be stored in it’s box or similar place.
Clean all lenses with a soft tissue and suitable lens cleaning fluid. Do not use
solvents. Never use tools or other sharp objects to remove material from the
filter or helmet. This may cause damage which may cause incorrect function
and invalidate the warranty.
5
Parts & Service: 020 8988 7400/E-mail:[email protected] or [email protected]
Page 6
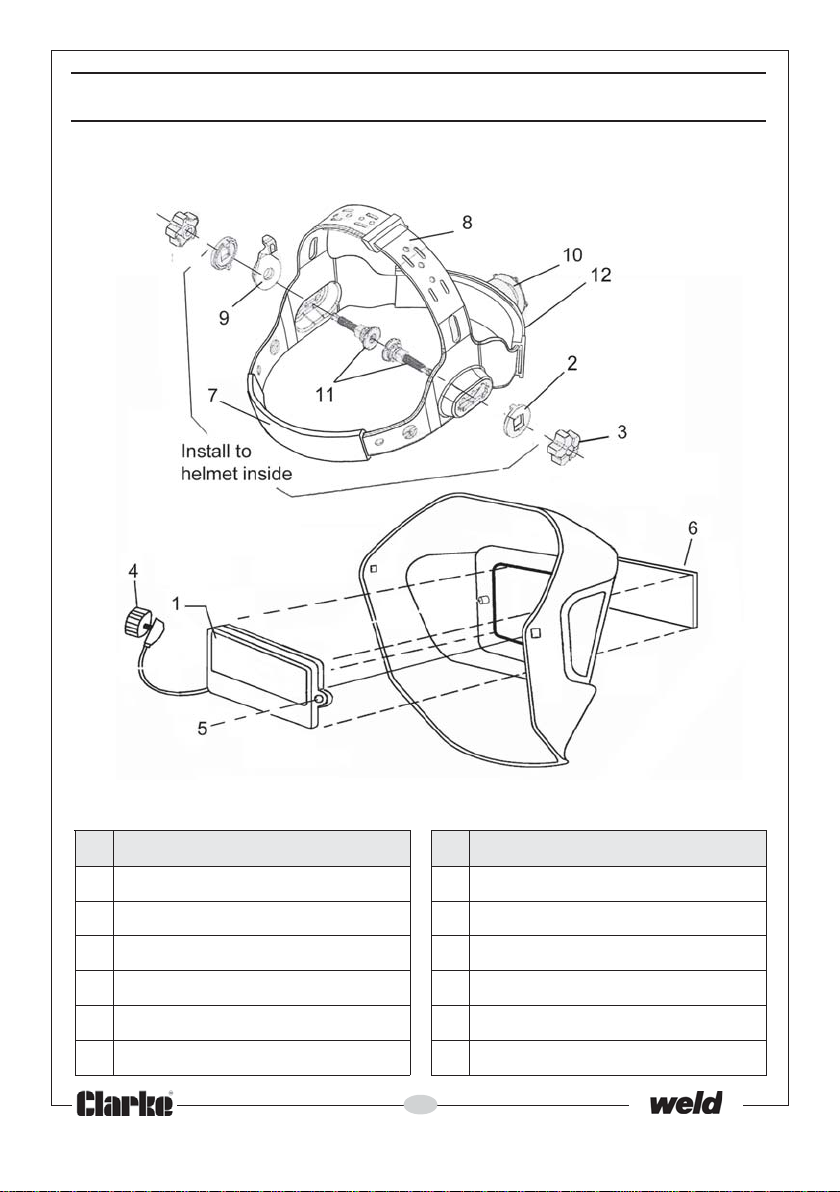
COMPONENT PARTS
oN noitpircseD oN noitpircseD
1ylbmessAegdirtraC7dnaBtaewS
2recapS8dnabdaeH
3dnabdaeHrofwercsbmuhT9baTtnemtsujdA
4bonKrotceleSedahS01bo
5wercSgnixiF11eldnipS
6neercSretuO21renoisneTdnabdaeH
6
Parts & Service: 020 8988 7400/E-mail:[email protected] or [email protected]
nKtnemtsujdAdnabdaeH
Page 7
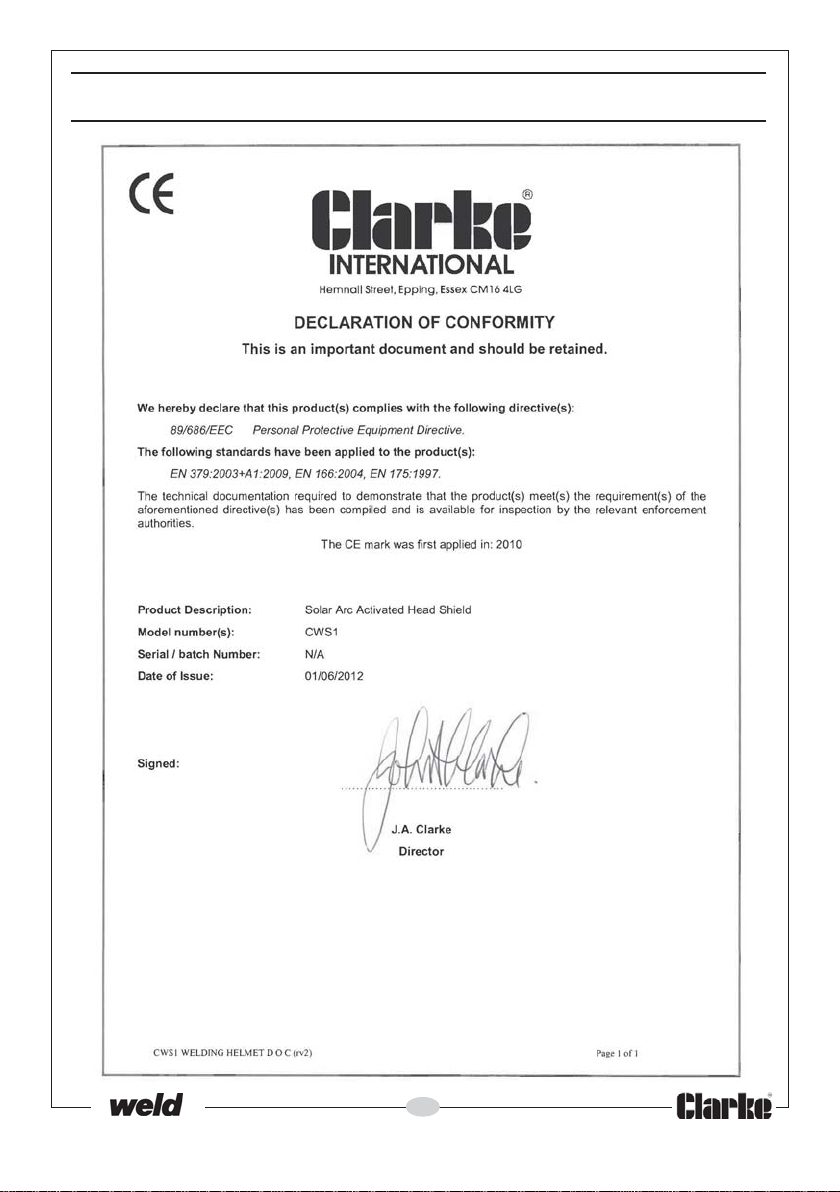
DECLARATION OF CONFORMITY
7
Parts & Service: 020 8988 7400/E-mail:[email protected] or [email protected]
Page 8

 Loading...