

Page 1
CWB1200P
Part Number: 4501500
Assembly Instructions
7
3
18
1
9
5
8
Contents
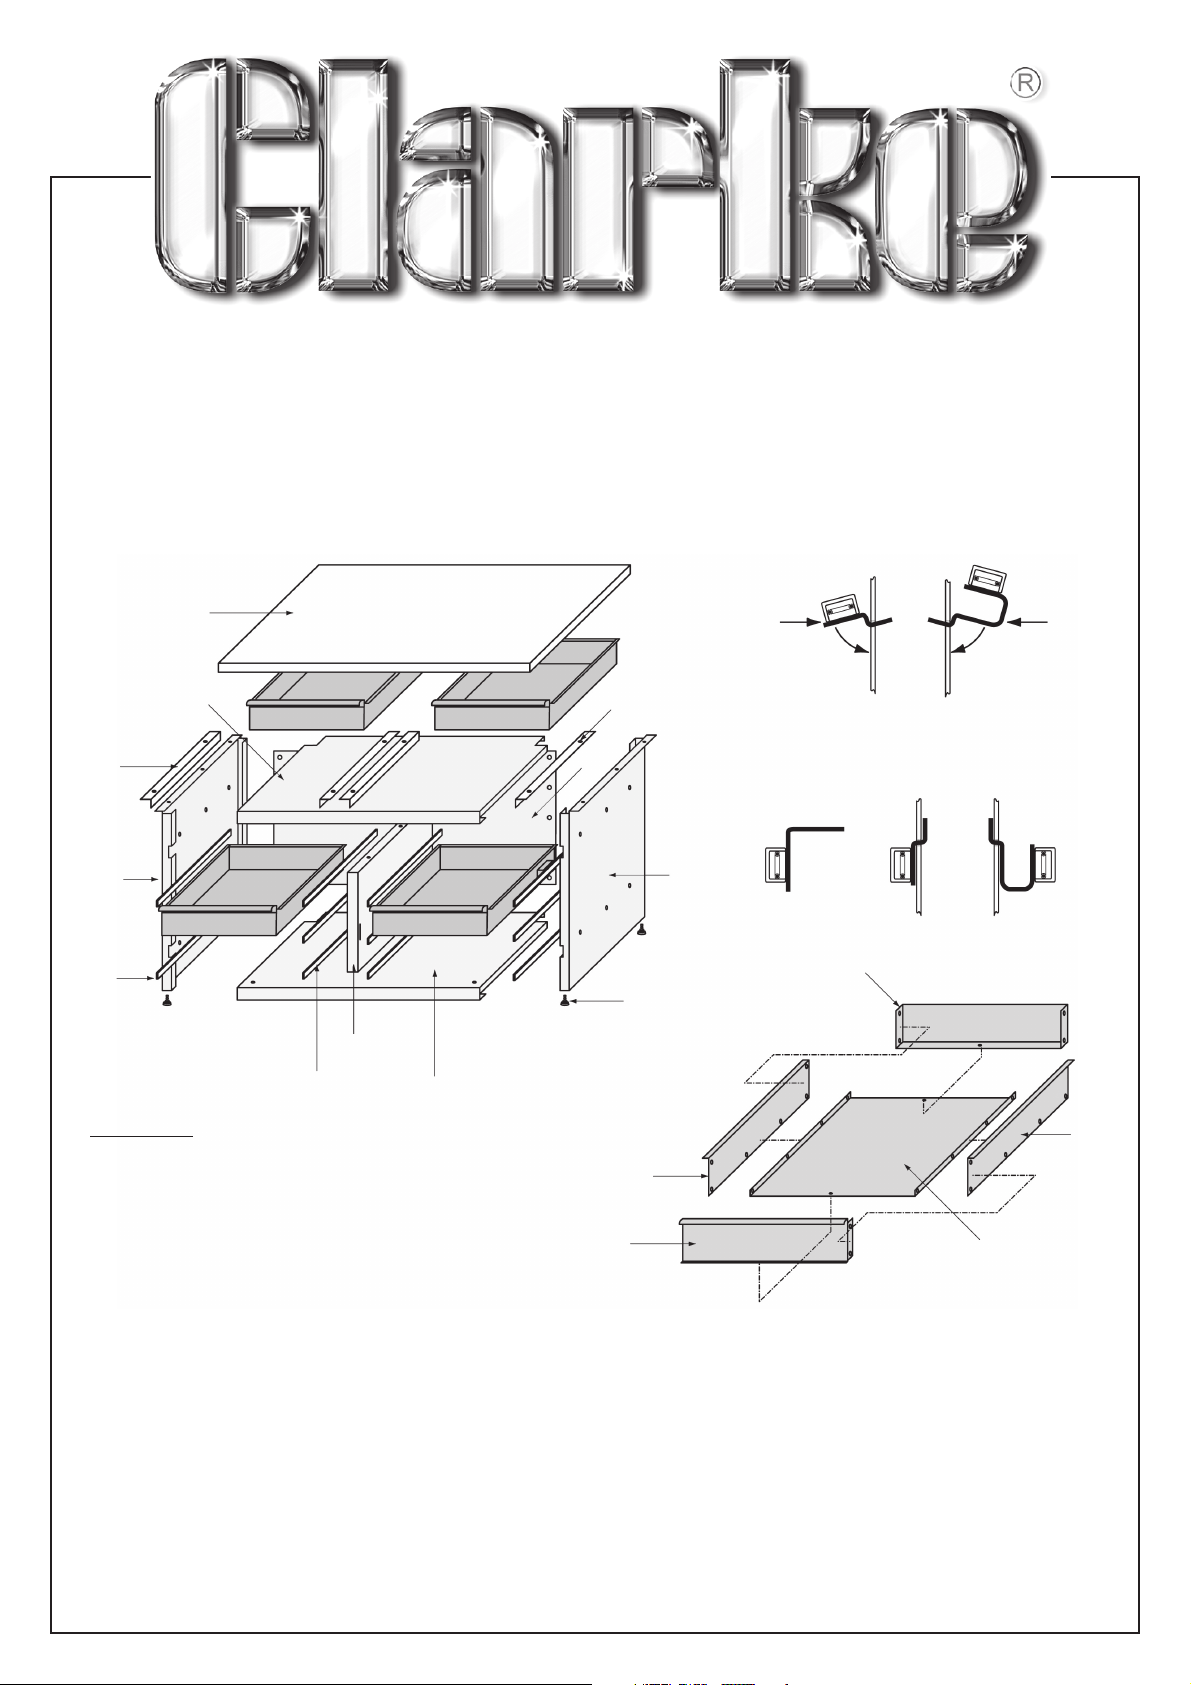
1. Left Leg x 1
2. Right Leg x 1
3. Upper Panel x 1
4. Bottom Panel x 1
5. Cross Panel x 1
6. Back Panel x 1
7. Bench Top x 1
8. Drawer Runner (Type ‘B’) x 6
9. Drawer Runner (Type ‘C’) x 6
10. Foot x 4
11. Screw M8x40 x 4
12. Nut M8 x 4
13. Drawer Front x 8
14. Drawer Bottom x 8
15. Drawer Side x16
4
19
6
‘A’ ‘B’ ‘C’
2
17
10, 11, 12
15
13
17. Drawer Back x 8
18. Drawer Runner (Type ‘A’) L/H x 2
19. Drawer Runner (Type ‘A’) R/H x 2
Polythene bag containing nuts, screws and
washers etc.
Polythene bag containing nuts, screws and
washers etc.
14
15
1207
Page 2

SAFETY PRECAUTIONS
ALWAYS seek assistance when lifting heavy items.
ALWAYS keep children and animals away from tools and work area.
ALWAYS keep work area clean and free from oil spills etc.
ASSEMBLY
Before attempting to assemble the work bench, carefully unpack/unwrap and lay out all components,
check off against the list of contents on front page, notify your Clarke dealer ASAP of any shortages
and/or damage.
Tools required:
Cordless drill and drill bits (4mm and 5mm). Due to manufacturing tolerances, some holes may
not line up accurately and may require opening up in order to fit securing screws.
1 x 12mm open ended spanner.
1 x Medium flat bladed screwdriver.
1 x 8mm ring or combination spanner.
1 x 7mm ring or combination spanner.
1 x Spirit Level.
Optional:
Cordless screwdriver + screwdriver bits, 7mm and 8mm sockets, flexi drive and or nut spinners.
Base Unit Assembly
Hint - It may help with assembly to lay the legs and panels on their back edge until the bench is at a
stage where it can be stood on its feet. Ensure some form of protection is laid down to prevent
damage to the painted surfaces.
NOTE : Figures in brackets refer to item numbers in contents list on front page.
1. Assemble feet (10, 11& 12) and attach two to each leg (1 & 2). Screw in as far as possible. DO
NOT tighten.
2. Attach the top panel (3) to the left leg (1) using M5x8 round head screws, nuts and lockwashers,
DO NOT tighten at this stage.
NOTE: Top panel has cut out in the front lip for the cross panel to fit into.
3. Attach the bottom panel (4) with the left leg (1) and loosely secure with screws nuts and
lockwashers.
4. Attach the Right leg (2) to the upper and lower panels and loosely secure with screws etc.
5. Attach the cross panel (5) between the upper and lower panels. Before loosely securing
with screws and nuts etc, ensure the cross panel is fitted with the slot for a lock lever to the
front of the unit.
6. Carefully turn the assembly onto its front, attach the back panel (6) and loosely secure with
screws etc.
7. Carefully stand the assembly on its feet.
8. To ensure the assembly is as square as possible before continuing, position the bench where
it is to be sited. Place spirit level on the upper panel and adjust the feet until the unit is level in
both directions, i.e. front to back and side to side, secure with locking nuts. Once satisfied
the unit is as square as possible, proceed to tighten all screws and nuts, starting in the centre
and working outwards until all are tight, DO NOT overtighten.
9. Carefully lay the bench top upside down on the assembled bench.
Hint - Using if available, a cordless screwdriver/drill, drive woodscrews L5 x 20 fully into all the pre-
drilled holes, DO NOT overtighten. Remove afterwards.
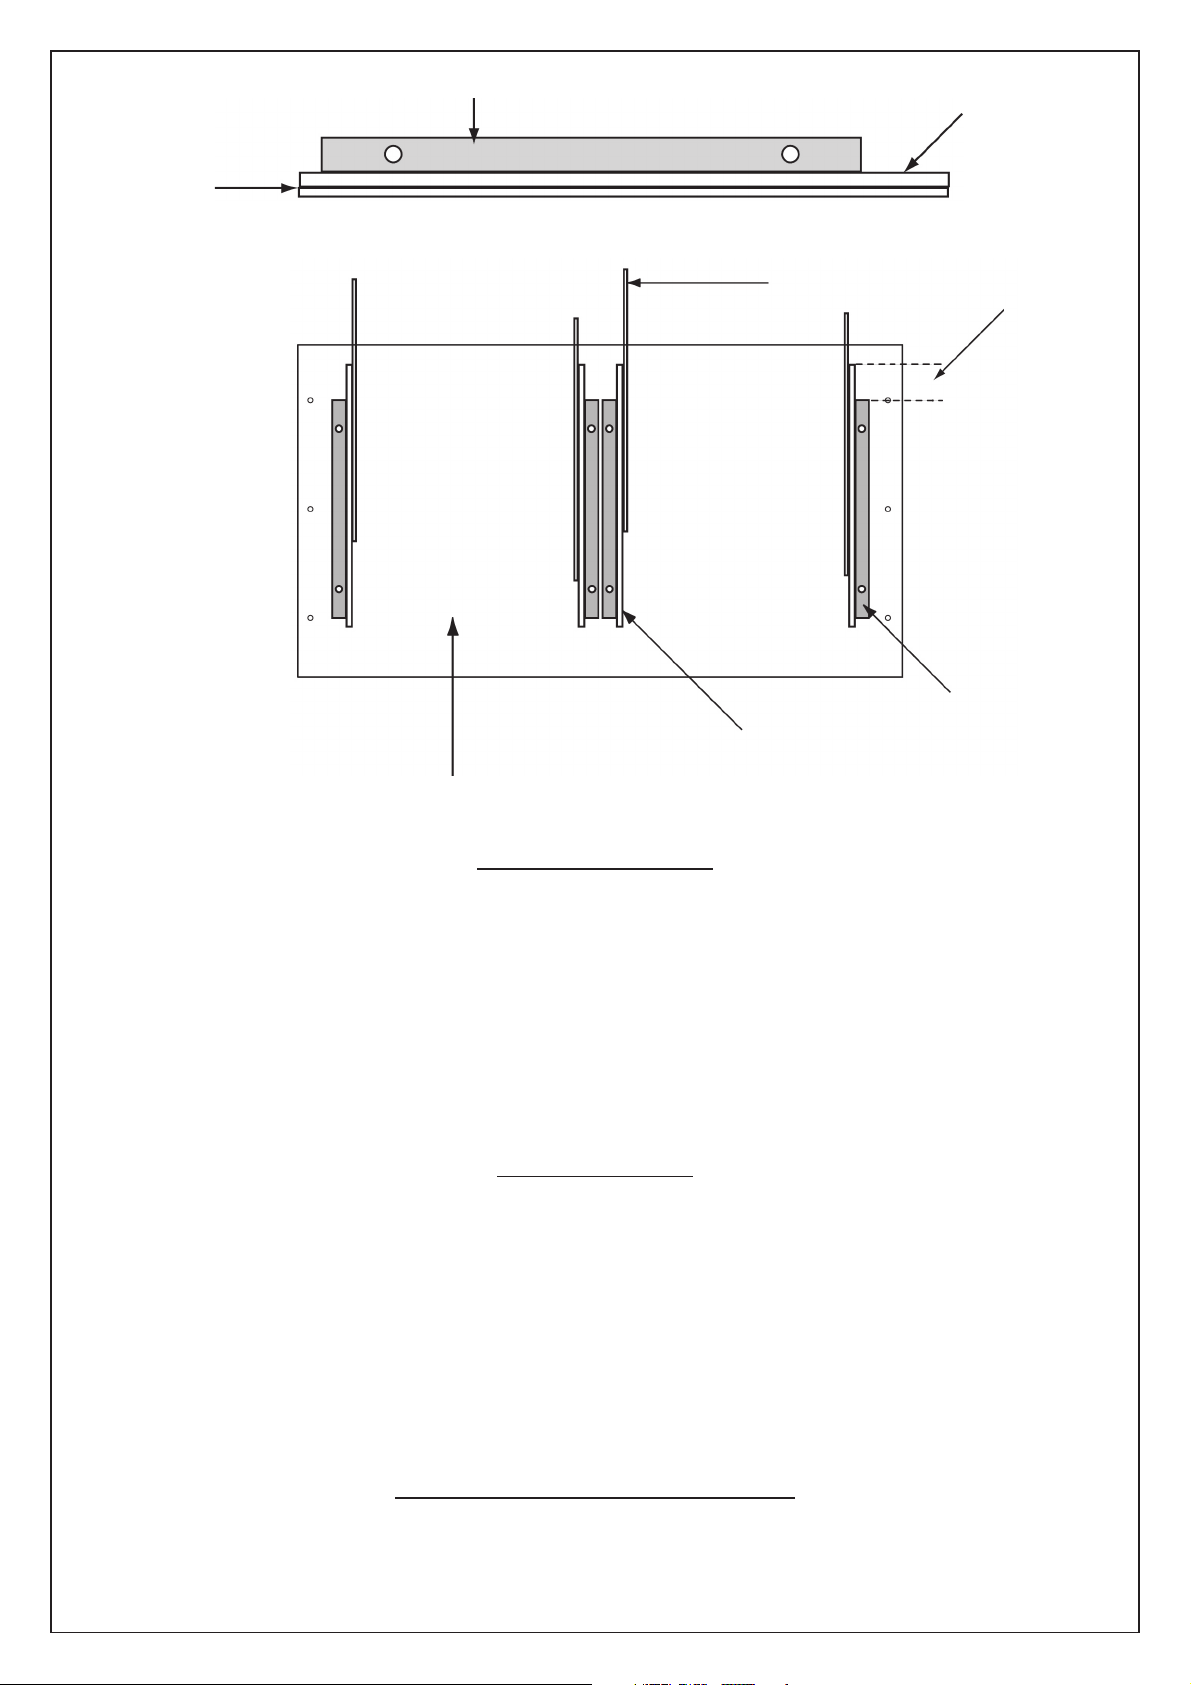
10. Loosely fit drawer runners (18 & 19 type ‘A’) with L shaped brackets to bench top.
NOTE: Drawer runners are left and right handed and must be fitted in pairs so that the longest part of
rail protrudes the bracket at the front of bench top.
Page 3
Type ‘A’ Drawer Runner
Sliding Rail
‘L’ shaped bracket
Longest overhang to
front of work bench
Bench Top (Underside)
Sliding Rail
L/H Bracket
Longest overhang to
front of work bench
R/H Bracket
Drawer Assembly
All drawers can be assembled at this stage and placed to one side for later.
NOTE:
should be inside of assembled drawer.
Refer to diagram on the front page when assembling.
1. Attach the front (13) and back (17) to the bottom (14) first, DO NOT tighten screws at this
2. Attach the sides (15).
3. Once the drawer is fully assembled, proceed to tighten all screws and nuts, starting in the
Drawers are held together using M4x8 round head screws, nuts and lockwashers, all screwheads
stage.
centre and working outwards, keeping the drawer as square as possible.
Fitting Drawers
Fit two drawers to the prepared bench top as follows:
1. Pull the sliding rails out to the front of bench top as far as possible.
2. Fit drawer between rails.
3. Line up the hole in the rail with the hole at the front of the drawer and secure with countersunk
screw, nut and lockwasher.
NOTE:
drawer.
Once both drawers are fitted and secured, tighten all woodscrews securing drawer runners to the
bench top.
Countersunk screw must be fitted from inside the rail with the nut and lockwasher inside the
Fitting Assembled Top to Base
Carefully with assistance, turn the bench top assembly over, ensuring the drawers are between both
legs, line up the securing holes in the tops of legs with the pre-drilled holes in the bench top and
secure with woodscrews, DO NOT fully tighten until all six screws are in place.
Page 4
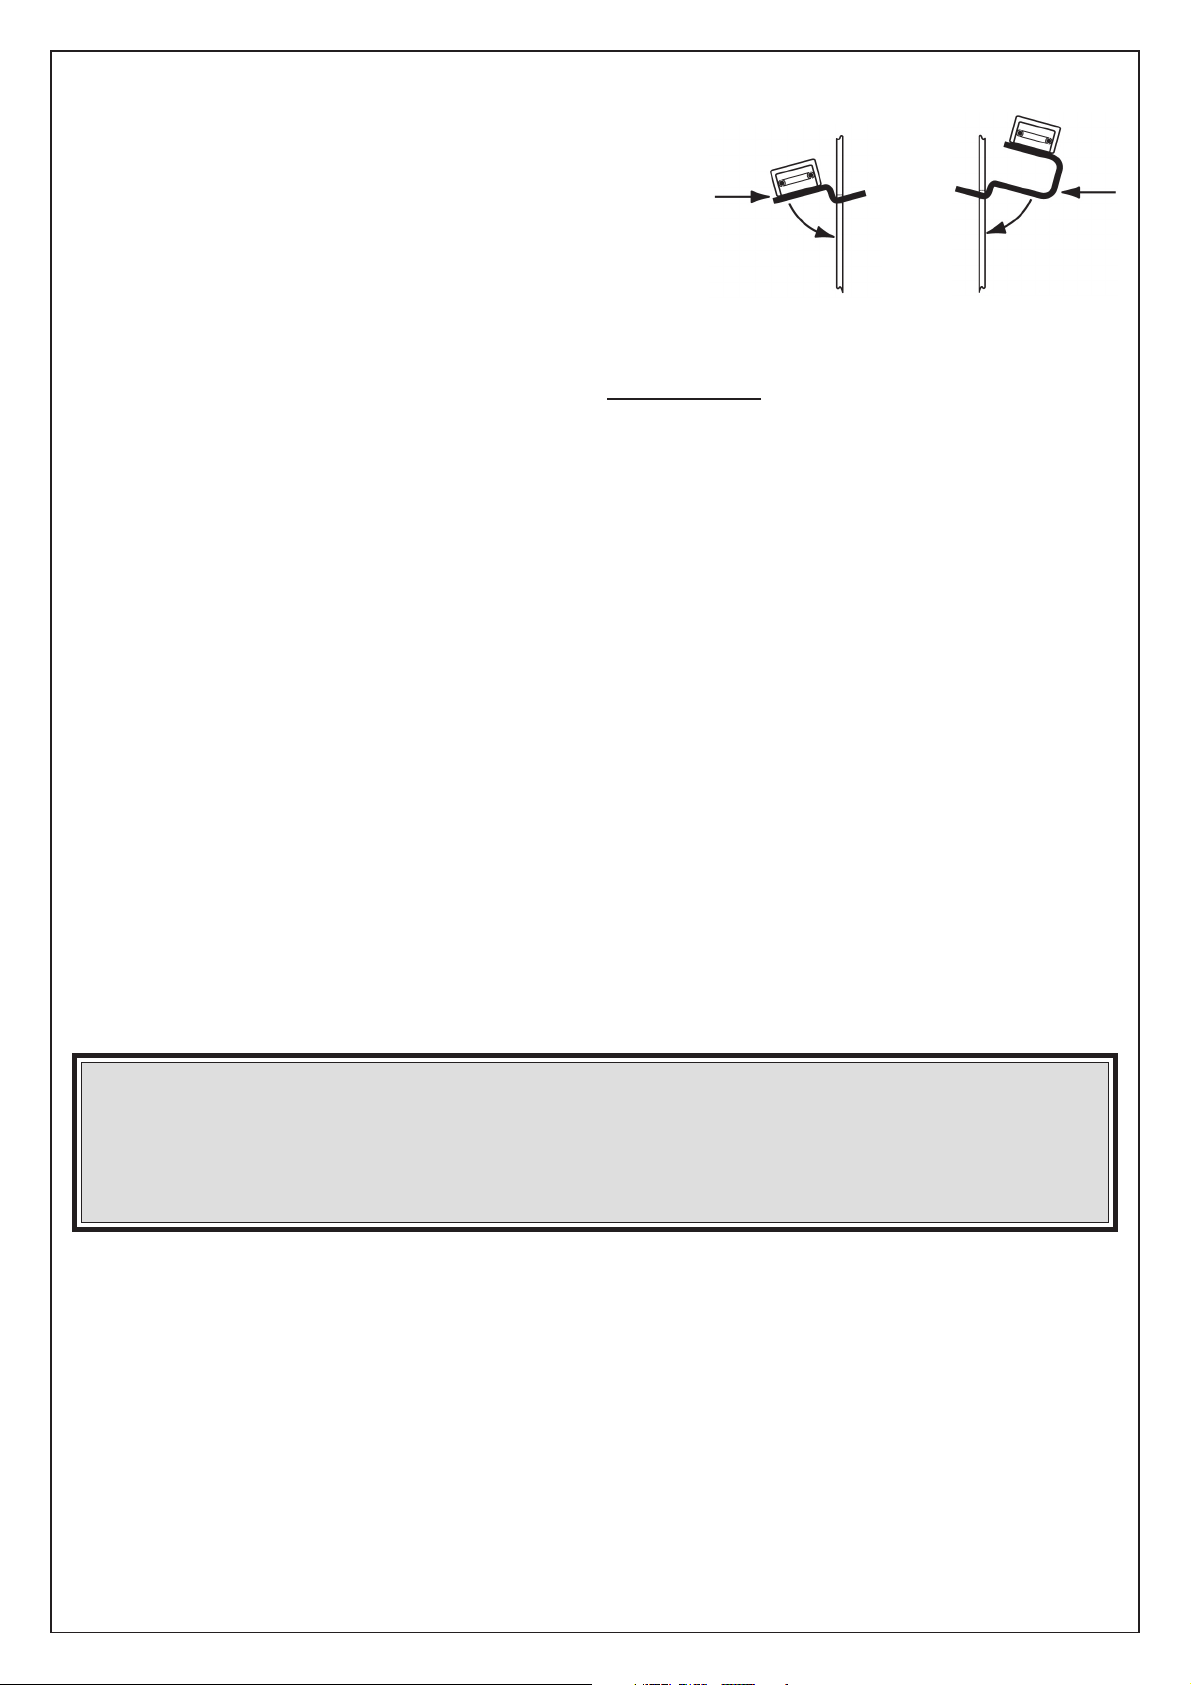
1. Fit 6 drawer runners (9 Type ‘C’) to both legs.
This is carried out simply by inserting the tongue’s
into the slots as in diag, allow the runner to swing
down in direction of arrow and come to rest
against the leg, hence holding itself in position,
(no fixings are required). Repeat for opposing
runners (8 Type ‘B’) in both sides of the cross
panel.
2. Attach the drawers to the runners as before (Fitting Drawers) starting at the bottom and
working upwards.
Before using the bench for the first time, we recommend the application of a propriety waterproof
wood preservative to the bench top to protect it from stains and spills etc.
‘B’
Type ‘C’Type
Your workbench is now ready for use.
PARTS & SERVICE TEL: 020 8988 7400
or e-mail as follows:
PARTS: [email protected]
SERVICE: [email protected]
Please note that the details and specifications contained herein are correct at the time of going to print. However
CLARKE International reserve the right to change specifications at any time without prior notice.
 Loading...