

Page 1
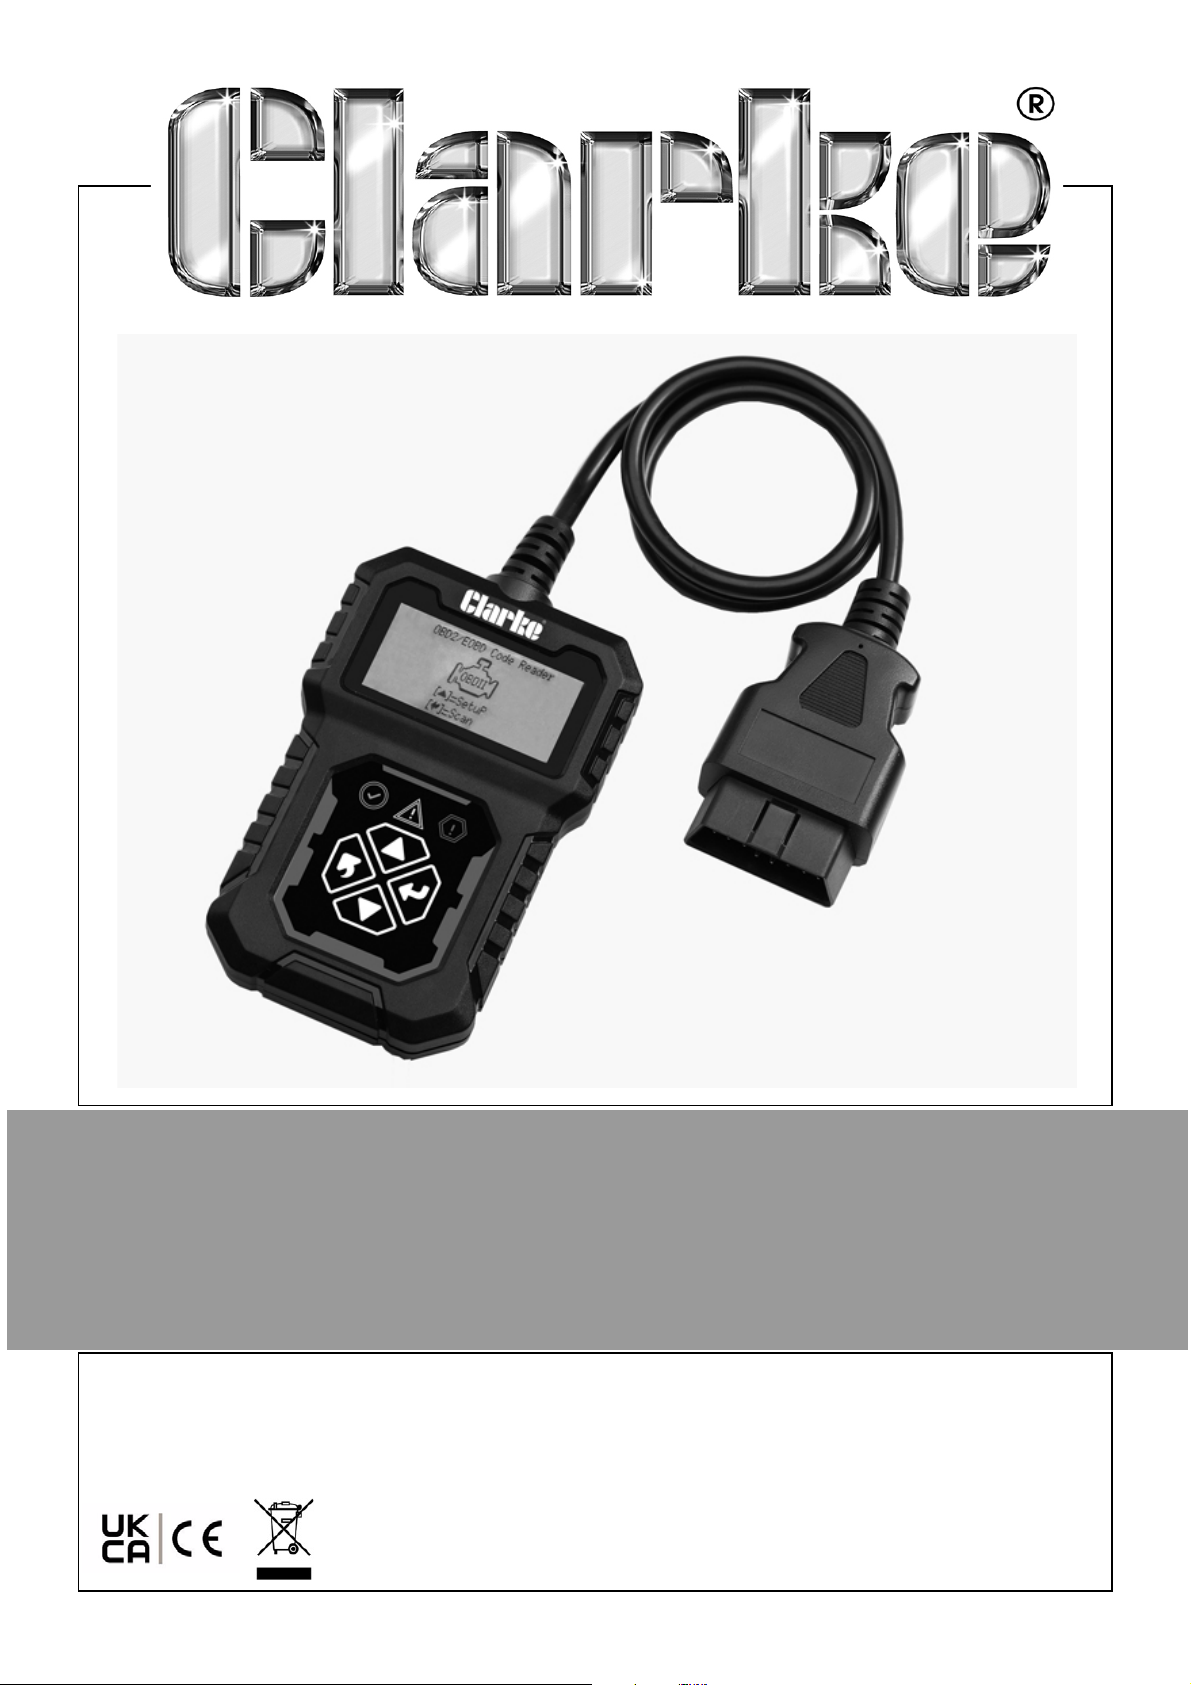
ENGINE FAULT CODE READER
MODEL NO: COBDIIR
PART NO: 4501138
USER INSTRUCTIONS
ORIGINAL INSTRUCTIONS DL1121
Page 2

INTRODUCTION
Thank you for purchasing this CLARKE Engine Fault Code Reader.
Please read this manual thoroughly, before attempting to operate and
carefully follow all instructions given.
It is vitally important that ALL precautions are taken, as specified, which will not
only provide protection for yourself and that of others around you, but will also
ensure that the code reader will give you long and satisfactory service.
GUARANTEE
This CLARKE product is guaranteed against faulty manufacture for a period of
12 months from the date of purchase. Please keep your receipt as proof of
purchase.
This guarantee is invalid if the product is found to have been abused or
tampered with in any way, or not used for the purpose for which it was
intended.
Faulty goods should be returned to their place of purchase, no product can
be returned to us without prior permission.
This guarantee does not effect your statutory rights.
ENVIRONMENTAL RECYCLING POLICY
Through purchase of this product, the customer is taking on the
obligation to deal with the WEEE in accordance with the WEEE
regulations in relation to the treatment, recycling & recovery and
environmentally sound disposal of the WEEE.
In effect, this means that this product must not be disposed of with general
household waste. It must be disposed of according to the laws governing
Waste Electrical and Electronic Equipment (WEEE) at a recognised disposal
facility.
If disposing of this product or any damaged components, do not dispose of
with general waste. This product contains valuable raw materials. Metal
products should be taken to your local civic amenity site for recycling of metal
products.
2
Parts & Service: 020 8988 7400 / E-mail: [email protected] or [email protected]
Page 3
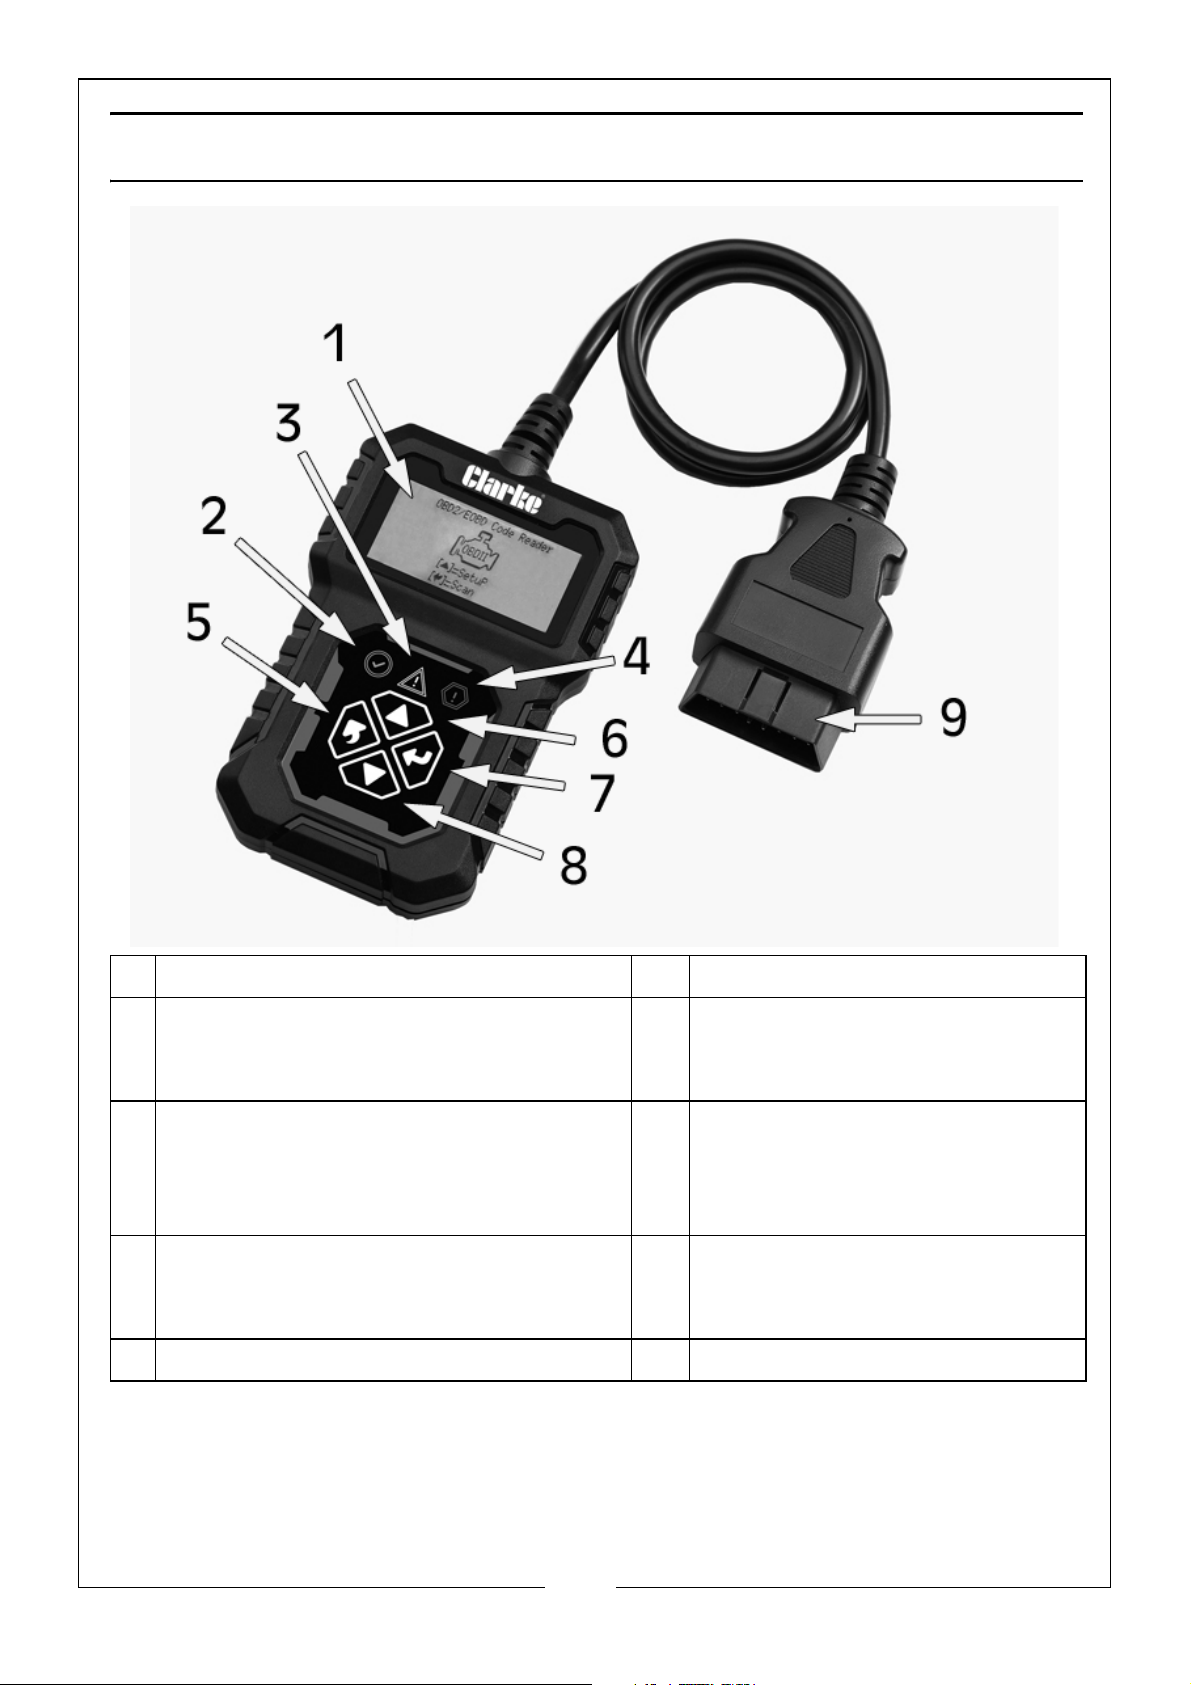
PRODUCT OVERVIEW
1 LCD Display 6 Up Button
2 Green LED: Indicates correct engine
operation, no Diagnostic Trouble
Code (DTC)
3 Yellow LED: Indicates a possible
problem. Some diagnostics could not
be performed and/or a DTC is
pending
4 Red LED: Indicates a problem with the
engine. The MIL (Malfunction
Indicator Light) may be on.
5 Back Button
7 Enter Button
8 Down Button
9 OBDII 16 Pin Connector
3
Parts & Service: 020 8988 7400 / E-mail: [email protected] or [email protected]
Page 4
SPECIFICATIONS
Model Number COBDIIR
Operating Voltage 8V - 25V
Operating Current 52mA
Operating Temperature 0°C to 50°C
Storage Temperature -20°C to 70°C
Display 128 x 64 Dot Matrix Monochrome Screen,
White Backlight
Dimensions (LxWxH) 112mm x 70mm x 22mm
Weight 168g
FUNCTION DESCRIPTION
1. Dual system diagnostic, optional engine and transmission.
2. Quickly indicate engine faults with green/yellow/red LED indicators as fault
lights
3. Read or clear the engine fault code and view DTC definition.
4. Display of sensor data stream information, supporting 249 types of
parameters
5. View freeze frame data and I/M status information.
6. Read vehicle information:
• Vehicle Identification Number (VIN)
• Calibration Identification Number (IDs)
• Calibration Verification Number (CVNs)
7. Multi Language (English, Spanish, French, German, Polish, Finnish, Italian,
Dutch & Russian).
8. Code Compliant: OBDII, EOBD & JOBD
9. Protocols Supported: SAE J1850 VPW, SAE J1850 PWM, ISO 9141-2,
ISO 14230-4(KWP FAST), ISO 14230-4(KWP 5BAUD), ISO 15765-4(CAN 11/250),
ISO 15765-4(CAN 11/500), ISO 15765-4(CAN 29/250), ISO 15765-4(CAN 29/
500).
4
Parts & Service: 020 8988 7400 / E-mail: [email protected] or [email protected]
Page 5

SAFETY PRECAUTIONS
PLEASE READ BEFORE USING THIS UNIT
1. ALWAYS perform automotive testing in a safe environment.
2. ALWAYS wear appoved safety eye protection.
3. Keep clothing, hair, hands, tools, test equipment, etc, away from all
moving or hot engine parts.
4. Operate the vehicle in a well-ventilated work area; Exhaust gases are
poisonous.
5. Put chocks on drive wheels and NEVER leave the vehicle unattended while
running tests.
6. ALWAYS use extreme caution when working around the ignition coil,
distributor cap, ignition wires and spark plugs. These components create
hazardous voltages when the engine is running.
7. Put transmission in PAR K (for automatic transmission) or NEUTRAL (for manual
transmission) and make sure the parking brake is engaged.
8. Keep a fire extinguisher suitable for gasoline/chemical/electrical fires
nearby.
9. DO NOT connect or disconnect any test equipment with ignition on or
engine running.
CARE AND MAINTENANCE
Keep the code reader dry, clean and free from oil, water and grease. Use a
mild detergent on a clean cloth to clean the outside of the code reader,
when necessary.
Keep the 16 pin connector clean and the cable tidy.
Always check for splits or cuts in the cable.
5
Parts & Service: 020 8988 7400 / E-mail: [email protected] or [email protected]
Page 6

GENERAL INFORMATION
VEHICLE COVERAGE
The OBDII Code Reader is specially designed to work with all OBDII compliant
vehicles, including those equipped with the next-generation protocol --
Control Area Network (CAN). All 2000 and later vehicles are OBDII
compliant and this includes all USA, Asian and European vehicles.
A small number of 1994 and 1995 model year petrol vehicles are OBDII
compliant. To verify if a 1994 or 1995 vehicle is OBDII compliant, check the
Vehicle Emissions Control Information (VECI) Label which is located under the
bonnet or by the radiator of most vehicles. If the vehicle is OBDII compliant, the
label will designate “OBDII Certified”. Additionally, regulations mandate that
all OBDII compliant vehicles must have a “common” sixteen-pin Data Link
Connector (DLC).
For your vehicle to be OBDII, EOBD or JOBD compliant it must have a 16-pin
DLC (Data Link Connector) under the dash and the Vehicle Emission Control
Information Label must state that the vehicle is OBDII compliant.
OBDII COMPLIANT CAR MANUFACTURERS
• European: Alfa Romeo, Audi, BMW, Citroen, Ferrari, Fiat, Jaguar, Iveco,
Lamborghini, Lancia, Lotus, Land Rover, MAN, Maserati, Mercedes-Benz,
Mini, Peugeot, Porche, Renault, Rover, Opel/Vauxhall, Saab, Scania,
Seat, Skoda, VW, Volvo, Smart.
• Asian: Daewoo, Daihatsu, Honda, Hyundia, Isuzu, Kia, Lexus, Mazda,
Mitsubishi, Nissan, Ssangyong, Subaru, Suzuki, Toyota.
• USA: Buick, Cadillac, Chevrolet, Chrysler/Jeep, Dodge, Ford, GM,
Pontiac.
DIAGNOSTIC TROUBLE CODES (DTC)
OBDII Diagnostic Trouble Codes are stored by the on-board computer
diagnostic system in response to a problem found in the vehicle. These codes
identify a particular problem area and are intended to provide you with a
guide as to where a fault might be occurring within a vehicle. OBDII Diagnostic
Trouble Codes consist of a five-digit alphanumeric code. The first character, a
letter, identifies which control system sets the code. The other four characters,
all numbers, provide additional information on where the DTC originated and
the operating conditions that caused it to set. Here is an example to illustrate
the structure of the digits:
6
Parts & Service: 020 8988 7400 / E-mail: [email protected] or [email protected]
Page 7
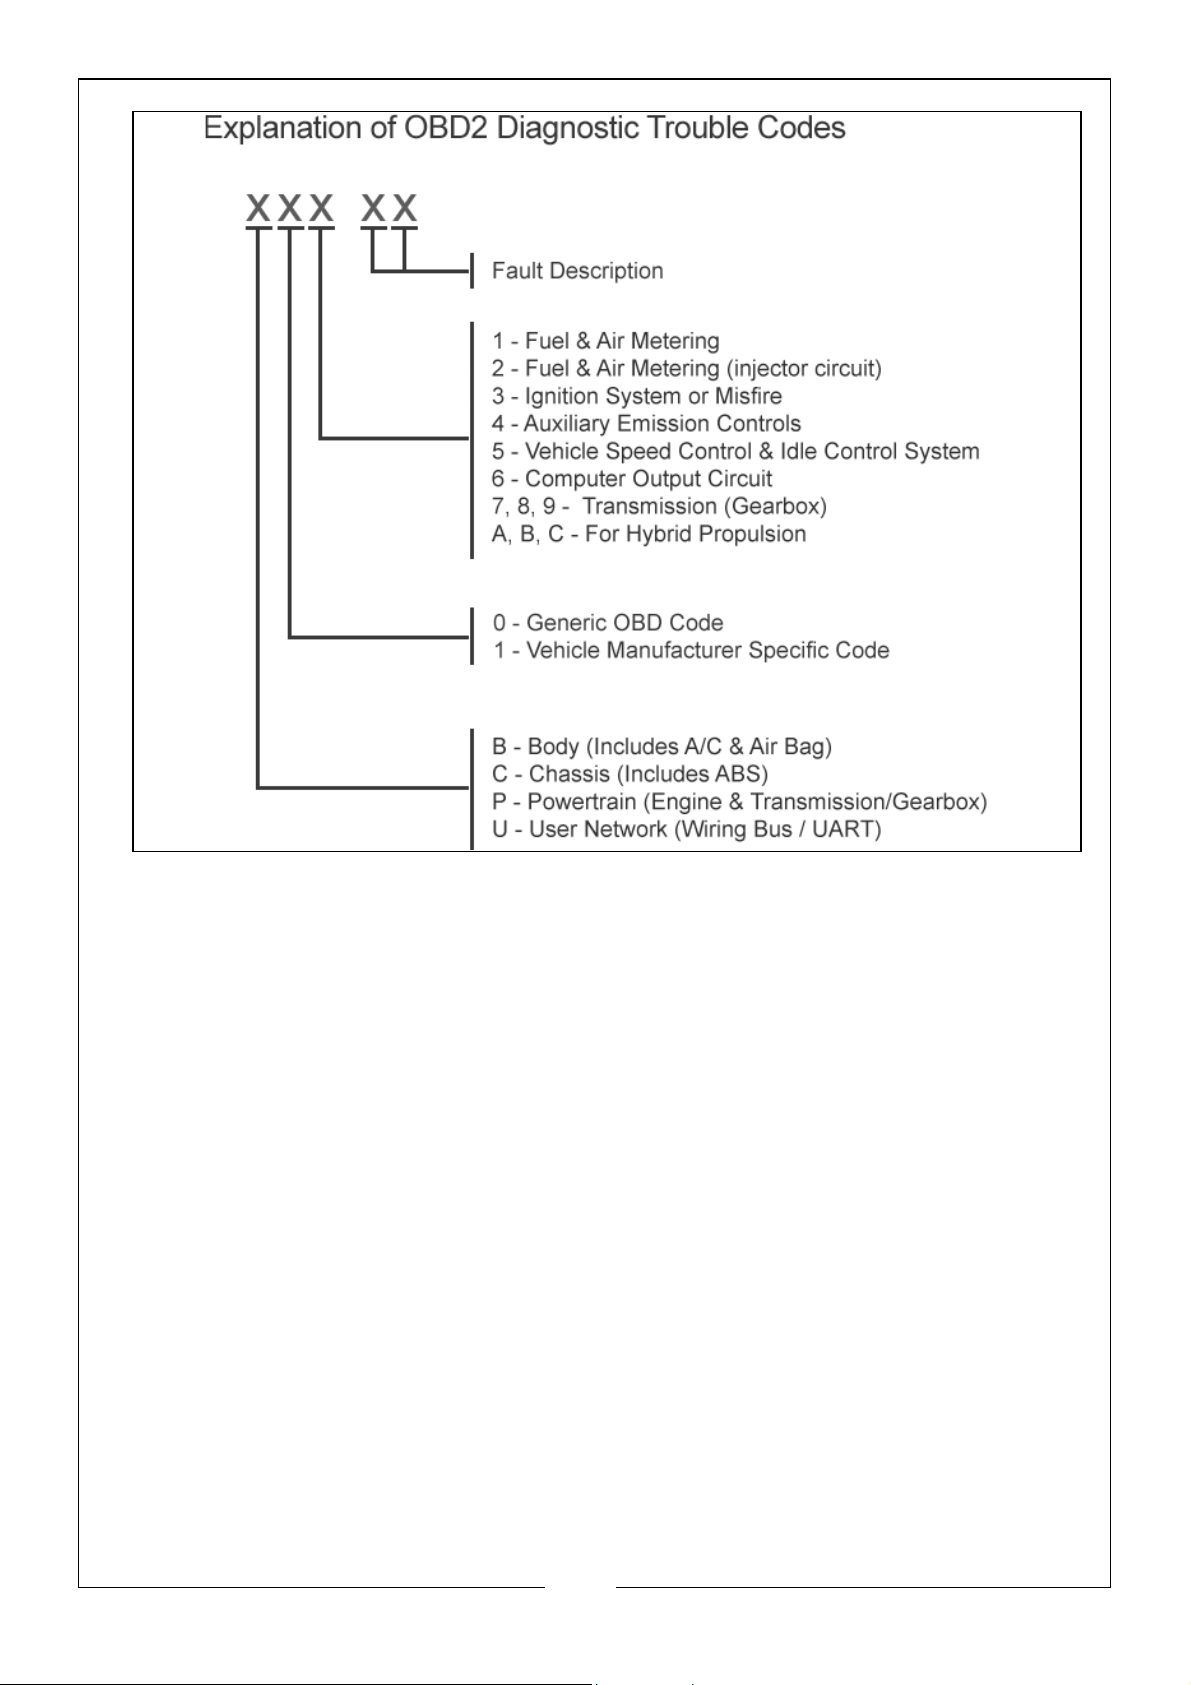
NOTE: Manufacturer Specific Codes(x1xxx): This is where the vehicle
manufacturer feels that a code is not avaiable within the generic list.
The definitions for these are set by the vehicle manufacturer.
OBDII READINESS MONITORS
An important part of a vehicle's OBDII system are the Readiness monitors,
which are indicators used to find out if all of the emissions components have
been evaluated by the OBDII system. They run periodic tests on specific
systems and components to ensure that they are performing within allowable
limits.
Currently, there are eleven OBDII Readiness Monitors (or I/M Monitors) defined.
Not all monitors are supported by all vehicles and the exact number of
monitors in any vehicle depends on the motor vehicle manufacturer's
emissions control strategy.
CONTINUOUS MONITORS
Some of the vehicle components or systems are continuously tested by the
vehicle's OBDII system, while others are tested only under specific vehicle
operating conditions. The continuously monitored components listed below
are always ready:
7
Parts & Service: 020 8988 7400 / E-mail: [email protected] or [email protected]
Page 8

1. Misfire
2. Fuel System
3. Comprehensive Components (CCM)
Once the vehicle is running, the OBDII system is continuously checking the
above components, monitoring key engine sensors, watching for engine
misfire, and monitoring fuel demands.
NON CONTINUOUS MONITORS
Unlike the continuous monitors, many emissions and engine system
components require the vehicle to be operated under specific conditions
before the monitor is ready. These monitors are termed non-continuous
monitors and are listed below:
1. EGR System
2. O2 Sensors
3. Catalyst
4. Evaporative System
5. O2 Sensor Heater
6. Secondary Air
7. Heated Catalyst
8. A/C System
OBDII MONITOR READINESS STATUS
OBDII systems must indicate whether or not the vehicle's PCM monitor system
has completed testing on each component. Components that have been
tested will be reported as Ready or Complete, meaning they have been
tested by the OBDII system. The purpose of recording readiness status is to
allow inspectors to determine if the vehicle's OBDII system has tested all the
components and/or systems.
The powertrain control module (PCM) sets a monitor to Ready or Complete
after an appropriate drive cycle has been performed. The drive cycle that
enables a monitor and sets readiness codes to ready varies for each individual
monitor. Once a monitor is set as Ready or Complete, it will remain in this state.
A number of factors, including erasing of diagnostic trouble codes (DTCs) with
a scan tool or a disconnected battery, can result in Readiness Monitors being
set to not ready. Since the three continuous monitors are constantly
evaluating, they will be reported as Ready all of the time. If testing of a
particular supported non-continuous monitor has not been completed, the
monitor status will be reported as Not Complete or Not Ready.”
In order for the OBD monitor system to become ready, the vehicle should be
driven under a variety of normal operating conditions. These operating
8
Parts & Service: 020 8988 7400 / E-mail: [email protected] or [email protected]
Page 9

conditions may include a mix of highway driving and stop and go, city type
driving, and at least one overnight-off period. For specific information on
getting your vehicle's OBD monitor system ready, please consult your vehicle
owner’s manual.
OBDII DEFINITIONS
POWERTRAIN CONTROL MODULE (PCM)
OBDII terminology for the on-board computer that controls engine and drive
train.
MALFUNCTION INDICATOR LIGHT (MIL)
Malfunction Indicator Light (Service Engine Soon, Check Engine) is a term used
for the light on the instrument panel. It is to alert the driver and/or the repair
technician that there is a problem with one or more of vehicle's systems and
may cause emissions to exceed standards. If the MIL illuminates with a steady
light, it indicates that a problem has been detected and the vehicle should be
serviced as soon as possible. Under certain conditions, the dashboard light will
blink or flash. This indicates a severe problem and flashing is intended to
discourage vehicle operation. The vehicle on-board diagnostic system can
not turn the MIL off until the necessary repairs are completed or the condition
no longer exists.
DIAGNOSTIC TROUBLE CODES (DTC)
Diagnostic Trouble Codes (DTC) that identify which section of the emission
control system has malfunctioned.
ENABLING CRITERIA
Also termed Enabling Conditions. They are the vehicle specific events or
conditions that must occur within the engine before the various monitors will
set, or run. Some monitors require the vehicle to follow a prescribed drive cycle
routine as part of the enabling criteria. Drive cycles vary among vehicles and
for each monitor in any particular vehicle.
OBDII DRIVE CYCLE
A specific mode of vehicle operation that provides condition required to set all
the readiness monitors applicable to the vehicle to the ready condition. The
purpose of completing an OBDII drive cycle is to force the vehicle to run its
on-board diagnostics. Some form of a drive cycle needs to be performed after
DTCs have been erased from the PCM's memory or after the battery has been
disconnected. Running through a vehicle's complete drive cycle will set the
readiness monitors so that future faults can be detected. Drive cycles vary
depending on the vehicle and the monitor that needs to be reset. For vehicle
specific drive cycle, consult the vehicle's Owner's Manual.
9
Parts & Service: 020 8988 7400 / E-mail: [email protected] or [email protected]
Page 10
PRODUCT INFORMATION AND SET UP
NAVIGATION CHARACTERS
Characters used to help navigate the code reader are:
1. “>” - Indicates current selection.
2. “Pd” - Identifies a pending DTC when viewing DTC’s.
3. “$” - Identifies the control module number from which the data is retrieved.
VEHICLE POWER
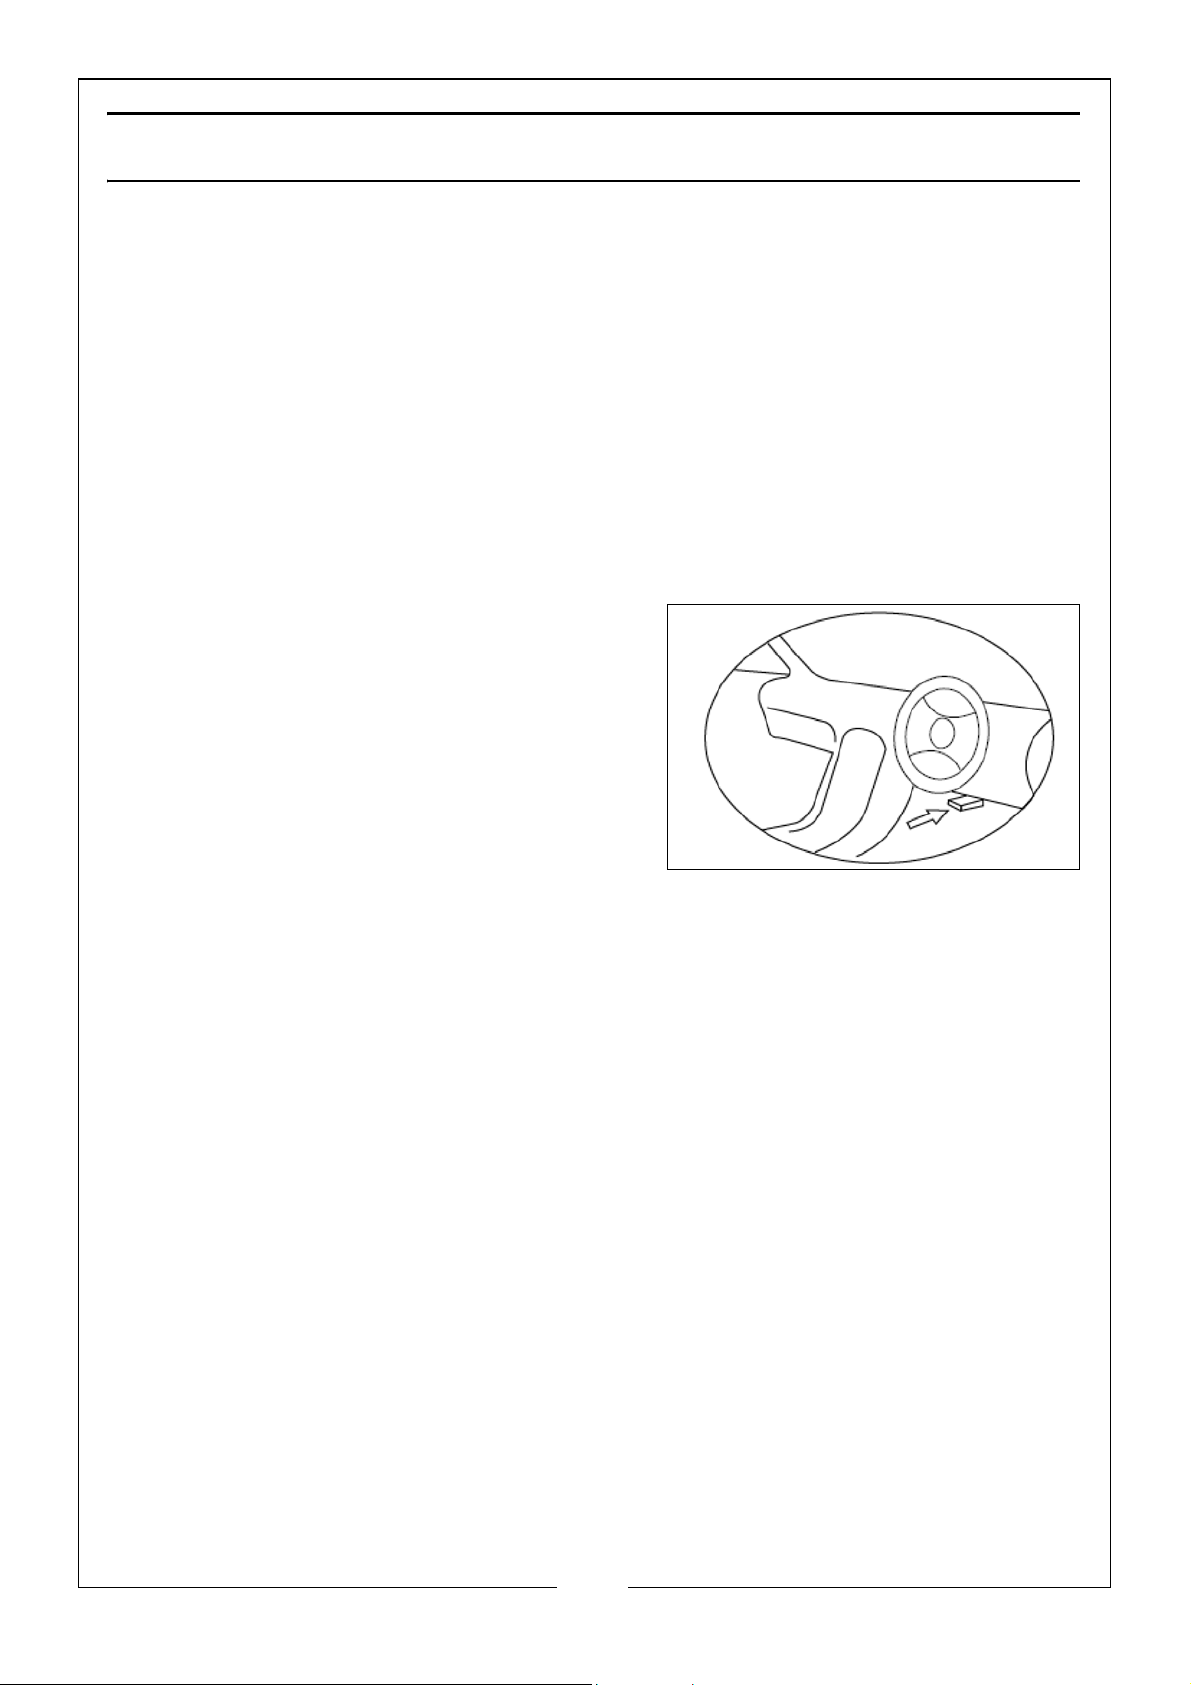
The power of the code reader is provided via the vehicle data link connector
(DLC). Follow the steps below to turn on the code reader:
1. The DLC is usually located
approximately 12 inches from the
centre of the instrument panel
(dashboard), under or around the
drivers side for most vehicles. Consult
the vehicles handbook for exact
location.
2. Plug the OBDII 16 pin data link
connector to the vehicles DLC port.
SET UP
The code reader allows you to make the following adjustments and settings:
1. Language: The factory default is English, other languages can be manually
selected.
2. Unit of Measure: Supports metric and imperial units, factory default is
metric.
3. Contrast: Backlight contrast is adjustable, factory default is 25%.
TO ENTER THE SETUP MENU
From the second startup screen, press UP/DOWN buttons to enter System
Setup menu. Follow the instructions to make adjustments and settings as
described in the following setup options.
10
Parts & Service: 020 8988 7400 / E-mail: [email protected] or [email protected]
Page 11
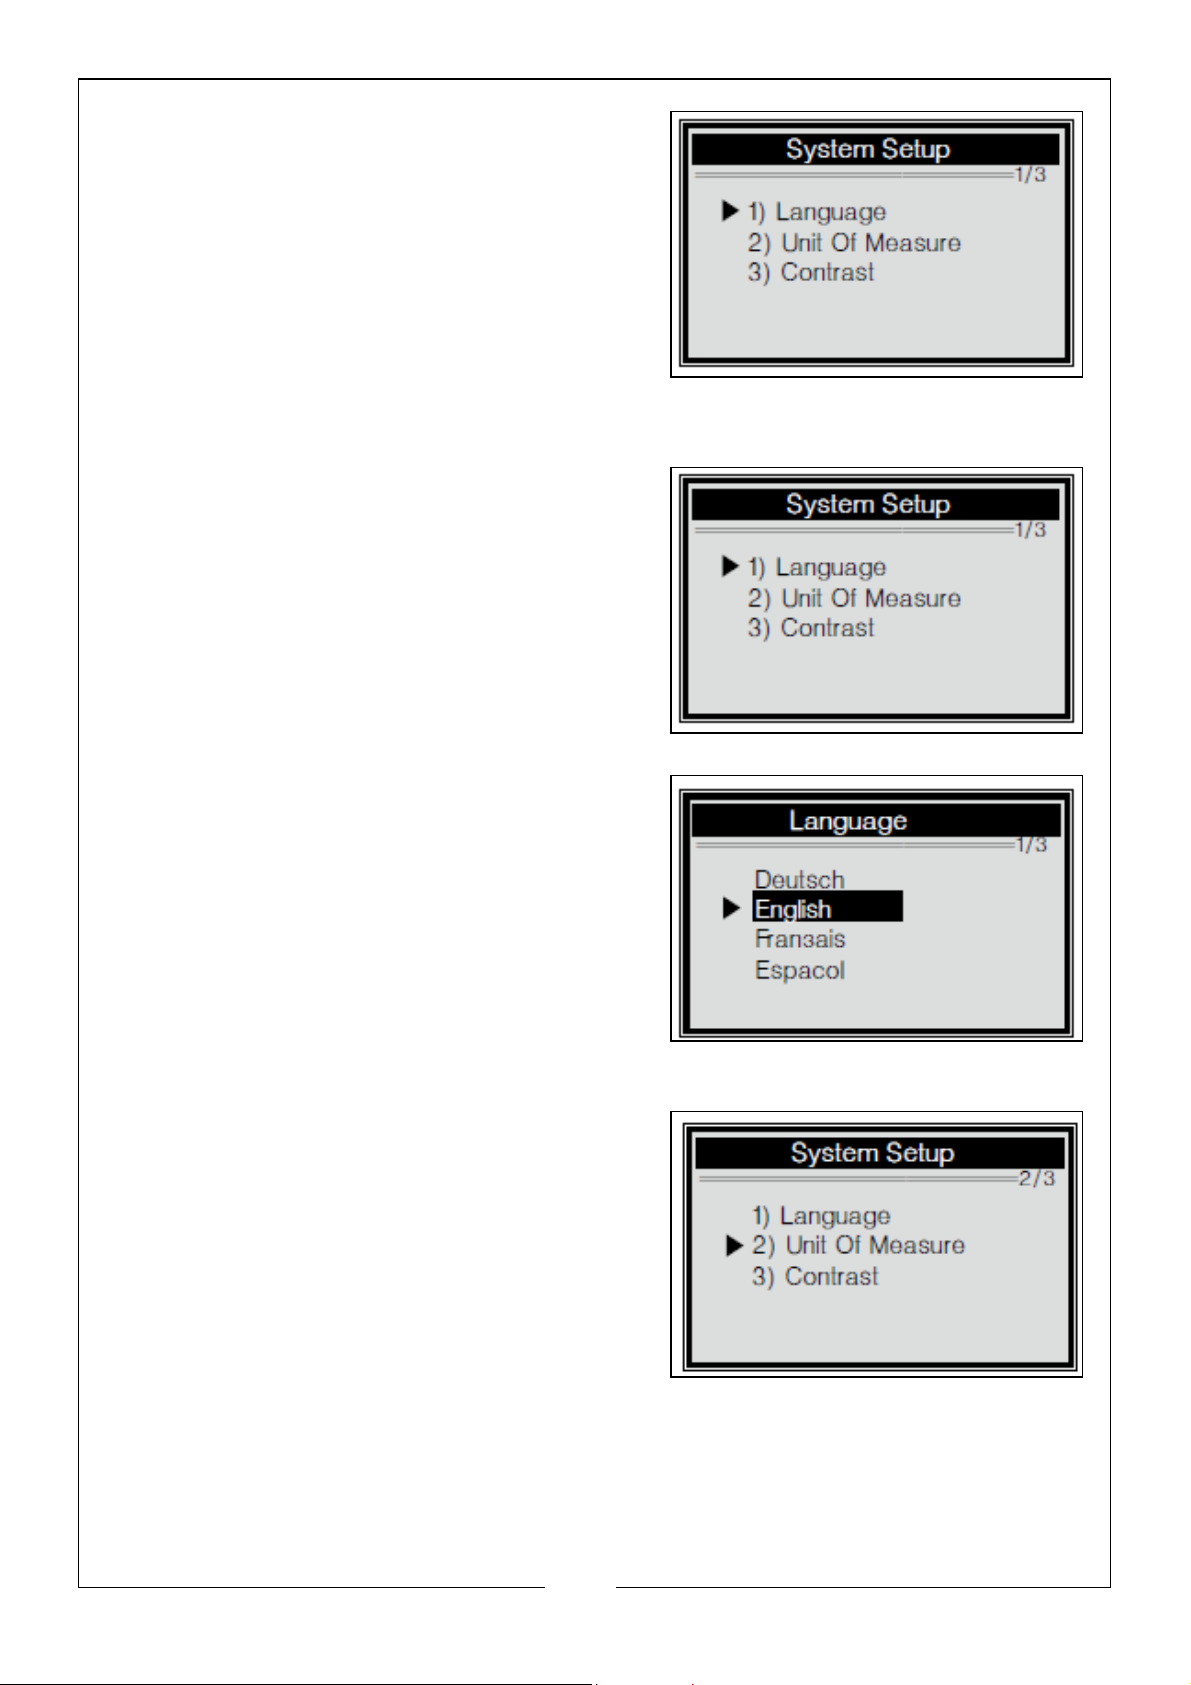
The number “x/x” to the upper right corner
of the screen indicates total number of
items under the menu and sequence of
currently selected item.
LANGUAGE SETUP
1. From the System Setup menu, use UP/
DOWN buttons to select Language,
and press ENTER button.
2. Use UP/DOWN buttons to select the
desired language and press ENTER
button to save your selection and
return to previous menu.
UNIT OF MEASUREMENT
1. From the System Setup menu, use UP/
DOWN buttons to select Unit of
Measure and press ENTER button.
11
Parts & Service: 020 8988 7400 / E-mail: [email protected] or [email protected]
Page 12
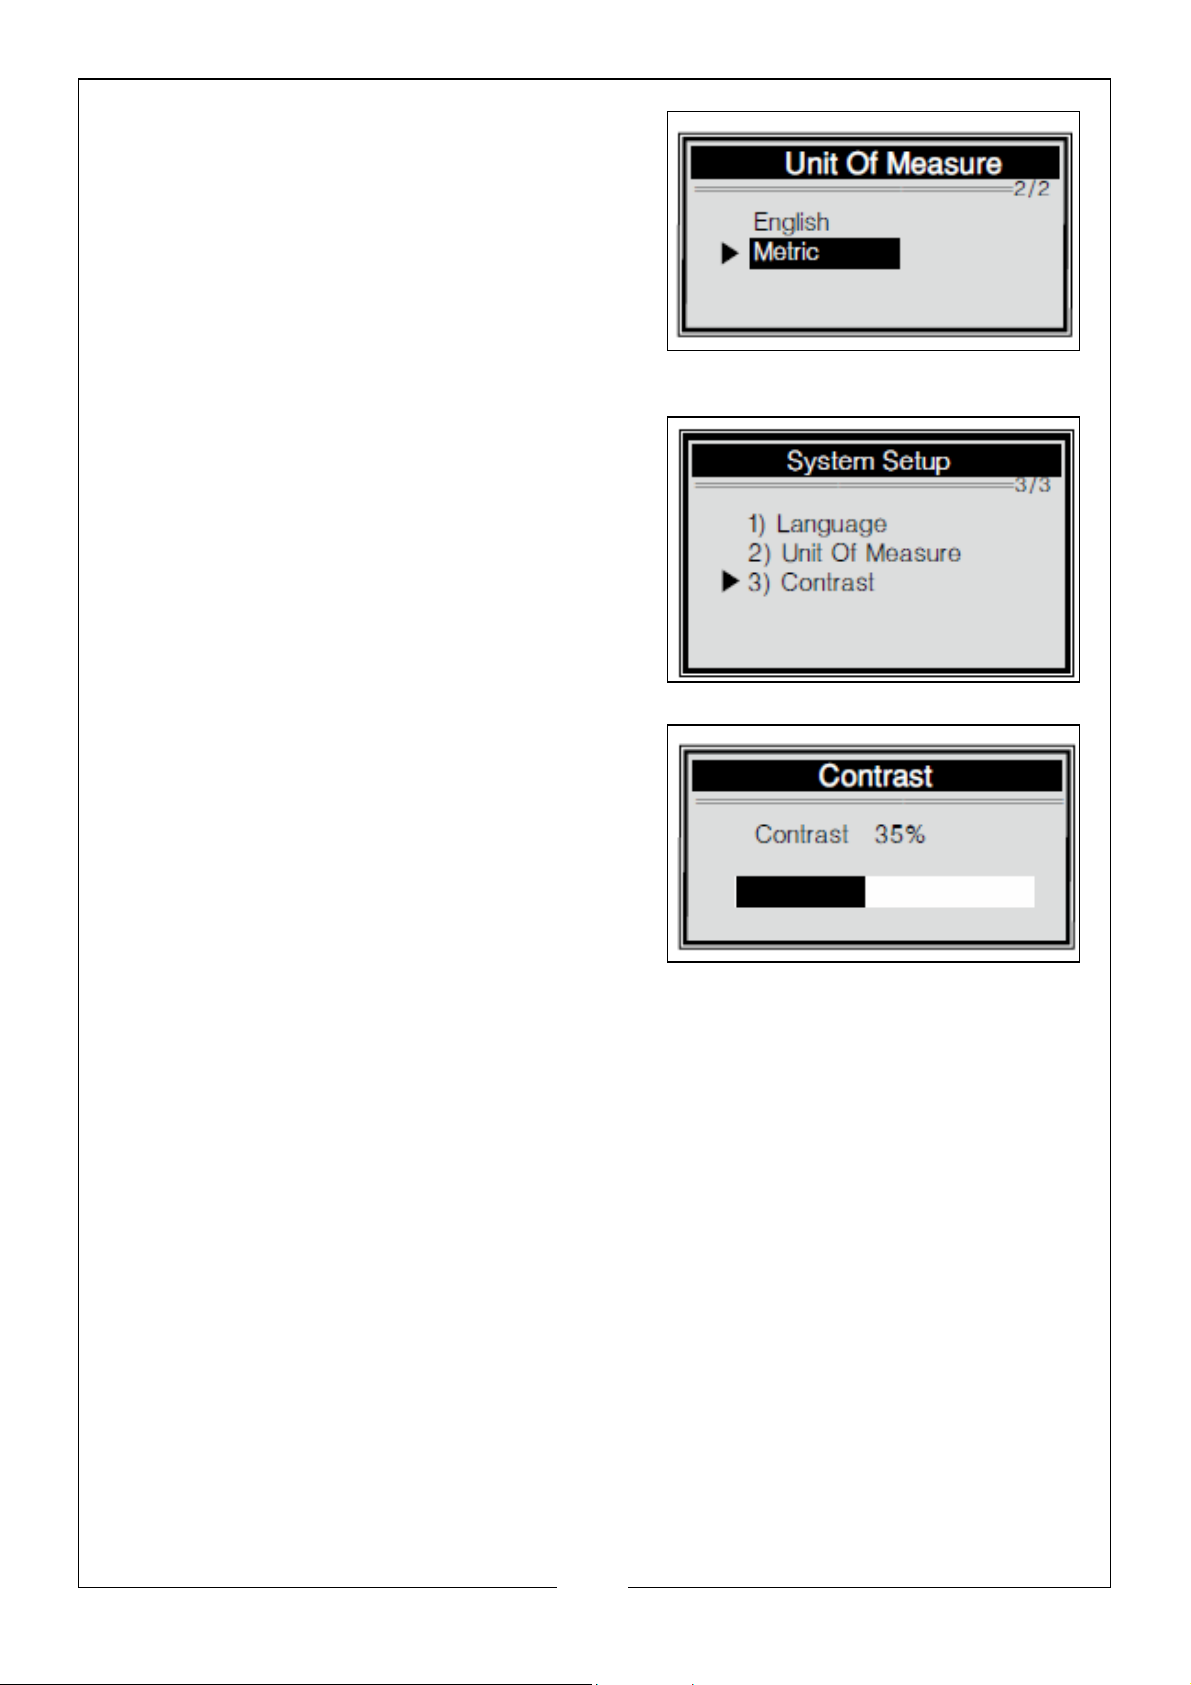
2. From the Unit of Measure menu, use
UP/DOWN buttons to select the desired
unit of measurement and press ENTER
button to save your selection and
return to previous menu
CONTRAST ADJUSTMENT
1. From the System Setup menu, use UP/
DOWN buttons to select Contrast and
press ENTER button.
2. From the Contrast menu, use UP/
DOWN buttons to adjust the contrast
and press ENTER button to save your
selection and return to previous menu.
12
Parts & Service: 020 8988 7400 / E-mail: [email protected] or [email protected]
Page 13
OPERATING INSTRUCTIONS
OBDII DIAGNOSTIC
When more than one vehicle control module is detected by the code reader,
you will be prompted to select the module where the data may be retrieved.
The most commonly selected are the Powertrain Control Module [PCM]
and Transmission Control Module [TCM].
WARNING: DO NOT CONNECT OR DISCONNECT ANY TEST EQUIPMENT
WITH THE IGNITION ON OR THE ENGINE RUNNING.
1. Turn the ignition OFF.
2. Locate the vehicles 16 pin DLC port.
3. Plug the code reader into the vehicles DLC port.
4. Turn the ignition on. Engine can be off or running.
5. Press ENTER button to enter the Diagnostic Menu. A sequence of messages
displaying the OBDII protocols will be observed on the display until the
vehicle protocol is detected. If the code reader fails to communicate with
the vehicles Engine Control Unit (ECU), a “LINKING ERROR” message shows
up on the display.
If this happens:
• Verify that the ignition is ON.
• Check if the code readers OBDII connector is securely connected to the
vehicles DLC port.
• Verify that the vehicle is OBDII compliant.
• Turn the ignition OFF and wait for about 10 seconds. turn the ignition
back to ON and repeat the procedure from step 5.
• If the “LINKING ERROR” message does not go away, then there might be
a problem with the code reader communicating with the vehicle.
Contact CLARKE Service Centre for assistance.
6. After the code reader successful links to the ECU, the Diagnostic Menu will
appear.
13
Parts & Service: 020 8988 7400 / E-mail: [email protected] or [email protected]
Page 14
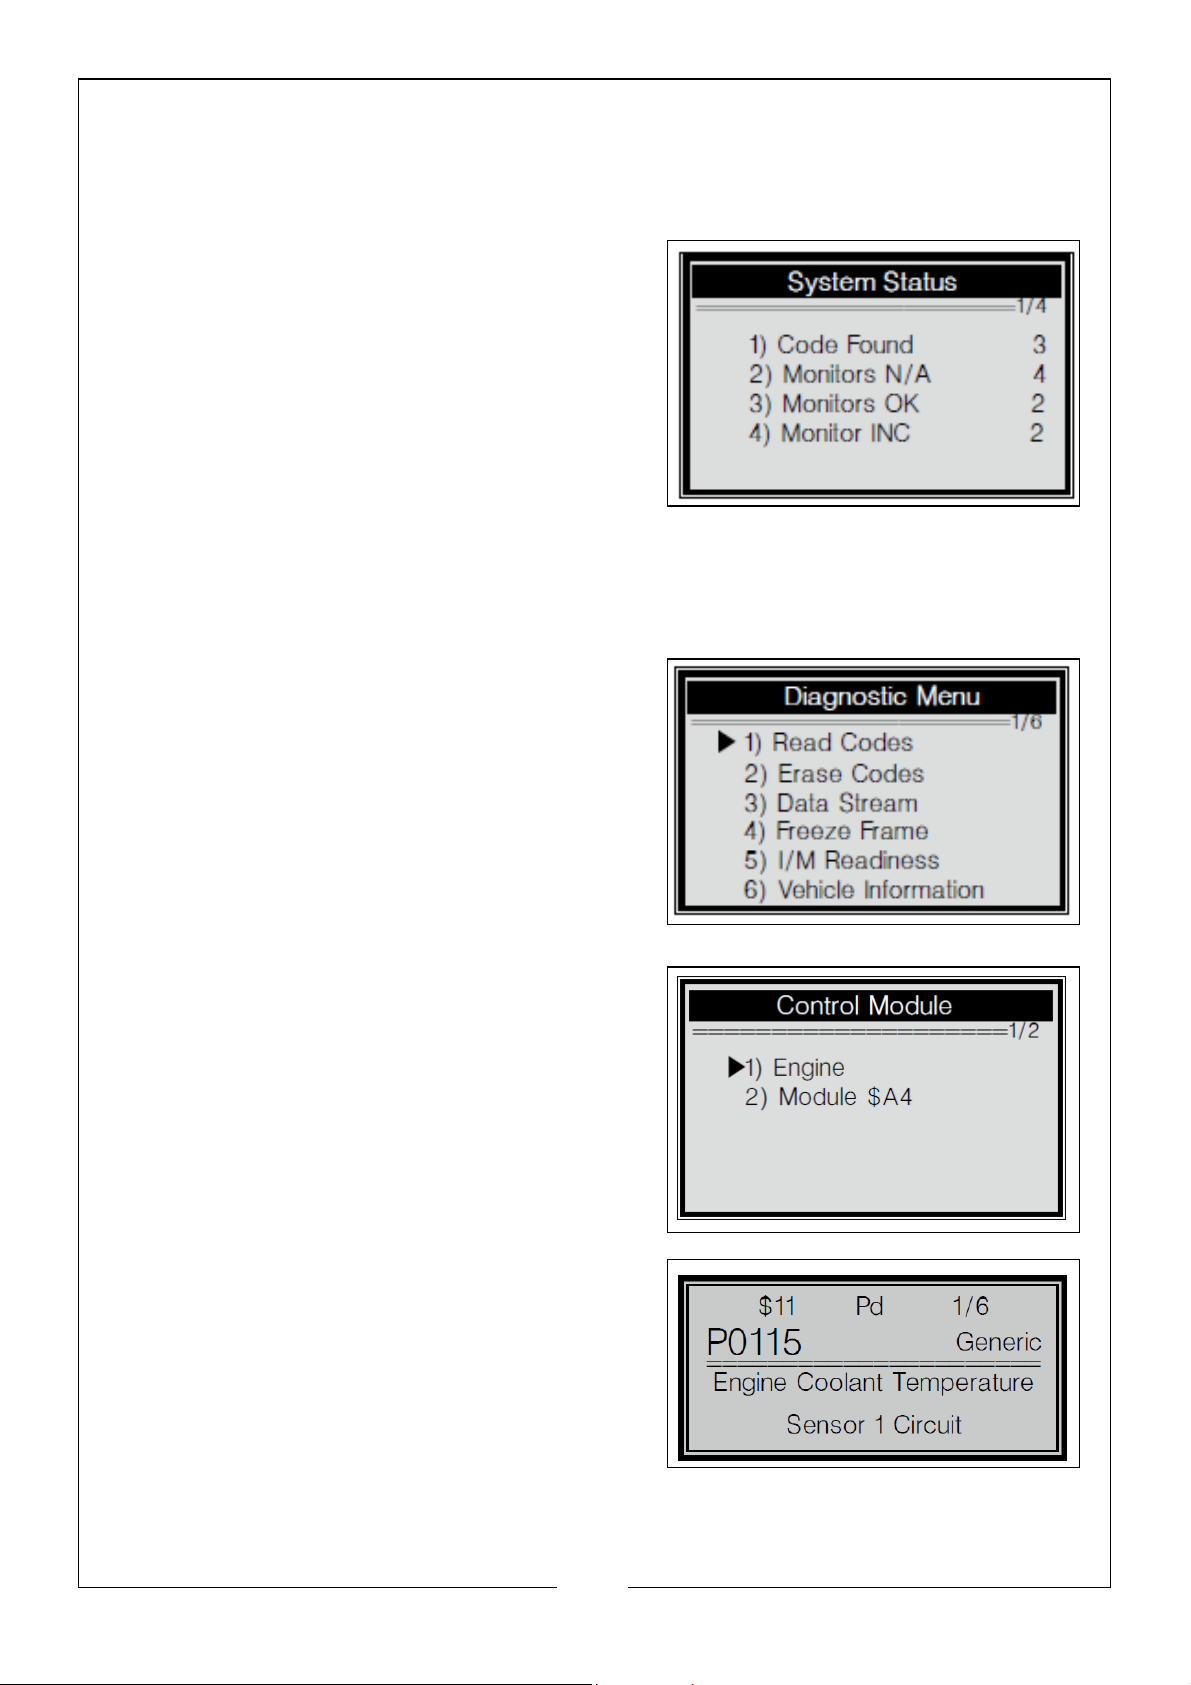
SYSTEM STATUS
1. Use the ENTER button to enter the Diagnostic Menu, the system status is
displayed (MIL status, DTC counts, Monitor status).
2. View System Status contents on screen.
3. Press ENTER button to return to next menu.
READING CODES
1. Use the UP/DOWN buttons to select
Read Codes from the Diagnostic Menu
and press ENTER button.
• If more than one module is
detected, you will be prompted to
select a module before test.
• Use UP/DOWN buttons to select a
module and press ENTER button.
2. View DTC’s and their definitions on
screen.
• The control module number,
sequence of the DTCs, total number
of codes detected and type of
codes (Generic of Manufacturer
specific, stored or Pending codes)
will be observed on the upper right hand corner of the display.
14
Parts & Service: 020 8988 7400 / E-mail: [email protected] or [email protected]
Page 15
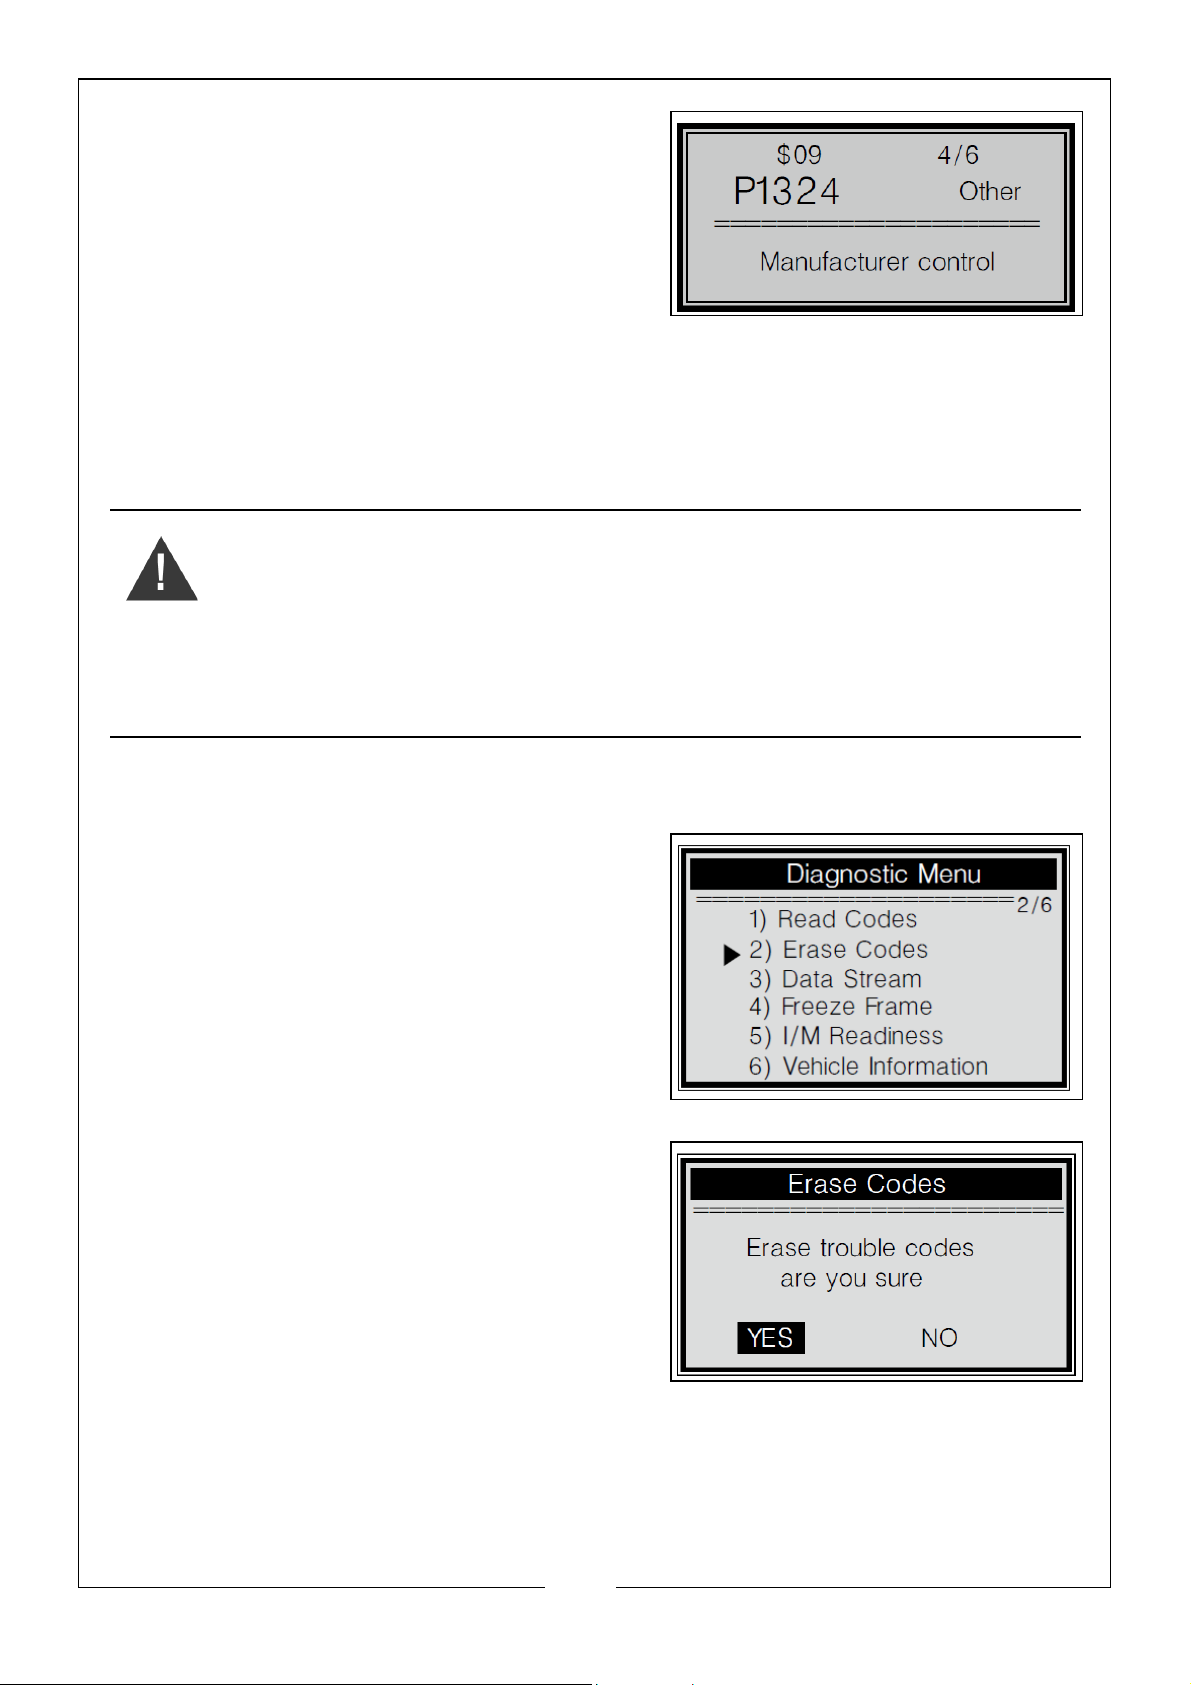
3. If more than one DTC is found, use
DOWN button, as necessary, until all
the codes have been shown. If no
codes are detected, a “No codes are
stored in the module!” message
displays on the screen. If retrieved DTCs
contain any manufacturer specific or
enhanced codes, the display indicates
“Manufacturer control”.
4. Press ENTER button to return to previous menu.
ERASING CODES
WARNING: ERASING THE DIAGNOSTIC TROUBLE CODES MAY ALLOW THE
CODE READER TO DELETE NOT ONLY THE CODES FROM THE VEHICLES ONBOARD COMPUTER, BUT ALSO FREEZE FRAME DATA AND
MANUFACTURERS ENHANCED DATA. FURTHER, THE I/M READINESS
MONITOR STATUS FOR ALL VEHICLE MONITORS IS RESET TO NOT READY
OR NOT COMPLETE STATUS. DO NOT ERASE THE CODES BEFORE THE
SYSTEM HAS BEEN CHECKED COMPLETELY BY A TECHNICIAN.
This function is performed with key on engine off (KOEO). DO NOT start the
engine.
1. If you decide to erase the DTCs, use
UP/DOWN buttons to select Erase
Codes from the Diagnostic Menu and
press ENTER button.
2. A warning message comes up asking
for your confirmation.
3. If you want to proceed with erasing the codes, press ENTER button to erase.
• If the codes are cleared successfully, an “Erase Done” message will
show up.
15
Parts & Service: 020 8988 7400 / E-mail: [email protected] or [email protected]
Page 16
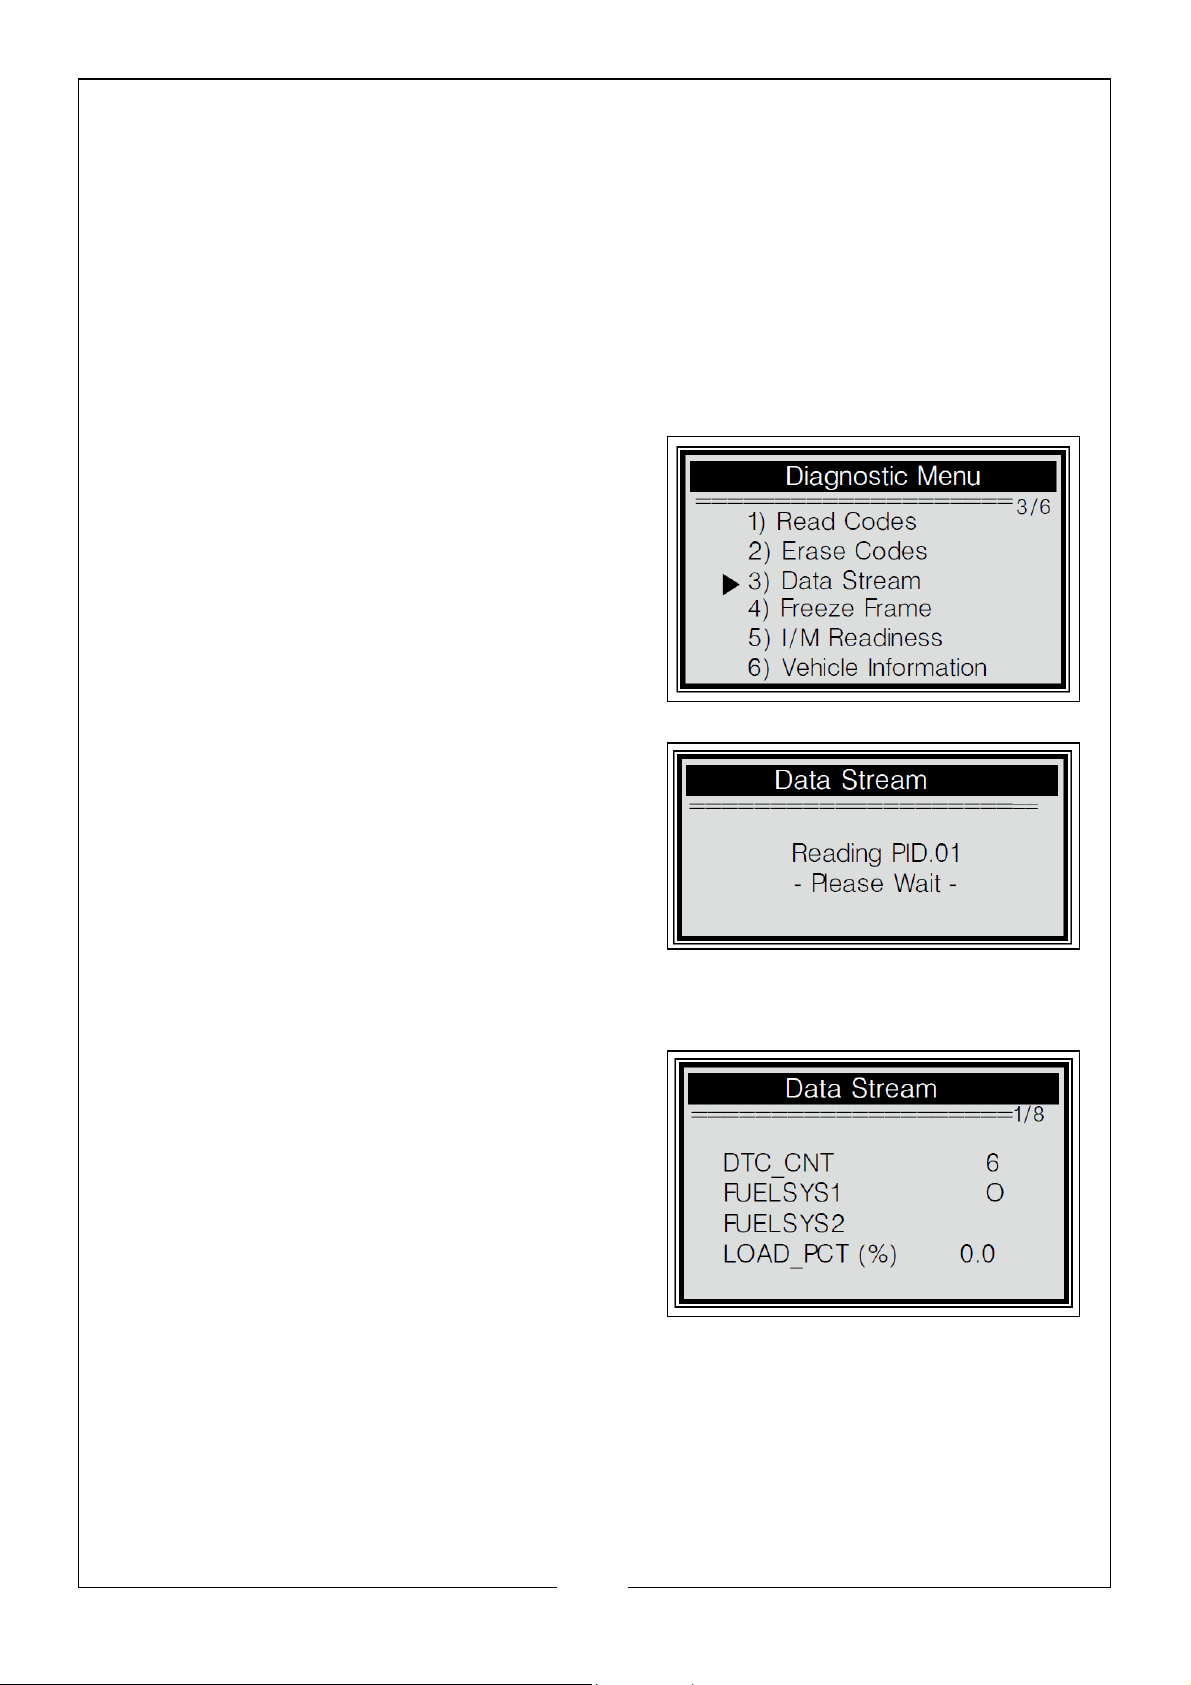
• If the codes are not cleared, then an “Erase Failure. Turn Key On with
Engine Off” message will show up.
4. Wait a few seconds or press any key to return to Diagnostic Menu.
If you DO NOT wish to proceed to erase the codes, then press UP/DOWN
buttons to select NO and press ENTER button. A “Command Canceled” message will show up. Press any key or wait a few seconds to return to the Diagnostic Menu.
VIEWING DATA STREAM
1. To view Data Stream, use the UP/
DOWN buttons to select Data Stream
from Diagnostic Menu and press ENTER
button.
2. Wait a few seconds while the code
reader validates the PID MAP.
3. View live PIDs on the screen. Use UP/
DOWN buttons for more PIDs on the
next screen.
4. Press ENTER button to return to previous menu.
16
Parts & Service: 020 8988 7400 / E-mail: [email protected] or [email protected]
Page 17
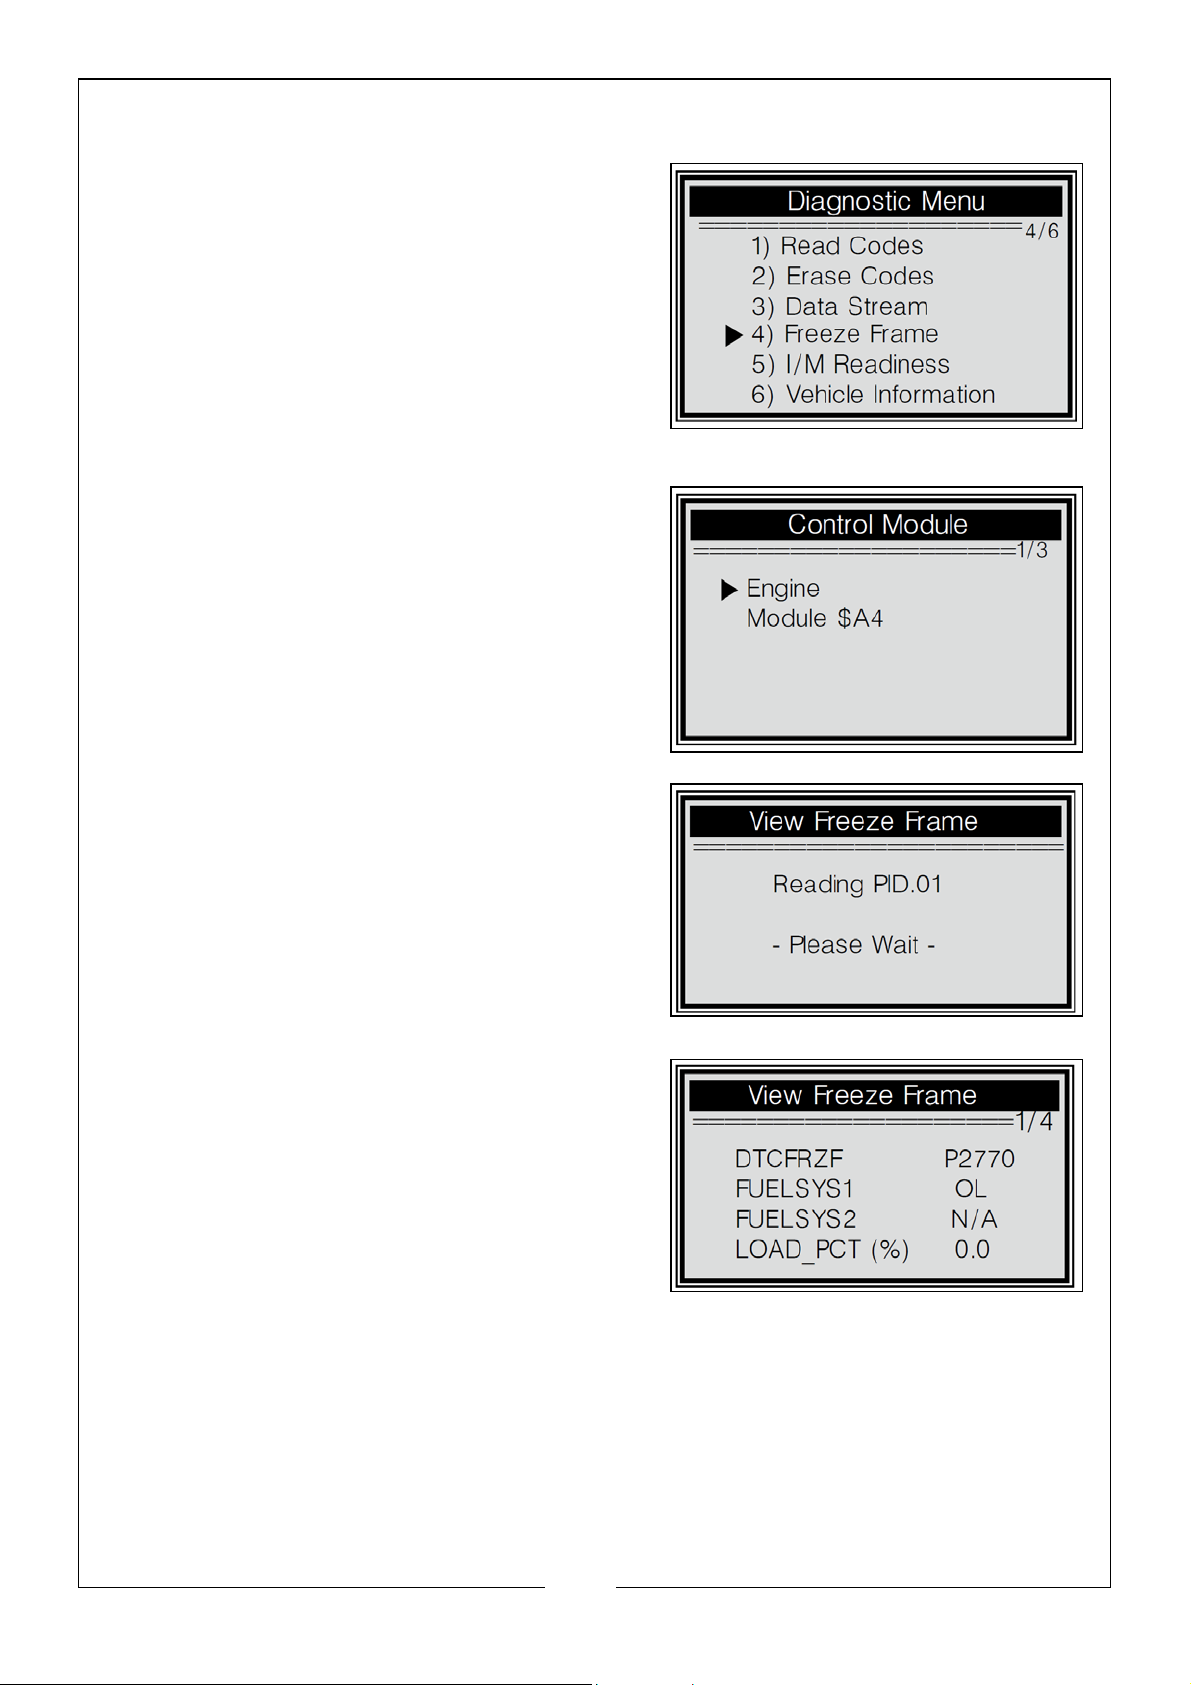
VIEWING FREEZE FRAME DATA
1. To view freeze frame, use the UP/
DOWN buttons to select Freeze Frame
from Diagnostic Menu and press ENTER
button.
If more than one module is detected, you
will be prompted to select a module
before test. Use the UP/DOWN buttons to
select a module and press the ENTER
button.
2. Wait a few seconds while the code
reader validates the PID MAP.
3. If the retrieved information covers more
than one screen, use the UP/DOWN
buttons, as necessary, to view all data.
The number “x/x” to the upper right
corner of the screen indicates total
number of screens the retrieved freeze
frame covers and sequence of
currently displayed data.
If there is no freeze frame data available, an advisory message “No Freeze
Frame Data Stored!” shows on the display.
4. Press ENTER button to return to previous menu.
17
Parts & Service: 020 8988 7400 / E-mail: [email protected] or [email protected]
Page 18
RETRIEVING I/M READINESS STATUS
I/M Readiness function is used to check the operations of the Emission System
on OBDII compliant vehicles. It is an excellent function to use prior to having a
vehicle inspected for compliance to a state emissions program. Some latest
vehicle models may support two types of I/M Readiness tests:
a. Since DTCs Cleared - indicates status of the monitors since the DTCs are
erased.
b. This Drive Cycle - indicates status of monitors since the beginning of the
current drive cycle.
An I/M Readiness Status result of “NO” does not necessarily indicate that the
vehicle being tested will fail the state I/M inspection. For some states, one or
more such monitors may be allowed to be “Not Ready” to pass the emissions
inspection.
• OK - indicates that a particular monitor being checked has completed
its diagnostic testing.
• INC - Indicates that a particular monitor being checked has not
completed its diagnostic testing.
• N/A - The monitor is not supported on this vehicle.
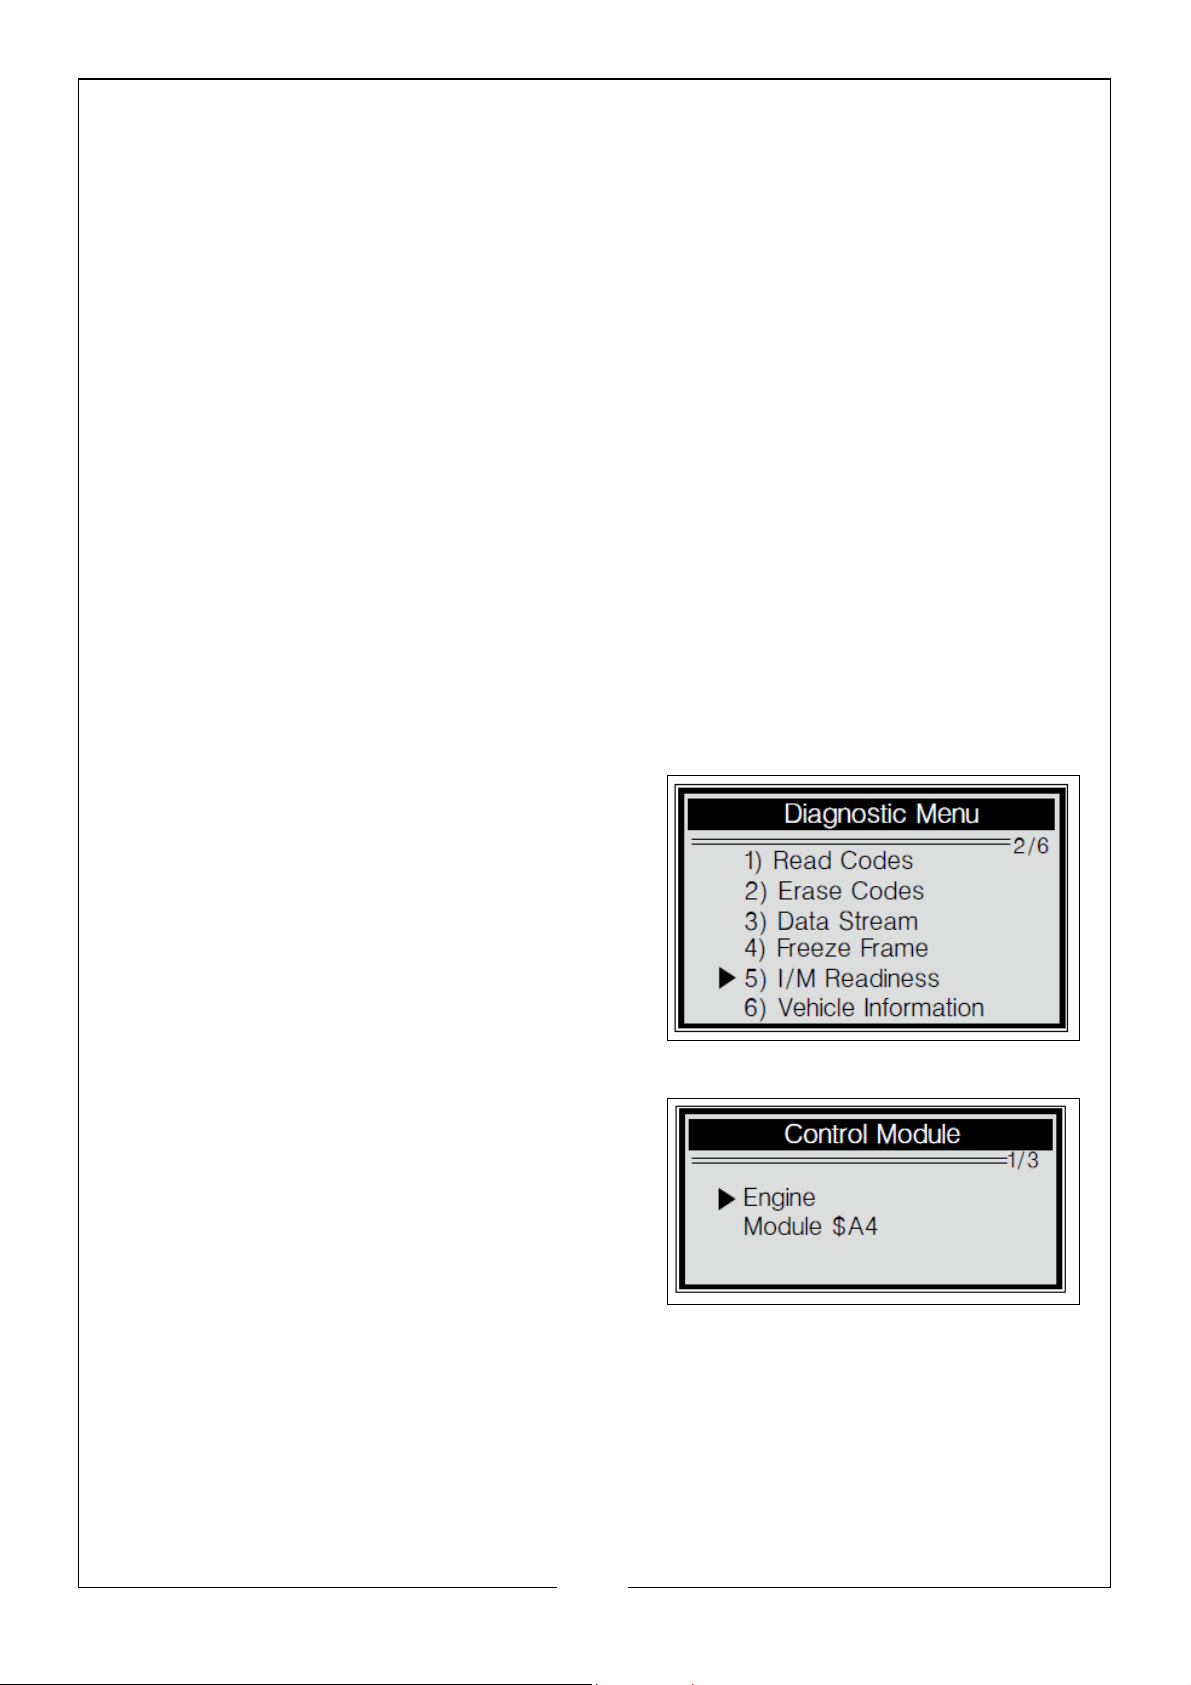
1. Use DOWN button to select I/M
Readiness from Diagnostic Menu and
press the ENTER button.
If more than one module is detected, you
will be prompted to select a module
before test. Use the UP/DOWN buttons to
select a module and press the ENTER
button.
18
Parts & Service: 020 8988 7400 / E-mail: [email protected] or [email protected]
Page 19
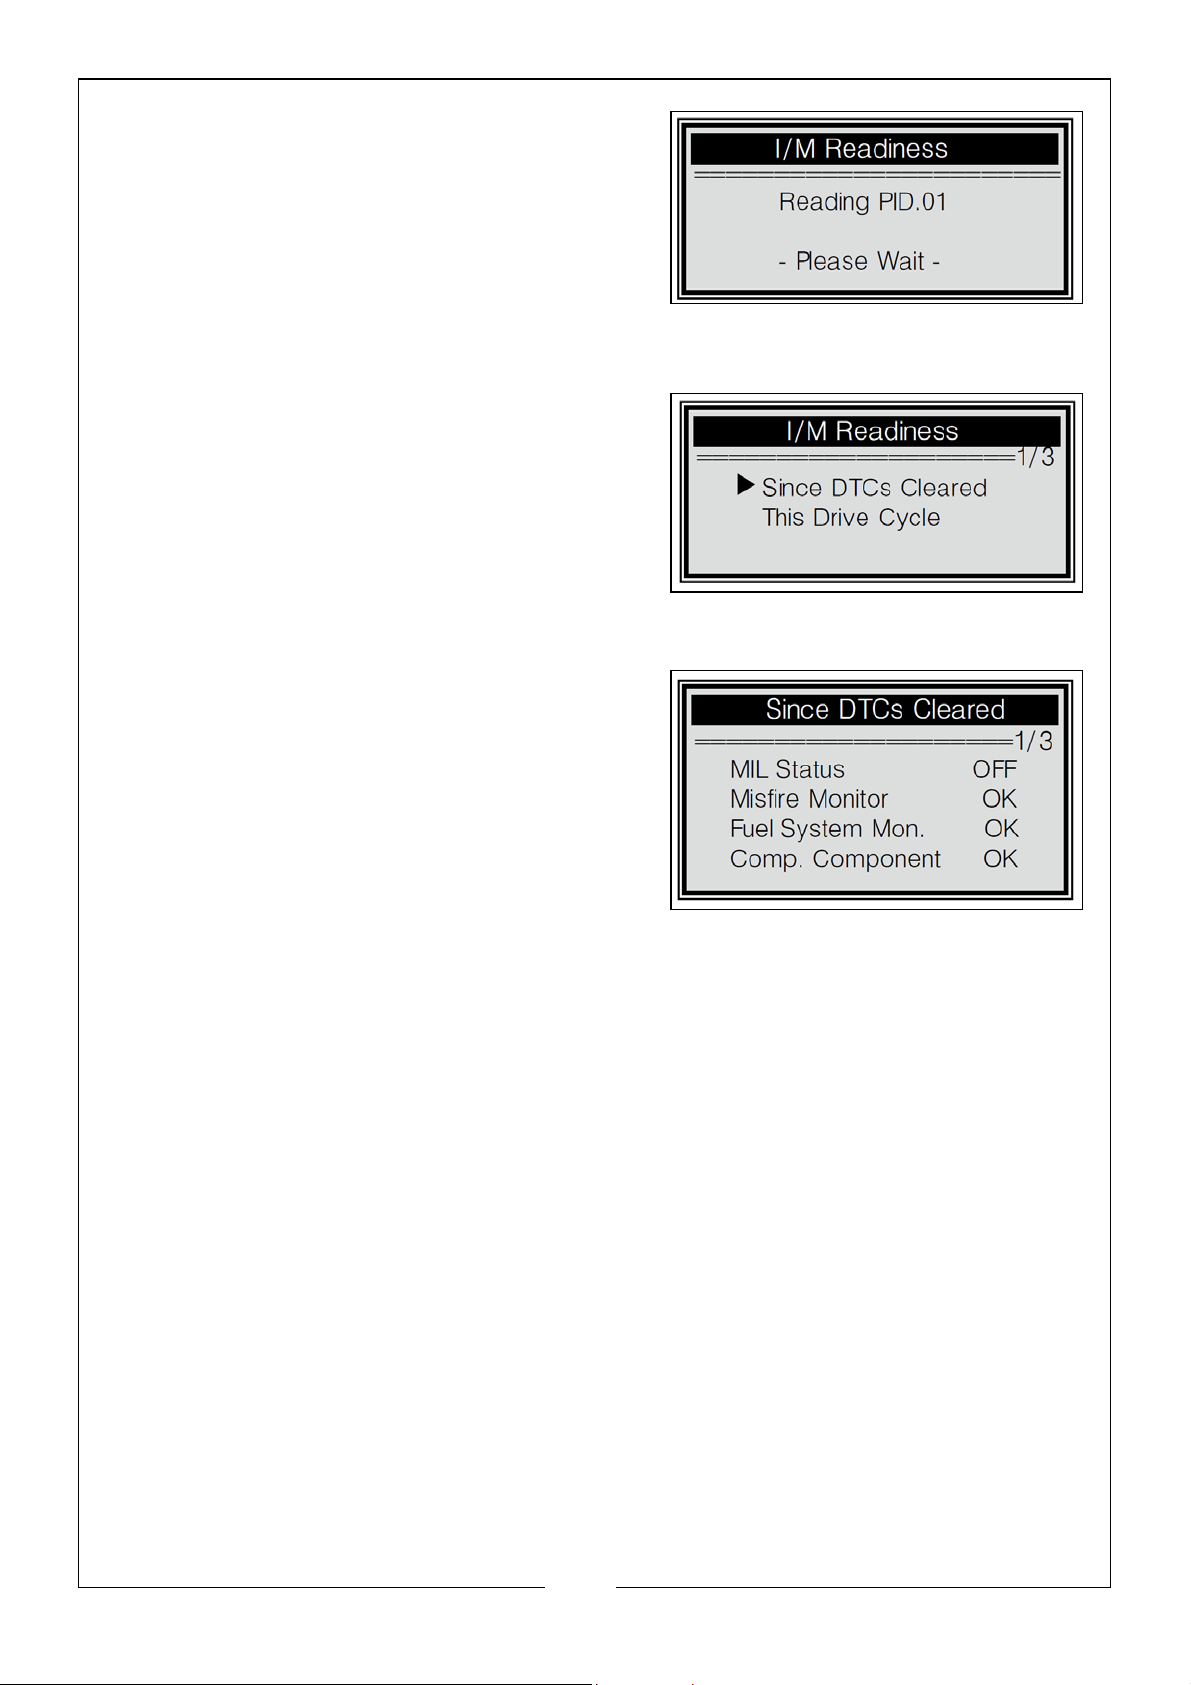
2. Wait a few seconds while the code
reader validates the PID MAP.
3. If the vehicle supports both types of
tests, then both types will show on the
screen for selection.
4. Use the UP/DOWN buttons to view the
status of the MIL light (ON or OFF) and
the following monitors:
• Misfire Monitor - Misfire Monitor
• Fuel System Mon - Fuel System
Monitor
• Comp. Component -
Comprehensive Components Monitor
• EGR - EGR System Monitor
• Oxygen Sens Mon - O2 Sensors Monitor
• Catalyst Mon - Catalyst Monitor
• EVAP System Mon - Evaporative System Monitor
• Oxygen Sens htr - O2 Sensor Heater Monitor
• Sec Air System - Secondary Air Monitor
• Htd Catalyst - Heated Catalyst Monitor
• A/C Refrig Mon - A/C System Monitor
19
Parts & Service: 020 8988 7400 / E-mail: [email protected] or [email protected]
Page 20
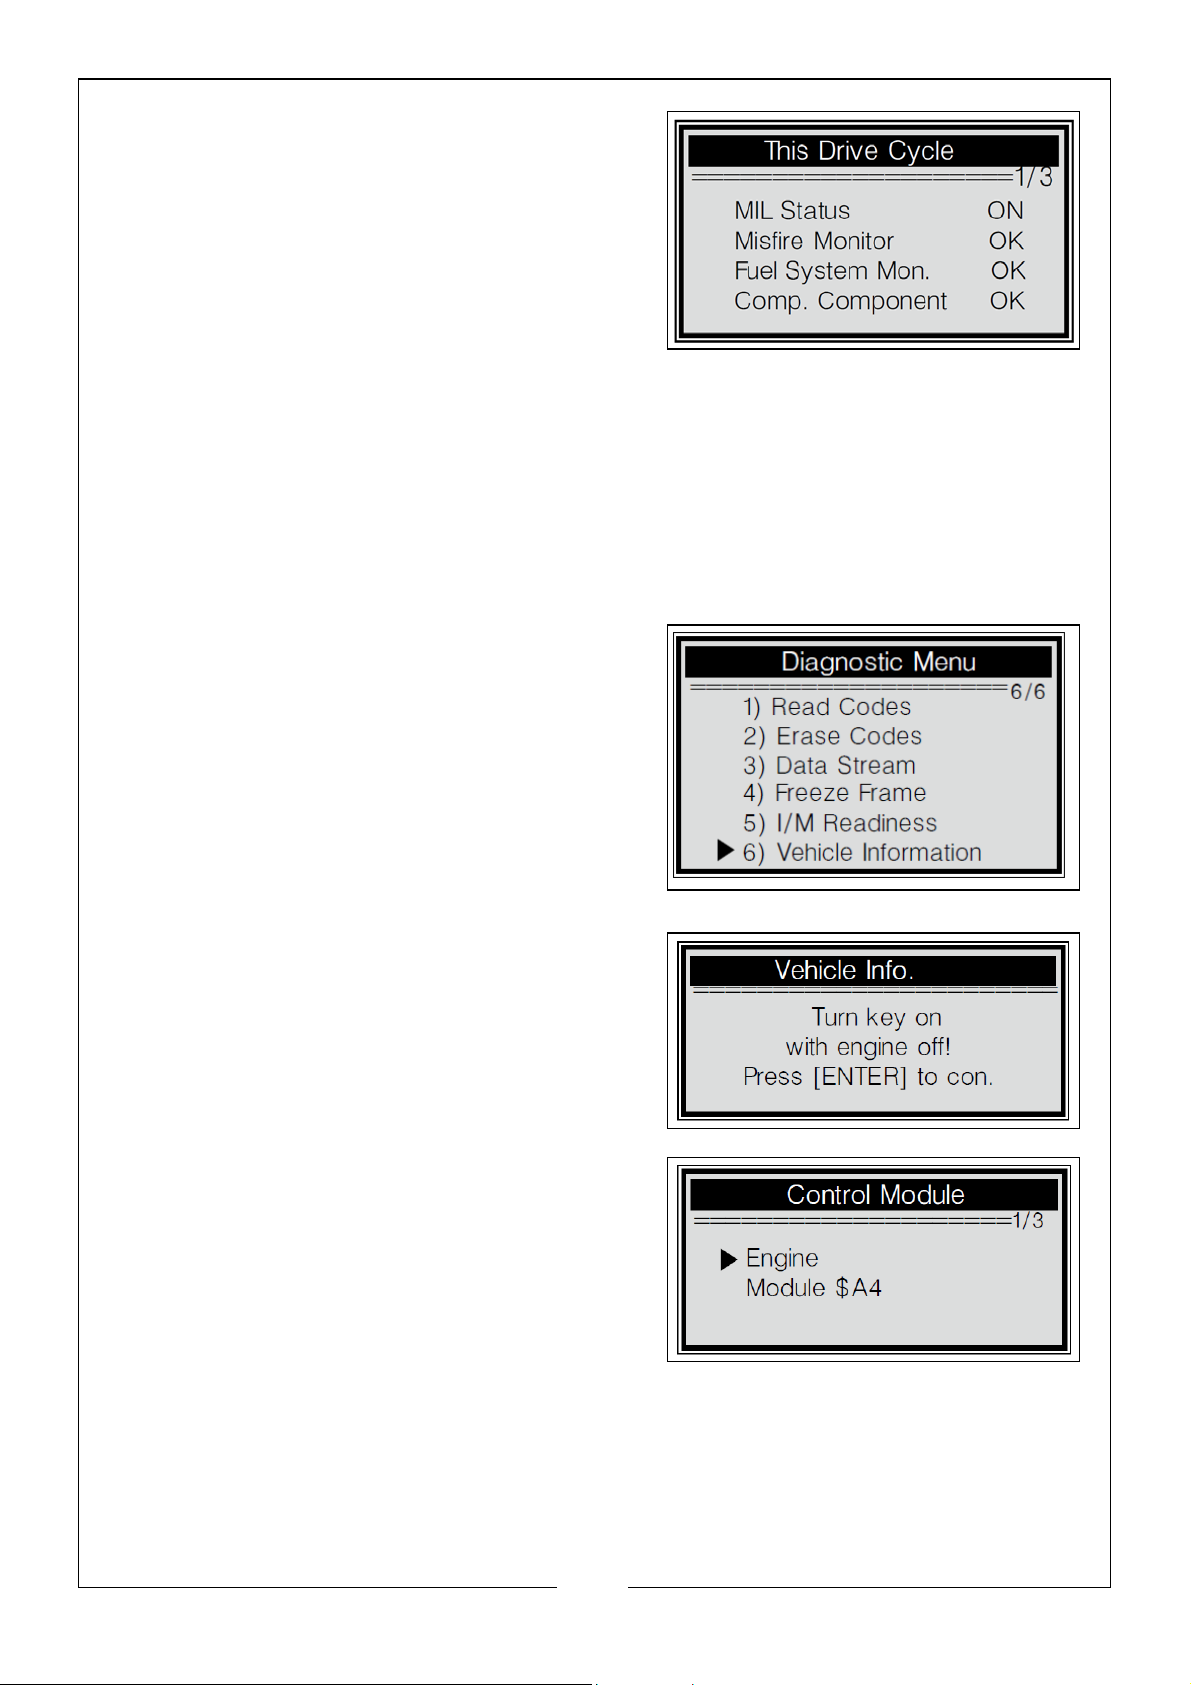
5. If the vehicle supports readiness test of
“This Drive Cycle”, the following will
appear on the screen.
The number “x/x” to the upper right corner
of the screen indicates total number of
screens the retrieved data cover and
sequence of currently displayed data.
6. Press ENTER button to return to previous menu.
VIEWING VEHICLE INFORMATION
The Vehicle Info. function enables retrieval of the Vehicle Identification No.
(VIN), Calibration ID Nos. (CINs), Calibration Verification Nos. (CVNs) and In Use
Performance Tracking on 2000 and newer vehicles that support Mode 9.
1. Use the UP/DOWN buttons to select
Vehicle Information from the Diagnostic
Menu and press ENTER button.
2. Wait a few seconds or press ENTER
button to continue.
If the vehicle does not support this mode, a
“The selected mode is not supported!”
message shows on the display. If more
than one module is detected, you will be
prompted to select a module before test.
Use the UP/DOWN buttons to select a
module and press ENTER button.
20
Parts & Service: 020 8988 7400 / E-mail: [email protected] or [email protected]
Page 21
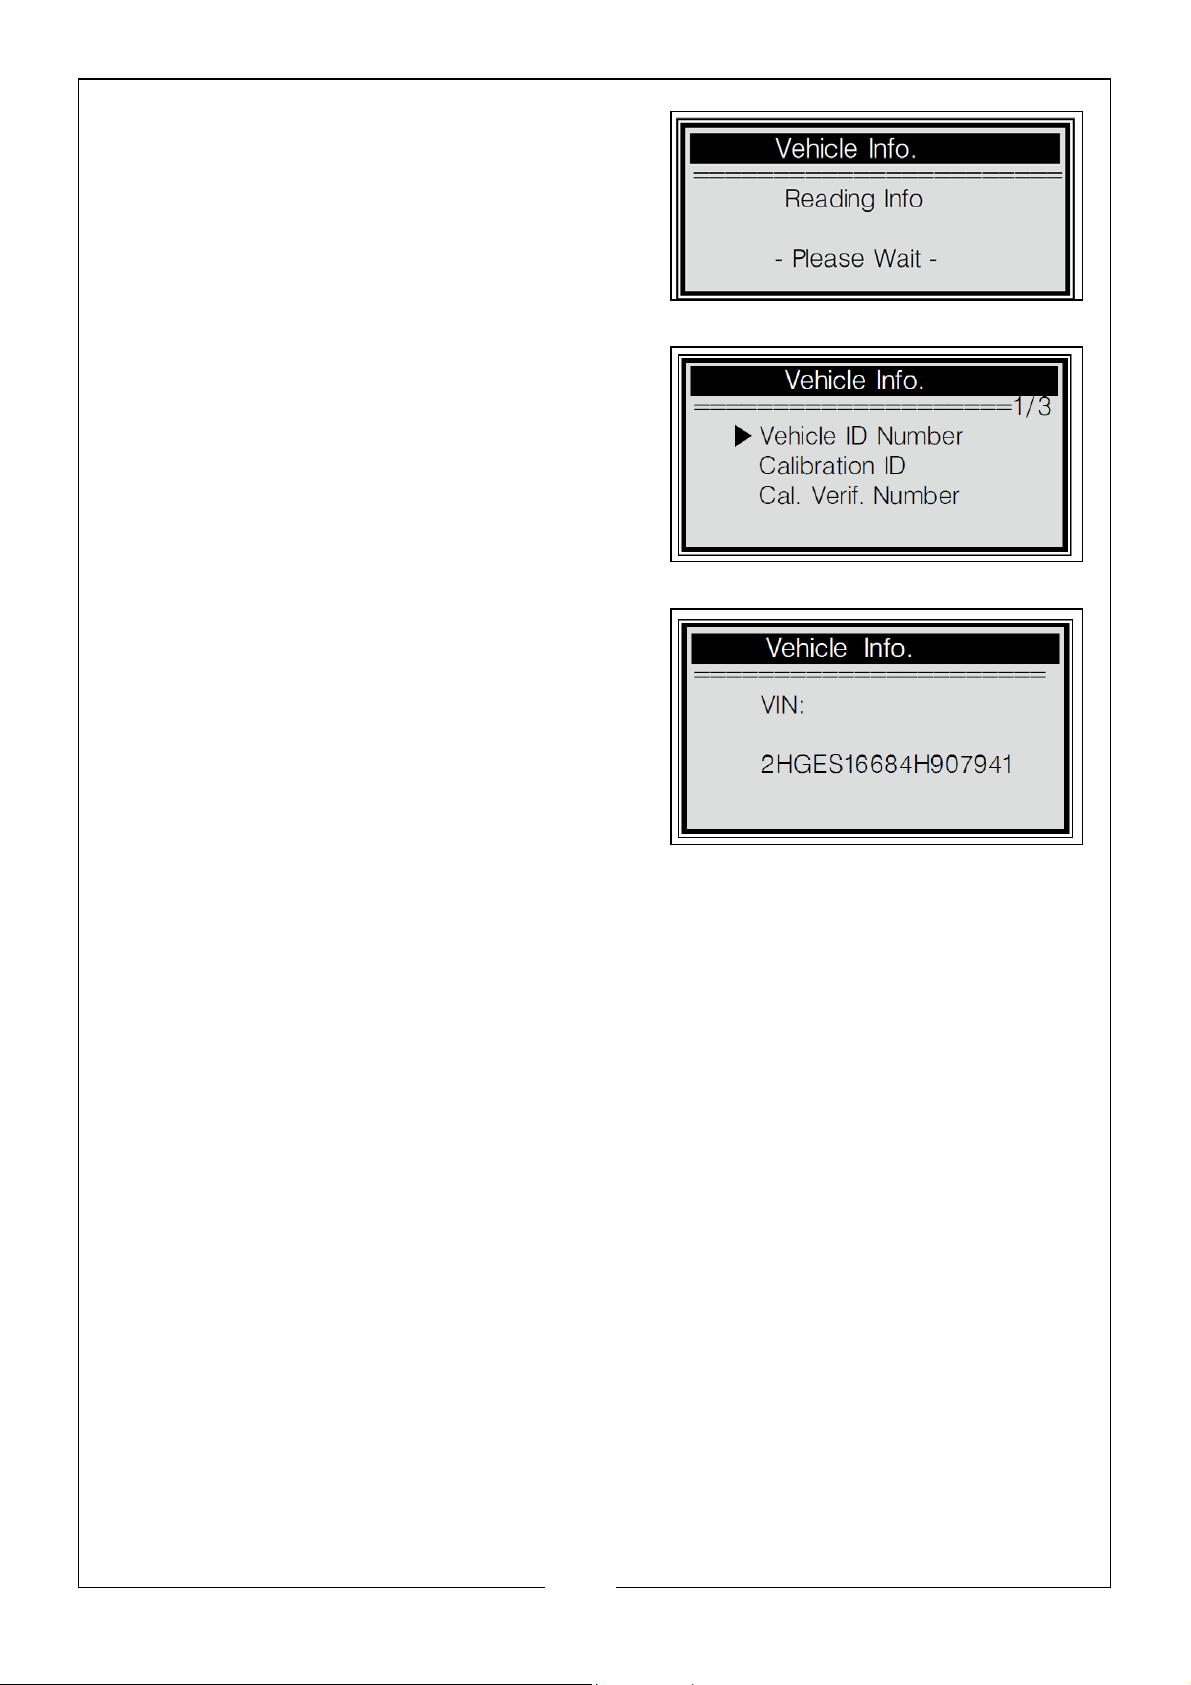
3. Wait a few seconds while the code
reader reads the vehicle information.
4. From Vehicle Info. menu, use the UP/
DOWN buttons to select an available
item to view and press the ENTER
button.
5. View retrieved vehicle information on
the screen.
6. Press ENTER button to return to previous menu.
21
Parts & Service: 020 8988 7400 / E-mail: [email protected] or [email protected]
Page 22
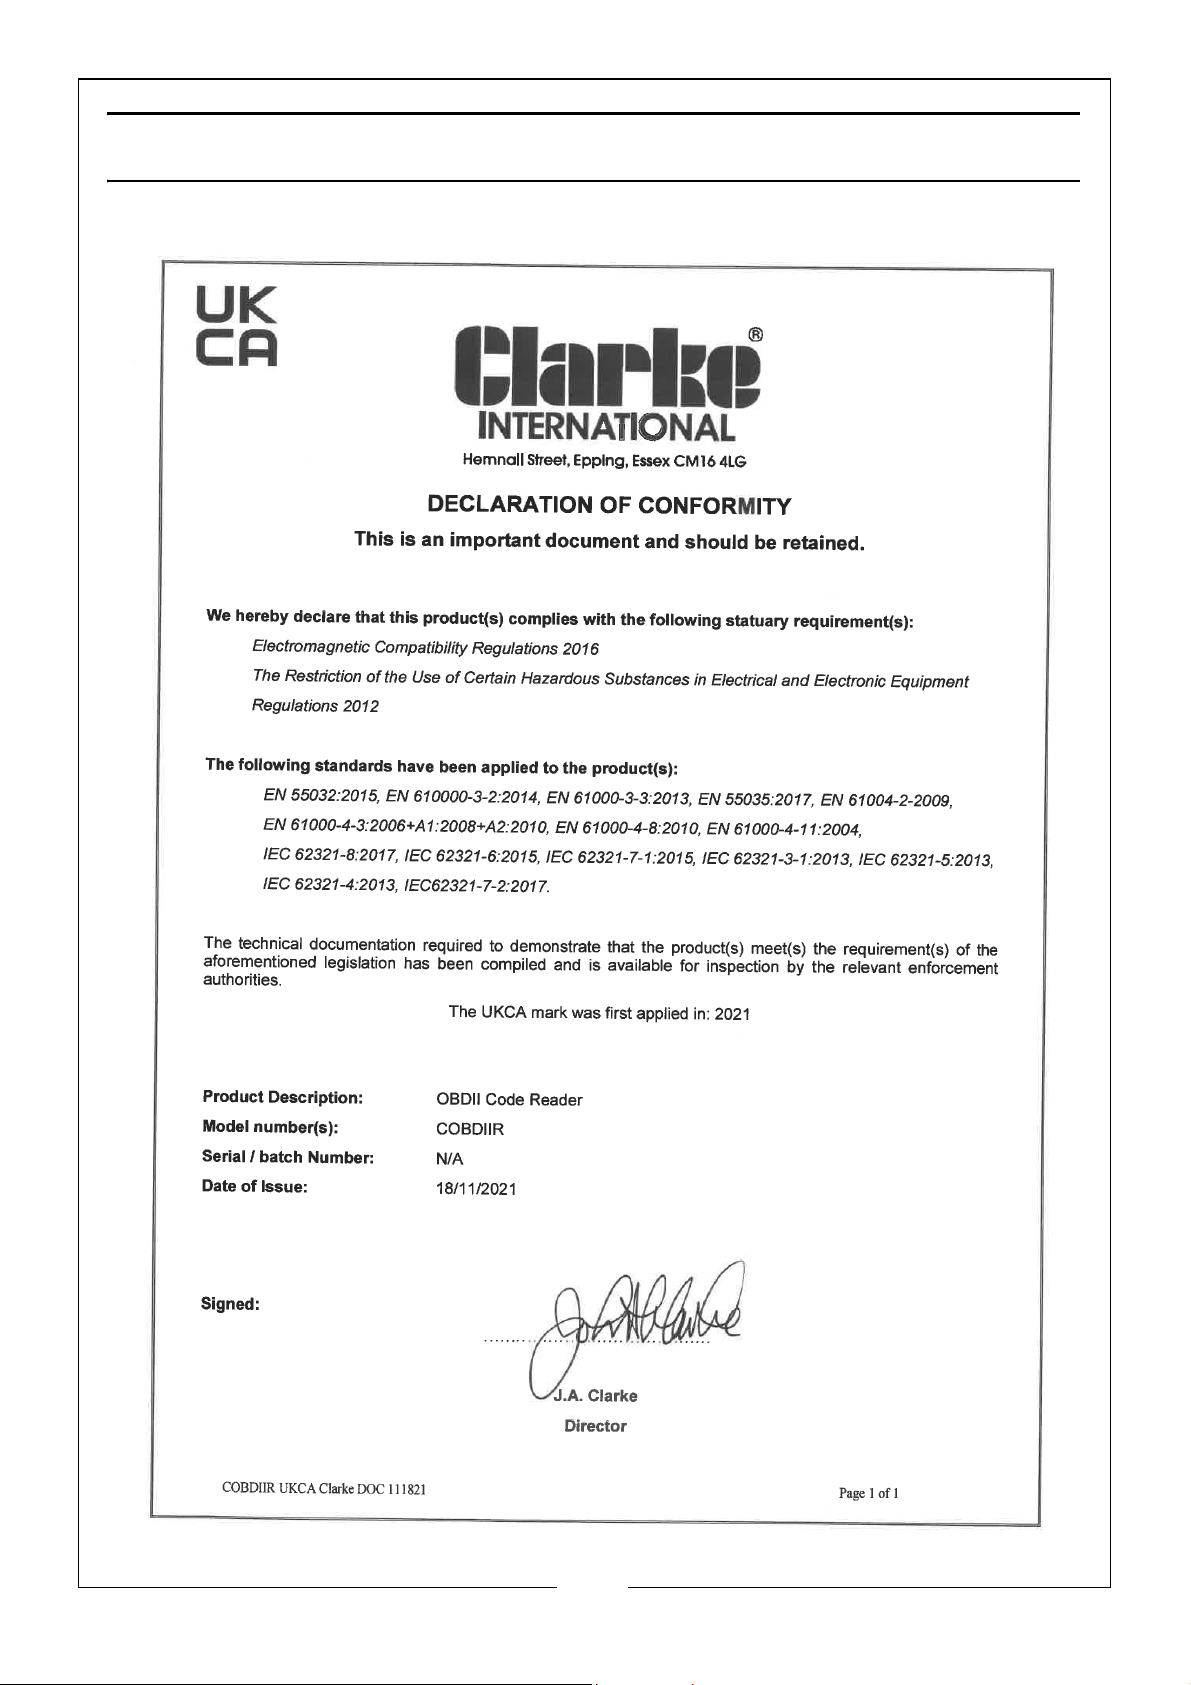
DECLARATION OF CONFORMITY - UKCA
22
Parts & Service: 020 8988 7400 / E-mail: [email protected] or [email protected]
Page 23
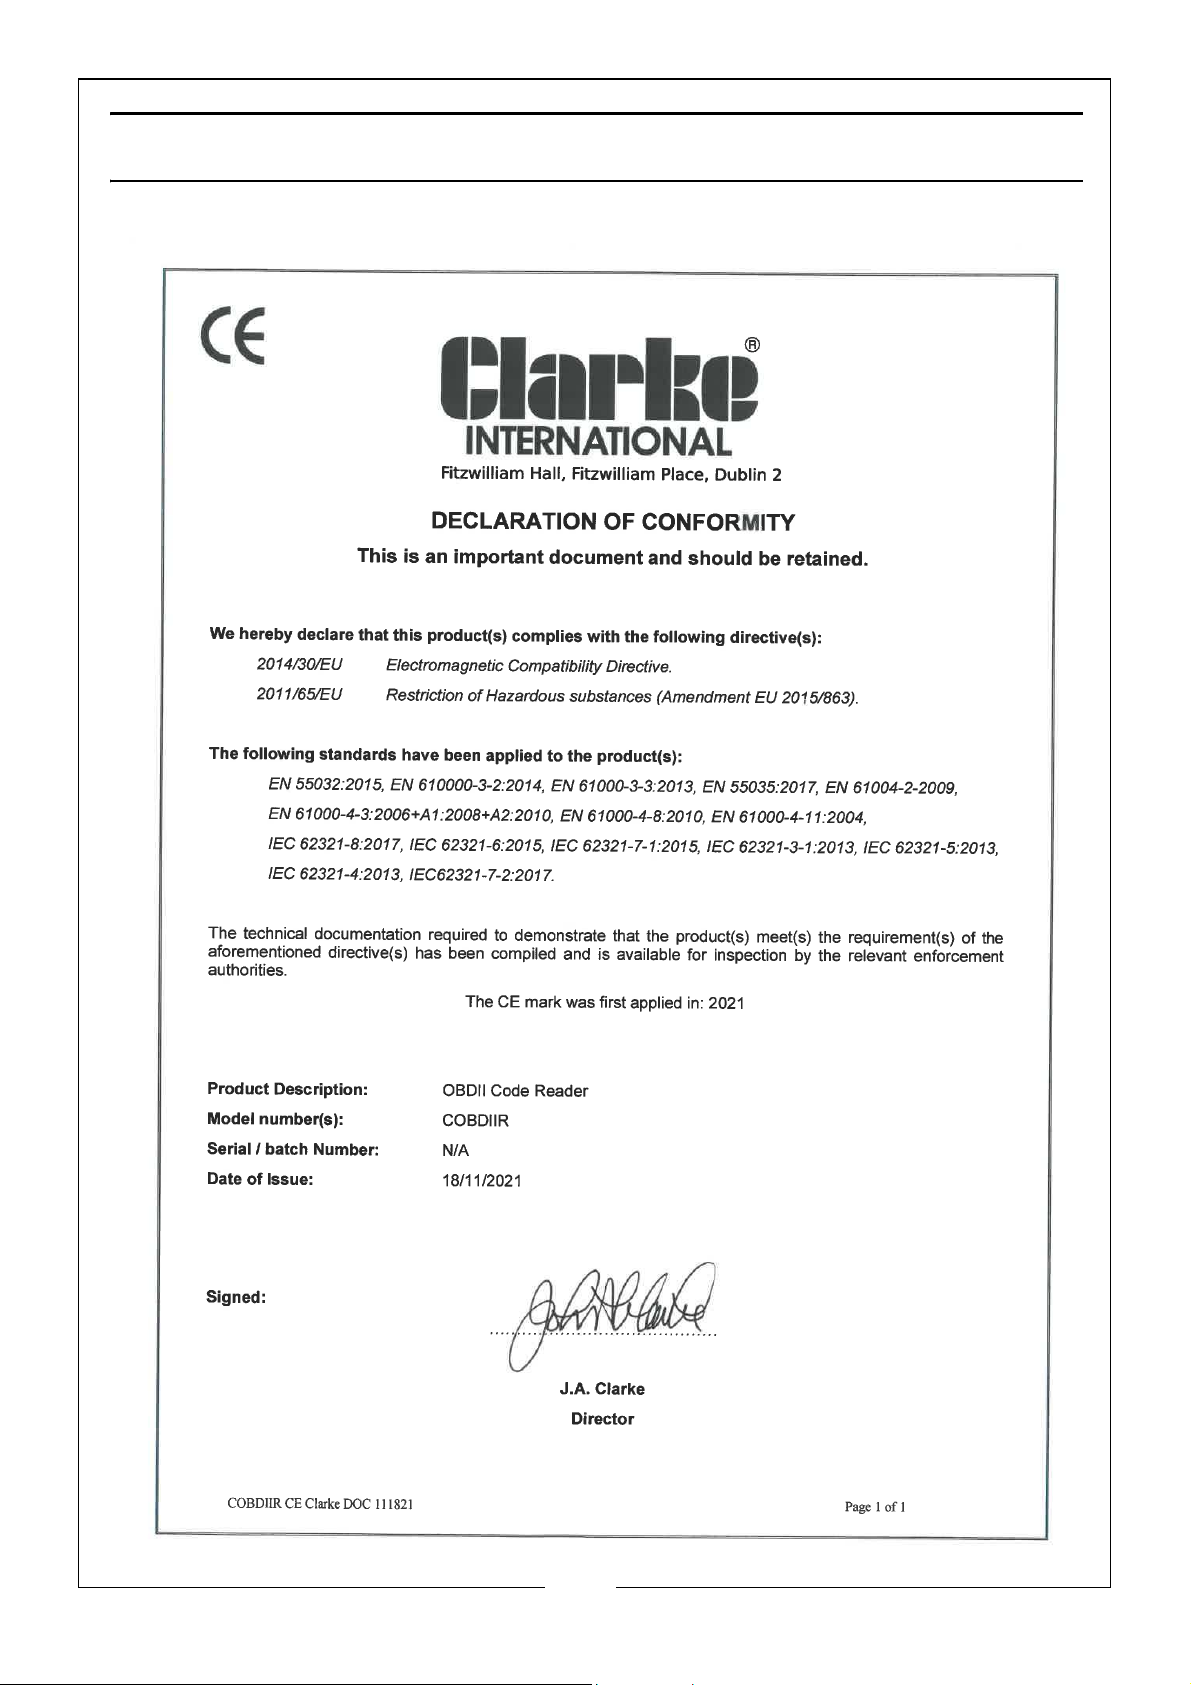
DECLARATION OF CONFORMITY - CE
23
Parts & Service: 020 8988 7400 / E-mail: [email protected] or [email protected]
Page 24

 Loading...