

Page 1
HEATING TORCH SETS
Models; PC108, PC109, PCSF109, PC216, PKP411,
PS555, PS560 & PLK1074
Part Nos: 3404115, 3404100, 3404105, 3404110, 3404125, 3404000,
3404005 & 3404135
OPERATING & SAFETY
INSTRUCTIONS
GC01/15
Page 2

INTRODUCTION
Thank you for purchasing this CLARKE Heating Torch Set, designed for trade
use. They are all to be used only with propane gas and are supplied with a
standard 3/8”BSP (LH) hose.
Before attempting to use the product, it is essential that you read this manual
thoroughly and carefully follow all instructions given. In doing so you will
ensure the safety of yourself and that of others around you, and you can also
look forward to the product giving you long and satisfactory service.
GUARANTEE
This CLARKE product is guaranteed against faulty manufacture for a period of
12 months from the date of purchase. Please keep your receipt as proof of
purchase.
This guarantee is invalid if the product is found to have been abused or
tampered with in any way, or not used for its intended purpose.
Faulty goods should be returned to their place of purchase, no product can
be returned to us without prior permission.
This guarantee does not effect your statutory rights.
SAFETY PRECAUTIONS
1. ALWAYS follow all precautions regarding the use of Propane gas cylinders.
(see manufacturers/suppliers instructions)
2. Ensure the gas hose is in perfect condition before use. If in doubt, have it
replaced.
3. Ensure all connections are fully secure before use.
4. Never transport the gas bottle by holding the regulator or gas hose.
5. NEVER point the torch at any person or animal.
6. Take great care when placing the torch down. Do not allow it to come
into contact with flammable surfaces, or any surface which could be
damaged by heat. Use the stand supplied with the PLK1074 to support the
nozzles clear of any supporting surface.
7. Never use the torch in an explosive atmosphere, or where there is danger
of fire.
8. IMPORTANT! If used indoors, ensure there is adequate ventilation.
Please keep these instructions in a safe place for future reference.
2
Parts & Service: 020 8988 7400/E-mail:[email protected] or [email protected]
Page 3
ASSEMBLY
NOTE: A bottle of propane gas is required for use with this equipment, capable of
delivering a pressure of 4 bar. (A regulator is provided)
1. Turn the knob on the regulator fully clockwise, then attach the
regulator to the gas bottle, ensuring it is tight.
2. Attach the hose supplied, to the regulator at one end, and the torch at
the other, noting that the hose connections have LEFT HAND THREADS, i.e.
turn them anticlockwise.
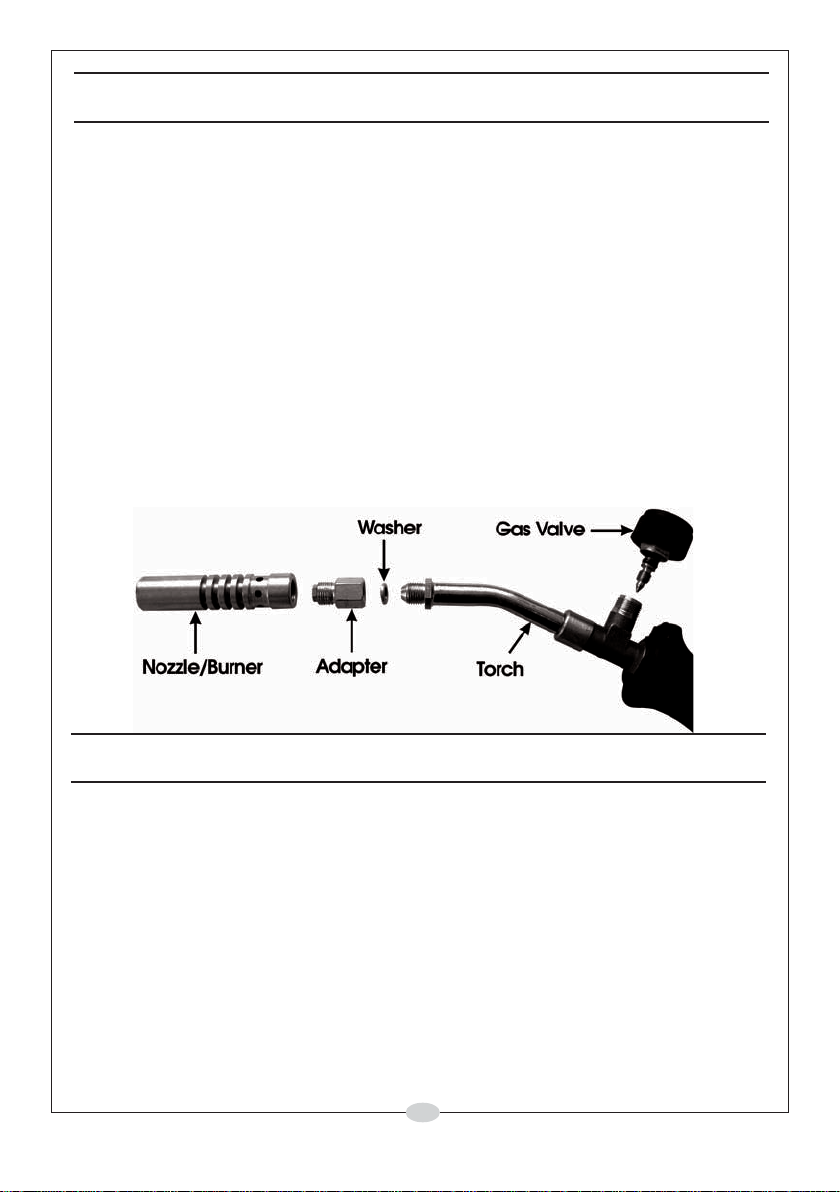
3. Attach the appropriate nozzle/burner to the torch where necessary.
If a nozzle/burner is already attached, remove it carefully, complete with
adapter (see illustration below). Unscrew the nozzle from the adapter and
replace with that of the desired type or size. Screw the adapter with nozzle
back on to the torch.
Note:
1. Model PKP411 requires the torch extension to be attached to the torch.
OPERATION
With the hose and regulator attached, and ensuring the gas tap on the torch
is closed, i.e. turned fully clockwise, open the gas regulator valve.
Gas will now be available at the torch, the volume of which will depend
upon the regulator valve opening.
Very gently, open the gas valve on the torch, ensuring the nozzle/burner is
pointing well away from people or property, and apply a flame to the end of
the burner. Model PKP411 is equipped with a piezo electric starter on the
torch extension. Press the button until ignition occurs. Adjust the gas valve
until the desired flame is achieved.
Some models have a control lever attached to the torch. This is used to
further regulate the gas flow and hence the intensity of the flame. When the
lever is released the flame will reduce to a pilot light.
3
Parts & Service: 020 8988 7400/E-mail:[email protected] or [email protected]
Page 4
In the case of the PC109 kit, the flame can also be adjusted by positioning
the clip-on sleeve provided, over the air holes in the circumferance of the
17mm screw-tipped nozzle.
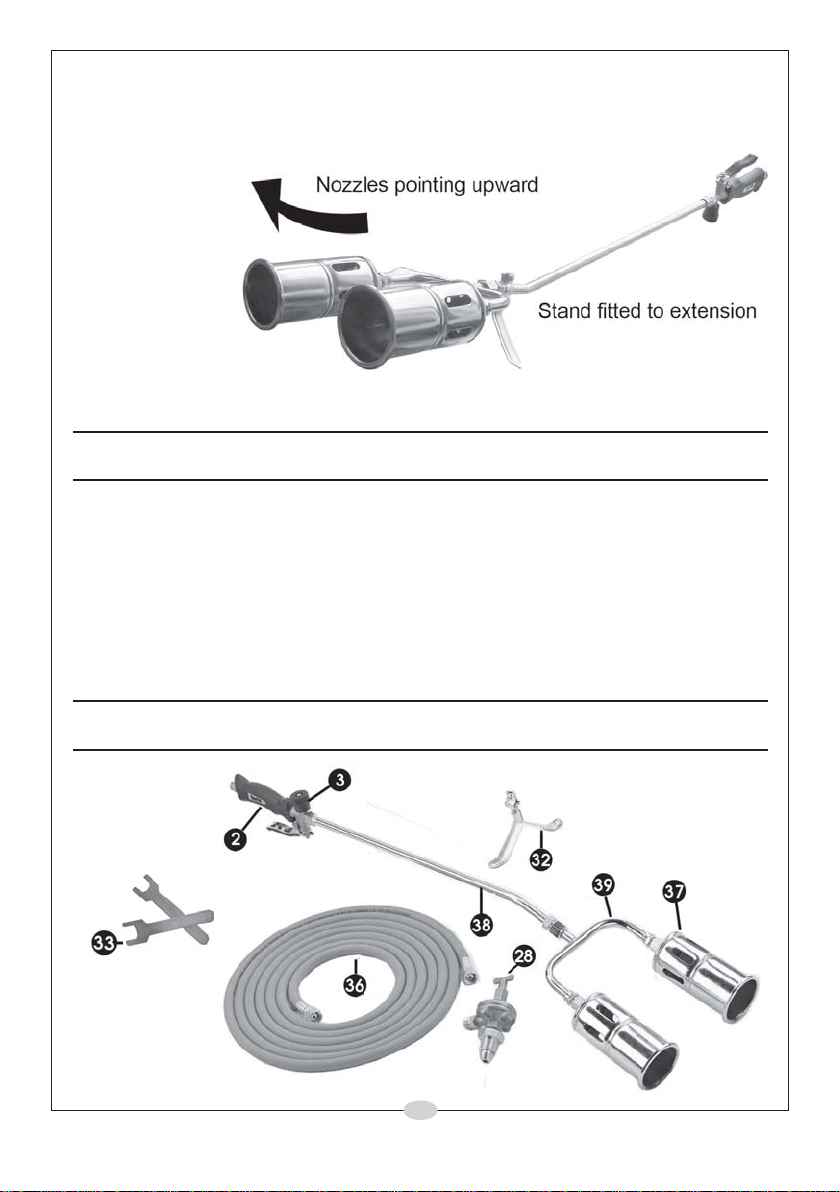
Models PC216,
PKP411 and
PLK1074 have
a support arm
which can be
clamped to
the nozzle
extension to
steady the unit
at rest. This
should be
fitted to ensure the flame points upwards, away from any supporting surface.
MAINTENANCE
The torches are maintenance free, except for visual checks before use to
ensure all connections are secure, and the gas hose is in perfect condition. If
the nozzle becomes sooted, clean with a soft wire brush. DO NOT poke wire
etc, through the holes in the nozzle.
To remove the filter from the nozzle for cleaning, grasp the nozzle with a pair
of mole grips or very carefully secure in a vice, then unscrew the filter.
The parts on the following pages are all available from your CLARKE dealer.
COMPONENT PARTS
PLK 1074
4
Parts & Service: 020 8988 7400/E-mail:[email protected] or [email protected]
Page 5
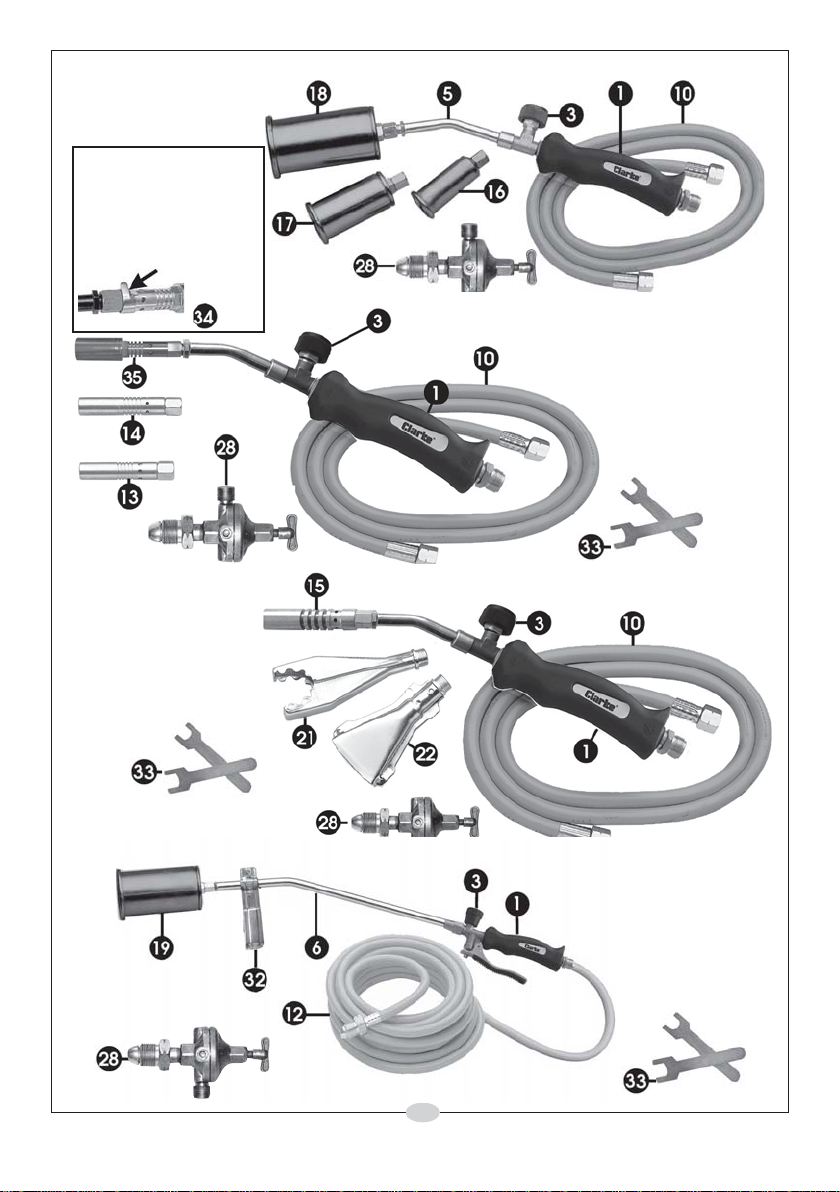
PC 108
Sleeve may be used to
adjust air mix by covering
holes as necessary to
produce desired flame
when used with
nozzle(35) only.
PCSF 109
PC 109
PC 216
5
Parts & Service: 020 8988 7400/E-mail:[email protected] or [email protected]
Page 6
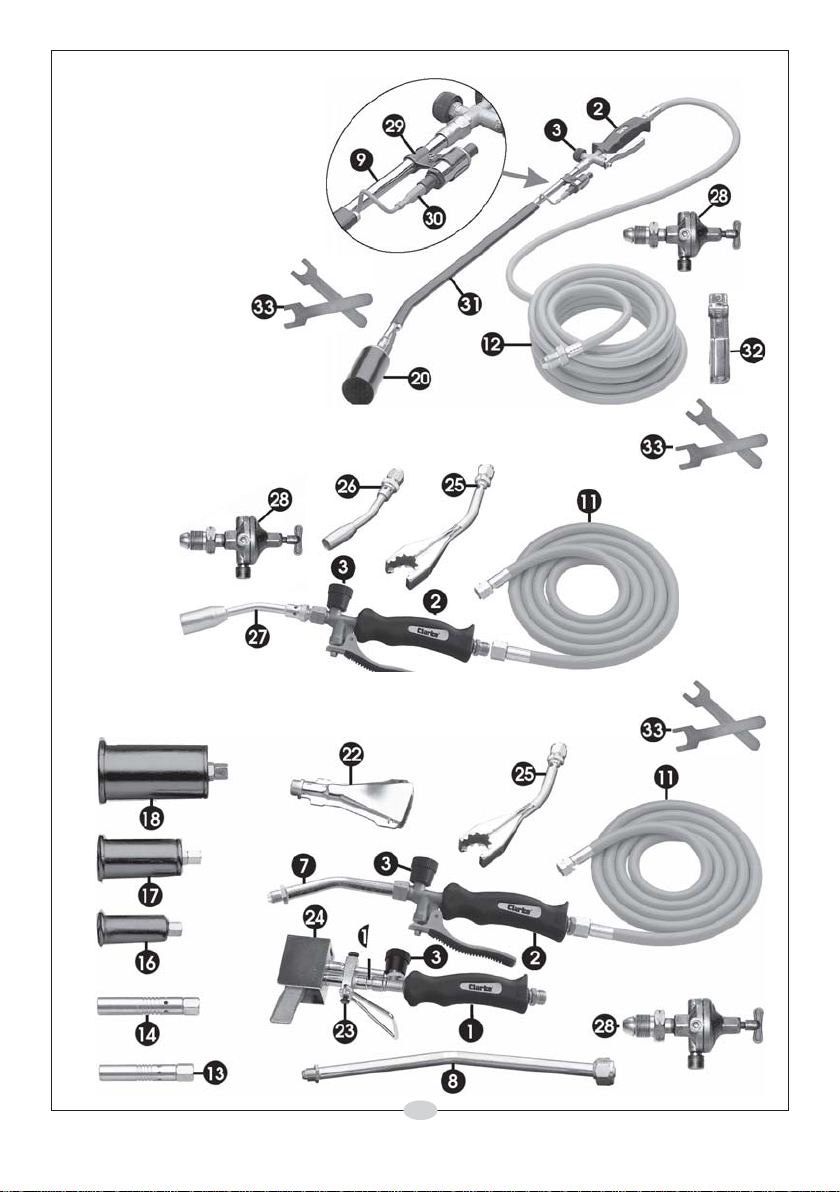
PKP 411
PS 555
PS 560
6
Parts & Service: 020 8988 7400/E-mail:[email protected] or [email protected]
Page 7
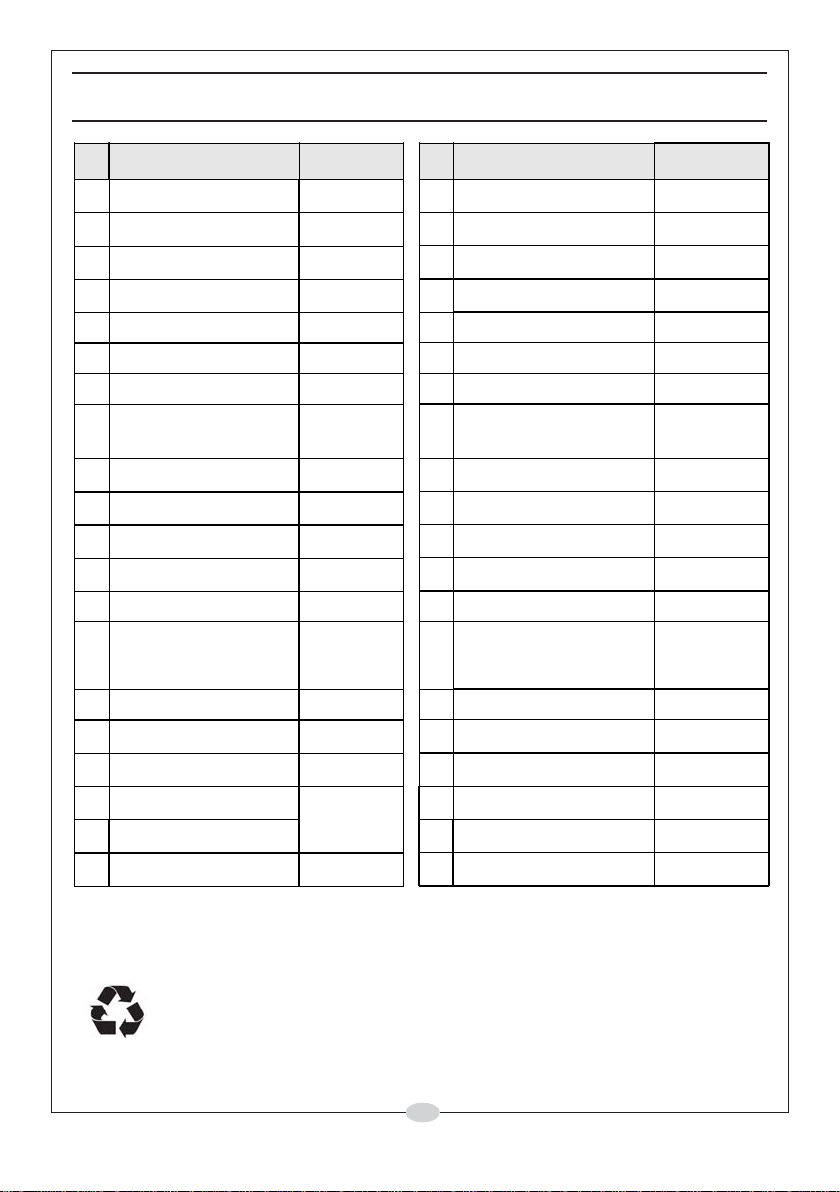
SPARE PARTS LIST
Ref Description Part No Ref Description Part No
Handle Assembly IDFC10901 21 Pipe Burner IDFCSF10921
1
2 Handle/Trigger Assy IDFK41102 22 Flat Burner IDFCSF10922
3 Control Knob Assy IDFC10903 23
4 Extension 80 mm IDFC10904 24 Soldering Iron IDFK10124
5 Extension 110 mm IDFC10805 25 Pipe Burner with extn IDFS55525
6 Extension 350 mm IDFC21606 26 Nozzle 14mm with extn IDFS55526
7 Extension 10 mm (kit) IDFS56007 27 Nozzle 22mm with extn IDFS55527
8 Extension 260 mm (kit) IDFS56008 28
9 Extension 600 mm (P) IDFKP41109 29 Clamp IDFKP41129
10 Hose 1500 mm IDFC10910 30
11 Hose 2000 mm IDFS55511 31
12 Hose 10,000 mm IDFC21612 32
13 Nozzle 9 mm IDFC10913 33 Open Wrench IDFK41133
14 Nozzle 12 mm IDFC10914 34 Metal sleeve to fit 17
15 Nozzle 15 mm IDFC10915 35 17mm Screw Tip Nozzle IDFC10935
16 Nozzle 25 mm IDFC10816 36 Hose 5000 mm IDFPLK107436
17 Nozzle 34 mm IDFC10817 37 Twin 60mm Burner IDFPLK107437
18 Nozzle 48 mm IDFC10818 38 Extension 500mm IDFPLK107438
19 Nozzle 58 mm IDFC21619 39 Fork Section IDFPLK107439
20 Nozzle Turbo 60 mm IDFKP41120
Soldering Iron Adaptor
Gas Regulator (new
style*)
Piezo Igniter (inc cable)
Extension Cover
Support Stand
mm screw-tip nozzle
item 35
IDFK10123
IDFS55528 *
IDFKP41130
IDFKP41131
IDFK41132
IDFC10934
ENVIRONMENTAL PROTECTION
Do not dispose of this product or its packaging with general household
waste. All tools, accessories and packaging contain valuable raw
materials and should be sorted, taken to a recycling centre and
disposed of appropriately.
7
Parts & Service: 020 8988 7400/E-mail:[email protected] or [email protected]
Page 8

 Loading...