

Page 1
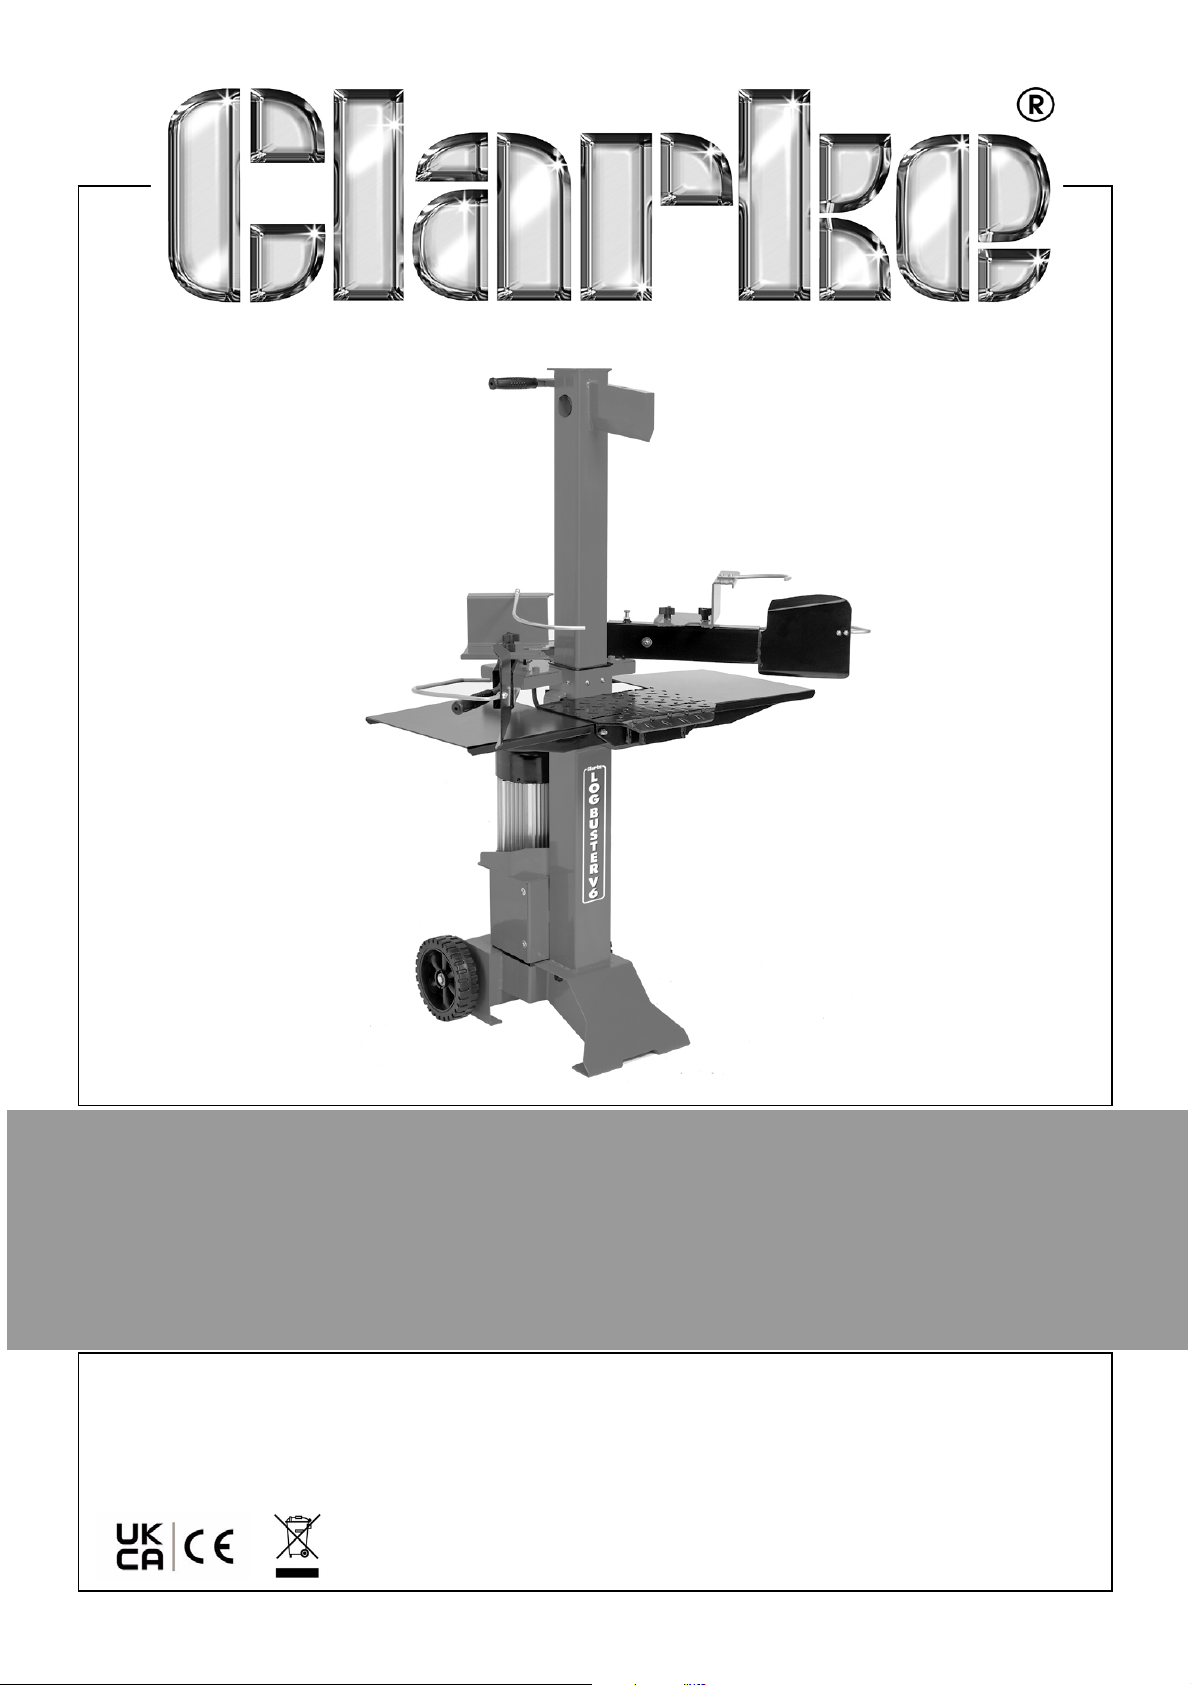
LOG SPLITTER
MODEL NO: LOGBUSTER V6
PART NO: 3402150
OPERATION & MAINTENANCE
INSTRUCTIONS
ORIGINAL INSTRUCTIONS DL0222 - Rev 3
Page 2
INTRODUCTION
Thank you for purchasing this Clarke product.
Before attempting to operate the machine, it is essential that you read this
manual thoroughly and carefully follow all instructions given. In doing so you
will ensure the safety of yourself and that of others around you, and you can
also look forward to the product giving you long and satisfactory service.
CAUTION: CAREFULLY READ THROUGH THIS ENTIRE OPERATOR'S
MANUAL BEFORE USING YOUR NEW LOG SPLITTER. TAKE SPECIAL CARE
TO HEED THE CAUTIONS AND WARNINGS.
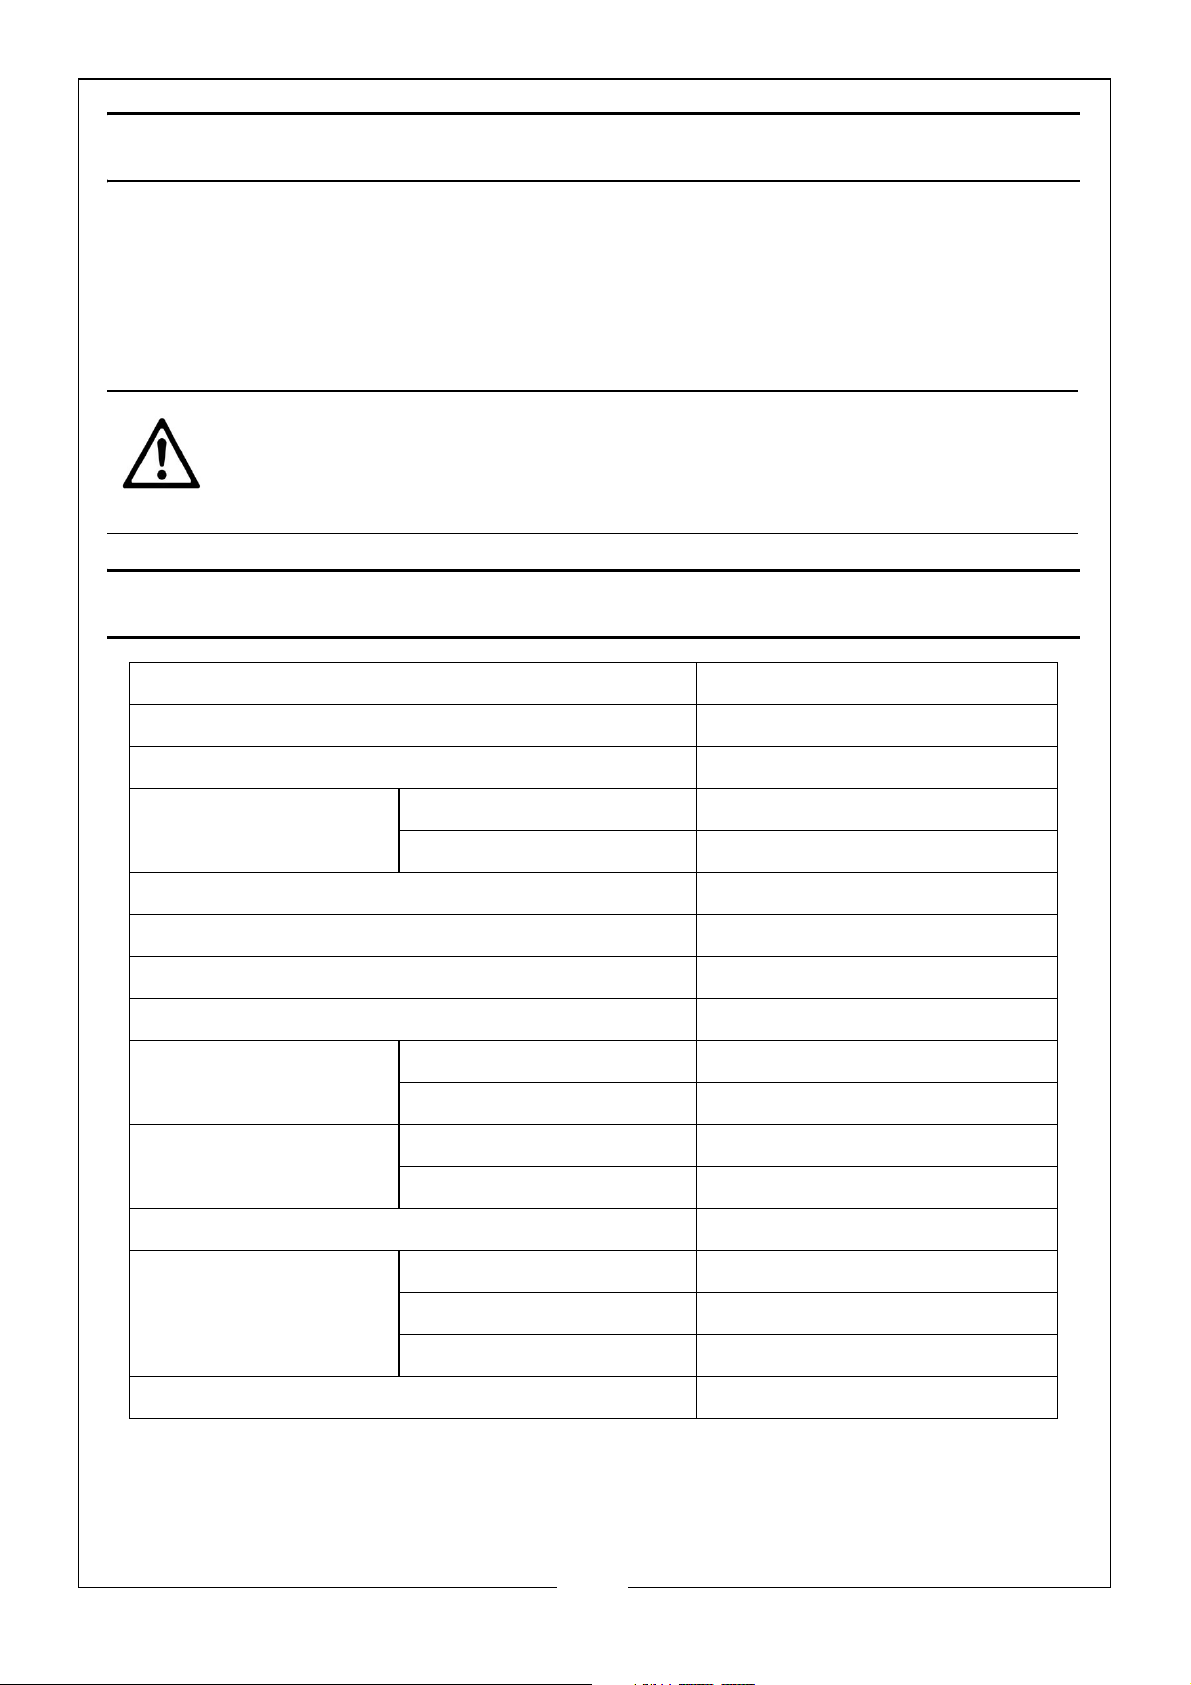
SPECIFICATIONS
Motor 230V @ 50Hz / 1 Ph
Input Wattage 3000W
Duty Cycle S6 40%*
Log Size Capacity Diameter 8-30 cm
Length 10-55 cm
Maximum Force 6000 kg
Hydraulic Pressure 21.6 Mpa
Hydraulic Oil Capacity 3.5 L
Ram Travel 49.5 cm
Speed Forward 3.6 cm/sec
Retract 16.5 cm/sec
Noise Pressure Level
(LpA)
Vibration <2.5 m/s²
Dimensions Length 84 cm
under no load; 78.8 dbA
under full load 89.8 dbA
Width 91.5 cm
Height 149.5 cm
Weight 98.2 kg
*This product is designed so that the motor may be run under load for an
accumulated period of 4 minutes only and off load for an accumulated
period of 6 minutes in any 10 minute period.
2
Page 3
SAFETY SYMBOLS
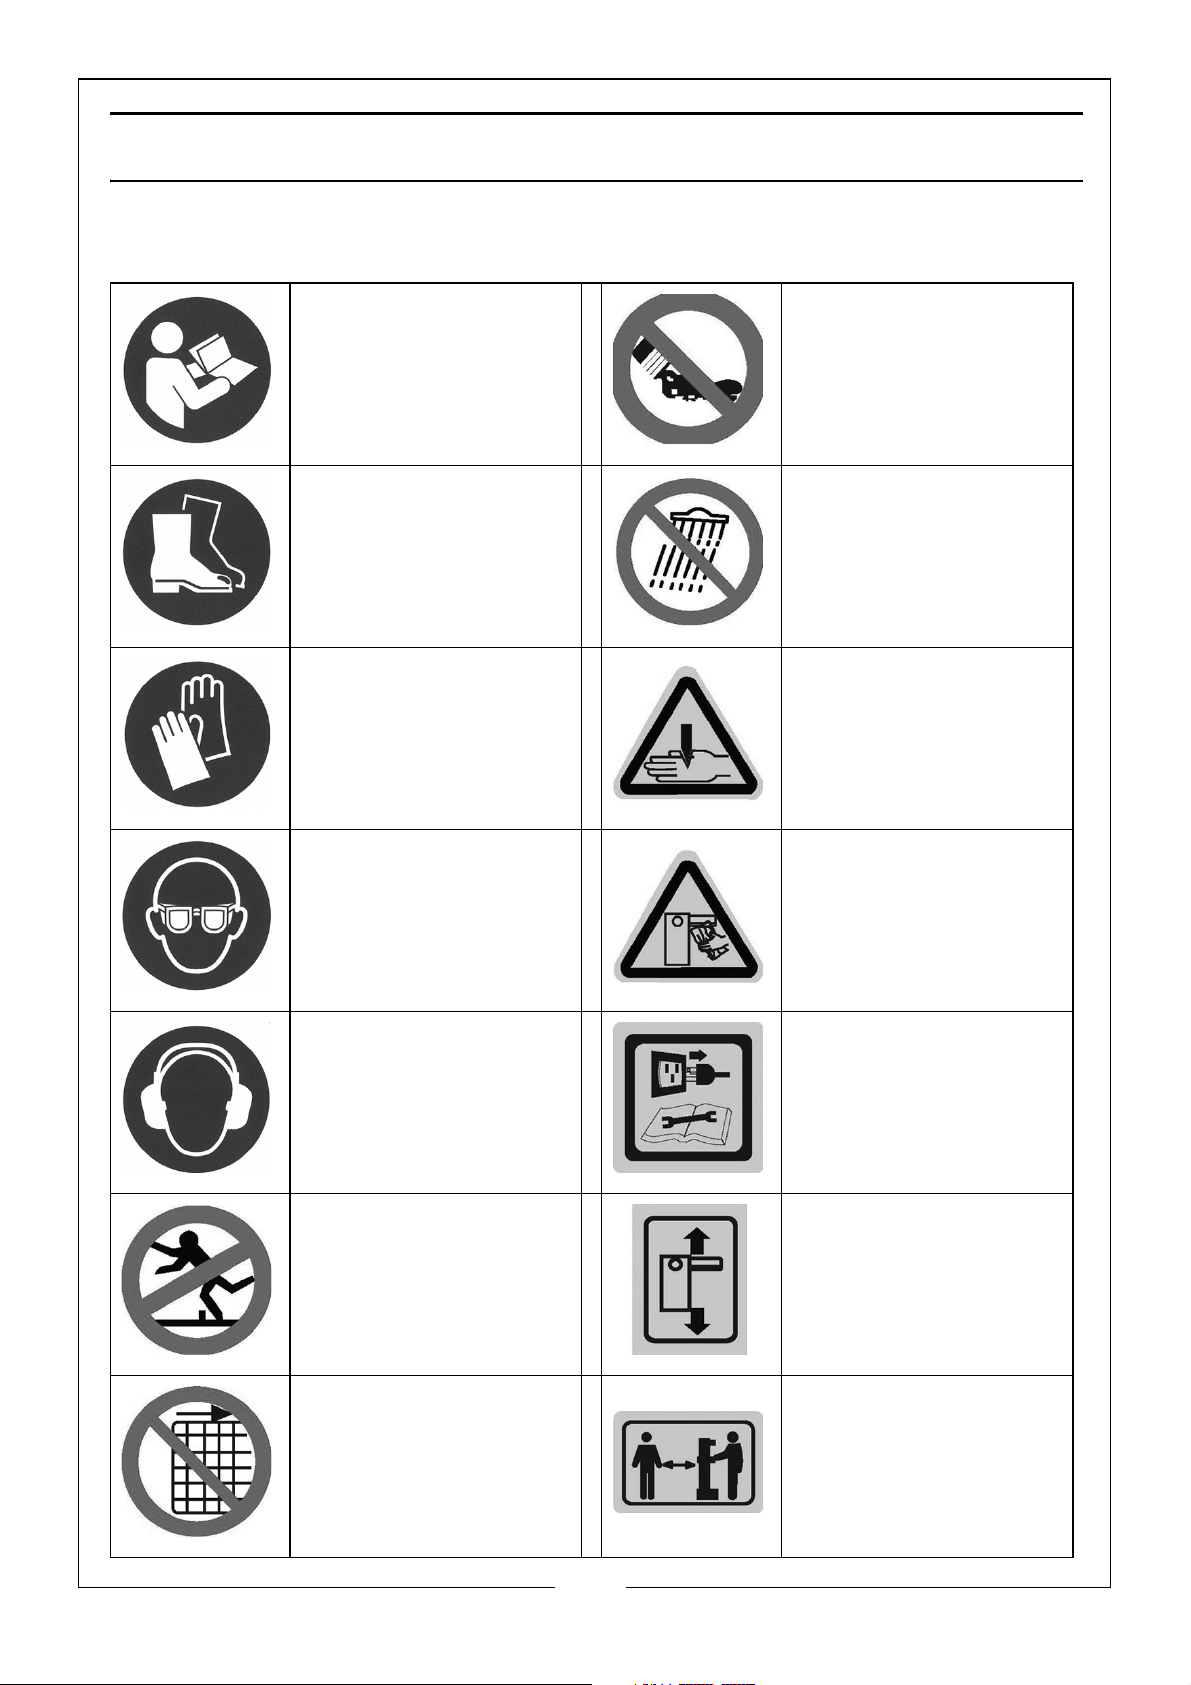
The following symbols represent important information about the product or
instructions on its use.
Read these
instructions in full
before using the
machine.
Wear safety footwear! Do not use in the rain.
Wear protective
gloves!
Wear eye protection!
Dispose of any used oil
in an environmentfriendly way.
Danger! Keep clear of
moving parts!
Do not remove
jammed logs with your
hands.
Wear hearing
protection!
Keep your work space
tidy! Untidiness may
result in accidents.
Do not remove or
tamper with any
protection or safety
device.
Before starting any
repair maintenance or
cleaning, always
disconnect the power.
Avoid injury from the
movement of the
splitting blade
Keep bystanders
away from the
working area.
3
Page 4

GENERAL SAFETY RULES
WARNING: READ ALL OF THESE INSTRUCTIONS. FAILURE TO FOLLOW ALL
INSTRUCTIONS LISTED BELOW MAY RESULT IN ELECTRIC SHOCK, FIRE AND/
OR SERIOUS INJURY. SAVE THESE INSTRUCTIONS FOR FUTURE REFERENCE.
WORK AREA
1. Keep the work area clean and well lit. Cluttered and dark areas invite
accidents.
2. Do not operate log splitters in explosive atmospheres, such as in the
presence of flammable liquids, gases or dust. Log splitters create sparks
which may ignite the dust or fumes.
3. Keep children and bystanders away while operating the log splitter.
Distractions can cause you to lose control.
4. The surface must be perfectly level to prevent the machine from moving
during operation.
ELECTRICAL SAFETY
1. The log splitters plug must match the outlet. Never modify the plug in any
way. Unmodified plugs and matching outlets will reduce risk of electric
shock.
2. Avoid body contact with earthed or grounded surfaces such as pipes,
radiators, ranges and refrigerators. There is an increased risk of electric
shock if your body is earthed or grounded.
3. Do not expose log splitters to rain or wet conditions. Water entering a log
splitter will increase the risk of electric shock.
4. Do not abuse the cord. Never use the cord for carrying, pulling or
unplugging the log splitter. Keep cord away from heat, oil, sharp edges or
moving parts. Damaged or entangled cords increase the risk of electric
shock.
5. When operating the log splitter outdoors, use an extension cord suitable for
outdoor use. Use of a cord suitable for outdoor use reduces the risk of
electric shock.
6. Do not leave the log splitter unattended when plugged in to the mains
supply
.
PERSONAL SAFETY
1. Stay alert, watch what you are doing and use common sense when
operating a log splitter. Do not use the log splitter while you are tired or
4
Page 5

under the influence of drugs, alcohol or medication. A moment of
inattention while operating log splitters may result in serious personal injury.
2. Use safety equipment. Always wear eye protection. Safety equipment such
as non-skid safety shoes, close fitting clothing and suitable work gloves
should always be used.
3. Avoid accidental starting. Ensure the switch is in the off position before
plugging in.
4. Do not overreach. Keep proper footing and balance at all times. This
enables better control of the log splitter in unexpected situations.
5. Dress properly. Do not wear loose clothing or jewellery. Keep your hair,
clothing and gloves away from moving parts. Loose clothes, jewellery or
long hair can be caught in moving parts.
USAGE AND CARE
1. Do not force the log splitter. It will do the job better and safer at the rate for
which it was designed.
2. Disconnect the plug from the power source before making any
adjustments, changing accessories, or storing the log splitter. Such
preventive safety measures reduce the risk of starting the log splitter
accidentally.
3. Store the log splitter out of the reach of children and do not allow persons
unfamiliar with log splitters or these instructions to operate the log splitter.
Log splitters are dangerous in the hands of untrained users.
4. Maintain the log splitter. Check for misalignment or binding of moving
parts, breakage of parts and any other condition that may affect the log
splitters operation. If damaged, have the log splitter repaired before use.
Many accidents are caused by poorly maintained power tools.
5. Keep cutting tools sharp and clean. Properly maintained cutting tools with
sharp cutting edges are less likely to bind and are easier to control.
SERVICING
1. Have your log splitter serviced by a qualified repair person using only
identical replacement parts. This will ensure that the safety of the log splitter
is maintained.
5
Page 6

LOG SPLITTER SPECIFIC WARNINGS
UNDERSTAND YOUR LOG SPLITTER
• Read and understand the owner's manual and labels affixed to the log
splitter. Learn its limitations as well as the specific potential hazards.
DRUGS, ALCOHOL AND MEDICATION
• Do not operate the log splitter while under the influence of drugs,
alcohol, or any medication that could affect your ability to use it
properly.
AVOID DANGEROUS WORKING CONDITIONS
• Always operate your log splitter on dry, solid, level ground. Never
operate your log splitter on slippery, wet, muddy, or icy surfaces. The
location you choose should be free from any tall grass, brush, or other
interferences.
• There should be plenty of room for handling.
• Keep your work area clean and well lit. Cluttered areas invite injuries. To
avoid tripping, do not leave tools, logs, or other components laying
around the work area.
• Do not use the log splitter in wet or damp areas or expose it to rain.
• Do not use it in areas where fumes from paint, solvents or flammable
liquids pose a potential hazard.
INSPECT YOUR LOG SPLITTER
• Check your log splitter before turning it on. Keep guards in place and in
working order.
• Replace damaged, missing or failed parts before using it.
• Make sure all nuts, bolts, screws, hydraulic fittings etc. are securely
tightened.
• Always check the oil level in the hydraulic oil tank.
• Never operate your log splitter when it is in need of repair or is in poor
mechanical condition.
6
Page 7

DRESS PROPERLY
• Do not wear loose clothing, gloves, neckties or jewelry (rings, wrist
watches). They can be caught in moving parts. Protective electrically
non-conductive gloves and non-skid footwear are recommended when
working. Wear protective hair covering to contain long hair, preventing it
from get caught in machinery.
PROTECT YOUR EYES AND FACE
• Any log splitter may throw foreign objects into the eyes. This can cause
permanent eye damage. Always wear safety goggles. Everyday
eyeglasses have only impact resistant lenses. They are not safety glasses.
EXTENSION CABLES
• Improper use of extension cables may cause inefficient operation of the
log splitter which can result in overheating.
• Be sure the extension cable is no longer than 10m and its section is no
2
less than 2.5mm
to allow sufficient current flow to the motor.
AVOID ELECTRIC SHOCK
• Check that the electric circuit is adequately protected and that it
corresponds with the power, voltage and frequency of the motor.
• Never open the switch / plug box. Should this be necessary, contact a
qualified electrician.
• Make sure your fingers do not touch the plug’s metal prongs when
plugging or unplugging the log splitter.
• Avoid excessive bending and twisting of the connection between the
power cord of the British plug and the junction box.
PREVENT FIRES
• Do not smoke or have open flames when operating or refilling the log
splitter with oil.
• Never operate the log splitter near a flame or spark. Oil is flammable.
7
Page 8

KEEP BYSTANDERS AWAY
• Allow only one person to load and operate the log splitter.
• Always keep bystanders, including visitors, children and pets away from
the work area, especially when the log splitter is in use.
• Only the operator should stand near the machine during use.
• Children should not be allowed to operate the machine.
• All operators should has the necessary training and skills to perform the
functions properly and safely.
INSPECT YOUR LOG
• Never attempt to split logs containing nails, wire or debris.
• Always make sure that both ends of the log you are splitting are cut as
square as possible. This will prevent the log from sliding out of position
while under pressure. Branches must be cut off flush with the trunk.
DON'T OVERREACH
• Keep proper footing and balance at all times.
• Never stand on the log splitter.
• Serious injury could occur if the machine tips over.
• Do not store anything above or near the log splitter where a person
might stand on the log splitter to reach it.
AVOID INJURY FROM AN UNEXPECTED ACCIDENT
• Do not straddle or reach across the splitting area when operating the
log splitter.
• Never pile logs to be split in a manner that will cause you to reach across
the log splitter.
• Only use your hands to operate the control levers. Never use your foot,
knee, a rope, or any other extension device.
• Always pay full attention to the movement of the wedge ram.
• Never attempt to load your log splitter while the ram is in motion.
• Keep hands out of the way of all moving parts.
• Never try to split two logs on top of each other. One of them may fly up
and hit you.
8
Page 9

PROTECT YOUR HANDS
• When the ram of the log splitter is in the return mode, keep your hands
off the machine – the log splitter is designed to automatically stop when
the cylinder is fully retracted.
• Keep your hands away from splits and cracks which open in the log.
They may close suddenly and crush or amputate your hands.
• Do not remove jammed logs with you hands.
DON'T FORCE THE TOOL
• It will do a better and safer job at its design rate.
• Don’t use log splitter for a purpose for which it was not intended.
• Do not, under any circumstances, alter your log splitter. This equipment
was designed and engineered to be used in accordance with the
operating instructions. Altering the equipment, or using the equipment in
such a way as to circumvent its design capabilities and capacities,
could result in serious or fatal injury and will void the warranty.
• Never try to split logs larger than those indicated in the specifications
table on page 10. This is dangerous and may damage the machine.
NEVER LEAVE LOG SPLITTER RUNNING UNATTENDED
• Don't leave log splitter until it has come to a complete stop
DISCONNECT THE POWER
• Unplug when not in use, before making adjustments, cleaning, or
working on the log splitter.
MAINTAIN YOUR LOG SPLITTER WITH CARE
• Always clean the log splitter after each use.
• Keep the log splitter clean and free from debris for best and safest
performance.
• Control levers and the power switch must be kept clean, dry and free
from oil and grease at all times.
PROTECT THE ENVIRONMENT
• Take any used oil to an authorized collection point. Do not discharge
into drains, soil or water.
MAKE THE WORKSHOP CHILDPROOF
• Lock the workshop. Store the log splitter away from children and others
not qualified to use it.
9
Page 10

SPECIAL WARNINGS & INSTRUCTIONS
The splitting operation of the machine is designed to be activated by one
person. While there is the possibility that additional operators could be working
with the machine (e.g. for loading and unloading), only one operator should
perform splitting operations:
• Never attempt to remove a log which has got stuck on the wedge by
hand. Lower the wedge until the log is completely split.
• If a log becomes stuck on the wedge at the bottom position, press the
handle with one hand and turn off the machine with the other hand.
Slightly knock the log by hammer to free it.
10
Page 11
ELECTRICAL CONNECTIONS
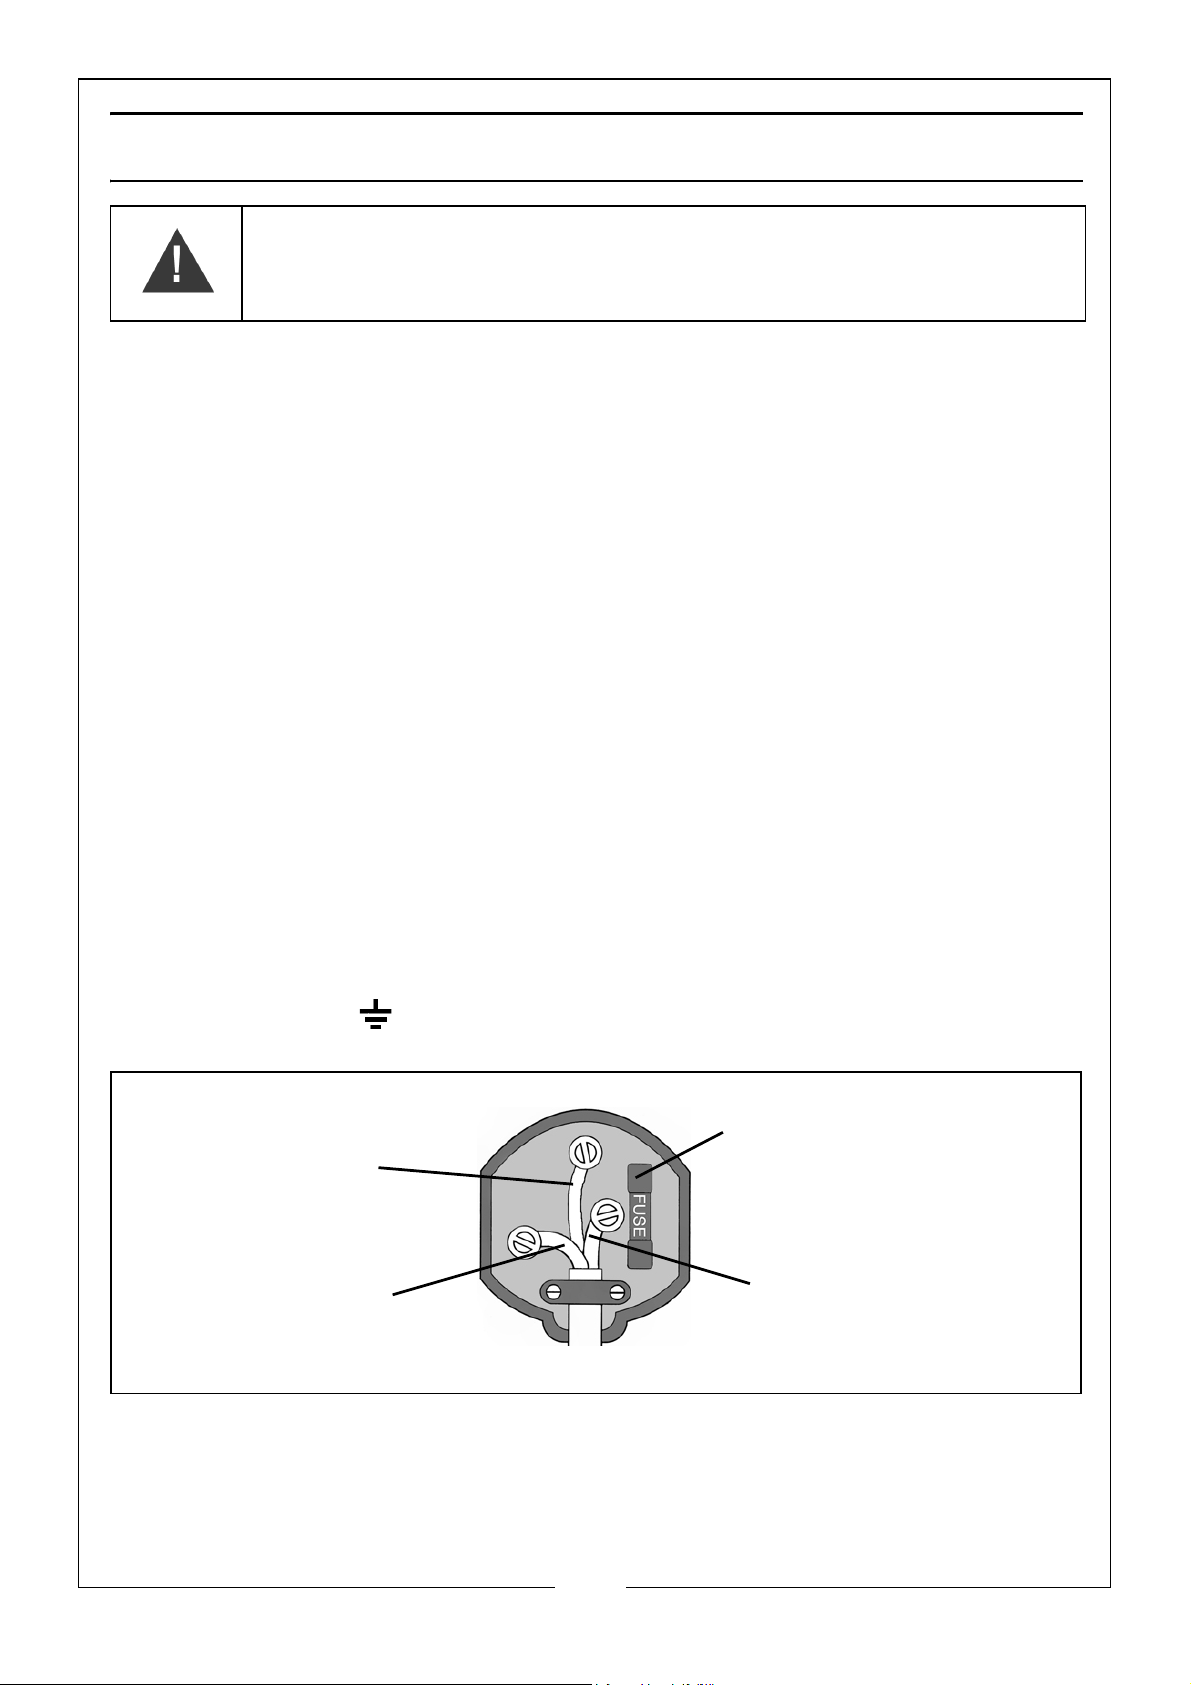
Plug must be BS1363/A approved.
Always fit a 13 Amp fuse.
Ensure that the outer sheath of the cable is firmly held by the clamp
Neutral
(Blue)
Live
(Brown)
Earth
(Green and Yellow)
WARNING! READ THESE ELECTRICAL SAFETY INSTRUCTIONS
THOROUGHLY BEFORE CONNECTING THE PRODUCT TO THE
MAINS SUPPLY.
Before switching the product on, make sure that the voltage of your electricity
supply is the same as that indicated on the rating plate. This product is
designed to operate on 230VAC 50Hz. Connecting it to any other power
source may cause damage.
This product may be fitted with a non-rewireable plug. If it is necessary to
change the fuse in the plug, the fuse cover must be refitted. If the fuse cover
becomes lost or damaged, the plug must not be used until a suitable
replacement is obtained.
If the plug has to be changed because it is not suitable for your socket, or due
to damage, it should be cut off and a replacement fitted, following the wiring
instructions shown below. The old plug must be disposed of safely, as insertion
into a mains socket could cause an electrical hazard
.
If the colours of the wires in the power cable of this product do not correspond
with the markings on the terminals of your plug, proceed as follows.
•The Blue wire must be connected to the terminal marked N or
coloured Black.
•The Brown wire must be connected to the terminal marked L or
coloured Red.
•The Yellow and Green wire must be connected to the terminal
marked E or or coloured Green
.
We strongly recommend that this machine is connected to the mains supply
via a Residual Current Device (RCD). If in any doubt, consult a qualified
electrician. DO NOT attempt any repairs yourself.
11
Page 12
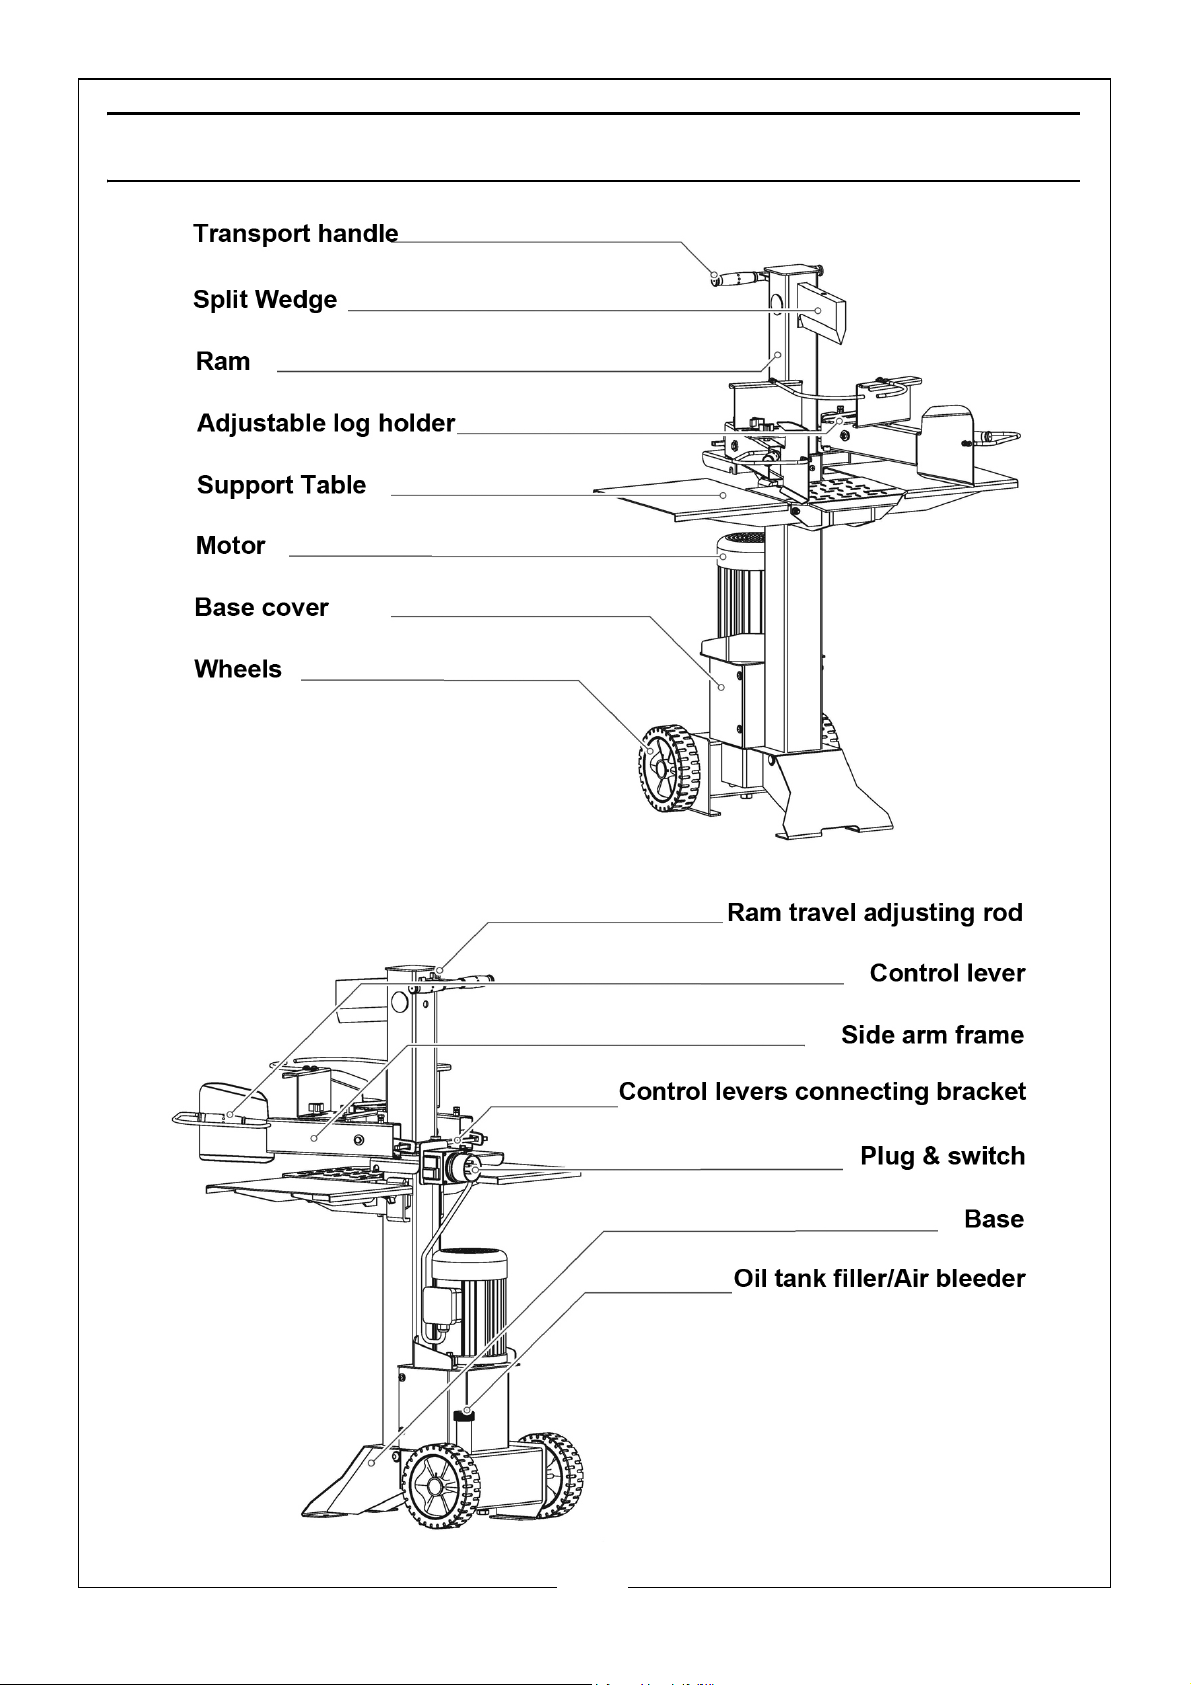
KNOW YOUR MACHINE
12
Page 13
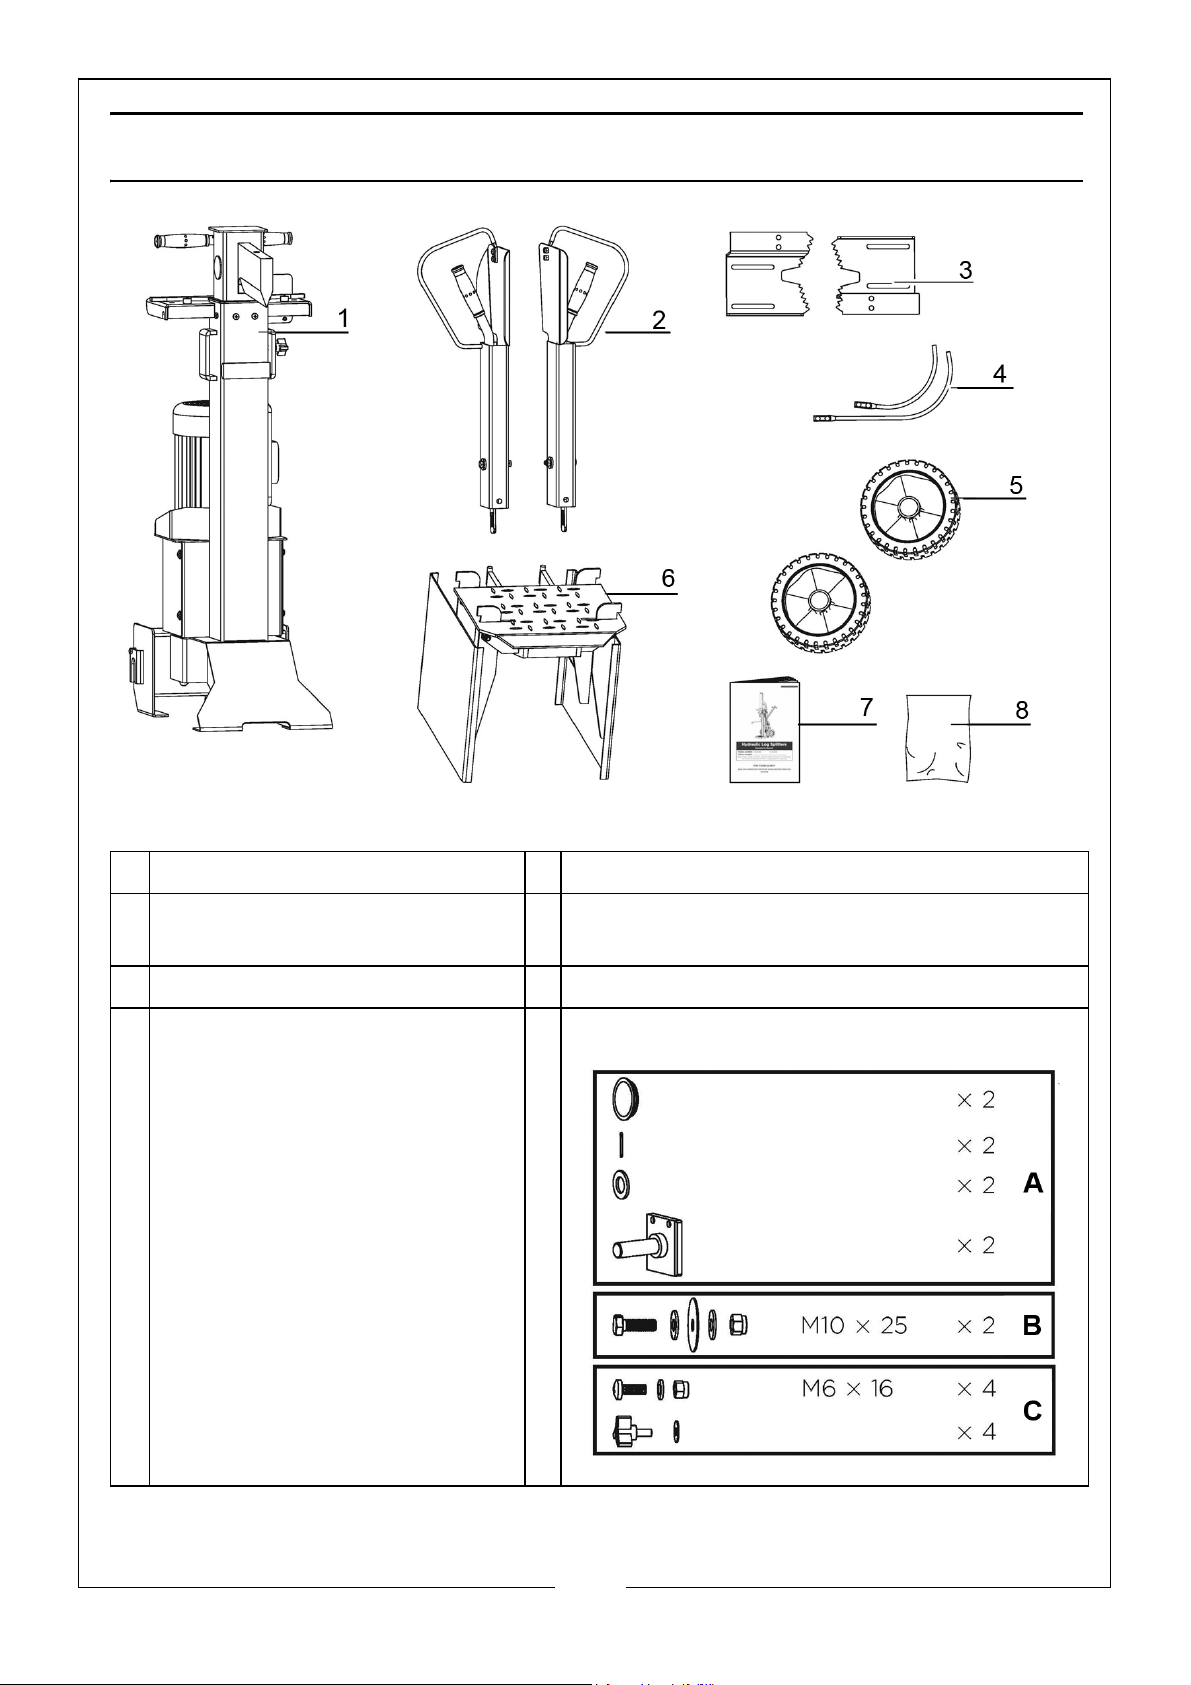
CONTENTS OF THE BOXES
1 Log splitter frame 5 Wheels (1 Pair)
2Control Lever and Guard
Assembly (1 Pair)
3 Adjustable Log Holder (1 Pair) 7 Operating manual
4 Retainer 1 and 2 8
6 Support Table
Hardware Bag, containing
13
Page 14
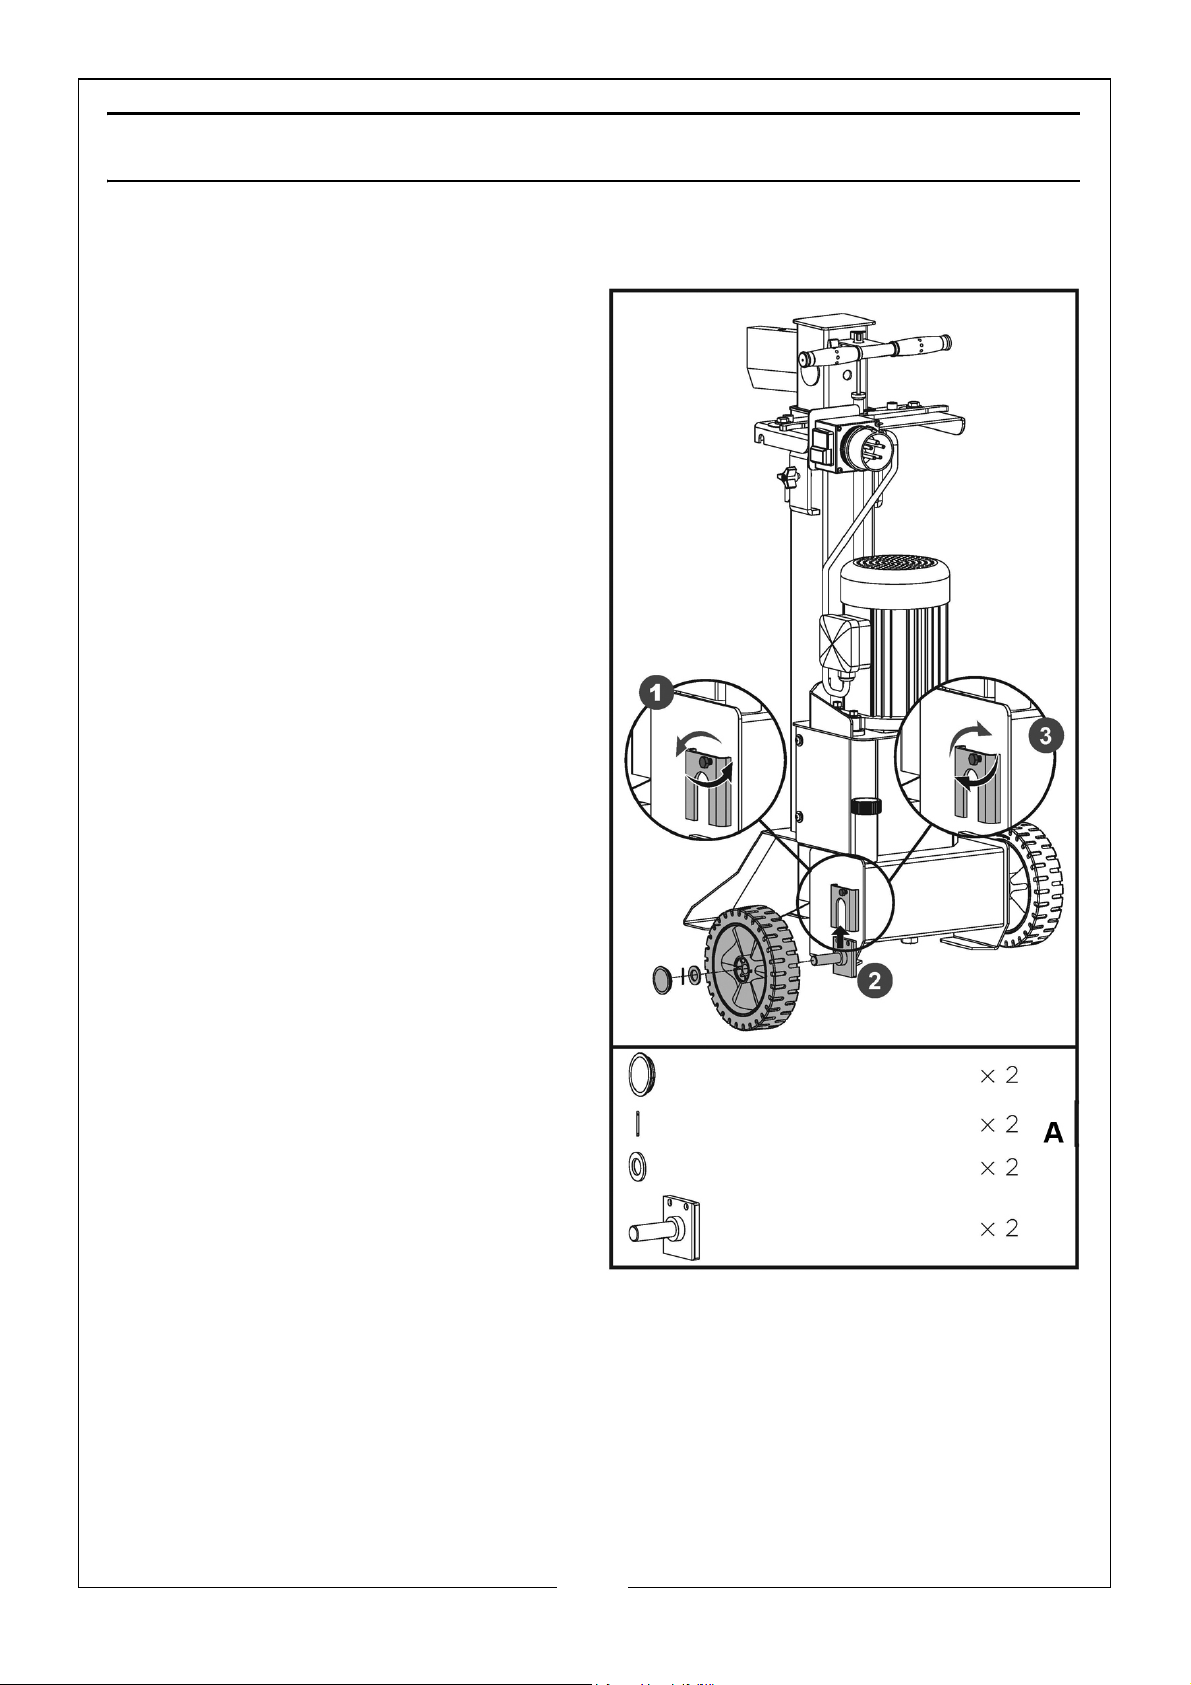
ASSEMBLY
WHEELS
1. Loosen the bolt on the axle
mounting bracket by turning it
counterclockwise, until the axle
can be inserted into the bracket.
2. Insert the axle into the mount
bracket.
3. Tighten the bolt in the mounting
bracket to secure the axle.
4. Slide the wheel on to the axle and
secure in position with a washer
and split pin from outside. spread
the split pin prongs in opposite
directions.
5. Put on the wheel cap.
6. Repeat the same steps to install
the wheel at the other side.
14
Page 15
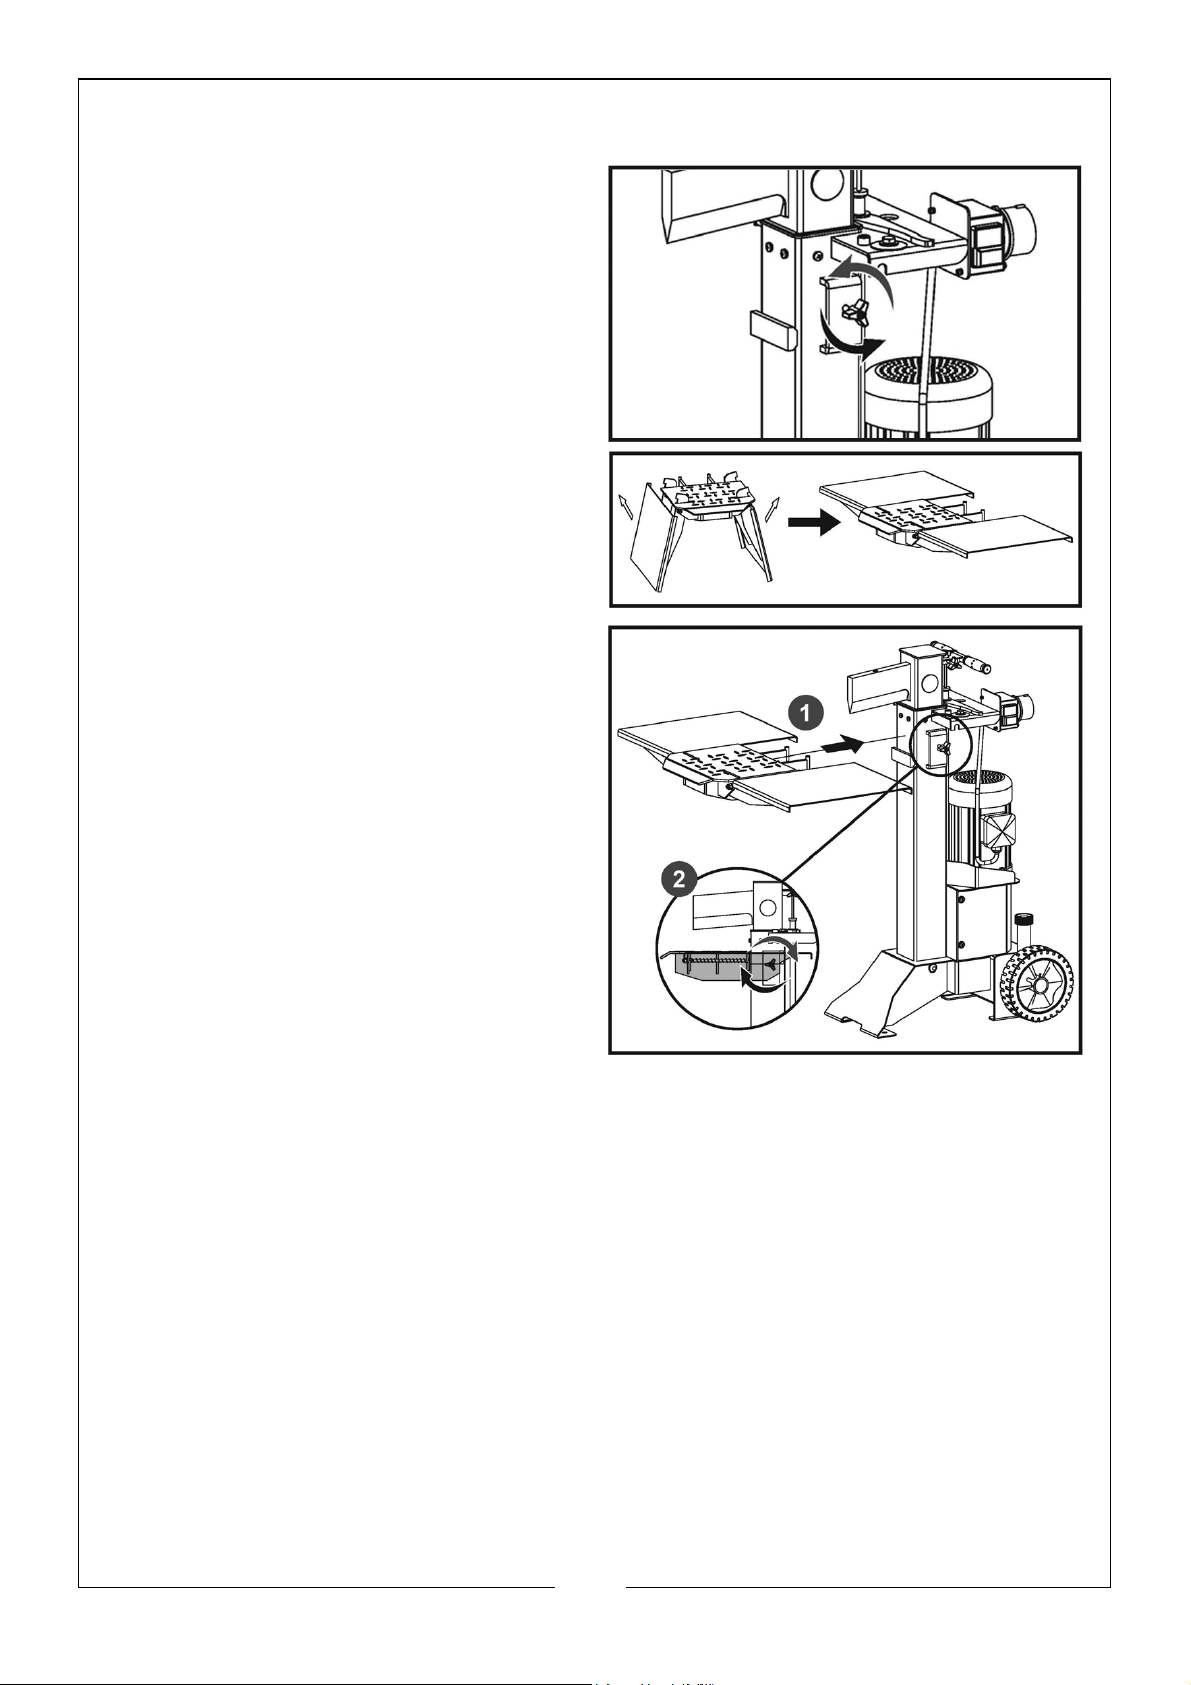
SUPPORT TABLE
1. Loosen the star knob on the
mounting bracket by turning it
counterclockwise.
2. Unfold the log support table, so
that the three parts of it are level.
3. Insert the hooks of the log support
table into the mounting brackets.
4. Tighten the star knob to secure
the table.
15
Page 16
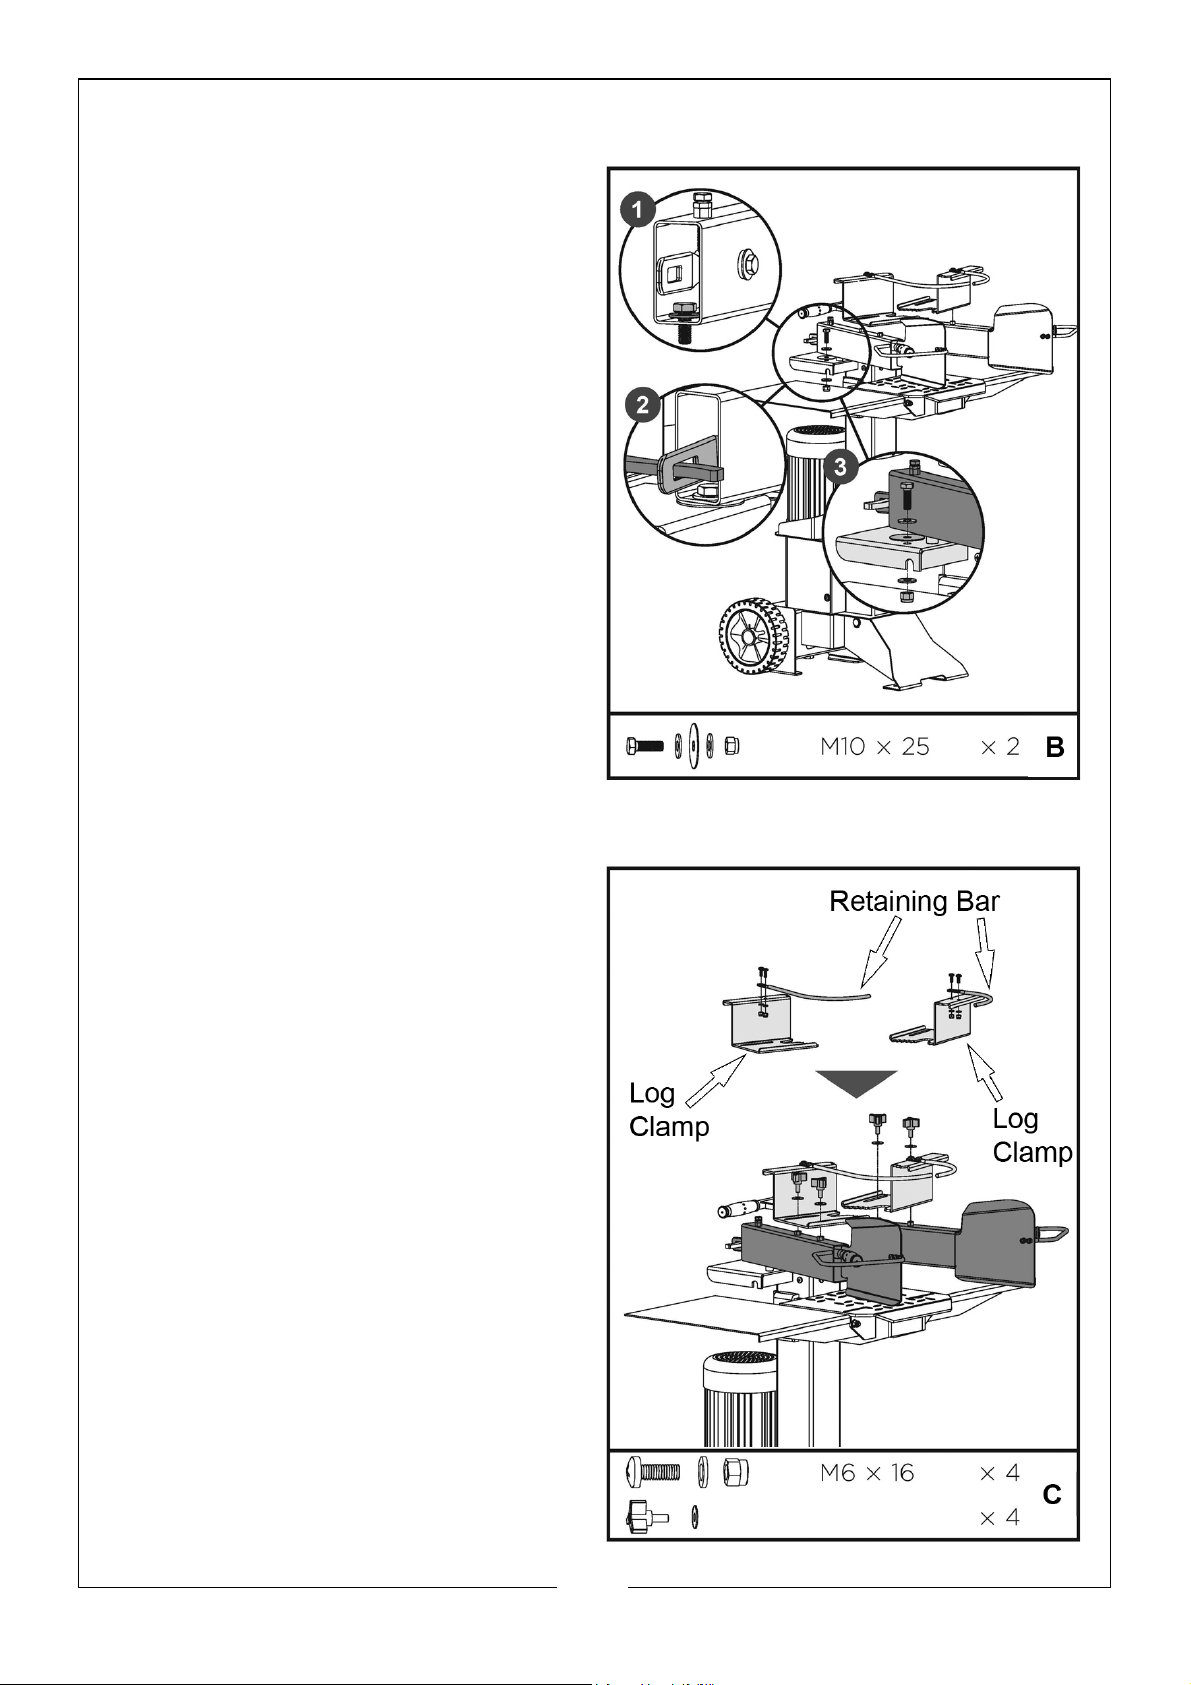
CONTROL LEVER
1. Insert an M10 bolt with a washer
through the hole in the side arm
(1).
2. Pass the control lever through the
slot in the control handle (2).
3. Position a large washer between
the side arm and the main frame.
• This will act as a bearing.
4. Secure the side arm assembly to
the frame with an M10 nut &
washer (3).
• Do not overtighten.
5. Check the side arm assembly for
free movement and repeat the
installation with the opposite side
arm assembly.
ADJUSTABLE LOG HOLDER
1. Secure the retaining bars to the
log holder with the M6x16 bolts,
nuts and washers.
• Ensure the direction of the
retaining bars are as shown in
the picture.
2. Fix the log holders to the side arm
frame with the star knobs and
washers.
16
Page 17
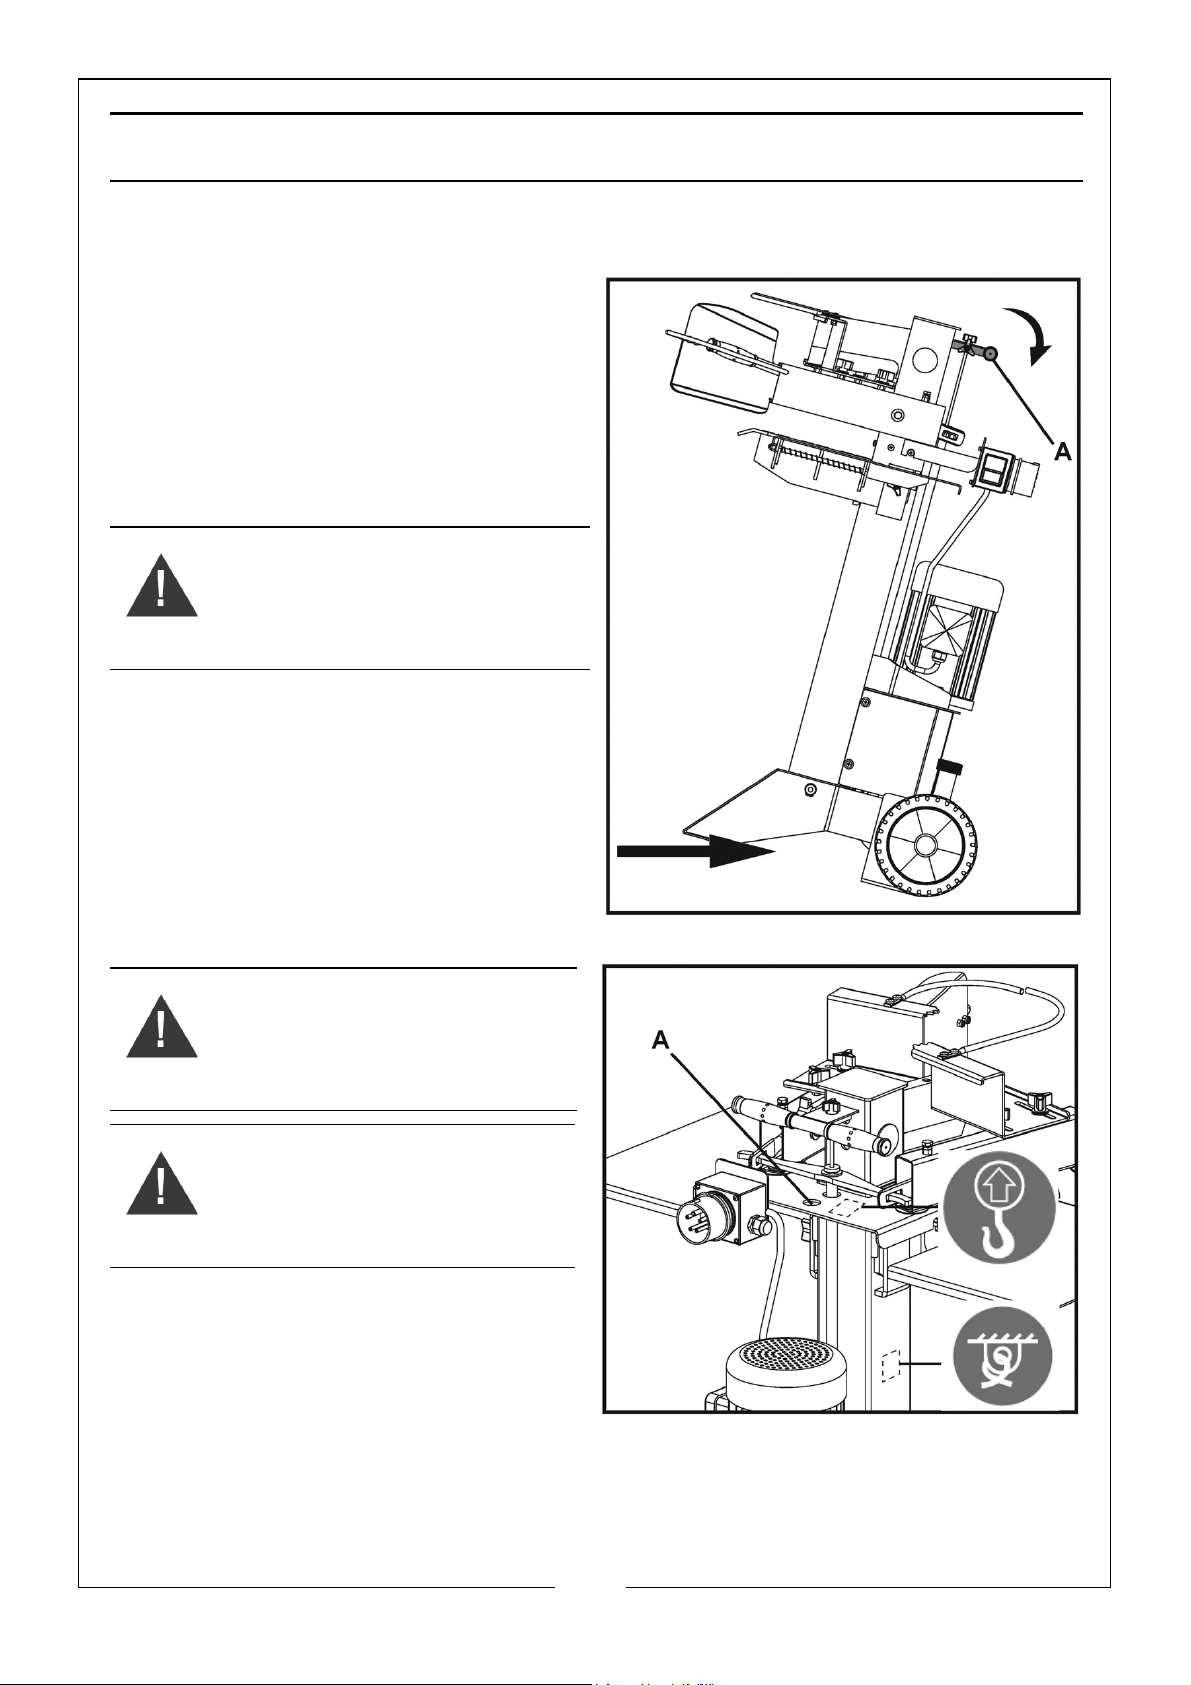
TRANSPORT
MOVING BY HAND
To move the log splitter to the work
site.
1. Hold the handle (A) and tilt the
log splitter back slightly onto the
wheels.
• Make sure the oil filler cap is
tight.
WARNING: THE LOG SPLITTER IS
VERY HEAVY, TAKE CARE WHEN
MOVING IT TO A NEW
LOCATION.
LIFTING WITH A CRANE
WARNING: IF USING A CRANE,
ATTACH A HOIST SLING AT
LIFTING POINT (A).
WARNING: FOR LONG
DISTANCE TRANSPORT,
SECURE THE LOG SPLITTER TO
PREVENT MOVEMENT.
17
Page 18
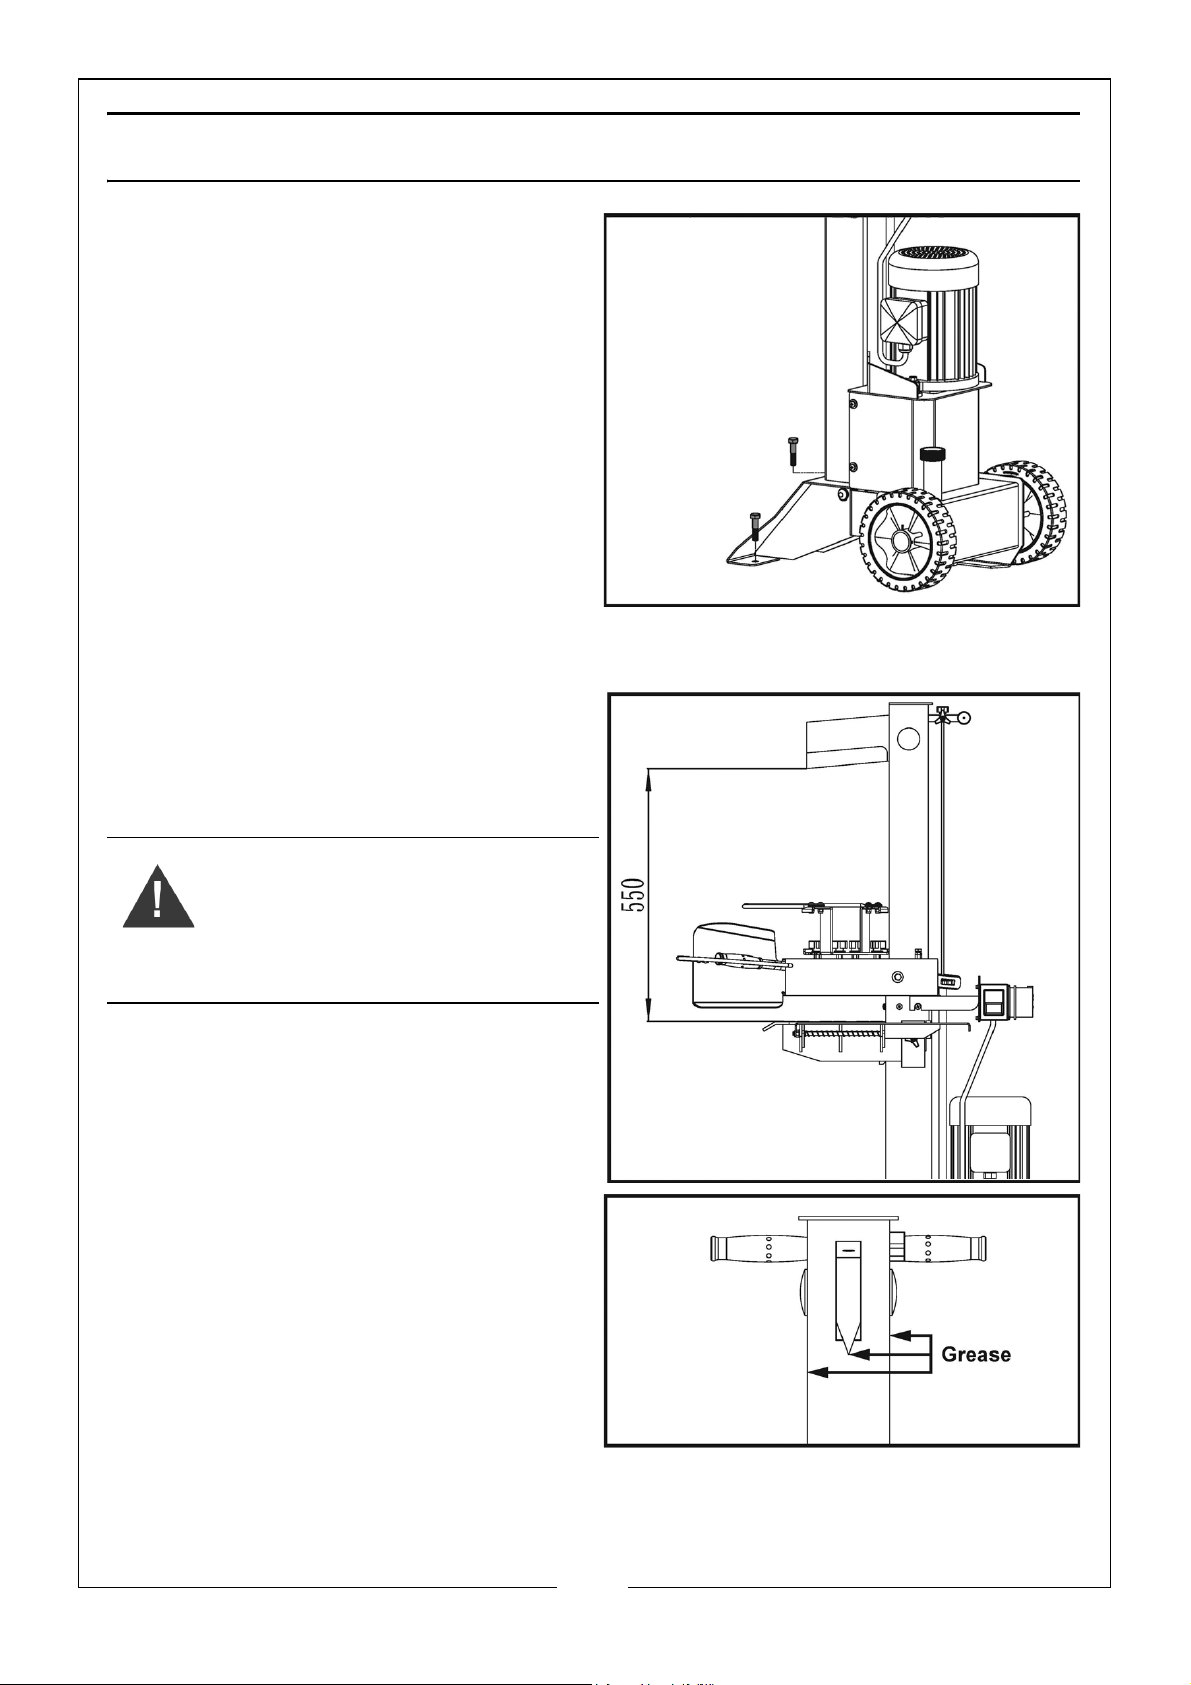
SPLITTER OPERATION
Before operation, attach the
machine to a level floor using M10
hold down bolts (not supplied).
1. Plan your work site.
• Work safely and save effort by
planning your work before
hand.
• Have your logs positioned
where they can be easily
reached.
• Have a site ready to stack the
split wood or load it onto a
nearby truck or other carrier.
2. Prepare the logs for splitting.
• This splitter will split logs up to
550mm in length and 300mm in
diameter.
WARNING: DO NOT TRY TO SPLIT
GREEN LOGS. DRY, SEASONED
LOGS SPLIT MUCH MORE EASILY
AND WILL NOT JAM AS
FREQUENTLY AS GREEN WOOD.
3. Apply a thin layer of grease to the
surfaces of the ram before
operation.
• This will increase the durability
of the ram.
4. Route the power cable in a way
that safeguards against tripping
on or damaging the cable, during
the work session. Protect the
power cable from impact, pulling, or contact with corrosive materials.
18
Page 19
5. Loosen the oil filler cap a few turns before use to allow air into the oil tank
during use.
• Retighten the oil filler cap when you have finished using or moving the
log splitter.
6. While operating under extremely low temperature, keep the log splitter
running under no load for 15 minutes to preheat the hydraulic oil.
7. Before initial operation, make sure the two-handed operation is functioning
correctly by:
• (1) Lower both control levers. Make sure that the splitting wedge lowers
to approx 5cm above the highest table position.
• (2) Release one of the levers. Confirm that the splitting wedge remains in
its current position.
• (3) Release both levers. The ram must rise to the highest position
automatically.
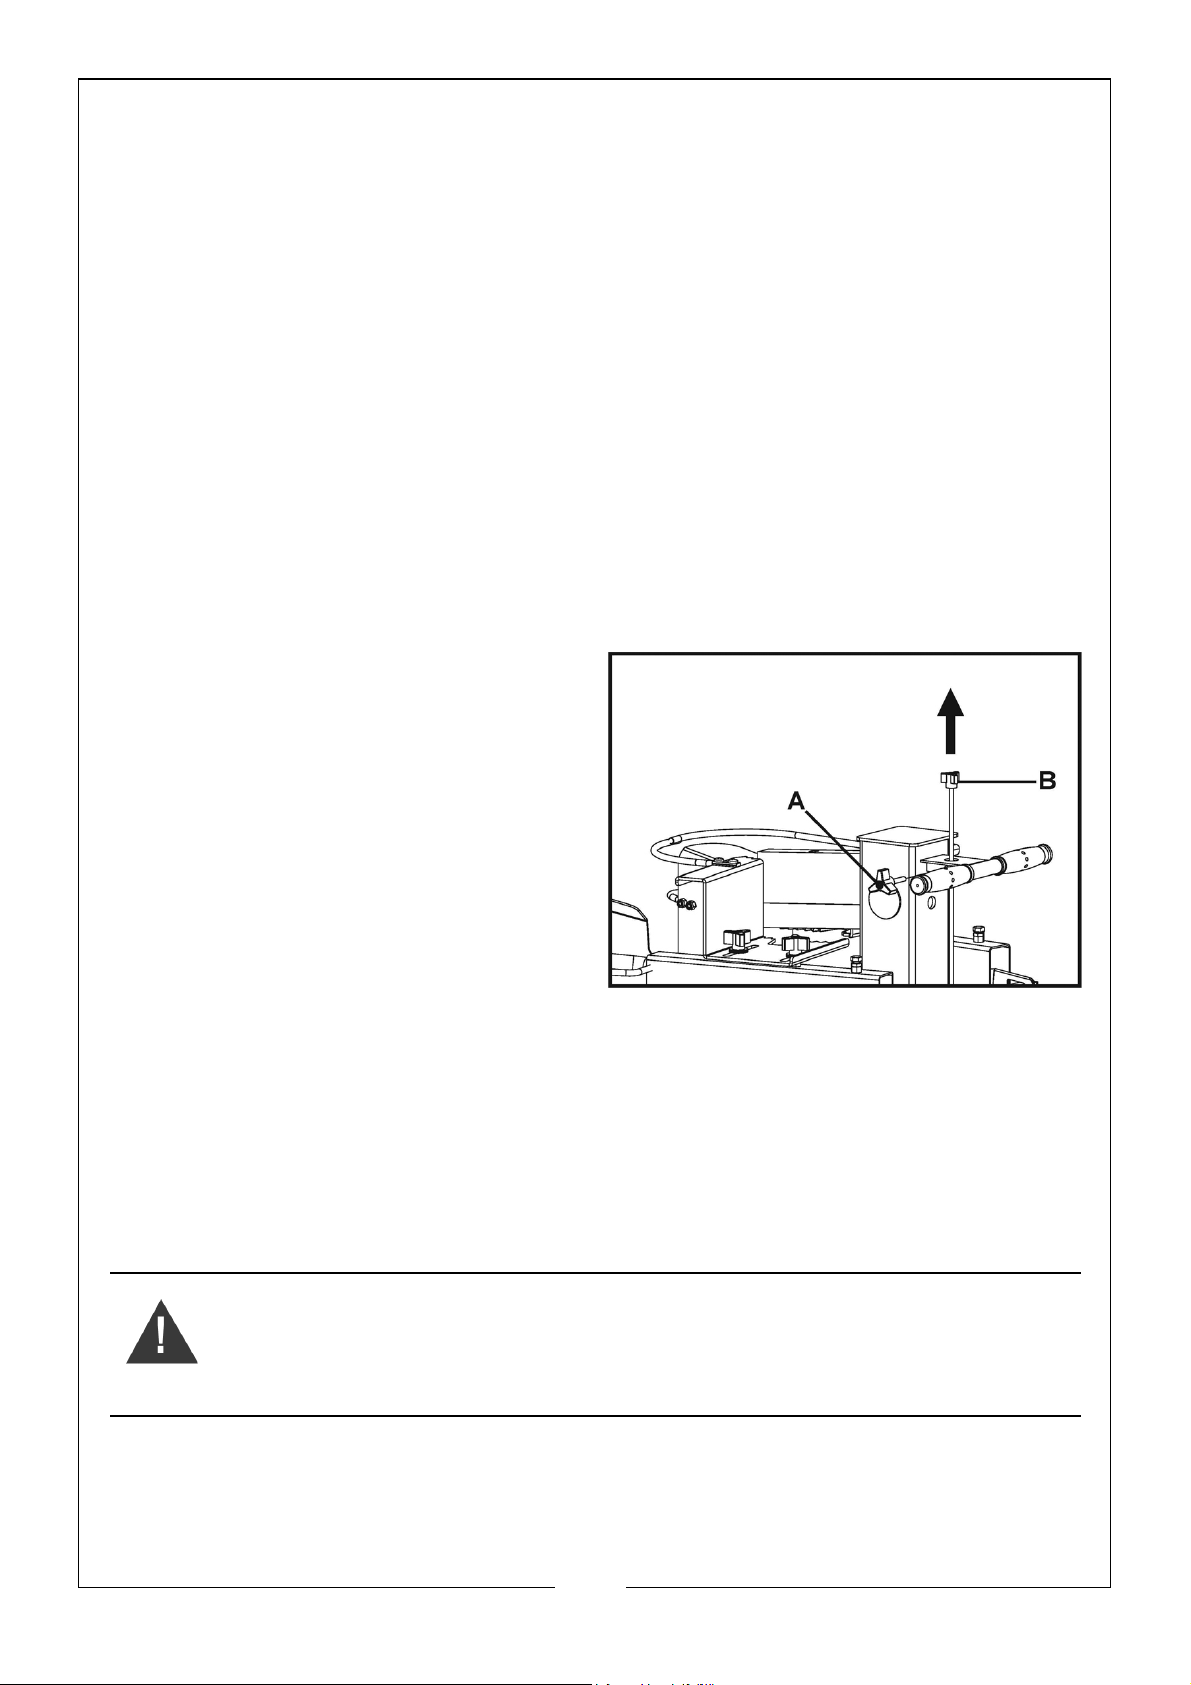
8. To set the ram stroke take the
following steps:
• (1) Move splitting wedge to the
desired position. The upper
position of the ram wedge
travel must be about 3~5cm
over the logs to be split.
• (2) Release one of the control
levers.
• (3) Release the star knob (A).
Raise the adjusting rod (B) until
it is stopped by the spring inside. Tighten the star knob (A).
• (4) Release both control levers.
• (5) Check upper position of splitting wedge.
9. Put the log onto the support table vertically. Make sure that the wedge
and support table touch the log squarely on the ends. Never try to split a
log at an angle.
WARNING: ALWAYS SPLIT LOGS LENGTHWAYS. DO NOT PLACE A LOG
ACROSS THE LOG SPLITTER FOR SPLITTING. IT CAN BE DANGEROUS AND
CAN SERIOUSLY DAMAGE THE MACHINE.
19
Page 20
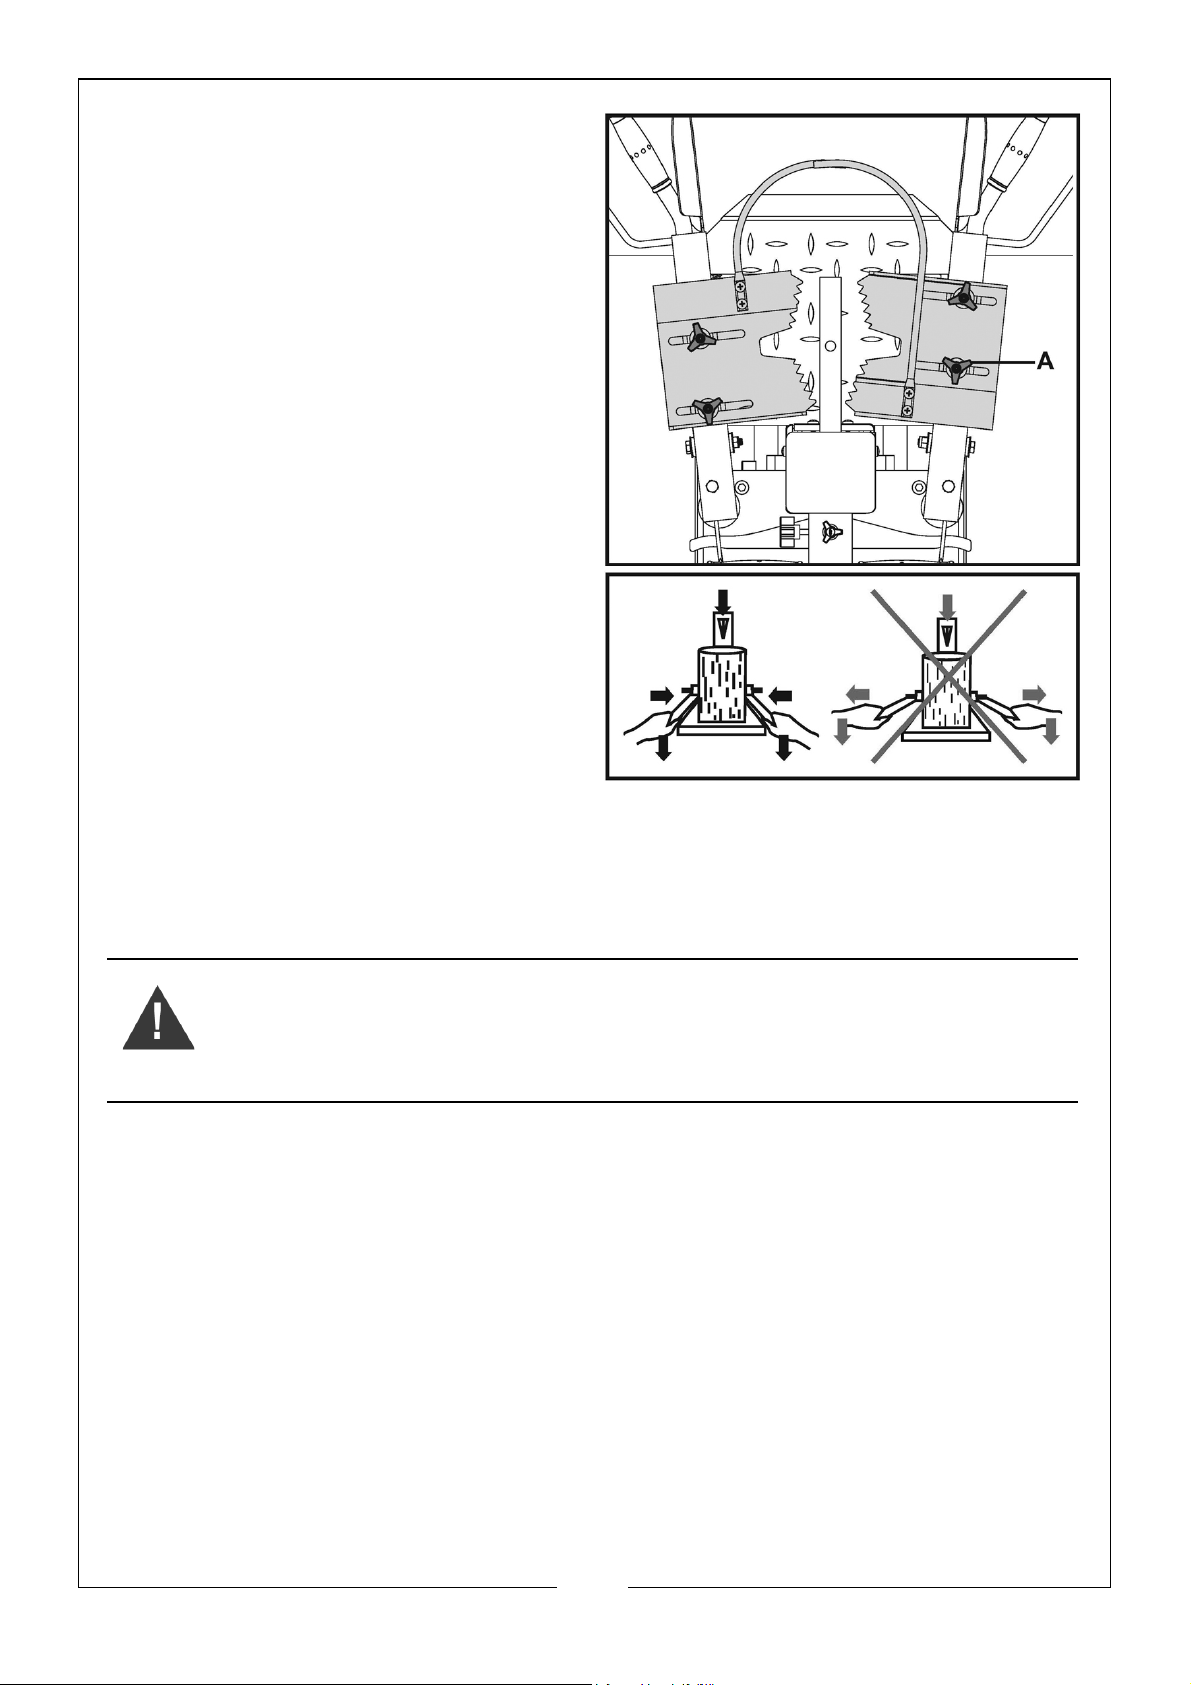
10. Adjust the log holders (A)
according to the diameter of the
log to obtain most comfortable
control lever angle.
11. Hold the log with log holders
Lower the levers to start the
splitting.
• Releasing either lever stops the
motion of the splitting wedge.
• Release both handles to return
the splitting wedge to the
upper position.
12. Stack the split logs as you work. This will provide a safer work area, by
keeping it uncluttered and avoiding the danger of tripping or damaging
the power cable.
WARNING: ACCUMULATED SPLIT WOOD AND WOOD CHIPS CAN CREATE
A HAZARDOUS WORK ENVIRONMENT. NEVER CONTINUE TO WORK IN A
CLUTTERED WORK AREA WHICH MAY CAUSE YOU TO SLIP, TRIP OR FALL.
20
Page 21
MAINTENANCE
WARNING: MAKE SURE THAT THE LOG SPLITTER IS SWITCHED OFF AND
DISCONNECTED FROM THE MAINS SUPPLY BEFORE STARTING ANY
CLEANING OR MAINTENANCE PROCEDURES.
THE HYDRAULIC SYSTEM
• Low oil levels can damage the oil pump.
• The oil should be completely changed once a year.
• Make sure that no dirt or debris finds its way into the oil tank.
• Collect used oil and recycle responsibly.
• Following an oil change, activate the log splitter a few times without
actually splitting.
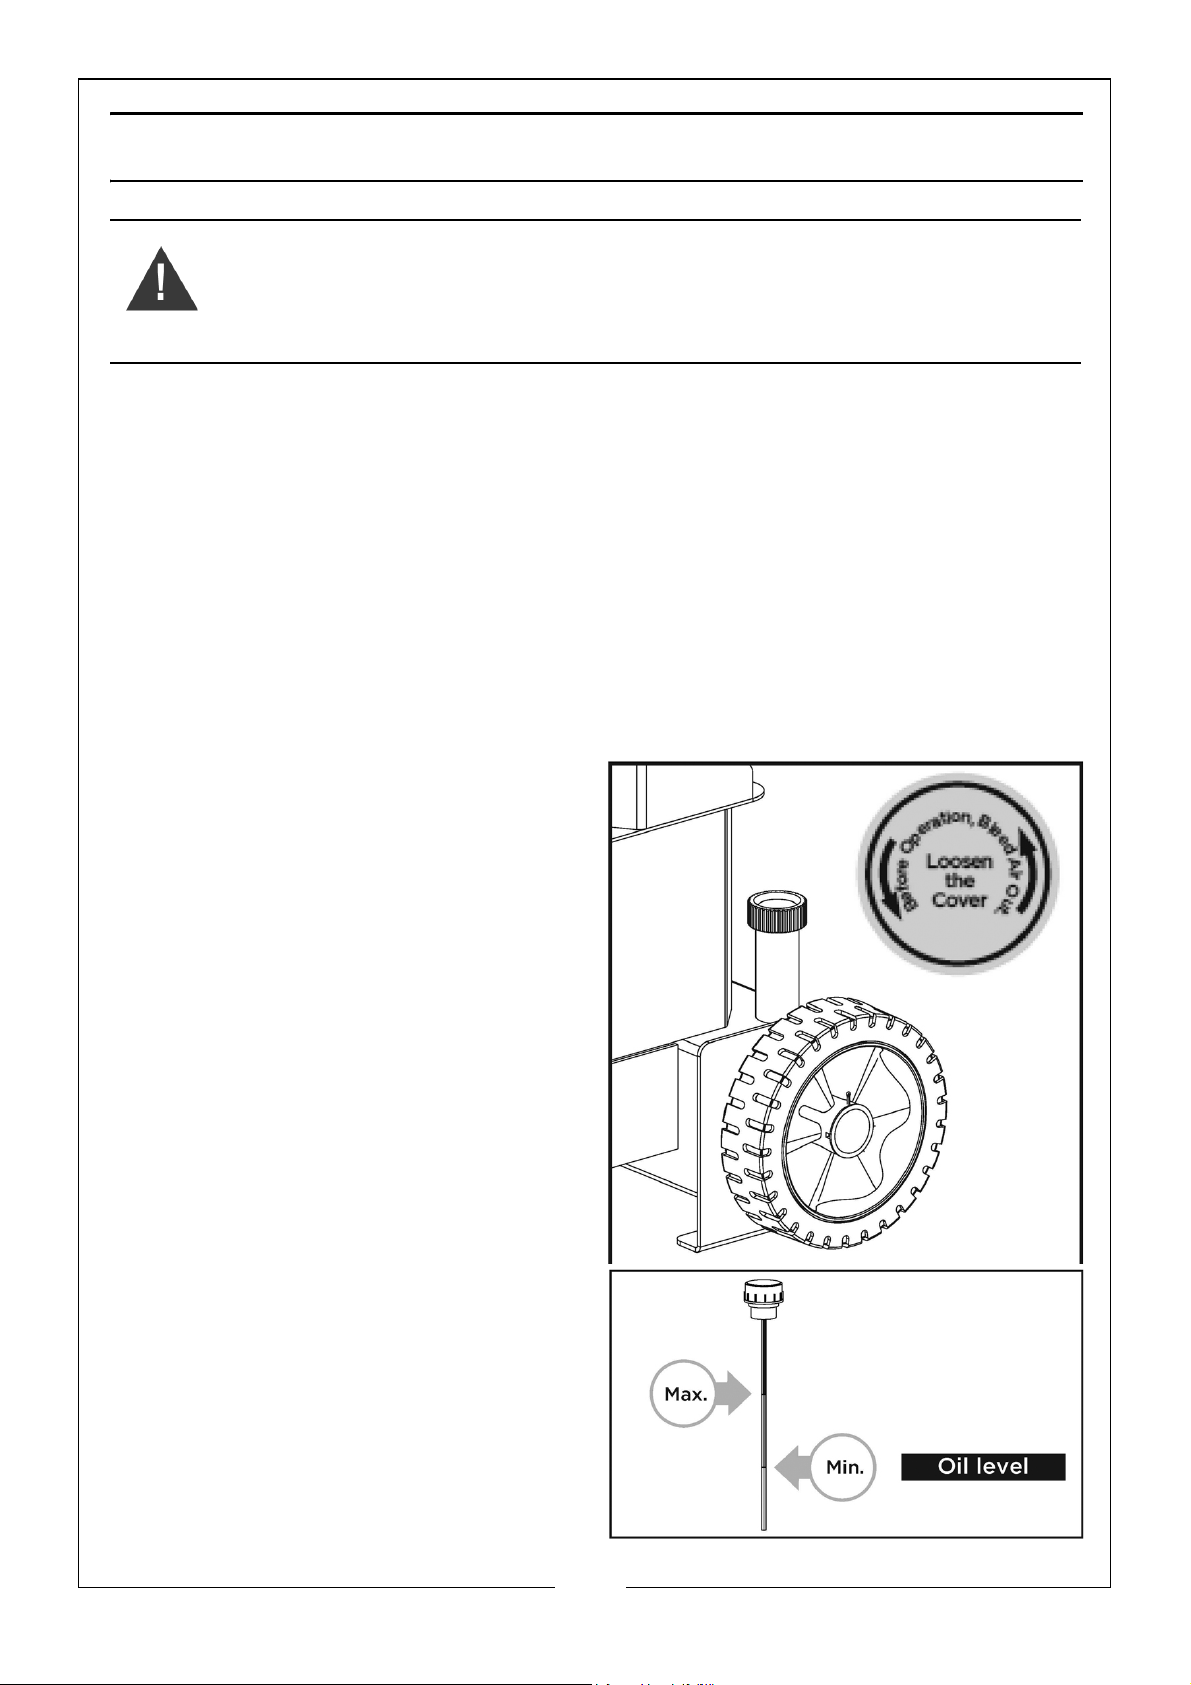
REPLACING HYDRAULIC OIL
1. Remove the oil filler cap.
2. Check the oil level with the
dipstick.
• Oil level should be between the
min and max marks on the
dipstick.
21
Page 22
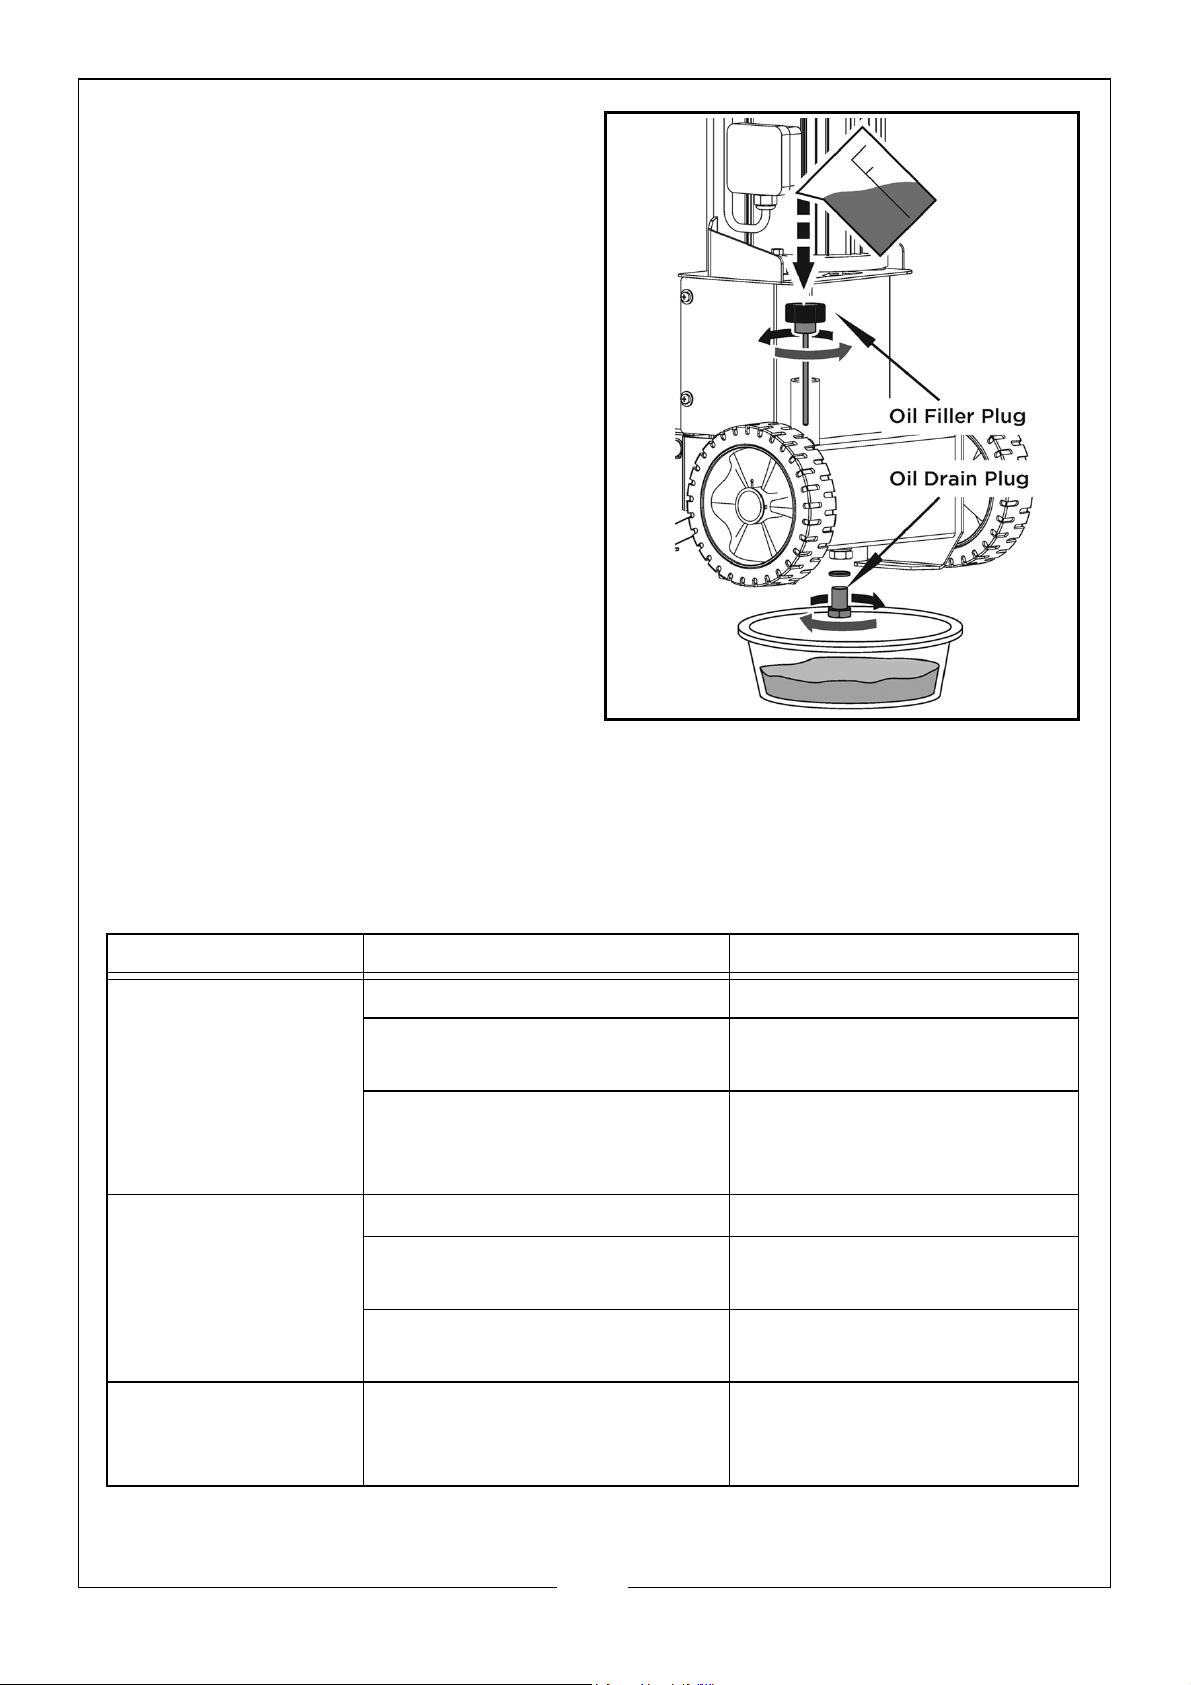
3. Place an oil pan beneath the oil
drain plug.
4. Remove the oil drain plug and
allow the oil to drain into the oil
pan.
5. Replace the oil drain plug.
6. Fill the oil tank with suitable
hydraulic oil available from your
Clarke dealer.
• 1L - Part no: 3050830
• 5L - Part no: 3050835
SHARPENING THE WEDGE
This log splitter is equipped with a reinforced splitting wedge, After long
periods of operation and when required, sharpen the wedge using a fine
toothed file removing any burrs or flat spots on the edge.
TROUBLESHOOTING
PROBLEM CAUSE REMEDY
Motor does not
start.
Log splitter does
not work while the
motor is running.
No power being supplied Check mains fuse
Extension lead is defective Unplug, check and
replace if necessary
Switch is defective Return the log splitter to
your local Clarke dealer for
servicing.
Air bleeder is not open Open oil bleeder.
Control levers are bent Repair the bent control
levers
Log splitter works
but with abnormal
noise and vibration.
Low oil level Check and refill hydraulic
oil.
Low oil level Check and refill hydraulic
oil.
22
Page 23

STORAGE
Disconnect the mains plug and ventilate the compressor and any connected
pneumatic tools. Store the compressor in a dry location. Always store upright.
ENVIRONMENTAL RECYCLING POLICY
By purchasing this product, the customer is taking on the obligation
to comply with current WEEE regulations.
This means that this product must not be disposed of with general
household waste. It must be disposed of according to the laws
governing Waste Electrical and Electronic Equipment (WEEE) at a recognised
disposal facility.
This product contains valuable raw materials. Metal products should be taken
to your local civic amenity site for recycling of metal products.
GUARANTEE
This product is guaranteed against faulty manufacture for a period of 12
months from the date of purchase. Please keep your receipt as proof of
purchase.
This guarantee is invalid if the product is found to have been abused or
tampered with in any way, or not used for the purpose for which it was
intended.
Faulty goods should be returned to their place of purchase, no product can
be returned to us without prior permission.
This guarantee does not effect your statutory rights.
23
Page 24
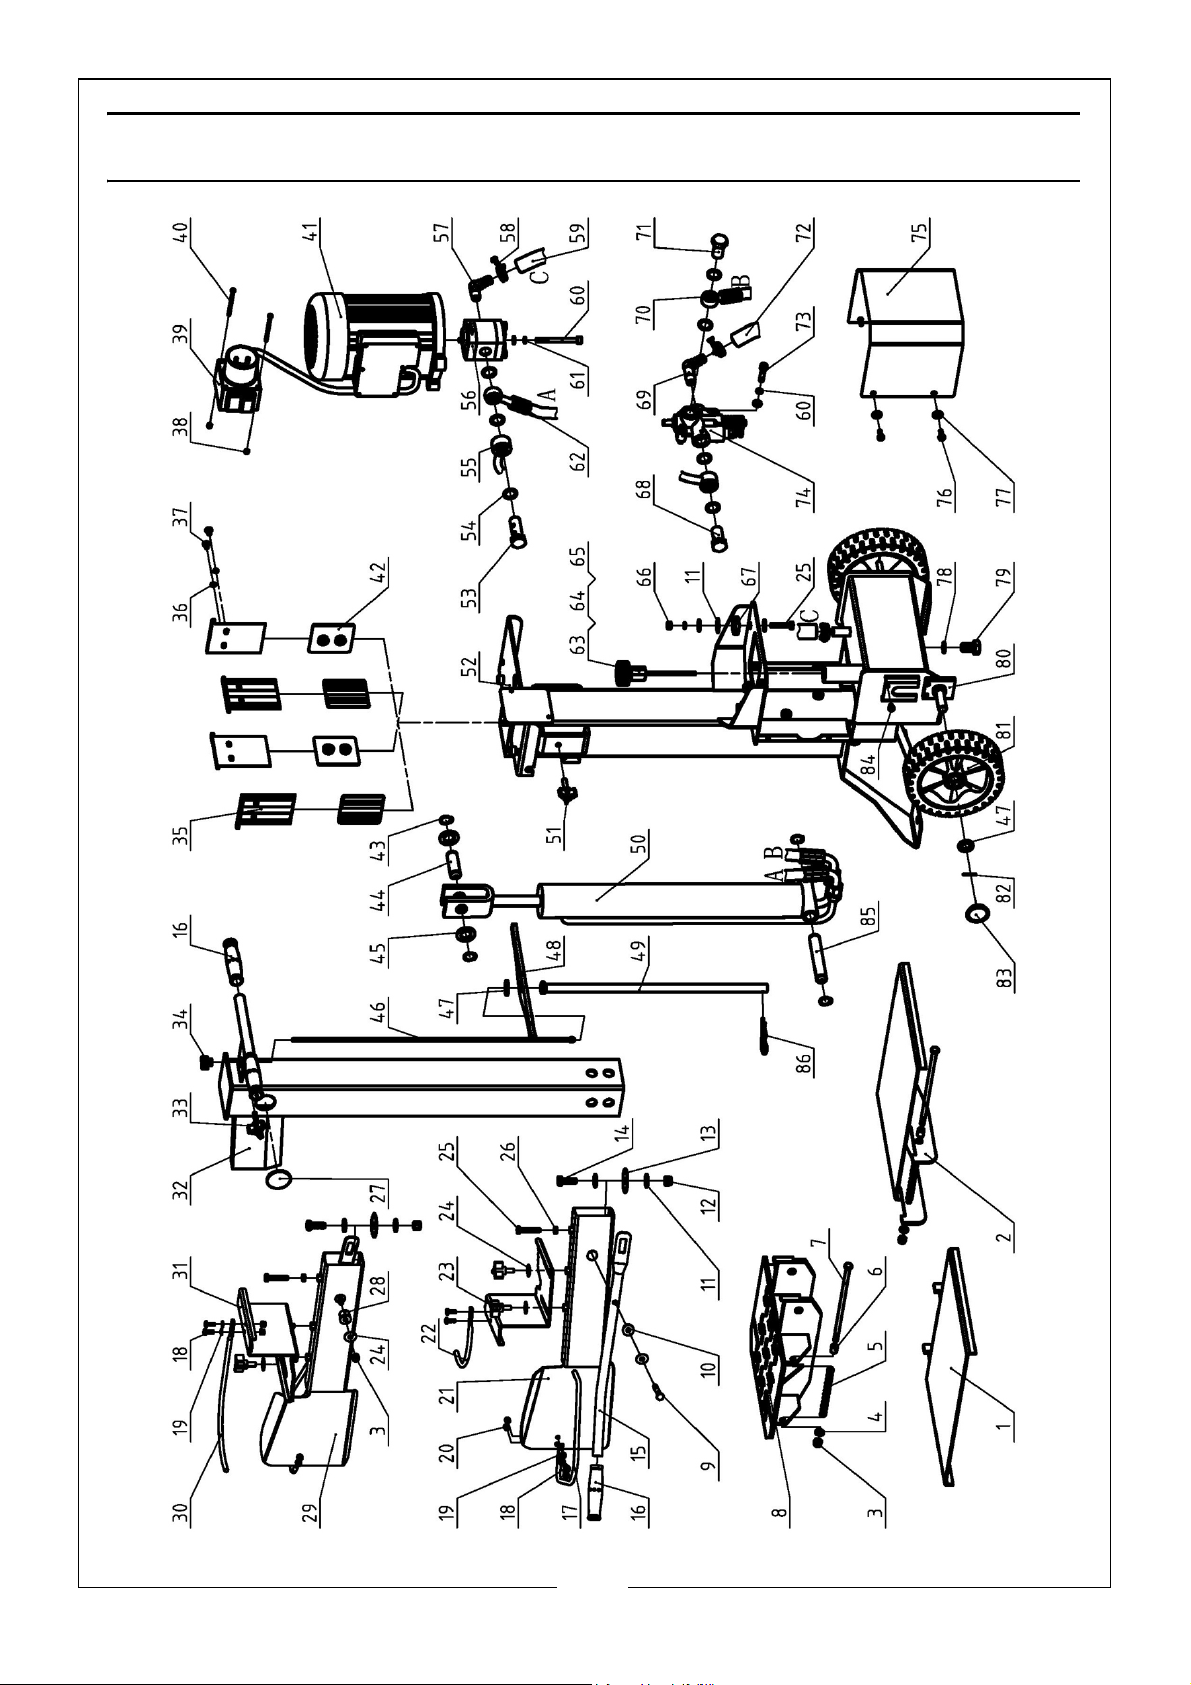
COMPONENT PARTS
24
Page 25

No Description No Description
1 Side log support 2 34 Start nut M5 black
2 Side log support 1 35 Upper lining plate G1
3 Locknut M8 36 Spring washer 6
4Washer 8
37
Screw M6x8
5 Spring 38 Locknut M4
6Bush 39Switch
7 Bolt 8.8 M8x210 40 Screw M4x60
8 Log support G5
41
Motor
9 Bolt 8.8 M8x60 42 Lower lining plate G
10 Bush 2 43 Circlip 20
11 Big washer 10 44 Short shaft G
12 Locknut M10 45 Washer 20
13 Washer L 46 Pull rod G5
14 Bolt 8.8 M10x25 47 Washer 20
15
Handle C1 48 Lever C1
16 Handgrip 49 Tube KG
17 Guard ring C1 50 Cylinder G5
18 Screw M6x16 51 Star knob (black)
19 Washer 6 52 Main frame G5
20 Locknut M6 53 Oil plug G5
21 Right armguard G5 54 Washer groupware 20
22 Retainer 1 55 Oil hose C1
23 Star knob 56 Gear pump G5
24 Big washer 8 57 Nozzle H
25 Bolt 8.8 M8x45 58 Hose clamp 20-26
26 Nut M8 59 Oil hose 16
27 Cap 60 Screw M8x90
28 Bush 1 61 Spring washer 8
29 Left armguard G5 62 Oil hose G5
30 Retainer 2 63 Oil cap K
31 Clamp 64 Oil dipstick K6
32 Splitting pipe G5 65 O-ring 25x2.65
33 Star knob M6 66 Nut M8
25
Page 26

67 Motor support 77 Big washer 6
68 Oil plug A2 78 Washer groupware 16
69 Nozzle A4 79 Bolt M16x25
70 Oil hose G5 80 Wheel axle G5
71 Oil plug G1 81 Wheel
72 Oil hose 16 82 Cotter pin
73 Screw M8x35 83 Wheel cap
74 Valve 84 Bolt 8.8 M6x8
75 Shield G5 85 Long shaft G
76 Screw M6x12 86 Clip 4
26
Page 27

DECLARATION OF CONFORMITY
27
Page 28

 Loading...