

Page 1
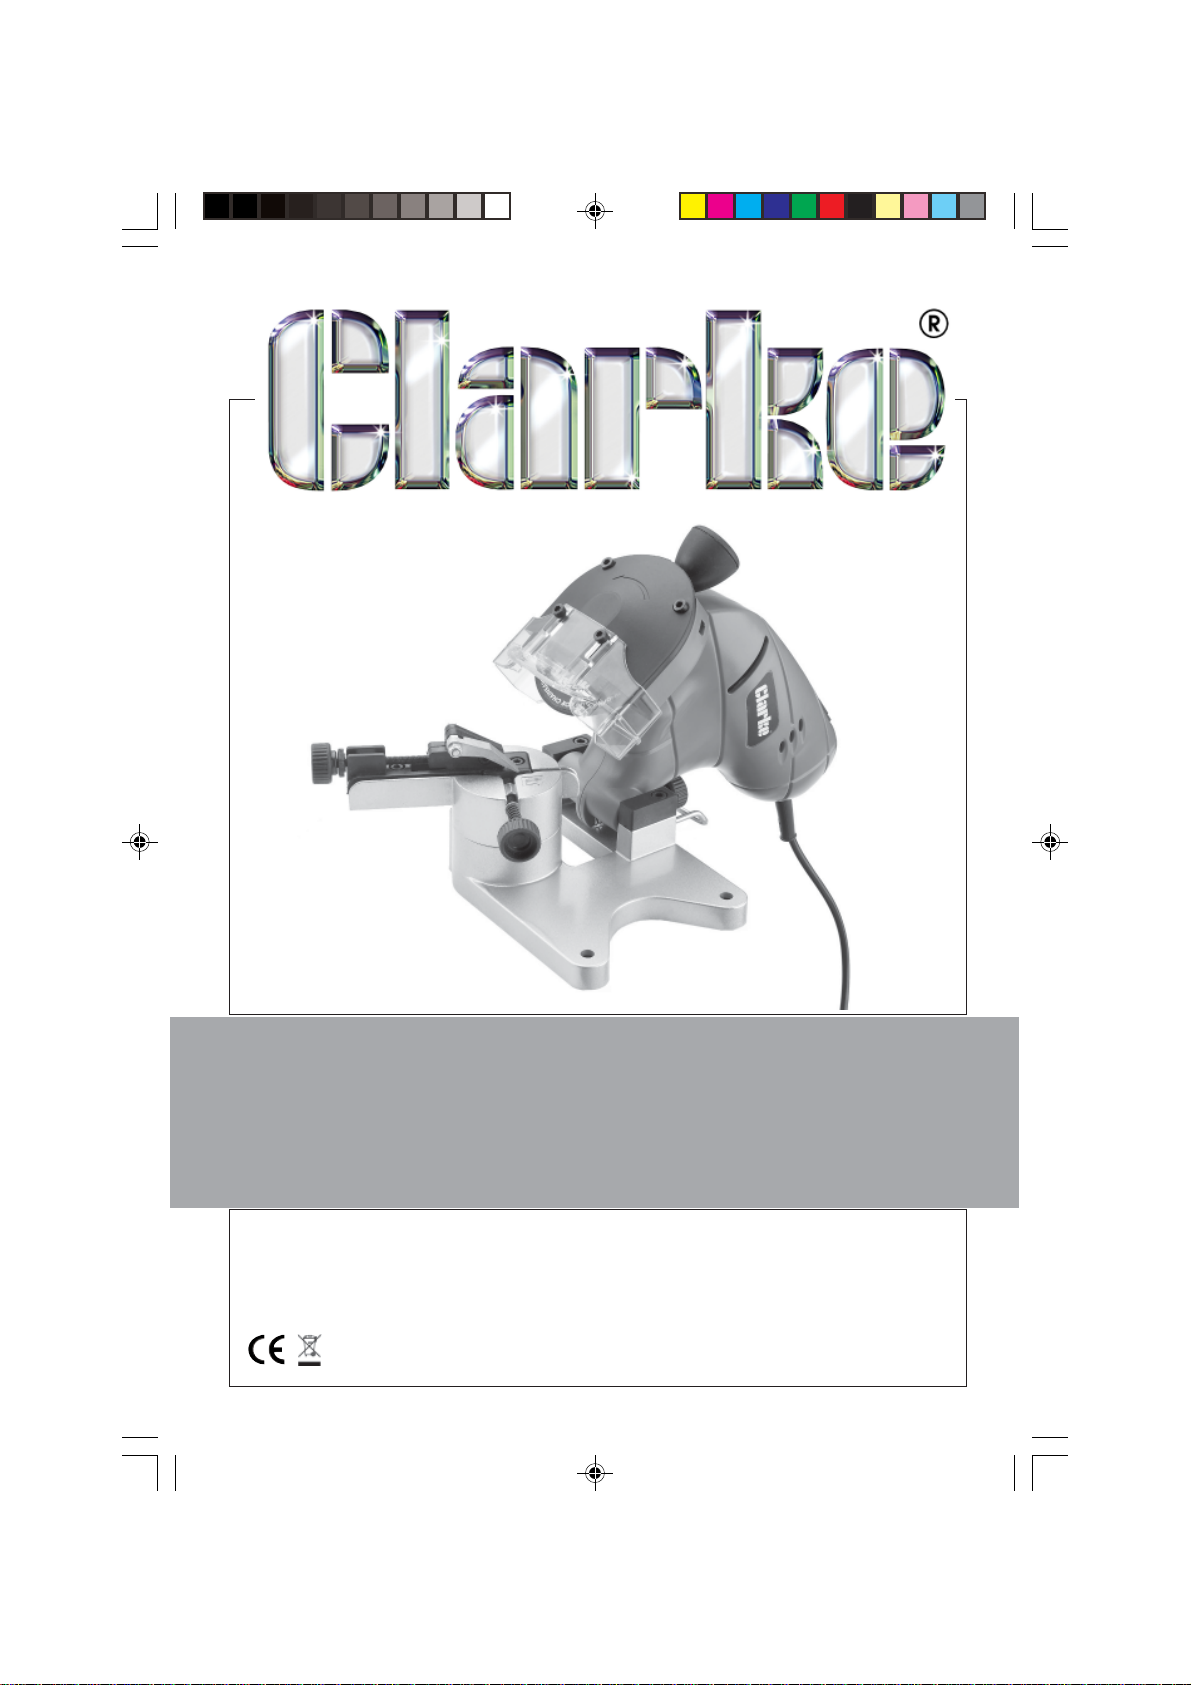
CHAINSAW SHARPENER
MODEL: ECSS-1
Part No: 3402075
ASSEMBLY & INSTRUCTION
MANUAL
LS0409
Page 2
INTRODUCTION
Thank you for purchasing this CLARKE product
Before attempting to use the product, it is essential that you read this manual
thoroughly and carefully follow all instructions given. In doing so you will
ensure the safety of yourself and that of others around you, and you can also
look forward to the product giving you long and satisfactory service.
GUARANTEE
This CLARKE product is guaranteed against faulty manufacture for a period of
12 months from the date of purchase. Please keep your receipt as proof of
purchase.
This guarantee is invalid if the product is found to have been abused or
tampered with in any way, or not used for the purpose for which it was
intended.
Faulty goods should be returned to their place of purchase, no product can
be returned to us without prior permission.
This guarantee does not effect your statutory rights.
ENVIRONMENTAL PROTECTION
Do not dispose of this product with general household waste. All tools,
accessories and packaging should be sorted, taken to a recycling
centre and disposed of appropriately.
PARTS & SERVICE
For parts & Servicing, please contact your nearest dealer, or
CLARKE International, on one of the following numbers.
PARTS & SERVICE TEL: 020 8988 7400
PARTS & SERVICE FAX: 020 8558 3622
or e-mail as follows:
PARTS: [email protected]
SERVICE: [email protected]
2
Page 3
CONTENTS
INTRODUCTION .............................................................................................. 2
GUARANTEE ................................................................................................... 2
ENVIRONMENTAL PROTECTION .................................................................... 2
PARTS & SERVICE ........................................................................................... 2
SAFETY PRECAUTIONS ................................................................................... 3
OPERATING HINTS .......................................................................................... 4
ELECTRICAL CONNECTIONS ........................................................................ 5
PARTS IDENTIFICATION .................................................................................. 6
ASSEMBLY ....................................................................................................... 7
OPERATING .................................................................................................... 8
MAINTENANCE AND CLEANING .................................................................. 10
SPECIFICATION ............................................................................................... 11
PARTS DIAGRAM ........................................................................................... 12
PARTS LIST ....................................................................................................... 13
DECLARATION OF CONFORMITY ................................................................. 14
SAFETY PRECAUTIONS
• Ensure your mains voltage corresponds to the voltage mentioned on the
rating plate.
• Persons with limited physical or mental abilities should not be allowed to use
this chainsaw sharpener, unless they are supervised by a qualified person.
• The unit is designed for sharpening all common chainsaw chains. Do not
use it for any other purpose.
• Do not sharpen damaged chainsaw chains.
• Do not operate the unit without the protective cover in place and make
sure that all parts are firmly assembled before starting the unit.
• When sharpening, always wear protective goggles. Wear suitable clothes.
Take off jewellery and tie long hair back.
• Protect your ears by wearing ear protectors.
• Do not operate the unit if it does not work correctly or has been dropped.
• Do not disassemble the unit and do not try to repair it yourself. Contact your
customer support.
3
Page 4
OPERATING HINTS
• Before you sharpen the chainsaw chain check it for damages, such as:
- bent or abraded chain links.
- broken cutting teeth, loose rivets or broken rivet heads.
If any damage is found, replace the entire chain.
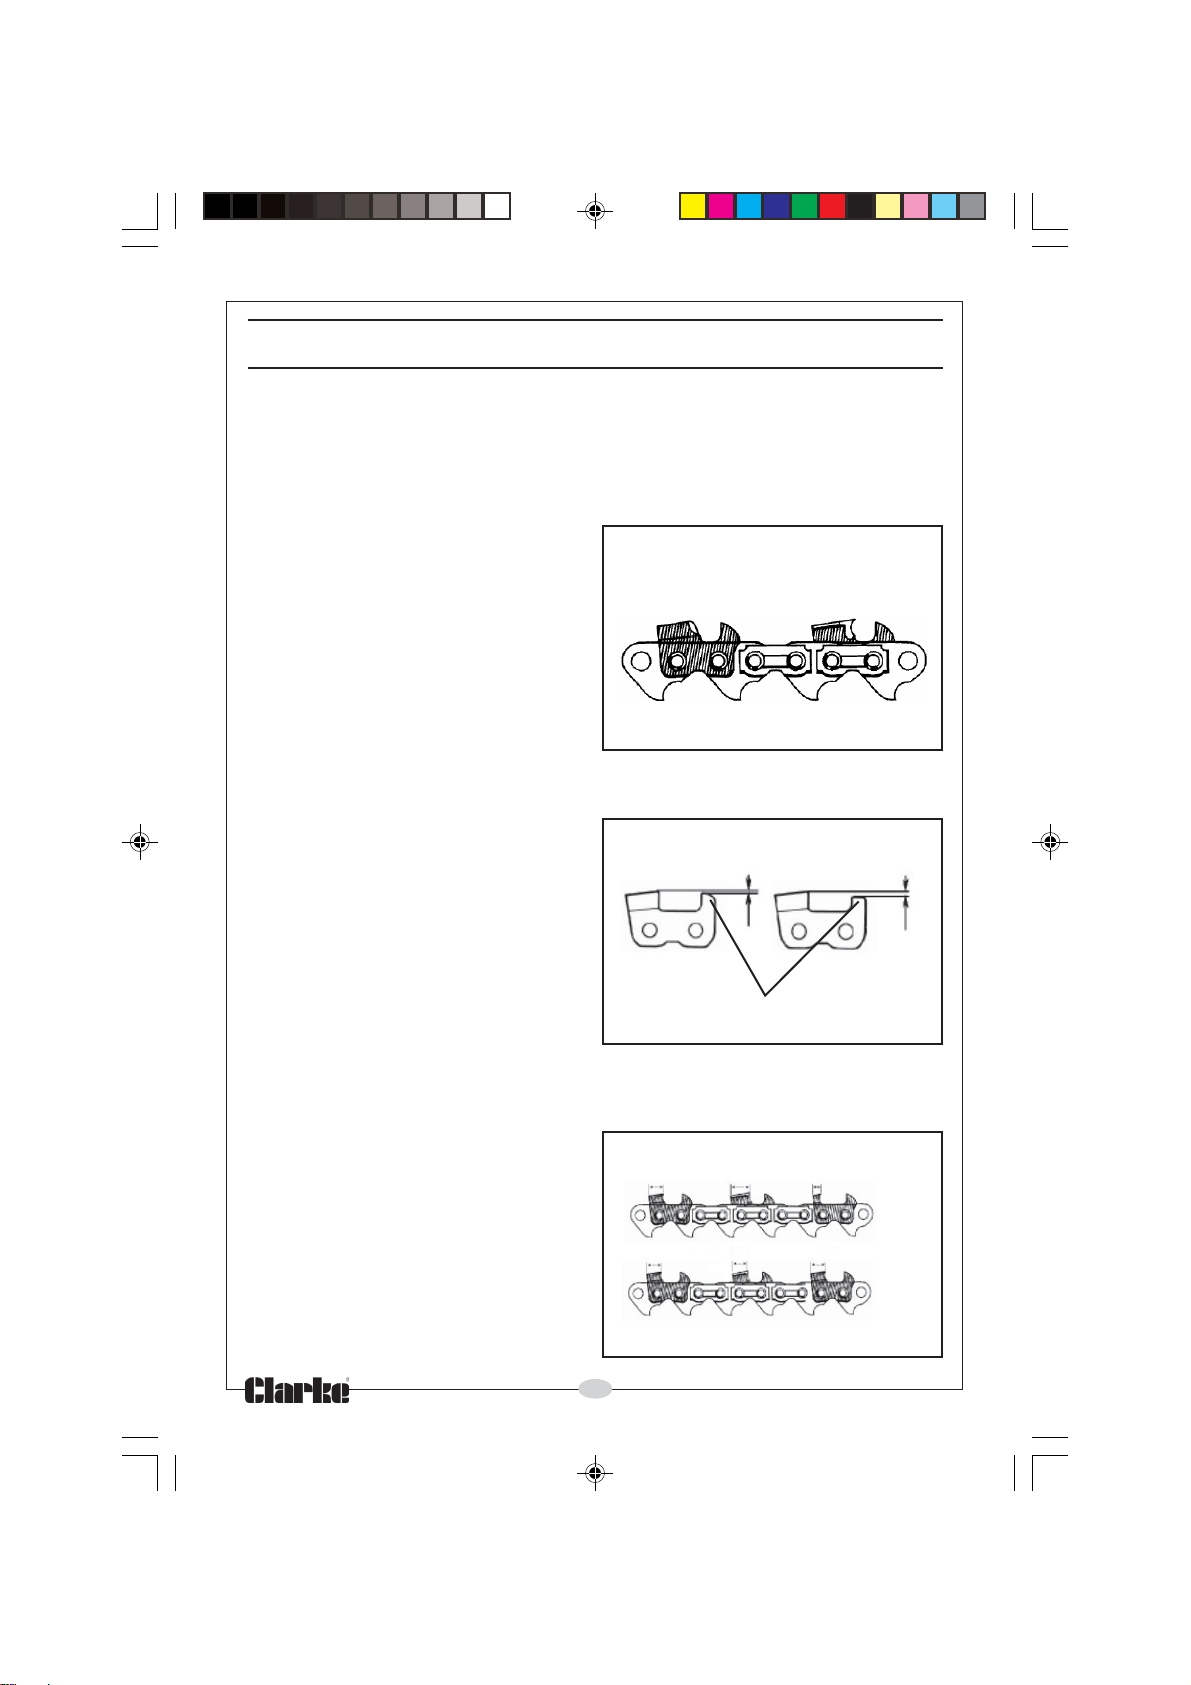
• A sharp chainsaw produces wood
chips and pulls itself into the timber
being cut. When it becomes blunt,
sawdust will start being produced
during cutting operations.
• You should sharpen the chain if you
notice that you have to use force to
cut through the timber, i.e. if the saw
does not “pull” anymore.
• Sharpen all cutting teeth as
uniformly as possible. This will ensure
smooth operation with a minimum of vibration. See Fig 1
• Blunt cutting teeth or parts
damaged by stones may cause an
inclined cut during chain saw
operation and may also increase
the wear on the running face of the
cutting teeth.
• The depth limiter bars must be
profiled by hand. Ensure that all
depth limiter bars are equal in
height. See Fig 2
• Ensure that all cutting teeth are
sharpened to the same cutting angle.
• During sharpening occasionally check that the cutting-angle is set
correctly, as this setting may go out
of adjustment due to vibration.
• Make sure that all teeth are
sharpened as evenly as possible.
Only sharpen the teeth, never the
chain links.
• Sharpening teeth to unequal blade
lengths can cause a side drift when
sawing. see Fig 3.
Fig 1
Cutting tooth
is damaged
Fig 2
Fig 3
Tooth size unequal
Cutting tooth
is OK
Depth limiting bar
Tooth size equal
x
✓
4
Page 5
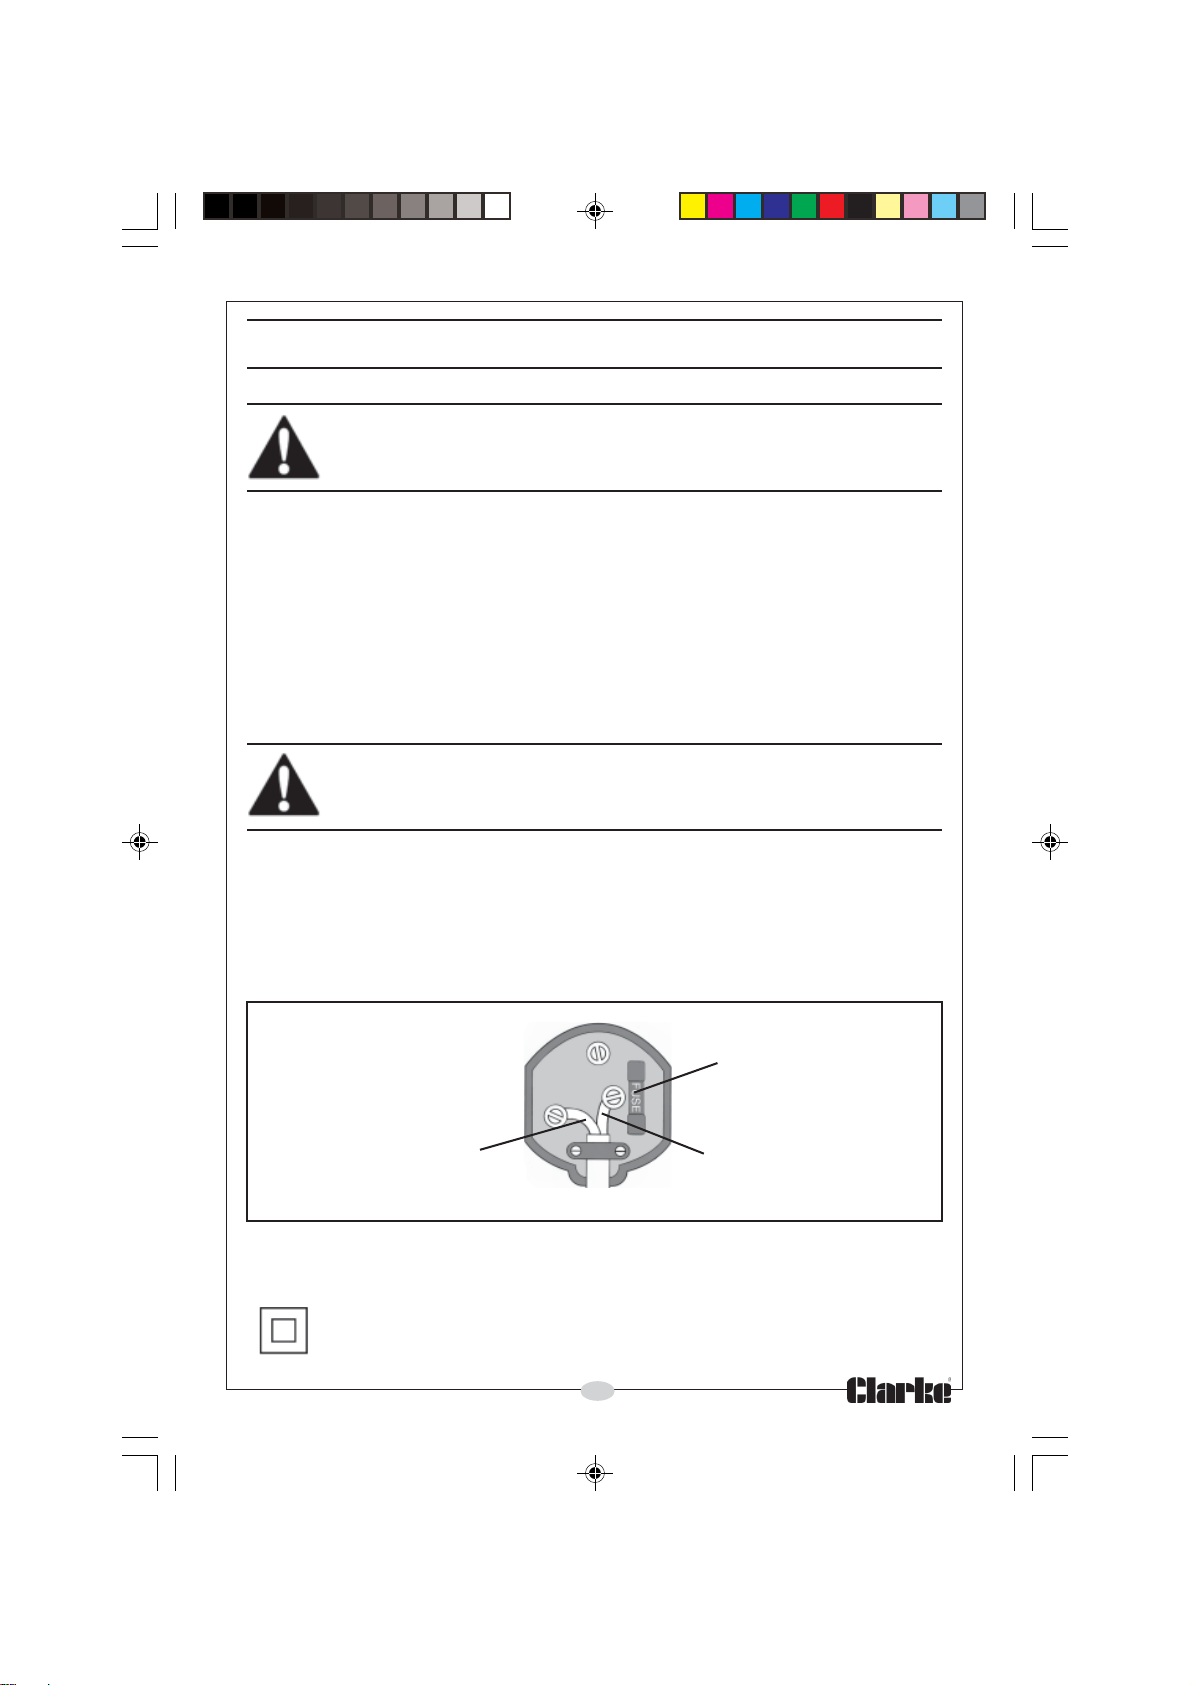
ELECTRICAL CONNECTIONS
WARNING! READ THESE ELECTRICAL SAFETY INSTRUCTIONS
THOROUGHLY BEFORE CONNECTING THE PRODUCT TO THE MAINS
SUPPLY.
Before switching the product on, make sure that the voltage of your electricity supply
is the same as that indicated on the rating plate. This product is designed to operate
on 230VAC 50Hz. Connecting it to any other power source may cause damage.
This product may be fitted with a non-rewireable plug. If it is necessary to change the
fuse in the plug, the fuse cover must be refitted. If the fuse cover becomes lost or
damaged, the plug must not be used until a suitable replacement is obtained.
If the plug has to be changed because it is not suitable for your socket, or due to
damage, it should be cut off and a replacement fitted, following the wiring instructions
shown below. The old plug must be disposed of safely, as insertion into a mains socket
could cause an electrical hazard.
WARNING! THE WIRES IN THE POWER CABLE OF THIS PRODUCT ARE
COLOURED IN ACCORDANCE WITH THE FOLLOWING CODE:
BLUE = NEUTRAL BROWN = LIVE
If the colours of the wires in the power cable of this product do not correspond with
the markings on the terminals of your plug, proceed as follows.
• The wire which is coloured Blue must be connected to the terminal which is
marked N or coloured Black.
• The wire which is coloured Brown must be connected to the terminal which
is marked L or coloured Red.
Plug must be BS1363/A approved
Always fit a 5 Amp fuse
Neutral
(Blue)
Ensure that the outer sheath of the cable is firmly held by the clamp
We strongly recommend that this machine is connected to the mains supply via a
Residual Current Device (RCD)
If in any doubt, consult a qualified electrician. DO NOT attempt any repairs yourself.
This symbol indicates that this is a Class II product, and does not require an
earth connection.
5
Live
(Brown)
Page 6
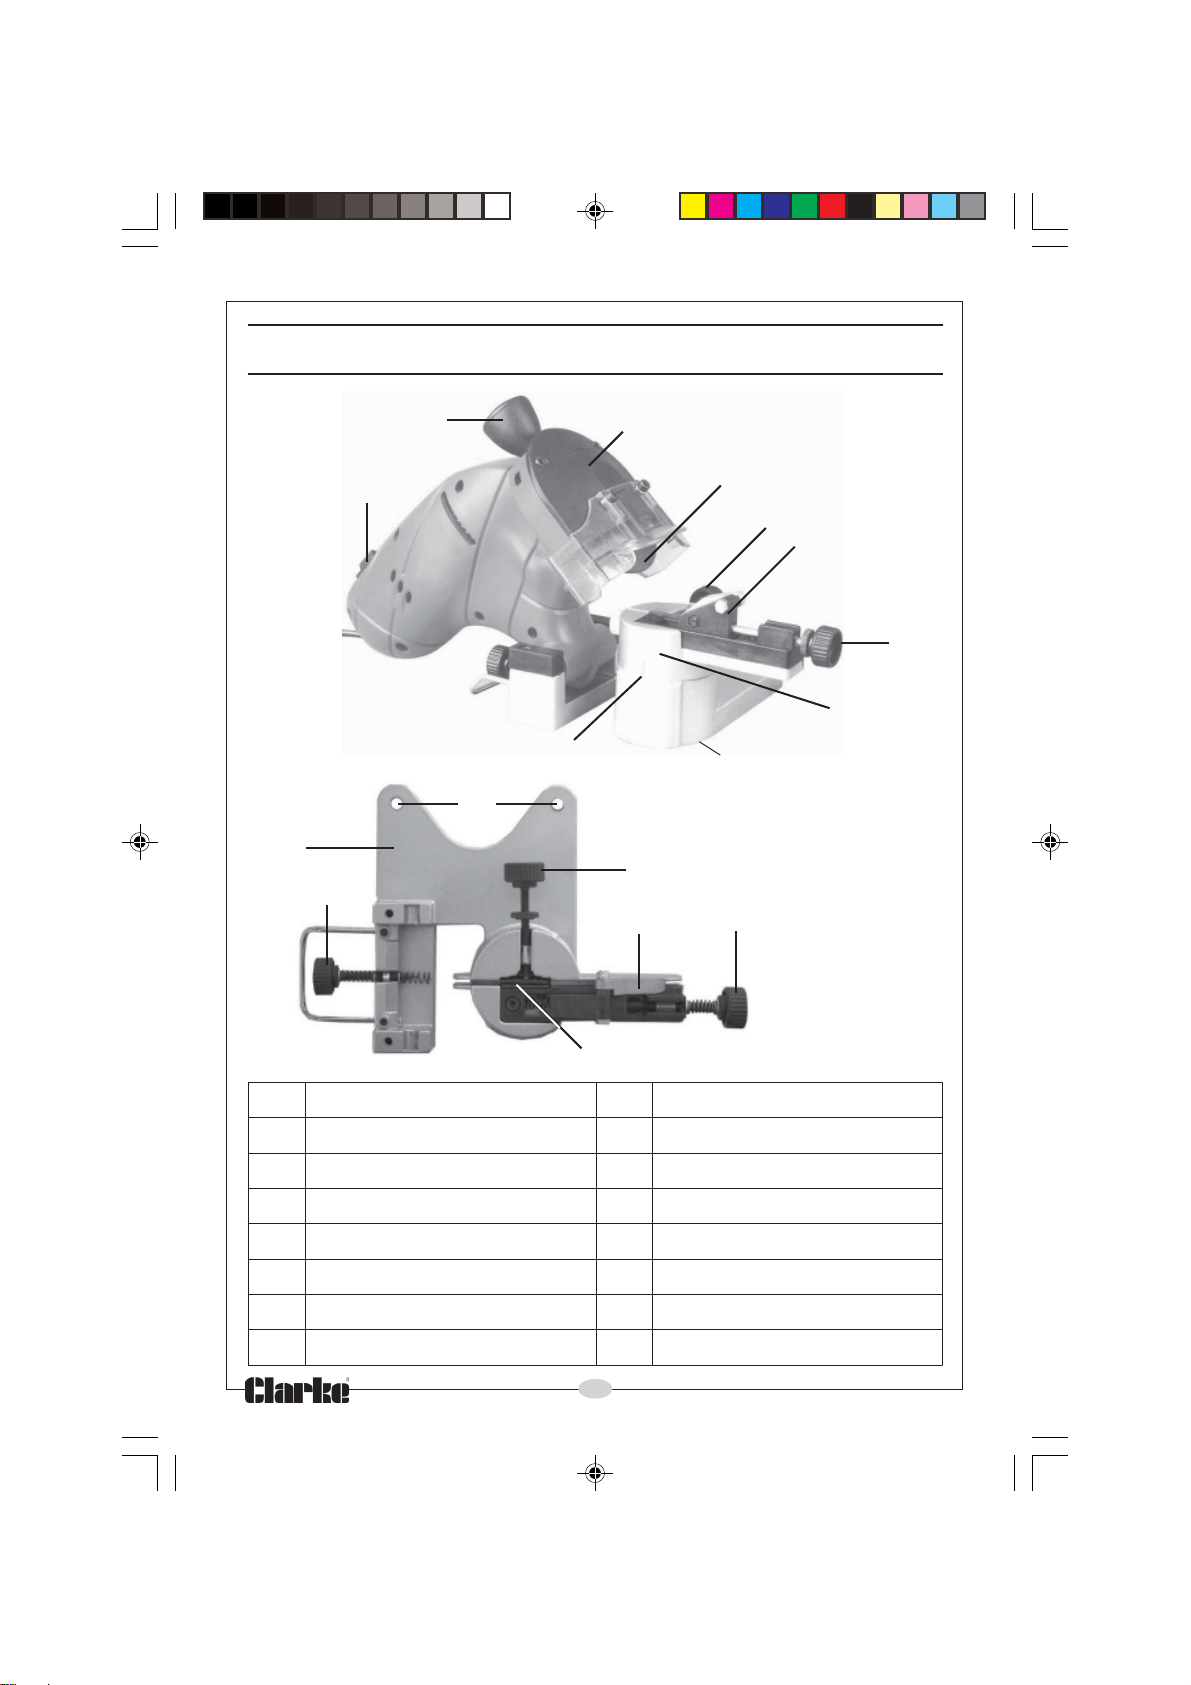
PARTS IDENTIFICATION
A
N
C
B
D
E
F
H
I
J
K
L
O
F
G
I
M
AetalPesaBIwercSgnitsujdA
BhctiwSFFO/NOJylbmessAredloHniahC
CeldnaHKrotacidnIelgnA
DrevoCevitcetorPLwercStnemtsujdAe
EcsiDgnidnirGMsdraoBediuG
FwercSgninetsaFNretimiLhtpeD
GegdeWtnemtsujdAOseloHgnitnuoM
HredloHniahC
6
lgnA
Page 7
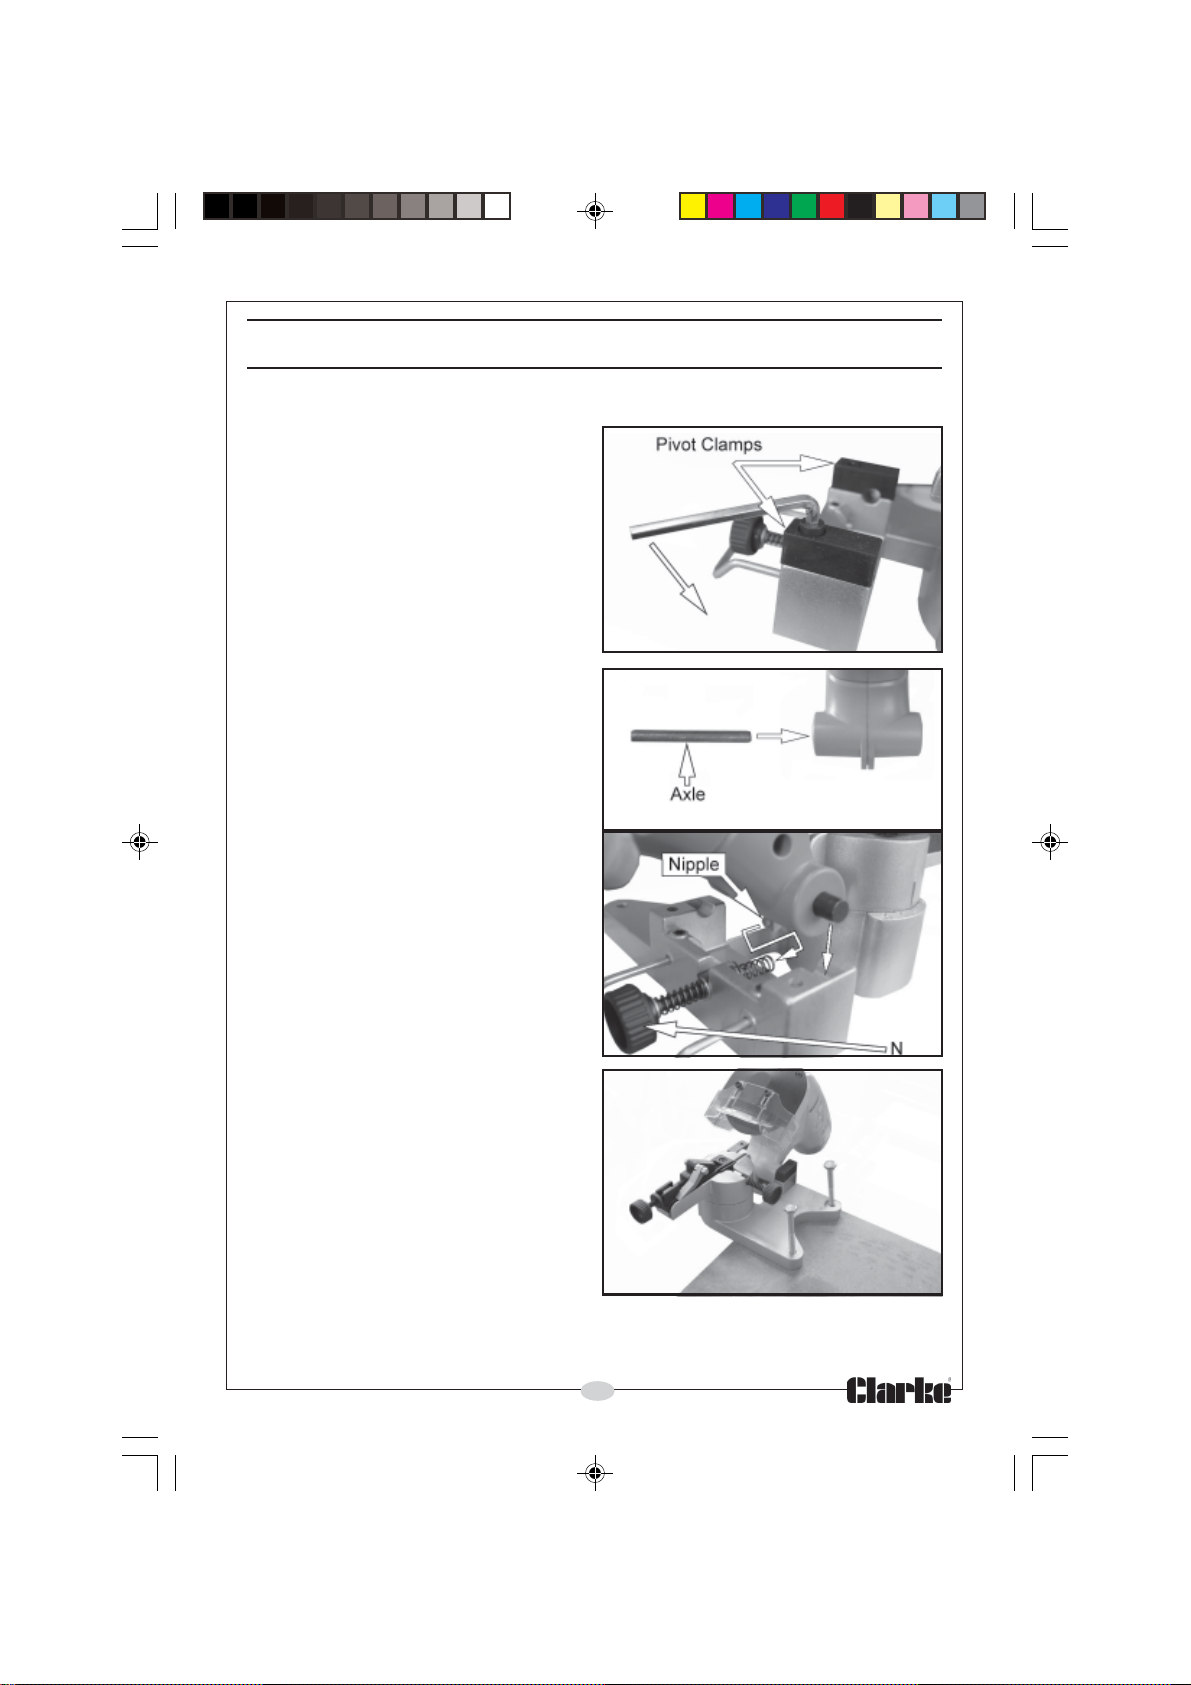
ASSEMBLY
The chain saw sharpener is supplied only partly assembled.
1. Remove the bolts from both
pivot clamps as shown in Fig 4.
2. Insert the axle into the body of
the chainsaw sharpener. Fig 5.
3. Place the chainsaw sharpener
on the base plate.
• Make sure the nipple on the
chainsaw sharpener is
positioned inside the depth
limiter (N) spring as shown in
Fig 6.
4. Replace the pivot clamps and
secure in place using the bolts
removed in step 1.
Note: Before starting the unit,
make sure the grinding
disc is fixed firmly. Never
operate the unit without the
protective cover.
5. Place the base plate (A) on a
solid, level surface, e.g. a
workbench. Fig 7.
• Ensure that the base plate
extends out far enough over
the edge of the work bench
so that the chain can hang
down freely and you can
easily access the angle
adjustment screw (L) at the
bottom.
6. Mount the base plate (A) using
the mounting holes (O).
Fig 4
Fig 5
Fig 7
Fig 6
The chain saw sharpener is now
ready for use.
7
Page 8
OPERATING
WHEN SHARPENING, ALWAYS WEAR SAFETY GOGGLES.
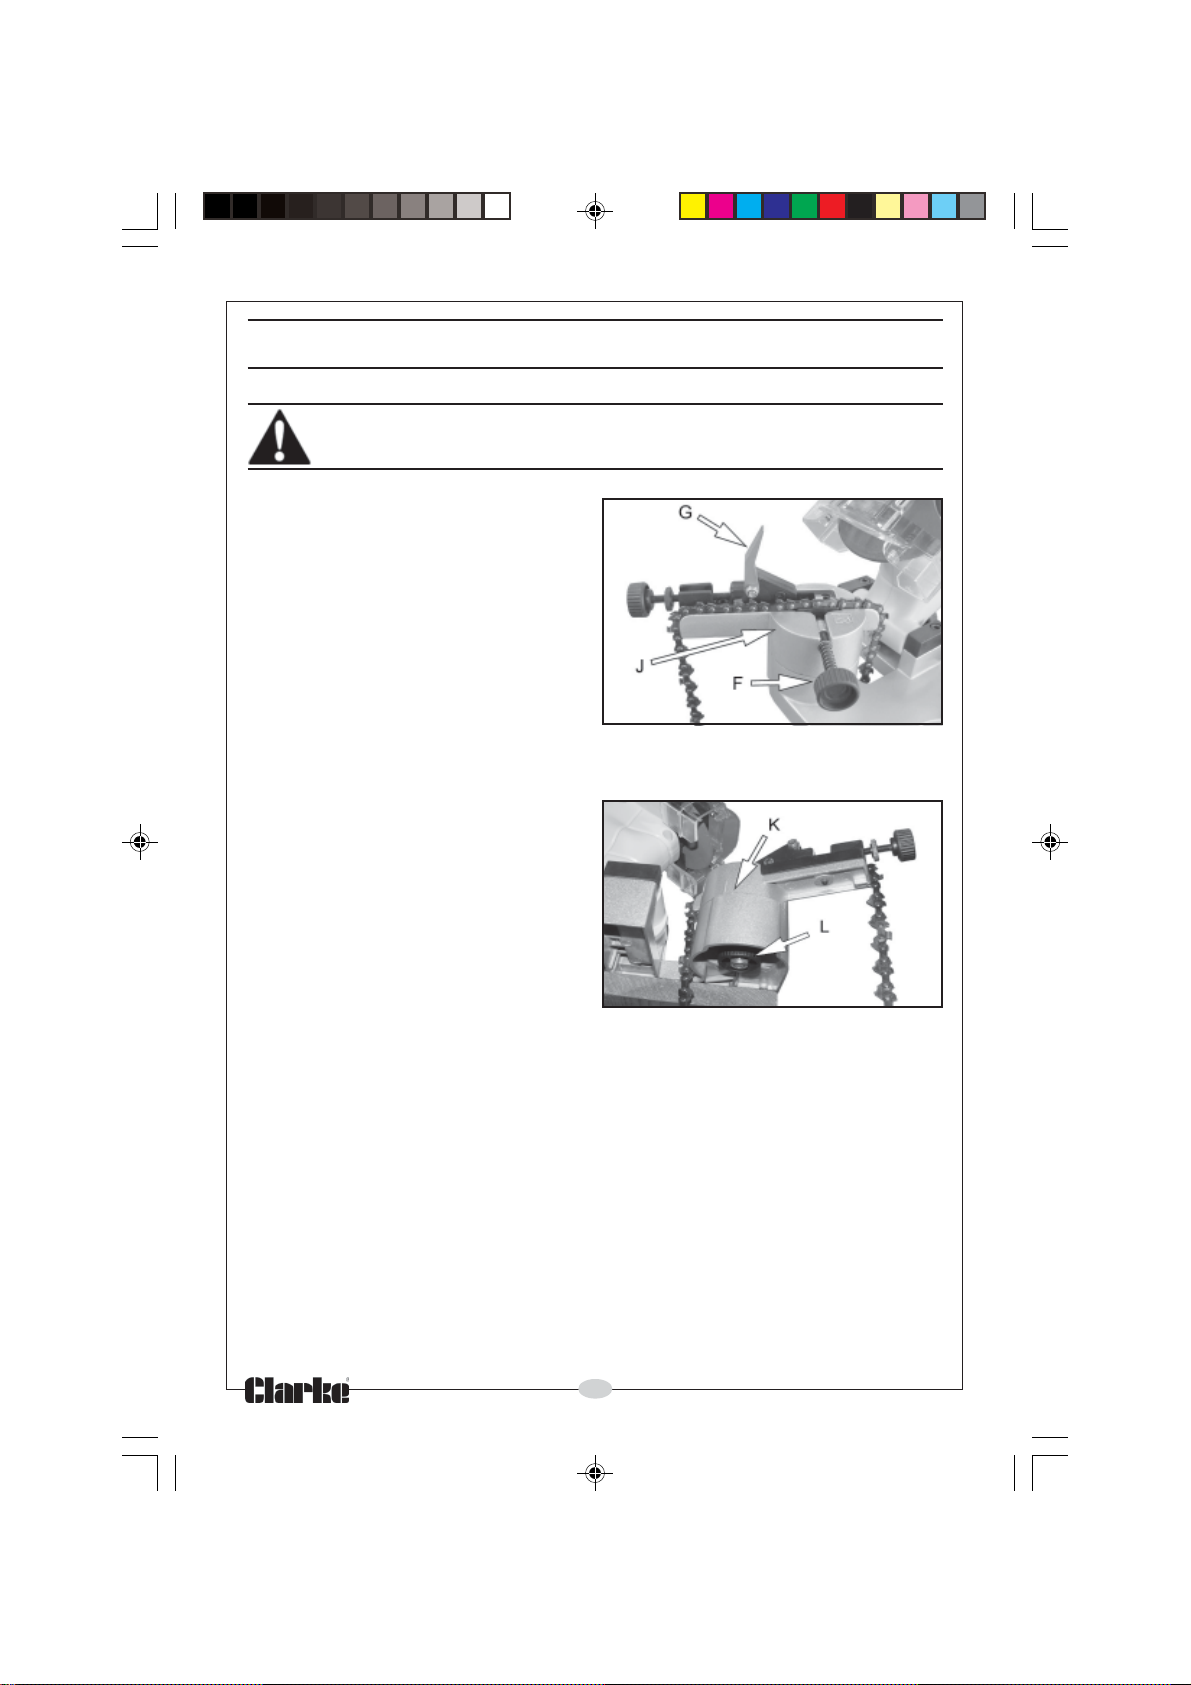
FITTING THE CHAIN TO THE
SHARPENER
1. Lift up the adjustment wedge
(G) and unscrew the fastening
screw (F), see Fig 8.
2. Place the chainsaw chain on
the chain holder assembly (J).
Fig 8
• There is a diagram on the
chainsaw holder indicating
which way the teeth should
be facing
ADJUSTMENTS
ADJUSTING THE GRINDING ANGLE
1. Rotate the chain holder
assembly (J) to the required
angle.
• Most chainsaw chains have a
cutting tooth angle of 15° or
30°. Check the chain
packaging for infomation.
2. Tighten the angle adjustment screw (L).
• Do not over tighten. The chain holder assembly should be able to
move when required but it must stay in the set position when
sharpening.
• Do not rotate the chain holder assembly (J) when the grinding disc
is moving.
• The chain holder assembly (J) clicks into place at 15° or 30°
degrees, shown by the angle indicator (K), see Fig 9.
Fig 9
ADJUSTING THE MAXIMUM SHARPENING DEPTH
3. Adjust the maximum sharpening depth using the depth limiter (N).
• Start grinding with the most worn-out tooth and sharpen all other
teeth to the same depth.
8
Page 9
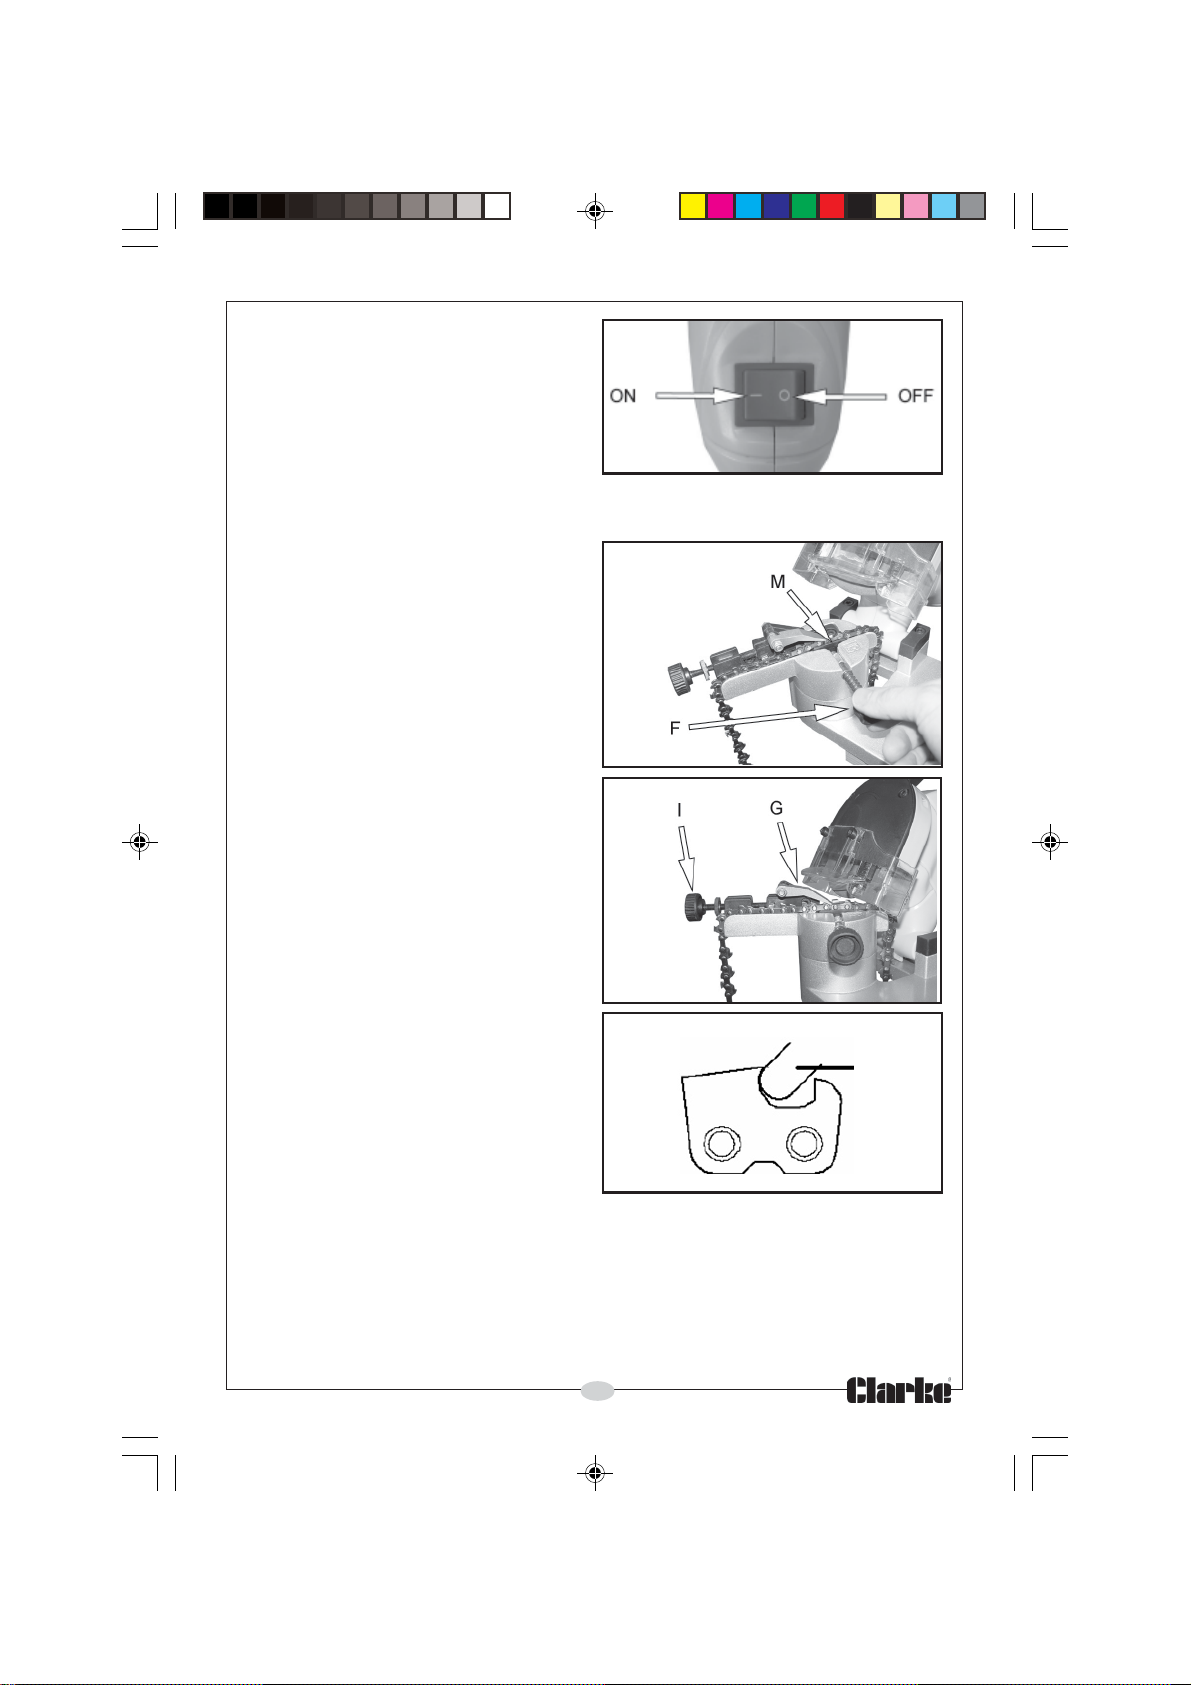
SWITCHING ON/OFF
6. To switch on, set the ON/OFF
switch to the ( I ) position. see Fig
10
7. To switch off, set the ON/OFF
switch to the ( O ) position. see
Fig 10
SHARPENING THE CHAIN
Fig 10
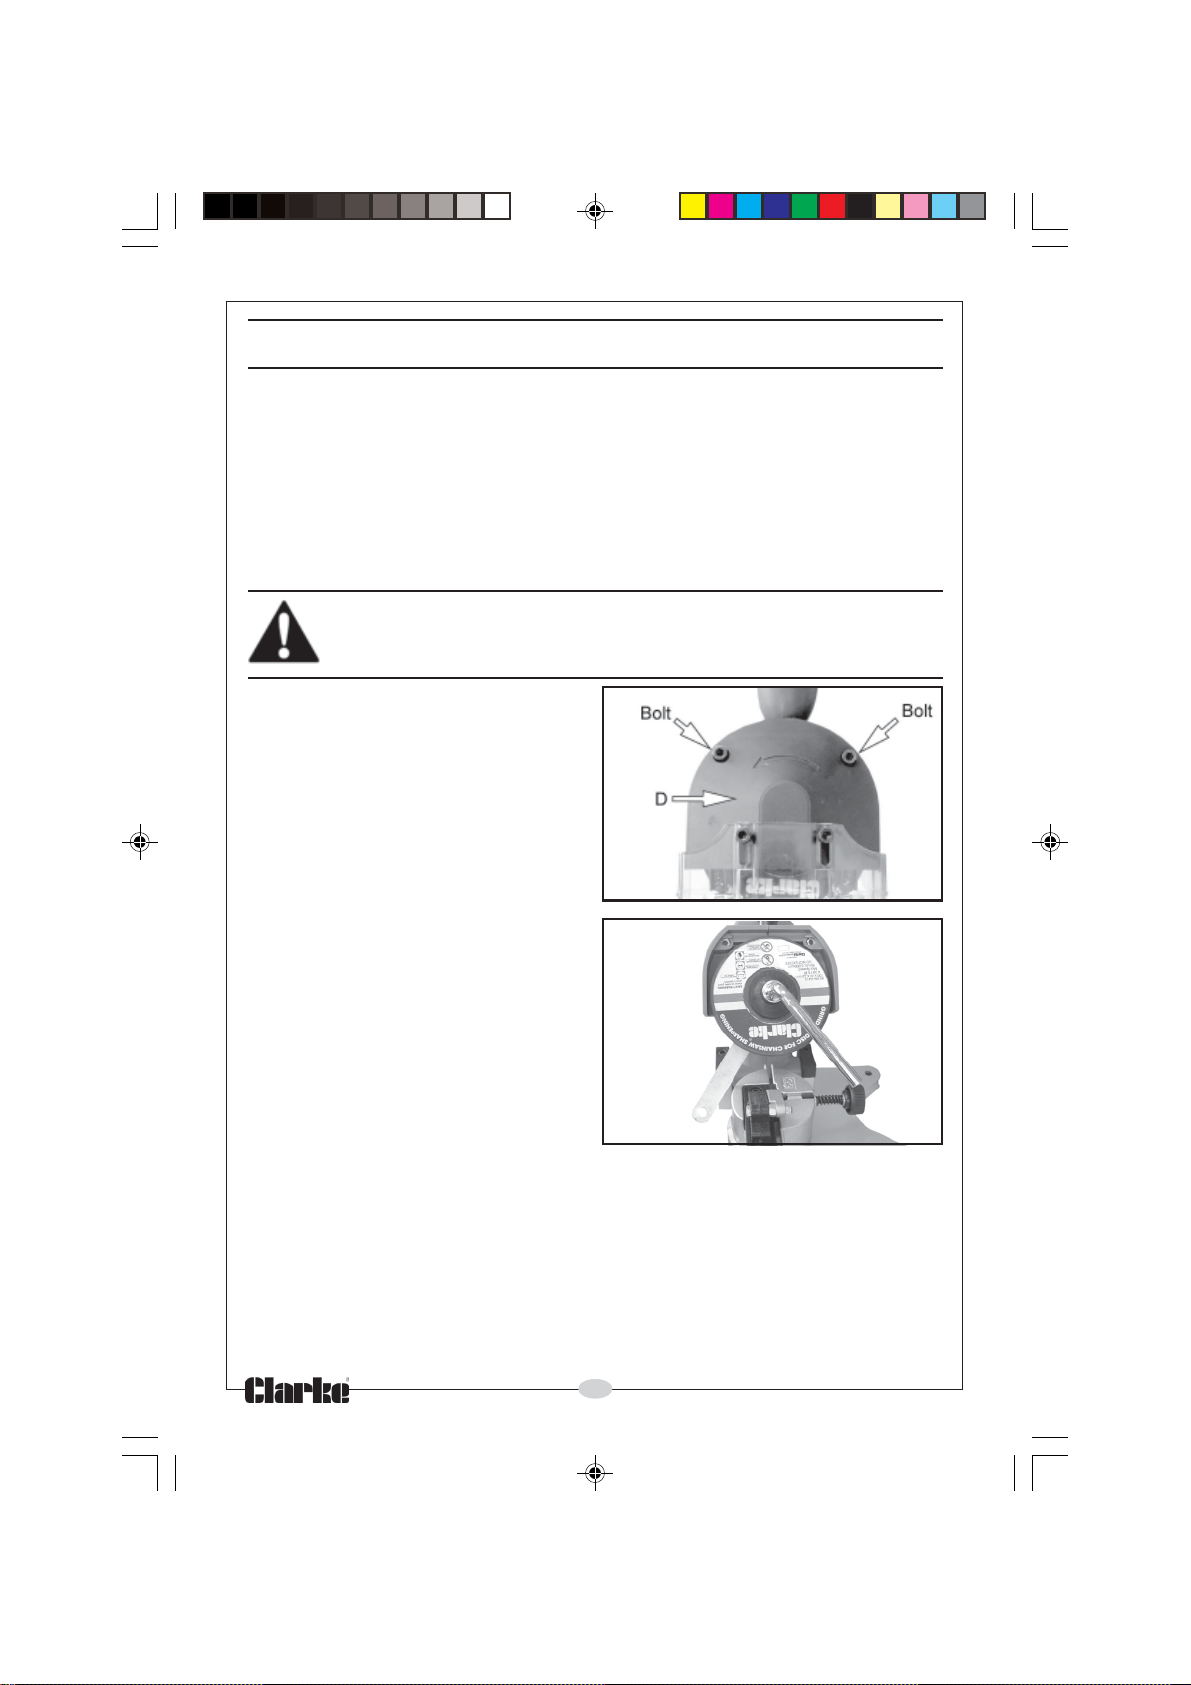
8. Make sure the chainsaw chain is
held securly between both guide
boards (M). Tighten with the
fastening screw (F) if nessecery.
see Fig 11.
9. Position the tooth being
sharpened near to the grinding
disc.
10. Put the adjustment wedge (G)
down into position (fig 12) and
move the tooth forward with the
adjusting screw(I) until the
bottom of the grinding disc (E)
can be positioned inside the
cutting edge of the tooth. See Fig
13.
Fig 11
Fig 12
• Before moving the chain to the
next tooth, switch the unit off
and wait until the grinding disc
comes to a complete stop.
• First sharpen all teeth in one
direction i. e. every second
tooth.
• Then change the sharpening
angle to the opposite
direction.
• Make sure that all teeth are
sharpened as evenly as
possible.
• Only sharpen the teeth, never the chain links.
Fig 13
E
9
Page 10
MAINTENANCE AND CLEANING
• Use a dry paint-brush to clean the unit and remove grinding
residues.
• Do not clean the unit with aggressive detergents or chemicals.
• The unit does not require any lubrication.
CHANGING THE GRINDING DISC
BEFORE CARRYING OUT ANY WORK ON THE CHAIN SAW SHARPENER
DISCONNECT THE PLUG FROM MAINS SUPPLY.
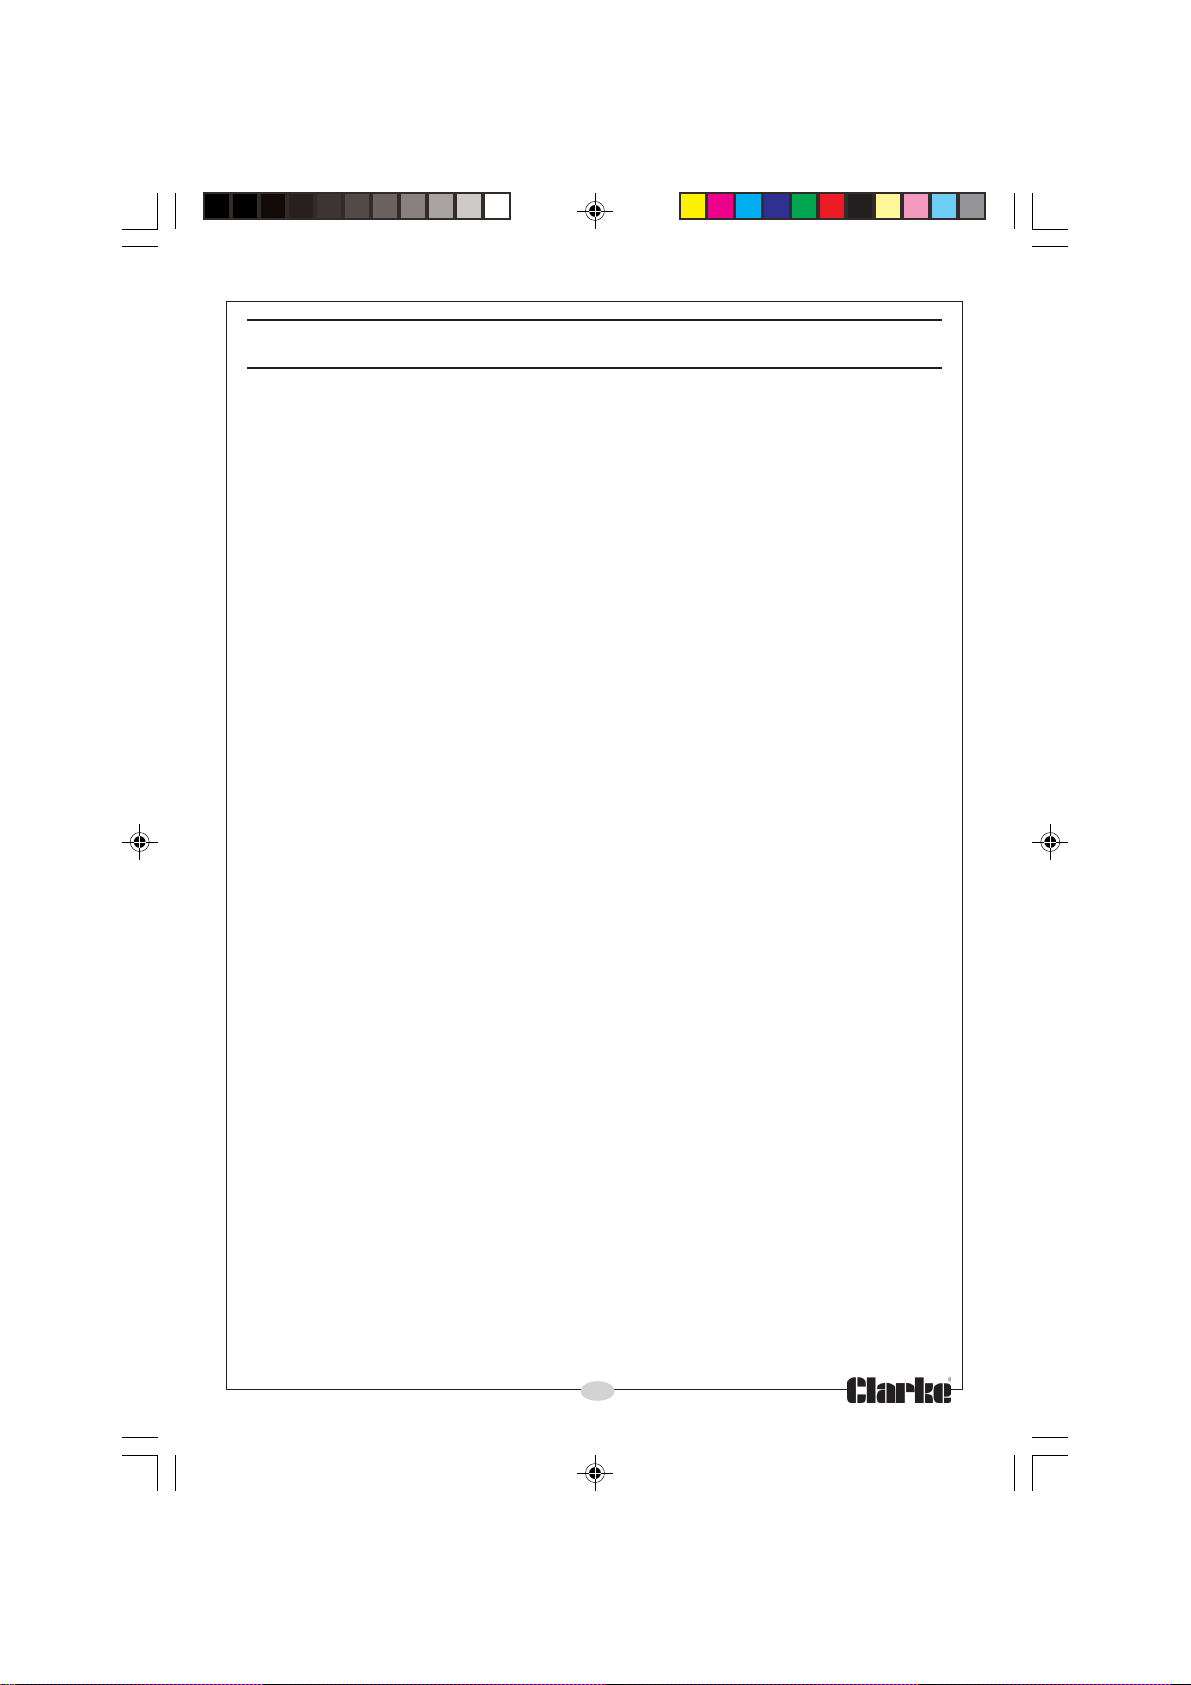
1. Unscrew the bolts indicated
using the hexagonal key
supplied and remove the
protective cover (D). See Fig 14.
Fig 14
2. Use the wrench supplied to lock
the spindle and then loosen the
nut with the socket wrench.
3. Place the new grinding disc over
the spindle.
• Only use grinding discs with a
diameter of 100 mm.
• Replacement grinding disc
speed must meet or exceed
the RPM rating of the unit.
Note: Replacement discs are available from your Clarke dealer part
number (3402076)
4. Tighten the nut and mount the protective cover (D) on the unit.
Fig 15
10
Page 11
SPECIFICATION
Nominal Voltage ...................................... 230 V
Frequency ................................................. 50 Hz
Nominal Power .........................................130 W
No Load Speed ........................................3000 rpm
Disc Diameter ...........................................Ø 100 mm
Weight ....................................................... 2.5 kg
Protection Class ....................................... II
Sound Pressure Level ...............................85.8 dB(A)
Sound Power Level .................................. 98.8 dB(A)
Hand Arm Vibration .................................3,168 m/s2
11
Page 12
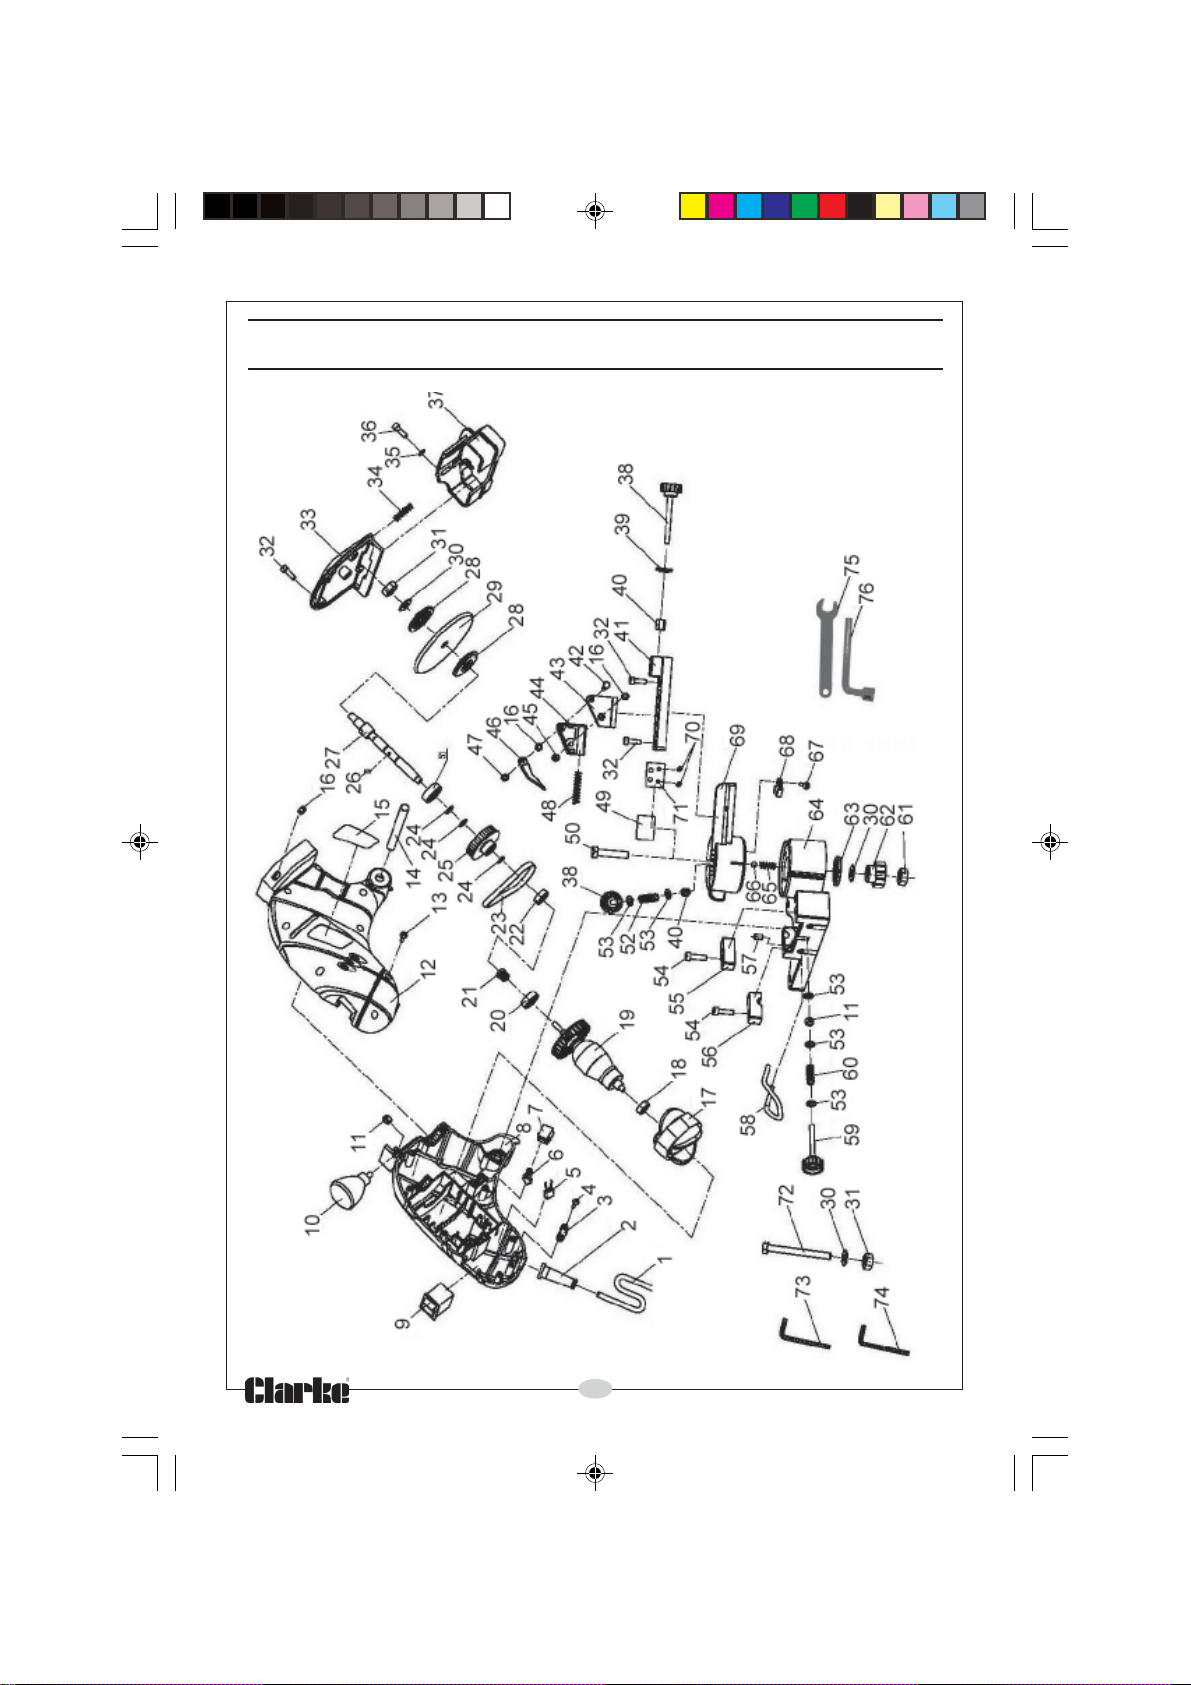
PARTS DIAGRAM
12
Page 13
PARTS LIST
No Description Part number
1 Cable KPECSS1001
2 Strain Relief KPECSS1002
3 Cable Pressboard KPECSS1003
4 Screw ST 4x14 KPECSS1004
5 Capacitance 0.33 μF KPECSS1005
6 Carbon Brush KPECSS1006
7 Carbon Brush Holder KPECSS1007
8 Motor Housing Left KPECSS1008
9 ON/OFF Switch KPECSS1009
10 Handle KPECSS1010
11 Nut M6 KPECSS1011
12 Motor Housing Right KPECSS1012
13 Screw ST 4x16 KPECSS1013
14 Axis KPECSS1014
15 Label KPECSS1015
16 Nut M5 KPECSS1016
17 Stator KPECSS1017
18 Bearing 606Z KPECSS1018
19 Rotor KPECSS1019
20 Bearing 608Z KPECSS1020
21 Small Wheel KPECSS1021
22 Bearing 607Z KPECSS1022
23 Drive Belt KPECSS1023
24 Retainer Ring 10 KPECSS1024
25 Big Wheel KPECSS1025
26 Pin 3x5 KPECSS1026
27 Spindle KPECSS1027
28 Press Plate KPECSS1028
29 Grinding Disc Ø100 KPECSS1029
30 Gasket 8 KPECSS1030
31 Nut M8 KPECSS1031
32 Bolt M5x16 KPECSS1032
33 Protective Cover KPECSS1033
34 Spring KPECSS1034
35 Gasket 5 KPECSS1035
36 Bolt M5x20 KPECSS1036
37 Transparent Cover KPECSS1037
38 Adjusting Screw 1 KPECSS1038
No Description Part number
39 Nut M6 KPECSS1039
40 Nut M6x12 KPECSS1040
41 Chain Guide KPECSS1041
42 Bolt M5x35 KPECSS1042
43 Left Chain Holder KPECSS1043
44 Right Chain Holder KPECSS1044
45 Bolt M5x10 KPECSS1045
46 Adjustment Wedge KPECSS1046
47 Nut M5 KPECSS1047
48 Spring 1 KPECSS1048
49 Guide Board KPECSS1049
50 Bolt M8x50 KPECSS1050
51 Bearing 6000Z KPECSS1051
52 Spring 2 KPECSS1052
53 Gasket 6 KPECSS1053
54 Bolt M6x16 KPECSS1054
55 Right Pivot Clamp KPECSS1055
56 Left Pivot Clamp KPECSS1056
57 Pin M6x12 KPECSS1057
58 Bracket KPECSS1058
59 Adjusting Screw 2 KPECSS1059
60 Spring 3 KPECSS1060
61 Nut M8 KPECSS1061
62 Locknut KPECSS1062
63 Swivel Plate KPECSS1063
64 Base KPECSS1064
65 Spring KPECSS1065
66 Steel Ball SØ5 KPECSS1066
67 Bolt M4x10 KPECSS1067
68 Splint KPECSS1068
69 Chain Holder Assy KPECSS1069
70 Spring KPECSS1070
71 Press Board KPECSS1071
72 Bolt M8x80 KPECSS1072
73 Wrench 4x22x60 KPECSS1073
74 Wrench 5x22x65 KPECSS1074
75 Jaw Wrench KPECSS1075
76 Socket Wrench KPECSS1076
13
Page 14
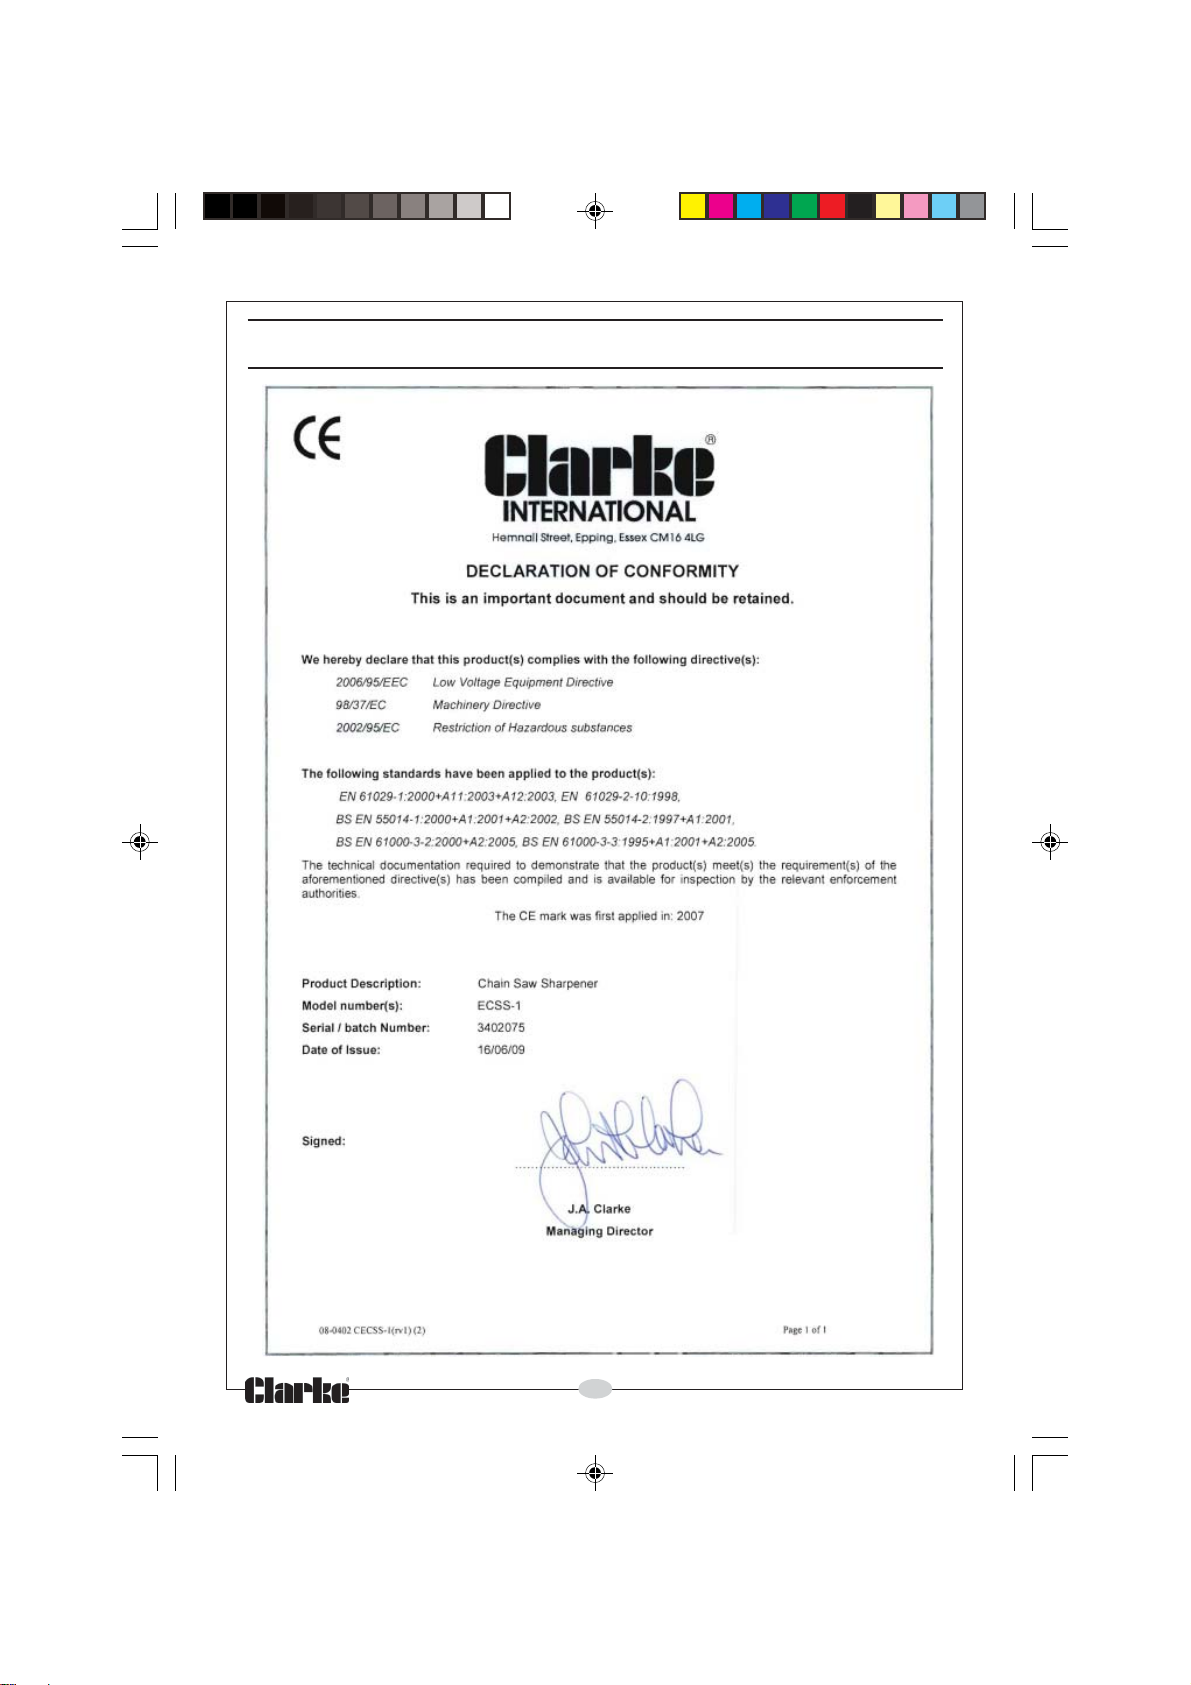
DECLARATION OF CONFORMITY
14
Page 15
NOTES
15
Page 16
16
 Loading...