

Page 1

ELECTRIC CHAINSAW
MODEL NO: CECS405C
PART NO: 3402073
OPERATION & MAINTENANCE
INSTRUCTIONS
ORIGINAL INSTRUCTIONS DL0521 - Rev 3
Page 2
INTRODUCTION
Thank you for purchasing this Electric Chainsaw.
Please read this manual thoroughly, before attempting to operate, and
carefully follow all instructions given.
It is vitally important that ALL precautions are taken, as specified, which will not
only provide protection for yourself and that of others around you, but will also
ensure that the chainsaw will give you long and satisfactory service.
GUARANTEE
This CLARKE chainsaw is guaranteed against faulty manufacture for a period
of 12 months from the date of purchase. Please keep your receipt as proof of
purchase.
This guarantee is invalid if the chainsaw is found to have been abused or
tampered with in any way, or not used for the purpose for which it was
intended.
Faulty goods should be returned to their place of purchase, no chainsaw can
be returned to us without prior permission. This guarantee does not affect your
statutory rights.
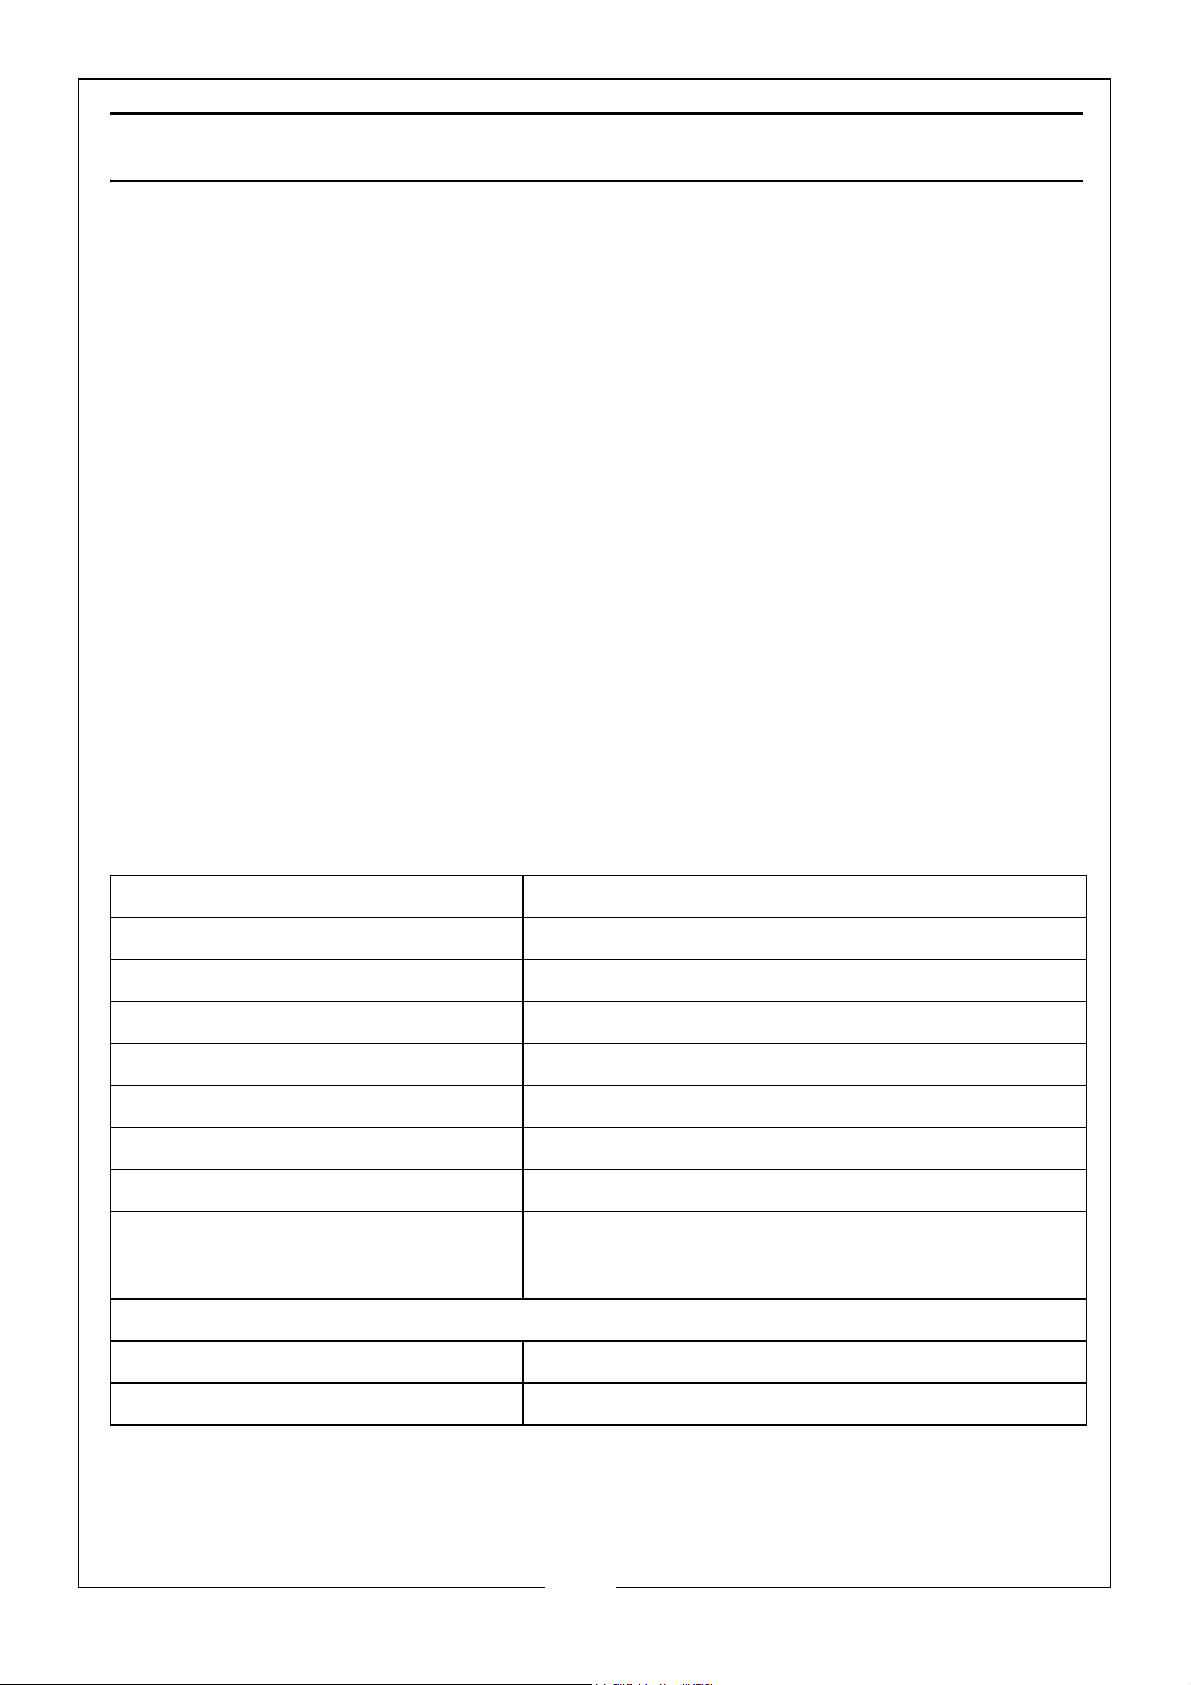
SPECIFICATIONS
Rated voltage 230 V @ 50Hz
Motor power rating 2000 W
Chain speed 13 m/s
Chain stopping time (kickback) < 0.12 seconds
Maximum cutting length 16” (405 mm)
Oil type Clarke chain oil.
Dimensions (L x W x H) 830 x 242 x 202 mm
Weight 5.5 kg
Vibration level (weighted)
Noise emission data
A-weighted sound pressure level 85.9 dB (A) K=3dB (A)
Guaranteed sound power level 112 dB Lwa
Main handle - 8.393 m/s
Aux handle - 6.002 m/s
2
2
2
Parts & Service: 020 8988 7400 / E-mail: [email protected] or [email protected]
Page 3

SAFETY PRECAUTIONS
WARNING: READ ALL INSTRUCTIONS. FAILURE TO FOLLOW ALL
INSTRUCTIONS LISTED BELOW MAY RESULT IN ELECTRIC SHOCK, FIRE AND/
OR SERIOUS INJURY. THE TERM “POWER TOOL” IN ALL WARNINGS LISTED
BELOW REFERS TO YOUR ELECTRIC CHAINSAW.
WORK AREA
1. Keep work area clean and well lit. Cluttered and dark areas invite
accidents.
2. Do not operate power tools in explosive atmospheres, such as in the
presence of flammable liquids, gases or dust.
which may ignite the dust or fumes.
3. Keep children and bystanders away while operating a power tool.
Distractions can cause you to lose control.
ELECTRICAL SAFETY
Power tools create sparks
1. Avoid body contact with earthed or grounded surfaces such as pipes,
radiators, ranges or refrigerators. There is an increased risk of electric shock
if your body is earthed or grounded.
2. Do not expose power tools to rain or wet conditions. Water entering a
power tool will increase the risk of electric shock.
3. When operating a power tool outdoors, use an extension cord suitable for
outdoor use. Use of a cord suitable for outdoor use reduces the risk of
electric shock.
4. Use outdoor extension leads. If working outdoors, always use an approved
cable extension suitable for the power rating of this tool (see
specifications), the conductor size should also be at least the same size as
that on the machine, or larger. When using a cable reel, always unwind the
cable completely. We strongly recommend that this machine is connected
to the mains supply via a Residual Current Device (RCD).
PERSONAL SAFETY
1. Stay alert, watch what you are doing and use common sense when
operating a power tool. Do not use a power tool while you are tired or
under the influence of drugs, alcohol or medication. A moment of
inattention while operating power tools may result in personal injury.
2. Use safety equipment. Always wear eye protection. Safety equipment such
as dust mask, non-skid safety shoes, or hearing protection used for
appropriate conditions will reduce personal injuries.
3
Parts & Service: 020 8988 7400 / E-mail: [email protected] or [email protected]
Page 4

3. Avoid accidental starting. Ensure the switch is in the off position before
connecting to the power supply.
4. Do not overreach. Keep proper footing and balance at all times. This
enables better control of the power tool in unexpected situations.
5. Dress properly. Do not wear loose clothing or jewellery. Keep your hair,
clothing and gloves away from moving parts. Loose clothes, jewellery or
long hair can be caught in moving parts.
POWER TOOL USE AND CARE
1. Do not force the power tool. Use the correct power tool for your
application. The correct power tool will do the job better and safer at the
rate which it was designed.
2. Do not use the power tool if the switch does not turn it on and off. Any
power tool that cannot be controlled with the switch is dangerous and
must be repaired.
3. Disconnect the power before making any adjustments, changing
accessories, or storing power tools. Such preventive safety measures
reduce the risk of starting the power tool accidentally.
4. Store idle tools out of the reach of children and do not allow persons
unfamiliar with the power tool or these instructions to operate the power
tool. Power tools are dangerous in the hands of untrained users.
5. Maintain power tools. Check for misalignment or binding of moving parts,
breakage of parts and any other condition that may affect the power tools
operation. If damaged, have the power tool repaired before use. Many
accidents are caused by poorly maintained power tools.
6. Keep cutting tools sharp and clean. Properly maintained cutting tools with
sharp cutting edges are less likely to bind and are easier to control.
7. Use the power tool and accessories in accordance with these instructions
and in the manner intended for the particular type of power tool, taking
into account the working conditions and the work to be performed. Use of
the power tool for operations different from intended could result in a
hazardous situation.
SERVICING
1. Have your power tool serviced by a qualified repair person using only
identical replacement parts. This will ensure that the safety of the power
tool is maintained.
4
Parts & Service: 020 8988 7400 / E-mail: [email protected] or [email protected]
Page 5

CHAINSAW SAFETY WARNINGS
1. Keep all parts of the body away from the saw chain when the chainsaw is
operating. Before you start the chainsaw, make sure the saw chain is not
contacting anything. A moment of inattention while operating chainsaws
may cause entanglement of your clothing or body with the saw chain.
2. Always hold the chainsaw with your right hand on the rear handle and your
left hand on the front handle. Holding the chainsaw with a reversed hand
configuration increases the risk of injury and should never be done.
3. Hold the chainsaw by insulated gripping surfaces only, because the saw
chain may contact hidden wiring or its own cable. Saw chains contacting
a “live” wire may make exposed metal parts of the power tool “live” and
could give the operator an electric shock.
4. Wear safety glasses and hearing protection. Further protective equipment
for head, hands, legs and feet must also be worn. Adequate protective
clothing will reduce personal injury by flying debris or accidental contact
with the saw chain.
5. Do not operate a chainsaw in a tree. Operation of a chainsaw while up in a
tree may result in personal injury.
6. Always keep proper footing and operate the chainsaw only when standing
on fixed, secure and level surface. Slippery or unstable surfaces such as
ladders may cause a loss of balance or control of the chainsaw.
7. When cutting a limb that is under tension be alert for spring back. When the
tension in the wood fibres is released the spring loaded limb may strike the
operator and/or throw the chainsaw out of control.
8. Use extreme caution when cutting brush and saplings. The material may
catch the saw chain and be whipped toward you or pull you off balance.
9. Carry the chainsaw by the front handle with the chainsaw switched off and
away from your body. When transporting or storing the chainsaw always fit
the guide bar cover. Proper handling of the chainsaw will reduce the
likelihood of accidental contact with the moving saw chain.
10. Follow instructions for lubricating, chain tensioning and changing
accessories. Improperly tensioned or lubricated chain may either break or
increase the chance for kickback.
11. Keep handles dry, clean, and free from oil and grease. Greasy, oily handles
are slippery causing loss of control.
12. Cut wood only. Do not use the chainsaw for purposes not intended. For
example: do not use the chainsaw for cutting plastic, masonry or nonwood building materials. Use of the chainsaw for operations different than
intended could result in a hazardous situation.
5
Parts & Service: 020 8988 7400 / E-mail: [email protected] or [email protected]
Page 6
CAUSES AND PREVENTION OF KICKBACK
Kickback may occur when the nose or tip of the guide bar touches an object,
or when the wood closes in and pinches the saw chain in the cut.
Tip contact in some cases, may cause a sudden reverse reaction, kicking the
guide bar up and back towards the operator.
Pinching the saw chain along the top of the guide bar may push the guide
bar rapidly back towards the operator.
Either of these reactions may cause you to lose control of the saw which could
result in serious personal injury. Do not rely exclusively upon the safety devices
built into your saw. As a chainsaw user, you should take several steps to keep
your cutting jobs free from accident or injury.
Kickback is the result of tool misuse and/or incorrect operating procedures or
conditions and can be avoided by taking proper precautions as given below:
1. Maintain a firm grip, with thumbs and fingers encircling the chainsaw
handles, with both hands on the saw and position your body and arm to
allow you to resist kickback forces. Kickback forces can be controlled by
the operator if proper precautions are taken. Do not let go of the
chainsaw.
2. Do not overreach and do not cut above shoulder height. This helps prevent
unintended tip contact and enables better control of the chainsaw in
unexpected situations.
3. Only use replacement bars and chains specified by the manufacturer.
Incorrect replacement bars and chains may cause chain breakage and/
or kickback.
ENVIRONMENTAL RECYCLING POLICY
Through purchase of this chainsaw, the customer is taking on the
obligation to deal with the WEEE in accordance with the WEEE
regulations in relation to the treatment, recycling & recovery and
environmentally sound disposal of the WEEE.
In effect, this means that this chainsaw must not be disposed of with general
household waste. It must be disposed of according to the laws governing
Waste Electrical and Electronic Equipment (WEEE) at a recognised disposal
facility.
6
Parts & Service: 020 8988 7400 / E-mail: [email protected] or [email protected]
Page 7
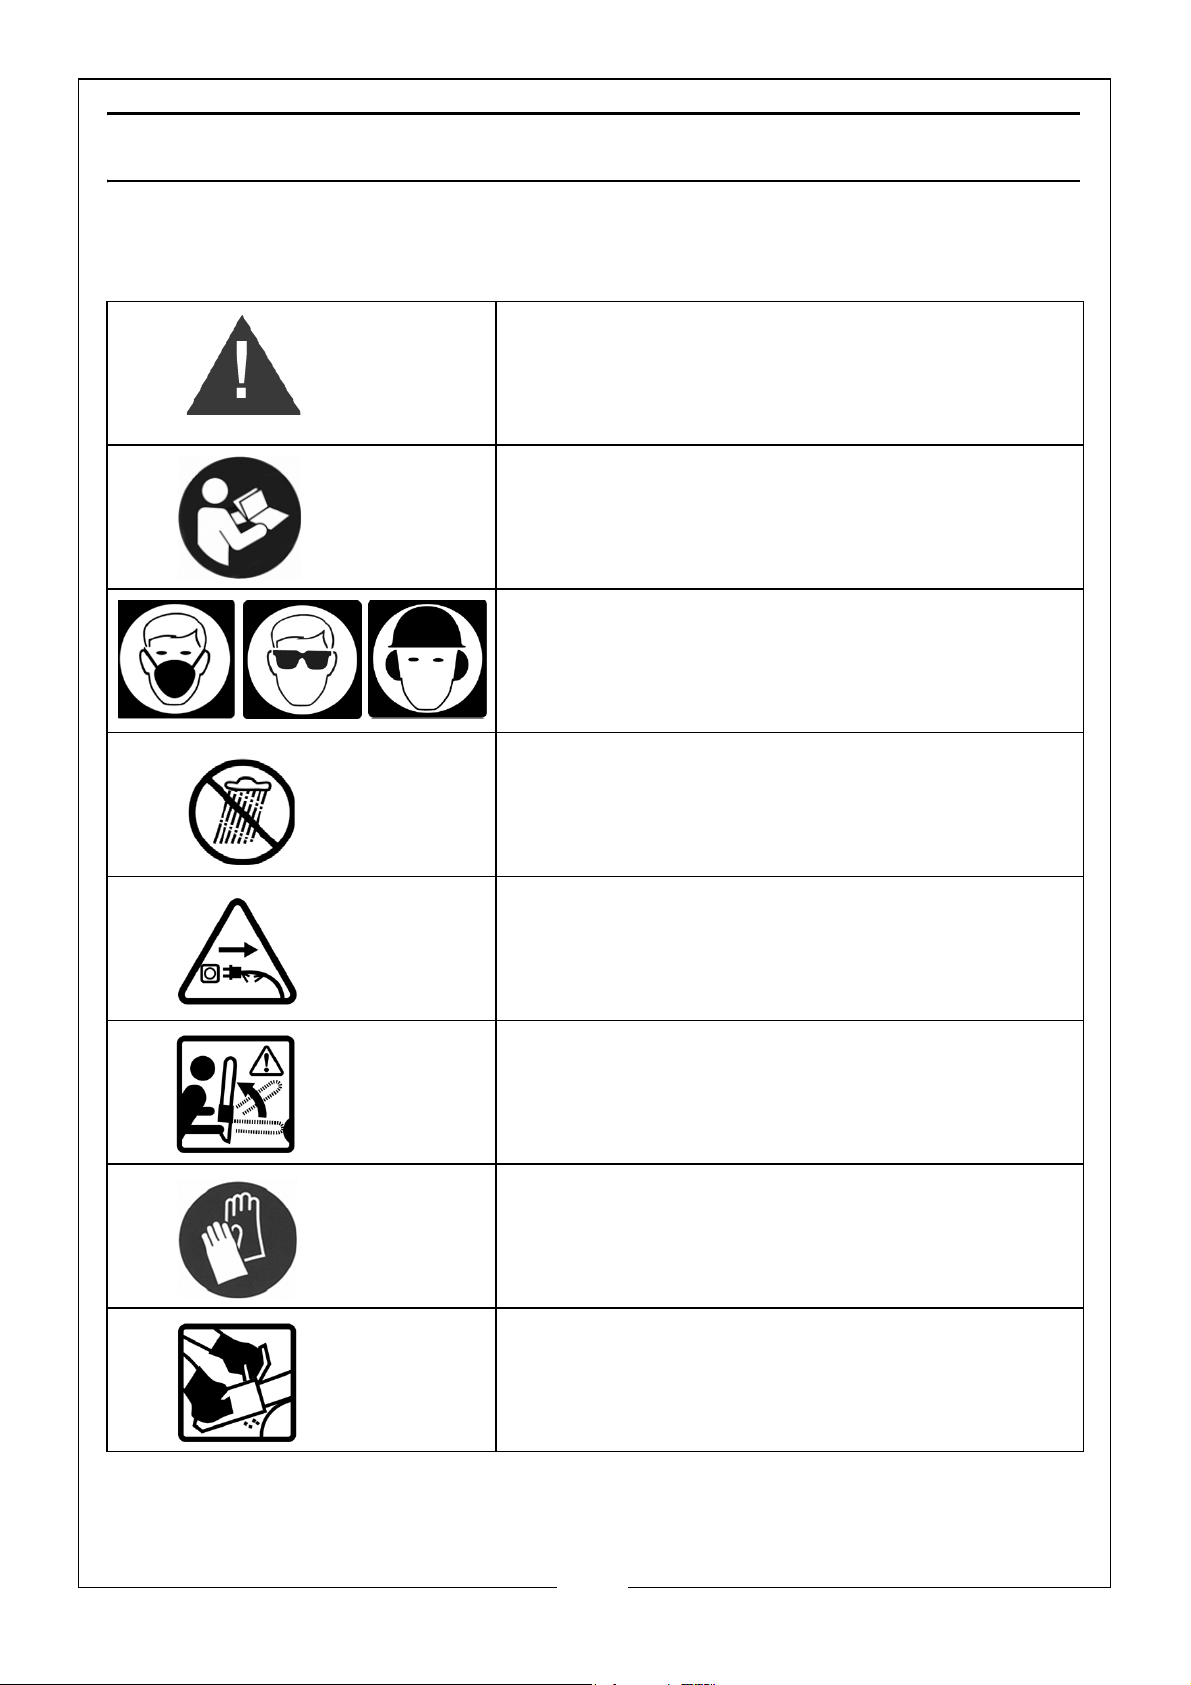
WARNING SYMBOLS
The following symbols are displayed on the chainsaw in order to remind you of
the safety precautions you should take during operation.
Warning! - When using this chainsaw, basic
safety precautions, including those in this user
guide, should be observed to reduce the risk of
fire, electric shock and personal injury.
Warning! - Read this user guide thoroughly
before use and keep in a safe place for future
reference.
Warning! - Wear safety goggles, ear protectors
and safety helmet when using this chainsaw.
Warning! - Do not expose this chainsaw to rain,
or use in damp or wet locations.
Warning! - Disconnect from the mains supply
immediately if the cable is damaged or cut.
Warning! - Never cut with the tip of the blade
as this may result in kickback and cause
personal injury.
Warning! - Always wear gloves approved for
chainsaw use.
Warning! - Always hold the chainsaw with both
hands during use.
7
Parts & Service: 020 8988 7400 / E-mail: [email protected] or [email protected]
Page 8
ELECTRICAL CONNECTIONS
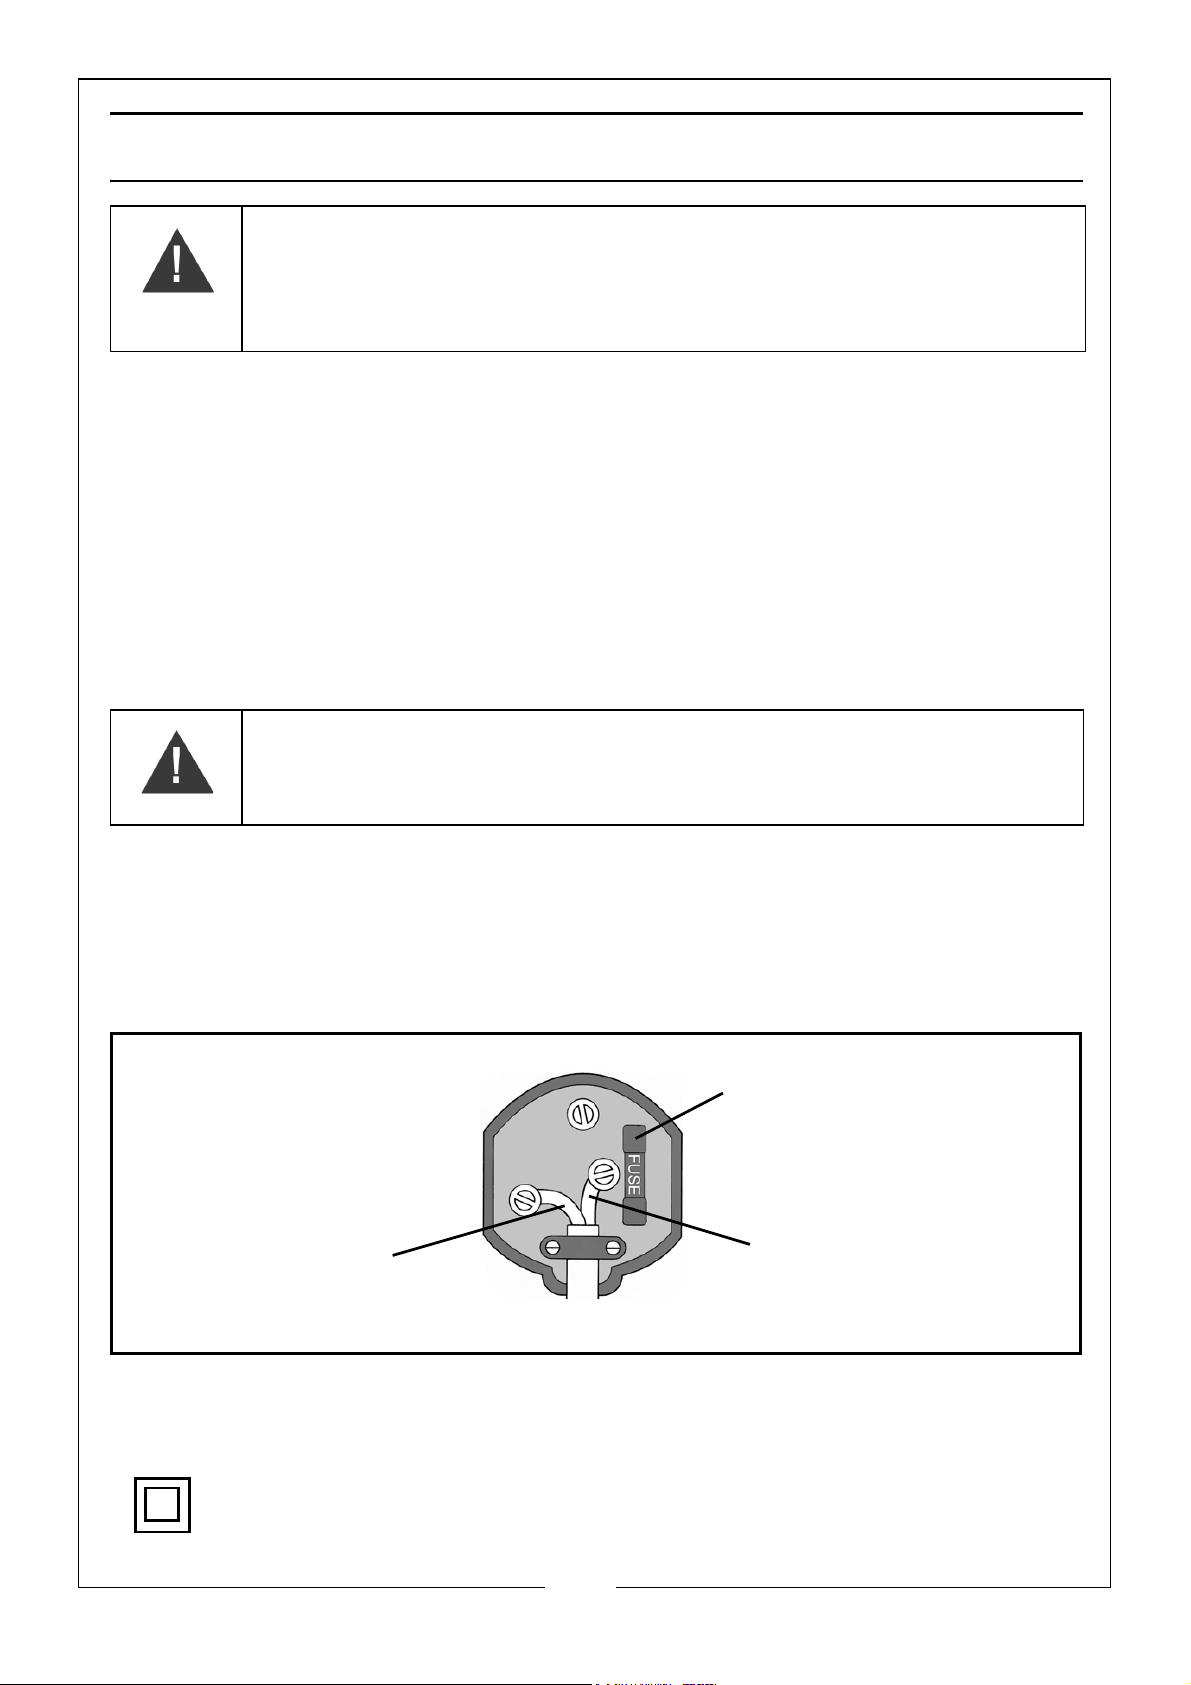
Plug must be BS1363/A approved.
Always fit a 13 Amp fuse.
Ensure that the outer sheath of the cable is firmly held by the clamp
Neutral
(Blue)
Live
(Brown)
WARNING: READ THESE ELECTRICAL SAFETY INSTRUCTIONS
THOROUGHLY BEFORE CONNECTING THE CHAINSAW TO THE MAINS
SUPPLY.
Before switching the chainsaw on, make sure that the voltage of your electricity supply
is the same as that indicated on the rating plate. This chainsaw is designed to operate
on 230V AC 50Hz. Connecting it to any other power source may cause damage.
This chainsaw is fitted with a non-rewireable plug. If it is necessary to change the fuse in
the plug, the fuse cover must be refitted. If the fuse cover becomes lost or damaged,
the plug must not be used until a suitable replacement is obtained.
If the plug has to be changed because it is not suitable for your socket, or due to
damage, it should be cut off and a replacement fitted, following the wiring instructions
shown below. The old plug must be disposed of safely, as insertion into a mains socket
could cause an electrical hazard.
WARNING! The wires in the power cable of this chainsaw are
coloured in accordance with the following code:
Blue = Neutral Brown = Live
If the colours of the wires in the power cable of this chainsaw do not correspond with
the markings on the terminals of your plug, proceed as follows.
•The Blue wire must be connected to the terminal which is marked N or
coloured Black.
•The Brown wire must be connected to the terminal which is marked L or
coloured Red.
We strongly recommend that this machine is connected to the mains supply via a
Residual Current Device (RCD)
If in any doubt, consult a qualified electrician. DO NOT attempt any repairs yourself.
This symbol indicates that this is a Class II chainsaw, and does not require an
earth connection.
Parts & Service: 020 8988 7400 / E-mail: [email protected] or [email protected]
8
Page 9
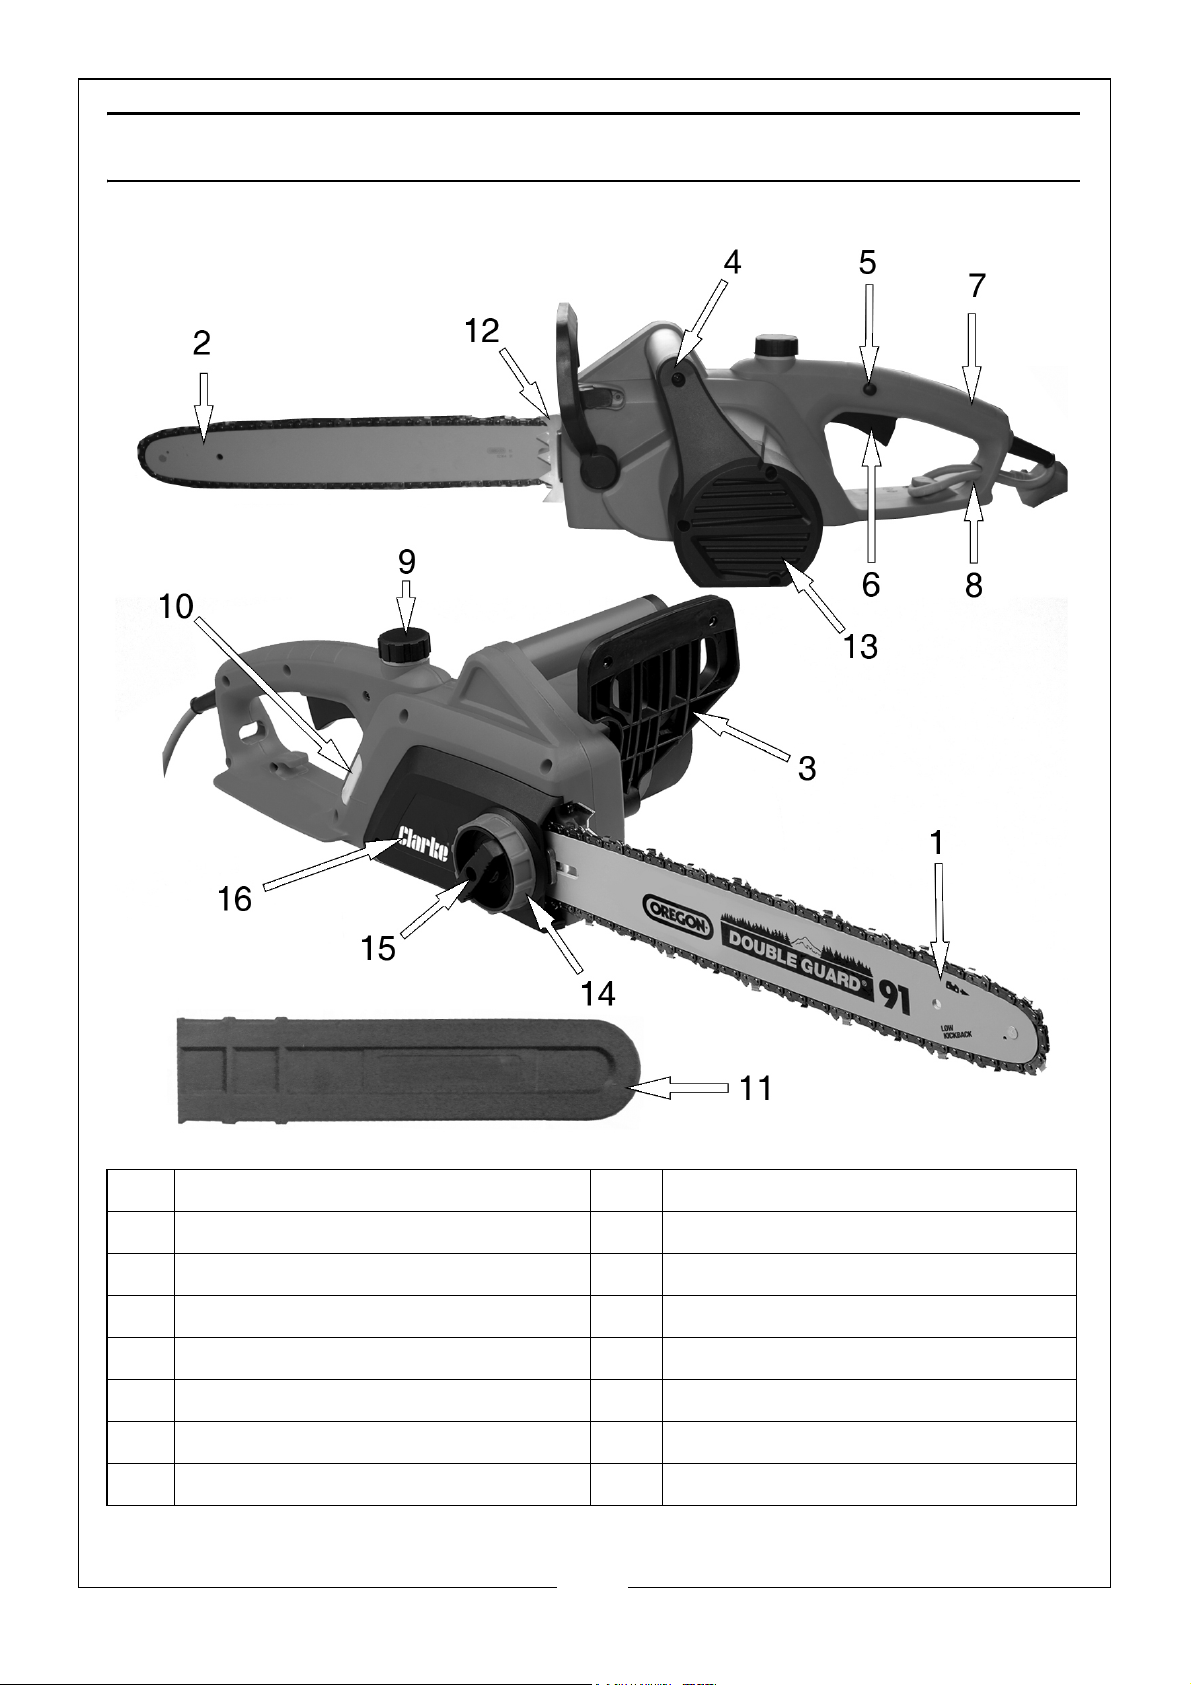
OVERVIEW
1 Chain 9 Oil Filler Cap
2 Chain Bar 10 Oil Level Window
3 Chain Brake Lever 11 Chain Scabbard
4 Front Handle 12 Gripping Teeth
5 Trigger Lock 13 Air Intake
6 On/Off Switch 14 Blade Tensioning Dial
7 Rear Handle 15 Cover Locking Screw
8 Cable Retainer 16 Housing Cover
9
Parts & Service: 020 8988 7400 / E-mail: [email protected] or [email protected]
Page 10
ASSEMBLY
WARNING: FOR YOUR SAFETY AND THE SAFETY OF OTHERS MAKE SURE
THAT YOU HAVE READ AND UNDERSTOOD ALL THE SAFETY WARNINGS
BEFORE CONTINUING WITH THIS SECTION.
WARNING: ENSURE THAT THE CHAINSAW IS DISCONNECTED FROM THE
MAINS SUPPLY DURING ALL CHECKS AND ADJUSTMENTS IN THIS SECTION
FILLING THE CHAINSAW WITH OIL
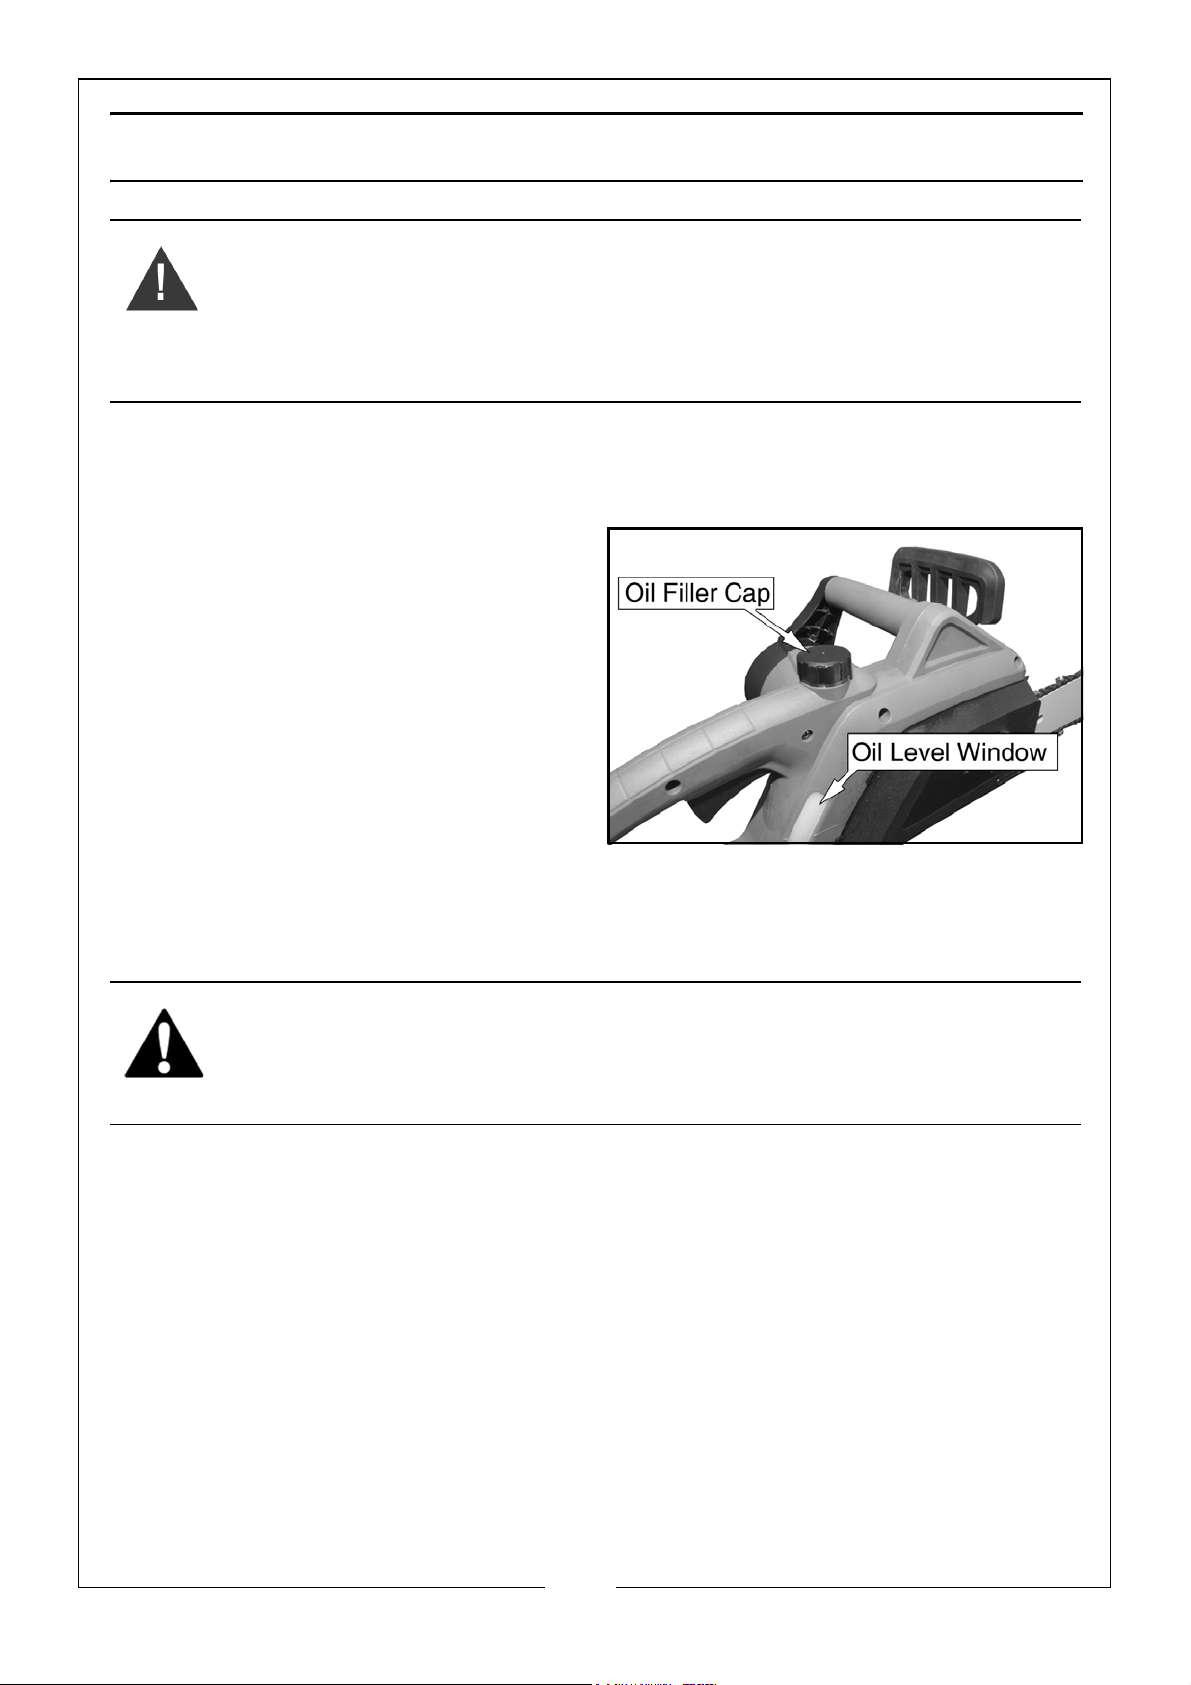
Chainsaw oil must be added to the chainsaw as follows before use.
1. Place the chainsaw on a stable,
level surface.
2. Unscrew and remove the oil filler
cap.
3. Using a funnel, fill the oil tank with
chainsaw oil (supplied).
• The oil tank will hold 135cc of
chain oil, enough to lubricate
the chain for 12-15 minutes of
sawing.
• Chainsaw oil is available from your CLARKE dealer (part number
3050865)
CAUTION: YOU MUST ONLY USE CHAINSAW OIL WITH THIS CHAINSAW.
USING DIFFERENT OIL MAY CAUSE DAMAGE AND INVALIDATE YOUR
WARRANTY.
4. Refit the oil filler cap.
5. Wipe up any spillage before continuing.
6. The oil level should be checked frequently during use and topped up as
necessary (when the level drops to the min line on the oil level window).
10
Parts & Service: 020 8988 7400 / E-mail: [email protected] or [email protected]
Page 11
ATTACHING THE CHAIN BAR AND CHAIN
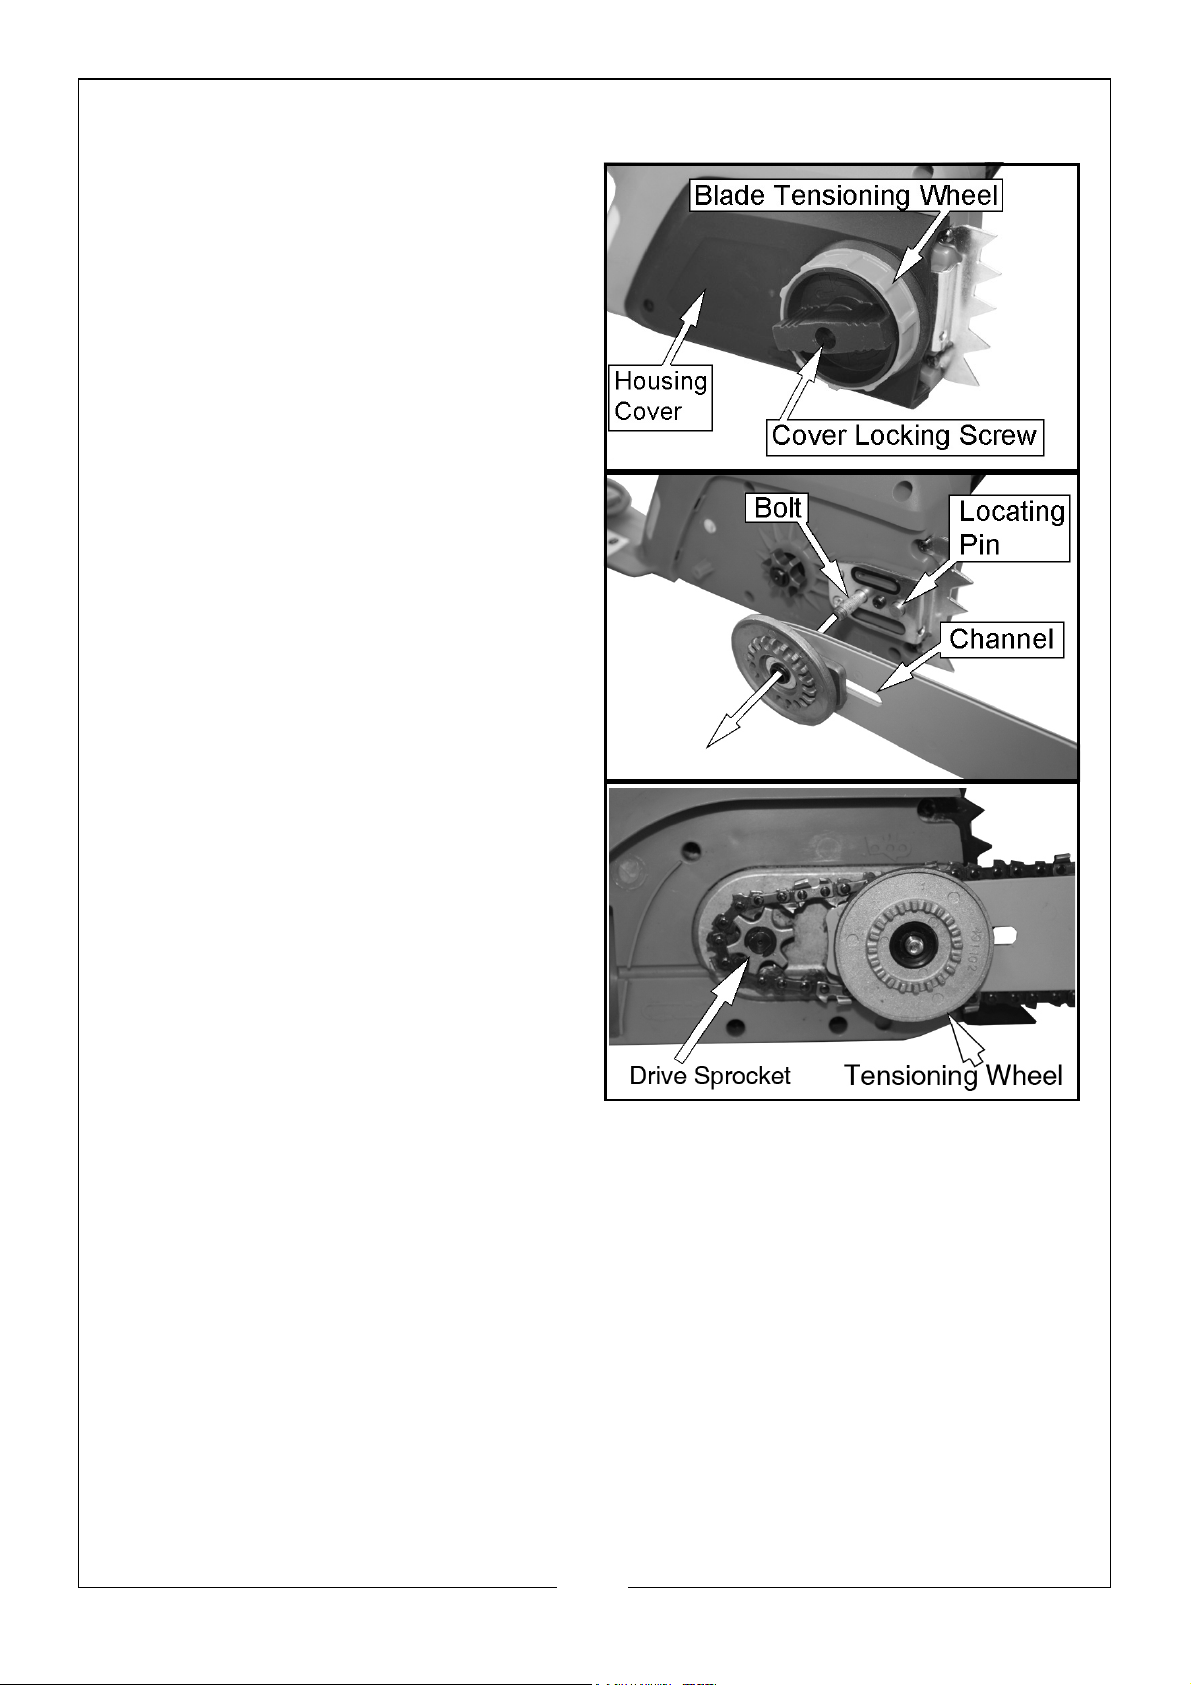
1. Place the chainsaw on a stable
surface.
2. Loosen the cover locking screw
and remove the housing cover.
3. Slide the bar into place so that the
tensioning wheel slides over the
bolt as shown.
• The locating pin slides into the
channel shown.
4. Put the chain onto the bar.
• The chain bar is marked with an
arrow, showing the direction in
which the chain will travel.
5. Make sure all the chain links are
seated correctly into the groove
on the chain bar
• The cutting teeth on the upper
side of the bar must point
forward.
6. Put the free end of the chain over the drive sprocket
• If the chain does not reach, turn the tension wheel anticlockwise.
7. To secure the bar, replace the housing cover and tighten the cover locking
screw finger tight.
8. Adjust the blade tension as follows.
11
Parts & Service: 020 8988 7400 / E-mail: [email protected] or [email protected]
Page 12
USING THE CHAINSAW
WARNING: DO NOT START THE CHAINSAW UNTIL IT IS FULLY ASSEMBLED
AND ADJUSTED AND YOU HAVE READ ALL RELEVANT WARNINGS / SAFETY
INSTRUCTIONS.
For ‘first time’ users of this type of product, we recommend that introductory
training is undertaken from an experienced person before use.
PERSONAL PROTECTIVE EQUIPMENT
The following Personal Protective Equipment (PPE) available from you local
Clarke Dealer has been designed for use with chainsaws.
• A safety helmet with mesh visor.
•Ear defenders.
• Specialist chainsaw gloves.
• Trousers or chaps suitable for chainsaw use (they contain a clogging
material which stops the chain if cut).
• Safety boots with toe and shin protection.
• Close fitting hi-visibility jacket.
CAUTION: NO PPE WILL OFFER 100% PROTECTION AGAINST CHAINSAW
CUTS ESPECIALLY IF THE CHAINSAW IS USED IN A DANGEROUS MANNER.
CONNECTING TO THE POWER SUPPLY
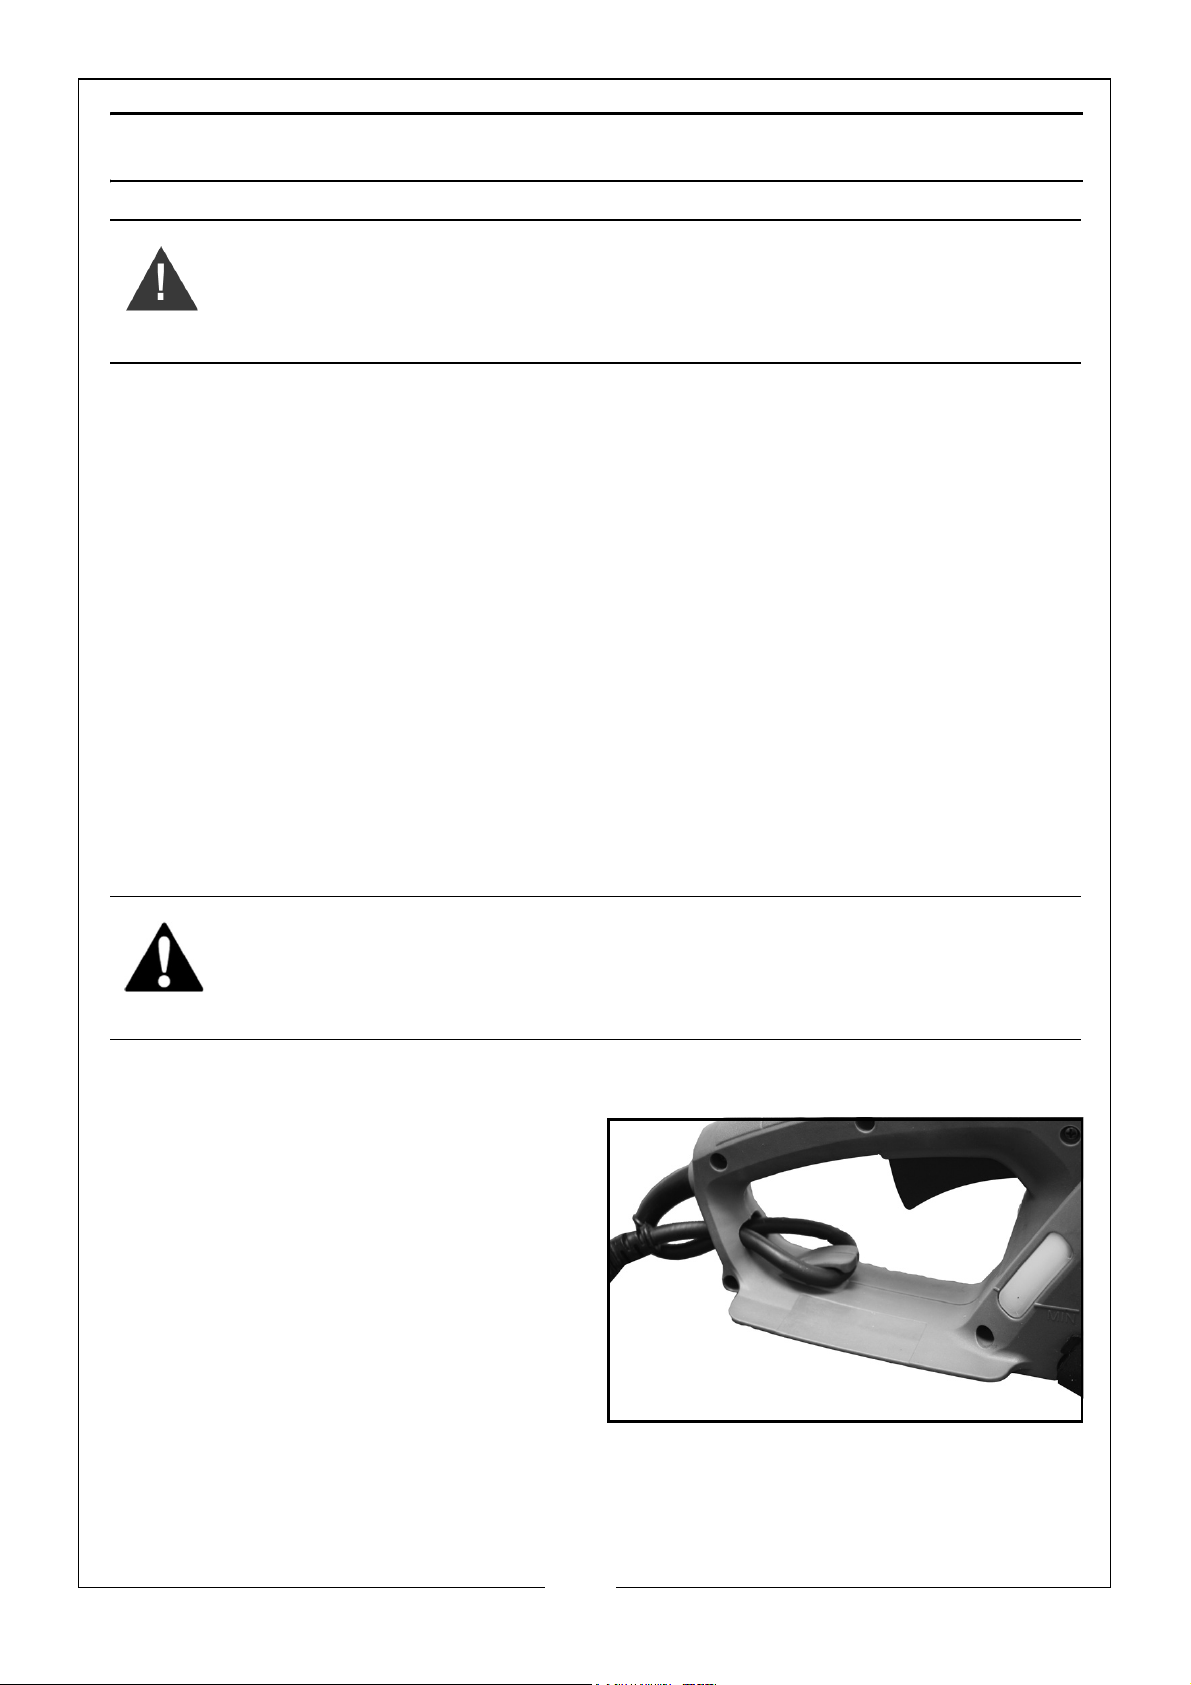
To prevent strain on the cable during
use:
1. Make a small loop in the power
cable.
2. Put the loop through the hole in
the handle and on the hook
shown.
3. Slowly pull the loop back to
remove the slack.
4. Connect the plug to a power socket.
NOTE: We strongly recommend that this machine is connected to the
mains supply via a Residual Current Device (RCD).
12
Parts & Service: 020 8988 7400 / E-mail: [email protected] or [email protected]
Page 13
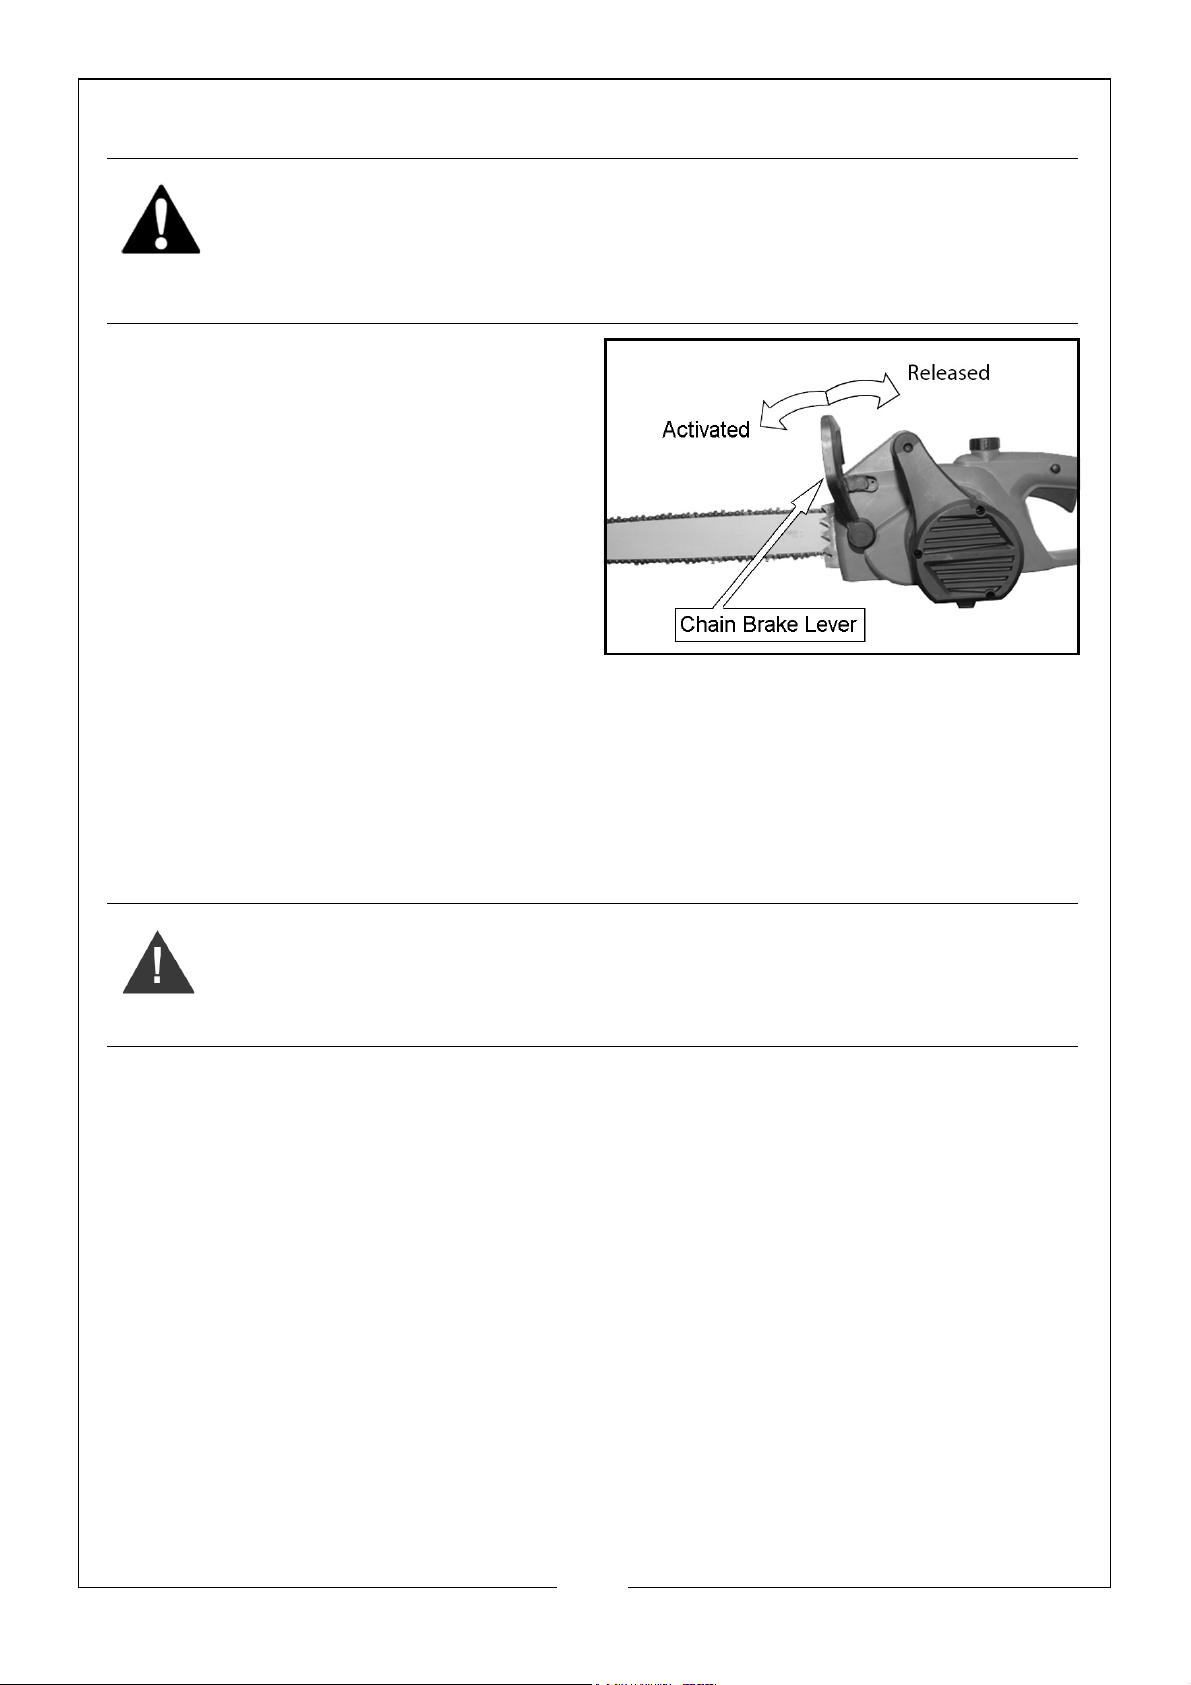
THE CHAIN BRAKE
CAUTION: THE CHAIN BRAKE HAS BEEN DESIGNED TO REDUCE THE
POSSIBILITY OF INJURY IF KICKBACK OCCURS. HOWEVER, IT CANNOT BE
RELIED UPON TO PROTECT YOU AGAINST INJURY IF THE CHAINSAW IS
USED CARELESSLY. TAKE GREAT CARE WHEN CUTTING, AND ALWAYS TEST
THE CHAIN BRAKE BEFORE USING THE CHAINSAW.
During kickback, the chain brake
lever will hit the back or your wrist/
lower arm, activating the chain
brake.
When the brake is activated the
chain will stop.
• The chain brake is released (the
chain can move) when the
chain brake lever is pulled back
towards the handle.
• The brake is activated (chain is stopped) when the chain brake lever
pushed forward away from the handle.
Release the chain brake by pulling the chain brake lever back towards the
handle.
CHAIN BRAKE TEST
WARNING: BEFORE OPERATING THIS CHAINSAW, ALWAYS CHECK THAT
THE CHAIN BRAKE IS IN PERFECT WORKING CONDITION.
The following functional check should be carried out before each use. The
purpose of the chain brake test is to reduce the possibility of injury due to
kickback.
1. Pull the chain brake lever towards the front handle to release the chain
brake.
2. Make sure that the saw chain is not touching anything and connect it to
the power supply.
3. Hold the chainsaw with the left hand on front handle and your right hand
on rear handle.
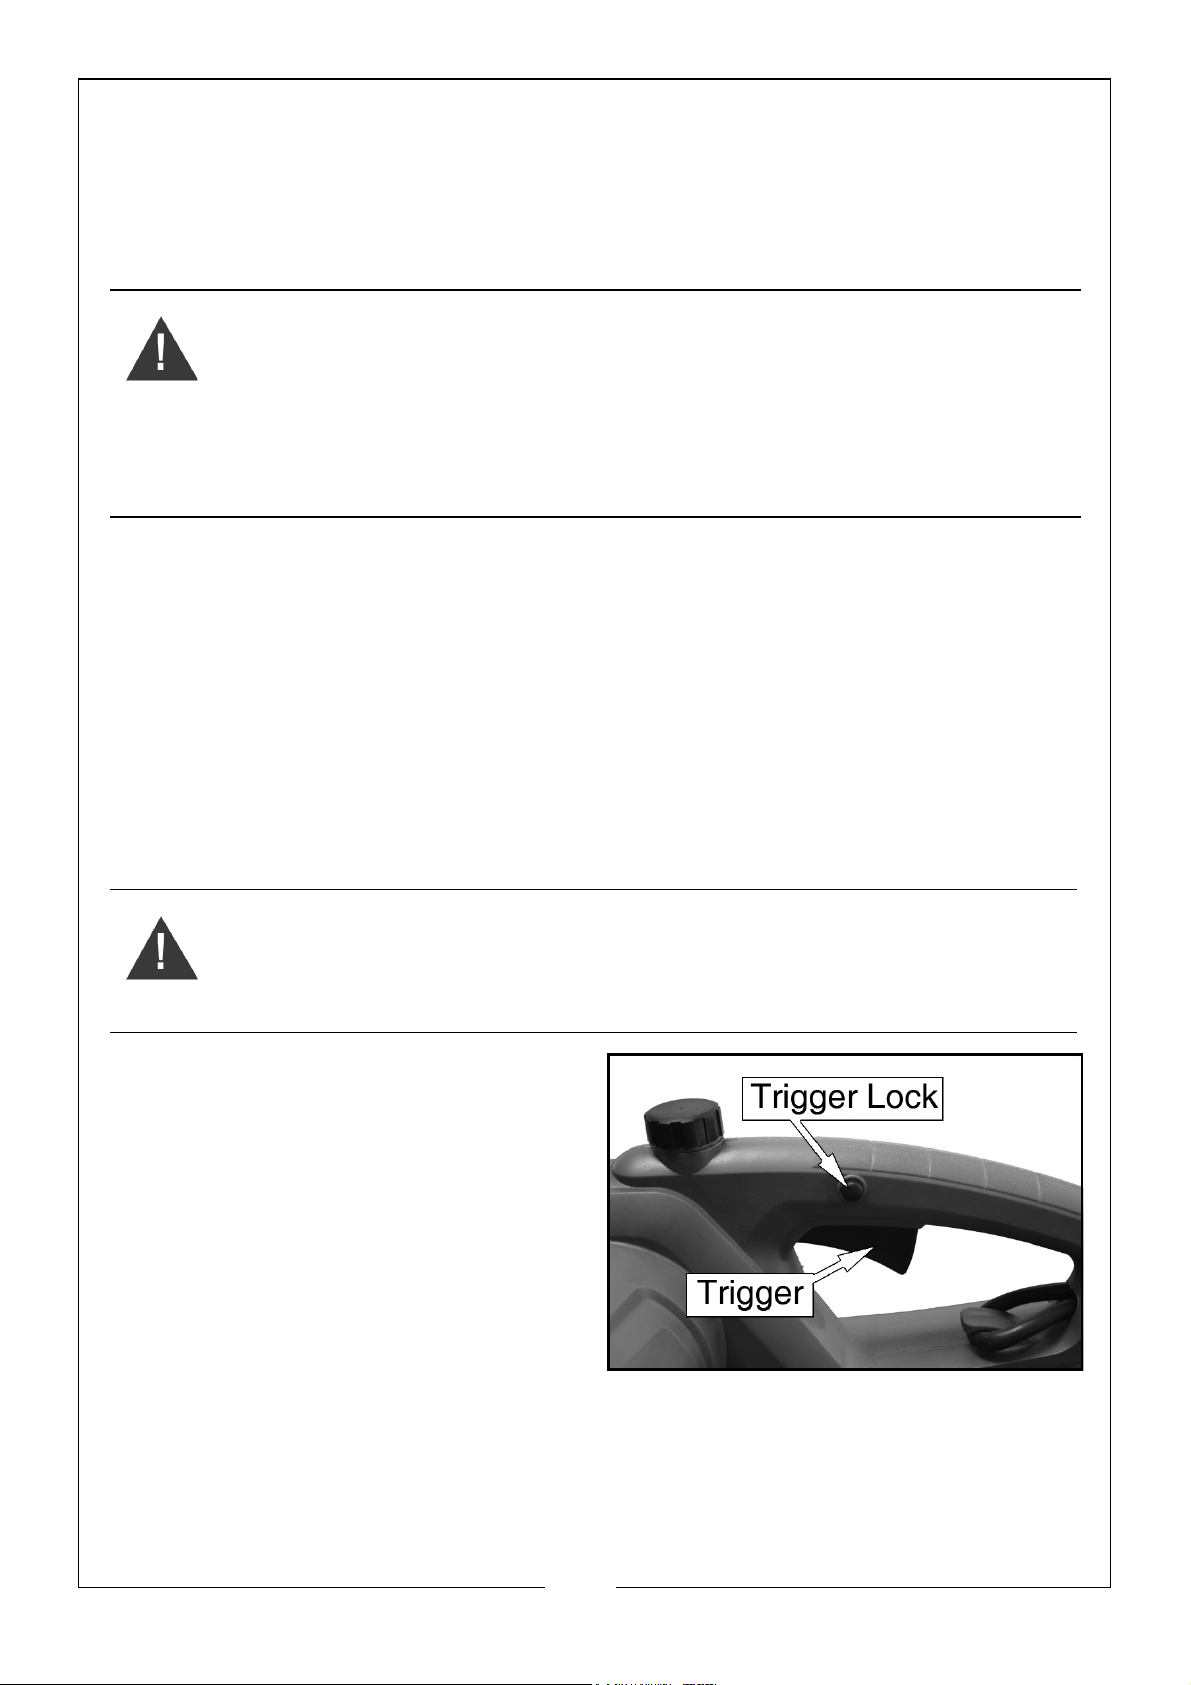
4. Press and hold the trigger lock button and squeeze the trigger to switch the
chainsaw on.
13
Parts & Service: 020 8988 7400 / E-mail: [email protected] or [email protected]
Page 14
5. While the motor is running, activate the chain brake by moving your left
hand forward against the chain brake. The saw chain and motor should
stop immediately.
NOTE: The motor will not start if the chain brake is in the engaged
position.
WARNING: IF THE SAW CHAIN AND MOTOR FAIL TO STOP WHEN THE
CHAIN BRAKE IS ENGAGED, TAKE THE CHAINSAW TO THE NEAREST
AUTHORISED DEALER OR SERVICE CENTRE! DO NOT USE THE CHAINSAW IF
THE CHAIN BRAKE IS NOT WORKING PROPERLY!
THE CHAIN BRAKE SHOULD NOT BE USED FOR STARTING AND STOPPING
THE CHAINSAW DURING NORMAL OPERATION!
SWITCHING ON/OFF
1. Make sure that the oil tank has been filled with oil.
2. Make sure the chain brake is in the released position.
3. Hold the chainsaw with left hand on front handle and right hand on rear
handle.
• Use a firm and proper grip when holding the handle, your finger and
thumbs should encircle the handles.
• Keep your body to the left of the blade at all times.
WARNING: DO NOT USE THE CHAIN BRAKE LEVER AS A HANDLE.
WARNING: NEVER USE A LEFT HANDED (CROSS-HANDED) GRIP OR ANY
GRIP THAT PLACES YOUR BODY OR ARM ACROSS THE CUTTING LINE.
4. Start the chainsaw by pushing the
trigger lock button with your
thumb and squeezing the trigger
switch.
NOTE: Check the blade tension
after every 15 minutes of use.
5. Release the trigger to switch the
chainsaw off.
14
Parts & Service: 020 8988 7400 / E-mail: [email protected] or [email protected]
Page 15
CHAIN TENSION
WARNING: ALWAYS DISCONNECT THE CHAINSAW FROM THE POWER
SUPPLY BEFORE ADJUSTING THE BLADE TENSION.
WARNING: THE CUTTING EDGES OF THE SAW CHAIN ARE SHARP. ALWAYS
WEAR PROTECTIVE GLOVES WHEN HANDLING THE CHAIN.
WARNING: ALWAYS MAINTAIN CORRECT BLADE TENSION TO REDUCE THE
RISK OF KICKBACK, A LOOSE CHAIN MAY JUMP OUT OF THE CHAIN BAR
GROOVE AND INJURE THE OPERATOR OR DAMAGE THE CHAINSAW.
WARNING: MAKE SURE THAT YOU HAVE READ AND UNDERSTOOD ALL OF
THE SAFETY WARNINGS BEFORE CONTINUING WITH THIS SECTION.
Correct chain tension is extremely important and must always be checked
before starting work.
When using the chainsaw for the first time (or after replacing the chain) the
tension should be checked regularly, as a new chain will stretch after several
cuts.
If the chain is too loose or too tight, the sprocket, bar and chain will wear more
rapidly. The tension should be sufficient to keep the chain snug on the bar, but
loose enough to allow the chain to be pulled around by hand. Taking time to
adjust the chain tension correctly will result in improved cutting performance
and prolonged chain life.
ADJUSTING THE CHAIN TENSION
WARNING: ALWAYS WEAR PROTECTIVE GLOVES WHEN ADJUSTING THE
CHAIN TENSION.
WARNING: NEVER CHECK OR ADJUST THE CHAIN TENSION WHEN THE
CHAINSAW IS CONNECTED TO THE MAINS SUPPLY.
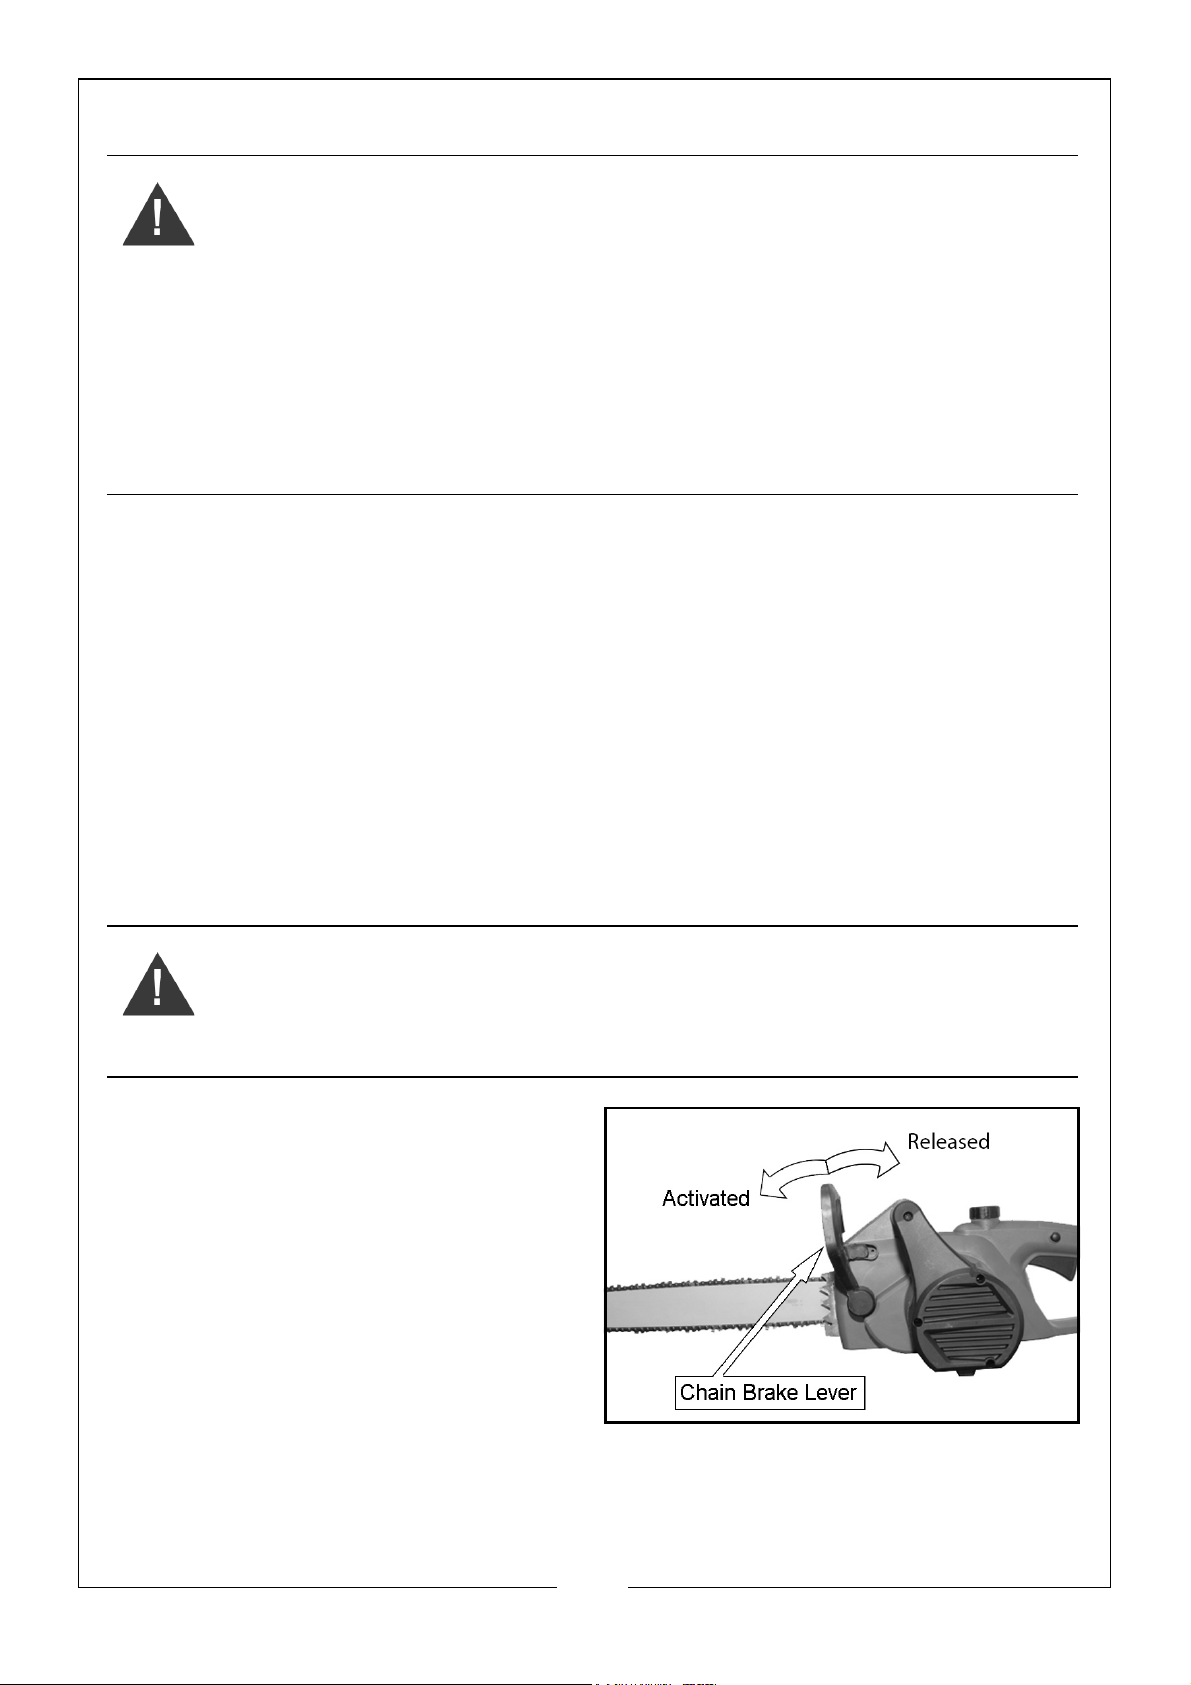
1. Ensure the chain brake lever is in
the released position (pulled back
towards the handle).
2. Loosen the housing cover by slightly rotating the cover locking screw, (do
not remove). See diagram.
3. Use the blade tensioning wheel to adjust the tension of the chain.
15
Parts & Service: 020 8988 7400 / E-mail: [email protected] or [email protected]
Page 16
• Turn the blade tensioning wheel clockwise to increase the tension.
• Turn the blade tensioning wheel anticlockwise to decrease the tension.
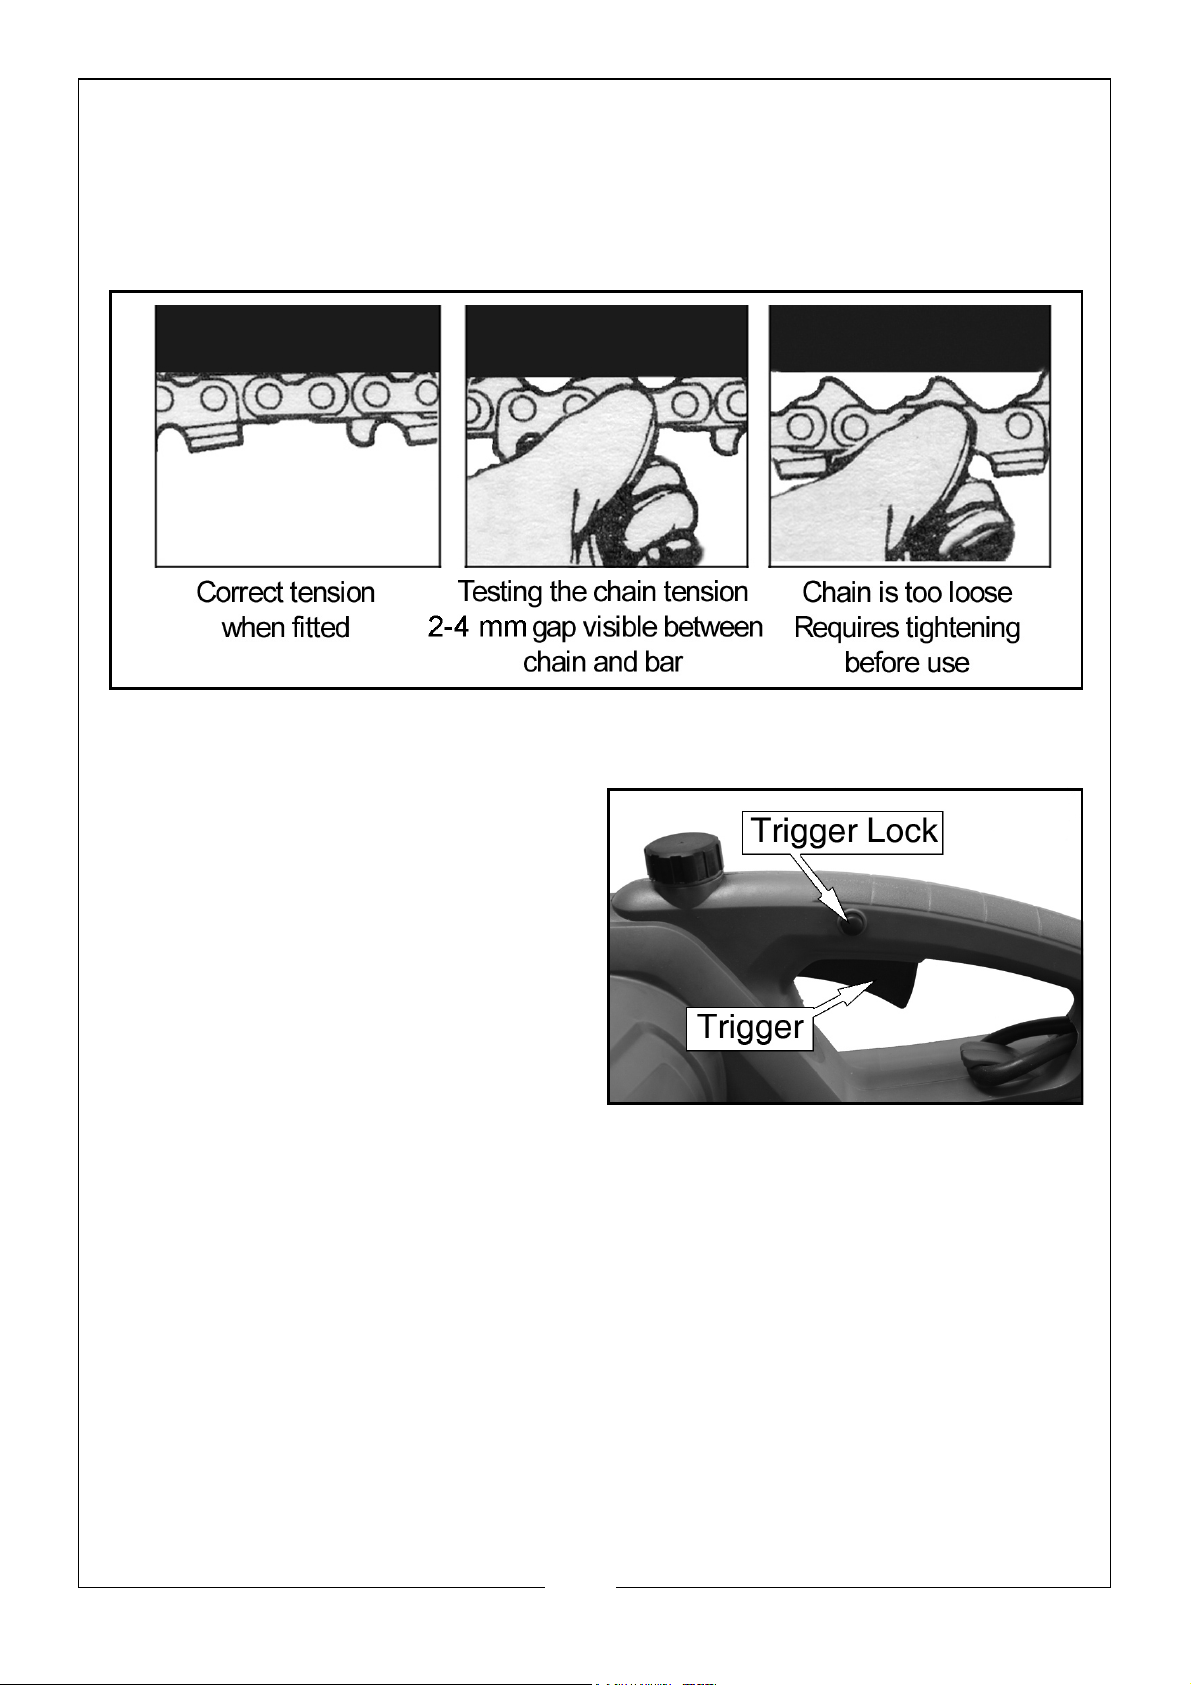
4. Pull the chain gently downwards at the centre of the bar. The chain is
correctly adjusted when gentle pulling only results in it moving 2-4 mm
away from the chain bar. See centre diagram below.
5. When the chain tension is correct, re-tighten the cover locking screw
securely.
6. Finally, push and hold the trigger
lock and squeeze the trigger, whilst
holding the trigger, pull the chain
around the bar by hand - it should
fit snugly around the bar and
move freely and smoothly.
NOTE: If the chain binds or is difficult
to rotate by hand, too much
tension has been applied.
Repeat steps 2 to 6, turning
the blade tensioning wheel
anticlockwise slightly to reduce the tension.
16
Parts & Service: 020 8988 7400 / E-mail: [email protected] or [email protected]
Page 17
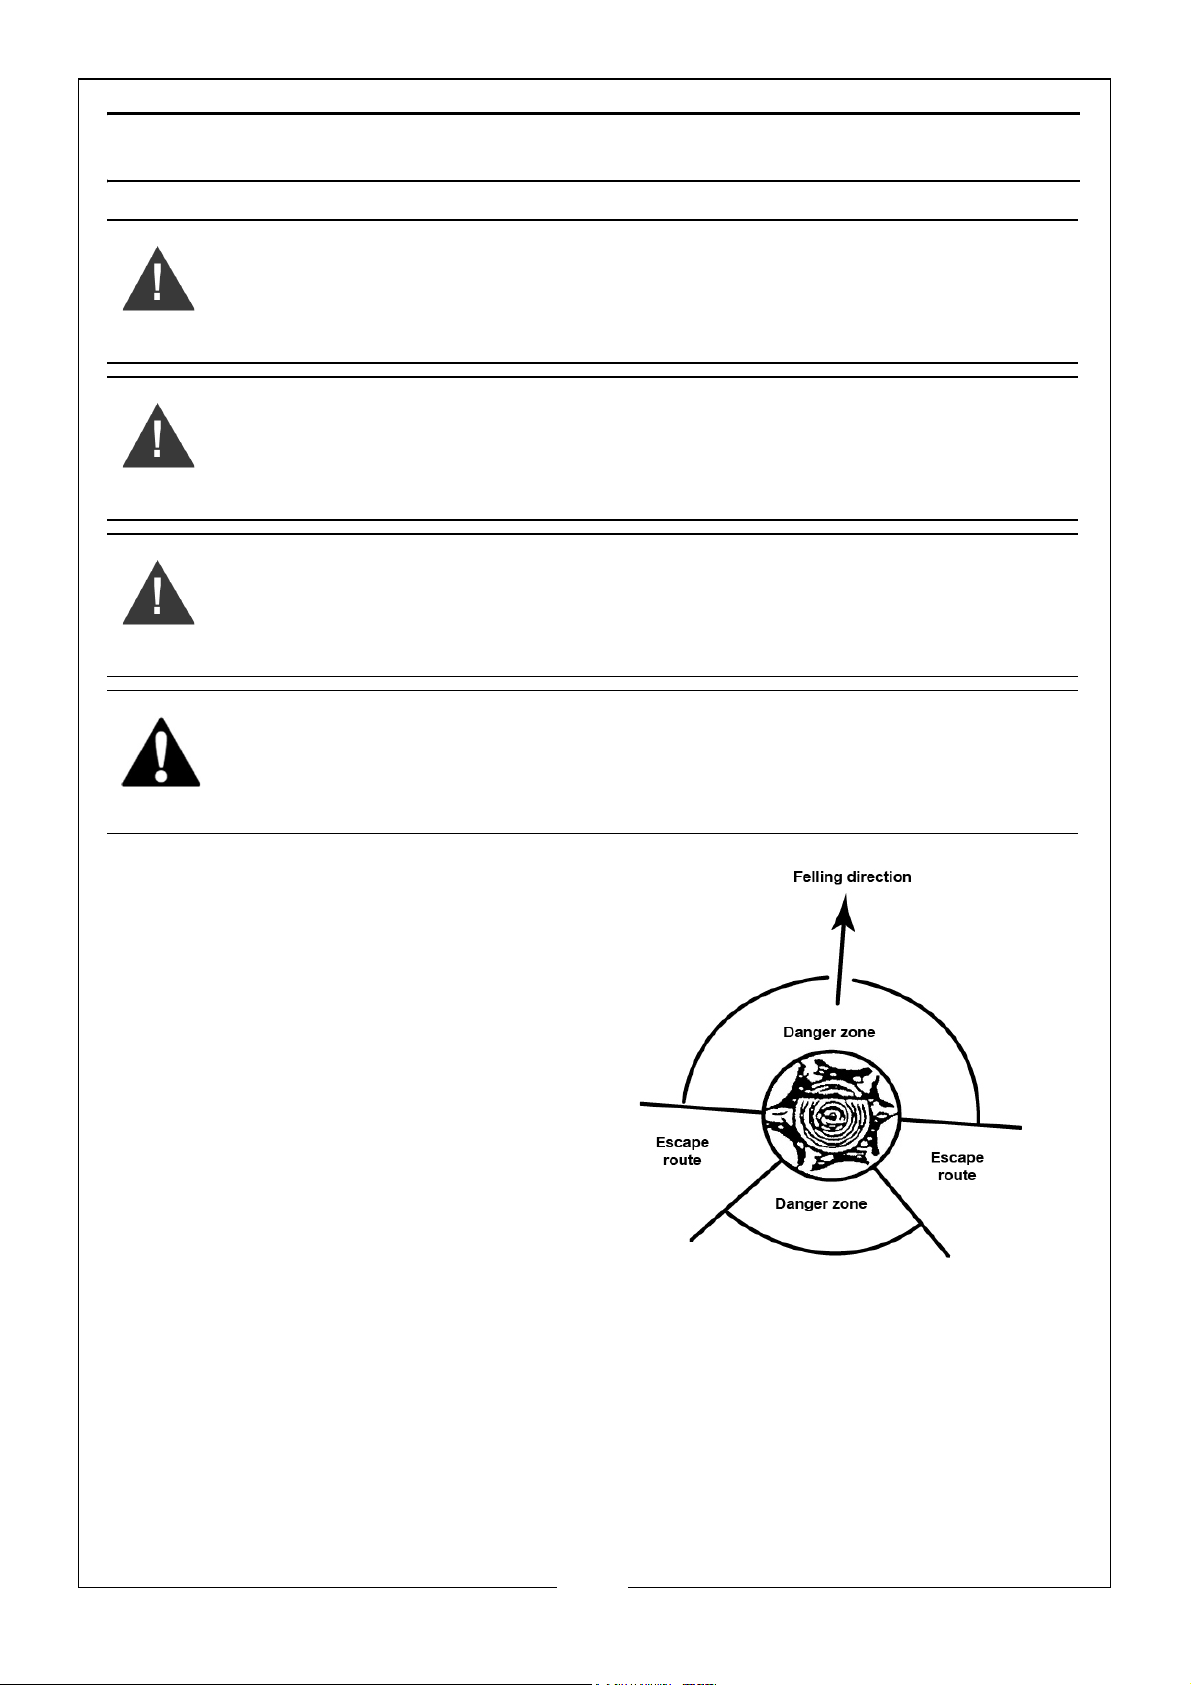
FELLING, LIMBING AND BUCKING
WARNING: WHEN BUCKING AND FELLING OPERATIONS ARE BEING
PERFORMED BY TWO OR MORE PERSONS AT THE SAME TIME, THE FELLING
OPERATIONS SHOULD BE SEPARATED FROM THE BUCKING OPERATION BY
A DISTANCE OF AT LEAST TWICE THE HEIGHT OF THE TREE BEING FELLED.
WARNING: DO NOT CUT DOWN A TREE DURING HIGH OR CHANGING
WINDS OR IF THERE IS A DANGER TO PROPERTY. DO NOT CUT DOWN A
TREE IF THERE IS A RISK OF STRIKING PHONE OR POWER LINES.
WARNING: MAKE SURE THE DANGER ZONE IS IDENTIFIED & ACCESS IS
RESTRICTED FOR ONLOOKERS.
CAUTION: BEFORE FELLING A TREE, MAKE SURE THAT THERE ARE NO
LOCAL BY-LAWS OR RESTRICTIONS THAT APPLY.
ESCAPE PATH
An escape path should be planned
and cleared as necessary before
cuts are started. The escape path
should extend back and diagonally
to the rear of the expected line of fall
as illustrated.
Before felling is started, consider the
natural lean of the tree, the location
of larger branches and the wind
direction to judge which way the tree
will fall. Remove dirt, stones, loose
bark, nails, staples and wire from the
tree.
17
Parts & Service: 020 8988 7400 / E-mail: [email protected] or [email protected]
Page 18
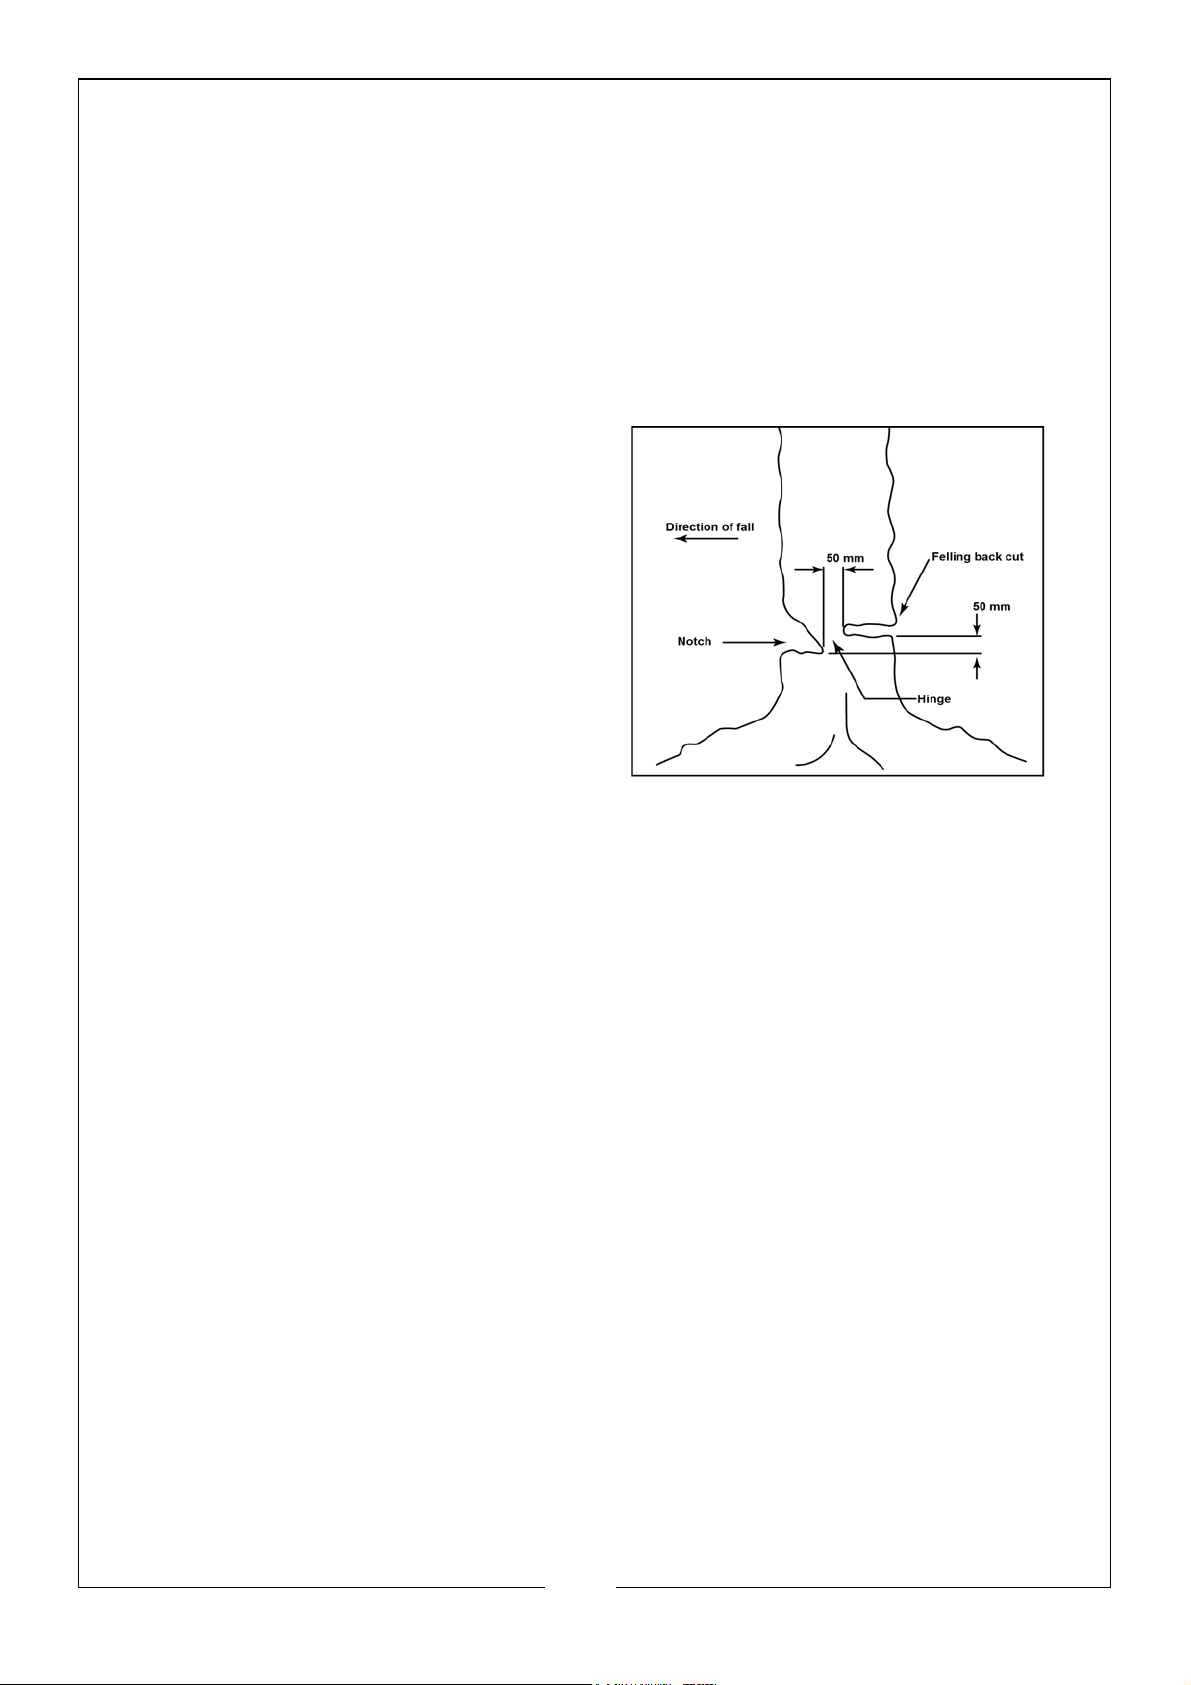
FELLING A TREE
Trees should not be felled in a manner that would endanger any person, strike
any electrical utility line or cause any property damage. If the tree does make
contact with any utility line, the utility company should be notified
immediately.
The chainsaw operator should keep on the uphill side of the terrain as the tree
is likely to roll or slide downhill after it is felled.
NOTCHING UNDERCUT
Make the notch 1/3 the diameter of
the tree, perpendicular to the
direction of fall as illustrated.
Make the lower horizontal notching
cut first. This will help to avoid
pinching either the saw chain or the
guide bar when the second notch is
being made.
FELLING BACK CUT
Make the felling back cut at least 50
mm higher than the horizontal
notching cut as illustrated.
Keep the felling back cut parallel to the horizontal notching cut. Make the
felling back cut so enough wood is left to act as a hinge. The hinge wood
keeps the tree from twisting and falling in the wrong direction. Do not cut
through the hinge.
As the felling gets close to the hinge, the tree should begin to fall. If there is any
chance that the tree may not fall in desired direction or it may rock back and
bind the saw chain, stop cutting before the felling back cut is complete and
use wedges of wood, plastic or aluminium to open the cut and drop the tree
along the desired line of fall.
When the tree begins to fall, remove the chainsaw from the cut, stop the
motor, put the chainsaw down, then use the retreat path planned. Be alert for
overhead limbs falling and watch your footing.
18
Parts & Service: 020 8988 7400 / E-mail: [email protected] or [email protected]
Page 19
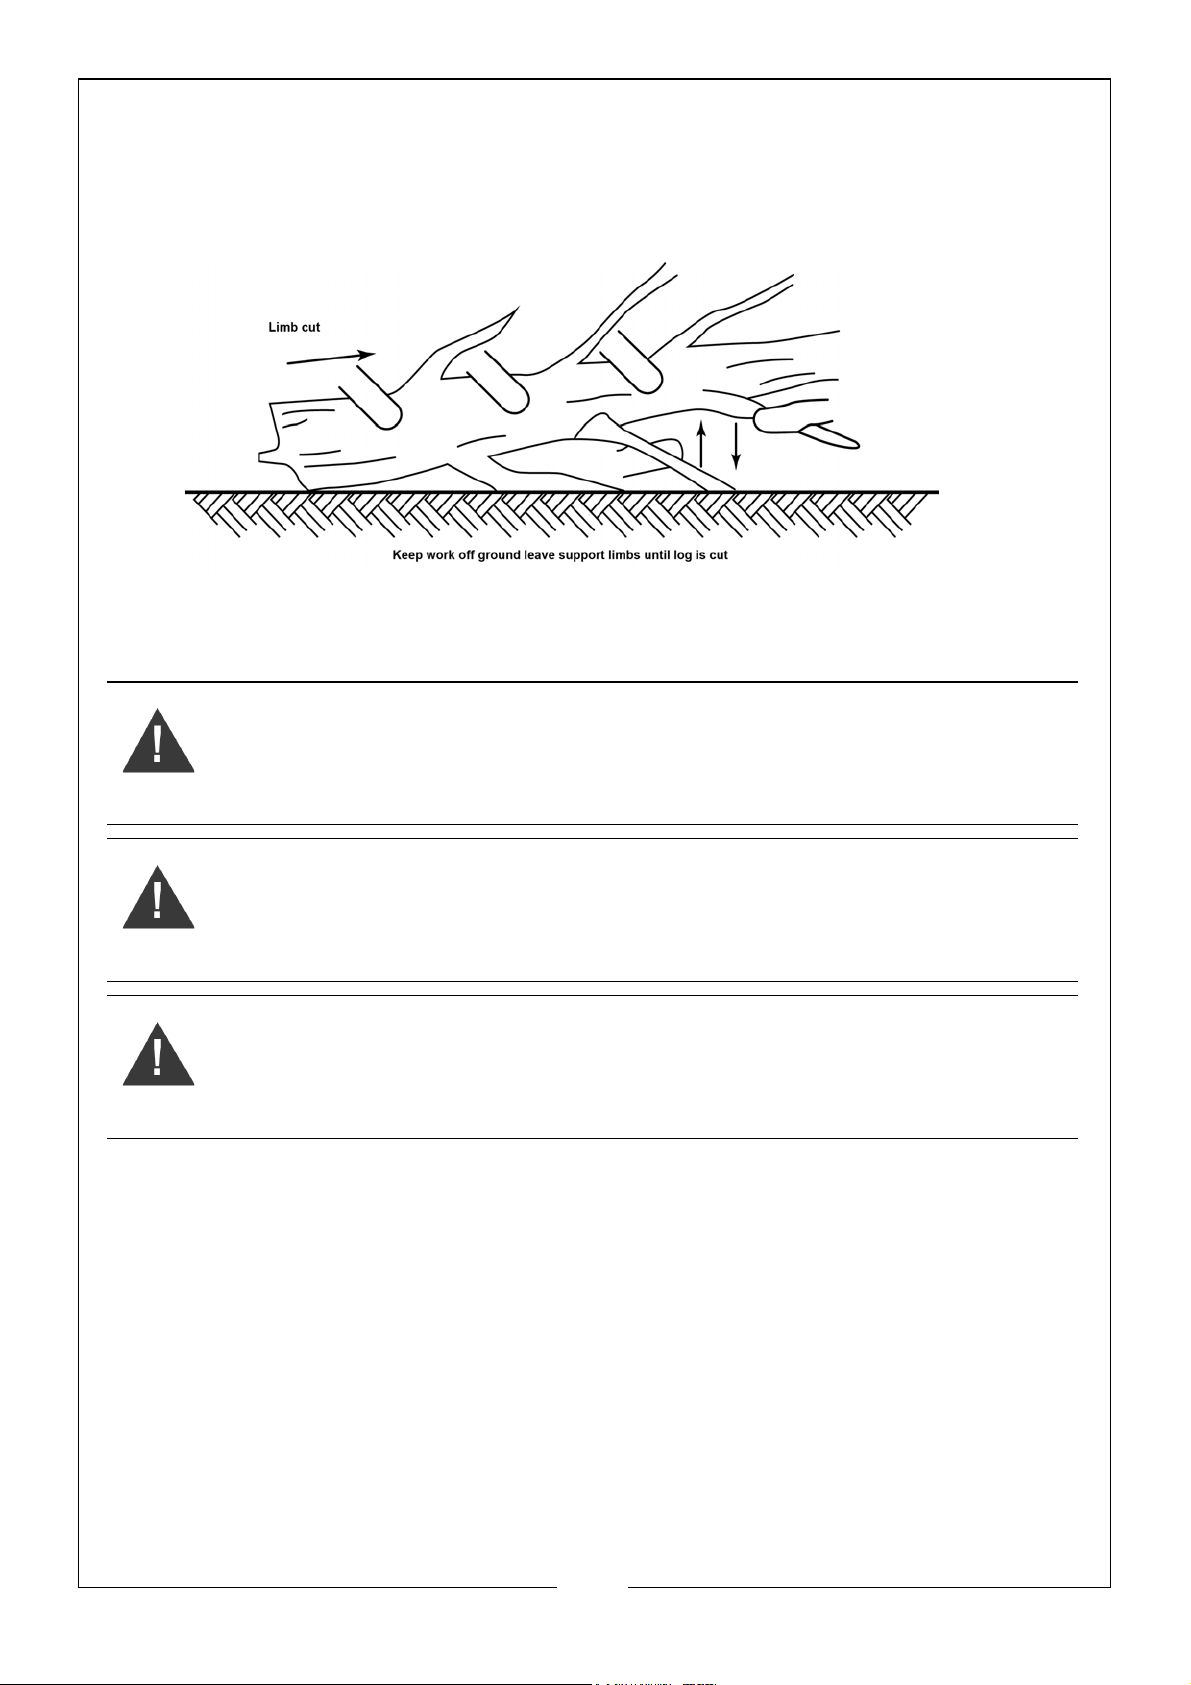
LIMBING A TREE
Limbing is removing the branches from a fallen tree.
When limbing leave larger lower limbs to support the log off the ground.
Remove the small limbs in one cut as illustrated below.
Branches under tension should be cut from the bottom up to avoid binding
the chainsaw.
WARNING: DO NOT REMOVE ANY BRANCHES THAT ARE SUPPORTING THE
TRUNK. THE TRUNK SHOULD BE CAREFULLY ROLLED AND SUPPORTED
BEFORE ANY SUPPORTING BRANCHES ARE REMOVED.
WARNING: MAKE SURE THAT THE TREE TRUNK IS SAFELY SUPPORTED
BEFORE LIMBING.
WARNING: DO NOT STAND ON THE TREE TRUNK WHILE LIMBING.
19
Parts & Service: 020 8988 7400 / E-mail: [email protected] or [email protected]
Page 20
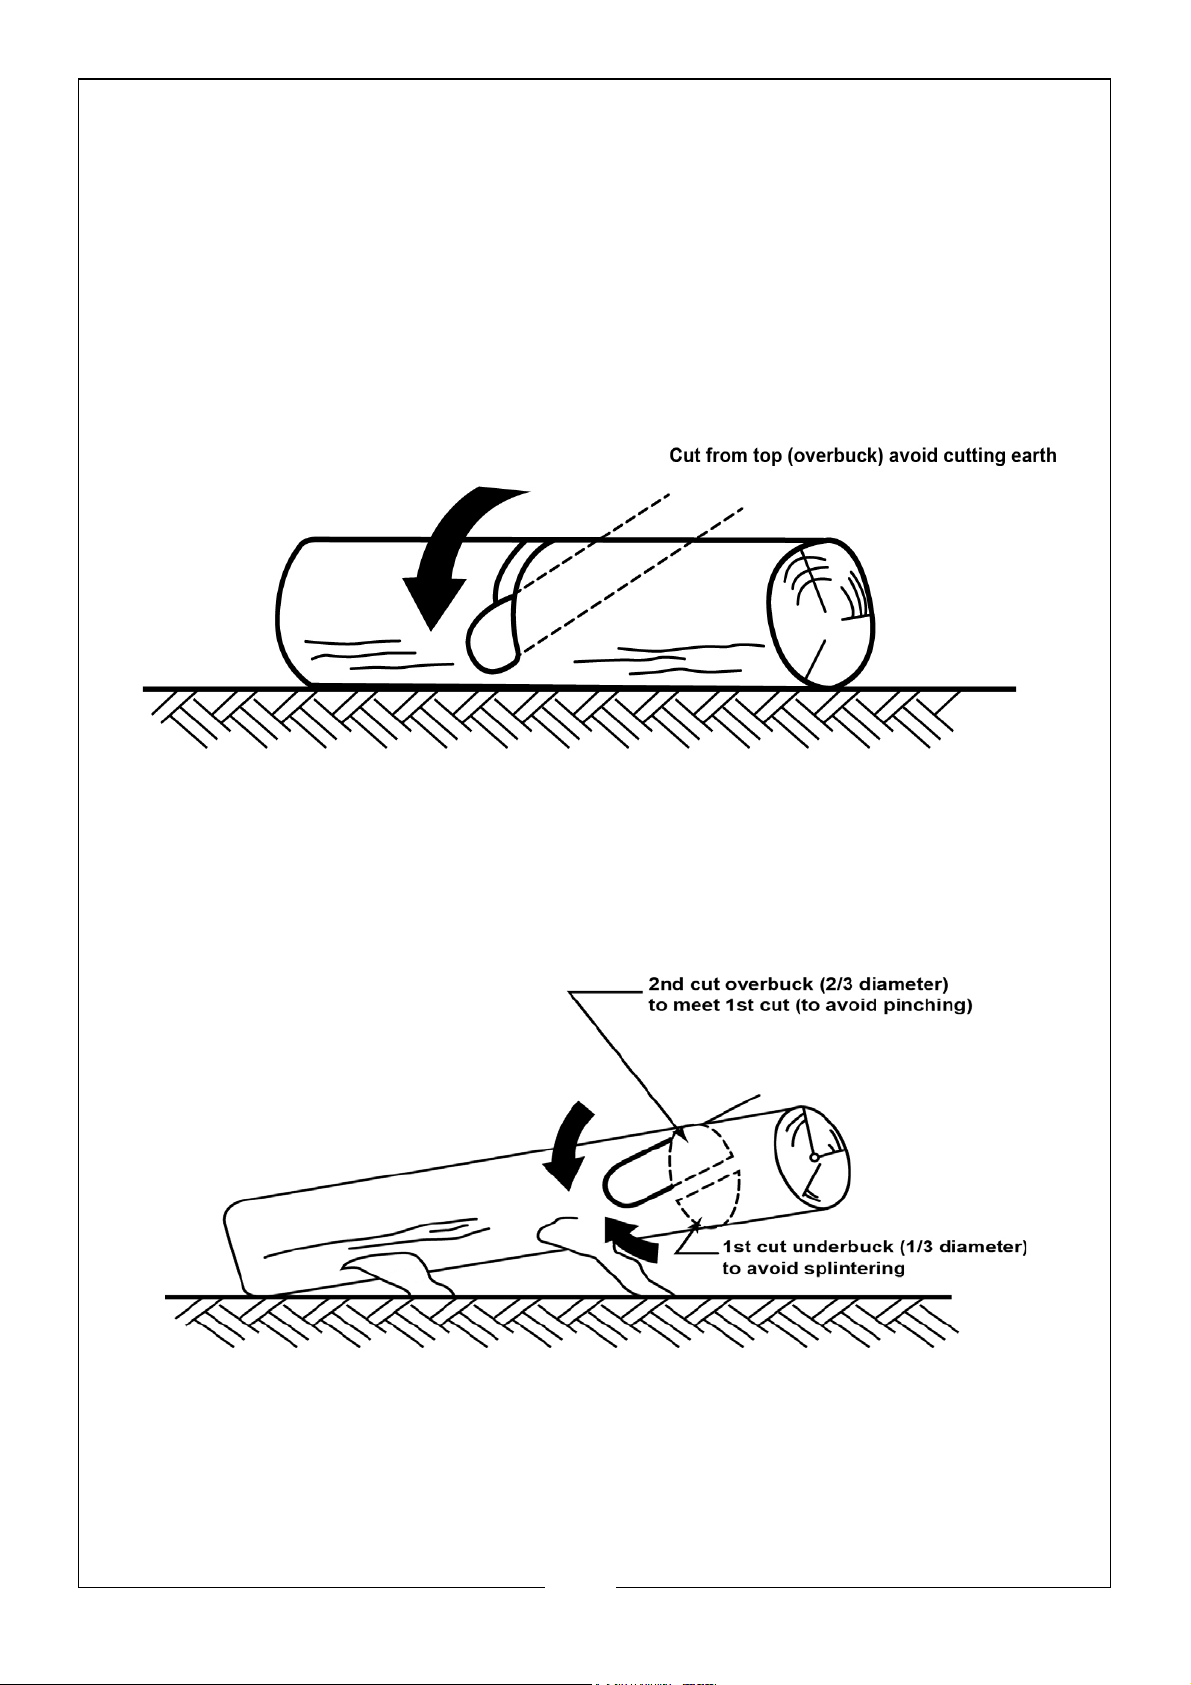
BUCKING A LOG
Bucking is cutting a log into lengths.
It is important to make sure your footing is firm and your weight is evenly
distributed on both feet. When possible, the log should be raised and
supported by the use of limbs, logs or chocks. Follow the simple directions for
easy cutting.
SUPPORTED ALONG ITS ENTIRE LENGTH
When the log is supported along its entire length as illustrated below, it is cut
from the top (overbuck).
SUPPORTED ON ONE END
When the log is supported on one end, as illustrated below, cut 1/3 the
diameter from the underside (underbuck). Then make the finished cut by
overbucking to meet the first cut.
20
Parts & Service: 020 8988 7400 / E-mail: [email protected] or [email protected]
Page 21
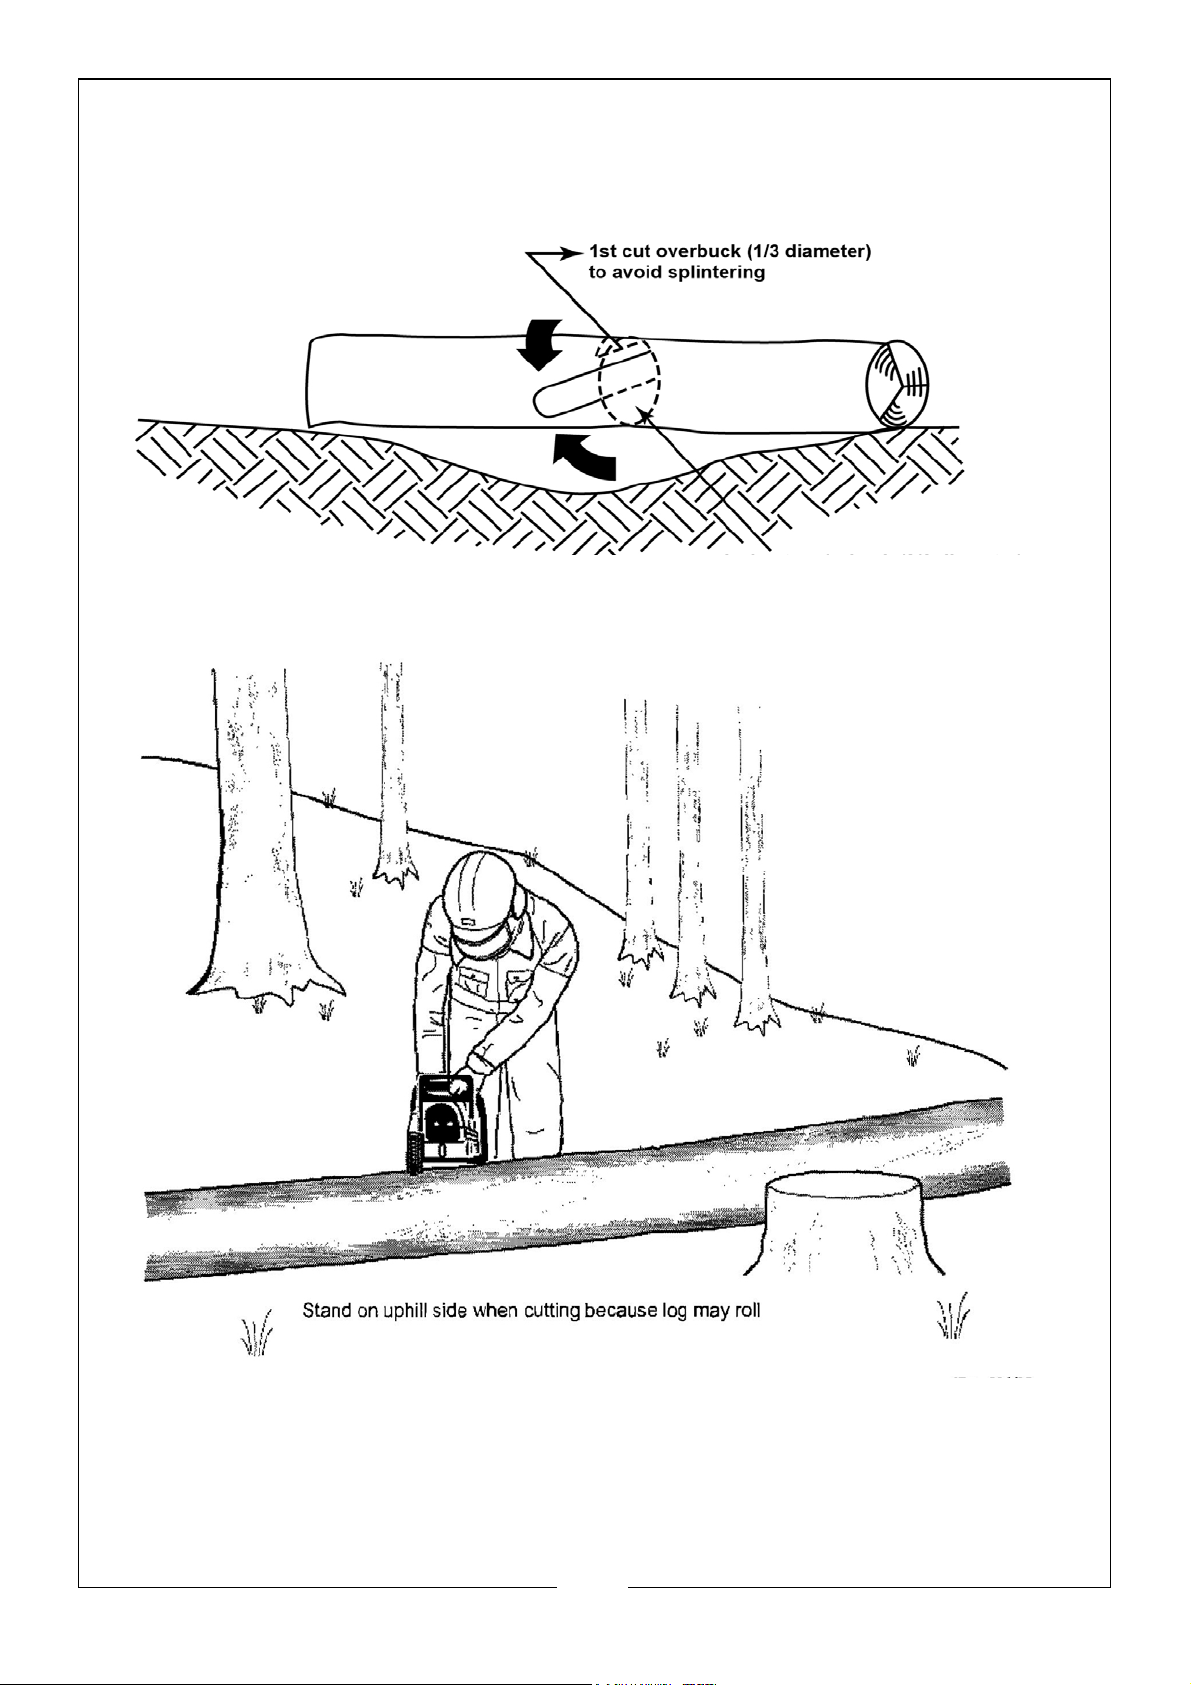
SUPPORTED ON BOTH ENDS
When the log is supported on both ends, as illustrated below, cut 1/3 the
diameter from the top (overbuck). Then make the finished cut by
underbucking the lower 2/3 to meet the first cut.
When bucking on a slope always stand on the uphill side of the log, as
illustrated ibelow.
When “cutting through”, to maintain complete control, release the cutting
pressure near the end of the cut without relaxing your grip on the chainsaw
handles. Don't let the chain contact the ground. After completing the cut,
wait for the saw chain to stop before you move the chainsaw. Always stop the
motor before moving from tree to tree.
21
Parts & Service: 020 8988 7400 / E-mail: [email protected] or [email protected]
Page 22
MAINTENANCE
WARNING: ALWAYS SWITCH THE CHAINSAW OFF, DISCONNECT FROM
THE POWER SUPPLY AND LET THE CHAINSAW COOL DOWN BEFORE
PERFORMING INSPECTION, MAINTENANCE AND CLEANING WORK!
• Keep the chainsaw clean. Remove debris from it after each use and
before storage.
• Regular and proper cleaning will help ensure safe use and prolong the
life of the chainsaw.
• Inspect the chainsaw before each use for worn and damaged parts. Do
not operate it if you find broken and worn parts.
WARNING: ONLY PERFORM REPAIRS AND MAINTENANCE WORK
ACCORDING TO THESE INSTRUCTIONS! ALL FURTHER WORK MUST BE
PERFORMED BY A QUALIFIED SPECIALIST.
CLEANING
1. Clean the chainsaw with a dry cloth. Use a brush for areas that are hard to
reach.
2. In particular clean the air vents after every use with a cloth and brush.
3. Remove stubborn dirt with compressed air.
NOTE: Do not use chemical, alkaline, abrasive or other aggressive
detergents or disinfectants to clean this chainsaw as they might
be harmful to its surfaces.
4. Check for worn or damaged parts. Replace worn parts as necessary or
contact an authorised service centre for repair before using the chainsaw
again.
5. Before and after each use, check the chainsaw and accessories (or
attachments) for wear and damage. Check for worn or damaged parts.
Replace worn parts as necessary before using the chainsaw again.
22
Parts & Service: 020 8988 7400 / E-mail: [email protected] or [email protected]
Page 23
GUIDE BAR AND CHAIN MAINTENANCE
If the guide bar is insufficiently lubricated and the chainsaw is operated with a
saw chain which is too tight, this will contribute to rapid bar wear. To help
minimise bar wear, maintenance of the guide bar as well as the saw chain is
recommended.
1. Disassemble the chain bar and saw chain See “Attaching the Chain bar
and chain” on page 11.
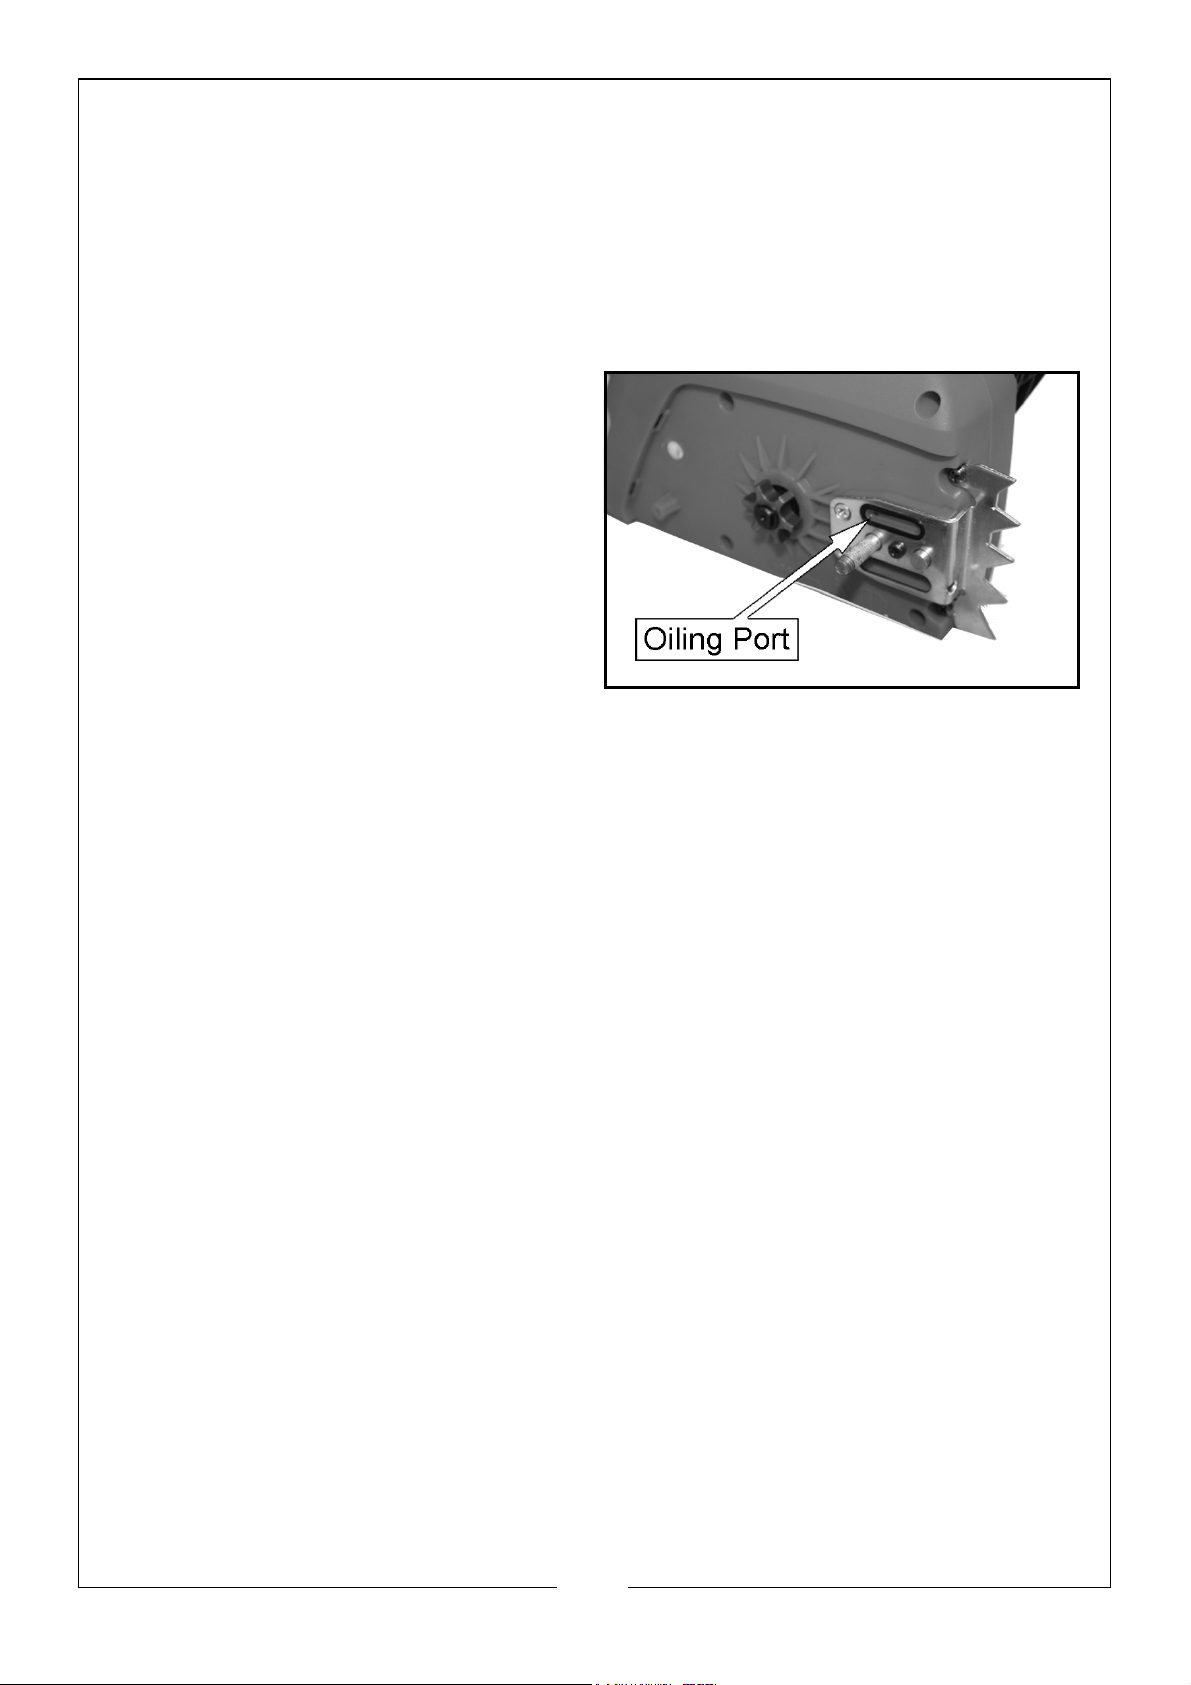
2. Check the oiling port for clogging
and clean if necessary.
NOTE: The condition of the oil
passages can be easily
checked. If the passages are
clear, the chain will
automatically give off a
spray of oil within seconds of
the chainsaw starting.
3. Check the drive sprocket. Have it
replaced by an authorised service centre or a similarly qualified person.
4. Clear residue from the rails on the guide bar with a proper tool like a putty
knife.
5. Check the guide bar 'rail' for wear, if the guide bar 'rail' is worn replace it
with a new one of the same type.
6. Check the chain for possible wear and damage. Replace it with a new
one if required.
7. Refit the chain and the guide bar.
BAR TURNING
1. After approximately 5 hours use, the bar should be turned 180 degrees, to
ensure even wear on the top and bottom of the bar.
2. The bar rails should be cleaned every time the bar is turned, or the chain is
removed. Using a suitable implement, clear any debris from the bar rails.
This will keep the oil passages open and provide correct lubrication to the
bar and chain.
23
Parts & Service: 020 8988 7400 / E-mail: [email protected] or [email protected]
Page 24
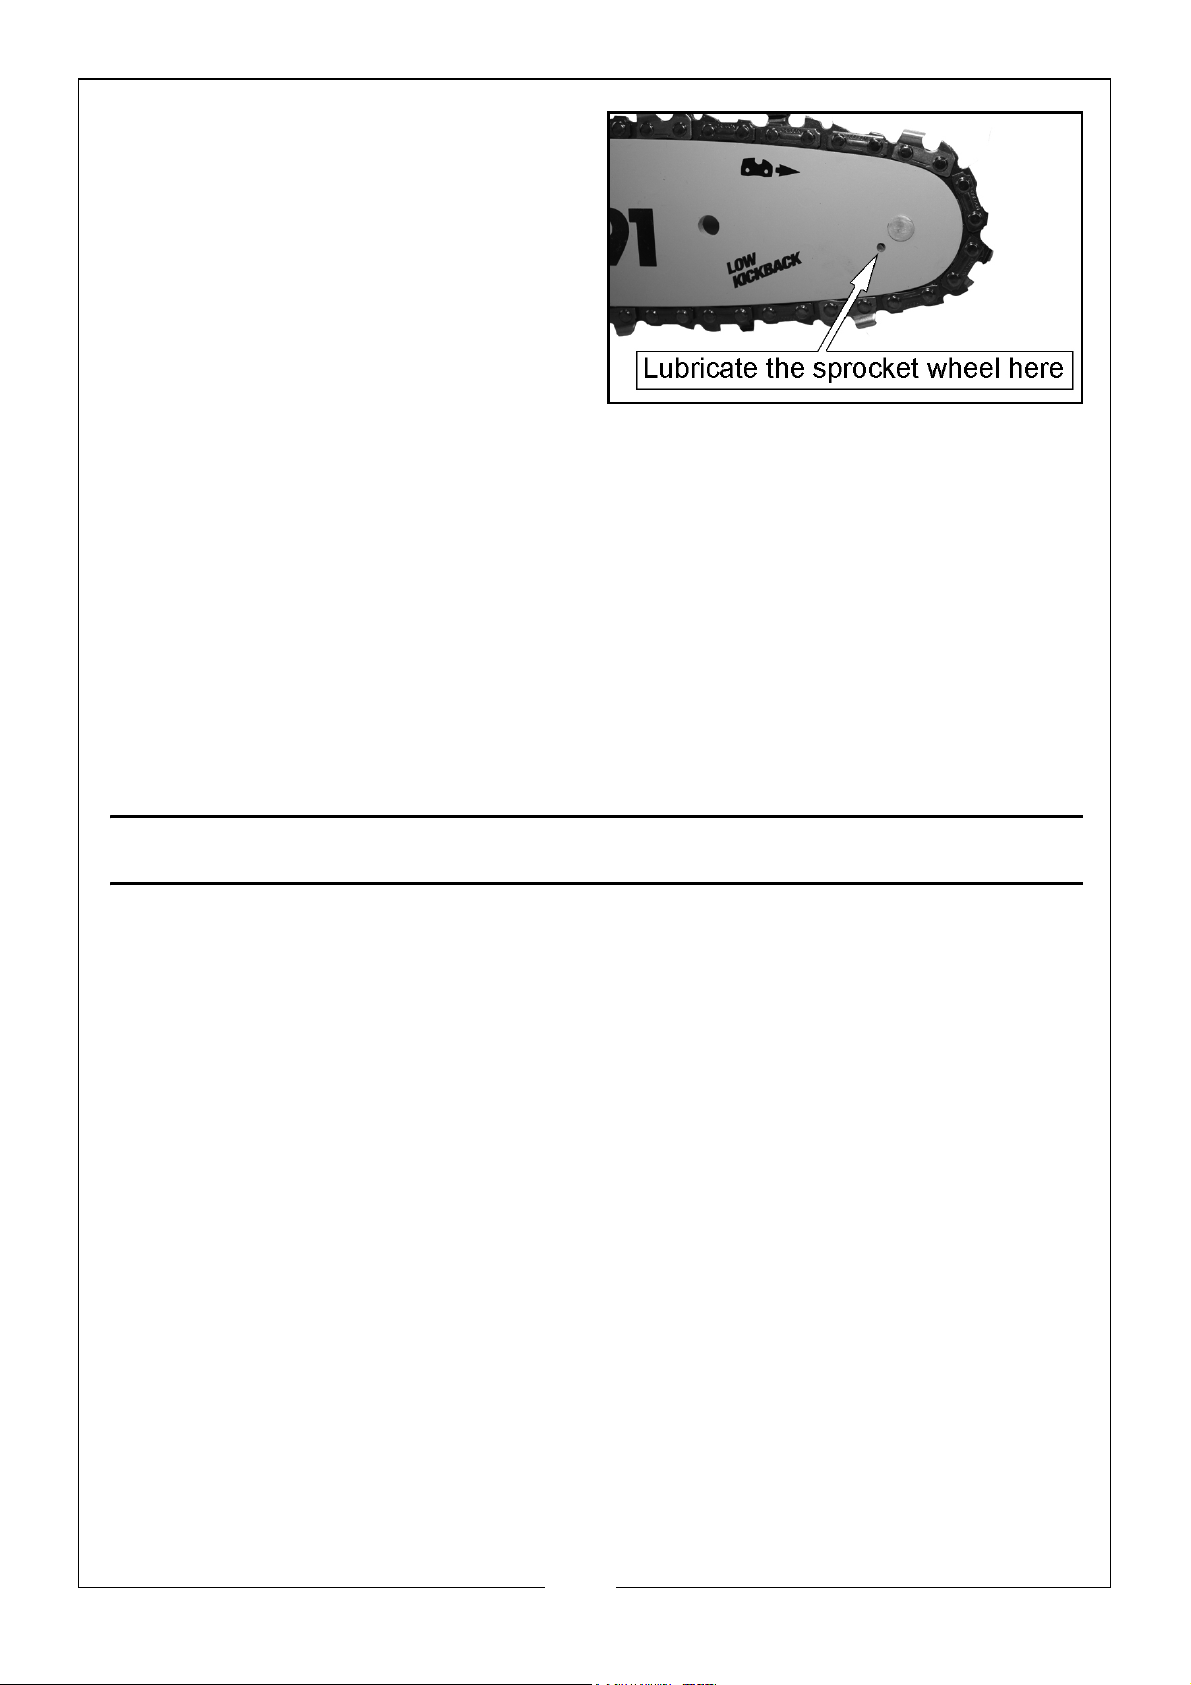
LUBRICATE THE SPROCKET
It is not necessary to remove the
chain to lubricate the sprocket.
1. Lubricate the sprocket wheel.
2. Rotate the saw chain until the
entire sprocket has been
lubricated.
POWER CABLE
If the supply cable is damaged, it must be replaced by the manufacturer or
similarly qualified persons in order to avoid a hazard.
SPARE PARTS/REPLACEMENT PARTS
Contact the CLARKE parts/service department on for replacement parts.
REPAIR
This chainsaw does not contain any parts that can be repaired by the
consumer. Contact the CLARKE parts/service department on 0208 988 7400 to
have it checked and repaired.
STORAGE
• Switch the chainsaw off and disconnect it from the power supply.
• Clean the chainsaw as described on page 22.
• Store the chainsaw and its accessories in a dry, frost-free, well-ventilated
place.
• Always store the chainsaw in a place that is inaccessible to children. The
ideal storage temperature is between 10 °C and 30 °C.
• We recommend using the original package for storage or covering the
chainsaw with a suitable cloth or enclosure to protect it against dust.
TRANSPORTATION
• Switch the chainsaw off and disconnect it from the power supply.
• Attach the chain scabbard.
• Always carry the chainsaw by its handles.
• Protect the chainsaw from any heavy impact or strong vibrations which
may occur during transportation in vehicles.
• Secure the chainsaw to prevent it from slipping or falling over.
24
Parts & Service: 020 8988 7400 / E-mail: [email protected] or [email protected]
Page 25

POPULAR ACCESSORIES
The following accessories are available from you local Clarke dealer:
PERSONAL PROTECTIVE EQUIPMENT
A wide range of Personal Protective Equipment suitable for use when using a
chainsaw.
CHAINSAW OIL
1 Litre (Part number 3050865)
CHAINSAW CHAIN SHARPENER
ECSS-2 Electric Chainsaw Sharpener (Part Number 3402077). Ideal for fast
accurate sharpening of all common chain types and sizes.
REPLACEMENT PARTS
Contact the CLARKE parts department on 0208 988 7400 for suitable
replacement parts.
25
Parts & Service: 020 8988 7400 / E-mail: [email protected] or [email protected]
Page 26
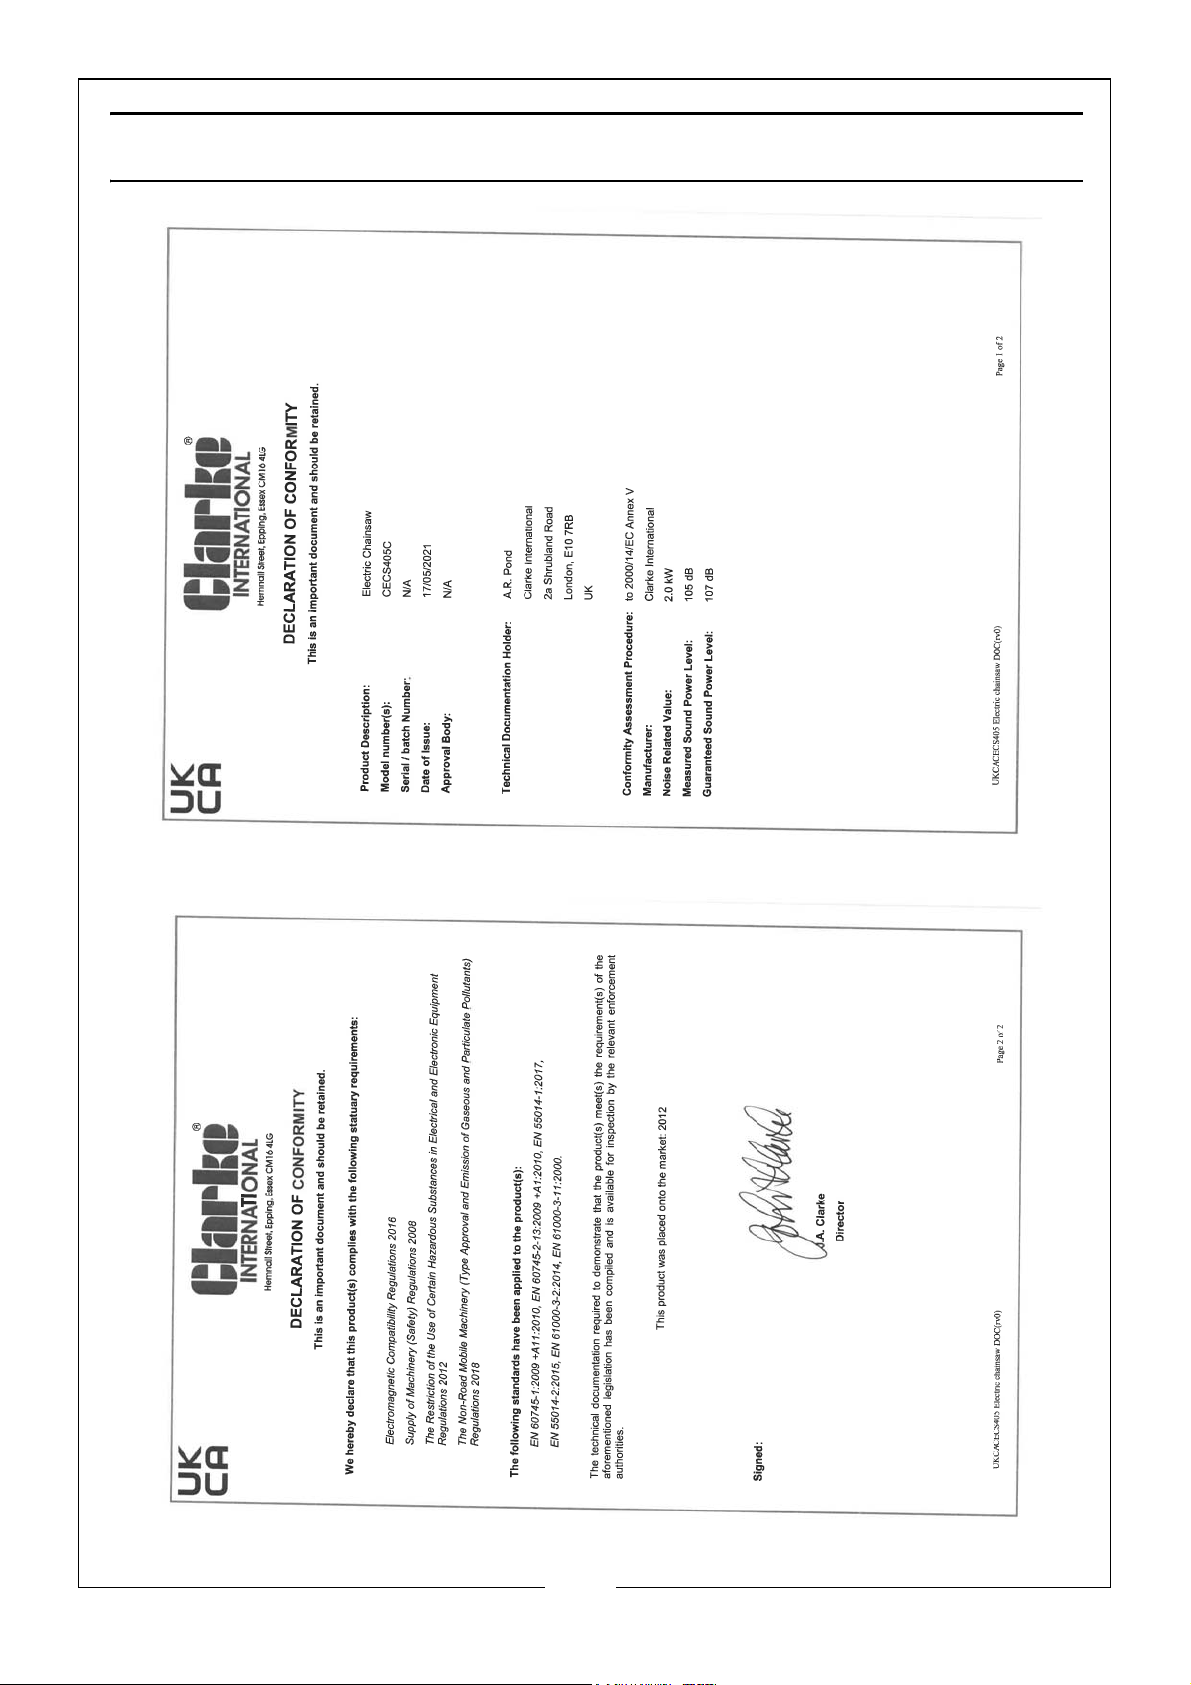
DECLARATION OF CONFORMITY - UKCA
26
Parts & Service: 020 8988 7400 / E-mail: [email protected] or [email protected]
Page 27
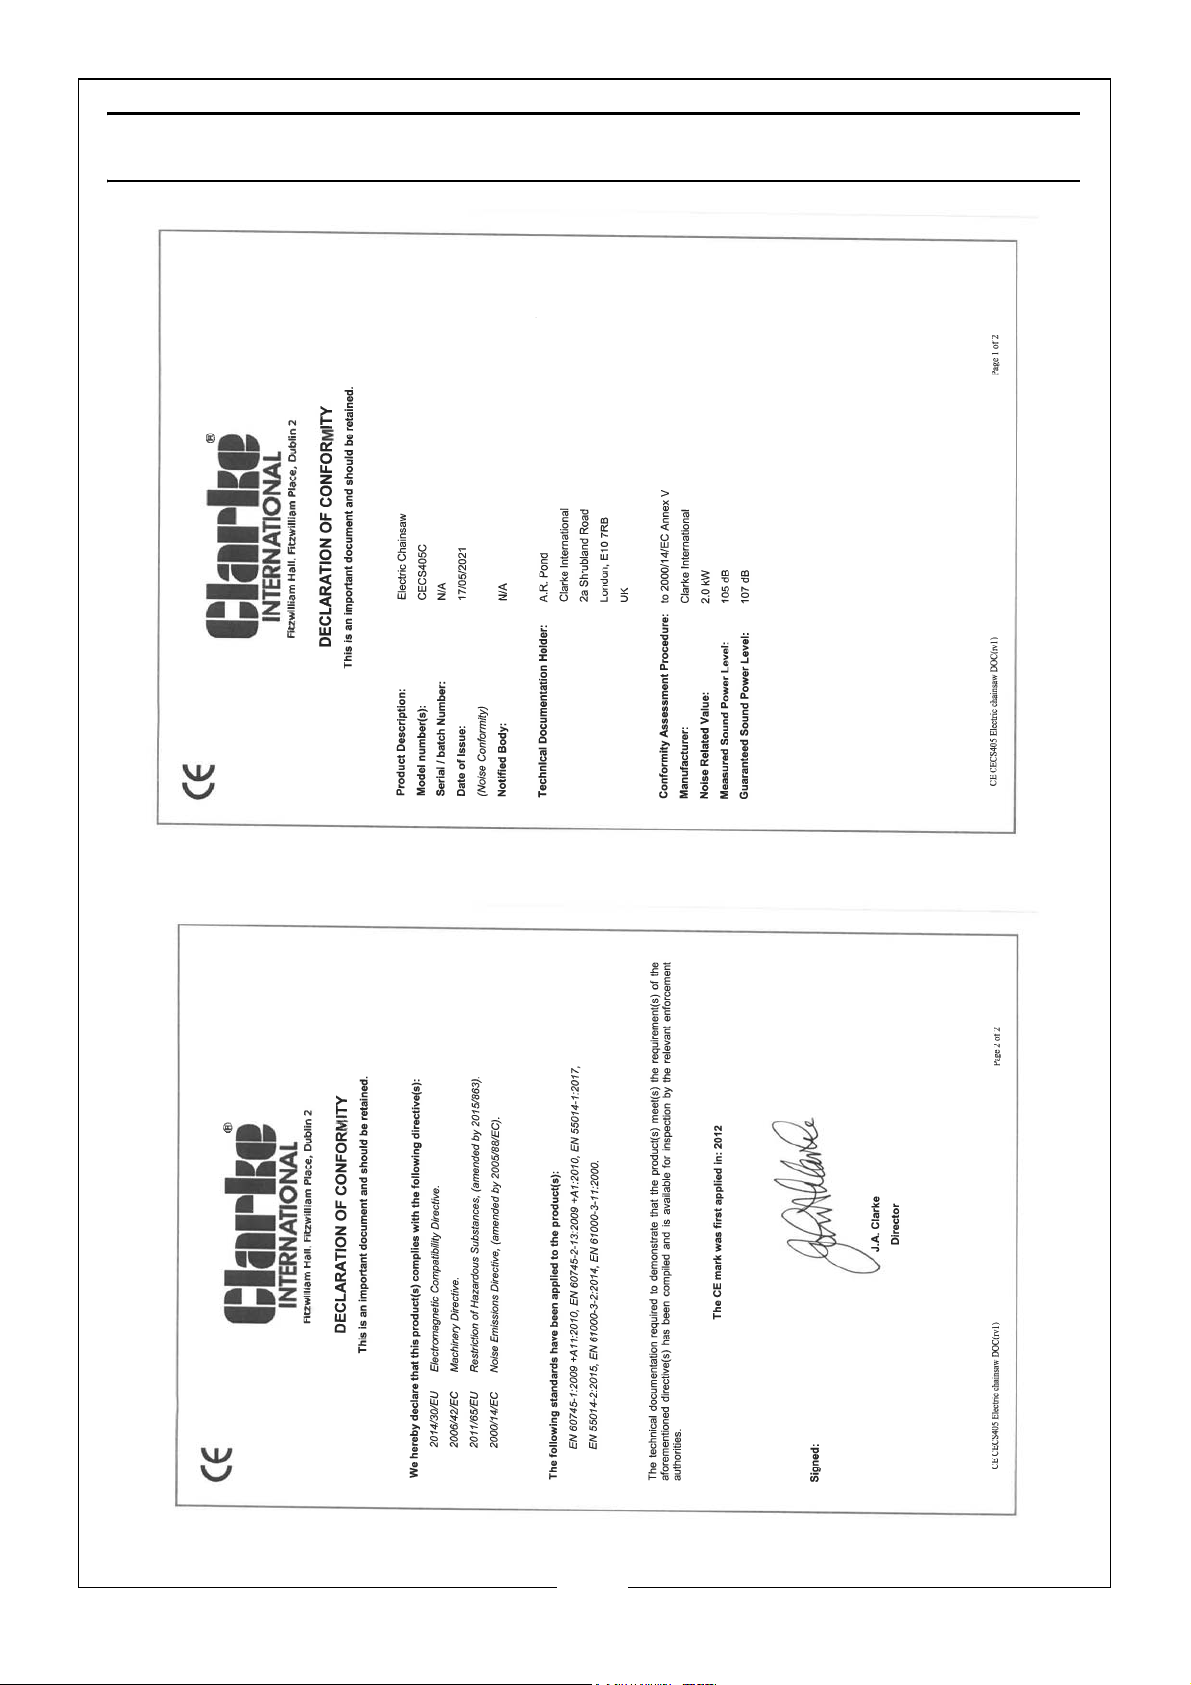
DECLARATION OF CONFORMITY - CE
27
Parts & Service: 020 8988 7400 / E-mail: [email protected] or [email protected]
Page 28

 Loading...