

Page 1

GARDEN SHREDDER
GARDEN SHREDDER
Model No: CGS40
Part No: 3402050
OPERATING & MAINTENANCE
INSTRUCTIONS
0108
Page 2

PARTS LIST
No: Description Qty Part No:
1 Safety screw 2 HTCGS4001
2 Plastic funnel 1 HTCGS4002
3 Rubber board 1 HTCGS4003
4 Flange 1 HTCGS4004
5 Screw 11 HTCGS4005
6 Body front 1 HTCGS4006
7 Hex. Bolt 2 HTCGS4007
8 Flat washer, 8 3 HTCGS4008
9 Spring washer, 8 4 HTCGS4009
10 Baffle A 1 HTCGS4010
11 Hex. Bolt 1 HTCGS4011
12 Spring washer, 10 1 HTCGS4012
13 Flange, blade plate 1 HTCGS4013
14 Hex. Bolt M10x12 4 HTCGS4014
15 Cutting blades 2 HTCGS4015
16 Blade plate 1 HTCGS4016
17 Screw, M8x16 4 HTCGS4017
18 Locking washer 4 HTCGS4018
19 O-ring 4 HTCGS4019
20 Screw 4 HTCGS4020
21 Hex. Locking nut 10 HTCGS4021
22 Spring washer, 4 5 HTCGS4022
23 Flat washer, 4 5 HTCGS4023
24 Screw, M4x14 6 HTCGS4024
25 Motor bracket 1 HTCGS4025
26 Switch bracket A 1 HTCGS4026
27 Protective switch 1 HTCGS4027
28 Screw, M4x14 2 HTCGS4028
29 Wire inner B 2 HTCGS4029
30 Motor assembly 1 HTCGS4030
31 Wheel Cover 2 HTCGS4031
32 Hex. Bolt, M8x60 2 HTCGS4032
33 Washer 2 HTCGS4033
34 Bush 2 HTCGS4034
35 Wheel 2 HTCGS4035
36 Fixed bracket 1 HTCGS4036
37 Push rod 1 HTCGS4037
38 Supporting leg, right 1 HTCGS4038
39 Washer 4 HTCGS4039
40 Supporting leg, left 1 HTCGS4040
41 Knob 1 HTCGS4041
42 Power cord 1 HTCGS4042
43 Split pin 1 HTCGS4043
44 Sheath, power cord 1 HTCGS4044
2 11
No: Description Qty Part No:
45 Conn. wire inner, D 1 HTCGS4045
46 Overload protector 1 HTCGS4046
47 Switch 1 HTCGS4047
48-1 Conn. wire inner, A 1 HTCGS4048a
48-2 Wire inner, A 1 HTCGS4048b
49 Capacitor, 20uF 1 HTCGS4049
50 Cover, capacitor 1 HTCGS4050
51 Hex. Screw 4 HTCGS4051
52 Seat, blade plate 1 HTCGS4052
53 Washer 1 HTCGS4053
54 Flange, power cord 1 HTCGS4054
55 Motor housing 1 HTCGS4055
56 Screw, M4x20 2 HTCGS4056
57 Switch pin 1 HTCGS4057
58 Switch bracket, B 1 HTCGS4058
59 Fixed nut 1 HTCGS4059
60 Plate 1 HTCGS4060
61 Pin 2 HTCGS4061
62 Leg cover 2 HTCGS4062
63 Connecting bar 1 HTCGS4063
64 Hex. Nut 6 HTCGS4064
65 Pull rod 1 HTCGS4065
66 Sponge assembly 1 HTCGS4066
67 Baffle, B 1 HTCGS4067
68 Screw, M6x14 2 HTCGS4068
69 Spring washer, 6 6 HTCGS4069
70 Flat washer, 6 6 HTCGS4070
71 Seal ring A 1 HTCGS4071
72 Seal ring B 1 HTCGS4072
73 Adjusting washer 1 HTCGS4073
74 Label 1 HTCGS4074
75 Flange 1 HTCGS4075
76 Rubber washer 1 HTCGS4076
77 Screw, M4x8 1 HTCGS4077
78 Locking washer 1 HTCGS4078
79 Latch support 1 HTCGS4079
80 Sleeve 1 HTCGS4080
81 Screw, ST5x30 2 HTCGS4081
82 Flat washer, 8 2 HTCGS4082
83 Spanner A 1 HTCGS4083
84 Spanner B 1 HTCGS4084
85 Sleeve 1 HTCGS4085
86 Screwdriver 1 HTCGS4086
Page 3
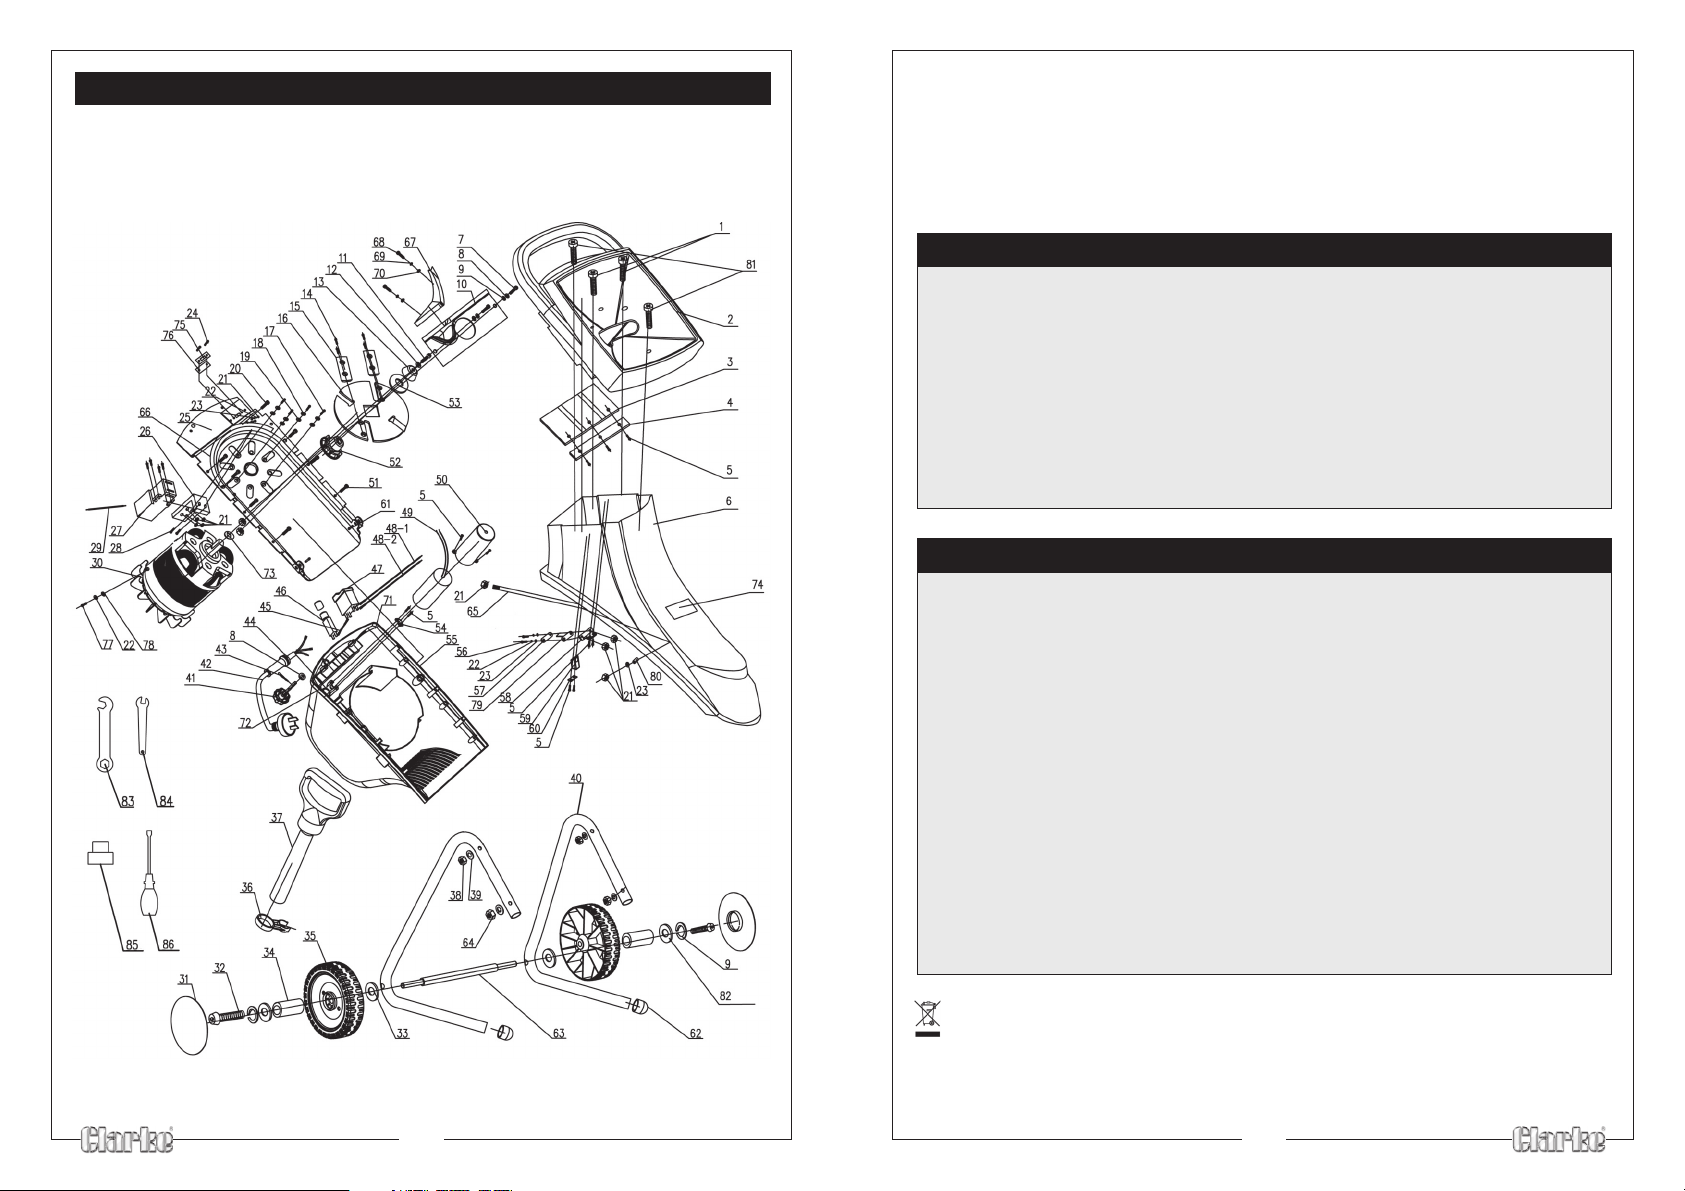
PARTS DIAGRAM
Thank you for purchasing this CLARKE Garden Shredder,
which is designed for DIY and light trade use only.
Please read this instruction leaflet thoroughly and follow the instructions carefully,
in doing so you will ensure the safety of yourself and that of others around you, this
will also ensure that the Garden Shredder will give you long and satisfactory service.
Please keep these instructions in a safe place for future reference.
CLARKE GUARANTEE
This CLARKE product is guaranteed against faulty manufacture for a period
of 12 months from the date of purchase. Please keep your receipt as proof
of purchase.
This guarantee is invalid if the product is found to have been abused or
tampered with in any way, or not used for the purpose for which is was
intended.
Faulty goods should be returned to their place of purchase, no product
can be returned to us without prior permission.
This guarantee does not effect your statutory rights.
CONTENTS
Declaration of Conformity ............................................................................. 2
Guarantee ....................................................................................................... 3
General Safety Precautions ........................................................................... 4
Electrical Connections ................................................................................... 5
Assembly Instructions ...................................................................................... 6
Operation ........................................................................................................ 7
Maintenance .................................................................................................. 8
Product Specifications ................................................................................... 8
Parts Description ........................................................................................... 10
Parts List .......................................................................................................... 11
Waste electrical products should not be disposed of with household waste. Please dispose of according to all
laws governing the disposal of electrical and electronic equipment, at a proper disposal facility.
Please Note that details and specifications herein, are correct of time of going to print. However CLARKE International
10
reserve the right to change specifications at any time without prior notice.
Copyright CLARKE International All rights Reserved 2006.
3
Page 4
GENERAL SAFETY PRECAUTIONS
WARNING:
PLEASE READ ALL INSTRUCTIONS CAREFULLY BEFORE OPERATING
As with all machinery, there are certain hazards involved with their operation
and use. Exercising respect and caution will considerably lessen the risk of personal injury. However, if normal safety precautions are overlooked or ignored,
personal injury to the operator or damage to property, may result.
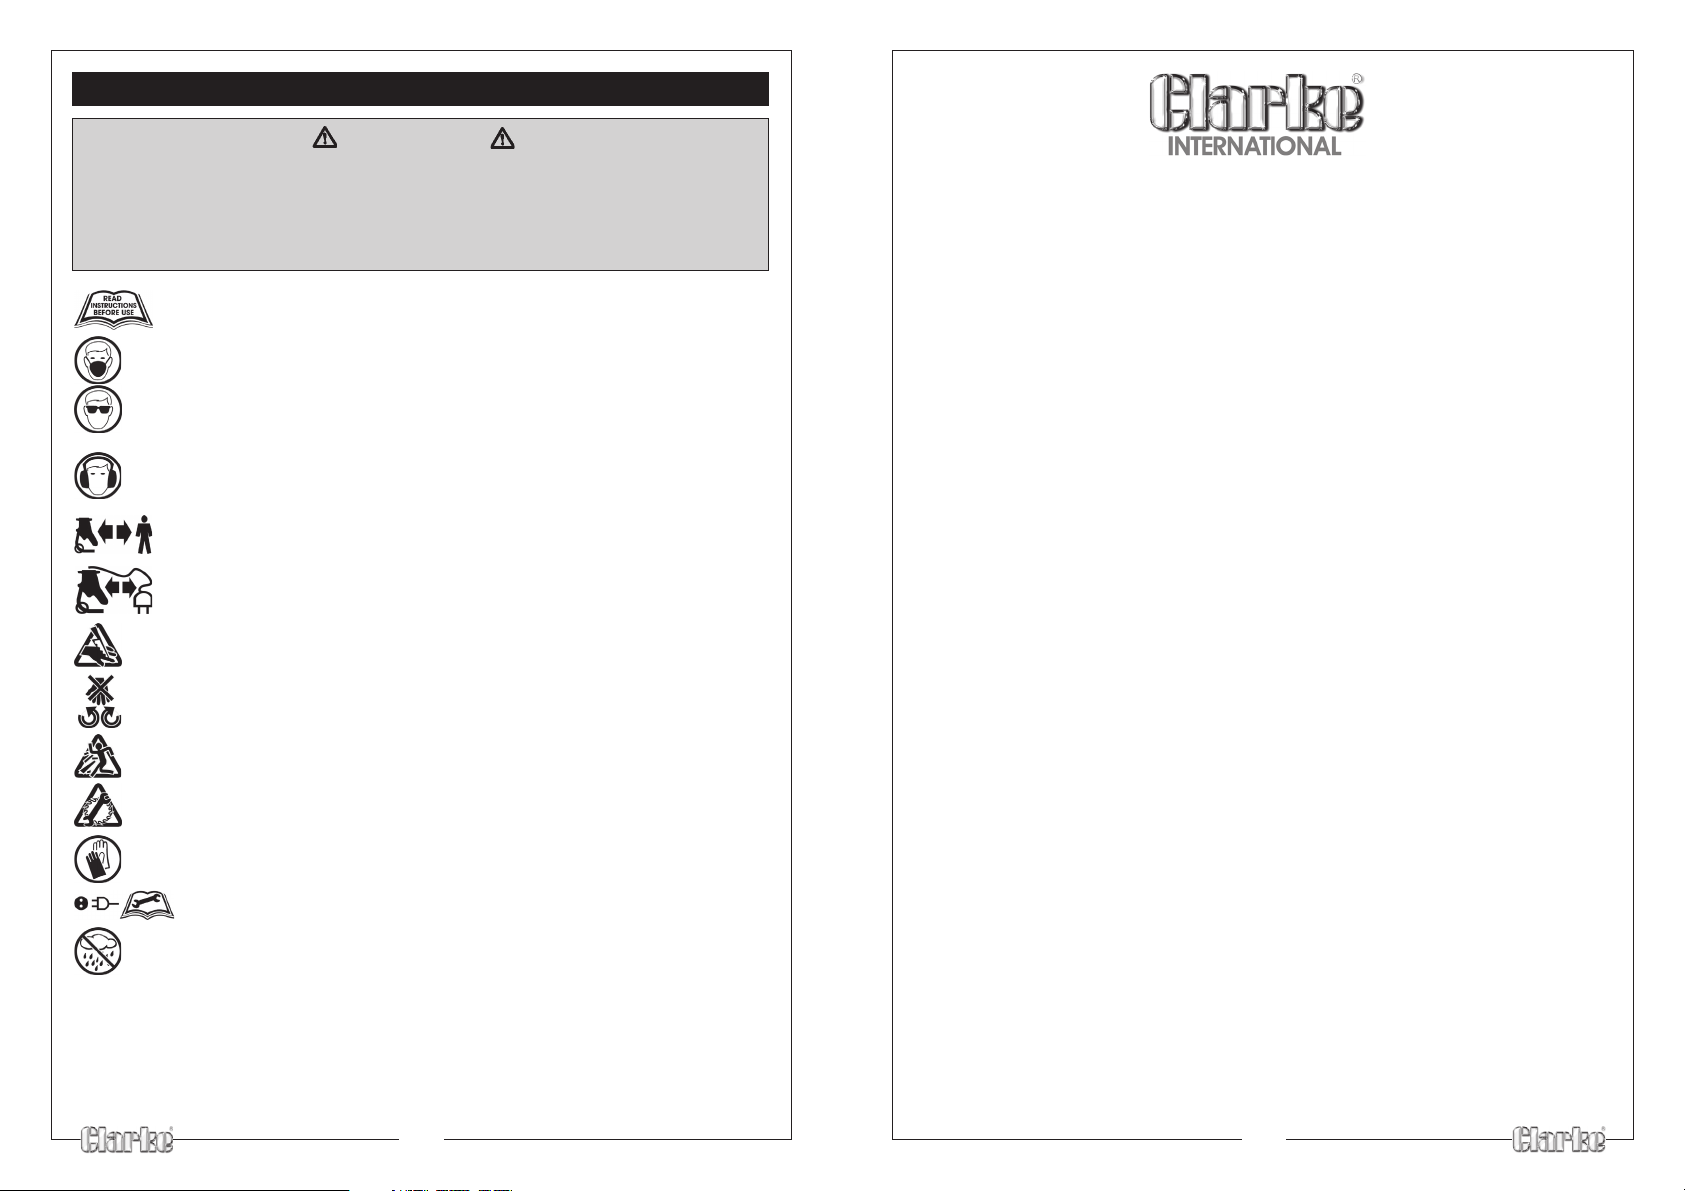
• ALWAYS learn the machines applications, limitations and specific potential hazards
peculiar to it. Read and become familiar with the entire operating manual.
• ALWAYS use a face or dust mask.
• ALWAYS wear safety goggles, manufactured to the latest European safety
standards. Everyday glasses do not have impact resistant lenses, they are NOT
safety glasses.
• ALWAYS wear ear protectors/defenders as the noise level of this machine can
develop considerable noise - see specifications.
• A LWAYS keep people at a safe distance from the work area, especially whilst
operating the machine. Children should not be allowed in the work area
PARTS LIST
• A LWAYS keep the mains cable away from the hopper/cutter blades. Follow
maintenance instructions.
• NEVER put your hands near the blades
• NEVER put your hands into hopper near the rotating blades
• ALWAYS be aware of flying chips and debris -NEVER peer into the hopper when
inserting material - keep your head well away.
• ALWAYS Ensure the blades have stopped before carrying out inspection or
maintenance
• ALWAYS wear a good pair of industrial gloves when using this machine
• ALWAYS disconnect the machine from the power supply before servicing or
cleaning etc.
• NEVER use power tools in damp or wet locations or expose them to rain.
• ALWAYS ensure the ON switch is OFF before plugging into the mains. Avoid accidental starting.
• ALWAYS concentrate on the job at hand, no matter how trivial it may seem. Be aware
that accidents are caused by carelessness due to familiarity.
• ALWAYS wear proper apparel. Loose clothing or jewellery may get caught in moving
parts. Wear protective hair covering to contain long hair.
4
&
DIAGRAM
9
Page 5
MAINTENANCE
Maintenance is limited to ensuring the machine is clean and free of wood chippings and
other debris. Servicing and repairs to this product must be carried out by Clarke International
or your local Clarke dealer.
When cleaning, open the front cover and clean thoroughly taking great care to avoid
contact with the cutting blades.
Lightly oil all surfaces to prevent rusting.
ALWAYS ensure the machine is switched OFF and disconnected from the mains supply before
carrying out any cleaning operations.
Should any repair be necessary, please contact your Clarke dealer for advice.
SPECIFICATIONS
Motor .......................................................................... 230V 50Hz 1ph
Input Wattage............................................................ 2400W
Input Current .............................................................. 11.5A
Max. Cutting Capacity ............................................. 40mm dia.
Guaranteed Sound Power Level ............................. 106dBL
Dimensions ................................................................. 690x470x944mm
WA
GENERAL SAFETY PRECAUTIONS CONTINUED
• ALWAYS keep your proper footing and balance at all times DO NOT over reach. For
best footing wear rubber soled footwear.
• NEVER operate the machine when under the influence of drugs, alcohol or any
medication.
• NEVER leave the machine running unattended. Turn power OFF. Do not leave the
machine until it comes to a complete stop.
• NEVER force the machine, it will do a better and safer job at the rate for which it was designed.
• ALWAYS check for damage before use, any damaged part should be checked to
ensure that it will operate properly and perform it’s intended function. Any damage
should be properly repaired or the part replaced . If in any doubt DO NOT use the
machine. Consult your local dealer.
ELECTRICAL CONNECTIONS
Connect the mains lead to a standard 230 volt (50Hz) electrical supply via a 13 amp BS1363
plug fitted with a 13 amp fuse.
WARNING: THIS APPLIANCE MUST BE EARTHED.
IMPORTANT: The wires in the mains lead are coloured in accordance with the following code:
Green & Yellow - Earth
Blue - Neutral
Brown - Live
As the colours of the flexible cord of this appliance may not correspond with the coloured
markings identifying terminals in your plug, proceed as follows:
• Connect GREEN & YELLOW cord to terminal marked with a letter ”E” or Earth symbol " ", or
coloured GREEN or GREEN & YELLOW.
• Connect BROWN cord to terminal marked letter “L” or coloured RED.
• Connect BLUE cord to plug marked letter “N” or coloured BLACK.
Net Weight ................................................................. 21.5kg
Duty Cycle ................................................................. S6 40%**
** This product is designed so that the motor may be run under load for an accumulated
period of 6 minutes only, and off load for an accumulated period of 4 minutes, in any 10
minute period.
8 5
FUSE RATING
The fuse for the plug in this appliance must be rated at 13 amps.
We recommend that this machine is connected to the mains supply via a Residual Current
Device (RCD).
EXTENSION CABLES
If an extension cable is used always ensure that it is fully unwound. The maximum extension
length is 25M, and the wire size in the cables must be at least 1.5mm in diameter. As a
general rule the extension cable must be thicker than the cable supplied with the Shredder.
If longer extensions are required please seek advice from a qualified electrician.
IF IN DOUBT CONSULT A QUALIFIED ELECTRICIAN.
DO NOT ATTEMPT ANY ELECTRICAL REPAIRS YOURSELF.
Page 6
ASSEMBLY
OPERATION
Unpack the carton and lay out the parts carefully, should any damage be apparent, please
contact your CLARKE dealer immediately for replacement.
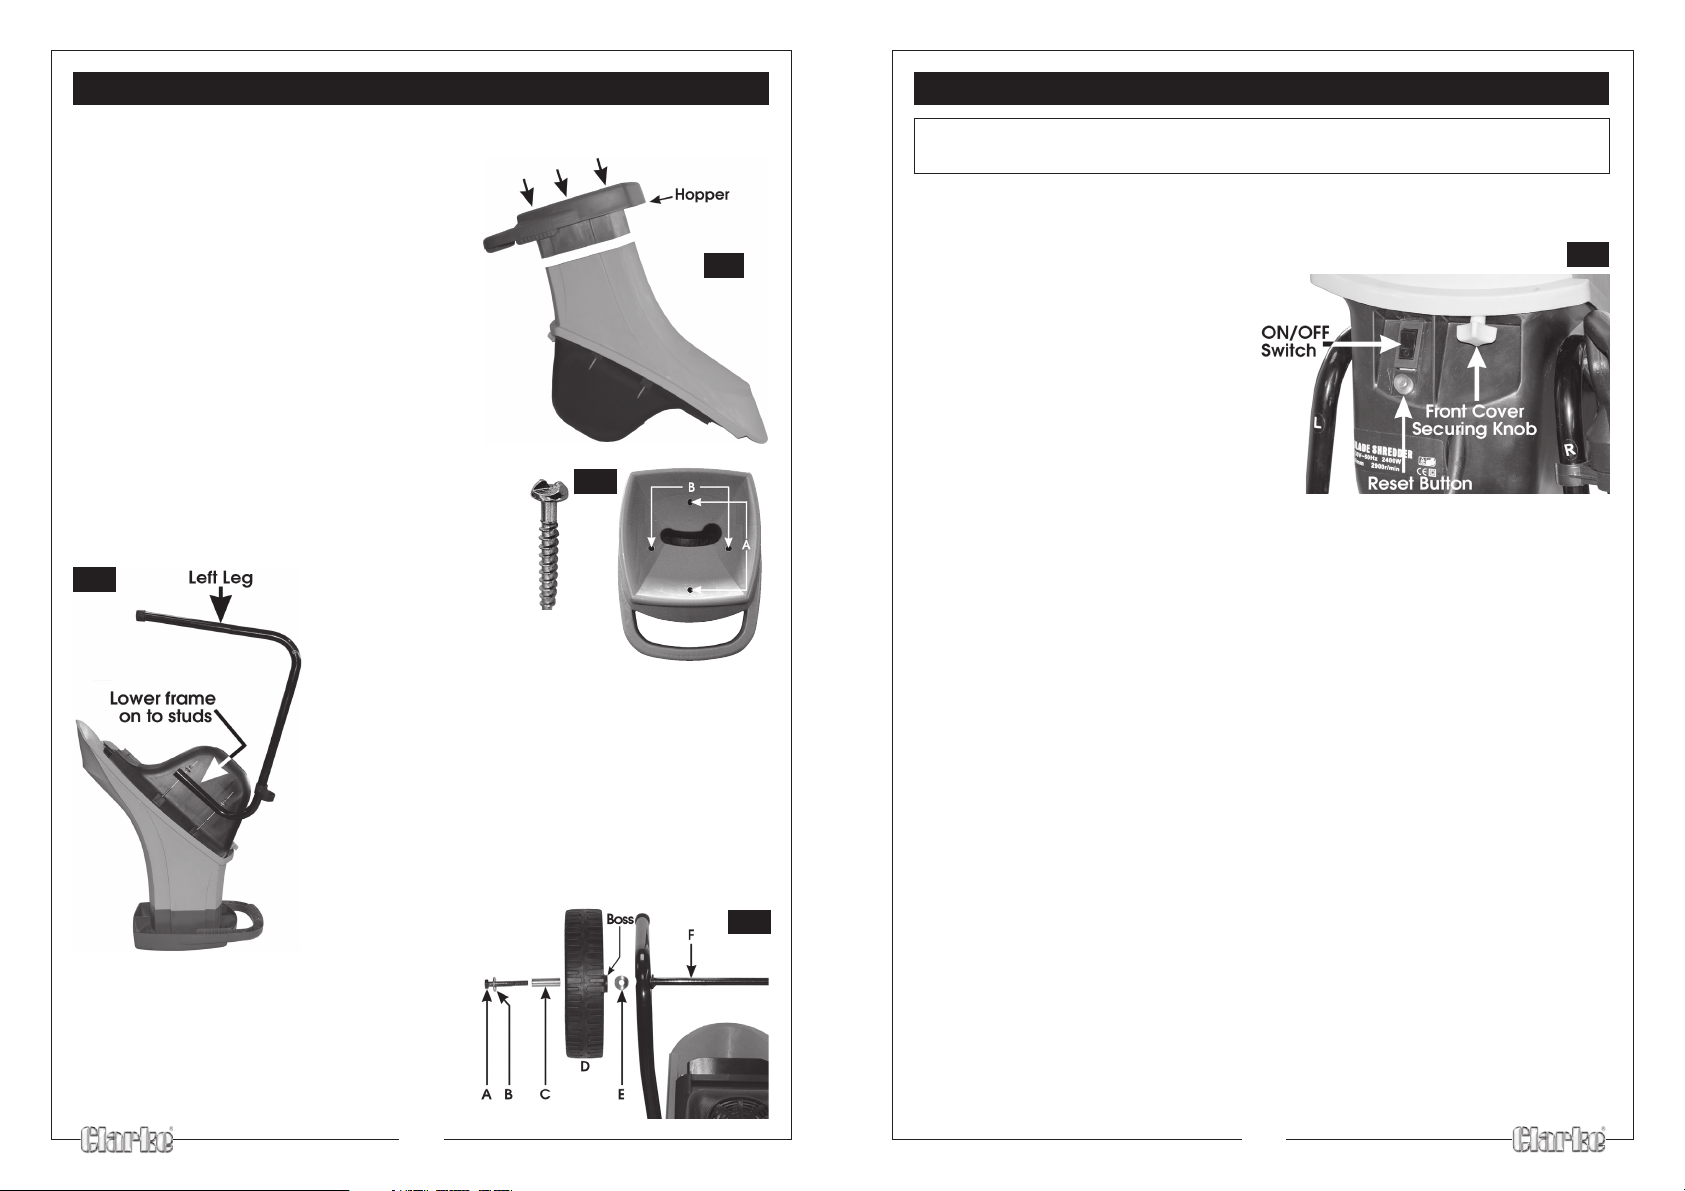
1. Lay the shredder body as shown in Fig.1, and
lower the hopper on to its top, ensuring it
locates entirely squarely before proceeding.
2. Insert two self tapping cross head screws at
position ‘A’ Fig. 2, and screw in, but do not fully
tighten.
3. Insert tamper proof screws (illustrated) into positions
‘B’, Fig.2, using a blade screwdriver to screw in until
tight.
4. Finally tighten two cross head screws at ‘A’.
Fig.2
Fig.1
Fig.3
position
B
5. Invert body, as shown in Fig.3, and lower each leg
side on to the studs.
Note: the frame sides are marked ‘L’ and ‘R’ - left and
right.
6. Secure each leg using a shaped washer and self
locking nut on each stud.
7. Insert the axle ‘F’ between the legs, then mount a
wheel on each side, in the manner shown below -
Bolt (A), flat washer (B), Bush (C), on the outside of the
wheel (D), and a shaped washer (E) between the
wheel and frame.
Note: The wheel central boss is innermost.
8. With the wheel centre bolts tightened, tap on
the wheel hub trim
9. Clip the plastic Push Stick holder on to either
leg, and drop in the push stick.
Fig.4
Your Shredder is now ready for use
6
Always wear proper safety goggles, and ear defenders .
With the machine standing on firm level ground, standing on a board if necessary, plug the
machine into the mains supply, via a residual current device (RCD), and start the machine
by pressing the ON/OFF rocker switch shown below, to ON.
If the machine fails to start, check to ensure
the front cover is firmly secured by
tightening, if necessary, the front cover
securing knob - see illustration.
NOTE: The front cover securing knob
incorporates a microswitch, which prevents
the shredder from operating if the front
cover is not properly secured.
When the machine is running at full speed,
proceed to feed material into the hopper,
DO NOT force it. The cutter blades will pull
the material into the machine, but small,
light material, leaves etc., may need
pushing in with the Push Stick - NEVER push material into the hopper with your hands.
The material must be of a size to easily enter the holes in the hopper - max. 40mm.
All side shoots, branches etc., must be cut off beforehand.
Please take note of the safety precautions, and DO NOT attempt to shred hard materials,
such as glass, metal, bones, plastic, polythene, rope etc.
Be aware that treated wood when shredded could produce toxic dust, as could prunings
with fungus or decay. These materials should not be shredded but taken to the recycling
centre.
Place a collecting bag, or bin below the chute to collect chippings.
Fig.5
IMPORTANT!
CAUTION
Should the machine become clogged and stop delivering chippings, switch OFF immediately
and disconnect from the mains supply.
Undo the front cover securing knob fully and open the cover. Using industrial quality gloves,
remove any material in the chute. Take great care to avoid contact with the cutter blades
- use a stick where necessary.
Ensure the cover is properly secured before plugging into the mains supply and restarting.
OVERLOAD PROTECTION
Should the machine become overloaded or overheat, a Thermal Overload will intervene,
shutting off the machine.
Should this occur, switch OFF the machine and disconnect from the mains supply, open the
front cover and remove any material in the chute, then replace the cover.
Allow the machine to cool for at least 5 minutes before plugging into the mains supply,
pressing the RESET button, see illustration above and restarting.
7
 Loading...