

Page 1
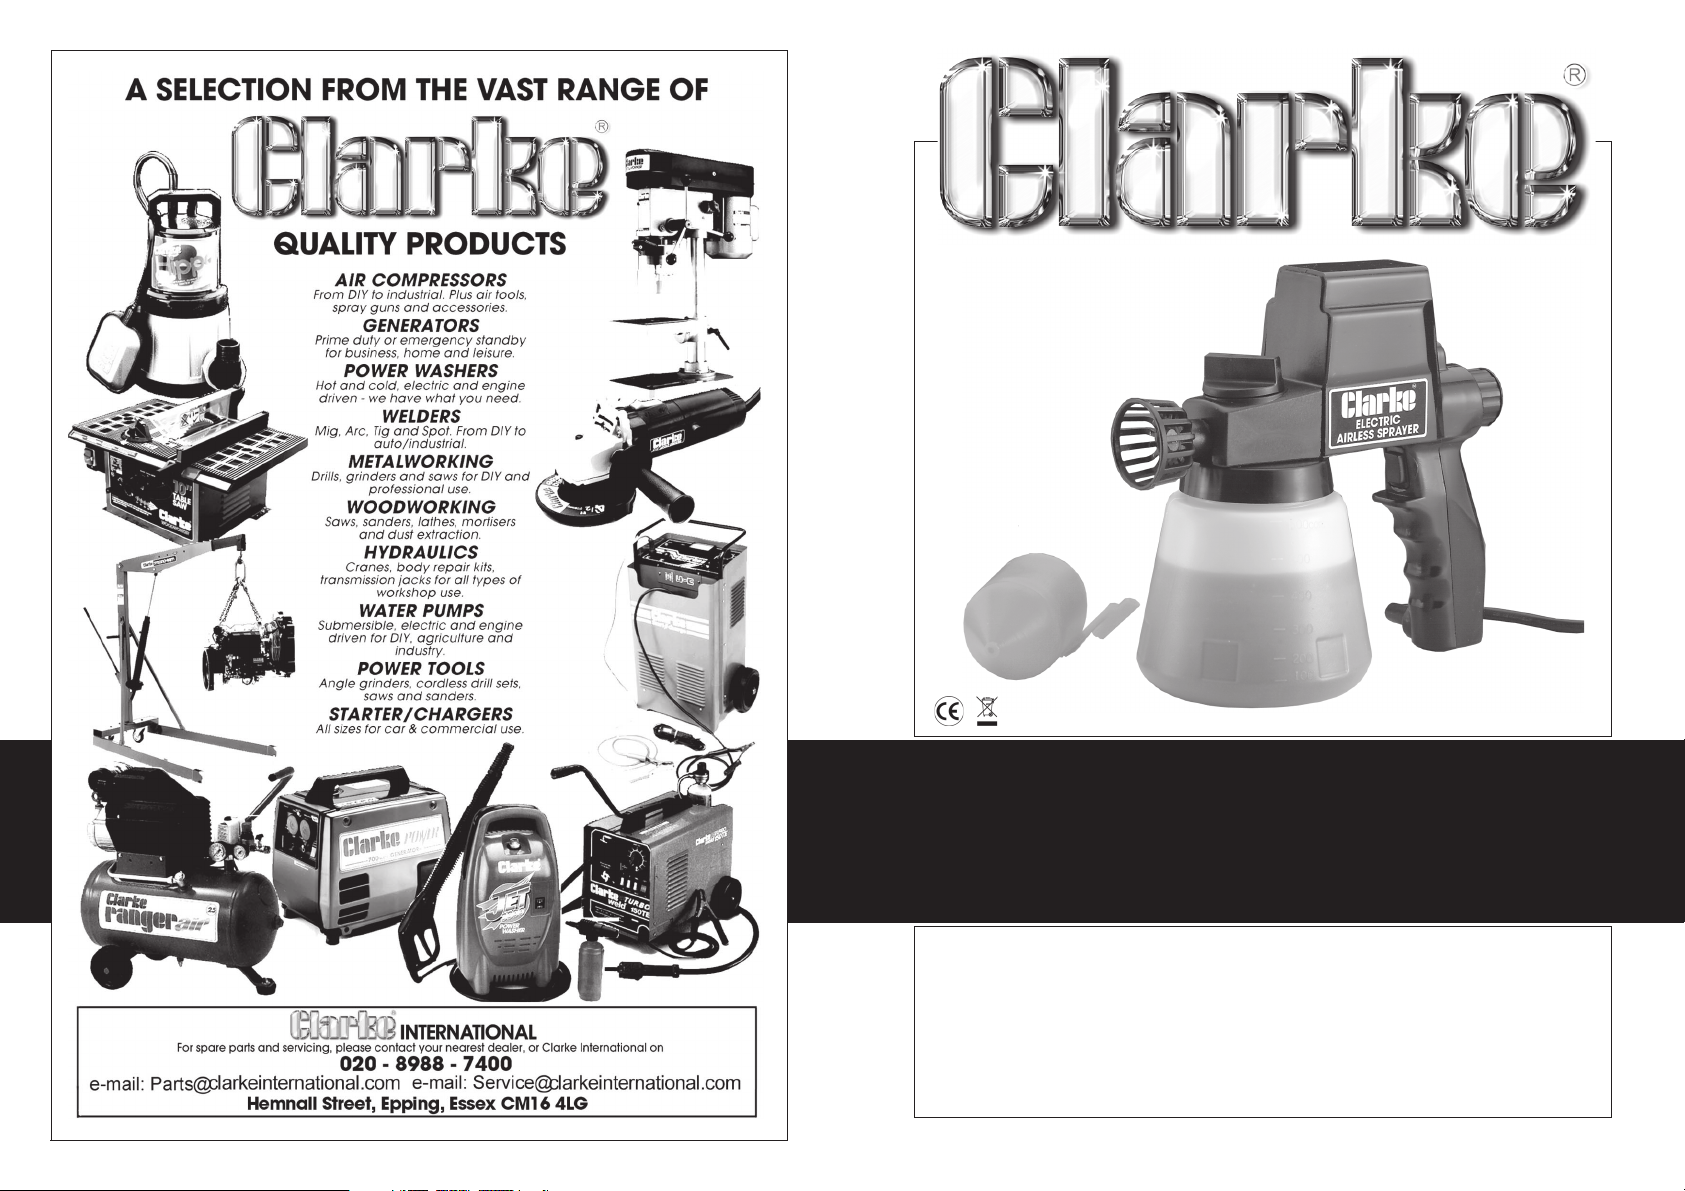
AIRLESS SPRAY GUN
Model No. CAS45
Part No. 2310045
OPERATING & MAINTENANCE
INSTRUCTIONS
0607
Page 2
Troubleshooting
IMPORTANT.
DO NOT use this product in a potentially explosive/
inflammable environment.
Use only in a well ventilated area.
When disposing of this product, do not dispose of with general waste. It must be disposed of according to the laws
governing Waste Electrical and Electronic equipment, at a recognised disposal facility.
Specifications
Model No. ............................................................ CAS45
Power Supply ...................................................... 230V 50Hz 1Ph
Rating ................................................................... 45Watts
Container Capacity ...........................................750ml
Nozzle Sizes ..........................................................0.6mm and 0.8mm
Weight..................................................................1.25kg
Part No. ................................................................2310045
2
PROBLEM
Spray Gun hums
but does not
operate.
No suction Feed.
Spray Gun motor
operates but
nothing coming
out.
Spray Gun motor
operates, but
spluttering.
Paint Dripping.
Excessive
fogging.
Runs and sags in
paint.
POSSIBLE CAUSE
Piston Sticking.
No Valve in pump.
Paint Pickup filter blocked
Liquid too thick.
Nozzle Blocked
Atomiser valve blocked,
Worn valve.
Worn nozzle.
Container almost empty.
Spray gun held at wrong
angle.
Liquid too thick.
Incorrectly set regulation
control.
Nozzle loose.
Operating at more than
45o angle.
Pressure too high.
Holding sprayer too far
from surface.
Arm movement too slow.
Spray gun too close to
work surface.
Applying too much paint
in one go.
11
REMEDY
Release container cover, cylinder
housing and piston assembly by
unscrewing the Large securing knob
on the top of the head. Unscrew and
remove nozzle. Remove atomiser
valve. Use soft punch with a shaft of
no more than 4.5mm diameter
inserted into the valve housing in the
container head, to eject the stuck
piston. Clean and lubricate piston
and cylinder. Re-assemble carefully in
reverse order. Remember to replace
the compression spring onto the
piston before fitting the piston. Ensure
you have not dropped any parts into
the motor housing.
Insert atomiser valve
Clean filter
Thin liquid as recommended.
Clean thoroughly with thinners.
Clean thoroughly with thinners.
Replace atomiser valve
Replace nozzle
Refill container.
Hold at correct angle.
Thin liquid as recommended.
Adjust using Control Knob at back of
gun.
Tighten nozzle.
Keep sprayer upright.
Turn Control Knob clockwise to
reduce pressure
Hold sprayer about 30cm (12”) from
work.
See section ‘Hints on spraying’
Page 3
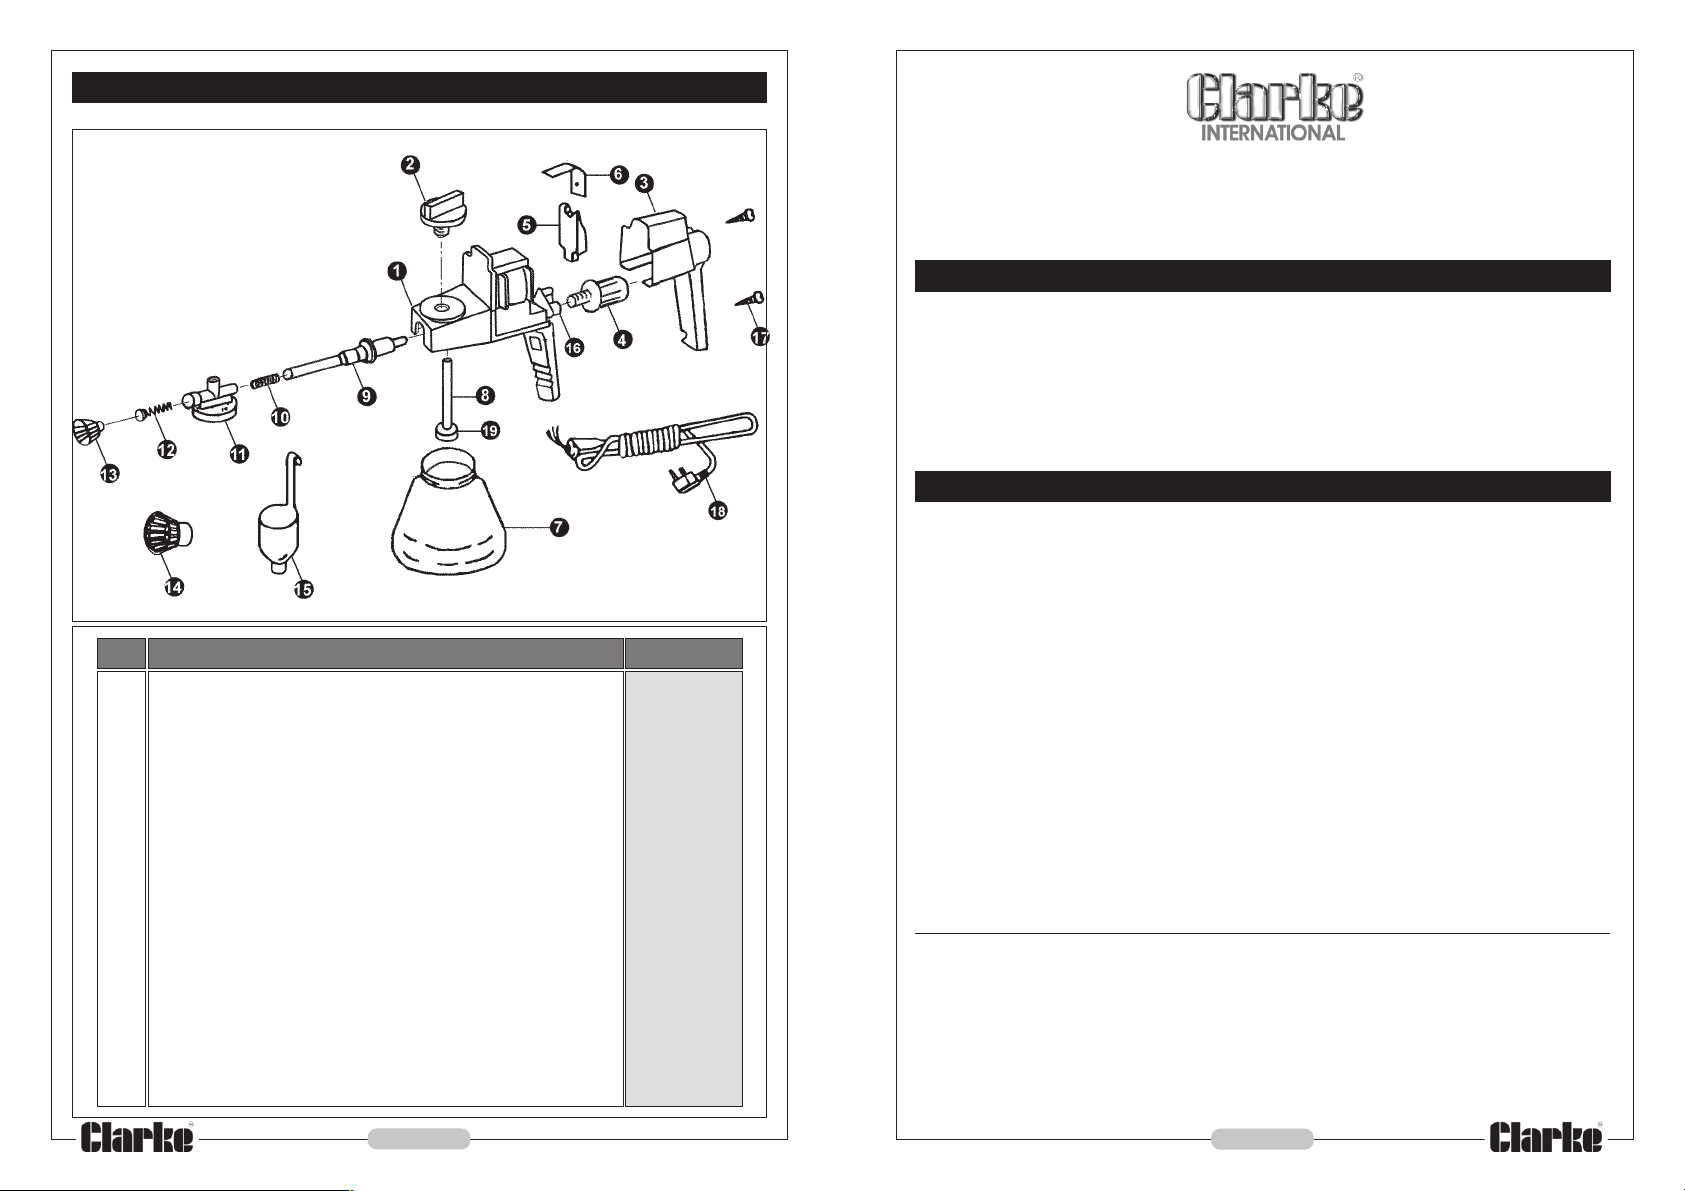
Parts List and Diagram
No. Description Part No.
1 Main Assembly c/w Solenoid and Trigger Switch ................. KLCAS4501
2 Head Securing Knob ................................................................. KLCAS4502
3 Rear Cover ................................................................................. KLCAS4503
4 Control Knob .............................................................................. KLCAS4504
5 Armature .................................................................................... KLCAS4505
6 Spring .......................................................................................... KLCAS4506
7 Container ................................................................................... KLCAS4507
8 Suction Tube............................................................................... KLCAS4508
9 Piston Assembly ......................................................................... KLCAS4509
10 Spring .......................................................................................... KLCAS4510
11 Container Head ........................................................................ KLCAS4511
12 Atomising Valve ......................................................................... KLCAS4512
13 Nozzle 0.6mm ............................................................................. KLCAS4513
14 Nozzle 0.8mm ............................................................................. KLCAS4514
15 Viscosity Cup .............................................................................. KLCAS4515
16 Triangular Plate .......................................................................... KLCAS4516
17 Self Tapping Screw .................................................................... KLCAS4517
18 Mains Cable ............................................................................... KLCAS4518
19 Filter ............................................................................................. KLCAS4519
10
Thank you for purchasing this Clarke Airless Spray Gun. Before attempting to use
this appliance, please read this instruction manual thoroughly, and carefully follow
all directions given. This is for your own safety and that of others around you, and
to help you achieve long and trouble free service from your spray gun.
Guarantee
This product is guaranteed against faults in manufacture for 12 months from
purchase date. Please keep your receipt as proof of purchase.
This guarantee is invalid if the product has been abused or tampered with in any
way, or not used for the purpose for which it is intended. The reason for return must
be clearly stated.
This guarantee does not affect your statutory rights.
For Your Own Safety
✔ ALWAYS wear a suitable approved breathing mask when spraying, to protect
against inhalation of paint spray or fumes. An air feed mask may be required
when spraying some types of paint. If in doubt, check with the paint
manufacturer.
✔ ALWAYS make sure there is adequate ventilation. Do not spray in confined or
enclosed areas.
✔ ALWAYS disconnect the spray gun from the electrical supply when it is not in
use, and before cleaning or any disassembly.
✔ ALWAYS keep the spray nozzle in place when spraying.
✔ ALWAYS adhere to the paint manufacturers instructions when thinning paint.
✔ ALWAYS disconnect from the mains supply when filling the paint container.
✔ ALWAYS thoroughly clean the spray gun after use and lubricate the piston
See ‘Maintenance’
✔ We strongly recommend the use of ear defenders when using this appliance.
✗ NEVER spray paint towards people or animals. In the case of injury, seek
expert medical adviced immediately.
✗ NEVER smoke while spraying or preparing paints, or spray near a naked flame
or heat source. Many paints are flammable.
✗ NEVER allow children to use or play with this appliance.
✗ NEVER use the spray gun outdoors when it is raining.
3
Page 4
Electrical Connections
This Appliance is Double Insulated
Connect the mains lead to a standard 230V (50Hz) electrical supply through an
approved 13 Amp BS1363 plug, or a suitably fused isolator switch
4. Press the Container Head assembly in slightly, and pull away from main body.
Remove the piston and spring, thoroughly clean with thinner.
5. Remove the spray nozzle by turning anti-clockwise.
6. Pull out the atomiser valve, making sure that this is not stretched during
removal and carefully retain it. If it does not come out easily, push it out
from the opposite end of the head using a rod of not greater than 4.5mm dia.
7. Clean all parts thoroughly.
8. Lubricate with a light oil then carefully reassemble in reverse order.
IMPORTANT :
code:
As the colours of the flexible cord of this appliance may not correspond with the
coloured markings identifying terminals in your plug proceed as follows:
• Connect BROWN coloured cord to plug terminal marked with a letter L or
coloured RED
• Connect BLUE coloured cord tothe plug terminal marked with a letter N or
coloured BLACK
IMPORTANT: If this appliance is fitted with a plug which is moulded on to the
electric cable (i.e. non- re-wireable) please note:
1. The plug must be thrown away if it is cut from the electric cable. There is a
danger of electric shock if it is subsequently inserted into a socket outlet.
2. Never use the plug without the fuse cover fitted.
3. Should you wish to replace a detachable fuse carrier, ensure that the correct
replacement is used (as indicated by marking or colour code).
4 Replacement fuse covers can be obtained from your local dealer or most
electrical stockists.
The wires in the mains lead are coloured in accordance with the following
Blue ..................................... Neutral
Brown .................................. Live
9. Ensure the Sprayer is dry and store carefully
Parts and Servicing
Please be aware that certain parts of this spray gun will wear, requiring replacement
and that these parts are not covered by your guarantee.
These parts include the atomising valve, spray nozzle, piston and spring. The wear
on these parts depends on the abrasiveness of the materials being sprayed. More
abrasive materials, such as emulsions, will cause these parts to wear much faster.
You would normally expect to replace an atomiser valve after spraying between
25-45 litres of emulsion.
If you check the face of a new atomisier valve you will see the size of the 3 holes
and the smoothness of the surrounds.
Worn valves will have larger holes and scratches on the surface. This will cause a
poor spray pattern and will require replacing. Replacement valves are available
from your dealer or the Clarke International Parts Department.
For Spare Parts and Service,please contact your nearest dealer, or Clarke
International, on one of the following numbers.
Fuse Rating
The fuse in the plug must be replaced with one of the same rating (3 amps) and
this replacement must be ASTA approved to BS1362.
IMPORTANT: If in any doubt, do not attempt any electrical repair yourself.
Consult a qualified technician
4
PARTS & SERVICE TEL: 020 8988 7400
PARTS & SERVICE FAX: 020 8558 3622
or e-mail as follows:
PARTS: [email protected]
SERVICE: [email protected]
9
Page 5
Spray Nozzle Selection
Overview
Two nozzle sizes are supplied with the gun, these should be used as follows:
0.6mm
This size works best for oil-based materials, stains, sealers, lacquers, water-proofers
and enamels for small application areas.
0.8mm
This nozzle works best for materials such as emulsions, and thicker type paints.
If you start spraying and find that the spray pattern is small and splattery, and
adjusting the Control Knob does not solve the problem, then you need to try the
larger nozzle before further thinning the material.
Maintenance
After each use it is essential that you clean the gun thoroughly. This will prevent
any blockages occuring and provide constant performance when you next come
to use it.
When you have finished spraying, empty any remaining material out of the paint
container.
Rinse the container, with the thinner that was used with your paint, until it is perfectly
clean. Then put a little clean thinner into the container, plug the Sprayer into the
mains and pull the trigger. Spray onto cardboard or newspaper until the material
being sprayed becomes clear.
Wipe the nozzle and filter, and dry using a clean cloth. Finally, turn the upside down
and apply a few drops of lubricating oil to the piston.
Reassemble, then plug in and momentarily trigger the gun to disperse the oil around
the piston and cylinder.
REMEMBER: USE SUITABLE THINNERS WITH A FLASH POINT GREATER THAN 32oC. ENSURE
THERE IS ADEQUATE VENTILATION AND DO NOT SPRAY NEAR NAKED FLAMES.
Storage
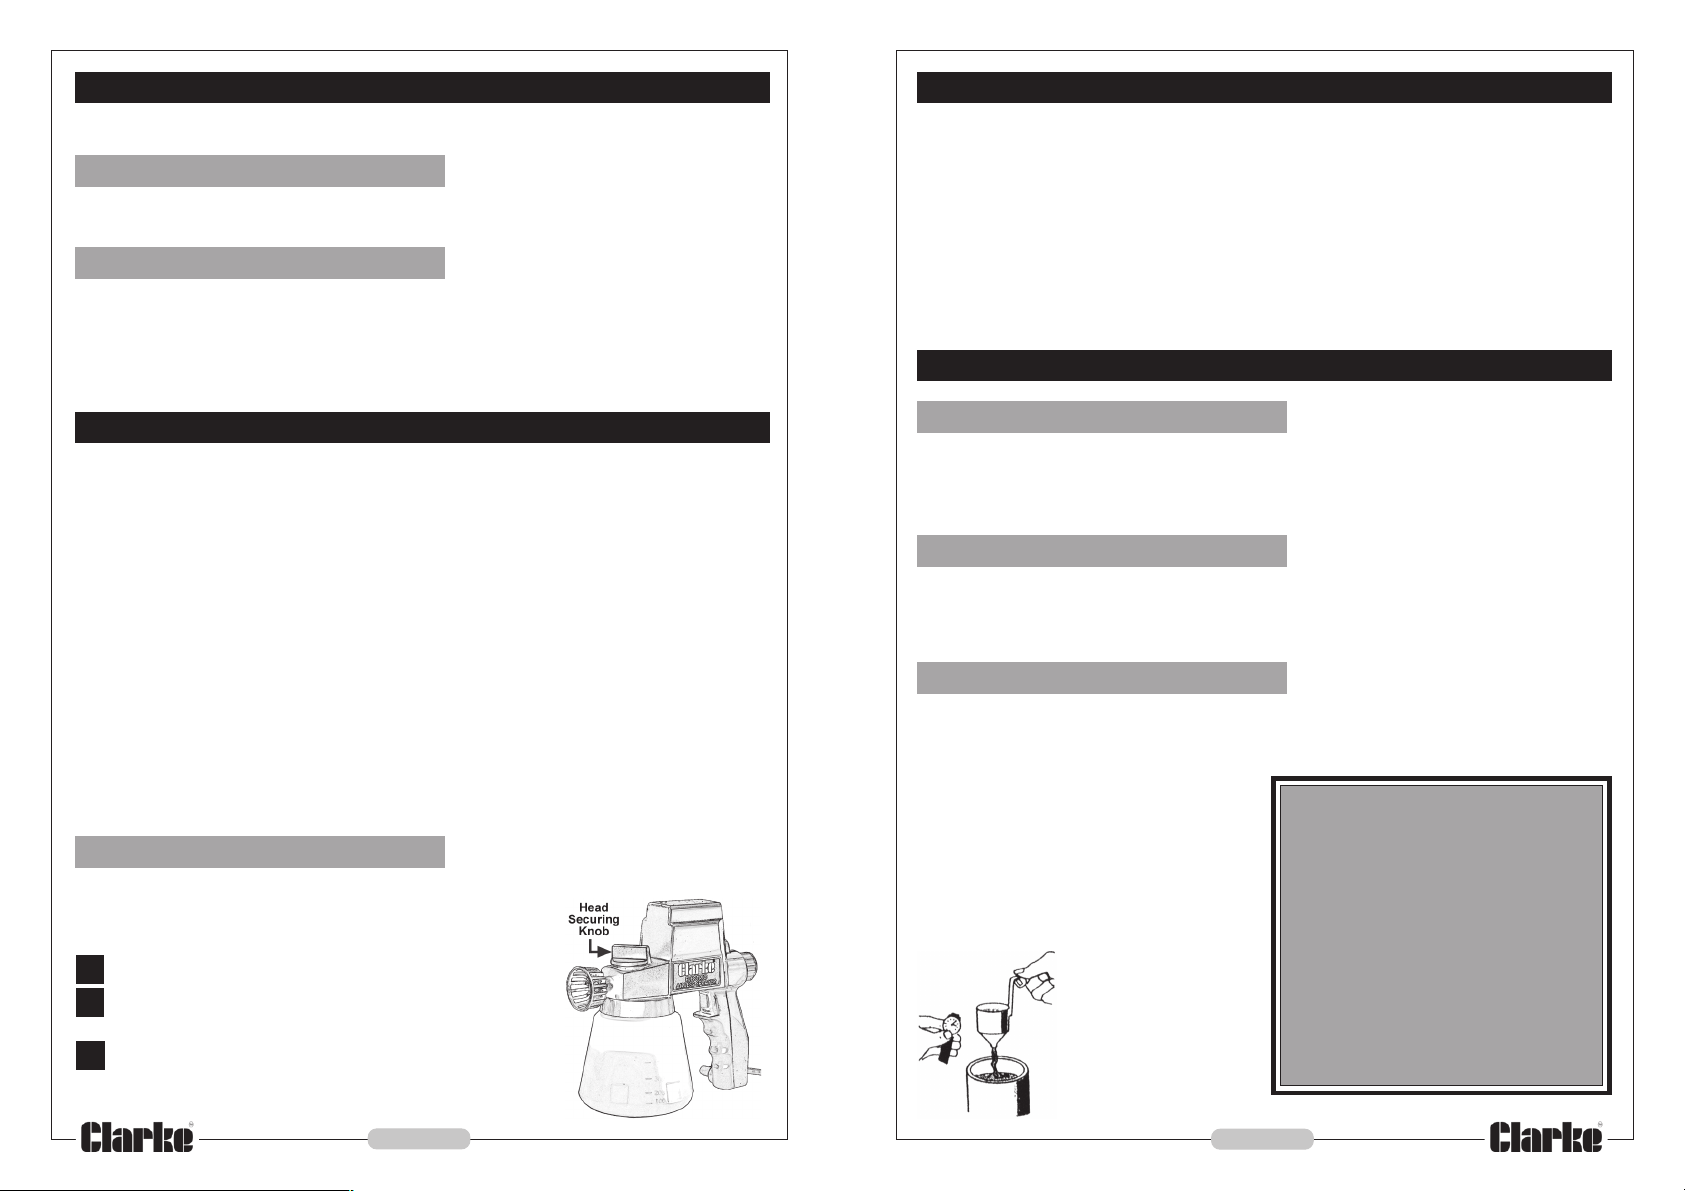
If the spray gun is being stored for a period of time the
following should also be undertaken in addition to the
above cleaning instructions:
1. Ensure the spray gun is unplugged.
2. Remove paint container and pull out the suction
tube.
3. Remove container cover and cylinder housing
from the main body by unscrewing the large
plastic Head Securing Knob, illustrated opposite.
8
Your sprayer is electrically operated and is provided with a 0.8mm spray nozzle for
spraying Latex, Creosote and other thicker materials, and an 0.6mm nozzle for
general purpose use. Additionally, a Viscosity Cup is provided so that materials
may be tested before use and a replacement Atomiser for use when required.
The gun may be used with several different spray mediums, including varnishes
wood preservatives - creosote etc., masonry paints,, enamel paints, and oil and
water based paints.
Airless spraying reduces the mist associated with air spraying and therefore reduces
paint loss.
Preparation
Paint Selection
ALWAYS check the manufacturers recommendations when selecting your paint.
Although many paints are suitable for spraying, some are not.
DO NOT use for spraying heavy exterior textured paints or coatings.
Surface Preparation
To obtain best results, it is vital that the surface to be sprayed is well prepared. It
must be clean, free from dust, dirt and grease. Mask any area that is not to be
sprayed.
Thinning the Paint
Thinning is particularly important when paint spraying. Most paints are supplied
ready for brush application and need to be sufficiently diluted for spraying
purposes. Always follow the paint manufacturers instructions. If in doubt, always
consult the paint manufacturer.
The Viscous Cup provided, will assist in
determining the correct thickness of the
paint.
Ensure the paint is free from lumps or
other matter, if necessary strain it
through a coarse filter.
The ideal viscosity for
most paints is given in
the chart opposite.
Dip the cup into the
paint and fill to the
brim. Time how long
it takes for the cup to
empty.
Water based paints ...... 35 - 45 secs
Oil based paints ........... 15 - 25 secs
Enamel paints ............... 15 - 25 secs
Primers ........................... 20 - 30 secs
Varnishes ....................... 20 - 25 secs
Aluminium paints ......... 15 - 25 secs
Wood preservatives ..... Do Not Dilute
Wood Stains .................. Do Not Dilute
Smooth Masonry paint...dilute by 5 - 10%
ALWAYS check with manufacturer
Thin as required until times are achieved
5
Page 6
Using the Sprayer
1. With the Sprayer disconnected from the mains supply, unscrew the paint
container and fill with the appropriate paint, remembering to filter where
necessary to ensure no lumps, grit or foreign matter is present. DO NOT
overfill...allow an air gap at the top of the container.
2. Before applying the first application, turn the Sprayer
head upside down, remove the suction hose and
inject a few drops of light lubricating oil into the piston
- both apertures on the underside of the head.
3. Replace the suction hose with filter, and screw on the
paint container - tightly.
4. Plug the Sprayer into the mains supply, and aiming at a piece of cardboard
or newspaper, pull the trigger in the handle to start. This will disperse oil around
the piston and cylinder and eject any excess. Additionally, it will show you
the spray pattern.
Turning the Control Knob, shown in the
illustration opposite, will determine the volume
of paint you wish to apply, and will also effect
the spray pattern.
Spraying Technique
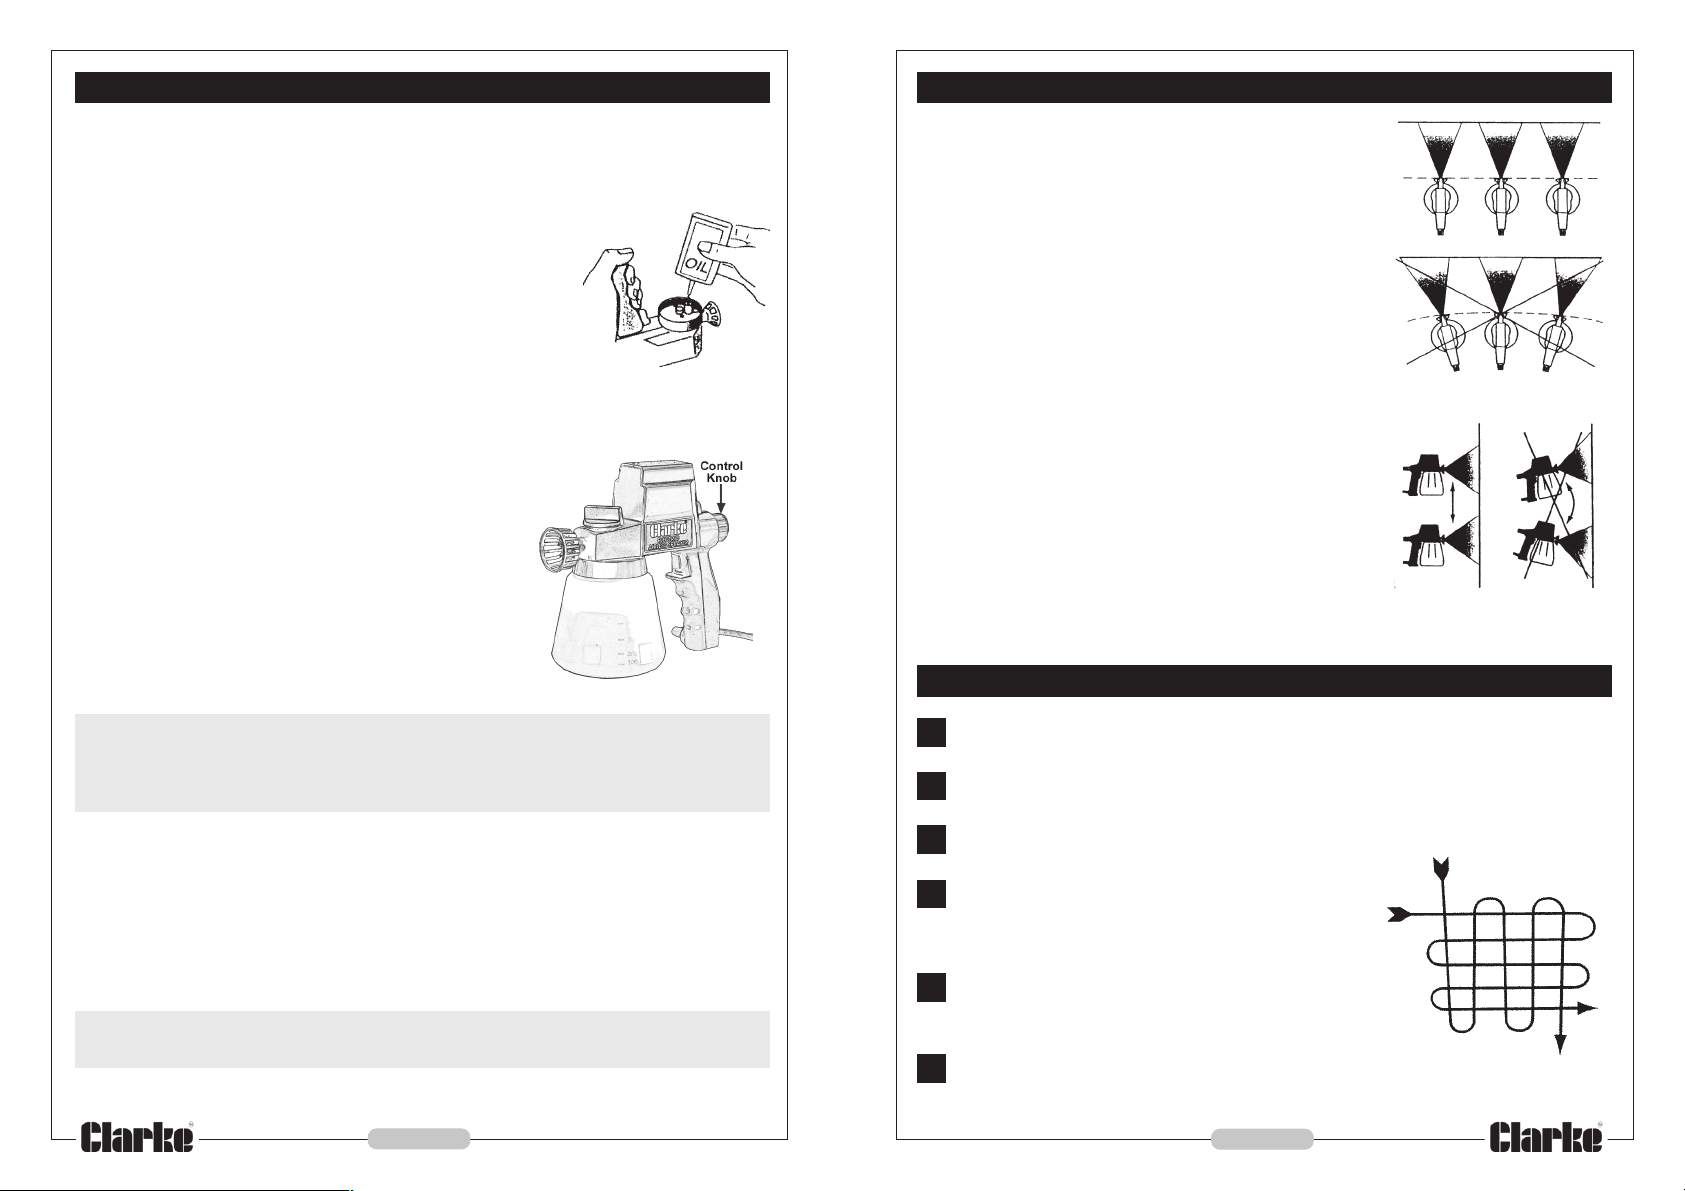
When spraying, the Sprayer should be held square
to the surface being painted, at a distance of 10
to 12 inches (25 - 30cm) from the surface.
Keep the gun parallel to the surface being sprayed,
starting the stroke before pulling the trigger, and
releasing the trigger before ending the stroke.
Overlap each stroke over the preceding stroke to
obtain an even finish. The paint cover should be
even and wet when spraying.
If the Sprayer is too far from the surface, or the paint
is too thin, the paint will dry before hitting the work,
resulting in a rough, sandy finish. Allowing overspray
to fall on a finished area will also result in a rough
finish. Too much paint feed or holding the gun too
close to the work will lead to runs and sagging.
Let your arm control the Sprayer, NOT your wrist.
NEVER tilt the Sprayer more than 45O as paint could find its way into the
motor housing, causing severe damage.
NOTE: A good spray pattern is achieved when there is an even amount of material in
a fine spray throughout the pattern.
A poor spray will concentrate the paint at the centre of the spray and produce a
blotchy finish
To determine the correct spray pattern and volume for your particular application,
proceed as follows:
1. Turn the Control Knob fully anticlockwise .
2. Pull the trigger to test the pattern, aiming at a piece of card/newspaper etc.
3. Continue pressing the trigger whilst turning the Control Knob clockwise until
the pattern is correct.
NOTE: If you have carried out the above procedure and the spray pattern is still not
satisfactory.....then it is likely that the paint requires further thinning.
6
Helpful Hints
1.
Control the speed of movement of the spray gun so that it is even. A fast
speed will give a thin coat and a slow speed will give a heavy coat.
2.
Only apply one coat at a time. If a further coat is required follow the paint
manufacturers instructions for drying times.
3.
If spraying small areas or objects keep the output setting low as this will avoid
excessive use of paint and will minimise overspray.
4.
When spraying large areas or objects, it is best to
use a criss-cross pattern, either from left to right
then up or down, or vice-versa. This will ensure
maximum coverage
5.
Avoid stopping and starting when spraying as this
can lead to too much or not enough material on
a surface.
6.
To ensure edges are covered, commence spraying just to the side of area
being sprayed, continue and do not stop until the spray has gone past the
opposite edge.
7
 Loading...