

Clark 2003 Model Clark Foam Planer, Foam Planer 2003 User Manual
CLARK FOAM PLANER
2003 MODEL
SAFETY AND OPERATING
INSTRUCTIONS
Version 1, 2003

WARNING – SAFETY INSTRUCTIONS
This planer is sold as is. The planer is designed for the specific purpose of shaping Clark Foam using
the well-known techniques and equipment universally used in the polyurethane foam surfboard industry since 1958. The planer is not suitable for any other purpose and may cause injury or death if
used for any other application or if any unorthodox surfboard shaping methods or equipment are
used. Beside observation, there is written material and video explaining the above mentioned techniques and equipment.
Should the planer make any unusual noise during operation, immediately stop using the planer and
return it to an authorized Clark Foam representative for inspection and repair. At the Clark Foam
factory we have full repair capabilities and maintain a telephone help service weekdays between 6:00
AM and 2:30 PM P.S.T. at (949) 582-2000.
The planer is double insulated protecting the operator from electrical shock. This is not the real danger. Fine foam dusts in air in certain concentrations are very explosive. Normally there will be a small
explosion followed by a very large explosion of the foam dust on the ceiling and walls dislodged by
the small explosion. Also foam and wood burns very rapidly. Historically faulty wiring has caused
most shaping room combustion. Serious fires have been caused by poor housekeeping or fuel buildup
combined with faulty wiring. Always keep the planer cord, plug, and all drop cords used in and
around shaping in top condition and use adequate size wire. Do not try to repair damaged or worn
wire and parts with tape or other methods but replace them with new parts using commonly accepted
wiring standards.
If the planer is not frequently blown out with air to clean the foam dust from the bearing area the
bearings may overheat causing premature failure or fire. If the planer is run with faulty bearings the
heat buildup can cause the plastic housing to melt ruining the planer. Significant damage to the housing can cause danger to the operator.
Keep all screws, bolts, and covers tightly in place. The six bolts holding the blades and blade backplates
in position must be securely tightened at all times.
Avoid loose clothing or other articles that could become entangled in the planer blades. Always hold
the planer very tight when the motor is running. Never operate the planer with a faulty or bypassed
trigger or other modified wiring.
The handles on the planer are significantly weaker than the handles on standard electric power planers. If there is any evidence of housing or handle failure, especially rear handle failure, stop using the
planer until it is the repaired at the Clark Foam factory.

TABLE OF CONTENTS
INTRODUCTION............................................................................................................................5
FEATURES.......................................................................................................................................5
SERVICE ..........................................................................................................................................7
HELP LINE ......................................................................................................................................7
FIRE DANGER ................................................................................................................................7
CUSTOM PLANERS.......................................................................................................................7
BLADE EXCHANGE SERVICE - BLADE SHARPENING ......................................................8
IMPORTANT BLADE CHANGING INSTRUCTIONS ..............................................................8
BASE PLATE LUBRICATION ......................................................................................................8
BASE PLATE MODIFICATION ...................................................................................................9
POWER CORD ADJUSTMENT....................................................................................................9
KNOB SELECTION........................................................................................................................9
THE DOUGHNUT AND DEPTH ADJUSTMENT INDICATOR ............................................10
DISASSEMBLY OF THE DEPTH ADJUSTMENT MECHANISM ........................................11
SERVICING THE DEPTH ADJUSTMENT SCREW ............................................................... 11
SERVICING THE FOAM FILTER .............................................................................................11
ADJUSTING THE MAXIMUM CUTTING DEPTH ................................................................12
INDEXING THE BASE PLATES AND START OF CUT.........................................................12
FRONT END ASSEMBLY DIAGRAM .......................................................................................12
DEPTH ADJUSTMENT MECHANISM ASSEMBLY AND ADJUSTMENT.........................14
DUST EXHAUST OUTLET .........................................................................................................15
VACUUM SYSTEMS ....................................................................................................................15
MAINTAINING THE BRUSHES ................................................................................................16
MAINTAINING THE TRIGGER ................................................................................................16
POWER CORD MAINTENANCE AND ADJUSTMENT ........................................................17
BEARING MAINTENANCE .......................................................................................................17
REPLACING BELTS ....................................................................................................................18
SHAPING TIPS FOR THE 2003 MODEL..................................................................................18
PLANER LENGTH AND WIDTH THEORY ............................................................................19
SKIL 100 PLANER COMPARISON TO THE 2003 MODEL ..................................................20
HISTORY........................................................................................................................................22
SUGGESTIONS .............................................................................................................................23
TOOL KIT AND PARTS...............................................................................................................24


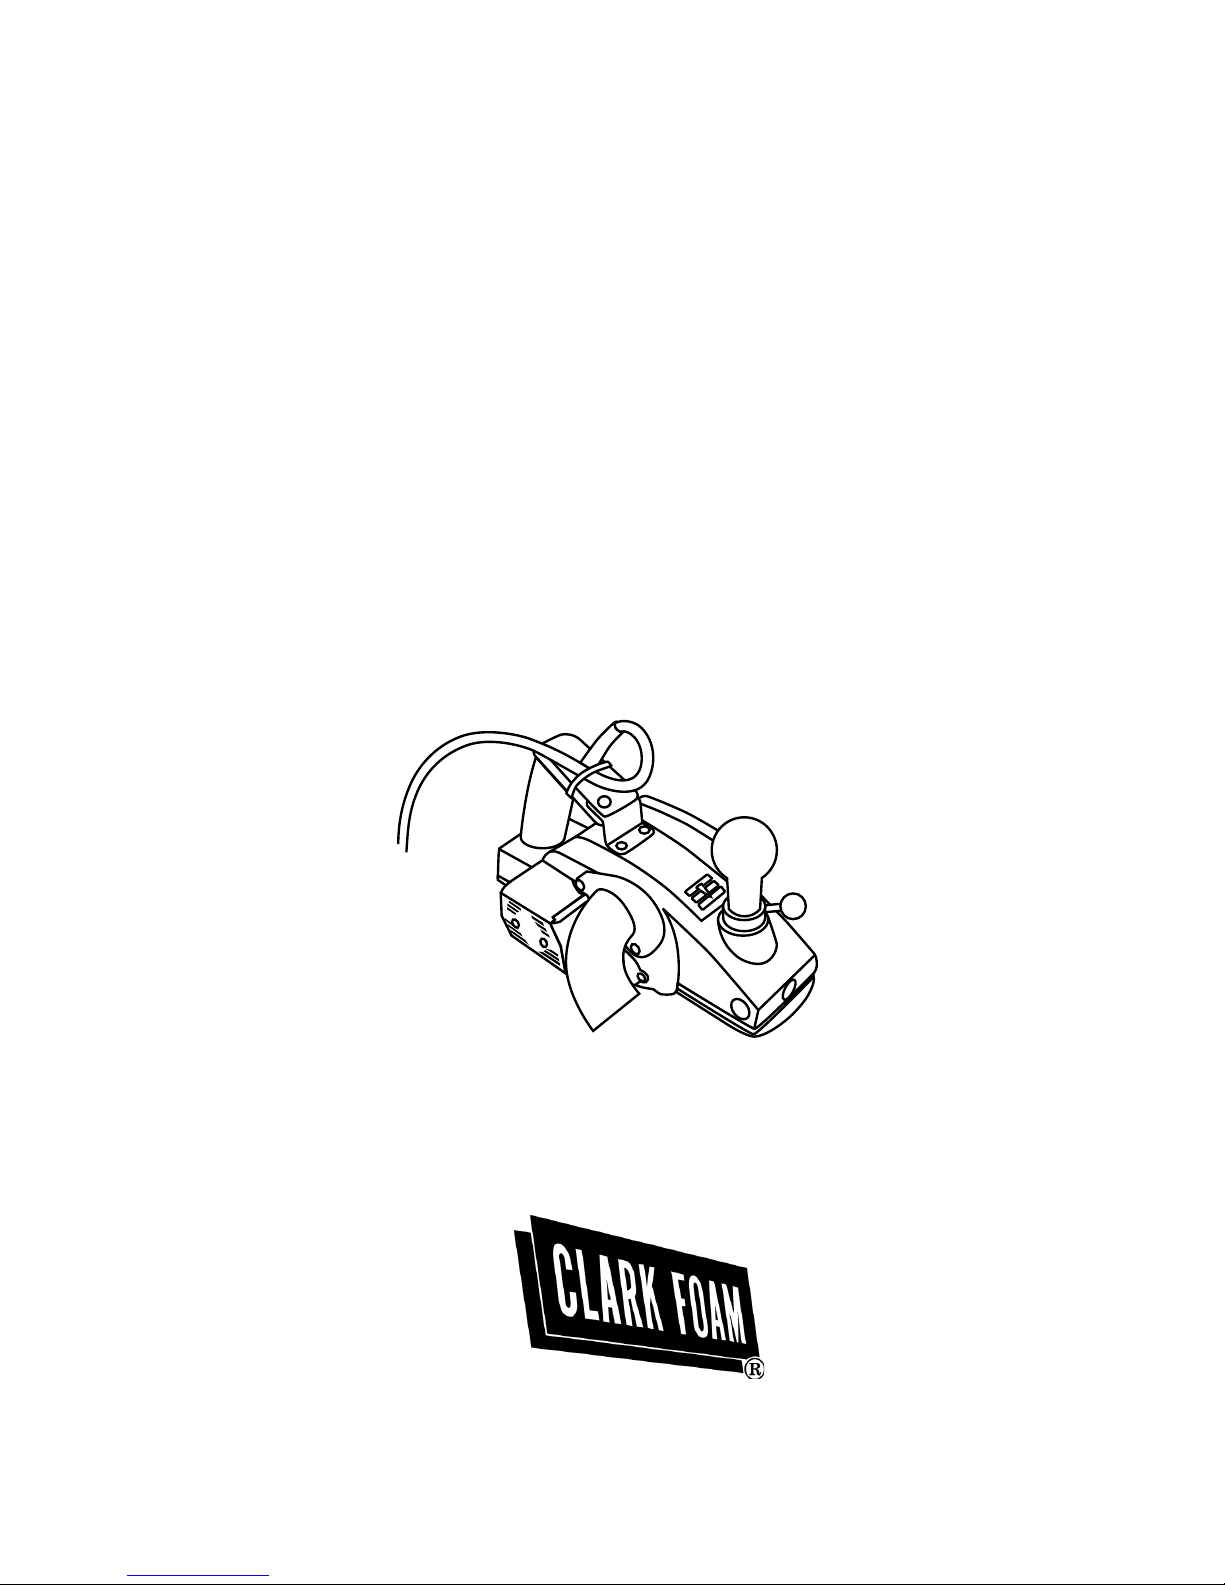
INTRODUCTION
The 2003 Model Clark Foam Planer and tool kit was developed specifically for the professional shaper. It comes fully equipped with every option the majority of professional shapers
use. The planer is assembled at Clark Foam from a combination of stock parts, modified
stock parts, and parts fabricated by or for Clark Foam. The main body is a Hitachi P20-SB.
Clark Foam has sold a modified Hitachi F-20 and P-20SB series planer since 1988. It has
proven durability and a good safety record.
Since 1988 we have accumulated a lot of information from shapers about the maintenance
and adjustment of this type of planer. In doing the research for the 2003 Model we gathered
a lot of information regarding productivity or increasing productivity while using power
planers. The following instructions and suggestions are based on our experience and the
experiences of many shapers. Each item in the instructions represents a shaping tip or problem one or more shapers have encountered or brought to our attention. Many of these problems have caused individual shapers a lot of frustration and a significant loss of productivity.
Therefore we have put a lot of thought into this document and have tried to cover each subject in great detail.
The depth adjustment mechanism on this planer is especially difficult to set up and understand. A new 2003 Model planer should be properly set up and work well out of the box. If
you choose to customize the depth adjustment mechanism or the depth adjustment mechanism requires maintenance be sure to read the instructions very carefully. This is a complex
mechanism and it would be very easy to screw it up!
IT IS RECOMMENDED THAT YOU CAREFULLY READ THESE INSTRUCTIONS AND
SUGGESTIONS, KEEP THIS DOCUMENT FOR FUTURE REFERENCE, AND KEEP ALL
TOOLS AND PARTS THAT COME WITH THE PLANER.
FEATURES
- Very lightweight for reducing fatigue.
- Adequate power for shaping Clark Foam when the blades are sharp.
- Significantly increased productivity using a blade/blade holder exchange service offered by Clark Foam that puts sharp blades in the planer in less then 5 minutes.
- Enough belt housing clearance to allow full depth, two way cutting passes.
- The rear base plate is milled and indexed to the blades for precision cutting.
- More room for the front hand than any planer used for surfboard shaping.

- When properly set up the depth adjustment mechanism operates very smoothly and
there is almost no backlash or play.
- The depth adjustment mechanism indicator can be moved to accommodate the individual shaper’s style.
- The large depth adjustment mechanism knob can be customized using knobs available
from Clark Foam and commercially available knobs.
- The depth adjustment knob’s tension is adjustable.
- A foam seal keeps dust and debris out of the depth adjustment mechanism significantly
reducing maintenance.
- The depth adjustment mechanism is Teflon coated and should require no lubrication or
maintenance for the life of the planer.
- The depth adjustment mechanism can be taken apart and cleaned insuring very smooth
operation for the life of the planer.
- Using shim washers the depth indicator knob can be set so the planer begins cutting at a
position preferred by the shaper. (See instructions for more details.)
- The maximum cut depth can be customized using a spacer provided with the planer.
- The rear handle is very close to the work and positioned for horizontal movement rather
than downward pressure. This allows higher horses and lights bringing the work closer
to the eye.
- The base plates are modified for shaping surfboards. The rear plate is wider than earlier
models and the front plate is tapered so the planer will slide over glue and obstructions
rather than plowing them into the foam.
- The planer is very short. This is an advantage for all but perfectly flat surfaces.
- Each planer comes with an exhaust deflector that can either attach to a vacuum hose or
be used to deflect the exhaust away from the shaper. The deflector has several configurations that can be changed to fit the individual shaper.
- A built in fan blows the dust out of the planer allowing a small exhaust port.
- The power cord goes straight up which is ideal for a vacuum system. It can be looped
and tied for shaping without a vacuum.
- The power cord is 25 feet long.
- The planer has high quality, sealed bearings for long life. The bearings used in the 2003
Model are custom built for low friction and are an improvement over our older Pro
Model bearings. Because of this the 2003 Model has more power.
- Planers can be custom built eliminating some modifications or changing other modifications.
- Included with the planer is a full tool kit and a jig for indexing cutter blades prior to
installing them in the planer. (There is a full list of what is included with the planer on
the last page.) There is also a blade-sharpening device available by special order.

SERVICE
Clark Foam will repair planers we have sold at the California Factory. Clark Foam stocks and
sells the commonly used parts like brushes, triggers, blades, blade holders, depth adjustment
components, bearings, foam filters, and knobs. We can usually rob parts we do not stock
from new planers being assembled. We can also order any part on the planer. It will probably
be easier to purchase parts from Clark Foam rather than from a local repair center because so
many parts are modified.
HELP LINE
Weekdays between 6:00 AM and 2:30 PM Pacific Standard Time there will be an expert available to answer planer and vacuum system technical questions at (949) 582-2000. FAX questions to (949) 582-5085 or e-mail to clarkfoam@pacbell.net. Also most representatives of Clark
Foam have some planer experience.
FIRE DANGER
The first rule is “no fuel - no fire”. Keep a clean shop. Also if you burn down it hurts everyone building surfboards. Fire Marshals read statistics and newspapers. You will not be very
popular!
Wiring is the number one cause of surfboard factory fires. Maintain good wiring and use
common sense. Poor housekeeping is the second most common cause of fires.
CUSTOM PLANERS
While developing the 2003 Model we identified three important things: First the really good
shapers have developed an incredible level of skill with their planers. Second we noticed that
once an experienced shaper has a planer set up a certain way they do not like change. Last we
noticed there are significant differences of opinion in several areas of planer design.
During our developmental work we tried a number of configurations including knobs, cut
depth indicators, base plates, handles, base plates, and modifications to the main plastic frame.
This information is available to customers.
Often we can build a special planer to the customer’s specification.

BLADE EXCHANGE SERVICE - BLADE SHARPENING
Beginning in 2003 Clark Foam offers a blade exchange service. Here is how it works: The
planer owner hands us a set of dull blades and blade holders. The blades may have any
amount of wear. The blades and blade holder must not be damaged. We hand the planer
owner a set of sharp blades attached to blade holders. The blades might be brand new or they
may have been sharpened for their very last time. The blade holder will be in good condition.
The sharp set of blades is indexed on the blade holder and ready to install. Removing the dull
blades and installing sharp, indexed blades takes less than 5 minutes. Only 6 bolts are involved.
The exchange service only applies to
If the planer owner is not near an exchange point they should purchase an extra set of blades
and blade holders and do the exchange by mail. Send them to Clark Foam, 25887 Crown
Valley Parkway, Laguna Niguel, California 92677.
The blades are sharpened at the Clark Foam Factory using a state of the art, automatic sharpening machine. The blades are indexed on the blade holder using the same jig that comes
with each planer. Our quality control is excellent.
We also sharpen blades from other hand and power planers.
both hand and power planers sold by Clark Foam.
IMPORTANT BLADE CHANGING INSTRUCTIONS
There is a very important indexing adjustment when changing blades!
There is some side-to-side play allowing a blade to go over to one side or the other of
the planer. This can make the effective blade width of the planer extra wide or it can
make the cut be to the left or right of the base plates. To keep that from happening,
center each blade to the main mandrel. The best way to do that is to use a small
screwdriver or the equivalent to move the blade and blade holder.
BASE PLATE LUBRICATION
To keep pieces of glue from gumming the bottom of the planer and to keep the planer moving
over the work smoothly, lightly spray the base plate with a silicon spray. Repeat fairly frequently for optimum performance.
Care must be taken to keep the coating very light and keep the silicone off shaped blanks. It
will ruin the glass job!
 Loading...