

Page 1
C4210™ User Guide
2.4 GHz Cordless Telephone with Caller ID
E
N
G
L
I
S
H
Featuring Digital Clarit
y PowerTM Technology
E
S
P
A
~
N
O
L
F
R
A
N
Ç
A
I
S
Page 2

Page 3

TABLE OF CONTENTS
Safety Instructions .......................................................5
Features .........................................................................
Getting Started ..........................................................11
Choosing a Location ...........................................11
Telephone Installation ........................................12
Battery Installation .............................................14
Handset Battery Charging ................................14
Low Battery .........................................................14
Battery Life ...........................................................15
Headset Jack .........................................................15
Belt Clip ................................................................15
Hearing Aid Compatibility .................................15
Feature Set Up ...........................................................16
Handset Features ................................................16
Set Up Mode ..................................................16
Digital Clarity Power ...................................19
Boost Clarity Power On/Off ......................19
Volume Control .............................................19
Tone Switch ....................................................19
Handset Ringer .............................................20
Pulse/Tone ......................................................20
Flash .................................................................20
Mute ................................................................20
Redial/Pause ...................................................20
Base Features .......................................................21
Ringer Volume ................................................21
Ringer Style ....................................................21
Visual Ringers .................................................21
Boost On/Off ................................................21
Battery Backup ..............................................22
9
Page 4

TABLE OF CONTENTS
Telephone Operations .............................................24
Placing a Call ........................................................24
Answering a Call ..................................................24
Last Number Redial ............................................24
Pause Feature .......................................................25
Temporary Tone ...................................................25
Lighted Key Pad ...................................................25
Page/Handset Locator ........................................25
Channel Operation .............................................26
Security Code ......................................................26
Memory Storage ........................................................26
Review Phonebook Information ......................26
Adding a Phonebook Number ..........................27
Dialing a Phonebook Entry ...............................28
Deleting a Stored Number ...............................28
Deleting All Stored Numbers ...........................28
Changing a Stored Number ..............................29
Adding the Emergency Number ......................29
Dialing the Emergency Number ......................30
Deleting the Emergency Number ...................30
Caller ID Operations ...............................................31
Caller ID Information ........................................31
Caller ID Review .................................................32
Saving Caller ID Information to Phonebook .33
Callback from Caller ID Information ..............34
Delete Caller ID Information ...........................36
Maintenance and Care .............................................37
Troubleshooting .........................................................37
Regulatory Compliance ...........................................40
Warranty and Service ...............................................45
Page 5

IMPORTANT SAFETY INSTRUCTIONS
When using your telephone equipment, basic safety
precautions should always be followed to reduce
the risk of fire, electric shock and injury to persons
including the following:
1. Read and understand all instructions.
2. Follow all warnings and instructions marked
on the telephone.
3. Do not use this telephone near a bath tub,
wash basin, kitchen sink or laundry tub, in
a wet basement, near a swimming pool or
any where else there is water.
4. Avoid using a telephone (other than a cord less type) during a storm. There may be a
remote risk of electrical shock from lightning.
5. Do not use the telephone to report a gas leak
in the vicinity of the leak.
6. Unplug this telephone from the wall outlets
before cleaning. Do not use liquid cleaners
or aerosol cleaners on the telephone. Use a
damp cloth for cleaning.
7. Place this telephone on a stable surface.
Serious damage and/or injury may result if
the telephone falls.
8. Do not cover the slots and openings on this
telephone. This telephone should never be
placed near or over a radiator or heat
register. This telephone should not be placed
in a built-in installation unless proper ventila-
tion is provided.
9. Operate this telephone using the electrical
voltage as stated on the base unit or in the
owner’s manual. If you are not sure of the
voltage in your home, consult your dealer or
local power company.
SAVE THESE INSTRUCTIONS
5
Page 6

IMPORTANT SAFETY INSTRUCTIONS
10. Do not place anything on the power cord.
Install the telephone where no one will step
or trip on the cord.
11. Do not overload wall outlets or extension
cords as this can increase the risk of fire or
electrical shock.
12. Never push any objects through the slots in
the telephone. They can touch dangerous
voltage points or short out parts that could
result in a risk of fire or electrical shock.
Never spill liquid of any kind on
the telephone.
13. To reduce the risk of electrical shock, do not
take this phone apart. Opening or removing
covers may expose you to dangerous volt ages or other risks. Incorrect reassembly can
cause electric shock when the appliance
is subsequently used.
14. Unplug this product from the wall outlet and
refer servicing to the manufacturer under
the following conditions:
A. When the power supply cord or plug is
frayed or damaged.
B. If liquid has been spilled into the product.
C. If the telephone has been exposed to rain
or water.
D. If the telephone does not operate normally
by following the operating instructions.
Adjust only those controls that are covered
by the operating instructions. Improper
adjustment may require extensive work
by a qualified technician to restore the
telephone to normal operation.
6
SAVE THESE INSTRUCTIONS
Page 7

IMPORTANT SAFETY INSTRUCTIONS
E. If the telephone has been dropped or the
case has been damaged.
F. If the telephone exhibits a distinct change
in performance.
15. Never install telephone wiring during a
lightning storm.
16. Never install telephone jacks in wet locations
unless the jack is specifically designed for
wet locations.
17. Never touch uninsulated telephone wires or
terminals unless the telephone line has been
disconnected at the network interface.
18. Use caution when installing or modifying
telephone lines.
19. Use only the power cord and batteries
indicated in the manual. Do not dispose
of batteries in a fire. They may explode.
Check with local codes for possible special
disposal instructions.
20. Plug the AC adaptor into the outlet that is
nearest and most accessible to the telephone.
SAVE THESE INSTRUCTIONS
7
Page 8

IMPORTANT SAFETY INSTRUCTIONS
SAFETY INSTRUCTIONS FOR BATTERIES
Caution: Risk of explosion if battery is replaced by
an incorrect type. Dispose of used batteries
according to the instructions.
1. Use only the approved battery pack in the
handset of your cordless phone.
For Handset Unit: 3.6V 600mAHr
NiMH Rechargeable Battery
Sanik Battery Co. Ltd.: 3SNAAA60HSJ1
GPI International Ltd.: GP60AAAH3BMJZ
For Base Unit:
Four (4) AA alkaline batteries
2. Do not dispose of the battery in a fire as it
may explode. Check with local codes for
possible special disposal instructions.
3. Do not open or mutilate the battery.
Released electrolyte is corrosive and may
cause damage to the eyes and skin. It may
be toxic if swallowed.
4. Exercise care in handling batteries in order
not to short the battery with conducting
materials such as rings, bracelets and keys.
The battery or conduction material may
overheat and cause burns.
5. Charge the battery (ies) provided with or
identified for use with this product only in
accordance with the instructions and
limitations specified in this manual.
6. Observe proper polarity orientation between
the battery pack and the battery charger.
8
SAVE THESE INSTRUCTIONS
Page 9
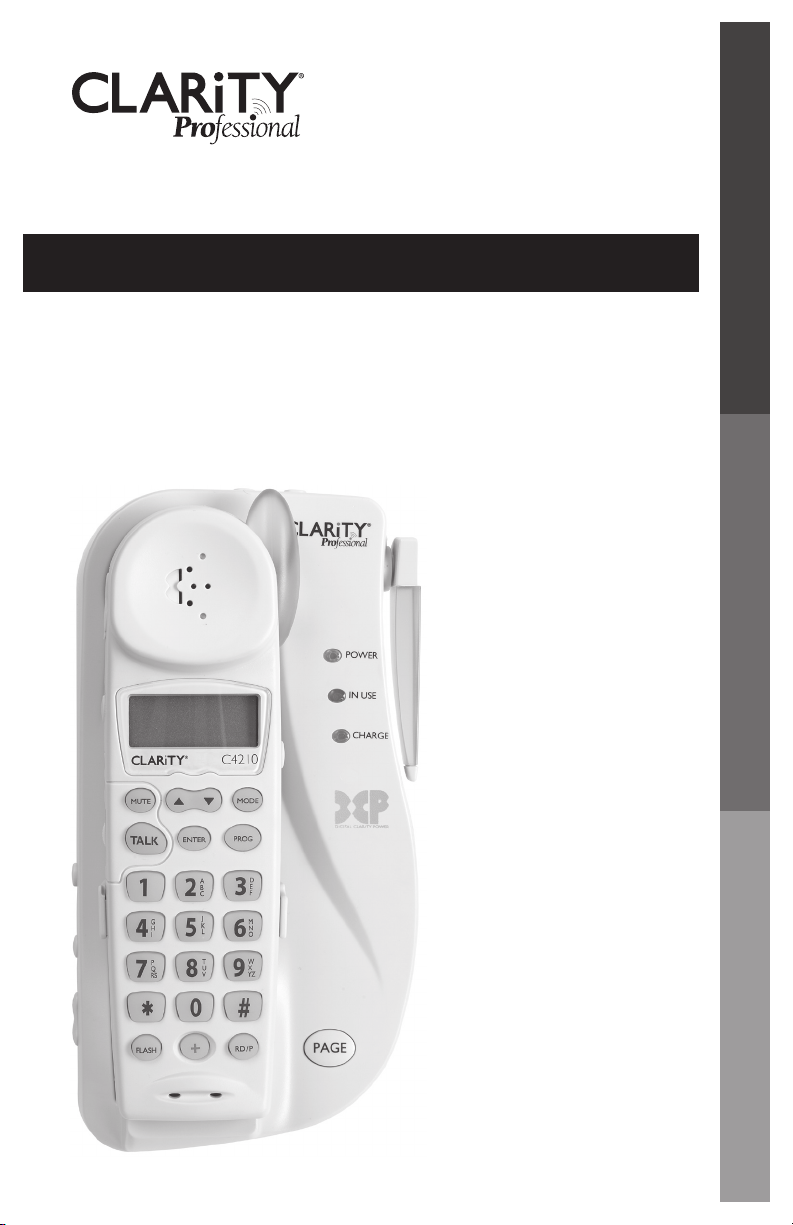
Telephone Base
1. Handset Page
2. Ringer Volume
3. Ringer Style
4. Ringer On/Off
5. Antenna/Visual Ringer
6. Pulse/Tone
7. Boost On/Off
FEATURES
5
7
6
1
2
34
9
Page 10
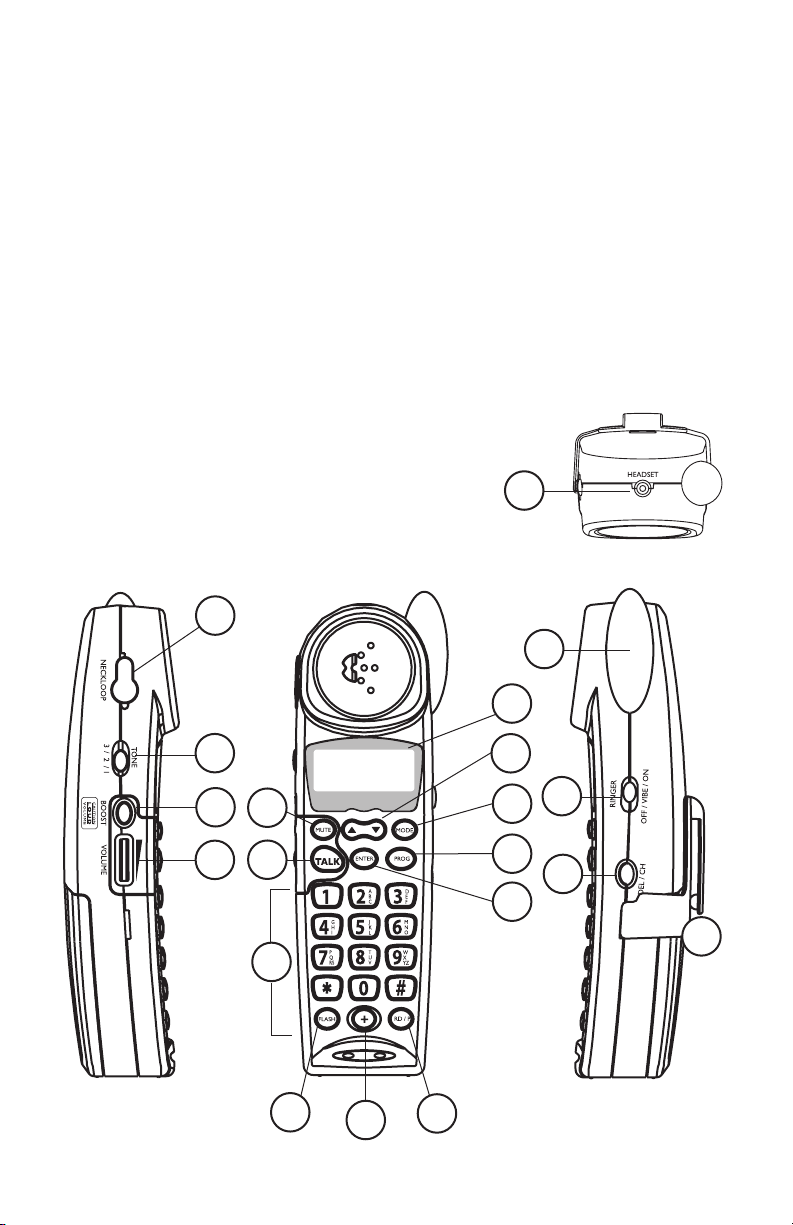
Handset
1. Neckloop Jack
2. Handset Tone
3. Boost
4. Handset Volume
5. Mute
6. Talk
7. Dial Pad
8. LCD Screen
9. Up/Down Arrow Keys
10. Mode
1
FEATURES
11. Program
12. Enter
13. Flash
14. Emergency Button
15. Redial/Pause
16. Visual Ringer
17. Handset Ringer Off/Vibe/On
18. Delete/Channel
19. Belt Clip
20. Headset Jack
20
10
16
8
2
3
5
6
4
9
10
11
17
18
12
19
7
13
14
15
Page 11
GETTING STARTED
9V DC
400 mA
TE
L
USE ONLY WITH CLASS
(CLASSE) 2 POWER SOURCE
9V DC
400 mA
TEL
USE ONLY WITH CLASS
(CLASSE) 2 POWER SOURCE
CHOOSING A LOCATION
1. This phone requires a modular phone
jack (RJ11C) and a standard 120V AC
wall outlet.
2. Plug the AC Adapter directly into outlet.
3. Do not plug other appliances into the
same outlet or have outlet controlled by a
wall switch.
4. Choose a location that is out of the way of
normal activities.
CAUTION: USE ONLY WITH CLASS
2 POWER SOURCE 9V DC, 400MA.
Always connect the AC Adapter to the phone before
you connect it to the AC power. When you finish,
disconnect the AC power before you disconnect it
from the phone.
Connecting telephone
line cord
CONNECTING YOUR TELEPHONE
Carefully remove your cordless telephone from its
box. If there is any visible damage, do not attempt
to operate this equipment. Return it to the place of
purchase. Check to be sure that you have all items
that come with your telephone. You should have a
HANDSET, BASE UNIT, BATTERY, AC ADAPTER,
TELEPHONE LINE CORD, BELT CLIP and
OWNERS MANUAL.
If at any time you have questions about your
telephone please contact our Customer Service
Department at: 1-800-552-3368 or 423-622-7793.
Connecting AC Adapter
11
Page 12

GETTING STARTED
TABLE/DESK TOP INSTALLATION
CAUTION: Disconnect the telephone line cord
before connecting or disconnecting the battery
backup in the wall mount bracket.
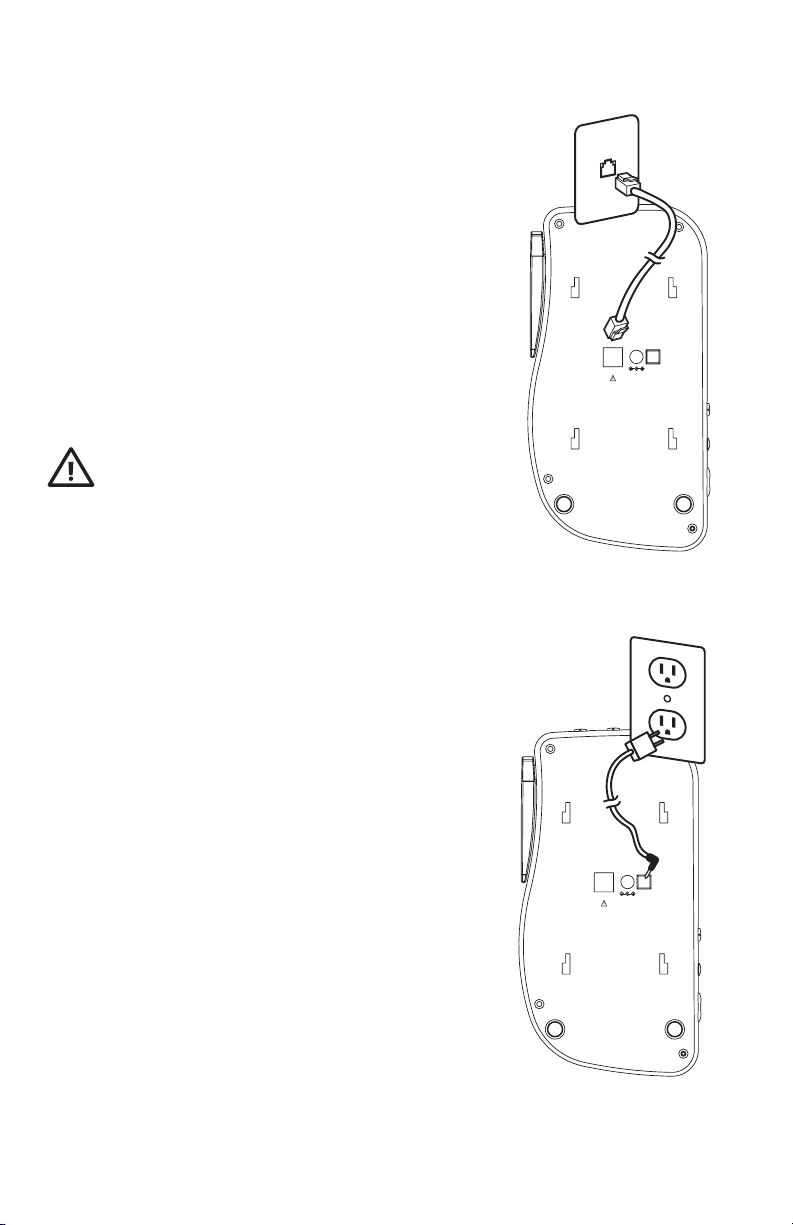
1. Plug one end of the supplied modular tele-
phone line cord into the jack marked TEL
located on the back of the telephone base
as shown in the diagram.
2. Plug the modular telephone line cord’s other
end into a modular phone jack.
3. Insert the supplied AC Adapter’s plug into the
jack marked 9V DC 400mA located on the
back of the telephone base.
4. Plug the adapter into a standard 120V AC
power (electrical) outlet.
5. Align the mounting bracket on the back of
the base so that the black rubber feet are
towards the bottom of the phone. Insert the
bracket’s tabs into the slots and secure the
bracket by sliding it upward.
6. Lift the base’s antenna to a vertical position.
7. Set the TONE/PULSE switch located on the
back of the base to correct dialing mode.
Please check with your local Phone Company
if uncertain of the type of service.
8. Place handset in the cradle to begin
initial charging.
12
WALL MOUNTING INSTALLATION
CAUTION: Disconnect the telephone line cord
before connecting or disconnecting the battery
backup in the wall mount bracket.
The base unit may be mounted on a standard
wall plate.
Page 13

GETTING STARTED
1. Plug one end of the supplied short modular
telephone line cord into the TEL jack located
on the back of the base of the phone.
2. Insert the plug of the AC adapter into the
jack marked DC 9V 400mA located on the
back of the telephone base.
3. Align the mounting bracket on the back of
the base so that the black rubber feet are
towards the bottom of the phone. Insert the
bracket’s tabs into the slots and secure the
bracket by sliding it upward.
4. Plug the short modular telephone line cord
into the wall plate jack, then align the mounting
bracket’s keyhole slots with the wall plate
studs and slide the base of the phone down-
ward to secure it on the wall.
5. Plug the adapter into a standard AC power
(electrical) outlet.
6. Press and lift out the handset holder tab, turn
it around so the narrow tab end extends out
and slide back into its slot. This will hold the
handset in the cradle when the phone is
wall mounted.
7. Lift the base’s antenna to a vertical position.
8. Set the Tone/Pulse switch located on the
end of the base to correct dialing mode.
Please check with your local Phone Company
if uncertain of the type of service.
9. Place handset in the cradle to begin initial
charging. Remember, you must charge the
phone for at least 12 hours before you use
the phone for the first time.
Note: Remember, you must charge the phone for
at least 12 hours before you use the phone for the
first time.
13
Page 14
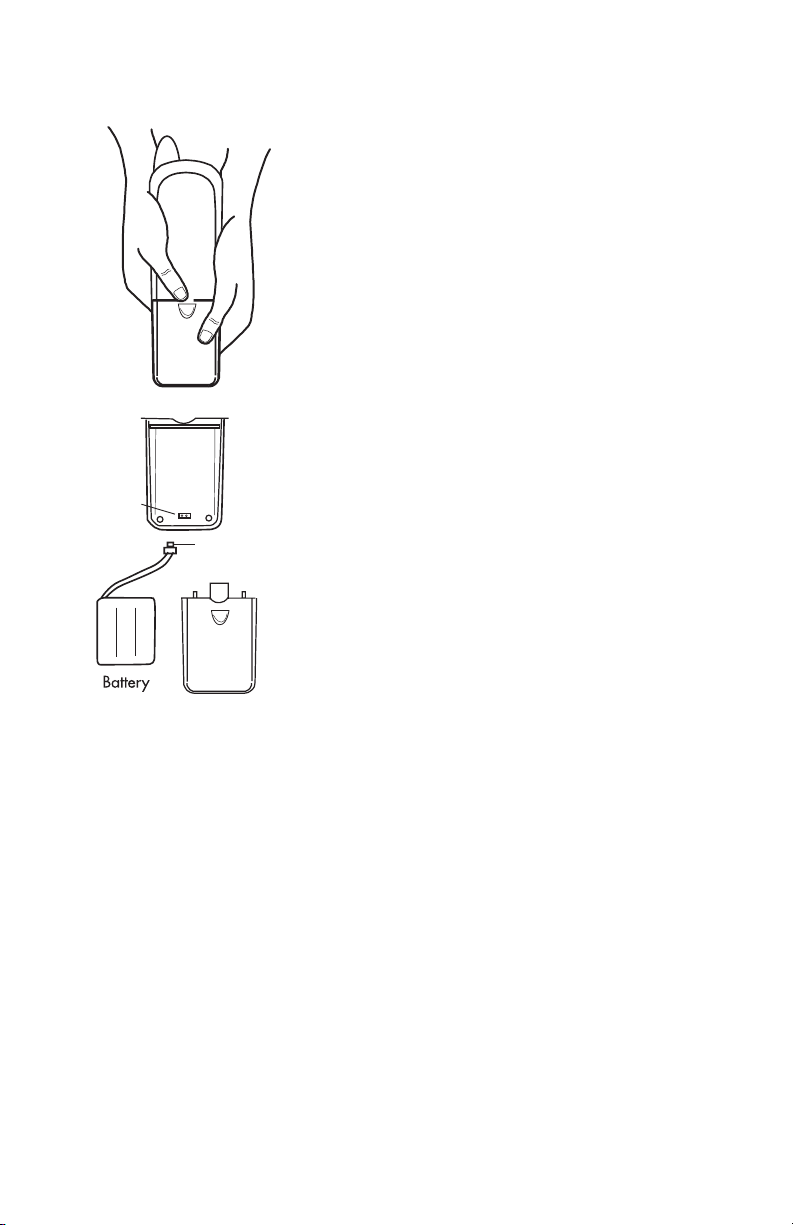
Battery
Connector
Battery
Pack Plug
Battery
Compartment
Cover
GETTING STARTED
HANDSET BATTERY INSTALLATION
The C4210 uses a 3.6Volt 600mAh NiMH rechargeable 3 cell (AAA Type) battery that is included with
your unit.
Handset Battery must be connected before
beginning initial charging.
To Install a New Battery
1. Remove battery cover
2. Install new battery
3. Connect battery pack
4. Replace battery cover
5. Charge for 12 hours before first use
Handset Battery Charging
1. Place the handset in the base. The
CHARGE LED on the base will light RED.
2. After the batteries are fully charged,
check for dial tone by pressing TALK on
the handset.
Installing and
connecting battery
Note: The battery in the
handset must be fully charged
for 12 hours before using the
telephone for the first time.
14
Low Battery
When the handset battery gets low, there will be
two (2) beeps every thirty (30) seconds. If the battery becomes low while you are on a call, you will be
disconnected after about two (2) minutes. Terminate
the call and recharge the battery. To recharge the
battery pack, place the handset in the base.
1. Make sure the contact points are touching
and the CHARGE LED is lit.
2. Be careful not to short battery with
Conducting materials such as rings,
bracelets and keys.
Page 15

GETTING STARTED
Battery Life
A fully charged battery provides an average talk time
of about four (4) hours, or standby time of about (8)
days. Talk time and standby time may vary depending
on operating conditions.
Headset Jack
You can use this telephone hands-free when you
install a 2.5mm headset (purchased separately). To
install, plug the headset into the HEADSET JACK
at the top of the handset. While in headset mode,
the volume of headset is controlled by the telephone and the handset’s earpiece and microphone
are disconnected.
Ordering a Headset
In the event you wish to purchase a headset for your
C4210, please contact Plantronics at 1-800-544-4660
for a location near you. We recommend using the
Plantronics M110 or M130 headset.
Talk Time: about
four (4) hours
Standby Time: about
eight (8) days
Belt Clip
You may choose to use the optional belt clip with
your handset.
1. To attach slide belt clip down onto grooves.
Press the tabs on the belt clip into the slots
to attach.
2. To remove, lift one side of the belt clip with
your thumbnail and push back.
Hearing Aid Compatibility
The handset has a special coil inside of it to couple
the sound to hearing aids equipped with T-Switches/
T-Coils.
15
Page 16

FEATURE SET UP
TELEPHONE HANDSET
Set-up Mode
The C4210 handset goes into setup mode automatically when the battery is connected.
Or press and hold MODE button for 3 seconds to
enter setup mode. If there is no input within 30
seconds, the language will be set to the last selected
one and go back to standby mode.
Setting Language
1. After entering setup mode, the LCD display
will show SEL LANGUAGE and then 1.ENG
2.SPA alternately with a tick mark against the
selected language.
2. Press the 1 or 2 button once to change the
language. The tick mark will move against the
new selection.
3. Press UP (
▲) to go to the next menu.
16
Setting Contrast
There are 3 contrast levels and the default is set to
level 2.
1. After setting the language, press UP (▲) key
to begin setting contrast.
2. The LCD display will show LCD CONTRAST
and 1 2 3.
3. Press the 1, 2 or 3 key to change the level.
The current selected level will be highlighted.
4. Press the UP (
to the next menu.
▲) or DOWN (▼) button to go
Setting Area Code 1
1. After setting Contrast, press UP (▲) button
to set Area Code 1.
2. The LCD display will show AREA CODE 1
and XYZ with X digit blinking.
Page 17

FEATURE SET UP
3. Enter the area code number using the
numeric keys on the handset.
4. Press the UP (
to the next menu.
Setting Area Code 2
1. After setting Area Code 1, press UP (▲)
button to set Area Code 2.
2. The LCD display will show AREA CODE 2
and XYZ with X digit blinking.
3. Enter the area code number using the
numeric keys on the handset.
4. Press the UP (
to the next menu.
Setting Long Distance Service
(LDS) Code
1. After setting Area Code 2, press UP (▲)
button to set LDS Code.
2. The LCD display will show LDS CODE and X
with X digit blinking.
3. Enter the LDS number using the numeric keys
on the handset.
4. Press the UP (
to the next menu.
▲) or DOWN (▼) button to go
▲) or DOWN (▼) button to go
▲) or DOWN (▼) button to go
Setting Easy Mode
1. After setting LDS Code, press UP (▲) button
to set the Easy Mode.
2. The LCD display will show EASY MODE and
1.ON 2.OFF.
3. Press 1 or 2 to change the mode. The tick
mark will move against the selected mode.
4. Press the UP (
change the mode.
▲) or DOWN (▼) button to
17
Page 18

FEATURE SET UP
Setting Voicemail Number
1. After setting Easy Mode, press UP (▲) button
to set VOICEMAIL Number.
2. The LCD display will show VOICEMAIL NO
and XXX-XXX-XXXX with the last
digit blinking.
3. Enter the voicemail number using the numeric
keys on the handset. Press DEL/CH key to
delete and move cursor back one place.
4. Press the UP (
to the next menu.
▲) or DOWN (▼) button to go
Setting Message Waiting ON/OFF
1. After setting Voicemail No, press UP (▲)
button to set Message Waiting function
ON/OFF.
2. The LCD display will show MESSAGE,
WAITING, and 1.ON 2.OFF with a tick
mark against the selected item.
3. Press 1 or 2 button to change the mode.
4. Press the UP (
to the next menu.
▲) or DOWN (▼) button to go
18
Setting Autoconnect ON/OFF
1. After setting Message Waiting Light ON/OFF,
press UP (▲) button to set
AUTOCONNECT ON/OFF (default to ON).
2. The LCD display will show AUTOCONNECT,
1.ON 2.OFF.
3. Press 1 or 2 to change or current selected
value. The tick mark will move against the
selected value.
4. Press the UP (
to the next menu.
▲) or DOWN (▼) button to go
Page 19

FEATURE SET UP
Digital Clarity Power™ Technology
With Digital Clarity Power, the high frequency
sounds are amplified more than the low frequency
sounds so words are not just louder, but clearer and
easier to understand. It also provides intelligent
amplification to make soft sounds audible, while
keeping loud sounds bearable.
BOOST – Clarity Power On/Off
The C4210 has a button that controls the loudness
of the receiver. Once the BOOST button is pressed,
an extra level of amplification is added over the
entire range of the volume control.
The TALK button will light ORANGE to indicate the
CLARITY POWER feature is activated.
WARNING: When the TALK button is lit ORANGE
volume may be at a high level. To protect
hearing, lower the volume control to minimum
before using.
Volume Control
The dial controls the level of volume the handset and
headset receive. The volume dial provides up to 15
dB of volume before the CLARITY POWER button
is activated. Once the CLARITY POWER button
is pressed, the C4210 will provide up to 40 dB of
amplification.
Tone Switch
The C4210 has three (3) TONE settings. Adjusting
the TONE switch changes the style of amplification
and allows you to customize your hearing experience. We all have different hearing preferences. We
suggest exploring each setting to find the one you
find most comfortable.
19
Page 20

FEATURE SET UP
Handset Ringer
Set the switch marked Ringer OFF/VIBE/ON located
on the side of the handset. When VIBE is selected
the handset will ring and vibrate when receiving and
incoming call. The ringer switch must be set to ON
or VIBE for the handset
to ring.
Note: If both handset and base ringers are set to
OFF, the visual ringer will flash to indicate there is an
incoming call.
Pulse/Tone
Slide the switch to the type of telephone service you
have; TONE for touch-tone service or PULSE for
rotary dialing. Please check with your local telephone
company if uncertain of the type of service.
Flash
The FLASH button is activated to use custom calling
services such as Call Waiting or Three-Way Calling.
Please contact your local telephone company for
information on these services.
20
Mute
The MUTE button allows the user to conduct a
private conversation that you do not want the
person on the other end to hear. While in the mute
mode, the MUTE button will illuminate RED and the
microphone in the handset is disabled. Pressing the
MUTE button again will disengage the MUTE feature.
Redial/Pause
Press the RD/P button to redial the last number
dialed. Pressing the RD/P button while storing a
telephone number will insert a four (4) second
pause. This is commonly used when storing both the
telephone number and an extension or PIN number.
Page 21

FEATURE SET UP
TELEPHONE BASE
Ringer Volume
The base ringer volume adjustments are located on
the side of the telephone base.
Pressing the UP (▲) key on the base increases the
ringer sound by one level while pressing the DOWN
(▼) key reduces the sound by one level. There are a
total of six levels from maximum to minimum. The
ringer will sound for two (2) seconds while choosing
a ringer volume, to allow the user to make a choice.
Ringer Style
The base ringer style adjustments are located on the
side of the telephone base. The style of ring can be
adjusted by pressing the RING STYLE button. Six (6)
styles are available allowing you to customize your
ring. The ringer will sound for two (2) seconds while
choosing a ringer style, to allow the user to make a
choice.
Visual Ringers
Visual ringers are located in both the handset
antenna and the base of the telephone. When an
incoming call is received, these lights will flash. The
handset visual ringer will also stay lit while the phone
is in use.
BOOST ON/OFF Switch
This switch will disable the reset feature of the
BOOST Clarity Power button as follows:
ON – When the BOOST ON/OFF switch is set to
ON, the Boost function will be ON every time a call
starts, and will default to ON every time the phone
hangs up. During a call, the BOOST Clarity Power
button can toggle the Clarity Power ON or OFF
according to the user’s needs.
21
Page 22

FEATURE SET UP
OFF – When the BOOST ON/OFF switch is set to
OFF, the Boost function will be OFF every time a call
starts, and the user will need to press the BOOST
Clarity Power button in order to gain the extra level
of amplification. If the phone hangs up, the Clarity
Power will reset to OFF. During a call, the BOOST
Clarity Power button can toggle the Clarity Power
function ON or OFF according to the user’s needs.
CAUTION: VOLUME WILL BE LOUD
WHEN BOOST SWITCH IS SET TO “ON.”
Battery Back-up
Installing four (4) AA Alkaline batteries into the
desk/wall mount bracket attached to the telephone
base will offer you a limited amount of time to continue operating your telephone in the event of
a power failure.
22
To Install Battery Back-up Batteries
1. Disconnect telephone line cord and
remove desk/wall mount bracket from
telephone base.
2. Disconnect battery back-up connector from
the telephone base.
3. Install four (4) AA Alkaline batteries
with negative (-) end of battery touching
the spring.
4. Connect battery back-up connector to
terminal on bottom of telephone base.
5. Install desk/wall mount bracket to
telephone base.
Page 23

FEATURE SET UP
To Replace Battery Backup Batteries
1. Disconnect telephone line cord and
remove desk/wall mount bracket from
telephone base.
2. Disconnect battery back-up connector from
the telephone base.
3. Remove batteries from desk/wall
mount bracket.
4. Install four (4) AA Alkaline batteries with
negative (-) end of battery touching
the spring.
5. Connect battery back-up connector to
terminal on bottom of telephone base
6. Install desk/wall mount bracket to
telephone base
After installing the four (4) AA Alkaline batteries
please refer to the chart below:
Power Supply
AC adapter and Steady Green
good batteries
AC adapter and Steady Red
no batteries
AC adapter and Flashing green and red
bad batteries
Power failure and Slow flashing red
good batteries
Power failure and Fast flashing red
bad batteries
Power LED Status
23
Page 24

TELEPHONE OPERATIONS
Placing a Call
1. Press the TALK button (TALK button will
illuminate GREEN) and dial the number you
wish to call.
2. To end the call press the TALK button or place
the handset in the base.
Or
1. Press the keys of the numbers needed to dial.
The LCD will display PREDIAL and the
keys pressed.
2. Press the TALK button. Handset will go off hook and dial the displayed numbers.
Answering a Call
If the handset is out of the cradle, press the
TALK button.
If the handset is in the cradle with Auto-Connect
Mode ON, lift the handset. The handset will be in
receiver mode.
24
If the handset is in the cradle with AutoConnect
mode OFF, lift the handset. The handset will be in
standby mode. Press TALK button to receive
the call.
Refer to BOOST Clarity Power and Volume Control
for information on adjusting volume controls on
Page 19.
Last Number Redial
The last number dialed (up to 32 digits) is stored in
the redial memory until another number is dialed.
To use this feature:
1. Press the TALK button.
2. When you hear the dial tone, press the
RD/P button.
3. The phone will automatically dial for you.
Page 25

TELEPHONE OPERATIONS
Pause Feature
Programming in a pause will cause the phone to wait
four (4) seconds before dialing additional numbers.
This feature may be used when it is necessary to dial
an access code (9, for example) and wait for a second dial tone before you can dial an outside number.
Press the RD/P button at the required point during
the memory storage process to program a pause.
Temporary Tone
If you have rotary (pulse) dial service, you can change
from pulse to touch tone (tone) during a call.
1. Make phone call and wait until it
is connected.
2. Press the * key. Keys pressed after this are
sent as tone signals.
3. The phone will automatically reset to rotary
(pulse) service after the call ends.
Lighted Key Pad
The key pad will light for fifteen (15) seconds after
removing the handset from the base. To reactivate
the feature while in standby, press the TALK or the
MEM button. To activate while the phone is in use,
press any key.
Page/Handset Locator
To send a page signal from the base to the handset,
press the PAGE button located on the base of
the telephone. A series of rings will sound from
the handset.
To locate the handset if it is away from the base,
press and hold the PAGE button for approximately
five (5) seconds. A series of rings will sound. Return
the handset to the base or press any
button to cancel the page.
25
Page 26

TELEPHONE OPERATIONS
Channel Operation
The C4210 cordless telephone automatically
searches and selects the clearest of 40 channels
when it is being used. If interference develops on the
line, pressing this button will move to
another channel.
Security Code
The security code prevents your cordless phone
conversations from being accessed by a phone on
a different line. Once the handset battery is fully
charged, the handset will automatically select the
code from over 65,000 different combinations. The
code is changed every time the handset is placed in
the cradle. If you have trouble with placing or receiving calls, a lost security code may be the cause of
the problem. When this occurs, the handset can no
longer communicate with the base.
26
MEMORY STORAGE
Review Phonebook Information
1. Unit must be in standby mode only.
2. Press MODE key twice. The LCD will show
PHONEBOOK.
3. If the phonebook is empty, after 1 second the
display shows - NO RECORDS -.
4. Otherwise, the display will show the first
alphabetical record with the record number
on the top icon line. The record number may
not be the first one.
5. Press the UP (
to the next record. Or select any other alpha betical list pressing “2” to “9” key.
6. When at the end of the list, pressing DOWN
(▼) button will show END OF LIST. Press the
UP (▲) button to go to the last record.
▲) or DOWN (▼) button to go
Page 27

TELEPHONE OPERATIONS
Adding a Phonebook Number
1. Unit must be in standby mode only.
2. Press MODE key twice. The display will show
PHONEBOOK for 1 second and
then display the first available record.
3. Press PROG key to add new phone record.
4. If the phonebook is full, the display will show
PHONEBOOK FULL for 1 second together
with an error keynote. Then return to
review mode.
5. If memory is available, the display will show
SAVE NEW NUM and then ENTER NUMBER.
6. After pressing any number key, the second
line will change to ENTER TO END and
the third line shows the number(s) pressed.
Enter phone number up to 23 digits, (RD/P)
treated as Pause, counted as one digit, shown as
(P). Press DEL/CH to erase any mistake.
7. Press ENTER to confirm number. The LCD will
display ENTER NAME and then the second
line is blanked.
8. Enter name up to 21 characters using
keys 2 to 9.
• Press 2 once for A and twice for B.
• Press # to insert # or punctuation marks.
• Use RD/P key to insert a space between
alphabets.
• Press DEL/CH key to erase any mistake.
The cursor will move forward one space
automatically.
9. Press ENTER to confirm name. The LCD will
display NUMBER STORED. Then it displays the
just entered information.
27
Page 28

TELEPHONE OPERATIONS
Dialing a Phonebook Entry
1. Locate the phonebook record you wish
to call.
2. Press TALK or ENTER button to dial the
displayed number.
Deleting a Stored Number
1. Unit must be in standby mode and display
is showing a phonebook record.
2. Press DEL/CH key once. The LCD will
show DELETE?
3. Press DEL/CH to confirm.
4. The display will show MEM DELETED for 3
seconds together with a success keynote.
5. The display will show the next available
record or -NO RECORDS-.
• If the memory location is empty, pressing
DEL key will have no action.
• This sequence will time-out after 30
seconds if no key is pressed.
28
Deleting All Stored Numbers
1. Unit must be in standby mode and display is
showing a valid phone record.
2. Press and hold DEL/CH button for 3 seconds
to delete all phonebook records. Display will
flash DELETE ALL?.
3. Press DEL/CH to confirm. Display will show
-NO RECORDS- for 2 seconds together with
a success keynote.
• If the memory location is empty, pressing
DEL key will have no action.
• This sequence will time-out after 30
seconds if no key is pressed.
Page 29

TELEPHONE OPERATIONS
Changing a Stored Number
1. Unit must be in standby mode only.
2. Press MODE key twice. The display will show
PHONEBOOK for 1 second and then display
the first available record.
3. Press the UP (
to the record to be changed, e.g. ABC, 567
4. Press # key to change the phone record.
5. The display will show ENTER TO END and
the stored number 567 with the blinking
cursor after the digit 7.
6. Press any numeric key to add extra numbers.
Or
Press DEL/CH key to move the cursor to the
digit 7. Then press other numeric key to
replace 7.
7. Press ENTER after finishing the digits.
8. The display shows ABC with the cursor
blinking after the character C.
9. Press any numeric key 2 to 9 to add
extra characters.
Or
Press DEL/CH key to move the cursor back
to character C. Then press any other
numeric key to change this character.
10. Press ENTER to finish. The modified
characters and numbers will replace the
original phone record.
11. The display will show NUMBER STORED.
▲) or DOWN (▼) button to go
Adding the EMERGENCY Number
1. Unit must be in standby mode only.
2. Press MODE key twice. The display will show
PHONEBOOK for 1 second and then display
the first available record.
29
Page 30

TELEPHONE OPERATIONS
3. Press the UP (▲) or DOWN (▼) button
to go to the record to be stored to the
EMERGENCY key.
4. Press and hold the EMERGENCY key for
2 seconds.
5. The phone number is copied to the
EMERGENCY key. The LCD will display MEM
STORING for one (1) second and the
handset will give a success keynote.
Dialing the EMERGENCY Number
1. Unit must be in standby mode only.
2. Press the EMERGENCY key once.
3. The display will show the stored name and
number for 5 seconds. Otherwise it will show
-MEMORY EMPTY-.
4. Then the handset goes off-hook and dial out
the stored numbers.
Or
5. Press TALK key to make handset goes off-hook.
6. Press the EMERGENCY key once. The display
will show the stored name and number for 1
sec. Then the numbers will be sent out.
30
Deleting the EMERGENCY Number
1. Unit must be in standby mode.
2. Press the EMERGENCY key once.
3. If this key has been programmed, the display
will show the stored number. Otherwise, it
will show MEMORY EMPTY.
4. Press DEL/CH key once to delete number.
5. The display will flash DELETE?.
6. Press DEL/CH to delete. The handset will
give a success keynote and the display will
show MEM DELETED.
Page 31

TELEPHONE OPERATIONS
CALLER ID OPERATIONS
Visual Message Waiting Indicator (VMWI)
Note: This is a service that is provided through your
local telephone company.
If the C4210 finds that there is voice message to be
retrieved, it will turn on the Message Waiting Indicator (the ENTER key).
To retrieve the voice message, press the ENTER key
while the indicator is on. The handset will go offhook and dial the stored Voicemail number.
CALLER ID Information
This function is turned off when EASY MODE is set
to ON during setup.
Caller Information
When somebody calls, the received caller information is displayed on the LCD. If the call is answered
by this phone, this caller information is considered
“old”. Otherwise, the Caller ID information will be
stored in the call log. Information which has not been
reviewed will be considered as “new call”.
The NEW CALL LED will blink. The top row displays
the time and date of the call. The second row displays
the caller’s ID or is blank if there is no information.
The third row displays the incoming telephone number. If the number is longer than twelve (12) digits,
the LCD will toggle the displayed number between
the first 12 digits and the remaining digits.
Receiving Call Waiting Caller ID
When you are on an existing call, you will hear a
beep and the display will show incoming call waiting
Caller ID information.
31
Page 32

TELEPHONE OPERATIONS
If you access the call waiting call, the Caller ID
information will disappear and the Time/Day screen
will appear.
If you do not access the call waiting call, the Caller
ID information will be transferred into the Caller log.
This caller information is considered “old”.
Unknown Call
If a call is from another country or the caller’s
number is not available, UNKNOWN is displayed
and stored in the Caller ID log.
Blocked Call
If the number is blocked or withheld, PRIVATE is
displayed and stored in Caller ID log.
Repeated Call
If this is a repeated call, it means the same number
called before and has not been reviewed.
32
CALLER ID Review
If there is new call information, the MODE button
will flash RED.
During standby mode, press MODE button once.
LCD will display CID MODE and then the last Caller
ID information.
Press UP (▲) or DOWN (▼) again to view the
Caller ID content. Press DOWN (▼) to scroll the
caller ID information from the most recent record.
Or, press the UP (▲) button to scroll the Caller ID
information from the oldest record.
If the caller’s number is more than (12) digits, the
LCD will toggle the displayed message between the
first 12 digits and the remaining digits.
Page 33

TELEPHONE OPERATIONS
If the Caller ID list is empty, the display will show
- NO CALLS -.
• At anytime, the user can press FLASH button
one time to go back to standby mode.
Or
• It will go back to standby automatically at
30 seconds time out if there is no action.
Saving CALLER ID Information to
Phonebook
1. While reviewing Caller information, press
PROG key once.
2. The display shows SAVE TO PHONEBOOK.
Then it changes to ENTER TO END, and the
Caller number on the third line with the blink-
ing cursor at the end of the number.
3. Use numeric key to add extra numbers. Press
DEL/CH to erase any mistakes.
Or
Press DEL/CH to move cursor back one digit.
Then press any other numeric key to replace
the number.
4. Press ENTER to confirm the number.
5. The display shows ENTER NAME first and
then the Caller’s name on the second line
with blinking cursor at the end. The entered
number is displayed on the third line.
6. Press 2-9 keys to add extra characters. Press
DEL/CH to erase any mistakes.
Or
Press DEL/CH to move cursor back one char-
acter. Then press any other numeric key to
replace the character.
7. Press ENTER to confirm the name.
8. The display will show NUMBER STORED
first. Then it shows the name and number
just saved.
33
Page 34

TELEPHONE OPERATIONS
• At anytime, the user can press FLASH
button one time to go back to
standby mode.
Or
• It will go back to standby automatically at
30 seconds time out if there is no action.
Callback from CALLER ID Information
To callback from incoming call information, the base
T/P switch should be set at T.
While reviewing the incoming call list, press
ENTER and the UP (▲) or DOWN (▼) key will
format the number with the following
dialing variations:
• 7 digits without a 1 prefix:
If the area code of the Caller ID number
matches to the setting of the stored area
code, the dialed numbers can be 7
digits only.
• Area Code + 7 digits without a 1 prefix:
If the area code of the Caller ID number
matches to the setting of the stored area
code, the dialed numbers can be Area
Code + 7 digits.
• 10 digits without a 1 prefix:
If the area code of the Caller ID number is
different from the stored area code, the
dialed numbers can be 10 digits without a
1 prefix.
• 10 digits with a 1 prefix:
If the area code of the Caller ID number is
different from the stored area code, the
dialed numbers can be 1 + 10 digits.
When reviewing the Caller ID information, press
ENTER to display the phone number in a
different format.
34
Page 35

TELEPHONE OPERATIONS
Example 1:
Stored Long Distance Service code: 1.
Stored area code: 770.
Stored incoming call number 770-123-4567.
1. Pressing the ENTER key will show blinking
123-4567.
2. Pressing the TALK or ENTER key again will
dial out 1234567.
Or
3. Pressing the UP (
770-123-4567. Then press the TALK or
ENTER key again will dial out 7701234567.
Or
4. Pressing the UP (
1-7701234567. Press the TALK or ENTER
key will dial out 17701234567.
Or
5. Pressing the UP (
123-4567 again.
▲) key will show blinking
▲) key will show blinking
▲) key will show blinking
Example 2:
Stored Long Distance Service code: 1.
Stored area code: 770.
Stored incoming call number 413-456-7890.
1. Pressing the ENTER key will show blinking
413-456-7890.
2. Pressing the TALK or ENTER key again will
dial out 4134567890.
Or
3. Pressing the UP (
1-413-456-7890. Press the TALK or ENTER
key will dial out 14134567890.
Or
▲) key will show blinking
35
Page 36

TELEPHONE OPERATIONS
4. Pressing the UP (▲) key will show blinking
413-456-7890 again.
Delete Caller ID Information
While reviewing the Caller ID, press DEL/CH button
to delete the displayed caller information. LCD will
flash DELETE ?.
Press DEL/CH to confirm. CID DELETED will be
displayed for 2 seconds. The next record is shown
automatically or - NO CALLS - if the list is empty.
• At anytime, the user can press FLASH button
one time to go back to standby mode.
Or
• It will go back to standby automatically at
30 seconds time out if there is no action.
Deleting All Caller ID Information
While reviewing the Caller ID, press and hold the
DEL/CH button for two seconds. LCD will flash
DELETE ALL?. Press DEL/CH to confirm. LCD will
display ALL CID and DELETED for 2 seconds and
then - NO CALLS -.
36
• At anytime, the user can press FLASH button
one time to go back to standby mode.
Or
• It will go back to standby automatically at
30 seconds time out if there is no action.
The C4210 has been designed to give you years
of dependable service with a minimum of care. To
ensure the utmost in performance, follow these
guidelines in caring for the unit:
1. Avoid dropping or knocking the unit.
2. Dust the unit regularly. Wipe the unit with a
soft damp cloth.
Page 37

MAINTENANCE AND CARE
3. Do not use detergents and avoid
excess moisture.
4. The C4210 is an electrical device. Avoid
electric shock by keeping the phone away
from water (i.e. bathroom, kitchen sink, etc.).
The unit will not operate/no dial tone:
• Verify the TALK Button is lit.
• Verify the AC Adapter is securely plugged
into AC outlet, the base and the telephone.
• Verify the telephone line cord is securely
plugged into the wall jack and the telephone.
• Make sure the base antenna is in an
upright position.
• Make sure the handset battery is fully charged.
• Verify the telephone is in the correct dialing
mode, tone (touch) or pulse (rotary).
• Make sure you are in the usable range of the
base station.
• Reset the security code by placing the handset
in the base for 5-10 seconds.
The phone does not ring when you
receive a call:
• Make sure the RINGER switch on the handset
and base are set to ON.
• Verify the AC Adapter is securely plugged into
AC outlet, the base and the telephone.
• Verify the telephone line cord is securely
plugged into the wall jack and the telephone.
• Make sure you are in the usable range of the
base station.
• You may have too many extensions on your
line. Try unplugging a few devices.
37
Page 38

TROUBLESHOOTING
Noise, Static, Interference or Other Calls
Heard while Using the Handset:
• Try changing channels.
• Make sure the base antenna is in an
upright position.
• Make sure you are in the usable range of the
base station.
• Make sure the handset battery is fully charged.
• Try relocating the base unit to another location.
• Make sure the AC Adapter is not plugged into
the wall outlet with other appliances.
Phone Will Not Hold Charge:
• Make sure the charging contacts on the
handset and base are free of dust and dirt.
Clean the contacts with a soft cloth.
• Make sure CHARGE LED on the base is lit
when handset is in the cradle.
• If necessary, replace the handset battery. (See
Handset Battery Charging)
38
Page 39

TROUBLESHOOTING
Difficulty in Placing or Receiving Calls:
• Move closer to the base and try again.
• If moving closer does not work, you may have
lost the security code.
• Reset code by placing the handset back on
the base for 5-10 seconds. (See Security
Code Section)
• Make sure you have selected the correct
dialing mode, tone or pulse.
• Make sure the AC Adapter is not plugged into
a wall outlet with other appliances. Discon-
nect for 5-10 seconds then reconnect. Place
the handset back on the base and reinsert the
AC Adapter.
• Make sure the handset battery is fully charged.
39
Page 40

REGULATORY COMPLIANCE
Part 68 of FCC Rules Information
a) This equipment complies with Part 68 of the FCC
rules and the requirements adopted by the ACTA.
On the bottom of this equipment is a label that
contains, among other information, a product
identifier in the format US:AAAEQ##TXXXX. If
requested, this number must be provided to the
telephone company.
b) A plug and jack used to connect this equipment
to the premises wiring and telephone network must
comply with the applicable FCC Part 68 rules and
requirements adopted by the ACTA. A compliant
telephone cord and modular plug, RJ11C USOC,
is provided with this product. It is designed to be
connected to a compatible modular jack that is also
compliant. See installation instructions for details.
c) The REN is used to determine the number of
devices that may be connected to a telephone line.
Excessive RENs on a telephone line may result in the
devices not ringing in response to an incoming call. In
most but not all areas, the sum of RENs should not
exceed five (5.0). To be certain of the number of devices that may be connected to a line, as determined
by the total RENs, contact the local telephone company. For products approved after July 23, 2001, the
REN for this product is part of the product identifier
that has the format US:AAAEQ##TXXXX.
40
The digits represented by ## are the REN without
a decimal point (e.g., 03 is a REN of 0.3). For earlier
products, the REN is separately shown on the label.
d) If this telephone equipment causes harm to
the telephone network, the telephone company will
notify you in advance that temporary discontinuance
of service may be required. But if advance notice isn’t
practical, the telephone company will notify the
Page 41

REGULATORY COMPLIANCE
customer as soon as possible. Also, you will be
advised of your right to file a complaint with the
FCC if you believe it is necessary.
e) The telephone company may make changes
in its facilities, equipment, operations or procedures
that could affect the operation of the equipment. If
this happens the telephone company will provide
advance notice in order for you to make necessary
modifications to maintain uninterrupted service.
f) If trouble is experienced with this telephone
equipment, for repair or warranty information, please
contact Clarity, 1-800-552-3368. If the equipment is
causing harm to the telephone network, the telephone company may request that you disconnect the
equipment until the problem is resolved.
g) This telephone equipment is not intended to be
repaired and it contains no repairable parts. Opening
the equipment or any attempt to perform repairs
will void the warranty. For service or repairs, call
1-800-552-3368.
h) Connection to party line service is subject to
state tariffs. Contact the state public utility
commission, public service commission or
corporation commission for information.
i) If your home has specially wired alarm equipment
connected to the telephone line, ensure the installation of this telephone equipment does not disable
your alarm equipment. If you have questions about
what will disable alarm equipment, consult your
telephone company or a qualified installer.
j) This telephone equipment is hearing
aid compatible.
41
Page 42

REGULATORY COMPLIANCE
Customer-Owned Coin/Credit Card
Phones:
To comply with state tariffs, the telephone company
must be given notification prior to connection. In
some states, the state public utility commission, public service commission or corporation commission
must give prior approval of connection.
Part 15 of FCC Rules Information
This device complies with Part 15 of the FCC Rules.
Operation is subject to the following two conditions:
(1) This device may not cause harmful interference,
and (2) this device must accept any interference
received, including interference that may cause
undesired operation.
Your equipment has been tested and found to
comply with the limits of a Class B digital device,
pursuant to Part 15 of FCC rules. These limits are
designed to provide reasonable protection against
harmful interference in residential installation.
42
This equipment generates, uses and can radiate radio
frequency energy and, if not installed and used in accordance with the instructions, may cause harmful interference to radio communications. However, there
is no guarantee that interference will not occur in a
particular installation; if this equipment does cause
harmful interference to radio or television reception,
which can be determined by turning the equipment
off and on, you are encouraged to try to correct the
interference by one of the following measures:
1. Where it can be done safely, reorient the
receiving television or radio antenna.
2. To the extent possible, relocate the television,
radio or other receiver with respect to the
telephone equipment. (This increases the
separation between the telephone equipment
and the receiver.)
Page 43

REGULATORY COMPLIANCE
3. Connect the telephone equipment into an
outlet on a circuit different from that to which
the television, radio, or other receiver is
connected.
4. Consult the dealer or an experienced Radio/
TV Technician for help.
CAUTION: Changes or modifications not ex
pressly approved by the manufacturer responsible for
compliance could void the user’s authority to operate the equipment.
Industry Canada Technical Specifications
This product meets the applicable Industry Canada
technical specifications.
Before installing this equipment, users should ensure
that it is permissible to be connected to the facilities of the local telecommunications company. The
equipment must also be installed using an acceptable
method of connection. In some cases, the company’s
inside wiring associated with a single line individual
service may be extended by means of a certified
connector assembly (telephone extension cord). The
customer should be aware that compliance with the
above conditions may not prevent degradation of
service in some situations. Repairs to certified equipment should be made by an authorized Canadian
maintenance facility designated by the supplier.
-
Any repairs or alterations made by the user to this
equipment, or equipment malfunctions, may give the
telecommunications company cause to request the
user to disconnect the equipment.
Users should ensure for their own protection that
the electrical ground connections of the power utility, telephone lines and internal metallic water pipe
system, if present, are connected together. This precaution may be particularly important in rural areas.
43
Page 44

REGULATORY COMPLIANCE
CAUTION: Users should not attempt to make
such connections themselves, but should contact the
appropriate electrical inspection authority, or electrician, as appropriate.
The Ringer Equivalence Number is an indication of
the maximum number of terminals allowed to be
connected to a telephone interface. The termination
on an interface may consist of any combination of
devices subject only to the requirement that the sum
of the Ringer Equivalence Numbers of all the devices
does not exceed five.
(The term “IC:” before the certification/
registration number only signifies that the Industry
Canada technical specifications were met.)
The party responsible for regulatory
compliance:
Clarity, A Division of Plantronics, Inc.
4289 Bonny Oaks Drive, Suite 106
Chattanooga, TN 37406
44
Phone: 1-800-552-3368
Page 45

WARRANTY & SERVICE
The following warranty and service information applies only to products purchased and used in the U.S.
and Canada. For warranty information in other countries, please contact your local retailer or distributor.
Limited Warranty
Clarity, a division of Plantronics, Inc. (“Clarity”) warrants to the original consumer purchaser that, except
for limitations and exclusions set forth below, this
product shall be free from defects in materials and
workmanship for a period of one (1) year from the
date of original purchase (“Warranty Period”). The
obligation of Clarity under this warranty shall be at
Clarity‘s option, without charge, of any part or unit
that proves to be defective in material or workmanship during the Warranty Period.
Exclusions from Warranty
This warranty applies only to defects in factory
materials and factory workmanship.
Any condition caused by accident, abuse, misuse or
improper operation, violation of instructions furnished by Clarity, destruction or alteration, improper
electrical voltages or currents, or repair or maintenance attempted by anyone other than Clarity or
an authorized service center, is not a defect covered
by this warranty. Telephone companies manufacture
different types of equipment and Clarity does not
warrant that its equipment is compatible with the
equipment of a particular phone company.
45
Page 46

WARRANTY & SERVICE
Implied Warranties
Under state law, you may be entitled to the benefit
of certain implied warranties. These implied warranties will continue in force only during the warranty
period. Some states do allow limitations on how long
an implied warranty lasts, so the above limitation may
not apply to you.
Incidental or Consequential Damages
Neither Clarity nor your retail dealer or selling
distributors has any responsibility for any incidental
or consequential damages including without limitation, commercial loss or profit, or for any incidental
expenses, expenses, loss of time, or inconvenience.
Some states do not allow exclusion or limitation of
incidental or consequential damage, so the above
limitation or exclusion may not apply to you.
Other Legal Rights
This warranty gives you specific legal rights and you
may also have other rights which vary from state to
state.
46
How to Obtain Warranty Service
To obtain warranty service, please prepay shipment
and return the unit to the appropriate facility listed
below.
In the United States
Clarity Service Center
4289 Bonny Oaks Drive, Suite 106
Chattanooga, Tennessee 37406
Tel: (423) 622-7793 or (800) 426-3738
Fax: (423) 622-7646 or (800) 325-8871
Page 47

WARRANTY & SERVICE
In Canada
Plantronics Service Center
8112 Trans-Canada Hwy.
Ville St. Laurent. Que.
Canada H4S 1M5
Tel: (800) 540-8363
(514) 956-8363
Fax: (514) 956-1825
Please use the original container, or pack the unit(s)
in a sturdy carton with sufficient packing material to
prevent damage.
Include the following information:
1. A proof-of-purchase indicating model number
and date of purchase.
2. Bill-to address.
3. Ship-to address.
4. Number and description of units shipped.
5. Name and telephone number of person to
call, should contact be necessary.
6. Reason for return and description of the
problem.
Damage occurring during shipment is deemed the
responsibility of the carrier, and claims should be
made directly with the carrier.
47
Page 48

Page 49

Guía del Usuario de Clarity
Professional C4210
™
Teléfono inalámbrico de 2,4 GHz con identificador
de llamadas Con Tecnología Digital Clarity Power
TM
E
S
P
A
~
N
O
L
Page 50

TABLA DE CONTENIDOS
Instrucciones de seguridad ........................................4
Preparación ...................................................................
Elección de una ubicación .........................................
Instalación .....................................................................
Instalación de la batería .............................................
Carga de la batería del receptor inalámbrico ....... 6
Batería baja ...................................................................
Duración de la batería ................................................ 7
Conexión para audífonos ..........................................
Soporte para cinturón ................................................
Compatibilidad con dispositivos
de ayuda auditiva .........................................................
Configuración de funciones ......................................
Receptor inalámbrico .................................................
Modo de configuración ..............................................
Digital Clarity Power .............................................. 10
Realce Clarity Power On/Off
(activado / desactivado) ...........................................10
Control de volumen .................................................10
Interruptor de tonos ................................................10
Timbre del receptor .................................................10
Flash .............................................................................12
Silencio (mute) ...........................................................12
Remarcado/Pausa ......................................................12
Base del teléfono .......................................................10
Volumen del timbre ..................................................10
Estilo de timbre .........................................................11
Timbres visuales ........................................................11
Boost On/Off (realce activado/desactivado) .......11
Pulso/Tono ..................................................................11
Batería de reserva .....................................................12
Operaciones del teléfono ........................................13
4
4
5
6
7
7
7
7
8
8
8
Page 51

TABLA DE CONTENIDOS
Batería de reserva .....................................................12
Hacer una llamada ...................................................13
Recibir una llamada ...................................................13
Remarcado del último número ..............................14
Función Pausa .............................................................14
Tono temporal ...........................................................14
Teclado iluminado ......................................................14
Page/Localizador del receptor inalámbrico .........14
Operación en canales ...............................................15
Código de seguridad .................................................15
Almacenamiento en memoria ................................15
Revisar información de la lista de teléfonos ........15
Agregar número a la lista de teléfonos .................15
Marcar una entrada de la lista de teléfonos ........16
Borrar un número almacenado ..............................16
Borrar todos los números almacenados ..............16
Cambiar un número de la memoria ......................17
Agregar número de emergencia ............................17
Marcar número de emergencia ..............................17
Borrar número de emergencia ...............................18
Operaciones del identificador de llamadas .........18
Guardar información del identificador de
llamadas en la lista de teléfonos .............................20
Rellamada a partir de la información del
identificador de llamadas .........................................20
Borrar información del identificador
de llamadas .................................................................21
Mantenimiento y cuidados ......................................22
Resolución de problemas ........................................22
Cumplimiento de las reglamentaciones ................24
Garantía y servicio ....................................................27
Page 52

INSTRUCCIONES IMPORTANTES DE SEGURIDAD
Cuando utilice su equipo de teléfono, se deben seguir
siempre las siguientes precauciones de seguridad
básicas para reducir el riesgo de incendio, choque
eléctrico y lesiones a personas incluyendo
lo siguiente:
1. Leer y comprender todas las instrucciones.
2. Seguir todas las advertencias e instrucciones
marcadas sobre el teléfono.
3. No use este teléfono cerca de una tina de
baño, lavabo, lava trastes de cocina o tina
de lavado, en un sótano húmedo, cerca de
una alberca o en cualquier otro lugar en
el que haya agua.
4. Evite usar un teléfono (que no sea del tipo
inalámbrico) durante una tormenta. Puede
haber un riesgo remoto de choque eléctrico
por los relámpagos.
5. No use el teléfono para reportar una fuga
de gas cerca de la fuga.
6. Desconecte este teléfono de los enchufes
de la pared antes de limpiarlo.No use
limpiadores líquidos o limpiadores en
aerosol sobre el teléfono. Utilice un trapo
húmedo para limpiarlo.
7. Coloque este teléfono sobre una superficie
estable. Un daño serio y/o lesión pueden
ocurrir si el teléfono se cae.
8. No cubra las ranuras y aberturas sobre
este teléfono. Este teléfono nunca debe
ser colocado cerca o sobre un radiador o
registro de calor. Este teléfono nunca
debe colocarse en una instalación ínter construida a menos que se provea
ventilación apropiada.
52
GUARDE ESTAS INSTRUCCIONES
Page 53

INSTRUCCIONES IMPORTANTES DE SEGURIDAD
9. Opere este teléfono usando el voltaje
eléctrico como se establece en la unidad
de base o en el manual del usuario. Si no
está seguro del voltaje de su hogar, consulte
al distribuidor del producto o a su compañía
eléctrica local.
10. No coloque nada sobre el cable de
corriente. Instale el teléfono donde nadie
pise o se tropiece con el cable.
11. No sobrecargue los enchufes de pared o
extensiones eléctricas ya que esto puede
aumentar el riesgo de incendio o choque
eléctrico.
12. Nunca empuje ningún objeto a través de
las ranuras en el teléfono. Pueden tocar
puntos de voltaje peligrosos o cortocircuitar
partes que pudieran resultar en un riesgo
de incendio o choque eléctrico. Nunca
derrame líquidos de ningún tipo sobre
el teléfono.
13. Para reducir el riesgo de choque eléctrico,
no desbarate el teléfono. El abrir o quitar
las cubiertas puede exponerle a voltajes
peligrosos u otros riesgos. El reensamblado
erróneo puede causar choque eléctrico
cuando el aparato es usado después.
14. Desconecte este producto del enchufe de la
pared y remita el servicio al fabricante bajo
las siguientes condiciones:
A. Cuando el cable eléctrico o el enchufe
estén raídos o dañados.
B. Si se ha derramado líquido en
el producto.
C. Si el teléfono ha estado expuesto a lluvia
o agua.
GUARDE ESTAS INSTRUCCIONES
53
Page 54

INSTRUCCIONES IMPORTANTES DE SEGURIDAD
D. Si el teléfono no funciona normalmente
siguiendo las instrucciones de operación.
Ajuste solo aquellos controles que están
cubiertos en las instrucciones de operación:
El ajuste inapropiado puede requerir trabajo
extensivo por un técnico calificado para
restaurar el teléfono a su operación normal.
E. Si el teléfono se ha caído o la caja ha
sido dañada.
F. Si el teléfono muestra un cambio notable
en el desempeño.
15. Nunca instale el alambrado del teléfono
durante una tormenta eléctrica.
16. Nunca instale los conectores del teléfono
en ubicaciones húmedas a menos que el
conector esté diseñado específicamente
para ubicaciones húmedas.
17. Nunca toque los alambres o terminales del
teléfono sin aislar a menos de que la línea
del teléfono haya sido desconectada en la
interfaz de la red de trabajo.
18. Sea cuidadoso cuando instale o modifique
las líneas telefónicas.
19. Use solamente el cable de corriente y las
baterías indicadas en el manual. No deseche
las baterías en el fuego. Podrían explotar.
Verifique los códigos locales para posibles
instrucciones especiales de desecho.
20. Conecte el adaptador AC en el enchufe
que esté más cercano y más accesible
al teléfono.
54
GUARDE ESTAS INSTRUCCIONES
Page 55

INSTRUCCIONES IMPORTANTES DE SEGURIDAD
INSTRUCCIONES DE SEGURIDAD
PARA LAS BATERÍAS
Precaución: Existe riesgo de explosión si la
batería es reemplazada con el tipo incorrecto.
Deshágase de las baterías usadas de acuerdo a
las instrucciones.
1. Use solamente el paquete de baterías
aprobado en el auricular de su teléfono
inalámbrico.
Para la Unidad de Auricular:
Batería Recargable NiMH
Sanik Battery Co. Ltd.: 3SNAAA60HSJ1
GPI International Ltd.: GP60AAAH3BMJZ
Para la Unidad de Base: Cuatro
(4) AA baterías alcalinas.
2. No se deshaga de la batería en el fuego
ya que podría explotar. Verifique con los
códigos locales para posibles instrucciones
especiales de para deshacerse de ellas.
3. No abra o mutile la batería. Los electrolitos
liberados son corrosivos y pudieran causar
daño a los ojos y piel. Puede ser tóxico si
se traga.
4. Tenga cuidado al manejar las baterías para
no cortocircuitarlas con materiales con ductivos como anillos, pulseras y llaves.
La batería o material conducente podría
sobrecalentarse y causar quemaduras.
5. Cargue la/s batería/s que se proporciona/n
o que se identifica/n para su uso con este
producto solamente de acuerdo con las
instrucciones y limitaciones especificadas en
este manual.
6. Cuide la orientación de polaridad apropiada
entre el paquete de baterías y el cargador
de baterías.
3.6V 600mAHr
GUARDE ESTAS INSTRUCCIONES
55
Page 56

CARACTERÍSTICAS
Base del teléfono
1. Localizador del receptor inalámbrico
2. Volumen del timbre
3. Estilo de timbre
4. Timbre On/Off (activado/desactivado)
5. Antena/Timbre visual
6. Pulso/Tono
7. Boost On/Off (realce activado/desactivado)
5
7
6
56
1
2
34
Page 57

CARACTERÍSTICAS
Receptor inalámbrico
1. Conexión para auricular tipo collar
2. Señal del receptor inalámbrico
3. Boost (realce)
4. Volumen del receptor inalámbrico
5. Silencio (mute)
6. Talk (Hablar)
7. Teclado de marcación
8. Pantalla de cristal líquido (LCD)
9. Teclas de flecha Up/Down
(arriba/abajo)
10. Modo
11. Programa
12. Enter (ingresar)
13. Flash
1
14. Botón de emergencia
15. Remarcado/Pausa
16. Timbre visual
17. Timbre del receptor
inalámbrico Off/Vibe/On
(activado/vibrador/desactivado)
18. Borrar/Canal
19. Soporte para cinturón
20. Conexión para audífonos
20
16
8
2
3
5
6
4
9
10
11
17
18
12
19
7
13
14
15
57
Page 58

9V DC
400 mA
TE
L
USE ONLY WITH CLASS
(CLASSE) 2 POWER SOURCE
9V DC
400 mA
TEL
USE ONLY WITH CLASS
(CLASSE) 2 POWER SOURCE
Conexión del cable de
línea telefónica
PREPARACIÓN
Elección de una ubicación
1. Este teléfono requiere de un conector
telefónico modular (RJ11C) y un enchufe de
pared están dar de 120V AC.
2. Conecte el adaptador AC directamente
en el enchufe.
3. No conecte otros artefactos en el mismo
enchufe o controle el mismo por medio de un
interruptor de pared.
4. Elija una ubicación que se encuentre fuera del
lugar de desarrollo de las actividades normales.
! PRECAUCIÓN: UTILICE SOLAMENTE
CON FUENTES DE ALIMENTACIÓN
CLASE 2, DE 9V DC, 400mA.
Conecte siempre el adaptador AC al teléfono antes
de conectarlo a la alimentación AC. Al finalizar,
desconecte la alimentación AC antes de desconec
tarla del teléfono.
-
Conexión del adaptador AC
58
INSTALACIÓN
Conexión del teléfono
Retire con cuidado el teléfono inalámbrico de la caja.
Si hubiera algún daño visible, no intente operar este
equipo. Devuélvalo al lugar de compra. Asegúrese
de que cuenta con todos los elementos que vienen
con el teléfono. Debe tener los siguientes elementos: RECEPTOR INALÁMBRICO, BASE, BATERÍA,
ADAPTADOR AC, CABLE DE LÍNEA TELEFÓNICA,
SOPORTE PARA CINTURÓN y MANUAL DEL
USUARIO.
Si en algún momento tuviera consultas acerca de su
teléfono, sírvase comunicarse con nuestro Departamento de Atención al Cliente a los teléfonos 1-800552-3368 ó 423-622-7793.
Page 59

PREPARACIÓN
INSTALACIÓN EN MESA / ESCRITORIO
PRECAUCIÓN : Desconecte el cable de línea
telefónica antes de conectar o desconectar la batería
de reserva en el soporte de montaje a la pared.
1. Conecte un extremo del cable de línea telefónica
modular que se suministra en el conector que
posee la marca TEL ubicada en la base del
teléfono, como se indica en el diagrama.
2. Conecte el otro extremo del cable de línea
telefónica modular en un conector telefónico
modular.
3. Inserte el enchufe del adaptador AC suministrado
en el conector marcado de 9V DC 400mA,
ubicado en la parte posterior de la base del
teléfono.
4. Conecte el adaptador en un enchufe de
alimentación (eléctrica) estándar de 120 V AC.
5. Alinee el soporte de montaje sobre la parte
posterior de la base, de manera que las patas
de goma negra estén hacia el lado inferior del
teléfono. Inserte las aletas del soporte en las
ranuras y asegure el soporte deslizándolo
hacia arriba.
6. Coloque la antena de la base en posición vertical.
7. Configure el interruptor TONE/PULSE (tono/
pulso) que se encuentra en la parte posterior de
la base para corregir el modo de marcado.
Consulte con su compañía telefónica local si no
está seguro acerca del tipo de servicio.
8. Coloque el receptor inalámbrico en el
receptáculo para iniciar la carga.
INSTALACIÓN EN PARED
PRECAUCIÓN : Desconecte el cable de línea
telefónica antes de conectar o desconectar la batería
de reserva en el soporte de montaje a la pared.
59
Page 60

PREPARACIÓN
La base puede montarse sobre una placa de
pared estándar.
1. Conecte un extremo del cable corto de línea
telefónica modular en el conector TEL ubicado
en la parte posterior de la base del teléfono.
2. Inserte el enchufe del adaptador AC en el
conector marcado de 9V 400mA DC, ubicado en
la parte posterior de la base del teléfono.
3. Alinee el soporte de montaje sobre la parte
posterior de la base, de manera que las patas de
goma negra estén hacia el lado inferior del
teléfono. Inserte las aletas del soporte en las
ranuras y asegure el soporte deslizándolo
hacia arriba.
4. Conecte el cable corto de línea telefónica
modular en el conector de la placa de pared,
luego alinee las ranuras de bocallave del soporte
de montaje con pernos de soporte para pared,
y deslice la base del teléfono hacia abajo para
asegurarlo a la misma.
5. Conecte el adaptador en un enchufe de
alimentación (eléctrica) AC estándar.
6. Presione y levante la aleta de soporte del
receptor inalámbrico, gírela completamente de
forma tal que el extremo angosto de la aleta se
extienda y se deslice en la ranura. Esto sostendrá
el receptor inalámbrico al receptáculo cuando el
teléfono está montado sobre la pared.
7. Coloque la antena de la base en posición vertical.
8. Configure el interruptor Tone/Pulse (tono/pulso)
que se encuentra en el extremo de la base para
corregir el modo de marcado.
Consulte con su compañía telefónica local si no
está seguro acerca del tipo de servicio.
9. Coloque el receptor inalámbrico en el recep
-
60
Page 61

PREPARACIÓN
táculo para iniciar la carga. Recuerde, debe cargar
el teléfono durante al menos 12 horas antes de
utilizarlo por primera vez.
Nota: Recuerde, debe cargar el teléfono durante al
menos 12 horas antes de utilizarlo por primera vez.
INSTALACIÓN DE LA BATERÍA
El modelo C4210 utiliza una batería recargable de
3 células (Tipo AAA) de 3,6 voltios, 600mAh NiMH,
que se incluye en la unidad.
La batería del receptor inalámbrico debe
conectarse antes de comenzar la carga inicial.
Para conectar la batería, retire la tapa del compartimiento de baterías y conecte el paquete de
baterías en el conector y vuelva a colocar la tapa
del compartimiento.
Nota: La batería del receptor inalámbrico debe
cargarse completamente durante 12 horas antes de
utilizar el teléfono por primera vez.
Para instalar una batería nueva:
1. Retire la tapa de la batería.
2. Instale la nueva batería.
3. Conecte el paquete de baterías.
4. Vuelva a colocar la tapa de baterías.
5. Cargue durante 12 horas antes del primer uso.
Carga de la batería del receptor
inalámbrico
1. Coloque el receptor inalámbrico en la base. El
indicador CHARGE (carga) que se encuentra
sobre la base se iluminará de color ROJO.
2. Luego de que las baterías estén completamente
cargadas, verifique el tono de marcado
presionando TALK (hablar) en el receptor
inalámbrico.
Instalación y conexión de
la batería
Nota: La batería del receptor
inalámbrico debe cargarse completamente durante 12 horas
antes de utilizar el teléfono por
primera vez.
61
Page 62

PREPARACIÓN
Batería baja
Cuando la batería esté baja, se escucharán dos
(2) avisos sonoros cada treinta (30) segundos y la
pantalla de LCD indicará que la batería está baja. Si
la batería está baja durante una llamada, la misma
se desconectará luego de aproximadamente dos (2)
minutos. Finalice la llamada y recargue la batería. Para
recargar el paquete de baterías, coloque el receptor
inalámbrico en la base.
La carga de la batería puede controlarse por medio
del ícono de carga de la batería. El ícono aparece
mientras el teléfono se encuentra en el modo en
espera e indica la condición de las baterías.
1. Asegúrese de que esté tocando los puntos de
contacto y que el indicador CHARGE (carga)
esté iluminado.
2. Asegúrese de no provocar un cortocircuito de
la batería con materiales conductores, como por
ejemplo anillos, pulseras o llaves.
Tiempo de habla:
aproximadamente cuatro
(4) horas
Tiempo de espera:
aproximadamente ocho
(8) días
62
Duración de la batería
Una batería completamente cargada permite hablar
un tiempo promedio aproximado de cuatro (4)
horas, o permanecer en espera por aproximadamente ocho (8) días. El tiempo de habla y el tiempo
de espera puede variar según las condiciones de
operación.
Page 63

PREPARACIÓN
Conexión para audífonos
Puede utilizar este teléfono a “manos libres” si instala
un audífono de 2,5 mm (se adquiere por separado).
Para instalarlo, conecte el audífono en la CONEXIÓN PARA AUDÍFONOS que se encuentra en la
parte superior del receptor inalámbrico. Mientras
se encuentra en el modo audífono, el volumen del
mismo se controla a través del teléfono y el auricular y el micrófono del receptor inalámbrico están
desconectados.
Para ordenar un audífono. En caso de que desee
adquirir un audífono para el teléfono C4210,
comuníquese con Plantronics al 1-800-544-4660
para determinar la ubicación más cercana a su
domicilio. Recomendamos el uso de los audífonos
Plantronics M110 o M130.
Soporte para cinturón
Puede elegir utilizar el soporte para cinturón opcional para el receptor inalámbrico.
1. Para colocar el soporte para cinturón deslizable
sobre las ranuras. Presione las aletas que se
encuentran sobre el soporte para cinturón en
las ranuras para sujetarlo.
2. Para quitarlo, levante con el pulgar un lado del
soporte para cinturón en el y retírelo.
Compatibilidad con dispositivos de
ayuda auditiva
El receptor inalámbrico cuenta en su interior con
una bobina especial para acoplar el sonido de los
dispositivos de ayuda auditiva equipados con Interruptores-T / Bobinas-T.
63
Page 64

CONFIGURACIÓN DE FUNCIONES
RECEPTOR INALÁMBRICO
DEL TELÉFONO
Modo de configuración
El receptor inalámbrico C4210 ingresa en el modo
de configuración de forma automática al conectar la
batería.
O presione y mantenga presionado el botón MODE
(modo) durante 3 segundos para ingresar en el
modo de configuración. Si no hay una entrada dentro
de los 30 segundos, el idioma se configurará al último
seleccionado y regresará al modo en espera.
Configuración de idioma
1. Luego de ingresar al modo de configuración, la
pantalla de LCD indicará SEL LANGUAGE
(seleccionar idioma) y luego 1.ENG 2.SPA
(1- inglés, 2- español) de forma alternada con
una marca en el idioma seleccionado.
2. Presione 1 ó 2 una vez para cambiar el idioma.
La marca se moverá hacia la nueva selección.
3. Presione UP (
siguiente menú.
▲) para desplazarse al
64
Configuración de contraste
Existen 3 niveles de contraste y el contraste predeterminado está configurado en el nivel 2.
1. Luego de configurar el idioma, presione la tecla
UP (▲) para iniciar la configuración del contraste.
2. La pantalla de LCD indicará LCD CONTRAST
(contraste pantalla LCD) y 1 2 3.
3. Presione las 1, 2 ó 3 para cambiar el nivel. El nivel
actual seleccionado estará resaltado.
4. Presione UP (
al siguiente menú.
▲) o DOWN (▼) para desplazarse
Page 65

CONFIGURACIÓN DE FUNCIONES
Configuración del Código de Área 1
1. Luego de configurar el contraste presione el
botón UP (▲) para configurar el Código de
área 1.
2. La pantalla de LCD indicará AREA CODE 1
(código de área 1) y XYZ con el dígito X
parpadeando.
3. Ingrese el número del código de área utilizando
las teclas numéricas del receptor inalámbrico.
4. Presione UP (
al siguiente menú.
▲) o DOWN (▼) para desplazarse
Configuración del Código de Área 2
1. Luego de configurar el Código de área 1,
presione el botón UP (▲) para configurar el
Código de área 2.
2. La pantalla de LCD indicará AREA CODE 2
(código de área 2) y XYZ con el dígito X par
padeando.
3. Ingrese el número del código de área utilizando
las teclas numéricas del receptor inalámbrico.
4. Presione UP (
al siguiente menú.
▲) o DOWN (▼) para desplazarse
Configuración de Código del Servicio
de Larga Distancia (LDS, por sus siglas
en inglés)
1. Luego de configurar el Código de área 2,
presione el botón UP (▲) para configurar el
Código LDS.
2. La pantalla de LCD indicará LDS CODE (código
LDS) y X con el dígito X parpadeando.
3. Ingrese el número de LDS utilizando las teclas
numéricas del receptor inalámbrico.
4. Presione UP (
al siguiente menú.
▲) o DOWN (▼) para desplazarse
65
Page 66

CONFIGURACIÓN DE FUNCIONES
Configuración de Easy Mode (Modo Fácil)
1. Luego de configurar el código LDS, presione el
botón UP (▲) para configurar Easy Mode.
2. La pantalla de LCD indicará EASY MODE (modo
fácil) y 1.ON (activado) 2.OFF (desactivado).
3. Presione 1 ó 2 para cambiar el modo. La marca se
moverá hacia el modo seleccionado.
4. Presione UP (
el modo.
Configuración del número de
correo de voz
1. Luego de configurar Easy Mode, presione
el botón UP (▲) para configurar el número de
CORREO DE VOZ.
2. El display de LCD mostrará VOICEMAIL NO
(número de correo de voz) y XXX-XXX-XXXX
con el último dígito parpadeando.
3. Ingrese el número de correo de voz utilizando
las teclas numéricas del receptor inalámbrico.
Presione la tecla DEL/CH (borrar/cambiar) para
borrar y mover nuevamente el cursor hacia
un lugar.
4. Presione UP (
al siguiente menú.
▲) o DOWN (▼) para cambiar
▲) o DOWN (▼) para desplazarse
66
Configuración de mensaje en espera
ON/OFF
1. Luego de configurar el número de correo de voz,
presione el botón UP (▲) para configurar la
función mensaje en espera en posición ON/OFF
(activado/desactivado).
2. La pantalla de LCD mostrará MESSAGE,
WAITING (mensaje, espera) y 1.ON (activado)
2. OFF (desactivado) con una marca en el
elemento seleccionado.
Page 67

CONFIGURACIÓN DE FUNCIONES
3. Presione el botón 1 ó 2 para cambiar el modo.
4. Presione UP (
al siguiente menú.
Configurar Autoconectar ON/OFF
1. Luego de configurar la luz de mensaje en
espera en posición Off (desactivado), presione el
botón UP (▲) para configurar AUTOCONNECT
(autoconectar) en posición ON/OFF
(predeterminada en ON).
2. La pantalla de LCD indicará AUTOCONNECT
(autoconectar) y 1.ON (activado), 2.OFF
(desactivado).
3. Presione 1 ó 2 para cambiar el valor actual
seleccionado. La marca se moverá hacia el valor
seleccionado.
4. Presione UP (
al siguiente menú.
▲) o DOWN (▼) para desplazarse
▲) o DOWN (▼) para desplazarse
Tecnología Digital Clarity Power
Con Digital Clarity Power, los sonidos de alta frecuencia se amplifican en mayor medida que los sonidos de baja frecuencia, por lo que los sonidos no son
solo más altos, sino más claros y fáciles de entender.
También proporciona amplificación inteligente para
hacer que los sonidos suaves sean audibles, a la vez
que hace tolerables los sonidos altos.
REALCE Clarity Power On/Off
(activado / desactivado)
El teléfono C4210 tiene un botón que controla el
volumen del receptor. Una vez que está presionado
el botón BOOST, se agrega un nivel adicional de
amplificación por sobre el rango total del control de
volumen.
El botón TALK (hablar) se iluminará de color NARANJA para indicar que la función CLARITY POWER
está activada.
67
Page 68

CONFIGURACIÓN DE FUNCIONES
ADVERTENCIA: Cuando del botón TALK está
iluminado de color NARANJA, el volumen puede
estar a un nivel alto. Para proteger la audición, baje el
control de volumen al mínimo antes de utilizarlo.
Control de volumen
El dial controla el nivel del volumen que reciben el
receptor inalámbrico y el audífono. El dial de volumen proporciona hasta 15 dB de volumen antes de
activar el botón CLARITY POWER. Una vez presionado el botón CLARITY POWER, el teléfono C4210
proporcionará hasta 40 dB de amplificación.
Interruptor de tonos
El teléfono C4210 tiene tres (3) configuraciones
de TONO. Ajustando el interruptor de TONOS,
se modifica el estilo de amplificación y le permite
personalizarlo según su audición. Todos tenemos
diferentes preferencias de audición. Le recomendamos explorar cada configuración para hallar la que le
resulte más confortable.
68
Timbre del receptor
Configure el interruptor Ringer OFF/VIBE/ON (timbre activado/vibrador/desactivado) que se encuentra
al costado del receptor inalámbrico. Cuando está
seleccionado VIBE (vibrador), el receptor inalámbrico
sonará y vibrará al recibir una llamada entrante. El
interruptor debe configurarse en ON (activado) o
VIBE (vibrador) para que el receptor inalámbrico
suene.
NOTA: Si tanto el receptor inalámbrico como los
timbres de la base están configurados en posición
OFF (desactivado), el timbre visual destellará para
indicar que hay una llamada entrante.
Page 69

CONFIGURACIÓN DE FUNCIONES
Flash
El botón FLASH se activa para utilizar servicios
personalizados de llamadas tales como Llamada en
espera o Llamada tripartita. Comuníquese con su
compañía telefónica local para obtener información
acerca de estos servicios.
Silencio (mute)
El botón MUTE (silencio) le permite al usuario llevar
una conversación privada que no desea que escuche
la persona que se encuentra del otro lado de la línea.
Mientras se encuentra en el modo silencio, el botón
MUTE se iluminará de color ROJO y el micrófono
del receptor inalámbrico se deshabilitará. Al presionar nuevamente el botón MUTE (silencio) se desconectará la función MUTE.
Remarcado/Pausa
Presione el botón RD/P para volver a marcar el
último número. Al presionar el botón RD/P mientras
se almacena un número telefónico se introducirá
una pausa de cuatro (4) segundos. Esto se utiliza
comúnmente al almacenar el número de teléfono
así como una extensión o número de identificación
personal (PIN).
BASE DEL TELÉFONO
Volumen del timbre
Los ajustes de volumen del timbre de la base se
encuentran al costado de la base del teléfono.
Presionando la tecla UP (▲) en la base, se incrementa
un nivel el sonido del timbre, mientras que presionando la tecla DOWN (▼) el sonido se reduce un
nivel. Existe un total de seis niveles desde un máximo
a un mínimo. El timbre sonará durante dos (2)
segundos mientras se elige un volumen de timbre
para permitir que el usuario realice su elección.
69
Page 70

CONFIGURACIÓN DE FUNCIONES
Estilo de timbre
Los ajustes del estilo de timbre de la base se encuentran al costado de la base del teléfono. El estilo de
timbre puede ajustarse presionando el botón RING
STYLE (estilo de timbre). Se encuentran disponibles
seis (6) estilos que le permiten personalizar el
timbre. El timbre sonará durante dos (2) segundos
mientras se elige un estilo de timbre, para permitir
que el usuario realice su elección.
Timbres visuales
Los timbres visuales se encuentran tanto en la
antena del receptor inalámbrico como en la base del
teléfono. Al recibir una llamada entrante, estas luces
destellarán. El timbre visual del receptor inalámbrico
permanecerá encendido mientras es teléfono esté
en uso.
Interruptor BOOST ON/OFF (realce
activado / desactivado)
70
Este interruptor deshabilitará la función de reinicio del botón BOOST (realce) Clarity Power de la
siguiente manera:
ON – Cuando el interruptor BOOST ON/OFF (realce activado/desactivado) está configurado en ON,
la función Realce estará ON (activada) cada vez que
se inicie una llamada y de forma predeterminada permanecerá en posición ON cada vez que se cuelgue
el teléfono. Durante una llamada, el botón BOOST
puede alternar la función Clarity Power en posición
ON (activado) u OFF (desactivado), de acuerdo con
las necesidades del usuario.
OFF – Cuando el interruptor BOOST ON/OFF
(realce activado/desactivado) está configurado en
OFF, la función Realce estará OFF (desactivada) cada
vez que se inicie una llamada, y el usuario tendrá
que presionar el botón BOOST Clarity Power para
obtener un nivel adicional de amplificación. Al colgar
Page 71

CONFIGURACIÓN DE FUNCIONES
el teléfono, Clarity Power se reiniciará a la posición
OFF. Durante una llamada, el botón BOOST (realce)
puede alternar la función Clarity Power en posición
ON (activado) u OFF (desactivado) de acuerdo con
las necesidades del usuario.
PRECAUCIÓN : EL VOLUMEN ESTARÁ ALTO
CUANDO EL INTERRUPTOR BOOST (REALCE)
SE ENCUENTRE CONFIGURADO EN POSICIÓN
“ON” (ACTIVADO).
Pulso/Tono
Coloque el interruptor en la posición correspondiente al servicio telefónico que posee, TONE (tono)
para el servicio de marcación por tonos o PULSE
(pulso) para marcación por disco. Consulte con su
compañía telefónica local si no está seguro acerca del
tipo de servicio.
Batería de reserva
La instalación de cuatro (4) baterías alcalinas AA
en el soporte de escritorio/pared adjunto a la base
del teléfono le proporcionará un lapso de tiempo
limitado para continuar utilizando el teléfono en caso
de falla eléctrica.
Para instalar baterías de reserva
1. Desconecte el cable de línea telefónica y retire el
soporte de montaje a escritorio/pared de la base
del teléfono.
2. Desconecte el conector de batería de reserva de
la base del teléfono.
3. Instale cuatro (4) baterías alcalinas AA con el
polo negativo (-) de la misma en contacto con
el resorte.
4. Conecte la batería de reserva al terminal en la
parte inferior de la base del teléfono.
5. Instale el soporte de montaje a escritorio/pared a
la base del teléfono.
71
Page 72

CONFIGURACIÓN DE FUNCIONES
Para reemplazar las baterías de reserva
1. Desconecte el cable de línea telefónica y retire el
soporte de montaje a escritorio/pared de la base
del teléfono.
2. Desconecte el conector de batería de reserva de
la base del teléfono.
3. Retire las baterías del soporte de montaje a
escritorio/pared.
4. Instale cuatro (4) baterías alcalinas AA con el
polo negativo (-) de la misma en contacto con
el resorte.
5. Conecte la batería de reserva al terminal en la
parte inferior de la base del teléfono.
6. Instale el soporte de montaje a escritorio/pared a
la base del teléfono.
Luego de instalar las cuatro (4) baterías alcalinas AA,
consulte el cuadro que se encuentra a continuación:
72
Fuente de alimentación Estado del indicador
de alimentación
Adaptador AC, baterías en Verde sólido
buen estado
Adaptador AC, sin baterías Verde sólido
Adaptador AC, baterías en Destello verde y rojo
mal estado
Falla de alimentación y Destello lento de
baterías en buen estado color rojo
Falla de alimentación y Destello rápido de
baterías en mal estado color rojo
Hacer una llamada
1. Presione el botón TALK (hablar) (el botón TALK
se iluminará de color VERDE) y marque el número
al que desea llamar.
2. Para finalizar la llamada, presione el botón TALK
Page 73

OPERACIONES DEL TELÉFONO
(hablar) o coloque el receptor inalámbrico en
la base.
O
1. Presione las teclas de los números que necesita
marcar. La pantalla de LCD mostrará PREDIAL
(premarcado) y las teclas presionadas.
2. Presione el botón TALK (hablar). Se descolgará
el receptor inalámbrico y marcará los números
que aparecen.
Recibir una llamada
Si el receptor inalámbrico se encuentra fuera del
receptáculo, presione la tecla TALK (hablar).
Si el receptor inalámbrico se encuentra en el receptáculo con el modo Auto-Connect (autoconectar) en
posición ON (activado), levántelo. El receptor inalámbrico estará en el modo de recepción.
Si el receptor inalámbrico se encuentra en el receptáculo con el modo AutoConnect (autoconectar)
OFF (desactivado), levántelo. El receptor inalámbrico
estará en el modo de espera. Presione el botón TALK
(hablar) para recibir la llamada.
Consulte BOOST (realce) Clarity Power y control
de volumen para obtener información acerca del
ajuste de los controles de volumen en la página 70.
Remarcado del último número
El último número marcado (de hasta 32 dígitos) está
almacenado en la memoria de remarcado hasta que
se marque otro número.
Para utilizar esta función:
1. Presione el botón TALK (hablar).
2. Cuando escuche el tono de marcado, presione el
botón RD/P.
3. El teléfono marcará por usted de forma au
tomática.
73
Page 74

OPERACIONES DEL TELÉFONO
Función Pausa
La programación durante una pausa originará que el
teléfono espere cuatro (4) segundos antes de marcar
números adicionales. Esta función puede utilizarse
cuando sea necesario marcar un código de acceso
(por ejemplo, 9) y esperar un segundo tono de marcado antes de marcar un número externo. Presione
el botón RD/P en el punto requerido durante el
proceso de almacenamiento en la memoria para
programar una pausa.
Tono temporal
Si cuenta con un servicio de marcado por disco
(pulsos), puede cambiar de marcación por pulsos a
marcación por tonos durante una llamada.
1. Realice la llamada telefónica y aguarde hasta
conectar.
2. Presione la tecla *. Las teclas presionadas luego
de ésta se reconocen como señales por tono.
3. El teléfono se reiniciará automáticamente al
servicio de marcación por disco (pulsos) luego
de que finalice la llamada.
74
Teclado iluminado
El teclado se iluminará durante quince (15) segundos
luego de retirar el receptor inalámbrico de la base.
Para reactivar la función mientras se encuentra en
espera, presione el botón TALK (hablar) o MEM
(memoria). Para activarla mientras el teléfono está en
uso, presione cualquier tecla.
Page/Localizador del receptor
inalámbrico
Para enviar un mensaje de localización desde la base
al receptor inalámbrico, presione el botón PAGE
(localizador) que se encuentra en la base del teléfono. Sonará una serie de timbres desde el receptor
inalámbrico.
Page 75

OPERACIONES DEL TELÉFONO
Para localizar el receptor inalámbrico si se encuentra
fuera de la base, presione y mantenga presionado el
botón PAGE (localizador) durante aproximadamente
cinco (5) segundos. Sonará una serie de timbres.
Lleve el receptor inalámbrico a la base o presione
cualquier botón para cancelar la localización.
Operación en canales
Cuando se encuentra en uso, el teléfono inalámbrico
C4210 busca y selecciona automáticamente el canal
de mayor claridad entre los 40 que posee. Si se presentaran interferencias en la línea, se cambiará a otro
canal al presionar este botón.
Código de seguridad
El código de seguridad evita que se acceda desde
un teléfono con diferente línea a las conversaciones mantenidas desde el teléfono inalámbrico. Una
vez que la batería del receptor inalámbrico está
completamente cargada, el mismo selecciona automáticamente entre más de 65.000 combinaciones
diferentes. El código cambia cada vez que el receptor
inalámbrico se coloca en el receptáculo. Si tuviera
problemas para realizar o recibir llamadas, la causa
del problema podría ser un código de seguridad
perdido. Cuando esto ocurra, el código de seguridad
ya no se podrá comunicar con la base.
ALMACENAMIENTO EN LA MEMORIA
Revisar información de la lista
de teléfonos
1. La unidad debe estar únicamente en el
modo pausa.
2. Presione dos veces la tecla MODE (modo). La
pantalla de LCD mostrará PHONEBOOK (lista
de teléfonos).
75
Page 76

OPERACIONES DEL TELÉFONO
3. Si la lista de teléfonos está vacía, la pantalla
indicará - NO RECORDS – (sin registros) luego
de 1 segundo.
4. De lo contrario la pantalla indicará el primer
registro alfabético con el número de registro
sobre la línea del ícono superior. El número de
registro puede no ser el primero.
5. Presione UP (
al siguiente registro. O seleccione cualquier otra
lista alfabética presionando las teclas “2” a “9”.
6. Al encontrarse el final de la lista de teléfonos, al
presionar el botón DOWN (▼) aparecerá END
OF LIST (fin de lista). Presione el botón UP (▲)
para desplazarse al último registro.
Agregar número a la lista de teléfonos
1. La unidad debe estar únicamente en el
modo pausa.
2. Presione dos veces la tecla MODE (modo). La
pantalla mostrará PHONEBOOK (lista de
teléfonos) durante 1 segundo y luego mostrará
el primer registro disponible.
3. Presione la tecla PROG (programar) para agregar
un nuevo registro telefónico.
4. Si la lista de teléfonos está llena, la pantalla
indicará PHONEBOOK FULL (lista de teléfono
llena) durante 1 segundo, junto con un mensaje
de error. Luego regresará al modo de revisión.
5. Si hay memoria disponible, la pantalla indicará
SAVE NEW NUM (guardar nuevo número) y
luego ENTER NUMBER (ingresar número).
6. Luego de presionar cualquier tecla numérica, la
segunda línea cambiará a ENTER TO END
(ingresar al final) y la tercera línea indicará el
número(s) presionado(s). Ingrese un número
telefónico de hasta 23 dígitos, (RD/P considerado
▲) o DOWN (▼) para desplazarse
76
Page 77

OPERACIONES DEL TELÉFONO
como Pausa, contado como un dígito, indicado
como P). Presione DEL/CH para borrar
cualquier error.
7. Presione ENTER para confirmar el número. La
pantalla de LCD indicará ENTER NAME
(ingresar número) y luego la segunda línea
estará en blanco.
8. Ingrese un número de hasta 21 caracteres utili
zando las teclas 2 a 9.
• Presione una vez 2 para A y dos veces 2 para B.
• Presione # para insertar # o signos de
puntuación.
• Utilice la tecla RD/P para insertar un espacio
entre alfabetos.
• Presione la tecla DEL/CH para borrar
cualquier error.
• El cursor se adelantará un espacio de forma
automática.
9. Presione ENTER para confirmar el nombre.
La pantalla de LCD indicará NUMBER STORED
(número almacenado). Luego muestra la
información recién ingresada.
Marcar una entrada de la lista
de teléfonos
1. Localice el registro de la lista de teléfonos al que
desea llamar.
2. Presione los botones TALK o ENTER para mar
car el número que aparece en pantalla.
Borrar un número almacenado
1. La unidad debe estar en el modo en espera y
la pantalla debe mostrar un registro de la lista
de teléfonos.
2. Presione una vez la tecla DEL/CH. La pantalla de
LCD mostrará DELETE? (¿borrar?).
77
Page 78

OPERACIONES DEL TELÉFONO
3. Presione DEL/CH para confirmar.
4. La pantalla indicará MEM DELETED (memoria
borrada) durante 3 segundos junto con un
mensaje satisfactorio.
5. La pantalla indicará el siguiente registro
disponible o NO RECORDS (sin registros).
• Si la ubicación en la memoria se encontrara vacía,
al presionar la tecla DEL no habrá acción.
• Esta secuencia finalizará a los 30 segundos si no
se presionara ninguna tecla.
Borrar todos los números almacenados
1. La unidad debe estar en el modo en espera
y la pantalla debe mostrar un registro
telefónico válido.
2. Presione y mantenga presionado durante 3
segundos el botón DEL/CH para borrar todos
los registros de la lista de teléfonos. La pantalla
indicará DELETE ALL?(¿borrar todos?)
3. Presione DEL/CH para confirmar. La pantalla
indicará -NO RECORDS (sin registros) durante 2
segundos junto con un mensaje satisfactorio.
• Si la ubicación en la memoria se encontrara vacía,
al presionar la tecla DEL no habrá acción.
• Esta secuencia finalizará a los 30 segundos si no
se presionara ninguna tecla.
78
Cambiar un número de la memoria
1. La unidad debe estar únicamente en el
modo pausa.
2. Presione dos veces la tecla MODE (modo). La
pantalla mostrará PHONEBOOK (lista de
teléfonos) durante 1 segundo y luego mostrará
el primer registro disponible.
3. Presione los botones UP (
desplazarse al registro a modificar, por ejemplo
ABC, 567.
▲) o DOWN (▼) para
Page 79

OPERACIONES DEL TELÉFONO
4. Presione la tecla # para modificar el registro
telefónico.
5. La pantalla indicará ENTER TO END (ingresar
al final) y el número almacenado 567 con el
cursor parpadeante luego del dígito 7.
6. Presione cualquier tecla numérica para agregar
números adicionales.
O
Presione la tecla DEL/CH para mover el cursor
al dígito 7.
Luego presione otra tecla numérica para reemplazar
el 7.
7. Presione ENTER luego de finalizar los dígitos.
8. La pantalla indicará ABC con el cursor par
padeante luego del caracter C.
9. Presione cualquier tecla numérica del 2 al 9 para
agregar caracteres adicionales.
O
Presione la tecla DEL/CH para mover el cursor
nuevamente al caracter C.
Luego presione cualquier otra tecla numérica
para cambiar este caracter.
10. Presione ENTER para finalizar. Los caracteres
y números modificados reemplazarán al registro
telefónico original.
11. La pantalla indicará NUMBER STORED (número
almacenado).
Agregar número de EMERGENCIA
1. La unidad debe estar únicamente en el
modo pausa.
2. Presione dos veces la tecla MODE (modo). La
pantalla mostrará PHONEBOOK (lista de
teléfonos) durante 1 segundo y luego mostrará
el primer registro disponible.
79
Page 80

OPERACIONES DEL TELÉFONO
3. Presione los botones UP (▲) o DOWN (▼) para
desplazarse al registro a almacenar en la tecla
EMERGENCY (emergencia).
4. Presione y mantenga presionada la tecla
EMERGENCY durante 2 segundos.
5. El número telefónico se copia a la tecla
EMERGENCY. La pantalla de LCD indicará MEM
STORING (memoria almacenando) durante un
(1) segundo y el receptor inalámbrico ofrecerá
un mensaje satisfactorio.
Marcar número de EMERGENCIA.
1. La unidad debe estar únicamente en el
modo pausa.
2. Presione una vez la tecla EMERGENCY
(emergencia).
3. La pantalla indicará el nombre y el número
almacenado durante 5 segundos. De lo contrario
indicará MEMORY EMPTY (memoria vacía).
4. Luego se descolgará el receptor inalámbrico y
marcará los números almacenados.
O
5. Presione la tecla TALK (hablar) para descolgar el
receptor inalámbrico.
6. Presione una vez la tecla EMERGENCY
(emergencia). La pantalla indicará el nombre y el
número almacenado durante 1 segundo. Luego se
enviarán los números.
80
Borrar número de EMERGENCIA
1. La unidad debe estar en el modo pausa.
2. Presione una vez la tecla EMERGENCY
(emergencia).
3. Si esta tecla ha sido programada, la pantalla
indicará el número almacenado. De lo contrario
indicará MEMORY EMPTY (memoria vacía).
4. Presione una vez la tecla DEL/CH para borrar
este número.
Page 81

OPERACIONES DEL TELÉFONO
5. La pantalla indicará DELETE? (¿borrar?)
6. Presione DEL/CH para borrar. El receptor
inalámbrico ofrecerá un mensaje satisfactorio
y la pantalla indicará MEM DELETED (memoria
borrada).
OPERACIONES DEL IDENTIFICADOR
DE LLAMADAS
Indicador visual de mensaje en espera (VMWI, por
sus siglas en inglés)
NOTA: Este es un servicio que se proporciona a
través de su compañía telefónica local.
Si el teléfono C4210 encuentra un mensaje de voz
para recuperar, se encenderá el indicador de mensaje
en espera (tecla ENTER).
Para recuperar el mensaje de voz, presione la tecla
ENTER mientras el indicador esté encendido. Se
descolgará el receptor inalámbrico y marcará el
número de mensaje de voz almacenado.
Información sobre el identificador de
llamadas
Esta función se desactiva durante cuando EASY
MODE (modo fácil) se encuentra en posición ON
(activado) durante la configuración.
Información sobre la persona que llama
Cuando alguien llama, la información recibida sobre
la persona que llama aparece en la pantalla de LCD.
Si este teléfono responde la llamada, dicha información sobre la persona que llama se la considera
“antigua” De lo contrario, la información del identificador de llamadas se almacenará en el registro de
llamadas. La información no revisada se considerará
como “llamada nueva”.
El indicador NEW CALL (llamada nueva) parpadeará.
La fila superior indica la hora y fecha de la llamada. La
81
Page 82

OPERACIONES DEL TELÉFONO
segunda fila indica la información del identificador de
llamadas, o está en blanco de no haber información.
La tercera fila muestra el número telefónico entrante. Si el número es más largo de doce (12) dígitos, la
pantalla de LCD alternará el número que muestra
entre los primeros 12 dígitos y los dígitos restantes.
Recibir identificación de una llamada
en espera
Cuando se encuentra realizando una llamada,
escuchará un aviso sonoro y la pantalla indicará
información sobre la identificación de una llamada en
espera.
Si toma la llamada en espera, la información del
identificador de llamadas desaparecerá y aparecerá la
fecha/hora en pantalla.
Si no toma la llamada en espera, la información del
identificador de llamadas se transferirá al registro
de llamadas. Esta información sobre la persona que
llama se considera “antigua”.
82
Llamada desconocida
Si la llamada proviene de otro país o el número de la
persona que llama no está disponible, aparece UNKNOWN (desconocido) y se almacena en el registro
del identificador de llamadas.
Llamada bloqueada
Si el número estuviera bloqueado o retenido,
aparecerá PRIVATE (privado) y se almacenará en el
registro del identificador de llamadas.
Llamada repetida
Si ésta fuera una llamada repetida, significa que antes
se ha recibido una llamada del mismo número y no
se ha revisado.
Page 83

OPERACIONES DEL TELÉFONO
Revisar el identificador de llamadas
Si hubiera información sobre llamadas nuevas, el
botón MODE (modo) destellará de color ROJO.
Durante el modo en espera, presione una vez el
botón MODE (modo). El display de LCD indicará
CID MODE (modo identificador de llamadas) y
luego la última información sobre el identificador de
llamadas.
Presione nuevamente UP (▲) o DOWN (▼) para
visualizar el contenido del identificador de llamadas. Presione DOWN (▼) para desplazarse hacia la
información del identificador de llamadas desde el
registro más reciente. O presione el botón UP (▲)
para desplazarse hacia la información del identificador de llamadas desde el registro más antiguo.
Si el número de la persona que llama es más largo
de doce (12) dígitos, la pantalla de LCD alternará el
mensaje indicado entre los primeros 12 dígitos y los
dígitos restantes.
Si la lista del identificador de llamadas estuviera vacía,
la pantalla indicará NO CALLS (sin llamadas).
• En cualquier momento, el usuario puede presionar
una vez el botón FLASH para retornar al modo
en espera.
O
• Volverá automáticamente al modo en espera a los
30 segundos si no hubiera acción.
Guardar información del identificador de
llamadas en la lista de teléfonos
1. Mientras revisa la información sobre la persona
que llama, presione una vez la tecla PROG.
2. La pantalla indicará SAVE TO PHONEBOOK
(guardar en la lista de teléfonos). Luego cambia a
83
Page 84

OPERACIONES DEL TELÉFONO
ENTER TO END (ingresar al final) y el número
de la persona que llama estará sobre la tercera
línea con el cursor parpadeante al final del
número.
3. Utilice una tecla numérica para agregar números
adicionales. Presione DEL/CH para borrar c
alquier error.
O
Presione DEL/CH para mover nuevamente el
cursor un dígito. Luego presione cualquier otra
tecla numérica para reemplazar el número.
4. Presione ENTER para confirmar el número.
5. La pantalla indica primero ENTER NAME
(ingresar número) y luego la información de la
persona que llama sobre la segunda línea con
el cursor parpadeante al final. El número
ingresado aparece sobre la tercera línea.
6. Presione las teclas 2 – 9 para agregar caracteres
adicionales. Presione DEL/CH para borrar cu
alquier error.
O
Presione DEL/CH para mover nuevamente el
cursor un caracter. Luego presione cualquier otra
tecla numérica para reemplazar el caracter.
7. Presione ENTER para confirmar el nombre.
8. La pantalla indicará en primer lugar NUMBER
STORED (número almacenado). Luego mostrará
el nombre y el número recién almacenados.
• En cualquier momento, el usuario puede presio
ar una vez el botón FLASH para retornar al
modo en espera.
O
• Volverá automáticamente al modo en espera a
los 30 segundos si no hubiera acción.
84
Page 85

OPERACIONES DEL TELÉFONO
Rellamada a partir de la información del
identificador de llamadas
Para realizar una rellamada a partir de información
de una llamada entrante, el interruptor T/P de la base
debe estar configurado en T.
Mientras revisa la lista de llamadas entrantes, presione ENTER y las teclas UP (▲) o DOWN (▼) le
darán formato al número con las siguientes variaciones de marcado:
• 7 dígitos sin un prefijo:
Si el código de área del identificador de llamadas
coincide con la configuración del código de área
almacenado, los números marcados solo pueden
ser de 7 dígitos.
• Código de área + 7 dígitos sin un prefijo:
Si el código de área del identificador de llamadas
coincide con la configuración del código de área
almacenado, los números marcados solo pueden
ser el código de área +7 dígitos.
• 10 dígitos sin un prefijo:
Si el código de área del número del identificador
de llamadas es diferente del código de área
almacenado, los números marcados pueden ser
de 10 dígitos sin un prefijo.
• 10 dígitos con un prefijo:
Si el código de área del número del identificador
de llamadas es diferente del código de área
almacenado, los números marcados pueden ser
de 1 + 10 dígitos sin un prefijo.
85
Page 86

OPERACIONES DEL TELÉFONO
Al revisar la información del identificador de llamadas, presione ENTER para visualizar la información
del identificador de llamadas en un formato diferente.
Ejemplo 1:
Código de Servicio de Larga Distancia almacenado: 1.
Código de área almacenado: 770.
Número de llamada entrante almacenado
770-123-4567.
1. Al presionar la tecla ENTER aparecerá
parpadeando 123-4567.
2. Presionando nuevamente las teclas TALK o
ENTER, se marcará 1234567.
O
3. Al presionar la tecla UP (
parpadeando 770-123-4567.
Luego, al presionar nuevamente las teclas TALK
o ENTER, se marcará 7701234567.
O
4. Al presionar la tecla UP (
parpadeando 1-7701234567.
Presionando nuevamente las teclas TALK o
ENTER, se marcará 17701234567.
O
5. Al presionar la tecla UP (
nuevamente parpadeando 123-4567.
▲) aparecerá
▲) aparecerá
▲) aparecerá
86
Ejemplo 2:
Código de Servicio de Larga Distancia almacenado: 1.
Código de área almacenado: 770.
Número de llamada entrante almacenado
413-456-7890.
Page 87

OPERACIONES DEL TELÉFONO
1. Al presionar la tecla ENTER aparecerá
parpadeando 413-456-7890.
2. Presionando nuevamente las teclas TALK o
ENTER, se marcará 4134567890.
O
3. Al presionar la tecla UP (
parpadeando 1-4134567890.
Presionando nuevamente las teclas TALK o
ENTER, se marcará 14134567890.
O
4. Al presionar la tecla UP (
nuevamente parpadeando 413-456-7890.
▲) aparecerá
▲) aparecerá
BORRAR INFORMACIÓN DEL IDENTIFICADOR DE LLAMADAS
Borrar una información del identificador
de llamadas
Mientras revisa el identificador de llamadas, presione
el botón DEL/CH para borrar la información del
identificador de llamadas que se muestra. En la pantalla de LCD destellará DELETE ? (¿borrar?)
Presione DEL/CH para confirmar. Durante 2 segundos aparecerá CID DELETED (identificador de
llamadas borrado). Aparece automáticamente el
siguiente registro o NO CALLS (sin llamadas), si la
lista estuviese vacía.
• En cualquier momento, el usuario puede
presionar una vez el botón FLASH para retornar
al modo en espera.
O
• Volverá automáticamente al modo en espera a
los 30 segundos si no hubiera acción.
87
Page 88

OPERACIONES DEL TELÉFONO
Borrar toda la información del identifica
-
dor de llamadas
Mientras revisa el identificador de llamadas, presione
y mantenga presionado el botón DEL/CH durante
dos segundos. En la pantalla de LCD destellará
DELETE ALL? (¿borrar todos?) Presione DEL/CH
para confirmar. La pantalla de LCD indicará ALL CID
(todos los números del identificador de llamadas) y
DELETED (borrados) durante 2 segundos y luego
NO CALLS (sin llamadas).
• En cualquier momento, el usuario puede
presionar una vez el botón FLASH para retornar
al modo en espera.
O
• Volverá automáticamente al modo en espera a
los 30 segundos si no hubiera acción.
88
Page 89

MANTENIMIENTO Y CUIDADOS
El teléfono C4210 ha sido diseñado para ofrecerle
años de servicio confiable con un mínimo de cuidados. Para asegurar el máximo rendimiento, siga estos
lineamientos para el cuidado de la unidad:
1. Evite hacer caer o golpear la unidad.
2. Limpie la unidad con frecuencia. Limpie la unidad
con un paño suave y húmedo.
3. No utilice detergentes y evite la humedad
excesiva.
4. El teléfono C4210 es un dispositivo eléctrico.
Evite la descarga eléctrica manteniendo el
teléfono lejos del agua (es decir, baño,
fregadero, etc.)
89
Page 90

RESOLUCIÓN DE PROBLEMAS
La unidad no funciona/no hay tono de
marcado:
• Verifique que el botón TALK esté encendido.
• Verifique que el adaptador AC esté conectado
con seguridad a un enchufe AC, a la base y
al teléfono.
• Verifique que el cable de la línea telefónica esté
conectado con seguridad al conector de pared y
al teléfono.
• Asegúrese de que la antena de la base esté en
posición elevada.
• Asegúrese de que la batería del receptor
inalámbrico esté completamente cargada.
• Verifique que el teléfono esté en el modo de
marcación correcto, por tonos (digital) o por
pulsos (disco).
• Asegúrese de que se encuentra dentro del rango
de alcance de la estación de base.
• Reinicie el código de seguridad colocando el
receptor inalámbrico en la base durante 5-10
segundos.
90
El teléfono no suena al recibir
una llamada.
• Asegúrese de que el interruptor del TIMBRE que
se encuentra sobre el receptor inalámbrico y la
base esté configurado en posición ON (activado).
• Verifique que el adaptador AC esté conectado con
seguridad a un enchufe AC, a la base y al teléfono.
• Verifique que el cable de la línea telefónica esté
conectado con seguridad al conector de pared y
al teléfono.
Page 91

RESOLUCIÓN DE PROBLEMAS
• Asegúrese de que se encuentra dentro del rango
de alcance de la estación de base.
• Puede tener demasiadas extensiones en su línea.
Intente desconectar algunos dispositivos.
Hay ruidos, estática, interferencias o se
oyen otras llamadas mientras se utiliza el
receptor inalámbrico:
• Intente cambiar los canales.
• Asegúrese de que la antena de la base esté en
posición elevada.
• Asegúrese de que se encuentra dentro del rango
de alcance de la estación de base.
• Asegúrese de que la batería del receptor
inalámbrico esté completamente cargada.
• Intente reubicar la base en otro lugar.
• Asegúrese de que el adaptador AC no esté
conectado al enchufe de pared con otros
artefactos.
El teléfono no se mantiene cargado:
• Asegúrese de que los contactos de carga del
receptor inalámbrico y de la base no tengan
polvo ni suciedad. Limpie los contactos con un
paño suave.
• Asegúrese de que el indicador CHARGE (carga)
que se encuentra sobre la base esté encendido
mientras el receptor inalámbrico se encuentra
sobre la base.
• De ser necesario, reemplace la batería del
receptor inalámbrico. (Consultar carga de la
batería del receptor inalámbrico).
91
Page 92

RESOLUCIÓN DE PROBLEMAS
Dificultad para hacer o recibir llamadas:
• Acérquese a la base e intente nuevamente.
• Si no funciona de esa forma, puede haber perdido
el código de seguridad.
• Reinicie el código colocando el receptor
inalámbrico sobre la base durante 5-10 segundos.
(Consulte la sección Códigos de seguridad).
• Asegúrese de haber seleccionado el modo de
marcación correcto, por tonos o por pulsos.
• Asegúrese de que el adaptador AC no esté
conectado a un enchufe de pared con otros
artefactos. Desconecte durante 5-10 segundos
y luego vuelva a conectar. Coloque nuevamente
el receptor inalámbrico sobre la base y vuelva a
colocar el adaptador AC.
• Asegúrese de que la batería del receptor
inalámbrico esté completamente cargada.
92
Page 93

CUMPLIMIENTO CON LOS REGLAMENTOS
Información sobre la Parte 68 de las
Reglas FCC (Comisión Federal de
Comunicaciones de EE.UU. por sus
siglas en inglés)
a) Este equipo cumple con la Parte 68 de las reglas
FCC y con los requerimientos adoptados por la
ACTA (Asociación Americana de Prestadores de
Servicios de Telecomunicaciones por sus siglas en
inglés) En la parte de abajo de este equipo hay una
etiqueta que contiene, entre otra información, un
identificador del producto en formato de EE.UU.:
AAAEQ##TXXXX. Si se solicita, este número debe
ser proporcionado a la compañía de teléfonos.
b) Una clavija y enchufe usados para conectar este
equipo al alambrado del local y
red telefónica deben cumplir con las reglas aplicables
de la FCC Parte 68 y con los requerimientos adoptados por el ACTA. Un cable telefónico y enchufe
modular que cumplen, RJ11C, se proporcionan con
este producto. Está diseñado para ser conectado a
un enchufe modular compatible que también cumpla.
Para más detalles, vea las instrucciones de instalación.
c) Se usa el REN (Número de Equivalencia de
Timbre) para determinar el número de dispositivos
que pueden ser conectadas a una línea telefónica.
Demasiados RENs en una línea telefónica podrían
provocar que los dispositivos no suenen en respuesta a una llamada entrante. En la mayoría pero no
en todas las áreas, el total de RENs no debe superar
los cinco (5.0). Para estar seguro de la cantidad de
dispositivos que pueden estar conectados a la línea,
como lo determinan los RENs totales, póngase en
contacto con la compañía de teléfonos local. Para los
productos aprobados después de Julio 23 de 2001,
el REN para este producto es parte del identificador
de producto que tiene el formato de los EE.UU.:
AAAEQ##TXXXX.
93
Page 94

CUMPLIMIENTO CON LOS REGLAMENTOS
Los dígitos representados por ## son el REN sin un
punto decimal (por Ej. 03 es un REN de 0.3). Para
productos anteriores, el REN se muestra separadamente en la etiqueta.
d) Si este equipo telefónico causa daños a la red
telefónica, la compañía de teléfonos le notificará por
adelantado que una suspensión temporal del servicio
puede ser necesaria. Pero si el aviso por adelantado
no es práctico, la compañía de teléfonos le notificará
al cliente tan pronto como sea posible. También, se le
asesorará de su derecho de presentar una queja con
la FCC si usted lo cree necesario.
e) La compañía de teléfonos puede realizar
cambios en sus instalaciones, equipos, operaciones
o procedimientos que podrían afectar el funcionamiento del equipo. Si esto sucede, la compañía de
teléfonos proporcionará aviso por adelantado para
que usted pueda hacer las modificaciones necesarias
para mantener el servicio sin interrupciones.
94
f) Si se experimentan problemas con este equipo
telefónico, para información sobre la reparación o
garantía, por favor póngase en contacto con Clarity,
al 1-800-552-3368. Si el equipo está causando daños
a la red telefónica, la compañía de teléfonos puede
solicitar que usted desconecte el equipo hasta que el
problema sea resuelto.
g) Este equipo de teléfono no está destinado para
ser reparado y no contiene partes reparables. El
abrir el equipo o cualquier intento de hacer reparaciones anulará la garantía. Para servicio o reparaciones, llame al 1-800-552-3368.
Page 95

CUMPLIMIENTO CON LOS REGLAMENTOS
h) La conexión a servicios de línea colectiva está
sujeta a tarifas estatales. Póngase en contacto con la
comisión de servicios públicos estatales, la comisión
del servicio público o la comisión corporativa para
información.
i) Si su casa tiene un equipo de alarma especialmente
cableado conectado a la línea de teléfono, asegúrese
que la instalación de este equipo telefónico no inhabilite su equipo de alarma. Si tiene alguna pregunta
sobre lo que deshabilitaría el equipo de alarma, consulte a su compañía de teléfonos o a un instalador
calificado.
j) Este equipo telefónico es compatible con los auxiliares auditivos.
Teléfonos de Monedas/Tarjeta de Crédito
Propiedad del Cliente:
Para cumplir con las tarifas estatales, la compañía de
teléfonos debe ser notificada antes de la conexión.
En algunos estados, la comisión de servicios públicos estatales, la comisión del servicio público o la
comisión corporativa deben dar aprobación previa
de conexión.
Información sobre la Parte 15 de las
Reglas FCC (Comisión Federal de
Comunicaciones de EE.UU. por sus
siglas en inglés)
Este dispositivo cumple con la Parte 15 de las Reglas
FCC. La operación está sujeta a las siguientes dos
condiciones: (1) Este dispositivo no puede causar
interferencia perjudicial, y (2) este dispositivo debe
aceptar cualquier interferencia recibida, incluyendo
interferencia que pudiera causar operación no
deseada.
95
Page 96

CUMPLIMIENTO CON LOS REGLAMENTOS
Su equipo fue probado y se comprobó que cumple
con los límites para un dispositivo digital Clase B,
de acuerdo con la Parte 15 de las normas de la
FCC (Comisión Federal de Comunicaciones). Estos
límites están diseñados para ofrecer una protección
razonable contra la interferencia perjudicial en una
instalación residencial.
Este equipo genera, utiliza y puede irradiar energía
de radiofrecuencia y, si no se instala y se utiliza de
acuerdo con las instrucciones, puede producir interferencia perjudicial en las comunicaciones radiales.
Sin embargo, no hay garantía de que no ocurrirá
interferencia en una instalación particular; si este
equipo causa interferencia perjudicial a la recepción
de radio o televisión, la cual puede determinarse
apagando y encendiendo el equipo, se le anima a
que trate de corregir la interferencia con una de las
siguientes medidas:
1. Donde pueda hacerse con seguridad,
reoriente la antena receptora de televisión
o radio.
2. En la medida de lo posible, reubique la
televisión, el radio u otro receptor con
respecto al equipo telefónico. (Esto aumenta
la separación entre el equipo telefónico y
el receptor.)
3. Conecte el equipo telefónico a un enchufe
o circuito diferente de aquel al que la tele
visión, el radio u otro receptor está
conectado.
4. Consulte al distribuidor o a un técnico de
radio/televisión experimentado para que
le ayuden.
96
Page 97

CUMPLIMIENTO CON LOS REGLAMENTOS
PRECAUCIÓN : Los cambios o modificaciones no
aprobados expresamente por el fabricante responsable del cumplimiento pudieran anular la autoridad
del usuario de operar el equipo.
Especificaciones Técnicas de
Industry Canada
Este producto cumple con las especificaciones
técnicas aplicables de Industry Canada
Antes de instalar este equipo, los usuarios deben
asegurarse de que está permitido conectarlo
en las instalaciones de la compañía local de
telecomunicaciones. Además el equipo debe
instalarse con un método de conexión aceptado.
En algunos casos, el cableado interior de la compañía
asociado con un servicio individual de línea sencilla
puede ser extendido por medio de un ensamble
conector certificado (cable de extensión telefónica).
El cliente debe estar consciente de que el
cumplimiento de las condiciones mencionadas
anteriormente quizás no evite el deterioro del s
ervicio en algunas situaciones. Las reparaciones al
equipo certificado deben ser llevadas a cabo por un
servicio de mantenimiento canadiense autorizado
designado por el proveedor.
Cualquier reparación o alteración del equipo realizada por el usuario, o el mal funcionamiento del
equipo, pueden dar motivo a la compañía de telecomunicaciones para solicitar al usuario que desconecte el equipo.
Los usuarios deben asegurarse, para su propia protección, de que las conexiones eléctricas a tierra del
suministro de energía pública, las líneas telefónicas y
los sistemas metálicos de cañería de agua internos,
si los hubiera, estén conectados conjuntamente. Esta
precaución puede ser especialmente importante en
áreas rurales.
97
Page 98

CUMPLIMIENTO CON LOS REGLAMENTOS
PRECAUCIÓN : Los usuarios no deben inten-
tar hacer tales conexiones por sí mismos, sino que
deben ponerse en contacto con la autoridad de
inspección eléctrica apropiada, o electricista, según
sea apropiado.
El Número de Equivalencia de Timbre es un indicativo del número máximo de terminales que se permite
sean conectadas a una interfaz telefónica. La terminación en una interfaz puede constar de cualquier
combinación de dispositivos, lo que está sujeto sólo
al requisito de que la suma de todos los Números de
Equivalencia de Timbres de todos los dispositivos no
sea superior a cinco.
(El término “IC”: antes del número de certificación/
registro solo significa que las especificaciones técnicas de Industry Canada fueron cubiertas.)
La parte responsable para el
cumplimiento reglamentario:
Clarity, Una División de Plantronics, Inc.
4289 Bonny Oaks Drive, Suite 106
Chattanooga, TN 37406
Teléfono: 1-800-552-3368
98
Page 99

GARANTÍA Y SERVICIO
La siguiente información de garantía y servicio solamente es aplicable a productos comprados y usados
en los EE.UU y Canadá. Para información de garantía
en otros países, por favor póngase en contacto con
su vendedor o distribuidor locales.
Garantía Limitada
Clarity, una división de Plantronics, Inc. (“Clarity”)
garantiza al comprador consumidor original que, excepto por las limitaciones y exclusiones presentadas
para consideración abajo, que este producto debe
estar libre de defectos en materiales y mano de obra
por un período de un (1) año de la fecha de la compra original (“Período de Garantía”). La obligación
de Clarity bajo esta garantía deberá ser a la opción
de Clarity, sin cargo, de cualquier parte o unidad que
pruebe ser defectuosa en material o mano de obra
durante el Período de Garantía.
Exclusiones de la Garantía
Esta garantía solamente es aplicable a defectos en
materiales de fabricación y mano de obra de fábrica.
Cualquier condición causada por accidente, abuso,
mal uso u operación inapropiada, infracción de las
instrucciones provistas por Clarity, destrucción o
alteración, voltajes o corrientes eléctricas inapropiadas o reparación o mantenimiento intentado
por alguien más que Clarity o un centro de servicio
autorizador no es un defecto cubierto por esta
garantía. Las compañías telefónicas fabrican
diferentes tipos de equipo y Clarity no garantiza
que este equipo sea compatible con el equipo de
una compañía telefónica particular.
Garantías Implícitas
Bajo la ley estatal, usted puede estar calificado para
el beneficio de ciertas garantías implícitas. Estas
garantías implícitas continuarán en vigor solamente
99
Page 100

GARANTÍA Y SERVICIO
durante el período de garantía. Algunos estados
permiten limitaciones sobre el tiempo que dura una
garantía implícita, así que las limitaciones anteriores
pueden no ser aplicables para usted.
Daños Incidentales o Consecuenciales
Ni Clarity ni su vendedor de menudeo o distribuidor de ventas tienen responsabilidad alguna por
cualesquier daños incidentales o consecuenciales
incluyendo sin limitación, pérdida o ganancia comercial, o por cualesquier gastos, pérdida de tiempo o
inconveniencia incidentales. Algunos estados no permiten exclusión o limitación de daños incidentales
o consecuenciales así que la limitación o exclusión
anterior puede no ser aplicable para usted.
Otros Derechos Legales
Esta garantía le da derechos legales específicos y
usted puede tener también otros derechos los cuales
varían de estado a estado.
100
Como Obtener el Servicio de Garantía
Para obtener el servicio de garantía, por favor prepague el envío y regreso de la unidad a la instalación
apropiada listada abajo.
En los Estados Unidos
Centro de Servicio Clarity
(Clarity Service Center)
4289 Bonny Oaks Drive, Suite 106
Chattanooga, Tennessee 37406
Tel: (423) 622-7793
u (800) 426-3738
Fax: (423) 622-7646
u (800) 325-8871
 Loading...