

Page 1
E
S
P
A
~
N
O
L
E
N
G
L
I
S
H
F
R
A
N
Ç
A
I
S
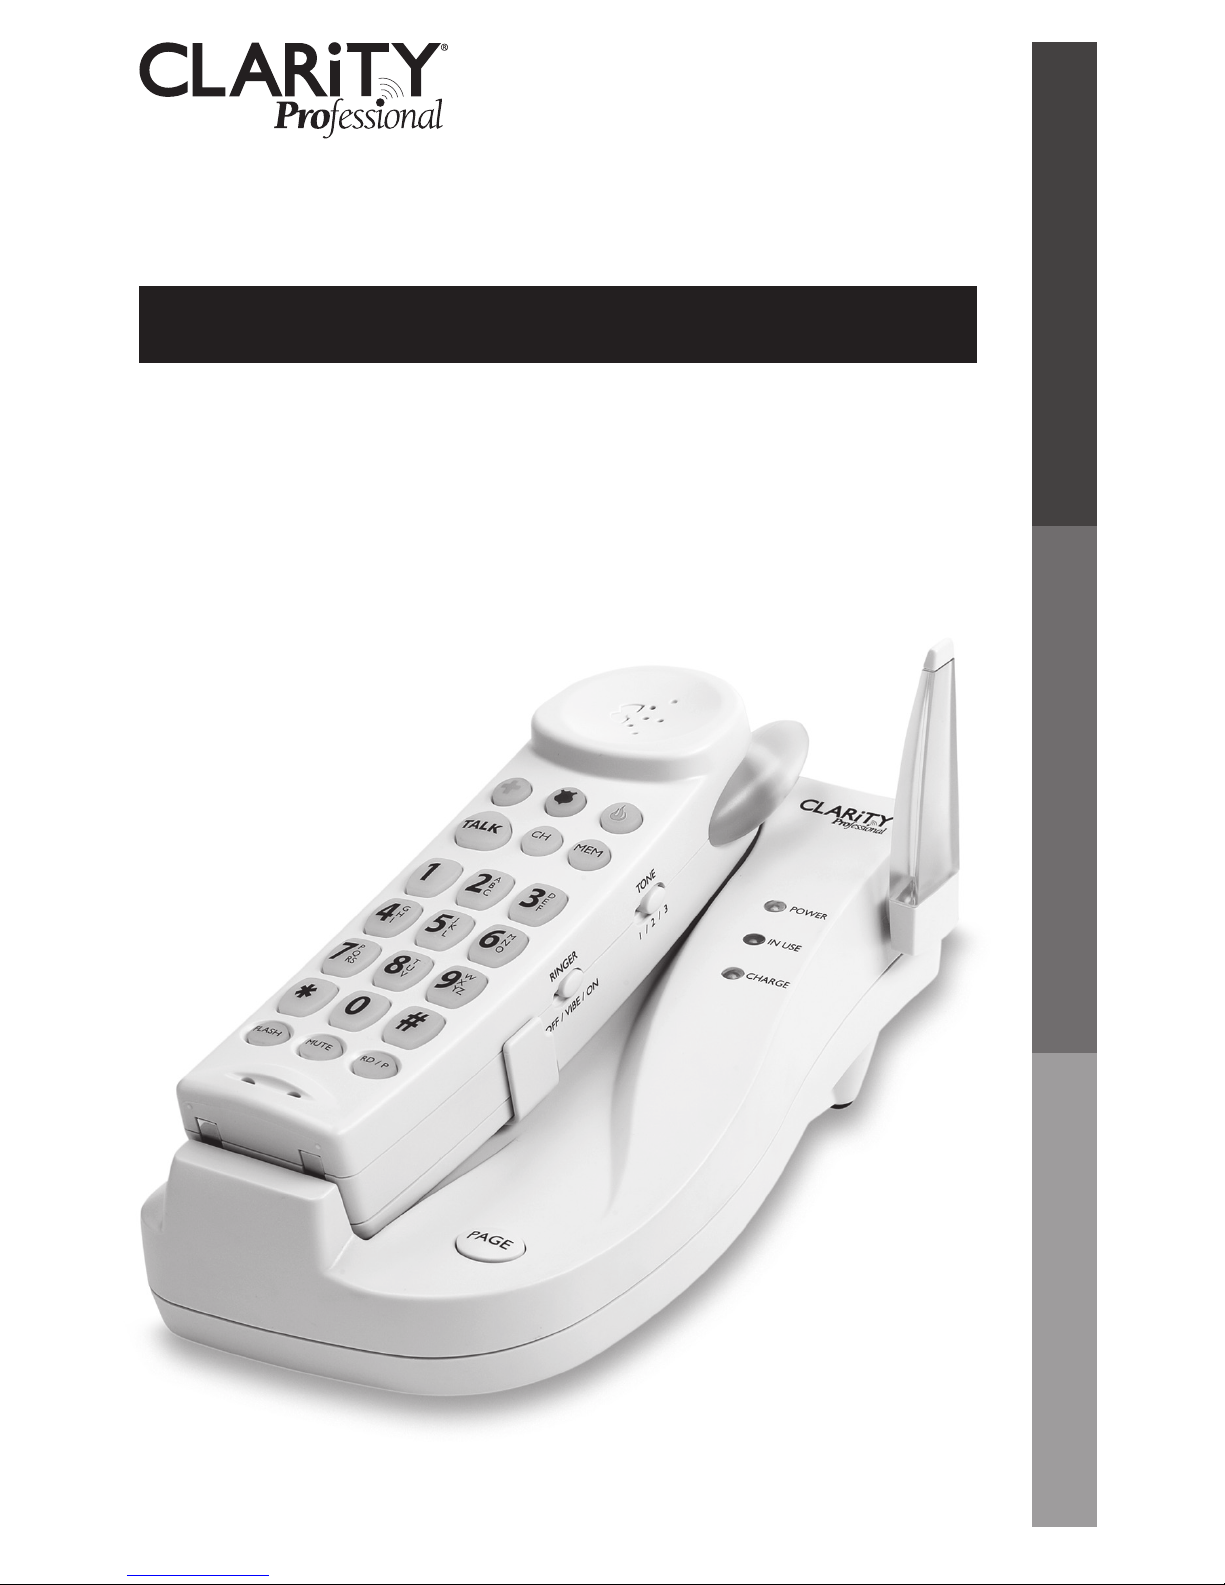
2.4 GHz Cordless Telephone
Featuring Clarity® Power™ Technology
C4105™ User Guide
Page 2

TABLE OF CONTENTS
Important Safety Instructions ............................................ 4
Features .................................................................................. 7
Choosing a Location ............................................................ 9
Telephone Installation ........................................................ 10
Handset Battery .................................................................12
Telephone Handset Features ...........................................13
Telephone Base Features ..................................................14
Using Your Telephone .........................................................17
Memory Storage ................................................................. 19
Maintenance and Care ......................................................20
Troubleshooting ..................................................................20
Regulatory Compliance .................................................... 22
Warranty and Service ........................................................26
Page 3

4
5
IMPORTANT SAFETY INSTRUCTIONS
IMPORTANT SAFETY INSTRUCTIONS
SAVE THESE INSTRUCTIONS
SAVE THESE INSTRUCTIONS
When using your telephone equipment, basic safety precautions should always
be followed to reduce the risk of fire, electric shock and injury to persons
including the following:
1. Read and understand all instructions.
2. Follow all warnings and instructions marked on the telephone.
3. Do not use this telephone near a bath tub, wash basin, kitchen sink or
laundry tub, in a wet basement, near a swimming pool or any
where else there is water.
4. Avoid using a telephone (other than a cordless type) during a storm.
There may be a remote risk of electrical shock from lightning.
5. Do not use the telephone to report a gas leak in the vicinity of the leak.
6. Unplug this telephone from the wall outlets before cleaning. Do not use
liquid cleaners or aerosol cleaners on the telephone. Use a damp cloth
for cleaning.
7. Place this telephone on a stable surface. Serious damage and/or
injury may result if the telephone falls.
8. Do not cover the slots and openings on this telephone. This telephone
should never be placed near or over a radiator or heat register. This
telephone should not be placed in a built-in installation unless proper
ventilation is provided.
9. Operate this telephone using the electrical voltage as stated on the base
unit or in the owner’s manual. If you are not sure of the voltage in your
home, consult your dealer or local power company.
10. Do not place anything on the power cord. Install the telephone where
no one will step or trip on the cord.
11. Do not overload wall outlets or extension cords as this can increase the
risk of fire or electrical shock.
12. Never push any objects through the slots in the telephone. They can touch
dangerous voltage points or short out parts that could result in a risk of
fire or electrical shock. Never spill liquid of any kind on the telephone.
13. To reduce the risk of electrical shock, do not take this phone apart. Open
ing or removing covers may expose you to dangerous voltages or other
risks. Incorrect reassembly can cause electric shock when the appliance is
subsequently used.
14. Unplug this product from the wall outlet and refer servicing to the manufacturer under the following conditions:
A. When the power supply cord or plug is frayed or damaged.
B. If liquid has been spilled into the product.
C. If the telephone has been exposed to rain or water.
D. If the telephone does not operate normally by following the operating
instructions. Adjust only those controls that are covered by the operating
instructions. Improper adjustment may require extensive work by a quali
-
fied technician to restore the telephone to normal operation.
E. If the telephone has been dropped or the case has been damaged.
F. If the telephone exhibits a distinct change in performance.
15. Never install telephone wiring during a lightning storm.
16. Never install telephone jacks in wet locations unless the jack is specifically
designed for wet locations.
17. Never touch uninsulated telephone wires or terminals unless the tele
-
phone line has been disconnected at the network interface.
18. Use caution when installing or modifying telephone lines.
19. Use only the power cord and batteries indicated in the manual. Do not
dispose of batteries in a fire. They may explode. Check with local codes for
possible special disposal instructions.
20. Plug the AC adaptor into the outlet that is nearest and most accessible to
the telephone.
Page 4
6
7
IMPORTANT SAFETY INSTRUCTIONS
SAVE THESE INSTRUCTIONS
SAFETY INSTRUCTIONS FOR BATTERIES
Caution: Risk of explosion if battery is replaced by an incorrect type. Dispose
of used batteries according to the instructions.
1. Use only the approved battery pack in the handset of your cordless phone.
For Handset Unit: 3.6V 600mAHr NiMH Rechargeable Battery
Sanik Battery Co. Ltd.: 3SNAAA60HSJ1
GPI International Ltd.: GP60AAAH3BMJZ
For Base Unit:
Four (4) AA alkaline batteries
2. Do not dispose of the battery in a fire as it may explode. Check with local
codes for possible special disposal instructions.
3. Do not open or mutilate the battery. Released electrolyte is corrosive and
may cause damage to the eyes and skin. It may be toxic if swallowed.
4. Exercise care in handling batteries in order not to short the battery with
conducting materials such as rings, bracelets and keys. The battery or con
-
duction material may overheat and cause burns.
5. Charge the battery (ies) provided with or identified for use with this
product only in accordance with the instructions and limittions specified in
this manual.
6. Observe proper polarity orientation between the battery pack and the
battery charger.
SAVE THESE INSTRUCTIONS
2
34
1
5
FEATURES
7
6
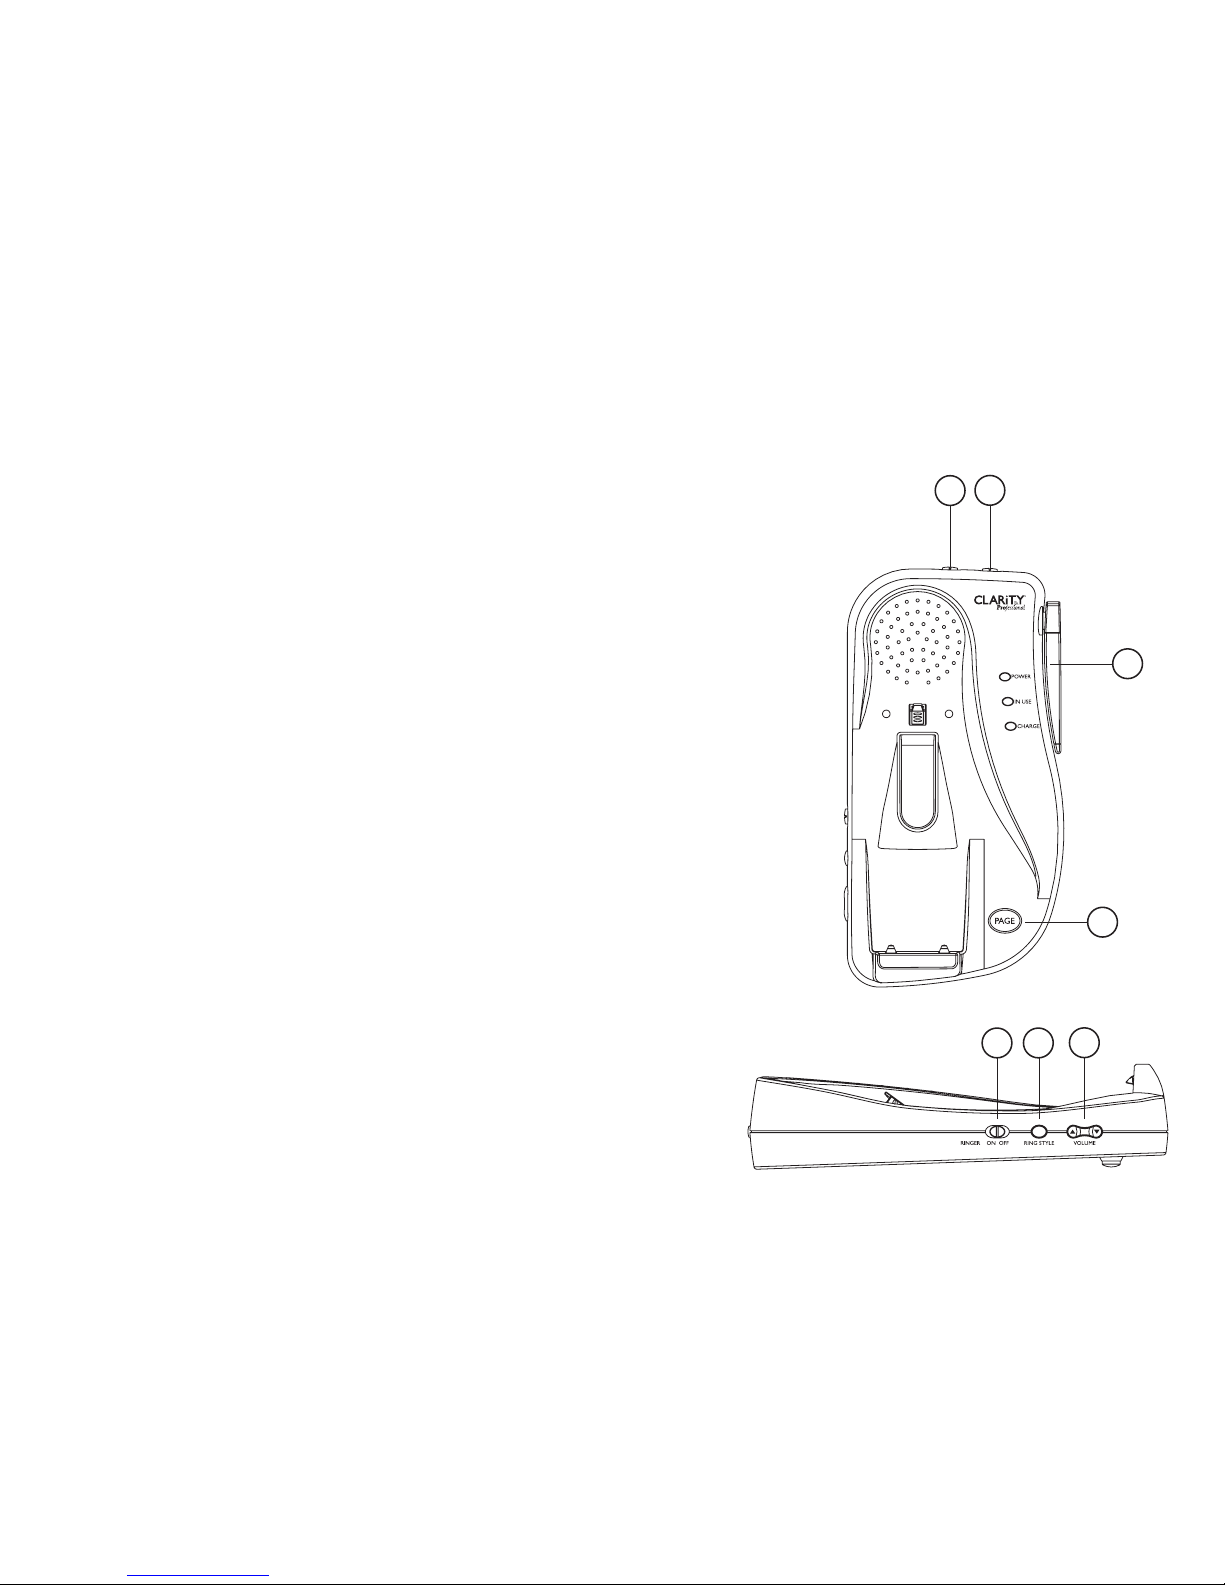
Telephone Base
1. Handset Page
2. Ringer Volume
3. Ringer Style
4. Ringer On/Off
5. Antenna/Visual Ringer
6. Boost On/Off
7. Pulse/Tone
Page 5
8
9
CHOOSING A LOCATION
1. This phone requires a modular phone jack (RJ11C) and a standard 120V
AC wall outlet.
2. Plug the AC Adapter directly into outlet.
3. Do not plug other appliances into the same outlet or have outlet con
-
trolled by a wall switch.
4. Choose a location that is out of the way of normal activities.
CAUTION: USE ONLY WITH CLASS 2 POWER SOURCE
9V DC, 400MA.
Always connect the AC Adapter to the phone before you connect it to the AC
power. When you finish, disconnect the AC power before you disconnect it
from the phone.
CONNECTING YOUR TELEPHONE
Carefully remove your cordless telephone from its box. If there is any visible
damage, do not attempt to operate this equipment. Return it to the place
of purchase. Check to be sure that you have all items that come with your
telephone. You should have a HANDSET, BASE UNIT, BATTERY, AC ADAPTER,
TELEPHONE LINE CORD, BELT CLIP and OWNERS MANUAL.
If at any time you have questions about your telephone please contact our
Customer Service Department at: 1-800-552-3368 or 423-622-7793.
FEATURES
10
1
2
3
5
6
7
8
9
11
12
13
14
4
15
16
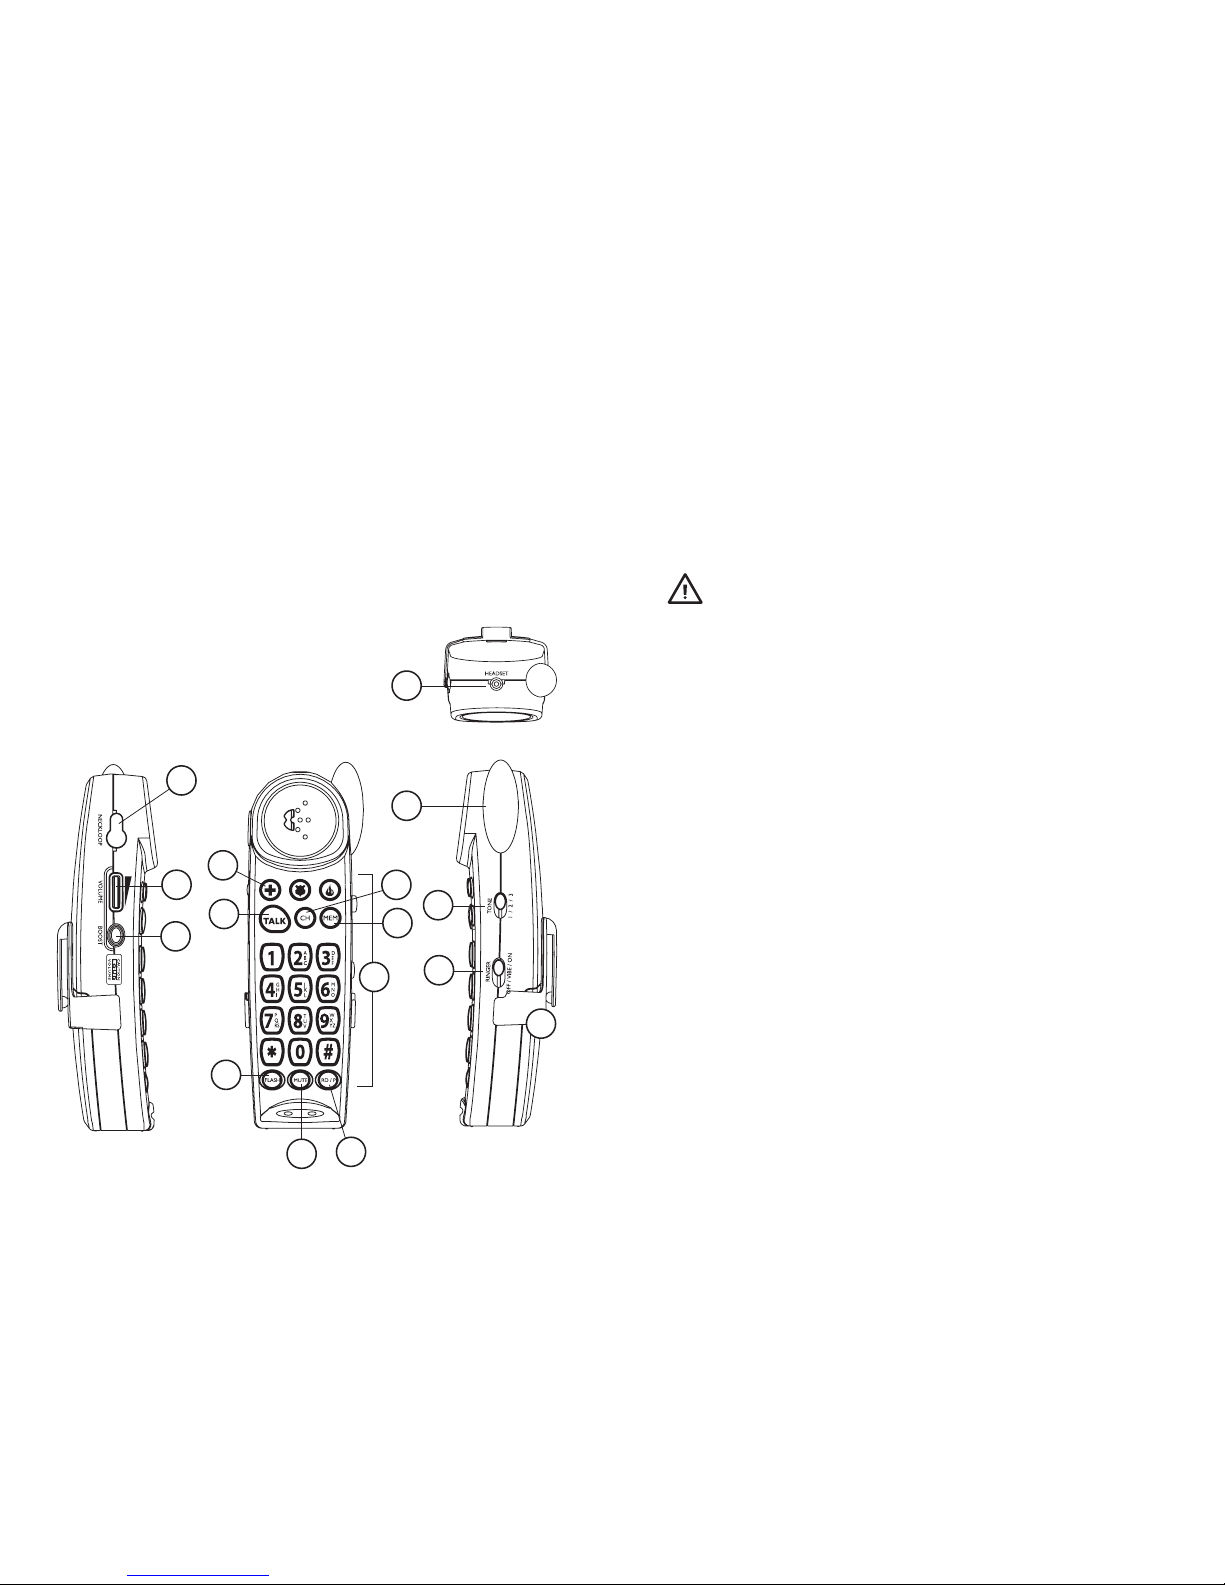
Handset
1. Neckloop Jack
2. Handset Volume
3. Boost
4. Dial Pad
5. Emergency Buttons
6. Talk
7. Channel
8. Memory
9. Flash
10. Mute
11. Redial/Pause
12. Handset Ringer Off/Vibe/On
13. Handset Tone
14. Belt Clip
15. Headset Jack
16. Antenna/Visual Ringer
Page 6
10
11
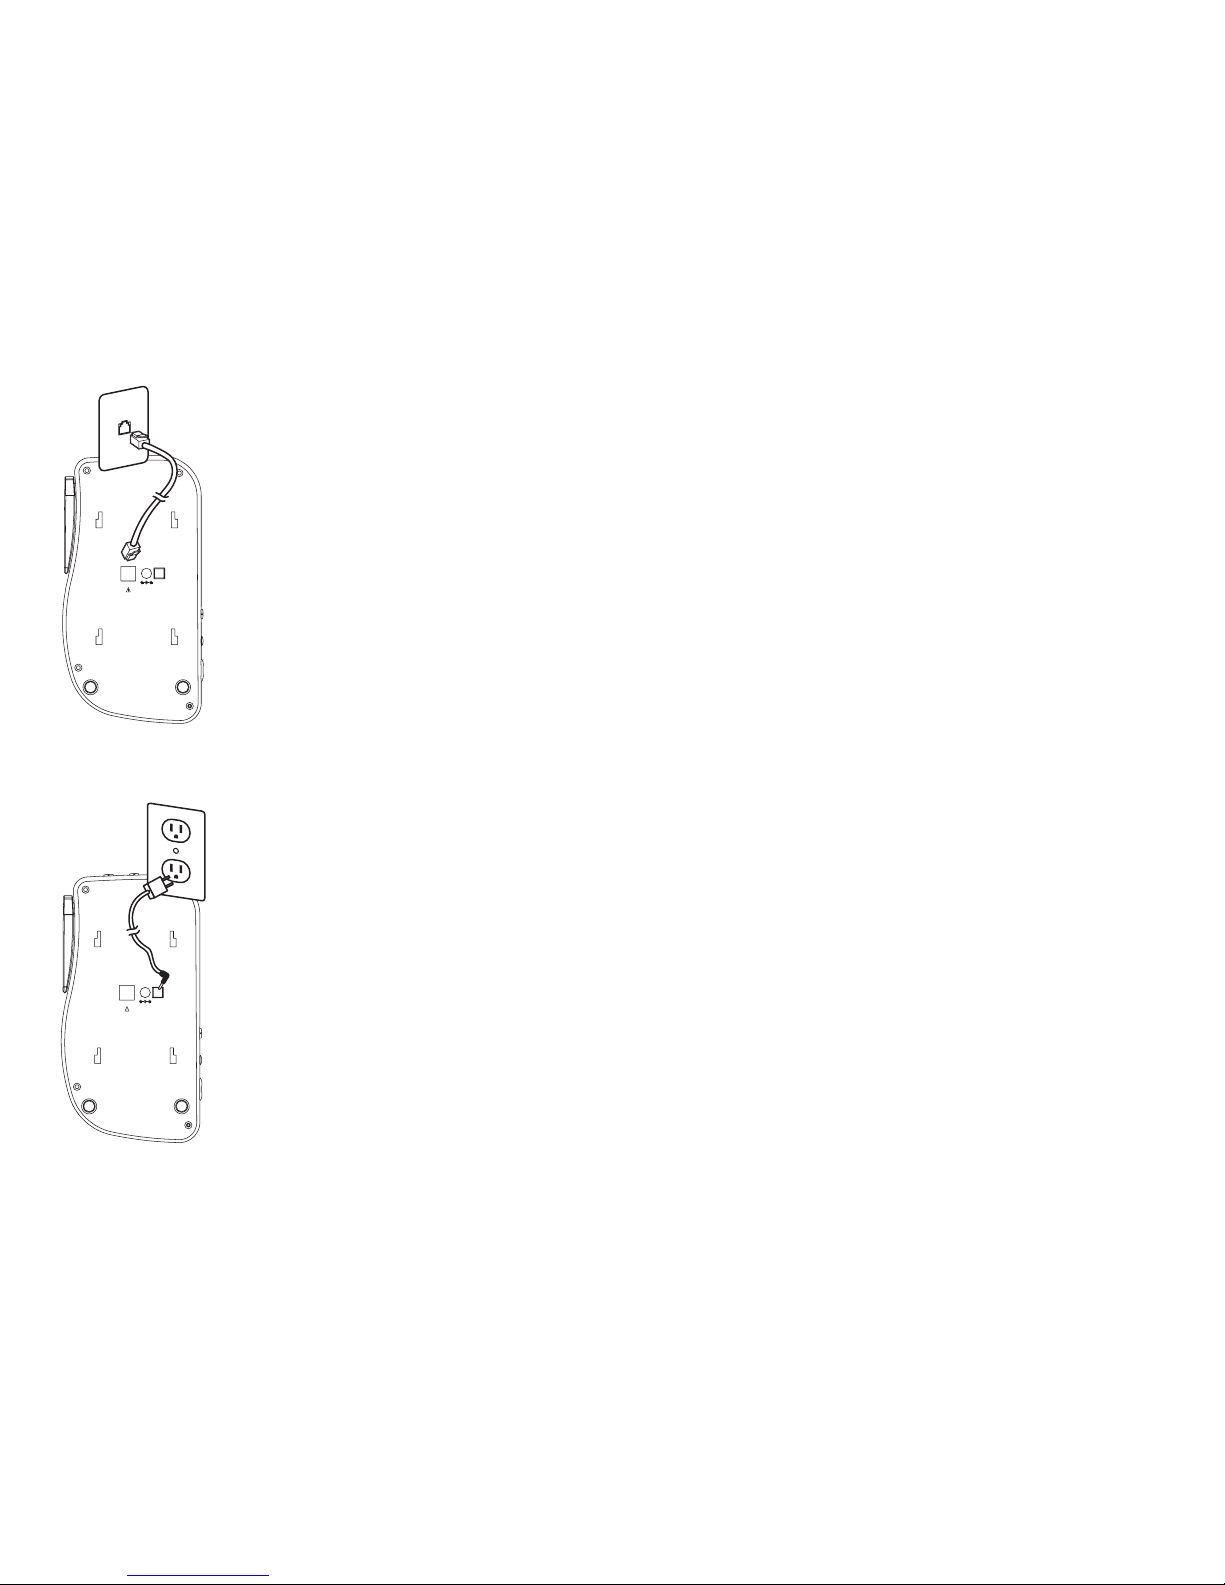
TABLE/DESK TOP INSTALLATION
CAUTION: Disconnect the telephone line cord
before connecting or disconnecting the battery
backup in the wall mount bracket.
1. Plug one end of the supplied modular telephone
line cord into the jack marked TEL located on
the back of the telephone base as shown in
the diagram.
2. Plug the modular telephone line cord’s other
end into a modular phone jack.
3. Insert the supplied AC Adapter’s plug into the
jack marked 9V DC 400mA located on the
back of the telephone base.
4. Plug the adapter into a standard 120V AC
power (electrical) outlet.
5. Align the mounting bracket on the back of the
base so that the black rubber feet are towards
the bottom of the phone. Insert the bracket’s
tabs into the slots and secure the bracket by
sliding it upward.
6. Lift the base’s antenna to a vertical position.
7. Set the TONE/PULSE switch located on the
back of the base to correct dialing mode.
Please check with your local Phone Company
if uncertain of the type of service.
8. Place handset in the cradle to begin
initial charging.
WALL MOUNTING INSTALLATION
CAUTION: Disconnect the telephone line cord
before connecting or disconnecting the battery
backup in the wall mount bracket.
The base unit may be mounted on a standard
wall plate.
1. Plug one end of the supplied short modular
telephone line cord into the TEL jack located
on the back of the base of the phone.
9V DC
400 mA
TE
L
USE ONLY WITH CLASS
(CLASSE) 2 POWER SOURCE
Connecting telephone
line cord
9V DC
400 mA
TEL
USE ONLY WITH CLASS
(CLASSE) 2 POWER SOURCE
Connecting AC
Adapter
2. Insert the plug of the AC adapter into the jack marked DC 9V 400mA
located on the back of the telephone base.
3. Align the mounting bracket on the back of the base so that the black rub
ber feet are towards the bottom of the phone. Insert the bracket’s tabs
into the slots and secure the bracket by sliding it upward.
4. Plug the short modular telephone line cord into the wall plate jack, then
align the mounting bracket’s keyhole slots with the wall plate studs and
slide the base of the phone downward to secure it on the wall.
5. Plug the adapter into a standard AC power (electrical) outlet.
6. Press and lift out the handset holder tab, turn it around so the narrow tab
end extends out and slide back into its slot. This will hold the handset in
the cradle when the phone is wall mounted.
7. Lift the base’s antenna to a vertical position.
8. Set the Tone/Pulse switch located on the end of the base to correct dialing
mode. Please check with your local Phone Company if uncertain of the
type of service.
9. Place handset in the cradle to begin initial charging.
Note: Remember, you must charge the phone for at least 12 hours before you
use the phone for the first time.
Page 7

12
13
HANDSET BATTERY INSTALLATION
The C4105 uses a 3.6Volt 600mAh NiMH recharge
able 3 cell (AAA Type) battery that is included with
your unit.
Handset Battery must be connected before beginning initial charging
To Install a New Battery
1. Remove battery cover
2. Install new battery
3. Connect battery pack
4. Replace battery cover
5. Charge for 12 hours before first use
Handset Battery Charging
1. Place the handset in the base. The CHARGE
LED on the base will light RED.
2. After the batteries are fully charged, check for
dial tone by pressing TALK on the handset.
Low Battery
When the handset battery gets low, there will be
two (2) beeps every thirty (30) seconds. If the bat
tery becomes low while you are on a call, you will be
disconnected after about two (2) minutes. Terminate
the call and recharge the battery. To recharge the
battery pack, place the handset in the base.
1. Make sure the contact points are touching and
the CHARGE LED is lit.
2. Be careful not to short battery with Conducting
materials such as rings, bracelets and keys.
Battery Life
A fully charged battery provides an average talk time
of about four (4) hours, or standby time of about (8)
days. Talk time and standby time may vary depending
on operating conditions.
Installing and
connecting battery
Note: The battery
in the handset must
be fully charged for
twelve (12) hours
before using the
telephone for the
first time.
Talk Time:
about
four (4) hours
Standby Time:
about
eight (8) days
Battery
Connector
Battery
Pack Plug
Battery
Compartment
Cover
TELEPHONE HANDSET
Clarity
®
Power™ Technology
With Clarity Power, the high frequency sounds are amplified more than the low
frequency sounds so words are not just louder, but clearer and easier
to understand.
BOOST – Clarity Power On/Off
The C4105 has a button that controls the loudness
of the receiver. Once the BOOST button is pressed,
an extra level of amplification is added over the entire range of the volume control.
The TALK button will light ORANGE to indicate the
CLARITY POWER feature is activated.
WARNING: When the TALK button is lit ORANGE volume may be at a high
level. To protect hearing, lower the volume control to minimum before using.
Volume Control
The dial controls the level of volume the handset and headset receive. The
volume dial provides up to 15 decibels of volume before the CLARITY POWER
button is activated. Once the CLARITY POWER button is pressed, the C4105
will provide up to 40 decibels of amplification.
Tone Switch
Adjusting the TONE switch allows you to customize your hearing experience.
Since we all have different hearing preferences we suggest exploring each setting to find the one most comfortable for you.
Handset Ringer
Set the switch marked Ringer OFF/VIBE/ON located on the side of the handset. When VIBE is selected the handset will ring and vibrate when receiving an
incoming call. The ringer switch must be set to ON or VIBE for the handset
to ring.
NOTE: If both handset and base ringers are set to OFF, the visual ringer will
flash to indicate there is an incoming call.
Boost On:
Talk
button is ORANGE
Boost Off:
Talk
button is GREEN
Page 8

14
15
Headset Jack
You can use this telephone hands-free when you install a 2.5mm headset (pur
chased separately). To install, plug the headset into the HEADSET JACK at the
top of the handset. While in headset mode, the volume of headset is controlled
by the telephone and the handset’s earpiece and microphone are disconnected.
Ordering a Headset
In the event you wish to purchase a headset for your C4105, please contact
Plantronics at 1-800-544-4660 for location near you. We recommend using the
Plantronics M110 or M130 headset.
Belt Clip
You may choose to use the optional belt clip with your handset.
1. To attach slide belt clip down onto groves. Press the tabs on the belt clip
into the slots to attach.
2. To remove, lift one side of the belt clip with your thumbnail and push back.
Hearing Aid Compatibility
The handset has a special coil inside of it to transmit the sound to hearing aids
equipped with T-Switches/T-Coils.
TELEPHONE BASE
Ringer Volume
The base ringer volume adjustments are located on the side of the phone base.
Pressing the UP (
) key on the base increases the ringer sound by one level
while pressing the DOWN ( ) key reduces the sound by one level. There are
a total of six levels from maximum to minimum. The ringer will sound for two
(2) seconds while choosing a ringer volume, to allow the user to make a choice.
Ringer Style
The base ringer style adjustments are located on the side of the telephone base.
The style of ring can be adjusted by pressing the RING STYLE button. Six (6)
styles are available allowing you to customize your ring. The ringer will sound
for two (2) seconds while choosing a ringer style, to allow the user to make
a choice.
Visual Ringers
Visual ringers are located in both the handset antenna and the base of the
telephone. When an incoming call is received, these lights will flash. The handset
visual ringer will also stay lit while the phone is in use.
BOOST ON/OFF Switch
This switch will disable the reset feature of the BOOST Clarity Power button
as follows:
ON – When the BOOST ON/OFF switch is set to ON, the Boost function will
be ON every time a call starts, and will default to ON every time the phone
hangs up. During a call, the BOOST Clarity Power button can toggle the Clarity
Power ON or OFF according to the user’s needs.
OFF – When the BOOST ON/OFF switch is set to OFF, the Boost function will
be OFF every time a call starts, and the user will need to press the BOOST
Clarity Power button in order to gain the extra level of amplification. If the
phone hangs up, the Clarity Power will reset to OFF. During a call, the BOOST
Clarity Power button can toggle the Clarity Power function ON or OFF according to the user’s needs.
CAUTION: VOLUME WILL BE LOUD WHEN BOOST
SWITCH IS SET TO “ON”.
Pulse/Tone
Slide the switch to the type of telephone service you have; TONE for touchtone
service or PULSE for rotary dialing. Please check with your local telephone
company if uncertain of the type of service.
Flash
The FLASH button is activated to use custom calling services such as Call
Waiting or Three-Way Calling. Please contact your local telephone company for
information on these services.
Mute
The MUTE button allows the user to conduct a private conversation that you
do not want the person on the other end to hear. While in the mute mode,
the MUTE button will illuminate RED and the microphone in the handset is
disabled. Pressing the MUTE button again will disengage the MUTE feature.
Page 9

16
17
Redial/Pause
Press the RD/P button to redial the last number dialed. Pressing the RD/P but
ton while storing a telephone number will insert a four (4) second pause. This is
commonly used when storing both the telephone number and an extension or
PIN number.
Battery Back-up
Installing four (4) AA Alkaline batteries into the desk/wall mount bracket
attached to the telephone base will offer you a limited amount of time to continue operating your telephone in the event of a power failure.
To Install Battery Back-up Batteries
1. Disconnect telephone line cord and remove desk/wall mount bracket from
telephone base.
2. Disconnect battery back-up connector from the telephone base.
3. Install four (4) AA Alkaline batteries with negative (-) end of battery touch
-
ing the spring.
4. Connect battery back-up connector to terminal on bottom of phone base.
5. Install desk/wall mount bracket to telephone base.
To Replace Battery Backup Batteries
1. Disconnect telephone line cord and remove desk/wall mount bracket from
telephone base.
2. Disconnect battery back-up connector from the telephone base.
3. Remove batteries from desk/wall mount bracket.
4. Install four (4) AA Alkaline batteries with negative (-) end of battery touch
-
ing the spring.
5. Connect battery back-up connector to terminal on bottom of phone base.
6. Install desk/wall mount bracket to telephone base.
After installing the four (4) AA Alkaline batteries please
refer to the chart below:
Power Supply Power LED Status
AC adapter and Steady Green
good batteries
AC adapter and Steady Red
no batteries
Power failure and Slow flashing red
good batteries
Power failure and Fast flashing red
bad batteries
USING YOUR TELEPHONE
Placing a Call
1. Press the TALK button (TALK button will illuminate GREEN) and dial the
number you wish to call.
2. To end the call press the TALK button or place the handset in the base.
Answering a Call
If the handset is out of the cradle, press the TALK button.
If the handset is in the cradle, simply lift the handset to answer.
Note: Refer to BOOST Clarity Power and Volume Control for information on
adjusting volume controls on Page 15.
Last Number Redial
The last number dialed (up to 32 digits) is stored in the redial memory until
another number is dialed.
To use this feature:
1. Press the TALK button.
2. When you hear the dial tone, press the RD/P button.
3. The phone will automatically dial for you.
Page 10

18
19
Pause Feature
Programming in a pause will cause the phone to wait four (4) seconds before
dialing additional numbers. This feature may be used when it is necessary to dial
an access code (9, for example) and wait for a second dial tone before you can
dial an outside number. Press the RD/P button at the required point during the
memory storage process to program a pause.
Temporary Tone
If you have rotary (pulse) dial service, you can change from pulse to touch tone
(tone) during a call.
1. Make phone call and wait until it is connected.
2. Press the * key. Keys pressed after this are sent as tone signals.
3. The phone will automatically reset to pulse service after the call ends.
Lighted Key Pad
The key pad will light for fifteen (15) seconds after removing the handset from
the base. To reactivate the feature while in standby, press the TALK or the MEM
button. To activate while the phone is in use, press any key.
Page/Handset Locator
To send a page signal from the base to the handset, press the PAGE button
located on the base of the telephone. A series of rings will sound from the
handset.
To locate the handset if it is away from the base, press and hold the PAGE button for approximately five (5) seconds. A series of rings will sound. Return the
handset to the base or press any button to cancel the page.
Channel Operation
The C4105 cordless telephone automatically searches and selects the clearest
of 40 channels when it is being used. If interference develops on the line, pressing this button will move to another channel.
Security Code
The security code prevents your cordless phone conversations from being accessed by a phone on a different line. Once the handset battery is fully charged,
the handset will automatically select the code from over 65,000 different combinations. The code is changed every time the handset is placed in the cradle. If
you have trouble with placing or receiving calls, a lost security code may be the
cause of the problem. When this occurs, the handset can no longer communicate with the base.
MEMORY STORAGE
The C4105 has ten (10) indirect, or two touch, memory storage locations on
the telephone handset (0-9) that can be programmed to dial frequently called
numbers of up to 16 digits.
Adding a Memory Location
1. Unit must be in standby mode only.
2. Press the MEM button.
3. Enter the telephone number you wish to store.
4. Press the MEM button.
5. Press the number on the dial pad that you wish to store the number to.
6. A long beep will indicate the programming process is complete.
During the memory storage process the TALK button will flash GREEN.
Use the RD/P button while entering the telephone number to insert a pause.
Refer to the Pause Feature section on page 21.
Dialing a Memory Location
1. Press the TALK button.
2. Press the MEM button.
3. Press the number on the dial pad for the stored number you wish to call.
4. The call will automatically dial.
Adding an EMERGENCY Number
1. Unit must be in standby mode only.
2. Press the MEM button.
3. Enter the telephone number you wish to store.
4. Press the MEM button.
5. Press the emergency button on the dial pad that you wish to store the
number to.
6. A long beep will indicate the programming process is complete.
Page 11

20
21
Dialing an EMERGENCY Number
1. Press the TALK button.
2. Press the EMERGENCY key you wish to call.
MAINTENANCE AND CARE
The C4105 has been designed to give you years of dependable service with a
minimum of care. To ensure the utmost in performance, follow these guidelines
in caring for the unit:
1. Avoid dropping or knocking the unit.
2. Dust the unit regularly. Wipe the unit with a soft damp cloth.
3. Do not use detergents and avoid excess moisture.
4. The C4105 is an electrical device. Avoid electric shock by keeping the
phone away from water (i.e. bathroom, kitchen sink, etc.)
TROUBLESHOOTING
The unit will not operate/no dial tone:
• Verify the TALK Button is lit.
• Verify the AC Adapter is securely plugged into AC outlet and the base.
• Verify the telephone line cord is securely plugged into the wall jack and
the telephone.
• Make sure the base antenna is in an upright position.
• Make sure the handset battery is fully charged.
• Verify the telephone is in the correct dialing mode, tone (touch) or
pulse (rotary).
• Make sure you are in the usable range of the base station.
• Reset the security code by placing the handset in the base for 5-10 seconds.
The phone does not ring when you receive a call:
• Make sure the RINGER switch on the handset and base are set to ON.
• Verify the AC Adapter is securely plugged into AC outlet and the base.
• Verify the telephone line cord is securely plugged into the wall jack and
the telephone.
• Make sure you are in the usable range of the base station.
• You may have too many phones on your line. Try unplugging a few devices.
Noise, Static, Interference or Other Calls Heard While Using
the Handset:
• Try changing channels.
• Make sure the base antenna is in an upright position.
• Make sure you are in the usable range of the base station.
• Make sure the handset battery is fully charged.
• Try relocating the base unit to another location.
• Make sure the AC Adapter is not plugged into the wall outlet with
other appliances.
Phone Will Not Hold Charge:
• Make sure the charging contacts on the handset and base are free of dust and
dirt. Clean the contacts with a soft cloth.
• Make sure CHARGE LED on the base is lit when handset is in the cradle.
• If necessary, replace the handset battery. (See Handset Battery Charging)
Difficulty in Placing or Receiving Calls:
• Move closer to the base and try again.
• If moving closer does not work, you may have lost the security code.
• Reset code by placing the handset back on the base for 5-10 seconds. (See
Security Code Section)
• Make sure you have selected the correct dialing mode, tone or pulse.
• Make sure the AC Adapter is not plugged into a wall outlet with other appli-
ances. Disconnect for 5-10 seconds then reconnect. Place the handset back
on the base and reinsert the AC Adapter.
• Make sure the handset battery is fully charged.
Page 12

22
23
Part 68 of FCC Rules Information
a) This equipment complies with Part 68 of the FCC rules and the require
ments adopted by the ACTA. On the bottom of this equipment is a label that
contains, among other information, a product identifier in the format US:
AAAEQ##TXXXX. If requested, this number must be provided to the telephone company.
b) A plug and jack used to connect this equipment to the premises wiring and
telephone network must comply with the applicable FCC Part 68 rules and
requirements adopted by the ACTA. A compliant telephone cord and modular
plug, RJ11C USOC, is provided with this product. It is designed to be connected
to a compatible modular jack that is also compliant. See installation instructions
for details.
c) The REN is used to determine the number of devices that may be connected to a telephone line. Excessive RENs on a telephone line may result in
the devices not ringing in response to an incoming call. In most but not all areas,
the sum of RENs should not exceed five (5.0). To be certain of the number
of devices that may be connected to a line, as determined by the total RENs,
contact the local telephone company. For products approved after July 23, 2001,
the REN for this product is part of the product identifier that has the format
US:AAAEQ##TXXXX.
The digits represented by ## are the REN without a decimal point (e.g., 03 is a
REN of 0.3). For earlier products, the REN is separately shown on the label.
d) If this telephone equipment causes harm to the telephone network, the
telephone company will notify you in advance that temporary discontinuance
of service may be required. But if advance notice isn’t practical, the telephone
company will notify the customer as soon as possible. Also, you will be advised
of your right to file a complaint with the FCC if you believe it is necessary.
e) The telephone company may make changes in its facilities, equipment, operations or procedures that could affect the operation of the equipment. If this
happens the telephone company will provide advance notice in order for you to
make necessary modifications to maintain uninterrupted service.
f) If trouble is experienced with this telephone equipment, for repair or warranty information, please contact Clarity, 1-800-552-3368. If the equipment is
causing harm to the telephone network, the telephone company may request
that you disconnect the equipment until the problem is resolved.
REGULATORY COMPLIANCE REGULATORY COMPLIANCE
g) This telephone equipment is not intended to be repaired and it contains no
repairable parts. Opening the equipment or any attempt to perform repairs will
void the warranty. For service or repairs, call 1-800-552-3368.
h) Connection to party line service is subject to state tariffs. Contact the state
public utility commission, public service commission or corporation commission
for information.
i) If your home has specially wired alarm equipment connected to the telephone line, ensure the installation of this telephone equipment does
not disable your alarm equipment. If you have questions about what will disable
alarm equipment, consult your telephone company or a qualified installer.
j) This telephone equipment is hearing aid compatible.
Customer-Owned Coin/Credit Card Phones:
To comply with state tariffs, the telephone company must be given notification
prior to connection. In some states, the state public utility commission, public
service commission or corporation commission must give prior approval of
connection.
Part 15 of FCC Rules Information
This device complies with Part 15 of the FCC Rules. Operation is subject to the
following two conditions: (1) This device may not cause harmful interference,
and (2) this device must accept any interference received, including interference
that may cause undesired operation.
Your equipment has been tested and found to comply with the limits of a Class
B digital device, pursuant to Part 15 of FCC rules. These limits are designed to
provide reasonable protection against harmful interference in
residential installation.
This equipment generates, uses and can radiate radio frequency energy and, if
not installed and used in accordance with the instructions, may cause harmful interference to radio communications. However, there is no guarantee
that interference will not occur in a particular installation; if this equipment
does cause harmful interference to radio or television reception, which can be
determined by turning the equipment off and on, you are encouraged to try to
correct the interference by one of the following measures:
Page 13

24
25
1. Where it can be done safely, reorient the receiving television or
radio antenna.
2. To the extent possible, relocate the television, radio or other receiver
with respect to the telephone equipment. (This increases the separation
between the telephone equipment and the receiver.)
3. Connect the telephone equipment into an outlet on a circuit different from
that to which the television, radio, or other receiver is connected.
4. Consult the dealer or an experienced Radio/TV Technician for help.
CAUTION: Changes or modifications not expressly approved by the manu
facturer responsible for compliance could void the user’s authority to operate
the equipment.
Industry Canada Technical Specifications
This product meets the applicable Industry Canada technical specifications.
Before installing this equipment, users should ensure that it is permissible to be
connected to the facilities of the local telecommunications company. The equipment must also be installed using an acceptable method of connection. In some
cases, the company’s inside wiring associated with a single line individual service
may be extended by means of a certified connector assembly (telephone extension cord). The customer should be aware that compliance with the above
conditions may not prevent degradation of service in some situations. Repairs
to certified equipment should be made by an authorized Canadian maintenance
facility designated by the supplier.
Any repairs or alterations made by the user to this equipment, or equipment
malfunctions, may give the telecommunications company cause to request the
user to disconnect the equipment.
Users should ensure for their own protection that the electrical ground connections of the power utility, telephone lines and internal metallic water pipe
system, if present, are connected together. This precaution may be particularly
important in rural areas.
CAUTION: Users should not attempt to make such connections themselves,
but should contact the appropriate electrical inspection authority, or electrician,
as appropriate.
The Ringer Equivalence Number is an indication of the maximum number of
terminals allowed to be connected to a telephone interface. The termination
on an interface may consist of any combination of devices subject only to the
requirement that the sum of the Ringer Equivalence Numbers of all the devices
does not exceed five.
(The term “IC:” before the certification/registration number only signifies that
the Industry Canada technical specifications were met.)
The party responsible for regulatory compliance:
Clarity, A Division of Plantronics, Inc.
4289 Bonny Oaks Drive, Suite 106
Chattanooga, TN 37406
Phone: 1-800-552-3368
REGULATORY COMPLIANCE REGULATORY COMPLIANCE
Page 14

26
27
The following warranty and service information applies only to products
purchased and used in the U.S. and Canada. For warranty information in other
countries, please contact your local retailer or distributor.
Limited Warranty
Clarity, a division of Plantronics, Inc. (“Clarity”) warrants to the original con
sumer purchaser that, except for limitations and exclusions set forth below, this
product shall be free from defects in materials and workmanship for a period of
one (1) year from the date of original purchase (“Warranty Period”). The obligation of Clarity under this warranty shall be at Clarity‘s option, without charge,
of any part or unit that proves to be defective in material or workmanship during the Warranty Period.
Exclusions from Warranty
This warranty applies only to defects in factory materials and
factory workmanship.
Any condition caused by accident, abuse, misuse or improper operation, violation of instructions furnished by Clarity, destruction or alteration, improper
electrical voltages or currents, or repair or maintenance attempted by anyone
other than Clarity or an authorized service center, is not a defect covered by
this warranty. Telephone companies manufacture different types of equipment
and Clarity does not warrant that its equipment is compatible with the equipment of a particular phone company.
Implied Warranties
Under state law, you may be entitled to the bene-fit of certain implied warranties. These implied warranties will continue in force only during the warranty
period. Some states do allow limitations on how long an implied warranty lasts,
so the above limitation may not apply to you.
Incidental or Consequential Damages
Neither Clarity nor your retail dealer or selling distributors has any responsibility for any incidental or consequential damages including without limitation,
commercial loss or profit, or for any incidental expenses, expenses, loss of time,
or inconvenience. Some states do not allow exclusion or limitation of incidental
or consequential damage, so the above limitation or exclusion may not apply
to you.
Other Legal Rights
This warranty gives you specific legal rights and you may also have other rights
which vary from state to state.
How to Obtain Warranty Service
To obtain warranty service, please prepay shipment and return the unit to the
appropriate facility listed below.
In the United States
Clarity Service Center
4289 Bonny Oaks Drive, Suite 106
Chattanooga, Tennessee 37406
Tel: (423) 622-7793 or (800) 426-3738
Fax: (423) 622-7646 or (800) 325-8871
In Canada
Plantronics Service Center
8112 Trans-Canada Hwy.
Ville St. Laurent. Que.
Canada H4S 1M5
Tel: (800) 540-8363 or (514) 956-8363
Fax: (514) 956-1825
Please use the original container, or pack the unit(s) in a sturdy carton with sufficient packing material to prevent damage.
Include the following information:
1. A proof-of-purchase indicating model number and date of purchase.
2. Bill-to address.
3. Ship-to address.
4. Number and description of units shipped.
5. Name and telephone number of person to call, should contact
be necessary.
6. Reason for return and description of the problem.
Damage occurring during shipment is deemed the responsibility of the carrier,
and claims should be made directly with the carrier.
WARRANTY & SERVICE WARRANTY & SERVICE
Page 15

E
S
P
A
~
N
O
L
Teléfono Inalámbrico de 2.4 GHz
Presentando Tecnología Clarity® Power™
Guía del Usario C4105
™
Page 16

31
TABLA DE CONTENIDO INSTRUCCIONES IMPORTANTES DE SEGURIDAD
GUARDE ESTAS INSTRUCCIONES
Cuando utilice su equipo de teléfono, se deben seguir siempre las siguientes
precauciones de seguridad básicas para reducir el riesgo de incendio, choque
eléctrico y lesiones a personas incluyendo lo siguiente:
1. Leer y comprender todas las instrucciones.
2. Seguir todas las advertencias e instrucciones marcadas sobre el teléfono.
3. No use este teléfono cerca de una tina de baño, lavabo, lava trastes de
cocina o tina de lavado, en un sótano húmedo, cerca de una alberca o en
cualquier otro lugar en el que haya agua.
4. Evite usar un teléfono (que no sea del tipo inalámbrico) durante una tor
menta. Puede haber un riesgo remoto de choque eléctrico por
los relámpagos.
5. No use el teléfono para reportar una fuga de gas cerca de la fuga.
6. Desconecte este teléfono de los enchufes de la pared antes de limpiarlo.
No use limpiadores líquidos o limpiadores en aerosol sobre el teléfono.
Utilice un trapo húmedo para limpiarlo.
7. Coloque este teléfono sobre una superficie estable. Un daño serio y/o
lesión pueden ocurrir si el teléfono se cae.
8. No cubra las ranuras y aberturas sobre este teléfono. Este teléfono nunca
debe ser colocado cerca o sobre un radiador o registro de calor. Este telé
fono nunca debe colocarse en una instalación ínterconstruida a menos que
se provea ventilación apropiada.
9. Opere este teléfono usando el voltaje eléctrico como se establece en la
unidad de base o en el manual del usuario. Si no está seguro del voltaje de
su hogar, consulte al distribuidor del producto o a su compañía
eléctrica local.
10. No coloque nada sobre el cable de corriente. Instale el teléfono donde
nadie pise o se tropiece con el cable.
11. No sobrecargue los enchufes de pared o extensiones eléctricas ya que esto
puede aumentar el riesgo de incendio o choque eléctrico.
12. Nunca empuje ningún objeto a través de las ranuras en el teléfono. Pueden
tocar puntos de voltaje peligrosos o cortocircuitar partes que pudieran re
sultar en un riesgo de incendio o choque eléctrico. Nunca derrame líquidos
de ningún tipo sobre el teléfono.
13. Para reducir el riesgo de choque eléctrico, no desbarate el teléfono. El abrir
o quitar las cubiertas puede exponerle a voltajes peligrosos u otros riesgos.
Instrucciones Importantes de Seguridad .....................31
Características ....................................................................34
Elegir una localización .......................................................36
Instalación Del Teléfono ....................................................36
Batería Del Microteléfono ................................................ 38
Características Del Microteléfono
Del Teléfono ........................................................................40
Características Bajas Del Teléfono .................................41
Usar Su Teléfono ................................................................. 44
Almacenaje De la Memoria ..............................................46
Mantenimiento y cuidado ................................................. 47
Localización de averías ......................................................48
Conformidad Reguladora ................................................. 50
Garantía y servicio .............................................................54
Page 17

32
33
GUARDE ESTAS INSTRUCCIONES GUARDE ESTAS INSTRUCCIONES
El reensamblado erróneo puede causar choque eléctrico cuando el aparato
es usado después.
14. Desconecte este producto del enchufe de la pared y remita el servicio al
fabricante bajo las siguientes condiciones:
A. Cuando el cable eléctrico o el enchufe estén raídos o dañados.
B. Si se ha derramado líquido en el producto.
C. Si el teléfono ha estado expuesto a lluvia o agua.
D. Si el teléfono no funciona normalmente siguiendo las instrucciones
de operación. Ajuste solo aquellos controles que están cubiertos en las
instrucciones de operación: El ajuste inapropiado puede requerir trabajo
extensivo por un técnico calificado para restaurar el teléfono a su
operación normal.
E. Si el teléfono se ha caído o la caja ha sido dañada.
F. Si el teléfono muestra un cambio notable en el desempeño.
15. Nunca instale el alambrado del teléfono durante una tormenta eléctrica.
16. Nunca instale los conectores del teléfono en ubicaciones húmedas a menos
que el conector esté diseñado específicamente para ubicaciones húmedas.
17. Nunca toque los alambres o terminales del teléfono sin aislar a menos de
que la línea del teléfono haya sido desconectada en la interfaz de la red
de trabajo.
18. Sea cuidadoso cuando instale o modifique las líneas telefónicas.
19. Use solamente el cable de corriente y las baterías indicadas en el manual.
No deseche las baterías en el fuego. Podrían explotar. Verifique los códigos
locales para posibles instrucciones especiales de desecho.
20. Conecte el adaptador AC en el enchufe que esté más cercano y más ac
-
cesible al teléfono.
Instrucciones de seguridad para las baterías
Precauci
ón: Existe riesgo de explosión si la batería es reemplazada con el
tipo incorrecto. Deshágase de las baterías usadas de acuerdo a las instrucciones.
1. Use solamente el paquete de baterías aprobado en el auricular de su teléfono inalámbrico.
Para la Unidad de Auricular: 3.6V 600mAHr Batería Recargable NiMH
Sanik Battery Co. Ltd.:
3SNAAA60HSJ1
GPI International Ltd.: GP60AAAH3BMJZ
Para la Unidad de Base: Cuatro (4) AA baterías alcalinas.
2. No se deshaga de la batería en el fuego ya que podría explotar. Verifique
con los códigos locales para posibles instrucciones especiales de para de
-
shacerse de ellas.
3. No abra o mutile la batería. Los electrolitos liberados son corrosivos y
pudieran causar daño a los ojos y piel. Puede ser tóxico si se traga.
4. Tenga cuidado al manejar las baterías para no cortocircuitarlas con ma
teriales conductivos como anillos, pulseras y llaves. La batería o material
conducente podría sobrecalentarse y causar quemaduras.
5. Cargue la/s batería/s que se proporciona/no que se identifica/n para su uso
con este producto solamente de acuerdo con las instrucciones y limitacio
-
nes especificadas en este manual.
6. Cuide la orientación de polaridad apropiada entre el paquete de baterías y
el cargador de baterías.
INSTRUCCIONES IMPORTANTES DE SEGURIDAD INSTRUCCIONES IMPORTANTES DE SEGURIDAD
Page 18

34
35
Base del Teléfono
1. Página del Microteléfono
2. Volumen del Campanero
3. Estilo del Campanero
4. Activar/Desactivar el Timbre
5. Antena/Timbre Visual
6. Activar/Desactivar el Boost
7. Tono/Pulso
CARACTERÍSTICAS
2
34
1
5
Auricular del Teléfono
1. Conector para el Collar de
Mano Libres
2. Volumen del Microteléfono
3. Botón de Boost
4. Cojín del Dial
5. Botones de la Emergencia
6. Botón de Hablar
7. Botón de Canal
8. Botón de Memoria
9. Botón de Flash
10. Botón de Silencio
11. Botón para volver a marcar
12. Campanero del Microteléfono
13. Tono del Microteléfono
14. Clip de la Correa
15. Conector para el Equipo de
Manos Libres
16. Antena/Timbre Visual
10
1
2
3
5
6
7
8
9
11
12
13
14
4
15
16
CARACTERÍSTICAS
7
6
Page 19

36
37
4. Enchufe el adaptador en una toma de
corriente estándar (eléctrica) de 120V CA.
5. Alinee el soporte de montaje sobre la parte
de atrás de la base para que las patas de
hule negro estén hacia el fondo del teléfono.
Inserte las lengüetas del soporte en las
ranuras y asegure el soporte deslizándolo
hacia arriba.
6. Suba la base de la antena a una
posición vertical.
7. Coloque el interruptor TONO/PULSO
ubicado sobre la parte de atrás de la base
al modo correcto de marcado. Por favor
verifique con su Compañía de Teléfonos
local si no está seguro del tipo de servicio.
8. Coloque el auricular sobre la horquilla para
empezar la carga inicial.
INSTALACIÓN MONTADA SOBRE LA
PARED
PRECAUCI
ÓN: Desconecte el cable de línea tele-
fónica antes de conectar o desconectar el respaldo
de batería en el soporte de montaje de pared.
1. La unidad base puede ser montada sobre una
placa de pared estándar.
2. Conecte una punta del cable de línea telefónica
modular provisto en el enchufe marcado TEL
ubicado en la parte de atrás de la base
del teléfono.
3. Inserte el enchufe del Adaptador CA provisto
en el enchufe marcado 9V DC 400mA ubicado
en la parte de atrás de la base del teléfono.
4. Alinee el soporte de montaje sobre la parte de
atrás de la base para que las patas de hule negro
estén hacia el fondo del teléfono. Inserte las
lengüetas del soporte en las ranuras y asegure el
soporte deslizándolo hacia arriba.
9V DC
400 mA
TE
L
USE ONLY WITH CLASS
(CLASSE) 2 POWER SOURCE
Línea telefónica que
conecta cuerda
9V DC
400 mA
TEL
USE ONLY WITH CLASS
(CLASSE) 2 POWER SOURCE
Adaptador de la AC
Que conecta
PARA EMPEZAR
Para Elegir una Ubicaci
ón
1. Este teléfono requiere un enchufe de teléfono modular (RJ11C) y un enchufe estándar de pared de 120V CA
2. Conecte el adaptador de CA directamente en el enchufe.
3. No conecte otros dispositivos en el mismo enchufe o haga que el enchufe
esté controlado por un interruptor de pared.
4. Elija una ubicación que esté fuera del camino de las actividades normales.
PRECAUCI
ÓN: ÚSELO SOLAMENTE CON UNA FUENTE
DE PODER CLASE 2 DE 9V DE CD 400MA.
Siempre conecte el adaptador de CA al teléfono antes de conectarlo a la
energía de CA. Cuando termine, desconecte de la energía CA antes de desconectarlo del teléfono.
PARA CONECTAR SU TELÉFONO
Saque con cuidado su teléfono inalámbrico de la caja. Si hay algún daño visible,
no intente operar este equipo. Regréselo al lugar de compra. Revise para que
esté seguro de que tiene todos los artículos que vienen con su teléfono. Debe
tener un AURICULAR, UNA UNIDAD BASE, UNA BATERÍA, UN ADAPTADOR DE CORRIENTE AC, UN CABLE PARA TELÉFONO, UN CLIP PARA
CINTURÓN y UN MANUAL DEL PROPIETARIO.
Si en cualquier momento tiene preguntas sobre su teléfono por favor comuníquese con el Departamento de Servicio al Cliente al: 1-800-552-3368 o al
423-622-7793.
INSTALACIÓN SOBRE UNA MESA/ESCRITORIO
PRECAUCIÓN: Desconecte el cable de línea telefónica antes de conectar o
desconectar el respaldo de batería en el soporte de montaje de pared.
1. Conecte una punta del cable de línea telefónica modular provisto en el
enchufe marcado TEL ubicado en la parte de atrás de la base del teléfono
como se muestra en el diagrama.
2. Conecte la otra punta del cable de línea telefónica modular en un enchufe
modular de teléfono.
3. Inserte el enchufe del Adaptador CA provisto en el enchufe marcado 9V
DC 400mA ubicado en la parte de atrás de la base del teléfono.
Page 20

38
39
2. Después de que las baterías estén com pleta
mente cargadas, verifique el tono de marcado
presionando TALK (HABLAR) en el auricular.
Batería Baja
Cuando la batería del auricular esté baja, emitirá dos
(2) pitidos cada treinta (30) segundos. Si la batería
se baja cuando esté en una llamada, le desconectará
después de aproximadamente dos (2) minutos. Complete la llamada y recargue la batería. Para recargar el
paquete de baterías, coloque el auricular en la base.
1. Asegúrese de que los puntos de contacto
se toquen y que la luz LED de CARGA
esté encendida.
2. Tenga cuidado de no cortocircuitar la batería
con materiales conductivos como anillos,
pulseras y llaves.
Vida de la Batería
Una batería completamente cargada proporciona un
tiempo promedio para hablar de aproximadamente
cuatro (4) horas, o un tiempo de espera de aproxima
damente (8) días. El tiempo para hablar y el tiempo
de espera pueden variar dependiendo de las condiciones de operación.
Enchufe de los Audífonos
Usted puede usar este teléfono con manos libres
cuando instala unos audífonos de 2.5 mm (que se
compran por separado). Para instalarlos, conecte
los audífonos en el ENCHUFE DE AUDÍFONOS
(HEADSET JACK) en la parte superior del auricular.
Cuando está en modo de audífonos, el volumen del
auricular es controlado por el teléfono y el audífono
y el micrófono del auricular se desconectan.
Para Ordenar unos Audífonos
En caso de que quiera comprar unos audífonos para
su C4105, por favor comuníquese con Plantronics al
5. Conecte el cable corto telefónico modular en el enchufe de la placa de
pared, luego alinee las ranuras tipo ojo de cerradura del soporte de mon
taje con los tornillos y deslice la base del teléfono hacia abajo para asegurarla en la pared.
6. Enchufe el adaptador en una toma de corriente estándar (eléctrica) de
120V CA.
7. Presione y levante la lengüeta sujetadora del auricular, déle vuelta de
manera que la parte angosta se extienda hacia afuera y deslícela de nuevo
en la ranura. Esto sujetará el auricular en la horquilla cuando el teléfono
esté montado en la pared.
8. Levante la antena a una posición vertical.
9. Coloque el interruptor de Tono/Pulso ubicado al final de la base en el
modo correcto de marcado. Por favor verifique con su Compañía de Teléfo
-
nos local si no está seguro del tipo de servicio.
Nota: Recuerde, debe cargar el teléfono por al menos 12 horas antes de
usarlo por primera vez.
INSTALACI
ÓN DE LA BATERÍA
DEL MICROTELÉFONO
El C4105 usa una batería de célula recargable de 3.6Volt 600mAh NiMH (Tipo
AAA) que está incluida con su unidad.
La Batería del Auricular Debe Estar Conectada Antes de Comenzar la
Carga Inicial
Para conectar la batería, quite la cubierta del compartimiento de baterías y
conecte el enchufe del paquete de baterías en el conector de
baterías y reemplace la cubierta del compartimiento de baterías.
Para Instalar una Batería Nueva
1. Quite la cubierta de las baterías
2. Instale la nueva batería
3. Conecte el paquete de baterías
4. Reemplace la cubierta de las baterías
5 Cargue por 12 horas antes del primer uso
Carga de la Batería del Auricular
1. Coloque el auricular en la base. La luz LED de CARGA se iluminará ROJA.
Instalación y conex
-
ión de la batería
Nota:
La batería
en el auricular debe
cargarse completamente por 12 horas
completas antes de
usar el teléfono por
primera vez.
Tiempo De la Charla :
Cerca de 4 horas
Tiempo Espera :
Cerca de 8 días
Page 21

40
41
Interruptor del Tono
El ajustar el interruptor del TONO permite personalizar su experiencia auditiva.
Como todos tenemos diferentes preferencias auditivas le sugerimos explorar
cada configuración para encontrar la que sea más cómoda para usted.
Timbre del Auricular
Fije el interruptor marcado Timbre (Ringer) APAGADO/VIBRAR/ENCENDIDO
(OFF/VIBE/ON) ubicado a un lado del auricular. Cuando se selecciona VIBE el
auricular timbrará y vibrará cuando reciba una llamada entrante. El interruptor
del timbre debe estar puesto en ON o VIBE para que el auricular suene.
NOTA: Si tanto los timbres tanto del auricular como de la base están puestos
en OFF, el timbre visual destellará para indicar que hay una llamada entrante.
BASE DEL TEL
ÉFONO
Volumen del Timbre
Los ajustes del volumen de la base están ubicados sobre el lado de la base
del teléfono.
Presionando la tecla ARRIBA (UP) ( ) sobre la base aumenta el sonido del
timbre un nivel mientras que presionar la tecla ABAJO (DOWN) (
) reduce
el sonido un nivel. Hay un total de seis niveles desde el máximo hasta el mínimo.
El timbre sonará por dos (2) segundos mientras escoge el volumen del timbre,
para permitir que el usuario haga una elección.
Estilo del Timbre
Los ajustes del estilo del timbre de la base están ubicados sobre el lado de la
base del teléfono. El estilo del timbre puede ajustarse presionando el botón
ESTILO DEL TIMBRE (RING STYLE). Hay seis (6) estilos disponibles lo que le
permite personalizar su timbre. El timbre sonará por dos (2) segundos mientras
elige un estilo de timbre, para permitir al usuario hacer una elección.
Timbres Visuales
Los timbres visuales están ubicados tanto en la antena del auricular como en
la base del teléfono. Cuando se recibe una llamada entrante, estas luces destel
larán. El timbre visual del auricular también permanecerá encendido cuando el
teléfono esté en uso.
1-800-544-4660 para que le den una ubicación cercana a usted. Le recomendamos usar los audífonos Plantronics M110 o M130.
Clip para el Cinturón
Usted puede elegir usar el clip opcional con su auricular.
1. Para sujetarlo deslice el clip para el cinturón sobre los nodos. Presione las
pestañas en el clip en las ranuras para sujetar.
2. Para quitarlo, levante un lado del clip para el cinturón con la uña de su
dedo y empuje hacia atrás.
Compatibilidad con Auxiliar Auditivo
El auricular tiene una espiral especial adentro para asociar el sonido a los auxili
-
ares auditivos equipados con Interruptores T/Espirales T.
AURICULAR DEL TELÉFONO
Tecnología Clarity® Power
™
Con Clarity Power, los sonidos de alta frecuencia son amplificados más que los
sonidos de baja frecuencia así que las palabras no solo son más sonoras, sino
también más claras y fáciles de entender.
REALCE – Clarity Power Encendido/Apagado (On/Off )
El C4105 tiene un botón que controla el volumen del receptor. Una vez que se
presiona el botón REALCE (BOOST), un nivel extra de amplificación se agrega
sobre el registro completo del control de volumen.
El botón HABLAR (TALK) se iluminará ANARANJADO para indicar que la
función CLARITY POWER está activada.
ADVERTENCIA : Cuando el botón HABLAR está iluminado ANARANJADO
el volumen puede estar un nivel más alto. Para proteger el oído, baje el control
de volumen al mínimo antes de usarlo.
Control del Volumen
El disco controla el nivel de volumen que el auricular y los audífonos reciben. El
disco de volumen proporciona hasta 15 decibeles de volumen antes de que se
active el botón CLARITY POWER. Una vez que se presiona el botón CLARITY
POWER, el C4105 proporcionará hasta 40 decibeles de amplificación.
Page 22

42
43
Interruptor de REALCE (Boost) ENCENDIDO/APAGADO (On/Off)
Este interruptor inhabilitará la función de volver
a poner la función del botón de REALCE Clarity
Power de la siguiente manera:
ON (ENCENDIDO) – Cuando el interruptor
BOOST ON/OFF está en la posición ON, la función
Boost estará ENCENDIDA cada vez que inicie una
llamada, y volverá por defecto a ENCENDIDO cada
vez que se cuelgue el teléfono. Durante una llamada, el botón de BOOST Clarity Power puede intercambiar la función Clarity Power entre ENCENDIDO o
APAGADO según las necesidades del usuario.
OFF (APAGADO) – Cuando el interruptor BOOST ON/OFF está en la
posición de OFF, la función Boost estará APAGADA cada vez que inicie una
llamada, y el usuario tendrá que presionar el botón BOOST Clarity Power para
ganar el nivel extra de amplificación. Si el teléfono se cuelga, el Clarity Power
volverá a ponerse en APAGADO. Durante una llamada, el botón BOOST Clarity Power puede intercambiar la función Clarity Power entre ENCENDIDO o
APAGADO de acuerdo a las necesidades del usuario.
PRECAUCIÓN: EL VOLUMEN ESTARÁ FUERTE CUAN
DO EL INTERRUPTOR BOOST ESTÉ EN POSICIÓN “ON”
Pulso/Tono
Deslice el interruptor al tipo de servicio telefónico que tenga. TONO para
servicio de tonos o PULSO para marcado de disco. Por favor verifique con su
compañía de teléfonos local si no está seguro del tipo de servicio.
Flash
El botón FLASH se activa para usar servicios de llamada personalizados como
Llamada en Espera o Tres a la Vez. Por favor comuníquese con su compañía local
de teléfonos para información sobre estos servicios.
Silenciador (Mute)
El botón SILENCIADOR (MUTE) permite al usuario llevar a cabo una conver
sación privada que no quiere que la persona al otro lado del teléfono escuche.
Mientras esté en modo Silenciado, el botón MUTE se iluminará ROJO y el micrófono del auricular estará inhabilitado. El presionar el botón MUTE de nuevo
desactivará la función de MUTE.
Remarcar/Pausa
Presione el botón Remarcar/Pausa (RD/P) para volver a marcar el último número marcado. El presionar el botón RD/P mientras guarda un número telefónico
insertará una pausa de cuatro (4) segundos. Esto es usado comúnmente cuando
se guarda el número telefónico y el número de extensión o de NIP (PIN).
Respaldo de Batería
El instalar cuatro(4) baterías alcalinas AA en el soporte de montaje del escritorio/pared sujeto a la base del teléfono le ofrecerá una cantidad limitada de
tiempo para continuar operando su teléfono en caso de una falla eléctrica.
Para Instalar las Baterías del Respaldo de Baterías
1. Desconecte el cable de la línea telefónica y quite el soporte de escritorio/
pared de la base del teléfono.
2. Desconecte el conector del respaldo de batería de la base del teléfono.
3. Instale cuatro (4) baterías alcalinas AA con la punta negativa (-) de la bat
-
ería tocando el resorte.
4. Conecte el conector del respaldo de batería a la terminal en el fondo de la
base del teléfono.
5. Instale el soporte de escritorio/pared en la base del teléfono.
Para Reemplazar las Baterías del Respaldo de Baterías
1. Desconecte el cable de la línea telefónica y quite el soporte de escritorio/
pared de la base del teléfono.
2. Desconecte el conector del respaldo de batería de la base del teléfono.
3. Quite las baterías del soporte de escritorio/pared.
4. Instale cuatro (4) baterías alcalinas AA con la punta negativa (-) de la bat
-
ería tocando el resorte.
5. Conecte el conector del respaldo de batería a la terminal en el fondo de la
base del teléfono.
6. Instale el soporte de escritorio/pared en la base del teléfono.
Alza Encendido:
El
botón de la charla
es ANARANJADO
Alza Apagado:
El
botón de la charla
es VERDE
Page 23

44
45
Para usar esta función:
1. Presione el botón TALK.
2. Cuando escuche el tono de marcado, presione el botón REMARCADO/
PAUSA (RD/P).
3. El teléfono marcará automáticamente por usted.
Función de Pausa
El programar una pausa hará que el teléfono espere cuatro (4) segundos antes
de marcar números adicionales. Esta función puede ser usada cuando es nec
esario marcar un código de acceso (9, por ejemplo) y esperar por un segundo
tono de marcado antes de que pueda marcar un número externo. Presione el
botón RD/P en el punto requerido durante el proceso de almacenamiento en la
memoria para programar una pausa.
Tono Temporal
Si tiene un servicio de marcado rotatorio (de pulso), usted puede cambiar de
pulso a tono de toque durante una llamada.
1. Haga la llamada telefónica y espere hasta que esté conectado.
2. Presione la tecla *. Las teclas que se presionen después de esto se envían
como señales de tono.
3. El teléfono se volverá a configurar automáticamente al servicio de marcado
rotatorio (de pulso) cuando la llamada termine.
Teclado Luminoso
El teclado se iluminará por 15 segundos después de remover el auricular de la
base. Para reactivar la función mientras esté en espera, presione el botón TALK
o el botón MEMORIA (MEM). Para activarla cuando el teléfono está en uso
presione cualquier tecla.
Llamado/Localizador del Auricular
Para enviar una señal de llamada desde la base hasta el auricular, presione el
botón LLAMADA (PAGE) ubicado sobre la base del teléfono. Una serie de tim
-
bres sonarán desde el auricular.
Para localizar el auricular si está lejos de la base, presione y mantenga presionado el botón PAGE por aproximadamente cinco (5) segundos. Una serie de
timbres sonarán. Regrese el auricular a la base o presione cualquier botón para
cancelar la localización.
Después de instalar las cuatro (4) baterías alcalinas AA por favor consulte la
siguiente tabla:
Suministro de Status de corriente LED corriente
Adaptador CA y buenas baterías Verde fijo
Adaptador CA sin baterías Rojo fijo
Adaptador CA y malas baterías Verde y rojo parpadeantes
Falla eléctrica y buenas baterías Rojo parpadeando lento
Falla eléctrica y malas baterías Rojo parpadeando rápido
OPER ACIONES DEL TELÉFONO
Para hacer una llamada
1. Presione el botón HABLAR (TALK ) (el botón TALK se iluminará verde) y
marque el número al que desea llamar.
2. Para finalizar la llamada presione el botón TALK o coloque el auricular en
la base.
Para responder a una Llamada
Si el auricular está fuera de la horquilla, presione el botón TALK.
Si el auricular está en la horquilla, simplemente levante el auricular
para contestar.
Note: Consulte el REALCE (BOOST) Clarity Power y el Control de Volumen
para información sobre el ajuste de los controles de volumen en las páginas 13
a la 51.
Remarcado del Último Número
El ultimo número marcado (de hasta 32 dígitos) se almacena en la memoria de
remarcado hasta que se marca otro número.
Page 24

46
47
Operación de Canal
El teléfono inalámbrico C4105 automáticamente busca y selecciona el más claro
de 40 canales cuando está siendo utilizado. Si se desarrolla interferencia en la
línea, el presionar este botón lo moverá a otro canal.
Código de Seguridad
El código de seguridad evita que se pueda acceder a sus conversaciones en el
teléfono inalámbrico por un teléfono en una línea diferente. Una vez que la
batería del auricular está completamente cargada, el auricular automáticamente
seleccionará el código de entre más de 65,000 combinaciones diferentes. El
código es cambiado cada vez que el teléfono es colocado en la horquilla. Si
tiene problemas para hacer o recibir llamadas un código de seguridad perdido
puede ser la causa del problema. Cuando esto ocurre, el auricular ya no puede
comunicarse con la base.
ALMACENAMIENTO DE MEMORIA
El C4105 tiene diez (10) ubicaciones de memoria indirecta o de dos tonos
en el auricular del teléfono (del 0 al 9) que pueden programarse para marcar
números a los que se llama frecuentemente de hasta 16 dígitos.
Agregar una Ubicación en la Memoria
1. La unidad debe estar solamente en modo de espera.
2. Presione el botón MEM.
3. Ingrese el número de teléfono que quiere almacenar.
4. Presione el botón MEM.
5. Presione el número en el teclado de marcado en el que quiere almacenar
el número.
6. Un pitido largo indicará que el proceso de programación está completo.
Durante el proceso de almacenamiento de memoria el botón TALK
parpadeará VERDE.
Use el botón RD/P mientras ingresa el número de teléfono para insertar una
pausa. Consulte la sección de Función de Pausa en la página 57.
Para Marcar una Ubicación de la Memoria
1. Presione el botón TALK.
2. Presione el botón MEM.
3. Presione el número en el teclado numérico donde el número deseado ha
sido almacenado.
4. La llamada se marcará automáticamente.
Para Agregar un Número de EMERGENCIA
1. La unidad debe estar solamente en modo de espera.
2. Presione el botón MEM.
3. Anote el número de teléfono que desea almacenar.
4. Presione el botón MEM.
5. Presione el botón de emergencia sobre el teclado de marcado en el que
desea almacenar el número.
6. Un pitido largo indicará que el proceso de programación está completo.
Para marcar un Número de Emergencia
1. Presione el botón TALK.
2. Presione la tecla de EMERGENCIA a la que desea llamar.
MANTENIMIENTO Y CUIDADO
El C4105 ha sido diseñado para darle años de servicio confiable con un mínimo
de cuidado Para asegurar el mejor desempeño posible, siga estas pautas para
cuidar la unidad:
1. Evite dejar caer o golpear la unidad.
2. Sacuda la unidad regularmente. Limpie la unidad con un trapo
suave húmedo.
3. No use detergentes y evite el exceso de humedad.
4. El C4105 es un dispositivo eléctrico. Evite un choque eléctrico mantenien
-
do el teléfono lejos del agua (Ej. baños, lavaplatos de la cocina, etc.)
Page 25

48
49
LOCALIZACI
ÓN DE FALLAS
La unidad no opera/no da tono de marcado:
• Verifique que el botón TALK esté encendido.
• Verifique que el Adaptador CA esté enchufado de manera segura en la toma
de corriente CA, la base y el teléfono.
• Verifique que el cable de la línea telefónica esté conectado de manera segura
en el enchufe de la pared y en el teléfono.
• Asegúrese de que la antena de la base esté en una posición vertical.
• Asegúrese de que la batería del auricular esté completamente cargada.
• Verifique que el teléfono esté en el modo de
marcado correcto, tono (toque) o pulso (rotario).
• Asegúrese de estar en el ámbito usable de la estación base.
• Renueve el código de seguridad colocando el auricular en la base por entre 5
y 10 segundos.
El teléfono no suena cuando recibe una llamada:
• Asegúrese de que el interruptor RINGER en el auricular y la base estén
en ON.
• Verifique que el adaptador esté conectado de manera segura en una toma
corriente CA, en la base y el teléfono.
• Verifique que el cable de la línea telefónica esté conectado de manera segura
al enchufe de la pared y al teléfono.
• Asegúrese de estar en el ámbito usable de la estación base.
• Usted puede tener demasiadas extensiones en su línea. Trate de
desconectar algunas.
Ruido, Estática, Se Oyen Otras Llamadas mientras se Usa
el Auricular:
• Trate de cambiar canales.
• Asegúrese de que la antena de la base esté en posición vertical.
• Asegúrese de que está en el ámbito usable de la estación base.
• Asegúrese de que la batería del auricular está completamente cargada.
• Intente reubicar la base a otra ubicación.
• Asegúrese de que el Adaptador CA no esté conectado en la toma de cor-
riente con otros aparatos.
El Teléfono no Se Mantiene Cargado:
• Asegúrese de que los contactos de carga sobre el auricular estén libres de
polvo y mugre. Limpie los contactos con un trapo suave.
• Asegúrese de que la luz de CARGA LED (CHARGE LED) sobre la base esté
encendida cuando el teléfono esté en la horquilla.
• Si es necesario, reemplace la batería del auricular. (Ver Carga de la Batería
del Auricular)
Dificultad para Hacer o Recibir Llamadas:
• Acérquese a la base e inténtelo de nuevo.
• Si el acercarse no funciona, usted puede haber perdido el código
de seguridad.
• Renueve el código colocando el auricular otra vez en la base por entre 5 y 10
segundos. (Vea la Sección de Código de Seguridad)
• Asegúrese de haber seleccionado el modo correcto de marcado, tono
o pulso.
• Asegúrese de que el Adaptador CA no esté conectado en una toma de cor-
riente junto con otros aparatos. Desconéctelo por entre 5 a 10 segundos y
luego vuélvalo a conectar. Colo que el auricular de regreso en la base y vuelva
a insertar el Adaptador CA.
• Asegúrese de que la batería del auricular esté totalmente cargada.
Page 26

50
51
antado para que usted pueda hacer las modificaciones necesarias para mantener
el servicio sin interrupciones.
f) Si se experimentan problemas con este equipo telefónico, para información
sobre la reparación o garantía, por favor póngase en contacto con Clarity, al
1-800-552-3368. Si el equipo está causando daños a la red telefónica, la compañía de teléfonos puede solicitar que usted desconecte el equipo hasta que el
problema sea resuelto.
g) Este equipo de teléfono no está destinado para ser reparado y no contiene
partes reparables. El abrir el equipo o cualquier intento de hacer reparaciones
anulará la garantía. Para servicio o reparaciones, llame al 1-800-552-3368.
h) La conexión a servicios de línea colectiva está sujeta a tarifas estatales. Póngase en contacto con la comisión de servicios públicos estatales, la comisión del
servicio público o la comisión corporativa para información.
i) Si su casa tiene un equipo de alarma especialmente cableado conectado a
la línea de teléfono, asegúrese que la instalación de este equipo telefónico no
inhabilite su equipo de alarma. Si tiene alguna pregunta sobre lo que deshabilitaría el equipo de alarma, consulte a su compañía de teléfonos o a un instalador
calificado.
j) Este equipo telefónico es compatible con los auxiliares auditivos.
Teléfonos de Monedas/Tarjeta de Crédito Propiedad del Cliente:
Para cumplir con las tarifas estatales, la compañía de teléfonos debe ser notificada antes de la conexión. En algunos estados, la comisión de servicios públicos
estatales, la comisión del servicio público o la comisión corporativa deben dar
aprobación previa de conexión.
Información sobre la Parte 15 de las Reglas FCC (Comisión Federal
de Comunicaciones de EE.UU. por sus siglas en inglés)
Este dispositivo cumple con la Parte 15 de las Reglas FCC. La operación está
sujeta a las siguientes dos condiciones: (1) Este dispositivo no puede causar interferencia perjudicial, y (2) este dispositivo debe aceptar cualquier interferencia
recibida, incluyendo interferencia que pudiera causar operación no deseada.
Su equipo fue probado y se comprobó que cumple con los límites para un
dispositivo digital Clase B, de acuerdo con la Parte 15 de las normas de la FCC
(Comisión Federal de Comunicaciones). Estos límites están diseñados para
Información sobre la Parte 68 de las Reglas FCC (Comisión Federal
de Comunicaciones de EE.UU. por sus siglas en inglés)
a) Este equipo cumple con la Parte 68 de las reglas FCC y con los requerimientos adoptados por la ACTA (Asociación Americana de Prestadores de Servicios
de Telecomunicaciones por sus siglas en inglés) En la parte de abajo de este
equipo hay una etiqueta que contiene, entre otra información, un identificador
del producto en formato de EE.UU.: AAAEQ##TXXXX. Si se solicita, este
número debe ser proporcionado a la compañía de teléfonos.
b) Una clavija y enchufe usados para conectar este equipo al alambrado del local y red telefónica deben cumplir con las reglas aplicables de la FCC Parte 68 y
con los requerimientos adoptados por el ACTA. Un cable telefónico y enchufe
modular que cumplen, RJ11C, se proporcionan con este producto. Está diseñado para ser conectado a un enchufe modular compatible que también cumpla.
Para más detalles, vea las instrucciones de instalación.
c) Se usa el REN (Número de Equivalencia de Timbre) para determinar el
número de dispositivos que pueden ser conectadas a una línea telefónica.
Demasiados RENs en una línea telefónica podrían provocar que los dispositivos
no suenen en respuesta a una llamada entrante. En la mayoría pero no en todas
las áreas, el total de RENs no debe superar los cinco (5.0). Para estar seguro
de la cantidad de dispositivos que pueden estar conectados a la línea, como lo
determinan los RENs totales, póngase en contacto con la compañía de teléfonos local. Para los productos aprobados después de Julio 23 de 2001, el REN
para este producto es parte del identificador de producto que tiene el formato
de los EE.UU.: AAAEQ##TXXXX.
Los dígitos representados por ## son el REN sin un punto decimal (por Ej. 03
es un REN de 0.3). Para productos anteriores, el REN se muestra separadamente en la etiqueta.
d) Si este equipo telefónico causa daños a la red telefónica, la compañía de
teléfonos le notificará por adelantado que una suspensión temporal del servicio
puede ser necesaria. Pero si el aviso por adelantado no es práctico, la compañía
de teléfonos le notificará al cliente tan pronto como sea posible. También, se le
asesorará de su derecho de presentar una queja con la FCC si usted lo
cree necesario.
e) La compañía de teléfonos puede realizar cambios en sus instalaciones, equipos, operaciones o procedimientos que podrían afectar el funcionamiento del
equipo. Si esto sucede, la compañía de teléfonos proporcionará aviso por adel-
CUMPLIMIENTO CON LOS REGLAMENTOS CUMPLIMIENTO CON LOS REGLAMENTOS
Page 27

52
53
Cualquier reparación o alteración del equipo realizada por el usuario, o el mal
funcionamiento del equipo, pueden dar motivo a la compañía de telecomunica
-
ciones para solicitar al usuario que desconecte el equipo.
Los usuarios deben asegurarse, para su propia protección, de que las conexiones eléctricas a tierra del suministro de energía pública, las líneas telefónicas y
los sistemas metálicos de cañería de agua internos, si los hubiera, estén conectados conjuntamente. Esta precaución puede ser especialmente importante en
áreas rurales.
PRECAUCIÓN: Los usuarios no deben intentar hacer tales conexiones por
sí mismos, sino que deben ponerse en contacto con la autoridad de inspección
eléctrica apropiada, o electricista, según sea apropiado.
El Número de Equivalencia de Timbre es un indicativo del número máximo de
terminales que se permite sean conectadas a una interfaz telefónica. La terminación en una interfaz puede constar de cualquier combinación de dispositivos,
lo que está sujeto sólo al requisito de que la suma de todos los Números de
Equivalencia de Timbres de todos los dispositivos no sea superior a cinco.
(El término “IC”: antes del número de certificación/registro solo significa que las
especificaciones técnicas de Industry Canada fueron cubiertas.)
La parte responsable para el cumplimiento
reglamentario:
Clarity, Una División de Plantronics, Inc.
4289 Bonny Oaks Drive, Suite 106
Chattanooga, TN 37406
Teléfono: 1-800-552-3368
ofrecer una protección razonable contra la interferencia perjudicial en una
instalación residencial.
Este equipo genera, utiliza y puede irradiar energía de radiofrecuencia y, si no se
instala y se utiliza de acuerdo con las instrucciones, puede producir interferen
cia perjudicial en las comunicaciones radiales. Sin embargo, no hay garantía de
que no ocurrirá interferencia en una instalación particular; si este equipo causa
interferencia perjudicial a la recepción de radio o televisión, la cual puede determinarse apagando y encendiendo el equipo, se le anima a que trate de corregir
la interferencia con una de las siguientes medidas:
1. Donde pueda hacerse con seguridad, reoriente la antena receptora de
televisión o radio.
2. En la medida de lo posible, reubique la televisión, el radio u otro receptor
con respecto al equipo telefónico. (Esto aumenta la separación entre el
equipo telefónico y el receptor.)
3. Conecte el equipo telefónico a un enchufe o circuito diferente de aquel al
que la tele visión, el radio u otro receptor está conectado.
4. Consulte al distribuidor o a un técnico de radio/televisión experimentado
para que le ayuden.
PRECAUCIÓN: Los cambios o modificaciones no aprobados expresamente
por el fabricante responsable del cumplimiento pudieran anular la autoridad del
usuario de operar el equipo.
Especificaciones Técnicas de Industry Canada
Este producto cumple con las especificaciones técnicas aplicables de
Industry Canada
Antes de instalar este equipo, los usuarios deben asegurarse de que está per
mitido conectarlo en las instalaciones de la compañía local de telecomunicaciones. Además el equipo debe instalarse con un método de conexión aceptado. En
algunos casos, el cableado interior de la compañía asociado con un servicio individual de línea sencilla puede ser extendido por medio de un ensamble conector certificado (cable de extensión telefónica). El cliente debe estar consciente
de que el cumplimiento de las condiciones mencionadas anteriormente quizás
no evite el deterioro del servicio en algunas situaciones. Las reparaciones al
equipo certificado deben ser llevadas a cabo por un servicio de mantenimiento
canadiense autorizado designado por el proveedor.
CUMPLIMIENTO CON LOS REGLAMENTOS CUMPLIMIENTO CON LOS REGLAMENTOS
Page 28

54
55
de tiempo o inconveniencia incidentales. Algunos estados no permiten exclusión
o limitación de daños incidentales o consecuenciales así que la limitación o
exclusión anterior puede no ser aplicable para usted.
Otros Derechos Legales
Esta garantía le da derechos legales específicos y usted puede tener también
otros derechos los cuales varían de estado a estado.
Como Obtener el Servicio de Garantía
Para obtener el servicio de garantía, por favor prepague el envío y regreso de la
unidad a la instalación apropiada listada abajo.
En los Estados Unidos
Centro de Servicio Clarity
(Clarity Service Center)
4289 Bonny Oaks Drive, Suite 106
Chattanooga, Tennessee 37406
Tel: (423) 622-7793 u (800) 426-3738
Fax: (423) 622-7646 u (800) 325-8871
En Canadá
Plantronics Service Center
8112 Trans-Canada Hwy.
Ville St. Laurent, Que.
H4S 1M5 Canada
Tel: (800) 540-8363 u (514) 956-8363
Fax: (514) 956-1825
La siguiente información de garantía y servicio solamente es aplicable a productos comprados y usados en los EE.UU y Canadá. Para información de garantía
en otros países, por favor póngase en contacto con su vendedor o
distribuidor locales.
Garantía Limitada
Clarity, una división de Plantronics, Inc. (“Clarity”) garantiza al comprador
consumidor original que, excepto por las limitaciones y exclusiones presentadas
para consideración abajo, que este producto debe estar libre de defectos en
materiales y mano de obra por un período de un (1) año de la fecha de la compra original (“Período de Garantía”). La obligación de Clarity bajo esta garantía
deberá ser a la opción de Clarity, sin cargo, de cualquier parte o unidad que
pruebe ser defectuosa en material o mano de obra durante el Período
de Garantía.
Exclusiones de la Garantía
Esta garantía solamente es aplicable a defectos en materiales de fabricación y
mano de obra de fábrica.
Cualquier condición causada por accidente, abuso, mal uso u operación inapropiada, infracción de las instrucciones provistas por Clarity, destrucción o
alteración, voltajes o corrientes eléctricas inapropiadas o reparación o mantenimiento intentado por alguien más que Clarity o un centro de servicio autorizador no es un defecto cubierto por esta garantía. Las compañías telefónicas
fabrican diferentes tipos de equipo y Clarity no garantiza que este equipo sea
compatible con el equipo de una compañía telefónica particular.
Garantías Implícitas
Bajo la ley estatal, usted puede estar calificado para el beneficio de ciertas
garantías implícitas. Estas garantías implícitas continuarán en vigor solamente
durante el período de garantía. Algunos estados permiten limitaciones sobre
el tiempo que dura una garantía implícita, así que las limitaciones anteriores
pueden no ser aplicables para usted.
Daños Incidentales o Consecuenciales
Ni Clarity ni su vendedor de menudeo o distribuidor de ventas tienen responsabilidad alguna por cualesquier daños incidentales o consecuenciales incluyendo sin limitación, pérdida o ganancia comercial, o por cualesquier gastos, pérdida
GARANTÍA Y SERVICIO GARANTÍA Y SERVICIO
Page 29

56
57
Por favor use el contenedor original, o empaque la(s) unidad(es) en un cartón
firme con suficiente material de empaque para prevenir daño.
Incluya la siguiente información:
1. Una prueba de compra indicando el número de modelo y la fecha
de compra.
2. Dirección de facturación.
3. Dirección de envío.
4. Número y descripción de las unidades enviadas.
5. Nombre y número telefónico de la persona a llamar, si fuera necesario pon
-
erse en contacto.
6. Razón para la devolución y descripción del problema.
El daño ocurrido durante el envío se considera responsabilidad del transpor
-
tista, y las reclamaciones deben hacerse directamente con el transportista.
GARANTÍA Y SERVICIO
Page 30

58
F
R
A
N
Ç
A
I
S
Téléphone sans fil 2.4 GHz
Avec la technologie Clarity® Power
™
Guide d’utilisateur C4105
™
Page 31

61
CONSERVEZ CES INSTRUCTIONS
Instructions De Sûreté Importantes ..............................61
Dispositifs ............................................................................64
Choix d’un Endroit ............................................................66
Installation De Téléphone .................................................66
Batterie De Combiné ........................................................68
Dispositifs De Combiné De Téléphone ........................ 69
Dispositifs Bas De Téléphone ..........................................71
Utilisation De Votre Téléphone ....................................... 74
Stockage De Mémoire ....................................................... 76
Soin et Entretien .................................................................77
Dépannage ...........................................................................78
Conformité Réglementaire ..............................................80
Garantie et service ............................................................ 84
TABLE DE MATIÈRES
Lorsque vous utilisez votre appareil téléphonique, observez ces quelques
mesures de base afin de réduire les risques d’incendie,d’électrocution et de
blessures corporelles :
1. Lisez et comprenez bien toutes les instructions.
2. Vous devez respecter les avertissements et instructions inscrits
sur l’appareil.
3. N’utilisez pas cet appareil près de l’eau ni près des endroits humides; par
exemple, près d’une baignoire, lavabo, évier de cuisine ou cuve de lavage,
dans un sous-sol humide ni près d’une piscine.
4. Evitez de vous servir d’un téléphone (autre qu’un téléphone sans fil) lors
d’un orage électrique. Les éclairs peuvent traverser le filage de votre mai
-
son et causer des chocs éléctriques.
5. N’utilisez pas le téléphone pour rapporter une fuite de gaz, surtout si vous
vous trouvez près de la fuite.
6. Débranchez le téléphone du mur avant de le nettoyer. Ne vous servez
jamais de nettoyant liquide ou aérosol pour nettoyer le téléphone. Servez
vous d’un chiffon doux.
7. Installez le téléphone sur une surface stable. De sérieux dommages ou bles
-
sures peuvent résulter d’une chute du téléphone.
8. Ne bloquez sous aucun prétexte les trous et ouvertures du Ne placez pas
cet appareil près ou par-dessus des systèmes de chauffage ni des plinthes
électriques. De plus, ne placez pas l’appareil dans une étagère ou une biblio
-
thèque avant de vous assurer qu’il y ait une bonne ciculation d’air.
9. Ne faites fonctionner cet appareil qu’avec le type d’alimentation indiqué
sur l’étiquette ou dans le guide d’utilisation. Si vous n’êtes pas certain du
type de tension de votre maison, communiquez avec votre marchand ou le
fournisseur en électricité de votre région.
10. Vous devez acheminer les fils d’alimentation de façon à ce qu’ils ne soient
pas pincés ni écrasés par des objets placés par-dessus ou quelqu’un qui
pourrait marcher dessus.
11. Ne surchargez pas les prises de courant ni les rallonge car il y a risque
d’incendie ou d’électrocution.
12. N’insérez jamais d’objets dans les ouvertures de cet appareil car ils pour
raient entrer en contact avec des points de tension dangereux ou courtcircuiter des pièces, pouvant résulter en un incendie ou un choc électrique.
INSTRUCTIONS DE SÛRETÉ IMPORTANTES
Page 32

62
63
Faites attention de ne jamais renverser du liquide à travers les ouvertures
d’aération du boîtier.
13. Afin de réduire les risques d’électrocution, ne tentez jamais de réparer
vous-même cet appareil. Le fait d’ouvrir le couvercle de celui-ci pourrait
vous exposer à des tensions néfastes ou autres dangers similaires. Un
remontage inadéquat peut être la cause d’électrocution lorsque vous
utiliserez l’appareil par la suite.
14. Débranchez l’appareil et consultez un technicien qualifié dans les
cas suivant :
A. Lorsque le cordon d’alimentation CA est endommagé ou dénudé
B. Si vous avez renversé du liquide dans l’appareil.
C. Si l’appareil a été laissé sous la pluie ou échappé dans l’eau.
D. Si l’appareil ne fonctionne pas normalement en suivant les instructions.
Ajustez que les commandes décrites dans le guide d’utilisation car un mauvais ajustement des commandes inaccessibles peut endommager l’appareil,
ce qui demanderait un travail plus substantiel de la part du technicien qui
devra remettre l’appareil à l’état neuf.
E. Si l’appareil a été échappé ou le boîtier, endommagé.
F. Si l’appareil démontre une nette diminution de sa performance.
15. N’installez jamais de filage électrique lors d’un orage électrique.
16. N’installez jamais des jacks téléphonique dans des endroits humides, sauf
dans les cas où l’équipement l’ai désigné.
17. Ne touchez jamais les fils téléphonique non-insulés ou les terminaux, sauf
dans les cas où la ligne téléphonique a été débranché au niveau
de l’ interface.
18. Soyez prudent en installant ou modifiant les fils téléphoniques.
19. N’utilisez que le type et le format de bloc-piles et fil téléphonique mention
né dans ce guide d’utilisation. Ne jetez pas le bloc-piles au feu. Les cellules
pourraient exploser. Consultez l’encart décrivant la marche à suivre pour
disposer adéquatement des bloc-piles.
20. Branchez l’adaptateur CA dans la prise téléphonique la plus proche
du téléphone.
CONSERVEZ CES INSTRUCTIONS
Consignes de sécurité des piles
Mise en garde : Risque d’explosion si la pile est remplacée par un type de pile
inapproprié se débarrasser des piles usagées selon les consignes.
1. N’utiliser que la pile approuvée dans le combiné de votre téléphone sans fil.
Pour le combiné : 3,6V 600mAHr Pile rechargeable NiMH
Pile Sanik Co, Ltée 3SNAAA60HSJ1
GPI International Ltée. : GP60AAAH3BMJZ
Pour le socle : Quatre (4) piles alcalines AA
2. Ne jetez pas la pile dans le feu car elle pourrait exploser. Vérifiez avec
l’indicatif local pour des instructions spéciales sur la façon de disposer des
piles.
3. N’ouvrez pas ou n’abîmez pas la pile. L’électrolyte libéré est corrosif et
peut causer des dommages aux yeux et à la peau. Peut être toxique si avalé.
4. Usez de prudence en manipulant les piles afin de ne pas court-circuiter la
pile avec des matériaux conducteurs tels que les bagues, les bracelets et les
clés. La pile ou le matériau conducteur peut surchauffer et causer
des brûlures.
5. Chargez la/les pile (s) fournie (s) ou identifiée (s) uniquement pour utilisa
tion avec cet appareil selon les directives et restrictions spécifiées dans
ce guide.
6. Observez l’orientation appropriée de la polarité entre la pile et le chargeur
de pile.
INSTRUCTIONS DE SÛRETÉ IMPORTANTESINSTRUCTIONS DE SÛRETÉ IMPORTANTES
CONSERVEZ CES INSTRUCTIONS
Page 33

64
65
DISPOSITIFS
Socle du Téléphone
1. Page de Combiné
2. Volume de Sonnerie
3. Modèle de Sonnerie
4. Marche/Arrêt de Sonnerie
5. Antenne/Sonnerie Visuelle
6. Marche/Arrêt de Boost
7. Impulsion/Tonalité
2
34
1
5
DISPOSITIFS
Combiné du Téléphone
1. Prise pour Cordelette
2. Volume de Combiné
3. Touche Amplification
4. Clavier
5. Boutons de Secours
6. Touche Parler
7. Touche Canal
8. Touche Mémoire
9. Touche Flash
10. Touche Discrétion
11. Touche Recomposition
12. Sonnerie de Combiné
13. Tonalité de Combiné
14. Agrafe de Ceinture
15. Prise pour Écouteurs
16. Antenne/Sonnerie Visuelle
10
1
2
3
5
6
7
8
9
11
12
13
14
4
15
16
7
6
Page 34

66
67
5. Alignez le support de fixation au dos du socle
afin que les supports de caoutchouc noir soient
vers le fond du téléphone. Insérez les languettes
du support dans les fentes et fixez le support en
le glissant vers le haut.
6. Soulevez l’antenne du socle en position verticale.
7. Réglez le commutateur TONALITÉ/IMPULSION
situé à l’arrière du poste de base pour corriger
le mode de composition.Vérifiez avec votre
compagnie de téléphone locale si vous n’êtes pas
certain du genre de service.
8. Placez le combiné dans le berceau pour débuter
la charge initiale.
INSTALLATION MUR ALE
MISE EN GARDE
: Débranchez le cordon de
la ligne téléphonique avant de brancher ou
débrancher la pile de secours dans le support mural
de fixation.
Le téléphone peut être monté sur une plaque
murale standard.
1. Branchez une extrémité de la ligne téléphonique modulaire dans la prise marquée TEL
située à l’arrière du poste de téléphone.
2. Insérez la fiche de l’adaptateur CA dans la prise
marquée 9 V DC 400mA située à l’arrière du
poste de téléphone.
3. Alignez le support de fixation au dos du socle
afin que les supports de caoutchouc noir soient
vers le fond du téléphone. Insérez les languettes
du support dans les fentes et fixez le support en
le glissant vers le haut.
4. Branchez le cordon court de la ligne télépho
nique modulaire dans la prise de la plaque
murale, et alignez les trous piriformes du support
avec les goujons de la plaque murale et glissez le
poste de téléphone vers le bas pour le fixer
au mur.
9V DC
400 mA
TE
L
USE ONLY WITH CLASS
(CLASSE) 2 POWER SOURCE
Ligne téléphonique
se reliante corde
9V DC
400 mA
TEL
USE ONLY WITH CLASS
(CLASSE) 2 POWER SOURCE
Adaptador de la AC
Que conecta
ÉTAPES DE DÉMARRAGE
Choix d’un emplacement
1. Ce téléphone nécessite une prise téléphonique modulaire (RJ11C) et une
prise murale standard 120V CA.
2. Branchez l’adaptateur CA directement dans la prise.
3. Ne branchez pas d’autres appareils dans la même prise soit reliée à un
commutateur mural.
4. Choisissez un endroit éloigné des activités normales.
MISE EN GARDE
: N’UTILISEZ QU’AVEC UNE SOURCE
D’ÉNERGIE DE CLASSE 2 9V DC, 400MA.
Branchez toujours l’adaptateur CA au téléphone avant de le connecter à
l’alimentation CA. Quand vous aurez terminé, débranchez l’alimentation CA
avant de déconnecter du téléphone.
BRANCHEMENT DE VOTRE TÉLÉPHONE
Retirez soigneusement votre téléphone sans fil de son emballage. S’il y a des
dommages apparents, ne tentez pas de faire fonctionner cet appareil. Retournez-le à son point de vente. Assurez-vous d’avoir tous les articles offerts
avec votre téléphone. Vous devriez avoir un COMBINÉ, UN BLOC DE BASE,
UNE PILE, UN ADAPTATEUR CS, UN CORDON DE LIGNE TÉLÉPHONIQUE,
UN ATTACHE-CEINTURE, et un GUIDE D’UTILISATION.
Si vous avez des questions à propos de votre téléphone, veuillez contacter
notre service à la clientèle au : 1 800-552-3368 ou 423 622-7793.
INSTALLATION DE TABLE/BUREAU
MISE EN GARDE : Débranchez le cordon de la ligne téléphonique avant de
brancher ou débrancher la pile de secours dans le support mural de fixation.
1. Branchez une extrémité de la ligne téléphonique modulaire dans la prise
marquée TEL situés à l’arrière du socle de téléphone, tel qu’illustré dans
le schéma.
2. Branchez l’autre extrémité de la ligne téléphonique modulaire dans une
prise téléphonique modulaire.
3. Insérez la fiche de l’adaptateur CA dans la prise marquée 9 V DC 400mA
située à l’arrière du poste de téléphone.
4. Branchez l’adaptateur CA dans une prise électrique standard 120 V CA.
Page 35

68
69
Charge de la batterie du combiné
1. Placez le combiné dans le socle. Le VOYANT DEL sur le socle s’allumera
en ROUGE.
2. Quand les piles sont complètement chargées, vérifiez la tonalité en appuy
-
ant sur TALK (parler) sur le combiné.
Batterie épuisée
Si la pile du combiné est épuisée, deux sons de bip se feront entendre à toutes
les trente (30) secondes. Si la pile s’épuise alors que vous faites un appel, vous
serez déconnecté après une période de deux (2) minutes. Terminez l’appel et
rechargez la pile. Pour une recharge de la pile, placez le combiné dans le socle.
1. Assurez-vous que les contacts de recharge soient fonctionnels et que le
VOYANT DEL est allumé.
2. Attention de ne pas court-circuiter la pile avec des matériaux conducteurs
tels des bagues, des bracelets et des clés.
Autonomie de la batterie
Une pile complètement rechargée procure un temps de conversation d’environ
quatre (4) heures, ou un temps d’attente d’environ huit (8) jours. Le temps de
conversation et d’attente peut varier selon les conditions d’utilisation.
COMBINÉ DU TÉLÉPHONE
Technologie Clarity® Power
™
Avec la puissance Clarity, les sons à haute fréquence sont amplifiés davantage
que les sons à basse fréquence afin que les mots ne soient pas qu’amplifiés mais
plus clairs et faciles à comprendre.
AMPLIFICATEUR – Clarity Power Marche/Arrêt
Le C4105 est doté d’une touche qui contrôle le volume du récepteur. Une
fois que la touche AMPLIFICATEUR est pressée, un niveau supplémentaire
d’amplification est ajouté à l’entière portée de la commande de volume.
La touche TALK (parler) s’allumera ORANGE pour indiquer que la fonction
CLARITY POWER est activée.
AVERTISSEMENT : Quand la touche TALK est éclairée ORANGE, cela indique peut-être que le volume se situe à un niveau élevé. Afin de protéger l’ouie,
abaissez le réglage du volume au minimum avant l’utilisation.
5. Branchez l’adaptateur CA dans une prise élec
-
trique standard CA.
6. Appuyez et soulevez la languette de support du
combiné, faites-le pivoter afin que l’extrémité
étroite de la languette se déploie et retourne
dans sa fente. Ceci maintiendra le combiné dans
le berceau quand le téléphone est installé
au mur.
7. Soulevez l’antenne du socle en position verticale
8. Réglez le commutateur Tonalité/Impulsion situé
à l’arrière du poste de base pour corriger le
mode de composition. Vérifiez avec votre com
pagnie de téléphone locale si vous n’êtes pas
certain du genre de service.
9. Placez le combiné dans le berceau pour débuter
la charge initiale.
Remarque
: Rappelez-vous que vous devez charger
le téléphone au moins 12 heures avant de l’utiliser
pour la première fois.
INSTALLATION DE LA PILE BATTERIE
DE COMBINÉ
Le C4105 utilise une pile rechargeable (AAA) de 3.6
volt 600mAhNiMH comprise avec votre appareil.
La pile du combiné doit être branchée avant de
débuter la charge initiale.
Pour installer une nouvelle batterie
1. Retirez le couvercle de la pile
2. Installez une nouvelle pile
3. Branchez la pile
4. Replacez le couvercle de la pile
5. Chargez pour au moins 12 heures avant la pre
-
mière utilisation
Installer et brancher
la batterie
Remarque
: La pile
dans le combiné doit
être complètement
chargée pour au
moins 12 heures avant
d’utiliser le téléphone
pour la première fois.
Temps D’Entretien :
Environ quatre
(4) heures
Temps De secours:
Environ huit (8) jours
Page 36

70
71
Commande du volume
Le cadran règle le niveau de volume que le combiné et le casque d’écoute
reçoivent. Le sélecteur de volume permet une fréquence allant jusqu’ à 15
dB avant même que la touche CLARITY POWER soit activée. Une fois la
touche CLARITY POWER pressée, le C4105 permettra un gain de 40 dB
d’amplification.
Touche tonalité
L’ajustement de la touche TONALITÉ vous permet de personnaliser votre ex
périence auditive. Parce que nous avons tous différentes préférences auditives,
nous vous conseillons d’explorer chaque paramètre afin de trouver celui avec
lequel vous êtes le plus à l’aise.
Sonnerie du combiné
Réglez la touche marquée Sonnerie (ringer) ARRÊT/VIBE/MARCHE située sur
le côté du combiné. Si VIBE (vibration) est sélectionné, le combiné sonnera et
vibrera à la réception d’en appel entrant. La touche de la sonnerie doit être
réglée à MARCHE ou VIBE pour que le combiné puisse sonner.
REMARQUE : Si les sonnerie du combiné et du socle sont réglées à ARRÊT,
la sonnerie visuelle clignotera pour indiquer un appel entrant.
Prise d’écouteurs
Vous pouvez utilisez ce téléphone en mode mains libres si vous installez des
écouteurs 2,5 mm (non compris).
Pour installer, branchez les écouteurs dans la PRISE D’ÉCOUTEURS au sommet
du combiné. Quand vous êtes en mode écouteurs, le volume des écouteurs est
régulé par le téléphone et l’écouteur et le microphone du combiné
sont déconnectés.
Commande de casque d’écoute si vous souhaitez vous procurer un casque
d’écoute pour votre C4105, veuillez contacter Plantronics au 1 800-544-4660
pour connaître le point de vente le plus près de chez-vous. Nous vous suggérons le casque d’écoute modèle Plantronics M110 ou le M130.
Attache-ceinture
Vous pouvez choisir d’utiliser l’attache-ceinture en option avec votre combiné.
1. Pour fixer, glissez l’attache-ceinture dans les rainures. Appuyez sur la
languettes de l’attache-ceinture dans les fentes pour fixer.
2. Pour retirer, soulevez un côté de l’attache-ceinture avec votre ongle
et repoussez.
Compatibilité avec les prothèses auditives
Le combiné comporte un circuit spécial en son intérieur pour coupler le son
aux prothèses auditives équipées de commutateurs-T/circuits-T.
SOCLE DU TÉLÉPHONE
Volume de la sonnerie
Les ajustements du volume de la sonnerie du socle sont situés du côté du poste
de base.
Le fait d’appuyer sur la touche HAUT (
) (Up) sur la base augmente la
sonnerie de un degré alors qu’en appuyant sur BAS (
) (Down), le son est
réduit de un degré. Il y a un total de six degrés en partant de maximum jusqu’à
minimum. La sonnerie sonnera pendant deux (2) secondes afin de permettre à
l’utilisateur de choisir le volume de la sonnerie.
Type de sonnerie
Les ajustements du type de la sonnerie du socle sont situés du côté du poste
de base. Le type de sonnerie peut être ajusté en appuyant sur la touche TYPE
DE SONNERIE (Ring Style). Six (6) types sont disponibles afin de vous permettre de personnaliser votre sonnerie. La sonnerie sonnera pendant deux (2)
secondes afin de permettre à l’utilisateur de choisir le type de sonnerie.
Sonneries visuelles
Les sonneries visuelles sont situées sur l’antenne du combiné et la base du
téléphone. Lors de l’arrivée d’un appel, ces lumières clignoteront. La sonnerie
visuelle du combiné demeurera allumée alors que le téléphone est utilisé.
Page 37

72
73
Touche AMPLIFICATEUR MARCHE/ARRÊT
Cette touche désactivera la fonction de réinitialisa
tion de la touche AMPLIFICATEUR Clarity Power
comme ceci :
MARCHE – Si la touche AMPLIFICATEUR ARRÊT/
MARCHE est à MARCHE, la fonction d’amplification
sera sur MARCHE à chaque début d’appel, et sera
par défaut à MARCHE chaque fois que le téléphone
est raccroché. Lors d’un appel, la touche AMPLIFICATEUR Clarity Power peut
faire basculer la fonction MARCHE ou ARRÊT Puissance Clarity selon les besoins de l’utilisateur.
ARRÊT – Quand la touche AMPLIFICATEUR MARCHE/ARRÊT la fonction
d’amplification sera à ARRÊT à chaque début d’appel, et l’utilisateur devra appuyer sur la touche AMPLIFICATEUR Clarity Power afin d’obtenir un degré
supérieur d’amplification. Si le téléphone est raccroché, le Clarity Power sera
ramené à ARRÊT. Lors d’un appel, la touche AMPLIFICATEUR Clarity Power
peut faire basculer la fonction MARCHE ou ARRÊT Puissance Clarity selon les
besoins de l’utilisateur.
MISE EN GARDE : LE VOLUME SER A ÉLEVÉ SI LA TOU CHE AMPLIFICATEUR EST RÉGLÉ À « MARCHE ».
Impulsion/Tonalité
Dirigez la touche vers le type de service téléphonique que vos avez, TONALITÉ
pour le service à clavier ou PULSATION pour le cadran d’appel. Vérifiez avec
votre compagnie de téléphone locale si vous n’êtes pas certain du genre
de service.
Clignotant
La touche CLIGNOTANT est activée pour l’utilisation du service d’appel
comme l’appel en attente ou la conférence à trois. Veuillez contacter votre
compagnie locale téléphonique pour de plus amples renseignements à propos
de ces services.
Touche discrétion
La touche de DISCRÉTION (mute) permet à l’utilisateur de mener une conversation privée et que vous ne voulez pas que la personne en ligne entende.
En mode Discrétion, la touche DISCRÉTION (mute) s’éclairera en ROUGE et
le microphone du combiné sera désactivé. En appuyant à nouveau sur DISCRÉTION (mute), cette fonction sera désactivée.
Recomposition/Pause
Appuyez sur RD/P pour recomposer le dernier numéro. Le fait d’appuyer sur
la touche RD/P tout en stockant un numéro de téléphone insérera une pause
de quatre (4) secondes. Ceci est généralement utilisé en stockant à la fois le
numéro de téléphone et une extension téléphonique ou NIP.
Pile de secours
L’installation de quatre (4) piles alcalines AA dans le support de montage de
bureau/mural fixé au poste du téléphone vous procurera une période de temps
limitée pour poursuivre l’utilisation de votre téléphone dans le cas d’une panne
de courant.
Pour installer les piles de secours
1. Débranchez le cordon de la ligne téléphonique et retirez le support de
montage/mural du socle du téléphone.
2. Débranchez l’ensemble de piles de secours du socle du téléphone.
3. Installez quatre (4) piles alcalines AA avec l’extrémité négative (-) de la pile
touchant le ressort.
4. Branchez le connecteur de l’ensemble de piles au terminal au fond du
poste de téléphone.
5. Installez le support de montage mural/de bureau au poste du téléphone
Pour remplacer les piles de secours
1. Débranchez le cordon de la ligne téléphonique et retirez le support de
montage/mural du socle du téléphone.
2. Débranchez l’ensemble de piles de secours du socle du téléphone.
3. Retirez les piles du support de montage mural/de bureau.
4. Installez quatre (4) piles alcalines AA avec l’extrémité négative (-) de la pile
touchant le ressort.
5. Branchez le connecteur de l’ensemble de piles au terminal au fond du
poste de téléphone.
6. Installez le support de montage mural/de bureau au poste du téléphone
Poussée Dessus:
Le
bouton d’entretien
est ORANGE
Poussée Au loin:
Le
bouton d’entretien
est VERT
Page 38

74
75
Après l’installation des quatre (4) piles alcalines, veuillez vous reporter au
tableau ci-dessous :
Alimentation électrique Statut DEL électrique
Adaptateur CA et piles en bon état Vert continu
Adaptateur CA et pas de piles Rouge continu
Adaptateur CA et piles en mauvais état Clignotement vert et rouge
Panne de courant et Clignotement lent rouge piles en
bon état
Panne de courant et état Clignotement rapide
piles en mauvais rouge
FONCTIONS DU TÉLÉPHONE
Transmettre un appel
1. Appuyez sur TALK (parler) (la touche TALK s’éclairera en VERT) et compo-
sez le numéro où vous souhaitez appeler.
2. Pour terminer un appel, appuyez sur la touche TALK (parler) ou placez le
combiné sur la base.
Répondre à un appel
Si le combiné n’est pas dans le berceau, appuyez sur TALK (parler).
Si le combiné est dans le berceau, soulevez simplement le berceau
pour répondre.
Reportez-vous à AMPLIFICATEUR Clarity Power et Commande due volume
pour de plus amples renseignements sur l’ajustement du volume aux page 90.
Recomposition du dernier numéro
Le dernier numéro composé (jusqu’à 32 chiffres) est emmagasiné dans la mémoire de recomposition jusqu’à ce qu’un autre numéro soit composé.
Pour utiliser cette fonction :
1. Appuyez sur la touche TALK (parler)
2. Quand vous entendez la tonalité de numérotation, appuyez sur RD/P.
3. Le téléphone composera automatiquement pour vous.
Fonction Pause
Le fait de programmer lors d’une pause entraînera une attente de quatre (4)
secondes avant la composition de numéro supplémentaires. Cette fonction peut
être utilisée quand il faut composer un indicatif d’accès (9, par exemple) et at
tendre pour une seconde tonalité avant que vous puissiez composer un numéro
extérieur. Appuyez sur RD/P au moment demandé lors du processus stockage
pour programmer une pause.
Tonalité temporaire
Si vous avez un service de composition à cadran (impulsion), vous pouvez
changer depuis l’impulsion à la tonalité par clavier pendant un appel.
1. Placez un appel téléphonique et attendez jusqu’à ce qu’il soit connecté.
2. Appuyez sur la touche * Après cette opération, les touches pressées seront
envoyées en tonalité.
3. Le téléphone se réinitialisera automatiquement à impulsion (cadran) à la fin
de l’appel.
Clavier éclairé
Le clavier s’éclairera pour quinze (15) secondes après le retrait du combiné de
la base. Pour réactiver cette fonction lorsque vous êtes en attente, appuyez sur
TALK (parler) ou sur MEM. Pour activer alors que le téléphone est utilisé, ap
-
puyez sur n’importe laquelle touche.
Téléavertisseur/Localisateur de combiné
Pour transmettre un téléavertissement depuis la base au combiné, appuyez sur
la touche PAGE (téléavertisseur) située sur le poste du téléphone. Une série de
sonneries se fera entendre depuis le combiné.
Pour localiser le combiné s’il est éloigné de la base, appuyez et maintenez la
touche PAGE (téléavertisseur) pour environ cinq (5) secondes). Une série de
sonneries se fera entendre. Remettez le combiné sur le poste de base ou appuyez sur n’importe laquelle touche pour annuler le téléavertissement.
Page 39

76
77
Exploitation des canaux
Quand il est utilisé, le téléphone sans fil C4105 recherche et sélectionne au
tomatiquement le canal le plus clair parmi plus de 40 canaux. S’il y a développement d’interférence sur la ligne, le fait d’appuyer sur cette touche sélectionnera
un autre canal.
Code de sécurité
Le code de sécurité empêche les conversations du téléphone sans fil d’être accessibles depuis un téléphone sur une ligne différente. Une fois la pile du combiné complètement rechargée, le combiné sélectionnera automatiquement le
code parmi plus de 65 000 combinaisons différentes. Le code est changé chaque
fois que le combiné est placé dans le berceau. Si vous éprouvez des difficultés
à transmettre ou recevoir des appels, un code de sécurité perdu peut être la
cause du problème. Quand cela se produit, le combiné ne peut plus communiquer avec le poste de téléphone.
STOCK AGE DE LA MÉMOIRE
Le C4305 est doté de dix (10) emplacements indirects, ou deux emplacements
de stockage de mémoire sur le combiné du téléphone (0-9) po9uvant être programmés pour composer les numéros fréquemment appelés, allant jusqu’à
16 chiffres.
Ajout d’un emplacement de mémoire
1. L’appareil doit être uniquement en mode d’attente.
2. Appuyez sur la touche MEM.
3. Entrez le numéro de téléphone que vous souhaitez mémoriser.
4. Appuyez sur la touche MEM
5. Appuyez sur le numéro du clavier correspondant au numéro que vous
souhaitez mémoriser.
6. Un long bip indiquera que le processus de programmation est complété.
Lors du processus de stockage de la mémoire, la touche TALK (parler)
lignotera en VERT.
Utilisez la touche RD/P tout en entrant le numéro de téléphone afin d’insérer
une pause. Reportez-vous à la section Fonction Pause à la page 94.
Numérotation d’un emplacement de mémoire
1. Appuyez sur la touche TALK (parler)
2. Appuyez sur la touche MEM.
3. Appuyez sur le numéro du clavier correspondant au numéro mémorisé.
4. Le numéro se composera automatiquement.
Ajout d’un numéro d’URGENCE
1. L’appareil doit être uniquement en mode d’attente.
2. Appuyez sur la touche MEM.
3. Entrez le numéro de téléphone que vous souhaitez mémoriser.
4. Appuyez sur la touche MEM.
5. Appuyez sur la touche d’urgence sur le clavier correspondant au numéro
que vous souhaitez mémoriser.
6. Un long bip indiquera que le processus de programmation est complété.
Composition d’un numéro d’URGENCE
1. Appuyez sur la touche TALK (parler).
2. Appuyez sur la touche URGENCE que vous souhaiter appeler.
SOIN ET ENTRETIEN
Le C4105 a été conçu pour vous offrir des années de service téléphonique sûr
avec un minimum d’entretien. Pour assurer une performance supérieure, suivez
ces directives d’entretien de l’appareil :
1. Évitez d’échapper ou de cogner l’appareil.
2. Époussetez régulièrement l’appareil. Essuyez l’appareil avec un chiffon doux
et humide.
3. N’utilisez pas de détersif et évitez l’humidité excessive.
4. Le C4105 est un appareil électrique. Évitez les chocs électriques en gar
-
dant l’appareil éloigné de l’eau (p.ex. salle de bain, évier de cuisine, etc.)
Page 40

78
79
DÉPANNAGE
L’appareil ne fonctionne pas/aucune tonalité :
• Assurez-vous que la touche TALK (parler) est éclairée.
• Assurez-vous que l’adaptateur CA est bien branché dans la prise CA, le poste
et le téléphone.
• Assurez-vous que le cordon de la ligne téléphonique est bien branchée à la
prise murale et au téléphone.
• Assurez-vous que l’antenne du poste de téléphone est en position verticale.
• Assurez-vous que la pile du combiné est complètement rechargée.
• Assurez-vous que le téléphone est dans le bon mode de composition, tonalité
(clavier) ou impulsion (à cadran).
• Assurez-vous que vous êtes située dans la portée d’émission utilisable de la
station de base.
• Réinitialisez le code de sécurité en plaçant le combiné dans le poste de télé-
phone pendant 5 à 10 secondes.
Le téléphone ne sonne pas quand vous recevez un appel :
• Assurez-vous que la touche SONNERIE (ringer) sur le combiné et le poste
de téléphone est à MARCHE (On).
• Assurez-vous que l’adaptateur CA est bien branché dans la prise CA, le poste
et le téléphone.
• Assurez-vous que le cordon de la ligne téléphonique est bien branchée à la
prise murale et au téléphone.
• Assurez-vous que vous êtes située dans la portée d’émission utilisable de la
station de base.
• Il se peut que vous ayez trop de postes téléphoniques sur votre ligne. Dé-
branchez quelques appareils.
Bruit, statique, interférence ou autres appels entendus lors de
l’utilisation du combiné :
• Essayez de changer de canal.
• Assurez-vous que l’antenne du poste de téléphone est en position verticale.
• Assurez-vous que vous êtes située dans un rayon d’action utilisable de la sta-
tion de base.
• Assurez-vous que la pile du combiné est complètement rechargée.
• Essayez de relocaliser le bloc de base dans un autre emplacement.
• Assurez-vous que l’adaptateur CA n’est pas branché dans la prise murale avec
d’autres appareils.
Le téléphone ne maintient pas la charge :
• Assurez-vous que les contacts de recharge sur le combiné et le poste de base
sont exempts de poussière et de saleté. Nettoyez les contacts avec un
chiffon doux.
• Assurez-vous que CHARGE DEL (charge LED) sur la base est éclairée
lorsque le combiné est dans le berceau.
• Au besoin, remplacez la pile du combiné. (Reportez-vous au Chargement de
la pile du combiné).
Difficulté à transmettre ou recevoir des appels :
• Rapprochez-vous du poste de base et réessayez.
• Si le fait de vous rapprocher du poste de base ne fonctionne pas, vous avez
peut-être perdu le code de sécurité.
• Réinitialisez le code de sécurité en replaçant le combiné dans le poste de
téléphone pendant 5 à 10 secondes. Reportez-vous à la section (Code
de sécurité)
• Assurez-vous d’avoir sélectionné le bon mode de composition, clavier
ou impulsion.
• Assurez-vous que l’adaptateur CA n’est pas branché dans une prise murale
avec d’autres appareils. Débranchez pendant 5 à 10 secondes et rebranchez.
Replacez le combiné sur la base et réinsérez l’adaptateur CA.
• Assurez-vous que la pile du combiné est complètement rechargée.
Page 41

80
81
Partie 68 des réglementaires FCC (conseil fédéral de l’audiovisuel
aux États-Unis)
a) Cet équipement est conforme à la partie 68 des réglementaires FCC et les
exigences adoptés par le ACTA. Il y a une étiquette sous l’appareil qui contient,
entre autres, un identificateur de produit en format US:AAAEQ##TXXXX.
Selon la demande, ce numéro doit être fourni à la compagnie de téléphone.
b) La prise et la fiche qui branche cet appareil aux installations électrique et à
la compagnie de téléphone doit être conforme la partie 68 des réglementaires
FCC et les exigences adoptés par le ACTA. Un fil téléphonique et une fiche
modulaire, RJ11C USOC, sont fournis avec se produit. Ils sont conçus pour être
branché a une fiche modulaire compatible. Voir les instructions d’installation
pour de plus amples détails.
c) Le facteur d’équivalence de sonnerie (numéro “REN”), attribué à chaque
dispositif, indique le nombre maximum de dispositifs pouvant être raccordés
à un interface téléphonique. Trop de RENs sur une ligne téléphonique peut
faire en sorte que les appareils ne sonne pas lors d’un appel téléphonique
reçu. Dans la plupart des régions, le nombre total du facteur “REN” ne doit
pas dépasser cinq (5.0). Pour vous assurez du nombres d’appareil qui peuvent
être branchés, tel que détérminé par le total des RENs, veuillez contacter votre
compagnie de téléphone.. Pour tous produits approuvés après le 23 juillet 2001,
le REN pour ce produit est identifié sur l’étiquette du produit en format US:
AAAEQ##TXXXX. Les chiffres representés par ## sont les RENs sans point
(i.e., 03 suggère un REN de 0.3). Pour tout autre produits, le REN est indiqué
séparément sur l’étiquette.
d) Dans le cas où cet appareillage téléphonique causes des dommages au réseau
téléphonique, la compagnie de téléphone vous avisera qu’un arrêt temporaire
de votre service pourrait être requis. La compagnie de téléphone avertira le
client immédiatement. De plus, vous serez avisés de vos droits concernant une
plainte a être soumise à l’ FCC si vous le trouvé nécessaire.
e) La compagnie de téléphone pourrait effectuer des changements à ces
installations, son équipement, opérations ou procédures qui pourraient affectés l’opération de l’équipement. Si ceci se produit, la compagnie de téléphone
fournira un préavis afin de vous permettre d’effectuer les modifications nécessaires pour maintenir un service continu.
f) Si vous faites l’expérience de problèmes avec cet appareillage téléphonique,
pour toute informations concernant les réparations ou les garanties, veuillez
CONFORMITÉ RÉGLEMENTAIRE
contacter Clarity au 1-800-552-3368. Si cet appareillage cause des dommages
au réseau téléphonique, la compagnie de téléphone pourrait vous demander de
débrancher votre équipement jusqu’à temps que le problème soit résolu.
g) Cet appareillage téléphonique ne doit pas être réparé et ne contient aucune
pièces réutilisable. Toute tentative d’ouvrir l’équipement ou d’effectuer des
réparations annulera la garantie. Pour le service ou les réparations, composez le
1-800-552-3368.
h) Le branchement au service de ligne commune est sujette au tarifs de l’état.
Contactez la commission de l’entreprise de services publics, la commission du
service public ou la commission corporative pour plus d’information.
i) Si votre maison est équipé d’un système d’alarme relié à votre ligne téléphonique, assurez vous que l’appareillage téléphonique ne débranche pas votre
système d’alarme. Si vous avez des questions concernant ce qui pourrait mettre
hors de service votre équipement de sécurité, consultez la compagnie de téléphone ou un installateur compétent.
j) Cet équipement téléphonique est compatible avec les prothèses auditives.
Téléphones à monnaie/carte de crédit
Pour respecter les tariffs, la compagnie téléphonique doit être averti avant le
branchement. Dans certains États, la commission de l’entreprise de services
publics, la commission du service public ou la commission corporative avant
le branchement.
Partie 15 des réglementaires FCC
Cet équipement est conforme à la partie 15 des réglementaires FCC. Son
fonctionnement est soumis aux deux conditions suivantes : (1) Ce dispositif
téléphonique ne doit pas causer d’inteférences et (2), il doit pouvoir accepter
les interférences, incluant celles pouvant nuire à son fonctionnement normal.
“La confidentialité de vos conversations n’est pas garantie avec
cet appareil”.
Votre appareillage a été vérifié et conforme aux limitations d’un appareil digital
Classe B, conformément à la partie 15 des réglementaires FCC. Ces limitations
sont conçues pour fournir une protection raisonnable contre une interférence
dangereuses en installations residentielle.
CONFORMITÉ RÉGLEMENTAIRE
Page 42

82
83
Cet équipement génére, utilise and peut émettre une fréquence radio et, si non
installé et utilisé en conformité avec les instructions, peut produire une inter
férence avec les communications radio. Toutefois, il n’y a aucune garantie que
l’interférence ne se produira pas dans un locale particulier; si cet équipement
cause une interférence dangereuses à la radio ou à la réception télévision, qui
pourrait être determiné en débranchant l’équipement, vous êtes encouragés a
tenter to rectifier l’interférence en vous servant des mesures suivantes :
1. Quand sa peut être fait en toute sécurité, réorienté l’antenne récepteur de
la télévision ou de la radio.
2. Si possible, éloignez le téléphone sans fil du téléviseur, la radio ou autre
source de réception
3. Branchez l’équipement téléphonique dans une prise ou un circuit autre que
celle de la télévision, de la radio, ou d’autre récepteur.
4. Consultez le détaillant ou un technicien en Radio/TV pour de l’assistance.
MISE EN GARDE: Tout changement ou modification apporté à cet appareil
qui ne serait pas expressément autorisé par le manufacturier peut vous retirer
l’autorisation de faire fonctionner l’appareil.
Avis d’Industrie Canada
Ce produit réponds aux critères des spécification techniques
d’Industry Canada.
Avant d’installer cet équipement, les utilisateurs doivent s’assurer qu’il est per
mis d’être branché aux installations de la compagnie de téléphone. Cet équipement doit être installé en se servant d’une méthode de branchement conforme.
Dans certains cas, le filage interne de la compagnie de téléphone associé à une
ligne de service individuelle allongé à l’aide d’un ensemble de raccord certifié
(prolongateur de ligne téléphonique). Le consommateur doit être avisé que la
conformité avec les conditions ci-haut mentionnées peut ne pas prevenir la dégradation de service dans certaines situations. Toutes réparations d’équipement
certifié doit être effectué par un service d’entretien Canadien autorisé par
le fournisseur.
CONFORMITÉ RÉGLEMENTAIRE
Toutes réparations ou modifications effectuées à l’équipement par l’utilisateur,
ou panne de l’équipement, peut donner cause à la compagnie de télécommuni
-
cations de demander à l’utilisateur de débrancher l’équipement.
Les utilisateurs doivent s’assurer que les conducteurs de terre, lignes téléphoniques ainsi que le systeme de conduit d’eau interne metallique, si présent,
sont liés ensemble. Cette précaution est particulierement importante dans les
régions rurales.
MISE EN GARDE: Les utilisateurs ne devraient pas tenter tel connexions
eux-mêmes, mais plutôt devraient contacter un electricien ou l’inspecteur electricien approprié.
Le facteur d’équivalence de sonnerie (numéro “REN”), attribué à chaque dispositif, indique le nombre maximum de dispositifs pouvant être raccordés à un
interface téléphonique. On peut raccorder plusieurs dispositifs téléphoniques à
l’interface, pourvu que le nombre total du facteur “REN” ne dépasse pas cinq.
(Le terme “IC:” devant le numéro de certification signifie uniquement que les
spécifications de Industrie Canada ont été rencontrées.)
Le responsable pour conformit
é règlementaire:
Clarity, Une Division de Plantronics, Inc.
4289 Bonny Oaks Drive,
Bureau 106
Chattanooga, TN 37406
Tél. : 1-800-552-3368
CONFORMITÉ RÉGLEMENTAIRE
Page 43

84
85
L’information concernant la garantie et le service est seulement applicable
aux produits achetés et utilisés aux E.U. et au Canada. Pour toute information
concernant la garantie et le service dans d’autre pays, veuillez contacter votre
détaillant locale ou le distributeur.
L’étendue de la garantie
Clarity, une division de Plantronics, Inc. (“Clarity”) déclare au consommateur
que cet appareil sera exempt de tout défaut de matériels ou de main-d’oeuvre,
uniquement selon les limitations ou exclusions énumérées cidessous, pendant
une année de la date d’achat (“Période de Garantie”).
L’obligation de Clarity sous cette garantie sera à l’option de Clarité, sans frais,
de toute composante ou d’appareil qui prouve être un défaut de matériel ou de
fabrication pendant la Période de Garantie.
Exclusions de garantie
Cette garantie promet un appareil exempt de tout défaut de matériel ou de
main-d’oeuvre.
Toutes conditions dûes à un accident, abus, emploi abusif ou mauvaise opéra
tion, contravention des instructions fournies par Clarity, destruction ou modifications, voltages ou courrant inadéquat, s’il y a eu réparation ou entretien effectué par une personne ou organisation autre que Clarity ou un centre de service
autorisé par Clarity, n’est pas couvert sous cette garantie. Les compagnie de
téléphone fabriquent de différent types d’équipement et Clarity ne garantie
pas que cet équipement soit compatible avec l’équipement d’une compagnie de
téléphone en particulier.
Garantie Tacite
Conformément à la Loi, vous pourriez être éligible à certains bénéfices de garantie tacite. Ces garanties tacite seront en force pendant la durée de la garantie du produit. Certains Etats permettent des limites sur la durée d’une garantie
tacite, donc, la garantie ci-haut mentionnée ne pourrait vous être applicable.
Dommages accessoires ou immatériels
Ni Clarity ni votre détaillant ou distributeur ne sont responsable pour les
dommages accessoires ou immatériels incluant sans limitation, pertes ou gains
commerciaux, ou pour n’importe quel dépenses accessoires, dépenses, perte
de temps, ou inconvénient. Certains Etats ne permettent pas l’exclusion ou
la limitation de dommages accessoires ou immatériels, donc, l’exclusion ou la
limitation ci-haut mentionnée ne pourrait vous être applicable.
Autres droits reconnus
Cette garantie vous donne des droits reconnu par la loi ainsi que certains au
-
tres droits qui varient de province en province.
Information concernant les Garanties
Pour obtenir de l’information concernant le service de Garantie, veuillez
expedier l’unité port-prépayé a l’une des installations compétentes
ci-bas mentionnés
Aux États-Unis
Centre de Service Clarity
4289 Bonny Oaks Drive, Bureau 106
Chattanooga, Tennessee 37406
Tél: (423) 622-7793 ou (800) 426-3738
Fax: (423) 622-7646 ou (800) 325-8871
Au Canada
Plantronics Service Center
8112 Trans-Canada Hwy.
Ville St. Laurent, Que.
Canada H4S 1M5
Tél: (800) 540-8363 ou (514) 956-8363
Fax: (514) 956-1825
GARANTIE ET SERVICE GARANTIE ET SERVICE
Page 44

86
87
GARANTIE ET SERVICE
Veuillez vous servir de l’emballage original, ou emballez bien le (les) unité(s)
dans un carton rigide avec suffisamment d’emballage pour prevenir
les dommages.
Veuillez inclure les informations suivantes:
1. Une preuve d’achat incluant le numéro de modéle et la date d’achat.
2. Adresse de la facturation.
3. Adresse de l’expédition.
4. Nombre et description des unitées expédiées.
5. Nom et numéro de téléphone de la personne a contacter si nécessaire.
6. La raison du retour ainsi qu’une description du problème.
Les dommages produitent lors de l’expédition sont jugé être la responsabilité
du transporteur, et toutes demandes doit être faite directement à celui-ci.
Page 45

Clarity, a Division of Plantronics, Inc.
4289 Bonny Oaks Drive, Suite 106
Chattanooga, TN 37406
1-800-552-3368
www.clarityproducts.com
©2006 Clarity, a Division of Plantronics, Inc. All rights reserved. Clarity,
Clarity Professional, C4105, Clarity Power and Amplifying Your Life are
trademarks or registered trademarks of Plantronics, Inc. Made in China.
PM061306_Rev
C
 Loading...