

Page 1
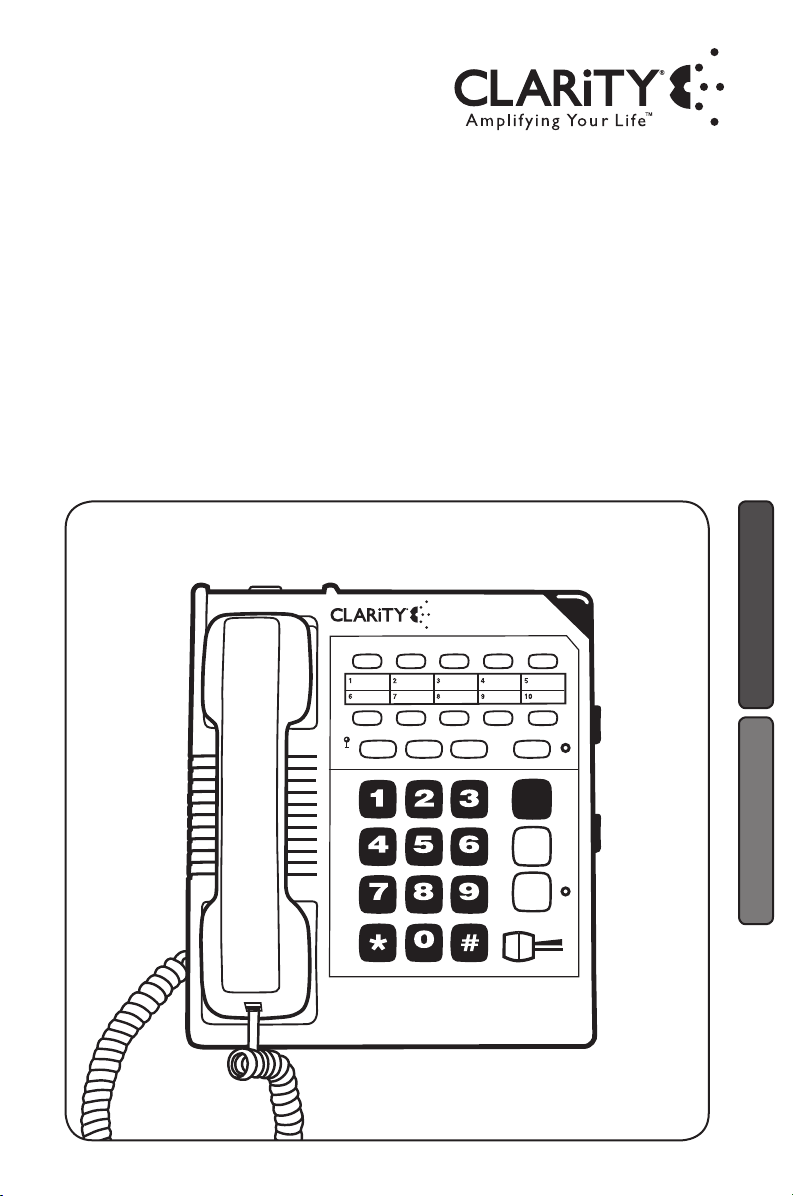
User Guide
program redial
signal
flash
C1000TM with Cla rity® Power
TM
hold
abc def
jklghi mno
tuv
oper
pgrs wxyz
help
mute
boost
Amplified corded telephone
Featuring Clarity® Power™ Technology
TM
C1000
E
N
G
L
I
S
H
E
S
P
A
Ñ
O
L
Page 2

Page 3

TABLE OF CONTENTS
Safety Instructions ................................................................................ 4
Installation ................................................................................................. 7
Features ...................................................................................................... 11
Clarity® Power Control ..................................................................... 11
Boost Control .................................................................................... 11
Clarity Effect ......................................................................................... 11
Boost Override.................................................................................... 11
Sound Level Indicator ......................................................................... 12
Ringer Volume Control ...................................................................... 12
Ringer Pitch Control .......................................................................... 12
Visual Ringer ......................................................................................... 12
Tone / Pulse Selection ........................................................................ 13
Last Number Redial ............................................................................ 13
Flash ....................................................................................................... 13
Hold ....................................................................................................... 14
Mute ....................................................................................................... 14
Surge Protection ................................................................................. 15
Neck Loop/Auxilary ........................................................................... 15
Hearing Aid Compatibility ................................................................. 15
Operation .................................................................................................. 16
To Place or Receive a Call ................................................................. 16
Programming Numbers Into Memory ............................................ 16
Care ........................................................................................................... 18
Troubleshooting ...................................................................................... 19
FCC Requirements and Regulations ............................................. 22
Warranty and service .......................................................................... 25
Page 4

SAFETY INSTRUCTIONS
When using your telephone equipment,
basic safety precautions should always
be followed to reduce the risk of fire,
electric shock and injury to persons
including the following:
1. Read and understand all instructions.
2. Follow all warnings and instruc-
tions marked on the telephone.
3. Do not use this telephone near
a bath tub, wash basin, kitchen
sink or laundry tub, in a wet
basement, near a swimming pool
or anywhere else there is water.
4. Avoid using a telephone (other
than a cordless type) during a
storm. There may be a remote risk
of electrical shock from lightning.
5. Do not use the telephone to report
a gas leak in the vicinity of the leak.
6. Unplug this telephone from the wall
outlets before cleaning. Do not use
liquid cleaners or aerosol cleaners
on the telephone. Use a damp cloth
for cleaning.
7. Place this telephone on a stable
surface. Serious damage and/or injury
may result if the telephone falls.
8. Do not cover the slots and open ings on this telephone. This telephone
should never be placed near or over
a radiator or heat register. This tele phone should not be placed in a
built-in installation unless proper
ventilation is provided.
9. Operate this telephone using the
electrical voltage as stated on
the base unit or in the owner’s
manual. If you are not sure of the
voltage in your home, consult your
dealer or local power company.
10. Do not place anything on the
power cord. Install the telephone
where no one will step or trip on
the cord.
11. Do not overload wall outlets or
extension cords as this can increase
the risk of fire or electrical shock.
12. Never push any objects through
the slots in the telephone. They can
touch dangerous voltage points or
short out parts that could result in
a risk of fire or electrical shock.
Never spill liquid of any kind on
the telephone.
13. To reduce the risk of electrical
shock, do not take this phone apart.
Opening or removing covers may
expose you to dangerous voltages
or other risks. Incorrect reassembly
can cause electric shock when the
appliance is subsequently used.
14. Unplug this product from the wall
outlet and refer servicing to the
manufacturer under the following
conditions:
A. When the power supply cord
or plug is frayed or damaged.
B. If liquid has been spilled into
the product.
C. If the telephone has been
exposed to rain or water.
D. If the telephone does not
operate normally by following
the operating instructions.
Adjust only those controls that
are covered by the operating
SAVE THESE INSTRUCTIONS
4
Page 5

SAFETY INSTRUCTIONS
instructions. Improper adjust ment may require extensive
work by a qualified technician
to restore the telephone to
normal operation.
E. If the telephone has been
dropped or the case has
been damaged.
F. If the telephone exhibits a
distinct change in performance.
15. Never install telephone wiring
during a lightning storm.
16. Never install telephone jacks in wet
locations unless the jack is specifi cally designed for wet locations.
17. Never touch uninsulated telephone
wires or terminals unless the tele phone line has been disconnected
at the network interface.
18. Use caution when installing or
modifying telephone lines.
19. Use only the power cord and
batteries indicated in the manual.
Do not dispose of batteries in a
fire. They may explode. Check with
local codes for possible special
disposal instructions.
20. Plug the AC adaptor into the outlet
that is nearest and most accessible
to the telephone.
Exposure to high volume sound levels
may damage your hearing. Although
there is no single volume setting that is
appropriate for everyone, you should
always use the handset with the volume
set at moderate levels and avoid prolonged exposure to high volume sound
levels. The louder the volume, the less
time is required before your hearing
could be affected. If you experience
hearing discomfort, you should stop using the handset. To protect your hearing,
some hearing experts suggest that you:
1. Set the volume control in a low
position and then adjust the volume
to a comfortable level.
2. Limit the amount of time you use
the handset at high volume.
3. Avoid turning up the volume to
block out noisy surroundings.
CHILDREN: Never allow children to
play with the product – small parts may
be a choking hazard and the amplified
volume may cause hearing damage.
SAVE THESE INSTRUCTIONS
5
Page 6
CONTENTS & PARTS CHECKLIST
program redial
signal
flash
C1000TM with Clarity® Power
TM
hold
abc def
jklghi mno
tuv
oper
pgrs wxyz
help
mute
boost
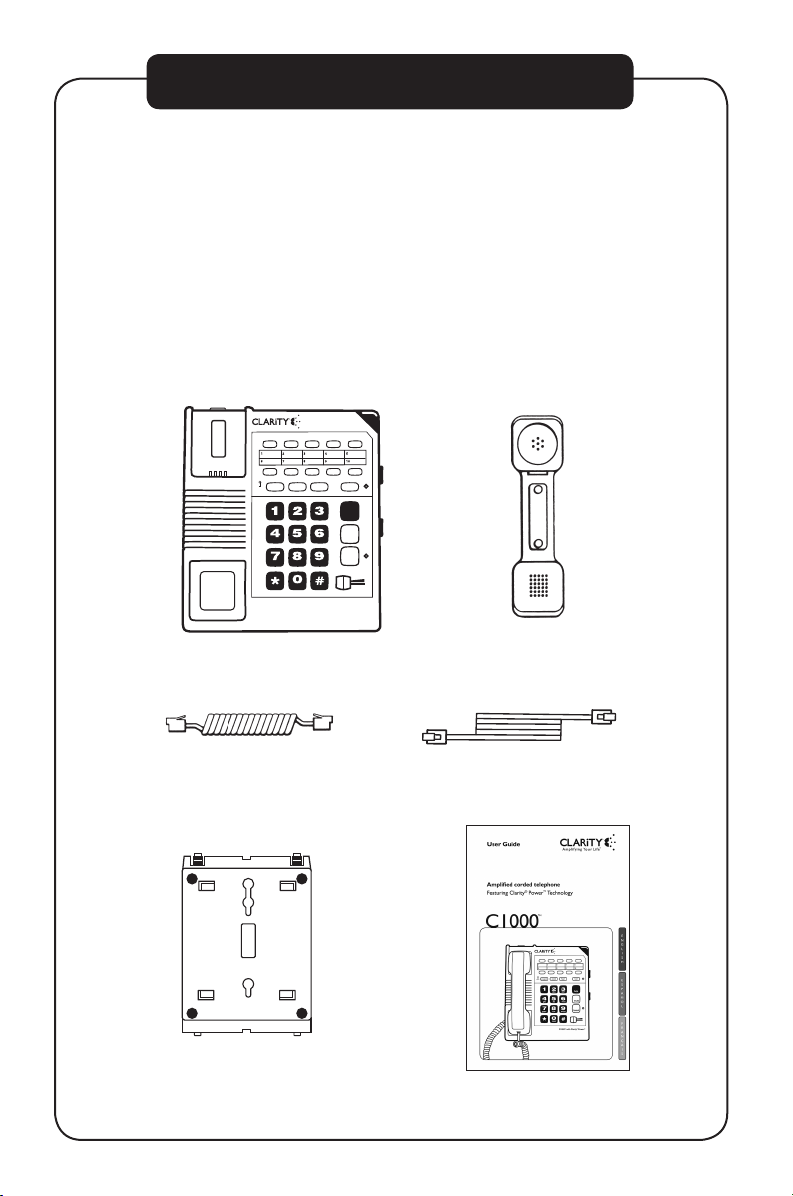
Carefully remove all of the contents from the package. If there is any
visible damage, or any of the contents are missing, do not attempt to
operate this equipment. Please call 1-800-552-3368 to exchange this
unit for a factory-fresh replacement.
In addition to the items listed above, you will need one of the
following to complete installation of this unit:
• Modular Wall Jack, or
• RJ-11C Modular Jack Adapter (if you have an older 4-prong jack)
Base
Handset line cord
Handset
Long phone cord
(Coiled 10 ft.)
Desk/Wall-Mounting
Bracket
User guide
6
Page 7
INSTALLATION
program redial
signal
flash
C1000TM with Clarity® Power
TM
hold
abc def
jklghi mno
tuv
oper
pgrs wxyz
help
mute
boost
Warning: To prevent electrical shock, always remove the telephone line cord
from the wall jack before removing the cord from the telephone. Never leave the
line cord connected to the wall jack if it is not also connected to the telephone.
Select a Location
• This unit requires a modular phone jack.
• The unit should be located in an area where it is easy to see the lighted ringer.
• The unit can be used as a desk top phone or a wall mount phone.
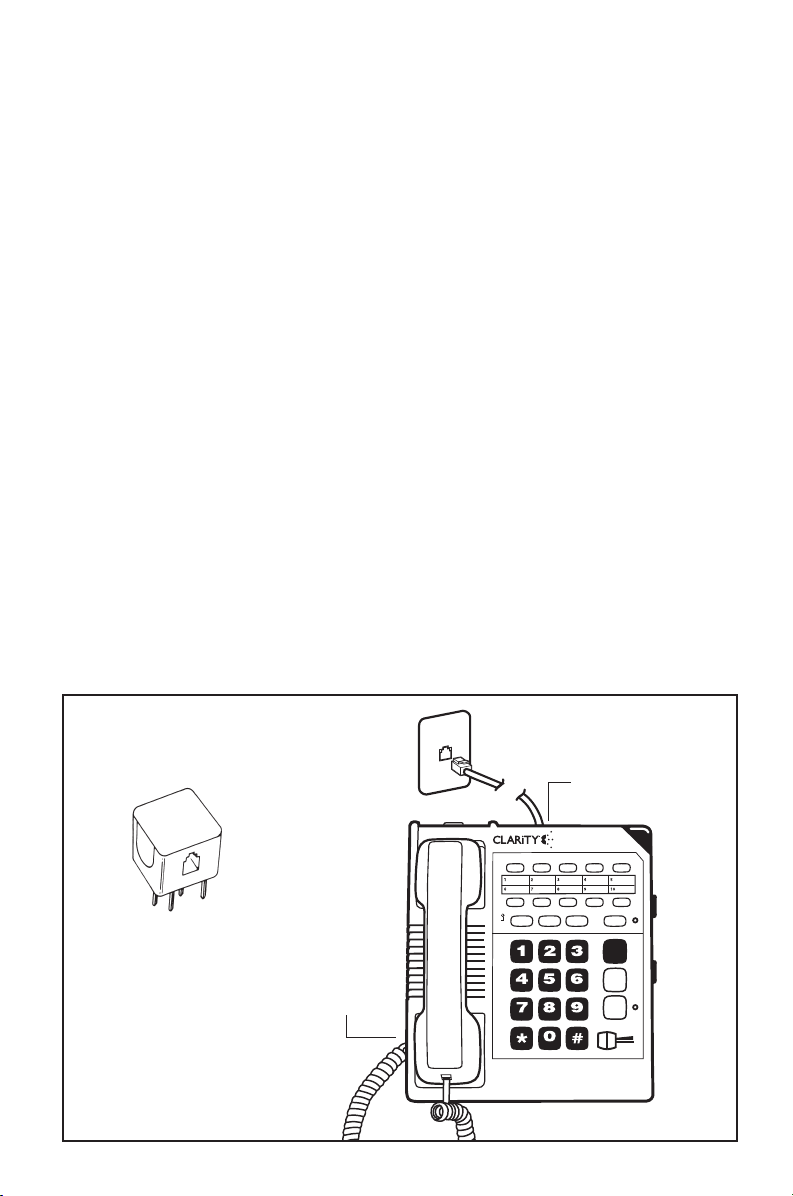
Connecting the Clarity C1000 Phone
To install as a Desk Unit:
• Plug one end of the telephone line cord (long, flat) into the back of the
Clarity telephone.
• Plug the other end of the telephone line cord into the wall jack.
• Plug one end of the handset cord (coiled) into the bottom of the handset.
• Plug the other end of the handset cord into the jack located on the left edge of
the Clarity telephone.
• Place the handset in the cradle of the Clarity telephone.
• Avoid placing the unit where it will be exposed to excessive heat or humidity.
Note: If you are
plugging the phone
into an older 4-prong
jack, use an RJ11C
adapter.
Flat cord here
Coiled
cord here
7
Page 8
INSTALLATION
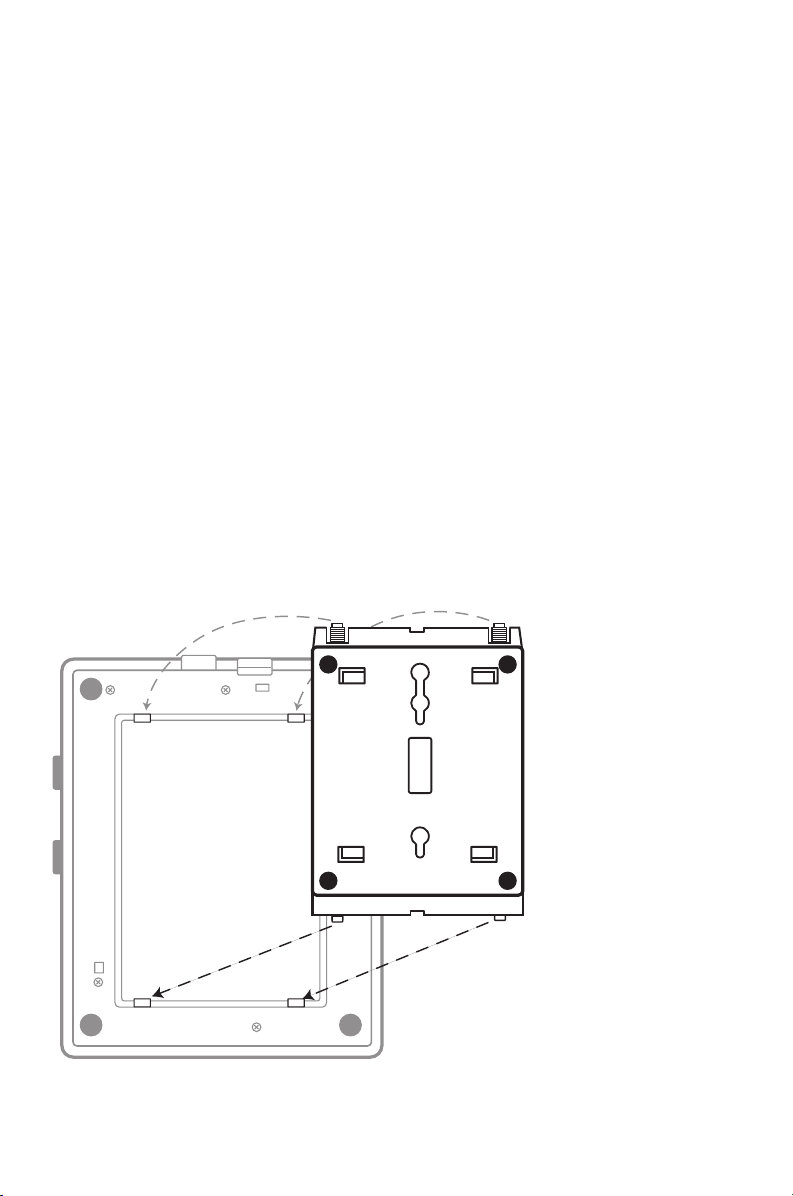
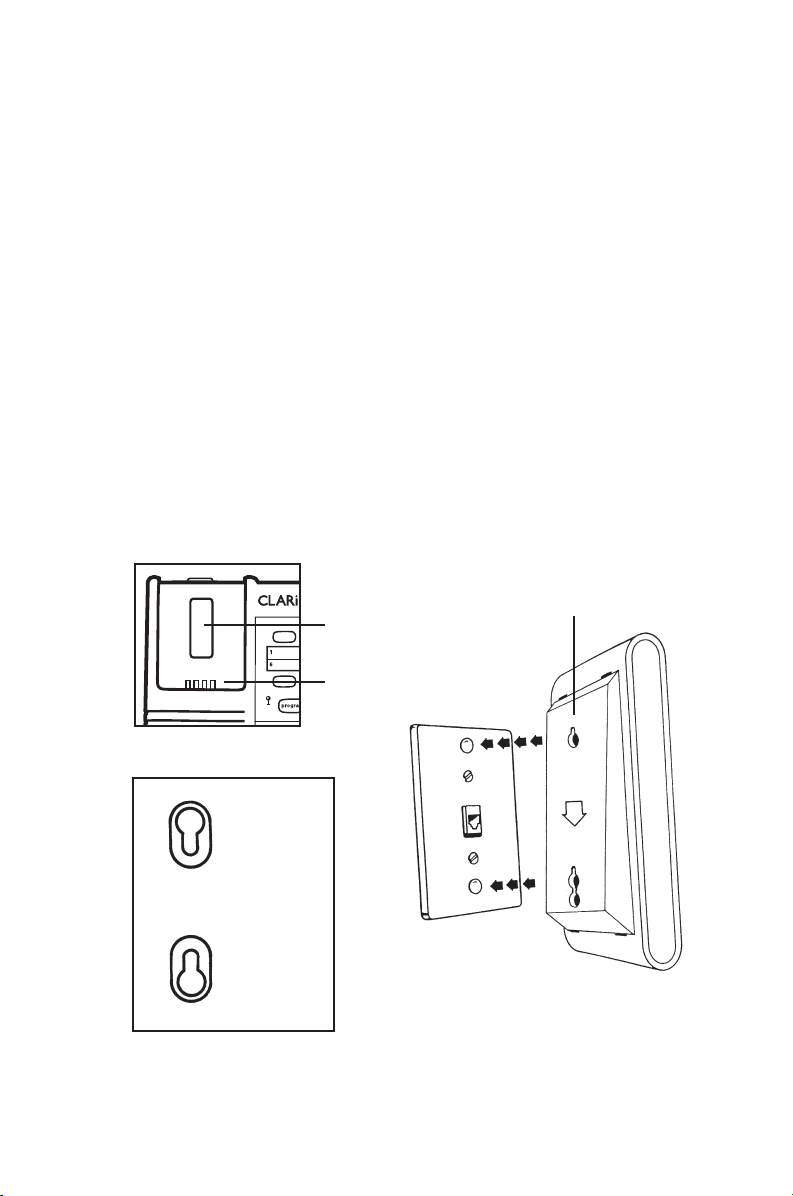
To Install As a Wall Unit:
Important: A modular wall jack with raised mounting pins is required for
installation as a Wall Unit.
The Clarity C1000 comes assembled with mounting bracket attached in desk
mount position. For wall mounting simply remove bracket, rotate 180 degrees and
reattach as shown.
• Plug one end of the telephone line cord (long, flat) into the back of the
Clarity telephone.
• Attach the wall-mounting bracket to the bottom of the Clarity telephone.
It snaps into place. The cord should run underneath the wall mounting bracket.
• Plug the other end of the telephone line cord into the wall jack with raised
mounting pins. You can store excess line cord inside the wall mounting bracket.
Note: If the wall-mounting bracket is already placed in the desk mount position,
remove it by pressing the tabs and turning it 180° per the key shown for the
wall-mount.
Wall-Mount
Bracket
Back of Phone
8
Page 9
INSTALLATION
signal
Warning: To prevent electrical shock, always unplug the telephone line cord
from the wall before removing the cord from the telephone. Never leave the cord
connected to the wall if it is not also connected to the telephone.
• Hold the Clarity telephone so that the holes on the mounting bracket line up
with the raised mounting pins on the modular wall jack. Once the holes are
lined up, push the phone in towards the wall jack and then slide the phone
downward until it is securely seated on the wall jack.
• Plug one end of the handset cord (coiled) into the bottom of the handset.
• Plug the other end of the handset cord into the jack located on the lower left
edge of the Clarity telephone.
• Place the handset in the cradle of the Clarity telephone. The special tabs will
hold it in place.
Wall-Mount Bracket
turned so phone can
be wall-mounted.
Hook switch
Tabs
Desk
Mount
key
Wall
Mount
Modular
wall jack
Key
9
Page 10
C1000 FEATURES
program redial
signal
flash
C1000TM with Cla rity® Power
TM
hold
abc def
jklghi mno
tuv
oper
pgrs wxyz
help
mute
boost
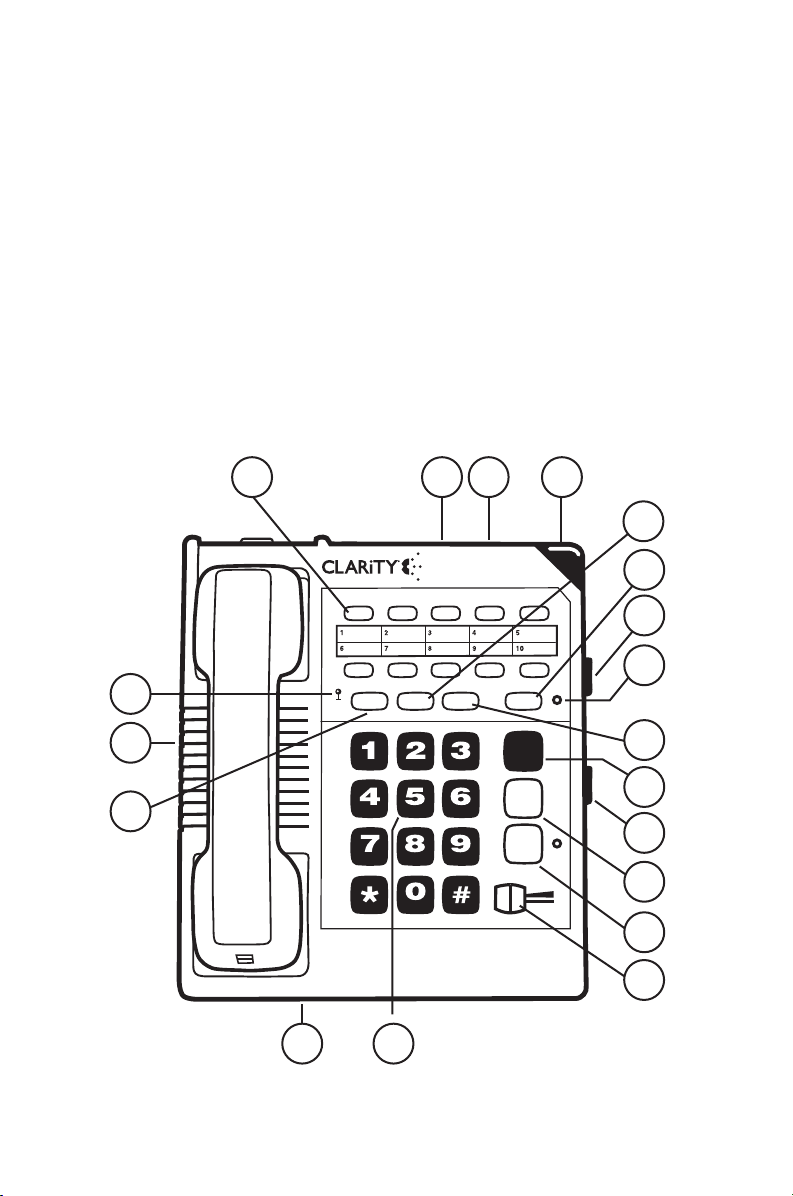
1. Clarity® Power™Control
2. Boost Button
3. Clarity ON/OFF Switch
4. Sound Level Indicator
5. Ringer Volume Control
6. Visual Ringer
7. Ringer Pitch Control
8. Tone/Pulse Selector
9. Last Number Redial
10. Flash Button
16
4
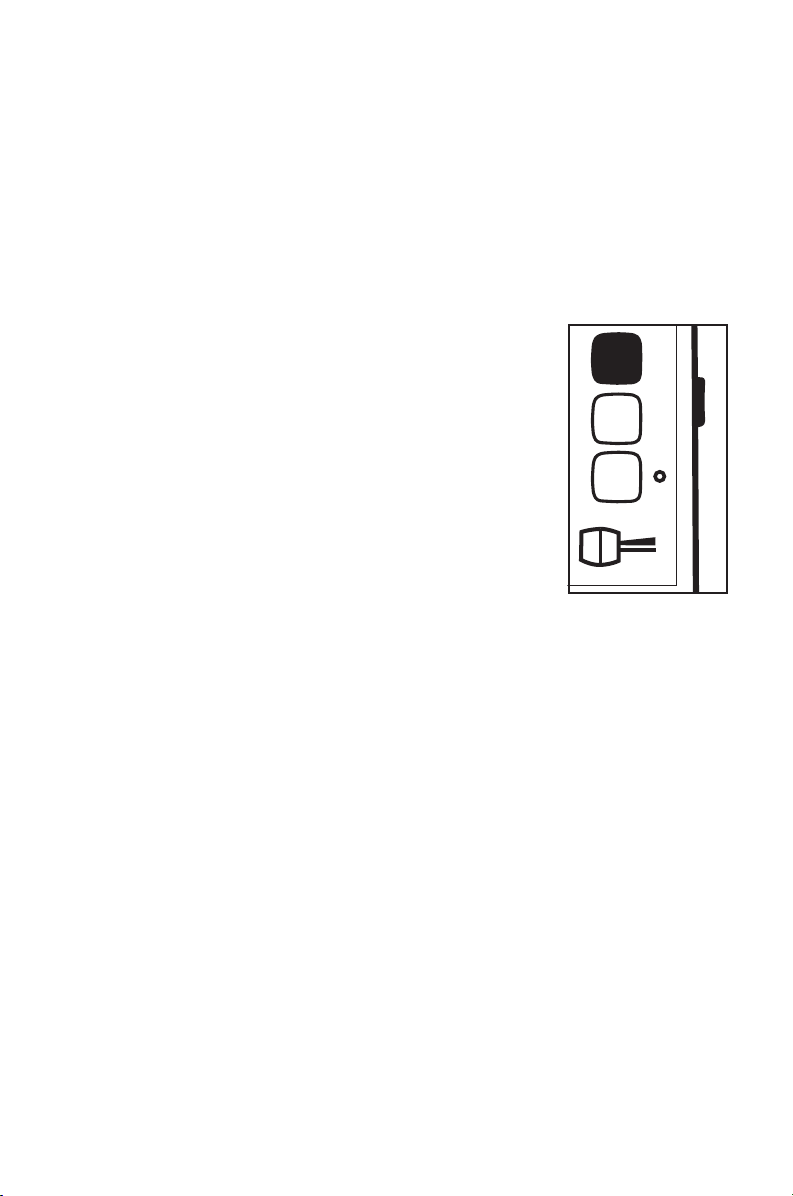
11. Hold Button
12. Hold Indicator
13. Mute Button
14. Program Button
15. Help Button
16. Memory Location
17. Braille Button #5 Key
18. Neck Loop Auxillary Port
19. Boost Override Switch
3
8
6
12
9
11
7
10
18
14
19
10
15
5
13
2
1
17
Page 11

C1000 FEATURES
Your Clarity C1000 is packed with features that will help you
improve your communications over the telephone.
Clarity® Power™ Control
The Clarity Power Control allows you to control the clarity of your phone
conversations. It will let you hear clearly phone calls that are normally difficult to
understand. The amplification will be increased by more than 26 decibels and the
frequency band from 2000 to 3000Hz will be specially enhanced to improve the
clarity of your call.
Boost Control
The C1000 has a boost button that controls the loudness of the receiver. Once the
boost button is pressed, the volume will jump to the volume level indicated by the
Clarity Power Control.
To Increase Clarity Power:
Slide the button marked Clarity Power toward the right.
To Decrease Clarity Power:
Slide the button toward the left. The extreme left is the level of a normal
telephone conversation.
Clarity Effect (On/Off Switch) Smart Tone Control
Clarity ON insures the user that the high frequency sounds are being amplified
more than lower frequencies so that words are not just louder, but clearer and
easier to understand. Clarity OFF provides the loudest output possible.
Boost Override
The C1000 has a boost override switch located on the back of the unit. This
switch will disable the reset feature of the boost button upon hang up as follows:
ON–When the Boost override switch is in “on” position volume will remain at the
current volume control setting. This eliminates the need to press the boost button
with each phone call.
OFF–When the Boost Override switch is in “off ” position volume will reset to
normal upon hangup. The Boost button will need to be depressed with each
phone call to restore settings.
WARNING: When Boost button is lit volume may be at a high level. To protect
hearing, lower volume control to minimum.
11
Page 12

C1000 FEATURES
Sound Level Indicator
This LED signal indicates if there is speech or sound present on the line. It will be
bright and steady when a dial tone is present. It will flash in rhythm with a busy
signal and will flicker when the person on the other end is speaking. This feature is
designed to assist those individuals with a more profound hearing loss.
Ringer Controls
The Clarity C1000 comes with a Special Low-Frequency Ringer designed to be
easily heard by everyone.
The ringer also comes with a volume and pitch adjustment, allowing it to be
tailored to each user.
The ringer Volume Control has three settings: OFF, LOW, and HIGH. It is suggested
that you set the volume control to high when you first start using your Clarity
telephone. To do this, slide the ringer volume control toward the largest dot.
The ringer also has a Pitch Control that has three settings: LOW, MED, and HIGH.
The low frequency is typically the easiest for people with partial hearing loss to
hear. It is suggested that you set the pitch control to low (the smallest dot) when
you start using the phone.
Visual Ringer
A lighted ringer works in conjunction with the low frequency ringer. It sends out
a visual flashing alert every time a phone call is coming in. (This ringer will light up
regardless of the setting on the ringer volume control.)
Tone/Pulse Selection
The Clarity C1000 can be used as either a TONE (touch dial) or PULSE (rotary
dial) phone. Tone dialing is required for using special phone services such as long
distance calling. Please check with your local phone company on certain types of
service.
For Low Frequency, Loud Ring
Look On Right
Edge of Case
Volume
12
Pitch
Page 13

C1000 FEATURES
Note for Users with Pulse/Rotary service only: Many automated answering
systems used by banks, stores and government agencies ask you to “Push 1 for
service”, “Push 2 for the operator”, etc. You must switch the tone/pulse switch on
the top edge of the phone to tone before responding to these prompts. In summary, dial the phone number you want to call in pulse mode, switch to tone mode
to interact with the automated answering system, switch back to pulse mode
when your call is done. When switching from Pulse to Tone during a call, there will
be a 3 second delay from the time you first push a key in tone mode until the key
press is transmitted.
Important: You must have tone signaling service to use the TONE feature on the
Clarity telephone. If in doubt, contact your local telephone company.
To Set the TONE/PULSE Switch:
1. Move the switch towards the correct setting.
2. Depress the hookswitch once.
3. The phone will now dial in the mode you selected.
Last Number Redial
Last Number Redial allows you to automatically redial the last telephone number
you called. This feature is convenient for redialing numbers which are busy. The
phone number stored for redial will be reset with every new call you make.
To Operate Last Number Redial:
1. Depress the hookswitch to get a new dial tone.
2. Press the “Redial” Button once.
3. Stay on the line, and your call will be dialed.
The last number dialed will be stored in the Clarity telephone for you until you
dial another number.
Flash
Flash is a special feature that is required to use some calling services provided
by your local phone company, such as call waiting. Consult your guide to these
services which are available from your local phone company. Flash serves the same
purpose as pressing and releasing the hook switch very quickly.
13
Page 14

C1000 FEATURES
To Use the Flash Feature:
Simply press the Flash button at the appropriate time as outlined in the guide
provided by your local phone company.
Hold
This advanced feature on your Clarity C1000 allows you to put a call on hold, hang
up and switch to another extension or have a private conversation that you don’t
want the person on the other end of the phone to hear.
You will be able to hear the person on the other end, but they won’t be able to
hear you while the hold indicator light is on. The hold light will be on any time the
hold button has been pressed. A call will stay on hold until you pick up a receiver,
or press and release the hook switch. Pressing the hold button a second time will
not take the call off hold.
To Use the Hold Feature:
1. While a telephone call is in progress, press the hold button once to place the
call on hold. The red hold light will turn on.
2. Hang up the receiver.
3. To take the call off hold:
A. Simply lift the Clarity C1000 receiver out of the cradle.
-ORB. Pick up another telephone extension in your home.
-ORC. If you did not return the handset to the cradle after pushing the hold button,
press and release the hook switch once.
4. The hold light will turn off.
Mute
The mute button allows the user to conduct a private conversation that you
do not want the person on the other end of the phone to hear. While the mute
button is depressed, the microphone in the handset will be deactivated, preventing
conversation from being transmitted.
14
Page 15

C1000 FEATURES
Surge Protection
The unit is equipped with a resettable fuse. The fuse will automatically reset within
30 minutes after activation once the surge condition has subsided.
Neck Loop/Auxilary Port
The C1000 has a 3.5mm jack to use with a neck loop. The volume to the neck
loop is controlled with the Clarity Power Control. When the neck loop is plugged
in, the receiver in the handset is disabled.
Hearing Aid Compatibility
The Clarity C1000 is Hearing Aid Compatible with hearing aids that utilize a
T- switch or T-coil.
Once you have installed your Clarity C1000 according to the instructions noted
previously, it will be ready to use.
15
Page 16
TELEPHONE OPERATIONS
help
mute
boost
To Place or Receive a Call:
1. Adjust the Clarity Power Control to its lowest setting (zero).
2. Pick up the handset and listen for the caller’s voice or a dial tone. Watch the green
sound level light located on the phone base, next to the program button. It should
sign steady.
3. When placing a call, dial as you would any phone and wait for someone to answer.
4. Press the Boost Button
5. Adjust the Clarity Power Control upwards to a level
where the other party’s voice is heard loud and clear, and
begin conversation.
6. When you complete the call, return the handset to the
base unit.
7. After hanging up, the sound level will reset to normal level.
8. Pressing the Boost Button during subsequent conversa tions will return the volume to your set sound level.
Note: If you made an error while dialing, just depress the
hookswitch, listen for a dial tone, and dial again.
Help, Mute and
Boost Buttons
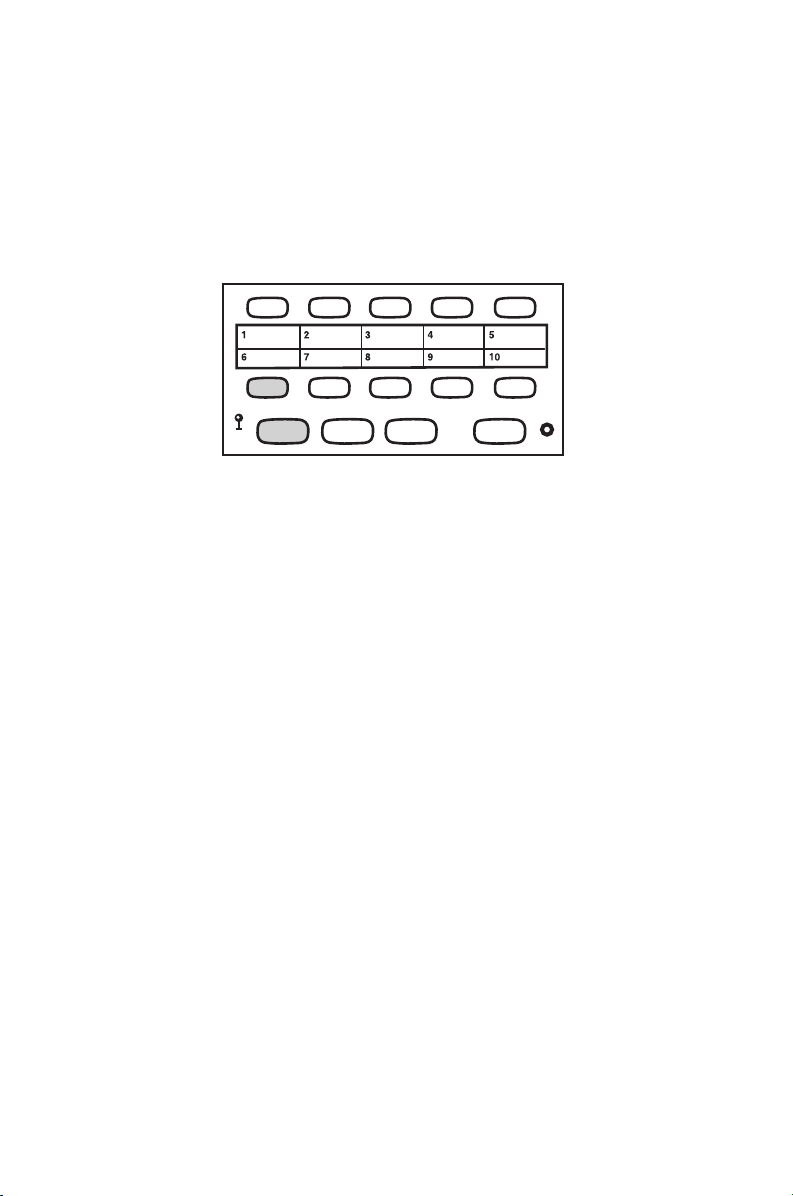
Programming Numbers into Memory
The Clarity C1000 allows you to program in one help number and ten frequently
dialed numbers into memory for future use. By doing so, you will only have to press
one button to place a call. As a matter of safety, write these important numbers on
the quick reference card under the receiver or below the memory storage locations.
Important: Wait at least two hours after installing for the phone to charge before
you begin programming.
To Program Numbers into the Clarity Phone:
1. Select the number you wish to store for each memory button. The C1000 will let
you store up to 16 digits with each button.
2. Select the correct TONE/PULSE setting you normally dial in. (Remember, some
long distance services require TONE dialing.)
3. Pick up the handset from the phone base, press and release the “PROGRAM”
button on the base unit.
4. Dial the number you wish to store. The number is not transmitted while you are
programming it.
16
Page 17
TELEPHONE OPERATIONS
program redial
signal
flash hold
5. Press the “PROGRAM” button again.
6. Select the appropriate memory storage button. Press and release this button.
7. Place handset back into cradle.
8. Repeat steps 3 through 7 for all other memory storage locations.
Programming Frequently-Dialed Numbers
To Dial Programmed Numbers:
1. Pick up the handset and listen for a dial tone.
2. Press the appropriate Memory Storage Button.
3. The number will be dialed automatically.
Change A Stored Number
Replace a stored number by programming a new number its place.
Important: The HELP BUTTON is not pre-programmed for 911. Once program-
ming is completed select the appropriate sticker from the sticker set provided and
place on the red button.
Programming Note: During the programming sequence the dial tone MAY
NOT break and in some instances an operator intercept may come on the line.
This is normal. Continue with the programming sequence to completion.
Note: You can program a pause into the dialing sequence if necessary. Since there
is not a pause button on the telephone, the redial button serves this purpose during programming. Programming in a pause will cause the phone to wait 3 seconds
before dialing any more numbers. For Example: Pressing a memory button that has
9 (pause) 555-1212 programmed into it will dial the number 9, then wait 3 seconds
and dial 555-1212. In most cases, you will not need to use a pause. You can store
up to 16 digits and the pause function counts as 1 of those digits.
17
Page 18

TELEPHONE CARE
The Clarity C1000 has been designed to give you years of dependable service with
a minimum of care.
To ensure the utmost in performance, follow these guidelines
in caring for the unit:
• Avoid dropping or knocking the unit.
• Dust the unit regularly. Wipe the unit with a soft, damp cloth. Do
not use detergents and avoid excess moisture.
• The Clarity C1000 is an electrical device. Avoid electric shock by keeping the
phone away from water. (i.e.: bathroom, kitchen sink, etc.)
18
Page 19

TROUBLESHOOTING
Phone Will Not Operate
Disconnect any other equipment that may be attached to the phone. Check your
phone cords and connections. Try a different line cord and/or handset cord to
determine if the problem is with one of the cords. If problem lies in the cord
simply replace the defective cord. If this does not solve the problem, try plugging
the phone into a different phone jack.
Can’t Dial Out
Make sure that TONE/PULSE switch is set correctly. Phone should be set to TONE
if you have touch tone service from your phone company. Phone should be set to
PULSE if operating with rotary dial service.
Phone Doesn’t Dial Out On First Attempt
Your phone may be at the end of a long line of phones, due to the way the phone
company installed the wiring in your neighborhood. In this case, your phone may
not get enough power from the phone line. Try waiting 3-5 seconds after lifting the
handset before dialing the number. Wait for the sound level indicator to light solid
before dialing.
Can’t Store Numbers Into Memory
Your new Clarity phone must charge for two (2) hours before you can program
any numbers into it.
Loss Of Numbers Programmed Into Memory
Your Clarity phone will maintain its memory for up to 12 hours during a power
loss. If you unplug the phone from the telephone line for long periods or lose
your phone service for an extended period of time you will need to reprogram
the phone.
Programming Personal Access Codes – Difficulty Programming
Account Numbers
Your TONE/PULSE selector must be switched to the TONE mode to enter account numbers. This is because most interactive phone systems require TOUCH
TONE to operate. If your phone service is rotary service, you must have the
switch set to PULSE to dial a number. Once you are connected move the switch
to TONE and enter your responses using TOUCH TONE mode. When your call is
complete move the switch back to PULSE so you are ready to make your next call.
19
Page 20

TROUBLESHOOTING
Static On Line – Interference From Household Appliances
Your Clarity phone may be located near a touch lamp, microwave or refrigerator
which may cause interference. Relocating your phone to another area may eliminate the problem.
A cordless phone on your phone line may also cause static. Try disconnecting your
cordless phone for several days. This may eliminate the problem.
Disconnect any extra devices which may be attached to the phone. Extra devices
may include cord detangler’s, caller ID units, and answering machines.
Interference From Malfunctioning, Frayed Or Poorly
Connected Telephone Cords
Check your phone cords and connections. Try interchanging cords with another
phone to see if the problem is eliminated. Replace any defective equipment.
Feedback Occurs When Handset Is Set Down
Avoid setting receiver on a hard surface or attach a foam receiver pad to earpiece
of phone. You can also lay the receiver on its side. This will eliminate feedback also.
A Person On The Other End Cannot Hear You
Too many phones or phone devices on the line may effect your phone’s transmission. As a guideline, more than five (5) phones or phone devices may overload the
phone line. Disconnect one (1) or two (2) of the devices to see if that eliminates
the problem. If not, contact your local phone company for load guidelines.
You may not be speaking directly into the transmitter. Always speak directly into
the mouthpiece in your normal tone of voice.
The C1000 is Compatible With Digital PBX Systems
If a standard, single line phone works, your C1000 phone should also work.
• Clarity Phones Are Not Compatible With Key Systems Or AT&T PBX Systems
These units have a large electronic box controlling many phones as one unit. These
types of units may be found in office buildings and some retirement homes, nursing
homes and condos.
20
Page 21

TROUBLESHOOTING
Unable To Hear Phone Ringer
Make sure the ringer volume is not set to OFF.
Slide the volume adjustment switch to the large dot and the pitch adjustment
switch to the small dot. This will cause the ringer to sound at its loudest and
lowest frequency. Typically, low frequencies are easier for people with hearing
loss to detect.
Consider purchasing a variable pitch auxiliary ringer such as the Clarity WR-100.
These devices are exceptionally loud and can be plugged into any phone outlet in
your home.
User Hears Radio or CB Transmissions On The Phone
Contact your local phone company to have your telephone line checked. A Radio
Frequency Interference (RFI) filter may be put on the line to minimize this problem.
If you have any telephone service problems, first make sure you have followed all
of the installation procedures outlined in this user’s guide. Then try to determine
if the source of the problem is the Clarity phone itself or your phone service. To
do this, disconnect the Clarity C1000 and plug in your standard telephone. If the
trouble persists with the standard telephone, inform your telephone company.
If the trouble is related to only the Clarity phone, review the installation
procedures and the troubleshooting guide before referring to the Limited
Warranty stated later in this user guide.
21
Page 22

REGULATORY COMPLIANCE
Part 68 of FCC Rules
Information
a) This equipment complies with Part
68 of the FCC rules and the requirements adopted by the ACTA. On the
bottom of this equipment is a label
that contains, among other information,
a product identifier in the format
US:AAAEQ##TXXXX. If requested,
this number must be provided to the
telephone company.
b) A plug and jack used to connect this
equipment to the premises wiring and
telephone network must comply with
the applicable FCC Part 68 rules and
requirements adopted by the ACTA. A
compliant telephone cord and modular
plug, RJ11C USOC, is provided with this
product. It is designed to be connected
to a compatible modular jack that is
also compliant. See installation instructions for details.
c) The REN is used to determine the
number of devices that may be connected to a telephone line. Excessive
RENs on a telephone line may result in
the devices not ringing in response to an
incoming call. In most but not all areas,
the sum of RENs should not exceed five
(5.0). To be certain of the number of
devices that may be connected to a
line, as determined by the total RENs,
contact the local telephone company.
For products approved after July 23,
2001, the REN for this product is part
of the product identifier that has the
format US:AAAEQ##TXXXX.
The digits represented by ## are the
REN without a decimal point (e.g., 03 is
a REN of 0.3). For earlier products, the
REN is separately shown on the label.
d) If this telephone equipment causes
harm to the telephone network, the
telephone company will notify you in
advance that temporary discontinuance of service may be required. But
if advance notice isn’t practical, the
telephone company will notify the
customer as soon as possible. Also,
you will be advised of your right to
file a complaint with the FCC if you
believe it is necessary.
e) The telephone company may make
changes in its facilities, equipment,
operations or procedures that could
affect the operation of the equipment.
If this happens the telephone company
will provide advance notice in order for
you to make necessary modifications to
maintain uninterrupted service.
f) If trouble is experienced with this
telephone equipment, for repair or
warranty information, please contact
Clarity, 1-800-552-3368. If the equipment is causing harm to the telephone
network, the telephone company may
request that you disconnect the equipment until the problem is resolved.
g) This telephone equipment is not
intended to be repaired and it contains
no repairable parts. Opening the equipment or any attempt to perform repairs
will void the warranty. For service or
repairs, call 1-800-552-3368.
h) Connection to party line service is
subject to state tariffs. Contact the state
public utility commission, public service
22
Page 23

REGULATORY COMPLIANCE
commission or corporation commission
for information.
i) If your home has specially wired alarm
equipment connected to the telephone
line, ensure the installation of this telephone equipment does not disable your
alarm equipment. If you have questions
about what will disable alarm equipment,
consult your telephone company or a
qualified installer.
j) This telephone equipment is hearing
aid compatible.
Customer-Owned Coin/Credit
Card Phones:
To comply with state tariffs, the telephone company must be given notification prior to connection. In some states,
the state public utility commission, public service commission or corporation
commission must give prior approval
of connection.
Part 15 of FCC Rules
Information
This device complies with Part 15 of the
FCC Rules. Operation is subject to the
following two conditions: (1) This device
may not cause harmful interference, and
(2) this device must accept any interference received, including interference
that may cause undesired operation.
Your equipment has been tested and
found to comply with the limits of
a Class B digital device, pursuant to
Part 15 of FCC rules. These limits are
designed to provide reasonable protection against harmful interference in
residential installation.
This equipment generates, uses and can
radiate radio frequency energy and, if
not installed and used in accordance
with the instructions, may cause harmful
interference to radio communications.
However, there is no guarantee that
interference will not occur in a particular installation; if this equipment
does cause harmful interference to
radio or television reception, which
can be determined by turning the
equipment off and on, you are encouraged to try to correct the interference
by one of the following measures:
1. Where it can be done safely,
reorient the receiving television
or radio antenna.
2. To the extent possible, relocate
the television, radio or other
receiver with respect to the
telephone equipment. (This
increases the separation between
the telephone equipment and
the receiver.)
3. Connect the telephone equip-
ment into an outlet on a circuit
different from that to which
the television, radio, or other
receiver is connected.
4. Consult the dealer or an
experienced Radio/TV Technician
for help.
CAUTION : Changes or modifi-
cations to this equipment not
expressly approved by the party
responsible for compliance could
void the user’s authority to operate
the equipment.
23
Page 24

REGULATORY COMPLIANCE
Privacy of communications may not be
ensured when using this phone.
CAUTION: To maintain the compliance with the FCC’s RF exposure
guideline, place the base unit at least
20 cm from nearby persons.
For body worn operation, this handset
has been tested and meets the FCC
RF exposure guidelines when used
with the (Plantronics) accessories
supplied or designated for this product.
Use of other accessories may not
ensure compliance with FCC RF exposure guidelines.
Industry Canada Technical
Specifications
This product meets the
applicable Industry Canada
technical specifications.
Before installing this equipment, users
should ensure that it is permissible to
be connected to the facilities of the
local telecommunications company. The
equipment must also be installed using
an acceptable method of connection.
In some cases, the company’s inside
wiring associated with a single line
individual service may be extended
by means of a certified connector
assembly (telephone extension cord).
The customer should be aware that
compliance with the above conditions
may not prevent degradation of service
in some situations. Repairs to certified equipment should be made by an
authorized Canadian maintenance
facility designated by the supplier.
24
Any repairs or alterations made by the
user to this equipment, or equipment
malfunctions, may give the telecommunications company cause to request the
user to disconnect the equipment.
Users should ensure for their own
protection that the electrical ground
connections of the power utility, telephone lines and internal metallic water
pipe system, if present, are connected
together. This precaution may be particularly important in rural areas.
CAUTION : Users should not
attempt to make such connections
themselves, but should contact the
appropriate electrical inspection
authority, or electrician, as appropriate.
The Ringer Equivalence Number is an
indication of the maximum number of
terminals allowed to be connected to
a telephone interface. The termination
on an interface may consist of any
combination of devices subject only
to the requirement that the sum of the
Ringer Equivalence Numbers of all the
devices does not exceed five.
(The term “IC:” before the certification/
registration number only signifies that
the Industry Canada technical specifications were met.)
This Class B digital apparatus complies
with Canadian ICES-003.
The party responsible for
regulatory compliance:
Clarity, A Division of Plantronics, Inc.
4289 Bonny Oaks Drive, Suite 106
Chattanooga, TN 37406
Phone: 1-800-552-3368
Page 25

WARRANTY & SERVICE
The following warranty and service
information applies only to products
purchased and used in the U.S. and
Canada. For warranty information in
other countries, please contact your
local retailer or distributor.
Limited Warranty
Clarity, a division of Plantronics, Inc.
(“Clarity”) warrants to the original
consumer purchaser that, except for
limitations and exclusions set forth
below, this product shall be free from
defects in materials and workmanship
for a period of one (1) year from the
date of original purchase (“Warranty
Period”). The obligation of Clarity
under this warranty shall be at Clarity‘s
option, without charge, of any part or
unit that proves to be defective in
material or workmanship during the
Warranty Period.
Exclusions from Warranty
This warranty applies only to defects in
factory materials and factory workmanship. Any condition caused by accident,
abuse, misuse or improper operation,
violation of instructions furnished by
Clarity, destruction or alteration, improper electrical voltages or currents,
or repair or maintenance attempted
by anyone other than Clarity or an
authorized service center, is not a
defect covered by this warranty. Telephone companies manufacture different
types of equipment and Clarity does not
warrant that its equipment is compatible with the equipment of a particular
phone company.
Implied Warranties
Under state law, you may be entitled to
the benefit of certain implied warranties.
These implied warranties will continue
in force only during the warranty period.
Some states do allow limitations on how
long an implied warranty lasts, so the
above limitation may not apply to you.
Incidental or
Consequential Damages
Neither Clarity nor your retail dealer or
selling distributors has any responsibility for any incidental or consequential
damages including without limitation,
commercial loss or profit, or for any
incidental expenses, expenses, loss of
time, or inconvenience. Some states
do not allow exclusion or limitation of
incidental or consequential damage, so
the above limitation or exclusion may
not apply to you.
Other Legal Rights
This warranty gives you specific legal
rights and you may also have other
rights which vary from state to state.
25
Page 26

WARRANTY & SERVICE
How to Obtain
Warranty Service
To obtain warranty service, please
prepay shipment and return the
unit to the appropriate facility
listed below.
In the United States
Clarity Service Center
4289 Bonny Oaks Drive, Suite 106
Chattanooga, Tennessee 37406
Tel: (423) 622-7793 or
(800) 426-3738
Fax: (423) 622-7646 or
(800) 325-8871
In Canada
Plantronics Service Center
8112 Trans-Canada Hwy.
Ville St. Laurent. Que.
Canada H4S 1M5
Tel: (800) 540-8363
(514) 956-8363
Fax: (514) 956-1825
Please use the original container, or
pack the unit(s) in a sturdy carton with
sufficient packing material to prevent
damage.
Include the following information:
1. A proof-of-purchase indicating
model number and date of
purchase.
2. Bill-to address.
3. Ship-to address.
4. Number and description of
units shipped.
5. Name and telephone number
of person to call, should contact
be necessary.
6. Reason for return and descrip-
tion of the problem.
Damage occurring during shipment is
deemed the responsibility of the carrier,
and claims should be made directly with
the carrier.
26
Page 27

program redial
signal
flash
C1000TM with Cla rity® Power
TM
hold
abc def
jklghi mno
tuv
oper
pgrs wxyz
help
mute
boost
Guía del Usario
Teléfono amarrado amplificado
Presentar tecnología de Poder de Clarity
TM
C1000
®
E
S
P
A
Ñ
O
L
Page 28

Page 29

TABLA DE CONTENIDOS
Instrucciones de seguridad: ............................................................. 30
Instalacion: ................................................................................................ 34
Funciones: .................................................................................................. 37
• Control de Potencia Clarity® ...................................................... 38
• Control de Amplificador .............................................................. 38
• Interrupter Fijo .............................................................................. 38
• Efectos de Clarity .......................................................................... 39
• Indicador del Nivel de Sonido .................................................... 39
• Control del Volumen de Sonido ................................................. 39
• Control para Graduar el Tono .................................................... 40
• Timbre Visual .................................................................................. 40
• Selección del Tono/Pulso.............................................................. 40
• Marcador del Ultimo Número ................................................... 41
• Luz Intermitente ............................................................................ 41
• Espera .............................................................................................. 41
• Enmudecido .................................................................................... 42
• Protección Activada ...................................................................... 42
• Auxiliar de Canal de Acceso ....................................................... 42
• Compatibilidad con los Mecanismos de Audición .................. 42
Operacion:................................................................................................. 43
• Hacer y Recibir una llamada ....................................................... 43
• Coma Progromar Númerosen
la Memoria del Teléfono ............................................................... 44
Mantenimiento: ...................................................................................... 46
• Guía Para La Corrección de Fallas ............................................ 47
• Reglamentos de La CFC .............................................................. 50
• Garantía y Seruicio........................................................................ 53
Page 30

INSTRUCCIONES
Cuando utilice su aparato telefónico,
debe tomar precauciones básicas de
seguridad para reducir los riesgos de
incendio, descarga eléctrica y lesiones a
las personas, entre las que se incluyen
las siguientes:
1. Lea y comprenda todas las
instrucciones.
2. Siga todas las instrucciones y adver tencias marcadas en el teléfono.
3. No utilice este teléfono cerca de
una bañera, lavatorio, lavabo o el
fregadero, en un subsuelo húmedo,
cerca de una piscina o cualquier
otro lugar con agua.
4. Evite utilizar un teléfono (que no sea
inalámbrico) durante una tormenta.
Existe el riesgo remoto de sufrir una
descarga eléctrica por rayos.
5. No utilice el teléfono para avisar de
una pérdida de gas, si se encuentra
cerca a la pérdida.
6. Desenchufe el teléfono de la pared
antes de limpiarlo. No utilice
limpiadores líquidos o en aerosol
para limpiar el teléfono. Utilice un
trapo húmedo para limpiar ela parato.
7. Coloque este teléfono sobre una
superficie firme. Si el teléfono se
cayera, podría causar daños y/o
lesiones graves.
8. No cubra las ranuras o aberturas
del teléfono. Este teléfono nunca
deberá colocarse cerca o sobre
un radiador o fuente de calor. Este
teléfono no debería instalarse en una
instalación empotrada a menos que
cuente con la ventilación apropiada.
9. Utilice este teléfono al voltaje
indica do en la unidad base o en
el manual del propietario. Si no
está seguro del voltaje en su hogar,
consulte con su distribuidor o con
la compañía de energía locales.
10. No coloque nada sobre el cable
de energía. Instale el teléfono de
manera que nadie pise o se tropiece
con el cable.
11. No sobrecargue las tomas en la
pared o los cables alargadores, ya
que esto puede aumentar el riesgo
de descarga eléctrica o incendio.
12. Nunca fuerce ningún objeto por
as ranuras del teléfono. Podría
tocar puntos con voltaje peligroso
o hacer cortocircuito en elementos
que generen el riesgo de descarga
eléctrica o incendio. Nunca vuelque
ningún tipo de líquido sobre el
teléfono.
13. Para reducir el riesgo de descarga
eléctrica, no desarme el teléfono.
Quitar o abrir las carcasas puede
exponerlo a voltajes peligrosos
u otros riesgos. El re-armado
incorrecto puede causar descarga
eléctrica luego, cuando se utilice
el aparato.
14. Ante alguna de las siguientes
condiciones, desconecte del toma
en la pared, y contáctese con el
fabricante para reparaciones:
30
GUARDE ESTAS INSTRUCCIONES
Page 31

INSTRUCCIONES
A. Cuando el cable de suministro
de energía o enchufe están
dañados o desgastado.
B. Si se volcó líquido en el interior
del producto.
C. Si el teléfono se vio expuesto a
la lluvia o al agua.
D. Si el teléfono no funciona
normalmente siguiendo las
instrucciones de operación.
Sólamente ajuste los controles
que se expliquen en las instruc ciones de operación. Un ajuste
incorrecto puede resultar en
trabajos complejos de un
técnico calificado para restau rar el teléfono a las condiciones
de operación normal.
E. Si se cayó el teléfono o la
carcasa está dañada.
F. Si se nota un cambio notable
en el funcionamiento del
teléfono.
15. Nunca instale cableado telefónico
durante una tormenta eléctrica.
16. Nunca instale tomas de teléfono
en áreas húmedas, a menos que el
toma esté diseñado para soportar
áreas húmedas.
17. Nunca toque el cable telefónico
desnudo o las terminales a menos
que la línea telefónica esté desco nectada en la boca de red.
18. Tenga precaución cuando instale o
modifique líneas telefónicas.
19. Sólo use las baterías y cable de
energía indicados en el manual. No
descarte las baterías en el fuego.
Puede explotar. Verifique las normas
locales, ya que pueden existi instruc ciones de eliminación especiales.
20. Conecte el adaptador de CA al
toma más accesible y cercano
al teléfono.
GUARDE ESTAS INSTRUCCIONES
31
Page 32

LISTA DE CONTROL DE
program redial
signal
flash
C1000TM with Clarity® Power
TM
hold
abc def
jklghi mno
tuv
oper
pgrs wxyz
help
mute
boost
ELEMENTOS Y CONTENIDOS
Saque todo el contenido del paquete cuidadosamente. Si hay algun daño
visible o si alguno de los aríiculos no aparece, no trate de operar este
equipo. Favor de llamar al 1-800-552-3368 para solicitar que le cambien
tal unidad por una nueva de fábrica.
Además de los artículos listados anteriormente, necesitará uno de los
siguientes para completar la instalación de esta unidad:
• Recptáculo Modular de pared, o
• Un adaptador modular RJ-IIC (Si posee un receptáculo más
adecuado de cuatro puntas o dientes)
32
Cordón del teléfono
(10 pies, enrollado)
Aparato de montura en
la pared/escritorio
Base
Unidad Inalámbrica
Cable telefónico
Esta guía del cliente
Page 33

INSTALACIÓN
program redial
signal
flash
C1000TM with Clarity® Power
TM
hold
abc def
jklghi mno
tuv
oper
pgrs wxyz
help
mute
boost
Advertencia: Para prevenir choques o cortos electricos, desconecte siempre
la linea o cordon del telefono, que esta enchufado al receptaculo electrico de la
pared antes de desconectar el cordon del telefono. Nunca deje la linea o el cordon
conectado al receptaculo de la toma de corriente electrica en la pared, si esta no
esta conectada tambien al telefono.
Seleccione una Localización:
• Esta Unidad requiere de un receptaculo modular.
• La unidad debera estar ubicada en una area donde el boton del timbre (que
produce el sonido) iluminado sea facil de ver.
• La unidad puede ser colocada sobre el escritorio o instalada en una pared.
Evite Colocar la unidad donde pueda estar expuesta al calor o
humedad excesiva.
Conectando el Teléfono Clarity C1000
Para instalar el teléfono Como una Unidad de Escritorio:
• Enchufe un extremo de la línea del cordón del teléfono (el que es largo y plano)
en la ranura, en la parte de atrás de la C1000.
Nota: Si está enchu-
fado su teléfono sobre
un receptáculo antiguo
de cuatro puntas o
dientes, use un adaptador RJIIC, como el que
aparece abajo.
Coloque
el Cordón
Plano Aquí
Conecte el cordón
enrollado aquí
33
Page 34

INSTALACIÓN
• Enchufe el otro extremo de la línea del cordón del teléfono en la ranura del
receptáculo de pared.
• Enchufe un extremo del cordón del auricular (cordón enrollado) en el extremo
de abajo del auricular.
• Enchufe el otro extremo del cordón del auricular en la ranura del receptáculo
ubicado en la orilla izquierda de la Unidad C1000.
• Coloque el auricular en la cuna o asiento de la Unidad C1000.
La Unidad de Clarity C1000 viene armado con su artefacto de montura adherido
en posición para colocarse sobre el escritorio. Para la instalación en una pared,
simplemente elimine el artefacto de montura a 180o grados y proceda a montarlo
como aparece en la ilustración.
• Ensamble la montura de pared a la parte inferior de la Unidad Clarity C1000.
Esta caerá rápidamente en su lugar. El cordón deberá extenderse por debajo del
soporte o artefacto de montura en la pared.
Montura de
soporte para
la pared
34
Parte posterior del telefono
Page 35

signal
INSTALACIÓN
• Enchufe la otra terminal de la línea del cordón del teléfono del soporte o
artefacto de pared con las clavijas que sobresalen. Puede almacenar el exceso
del cordón dentro del soporte o artefacto de montura sobre la pared.
• Enchufe una terminal de la línea del cordón del teléfono (la más larga y de forma
plana) en la ranura de atrás de la unidad C1000.
Nota: Si el soporte o artefacto de montura sobre la pared ya ha sido colocado
en la posición de montura sobre el escrotorio, quítelo presionando las proyecciones y dele una vuelta de 180o grados hacia la llave mostrada para la montura en
la pared.
Advertencia: A fin de prevenir un choque electrico, siempre desconecte la linea
del cordon del telefono del receptaculo de toma de corriente en la pared antes de
desconectar el cordon del telefono.
Nunca deje la línea conectada al receptáculo de toma de corriente eléctrica en la
pared si no está conectada también al teléfono.
Montura
sobre el
Interruptor
Proyecciones
Escritorio
Llave para
montar
la Unidad
sobre la
pared
35
Page 36

INSTALACIÓN
•Sostenga la Unidad de Clarity C1000 mientras nivela los huecos sobre el soporte
o receptáculo de montura con las clavijas que sobresalen del receptáculo modular
de pared. Una vez que los huecos son nivelados, empuje el teléfono hacia el receptáculo de pared; luego deslice la unidad del teléfono hacia abajo, hasta que sienta
que fue incrustada firmemente sobre el receptáculo de montura en la pared.
• Enchurfe una terminal del cordón del auricular (el que está enrollado, no el
plano) dentro de la parte inferior del auricular.
• Enchufe la otra terminal del cordón del auricular dentro de la ranura del
receptáculo ubicado en la parte inferior izquierda de la unidad Clarity C1000.
• Coloque el auricular en la cuna o asiento de la Unidad Clarity C1000. Las
proyecciones especiales le sostendrán en su lugar.
Montura de soporte
para la pared
36
Parte posterior
del telefono
Page 37

FUNCIONES DEL TELÉFONO
program redial
signal
flash
C1000TM with Cla rity® Power
TM
hold
abc def
jklghi mno
tuv
oper
pgrs wxyz
help
mute
boost
1. Control de Potencia Clarity
2. Control de Amplificador
3. Interruptor de Encendido/
Apagado Clarity
4. Indicador del Nivel de Sonido
5. Control de Volumen de Sonido
6. Timbre Visual
7. Control para Graduar el Tono
8. Selección del TONO/PULSO
9. Marcardor del Ultimo Número
10. Botón de Luz Intermitente
16
4
11. Botón de Espera
12. Indicador de Llamada en Espera
13. Botón de Enmudecido
14. Botón para Prgramar
15. Botón para Ayuda
16. Localizar Números en la Memoria
17. Botón para Braile, tecla #5
18. Auxiliar de Canal de acceso
19. Interrupter Fijo
3
8
6
9
11
7
12
18
14
19
10
15
5
13
2
1
17
37
Page 38

FUNCIONES DEL TELÉFONO
Su equipo Clarity C1000 estaácompuesto con funciones integradas que le ayudarán
a mejorar su communicación por teléfono.
Botón para el control del CLARITY:
El botón para el control de la claridad le permite modificar la claridad de sus
conversaciones telefónicas. Le permitirá también, esuchar las llamadas claramente,
que en circunstancias normales le sería dificil entender. La potencia podría ser
aumentada a más de 26 dB y a la banda de frecuencia de 2000 a 3000 Hz, será
aumentada especialmente para mejorar la claridad de su llamada.
Control del Amplificador
El C1000 tiene un botón amplificador que controla el sonido del auricular. Una vez
que el botón es presionado, cambiará el nivel de volumen indicado en el control de
volumen. El Botón amplifi-cador será programado automáticamente cada vez que
esté colgado por lo menos hasta 5 segundos. Esta función le permitirá al cliente
hacer múltiples llamadas, una tras otra, sin tener que presionar el botón amplificador cada vez que se haga una llamada.
Para aumentar la Potencia del Clarity:
Deslice el botón marcado Aumento de Claridad hacia la derecha.
Para Disminuir la Potencia del Clarity:
Deslice el botón hacia la izquierda. La extrema izquierda es el nivel de una
conversación normal por teléfono.
Interruptor Fijo
El Modelo C1000 tiene un interruptor fijo localizado en la parte posterior de la
Unidad. Este interruptor incapacitará la función establecida sobre el botón
Amplificador al colgar, como se muestra en seguida:
Apagado – (ON) Al Colgar, el control de volumen, es retenid o.
Encendido – (OFF) Al colgar, el volumen se fijará en el minimo nivel de Volumen
después de 5 segundos.
ALERTA: Cuando es el botón del alza encendió el volumen puede estar en un
alto nivel. Para proteger la audiencia, control de un volumen más bajo al mínimo.
38
Page 39

FUNCIONES DEL TELÉFONO
Interruptor de Encendido/Apagado Clarity
El Control de encendido Clarity, asegurará al cliente, que los sonidos de alta
frecuencia han sido amplificados para baja frecuencia para que las palabras no sean
sólo más “fuertes” pero claras y fáciles de comprender. El Control de apagado
Clarity, proveé el mejor rendimiento posible de amplificación.
Indicador del Nivel de sonido
Esta señal indica si hay sonido en la líinea. Cuando haya tono de marcar, la luz será
brillante y fija, cuando haya una señal de ocupado, alumbrará de manera rítmica e
intermitente, la luz fluctuará cuando una persona, al otro lado del teléfono esté
hablando. Esta función ha sido diseñada para auxiliar a aquellas personas con
problemas de audición.
Control del Volumen de Sonido
La Unidad de Clarity C1000 viene con un control especial del sonido de baja
fre-ucuencia disenado para ser escuchado facilmente por cada uno.
El control del sonido tambien viene con su propio control del volumen de tono
y trinopara ser ajustado por el usuario.
El Control del volumen de sonido tiene tres conexiones: APAGADO, BAJO y
ALTO. Se sugiere que fije el control del volumen en alto cuando comience a usar
la unidad Clarity por primera vez. A fin de hacer esto, deslice el botón de control
de sonido hacia el punto más grande.
El botón de control del sonido también tiene un control del tono con tres
indicadores: BAJO, MEDIO y ALTO.
La frecuencia baja es típicamente la más fácil para las personas con problema
auditivo. Se sugiere que fije el control del tono en bajo (el punto más pequeño)
cuando comience a usar el teléfono.
Timbre Visual
Un panel iluminado opera en conjunto con el tono de baja frecuencia. Emite una
luz intermitente visible como aviso. Cada vez que entra una llamada telefónica.
(Este timbre se iluminará sin considerar de cómo esté fijado el control del
volumen de sonido.)
39
Page 40

FUNCIONES DEL TELÉFONO
Selección del Tono/Pulso
El C1000 puede ser usado en el modo de TONO (marcado de Toque de botones)
o en el modo de pulso (como si fuera marcado con disco giratorio). El modo de
TONO es requerido para usar servivios telefónicos especiales, como llamadas de
larga distancia.
Para Baja Frecuencia
Examine el borde derecho
de la caja
Volumen
Nota para los que tienen servicio de teléfono de Pulso/giratorio
únicamente:
Muchos sistemas de contestadora automática usada en bancos, tiendas y agencias
del gobierno le piden: “Marque el #1 PARA RECIBIR SERVICIO, el #2 para la operadora” etc. Deberá cambiar el botón del conmutador de tono/pulso en el extremo
superior del borde del teléfono al MODO DE TONO antes de responder a esas
sugerencias. En Resumen, marque el número que desea llamar en el modo de pulso,
cambie modo de tono para estar en reciprocidad con el sistema de contestadora
automática; luego vaya de nuevo al modo de pulso cuando su llamada haya concluído. Cuando cambie de pulso a tono durante una llamada, habrá un lapso de 3
segundos dilatación desde el tiempo en que presionó una tecla en la escala de tono
por primera vez hasta que la presión de la tecla sea transmitida.
Importante: Usted debe tener servicio de tono en el equipo, si tiene alguna duda,
llame a su compañía local de teléfonos.
Como fijar el modo de Tono/Pulso:
1. Mueva el conmutador hacia la posición correcta.
2. Oprima hacia abajo una vez, el botón de colgar/descolgar.
3. El teléfono podrá ser operado ahora en la escala que usted seleccionó.
Tono
Marcado del Ultimo Número:
La tecla de marcar el último Número, le permite volver a marcar automáticamente
el último número de teléfono al que llamó. Esta función es conveniente para volver
a llamar números que están ocupados. El último número de teléfono al cual llame,
quedará registrado en la memoria cada vez que haga una llamada nueva.
40
Page 41

FUNCIONES DEL TELÉFONO
Para Operar el Ultimo Número Marcado:
1. Descuelgue su teléfono y espera hasta obtener un nuevo tono de marcar.
2. Oprima el botón de “Redial” una vez.
3. Permanezca en la línea y su llamada volverá a ser marcada.
4. Por favor, verifique algunos tipos de servicios con su compañía local de teléfonos.
El último número marcado será registrado automáticamente en la Unidad Clarity
C1000 hasta que vuelva a llamar a otro número o cuando desconecte la unidad del
receptáculo de pared.
Luz Intermitente
La luz intermitente es una función especial requerida para usar algunos servicios
provistos por su compañía telefónica local, tales como llamada en espera. Consulte
su guía para esos servicios que están disponibles a través de su compañía local
de teléfonos. El botón de la luz intermitente tiene la misma función de colgar y
descolgar rápidamente su teléfono.
Como usar la función de la Luz Intermitente
Simplemente oprima el botón de la luz intermitente en el momento apropiado,
como aparece indicado en la guía provista por su compañía local de teléfonos.
Llamada en Espera
Esta función de tecnología avanzada en su unidad Clarity C1000 le permite poner
una llamada en espera, volver a colgar y cambiar hacia otra extensión o para
tener una conversación privada, la cual no desea que la persona al otro extremo
esuche. Usted prodrá escuchar a la persona al otro extremo, pero ella no podrá
escucharle a usted mientras la luz de espera esté encendida. Esta luz permanecerá
encendida mientras el botón de espera continue oprimido. Una llamada permanecerá en espera hasta que usted descuelgue otra extensión, o presione y suelte
el botón de colgar/descolgar el teléfono. El Oprimir el botón de espera una
segunda vez, no hará que la llamada en espera se interrumpa.
Como usar la función de Espera
1. Mientras una llamada telefónica está en progreso, oprima el botón de espera
una vez para poner la llamada en espera. La luz foja de llamada en espera
se encenderá.
2. Cuelgue el auricular.
3. Para sacar la llamada fuera de “espera”:
41
Page 42

FUNCIONES DEL TELÉFONO
A. Simplemente levante el auricular C1000 de su Unidad base O
B. Tome otra extensión de teléfono en su hogar O
C. Si no devuelve el auricular a su Unidad base después de oprimir el botón de
“espera”, presione y suelte el botón de colgar/descolgar solamente una vez.
4. La luz de espera se apagará.
Llamada Enmudecida
El botón para enmudecer “mute” le permite al usuario tener una conversación
privada, que usted no desea que la persona al otro extremo, escuche. Mientras
el botón de enmudecido esté presionado, el micrófono en el auricular estará
desconectado, previniendo que la conversación sea transmitida.
Protección Activada
Esta Unidad está equipada con un fusible preparado. Este fusible será activado
automáticamente, en un tiempo no menos de treinta minutos, una vez que se haya
dado la condición baja.
Auxiliar de Canal de Acceso
El C1000 tiene un receptor de sonido para usarse con un Auxiliar de canal de
acceso. El Volumen de dicho auxiliar, es controlado con el botón de control de
potencia Clarity. Cuando el auxiliar de canal de acceso está conectado, el auricular
será desactivado.
Una vez que usted haya instalado su Unidad de C1000 de acuerdo al instructivo
indicado previamente, estará listo para su uso.
Compatibilidad con los Mecanismos de Audición
El equipo C1000 es compatible a los auxiliares auditivos.
42
Page 43

C1000 OPERACION
help
mute
boost
Cómo Hacer o Recibir una llamada:
1. Ajuste el control de la C1000 a su grado más bajo (cero).
2. Levante el auricular y escuche el tono de marcar o si es una llamada, escuche
la voz de la persona. Mire el botón de la luz verde del nivel de sonido ubicada
sobre la base del teléfono, próximo al botón que dice “programa.” La señal
será constante.
3. Cuando haya tono de marcar, marque
el número como lo haría con cualquier otro
teléfono y espere que alguien conteste.
4. Oprima el botón del Amplificador.
5. Ajuste el control de potencia Clarity hacia
arriba al nivel donde las voces de las
personas se escuchen claro y fuerte y
comience su conversación.
6. Cuando termine la llamada, regrese el
auricular a la Unidad de base.
7. Después de colgar, El Nivel del sonido
volverá a su nivel normal.
8. Presionar el botón del amplificador en llamadas posteriores, hará que el
volumen vuelva a ajustarse a su nivel.
Nota: Si usted cometió un error mientras marcaba el número, sólo oprima el
botón del enganchador, escuche el tono de marcar y vuelva a marcar el número.
El Equipo de Clarity C1000 le da la oportunidad a usted de programar en un
número de emergencia y diez números frecuentes a marcar en la memoria para
uso futuro. Al hacer tal cosa, usted sólo tiene que oprimir un botón para hacer
una llamada. Como cuestion de seguridad, escriba estos números también en la
tarjeta de referencia rápida ubicada debajo del auricular o debajo de localización
de memoria almacenada.
Importante: Espere por lo menos dos horas después de instalar el teléfono
hasta que éste se cargue y luego puede porceder a programar.
Botones de Emergencia,
Enmudecido y Amplificador
Ayuda
Emmudecido
Amplificador
Control de
Pontencia
Clarity
43
Page 44

program redial
signal
flash hold
C1000 OPERACION
Cómo Programar Números en la Memoria del Teléfono
1. Seleccione el número que usted desea registrar para cada botón de la Memoria.
El Equipo de Clarity C1000 le permitirá programar en la memoria hasta 16
dígitos por cada número.
2. Marque el Número que usted desea programar en la Memoria. El Número no
es transmitido mientras usted lo esté programando. Usted puede programar
una pausa dentro de la secuencia de marcar, si es necesario. Dado que no hay
un botón de pausa separado en la Unidad telefónica, el botón de volver a marcar
automáticamente, el último número al que llamó, servirá para tal propósito
durante la programación. Recuerde, usted puede programar en la memoria
hasta 16 dígitos o números.
Nota: La Programación de la Función “pausa” hará que el teléfono espere 3
segundos antes de poder marcar números adicionales. Por ejemplo: El oprimir el
botón de la memoria que tiene el número 9 <P> 555-1212. En la mayoría de los
casos, usted no necesitará usar una pausa.
3. Oprima el botón de “Programa” de nuevo.
4. Seleccione el botón del número programado en la memoria. Presione y suéltelo.
5. Coloque el auricular de nuevo en la Unidad de base.
6. Repita los pasos 3 al 7 para otros números a marcar que programe en
la memoria.
44
Programando Números que se
llaman frecuentemente
Page 45

C1000 OPERACION
Marcar los Números Programados en la Memoria
1. Levante el auricular y espere el Tono de marcar.
2. Oprima el botón de Memoria Programada apropiado.
3. El Número será marcado automáticamente.
Importante: El Botón de Ayuda no es programable para el servicio de 911.
Usted deberá hacerlo por su cuenta.
Nota de Programación:
Durante la secuencia de programación, el tono de marcar NO DEBE ser interrumpido y en algunos casos, una inter-rupción de la operadora puede llegar a la línea.
Esto es normal. Continue con la secuencia de la programación para terminar.
45
Page 46

MANTENIMIENTO
La Unidad de Clarity C1000 ha sido diseñada para darle a usted muchos años de
buen servicio con un mínimo de mantenimiento.
Para asegurar lo máximo en Operación, siga las siguentes pautas en el mantenimiento de la Unidad:
• Evite dejar caer o golpear la Unidad.
• Limpie la Unidad regularmente utilizando un paño de tela suave y húmedo.
No utilice detergentes y evite el exceso de humedad.
• La Unidad Clarity es un aparato eléctrico. Evite los choques o descargas
eléctricas colocando el teléfono lejos del agua (ejemplo: baño, fregadero, etc.).
46
Page 47

GUIA PARA LA CORRECCION DE FALLAS
El teléfono no funcionará
• Desconecte cualquier otro equipo que pueda estar conectado al teléfono.
Verifique los cordones del teléfono y sus conexiones. Pruebe diferentes
cordones de línea y/o el cordón del auricular para determinar si el problema
es con uno de los cordones. Si el problema viene de uno de los cordones,
simplemente reemplace el cordón defectuoso. Trate de conectar el teléfono
en otro interruptor diferente de teléfono.
No Llama
• Asegurese de que el interruptor de TONO/PULSO esté puesto correctamente.
Si el conmutador de TONO está en su lugar, asegurese de tener el servicio
telefónico con su compañía local de teléfonos.
Cuando el Teléfono no Marca de primera Intención
• Su Teléfono puede que esté al final de una larga línea de teléfonos, dado a la
manera en que la compañía de teléfonos instaló el cablerío en su vecindario. En
tal caso, es posible que su teléfono no reciba suficiente energía o potencia de la
línea telefónica. Espere de 3 a 5 segundos después de levantar el auricular antes
de marcar el número. Espere que el indi-cador del nivel de sonido se encienda
completamente antes de marcar.
No puede almacenar los Números en la Memoria
• Su nueva Unidad Telefónica Clarity C1000 deberá ser cargada por unas 2 horas
antes de que pueda programar algún número en la memoria.
Pérdida de Números que fueron Programados en la Memoria
• Su Unidad Telefónica Clarity C1000 mantendrá su memoria un promedio de
12 horas durante la interrupción de la electricidad. Si desconecta la línea de
teléfono o si su servicio telefónico es desconectado por extensos periodos de
tiempo tendrá que reporgramar su teléfono.
Dificultad en la Programación de Números de Cuenta
• Su selector de TONO/PULSO tiene que estar en el modo de TONO a fin de
que entren los números de cuenta. El motivo de éste, se debe a que la mayoría
de los sistemas telefónicos interactivos requieren de un servicio de “TONO DE
CONTACTO” para operar. Si su servicio telefónico es giratorio, el interruptor
deberá estar en PULSO para poder marcar un número. Una vez conectada su
llamada, mueva el conmutador hacia la escala de TONO y entre su respuestas
47
Page 48

GUIA PARA LA CORRECCION DE FALLAS
usando el Servicio de TONO DE CONTACTO. Cuando su llamada conclya,
mueva el conmutador hacia la escala de PULSA y estará listo para hacer su
próxima llamada.
Interferencia de los Utensilios Eléctricos en el Hogar
• Su Unidad de Teléfono Clarity C1000 puede que esté ubicada cerca de una
ámpara que se enciende tocándola, cerca de un horno de micro-onda o de
un refrigerador; Estos utensilios causan interferencia en la Unidad.
La localización de de su teléfono a otra área del hogar podría
eliminar el problema.
• Un teléfono inalámbrico en su línea de teléfono también podría causar estática.
Desconectar su teléfono también podría causar estática. Desconecte su teléfono
inalámbrico durante varios dias. Esto podría eliminar el problema.
• Desconecte cualquier aparato conectado al teléfono. Tener varios aparatos
conectados al teléfono, como el Identificador de llamadas y la contestadora,
pueden causar que los cables se enreden.
• Interferencia debido al mal funcionamiento, Deshiladura o a la mala Conexión
de los cables del Teléfono.
• Examine los cables y conexiones de su teléfono. Trate de intercambiar los
cables o cordones con otro teléfono. Remplace cualquier equipo defectuoso.
El Problema de Eco Ocurre cuando el auricular es puesto en
alguna superficie
• Evite colocar el auricular sobre superficies duras o adhiera una almohadilla
de esponja en el teléfono. También puede colocar el auricular de lado, esto
eliminará el Eco.
La persona en el lado opuesto, No puede Escucharle
• Cuando hay muchos teléfonos o aparatos en la línea, podrían afectar su
transmisión telefónica. Como norma, más de (5) teléfonos o aparatos
telefónicos podrían sobrecargar la línea telefónica. Desconecte uno, (1) ó
dos (2) aparatos para ver si eso elimina el problema. Si No tiene Solución,
llame a su compañía telefónica local.
• Quizá usted no hable directamente por el transmisor. Siempre hable directa-
mente por el orificio del teléfono en tono normal de voz.
48
Page 49

GUIA PARA LA CORRECCION DE FALLAS
Los Teléfonos Clarity son Compatibles con los Sistemas Digitales PBS
• Si una línea sencilla y normal funciona bien, su teléfono C1000 también deberá
funcionar normalmente.
• Los Teléfonos Clarity No son compatibles con los Sistemas de Teclas Ni con
los Sistemas PBS de la Compañía AT&T
• Estas Unidades poseen una caja electrónica extensa que controla muchos
teléfonos como una Unidad. Estos Tipos de Unidades pueden ser hallados en
edificios de oficinas y en algunos asilos y condominios.
No puede escuchar cuando Suena el teléfono
• Asegurese de que el mecanismo del timbre no esté puesto en OFF– Apagado.
• Deslice o mueva el conmutador de ajuste del volumen hacia la marca mas
grande y ajuste el que gradua el tono moviéndolo hacia el punto más pequeño.
Esto hará que el mecanismo del sonido se oiga en su frecuencia más baja.
Típicamente las frecuencias bajas son más fáciles de detectar por las personas
con problemas de audición.
• Considere la compra de un mecanismo auxiliar de tono o sonido variable, tal
como el que nosotros ofrecemos: Clarity WR-100. Estos aparatos pueden
amplificar el volumen excepcionalmente y pueden ser enchufados en cualquier
receptáculo de pared para teléfono en su hogar.
Cuando el que llama Escucha Transmisiones de Radio o de CB por
la Unidad Telefónica
• Comuníquese con la Compañía Telefónica Local para que examine su línea de
teléfonos. Un filtro para interferencias en Frecuencias de radio (IFR) deberá ser
instalada en la línea para minimizar este problema.
• Si usted tiene problemas con cualquier servicio de teléfonos, primero debe
asegurarse de que haya seguido todos los procedimientos de instalación
bosquejados en la Guía del Usuario. Luego trate de determinar si la fuente del
problema es con Clarity C1000 o con su servicio de teléfonos. Para verificar
esto, desconecte la Unidad de Clarity C1000 y conéctela en el receptáculo
normal de su teléfono. Si el problema continua con el teléfono normal, llame
a su compañía de teléfonos local al respecto. Si el problema está relacionado
exclusivamente con Clarity C1000, revise de nuevo los procedimientos de
instalación y la guía para la corrección de fallas antes de referir su problema al
servicio de garantía limitada de la Compañía Clarity, de lo cual hablar-emos más
adelante en este manual del consumidor.
49
Page 50

ACATAMIENTO A LA NORMATIVA
Sección 68 de la Normativa de la
FCC Información
a) Este equipo cumple con la Sección
68 de la normativa de la FCC y los
requisitos adoptados por la ACTA. En
la base de este equipo hay una etiqueta,
donde consta entre otra información,
unidentificador de producto en el
formato US: AAAEQ##TXXXX. De
ser solicitado, este número debe
facilitárselo a la compañía telefónica.
b) El enchufe y toma utilizados para
conectar este equipo al cableado local y
red telefónica deben cumplir con Sección
68 de la normativa de la FCC y los
requisitos adoptados por la ACTA según
corresponda. Con este producto se
suministra un cable telefónico y conector RJ11C USOC que cumplen con esta
normativa. Está diseñado para conectarlo
a un toma que también debe cumplir
con la normativa. Vea Instrucciones de
Instalación, donde hallará más detalles.
c) El REN se utiliza para determinar la
cantidad de aparatos que pueden
conectarse a una línea telefónica. Un
REN excesivo en una línea telefónica
puede dar como resultado que los aparatos no suenen cuando entre una llamada.
En la mayoría de las áreas, aunque no
en todas, la suma de los RENs no debe
ser mayor a cinco (5). Para estar seguro
de la cantidad de aparatos que pueden
conectarse a una línea, determinando el
número total de RENs, contáctese con
la compañía local de teléfonos. En los
productos aprobados con posterioridad
al 23 de julio de 2001, el número de
REN de este producto es parte del
identificador de producto que posee el
formato US: AAAEQ##TXXXX.
Los dígitos que representa ## son el
REN sin el decimal (Por Ej.: 03 es un REN
de 0,3). En productos anteriores, el REN
se muestra por separado en la etiqueta.
d) Si este teléfono genera daños en la red
telefónica, la compañía telefónica deberá
avisarle con antelación que posiblemente
se necesite suspender el servicio temporalmente. De no ser practicable el aviso
con antelación, la compañía de teléfonos
notificará al cliente lo antes posible. También le deberán informar de su derecho
de presentar una denuncia ante la FCC
si usted lo considera necesario.
e) La compañía telefónica puede realizar
cambios en sus instalaciones, equipos,
operaciones o procedimientos que
podrían afectar la operación del equipo.
De ocurrir esto, la compañía telefónica
deberá notificarle los cambios con antelación para que usted pueda llevar a cabo
los cambios necesarios para mantener el
servicio ininterrumpido.
f) Si tiene problemas con el teléfono,
contáctese con Clarity para información
sobre reparaciones y garantía al 1-800552-3368. Si el equipo genera daños en
la red telefónica, la compañía telefónica
puede solicitarle que lo desconecte
hasta que se solucione el problema.
g) Este teléfono no debe ser reparado
y no contiene partes que puedan ser
reparadas por usted. Cualquier intento
de reparación, así como la apertura
del equipo anularán la garantía. Para
información sobre service y reparaciones
llame al 1-800-552-3368.
50
Page 51

ACATAMIENTO A LA NORMATIVA
h) La conexión a servicios de línea está
sujeta a tarifas estatales. Contáctese
con la comisión de servicios públicos
estatal, o la comisión corporativa para
más información.
i) Si su hogar tiene una alarma con
cableado especial conectada a la línea
telefónica, asegúrese que la instalación
de este teléfono no inhabilita el sistema
de alarmas. Si tiene dudas sobre qué
puede inhabilitar su equipo de alarmas,
contáctese con la compañía telefónica o
con un instalador calificado.
j) Este teléfono es compatible con
elementos de asistencia de la audición.
Teléfono con Tarjeta de Crédito o
Monedas Propiedad del Cliente:
Para que se cumpla con las tarifas
estatales, debe notificarse a la compañía
telefónica antes de la conexión. En
algunos estados, la comisión de servicios
públicos estatal, o la comisión corporativa
deben otorgar su aprobación antes de
la conexión.
Sección 15 de la Normativa de la
FCC Información
Este aparato cumple con la Sección 15
de la Normativa de la FCC. El funcionamiento está sujeto a las siguientes dos
condiciones: (1) Este aparato no debe
generar interferencia dañinas, y (2) este
aparato debe aceptar cualquier interferencia, incluyendo aquella que pudiera
causar funcionamiento indebido.
Se ha probado su equipo y cumple con
los límites de un aparato digital Clase
B, según la normativa de la FCC,
Sección 15. Estos límites están diseñados
para proporcionar protección razonable
contra la interferencia dañina en instalaciones residenciales.
Este equipo genera, utiliza y puede irradiar energía de frecuencias de radio,
y si no se instala de acuerdo a las
instrucciones, puede causar interferencias
dañinas a las comunicaciones radiales.
Sin embargo, no existen garantías de
que no habrá interferencias en una
instalación determinada; si este equipo
causa en verdad interferencias dañinas a
la recepción radial o televisiva, que puede
determinarse apagando y encendiendo
el equipo; se le insta a intentar corregir
la interferencia tomando alguna de las
siguientes medidas:
1. Donde se pueda hacer con seguridad,
reoriente la antena de televisión
o radio.
2. Dentro de lo posible, reubique el
televisor, la radio u otro receptor
con respecto al equipo telefónico.
(Esto aumenta la separación entre el
teléfono y el receptor).
3. Conecte el teléfono en un toma que
se encuentre en un circuito diferente
al que esté conectado el televisor,
radio u otro receptor.
4. Consulte al distribuidor o a un
Técnico experimentado en Radio y
Televisión para más ayuda.
PRECAUCIÓN: Los cambios o
modificaciones que no estén aprobados
explícitamente por el fabricante responsable del cumplimiento podrían anular
la autoridad del usuario para operar
el equipo.
51
Page 52

ACATAMIENTO A LA NORMATIVA
Especificación Técnica de
Industry Canada
Este producto cumple con las
especificaciones técnicas aplicables
de Industry Canada
Luego de instalar este equipo, los
usuarios deben asegurarse que está
permitido conectarlo a las instalaciones
de la empresa telefónica local. El equipo
debe además instalarse utilizando un
método de conexión aceptable. En
algunos casos, el cableado telefónico
interior asociado a un servicio individual
de línea única puede extenderse
mediante un conector certificado
(cable telefónico de alargue). El cliente
deberá saber que el cumplimiento de
las condiciones arriba descritas en
algunas situaciones puede no evitar
la degradación del servicio. Las
reparaciones al equipo certificado
deberán ser realizadas por una
instalación de mantenimiento
canadiense autorizada, designada por
el proveedor.
Cualquier reparación o modificaciones
realizada por el usuario a este equipo, o
funcionamiento defectuoso del equipo,
puede darle razones a la compañía de
telecomunicaciones de solicitarle al
usuario que desconecte el equipo.
Los usuarios deberán asegurarse por
su propia seguridad que las conexiones
de puesta a tierra de la electricidad, la
línea eléctrica y los sistemas de cañerías
internos metálicos estén conectados
entre sí. Esta precaución puede ser de
importancia especial en zonas rurales.
PRECAUCIÓN: Los usuarios no
deberán intentar realizar dicha conexión
ellos mismos, sino que deberán contactarse con un electricista o autoridad
de inspección eléctrica adecuados,
según corresponda.
El Número de Equivalencia de Repiques
(REN) es una indicación del número
máximo de terminales permitido por
línea telefónica. El extremo de la línea
telefónica puede consistir cualquier
combinación de aparatos, atendiendo
al requisito de que la suma de los
Números de Equivalencia de Repiques
de todos los aparatos no sea mayor
a cinco.
(El término “IC” antes del número de
certificado/registro sólo significa que
se cumplieron con las especificaciones
técnicas de Industry Canada).
La división responsable por el
cumplimiento normativo:
Clarity, A Division of Plantronics, Inc.
4289 Bonny Oaks Drive, Suite 106
Chattanooga, TN 37406
Teléfono: 1-800-552-3368
52
Page 53

GARANTÍA Y SERVICIO
La siguiente garantía e información de
servicio sólo es aplicable a productos
adquiridos y utilizados en los Estados
Unidos y Canadá. Contáctese con su
distribuidor o vendedor local para
mayor información acerca de la información de garantía en otros países.
Garantía Limitada
Clarity, una división de Plantronics,
Inc. (“Clarity”) garantiza al comprador
usuario original que, salvo las
limitaciones y excepciones delineadas
más abajo, este producto estará libre de
defectos de materiales y mano de obra
por un período de un (1) año a partir
de la fecha original de compra (“Período
de Garantía”). La obligación de Clarity
según la presente garantía será elección
de Clarity, sin cargo, de cualquier parte
o unidad que sea en efecto defectuosa
por materiales o mano de obra durante
el Períodode Garantía.
Excepciones a la Garantía
Esta garantía sólo es aplicable a defectos en los materiales de fabricación y
mano de obra de fabricación. Cualquier
condición que haya sido causada por
accidentes, abuso, mal uso u operación
inadecuada, violación a las instrucciones
provistas por Clarity, destrucción o
modificación, corrientes o voltajes
inapropiados, o reparación o mantenimiento a cargo de alguien distinto
a Clarity o sus centros de servicios
autorizados, no es un defecto cubierto
por la presente garantía. Las compañías
telefónicas fabrican distintos tipos de
equipos y Clarity no garantiza que este
equipo sea compatible con los equipos
de determinada compañía telefónica.
Garantías Implícitas
Según la ley estatal, puede tener derecho a ciertas garantías implícitas. Estas
garantías implícitas continuarán en vigor
sólo durante el período de garantía. En
algunos estados las garantías implícitas
no prescriben, por lo que las limitaciones
arriba descritas pueden no ser aplicables
a usted.
Daños Incidentales o Consecuentes
Ni Clarity ni su vendedor local o distribuidores tienen ninguna responsabilidad
sobre daños Incidentales o consecuentes,
incluyendo, sin límites, lucro cesante o
pérdidas comerciales, o de cualquier
gasto, pérdida de tiempo o inconveniente
incidental. En algunos estados los daños
incidentales o consecuentes no tienen
excepciones o limitaciones, por lo que
las limitaciones arriba descritas pueden
no ser aplicables a usted.
Otros Derechos Legales
Esta garantía le confiere derechos legales
específicos y puede tener otros derechos
que varían de estado en estado.
53
Page 54

GARANTÍA Y SERVICIO
Cómo Conseguir el Service
En Garantía
Para obtener service en garantía, por
favor pague el envío por adelantado y
envíe la unidad a la instalación adecuada
abajo listada:
En los Estados Unidos
Clarity Service Center
4289 Bonny Oaks Drive, Suite 106
Chattanooga, Tennessee 37406
Tel: (423) 622-7793 o
(800) 426-3738
Fax: (423) 622-7646 o
(800) 325-8871
En Canadá
Plantronics Service Center
8112 Trans-Canada Hwy.
Ville St. Laurent. Que.
Canada H4S 1M5
Tel: (800) 540-8363
(514) 956-8363
Fax: (514) 956-1825
Por favor utilice la caja original, o embale
la(s) unidad(es) en una caja de cartón
embalada de tal forma que no se dañe(n).
Incluya la siguiente información:
1. Comprobante de compra indicando
número de modelo y fecha
de compra.
2. Dirección para enviar la factura.
3. Dirección para enviar la reparación.
4. Cantidad y descripción de las
unidades enviadas.
5. Nombre y número de teléfono de
una persona a la que se pueda
contactar de ser necesario.
6. Razón de la devolución y descripción
del problema.
Los daños que ocurran durante el envío
serán considerados responsabilidad
del transportista, y los reclamos
deberán efectuarse directamente con
el transportista.
54
Page 55

Page 56

Clarity, a Division of Plantronics, Inc.
4289 Bonny Oaks Drive, Suite 106
Chattanooga, TN 37406
1-800-552-3368
www.clarityproducts.com
© 2007 Clarity, a Division of Plantronics, Inc. All rights reserved.Amplifying Your Life, Clarity,
the amplificatin device, Clarity and the amplification device combined, Clarity Power, and C1000
are trademarks or registered trademarks of Plantronics, Inc. FCC Registration complies with
part 68 of FCC rules and regulations.
Rev. A (11-07)
 Loading...