

Page 1
Page 2
Section 1
The (ESB101), (ESB1000), (ESB3011B) and (ESB301) comes equipped with:
! EthIR Switch single port
! EthIR Beam with mini-DIN connector
! 110/220 Power supply
! Mini-DIN cable to connect the EthIR Beam to the EthIR Switch
Note: The (ESB301) comes equipped with an additional Ethernet port for user PC.
IMPORTANT NOTE:
The single port (ESB101), (ESB1000), (ESB3011B), (ESB301) and Multiport (ESB208/216)
are shipped with DHCP enabled. If you connect to a non DHCP network you will experience connection difficulties. Configure the Switch first before uplinking to the network.
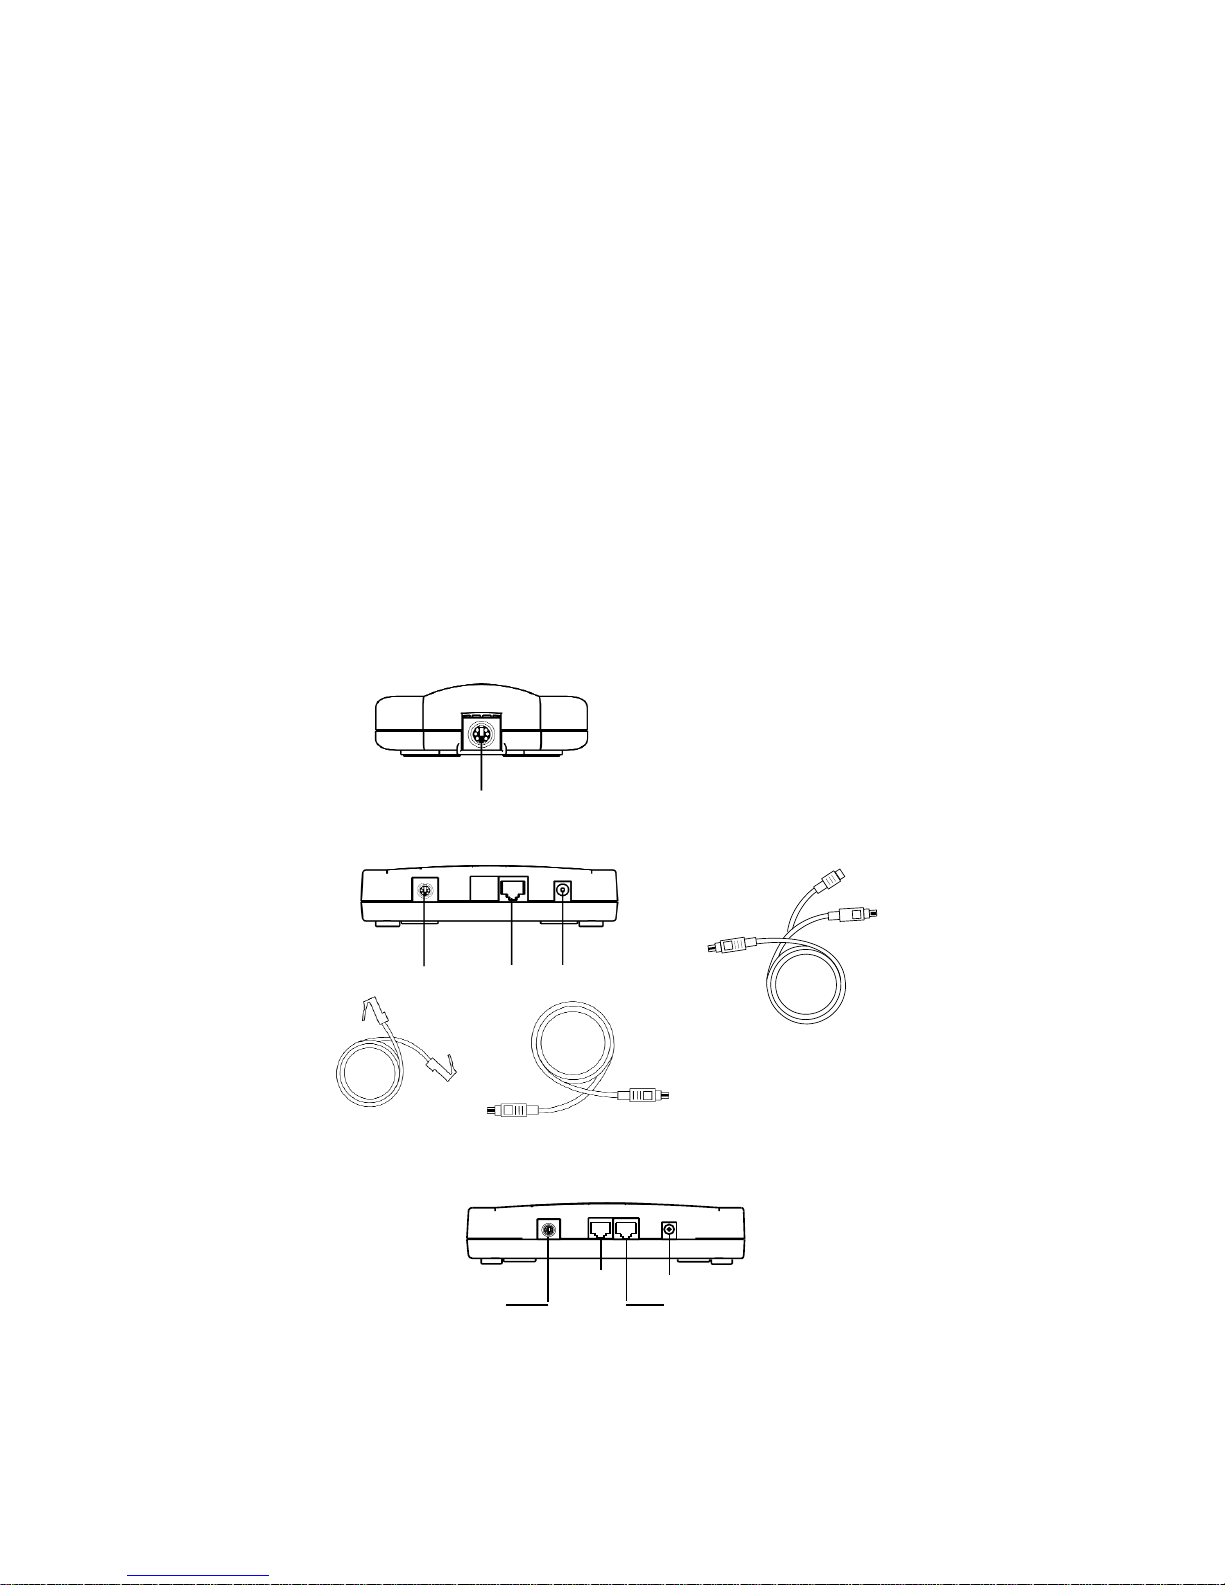
Mini DIN
port
Uplink port
10 Base-T
Power
Mini DIN
cable
RJ45 cable
EthIR Beam EB100
rear view
EthIR Switch (ESB101) and (ESB1000 and ESB3000)
rear view
Mini DIN port
Uplink
port
10/100 Base-T
Power
Ethernet to desktop
EthIR Switch ESB301
rear vie
w
Mini DIN port
Mini DIN
cable
Mini DIN
cable
RCA Jack
For EthIR LAN
and EthIR STAR ESB1000
Page 3

The (ESB208/216)
! The multiport (ESB208) comes equipped with:
• 8 Infrared ports
• 8 Ethernet pass-through ports (See Section 3 for more pass-through information)
! The multiport (ESB216) comes equipped with:
• 16 Infrared ports
• 16 Ethernet pass-through ports (See Section 3 for more pass-through information)
! EthIR Beam with RJ45 connector
! Power cable
! RJ45 patch cable to connect the EthIR Beam to the EthIR Switch
(RJ45 patch cable for 10/100 Base-T Uplink not included)
RJ45 connector
Infrared ports
10/100Base-T
Uplink
Console for
troubleshooting
(Cable not included)
Ethernet pass-through ports
RJ45 cable
EthIR Beam EB1000
rear view
EthIR Switch front view
(ES216 shown)
Page 4

Multiport (ESB208/216)
A: Housed in multi-user environment such as conference room or class room with one
available network wall jack.
After configuration is completed, perform the following:
1. Position the Switch where convenient.
2. Connect one end of an enclosed RJ45 cable to one of the bottom ports on the EthIR
Beam. Repeat for as many EthIR Beams as needed.
3. Uplink the Switch to a wall jack or hub with an RJ45 patch cable (Cat 3 or 5).
4. Power on the unit by connecting enclosed power cable to a 110/220 electrical outlet.
Section 2
The (ESB101, ESB301,ESB1000, ESB3011b and the ESB208/216) are all DHCP enabled.
Insure a DHCP server is up and running on the network before uplinking. If there is no
DHCP
server on the network then do not uplink. You will have to configure the Switch first,
before uplinking to the network.
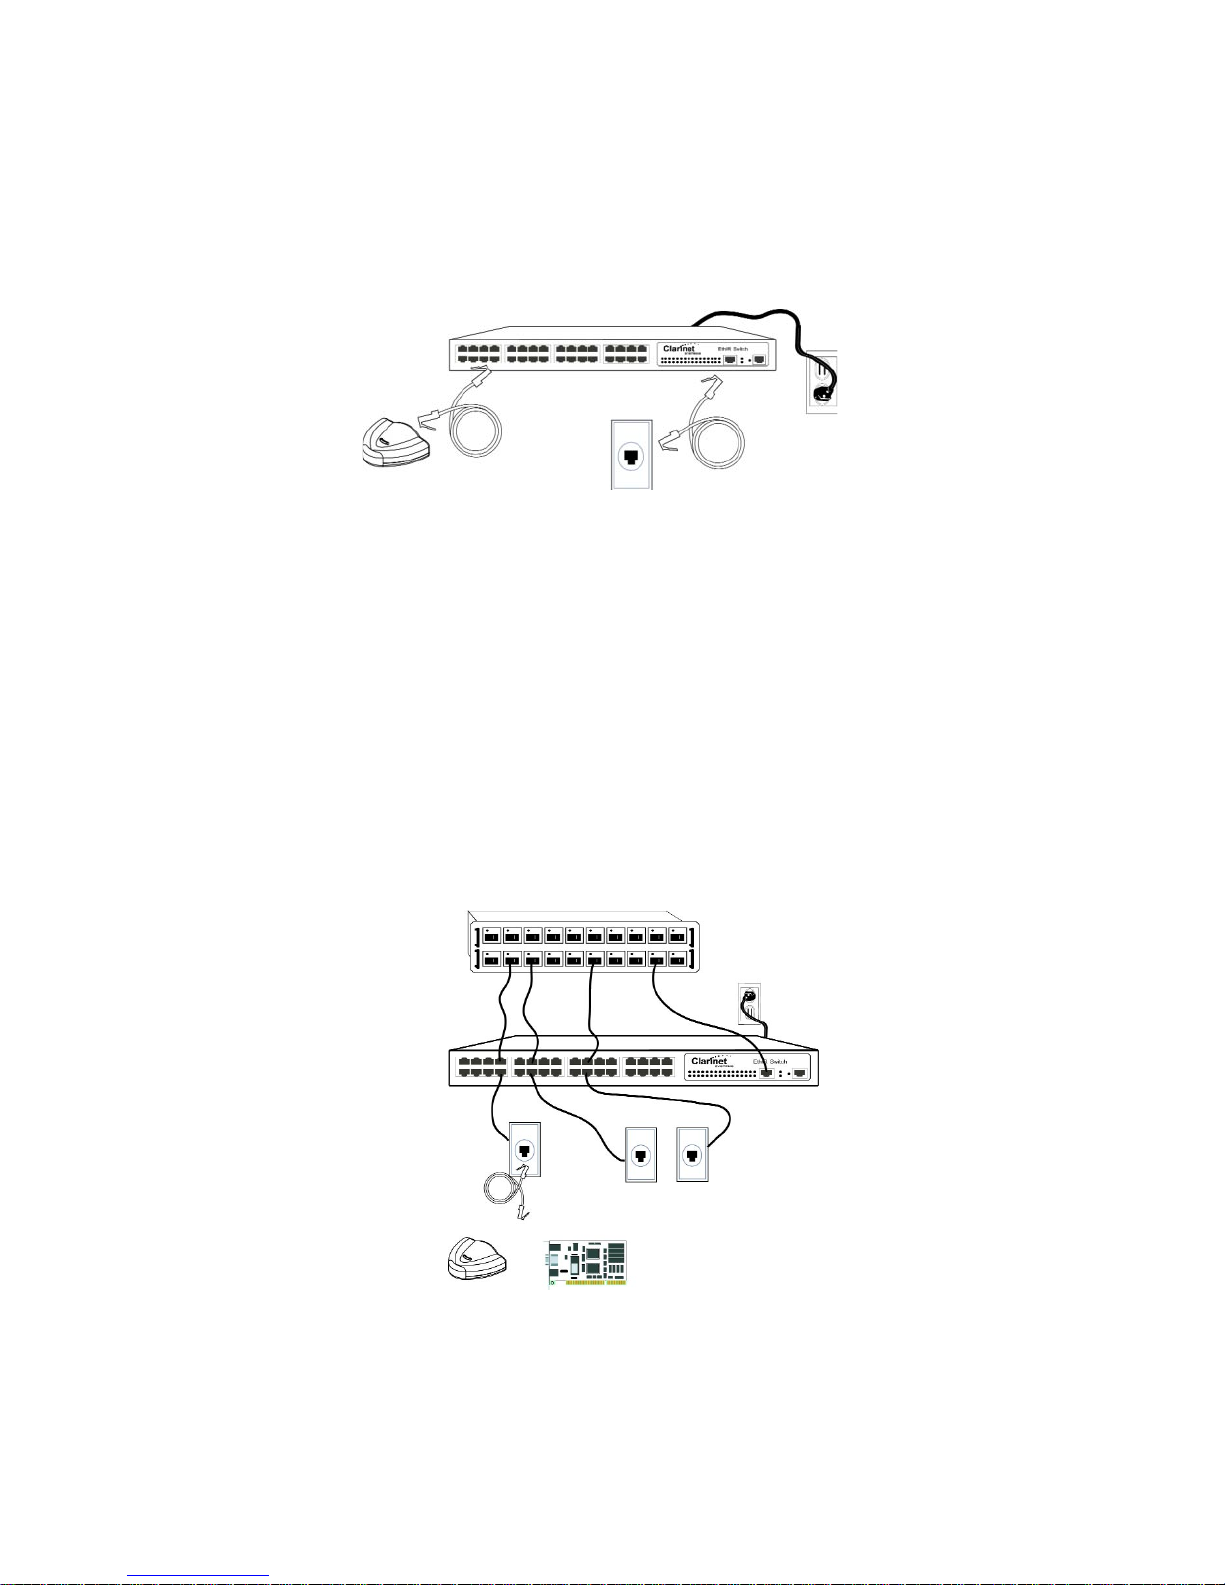
Single Port:
1. Connect one end of the mini-DIN cable to the EthIR Beam and the other end
to the mini-DIN connector on the Switch.
2. Connect one end of the RJ45 cable from the Ethernet uplink port
on the Switch to an Ethernet wall jack or hub.
3. Connect power jack to the power jack port and plug into a 110/220 electrical
outlet.
Note: For the (ESB301) connect the additional Ethernet to desktop port to an Ethernet
NIC card in your desktop computer (Optional).
RJ45 wall jack
Power
outlet
RJ45 cable
EthIR Beam
EthIR Switch (ESB101, ESB1000 and ESB3000)
rear view
EthIR LAN and
EthIR STAR
ESB1000
Mini DIN cable
Button
Page 5
B: Housed in the network equipment closet.
These switches can be placed in the wiring closet to provide either Infrared or Ethernet
connectivity to the existing wall jacks.
1. Position Switch in wall rack.
2. Connect the incoming RJ45 cable from each office or cubicle wall jack to one of the
bottom infrared ports on the Switch. Repeat as needed for each office cubicle
requiring infrared support.
3. Connect another RJ45 cable from the corresponding top Ethernet pass-through port
to the patch panel or hub. Repeat as needed for each office cubicle requiring both
Infrared or Ethernet support. (NOTE: if only providing for Infrared connectivity this
step can be skipped).
4. Uplink the Switch to the patch panel or hub with an RJ45 patch cable (Cat 3 or 5).
5. Power on the unit by connecting enclosed power cable to a 110/220 electrical outlet.
EthIR Beam
or
Ethernet card
RJ45 wall jacks
Ethernet rack
Power
outlet
EthIR Switch front view
(ES216/616 shown)
RJ45 wall jack
Power
outlet
RJ45 cable
EthIR Beam
EthIR Switch front view
RJ45 cable
Optional
Page 6

© 2003 Clarinet Systems, Inc. All Rights Reserved.
11/02
For Further Information Contact:
Clarinet Systems, Inc. email: sales@clarinetsys.com
44040 Fremont Blvd. support@clarinetsys.com
Fremont, CA 94538 www.clarinetsys.com
For updated information on Clarinet Systems products, contacts and FAQ’s please visit our web site at
www.clarinetsys.com
Troubleshooting Issues
A) If the EthIR Switch (all models) fails to obtain IP addresses for connecting devices when
it is set in DHCP mode, check the following:
• There may not be available IP addresses in the DHCP server pool to allocate for the
device. Contact the network administrator to verify if the DHCP server is up and
running and has enough IP addresses to allocate. If using a multi-port Switch (for
example, the 8 port ES208) and attempting to connect 8 devices, the DHCP server
must allocate at least 8 IPs for the Switches IP Pool. Example: If the DHCP server
can only allocate 4 IP addresses to the Switches IP pool, then only 4 infrared
devices will be able to communicate on the network through the Switch.
B) When using the (ESB101), (EthIR STAR 1000-3000) or (ESB301) to connect to the network, the infrared notebook or handheld device fails to communicate over the DHCP
enabled network. Check the cabling:
•
The (ESB101, ESB1000 and the ESB3000) will not function in a 100 Base-T only
environment.
•
For all EthIR LAN models, except the ESB3011b, insure that a Category 5
Ethernet Patch Cable is used to uplink to the network. Do not use a cross-over cable
to connect the Uplink to the network wall jack.
•
For the (ESB301), insure that the RJ45 cable in the Uplink port is connected to the
network wall jack and not
to the Ethernet NIC card in the desktop computer.
The Ethernet to Desktop port is for connecting the ESB301 to the desktop and not to
the network wall jack. Crossing these two ports will result in a failure for the ESB301
to communicate with the network and the desktop computer.
•
For the (ESB3011b), insure that the 802.11b uplink to the 802.11P AP is connected
and stable.
•
Check all cables and make certain they fit properly into each connection.
C) When there is no DHCP server on the network, make sure the correct IP addresses
have been configured on the EthIR Switch.
Section 3
Pass-through allows for flexibility of either Infrared or Ethernet connectivity for each
office or cubicle wall connection. If the EthIR Switch senses an incoming Ethernet
frame it will “pass-through” the frame to the Ethernet network via the pass-through
port. If the EthIR Switch senses an Infrared frame it will convert it to Ethernet and
send it to the network via its Uplink port.
 Loading...