

Page 1
EthIR LAN®
User Guide
Page 2

Page 3

EthIR LAN® User Guide
(for ESB101/301/3011b/1000 and ESB208/216/608)
Clarinet Systems, Inc.
44040 Fremont Blvd.
Fremont, CA 94538
info@clarinetsys.com
www.clarinetsys.com
Page 4

Copyright
Copyright©
change without notice. The software described in this manual is furnished under a license agreement.
No part of this publication may be transmitted, transcribed, reproduced, stored in any retrieval system
or translated into any language or computer language in any form or by any means, mechanical,
electronic, optical, chemical, manual or otherwise, without the prior written permission of Clarinet
Systems, Inc., 44040 Fremont Blvd., Fremont, CA 94538.
Modified: March 9, 2007
Version: 3.10
Clarinet Systems, EthIR LAN, EthIR Switch and EthIR Beam are registered trademarks of Clarinet
Systems, Inc.
All other company and product names are trademarks or registered trademarks of their respective
owners.
Eye Safety Note:
Clarinet Systems’ EthIR Beam product is IEC 825-1 and CENELEC EN 60825-1 com-pliant and meets
national and international eye safety standards.
2003 Clarinet Systems, Inc. All rights reserved. Information in this document is subject to
Page 5

TABLE OF CONTENTS
Chapter 1 Introduction ----------------------------------------------------------------- 1-1
Introducing EthIR LAN----------------------------------------------------------------- 1-1
User Profile -------------------------------------------------------------------------------- 1-1
How this Guide Is Organized-----------------------------------------------------------1-1
Appendices--------------------------------------------------------------------------------- 1-2
Conventions-------------------------------------------------------------------------------- 1-2
Contacting Clarinet Systems ----------------------------------------------------------- 1-3
Chapter 2 Installation-------------------------------------------------------------------2-1
Introduction to EthIR LAN Components-------------------------------------------- 2-1
Installation Requirements -------------------------------------------------------------- 2-1
Wiring ------------------------------------------------------------------------------------ 2-1
Power (ES 208 / 216 / 608)------------------------------------------------------------ 2-1
Power (ES101 / 301 / 3011b / 1000)-------------------------------------------------- 2-1
Resetting --------------------------------------------------------------------------------- 2-1
EthIR Beam Supported Platforms ---------------------------------------------------- 2-2
Notebook Computer -------------------------------------------------------------------- 2-2
Handheld PC (H/PC), PocketPC, Palm-sized PC (P/PC), or Cell phone -------- 2-2
Installation--------------------------------------------------------------------------------- 2-2
Order of Installation -------------------------------------------------------------------- 2-2
EthIR Switch (ES208 / 216 / 608) ---------------------------------------------------- 2-2
EthIR Switch (ES101 / 301 / 3011b / 1000)----------------------------------------- 2-3
Install EthIR Switch (ES208 / 216)--------------------------------------------------- 2-3
Install EthIR Switch (ES101 / 301 / 3011b / 1000)--------------------------------- 2-4
Infrared Mode (ES208 / 216 only)---------------------------------------------------- 2-5
Pass Through Mode (ES208 / 216 only) --------------------------------------------- 2-5
Understanding the EthIR Switch Panel LEDs (ES208 / 216 only)-------------- 2-6
EthIR Beam-------------------------------------------------------------------------------- 2-7
Power ------------------------------------------------------------------------------------- 2-7
Checking Connection Status----------------------------------------------------------- 2-7
The EthIR Soft Family of Products--------------------------------------------------- 2-7
Introduction------------------------------------------------------------------------------ 2-7
CSI Configuration Tool ---------------------------------------------------------------- 2-7
Infrared Support for Windows 95----------------------------------------------------- 2-8
ClarinetIR™ ----------------------------------------------------------------------------- 2-8
CSI Firmware updates------------------------------------------------------------------ 2-8
i
Page 6

Software Installation and Hardware Requirements ---------------------------------2-8
Chapter 3 Configuring EthIR LAN---------------------------------------------------3-1
Introduction--------------------------------------------------------------------------------3-1
Configure EthIR Switch-----------------------------------------------------------------3-1
CSI Configuration Tool------------------------------------------------------------------3-1
CSI Configuration Tool Installation --------------------------------------------------3-2
CSI Configuration Tool Functions ----------------------------------------------------3-2
CSI Configuration Tool Window Description:--------------------------------------3-3
Connectivity Choices for Using the CSI Configuration Tool---------------------3-3
Configure via Infrared ------------------------------------------------------------------3-3
Configure via IP address ---------------------------------------------------------------3-4
Setting The IP Address Of The Switch For The First Time----------------------3-4
Searching For EthIR Switches ---------------------------------------------------------3-6
The NVM Editor--------------------------------------------------------------------------3-8
General Info Tab ------------------------------------------------------------------------3-8
SNMP Variables Tab -------------------------------------------------------------------3-9
IP Pool Tab (except ESB3011b)-------------------------------------------------------3-9
RF Card Info (ESB3011b only) ----------------------------------------------------- 3-10
WEP (ESB3011b only)--------------------------------------------------------------- 3-11
Updating The Firmware--------------------------------------------------------------- 3-12
Switch Security-------------------------------------------------------------------------- 3-12
Chapter 4 ClarinetIR------------------------------------------------------------------ 4-13
APPENDIX A - ------------------------------------------------------------------------------ A-1
Installing Infrared Support for Windows 95--------------------------------------- A-1
Binding TCP/IP Protocol for Notebook --------------------------------------------- A-4
APPENDIX B - ------------------------------------------------------------------------------ B-1
Verifying that Dial-Up Adapter is in your Network Configuration ----------- B-1
APPENDIX C - ------------------------------------------------------------------------------ C-1
Disabling Puma Technology’s IR Communication Software ------------------- C-1
APPENDIX D - ------------------------------------------------------------------------------ D-1
Browsing the Network Neighborhood Windows 95/98--------------------------- D-1
APPENDIX E - ------------------------------------------------------------------------------ E-1
Upgrading from 115Kbps to 4Mbps Speeds---------------------------------------- E-1
ii
Page 7

APPENDIX F - -------------------------------------------------------------------------------F-1
Notebook and Handheld PC Configurations----------------------------------------F-1
Configuration Options------------------------------------------------------------------F-1
Before You Begin — Needed Changes to Your System---------------------------F-1
Using IrLAN with Windows 95 Notebooks-----------------------------------------F-2
Using Direct Cable Connection with Windows 98 Notebooks -------------------F-5
Before You Begin — Needed Changes to Your System---------------------------F-5
Install Direct Cable Connection-------------------------------------------------------F-5
Configure Infrared Monitor for Direct Cable Connection-------------------------F-7
Configure Direct Cable Connection for the First Time ---------------------------- F-8
Connecting to and Disconnecting from the Network----------------------------- F-10
Using Direct Cable Connection with Windows 2000 Notebooks -------------- F-12
Configuring Windows CE Handheld PCs ----------------------------------------- F-14
Adding Direct Connection to Remote Networking------------------------------- F-14
Connecting to and Disconnecting from the Network----------------------------- F-16
Specifying an HTTP Proxy Server-------------------------------------------------- F-17
Using IrLAN with Apple MacOS Powerbooks ----------------------------------- F-18
Configuring Palm Organizers -------------------------------------------------------- F-19
iii
Page 8

Page 9

Chapter 1
Introduction
Introducing EthIR LAN
Clarinet EthIR LAN provides single and multiple infrared network access and
information beaming points allowing users to connect cell phones or handheld PCs to
their network and server using safe, cordless infrared technology. Once installed,
EthIR LAN is transparent to the user; that is you can receive and transmit information
just as you would with a wired connection.
This document was written for single port ESB101/301/3011b/1000 and multi-port
ESB208/216/608. The users of other EthIR LAN models shall refer other EthIR LAN
user manuals although many concepts in this document are useful.
User Profile
This documentation is for IT Managers and Network Administrators. It assumes that
as an EthIR LAN user you possess basic knowledge and expertise in the following
networking areas:
• Concepts - such as network management
• Structure - network structure in general and your network structure in
particular, including hardware, software, and topology
• General standards and protocols - such as 10/100Base-T and SNMP
How this Guide Is Organized
This EthIR LAN User Guide provides detailed instructions for installing, configuring
and using EthIR LAN. It is comprised of this chapter and three additional chapters
and appendices as follows:
• Chapter 2, Installation, provides information on the components that compose
EthIR LAN and provides installation instructions for each component. In
addition, it describes how to use EthIR LAN.
• Chapter 3, Configuring EthIR LAN, provides instructions for configuring the
EthIR Switch, your user system, and connecting to EthIR LAN.
• Chapter 4, ClarinetIR, provides information on ClarinetIR freeware utility that
helps your notebook, PocketPC, and Palm devices to connect to EthIR LAN
system.
1-1
Page 10

Note: Please visit Clarinet’s website to review the software products such as OBEX
SDK (Software Development Kit), OBEX DP (Deployment Package), DM (Download
Manager application program), RADIUS Security and iPAQ 4Mbs FIR driver.
Appendices
APPENDIX A - instructs users on the procedures for installing the infrared drivers
on Windows 95 notebooks that did not originally ship with the drivers.
APPENDIX B - instructs users on the need for having this adapter as a part of the
network configuration and how to install it if it isn’t there.
APPENDIX C - explains how to check if “Tranxit” (incompatible with IrLAN,
ClarinetIR, and Direct Cable Connection communication) is installed and, if so, how
to disable it.
APPENDIX D - provides instructions for users to connect to a particular networked
environment with their notebook to make full use of network services as well as
Internet connectivity.
APPENDIX E - instructs the user on ways to dramatically improve the connection
speed of their Windows 95 notebooks to the EthIR LAN system (applicable only to
specific notebook models).
APPENDIX F – provides step-by-step instructions on connecting your notebook,
handheld PCs, and Palm IIIx, IIIxe, V, Vx and VII Organizers to the EthIR LAN
system using IrLAN protocols or Cable Connection.
Conventions
This guide uses special conventions to present and help you access information in a
concise and helpful way. The following textual conventions are used:
Style Style used for
Italic Emphasis
bold face documentation section, window name, and dialog buttons
boxed text strong emphasis
courier bold directory path or program path
bold underline special notes
In addition to the above textual conventions, this guide provides the following
format for note statements:
Note: xxxxx xx xxxx xx xxx xxxx xxxx xxxxxxxx
xxxxxx
A note is used to communicate important information, for example, the system
responding differently than expected.
1-2
Page 11

Contacting Clarinet Systems
We welcome any comments you may have about our products or our documentation.
Our goal is to provide functional and easy-to-use products that help you work more
efficiently. Please Email or fax your comments to the following:
Clarinet EthIR LAN Support
Voice: 510.249.9660
Fax: 510.249.9661
Email: support@clarinetsys.com
Web Site: http://www.clarinetsys.com
1-3
Page 12

Page 13

Chapter 2
Installation
Introduction to EthIR LAN Components
Clarinet EthIR LAN includes EthIR Switch and EthIR Beam. Model number
description follows. For description of “Pass Through” mode refer to page 2-6:
ES208 - 8 port Pass Through
ES216 - 16 port Pass Through
ES608 - 4 port EthIR LAN with 4 PDA sockets
ES101 - single port infrared only
ES301 - single infrared port with additional Ethernet port and OBEX function
ES3011b - single infrared port with 802.11b uplink and OBEX function
ES1000 - single infrared port with flash memory for content and OBEX
function
After EthIR LAN is installed you must configure it for your network. See Chapter 3,
“Configuring EthIR LAN” for additional information on this topic.
Installation Requirements
Wiring
The EthIR Switch (ES208 / 216 / 608) requires standard UTP Category 3 or 5 wire
with 4-pair wiring to the EthIR Beam. The EthIR Switch (ES101/301/3011b/1000)
single port uses a mini-DIN connector cable. The EthIR Switch uplink supports both
100Base-T, 10Base-T Ethernet and 802.11b RF. Please note: 100Base-T4 is not
supported.
Power (ES 208 / 216 / 608)
The EthIR Switch automatically detects and supports both the US and European
110/220 power supply and configures itself accordingly.
Power (ES101 / 301 / 3011b / 1000)
The ES101 will have a power supply specific to the installed region.
Resetting
To reset the system, unplug the EthIR Switch power cord and wait at least 4 seconds
before plugging the unit in again.
2-1
Page 14

EthIR Beam Supported Platforms
Notebook Computer
To connect to the EthIR Beam, a notebook computer requires the following:
1. Microsoft Windows 95 with infrared protocol stack and IrLAN. Microsoft
Windows 98/2000 with infrared protocol stack and ClarinetIR or Direct Cable
Connection (DCC). Check your notebook vendor’s documentation. Apple
MacOS v. 8.5 or later with infrared protocol stack and IrLAN.
2. Framer (infrared device driver)
3. IrDA compatible infrared port enabled.
Note: If your notebook IR port supports a connection speed of 4Mbps, you may have to update
your Windows 95 infrared drivers to use the 4Mbps connection; otherwise, the port may
connect at 115Kbps. See APPENDIX E for instructions.
Handheld PC (H/PC), PocketPC, Palm-sized PC (P/PC), or Cell
phone
An H/PC or P/PC must run Windows CE 2.0+. PocketPC devices using Windows CE
3.0 or higher. Palm Organizers IIIx, IIIxe, V, Vx, and VII must run OS 3.3+. Palm
VII must run OS 3.5+. Also including any devices that my run ClarinetIR™. These
devices (as well as Windows 98 using DCC) are referred to as IR/PPP devices in this
Guide. Cell phone should support IrDA OBEX.
Installation
Order of Installation
Install the EthIR Switch first, then install the EthIR Beam.
EthIR Switch (ES208 / 216 / 608)
The EthIR Switch, in 8 and 16 port versions each able to support multiple EthIR
Beams for infrared connectivity or a LAN card for Ethernet connectivity.
The following figure illustrates the front panel of the EthIR Switch into which the
device cables are plugged:
Note: ES608 has four EthIR Beams built in. Please refer ES608 data sheet for detail.
2-2
Page 15
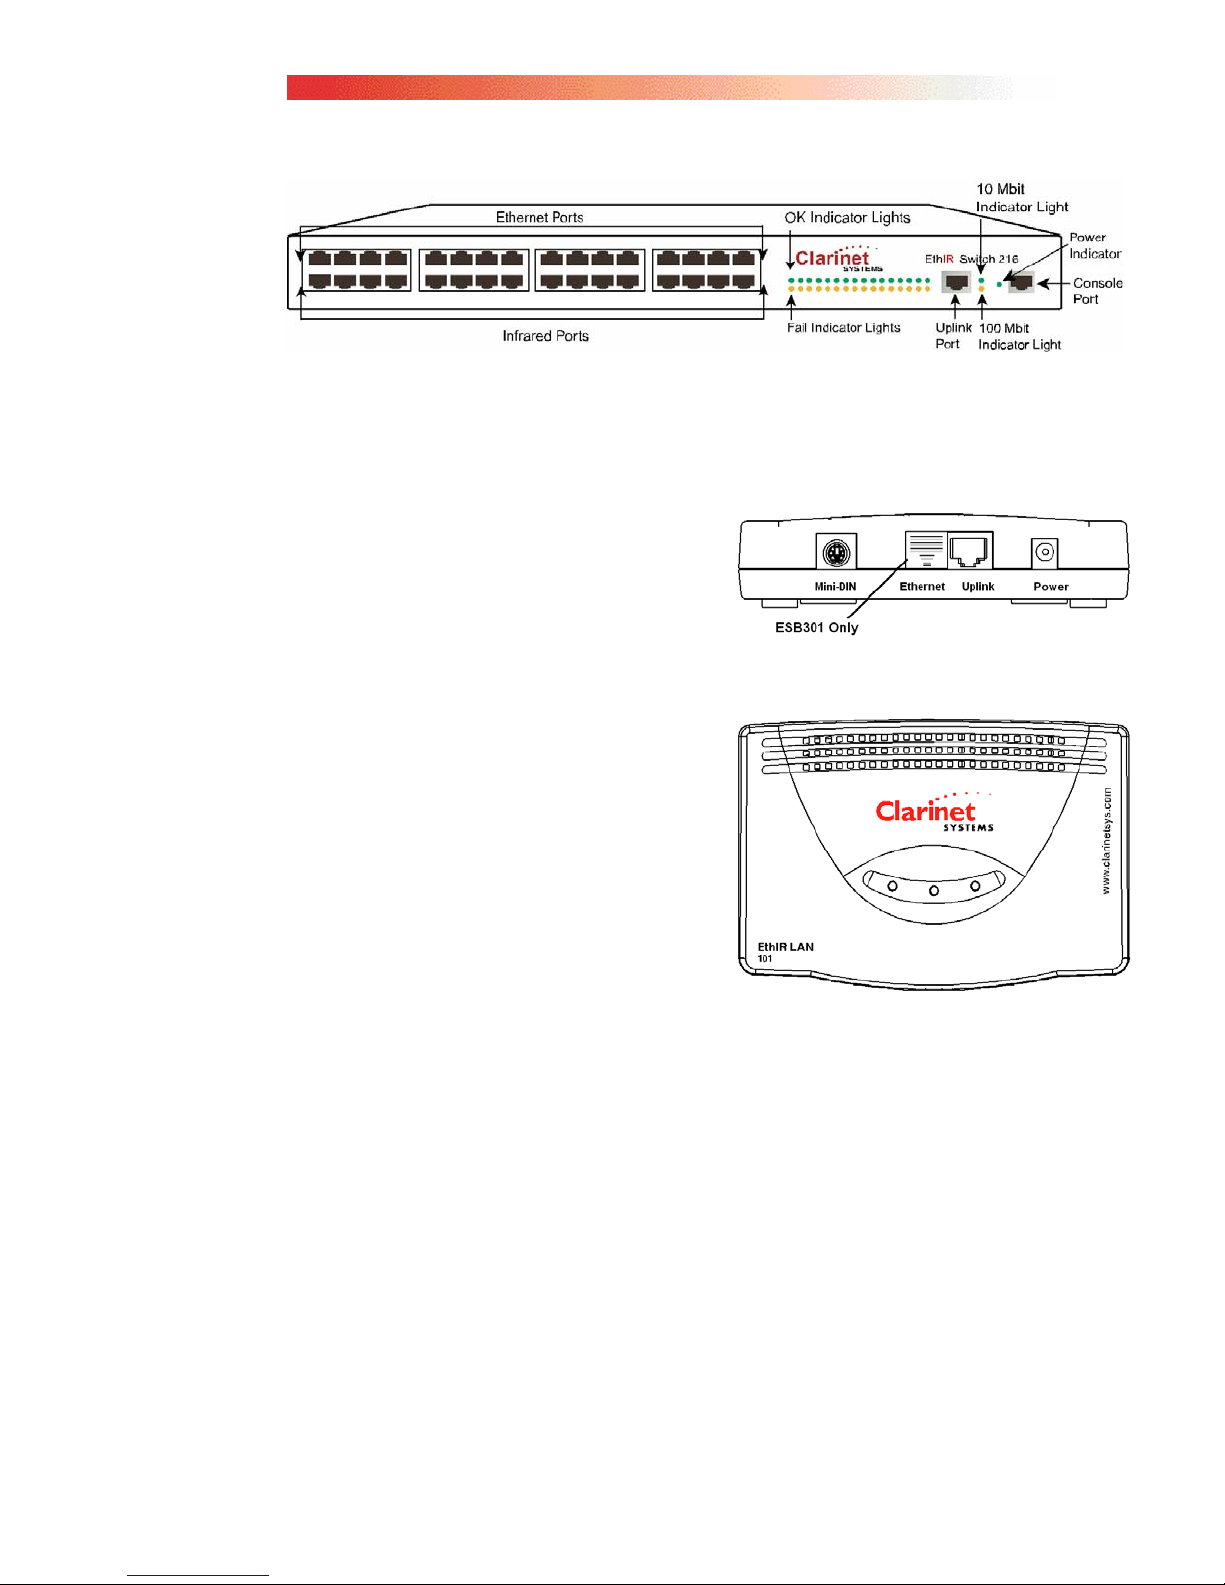
Figure 2-1
Note: The “OK” and “Fail” port indicator lights are only for infrared connections (where an
EthIR Beam is connected to one of the lower ports via an RJ45 cable). If using a particular
port for “Pass Through” mode (an Ethernet connection) the port indicator light for that port
will not light up (see Pass Through Mode (ES208 / 216 only) on page 2-5).
EthIR Switch (ES101/301/3011b/1000)
The EthIR Switch single port version is able
to support one EthIR Beam for infrared
connectivity.
The adjacent figure illustrates the port panel
into which device cables are plugged:
9 mini-dim connector (for EthIR
Beam)
9 RJ45 Ethernet uplink port
9 power jack
In addition, the dual port model also offers
an additional Ethernet port that can be
connected to an Ethernet hub or available
for a desktop computer.
Install EthIR Switch (ES208 / 216)
The EthIR Switch can be installed in any location in your facility. The most practical
place to install it is in the same location as other network equipment.
To install the EthIR Switch:
1. Plug in one end of an Ethernet UTP cable into the uplink port and the other end
into a network patch panel or Ethernet wall jack leading to a patch panel.
2. Power up the system by plugging it into any 110/220 AC outlets. Once the switch
is plugged in, indicator lights display its status as follows:
2-3
Page 16

a. A steady green light beside the Console Port means the system has powered up
correctly.
b. A steady green light beside the uplink port indicates a 10Mbit or 100Mbit per
second connection respectively. If both lights are unlit, the Uplink to your
network failed.
3. Make the device connections. Each EthIR Switch is equipped with two rows of RJ
45 jacks. The top jack of each port is the Ethernet “pass through” port. The
bottom jack of each port is the infrared connection port.
a. If your intention is to connect only infrared devices to the EthIR Switch, see
“Infrared Mode” below.
b. If you are connecting a combination of infrared and Ethernet devices to the
EthIR Switch, see Pass Through Mode (ES208 / 216 only) on the next page.
Install EthIR Switch (ES101 / 301 / 3011b / 1000)
To install the single port EthIR Switch:
1. Plug in one end of an Ethernet UTP cable into the uplink port and the other end
into a network patch panel or Ethernet wall jack leading to a patch panel.
2. Connect the EthIR Beam to one end of a mini-dim cable and plug the other end
into the mini-dim plug on the switch.
3. Power up the system by plugging it into an AC outlet. Once powered the EthIR
Switch indicator lights display its status illustrated as follows:
a. Uplink - (indicates state of network connection)
b. Status - (indicates progress of obtaining an IP address from DHCP server)
c. Power - ES101 (indicates state of power)
d. PC - ES301 (indicates Ethernet port in use)
The LED indicator light on the EthIR Beam (EB100) indicates data transmission via
infrared.
Uplink Status
Status
Power On
System Init
Connected by
IrLAN
Connected by
IR/PPP
Fatal Error
Power
(101 only)
ON
OFF
OFF ON then OFF ON OFF LOW
ON if uplink
is up
ON if uplink
is up
ON if uplink
is up
N/A OFF OFF/ON N/A N/A
OFF
ON
Blinking (½ seconds)
ON if the IP is found.
Blinking if the IP is
not found.
OFF if the unit is bad
ON if the IP is found.
Blinking if the IP is
not found
ON if the IP si found.
Blinking if the IP is
not found
OFF
ON
ON OFF LOW
ON N/A HIGH Blinking
ON N/A HIGH Blinking
PC
(301 only)
OFF
ON
Beam EB100
OFF
LOW
HIGH
if there is
activity
if there is
activity.
2-4
Page 17

Uplink Status
PC
Connected
Via Ethernet
Power
(101 only)
N/A N/A N/A ON N/A
PC
(301 only)
Beam EB100
Infrared Mode (ES208 / 216 only)
If the EthIR Switch will only support infrared devices, do the following:
1. Connect one end of the UTP cables to the bottom infrared ports on the EthIR
Switch and the other ends to an EthIR Beam.
2. Uplink the EthIR Switch to an existing network for network access.
As each EthIR Beam is successfully connected, the Connect indicator is illuminated.
See Figure 2-1 for the positioning of these indicators on the Switch panel.
Pass Through Mode (ES208 / 216 only)
Although designed to support infrared connections, the flexibility of the Pass Through
mode allows for Ethernet connections as well by “passing” Ethernet frames to an
Ethernet hub or patch panel. This allows for a “mixed” environment to coexist. There
are several kinds of EthIR Switch installation scenarios that can be implemented
depending on your network infrastructure.
Scenario 1:
Scenario 2:
You can connect a combination of LAN cards and infrared devices to the EthIR
Switch up to the number of supported ports. If your EthIR Switch has eight ports, you
can connect any combination of LAN card and infrared devices up to eight. The
EthIR Switch automatically distinguishes whether the connection is infrared or
Ethernet and responds appropriately.
To set up for combination LAN card and infrared device use, do the following:
1. Desktop computers using Ethernet adapters for Pass Through:
The EthIR Switch is situated in a location (such as a
conference room) that has only one available uplink wall jack
to an Ethernet network but several notebook/desktop PCs
needing network access.
The EthIR Switch is installed between the Ethernet rack and
hub in the communications closet. This scenario allows each
wall jack that is connected to the EthIR Switch to support
either infrared or Ethernet connections depending on need.
2-5
Page 18

a. Connect the appropriate number of UTP cables from each adapter card on the
desktop computers to the infrared port on the EthIR Switch (the bottom row of
ports).
b. Connect a second UTP cable from the Ethernet port (the top row of ports) to an
Ethernet hub (Scenario 1) or patch panel (Scenario 2)
2. Notebooks and HPCs using Infrared:
a. Connect one end of the UTP cables to the infrared ports on the EthIR Switch
and the other ends to an EthIR Beam.
3. Uplink the EthIR Switch and pass through ports to an Ethernet hub and uplink the
Ethernet hub to an existing network connection (Scenario 1) or uplink the EthIR
Switch to a patch panel (Scenario 2).
As each EthIR Beam successfully connects, the Connect indicator is illuminated. See
Figure 2-1 for the positioning of these indicators on the Switch panel.
Note: Connect or Fail LEDs light only for EthIR Beam connections. No LEDs are lit when
a port is connected to a LAN card device.
Understanding the EthIR Switch Panel LEDs (ES208 /
216 only)
• Ethernet Uplink LED - The Ethernet Uplink displays one of two lights when
power is connected to the EthIR Switch and the Switch is uplinked to a
network hub: A steady green light to the right of the Uplink port indicates
either a 10Mbit or 100Mbit per second connection. See Figure 2-1 above for
the exact position of these lights.
• Power LED - A steady green light means the system has powered up correctly.
• IR Port LEDs - The EthIR Switch provides 8 or 16 ports for connection to
infrared devices. Each port has two indicator LEDs as follows:
o A green Connect LED that when lit indicates successful connections to
the EthIR Beam. This means the EthIR Beam is working. When the
EthIR beam is plugged in, the light comes on; when the cable or EthIR
Beam is unplugged, the light goes off.
o An amber Fail LED that when lit indicates failure to successfully
connect to the EthIR Beam. This means either the cable or EthIR beam
may have a short circuit. When the troublesome cable or EthIR Beam
is unplugged, the light goes off.
Note: The Console serial port is provided for Clarinet diagnostic and support purposes only
and should not be used for any other purpose.
2-6
Page 19

EthIR Beam
Power
The EthIR Beam is powered by the EthIR Switch, which means that no power adapter
or extra line is required to install it. Simply plug it into the infrared port (or mini-DIN
connector) on the EthIR Switch. The Switch powers the EthIR Beam via the UTP or
mini-DIN cable connected to the particular Switch model.
Checking Connection Status
The EthIR Beam displays a steady green light when it is successfully connected
through the network to the EthIR Switch. A flashing green light on the EthIR Beam
means that data is being transmitted between the network and your portable computer.
For successful transmission of data, the infrared access point of your portable
computer must be aligned with the infrared access of the EthIR Beam. Each infrared
device provides a cone of approximately 30 degrees within one meter from the access
point within which it can sense infrared transmission.
If you miss align your notebook computer, or block the infrared access point, a helper
dialog pops up to display a countdown period of time within which you can realign the
computer without losing the connection.
The EthIR Soft Family of Products
Introduction
The CSI Configuration Tool is a software utility for network administrators to
maintain and configure the EthIR Switch. The Infrared Driver for Windows 95 is a
utility that updates Windows 95 notebooks originally shipped without infrared
support. The ClarinetIR™ software allows mobile Windows 95/98/2000, PocketPC
and Palm users to effortlessly connect to any EthIR LAN system anywhere without
having to reconfigure their IP addressing.
CSI Configuration Tool
All eight and sixteen port EthIR Switches are pre-configured with a default set of IP
addresses that have been entered as a guide for network administrators when
configuring the EthIR Switch according to their own network scheme. This tool
allows for configuration of IP address for the EthIR Switch itself and any DNS or
Proxy addresses as well as an IP Pool of addresses that will be used by Windows 98,
Windows CE devices, and Palm IIIx, IIIxe, V, Vx, and VII Organizers as well as any
notebook or devices running the ClarinetIR™ software. Supported platforms for
running the Tool include: Windows 95/98/2000, Palm and MacOS
2-7
Page 20

running a PC emulator.
Infrared Support for Windows 95
A few notebooks manufactured during the initial release of Windows 95 were not
configured with infrared drivers (despite having infrared hardware). This software
utility installs and configures infrared drivers in such notebooks. See APPENDIX A
for further information.
ClarinetIR™
The ClarinetIR™ software was developed primarily for mobile notebook users
running Windows 95/98/2000 and PocketPC or Palm handheld devices. It allows
users to access a LAN or the Internet when interfacing with any EthIR LAN system
anywhere. The software ‘reads’ the EthIR Switch IP information and self-configures
to interact with that particular system during an infrared communication session. No
user intervention is required. Any user who wishes to gain LAN access via EthIR
LAN switches should always use this software.
CSI Firmware updates
Periodically, Clarinet Systems engineers make improvements to an EthIR Switch’s
performance and flexibility with new features and enhancements. This comes by way
of Firmware updates. Customers can download the latest firmware updates from the
Clarinet Systems web site: http://www.clarinetsys.com. The firmware is used in
conjunction with the CSI Configuration Tool. Please refer to Updating The Firmware
in Chapter 3 at page 3-12 for more details.
Software Installation and Hardware Requirements
The CSI Configuration Tool is for network administrators and is not intended for the
casual user. Installation is performed on any Windows 95/98/2000 or MacOS
notebook with an infrared port. Insert the CSI Media Installer CDROM, and click on
the Install Configuration Tool button. MacOS and Linux users will need to run the
program with a PC emulator.
The ClarinetIR™ software disk is for any Windows 95/98/ME/2000/XP notebook
user. Please refer to Chapter 4 ClarinetIR for more details
For installing Infrared Support for Windows 95 software refer to APPENDIX A for
more details.
2-8
Page 21

Chapter 3
Configuring EthIR LAN
Introduction
Please read through this section of the User Guide before performing any
configurations. This section describes how to:
1. Configure the EthIR Switch.
2. Use the CSI Configuration Tool.
Each step is described in the following sections.
Configure EthIR Switch
The EthIR Switch requires configuration to support handheld PCs running “PPP over
IR” (hereinafter called “IR/PPP Devices”) such as Windows CE devices, Palm
Organizers (IIIx, IIIxe, V, Vx, and VII), and Windows 95/98/ME/2000/XP notebooks
running ClarinetIR™ or Direct Cable Connection (DCC). Configuration is also
needed to manage the Switch using SNMP (the EthIR Switch supports up to four
SNMP managers), or update the Switch’s firmware. In these cases you must specify
an IP address for the Switch using the CSI Configuration Tool if you are to interact
with an existing network. A complete description of the Tool and instructions on
setting the Switch IP address follows:
CSI Configuration Tool
The CSI Configuration Tool provides a way to do setup and firmware upgrades for
Clarinet Switches.
The following requirements must be met to use the Configuration Tool:
9 A Windows 95/98/ME/NT/2000/XP PC or notebook with TCP/IP protocol
installed (described in Binding TCP/IP Protocol for Notebook section in
APPENDIX A).
The Tool can run on a PC with an Ethernet adapter or infrared port**. If the Tool is
running on a PC using Ethernet, the PC’s Ethernet adapter must be connected to an
Ethernet network which the EthIR Switch should also be connected to. If the Tool is
running on a notebook using infrared, the notebook can be connected to the EthIR
**
infrared port option is not available for Windows NT.
3-1
Page 22
Switch via infrared through an EthIR Beam to the Switch (see page 3-3, “Connectivity
Choices for Using the CSI Configuration Tool”).
CSI Configuration Tool Installation
Your EthIR LAN system comes with a CSI Media Installer CD-ROM. On a PC,
insert the CD-ROM into the drive and follow the on-screen prompts. This installs the
Configuration Tool and icons onto your PC.
CSI Configuration Tool Functions
The Configuration Tool provides the following functions:
1. Sets the IP address of the Switch. This is usually required for the Switch to
support IR/PPP devices, or be managed by SNMP.
2. Finds all the EthIR Switches on the network.
3. Updates the Switch firmware.
4. An IP Editor to configure IP addressing. The IP Editor can change the
Switch’s IP address, Gateway, DNS and Proxy server IP addresses, and a pool
of IP addresses. It can also be used to point to a DHCP server on the network
to obtain these addresses.
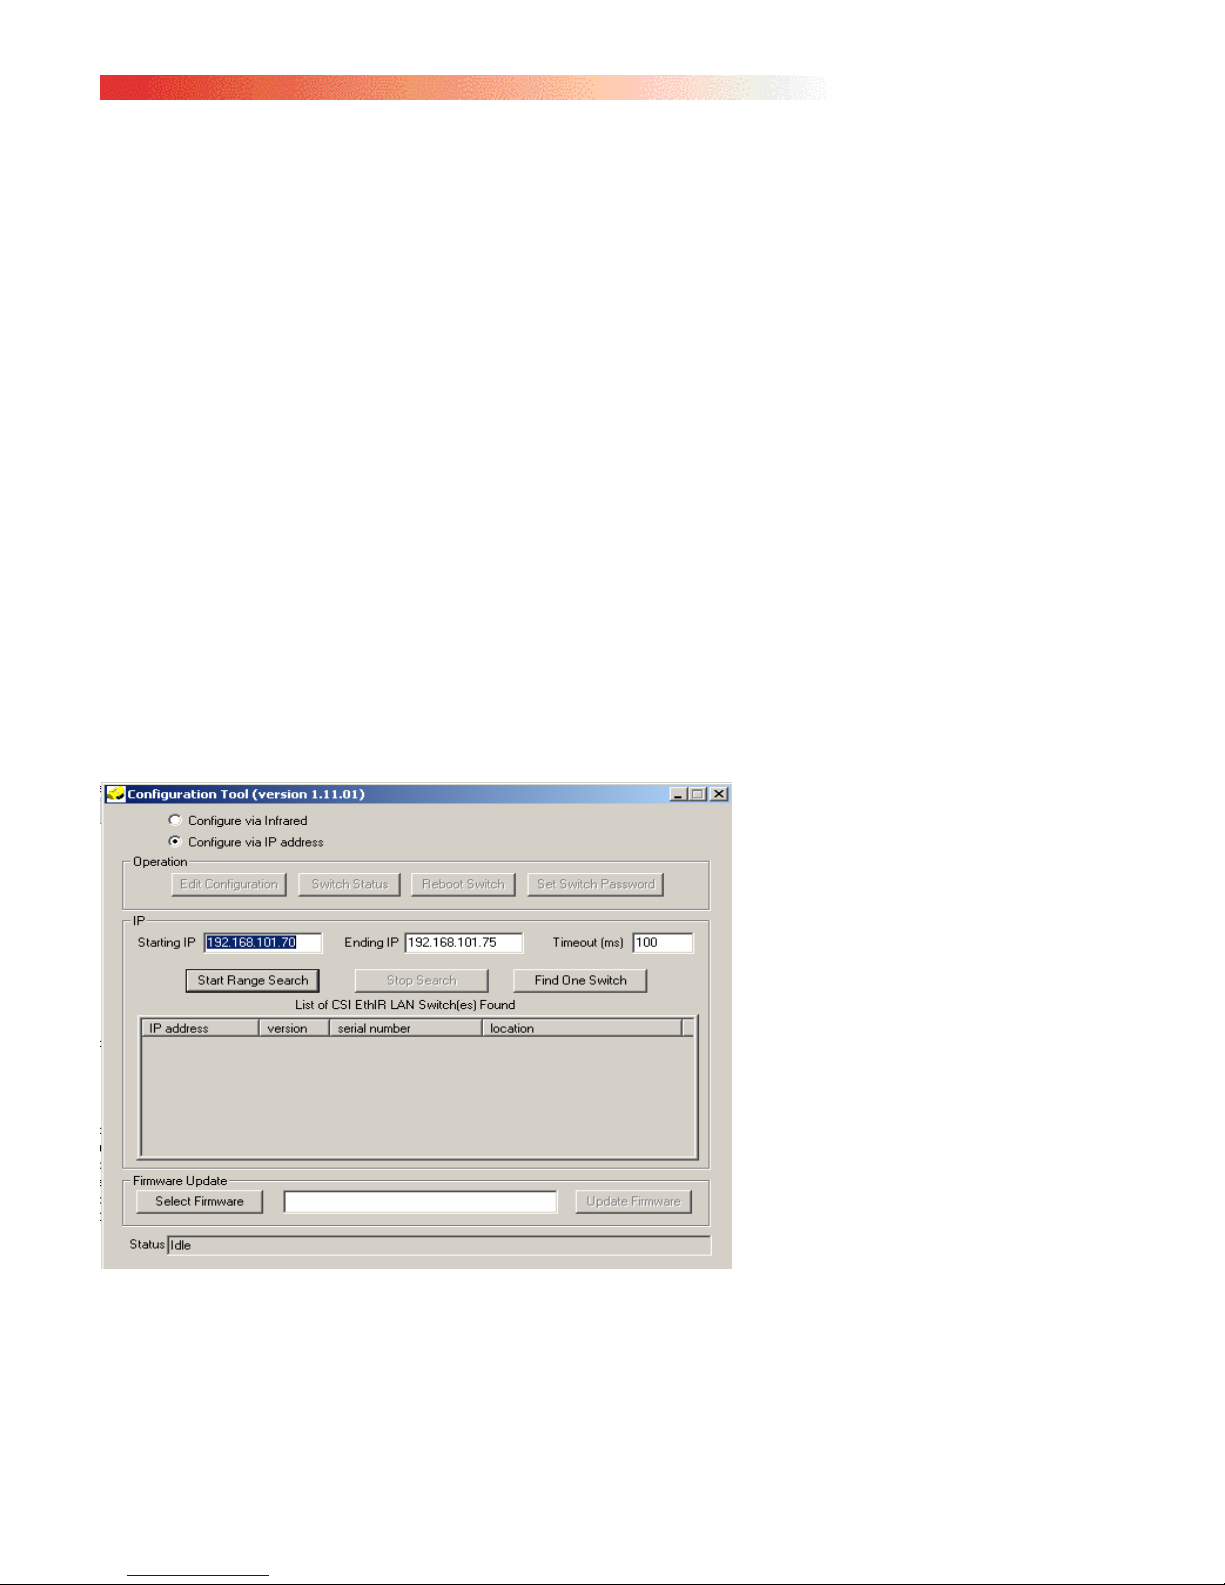
The following graphic illustrates the Configuration Tool once it is started.
3-2
Page 23

CSI Configuration Tool Window Description:
The Configuration Tool is divided into three sections:
1. Operation section is for accessing the configuration of any Switch on the
network via an infrared or Ethernet connection. This section allows
reconfiguring and managing Switches over the network.
a. Edit Configuration edits the Switch’s IP and its Pool of IP addresses for connecting
devices as well as gateway, DNS, Proxy IPs and an option to obtain these from a
DHCP server.
b. Switch Status grabs the configuration of the Switch’s current setup in a pop up
window, which can be used to save to disk or sending to Clarinet Systems for
troubleshooting purposes.
c. Reboot Switch allows user to manually reboot the switch without physically be at
switch’s location.
d. Set Switch Password allows you to supply password protection to Switches in your
network.
2. IP section relating to locating a Switch on the network, which includes:
a. Starting IP and Ending IP specify the range of IP addresses within which to search
for EthIR Switches on your subnet.
b. Timeout specifies the time period in milliseconds to wait for a reply from a Switch
during a search. Default is set to 100 ms.
c. Start Range Search to begin a range search and Stop Search buttons to end a search.
d. Find one Switch button to enter the IP address of one specific Switch to search for
rather than a range.
3. Firmware Upgrade section is for loading the firmware file for updating.
a. The Select Firmware File button allows you to navigate to the location of the file
needed to upgrade the Switch’s firmware. Then the “Update Firmware” button must
be clicked.
b. Update Firmware button is clicked after locating the firmware file for upgrading.
Connectivity Choices for Using the CSI Configuration
Tool
Configure via Infrared
The easiest and quickest way to connect to an EthIR Switch for initial IP
configuration purposes is by installing the Configuration Tool on an infrared enabled
notebook and does the following.
1. Point an EthIR Beam towards the notebook’s infrared port.
2. Launch the Configuration Tool software.
3. Click the Configure via Infrared.
4. Click the Edit Configuration.
3-3
Page 24

A proprietary infrared communication link is established enabling you to make IP
configuration changes. However, this option does not provide a mean to update
firmware nor allow the user to configure switches other then the one connecting to.
For managing multiple network Switches or updating the firmware, follow the steps in
Configure via IP address on the following section. Nevertheless, this option provides
the mean to configure the switch without an Ethernet uplink or invalid IP address
settings.
Configure via IP address
The CSI Configuration Tool can be installed and launched on a PC running Windows
95/98/ME/2000/XP and connect to any Switch on the network provided the TCP/IP
settings of its Ethernet adapter card is configured to be on the same subnet as the
EthIR Switch. Laptop using an Ethernet card or utilizing ClarinetIR™ for LAN
connectivity also applies. The following step describes how to start configuration
using Ethernet connection:
1. Make sure Ethernet connectivity is available and switch is on the network.
2. Launch the Configuration Tool software.
3. Click the Configure via IP address.
4. Search for the switch via either range search or search for specific IP.
5. Click on the IP address of the switch to be configured.
6. Click the Edit Configuration.
This method is best suited to manage a Switch that has already been properly
configured. However, if an infrared notebook is not available for initial Switch
configuration, a Palm based configuration tool is also available for initial
configuration.
Setting The IP Address Of The Switch For The First
Time
If the EthIR Switch will be managed by SNMP or support IR/PPP devices, it must
have an IP address. Since ES1000 may work as a standalone device with no need of
uplink connection, it does need IP addresses in such case.
All EthIR Switches except ES1000 are shipped with DHCP option turned on so no
configuration is needed if you have a DHCP server deployed on your network.
The users who wish to assign static IP addresses can follow the instructions below by
uncheck the use DHCP option. To avoid possible IP conflicts you should reset the
Switch’s IP of those models before connect the uplink to an existing network. Again,
do not uplink the Switch to an existing network when performing the initial
configuration.
3-4
Page 25

The following steps describe how to set the IP address of the EthIR Switch for the first
time from a notebook running Windows with an enabled Infrared capability:
Models ES208 / 216 / 608
DHCP off. Generic IPs entered
DHCP option turned on
1. Launch the Infrared applet in the Control Panel to insure that “enable infrared”
is enabled and the “plug and play” feature is disabled.
2. Install the CSI Configuration Tool software on the notebook.
3. Point and EthIR Beam to the notebook’s infrared port.
4. Launch the CSI Configuration Tool.
5. Click the Configure via Infrared.
3-5
Page 26

6. Click the Edit Configuration. The IP Editor dialog appears showing the
Switch’s current configuration settings.
In the “General Info” tab, entries are available to setup your EthIR Switch with its
own unique IP address according to your networking environment. Also, entries for
Gateways, DNS Servers, and Proxy settings are made in this dialog.
A unique feature is the Use DHCP option. Checking this option will disable the
entries for Switch IP, Subnet Mask, Gateway IP, DNS IP 1 and DNS IP 2. These
settings will be secured from your DHCP Server if such is implemented within your
networking infrastructure. If no DHCP server is on the network, do not check this
feature.
If the Use DHCP option is invoked, the IP Pool (for IR/PPP devices) will also obtain
available IP address from the DHCP server. If the Switch is an 8 port model, it will
request 8 IPs from the DHCP server. If it is a 16 port model, then it will request 16
IPs. However, if the DHCP server is unable to honor the request and offers, say, five
IP addresses to the IP Pool, then only up to five IR/PPP devices can connect to the
Switch. If the Use DHCP option is not invoked, then eight valid IP addresses (for an
8 port EthIR Switch model) should be secured and entered into the IP Pool. For 16
port models then 16 IP addresses should be entered. If fewer IP addresses than
available ports are entered into the IP Pool then only that number of IR/PPP
connections can be made.
For the ES101 / 301 EthIR Switch, only one IP address can be entered into the IP
Pool. So as ES1000 if it connects to network to perform network access point.
ES3011b has no IP pool, instead ES3011b Switch share the same IP (one IP) with
connected portable device.
IMPORTANT NOTE: Make certain the DHCP Server is up and running over the
network before setting the DHCP option and connect the uplink to the Switch to the
network. It takes up to three minutes for the Switch to obtain IPs for the first time. If
the DHCP server is not available but the Use DHCP option has been invoked, the Switch
will not respond to any attempts to connect to it for up to three minutes.
Searching For EthIR Switches
To update the firmware and edit the IP information of the Switches once a valid IP has
initially been set for the Switch, the Tool must first find the Switches. The Tool can
run on a Windows PC or notebook or a MacOS PC emulator. Three pieces of
information are required for the search to succeed.
9 Starting IP address.
9 Ending IP address.
9 Search timeout.
3-6
Page 27

Starting IP address and Ending IP address specify the IP address range within
which to search. Searches can also be performed across subnets.
Timeout specifies the time period in milliseconds to wait for a reply from the Switch
during a search. This value varies depending on the following:
1. If the Tool runs on a PC connecting to the network using Ethernet and the
Switch is on the same subnet, a timeout of 50 ms is usually sufficient.
2. If there are routers between the PC running the Tool and the Switch itself, or if
the Tool runs on a notebook connecting to the Switch using Infrared, a high
timeout (such as 1000 ms) may be required. The default timeout setting is 1000
ms. However, 100 ms can many times be sufficient.
As mentioned, except ES1000, all the Switches are shipped with default IP settings
and DHCP option turned on. Depending on need changes can be made such as the IP
address for the Switch itself or turning on/off the DHCP option, and the IP Pool of IP
address(es) for connecting IR/PPP devices. Since ES3011b Switch shares one IP
address with the portable device, the ES3011b Switch is not accessible (visible) by the
search program if a portable device is connected (occupies that IP address).
The above picture illustrates the discovery of three Switches.
3-7
Page 28

The NVM Editor
General Info Tab
The General Info tab of NVM Editor contains configuration information required by
the Switch. Select the appropriate Switches first using the Tool then click Edit
Configuration. The NVM Editor dialog is displayed, as illustrated below:
Settings include the Switch’s IP address, Subnet Mask, and optional Gateway IP. The
DNS IP 1 and 2 fields as well as the Proxy field have been included to support Internet
connectivity for IR/PPP devices required to connect to the EthIR Switch. After all
required tab fields are modified, click Update to update the IP information of the
Switch. Clicking Done will reboot the switch if IP information is updated. If using
the DHCP option, all IP entries (except the Proxy IP) will be obtained automatically.
Note: Do not change MAC Address..
3-8
Page 29

SNMP Variables Tab
This tab contains information about SNMP, as illustrated below. The Switch supports,
up to, four SNMP managers. If SNMP is not used, do not modify the information in
this tab section. If SNMP is used, these fields should be set by your system
administrator.
IP Pool Tab (except ESB3011b)
This tab enables you to create a pool of dynamic IP addresses for assignment to
IR/PPP devices as illustrated below:
If you intend to use any IR/PPP devices you must provide IP addresses in the IP Pool
either manually or via DHCP. You can add or delete IP addresses to and from the
pool respectively by clicking
Alternatively, if DHCP Servers are available, invoking the
will eliminate the need for managing IP Pool.
Add or Delete and then clicking the Update button.
Use DHCP on this screen
3-9
Page 30

Model ES101 / 301/ 1000
Models ES208 / 216 / 608
The IP Pool is preset to: 192.168.101.179 through 186 (on 8 port models ES208 and
608) and 192.168.101.179 through 194 (on 16 port models ES216). The one port
ES101 / 301 IP Pool is initially empty since it is factory shipped with the DHCP
option turned on. As a result, it requests an IP from the DHCP server for its IP Pool
and will not be visible in the IP Pool list.
Once you set the appropriate information in this tab, the EthIR Switch automatically
provides a IP Address from the IP Pool to any IR/PPP device that connects to the
network via an EthIR Beam.
The fewer available IP addresses or available EthIR Switch infrared ports determines
how many IR/PPP devices can connect to the system simultaneously. If you add less
IP addresses than there are available ports, the number of IP addresses determines how
many IR/PPP devices can connect to the system at any one time. For example, if your
Switch supports up to eight infrared ports and you or a DHCP server provides only six
IP addresses to this pool, then only six IR/PPP devices can connect to the Switch at
any one time.
After all fields are modified, click the
Update button to update the Switch’s IP
information.
Note: If you change the IP address of the Switch, you must reboot the switch by clicking
Reboot. Any infrared communication during reboot will terminate.
RF Card Info (ESB3011B only)
3-10
Page 31

When editing configuration of an
ESB3011b, which uses 802.11b
wireless uplink, the
tab will replace the
RF Card Info
IP Pool tab. As
displayed on the right, there are
several statistic fields alone with
some configuration items.
ESSID field contains case-
The
sensitive string, which identify the
wireless access point (AP) this
switch is going to connect to. This
field must match with the ESSID
field in the AP’s configuration in
order to establish a connection.
If encryption is enabled by the
wireless AP, select
configuration. However, if no encryption is enabled, use
Shared Key Authentication and switch to WEP tab for more
Open System
Authentication and click on Update to update the switch with the new setting.
Note: there will be a performance decrease when encryption is enabled.
WEP (ESB3011b only)
The WEP tab provides a mean to
modify data encryption key
necessary for a secure connection.
This tab is enabled only if
Key Authentication is selected in
RF Card Info tab.
Within this section of configuration,
the administrator may choose either
64-bit encryption key or 128-bit
encryption key in
Encryption field.
Then, the proper encryption key
value must be entered into the
Key Entry fields.
In case of 64-bit encryption, key
content must be entered into the
correct key field and use
content and
Default Tx Key field must match the configuration within the wireless
Shared
WEP
Default Tx Key field to select the key field. Both the key
3-11
Page 32

AP. In the case of 128-bit encryption, The
Default Tx Key will always be 1 and AP
must be configured to used 1 if multiple keys are allowed for 128-bit encryption.
Note: 128-bit encryption will have performance decrease compare to 64-bit encryption.
Updating The Firmware
Periodically, Clarinet Systems engineers make improvements to the functionality of
the EthIR Switch via firmware updates. These can be freely downloaded from
Clarinet Systems web site.
To update the firmware in the Configuration Tool:
Initiate either an Ethernet communication session to the switch in need of
1.
updating as described in Configure via IP address on page 3-4.
2.
Locate the EthIR Switches as described in Searching For EthIR Switches on
page 3-6
system, you can click the
address of that Switch.
Select the Switch you want to update from the list of available switches on the
3.
Tool dialog. You can select multiple Switches by holding the control key and
clicking on the desired Switches.
Once you select a Switch, the Update Firmware button will be enabled.
4.
Click Select File to navigate to the file containing a image (wrp file) that was
5.
either downloaded or sent to you from Clarinet Systems. Click the
Firmware button. If no file is selected, you are prompted to select a file.
Once a file is chosen, all the selected Switches are updated in sequence. Once
the upgrade is complete the switch is automatically rebooted.
Note: Try to update the firmware after work or at light traffic since the Switch will reboot
itself after updating and any infrared sessions taking place will terminate. The update and
reboot process takes about one minute for each Switch. If a group of Switches are selected,
then the update will take one minute for each Switch in sequence.
. Alternately, if you wish to manage only one Switch in your LAN
Find One Switch button and enter the specific IP
Update
Switch Security
All switches of EthIR LAN family contain security option that prevent unauthorized
individuals to view and modify the switch configuration. This option can be enabled
by click on the
configuration operation will require the user to enter the proper password to continue.
Set Switch Password button can also be used to disable password. If at any
The
given time the switch password is lost, please free to contact Clarinet Systems Tech
Support to obtain a default password for the switch. “RADIUS Security” is an
optional feature should be considered to provide further security protection.
3-12
Set Switch Password button on the configuration tool. Once set, all
Page 33

Chapter 4
ClarinetIR
ClarinetIR™ is a freeware application, which provides network connectivity via
infrared (IR) without the hassle and confusion of setting up and/or launching a dial-up
network. With few simple clicks, the application can be installed onto your
computer(s) and/or device(s) with ease. The uninstall feature also makes removal of
application as simple as one, two, and three.
ClarinetIR™ comes in three different formats for three different types of systems.
ClarinetIR for Windows PCs are designed mainly for Windows based laptops where
the IR port is built-in and enabled by default. ClarinetIR for PocketPC supports
Windows CE 3.0 based PocketPC devices. Lastly, the Palm version of ClarinetIR is
also available for our users.
For the latest ClarinetIR™ download, information changes, and list of supported
platforms please go to http://www.clarinetsys.com/
.
4-13
Page 34

Page 35

APPENDIX A -
Installing Infrared Support for Windows 95
This section applies ONLY if IrLAN was not originally installed in your Windows 95
notebook (no Infrared icon in the Control Panel).
To install or update Windows 95 Infrared Drivers do the following:
Insert the CSI Media Installer CD. You will find the setup file in
1.
\Software\Infrared Support for Windows 95 notebooks
without infrared ONLY\setup.exe
2. At the Welcome Screen click Next to begin the installation process, which
updates your notebook’s hardware profile and adds the infrared device. Please
skip to step 10 if your notebook’s infrared hardware is already installed and
operational.
.
Click Yes if you agree to the License Agreement.
3.
When the Add Infrared Device wizard is displayed, click on the Next button,
4.
and select the correct manufacturer and model of your portable computer as
illustrated on the next page. It is important that you select the exact
manufacturer; otherwise, your computer may connect at a speed significantly
lower that 4Mbps. For example:
- If your notebook is Fujitsu, click on it and then the correct model.
- If your notebook is IBM, click on it and then the correct model.
A-1
Page 36

If your notebook is not on
the Manufacturers list,
select Standard Infrar ed
Device, then select Builtin Infrared port on
notebook or desktop in
the Models list.
5.
After making your manufacturer and model selections, click Next.
Select the COM port your notebook uses for Infrared.
6.
Example:
• If your notebook is Fujitsu
735, select SMC IrCC
(Fast Infrared) Hardware
and Driver (COM4).
• If your notebook is
Toshiba 500 Serial, select
Generic IR.
Note: When the Add Infrared Device Wizard prompts you to choose th e IR-related
communications port to which the IR device is physically connected, click that port in the list
(do not select “Virtual” COM port if it appears). If you are uncertain which physical
communications port the IR device is using, select the first COM port in the list (for example,
COM1).
7. Click Next. (CAUTION: if the wrong COM port is selected a reinstallation of
the drivers will be necessary).
A-2
Page 37

When the Add Infrared Device Wizard prompts you to select the virtual
8.
COM and LPT ports, accept the default values as illustrated below and click
Next button.
the
After the wizard copies the IR communications driver files to the hard disk, the
9.
wizard displays two
New Hardware Found messages:
- Infrared Serial Connection (COM) port
- Infrared printer (LPT) port.
Note: If the New Hardware Found messages were not displayed, reboot y ou r not ebook and
repeat steps 1 through step 9)
When the Add Infrared Device
10.
Wizard prompts you, click Finish
to complete the IR device
installation.
Start Up. Infrared Monitor must be
11.
launched each time you wish to use
infrared communication. The
setup program allows you to
choose whether to launch the
Infrared Monitor each time automatically upon startup by clicking
Yes to the
following question. If you do not want it to launch automatically each time
click
No, however, you will need to manually launch Infrared Monitor each
time you wish to connect via infrared.
Point the EthIR Beam at your notebook’s infrared port. With the infrared
12.
drivers now loaded, Windows 95 recognizes the Clarinet EthIR Switch as the
new hardware device. Windows 95 starts the Plug-and-Play installation
process by installing the Microsoft IrDA LAN Driver and Clarinet EthIR LAN
adapter for your notebook. At this point you may be prompted to insert the
A-3
Page 38

Windows 95 CD-ROM to continue the installation process. Follow the
prompts until the installation is complete. You will see the Infrared Monitor
screen indicating successful IrLAN connection.
Note: If the IrLAN connection only runs at 115Kbps, verify the IR port specifications of your
notebook to see what the maximum speed it can support by consulting the documentation th at
came with your notebook or contacting the manufacturer. If the IR port can only support a
maximum of 115Kbs then you cannot upgrade to a higher speed. If the port specification can
support Fast-IR (4Mbps), you can continue to use the 115Kbps connection but you should
request the IR 4Mb Framer (device driver) from your notebook manufacturer and then update
the Framer by performing the steps outlined in “APPENDIX E - Upgrading from 115Kbs to
4Mbs Speeds.”
Binding TCP/IP Protocol for Notebook
Clarinet EthIR Switch Client Driver enables the following protocols and clients on
your portable computer:
• IPX/SPX
• NetBEUI
For the CSI Configuration Tool to work and TCP/IP based network environment,
the Microsoft IrDA LAN Driver must be bounded to the TCP/IP protocol of your
notebook. Typically this is done automatically. However, check your
applet in the
Control Panel to verify if the TCP/IP protocol was added.
Launch the Network icon in
1.
Control Panel on your
the
notebook. The system displays
the Network panel illustrated
on the right.
If the TCP/IP is not listed, click
2.
Add in the Network panel,
then click
Protocol and click
Add in the Select Network
Component Type
activate the
Protocol
Select Network
panel. Select
. This will
Microsoft in the
Manufacturers list and select
TCP/IP in the Network
Protocols
. Click OK.
Network
A-4
Page 39

3.
You will see TCP/IP -> Microsoft IrDA LAN Driver is listed in the
Network panel.
Once present, double click Microsoft IrDA LAN Driver in the Network
4.
panel. Select
Bindings. Insure that TCP/IP --> Microsoft IrDA LAN
Driver is checked on. Click OK. This returns you to the Network panel.
Select
TCP/IP --> Microsoft IrDA LAN Driver. Select Properties. An
IP Address needs to be assigned.
To assign a static IP address, click Specify an IP address, then type in the
5.
IP address according to your corporate network policies. Click
process is complete. You can close all of the panels. The static IP address
approach allows you to assign a permanent IP address manually.
Networked environments that did not use TCP/IP before should use this
approach.
To assign an automatic IP address, you would instead click Obtain an IP
6.
address automatically. Click OK. The process is complete. You can
close all of the panels. The automatic IP address approach allows the IP
address to be configured automatically. It minimizes administration effort
and allows reuse of the IP address. It is recommended for networks with
DHCP.
For other configurations such as DNS, Gateway, etc., please see your system
administrator.
OK. The
A-5
Page 40

Page 41

APPENDIX B -
Verifying that Dial-Up Adapter is in your Network
Configuration
In order to use ClarinetIR or Direct Cable Connection successfully, you must have
Dial-Up Adapter in your network configuration. Go to
Panel
click the
and click Add… and choose Microsoft as the Manufacturer and Dial-Up Adapter
from the
and double-click the Network icon. If Dial-Up Adapter is not there you must
Add button. In the Select Network Component Type dialog click Adapter
Network Adapter list.
Start\Settings\Control
Note: Windows may prompt you to insert the Windows CD-ROM. If none is available, enter
\WINDOWS\OPTIONS\CABS in the dialog path name.
B-1
Page 42

Page 43

APPENDIX C -
Disabling Puma Technology’s IR Communication
Software
If your laptop is equipped with Puma Technology’s Tranxit communication software it
must be disabled before continuing the configuration. If present, remove it from the
Start\Program\Start Up folder and reboot. You can check this by clicking:
Start\Settings\Taskbar & Start Menu. Click the Start Menu Programs tab.
Click the
once on the plus sign (+). Find the
once. Check the right panel for
the
enabled and you can proceed with the installation. Close the dialog window and click
OK for the Taskbar properties.
.
Advanced button. Expand the Programs icon in the left frame by clicking
StartUp folder in the expanded list and click on it
Tranxit icon. If you find it, click once on it and press
Delete key. If the icon is not there then this communication program has not been
C-1
Page 44

Page 45

APPENDIX D -
Browsing the Network Neighborhood Windows 95/98
If you cannot find the Network Neighborhood icon on your desktop or in your
Windows Explorer, you will need to install
Double click the Network icon in the Control Panel.
1.
Client for Microsoft Net-works.
Click Add button. In Network Component Type, select Client. Click the
2.
Add button.
3. In Manufacturer box, choose Microsoft. Then choose Client for Microsoft
Networks
. Click OK.
D-1
Page 46

4.
Now configure the network identification properties for the workgroup name.
Note: If you wish to participate on a Windows NT network and use services such as network
browsing and shared resources.
Click on the Identification tab in the Network Properties dialog.
5.
Enter the name of the workgroup and click OK.
6.
7.
Click OK again. Windows will begin installing the client. You may be
prompted to insert the Windows 98 CD-ROM. If none is available, enter
\WINDOWS\OPTIONS\CABS in the dialog path name.
Windows will reboot your system.
8.
.
D-2
Page 47

APPENDIX E -
Upgrading from 115Kbps to 4Mbps Speeds
The following procedures apply only to Windows 95 in general and the following
manufacturers in particular: Compaq, Fujitsu, Hewlett Packard, Sharp, Sony, Toshiba.
In order to upgrade you’ll need an updated framer for your Windows 95 notebook.
Consult your hardware manufacturer for an updated driver. Download and copy the
appropriate framer file onto your hard drive. Then follow the instructions as outlined:
From Start\Settings\Control Panel click Add New Hardware and
1.
Next.
click
2.
When prompted to have Windows detect the new hardware you wish to install
check the
Select Infrared as the hardware you wish to install from the Hardware types
3.
window and click
No radio button and click Next (as illustrated on the next page).
Next.
E-1
Page 48

4.
You will see the Wizard display a dialog box informing you that it will install
infrared devices. Click Next and be sure the Infrared Driver for Windows
disk is inserted in the floppy drive. Click Have Disk in the
95
Manufacturers/Model dialog box. Type the path a:\, and click OK.
5.
Select the correct manufacturer and model for your notebook and click Next.
Note: If it’s not printed on the notebook housing you can check the documentation, which
came with it or the bottom of your notebook for the model.
Select the COM port your notebook uses for Infrared.
6.
Note: When the Add Infrared Device Wizard prompts you to choose the IR-related
communications port to which the IR device is physically connected, click that port in the list
(do not select Virtual COM port if it appears in the list. If you are uncertain which physical
communications port the IR device is using, select the first COM port in the list (for example,
COM1). Then click Next.
E-2
Page 49

CAUTION: if the wrong COM port is selected a reinstallation of the drivers will be necessary.
Example:
• If your notebook is Fujitsu
735, select SMC IrCC (Fast
Infrared) Hardware and
Driver (COM4).
• If your notebook is Toshiba
500 Serial, select Generic Ir
Serial Port (COM3).
7. When the Add Infrared Device Wizard prompts you to select the simulated
COM and LPT ports, accept the default values as illustrated below and click
the
Next button.
8. When the Add Infrared Device Wizard prompts you, click Finish to
complete the IR device installation.
PLEASE BE CERTAIN TO RESTART YOUR COMPUTER
. Once re-started the
Infrared Monitor should come up and display that the connection is good at 4Mbs
E-3
Page 50

Fast-IR speed. If it still runs at 115Kbs it is likely that the wrong COM port had been
select from step 6. Return to step 1 at the beginning of this section and repeat the
process.
E-4
Page 51

APPENDIX F -
Notebook and Handheld PC Configurations
Configuration Options
Please read through the application section of this chapter before performing any
configurations. This section describes how to:
1. Configure your notebook PC running IrLAN with Windows 95 or Direct Cable Connection
(DCC) or ConnectIR with Windows 95/98/2000.
2. Configure your Windows CE handheld PC or palm-size PC.
3. Configure your Apple MacOS Powerbook.
4. Configure your Palm Organizer (IIIx, IIIxe, V, Vx, or VII).
Before You Begin — Needed Changes to Your System
The following pages discuss the steps needed for a successful notebook connection
to a network via EthIR LAN. There are a few changes necessary to achieve this.
Some of these steps may require your Windows CD-ROM in order for the system
to copy the needed files (unless the CAB files have been copied to your hard disk).
Also, some of these changes require a reboot. It may be helpful to do all these
steps at one time. Please refer to the page number outlined for each of the
following steps and read it carefully first, then perform the needed task.
Remove any Ethernet PCMCIA adapter cards from your notebook.
Verify that Dial-Up Adapter is installed in your network configuration
(APPENDIX B)
Disable Puma Technology’s IR Communication software (APPENDIX C)
Configure Infrared Monitor for IrLAN with Windows 95 (Page F-2)
OPTIONAL: Specify workgroup to enable Network Neighborhood browsing and
file sharing (APPENDIX D)
F-1
Page 52

Using IrLAN with Windows 95 Notebooks
In most cases, your portable computer is already configured for use with Clarinet
Systems’ EthIR LAN. As mentioned on the previous page, only minor setup on
your part is required to enable the
1. Open the Infrared Application Program in Windows 95—In the
Start\Settings\Control Panel, double click the Infrared Icon as
illustrated below (If you don’t see the Infrared Icon, skip this section and
go to APPENDIX A)
Infrared Monitor as follows:
Double
Click
F-2
To enable your Infrared Monitor, click Options, as illustrated below
2.
Page 53

3.
Check the box Enable infrared communication on…. and Enable
software install for Plug and Play devices in range.
Click Options
Check Enable
infrared
Communication and
Enable software
install for Plug and
Play devices
4.
Click Apply then return to the Status tab to see connectivity taking place.
Your portable computer is now configured and ready for use with the
Clarinet EthIR Beam. Point the EthIR Beam towards your notebook’s
infrared port. With the infrared drivers now loaded, Windows 95
recognizes the Clarinet EthIR Switch as the new hardware device.
Windows 95 starts the
Plug-and-Play installation process by installing the
Microsoft IrDA LAN Driver and Microsoft IrDA LAN Adapter for
your notebook. At this point you may be prompted to insert the Windows
95 CD-ROM to continue the installation process. Follow the prompts until
the installation is complete. You will see the
Infrared Monitor screen
indicating successful IrLAN connection. See Chapter 2 for information on
positioning your notebook computer with the EthIR Beam.
F-3
Page 54

5.
If the IrLAN connection is successful but only runs at 115Kbps verify your
IR port specification for your notebook. If the port specification is
115Kbps then the notebook installation is complete. If the spec is 4Mbs
and you are only able to connect at 115Kbps, you should request the IR
4Mbs Framer (device driver) from your notebook manufacturer and then
update the Framer (see APPENDIX E) and repeat this section again. In the
meantime, you can continue to use 115Kbps. The installation is complete.
The following figure illustrates the activated Infrared Monitor screen with
successful IrLAN connection.
To interact with your network, you will need to configure the
Microsoft IrLAN
Adapter in your Network Configuration panel with the appropriate TCP\IP
information.
Consult your network administrator for that information.
F-4
Page 55

Using Direct Cable Connection with Windows 98
Notebooks
In lieu of the software the following directions can be followed and the same
connectivity can be achieved. Please read through this entire section of the User
Guide before configuring your system.
Note: The ClarinetIR software, which ships with the EthIR LAN system automatically,
configures your notebook to access the LAN and Internet.
This section describes:
• How to configure your Windows 98 notebook to connect to the Clarinet EthIR
Switch via Direct Cable Connection (DCC).
• How to start and end a connection once configuration is done
Before You Begin — Needed Changes to Your System
The following pages discuss the steps needed for a successful connection to a network
Direct Cable Connection (DCC). There are few changes necessary to achieve
via
this—some of which may require your Windows CD-ROM and a system reboot. It
may be helpful to do all these steps necessary all at one time. Please refer to the page
number outlined for each of the following sections and read it carefully first.
• Remove any Ethernet PCMCIA adapter cards from your notebook
• Install Direct Cable Connection – DCC (pageF-5)
• Verify that Dial-Up Adapter is installed in your network configuration
(APPENDIX B)
• If using Puma Technology’s IR software see “Disabling Puma Technology’s
IR Communication Software” (APPENDIX C)
• Configure Infrared Monitor for DCC (page F-7)
• OPTIONAL: Specify workgroup to enable Network Neighborhood browsing
and file sharing (APPENDIX D)
Install Direct Cable Connection
The first step is to check that Direct Cable Connection is installed in your
Windows 98 notebook.
Select Start\Programs\Accessories\Communication\ from the task bar. If
1.
Direct Cable Connection is installed, you will see it as illustrated below.
F-5
Page 56

2.
If the Direct Cable Connection is already in this menu, skip the following
steps and go to next section, Configure Infrared Monitor for Direct Cable
Connection, on pageF-7. If there is no Direct Cable Connection in this
menu, double-click on
Start\Settings\Control Panel. The system displays the following
Add/Remove Program icon in
Add/Remove dialogs:
F-6
Page 57

Click on Windows Setup tab, choose Communications then click on
3.
Details button.
Check the item Direct Cable Connection, as illustrated above, and then
4.
OK. Click OK again in the next window. Windows 98 may ask for
click
the Windows 98 CD-ROM to be inserted into your CD-ROM drive. If the
CD-ROM is not available enter
\WINDOWS\OPTIONS\CABS in the path
line of the dialog box.
Configure Infrared Monitor for Direct Cable Connection
1. Double-click the Infrared icon under Start\Settings\Control
Panel
Play devices within range as illustrated below. Note the COM port under
Enable infrared communication. This is the virtual COM port, which your
notebook’s IR port uses. In this example, the IR port uses COM4 (Refer to
Configure Direct Cable Connection for the First Time, step 2, on page F-9).
, select Options tab and uncheck the Install software for Plug and
F-7
Page 58

2.
Click OK
Configure Direct Cable Connection for the First Time
Configuration needs to be done only once. For successive connectivity using DCC
you need only follow the steps under “Connecting to and Disconnecting From the
Network” section.
Select Start\Programs\Accessories\Communication\Direct
1.
Cable Connection
window will open as shown below. Choose Guest then click the Next
button.
from the task bar. The Direct Cable Connection
F-8
Page 59

2.
DCC will build a list of available ports for you to select from. Select
Serial cable on COM4 and click Next button. COM4 is the virtual
communications port which your notebook’s IR port is using.
Click Finish button. Make sure the EthIR Beam is pointed at your IR port.
3.
The system will connect and will ask for the host computer name as shown
below. Do not enter a name. Instead, click on
Cancel.
F-9
Page 60

4.
Your notebook is now configured for Direct Cable Connection. Do not
click Close. Rather, MINIMIZE the dialog unless you wish to terminate the
connection.
Connecting to and Disconnecting from the Network
The ClarinetIR software allows you a simple point and click solution to get
connected with DCC. If this software is not available then the following
instructions can help you achieve the same goal:
To connect the notebook to the network using Direct Cable Connection:
1.
Face your notebook infrared port directly toward any EthIR Beam
connected to the EthIR Switch.
2.
Establish a remote connection by running DCC from the Start menu or
desktop shortcut. A window pops up to display the status of the
connection.
With your configured settings in place a dialog appears asking you to
3.
Connect as Guest on COM4. Click Connect.
4.
Another window will ask for the host computer name. Choose Cancel.
F-10
Page 61

Note: Once a session starts successfully, the status window displays a Close button. Do not
click the close button unless you wish to terminate your DCC network session. To disconnect
a DCC network session, click Close.
Note: In their network configuration, mobile users may have mapped drives from other
networked sites or have settings to log on to a network other than the one they are trying to
establish a connection with. Should error dialog boxes appear, simply click Cancel. The
reason is that a domain name has been specified in the Networks configuration. There is no
requirement to have this enabled in order to successfully use DCC.
F-11
Page 62

Using Direct Cable Connection with Windows 2000
Notebooks
In lieu of the software the following directions can be followed and the same
connectivity can be achieved. Please read through this entire section of the User Guide
before configuring your system.
This section describes:
• How to configure your Windows 2000 notebook to connect to the Clarinet
EthIR Switch via Direct Cable Connection (DCC).
• How to start a connection once configuration is done.
Go to Start\Settings\Network and Dial-Up Connections and
1.
double click on
2.
The following dialog box will appear, click Next to start the Network
Connection Wizard.
3.
For connection type, choose Connect directly to another computer, and
4. click Next to continue.
5.
Configure your computer to connect as Guest, click Next to continue.
6.
Select your Infrared port, click Next to continue.
7.
Select the option For all users, click Next to continue.
8.
Choose a name for you new Infrared connection, we suggest EthIR LAN.
Click Finish to complete the process.
Once you have successfully created your new connection, Windows will
9.
bring you to the connection screen so you can begin using your new
connection. You do not need a user name and password to connect to your
EthIR Switch because the EthIR Switch ignores these fields. Prior to
pressing the
properly and there is an EthIR Beam pointed towards the Infrared port on
your notebook.
10.
During the connection process, Windows will try and use protocols that are
unnecessary to connect to your EthIR LAN. Place a check mark in the box
next to,
Do not request the failed protocols next time this will prevent
Make New Connection.
Connect button, make sure your EthIR Switch is configured
F-12
Page 63

you from seeing this message in the future. Click
accept to begin
accessing your network.
F-13
Page 64

Configuring Windows CE Handheld PCs
This section describes
• How to configure your HPC to connect to the Clarinet EthIR Switch.
• How to start and end a connection once configuration is done.
• How to specify the HTTP proxy server in Pocket Internet Explorer.
Adding Direct Connection to Remote Networking
Each Windows CE HPC is bundled with a Microsoft Windows CE communication
package that enables you to add and configure a new connection to a remote
networking system. Follow the following step to add a new remote connection:
Select Start\Programs\Communication\Remote Networking
1.
menu from the task bar, as illustrated below.
Double click on Make New Connection, which brings up the Connection
2.
Configuration dialog. Enter a name for the new connection and specify it
as a direct connection, as illustrated below.
Click Next to display the Make New Direct Connection dialog. Select
3.
Infrared Port as the device. Typically, each HPC has a built-in infrared.
Note: It is unnecessary to click the Configure button because no change is required to the
default settings in Device Properties.
F-14
Page 65

4. Click OK to return to Make New Direct Connection dialog and click on
TCP/IP Settings…. Currently, Clarinet supports the specification in the
General TCP/IP dialog box. Again, no change is required although it
would be helpful to understand what is entailed in these dialogs.
Note: Support of some of the items is negotiated as the connection session begins. The EthIR
Switch from which the EthIR Beam is extended automatically assigns the IP address of your
HPC. SLIP protocol is not supported. Software compression and IP header compression ar e
negotiated. The EthIR Switch assigns the HPC IP address. Compression is not supported.
5. Click on the Name Servers tab.
The domain name server are configured in the Switch and do not have to
6.
be configured into the CE device. The Switch passes all information to the
CE device.
F-15
Page 66

Click OK to finish the configuration of the new connection.
7.
Hint: To make your tasks easier to accomplish, consider creating a Desktop
Shortcut: Click on the Make New Connection icon and select
Shortcut
in the Remote Networking applet.
File\Desktop
Connecting to and Disconnecting from the Network
To connect a Windows CE handheld device to the network through the Clarinet
EthIR Switch:
1.
Face your device’s infrared port directly toward any EthIR Beam
connected to the Switch.
2.
Establish a remote connection by double clicking on the IR icon in the
Remote Networking applet or click its shortcut on your desktop. A
Connection window pops up to display the status of the connection.
Note: As events occur, they are displayed in the status window, such as handshaking and user
authentication. Audio notice is provided once a session successfully starts or fails to start.
3. If an error occurs while a connection is being established, the device
repeats the connection attempt four times as displayed in the pop-up status
window. Wait until all four attempts fail before taking further action. If all
four attempts fail, repeat steps 1 and 2.
Troubleshooting Note: A common connection failure occurs when incorrect IP addresses
are entered into the IP Pool or are IPs that are already in use by other users on the
network.
F-16
Page 67

Once a session starts successfully, the status window displays two buttons:
4.
Hide and Disconnect. Consider hiding the pop-up window. A connection
indication icon resides on the task bar. Clicking on the icon displays the
connection dialog once again.
To disconnect a network session, click
5.
Start\Programs\Communication\Remote Networking and click
IR icon and click Disconnect.
the
Specifying an HTTP Proxy Server
Although an option exists in the EthIR Switch to point to a proxy server, this
information is not passed on to Windows CE devices. It must be entered
manually. To specify where the HTTP proxy server resides, select the menu item
View\Options in Internet Explorer. When specifying the proxy server, enter the
IP address instead, as in the example illustration below.
F-17
Page 68

Using IrLAN with Apple MacOS Powerbooks
In most cases, Apple Powerbooks running MacOS 8.5 or later (including models G3,
2400, and 3400 as well as early versions of the iMac) are already configured for use
with Clarinet Systems’ EthIR LAN. Only minor changes on your part are required to
enable the Infrared communication as follows:
From the Apple Menu\Control Panel pull down menu, launch
1.
AppleTalk. You have three connection options: Ethernet built-in, Infrared
Port (IrDA),
2. and Remote Only. Choose Infrared as your connection method.
3.
Next, configure your TCP/IP settings according to your networking scheme.
This is done in the
Panel
, pull down menu, and launch TCP/IP.
In the TCP/IP applet, specify the connection method (again, Infrared Port
4.
(IrDA)). If your network supports DHCP server services then select DHCP as
your configure method. If not, select manual and obtain the appropriate
configuration settings from your network administrator.
5.
Point a properly configured EthIR Beam towards your PowerBook’s infrared
port. The AppleTalk dialog will monitor connection and disconnection of
infrared transmission.
TCP/IP applet, again from the Apple Menu\Control
F-18
Page 69

Configuring Palm Organizers
Supports Palm Organizers (Palm IIIx, IIIxe, V, Vx, and VII) with OS 3.3 or greater
installed. Network synchronization to a partner computer via the network using the
EthIR Switch, allows Palm users complete mobility without having to be physically
cradled to the computer. To setup a Palm that has already been locally synchronized
to a partner notebook for infrared network synchronization, perform the following:
1.
In the Home menu click Prefs. In the upper right corner click the down-arrow
for the Prefs pull-down menu and make the following changes:
Connection: IR to a PC/Handheld
Network: Choose any service except Windows RAS
9 User Name leave blank
9 Password leave blank
9 Connection IR to a PC/Handheld
2.
In the Home menu, click the HotSync icon and choose the Modem option.
The name of your connection service will appear directly below the HotSync
graphic. Disregard the phone number entry. Click the
(bottom-left button on the bottom panel). Change as follows:
Modem Sync Perfs: Network
LANSync Prefs: LANSync
Primary PC Setting Enter NetBIOS name of partner computer
or leave blank. Enter the IP address and
subnet assigned to the partner computer.
If DHCP assigned, enter at lease the first
3 octets (e.g. 192.168.101)
Connection Setup IR to a PC/Handheld
3.
On the partner computer, right click on the HotSync icon on the system tray
and insure that Network is checked on. Point the Palm’s infrared port toward
an EthIR Beam and tap the
HotSync icon. Synchronization should take place.
To sync locally via a cradle at any time simply choose the Local option and
sync.
No changes have to be made. To sync via infrared just choose Modem
again.
Option List button
F-19
Page 70

Page 71

 Loading...