

Clare Controls CLIQ.mini Installation And Setup Manual
© Clare Controls, LLC. 1 / 7 Doc ID – 1263 • REV 08
CLIQ.mini Installation and Setup Guide
Last modified: 04/06/18
Description
The Clare Controls CLIQ.mini controller provides all device
management services, supports all Clare user interface
services, and acts as the gateway to the ClareCloud for system
updates. The controller comes complete with the ClareOS
preloaded. The controller also comes equipped with
Z-Wave Plus™ for controlling your Z-Wave devices, such as
integrated lighting, thermostats, sensors, and door locks.
Note: Models are subject to change without notice.
WARNING: Any changes or modifications made to this product
not expressly authorized by the manufacturer could void the
user’s right to operate this device.
Unpacking the CLIQ.mini
Remove all contents from the CLIQ.mini packaging and ensure
you have the following items.
• 1 × CLIQ.mini device (p/n CLIQ-MOSM-10)
• 1 × wall mounting kit (p/n 950-5002-0)
o 1 × wall mounting bracket (p/n 200-1838-0)
o 2 × long screws (8-32 × 5/16”) (p/n 100-1834-0)
o 2 × short screws (6-32 × 3/4”) (p/n 100-1849-0)
• 1 × PoE (Power over Ethernet) injector with power supply
(p/n 500-1825-0)
• 1 × paper clip (p/n 999-1852-0)
• 1 × Cat6 Ethernet cable (p/n 300-I894-0)
• 1 × CLIQ.mini Quick Start Guide (CC-DOC-1284)
• 1 × Additional Tips Insert (CC-DOC-1285)
• 5 × UUID/Mac identification labels (CC-DOC-1318)
WARNING: Do not apply power to the CLIQ.mini until
installation is complete. Failure to do so may result in bodily
injury and/or damage to the equipment.
Installation
We recommend placing the CLIQ.mini in an open centrally
located area within the home, using the included wall mount to
attach the CLIQ.mini to a standard single gang box.
The CLIQ.mini should not be mounted in a structured
enclosure, panel, or closet. If the CLIQ.mini is placed in a
closed off area, the wireless signal strength may be
compromised.
Note: To prevent radio frequency (RF) interference, we
recommend that you place the CLIQ.mini away from devices
that may cause interference and away from grounded metals.
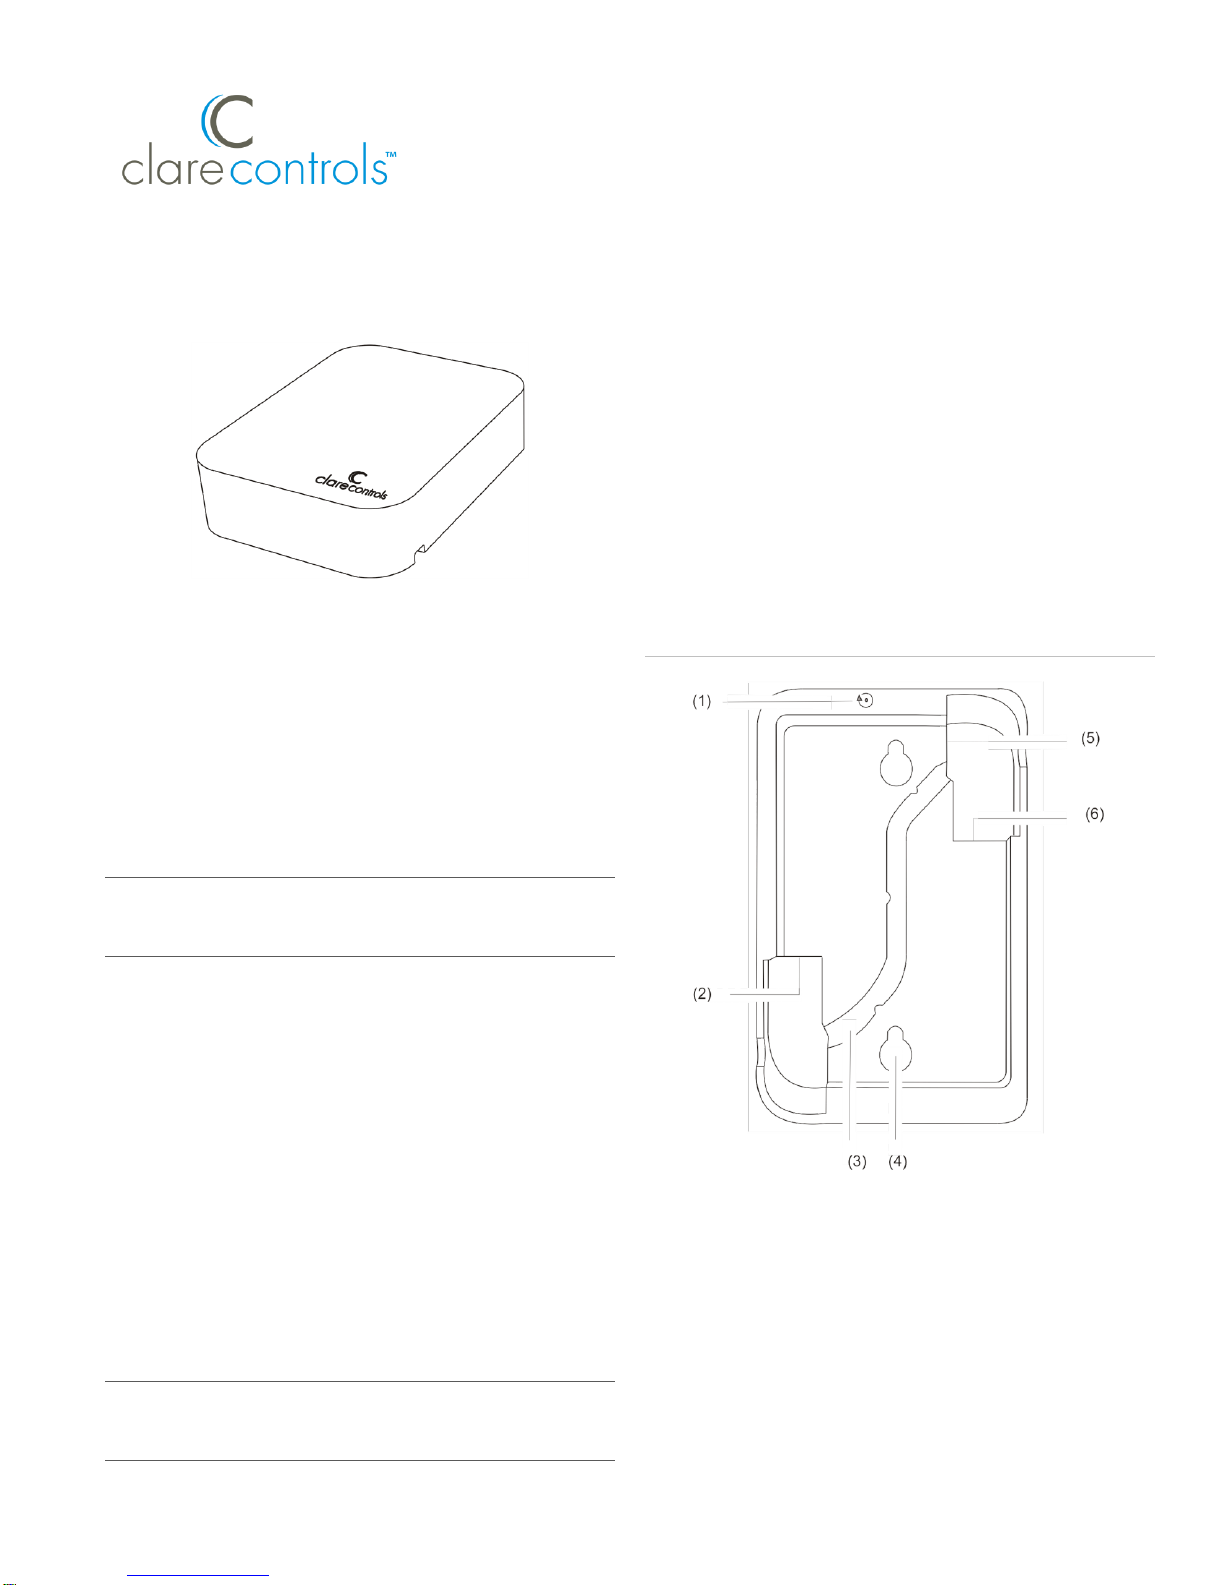
Figure 1: CLIQ.mini rear connections
Figure 1
(1) Recessed push button
(2) 2 USB ports
(3) Wire routing channel
(4) Wall mount slots
(5) Micros USB port
(6) Ethernet port
2 / 7 DOC ID – 1263 • Rev 08
Powering on and connecting the CLIQ.mini
After installing the CLIQ.mini and downloading the ClareHome
App, power on the CLIQ.mini. The CLIQ.mini can be powered
using PoE or the included 5v micro USB adapter.
WARNING: You must follow the instructions below to power
your CLIQ.mini. Failure to do so may result in bodily injury
and/or damage to the equipment.
Connecting power to the CLIQ.mini
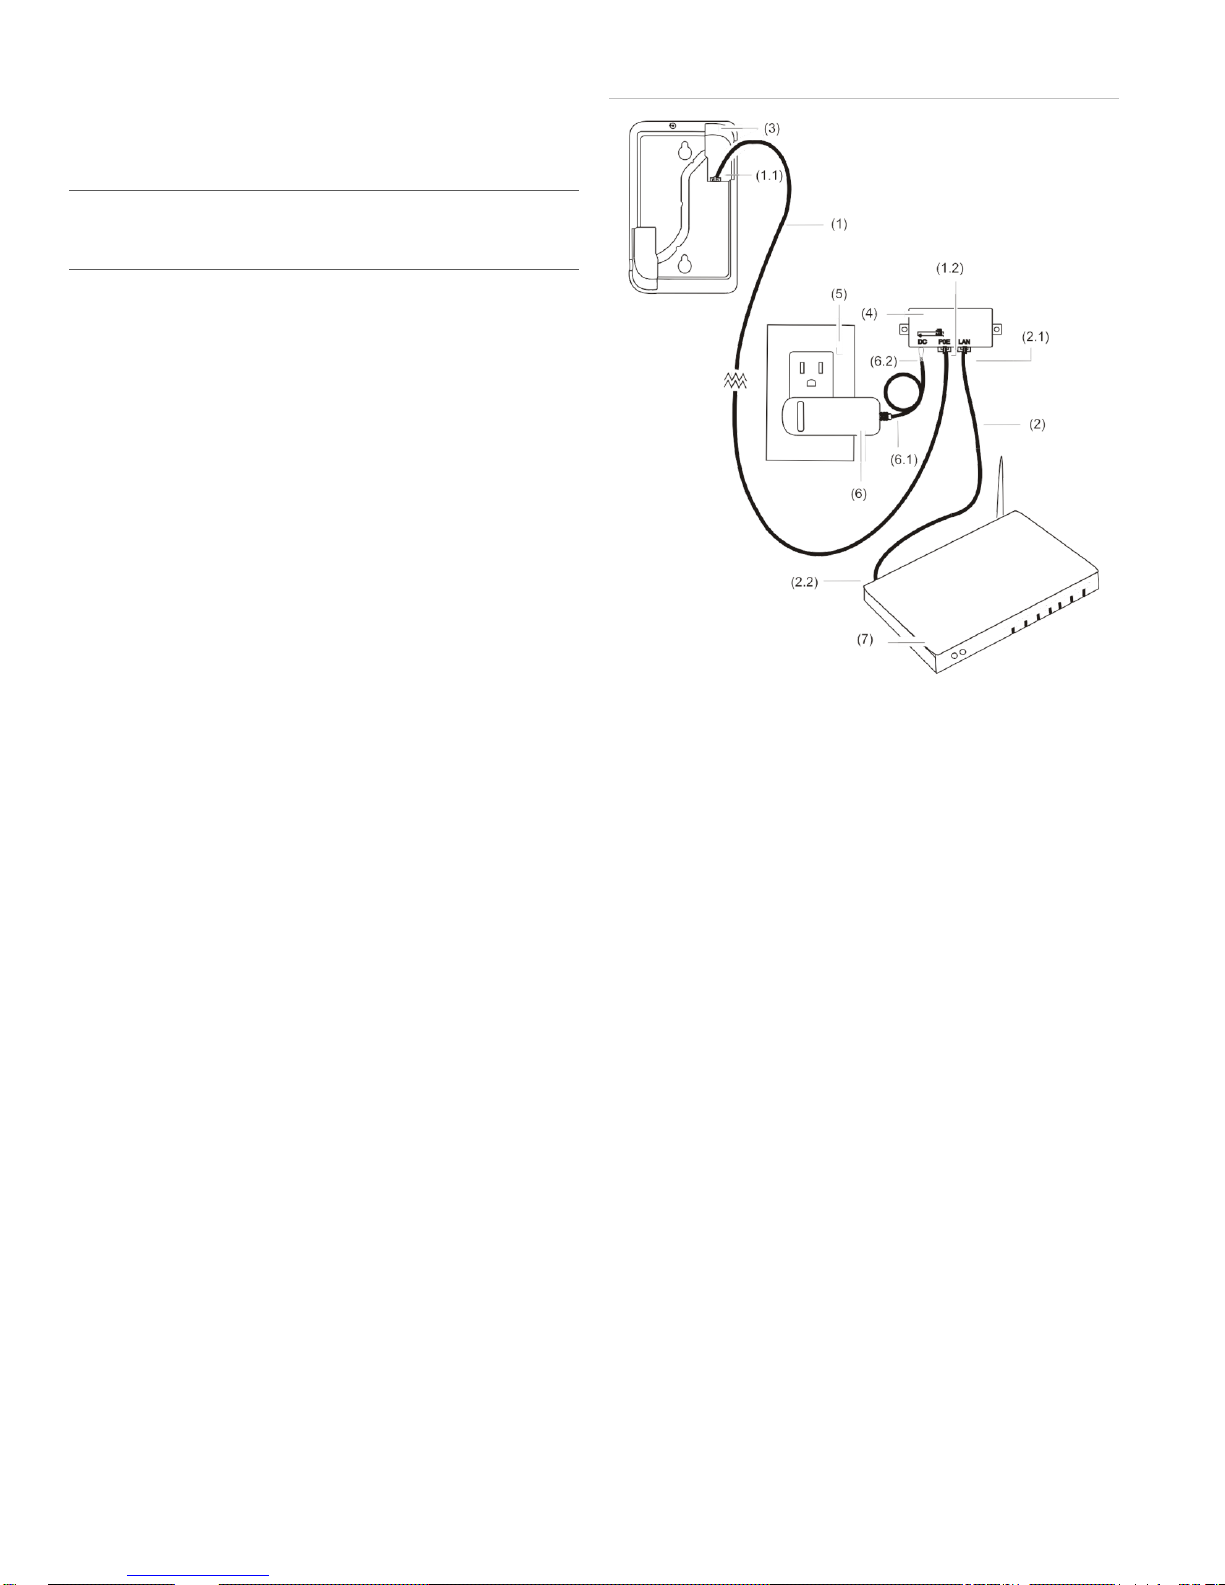
To connect power to the CLIQ.mini using PoE using LAN:
Note: PoE connection requires two Ethernet cables, they are
referred to as cable #1 and cable #2.
1. Plug an Ethernet cable (#1) into the Ethernet port on your
CLIQ.mini. See Figure 2, item 1.1.
2. Plug the opposite end of the cable into the (provided) PoE
injector port labeled POE. See, Figure 2, item 1.2.
3. Plug a separate Ethernet cable (#2) into the LAN port on
the PoE injector. See, Figure 2, item 2.1.
4. Plug the opposite end of the Ethernet cable (#2) into an
Ethernet port on your router. See Figure 2, item 2.2.
5. Plug the PoE power supply into the D/C port on the PoE
injector. See Figure 2, item 6.2.
6. Plug the PoE power supply into a wall outlet. See Figure
2, items 6 and 5.
7. Once the mini has internet connection, the mini may
update. Once the mini begins to update, the LED flashes
blue and red in unison. This update can take up to ten
minutes.
Note: Do not remove power or network connection during
this process, doing so may cause damage to the
ClareHome system requiring maintenance from Technical
Services.
Figure 2: CLIQ.mini PoE LAN connection
Figure 2
(1)
(1.1)
(1.2)
(2)
(2.1)
Ethernet cable #1
Ethernet cable #1
connected to the CLIQ.mini
Ethernet port
Ethernet cable #1
connected to the PoE port
on the PoE injector
Ethernet cable #2
Ethernet cable #2
connected to the LAN port
of the PoE injector
(2.2)
(3)
(4)
(5)
(6)
(6.1)
(6.2)
(7)
Ethernet cable #2 connected to
the Ethernet port on the router
CLIQ.mini
PoE injector
Wall outlet
PoE injector power supply
PoE injector power supply cable
PoE power supply connected to
the DC port
Wireless router
3 / 7 DOC ID - 1263 • Rev 08
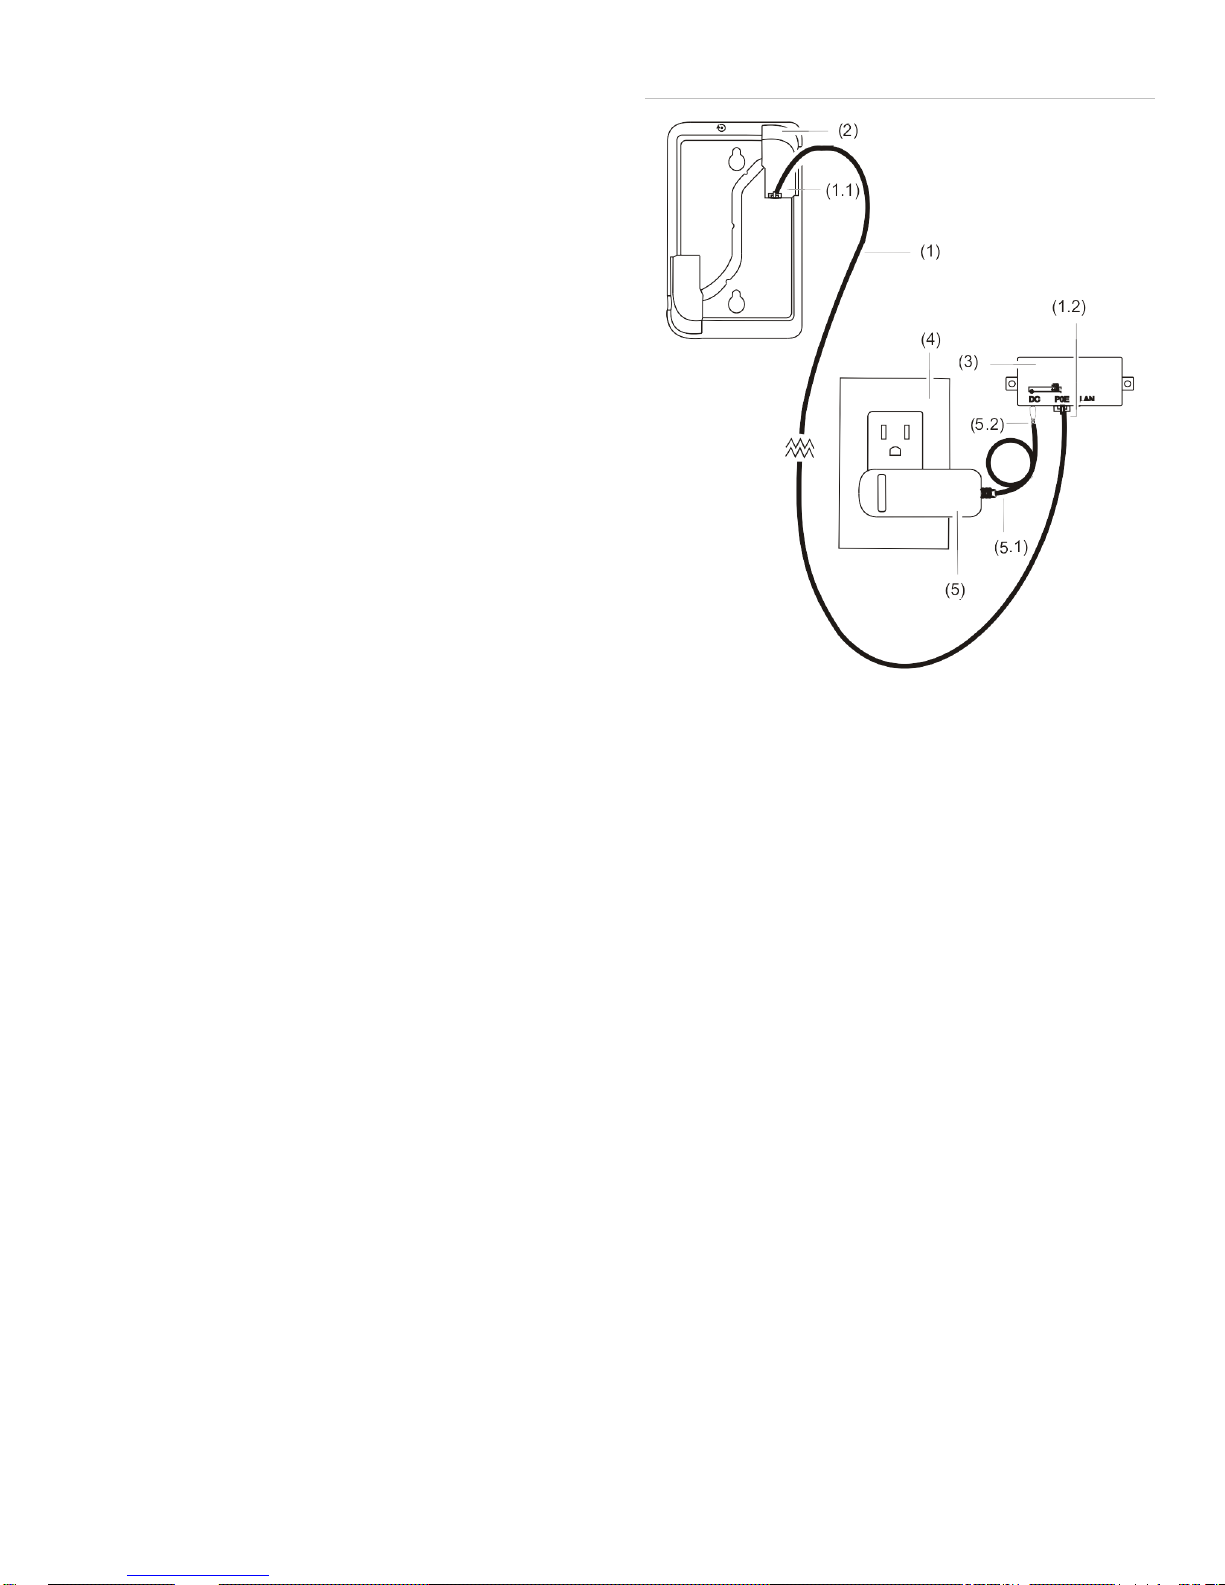
To connect power to the CLIQ.mini using PoE using Wi-Fi:
Note: PoE with Wi-Fi connection requires an Ethernet cable
and an existing Wi-Fi source.
1. Plug an Ethernet cable (#1) into the Ethernet port on your
CLIQ.mini. See Figure 3, item 1.1.
2. Plug the opposite end of the cable into the (provided) PoE
injector port labeled POE. See, Figure 3, item 1.2.
3. Plug the PoE power supply into the D/C port on the PoE
injector. See Figure 3, item 5.2.
4. Plug the PoE power supply into a wall outlet. See Figure
3, items 5 and 4.
5. Once the mini has a Wi-Fi connection, the mini may
update. Once the mini begins to update, the LED flashes
blue and red in unison. This update can take up to ten
minutes.
Note: Do not remove power or network connection during
this process, doing so may cause damage to the
ClareHome system requiring maintenance from Technical
Services.
Figure 3: CLIQ.mini PoE Wi-Fi connection
Figure 3
(1)
(1.1)
(1.2)
(2)
Ethernet cable
Ethernet cable connected
to the CLIQ.mini Ethernet
port
Ethernet cable connected
to the PoE port on the PoE
injector
CLIQ.mini
(3)
(4)
(5)
(5.1)
(5.2)
PoE injector
Wall outlet
PoE injector power supply
PoE injector power supply cable
PoE power supply connected to
the DC port
 Loading...