

Clare Controls CH-THSTAT-W Installation Manual

DCN: 2012-11-222-1 Page 1
™
Installation Guide
Model CH-THSTAT-W
This thermostat is compatible with most HVAC systems, including the following:
• 24VAC systems Note: requires both the 24R and 24C (common) wires
• Standard gas/oil/electric heating systems
o 1 stage heating and cooling
o 2 stage heating and cooling
• Heat Pump systems:
o 1 stage heating and cooling
o 2 stage heating and cooling
o 2nd or 3rd stage Auxiliary heating (heat strips)
• Do NOT use for line voltage controls (120/240VAC)
Stop! Before removing your existing thermostat be sure to label the wires with the wiring
labels included. Label the wires as they were connected to the old thermostat terminals
and record them below.
We strongly recommend you take a picture of your existing thermostat wiring
connections. This will enable you to reconnect your old thermostat if you encounter a
problem installing the CH-THSTAT-W and will assist in trouble shooting the installation, if
needed.
CAUTION: The typical wire colors noted below may be different from your installation.
Standard HVAC System Wiring
Thermostat
Terminal Marking
Meaning
Typical Wire
Color
Record the old thermostat wire color
connected to this terminal here
C
24VAC Common
Blue
R (or RH)
24VAC Return (heating system)
Red
G
Fan
Green
W or W1
Heat stage 1
White
Y or Y1
Cool stage 1
Yellow
W2
Heat stage 2
Orange
Y2
Cool stage 2
Black
Heat Pump HVAC System Wiring
Thermostat
Terminal Marking
Meaning
Typical Wire
Color
Record the old thermostat wire color connected
to this
terminal here
C
24VAC Common
Blue
R
24VAC Return
Red
G
Fan
Green
W or W1
Aux Heat
White
Y or Y1
Compressor stage 1
Yellow
O (or B*)
Change Over Valve
Orange
(brown*)
Y2
Compressor stage 2
Black
* if you have a terminal marked “B” with a brown wire attached to it, that means you have a changeover (C/O) with heating
type heat pump system. Be sure to set the change over type in the Installer Settings menu to C/O Type: w/Heat.
Otherwise leave it set to w/Cool.
DCN: 2012-11-222-1 Page 2
INSTALLATION
IMPORTANT! You must set the HVAC System type before operating the thermostat.
After the thermostat is installed and powered up, check and set the HVAC system
configuration setup as needed. Follow the steps below to select the correct HVAC system
setup.
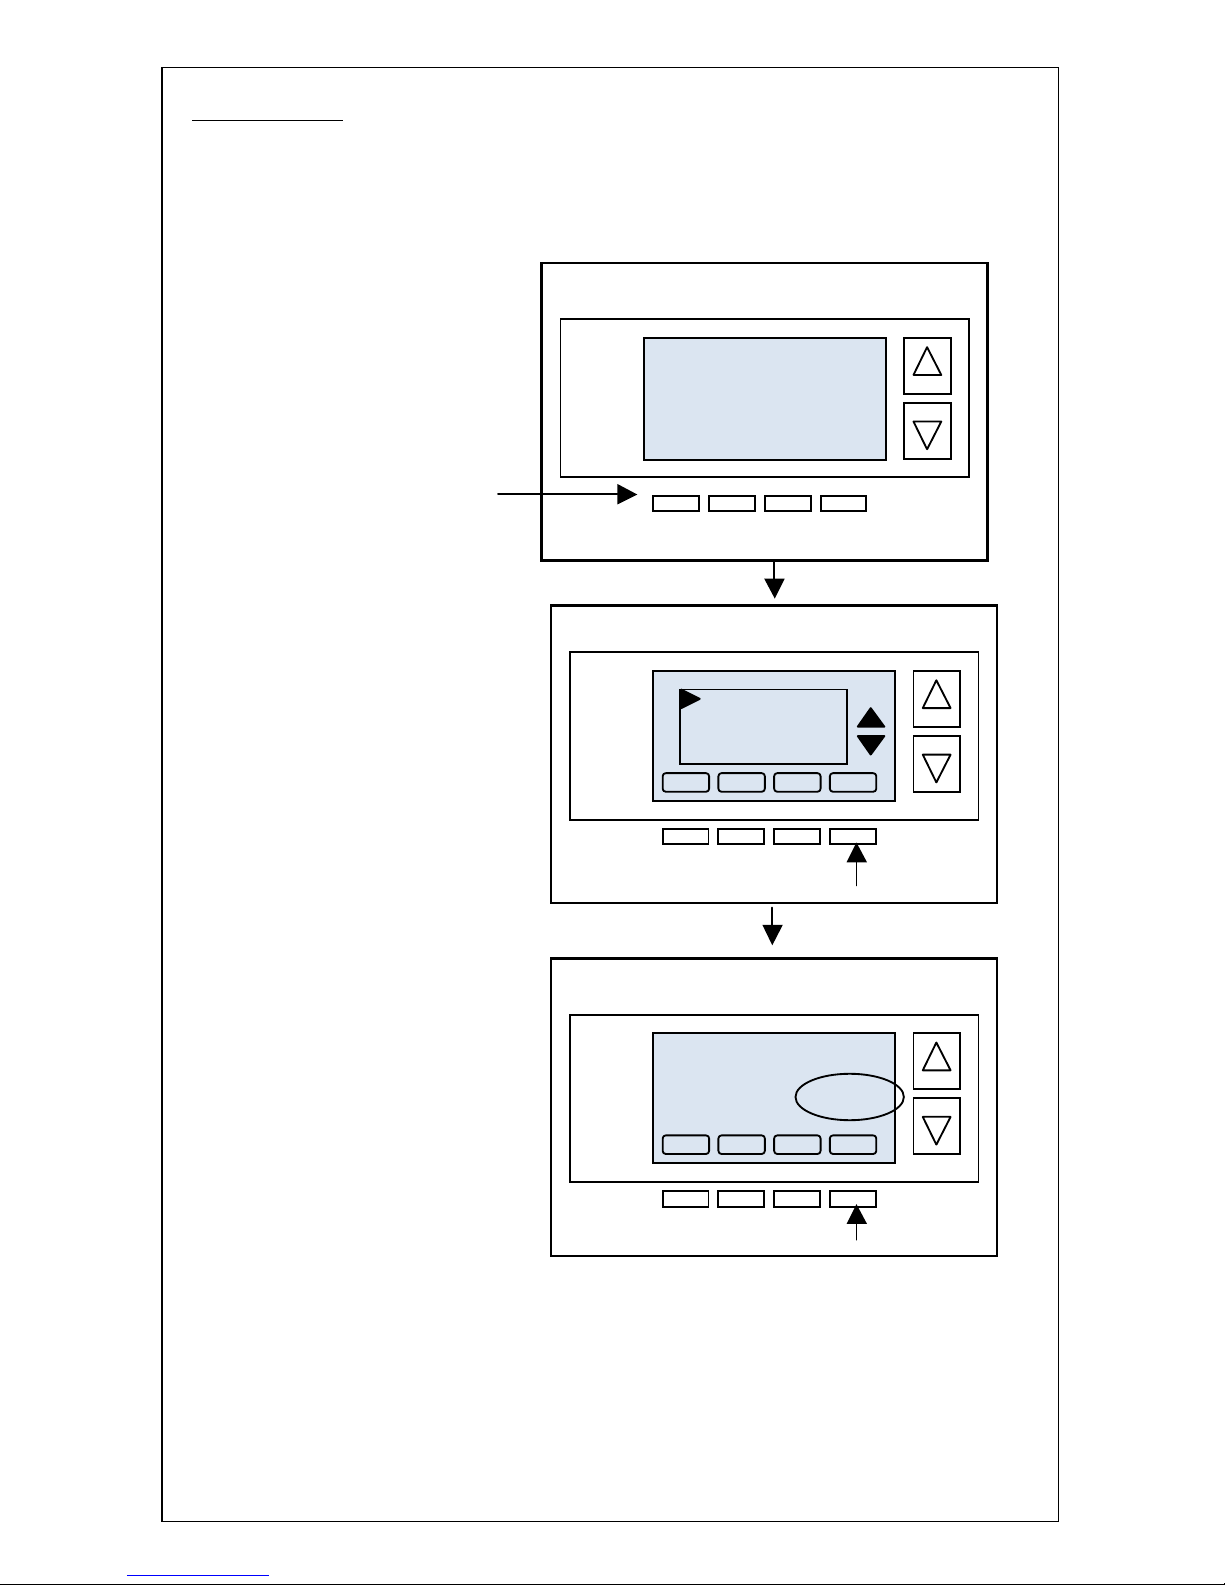
Thermostat Info Screen
4:30 PM
75
MENU
OFF
MODE
HOLD
64H
82C
AUTO
FAN
Sys Off
Thermostat Info
Done
Setup
TW45 Ver: 02.04.01
WiFi Radio Version: 02.30
System Type: Standard
Fan Type: Gas
Network Address 1
Status
Press the MENU button to go to
the main menu screen
Scroll down to the Thermostat Info
using down arrow button.
Press the SELECT button
Note the System Type displayed here.
The default HVAC type is Standard Gas (single stage)
If this is the correct system type, no further setup is required.
Press Done to exit.
If this is not the correct system type, press and HOLD the
SETUP button to go to the Mechanical Settings screen.
Menu Selection
Select
Thermostat Info
WiFi Network Status
WiFi Setup
Done

DCN: 2012-11-222-1 Page 3
Mechanical Settings Screen
INSTALLER SETTINGS
In addition to the HVAC System Setup, there are other settings of the thermostat that can
be configured. These settings are intended for use by certified HVAC installation
technicians and are not intended for user changes.
Installer Settings Menu
To access the Installer Settings Menu,
Press the Menu button on the main thermostat page.
In the Main Menu screen,
Press and hold the two middle buttons
until the Installer Settings Menu appears.
Press and hold two middle buttons to enter
the Installer Settings screen
Mechanical Settings
Type Gas/Elec
Fan Type Gas
2nd Stage Heat N
2nd Stage Cool N
Done
+
If HVAC system is a Standard Gas or Electric heat system:
• Set the Type: Standard Gas/Electric systems or HP systems
• Set the Fan Type: Gas or Electric Heat
• Set 2nd Stage Heat: Yes or No (does the system have 2 stage heating)
• Set 2nd Stage Cool: Yes or No (does the system have 2 stage cooling)
If HVAC system is a Heatpump system:
• Set the Type to Heatpump
• Set the C/O Type: Changeover or reversing valve
o w/Cool = changeover with Cool (default/typical)
o w/Heat = changeover with Heat
• Set 2nd Stage Heat: Yes or No (does the system have 2 stage heating)
• Set Aux Heat: Yes or No (does the system have auxiliary heating – heat strips)
• Set 2nd Stage Cool: Yes or No (does the system have 2 stage cooling)
Menu Selection
Select
Thermostat Info
WiFi Network Status
WiFi Setup
Done
 Loading...