

Page 1

Model No.
- 8325 -
p/n 108325
Specifications
Height: 75” (24” packed)
▪
Width: 72”
▪
Depth: 92” (40” packed)
▪
Weight: 135 lbs.
▪
Instruction p/n 102479
▪
- Clam Custo me r Service I nf or mation -
NOTICE!! Once used, this shelter cannot be returned to the store. If you have a
warranty claim, have your sales receipt ready and contact Clam Corporation
Customer Service by email inquiry or direct by calling:
Customer Service Hrs: - 9am to 4pm, Mon. - Fri. Central Standard Time
▪
Clam Corporation
▪
600 Clydesdale Trail
Medina, MN 55340
Phone - 763-231-4120
▪
Fax - 763-231-4121
▪
Website – www.clamcorp.com
▪
Email – [email protected]
▪
Clam Corporation cannot honor warranty without an original, dated receipt.
Page 2

2
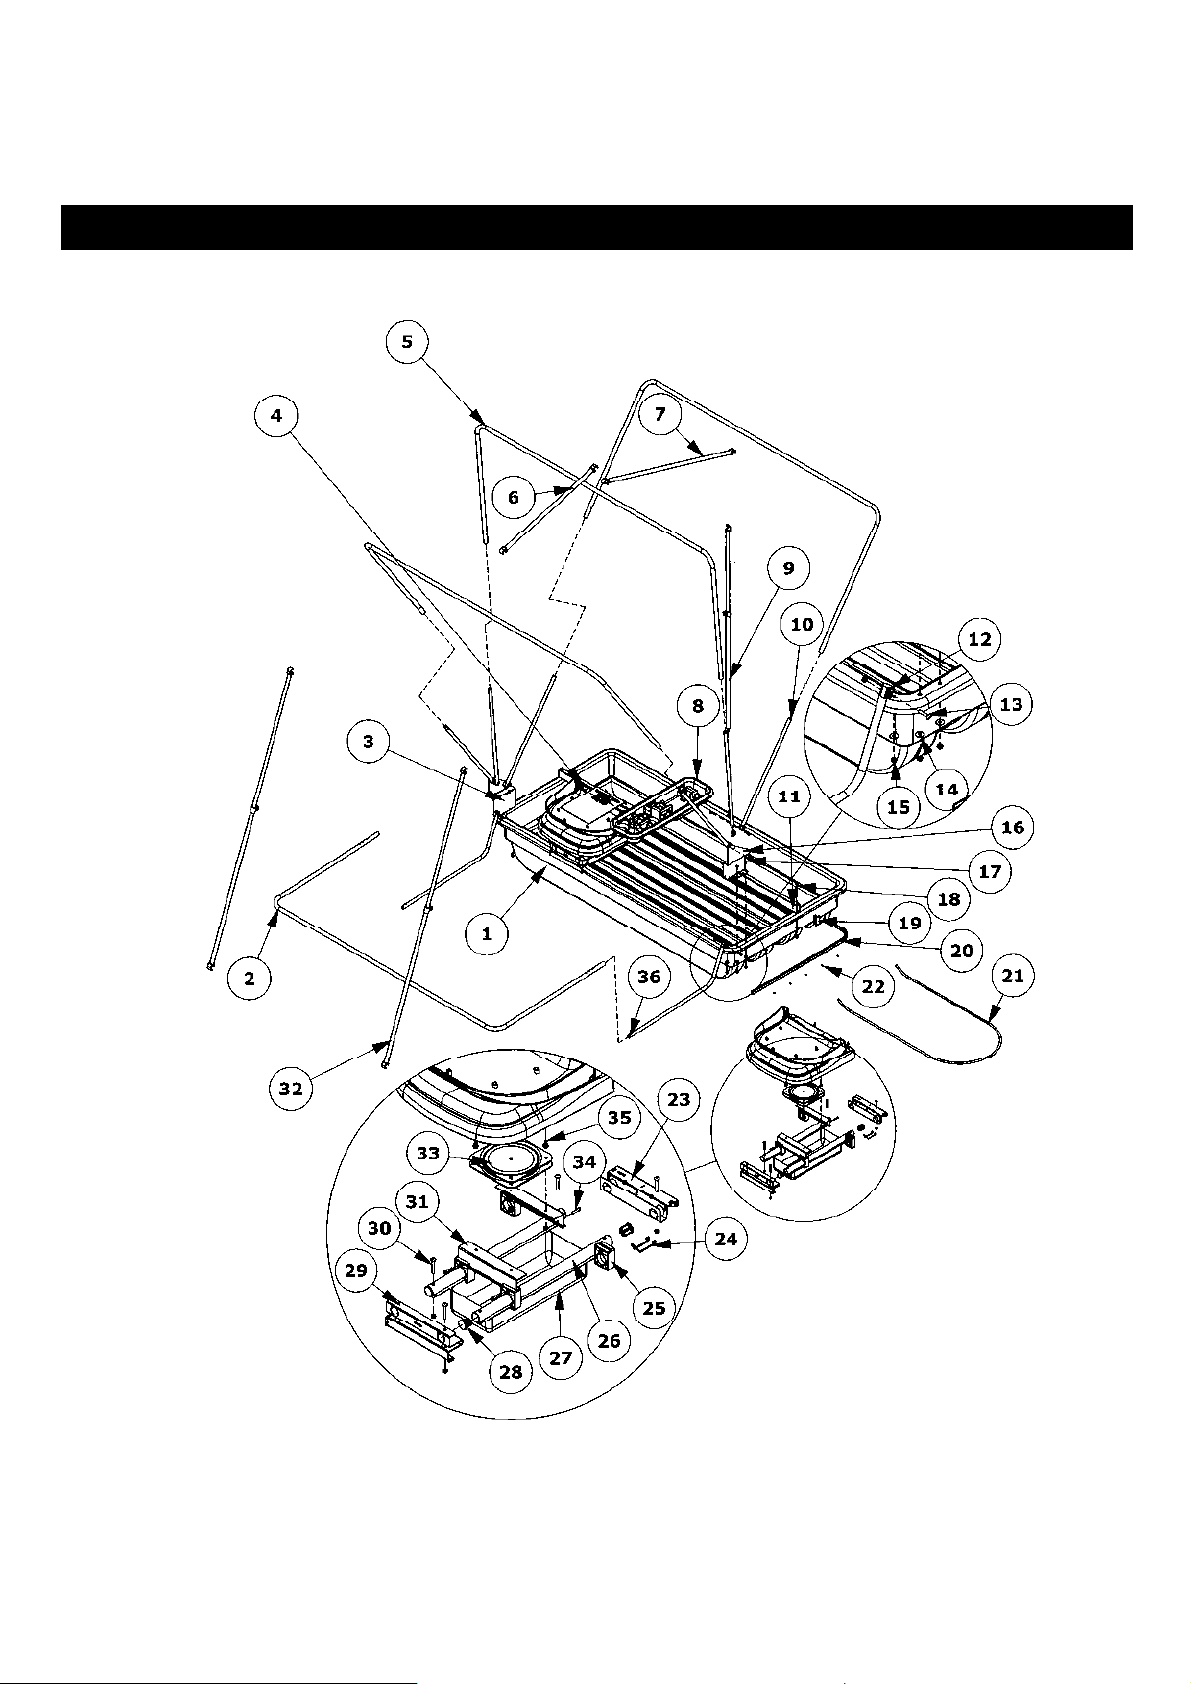
- P art s Li st -
ITEM NO. PART NUMBER DESCRIPTION QTY.
1 102498 BASE, VOYAGER, 08/09 1
2 101479 TUBE, PORCH HOOP 1
3 101585 BRKT, RIGHT CANOPY 1
4 101463 FOLDING SEAT ASSEMBLY 2
5 101482 TUBE, CANOPY HOOP 3
6 101130 LONG ROOF SPREADER 1
7 101124 SHORT ROOF SPREADER POLE 1
8 101458 CONSOLE, CLAM CENTER 1
9 101580 REAR SPREADER POLE 1
10 101069 POLE CANOPY, 1/2" 6
11 102504 TUBE, RAIL SUPPORT 08/09 1
12 101083 CAP, TUBE SPACER 8
13 101080 SCREW, 1/4-20 X 1.25 8
14 101081 WASHER, 1/4 FLAT REG 8
15 101082 NUT, 1/4-20 THIN NYLOCK 32
16 101584 BRKT, LEFT CANOPY 1
17 101088 SCREW, 1/4-20 X 0.75 6
18 101487 SCREW, 1/4-20 X 2.75 2
19 101430 CAP, TUBE 1 X 2 - 1/8 WALL 2
20 101116 MOLDING, 3/4 X 118 U-CHNL 1
21 101095 ROPE, 3/8 DIA X 9 FT 1
22 101148 SCREW, #6 X 0.38 16
23 102430 BRKT, REAR RETAINER 2
24 102512 SPRING, CATCH 2
25 101048 BLOCK, SLIDE 8
26 101652 TUBE, 20.00 SEAT RAIL 4
27 101466 HAMMOCK, ACCESSORY 2
28 101429 PLUG, 1.16 DIA TUBE 8
29 101420 BRKT, FRONT RETAINER 2
30 101486 SCREW, 1/4-20 X 1.75 8
31 101146 CHANNEL, 8.78 ALUM EXT 4
32 101167 FRONT SPREADER POLES 2
33 101399 SEAT SWIVEL 2
34 101147 SCREW, #10 x 1.00 8
35 101470 SCREW, 1/4-20 X 0.50 16
36 101121 TUBE, PORCH 2
37 102436 TENT, 08/09 VOYAGER 1
38 102479 MANUAL, 08/09 VOYAGER 1
Page 3
3
- Ass embl y Diagram -
Page 4
4
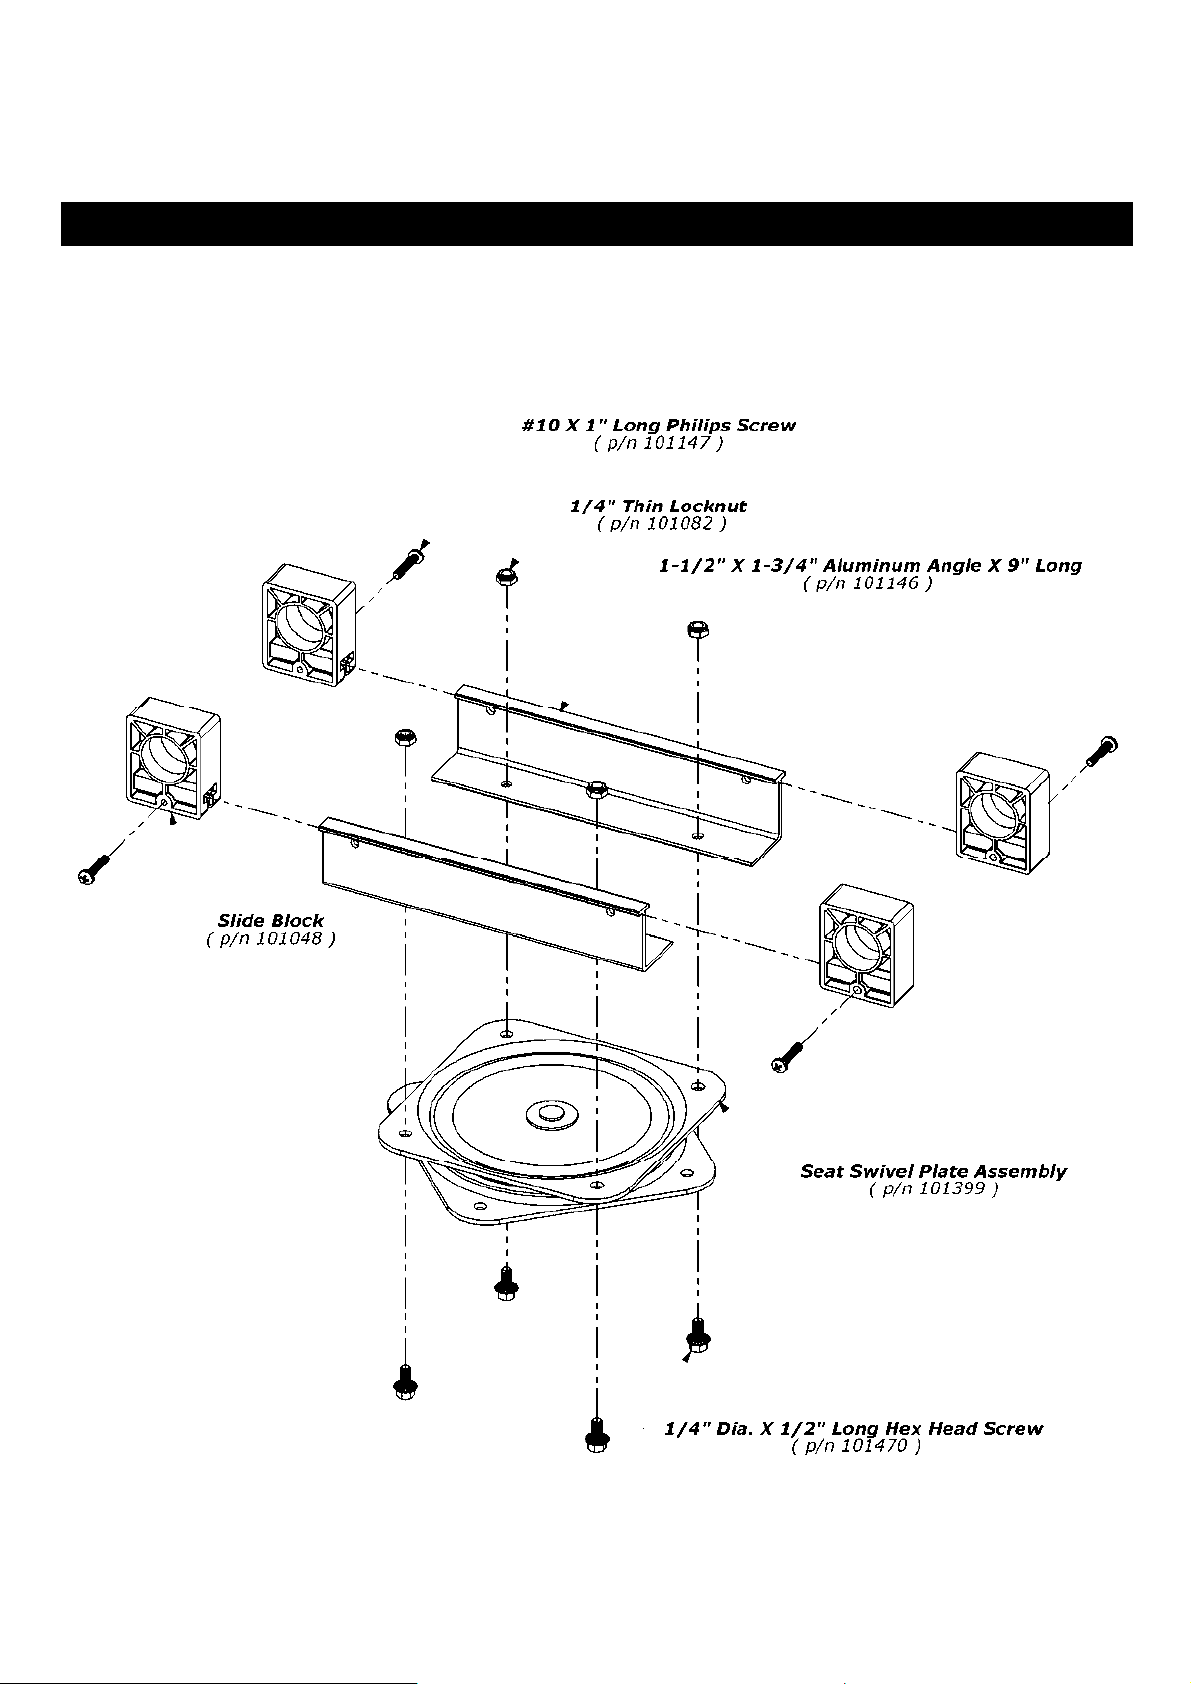
- Step On e -
Page 5
5
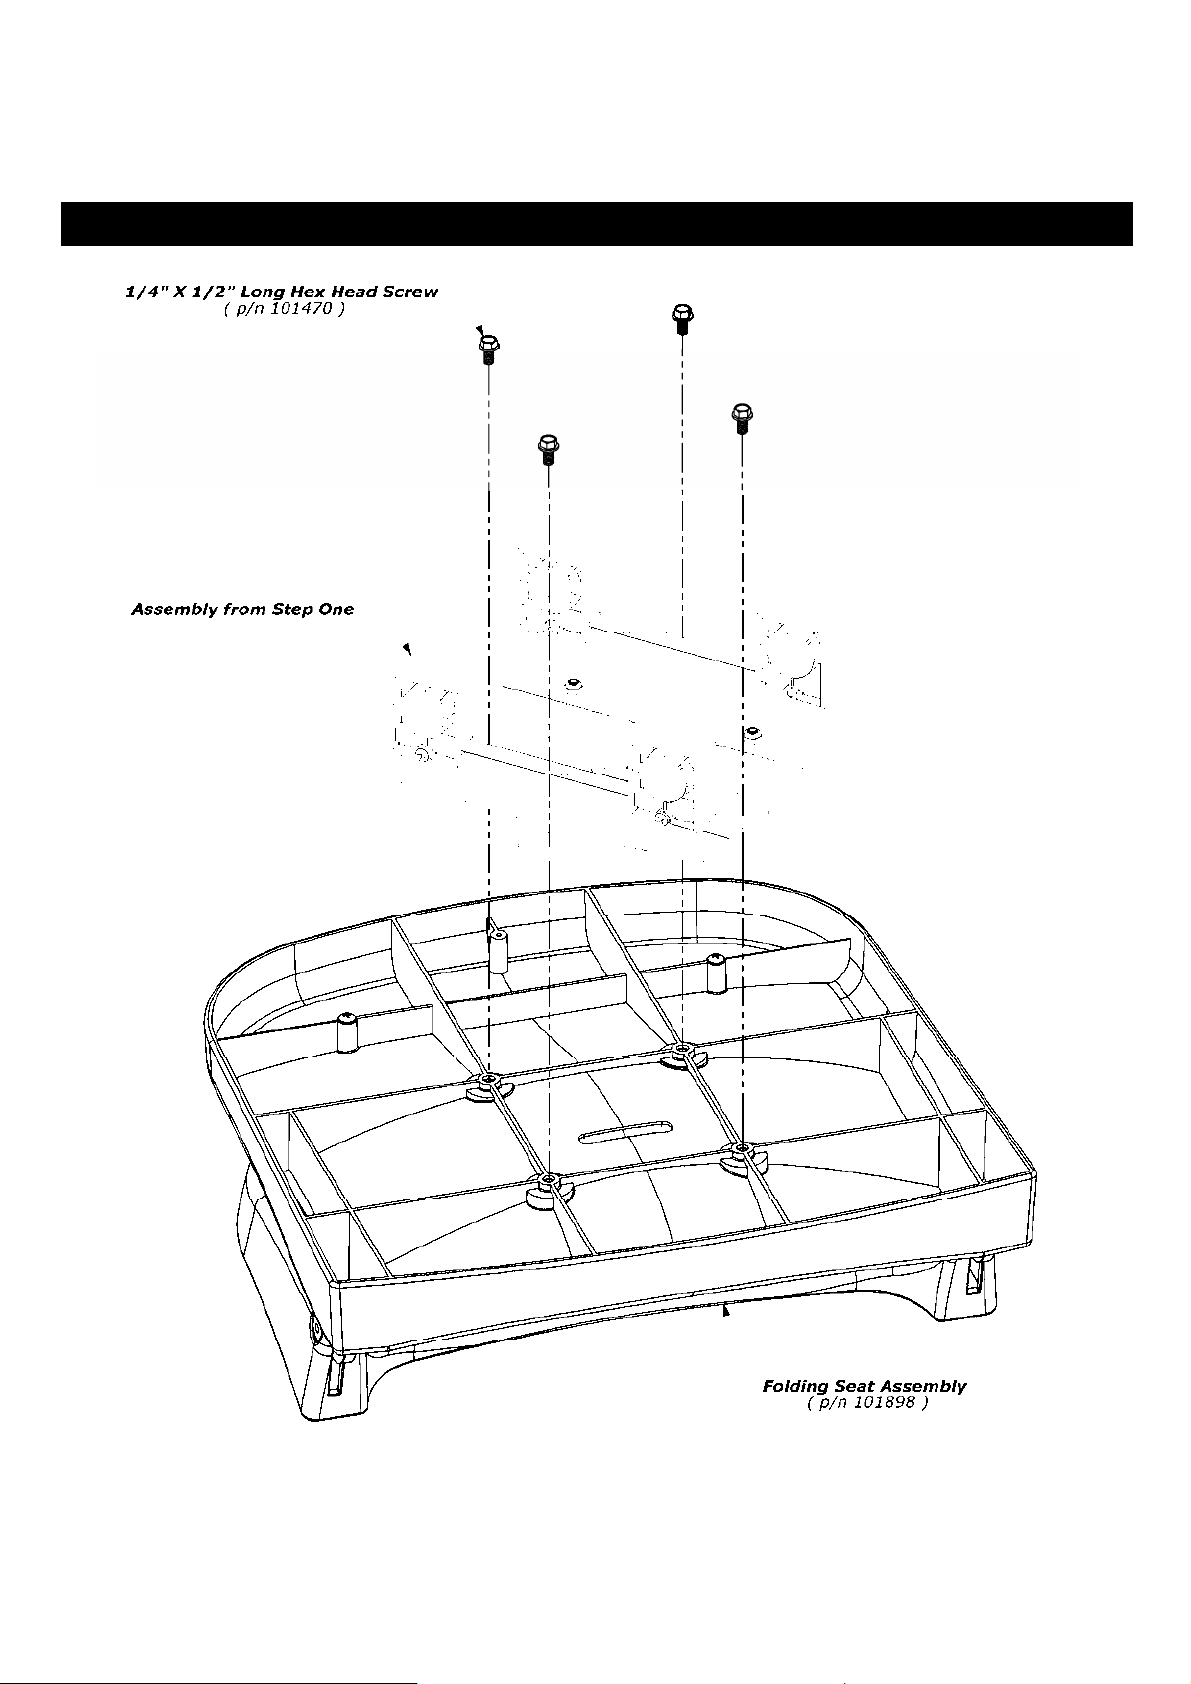
- Step Two -
Page 6
6
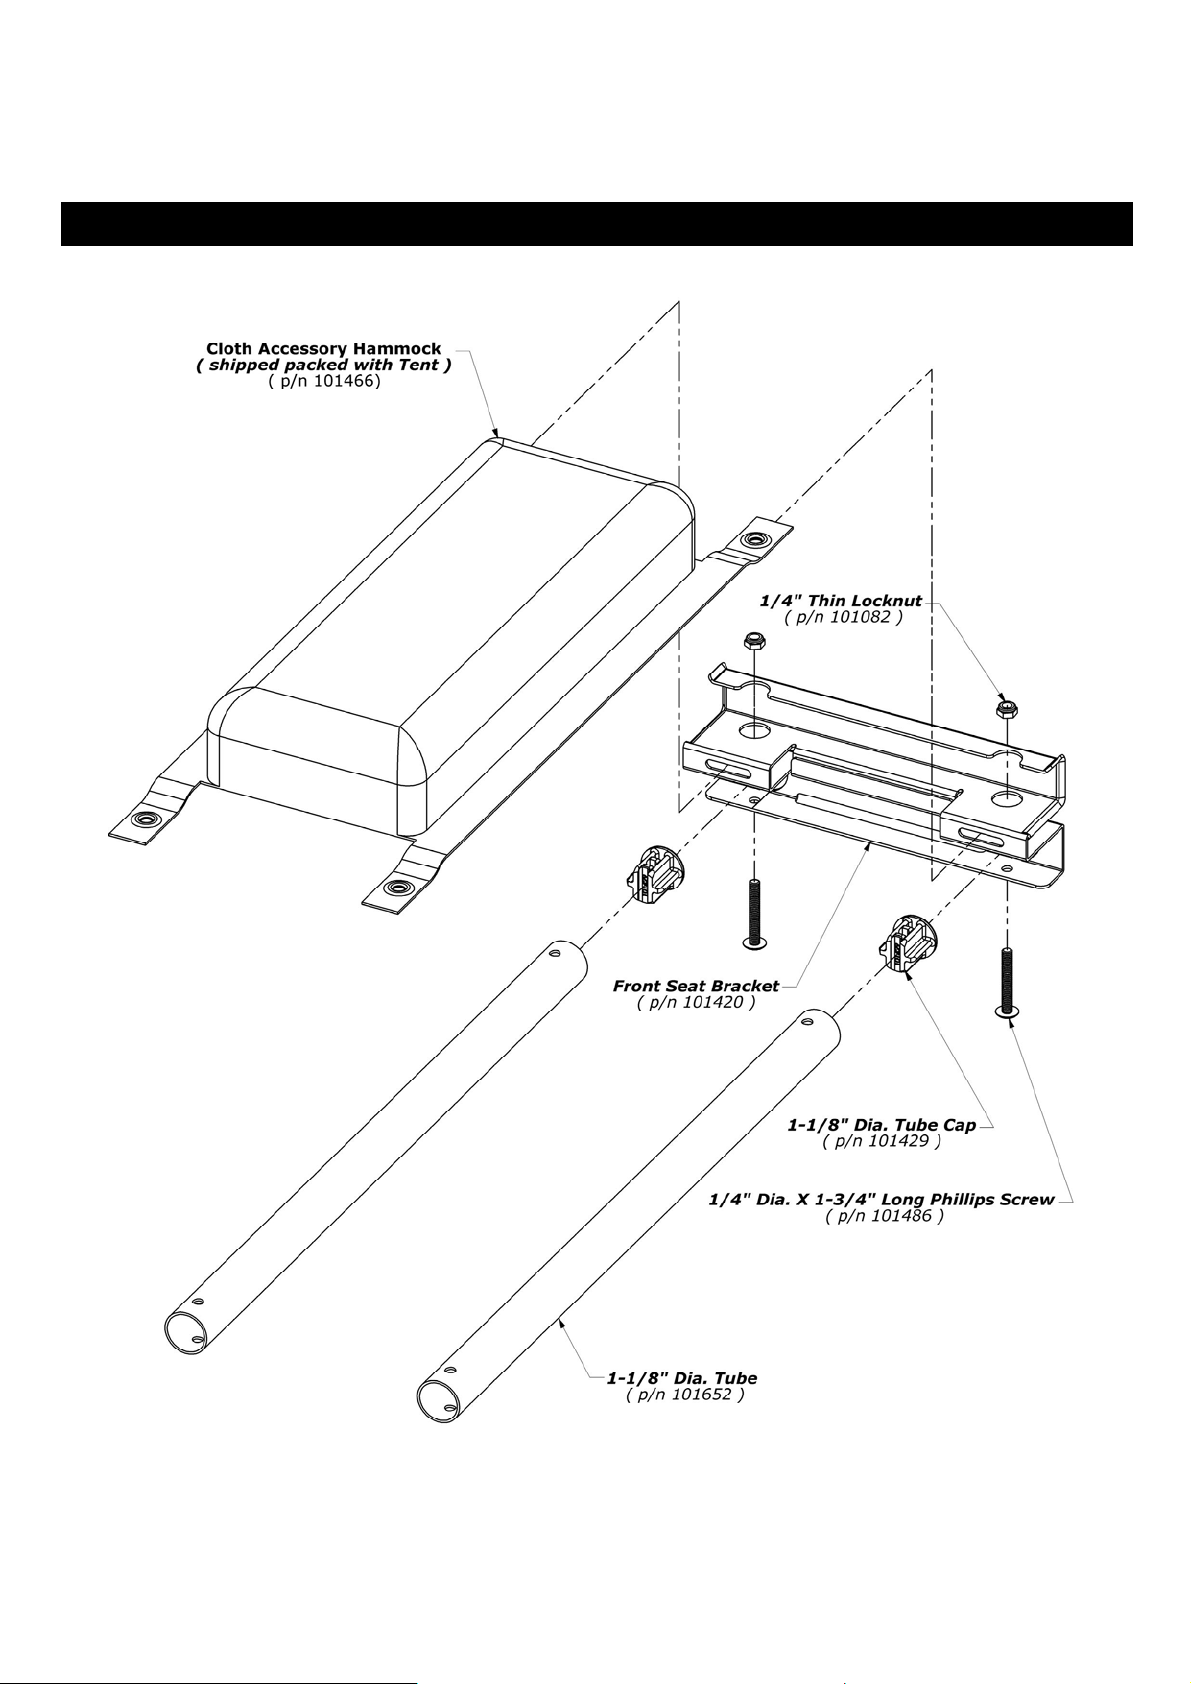
- Step Thr ee -
Page 7
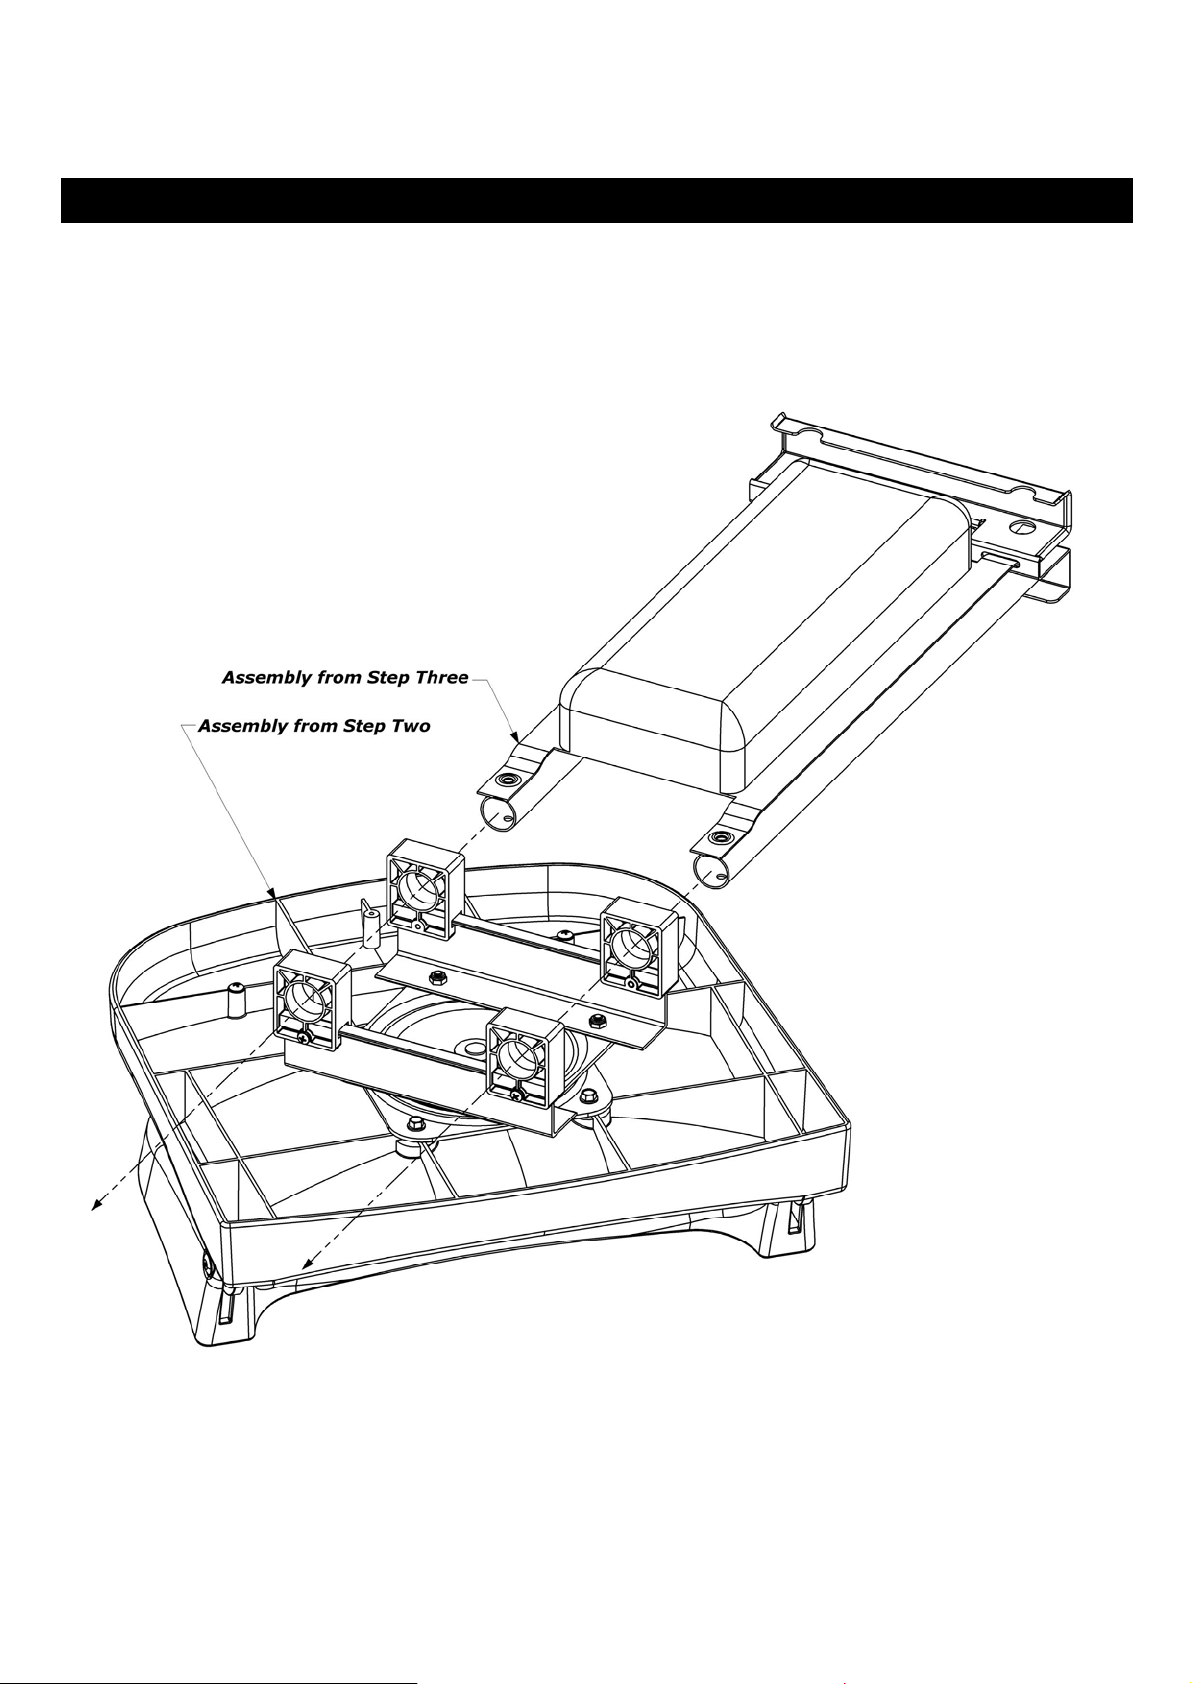
7
- Step Four -
Page 8
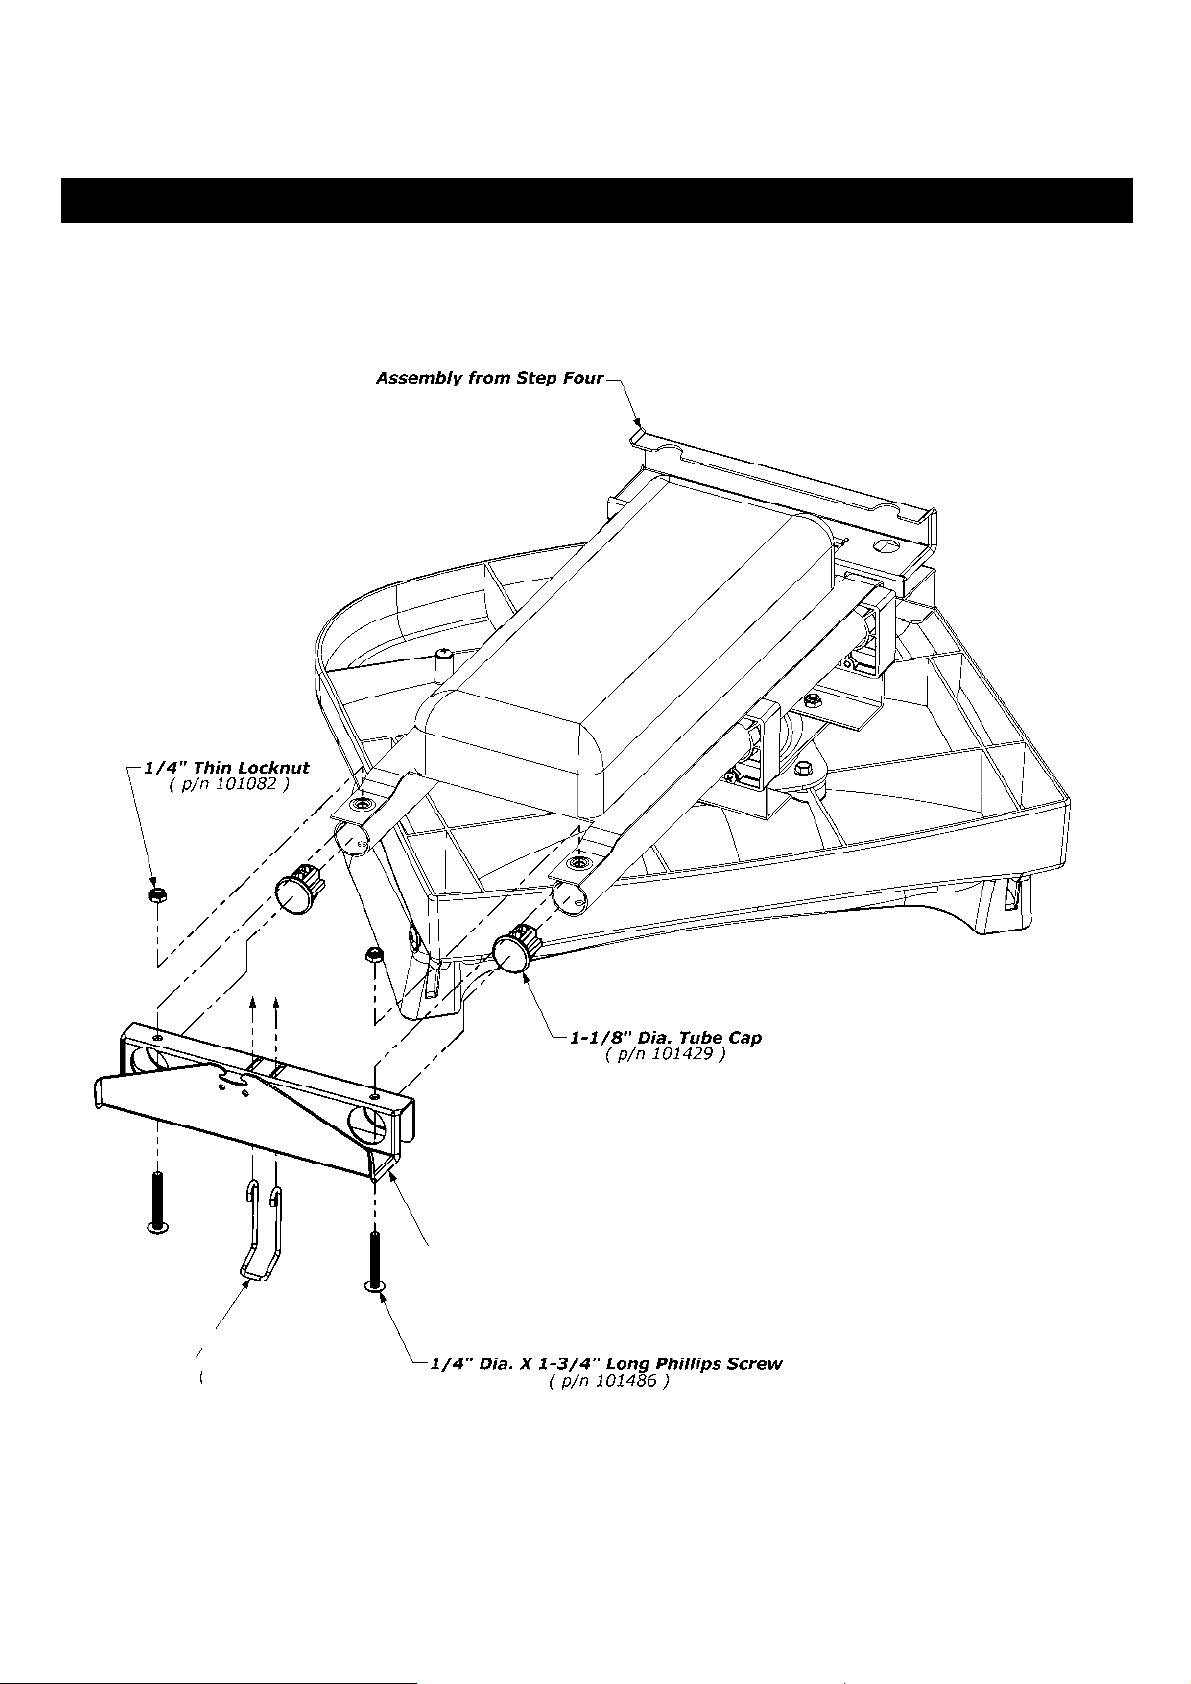
8
- Step Five -
Rear Seat Bracket
Latch Clip
(p/n 102512)
(p/n 102430 )
Page 9
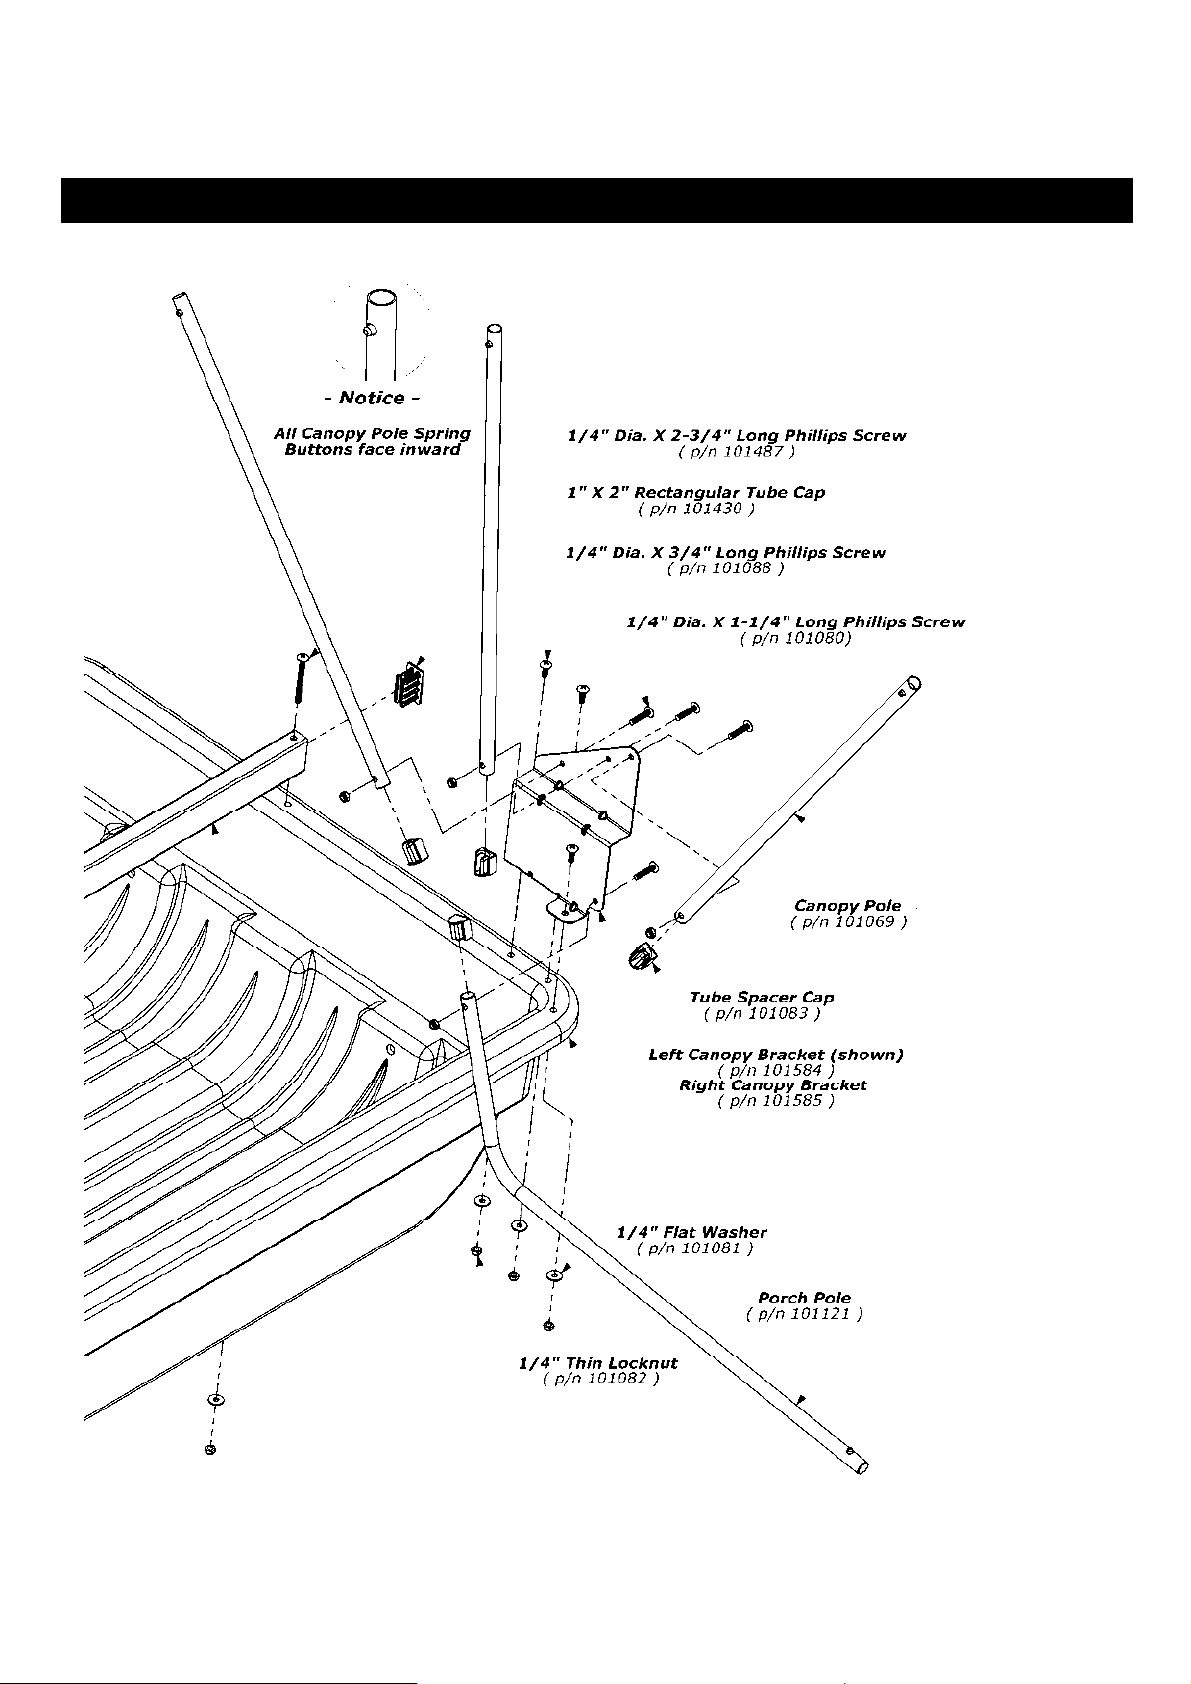
9
- Step Six -
1”x2 ” Rec t angul ar S u p port Tub e
(p/n 102504 )
Voyager B as e
(p/n 102498)
Page 10
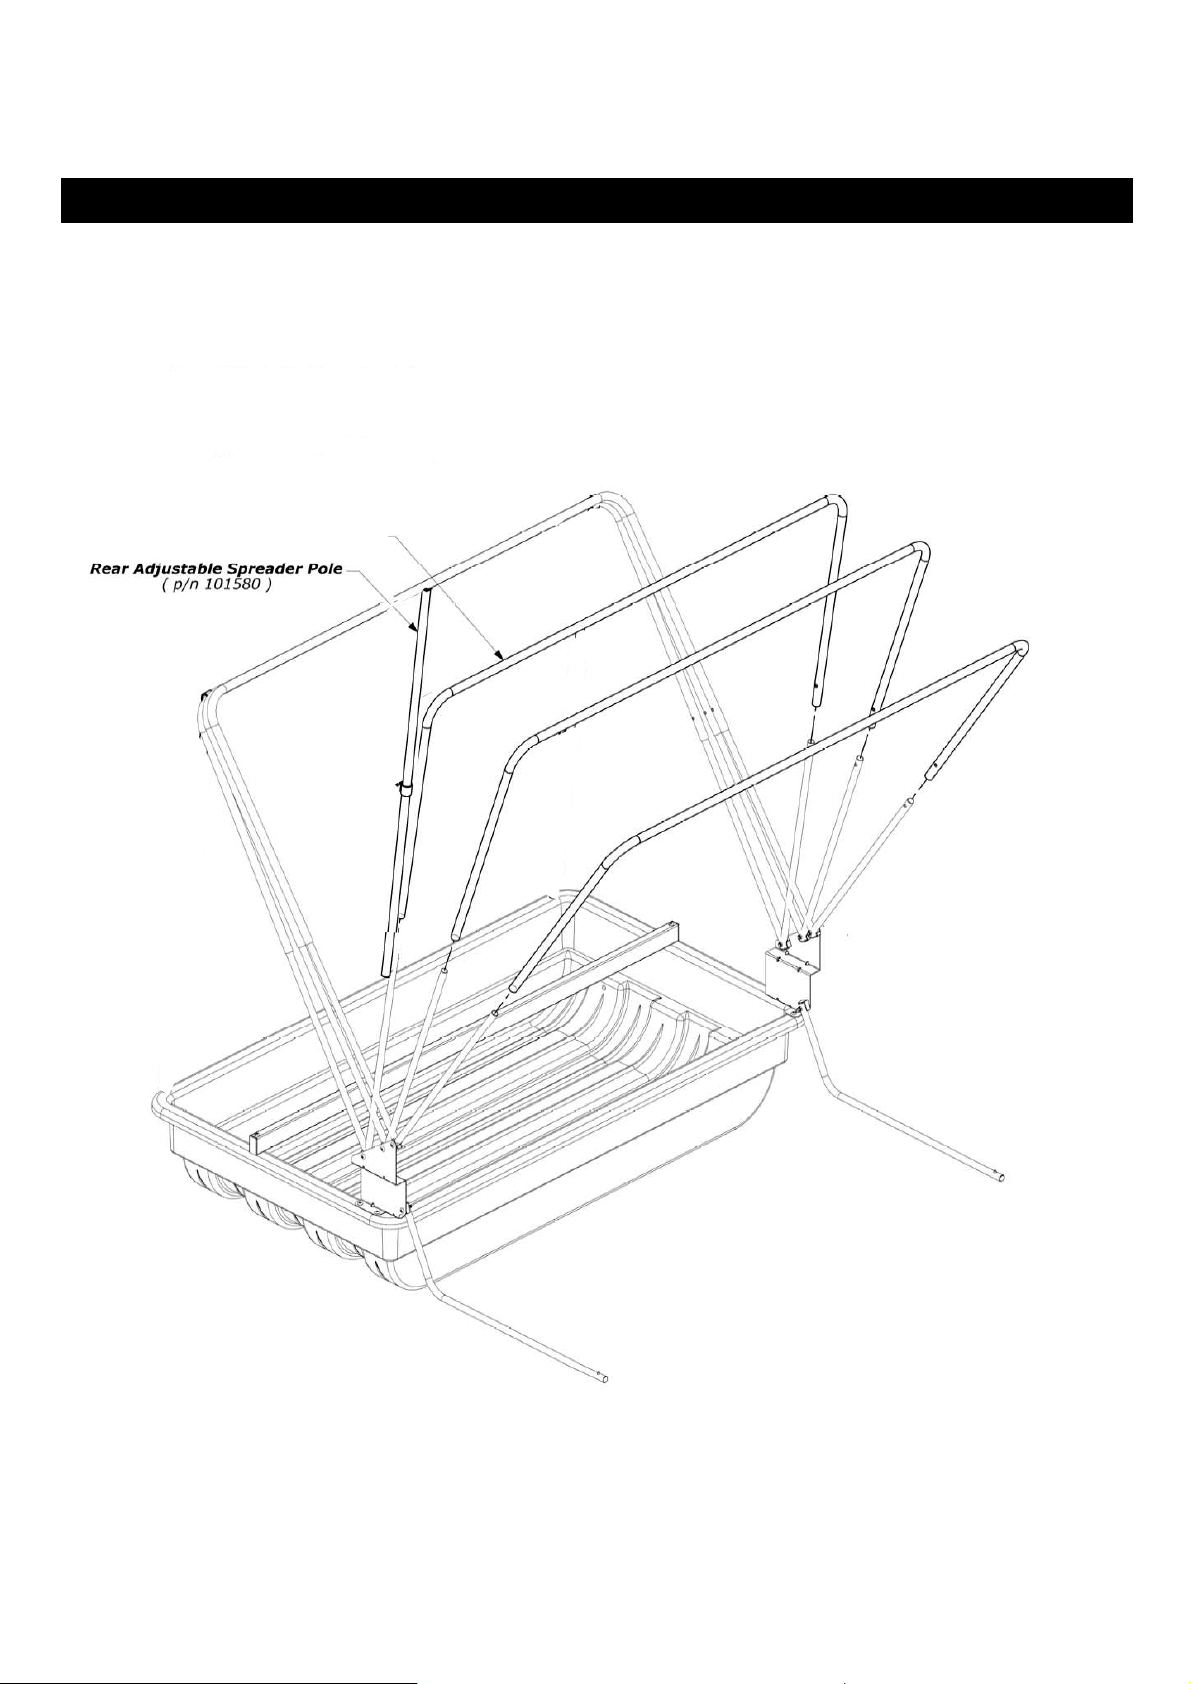
10
- Step Seven -
Slide the canopy hoop poles onto the canopy poles until the spring buttons engage the holes near the
ends of each canopy hoop pole.
Support the first canopy hoop pole as pictured with the rear adjustable spreader poles (the shorter of the
two provided lengths).
Lean the two remaining canopy hoop poles against the first.
Canopy Hoop Pole
(p/n 101482)
Page 11
11
- Step Eight -
(p/n 102436)
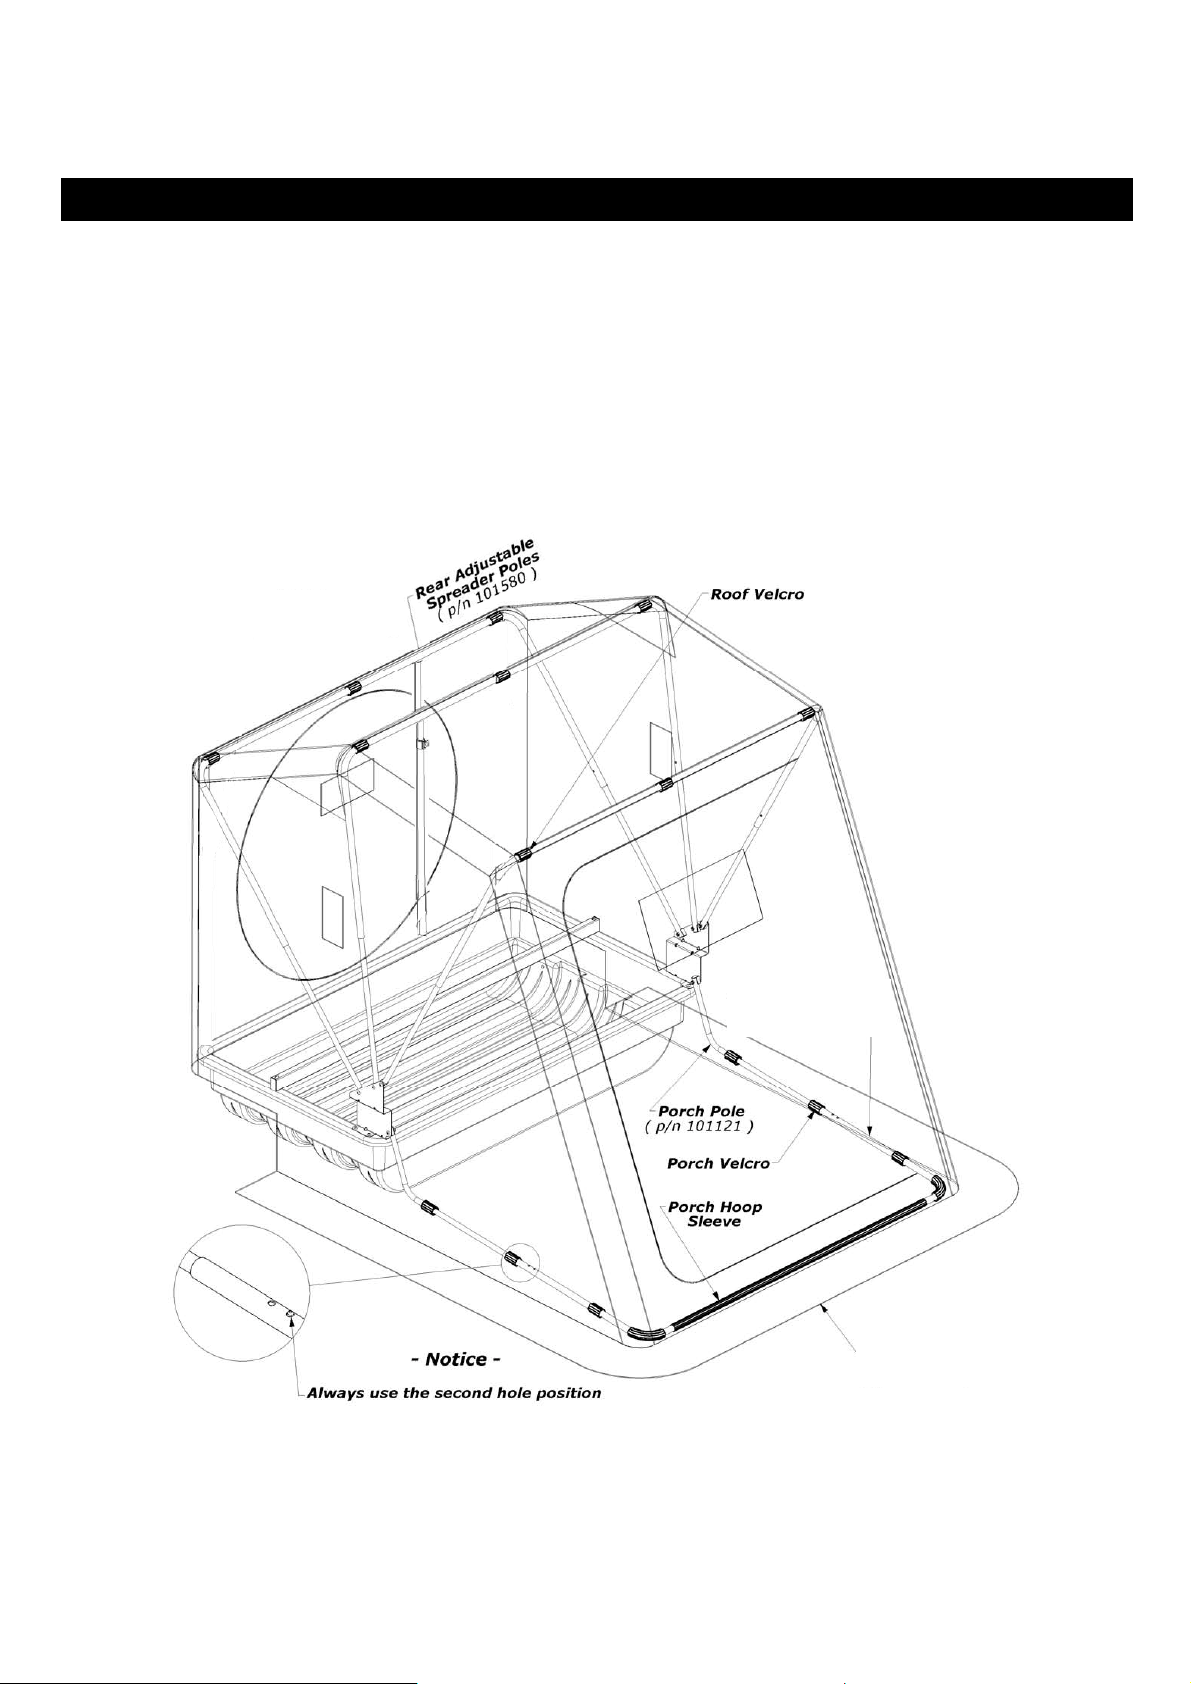
Drape the tent over the supported hoops then go inside and spread out the canopy hoop poles, attaching
the roof velcro as you go.
Orient the porch hoop pole so that the holes face upward and then feed the length of the pole through the
three porch hoop sleeves sewn on the tent. Slide the porch hoop pole onto the porch poles, engaging the
third hole position.
Attach the porch hoop velcro on each side of the tent. Remove the rear adjustable spreader poles now
supporting the hoops to allow the tent to be “set” in the next step.
Porch Hoop Pole
(p/n 101479)
Voyager Tent
Page 12
12
- Step Nine -
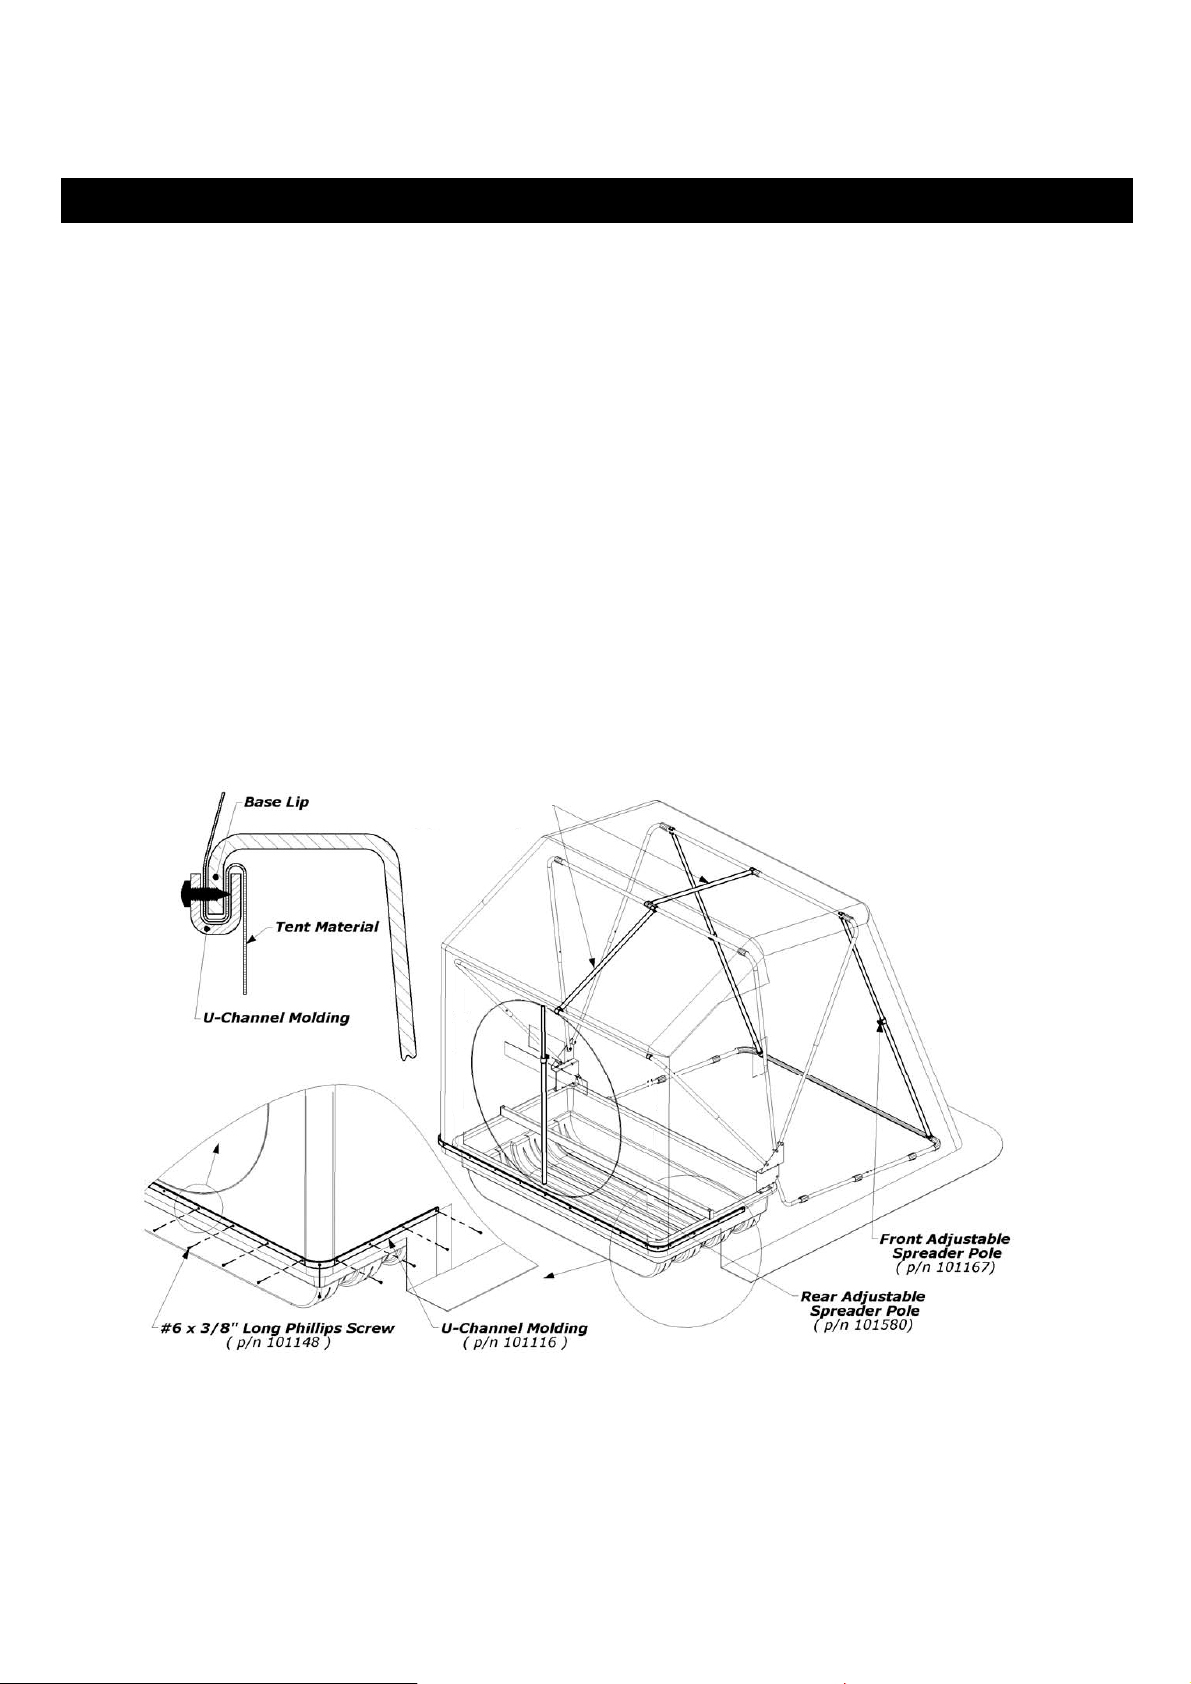
Roof Spreader Pole
short)
To “set” the tent, grasp the tent material at the rear of the shelter and pull it downward. Observe the
porch area of the tent lifting accordingly as you pull. When the U-Channel molding is correctly installed,
the porch hoop pole will lightly touch the floor.
To achieve this condition, start by finding the center of the molding. From behind the unit, pull the
midpoint of the tent downward and fold the tent material under the base lip. Press the midpoint of the
molding over the tent material and base lip. Continue pressing outward in both directions until you have
secured about twelve inches of molding onto the base.
Having temporarily secured the tent to the base, take a walk around the unit. Readjust the molding until
you have verified the proper porch hoop pole position and also that the tent sides and corners are
properly proportioned.
When satisfied, continue applying the molding around the shelter, one direction from center and then the
other, pulling the material as you go so that surface is relatively wrinkle-free and snug. Use a side cutters
to trim the ends of the molding if they are not equal relative to base.
Reinstall the rear adjustable spreader pole to tighten the fit of the tent. If everything still looks good,
secure the molding with the #6 phillips screws. Evenly space them about every ten to twelve inches, and
also put a screw in the center of both corners. Since there aren’t any predrilled holes, it's advisable to
use a powered driver for this operation
(p/n 101124(p/n 101130-long)
Page 13
13
- Step Ten -
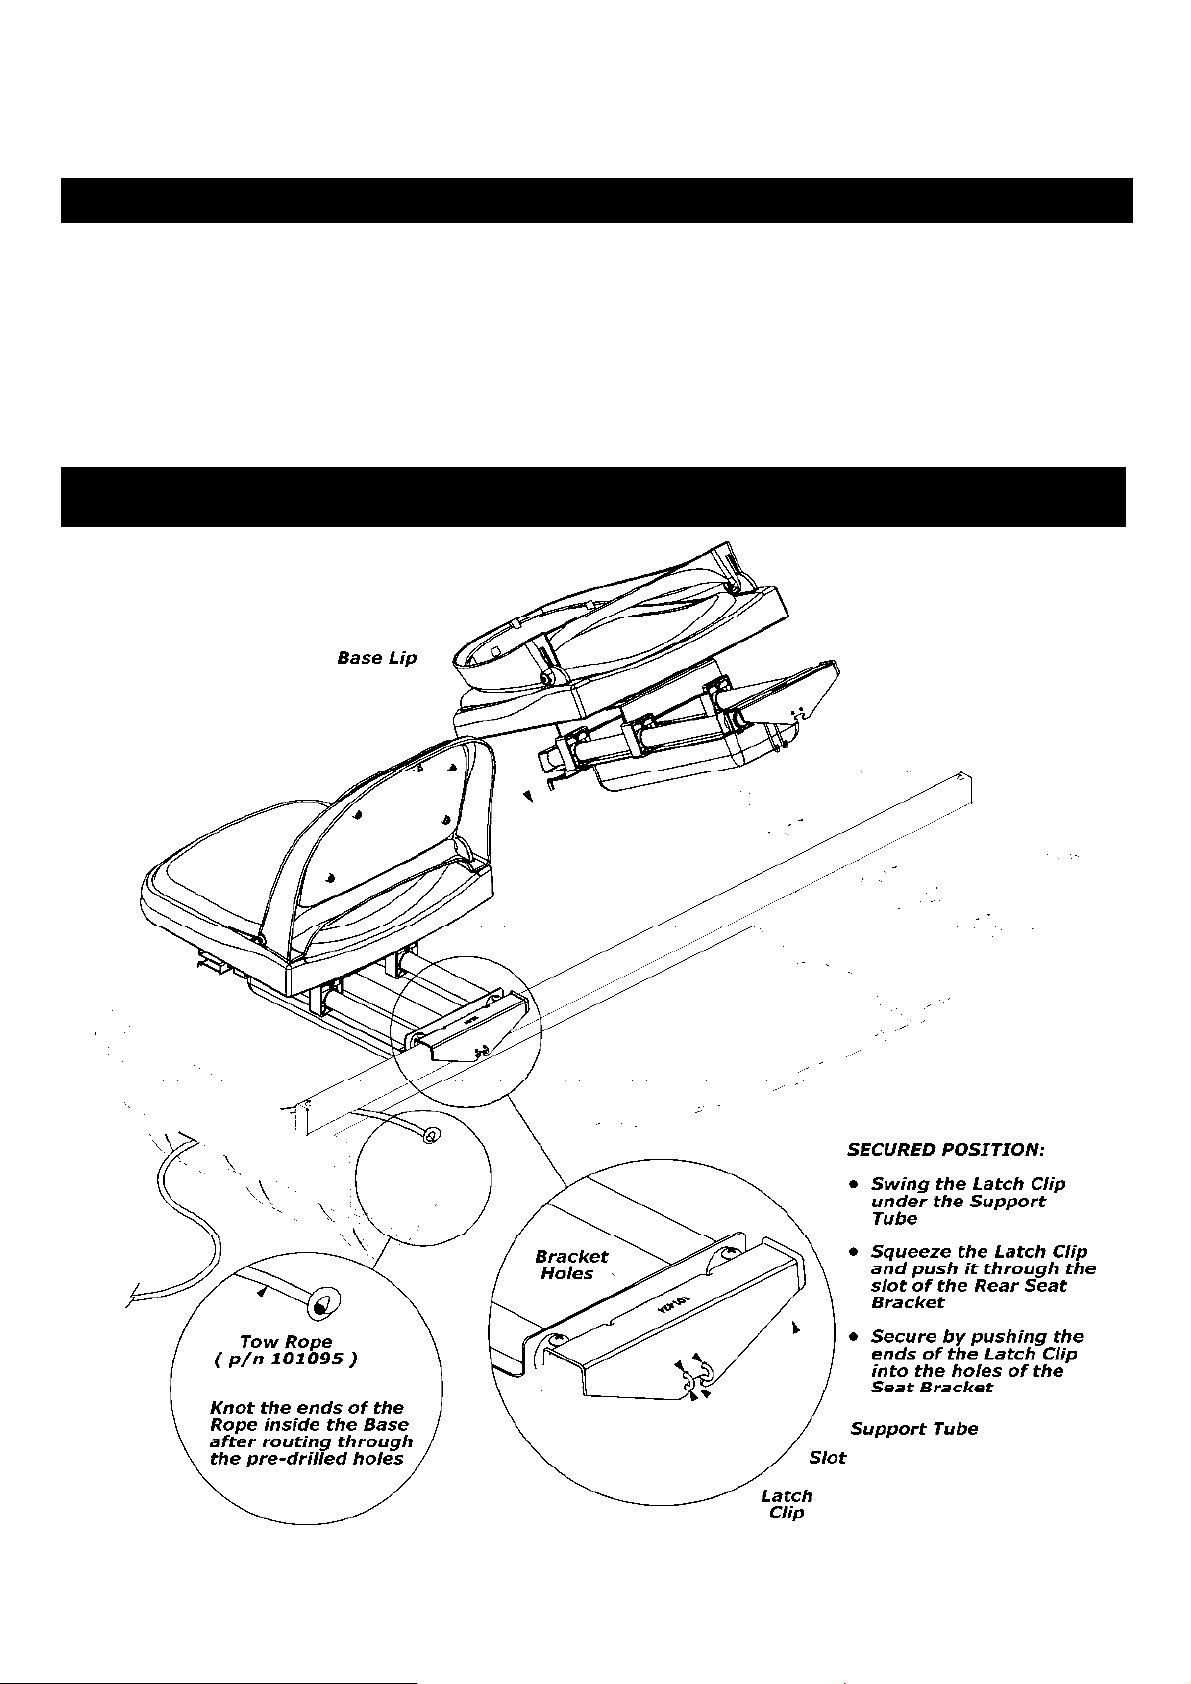
Angle the seat assembly slightly while placing the bottom lip of the front seat bracket under the outside
edge of the base lip.
Tilt the complete assembly downward so that the rear seat bracket lands upon the support tube.
Reach under the rear seat bracket and slide the latch clip outwards and then up against the underside of
the support tube. Squeeze the latch clip into the horizontal slot of the rear seat bracket.
Secure the position of the latch clip by pushing it into the two holes located above the horizontal slot of
the rear seat bracket.
WARNING: ALWAYS KEEP THE LATCH CLIP IN THE SECURED POSITION DURING USE. FAILURE
TO DO SO COULD RESULT IN INJURY FROM THE SEAT COMING OFF OF ITS MOUNTING SYSTEM.
Page 14

14
- Tips f or Use -
Folding and transporting your Fish Trap is easy:
Unsnap the roof spreader poles, rear spreader poles, and front spreader poles. Lay them in the bottom
▪
of the base.
Push the spring buttons and retract each hoop, starting with the rear hoop and working towards the
▪
front. Rotate all retracted hoops to the resting position. Tuck the tent into the base and between the
hoops so that no material is left hanging on the ground for transport.
Cover with the Travel Cover* (an optional but recommended accessory to help prolong the life of the
▪
unit). Tow the unit out to your favorite fishing spot! (NOTE: continuous pulling behind a four wheeler or
snowmobile may result in premature wear of the base. We recommend the optional Wear Strips* be
mounted to the base of your Fish Trap).
Make sure your Ice Shelter is completely dried out before storing for long periods of time. Store your Ice
Shelter in a cool, dry place. Keep away from rodents.
*See our accessory catalog or www.clamcorp.com for these items and more!
- Saf et y I nstructions -
Please fully understand and follow all safety instructions as outlined. Failure to do so could result in
severe injury or death.
Do not use open flame heaters in your ice shelter. Injury or death may result from fire if tent fabric is
▪
exposed to open flame. The tent is not fireproof, but the fabric is treated with a fire retardant that meets
CPAI-84 specifications. Application of any foreign substance may render the flame retardant properties
ineffective. Ice Armor fabric will melt when contact is made with hot surfaces (i.e., heaters).
Death from asphyxiation may result from use of oxygen depleting heaters. Open all vents for fresh air
▪
ventilation.
Never leave shelter unattended when set up.
▪
Due to the increase in traffic (snowmobiles, autos, etc.) on area lakes, ice fishing can be hazardous at
▪
night. If you choose to fish at night or in poor visibility conditions, be sure to take precautions with
lights or reflectors to show drivers your whereabouts. Night time: exterior reflectors must be visible to
reduce risk of collisions.
- Warra nt y -
Clam Corporation warrants to the original retail purchaser that all Clams are free from manufacturer’s
defects for one (1) year from the date of the original purchase. Warranty does not cover cracked
windows, tent tears, broken or bent hoops due to high wind weather conditions or unattended use. Clam
Corporation will replace or repair any part found defective within the one (1) year time limit. All parts
must be returned to Clam Corporation. Before returning any parts, you must first call or write and acquire
a return authorization. All returns must be returned postage-prepaid and include the original cash register
receipt (date and purchase price).
Note: Please write the return authorization number on the outside of the package to help
ensure the transaction gets processed swiftly and accurately.
- Lim it ation of Liabi lity -
It is expressly understood that Clam Corporation’s liability for its products, whether due to breach of
warranty, negligence, strict liability, or otherwise, is limited to the repair of the product as stated above.
Clam Corporation is not liable for any injury, loss, damage, or expense, whether direct or consequential,
including but not limited to loss of use, income, profit, or damage to material arising in connection with
the sale, installation, use of, inability to use, or the repair or replacement of Clam Corporation products.
Clam Corporation reserves the right to make alterations or modifications in its products at any time, which
in its opinion, may improve the performance and efficiency of the product. It shall not be obligated to
make such alterations or modifications to products already in service.
 Loading...