

Page 1

Model No.
-8202-
Specifications
Height - 80 inches
▪
Length - 72 inches
▪
W id th - 96 inches
▪
Weight – 87 lbs.
▪
p/n 108256
Instruction No. 101929
- Clam Customer Service Information -
NOTICE!! - ONCE USED, THIS SHELTER CANNOT BE RETURNED TO THE STORE. IF YOU HAVE A
WARRANTY CLAIM, PLEASE CONTACT CLAM CORP. CUSTOMER SERVICE BY EMAIL INQUIREY OR
DIRECT BY CALLING:
■ Customer Service Hrs: - 8am to 5pm, Mon. - Fri. Central Standard Time
■ Clam Corporation, Inc.
600 Clydesdale Trail
Medina, MN 55340
■ Phone - 763-231-4120
■ Fax - 763-231-4121
■ Email – [email protected]
■ Website – www.clamcorp.com
Page 2

f
r
h
e
s
-
t
PAR
P
A
SAFETY INSTRUCTIONS
Please fully understand and follow all safety instructions
outlined in this booklet. Failure to do so could result in
severe injury.
•
Do not use open flame heaters in your ice shelter.
Open vents for cross ventilation.
•
Ice Ar mor fabric will melt when contact is made with
hot surfaces (i.e., heaters).
•
Never leave shelter unattended when set up.
•
Due to t he increase in traffic (snowmobiles, autos,
etc.) on area lakes, ice fishing can be hazardous at
night. If you choose to fish at night or in poor visibility
conditions, be sure to take precautions with lights or
reflectors to show drivers your whereabouts.
Death from Asphyxiation may result from use o
oxygen depleting heaters. Open all vents fo
fresh air ventilation.
Injury or death may result from fire if tent fabric
is exposed to open flame.
Tent fabric is not fireproof. Fabric will burn wit
extended exposure to open flame. Do not us
open flame products inside tent. Tent fabric i
treated with fire retardant. Application of any for
eign substance may render the flame retardan
properties ineffective.
Night time: exterior reflectors must be visible to
reduce risk of collisions.
This tent is made with flame resistant fabric
which meets CPAI-84 specifications.
CLAM 6800
If you need replacement
parts, contact Clam
Corporation’s Customer
Service at
763-231-4120 or
[email protected]
m. Customer service hours:
9am – 4pm,
weekdays, central
time.
TSLIST
ITEM #
1
BASE HALF 2 101239
2
HINGE, FLOOR 1 101235
3
SQUARE POLE ASSEMBLY 4 101645
4
CAP, POLE 1 4 101181
5
HOOP POLE 2 101236
6
PIN, HINGE 2 101238
7
SPREADER TUBE 4 101244
8
DOME POLE 2 101247
9
PLYWOOD, 1/2 X 11-7/8" 6 101184
10
WASHER, 1" NYLON 4 101305
11
BRACKET, EXT POLE 4 101641
12
BOLT, 1-3/4" 4 101211
13
LATCH, RUBBER W/PIN 3 101203
14
SCREW, 3/4" 3 101088
15
NUT, NYLOCK 7 101163
16
LATCH, HOL E COVER 12 101189
17
RIVET, 5/8" 12 101190
18
ROPE, 3/8 X 20" BRAIDED POLY 4 101200
19
STRAP ATTACHMENT 18 101202
20
RIVET, 3/8" 18 101077
21
WASHER, 1" 18 101206
22
TUBE, PLASTIC SPACER 2 101250
23
STAPLE, 1/2 " X 1/4 " CROWN 4 101252
24
SCREW, 3/4" HI-LO 4 101212
25
A SUPPORT BRACE 2 101197
26
B SUPPORT BRACE 2 101192
27
CARRIAGE BOLT, 1/2" 8 101209
28
NUT, KEPS 8 101191
29
ROPE, 11' 1 101249
30
TENT 1 101878
DESCRIPTION
QTY.
R
TNO.
Page 3
A
R
Pag
P
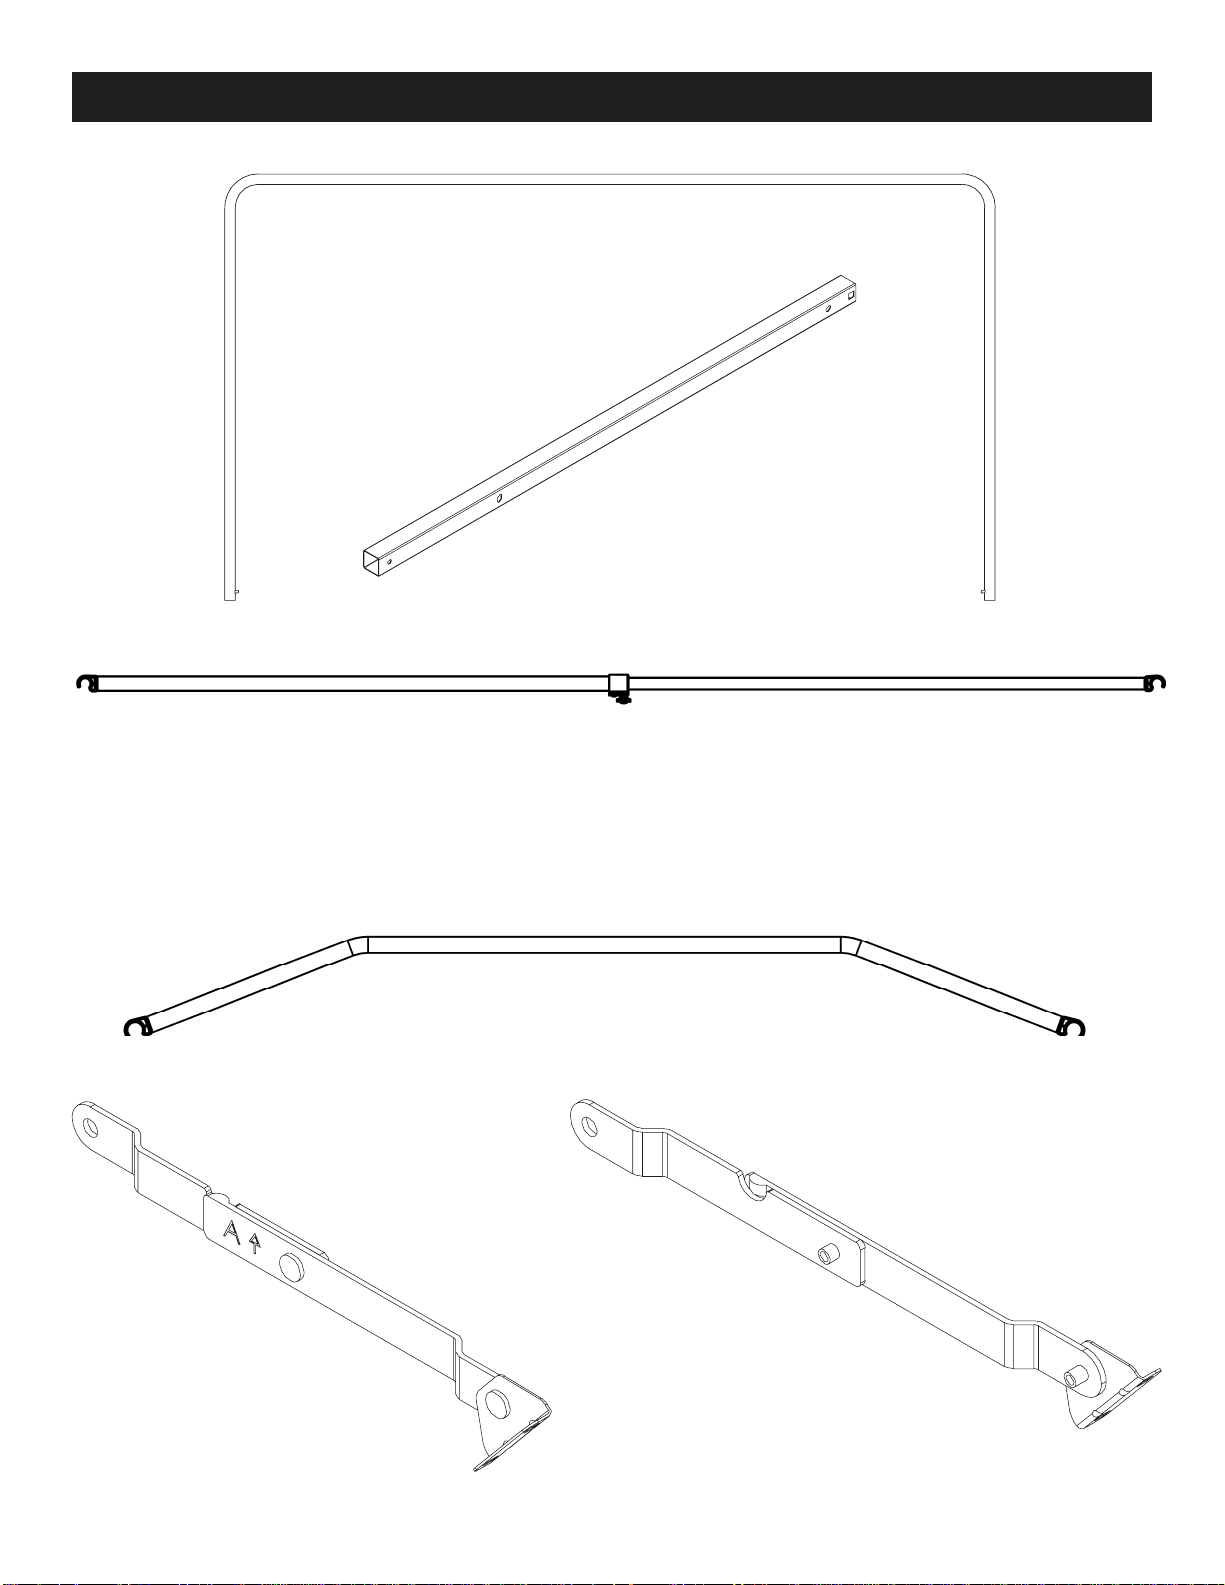
TS IDENTIFICATION
(Parts on this page are NOT actual size.)
#5 HOOP POLE
PART101236
#3 SQUARE POLE
PART101621
#7 SPREADER TUBE
PART101244
#8 DOME POLE
PART101247
#25 A SUPPORT BRACE
PART 101197
e 3
#26 B SUPPORT BRACE
PART101192
Page 4

A
R
Pag
P
TS IDENTIFICATION
(Parts below this box ARE shown actual size.)
#21 1" W
ASHER
PART 101206
#24 3/4" SCREW
PART 101212
#1
5 NYLOCKNUT
PART101163
#44 3/4" SCREW
PART101088
#28 KEPS NU T
PART 101191
#27 CARRIAGE BOLT
PART 101209
e 4
#12 1-3/4" BOL
PART101211
T
Page 5

Pag
e 5
CLAM 6800 EXPLODED VIEW
Page 6

A
h
e
p
p
y
)
Pag
SSEMBL
Y INSTRUCTIONS
BEFORE A
down at home in the comfort of a heated area. Repeat several times until comfortable. This will make
your on-ice set-up much easier.
TTEMPTING TO USE THIS PRODUCT ON THE ICE
practice setting up and tak ing
NO TOOLS ARE NEEDED FOR ASSEMBLYOFYOUR
CLAM 6800.
1. INITIAL SET
a. Open the Clam 6800 and lay on a flat level surface.
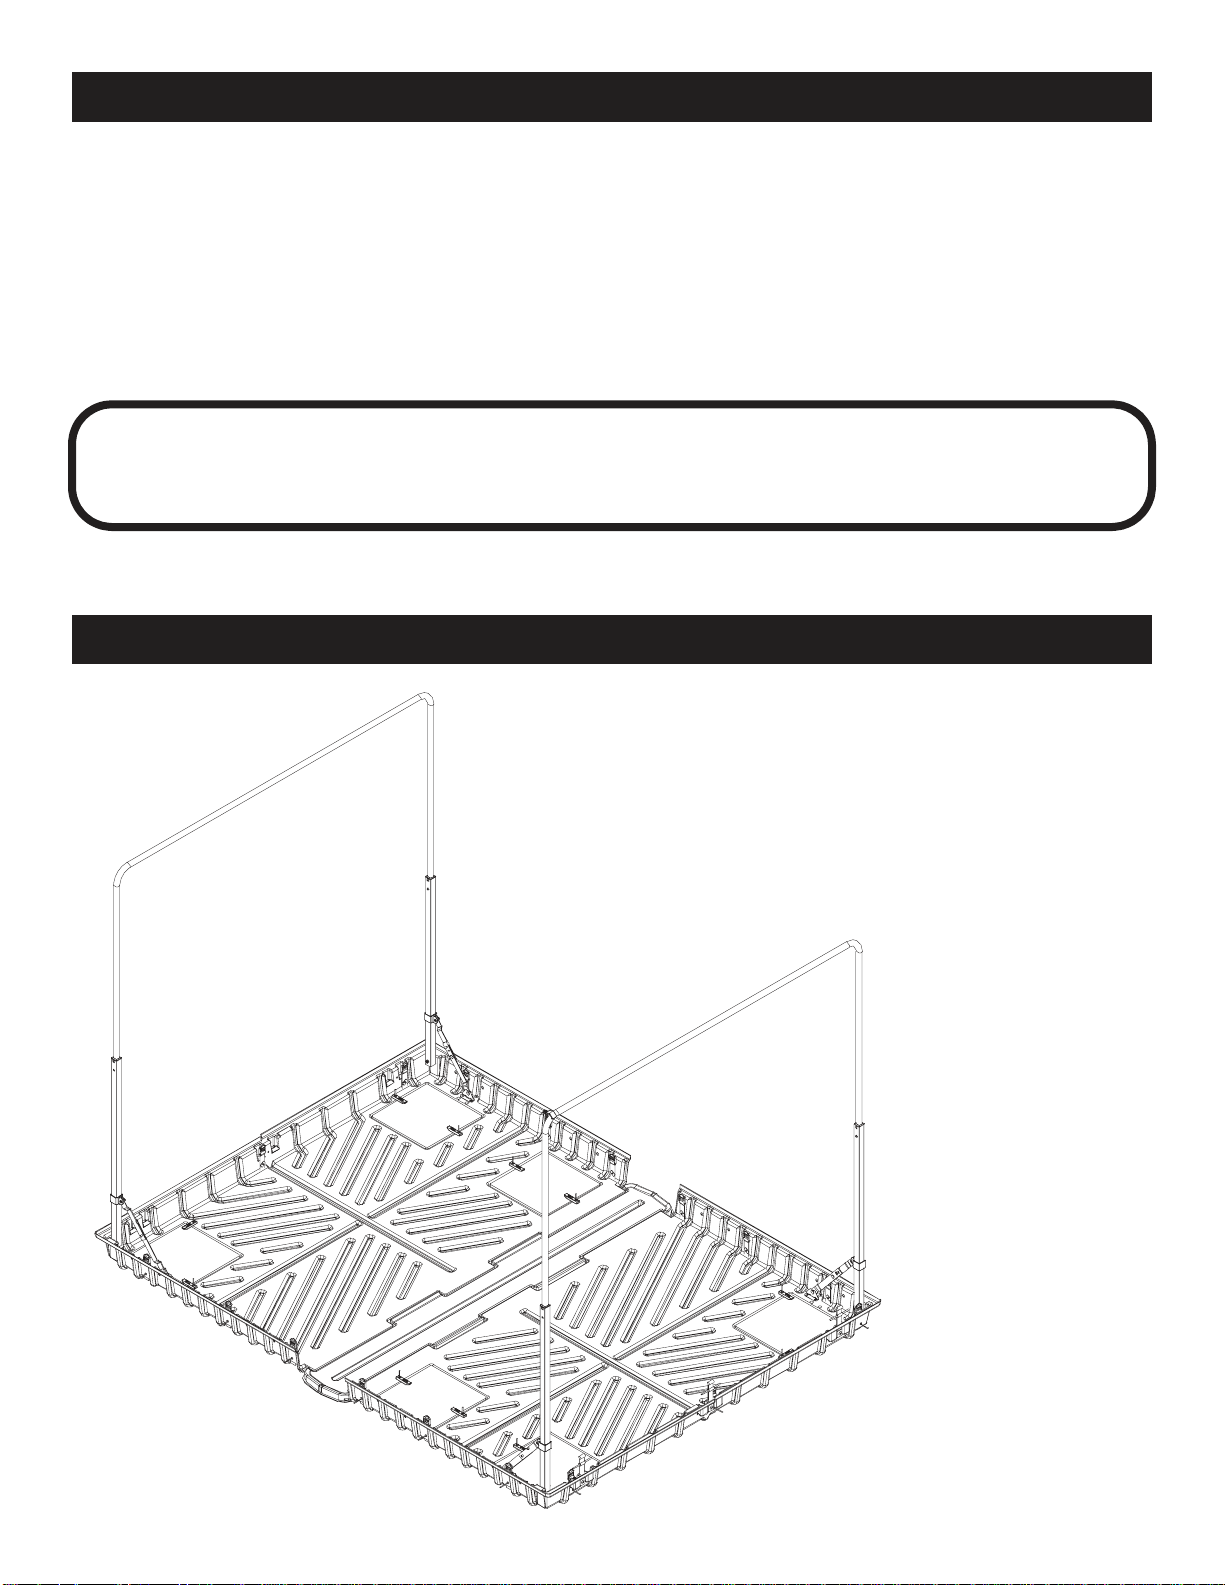
b. Lift up the two hoop pole sections until the snap button locks into place. Lock the braces.
See Diagram A.
c. Unfold the tent and unzip both doors. Pull the tent over the two hoop poles.
d. Above each tent door, on the top of the seam, you will see three velcro strips. Attach the three
velcro strips to the hoop poles.
-UP
(Both ends.)
See Diagram B.
2. INSERT POLES
a. Insert the four spreader tubes (#7) on each end of the hoop pole.
b. Adjust the spreader tubes until the hoop poles are at a 90 degree angle and tent is snug,
then tighten the adjustment knob.
c. Install the two dome poles (#8) in the c enter of the 6800. Install each dome pole in line wit
the velcro on the roof. Attach the velcro to the dome poles.
oles ar
e the non-adjustable poles.)
See Diagram C.
See Diagram D.
(Note: The dom
3.
FASTEN THE TENT
a. Fasten the tent to the base by inserting the strap from the tent through the back of the buckle.
See Diagram E.
stretch the elastic straps.
b. Fold the tab on the buckle over and all the way down to fasten.
only needs to be done the first time you set u
Pull the strap until the elastic on the buckle starts to stretch. Do not over
See Diagram F.
our 6800.
(Note: This
4.
INSTALL LICENSE
(Check with local authorities for the requirements of your ar
ea.).
a. Locate the clea r sleeve sewn to the outside of the tent. Slide the required documention of
you ar ea into t he sle eve fo r disp lay.
e 6
Page 7
A
b
A
Pag
SSEMBL
Y INSTRUCTIONS
5. DISMANTLING YOUR CLAM
a. To take your Clam 6800 down, repeat steps 1–3 in reverse order. Lay all the poles on one
side of the base. Fold the tent into the base, making sure you don’t fold or crease the windows
DIAGRAM A
as that could cause them to crack.
. Close up the base and secure therubberlatches.
Note: Continuous pulling behind a four wheeler or snow mobile w ill r
wear of the base. We recommend a ski or slide system be mounted to the base of your
Clam ( i.e., nylon strapping or old downhill or cr
SSEMBL
oss country skis).
YDIAGRAMS
esult in pr
ematur
e
e 7
Page 8

A
Pag
SSEMBL
YDIAGRAMS
DIAGRAM B
DIAGRAM C
Spreader Tubes
e 8
Page 9

A
E
Pag
DIAGRAM D
SSEMBL
YDIAGRAMS
DomePole
DIAGRAM
e 9
Page 10

A
P
DIAGRAM F
SSEMBL
YDIAGRAMS
age 10
Page 11

Page 12

 Loading...