

Page 1

Model No.
- 8398 -
p/n 108884
S p e c i f i c a t i o n s
H e i g h t - 65” (24” packed)
▪
Width - 59”
▪
Depth - 132” (41” packed)
▪
W e i g h t – 95 lbs.
▪
Instructions – 103146
▪
- Clam Customer Service Information -
NOTICE: Once used, this shelter cannot be returned to the store. Please contact Customer
Service directly at the email address or phone number below.
Customer Service Hrs: 9am to 4pm, Monday – Friday Central Standard Time
Phone: 763-231-4120
Fax: 763-231-4121
Email: [email protected]
** Warranty cannot be honored without an original, dated receipt **
IMPORTANT! PLEASE READ: Warranty Information
This product is warranted to the original retail purchaser (not transferable). This product is to be
free from manufacturer’s defects for one (1) year from the date of the original purchase. Warranty
does not
weather conditions or unattended use. The part will replaced or repaired (manufacturer’s
option) if found defective within the one (1) year time f rame. Warrant y will be void if product has been
subject to neglect, misuse, improper installation, misapplication, alteration, or accident including, but not
limited to, improper maintenance or use of unauthorized parts or attachments. Please read this entire
owner’s manual to ensure proper installation, use, storage, and care for your Clam shelter.
To submit a Warranty Claim Request, please use one of the following methods:
•
Email: [email protected] (Preferred Method)
•
Fax: 763-231-4121
•
Write: Customer Service – Warranty Department
Information needed to submit a warranty claim: If you need to submit a warranty claim, please e-mail
Clam’s Customer Service Department at [email protected]
your full name, address, phone number, a copy of your receipt, a brief description of the problem, and
pictures to clearly show the area(s) of concern. Clam’s warranty department will review your request and a
Clam representative will contact you regarding your claim status. All returns must be returned with postage
pre-paid.
cover cracked windows, tent tears, broken or bent hoops due to high wind
600 Clydesdale Trail
Medina, MN 55340
Denali II
. In your e-mail, please include
- Limitation of Liability -
It is expressly understood that Clam Corporation’s liability for its products, whether due to breach of warranty,
negligence, strict liability, or otherwis e, is limited to the repai r of the product as stated above. Clam C orporation is not
liable for any injury, loss, damage, or e xpens e, whet her d irect or consequent ial, including but not limited to loss of us e,
income, profit, or damage to materia l arising in connection with the sale, installation, use of, inability to use, or the
repair or replacement of Clam Corporation products. Clam Corporation reserves the right to make alterations or
modifications in its products at any time, which in its opinion, may improve the performance and efficiency of the
product. Clam shall not be obligated to make such alterations or modifications to products already in service.
Page 2

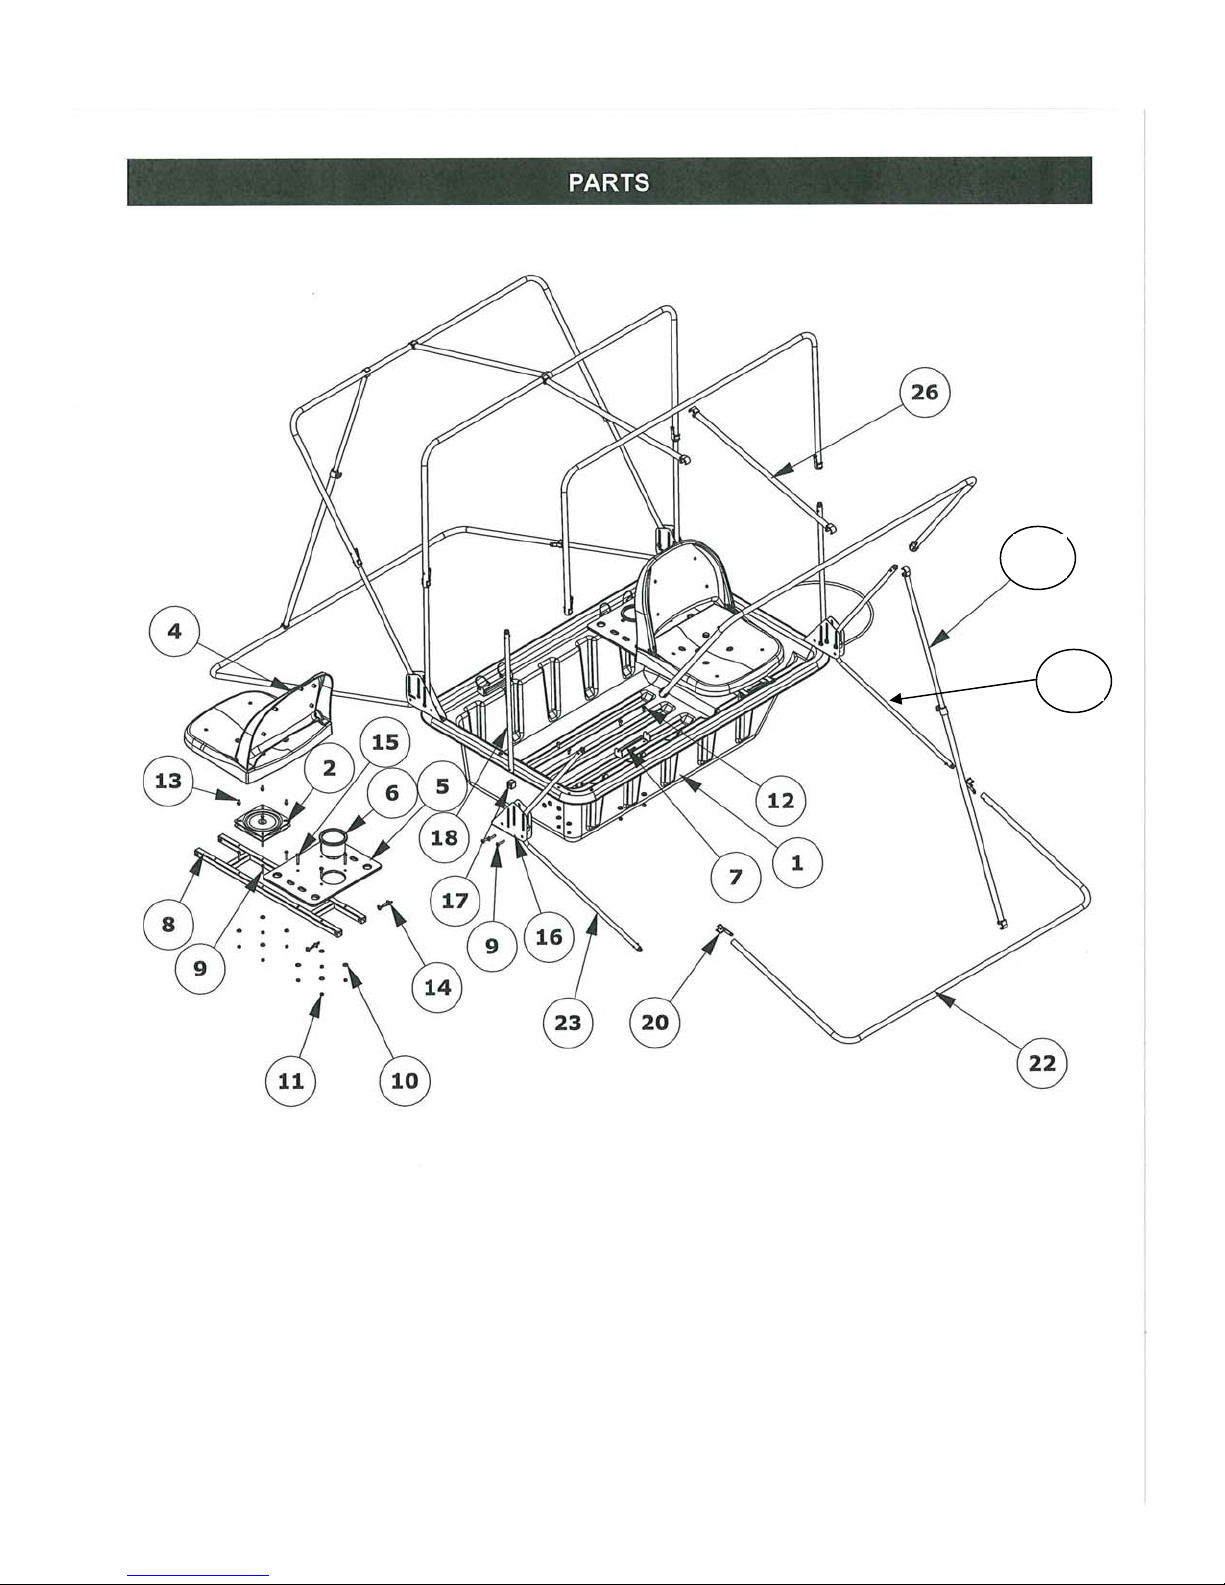
- Parts List -
ITEM NO. PART NUMBER DESCRIPTION QTY.
1 103203 BASE, DENALI 1
2 101399 SEAT SWIVEL 2
3 103205 TENT, DENALI 1
4 102759 DELUXE SEAT 2
5 102796 CONSOLE, FLAT 2
6 102795 PLASTIC CUP HOLDER 2
7 102808 SEAT MOUNT BRACKET 4
8 102707 SEAT MOUNT TUBE 2
9 101208 SCREW, 1/4"-20 X 1-1/2" 20
10 101081 WASHER, 1/4" FLAT 46
11 101082 NUT, 1/4"-20 THIN 46
12 101088 SCREW, 1/4"-20 X 0.75" 18
13 101470 SCREW, 1/4"-20 X 0.50" 8
14 101314 SNAP PIN, 1/4" DIA SINGLE WIRE 8
15 101486 SCREW, 1/4"-20 X 1.75" 8
16 102676 MOUNT BRACKET 4
17 101010 TUBE SPACER CAP 12
18 103102 EZ GLIDE POLE, 1/2" 8
19 101095 ROPE, 3/8 DIA X 9 FT TOW 1
20 102650 RPS CLIP, 7/8" 12
21 103143 LEFT PORCH POLE 2
22 102677 HOOP POLE 6
23 103144 RIGHT PORCH POLE 2
24 102775 SEAT SLIP COVER, BOTTOM 2
25 102776 SEAT SLIP COVER, BACK 2
26 101481 SPREADER POLE 3
27 101167 ADJUSTABLE SPREADER POLE 2
28 103146 INSTRUCTION, DENALI II 1
2
Page 3
27
3
Page 4
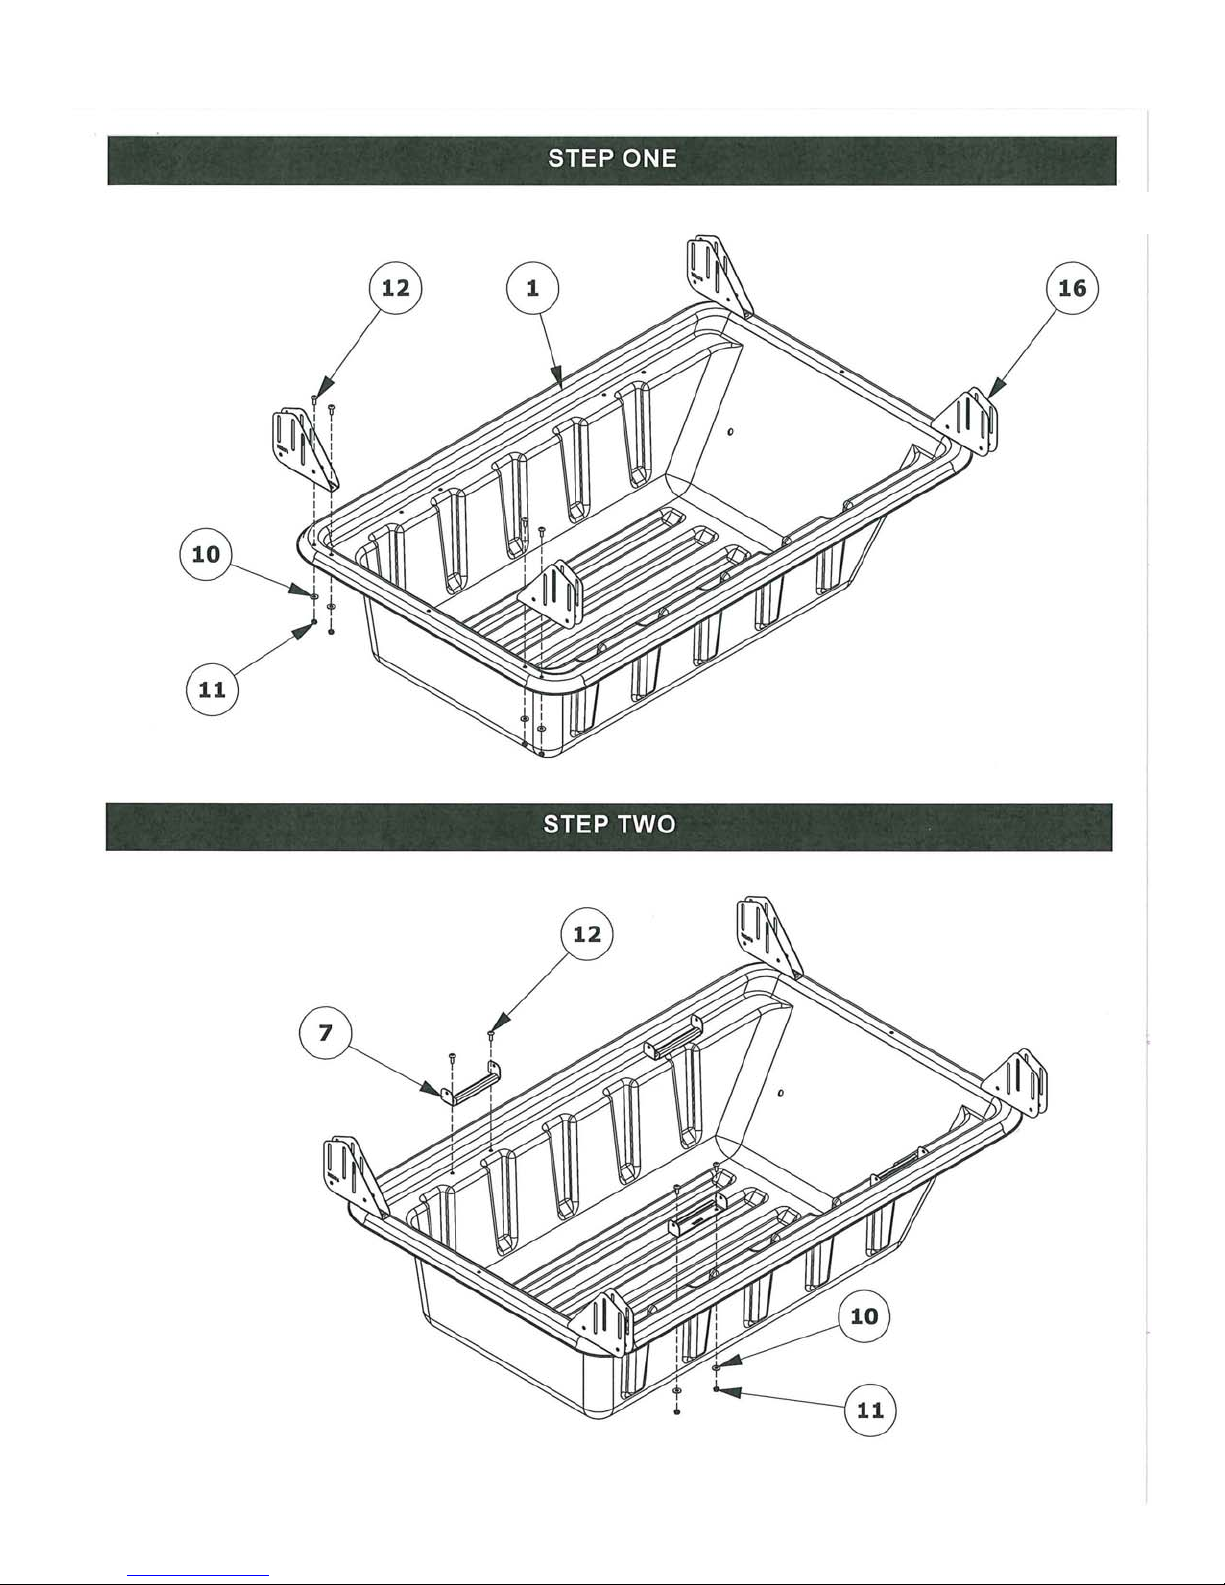
Install pole mount brackets (item 16)
Install seat mount brackets (item 7)
4
Page 5
5
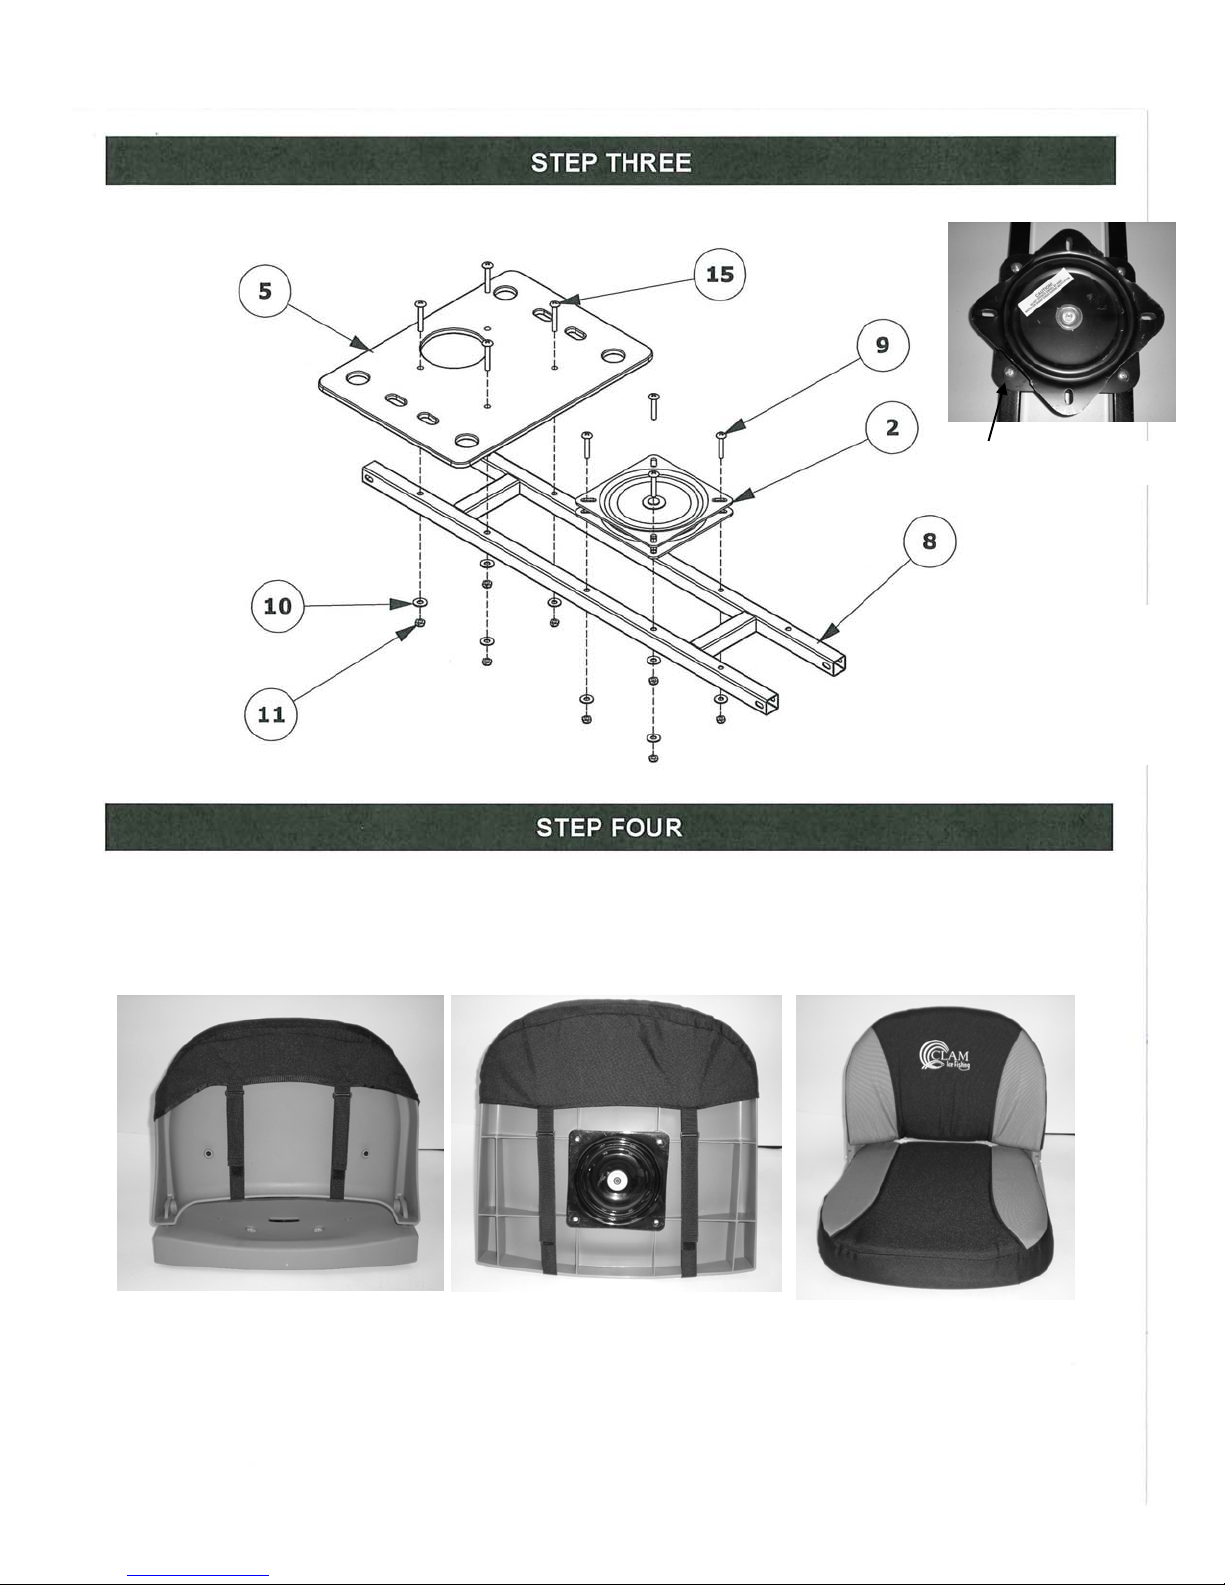
Install seat slip covers
Swivel bolts (item 9).
Rotate the seat swivel
(item 2) as shown and
assemble to seat mount
(item 8). Install console
(item 5).
Install back slip cover
(item 25).
Install bottom slip cover
(item 24).
Seat covers installed
Page 6
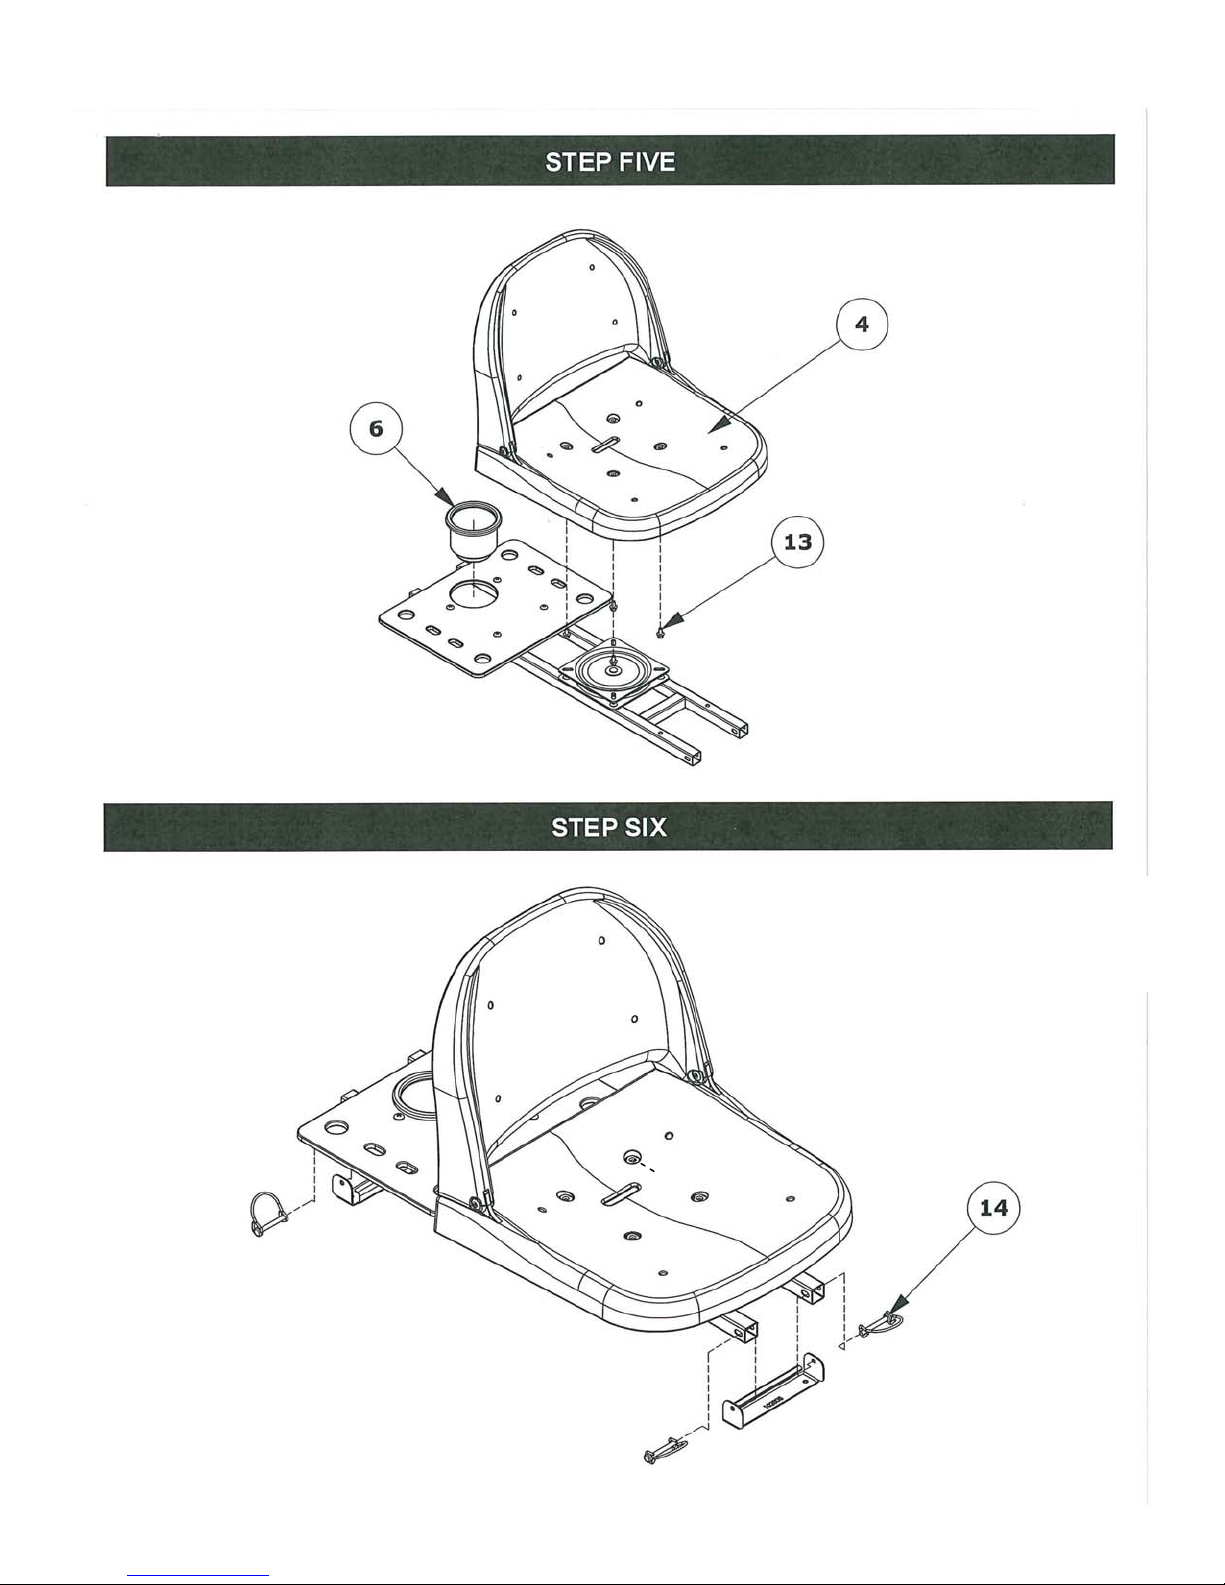
Install seat assemblies
(item 4) and insert cup
holders (item 6).
Install seats & console assemblies to
front and rear seat brackets. Secure with
snap pins (item 14).
6
Page 7
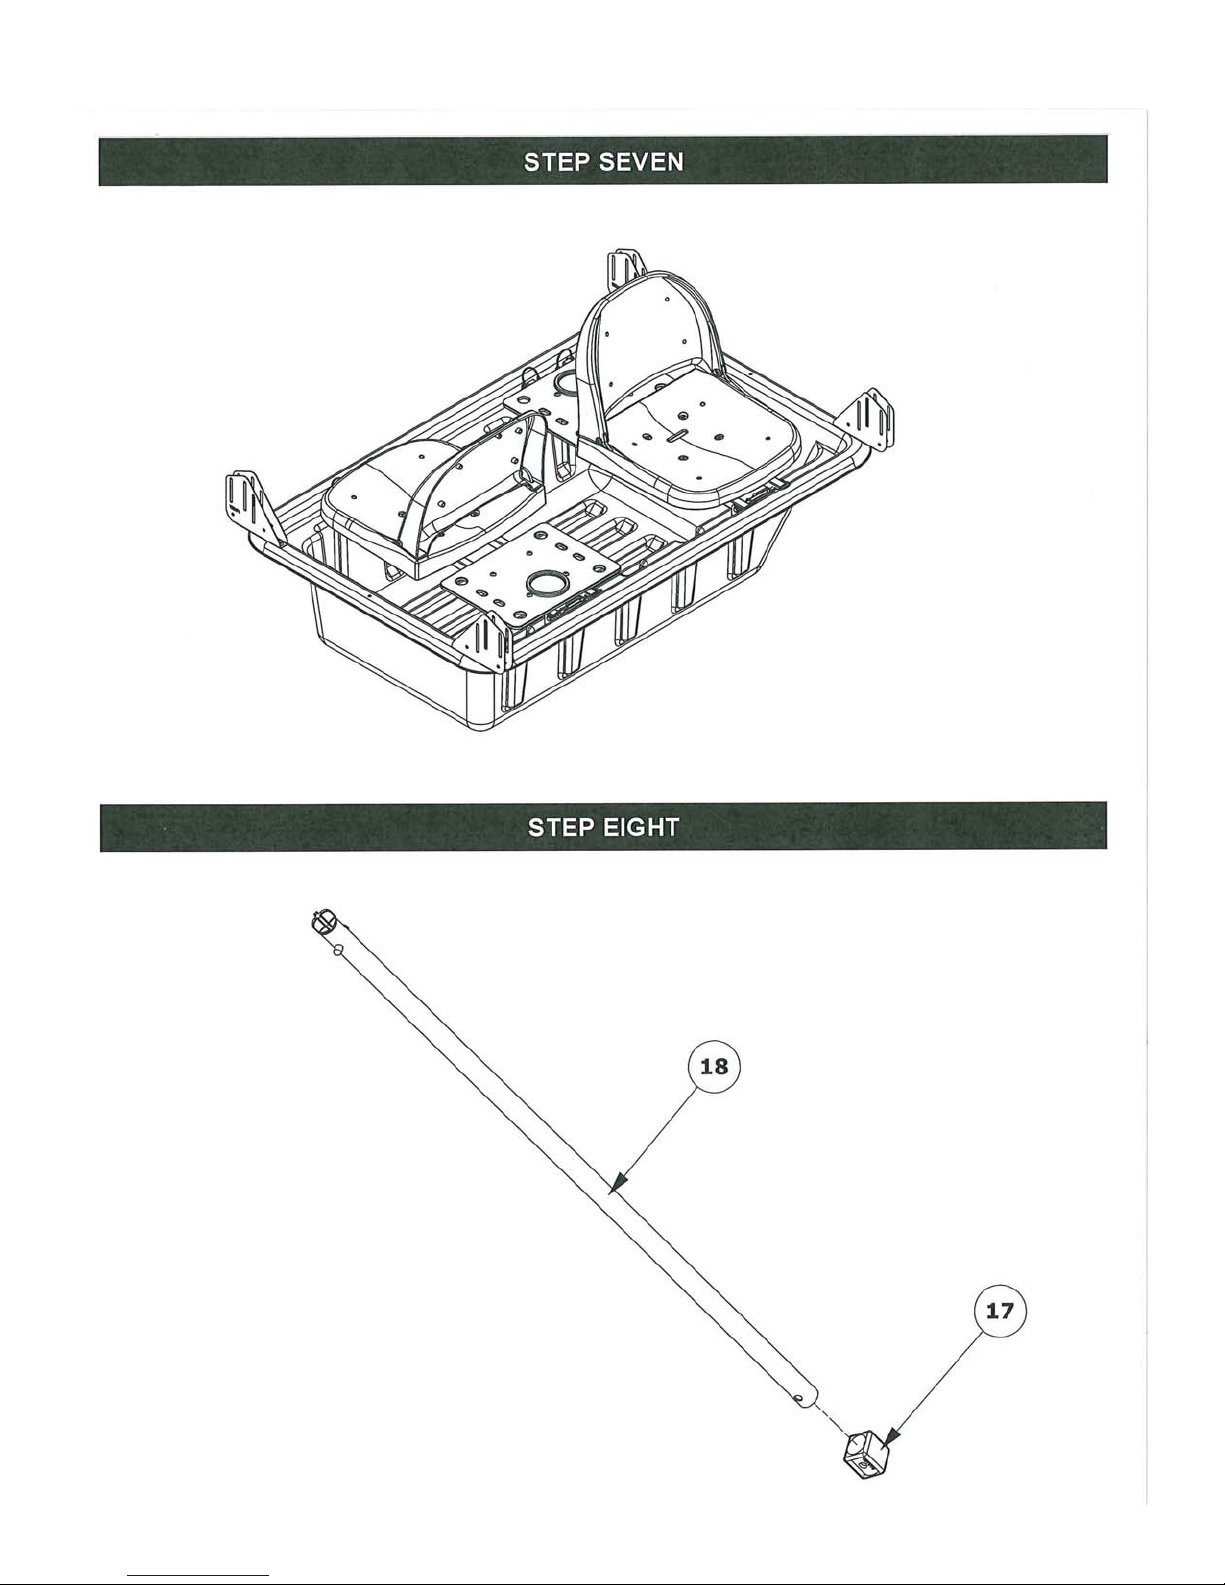
7
Base completed with seats &
consoles.
Install the tube spacer caps
(item 17) to the EZ glide poles
(item 18).
Page 8
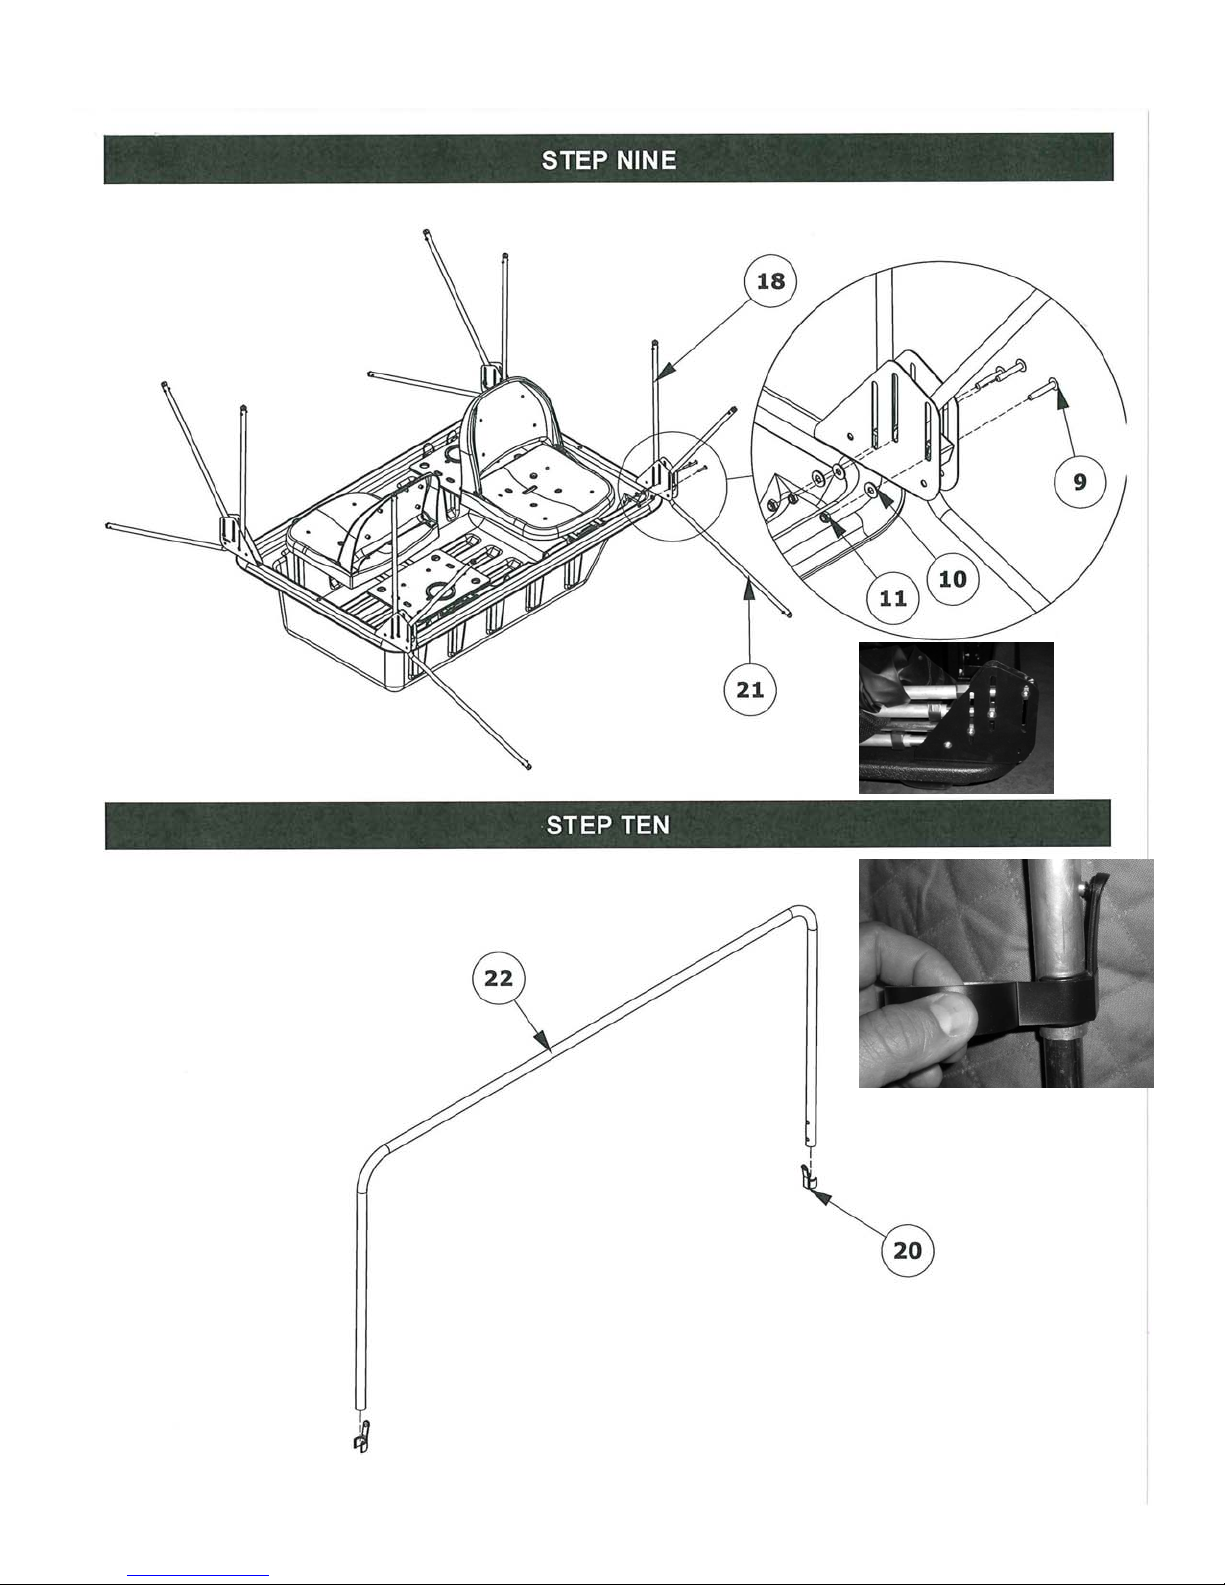
Install hoop poles (item 18).
DO NOT OVERTIGHTEN!
The poles must slide inside
the bracket cutouts.
NOTE: Tighten canopy
bracket hardware so the
ends of the bolts are even
with the ends of the thin
lock nuts.
Install RPS (Rapid Pole Slide)
clips (item 20) to the hoop
poles (item 22) by snapping
them in the correct position as
shown.
Advised: Secure all RPS
clips to the poles using
electrical tape.
8
Page 9
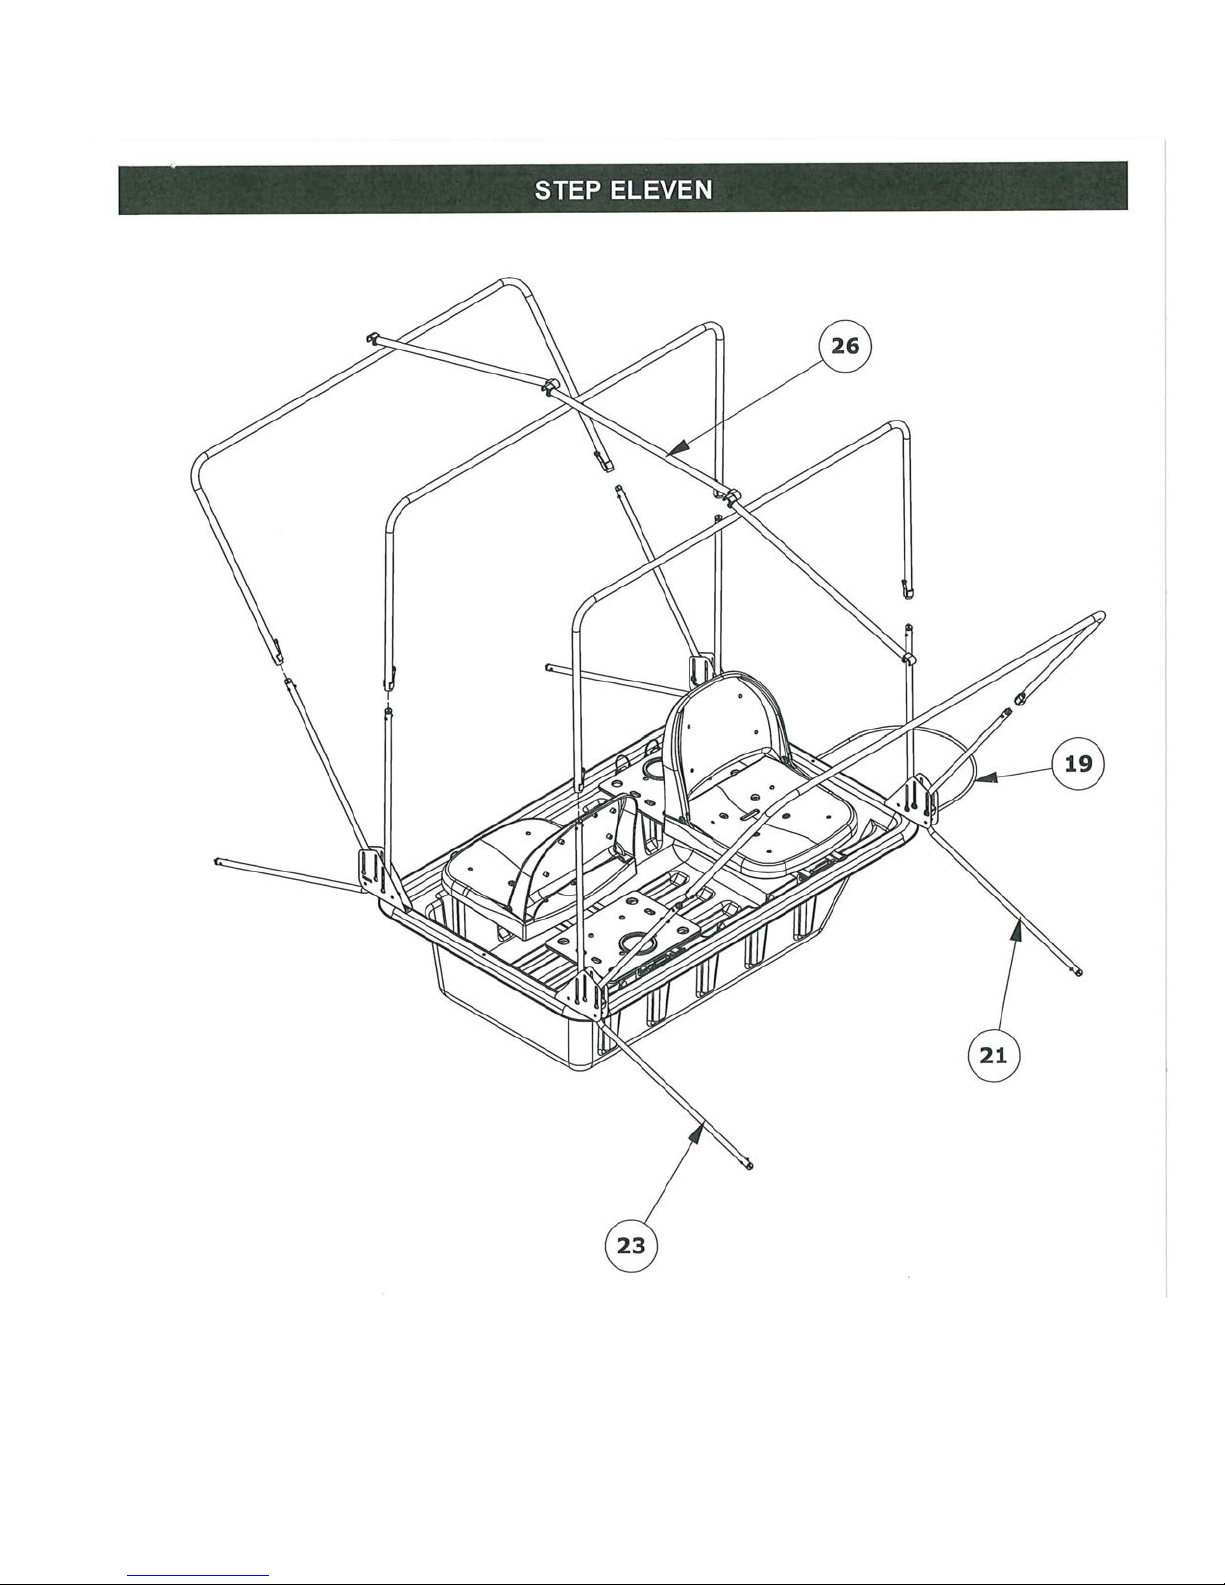
Install canopy poles (item 22) to the EZ Glide poles. Use
spreader poles (item 26) to space the poles. Do not
install the front porch poles at this time.
Extend the hoop poles until the spring buttons engage the holes near the ends of each hoop
pole and the poles are fully extended.
Support the hoop poles as pictured with the spreader poles. The shelter will now be stable
enough to drape the tent over the poles.
Install tow rope (item 19). Knot the ends of rope after routing through pre-drilled holes in
base.
9
Page 10
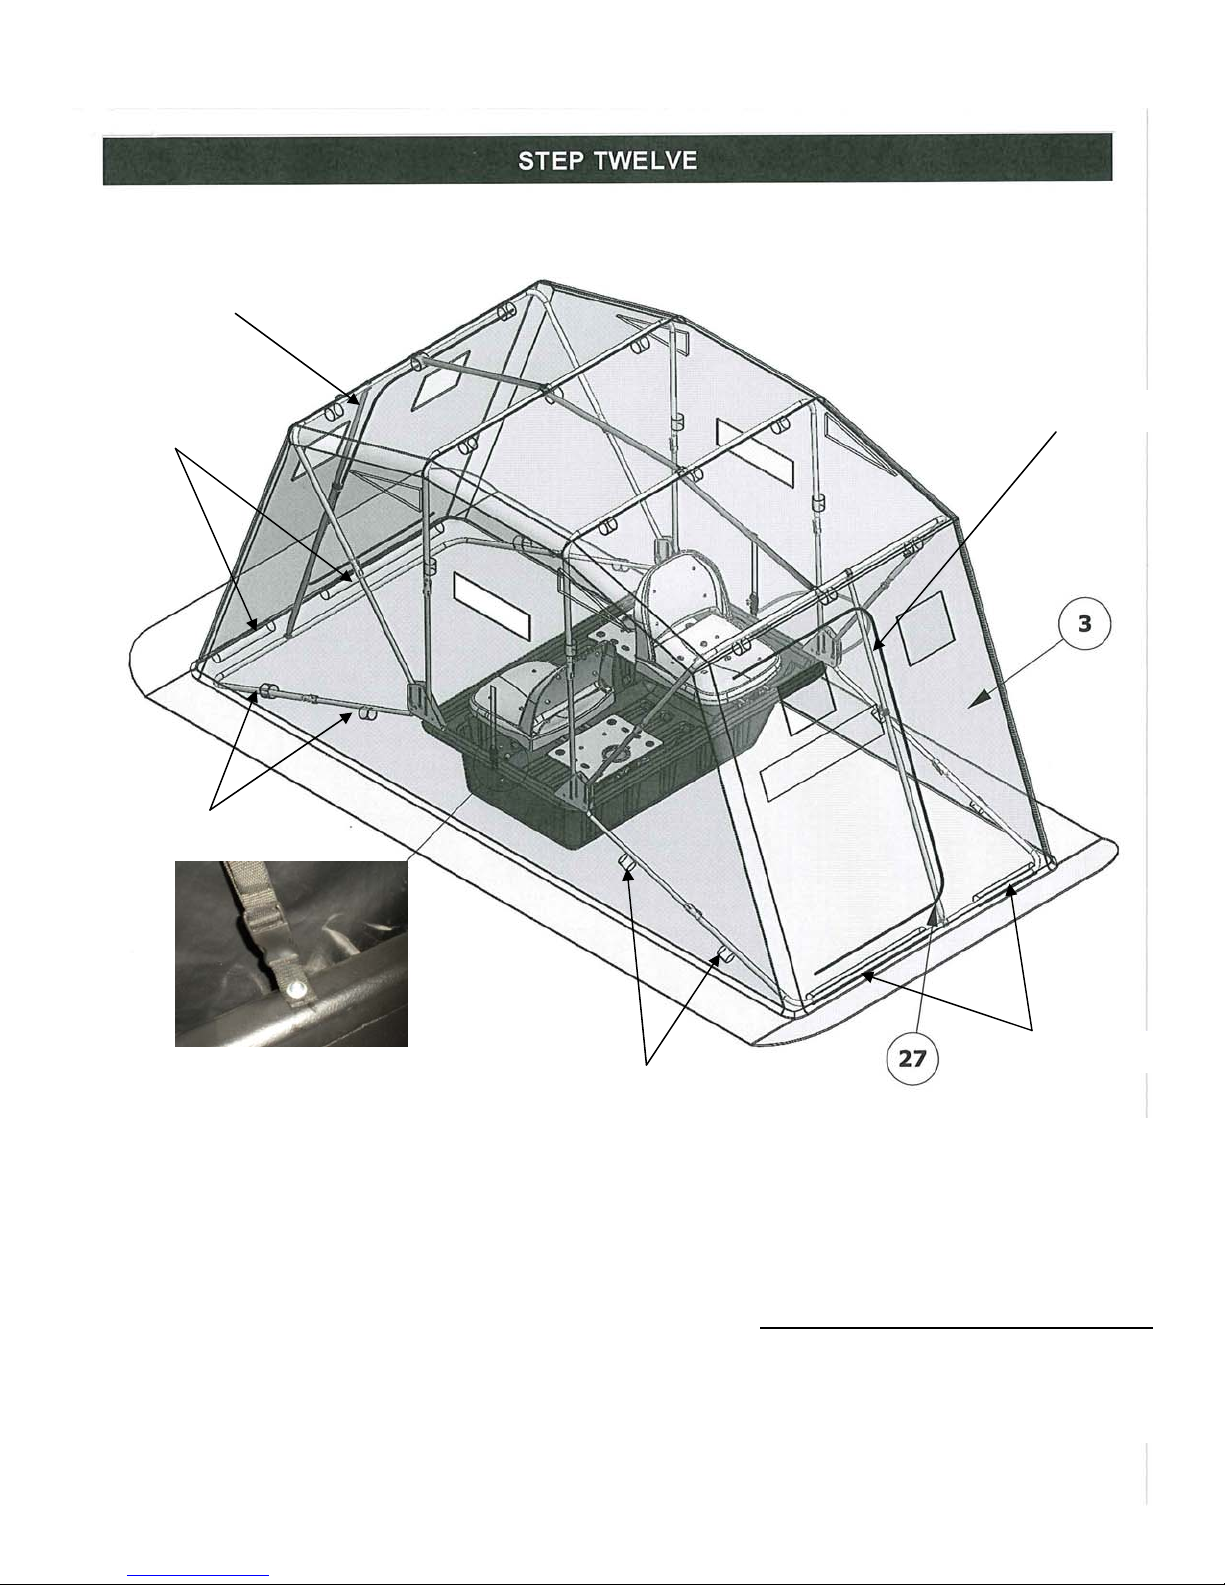
Adjustable Spreader Pole
Hoop sleeves
Porch Pole Velcro
Adjustable Spreader Pole
Middle Buckle
Drape the tent over the supported hoops, then go inside and attach the roof Velcro straps.
Feed the length of the porch poles through the hoop sleeves sewn on the tent. Slide the porch hoop poles
onto the porch poles. Install adjustable spreader poles (item 27).
Attach the floor hoop Velcro. Install and connect the buckle in the middle of the tent. Inspect the tent for
proper fit.
IMPORTANT! When collapsing the Denali it is very important to collapse the two porch hoop poles first
to relieve tension on the tent when folding. Failure to collapse the floor hoop poles first may cause the
tent to tear at the corners and in this case the tent will not be covered under warranty.
When collapsing, lay hoop poles on base first one side then the other until all hoops are on top of base.
Porch pole Velcro
10
Hoop sleeves
Page 11
r
t
f
- Tips for Use -
Folding and transporting your Clam Ice Fishing shelter is easy:
Unsnap the spreader poles and lay them in the bottom of the base.
▪
Push the Rapid Pole Slide push buttons and retract each hoop, starting with the two porch hoops and
▪
working towards the middle. Rotate all retracted hoops to the resting position. Tuck the tent into the
base and between the hoops so that no material is left hanging on the ground for transport.
Cover with the Travel Cover* (PN 108073-an optional but recommended accessory to help prolong the
▪
life of the unit).
We recommend the optional Runner Kit* (PN 108446) be mounted to the base of your Fish Trap (NOTE:
▪
Pulling behind an ATV or snowmobile may result in premature wear of the base).
In windy conditions it is advised to secure your shelter to the ice using Clam’s Ice Anchor Kit (PN
▪
108064) and Ice Anchor Installation Tool (PN 108348).
Make sure your ice shelter is completely dried out after each use. Store your Ice Shelter in a cool, dry
▪
place. Keep away from rodents.
*For replacement parts, frequently asked questions, shelter information, and all of your ice fishing needs
visit our web site at www.clamcorp.com.
- Safety Instructions -
Please fully understand and follow all safety instructions as outlined. Failure to do so could result in
severe injury or death.
Do not use open flame heaters in your ice shelter. Injury or death may result from fire if tent fabric is
▪
exposed to open flame. The tent is not fireproof, but the fabric is treated with a fire retardant that meets
CPAI-84 specifications. Application of any foreign substance may render the flame retardant properties
ineffective. Ice Armor fabric will melt when contact is made with hot surfaces (i.e., heaters).
Death from asphyxiation may result from use of oxygen depleting heaters. Open all vents for fresh air
▪
ventilation.
Never leave shelter unattended when set up.
▪
Due to the increase in traffic (snowmobiles, autos, etc.) on area lakes, ice fishing can be hazardous at
▪
night. If you choose to fish at night or in poor visibility conditions, be sure to take precautions with
lights or reflectors to show drivers your whereabouts. Night time: exterior reflectors must be visible to
reduce risk of collisions.
Death from asphyxiation may result from use of oxygen depleting heaters. Open all vents fo
fresh air ventilation.
Injury or death may result from fire if tent fabric is exposed to open flame.
Tent fabric is not fireproof. Fabric will burn with extended exposure to open flame. Do no
use open flame products inside tent. Tent fabric is treated with fire retardant. Application o
any foreign substance may render the flame retardant properties ineffective.
Night time: exterior reflectors must be visible to reduce risk of collisions.
This tent is made with flame resistant fabric which meets CPAI-84 specifications.
11
Page 12

Q: What will help keep mice or rodents from eating my Clam/Fish Trap tent?
A: Keep your tent in a sealed plastic tote with DRYER SHEETS and or MOTH BALLS. If being stored in a garage, barn, or
shed, take tent off the house and store the tent inside the house.
Q: I have lost my owner’s manual where can I get another?
A: There are owner’s manuals available for the last few years’ shelters online at the following link,
http://www.clamcorp.com/manuals.html
have one sent to you.
Q: The poles to my Fish Trap/Clam house have bent out of place should I try to bend them back?
A: It might be possible to bend the pole back into place, if your pole does not have a crease in it. Take the bent pole and lay it on
a flat surface and gently bend it back in place.
Q: The zipper on my tent freezes up and or sticks; is there anything I can use to help prevent this from happening?
A: Apply Zipper Lube - A gel that you can apply just by squeezing it onto the zipper and moving the zipper back and forth. This
can be found in the camping section of most sporting goods store. Silicone spray works well, too.
Q: Do you have replacement bases available for my Fish Trap or Clam that is a couple years old?
A: We do have bases available for our current shelters. We may not have the exact replacement for the older style shelters, but
may have one that will work. If you would like more information on replacement bases or pricing and availability you can
email us at [email protected]
Q: Do you have replacement tents for the current Fish Trap/Clam shelters as well as ones that are older?
A: We do have replacement tents available for our current shelters. W e may not have the exact replacement tent that will fit, but
if your house is similar to one of our current style houses we may have a tent that will work. If you would like more
information on replacement bases or pricing and availability you can email us at [email protected]
Q: The seat poles, frame poles, or spreader poles of my shelter are sticking, is there anything I can put on these poles to help
them slide better?
A: Apply Zipper Lube, silicone spray, or bar soap. When the poles get slid up and down sometimes burs will get created. If this
happens you can separate the poles that are sliding hard and take a fine file or fine sand paper and debur the pole(s) and then
apply a light film of lubricant.
Q: My V-channel molding is difficult to get started what can be done to help?
A: Heating the V-channel with a hair dryer prior to installation will help make the U-channel molding more pliable.
Q: Would it be best to completely dry my shelter out every time it gets used?
A: It is recommended to dry your tent out completely after each use, if not dried completely moisture left in the house may cause
damage to your tent.
*** Please Note- dry tent completely or remove tent if applicable, if you are going to store over a long periods of time. ***
Q: What can I do to make it easier to pull my Clam shelter and protect the base?
A: We sell runner kits that can be mounted to the base of your shelter. This is recommended especially when pulling with ATV
and/or snowmobile. You can purchase a runner kit at a local dealer near you or on our web site at www.clamcorp.com
Q: How do I wash my shelter tent?
A: You can use a bleach and water solution (10 parts water to 1 part bleach) to get rid of the mildew smell and surface dirt. If
you want to wash the tent you can use a standard soap to wash it.
*** Please note - We do not
Q: Are patch kits available for my Fish Trap and Clam shelter?
A: Patch kits are available they can be purchased online at www.clamcorp.com
patch it works best to use spray adhesive (we recommend using 3M #77 or 3M #90 spray adhesive) on to both surfaces;
the part of the tent where the patch is going to be applied and the patch itself. Wait until the adhesive begins to dry and
becomes tacky, then place the patch on the tent, and they will stick together.”
Q: Am I able to order parts and accessories from Clam website?
A: Absolutely, if you are not able to find what you need at your local dealer you can go to www.clamcorp.com
accessories and/or parts.
FREQUENTLY ASKED QUESTIONS
. You can also contact Customer Service at [email protected] and
.
.
recommend placing your shelter tent into a washing machine for cleaning. ***
. Instructions are included. “When applying a
to order your
12
Page 13

Q: Is there anything can be put on outside of the tent to prevent water from coming through, when we are using it?
A: Customers have been known to spray or apply water repellant on the outside of the shelter that you would use for camping
tents or boots. (Camp Dry would be an example of this type of product). These products will not damage your tent in
anyway.
Q: What is the proper way to set up and take down my Fish Trap?
A: Set-Up:
Take-Down:
***Please Note: Make sure that the tent material is clear of the canopy brackets to minimize rubbing or possible tearing. ***
Q: Do you ship outside of the United States?
A: We will take phone orders for any item or parts required to MAINTAIN
We will charge for the product plus the actual shipping charges. It will be the customer’s responsibility to pay all the
importing costs (duties, taxes, etc.) at the time the goods are delivered.
Q: Why can I see pin holes in my fabric?
A: There are a few explanations as to why those pin holes exist. The color and/or black-out coating may be worn off the fabric
due exposure to the elements and wear due to friction. Ice Arm or fabric is a woven material and these pin holes are parts of
the thread that the coating did not attach to. Either way this has no effect on the function of the fabric and is simply an
appearance issue.
Q: Why are there cracks on the inside finish of the fabric?
A: This is normal, when you fold up your shelter, lines develop in the fabric. The inside coating may even appear to be peeling.
This is normal and will not affect the overall function of the ice house.
Q: Will my fish house leak because I can see pin holes in the fabric?
A: Quite the opposite, as you heat your house and the snow and ice begins to melt, the vapors can better escape the shelter
through an uncoated fabric. When it snows or rains, the water molecules are larger than the vapor molecules and cannot pass
through the fabric and into the house.
Q: It gets wet in my ice shelter. Will using a heater eliminate water in my shelter?
A: A warm interior coupled with a cold exterior will cause condensation. This moisture collects on the poles, sides, and top of
the house and drips inside the house. A by-product of burning propane is water. You may think that a bigger heater would get
rid of the water, but the opposite is true. You would actually be creating more moisture due to burning more propane,
resulting in more condensation from the heat, ice, and water vapor created by the heater.
Face the seats. Grab the hoop that is on top and pull on it until you feel and hear the push buttons engaging in
the full open position. Grab the next hoop and do the same until all the hoops are fully open. When finished,
you should be inside the shelter.
Install the roof spreaders, then the front spreader(s), and finally the rear spreader(s). (Spreader count varies with
shelter style/configuration – smaller shelters use only a rear spreader).
Remove all spreaders and lay in the bottom of base.
For adjustable spreaders, snug the tension knobs after compacting so that they don’t vibrate out during transit.
From inside the shelter, start with the rear wall hoop. Compress both buttons and retract the hoop, then the same
with next inward hoop, etc. Continue until all upright hoops are collapsed.
Step out of the shelter, disengage the porch hoop buttons and swing the porch hoop onto the previously
retracted hoops. Make sure the tent does not catch on the mount brackets while collapsing the porch hoop.
Go around the shelter and tuck the tent material in between the rested hoops the best you can to keep the tent
material from dragging during transit – a travel cover works great here to hold everything together.
FREQUENTLY ASKED QUESTIONS
the shelter (tents, poles, parts, patch material, etc.)
13
 Loading...