

Clairtone R1W001BCDC Owner's Manual
18-BOTTLE DUAL TEMPERATURE ZONE WINE COOLER
MODEL NO.: R1W001BCDC
OWNER MANUAL
FOR HOUSEHOLD USE ONLY
SAVE THESE INSTRUCTIONS

TABLE OF CONTENTS
Important Instructions……………………. 3
Parts of the Wine Cooler ………………... 4
Installation Instructions……………………. 4
Operating Instructions…………………….. 5
Specifications……………………………… 6
Cleaning & Maintenance………………… 6
Storage & Transport………………………. 6
Troubleshooting…………………………… 7
Warranty…………………………………… 8

SAVE THESE INSTRUCTIONS
IMPORTANT INSTRUCTIONS
PLEASE READ & UNDERSTAND ALL INSTRUCTIONS BEFORE USING THIS APPLIANCE.
WHEN USING ELECTRICAL APPLIANCES, BASIC PRECAUTIONS SHOULD ALWAYS BE FOLLOWED TO REDUCE
RISK OF FIRE, ELECTRICAL SHOCK AND INJURY TO PERSONS OR PROPERTY, INCLUDING THE FOLLOWING:
1. Read all instructions before using this appliance.
2. Check that neither the appliance nor the power cable has been damaged in any way during transportation.
3. Make sure that no pieces of polystyrene or other packaging material have been left between elements of the
appliance. It may be necessary to pass over the appliance with a vacuum cleaner.
4. Plastic bags, nails and small parts should be kept out of reach of children.
5. Be sure to plug into a 120V AC, 60Hz outlet.
6. Be sure that the plug is fully inserted into appropriate receptacle. Please remember that receptacles also deteriorate
due to aging and continuous use: check periodically for signs of overheating or deformations evidenced by the plug.
Do not use the receptacle and CALL your electrician.
7. This appliance must be grounded. In the event of an electrical short circuit, grounding reduces the risk of electrical
shock by providing an escape wire for the electrical current. Connect to properly polarized outlets only.
8. We do not recommend use of an extension cord as it may overheat and cause a risk of fire.
9. Ensure the wine cooler is on a stable, secure surface to eliminate the potential of tipping over.
10. Always unplug the wine cooler when not in use. To disconnect the wine cooler, turn controls to OFF, then remove the
plug from the outlet.
11. Do not run cord under carpeting. Do not cover cord with throw rugs, runners or the like. Arrange cord away from
traffic area where it will not be tripped over.
12. It is normal for the wine cooler’s plug and cord to feel warm to the touch. A plug or cord which becomes hot to the
touch or becomes distorted in shape may be a result of a worn electrical outlet. Worn outlets or receptacles should be
replaced prior to further use of the wine cooler. Plugging the wine cooler into a worn outlet/receptacle may result in
overheating of the power cord or fire.
13. To prevent overload and blown fuses, be sure that no other appliance is plugged into the same wall outlet (receptacle)
or into another outlet (receptacle) wired into the same circuit.
14. Do not operate any appliance with a damaged cord or plug or after the appliance malfunctions or is damaged in any
manner. Return the appliance to an authorized service facility for examination, electrical or mechanical adjustment or
repair.
15. Damages resulting from repairs performed by unqualified personnel will void this product’s warranty.
16. Do not use outdoors.
17. Use this wine cooler only as described in this manual. Any other use not recommended by the manufacturer may
cause fire, electric shock and injury to persons or damage to property.
PARTS OF THE WINE COOLER
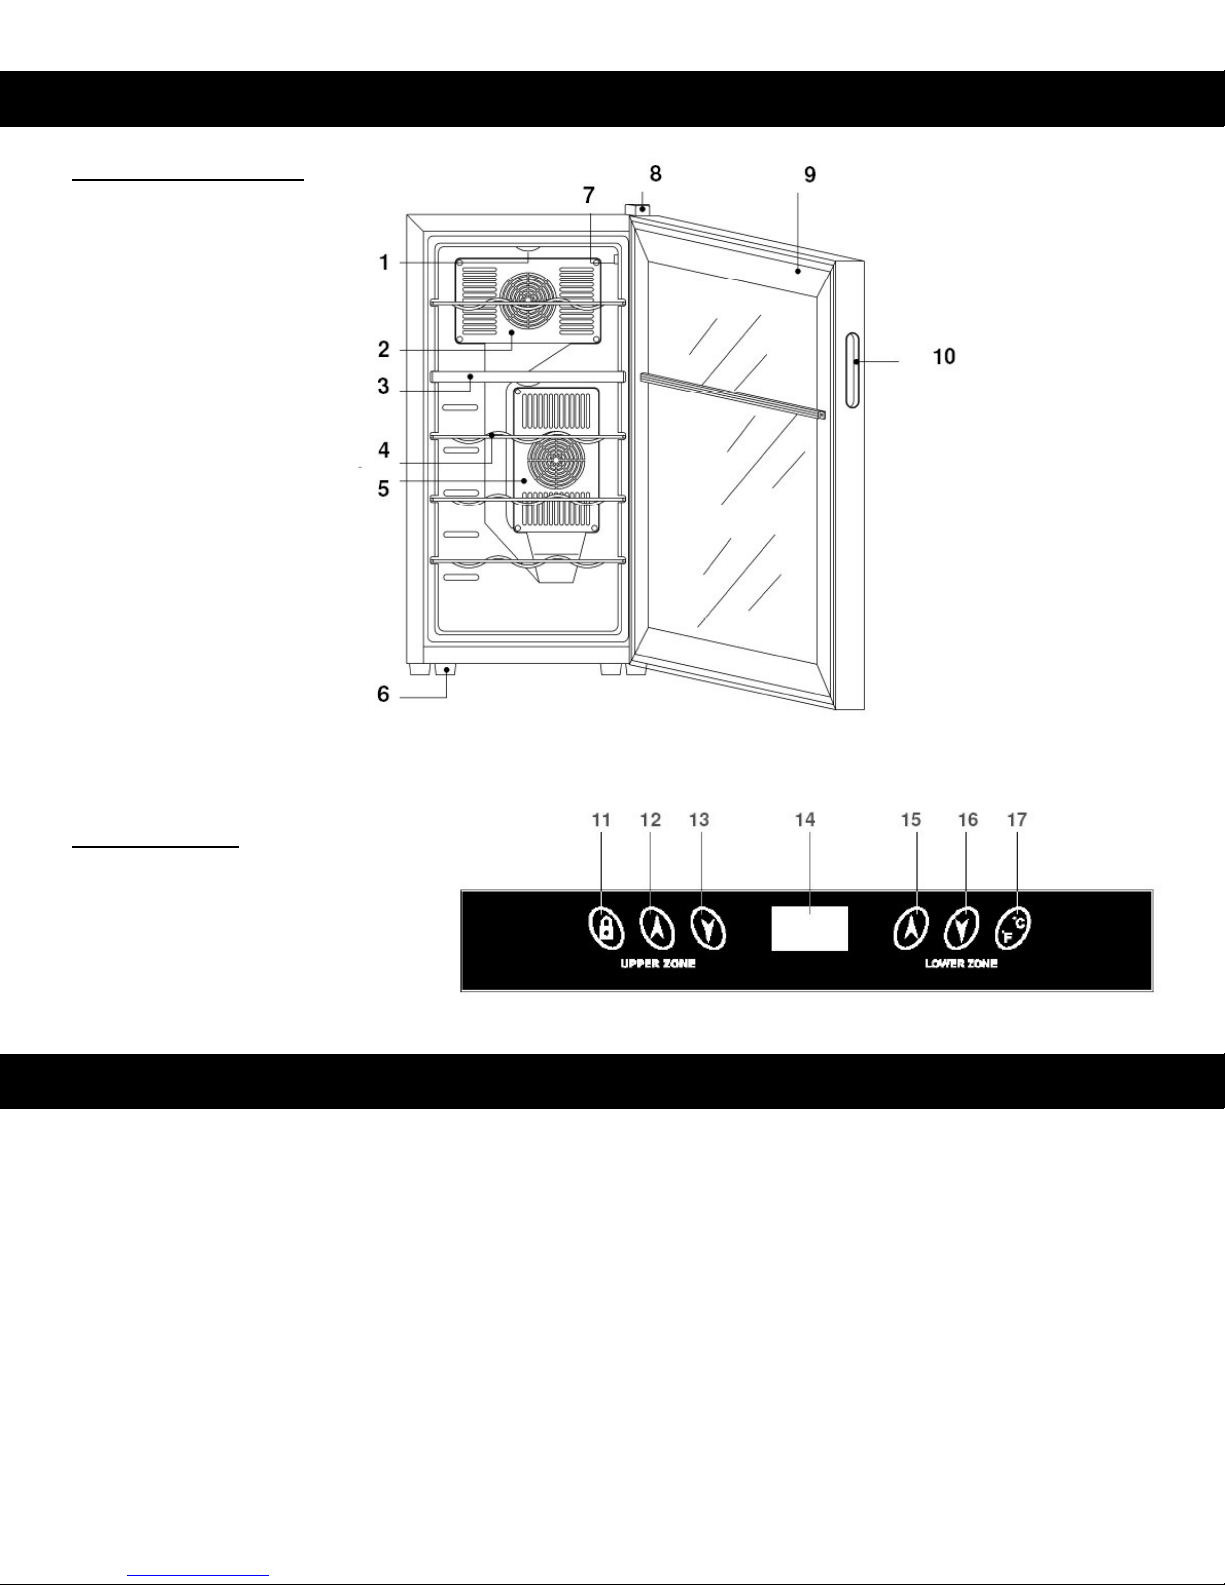
Parts of the Wine Cooler
1. Interior light
2. Upper fan cover
3. Separator
4. Shelf
5. Lower fan cover
6. Leveling feet
7. Light switch
8. Hinge cover
9. Door
10. Recessed handle
The control panel
11. Control Panel Lock
12. Temperature increase, upper zone
13. Temperature decrease, upper zone
14. LCD display screen
15. Temperature increase, lower zone
16. Temperature decrease, lower zone
17. C/F display switch
Before installing, remove exterior and interior packing and wipe outside thoroughly with a soft dry cloth and the inside with
a damp cloth.
LOCATION OF THE WINE COOLER
1. Position wine cooler on a strong, level floor.
2. Allow 5 inches (12.7cm) of space between the back of the wine cooler and any adjacent wall and at least 0.8 inches
(2 cm) of space at each side to allow air to circulate freely around the cabinet.
3. Avoid direct sunlight and heat. Heat sources will cause higher electricity consumption.
4. Adjust legs as needed to ensure appliance is completely level.
PARTS OF THE WINE COOLER
INSTALLATION INSTRUCTIONS
This appliance must be grounded. In the event of an electrical short circuit, grounding reduces the risk of electrical shock
by providing an escape wire for the electrical current. This appliance is equipped with a cord having a grounding wire with
a grounding plug. The plug must be plugged into an outlet that is properly installed and grounded. Be sure to plug into a
120V AC, 60Hz outlet.
ADJUSTING TEMPERATURE:
This is a dual temperature zone wine cooler with two sets of controls- one on either side of the LCD display to enable
temperature adjustment of individual zones. The control panel and LCD display is on the front of the door. To change the
temperature display in ˚C or ˚F, press the ˚C/˚F switch.
Left Panel, Upper zone (7˚C-12˚C or 44.6˚F-53.6˚F):
• TEMP increases temperature of upper zone. TEMP decreases temperature of upper zone.
• Once the desired temperature is displayed, press the LOCK button to set it and a “click” will sound.
Right Panel, Lower zone (12˚C-18˚C or 53.6˚F-64.4˚F):
• TEMP increases temperature of lower zone. TEMP decreases temperature of lower zone.
• Once the desired temperature is displayed, press the LOCK button to set it and a “click” will sound.
AUTO CYCLING:
Once the interior temperature is cooled to the set temperature, the wine cooler will automatically continue to maintain this
temperature to minimize electrical consumption. NOTE: The wine cooler temperature will vary depending on the quantity
of bottles stored and on the frequency of which it is opened.
INTERIOR LIGHT:
To turn ON/OFF the interior light, simply press the light switch located inside the upper compartment.
CORRECT USE OF THE WINE COOLER:
• Bottles being stored should be tightly sealed to prevent leaks.
• Store only the recommended number of bottles to avoid overload (this wine cooler has an 18 bottle capacity or 52L).
• Do not open the door unless necessary and minimize length of time it is opened.
• Do not use shelf covering material. Doing so will cause uneven cooling.
RECOMMENDED CHILLING TEMPERATURES OF YOUR WINE:
Below are general chilling temperature ranges for various wine types. They can be adjusted according to personal
preference as well.
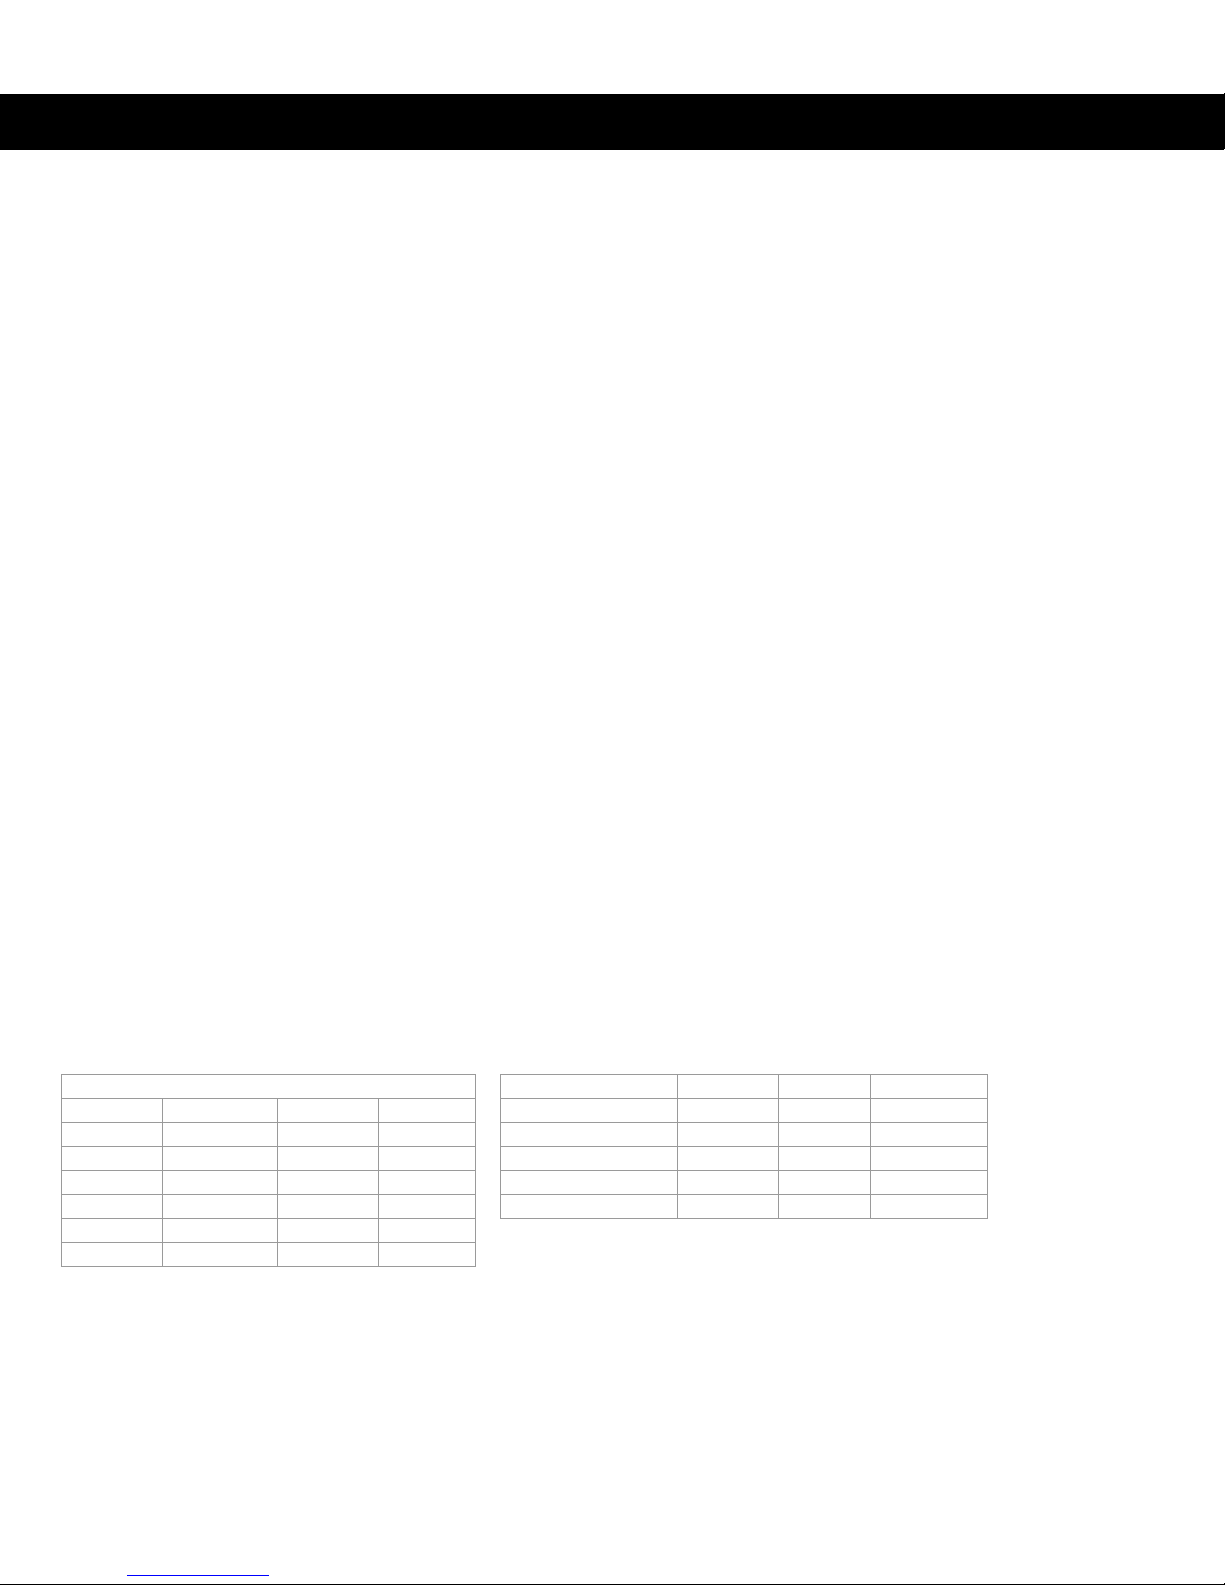
TEMPERATURE CONVERSION TABLE
˚C ˚F ˚C ˚F
7 44.6 13 55.4
8 46.4 14 57.2
9 48.2 15 59.0
10 50.0 16 60.8
11 51.8 17 62.
12 53.6 18 64.4
OPERATING INSTRUCTIONS
Type of Wine Zone ˚C ˚F
Dry Wines Upper 9-14 48.2-57.2
Rosé Wines Upper 10 50
Sparkling Wines Upper 9 48.2
White Wines Upper 7-12 44.6- 53.6
Red Wines Lower 12-18 53.6-64.4
 Loading...