

Page 1
o
o
o
o
a
a
r
h
n
u
a
a
m
h
t
SO7 PC
B
m
t
y
o
c
M
C
w
d
d
A USER
ANUAL
◆Do n
◆Do n
◆Do n
◆Do n
◆Use s
1. H
t use the bo
t put it in fi
t damage t
t try to cha
afe power s
ardw
rd in extre
e or water.
e componen
ge/modify t
pply only.
re In
Safety
e environ
s when carr
e circuits/c
rodu
Alerts and
ents, when
ying or mov
mponents.
tion
autions
et, or when
ing the boar
extremely
.
usty.
Page 2

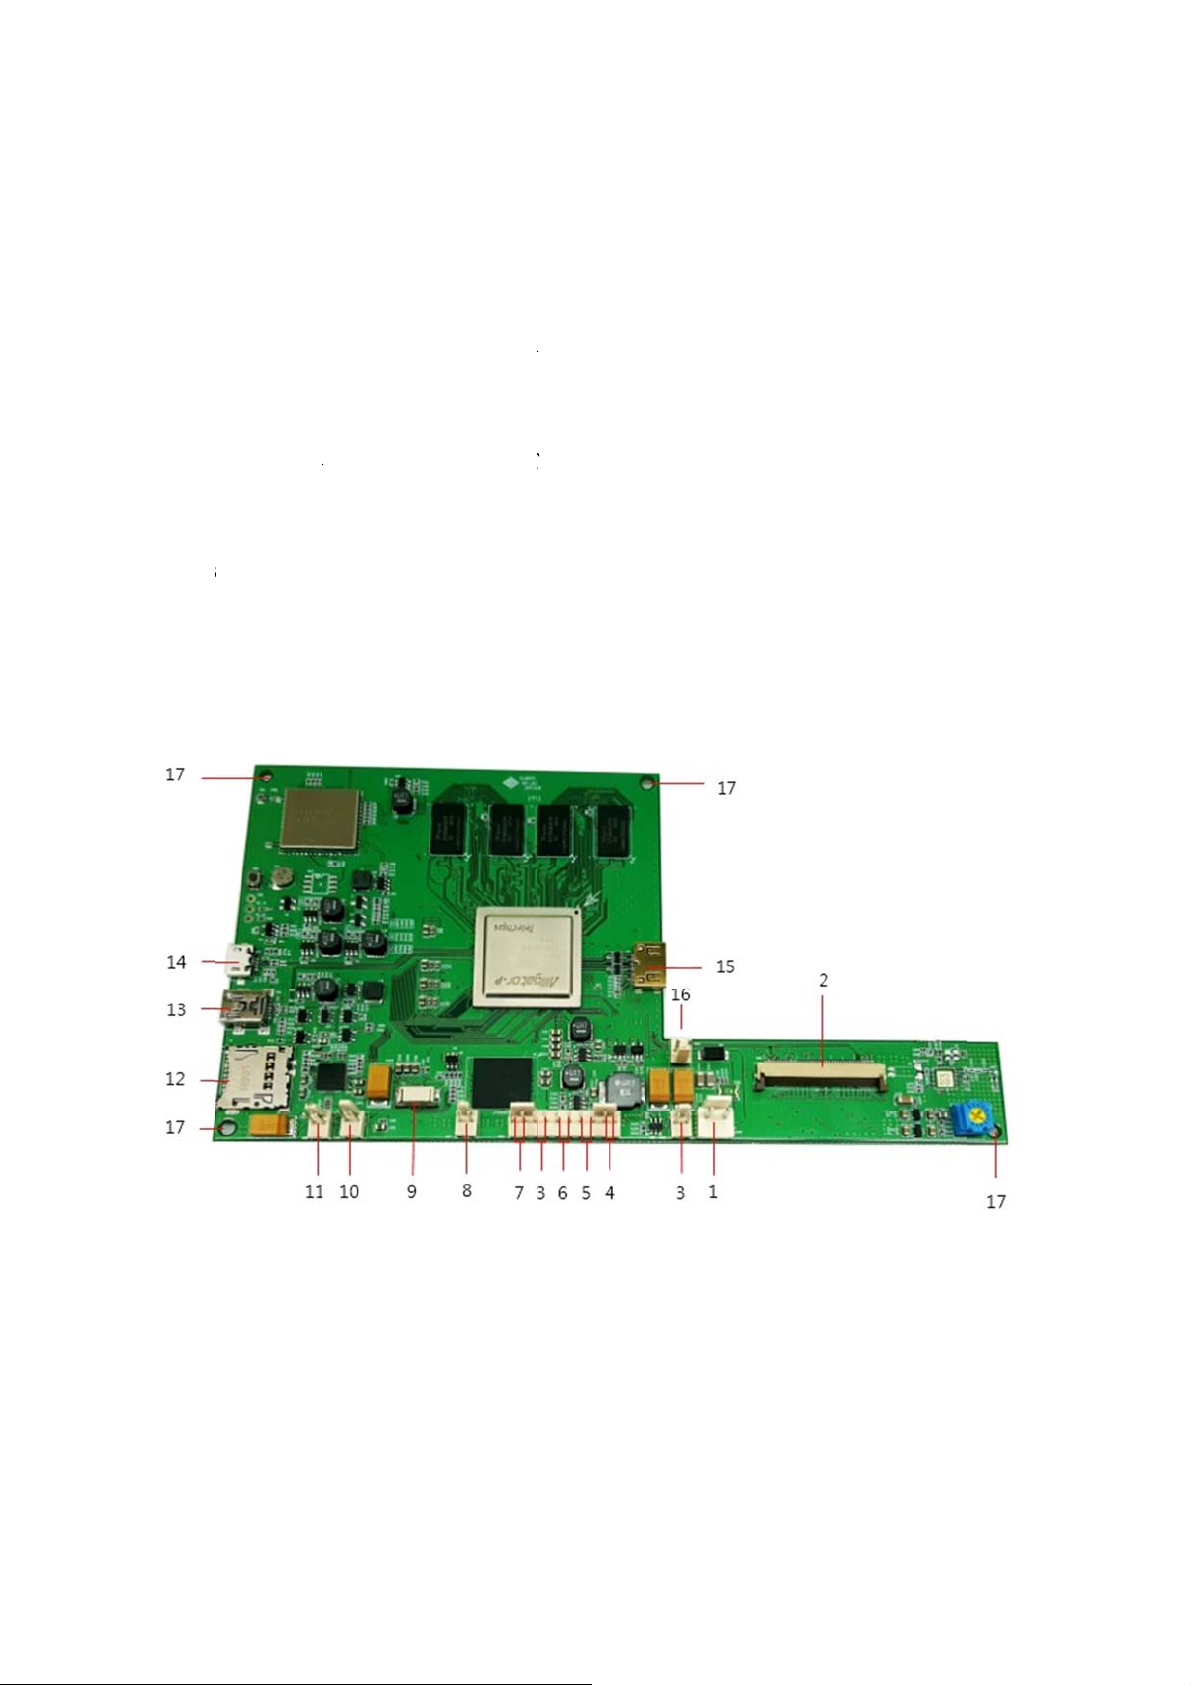
1) DC-IN connector(2-pin)
2) LCD connector(50-pin)
3) Reset connector(2-pin)
4) ESC connector(2-pin)
5) HOME connector(2-pin)
6) MENU connector(2-pin)
7) Power on/off connector(2-pin)
8) Microphone connector
9) Touch Panel connector(7-pin)
10) Speaker connector left(2-pin)
11) Speaker connector right(2-pin)
12) microSD card slot
13) USB Host port(miniAB type)
14) micro USB port
15) HDMI(mini) port
16) Power (Battery) connector
17) Mounting holes
This board works with a 7inch LCD with a 50-pin connector, and a 7inch touch panel with 7-pin
connector. The power supply should be 12V/2A. Please pay attention to the polarities printed on the
board. You could integrate the board to your device under manufacturer’s instructions.
Page 3
o
a
g
b
a
b
o Re
p
s
e
r
d
k
c
y
D
m
r
n
e
p
e
k
n
t
t
s
i
r
o
s
u
n
t
l
h
r
y
t
n
i
n
e
n
c
c
n
t
c
e
e
r
n
t
p
e
h
u
d
u
2. S
This bo
1) Navi
ftwa
rd runs An
ation Keys
e op
roid 6.0.1 o
ratio
erating sys
guid
em.
On the
B
een on
H
remove
A
the app
the curr
ottom midd
ck: The bac
the home s
me: Bring
cent apps:
the app fro
ps: On the
which are i
Sy
nt time and
le of the scr
button bri
reen, the bu
ou back to
isplays a li
the list, sw
ight middle
stalled in y
stem icon:
Wi-Fi or Bl
en, you wil
gs you to t
ton will not
he home sc
t of recentl
pe from lef
of the scree
ur device.
ystem icon
etooth con
find three
e previous s
take you ba
een
used apps.
or right
, you will s
s placed on
ection.
avigation so
reen you w
k any furth
To open a p
ee Apps ico
he right-to
ft keys.
re on. Onc
evious app,
. After you
corner of t
you have
touch it. To
touch it, Yo
e screen. It
can
isplays
Page 4
a
o
o
o
Notific
bottom.
tion bar: T
see your notifications, sswipe your finger down
rom the top
Notificati
of the scree
n bar
n to
Quick c
nnection ba
Page 5

Quick
c
u
c
n
c
u
o
o
&
c
T
e
o
c
v
-
a
n
p
h
h
s
h
b
t
m
e
u
u
c
o
u
w
g
b
w
i
p
i
c
s
u
n
r
m
r
o
n
f
H
n
i
c
s
.
t
h
n
.
c
e
m
n
t
s
e
o
h
f
a
t
t
i
c
c
e
c
a
o
m
B
d
s
m
u
o
m
o
s
a
u
n
w
o
y
quickly.
onnection
After open
ar: It helps
he notificat
to control d
on bar, Tou
splay brigh
h the time
ness, Wi-fi
tate.
onnection,
luetooth c
nnection
2) Touc
Use yo
touch s
You ca
To sele
terms, j
A keyb
Other c
Touch
action o
Drag:
the scre
Swipe
first tou
right to
h & Type
r fingers to
reen.
also chang
t or activate
st touch wh
ard pops up
mmon gest
hold: To
ccurs
ouch &hold
n until you
r slide: Qui
h (so you d
iew the oth
anipulate i
the screen'
something,
ere you wan
that lets yo
res include:
ch &hold a
an item for
reach the ta
kly move y
n't drag so
er Home sc
ons, button
orientation
ouch it. To
to type.
type into t
item on the
a moment a
get position
ur finger a
ething inst
eens.
, menus, th
type someth
e field.
screen by t
d then, wit
ross the sur
ad). For ex
onscreen k
ing, such as
uching it an
out lifting y
ace of the s
mple, you c
yboard, an
a name, pas
not lifting
ur finger,
reen, witho
n slide a H
other item
word, or se
your finger
ove your fi
t pausing
me screen l
on the
rch
ntil an
ger on
hen you
ft or
Double
a webp
3) Cha
Wallpa
place of
1. Touc
2. Touc
3. Choo
4. Touc
tap: Tap q
ge in Brows
ge default
ers are ima
the default
&hold any
wallpaper
e a wallpap
a ‘Set wall
ickly twice
er to zoom i
allpaper
es from Gal
ackground
here on a
con
er source.
aper’ butto
n a webpag
, and doubl
ery, images
or your Ho
ome scree
.
e, map, or o
e-tap again
included w
e screens.
that's not o
her screen t
o zoom out.
th the syste
cupied. A li
zoom. For
, and live i
st of options
example, d
ages. The
appears.
uble tap
take the
Page 6
My ph
o
a
a
a
C
t
a
d
k
n
a
o
m
f
n
tos: Choose
a picture th
t you've ta
en with Ca
era or dow
loaded to your device.
(‘Set wallp
per’ button
is placed o
the top left
of screen)
Live W
(‘Set w
llpapers:
llpaper’ but
hoose from
on is place
list of anim
on the bott
ted wallpap
middle o
ers.
screen)
Page 7
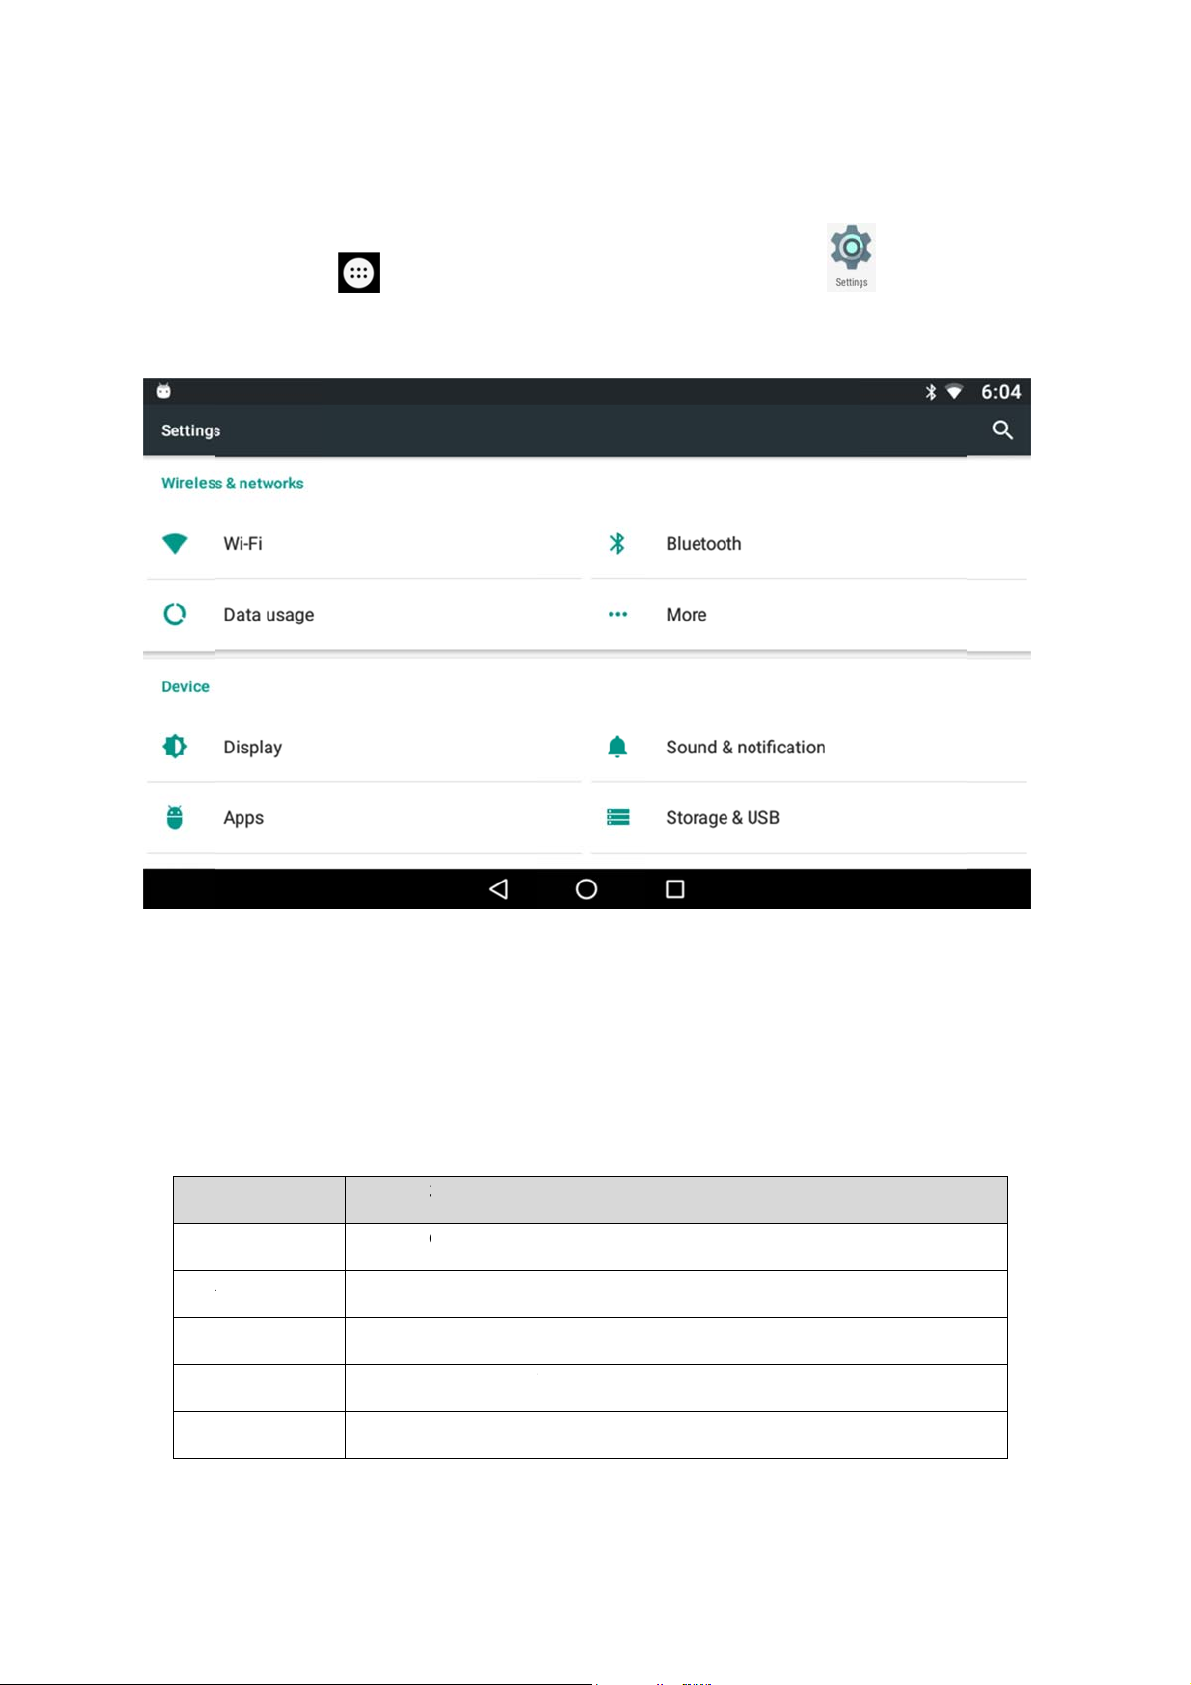
4) Setti
n
h
l
e
f
e
n
-BluDat
-
N
n
o
u
a
w
H
n
t
t
o
B
e
n
p
y
c
n
y
u
x
f
e
o
P
n
’
W
w
)
d
gs
Touch t
you wil
e Apps ico
see the foll
on
wing scree
ome screen
where you
and then to
could setup
ch the setti
your device
gs icon
s settings.
In the S
sound o
[1] Wir
Me
Wi
Wi
VP
ttings men
the device
less & net
u
Fi
etooth
a usage
Fi Direct
, you can se
nd manage
orks
Descrip
Enable t
Enable
Monitor
Direct d
Set up a
up many o
the apps in
ion
see the ac
luetooth co
your device
vice-to-dev
d manage
tions. For e
our device.
essible Wi-
nections.
’s data usag
ice connecti
our Virtual
ample, turn
i list and to
.
ns using
rivate Net
on/off Wi-F
elect Wi-fi.
i-Fi
orks(VPNs
i network, a
just the
Page 8
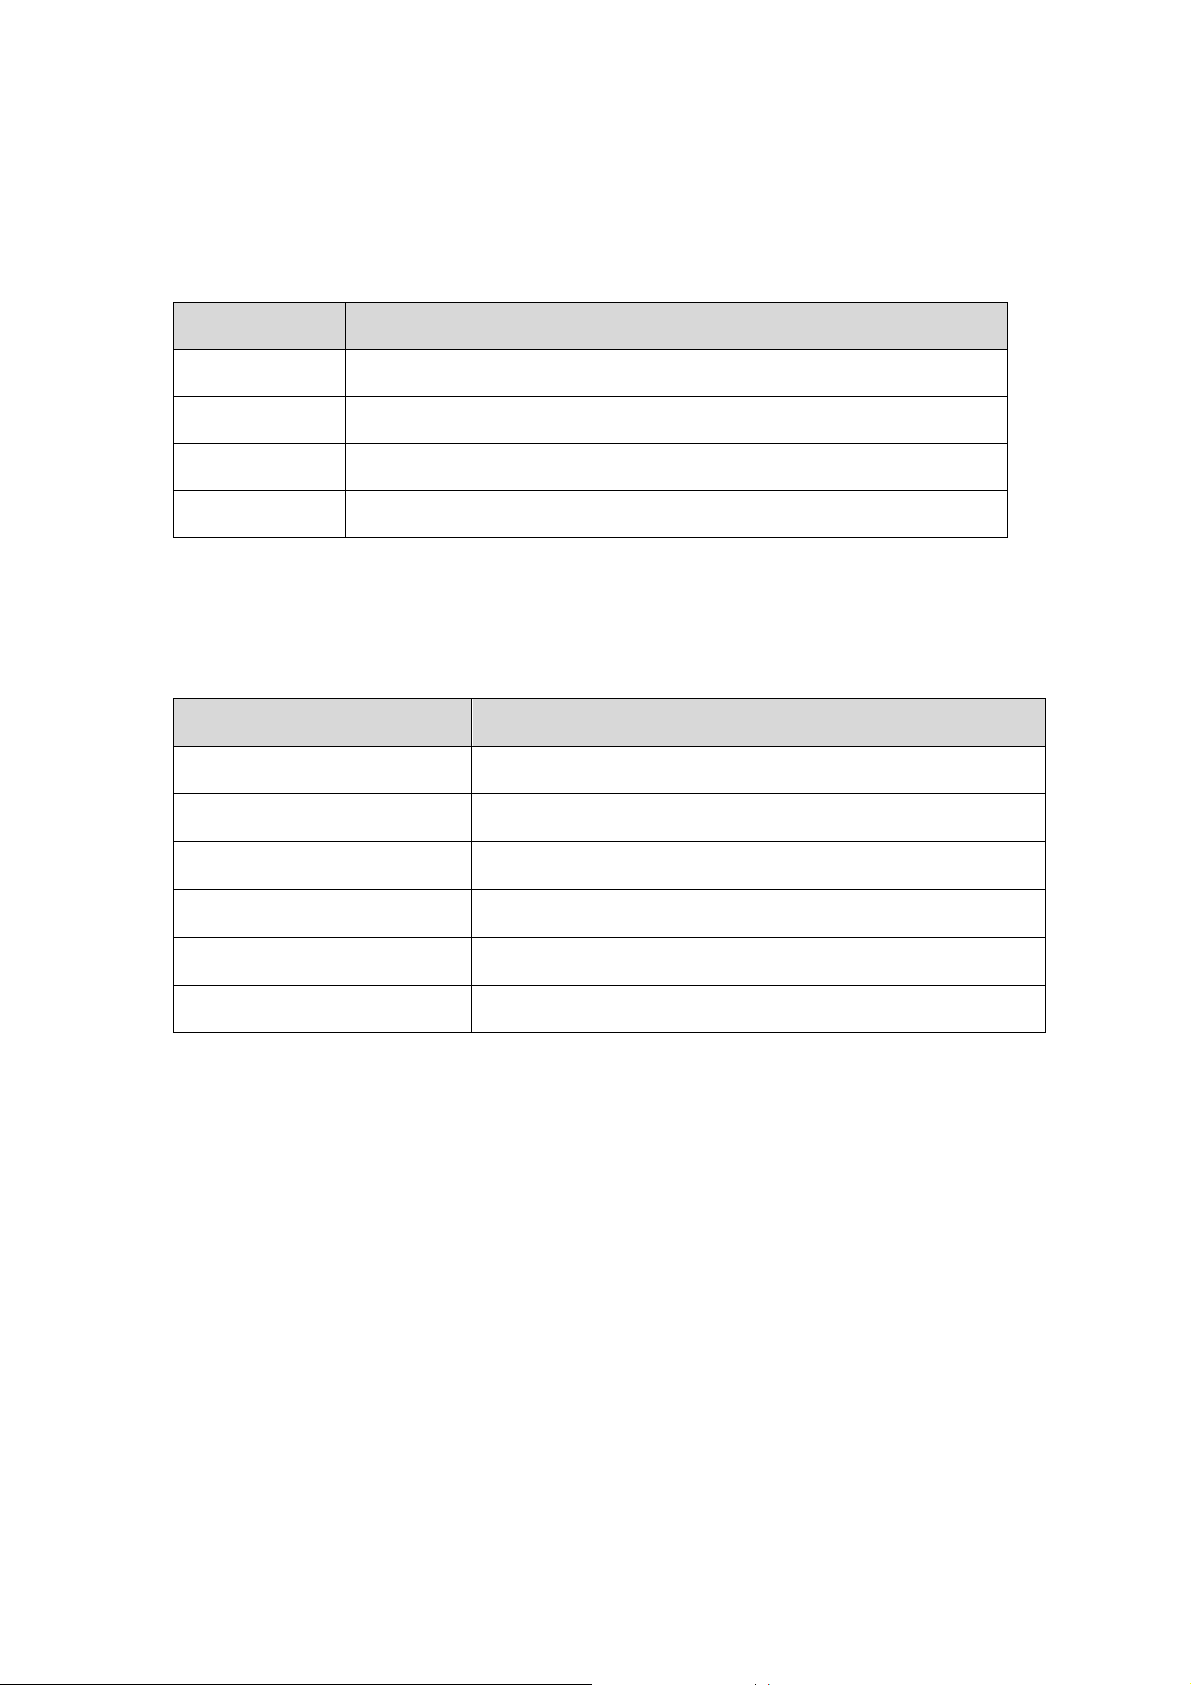
[2] Device
Display: Adjust the screen brightness and font size to suit your preference. And you can set up
sleep mode and daydream mode.
Menu Description
Brightness level Set the display brightness.
Sleep Choose options for when the device is on inactivity state.
Daydream Control what happens when the phone is on inactivity state.
Font size Choose the default font.
Sound & notification: You can turn off sounds or select the sounds about several notification and
function. Also, you can adjust Media, Alarm, Notification volume for device.
Menu Description
Media volume Adjust the Media volume
Alarm volume Adjust the Alarm volume
Notification volume Adjust the Notification volume
Do not disturb Enable to make some rules for free from notification
Default notification ringtone Set the default notification sounds for apps
Other sounds Set the options about turn on/off sounds of some functions
Apps: This menu displays all app list that be installed. (It includes all preloaded apps and apps
that you downloaded)
Storage & USB: View the device memory and USB memory usage. Also you can check the
contents that are stored in device or USB memory
Page 9

[3] Personal
Security: The security settings let you set unlocking your phone, customize lock screen options,
encryption options, password, administration, and credential storage options.
Menu Description
Screen lock Set your screen lock type.
Lock screen message Set message on lock screen
Encrypt tablet Set encrypt your tablet for security
Make passwords visible Set passwords visible option
Device administrators Allow or deny access to device by device administrators.
Unknown Sources
Storage type Select a storage location for credential contents.
Trusted credentials Set to enable/disable credentials
Install from SD card
Trust agents Set your preferred system and user credentials.
Screen pinning Set locks or pins the screen to a particular app.
Application with usage access Set authorization of apps to access
Accounts : The Accounts settings menu lets you add your Google Account.
You will need a Google Account to access several device apps such as Google, Play Store, and
apps that related with google that you will download. Before you are able to access Google
applications, you must enter your account information. These applications sync between your
device and your online Google Account.
Allow or deny installation of apps from sources other than the
Google Play store app.
View folders and files located on the optional SD card (not
included). This option only appears if an optional SD card is
installed.
Google: You can set your google service options.
Language & input: Language and input settings let you select a language for the menus and
keyboards and configure keyboard settings, speech input settings, and pointer speed options.
Page 10

Apps: If you touch it, you will see all the installed apps list on the window, and you can tap
anyone of them to uninstall it or clean data for that app.
Language &input: touch it you can change your device's language and input method.
Backup &reset: This menu lets you back up your device’s data and settings to Google servers.
And it also has Factory data reset function. Once implement reset function, all data will be erased
from the device’s application storage, including:
-Your Google account
-All other email and social networking accounts
-System and application data and settings
-Downloaded applications
Before Reset, back-up is recommended
[4] System
Date & time: Use the Date and Time settings menu either to automatically use the network-
provided date and time or manually set these values, as well as select time and date format
options.
Accessibility: The Accessibility menu lets you enable and manage accessibility-related
applications.
Developer options: Hidden in the settings on your phone, (really, they are hidden by default) are
settings used for debugging and application development
About device: The About device menu lets you access important device information, search for
and apply updates, and view legal and safety information.
Page 11

3.
M
s
n
n
m
(
s
z
F
i
v
o
nBludevmak
t
econ
batt
n
F
F
r
W
u
n
'
c
u
A
n
F
W
s
f
t
o
e
h
d
n
n
y
n
o
n
i
i
h
r
p
o
W
a
w
t
o
o
t
s
e
w
b
m
u
t
h
r
o
o
n
e
r
g
l
y
r
n
c
d
m
s
c
o
a
n
y
a
b
a
d
o
n
l
o
e
o
a
c
p
e
-
s
r
f
r
u
u
o
r
h
c
n
H
t
u
w
l
w
t
k
m
m
c
e
u
t
a
r
h
y
d
e
w
.
f
t
s
c
e
o
q
ajor
unct
on I
trodu
ction
nd
ow to
use
tho
[1]Con
Co
To use
Fidelity
require
authori
off Wi-
Turn W
your de
H
1.
e.
ect to netw
nect to Wi-
any apps o
Wi-Fi) or
teps of sec
ed users ca
i when you
-Fi on and
ice, Wi-Fi i
w to set yo
Touch All
orks & dev
i networks
functions t
ireless inte
rity to set u
connect. T
re not using
onnect to a
s turned on
r wi-fi net
pps button
ces
at are relat
net. Some a
, such as di
extend the
it.
i-Fi netwo
utomaticall
ork
on sc
d with(to) i
e open and
ital certific
ife of your
rk If you're
.
een.
ternet, you
ou can sim
tes or other
attery betw
dding a Wi
onnect to a
ly connect
ways to ens
en charges,
Fi network
wireless Wi
o them. Ot
re that onl
Recommen
hen first s
eless
ers
to turn
tting up
Touch Setti
2.
Touch Wi-
3.
Slide the
4.
and display
the device
Touch a ne
5.
prompted t
details.)
Co
nect to Blu
etooth is a s
ices over a
ing calls or
lap
ops. To con
tim
you use a
nect securel
ery betwee
tur
Bluetooth
gs
i.
i-Fi switch
the names
inds a netw
work name
enter a pas
tooth devic
ort-range
istance of a
listening to
ect to a Bl
ew Bluetoo
to each ot
charges, tu
ff in some l
o the ‘On’ p
rk that you
o see more
word or oth
s
ireless com
etooth devi
er. After th
n off Blueto
f those it fi
out 8 meter
usic, hand
h device, y
cations.
osition. The
ds. Secure
onnected t
etails or co
er credentia
unications
s. The most
-free kits f
e, you must
u must pair
t, they conn
oth when y
device scan
networks a
previously,
nect to it. I
s. (Ask you
technology
common Bl
r cars, and
turn on you
it with, so t
ct automati
u're not usi
for availab
e indicated
it connects
the networ
network ad
sed to com
etooth devi
ther portabl
device's Bl
at both devi
ally. To ex
g it. You m
e Wi-Fi net
ith a Lock
o it directly
is secured,
inistrator
unicate be
es are head
devices, in
etooth. Th
ces know h
end the life
y also be re
orks
icon. If
you're
or
ween
ets for
luding
first
w to
f your
uired to
Sys
tem icons i
dicate Bluet
oth status.
Page 12

T
T
T
S
uwhe
m
n
y
odev
m
Y
o
c
t
b
g
o
e
a
s
e
e
o
a
d
e
e
a
o
h
B
B
o
o
o
c
t
o
y
o
n
a
m
e
n
’
h
c
n
v
i
l
s
g
u
p
e
v
m
c
c
e
e
z
n
l
e
u
r
How to se
ouch Apps
1.
2.
ouch Settin
your Bluet
utton
oth turn o
on screen.
s
/off
3.
ouch Bluet
4.
lide the Blu
oth.
tooth switc
on or off.
How to ch
Yo
r device ha
n you conn
nge your
a generic
ct them. Y
luetooth n
luetooth na
u can chang
me
e by defau
e the name
t, which is
o that it is
isible to oth
ore recogni
r Bluetooth
able.
device
1. I
2. I
this
3 T
device’
plement st
the Blueto
pe a new n
ps to turn
th screen, t
me and tou
n Bluetooth
uch the ico
h ‘Rename
and stay on
on ri
.
Bluetooth s
ht top on sc
reen.
een and the
n choose ‘R
name
Pair your
u must pair
Y
ice with a d
1. I
plement st
2.
our device
3.T
uch the ID
to
omplete the
evice with
your device
vice, they s
ps to turn
utomaticall
of the Bluet
pairing
a Bluetoot
with a devi
ay paired u
n Bluetooth
scans all a
oth device
device
e before yo
less you un
ailable Blu
n the list to
can conne
air them.
tooth devic
air with it.
t to it. Once
s in range.
nd then fo
you pair yo
low the inst
r
uctions
Page 13

6) Manage Apps
To see all your apps, touch the Apps icon on Home screen.
The main Apps screen opens. This is where you can see all your apps, including those downloaded
from Android Market. You can move app icons to any of your Home screens.
From All Apps, you can
Move between screens: Swipe left or right.
Launch an app: Touch its icon.
Place an app icon on a Home screen: Touch &hold the app icon, slide your finger, and lift your
finger to drop the icon in place.
Get more apps: Enter app ‘Play Store’
To remove an app icon from the Home screen, touch and hold it, slide your finger toward the left side
of the screen, and drop the app over the Remove icon.
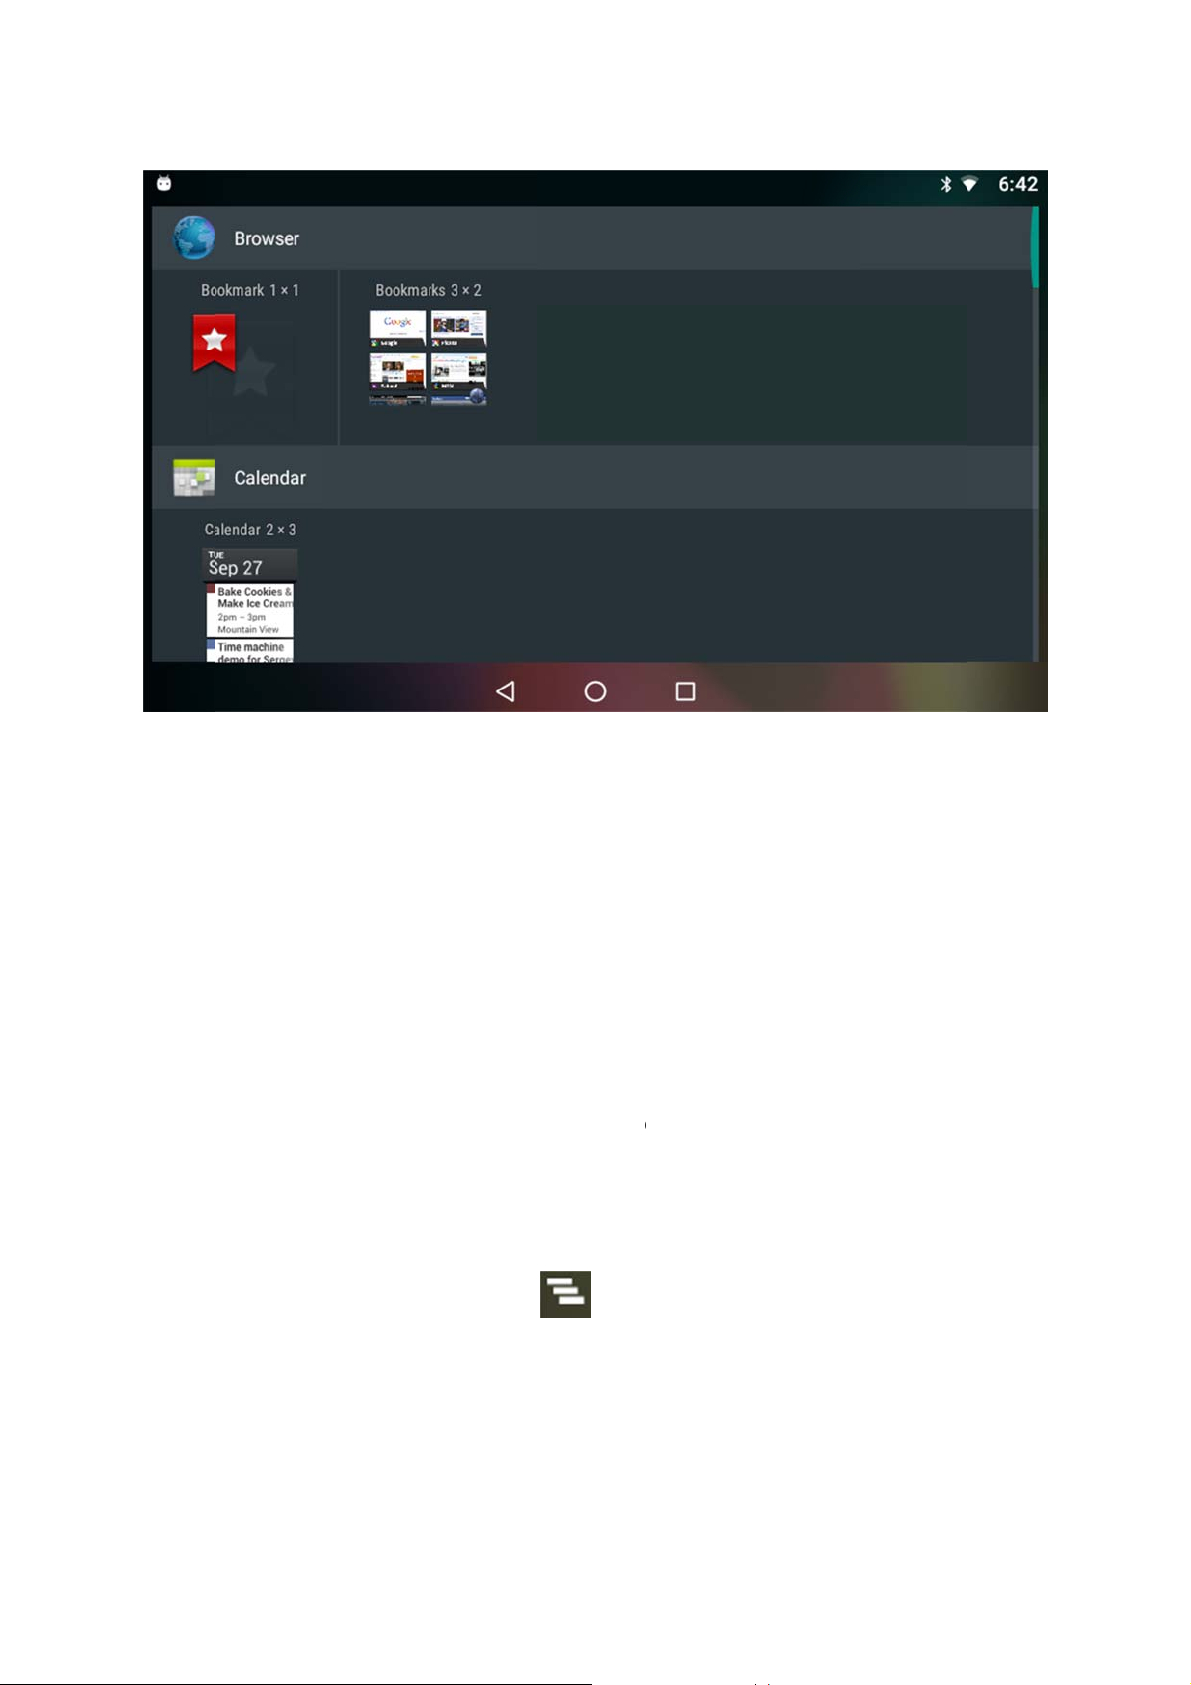
7) Add widgets
Widgets are convenient function. It likes windows into your apps. To add widgets on home screen,
You need to follow some steps below.
How to add widgets on home screen:
1. Touch &hold anywhere on a Home screen that's not occupied. A list of options appears.
2. Touch Widgets at the bottom of the screen.
3. Choose a widget you want. By swiping your finger down and up, you can see all kinds of widgets.
4. Touch and hold the widget's icon, slide your finger where you want to place it, and lift your finger.
Page 14
a
a
W
i
d
s
s
o
a
r
t
e
S
o
t
f
f
g
y
c
t
h
n
c
o
s
e
e
f
s
h
t
n
r
8) Man
Notific
events.
Depend
See you
Respon
Dismis
Dismis
9) Prel
Apkinst
Browse
ge notifica
tions report
hen you r
ng on your
r notificati
to a notifi
a notificati
all notifica
aded app li
ller
ions
the arrival o
ceive a noti
ound settin
ns: Swipe
cation: Tou
on: Swipe i
ions: Touc
st
applicatio
ication, its i
s, you may
our finger d
h it.
sideways.
the button
notice, cale
con appears
also hear a
wn from th
in th
ndar events,
in the top le
ound.
top of the
bottom rig
and alarms,
t corner of
creen.
t corner on
as well as o
he screen.
notification
going
ba
Page 15

Calcula
t
a
o
r
R
e
n
B
r
e
s
i
r
e
i
e
i
s
o
e
l
a
e
i
e
or
Calend
Clock
Dev To
Downlo
Gallery
Google
Music
Play sto
Search
Settings
Sound
ls
ads
e
ecorder
Video P
Voice S
WFDSi
10) US
Transfe
1.Conn
2. ‘USB
laye
earch
k
Connectio
files betwe
ct your dev
for file tran
n
n your devi
ce and PC v
sfer’ appear
ce and pc
a USB cabl
automatica
lly on Notif
cation bar.
3.Click
4. Choo
4. If not
‘USB for fil
e and click
ification bar
transfer’.
your USB c
disappeard,
nnection w
now your d
y.
vice has be
n connected to your pc successfully.
Page 16
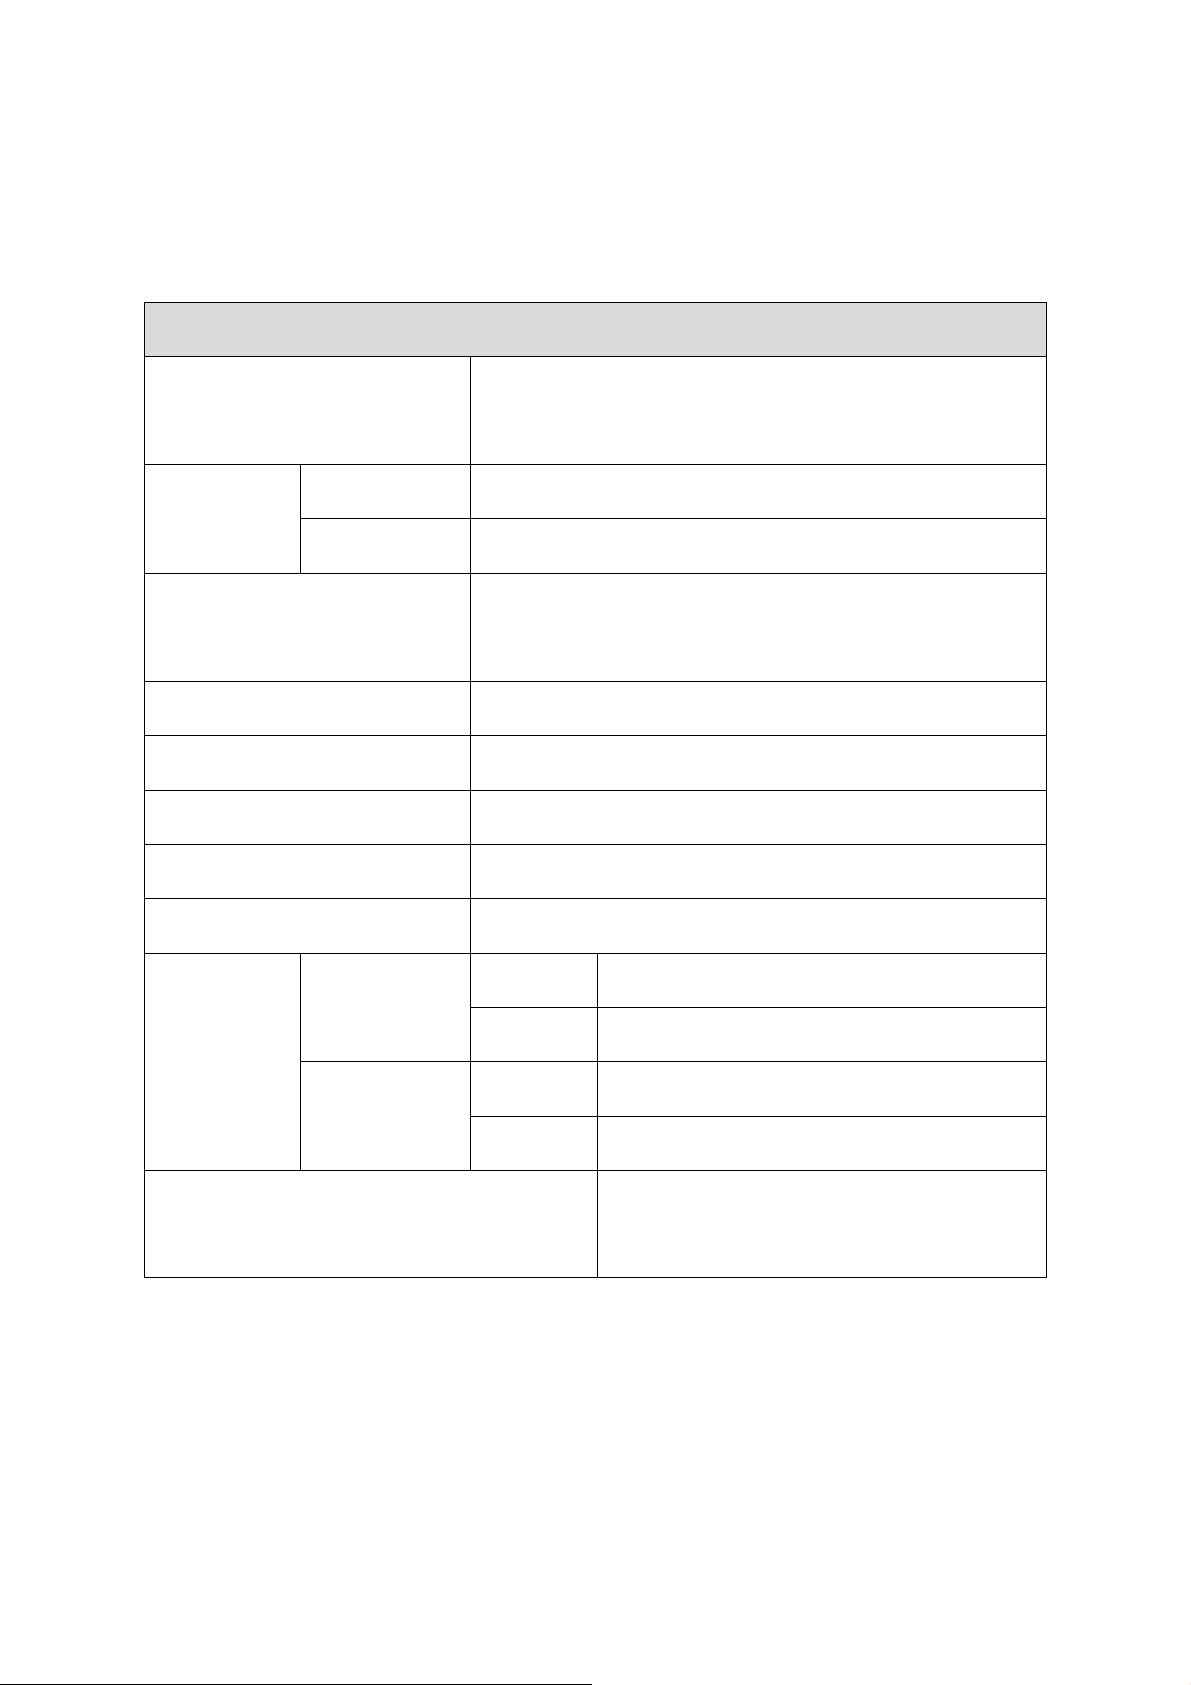
3. Specification
Hardwa
HARDWARE
Telechips TCC3830
CPU
Cortex-A53 Quad / 1GHz + Cortex A7 Single / 1GHz
Storage Samsung eMMC 32GB
Memory
RAM Hynix DDR3 2GB(512M x 4)
Wi-Fi(IEEE 802.11ac)
Wifi & Bluetooth Combo
Bluetooth 4.1
Audio Decode MP3, AAC
Video Decode
Photo
Buttons
Power 12V/2A
Temperature
Environment
Conditions
Physical
Humidity
Humidity
MPEG1,2 , H.263, H.264, MPEG1/2, MPEG4-ASP, VC-1,
MVC, MJPEG/JPEG, VP8, HEVC, VP8, HEVC, VP9
JPG, PNG
Support external button
( HOME , MENU, RST, BACK , etc)
Operation
Storage
Operation 4%~90%RH
Storage 40%RH
-10 ~ +70℃
-10 ~ +60℃
Demension :
Weight : 80g
Page 17

Information to Users
According to the FCC Part 15.19, 15.21, 15.109 and 15.212 rules, for this EUT, the instructions or
operation manual furnished the user shall include the following or similar statement, placed in a
prominent location in the text of the manual:
This device complies with the following radio frequency and safety standards.
Important to OEM Manufacturer: This following FCC Warning must be included in the HOST
User Manual.
FCC Warning This device complies with Part 15 of the FCC Rules. Operation is subject to the
following two conditions: (1) this device may not cause harmful interference, and (2) this device must
accept any interference received, including interference that may cause undesired operation.
NOTE 1: This equipment has been tested and found to comply with the limits for a Class B digital
device, pursuant to part 15 of the FCC Rules. These limits are designed to provide reasonable
protection against harmful interference in a residential installation. This equipment generates, uses
and can radiate radio frequency energy and, if not installed and used in accordance with the
instructions, may cause harmful interference to radio communications. However, there is no guarantee
that interference will not occur in a particular installation. If this equipment does cause harmful
interference to radio or television reception, which can be determined by turning the equipment off
and on, the user is encouraged to try to correct the interference by one or more of the following
measures: - Reorient or relocate the receiving antenna. - Increase the separation between the
equipment and receiver. -Connect the equipment into an outlet on a circuit different from that to
which the receiver is
connected. -Consult the dealer or an experienced radio/TV technician for help.
NOTE 2: Any changes or modifications to this unit not expressly approved by the party responsible
for compliance could void the user's authority to operate the equipment.
FCC Radiation Exposure Statement:
This equipment complies with FCC radiation exposure limits set forth for an uncontrolled
environment. End users must follow the specific operating instructions for satisfying RF exposure
compliance.
Note 1: This device is only authorized for use in a mobile application. At least 20 cm of separation
distance between the transmitting antenna device and the user's body must be maintained at all times.
Note 2: Any modifications made to the module will void the Grant of Certification, this module is
limited to OEM installation only and must not be sold to end-users, end-user has no manual
instructions to remove or install the device, only software or operating procedure shall be placed in
the end-user operating manual of final products.
Note 3: The device must not transmit simultaneously with any other antenna or transmitter.
Note 4: To ensure compliance with all non-transmitter functions the host manufacturer is responsible
for ensuring compliance with the module(s) installed and fully operational. For example, if a host was
Page 18

previously authorized as an unintentional radiator under the Declaration of Conformity procedure
without a transmitter certified module and a module is added, the host manufacturer is responsible for
ensuring that the after the module is installed and operational the host continues to be compliant with
the Part 15B unintentional radiator requirements.
Note 5: FCC ID label on the final system must be labeled with “Contains FCC ID: 2ALVHSO7” or
“Contains transmitter module FCC ID: 2ALVHSO7”.
The transmitter module must be installed and used in strict accordance with the manufacturer's
instructions as described in the user documentation that comes with the host product.
 Loading...