

claber Oasis 8053 User Manual

Oasis
Oasis
Page 1
Position. Oasis® must be installed in closed environments, protected from atmospheric agents and poor weather conditions. To
prevent the water in the internal tank from overheating, position Oasis® in a shaded and cool area, away from windows or glass partitions and in any case, away from direct sunlight.
Once the installation position has been selected, lift Oasis® holding it at the bottom with both hands and place it on a unit or a shelf,
at a height of approximately 70-80 cm from the ground: the unit or the shelf must be stable, level and be able to support the weight
of Oasis® when full of water (approximately 30 kg). Also, make sure that Oasis® is at least 50 cm from the edge of the tallest pot.
Position. Position the plant pots on the oor near the unit where Oasis® is positioned.
Remember to place a pot saucer below the plants to collect any excess water.
Plant the plastic stakes provided in the soil: each stake will correspond to a dripper (the maximum number of
drippers which can be used with Oasis® is 20). Useful suggestions: place the stakes close to the stems of the
plants; use one or more stakes per pot, depending on the pot size and individual plants' water requirements.
For Oasis (cod.): 8053
For Oasis (cod.): 8053
60
120
ml
30
40
20 DAYS
10 DAYS
OFF
40 DAYS
30 DAYS
70 - 80 cm (MIN)
50 cm (MIN)
User manual
User manual
1
1
2
2
1
1
2
2
60
120
ml
30
40
20 DAYS
10 DAYS
OFF
40 DAYS
30 DAYS
Oasis
Oasis
Page 2
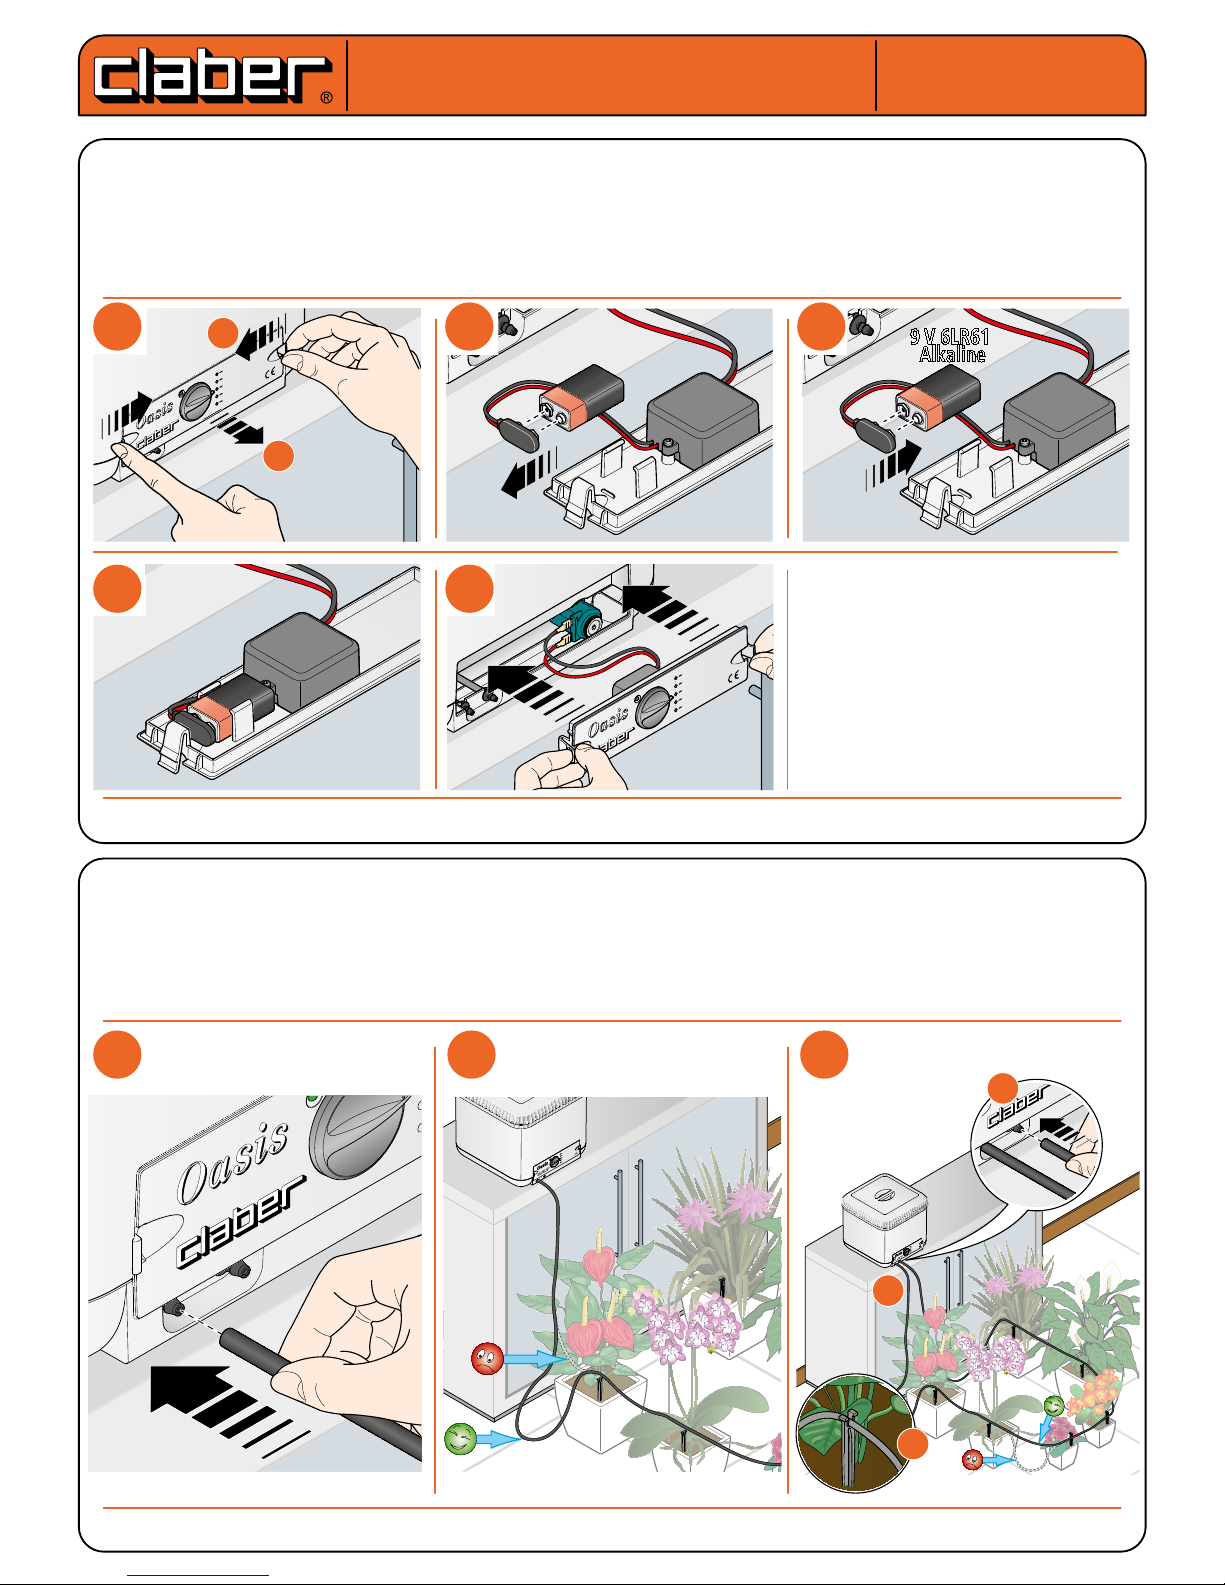
Fitting the battery. In order to operate, Oasis® requires a new 9V (6LR61) Alkaline battery, with an expiry date exceeding one year.
To insert or replace the battery, proceed as follows: Act on the keys on the sides of the front panel (1) until you hear it engage. SIf
present, remove the at battery (2). Connect the new battery to the connector respecting the polarity (3). Put the new battery into
the battery compartment (4). Replace the front panel (5). For optimal operation, it is recommended that the battery is replaced at
least once a year. In any case, before using Oasis®, check the battery charge by turning the programming selector switch to any
programme and checking the led light: the led ashes approximately every 2 seconds the battery is charged, the led stays o the
battery is drained and needs to be replaced.
Connection. In order to ensure that Oasis® operates correctly, the two lengths of hose leading from the tank panel must be
long enough to touch the oor before they are connected to the drippers in the rst pots: this simple precaution is necessary
to make sure that watering starts correctly.
Unroll the hose moving around the plants making sure that they do not obstruct people or animals and select the shortest
possible path. Insert the hose into the forks of the individual stakes until it takes on the correct shape, taking care not to
create kinks in the hose. Once all the pots have been connected, bring the hose back to the second connector in the front
panel of Oasis® (if necessary, cut o the excess hose using scissors).
For Oasis (cod.): 8053
For Oasis (cod.): 8053
User manual
User manual
9 V 6LR61
Alkaline
2
2
3
3
1
1
2
2
3
3
60
120
ml
30
40
20 DAYS
10 DAYS
OFF
40 DAYS
30 DAYS
1
1
4
4
60
120
ml
30
40
20 DAYS
10 DAYS
OFF
40 DAYS
30 DAYS
5
5
60
120
ml
30
40
20 DAYS
10 DAYS
OFF
40 DAYS
30 DAYS
60
120
ml
30
40
20 DAYS
10 DAYS
OFF
40 DAYS
30 DAYS
60
120
ml
30
40
20 DAYS
10 DAYS
OFF
40 DAYS
30 DAYS
20 DAYS
10 DAYS
OFF
40 DAYS
30 DAYS
c
c
a
a
b
b
a
a
b
b

Oasis
Oasis
Page 3
Connection. Cut the distribution hose approximately 2 cm from the stake. Connect a dripper by pressing the
hose rmly onto each end: make sure that the dripper outlet is facing downwards. Use the same procedure for
all the other stakes, until all the drippers required have been tted. You have now created the circuit which will
distribute the water to the pots, complete with drippers.
Filling. Check that the programming selector switch is set to - OFF and use a watering can to rell the water
tank with 25 litres of water.
Any liquid or granular fertilisers are to be added directly to the soil in the pots, do not under any circumstances
put them into the water in the tank. Close the cover before activating Oasis®.
For Oasis (cod.): 8053
For Oasis (cod.): 8053
User manual
User manual
2
2
1
1
2
2
1
1
2 cm
b
b
a
a
25 Lt
60
120
ml
30
40
20 DAYS
10 DAYS
OFF
40 DAYS
30 DAYS
60
120
ml
30
40
20 DAYS
10 DAYS
OFF
40 DAYS
30 DAYS
25 Lt
OFF
OFF
60
120
ml
30
40
20 DAYS
10 DAYS
OFF
40 DAYS
30 DAYS
 Loading...