

User manual
User manual
Page 1
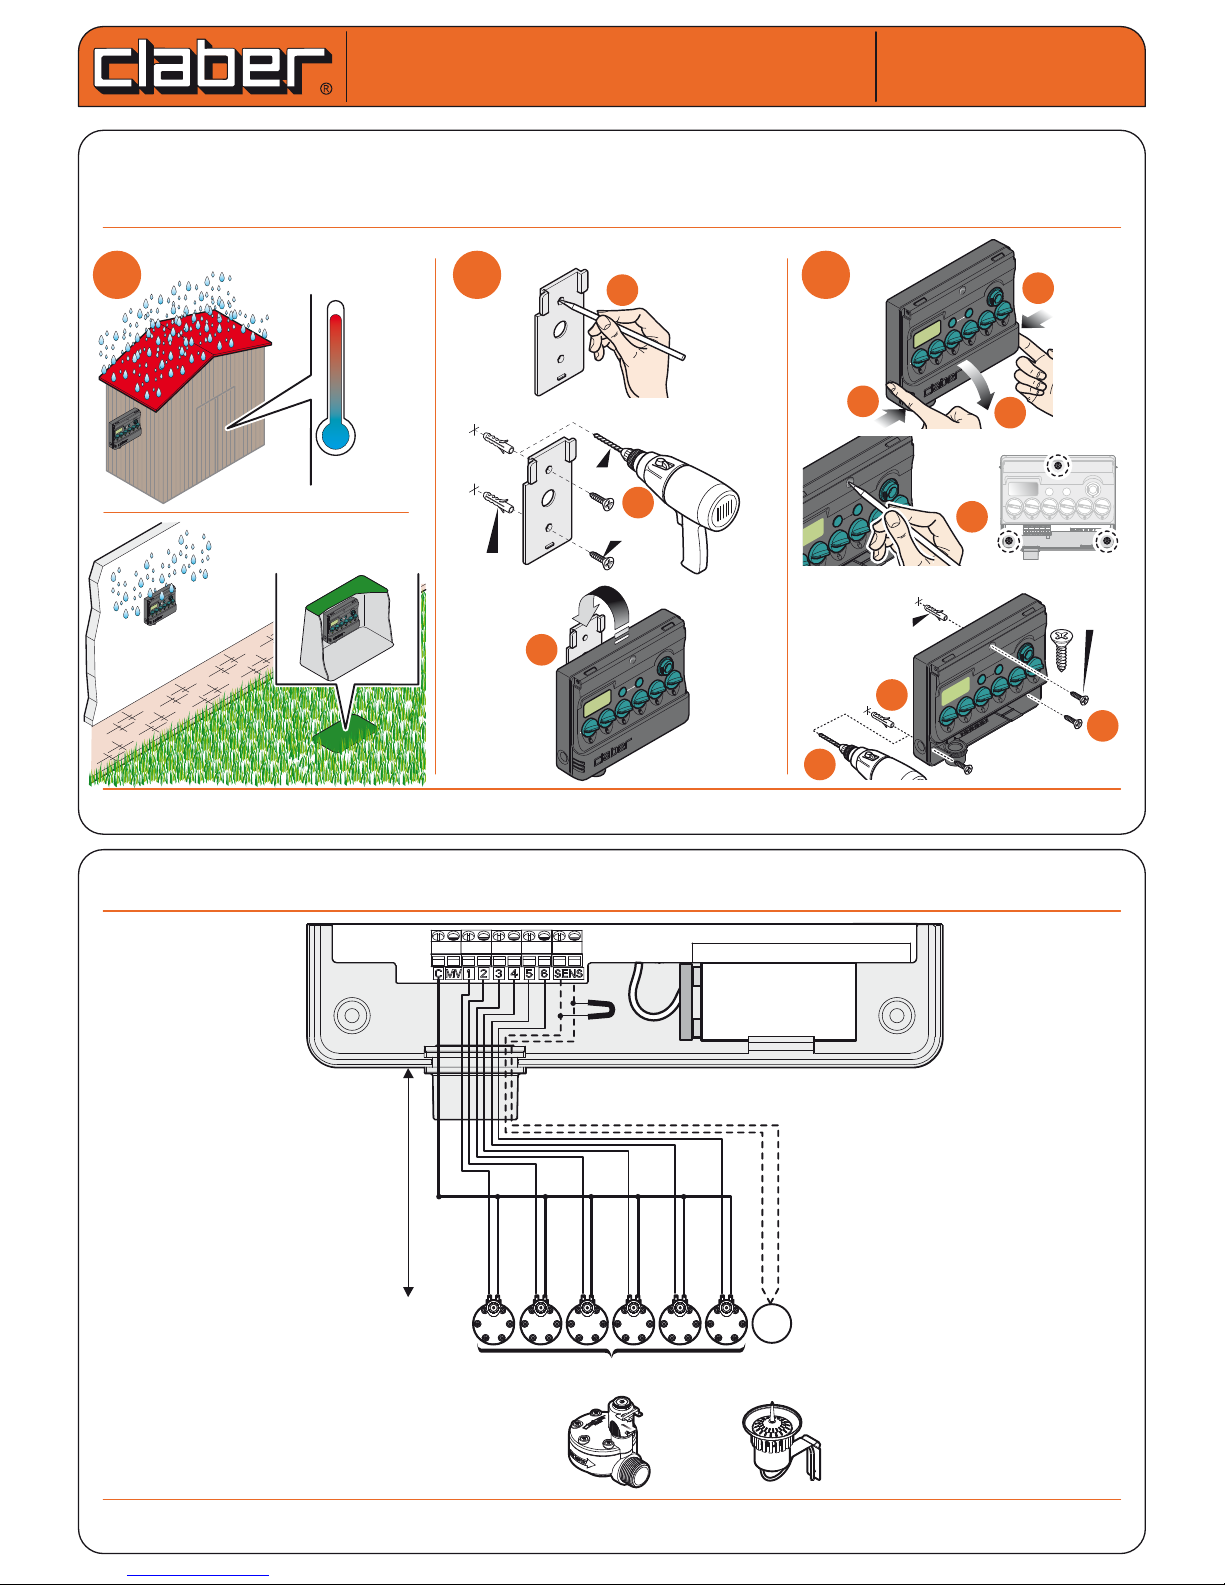
Fix the timer to a wall in a covered location, sheltered from weather and splashing water; ambient temperature
between 0 and 50 °C. Do not install the timer outdoors or in underground valve box.
For Multipla 9V LCD (p/n): 8060
Multipla 9V LCD
Multipla 9V LCD
Electrical connections.
For Multipla 9V LCD (p/n): 8060
1
1
2
2
3
3
a
a
c
c
d
d
f
f
e
e
6mm
6mm
TSP 4x30
b
b
c
c
60
5
10
15
30
20
60
5
10
15
30
20
60
5
10
15
30
20
TEST/MANUAL
MULTIPLA DC 9V LCD
START + ...HOURS
RESET
60
5
10
15
30
20
7d
FREQUENCY
12h
8h
24h
2d
4d
3d
60
5
10
15
30
20
60
5
10
30
20
60
30
60
5
10
15
30
20
60
5
10
15
30
20
TEST/MANUAL
START + ...
RESET
60
5
10
15
30
20
7d
FREQUENCY
12h
8h
24h
2d
4d
3d
60
5
10
15
30
20
60
5
10
30
20
60
5
10
15
30
20
60
5
10
15
30
20
60
5
10
15
30
20
TEST/MANUAL
START + ...HOURS
RESET
60
5
10
15
30
20
7d
FREQUENCY
12h
8h
24h
2d
4d
3d
60
5
10
15
30
20
60
5
10
30
20
6mm
6mm
TSP 4x30
60
5
10
15
30
20
60
5
10
15
30
20
60
5
10
15
30
20
TEST/MANUAL
MULTIPLA DC 9V LCD
START + ...HOURS
RESET
60
5
10
15
30
20
7d
FREQUENCY
12h
8h
24h
2d
4d
3d
60
5
10
15
30
20
60
5
10
30
20
a
a
a
a
b
b
60
5
10
15
30
20
60
5
10
15
30
20
60
5
10
15
30
20
TEST/MANUAL
MULTIPLA DC 9V LCD
START + ...HOURS
RESET
60
5
10
15
30
20
7d
FREQUENCY
12h
8h
24h
2d
4d
3d
60
5
10
15
30
20
60
5
10 30
20
60
5
10
15
30
20
60
5
10
15
30
20
60
5
10
15
30
20
TEST/MANUAL
MULTIPLA DC 9V LCD
START + ...HOURS
RESET
60
5
10
15
30
20
7d
FREQUENCY
12h
8h
24h
2d
4d
3d
60
5
10
15
30
20
60
5
10 30
20
OK!
NO!
min. 0°C
max. 50°C
60
5
10
15
30
20
60
5
10
15
30
20
60
5
10
15
30
20
TEST/MANUAL
MULTIPLA AC 230/24V LCD
START + ...HOURS
RESET
60
5
10
15
30
20
7d
FREQUENCY
12h
8h
24h
2d
4d
3d
60
5
10
15
30
20
60
5
10 30
20
2 x 9Volt
ALCALINE
MULTIPLA DC 9V
Common (-)
max 50 m (cross section 1.5 mm
2
)
1 (+)
2 (+)
3 (+)
4 (+)
5 (+)
6 (+)
RS
Jumper
Grommet
Line valves
(bistable)
Rain
Sensor
(optional)
1
+ - + - + - + - + - + -
2 3 4 5 6

Page 2
On tting the batteries, the timer automatically runs a test cycle, closing all the valves, during which each of the
Leds will blink once in turn.
For Multipla 9V LCD (p/n): 8060
Multipla 9V LCD
Multipla 9V LCD
Remove the cover of the battery pocket from its seat, connect the batteries and position them in the pocket,
applying light pressure. Use only new 9 volt alkaline batteries, type IEC 6LR61. Ret the battery cover. The
appliance is able to operate with one battery only, although the life of the battery will be shorter (about 6
months with a daily watering program using four lines);
For Multipla 9V LCD (p/n): 8060
User manual
User manual
1
1
60
5
10
15
30
20
60
5
10
15
30
20
60
5
10
15
30
20
TEST/MANUAL
MULTIPLA DC 9V LCD
START + ...HOURS
RESET
60
5
10
15
30
20
7d
FREQUENCY
12h
8h
24h
2d
4d
3d
60
5
10
15
30
20
60
5
10
30
20
Closing valve 1...
...closing valve 2...
...closing valve 3...
...closing valve 4...
...closing valve 5...
...closing valve 6.
led-valve 1 ...
... led-valve 2 ...
... led-valve 3 ...
... led-valve 4 ...
... led-valve 5 ...
... led-valve 6 .
60
5
10
15
30
20
60
5
10
15
30
20
60
5
10
15
30
20
TEST/MANUAL
START + ...HOURS
RESET
60
5
10
15
30
20
7d
FREQUENCY
12h
8h
24h
2d
4d
3d
60
5
10
15
30
20
60
5
10
30
20
60
5
10
15
30
20
60
5
10
15
30
20
60
5
10
15
30
20
TEST/MANUAL
START + ...HOURS
RESET
60
5
10
15
30
20
7d
FREQUENCY
12h
8h
24h
2d
4d
3d
60
5
10
15
30
20
60
5
10
30
20
1
1
2
2
3
3
a
a
a
a
a
a
b
b
b
b
c
c
60
5
10
15
30
20
60
5
10
15
30
20
TEST/MANUAL
START + ...HOURS
RESET
60
5
10
15
30
20
7d
FREQUENCY
12h
8h
24h
2d
4d
3d
60
5
10
15
30
20
60
5
10
30
20
click!
60
5
10
15
30
20
60
5
10
15
30
20
60
5
10
15
30
20
TEST/MANUAL
MULTIPLA DC 9V LCD
START + ...HOURS
RESET
60
5
10
15
30
20
7d
FREQUENCY
12h
8h
24h
2d
4d
3d
60
5
10
15
30
20
60
5
10
30
20
9 V
Alcaline
Page 3
During a watering cycle, the Multipla activates all of the valves on lines 1 to 6 for which a watering time has been
programmed using the LINE SELECTORS, opening them in succession and in ascending order. A watering
program consists in the repetition of a watering cycle at intervals programmed with the FREQUENCY selector.
Having decided which lines are to be activated, turn the LINE selector for each one until it is positioned on the
required time. Watering can be programmed for a duration of between 5 and 60 minutes. To exclude watering
on a given line, on the other hand, position the corresponding selector on • (zero).
For Multipla 9V LCD (p/n): 8060
Multipla 9V LCD
Multipla 9V LCD
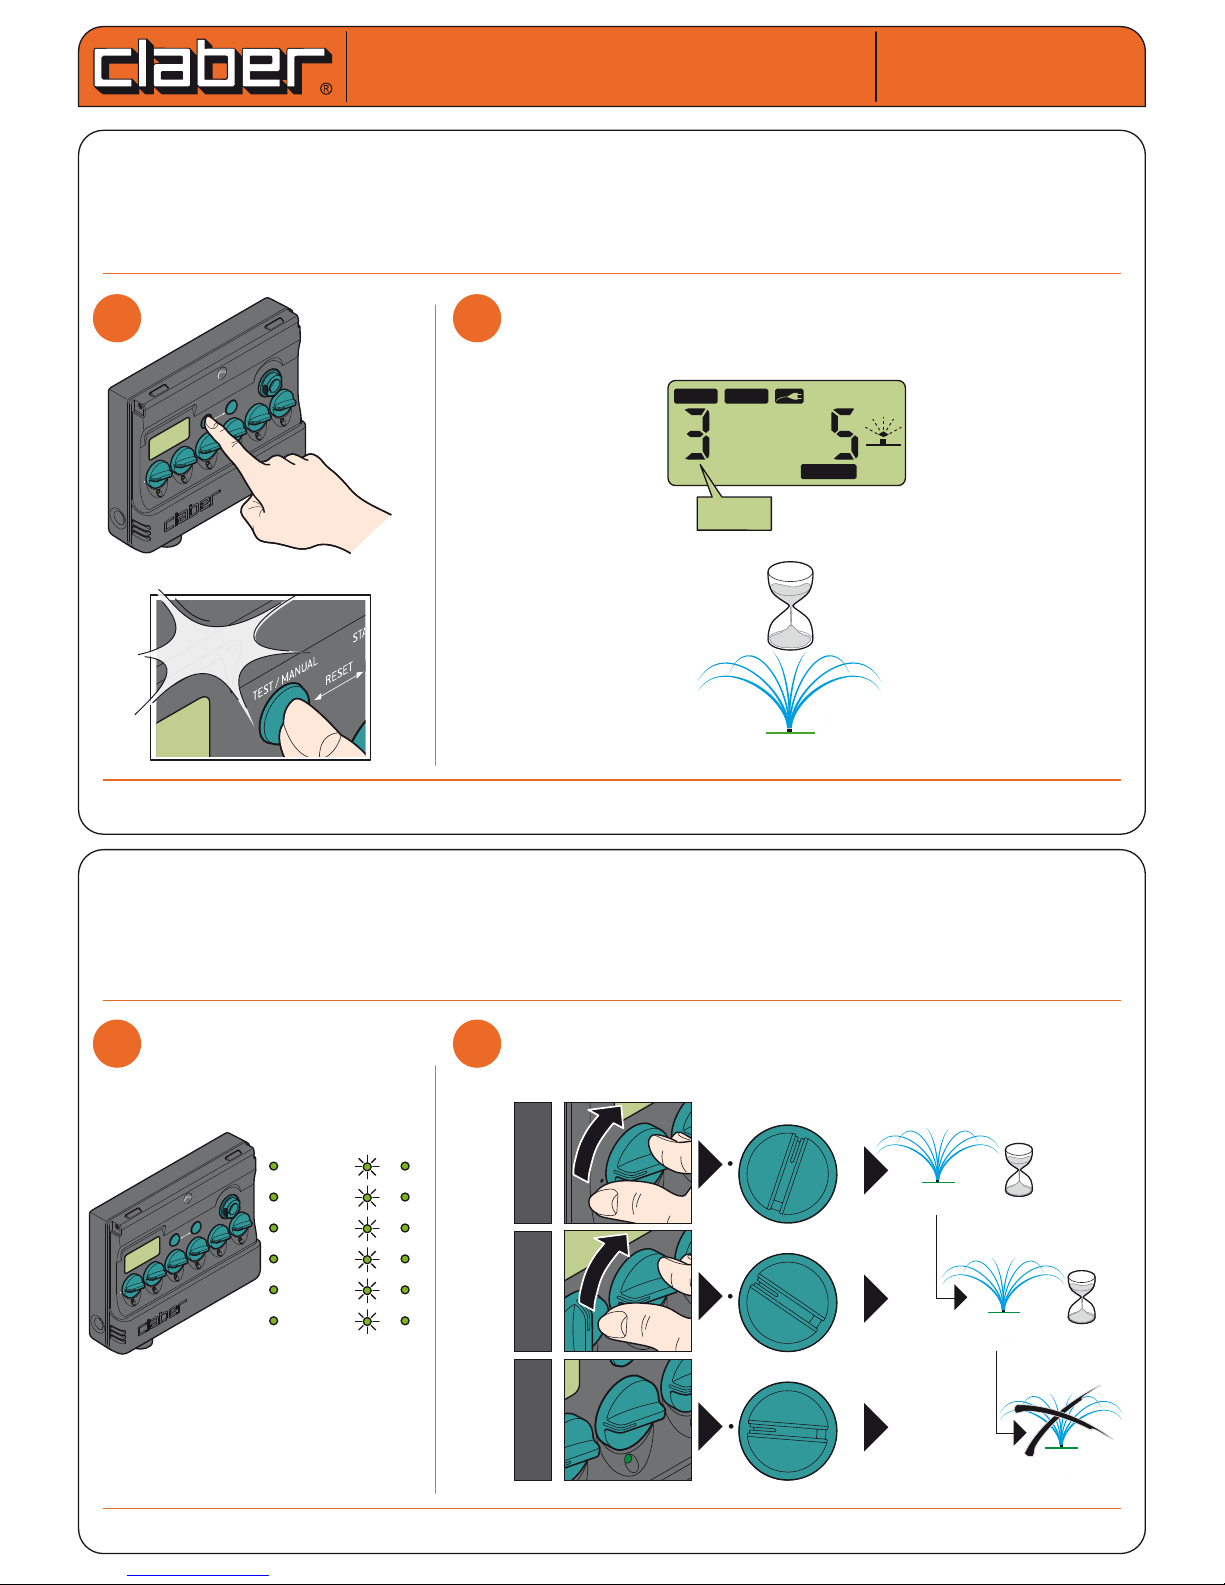
The TEST function can be used to perform a quick check on the system that will ensure its correct operation, by
activating a given valve manually for a preset duration of 5 minutes. If there is a watering cycle in progress, it can
be interrupted by pressing the TEST and START+… buttons. Press the TEST button repeatedly to select and
activate one of the lines; after a few seconds, the relative valve will open for 5 minutes. To close the valve being
tested before the end of the 5 minutes, press the TEST and START+... buttons simultaneously. The display indicates the operating mode — ‘TEST’ — the line selected, and the time remaining.
For Multipla 9V LCD (p/n): 8060
User manual
User manual
1
1
2
2
60
5
10
15
30
20
60
5
10
15
30
20
60
5
10
15
30
20
TEST/MANUAL
MULTIPLA DC 9V LCD
START + ...HOURS
RESET
60
5
10
15
30
20
7d
FREQUENCY
12h
8h
24h
2d
4d
3d
60
5
10
15
30
20
60
5
10
30
20
led-valve 1 ... ...
led-valve 2 ... ...
led-valve 3 ... ...
led-valve 4 ... ...
led-valve 5 ... ...
led-valve 6 ... ...
60
5
10
15
30
20
60
5
10
15
30
20
60
5
10
15
30
20
Test
START + ...
RESET
60
5
10
15
30
20
7d
FREQUENCY
12h
8h
24h
2d
4d
3d
60
5
10
15
30
20
60
5
10
30
20
Line 1
5
10
15
20
30
60
60
30
20
60
5
10
15
30
20
60
5
10
15
30
20
Test
START + ...
RESET
60
5
10
15
30
20
7d
FREQUENCY
12h
8h
24h
2d
4d
3d
60
5
10
15
30
20
60
5
10
30
20
Line 2
5
10
15 20
30
60
60
30
60
5
10
15
30
20
Test
START + ...
RESET
60
5
10
15
30
20
7d
FREQUENCY
12h
8h
24h
2d
4d
3d
60
5
10
15
30
20
60
5
10
30
20
Line 3
5
10
15 20
30
60
20 min.
5 min.
1
1
2
2
60
5
10
15
30
20
60
5
10
15
30
20
60
5
10
15
30
20
TEST/MANUAL
MULTIPLA AC 230/24V LCD
START + ...HOURS
RESET
60
5
10
15
30
20
7d
FREQUENCY
12h
8h
24h
2d
4d
3d
60
5
10
15
30
20
60
5
10
30
20
TEST!
1...6
60
10
15
30
20
60
5
10
15
30
20
60
5
10
30
20
x 3
LINE
MIN
TEST
1...6
5 min.
Page 4
Multipla 9V LCD
Multipla 9V LCD
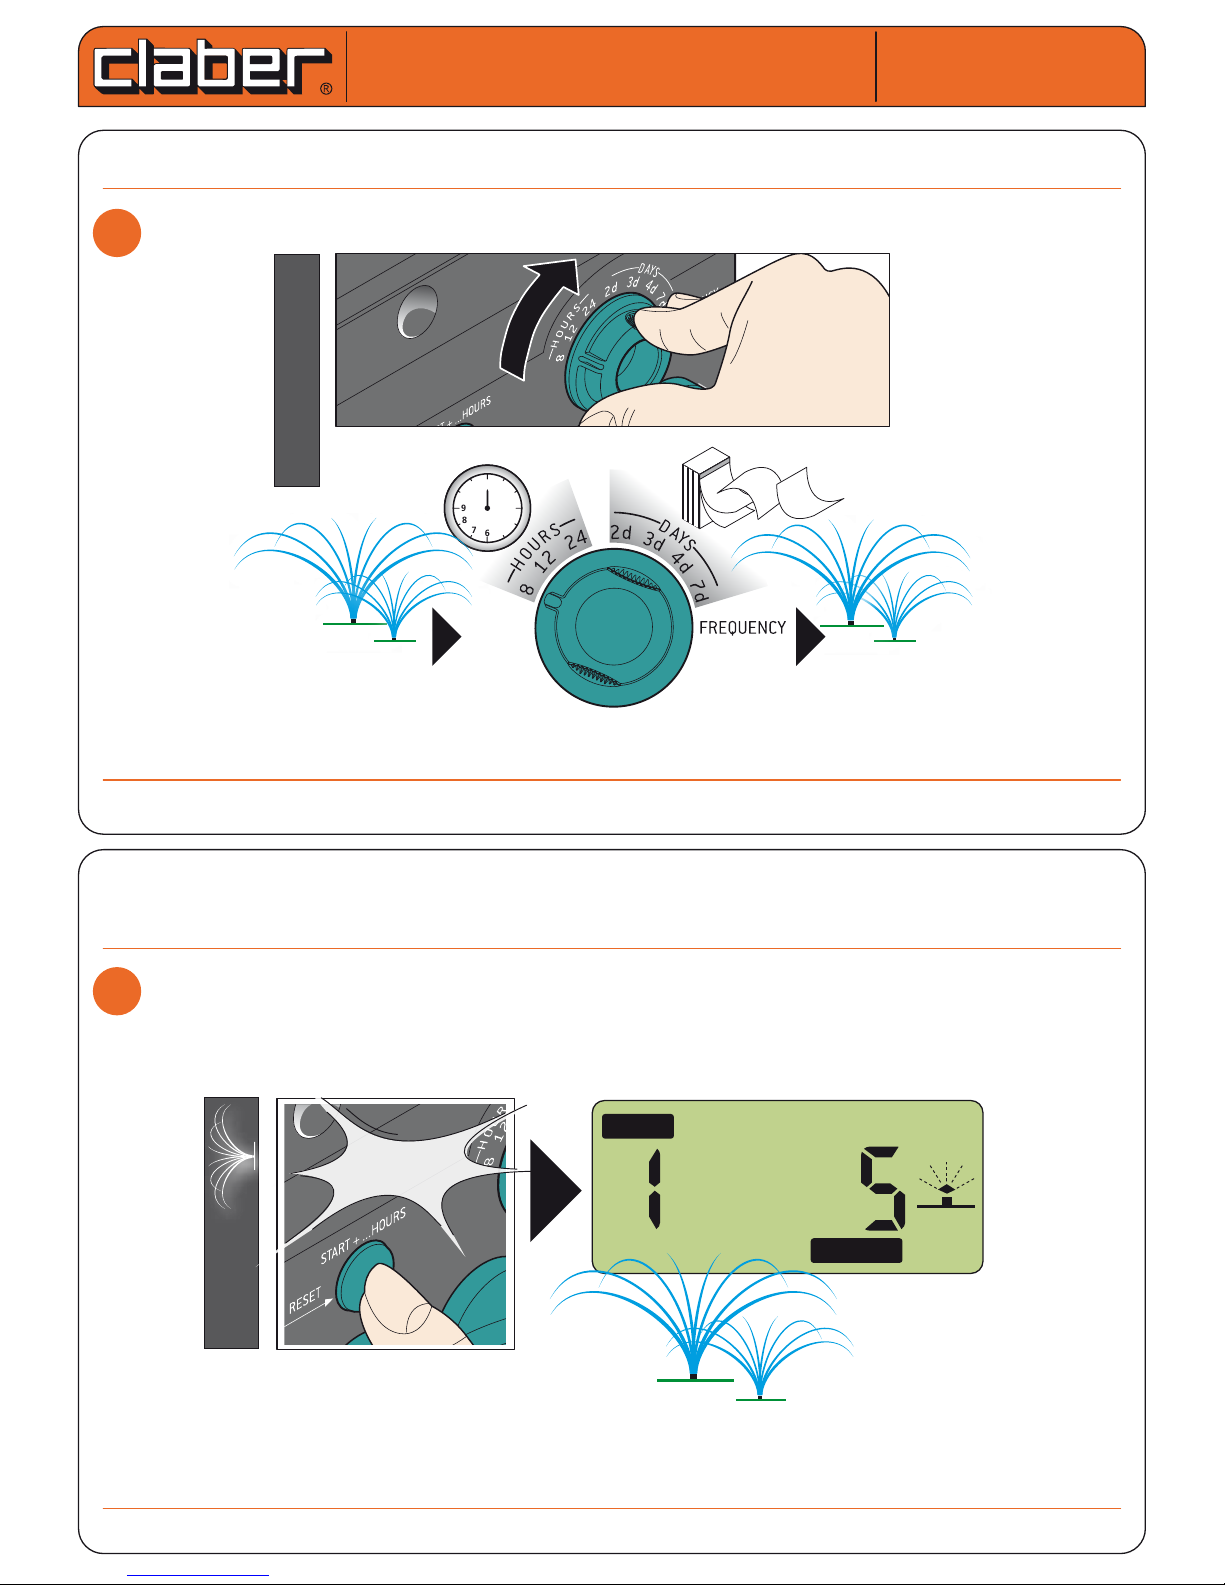
To set the watering frequency, turn the FREQUENCY selector to the required position (every 8, 12 or 24 hours, or
2, 3, 4 or 7 days)
For Multipla 9V LCD (p/n): 8060
To start the program immediately, press the START+… button once. The next watering cycle will begin after the time period
set with the FREQUENCY selector has elapsed (example: pressing the START+... button at 20:00 hours to activate the
program, with the FREQUENCY set at 8 hours, the next watering cycle will commence at 04:00 hours).
For Multipla 9V LCD (p/n): 8060
User manual
User manual
1
1
30
12
1
2
3
4
5
6
7
8
9
10
11
28
29
60
10
30
20
Frequency
1
1
Start
LINE
MIN
30
20
60
5
10
15
30
20
60
5
10
30
20
x1

When a watering cycle is in progress, the display shows the in-progress symbol, the number of the line currently active, and the
number of minutes remaining until watering is due to nish on that line. The valve currently open is also indicated by the relative Led,
which blinks. On completion of the watering cycle, the standby signal reappears in the display, with the time remaining until the start
of the next watering cycle. (example of watering cycle with FREQUENCY selector set to 8h).
For Multipla 9V LCD (p/n): 8060
Multipla 9V LCD
Multipla 9V LCD
Example of watering cycle with FREQUENCY selector set to 8h
To delay the start of the program, press the START+… button a second time before 5 seconds have elapsed, to
set a delay of one hour, a third time for two hours, and so on up to as many as 23 hours. The display momentarily
indicates the number of hours delay selected, then the watering standby signal appears, together with the time
remaining until the start of the rst cycle.
For Multipla 9V LCD (p/n): 8060
User manual
User manual
Page 5
1
1
2
2
LINE
MIN
LINE
MIN
HOUR MIN
led-valve 1
60
5
10
15
30
20
60
5
10
15
30
20
60
5
10
15
30
20
TEST/MANUAL
MULTIPLA AC 230/24V LCD
START + ...HOURS
RESET
60
5
10
15
30
20
7d
FREQUENCY
12h
8h
24h
2d
4d
3d
60
5
10
15
30
20
60
5
10
30
20
1
1
Start
60
15
30
20
60
5
10
15
30
20
60
5
10
30
20
60
15
30
20
60
5
10
15
30
20
60
5
10
30
20
per 1
+
per 7
HOUR MIN
1...23

Page 6
To change a watering program currently in use, enter the new LINE and FREQUENCY settings as desired.
The change will be rendered eective by the timer when appropriate.
Examples: - with watering in progress and line 2 active, the position of the LINE selectors is changed (say, from 10 min to 20 min): here will be no
change to the duration of the watering step already in progress on line 2, whereas the new setting of 20 minutes will take eect with the activation of line 3.
- changing the position of the FREQUENCY selector (say, from 8 to 12 hours): the new setting will take eect within 24 hours subsequent to the
change being made; thereafter, the watering cycles will be repeated at the new frequency selected, whilst the START time remains unchanged.
For Multipla 9V LCD (p/n): 8060
Multipla 9V LCD
Multipla 9V LCD
Example of programming: at 16:30, the duration is selected for all of the watering lines (LINE selectors) and the
frequency is set at 8h (FREQUENCY selector). Suppose that watering is not to start immediately, but at 22:30 (i.e.
after 6 hours): press the START+… button once, and then six times in succession, so that the display shows 6:00. The
time indicated in the display begins counting down, ultimately reaching 0:00 at 22:30; the watering cycle starts, and
will then be repeated every 8 hours as set with the FREQUENCY selector (i.e. at 22.30, at 06:30 and at 14:30).
For Multipla 9V LCD (p/n): 8060
16:30
User manual
User manual
1
1
2
2
3
3
LINE
MIN
from 10 min to 20 min
LINE
MIN
LINE
MIN
60
10
30
20
from 10 min to 20 min
from 8h to 12h
24h
HOUR MIN
Frequency
a
a
a
a
a
a
c
c
b
b
b
b
b
b
60
30
20
60
5
10
15
30
20
60
5
10
15
30
20
Test
START + ...
RESET
60
5
10
15
30
20
7d
FREQUENCY
12h
8h
24h
2d
4d
3d
60
5
10
15
30
20
60
5
10
30
20
Line 2
60
30
20
60
5
10
15
30
20
60
5
10
15
30
20
Test
START + ...
RESET
60
5
10
15
30
20
7d
FREQUENCY
12h
8h
24h
2d
4d
3d
60
5
10
15
30
20
60
5
10
30
20
Line 3
1
1
2
2
3
3
60
5
10
15
30
20
60
5
10
15
30
20
60
5
10
15
30
20
5
16:30
22:30
22:30
HOUR MIN
HOUR MIN
Frequency
16:30
16:30
START
60
10
15
30
20
60
5
10
30
20
x 1
60
10
15
30
20
60
5
10
30
20
x 6
60
10
30
20
8 h
a
a
a
a
a
a
b
b
b
b
6:30
b
b
c
c

Page 7
The RESET function closes the valve, if currently open, and switches the timer OFF. Watering will be suspended
until the START+... button is pressed again, or until a TEST is run. To RESET the timer, press the START and
START+… buttons simultaneously and hold for 5 seconds. The message OFF appears in the display.
For Multipla 9V LCD (p/n): 8060
For more information and additional details, consult the instruction booklet accompanying the product.
Multipla 9V LCD
Multipla 9V LCD
The STOP function interrupts the watering cycle currently in progress. Watering will restart as normal with eect
from the cycle subsequent to the selected pause, as programmed by positioning the FREQUENCY selector.
The STOP function can also be used to close a valve manually, when activated in TEST mode.
For Multipla 9V LCD (p/n): 8060
User manual
User manual
1
1
60
10
15
30
20
60
5
10
15
30
20
60
5
10
30
20
5 sec.
1
1
2
2
LINE
MIN
30
20
60
10
15
30
20
60
5
10
15
30
20
60
5
10
30
20
 Loading...