

Page 1
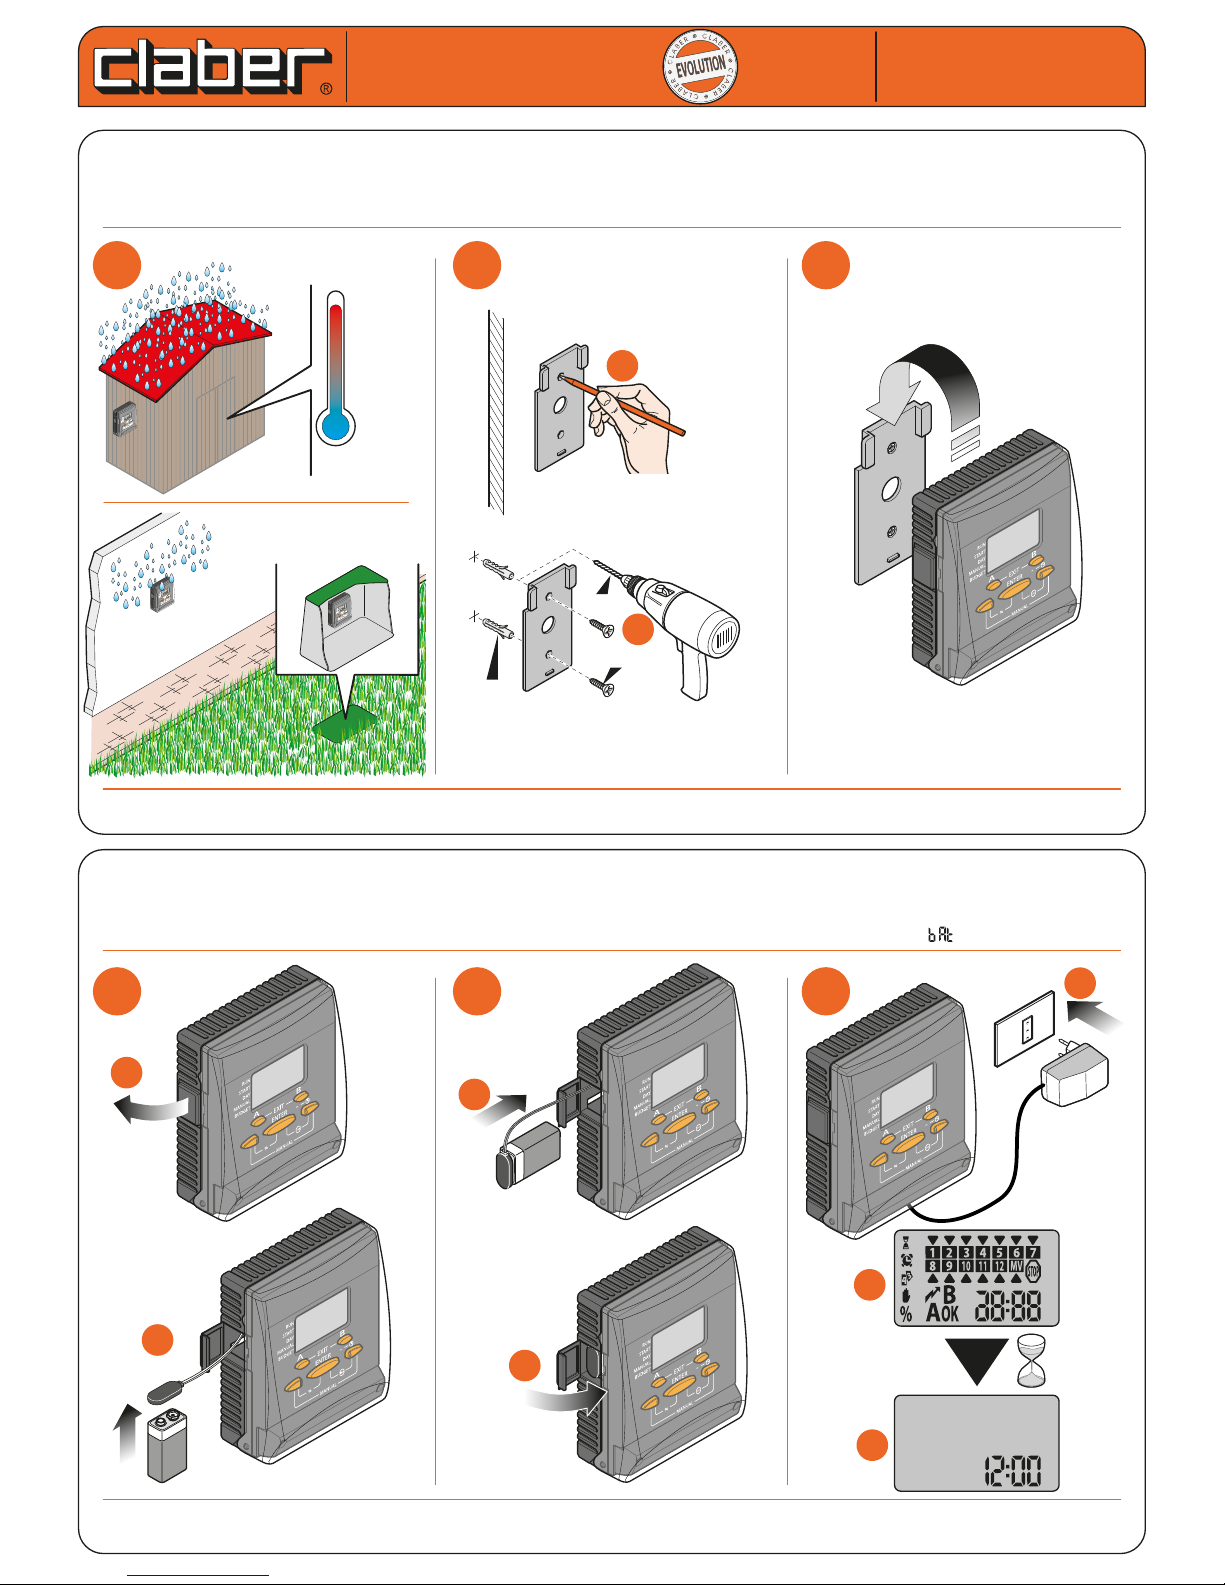
Fix the timer to a wall in a covered location, sheltered from weather and splashing water; ambient temperature
between 0 and 50 °C. Do not install the timer outdoors or in underground valve box.
Before connecting the timer to the electrical power supply, install the 9V backup battery, which will ensure that the clock
setting and programme data will not get lost in case of a mains power failure. Open the snap-t cover of the battery pocket.
Pull out the cable (and the old battery, in case of a replacement). Connect or replace the battery. Reposition the cable and
the battery in the pocket and close the cover. If the back-up battery is missing or at, the message “ ” appears.
For Cometa Evolution 4 Zone (p/n): 8014
For Cometa Evolution 6 Zone (p/n): 8016
For Cometa Evolution 4 Zone (p/n): 8014
For Cometa Evolution 6 Zone (p/n): 8016
Cometa
Cometa
User manual
User manual
1
1
2
2
3
3
1
1
2
2
3
3
a
a
6mm
6mm
TSP 4x30
b
b
a
a
a
a
a
a
b
b
b
b
b
b
c
c
OK!
NO!
min. 0°C
max. 50°C
89
101112 MV
89
101112 MV
89
101112 MV
2 - 3 sec.
9 V
Alcaline
Page 2
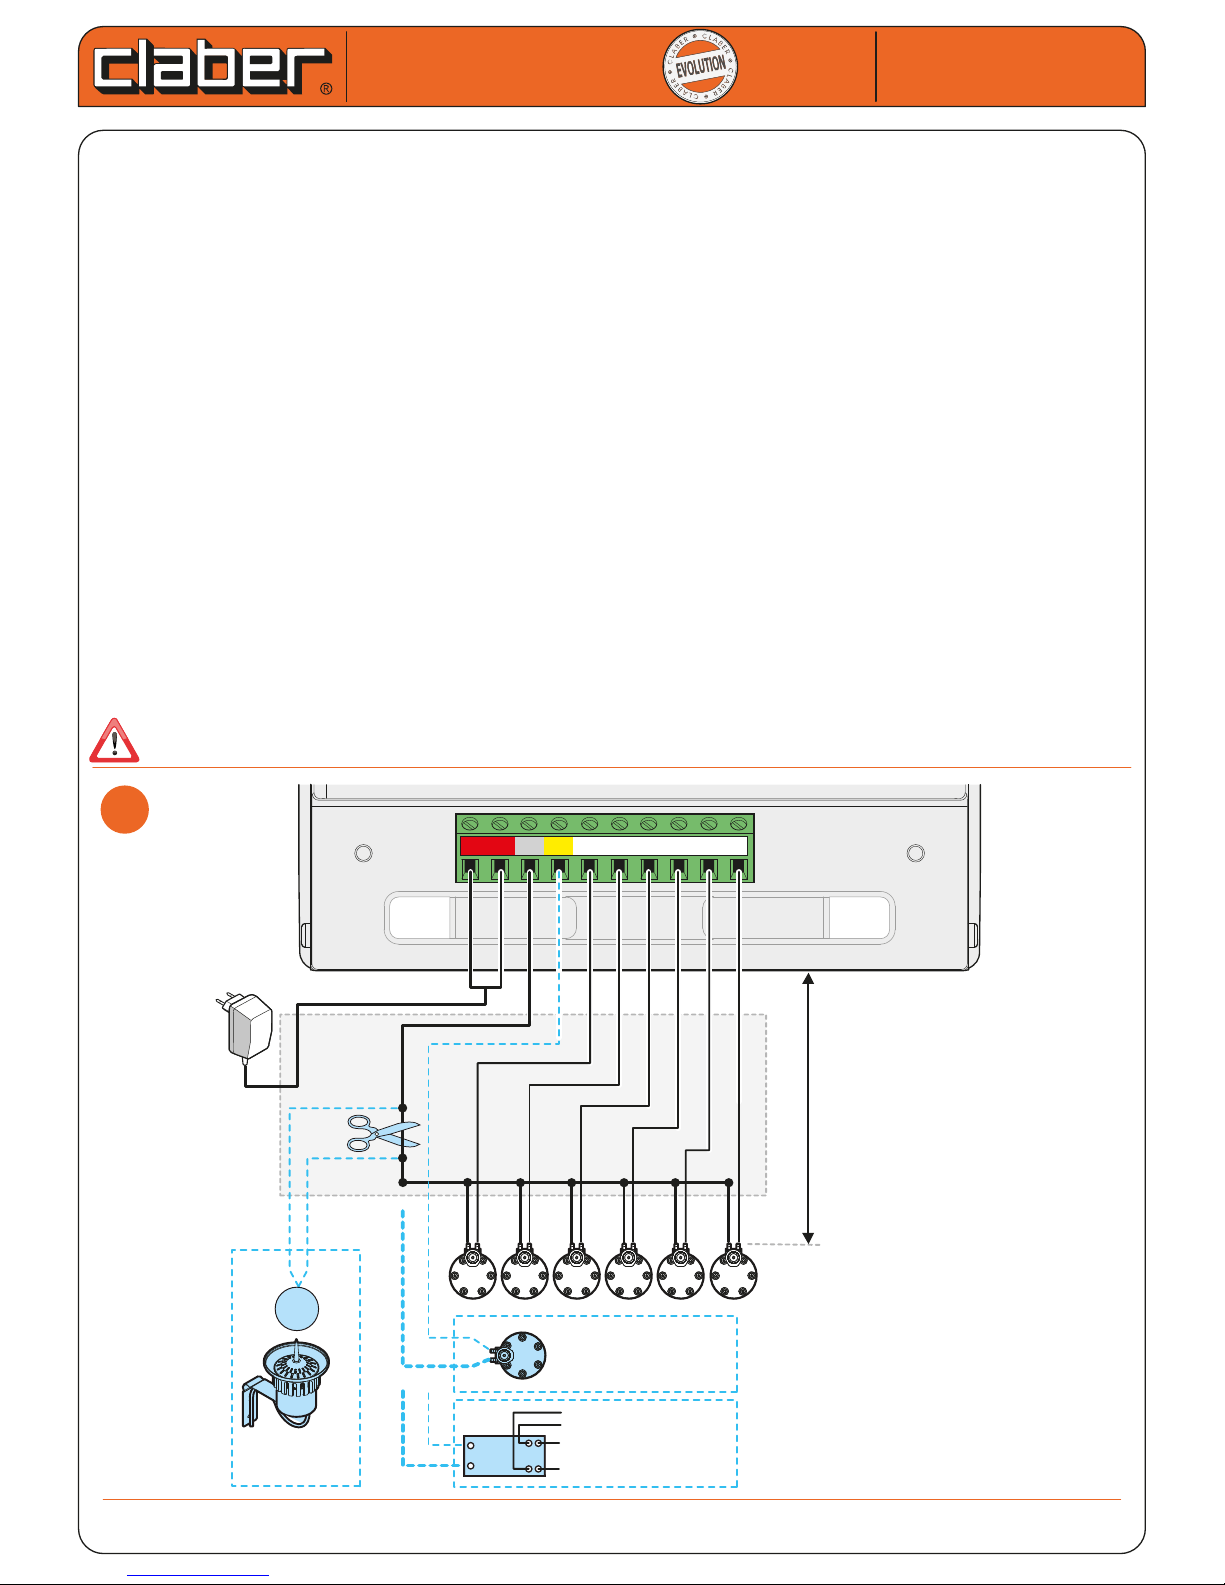
The Master Valve (main valve) is an optional safety valve, installed upstream of the line valves; it is opened auto-
matically so that the system is only powered while watering operations are in progress.
1
Pass the required electrical cables through the protective pipe. The recommended cross-section for all
cables is 1.5 mm
2
with a length of less than 350 m: above this limit, the cross-section needs to be increased.
2 Connect the cables to the relative valves (including the Master Valve if used).
3 Join the individual wires coming from any valve terminal with a wire from the water timer (common for the
valves).
4
Remove the cable protection cover by unscrewing the self-tapping screws and make the connections to the
water timer terminal board by inserting and tightening the ends which will have been stripped by 5-6 mm;
- the common wire coming from the valves to the terminal C,
-
the wire coming from the second terminal of each line valve to terminals from 1 to 4 (6 if there are 6 lines),
- the wire coming from the second terminal of the Master Valve (if used) to the terminal MV.
If a control pump is used, connect the two terminals A1 and A2 of the relay coil to the terminals MV and C
respectively, and complete the connections.
The solenoid valves and relay used must operate at 24 VAC - if a pump is used, this must only be connected
via a relay which will operate a contactor.
The Master Valve is used as an alternative to the pump relay and vice versa.
5 Attach the water timer to the bracket.
6 Insert the stripped ends (stripped by at least 5-6 mm) of the transformer cable into the two terminals AC.
7 Attach and secure the cover using the two 2.9x13 self-tapping screws.
8 Plug the transformer into the power socket.
Only use the transformer supplied with the water timer.
For Cometa Evolution 4 Zone (p/n): 8014
For Cometa Evolution 6 Zone (p/n): 8016
Cometa
Cometa
User manual
User manual
1
1
CommonCommon
MAX 350m (ø 1,5 mm
2
)
MV MV
Valve
Rain Sensor
OPTIONAL
RS
1 2C
MVACAC
3 4 5 6
6
5
4
3
2
1
654321
to pump
220 V
220 V
A1
A2
Relè Claber
cod. 90439
Master Valve
OPTIONAL
Page 3
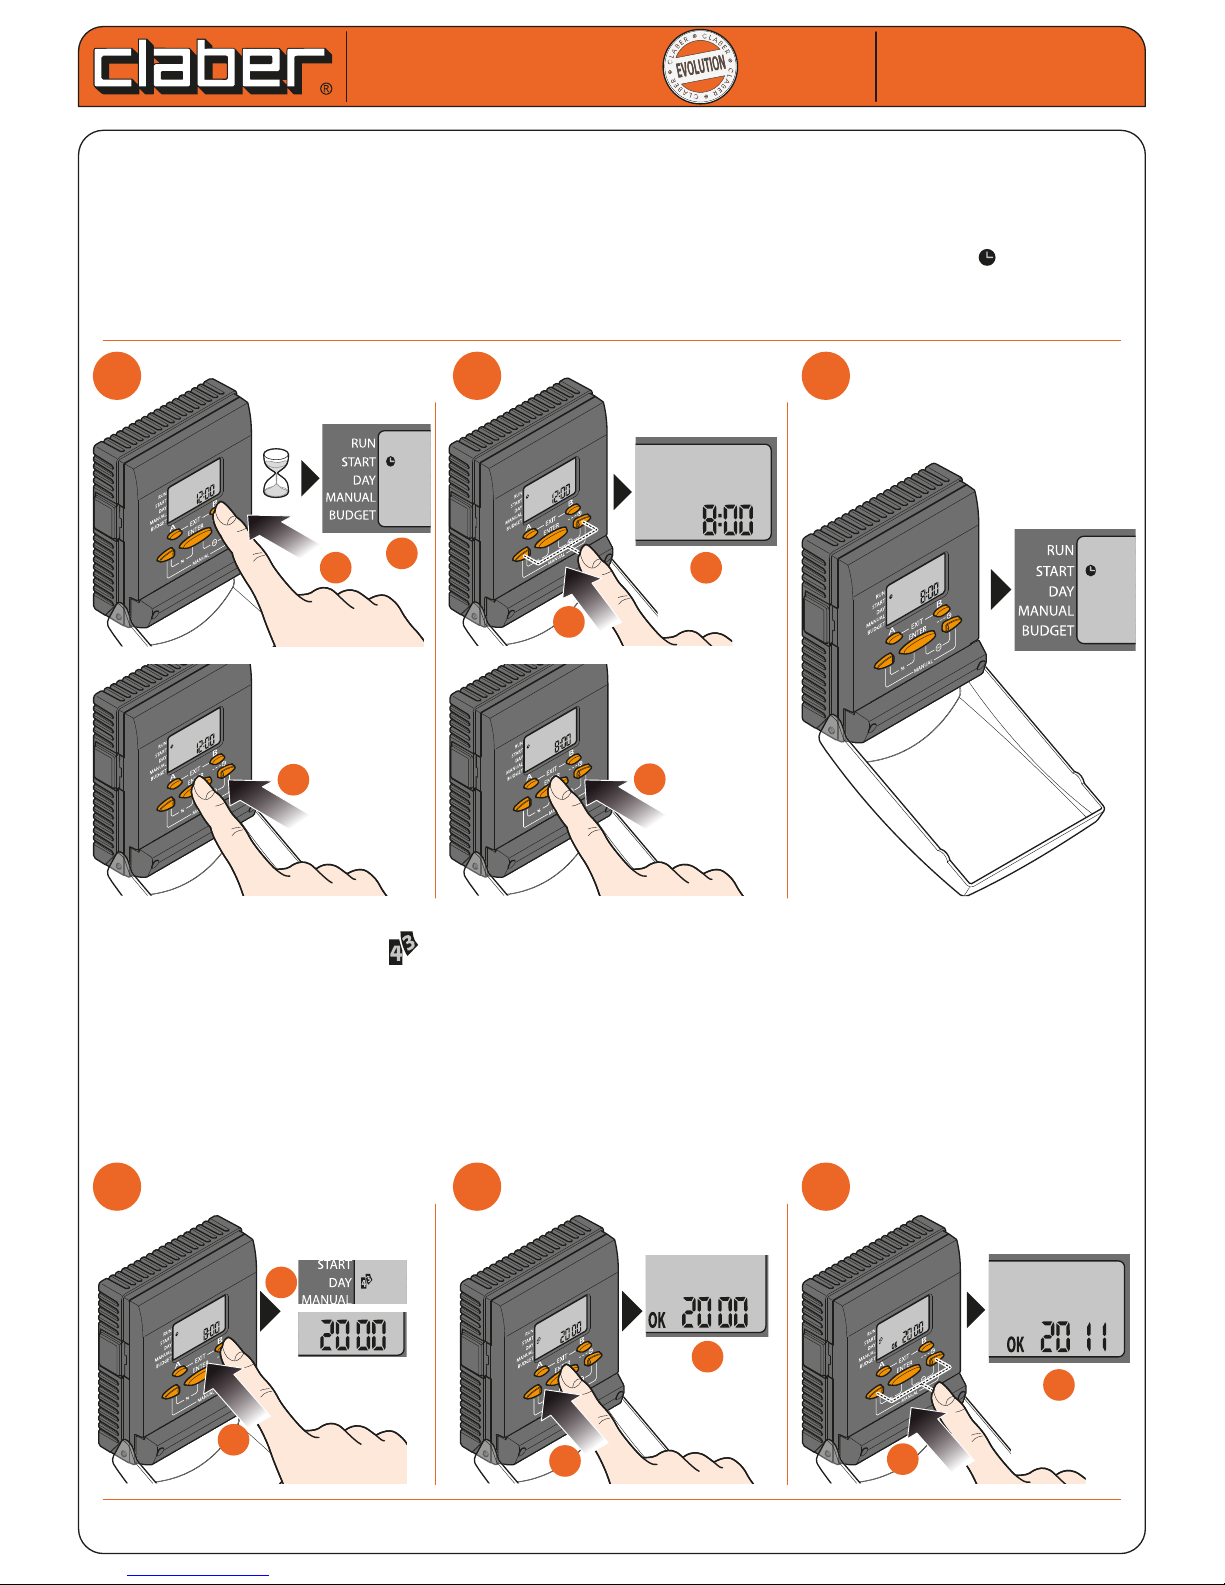
Having completed the installation of the timer, the clock and calendar must be set: time, year, day and month.
The internal calendar, which runs until 2057, will show the day of the week corresponding to the current date:
setting the date 11/01/2011, for example, the number 3 will be displayed, corresponding to Tuesday (number 1
denotes Sunday).
To set the time:
- press button B and keep it pressed for at least 5 seconds (to activate the SET-TIME function )
- press ENTER to activate the setting procedure
- use the arrows to set the time
- press ENTER to conrm
To set the year, day and month:
-
press button B; the symbol will appear in the display, with the default year
- press ENTER to activate the setting procedure
- use the arrows to select the year
- press ENTER to conrm the year and activate the day and month setting function (the message OK conti-
nues to be displayed, and the cursor blinks on month 7)
- use the arrows to select the day and month (press the button and keep it pressed until the cursor is positio-
ned on the number of the month and the current day)
- press ENTER to conrm
- press EXIT (buttons A and B)
For Cometa Evolution 4 Zone (p/n): 8014
For Cometa Evolution 6 Zone (p/n): 8016
Cometa
Cometa
User manual
User manual
1
1
2
2
3
3
1
1
2
2
3
3
a
a
5 sec.
b
b
b
b
b
b
a
a
a
a
b
b
b
b
a
a
c
c
c
c
a
a
Guida all’utilizzo
Guida all’utilizzo
Page 4
For Cometa Evolution 4 Zone (p/n): 8014
For Cometa Evolution 6 Zone (p/n): 8016
For Cometa Evolution 4 Zone (p/n): 8014
For Cometa Evolution 6 Zone (p/n): 8016
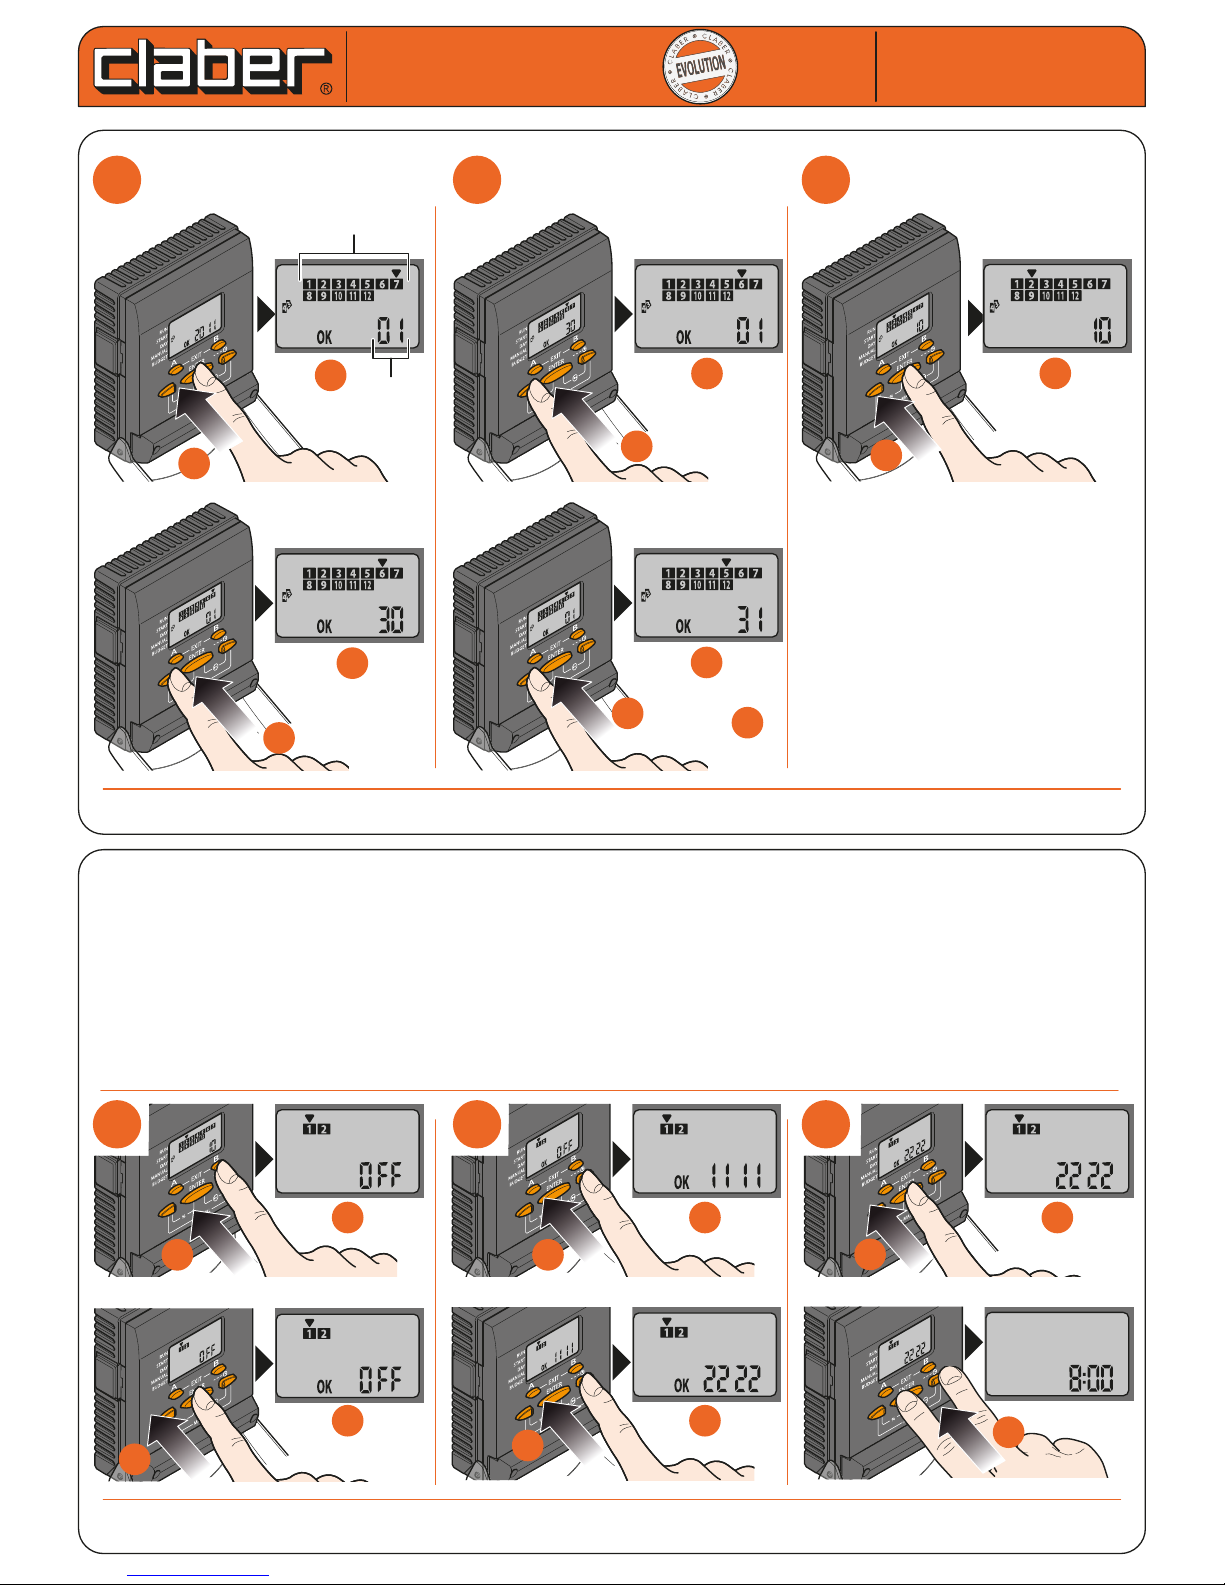
FUNCTION FOR WATERING ON ODD/EVEN DAYS
This function is needed when watering is required on odd and even days. If the value is set to: OFF (default)= function not
enabled. 1111= watering only carried out on ODD days (TUE - THUR - SAT).
2222= watering only carried out on EVEN days (MON
- WED - FRI - SUN). Activating this function (value set to 1111 or 2222) excludes WEEKLY or CYCLICAL SCHEDULE and it is
applied to both Programmes A and B.
- press B: access the ODD/EVEN FUNCTION setting, To activate the function setting, press ENTER and OK appears.
- press arrows to set watering on even days (2222) or odd days (1111). If the value remains set to OFF the user must set the
WEEKLY SCHEDULE
- press ENTER to conrm the setting.
- press A and B at the same time to exit the INITIAL CONFIGURATION function.
Cometa
Cometa
4
4
5
5
6
6
x1
b
b
b
b
b
b
a
a
x 30
month
day
d
d
d
d
d
d
x1
x XX
c
c
a
a
c
c
e
e
a
a
1
1
2
2
3
3
a
a
b
b
c
c
b
b
b
b
c
c
d
d
d
d
a
a
a
a
c
c
Page 5
For Cometa Evolution 4 Zone (p/n): 8014
For Cometa Evolution 6 Zone (p/n): 8016
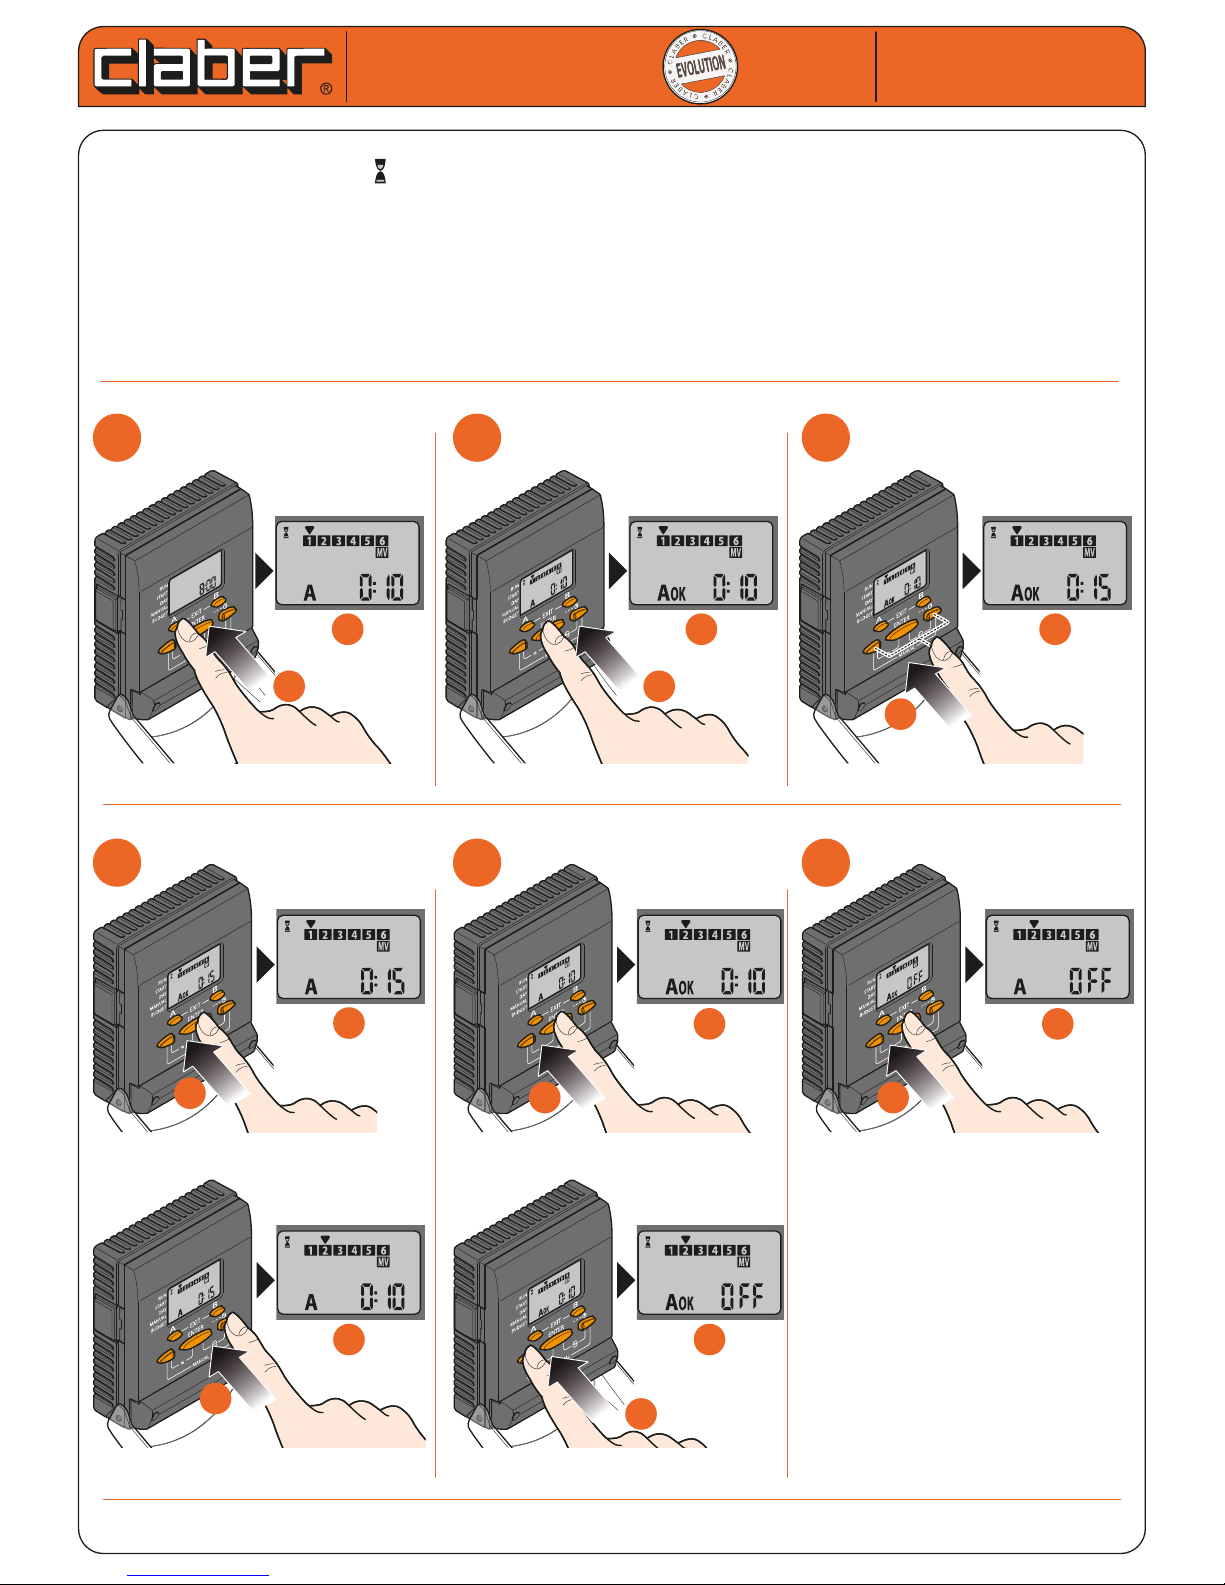
SETTING PROGRAMME A - DURATION
- press button A once: the symbol appears, the cursor blinks on valve 1 of the 4 or 6 valves available, and
the relative duration is displayed (0:10)
- press ENTER to activate the line 1 duration setting procedure
- use the arrows to select the duration (e.g. 0:15) (max 4 hours e 15 minutes)
- press ENTER to conrm the setting
-
press the right arrow to select the next valve (up to 4 for the Cometa 4 zone timer, up to 6 for the Cometa 6 zone)
- repeat the same sequence of steps for all the valves. To deselect a valve, if required, simply set the duration
to OFF, pressing the left arrow
Cometa
Cometa
User manual
User manual
1
1
2
2
3
3
a
a
a
a
b
b
b
b
b
b
a
a
4
4
5
5
6
6
d
d
b
b
b
b
a
a
c
c
d
d
c
c
x 10
a
a
b
b
a
a

Page 6
For Cometa Evolution 4 Zone (p/n): 8014
For Cometa Evolution 6 Zone (p/n): 8016
SETTING PROGRAMME A - START TIMES
- press button A once: the symbol appears, the cursor blinks on the rst start of the four available
- press ENTER to activate the setting procedure
- use the arrows to set the start time
- press ENTER to conrm the setting
- To set another start time, select 2-3-4 with the arrows and repeat the same sequence of steps. To deselect a
start, simply set the time to OFF.
Cometa
Cometa
User manual
User manual
1
1
2
2
3
3
a
a
b
b
b
b
a
a
b
b
a
a
d
d
b
b
b
b
a
a
c
c
d
d
c
c
x 10
a
a
b
b
a
a
4
4
5
5
6
6

Page 7
For Cometa Evolution 4 Zone (p/n): 8014
For Cometa Evolution 6 Zone (p/n): 8016
SETTING PROGRAMME A - WATERING DAYS
- press button A once: the symbol appears and the cursor blinks on the rst day of the week (number 1
denotes Sunday)
- press ENTER to activate the setting procedure
- use to the arrows to select ON (watering active) or OFF (no watering)
- press ENTER to conrm the setting
- select another day using the arrows, and repeat the same steps for all the days of the week
- press EXIT (buttons A and B) to quit the programming function
Cometa
Cometa
User manual
User manual
1
1
2
2
3
3
a
a
b
b
b
b
a
a
b
b
a
a
on
o
4
4
5
5
6
6
d
d
c
c
d
d
b
b
a
a
b
b
a
a
b
b
a
a
c
c
d
d
c
c
Repeat the same sequence of steps for programme B

Page 8
For Cometa Evolution 4 Zone (p/n): 8014
For Cometa Evolution 6 Zone (p/n): 8016
CYCLICAL SCHEDULE
The CYCLICAL SCHEDULE function allows Programme A or B to be repeated at time intervals equal to the number of set
days. This type of programming is carried out as an alternative to the weekly schedule but programmes A and B are
independent:this means that Programme A can be associated with a WEEKLY SCHEDULE while Programme B can be associated with a CYCLICAL SCHEDULE.
- repeatedly press A or B until the watering day settingis reached
- press a number of times right arrow until the cyclical schedule symbol appears
- press ENTER, appears OK
- to set the number of days in the interval (from 1 to 12), press the arrows
- press ENTER to conrm the setting; the rst watering operation will take place on the same day as the setting
- press A and B at the same time to exit the programming
- to cancel the CYCLICAL SCHEDULE, repeat the steps and set the day interval duration to .
Example. If Programme B is carried out EVERY THURSDAY, therefore every 7 DAYS (WEEKLY SCHEDULE) but needs to be carri-
ed out more frequently, it can be set to every 3 DAYS (for example, SATURDAY 1 March....MONDAY 3 March....THURSDAY 6
March... and soon..) using the CYCLICAL SCHEDULE function.
If the CYCLICAL SCHEDULE is cancelled, the water timer suggests the previous WEEKLY SCHEDULE associated with the
programme (Programme B is once again associated with THURSDAY).
Cometa
Cometa
User manual
User manual
1
1
2
2
3
3
a
a
b
b
b
b
a
a
b
b
a
a
b
b
a
a
4
4
5
5
6
6
b
b
a
a
b
b
a
a

Page 9
For Cometa Evolution 4 Zone (p/n): 8014
For Cometa Evolution 6 Zone (p/n): 8016
SEMI-AUTOMATIC MODE
The SEMI-AUTOMATIC mode allows a single watering cycle to be started immediately in accordance with the run
time set in one of the Programmes A or B; this is useful in providing additional watering if necessary.
The opening run times of the valves are those set in Programme A or B, while the function does not consider:
- START TIMES (watering start times);
- CYCLICAL/WEEKLY SCHEDULE (on which days Programme activation was planned) since watering is imme-
diate.
- press the arrows once at the same time (SEMI-AUTOMATIC mode of Programme A) or twice (SEMI-
AUTOMATIC mode of Programme B)
- Press ENTER to activate the selected programme or suspend it if previously activated. = programme
activated, = programme suspended.
- Press A and B at the same time to exit the function.
In SEMI-AUTOMATIC mode the display will show all the numbers of the active valves, with the cursor on the
active valve; if it is ashing this indicates that the valve is activated by Programme A, if it is permanently on it
indicates that the valve is activated by Programme B or that it is activated in the Manual or Test mode.
SEMI-AUTOMATIC mode is not permitted if MANUAL or TEST modes are active.
Cometa
Cometa
User manual
User manual
2
2
3
3
b
b
a
a
b
b
a
a
1
1
b
b
a
a

Page 10
For Cometa Evolution 4 Zone (p/n): 8014
For Cometa Evolution 6 Zone (p/n): 8016
MANUAL OPERATION
This function can be used to open a single solenoid valve immediately and for a timed duration.
-
press the two arrow buttons simultaneously three times (MANUAL) until the display shows only the numbers of
the valves, the symbol and the message ON or OFF; the cursor blinks on the rst valve available
- select the valve to be opened by moving the cursor with the arrows
- press ENTER to conrm the selection, and proceed to set the watering duration
- use the arrows to set the duration of watering in hours and minutes (up to 4h and 15’)
- press ENTER to conrm the setting; watering will start immediately
- press ENTER to stop watering before the set time has elapsed, if required
- press EXIT (buttons A and B) to quit the manual function
Cometa
Cometa
User manual
User manual
1
1
2
2
3
3
b
b
a
a
b
b
b
b
a
a
x 3
... valve 3-4-5-6
a
a
4
4
5
5
d
d
max 4h 15
’
START!
b
b
b
b
a
a
+
-
c
c
a
a
STOP!
d
d
c
c

Page 11
For Cometa Evolution 4 Zone (p/n): 8014
For Cometa Evolution 6 Zone (p/n): 8016
TEST MODE
The TEST mode is particularly useful during installation or system maintenance as it allows all the valves to be
activated in sequence by the user; this way it is possible to check operation of the each part of the system.
- press the arrows a number of times together until TEST can be selected; the valve numbers are in a cycle.
- to activate the setting, press ENTER, appears OK
- press the arrows together to set the run time
- Press ENTER to conrm the setting; watering begins immediately.
- Press A and B at the same time to exit the function (by carrying out this operation, the watering test in
progress is NOT interrupted)
To stop watering after exiting the function ( A and B pressed at the same time), repeat the step 1 and then press
ENTER.
TEST mode takes priority: if it is activated, all other modes are interrupted (for example, MANUAL, AUTOMATIC,
SEMI-AUTOMATIC, etc.).
Cometa
Cometa
User manual
User manual
1
1
2
2
3
3
4
4
5
5
a
a
a
a
b
b
b
b
a
a
b
b
a
a
b
b
a
a
b
b

Page 12
For Cometa Evolution 4 Zone (p/n): 8014
For Cometa Evolution 6 Zone (p/n): 8016
% FUNCTION
The BUDGET function enables an easy and swift adjustment of the selected programme duration to changing
climatic conditions; times can be varied without diculty: either reduced to 0 (this is the quickest way to deactivate the set programme) or increased to 200%, without any need to change the watering duration selected in
the programmes. 100% corresponds to the duration set when the timer is programmed. The adjustment is independent for each programme (A and B).
- press the left arrow and the middle button (%): the symbols % and A will appear
- press ENTER to activate the selection of a percentage for programme A
- use the arrows to select the percentage (e.g. from 100% to 150%)
- press ENTER to conrm the setting for programme A
- press the left arrow and the middle button again (%): the symbols % and B appear
- repeat steps 2) to 4) to select the percentage for programme B (example: from 100% to 75%)
- press ENTER to conrm the setting for programme B
- press EXIT (buttons A and B) to quit the % function
Cometa
Cometa
User manual
User manual
1
1
2
2
3
3
b
b
a
a
b
b
a
a
f
f
d
d
c
c
e
e
d
d
d
d
c
c
c
c
0 ÷ 200
f
f
f
f
e
e
0 ÷ 200
b
b
a
a
0 ÷ 200
e
e

Page 13
For Cometa Evolution 4 Zone (p/n): 8014
For Cometa Evolution 6 Zone (p/n): 8016
STOP FUNCTION
This function can be used to suspend watering for a duration ranging from a few minutes up to 15 days
- press the middle button and the right arrow (STOP)
- Press ENTER to activate the control function.
-
set the number of days for which watering is to be suspended, using the right arrow (10 days, for example). Press
ENTER to conrm
- press EXIT (buttons A and B) to quit the setting
- press the middle button and the right arrow again (STOP) to reactivate watering.
Cometa
Cometa
User manual
User manual
1
1
2
2
3
3
b
b
a
a
d
d
c
c
b
b
a
a
per 10
4
4
5
5
6
6
d
d
d
d
e
e
c
c
b
b
a
a
c
c

Page 14
For Cometa Evolution 4 Zone (p/n): 8014
For Cometa Evolution 6 Zone (p/n): 8016
RESET FUNCTION
The RESET function re-initialises Cometa® deleting all the programmes which were previously set by the user
but keeping the factory programmes in the memory
- Press A and B at the same time for at least 10 seconds.
- Press ENTER to conrm the setting.
After a RESET, the current time, year, day and month must be reset and Programmes A and/or B.
If Programmes A and/or B are not set after a RESET, the factory programme will automatically be started
(activation of each line for 10 MINUTES, at 7:00, ON EACH day of the week).
Cometa
Cometa
For Cometa Evolution 4 Zone (p/n): 8014
For Cometa Evolution 6 Zone (p/n): 8016
User manual
User manual
1
1
2
2
b
b
a
a
10 sec.
FACTORY PROGRAMME
The timer is provided with an internal memory containing a safety programme designed to activate each watering line for 10 minutes a day, every day, when the time displayed in the clock eld reaches 7:00. To activate this
function, press buttons A and B simultaneously (EXIT) and hold them for at least 10 seconds. The display blinks,
and pressing any button in this situation will restore the timer to the previous situation.
1
1
2
2
3
3
b
b
b
b
a
a
a
a
10 sec.
every days
valve 110’
valve 210’
valve 310’
valve 410’
valve 510’
valve 610’

Page 15
For Cometa Evolution 4 Zone (p/n): 8014
For Cometa Evolution 6 Zone (p/n): 8016
ENABLING THE MASTER VALVE
The cut o valve (Master Valve) or a supply pump (through the control relay of the relative contactor) allow water to
be added to the system only when required for watering needs.
Master Valve: is an additional valve which is tted upstream of the valves associated with the various watering areas;
it is only opened by Cometa® during watering operations.
Supply pump: if the water supply comes from a well, tank or cistern, the pump is needed to ensure the system has
enough pressure. Cometa® is therefore able to control pump activation only during watering operations.
If the system has a Master Valve, it must be enabled as follows:
- press A or B once
- press right arrow until the cursor moves to
- to activate the Master Valvesetting, press ENTER, appears OK
- press right arrow to activate or deactivate the Master Valve. = Master Valve enabled, = Master Valve
NOT enabled
- Press ENTER to conrm the setting.
- Press A and B at the same time to exit the function.
Cometa
Cometa
For more information and further details, please consult the instruction manual supplied with the product.
User manual
User manual
1
1
2
2
3
3
4
4
5
5
6
6
b
b
a
a
b
b
a
a
b
b
a
a
b
b
a
a
b
b
a
a
b
b
a
a
 Loading...