

Page 1

Citrix NetScaler Hardware Installation
and Setup Guide
Citrix NetScaler 9.3
Page 2

Copyright and Trademark Notice
Copyright © 2013 Citrix Systems, Inc. All rights reserved. NO PART OF THIS DOCUMENT MAY BE REPRODUCED
OR TRANSMITTED IN ANY FORM OR BY ANY MEANS OR USED TO MAKE DERIVATIVE WORK (SUCH AS
TRANSLATION, TRANSFORMATION, OR ADAPTATION) WITHOUT THE EXPRESS WRITTEN PERMISSION OF
CITRIX SYSTEMS, INC.
ALTHOUGH THE MATERIAL PRESENTED IN THIS DOCUMENT IS BELIEVED TO BE ACCURATE, IT IS
PRESENTED WITHOUT WARRANTY OF ANY KIND, EXPRESS OR IMPLIED. USERS MUST TAKE ALL
RESPONSIBILITY FOR THE USE OR APPLICATION OF THE PRODUCT(S) DESCRIBED IN THIS MANUAL.
CITRIX SYSTEMS, INC. OR ITS SUPPLIERS DO NOT ASSUME ANY LIABILITY THAT MAY OCCUR DUE TO THE
USE OR APPLICATION OF THE PRODUCT(S) DESCRIBED IN THIS DOCUMENT. INFORMATION IN THIS
DOCUMENT IS SUBJECT TO CHANGE WITHOUT NOTICE. COMPANIES, NAMES, AND DATA USED IN
EXAMPLES ARE FICTITIOUS UNLESS OTHERWISE NOTED.
This equipment has been tested and found to comply with the limits for a Class A digital device, pursuant to part 15 of
the FCC Rules. These limits are designed to provide reasonable protection against harmful interference when the
equipment is operated in a commercial environment. This equipment generates, uses, and can radiate radio-frequency
energy and, if not installed and used in accordance with the instruction manual, may cause harmful interference to radio
communications. Operation of this equipment in a residential area is likely to cause harmful interference in which case
the user will be required to correct the interference at his or her own expense.
Pursuant to the rules and regulations of the Federal Communications Commission, changes or modifications to this
product not expressly approved by Citrix Systems, Inc., could void your authority to operate the product. Note the FCC
rules and regulations are not included for software products, such as virtual appliances.
AppCache, AppCompress, AppDNA, App-DNA, AppFlow, AppScaler, Apptitude, Citrix, Citrix Access Gateway, Citrix
Application Firewall, Citrix Cloud Center, Citrix Systems, Citrix XenApp, CloudGateway, CloudBridge, CloudPortal,
CloudStack, EdgeSight, Flex Tenancy, HDX, ICA, MPX, nCore, NetScaler, NetScaler App Delivery Controller, NetScaler
Access Gateway, NetScaler App Firewall, NetScaler CloudConnector, NetScaler Gateway, NetScaler SDX, Netviewer,
Network Link, SecureICA, VMLogix LabManager, VMLogix StageManager, VPX, Xen, Xen Source, XenApp,
XenAppliance, XenCenter, XenClient, XenDesktop, XenEnterprise, XenServer, XenSource, Xen Data Center, and
Zenprise are trademarks of Citrix Systems, Inc. and/or one of its subsidiaries, and may be registered in the U.S. and
other countries. Other product and company names mentioned herein may be trademarks of their respective
companies.
All rights reserved.
Last Updated: November 2013
Document code: December 26 2013 23:21:11
Page 3

Contents
Preface....................................................................................................7
Formatting Conventions for NetScaler Documentation ......................................7
Documentation Available on the NetScaler Appliance .......................................8
Getting Service and Support ..................................................................9
NetScaler Documentation Feedback .........................................................9
1 Introduction to the Hardware Platforms ...........................................................11
Common Hardware Components ........................................................... 12
LCD Display.............................................................................12
Ports .................................................................................... 16
RS232 Serial Port..................................................................17
Copper Ethernet Ports.............................................................17
Management Ports.................................................................17
1G SFP, 10G SFP+, and XFP Ports...............................................17
1G Pluggable Media............................................................... 18
10 GE Pluggable Media........................................................... 20
LED Port-Status Indicators........................................................ 23
Field Replaceable Units.................................................................26
Power Supply ......................................................................26
CompactFlash Card................................................................30
Solid-State Drive...................................................................33
Hard Disk Drive.................................................................... 35
Direct Attach Cable................................................................ 36
Hardware Platforms ..........................................................................38
Citrix NetScaler 9010 FIPS............................................................. 38
Citrix NetScaler 12000-10G.............................................................39
Citrix NetScaler MPX 5500............................................................. 41
Citrix NetScaler MPX 5550 and MPX 5650............................................ 42
Citrix NetScaler MPX 7500 and MPX 9500............................................ 43
Citrix NetScaler MPX 8200, MPX 8400, MPX 8600, and MPX 8800..................45
Citrix NetScaler MPX 9700, MPX 10500, MPX 12500, and MPX 15500 .............47
iii
Page 4

Contents
Citrix NetScaler MPX 11500, MPX 13500, MPX 14500, MPX 16500, MPX
18500, and MPX 20500 ................................................................50
Citrix NetScaler MPX 15000............................................................51
Citrix NetScaler MPX 17000............................................................53
Citrix NetScaler MPX 17500, MPX 19500, and MPX 21500...........................54
Citrix NetScaler MPX 17550, MPX 19550, MPX 20550, and MPX 21550............ 56
Citrix NetScaler MPX 22040, MPX 22060, MPX 22080, MPX 22100, and MPX
22120....................................................................................57
Summary of Hardware Specifications .......................................................59
2 Preparing for Installation............................................................................69
Unpacking the Appliance ....................................................................70
Preparing the Site and Rack ................................................................ 71
Site Requirements...................................................................... 71
Rack Requirements.....................................................................71
Cautions and Warnings...................................................................... 72
Electrical Safety Precautions........................................................... 72
Appliance Precautions.................................................................. 73
Rack Precautions....................................................................... 74
3 Installing the Hardware..............................................................................75
Rack Mounting the Appliance ............................................................... 76
To remove the inner rails from the rail assembly.......................................77
To attach the inner rails to the appliance............................................... 77
To install the rack rails on the rack......................................................78
To install the appliance in the rack......................................................79
Installing and Removing 1G SFP Transceivers .............................................80
To install a 1G SFP transceiver.........................................................81
To remove a 1G SFP transceiver.......................................................82
Installing and Removing XFP and 10G SFP+ Transceivers ................................82
To install an XFP/10G SFP+ transceiver............................................... 83
To remove an XFP/10G SFP+ transceiver............................................. 84
Connecting the Cables ...................................................................... 85
Connecting the Ethernet Cables........................................................85
To connect an Ethernet cable to a 10/100/1000BASE-T port or 1G SFP
copper transceiver................................................................. 85
To connect the Ethernet cable to a 1G SFP fiber, 10G SFP+, or XFP
transceiver......................................................................... 86
Connecting the Console Cable......................................................... 86
To connect the console cable to a computer or terminal......................... 86
iv
Page 5

Citrix NetScaler Hardware Installation and Setup Guide
Connecting the Power Cable........................................................... 86
To connect the appliance to the power source....................................87
Switching on the Appliance.................................................................. 87
To switch on the appliance..............................................................87
4 Initial Configuration..................................................................................89
Using the LCD Keypad.......................................................................90
Using the NetScaler Serial Console .........................................................91
To configure initial settings by using a serial console..................................91
Using the Setup Wizard ..................................................................... 93
To configure initial settings by using the Setup Wizard................................ 93
Using DHCP for Initial Access ...............................................................94
Prerequisites............................................................................ 95
To configure a Linux/UNIX DHCP server for the NetScaler appliance................ 95
Sample DHCP configuration (dhcpd.conf)........................................ 96
Implementing an Initial NetScaler Configuration from a Remote Computer.......... 96
To find the SNIP address from the NetScaler console............................97
To find the SNIP address from the DHCP server................................. 97
Using DHCP When a Configuration File is Present....................................98
Accessing a NetScaler by Using SSH Keys and No Password.............................99
To generate the keys and connect to a remote NetScaler by using SSH keys....... 99
Changing the Administrative Password.................................................... 101
To change the administrative password by using the configuration utility........... 101
To change the administrative password by using the command line interface...... 102
5 Lights Out Management Port of the NetScaler Appliance.......................................103
Accessing the LOM Port by using a Web Browser.........................................104
Configuring the LOM Port...................................................................104
To Configure the NetScaler LOM Port................................................ 104
Power Cycling the Appliance............................................................... 105
To power cycle the appliance..........................................................105
Performing a Core Dump .................................................................. 105
To perform a core dump............................................................... 105
Accessing the Appliance by using the Access Console................................... 105
Obtaining Properties of the Host........................................................... 106
Obtaining Health Monitoring Information...................................................106
Obtaining the MAC Address and the Serial Number of the Appliance.................... 106
Power Control Operations using the LOM Port............................................ 107
6 Migrating the Configuration of an Existing NetScaler Appliance to Another Appliance..... 109
v
Page 6

Contents
To migrate a configuration.................................................................. 110
vi
Page 7

Preface
Learn about the Citrix® NetScaler® collection of documentation, including information
about support options and ways to send us feedback.
In This Preface:
Formatting Conventions for NetScaler Documentation
w
Documentation Available on the NetScaler Appliance
w
Getting Service and Support
w
NetScaler Documentation Feedback
w
For information about new features and enhancements for this release, see the Citrix
NetScaler 9.3 Release Notes at http://support.citrix.com/article/CTX128669.
Formatting Conventions for NetScaler
Documentation
The NetScaler documentation uses the following formatting conventions.
Table 1. Formatting Conventions
Convention Meaning
Boldface In text paragraphs or steps in a
procedure, information that you type
exactly as shown (user input), or an
element in the user interface.
Monospace
<angle brackets> A term enclosed in angle brackets is a
Text that appears in a command-line
interface. Used for examples of
command-line procedures. Also used to
distinguish interface terms, such as
names of directories and files, from
ordinary text.
variable placeholder, to be replaced with
an appropriate value. Do not enter the
angle brackets.
7
Page 8

Preface
Convention Meaning
[ brackets ]
| (vertical bar)
Optional items in command statements.
For example, in the following command,
[ -range <positiveInteger> ] means that
you have the option of entering a range,
but it is not required:
add lb vserver <name> <serviceType>
<IPAddress> <port> [ -range
<positiveInteger>]
Do not type the brackets themselves.
A separator between options in braces or
brackets in command statements. For
example, the following indicates that you
choose one of the following load
balancing methods:
<lbMethod> = ( ROUNDROBIN |
LEASTCONNECTION |
LEASTRESPONSETIME | URLHASH |
DOMAINHASH | DESTINATIONIPHASH |
SOURCEIPHASH | SRCIPDESTIPHASH |
LEASTBANDWIDTH | LEASTPACKETS |
TOKEN | SRCIPSRCPORTHASH | LRTM |
CALLIDHASH | CUSTOMLOAD )
… (ellipsis) You can repeat the previous item or
items in command statements. For
example, /route:<DeviceName>[ ,…]
means you can type additional
<DeviceNames> separated by commas.
Documentation Available on the NetScaler Appliance
A complete set of Citrix® NetScaler® documentation is available on the Documentation
tab of your NetScaler appliance and at http://support.citrix.com/ (PDF version), and at
http://edocs.citrix.com (HTML version). (The PDF version of the documents require
Adobe Reader, available at http://adobe.com/.)
To view the documentation
1. From a Web browser, log on to the NetScaler Appliance.
2. Click the Documentation tab.
8
Page 9

Citrix NetScaler Hardware Installation and Setup Guide
3. To view a short description of each document, hover the mouse pointer over the
title. To open a document, click the title.
Getting Service and Support
Citrix® offers a variety of resources for support with your Citrix environment, including
the following:
The Knowledge Center is a self-service, Web-based technical support database that
w
contains thousands of technical solutions, including access to the latest hotfixes,
service packs, and security bulletins.
Technical Support Programs for both software support and appliance maintenance
w
are available at a variety of support levels.
The Subscription Advantage program is a one-year membership that gives you an
w
easy way to stay current with the latest product version upgrades and
enhancements.
Citrix Education provides official training and certification programs on virtually all
w
Citrix products and technologies.
For more information about Citrix services and support, see the Citrix Systems Support
Web site at http://www.citrix.com/lang/English/support.asp.
You can also participate in and follow technical discussions offered by the experts on
various Citrix products at the following sites:
http://community.citrix.com
w
http://twitter.com/citrixsupport
w
http://forums.citrix.com/support
w
NetScaler Documentation Feedback
You are encouraged to provide feedback and suggestions so that we can enhance the
documentation. You can send an email to nsdocs_feedback@citrix.com. In the subject
line, specify "Documentation Feedback." Please include the title of the guide and the
page number in the email message.
You can also provide feedback through the Knowledge Center at http://
support.citrix.com/.
To provide feedback at the Knowledge Center home page
1. Go to the Knowledge Center home page at http://support.citrix.com/.
2. On the Knowledge Center home page, under Products, expand NetScaler, and then
click the NetScaler release for which you want to provide feedback.
3. On the Documentation tab, click the guide name, and then click Article
Feedback.
9
Page 10

Preface
4. On the Documentation Feedback page, complete the form, and then click Submit.
10
Page 11

Chapter 1
Introduction to the Hardware Platforms
Topics:
• Common Hardware
Components
• Hardware Platforms
• Summary of Hardware
Specifications
The NetScaler hardware platforms range from the single
processor MPX 5500 platform to the high-capacity, MPX
22040/22060/22080/22100/22120 hardware platform. The
various NetScaler hardware platforms are similar in that they
use the same types of components, but different models
provide different hardware capabilities. All NetScaler
hardware platforms support the NetScaler software.
Some of the hardware platforms are available as dedicated
application firewall appliances or secure application access
appliances.
11
Page 12

Chapter 1 Introduction to the Hardware Platforms
Common Hardware Components
Each platform has front panel and back panel hardware components. The front panel
has an LCD display and an RS232 serial console port. The number, type, and location of
ports—copper Ethernet, copper and fiber 1G SFP, 10G SFP+, and XFP—vary by hardware
platform. The back panel provides access to the fan and the field replaceable units
(power supplies, CompactFlash card, and solid-state and hard-disk drives).
LCD Display
The LCD display on the front of every appliance displays messages about the current
operating status of the appliance. These messages communicate whether your
appliance has started properly and is operating normally. If the appliance is not
operating normally, the LCD displays troubleshooting messages.
The LCD displays real-time statistics, diagnostic information, and active alerts. The
dimensions of the LCD limit the display to two lines of 16 characters each, causing the
displayed information to flow through a sequence of screens. Each screen shows
information about a specific function.
The LCD has a neon backlight. Normally, the backlight glows steadily. When there is an
active alert, it blinks rapidly. If the alert information exceeds the LCD screen size, the
backlight blinks at the beginning of each display screen. When the appliance shuts
down, the backlight remains on for one minute and then automatically turns off.
There are nine types of display screens on the LCD display. The first two screens in the
following list, the booting screen and the startup screen, appear when your appliance
is starting up. The other screens, except the out-of-service screen, can appear while
the appliance is operating. They show configuration information, alerts, HTTP
information, network traffic information, CPU load information, and port information
for your appliance.
Booting Screen.
The booting screen is displayed immediately after the appliance is turned on. The
first line displays the hardware platform, as shown in the following figure.
Figure 1-1. LCD Booting Screen
The newer MPX appliances display NSMPX followed by the platform number in the
first line. For example, the MPX 7500/9500 appliances display NSMPX-7500. To view
the model number, at the NetScaler command line, type show license. Scroll to the
end of the command output to view the model number.
12
Startup Screen.
Page 13
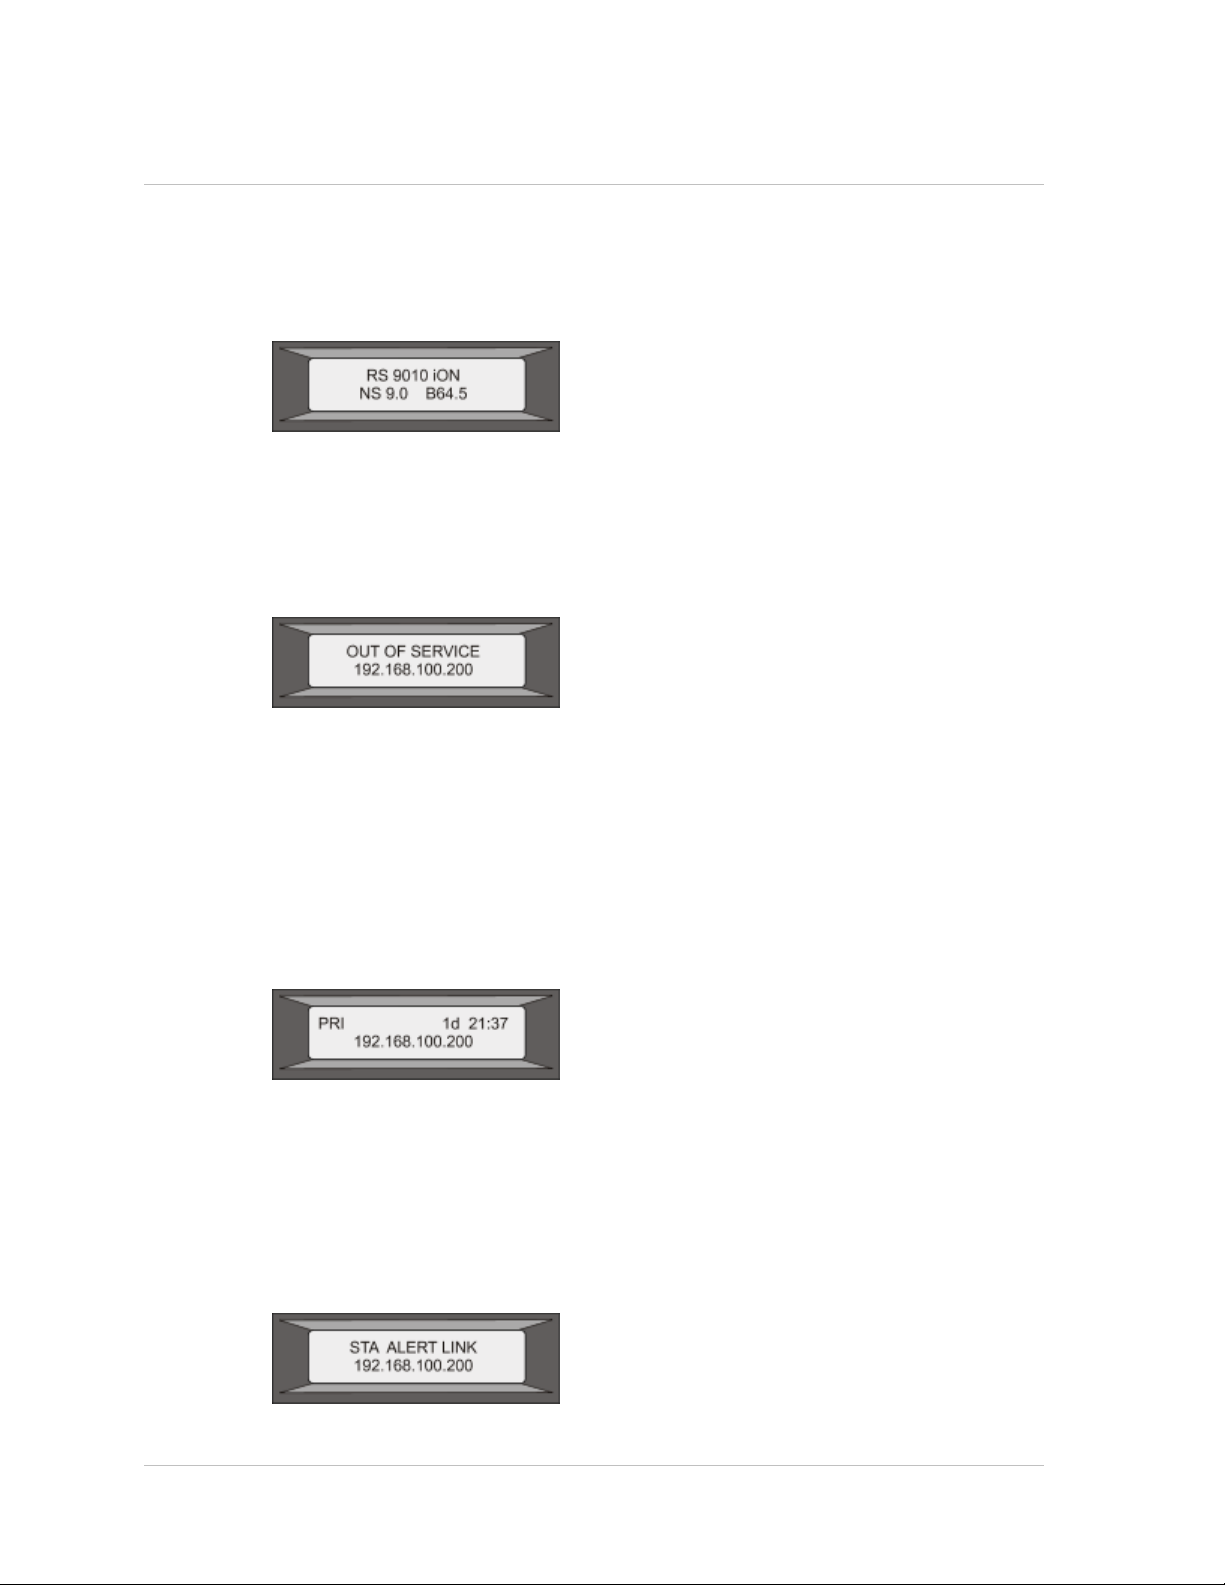
Citrix NetScaler Hardware Installation and Setup Guide
The startup screen is displayed for a few seconds after the appliance successfully
begins operation. The first line displays the hardware platform, and the second line
displays the software version and build number, as shown in the following figure.
Figure 1-2. LCD Startup Screen
Out-of-Service Screen.
The out-of-service screen is displayed when the appliance has undergone a
controlled shutdown, as shown in the following figure.
Figure 1-3. LCD Out-of-service Screen
Configuration Screen.
The first line displays the appliance status (STA, PRI, or SEC) and uptime. STA
indicates that the appliance is in standalone mode, PRI indicates that the appliance
is a primary node in a high availability (HA) pair, and SEC indicates that the appliance
is a secondary node in an HA pair. Appliance uptime is displayed in HH:MM format.
The second line displays the IP address of the appliance, as shown in the following
figure.
Figure 1-4. LCD Configuration Screen
Alert Screen.
The first line displays the appliance status (STA, PRI, or SEC). STA indicates that the
appliance is in standalone mode, PRI indicates that the appliance is a primary node
in a high availability (HA) pair, and SEC indicates that the appliance is a secondary
node in an HA pair. The second line displays the IP address of the appliance.
Figure 1-5. LCD Known Alert Screen
13
Page 14
Chapter 1 Introduction to the Hardware Platforms
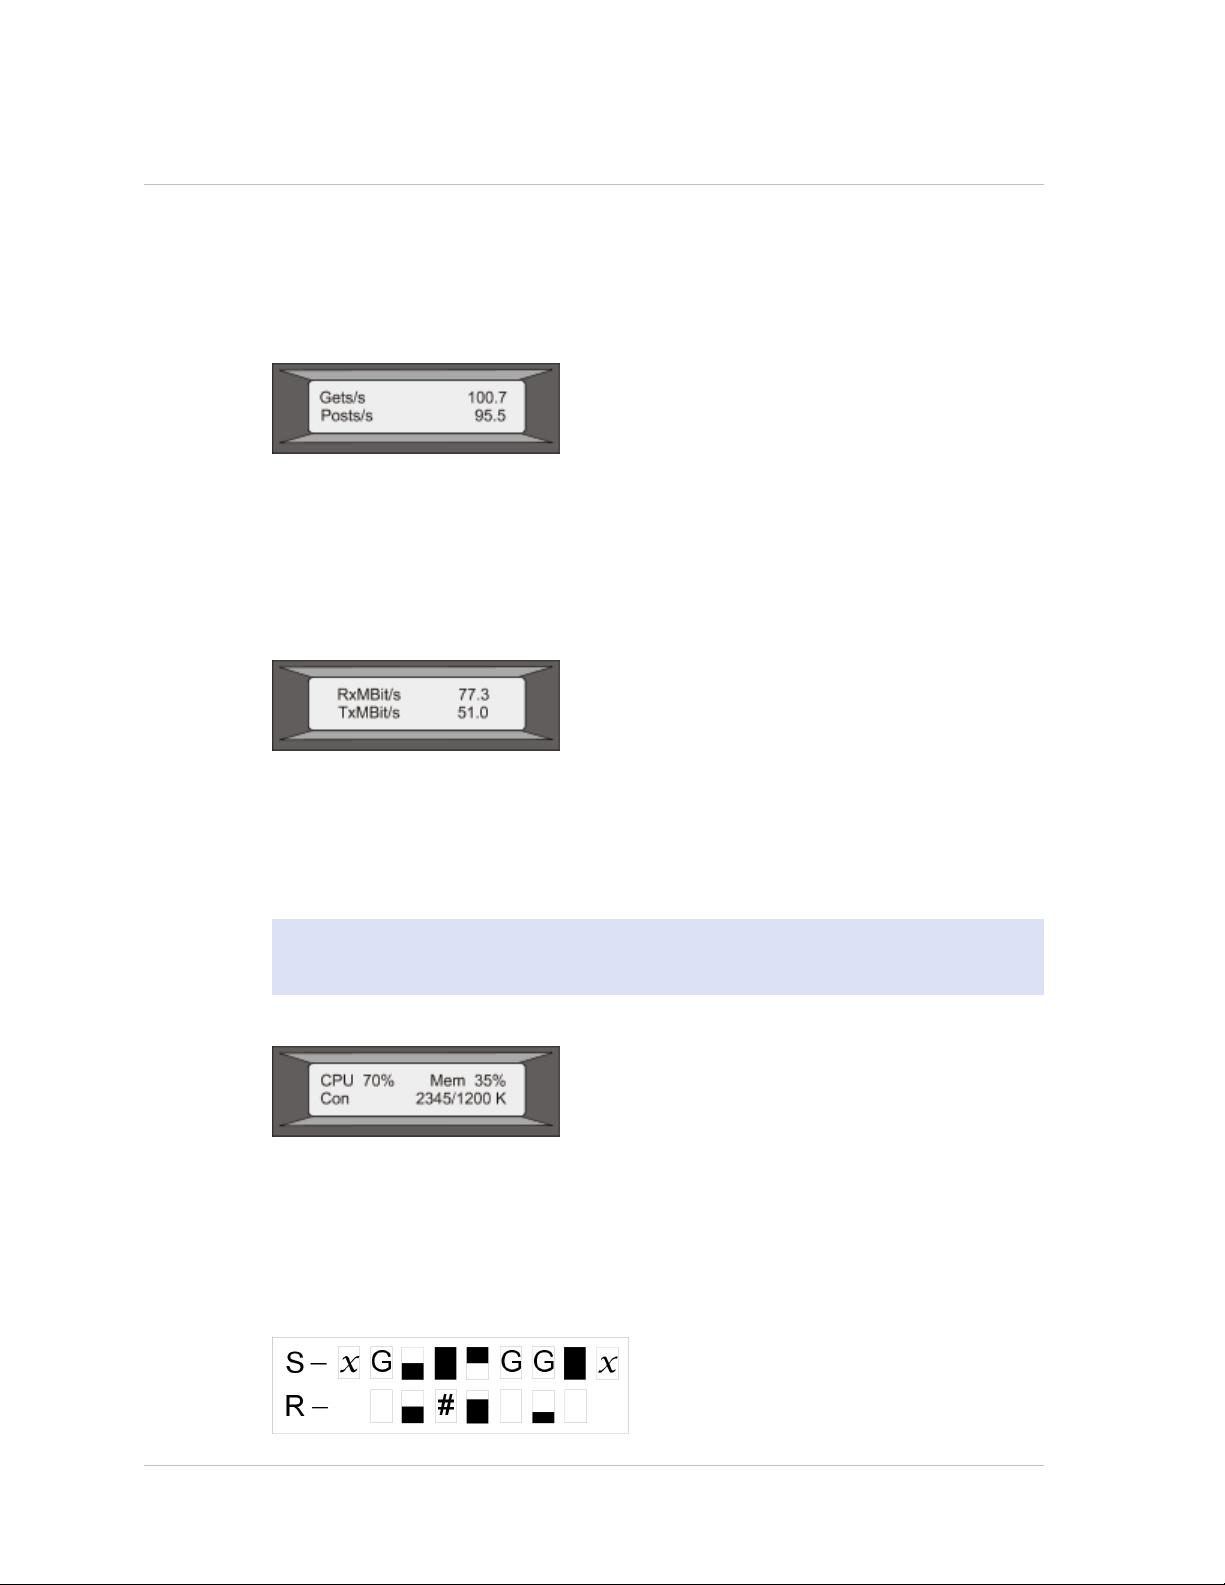
HTTP Statistics Screen.
The first line displays the rate of HTTP GETS per second. The second line displays the
rate of HTTP POSTS per second, as shown in the following figure.
Figure 1-6. LCD HTTP Statistics Screen
Network Traffic Statistics Screen.
The first line displays the rate at which data is received, in megabits per second. The
second line displays the rate of data transmission, in megabits per second, as shown
in the following figure.
Figure 1-7. LCD Network Traffic Statistics Screen
CPU Load, Memory, and Connections Screen.
The first line displays CPU utilization and memory utilization as percentages. The
second line displays the ratio of the number of server connections to the number of
client connections.
Note: If the number of server or client connections exceeds 99,999, the number is
displayed in thousands, indicated by the letter K.
Figure 1-8. LCD CPU Load, Memory, and Connections Screen
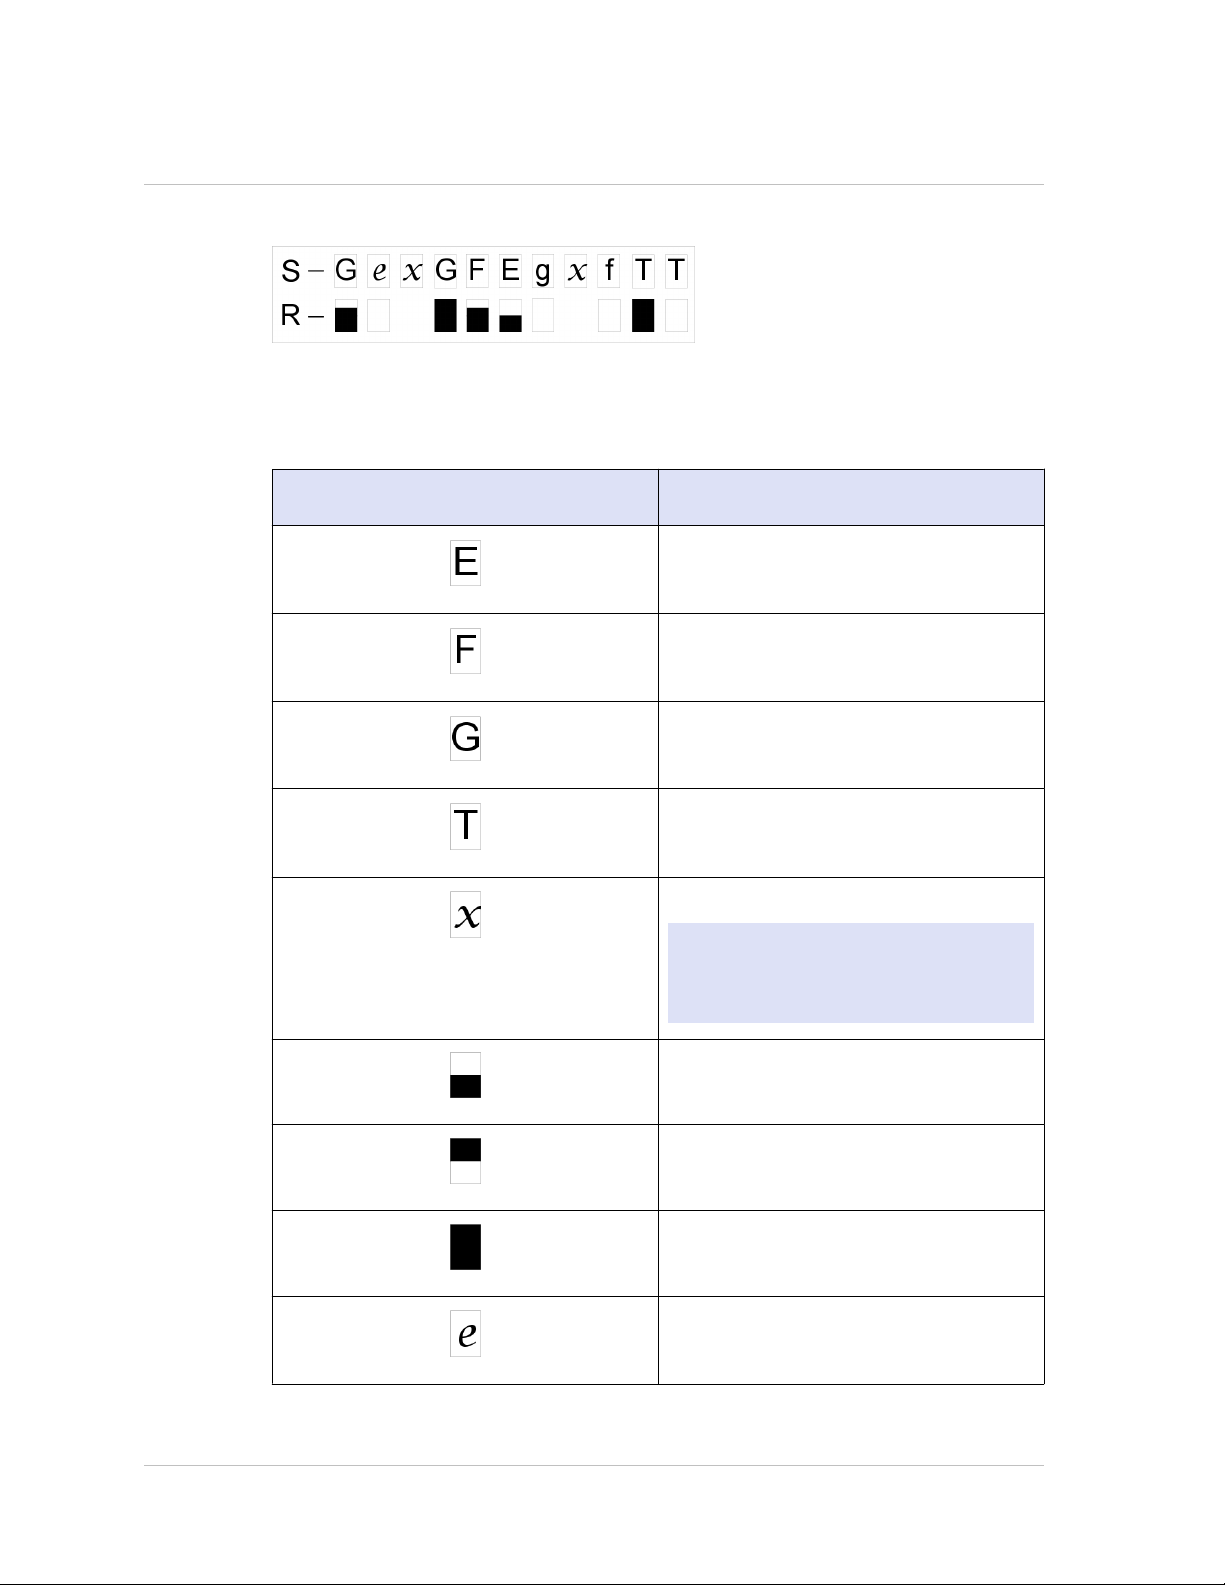
Port Information Screen.
The S row displays port speed, flow control, and duplex information. The R row
displays megabits received per second on the interface. The first port in each row is
the management port.
Figure 1-9. Port Information for an 8-port Appliance
14
Page 15
Citrix NetScaler Hardware Installation and Setup Guide
Figure 1-10. Port Information for a 10-port Appliance
The following table defines the various abbreviations and symbols that appear in the
S row of the port information screen.
Table 1-1. Port Abbreviations and Symbols for S Row
S row abbreviation/symbol Indicates
A rate of 10 megabits per second, full
duplex mode, and flow control OFF.
A rate of 100 megabits per second, full
duplex mode, and flow control OFF.
A rate of 1 gigabit per second, full
duplex mode, and flow control OFF.
A rate of 10 gigabits per second, full
duplex mode, and flow control OFF.
A disconnected port.
Note: The R row does not display an
abbreviation or symbol for a
disconnected port.
Receive flow control regardless of speed
or duplex mode.
Transmit flow control regardless of
speed or duplex mode.
Receive and transmit flow control
regardless of speed or duplex mode.
A rate of 10 megabits per second, half
duplex mode, and flow control OFF.
15
Page 16
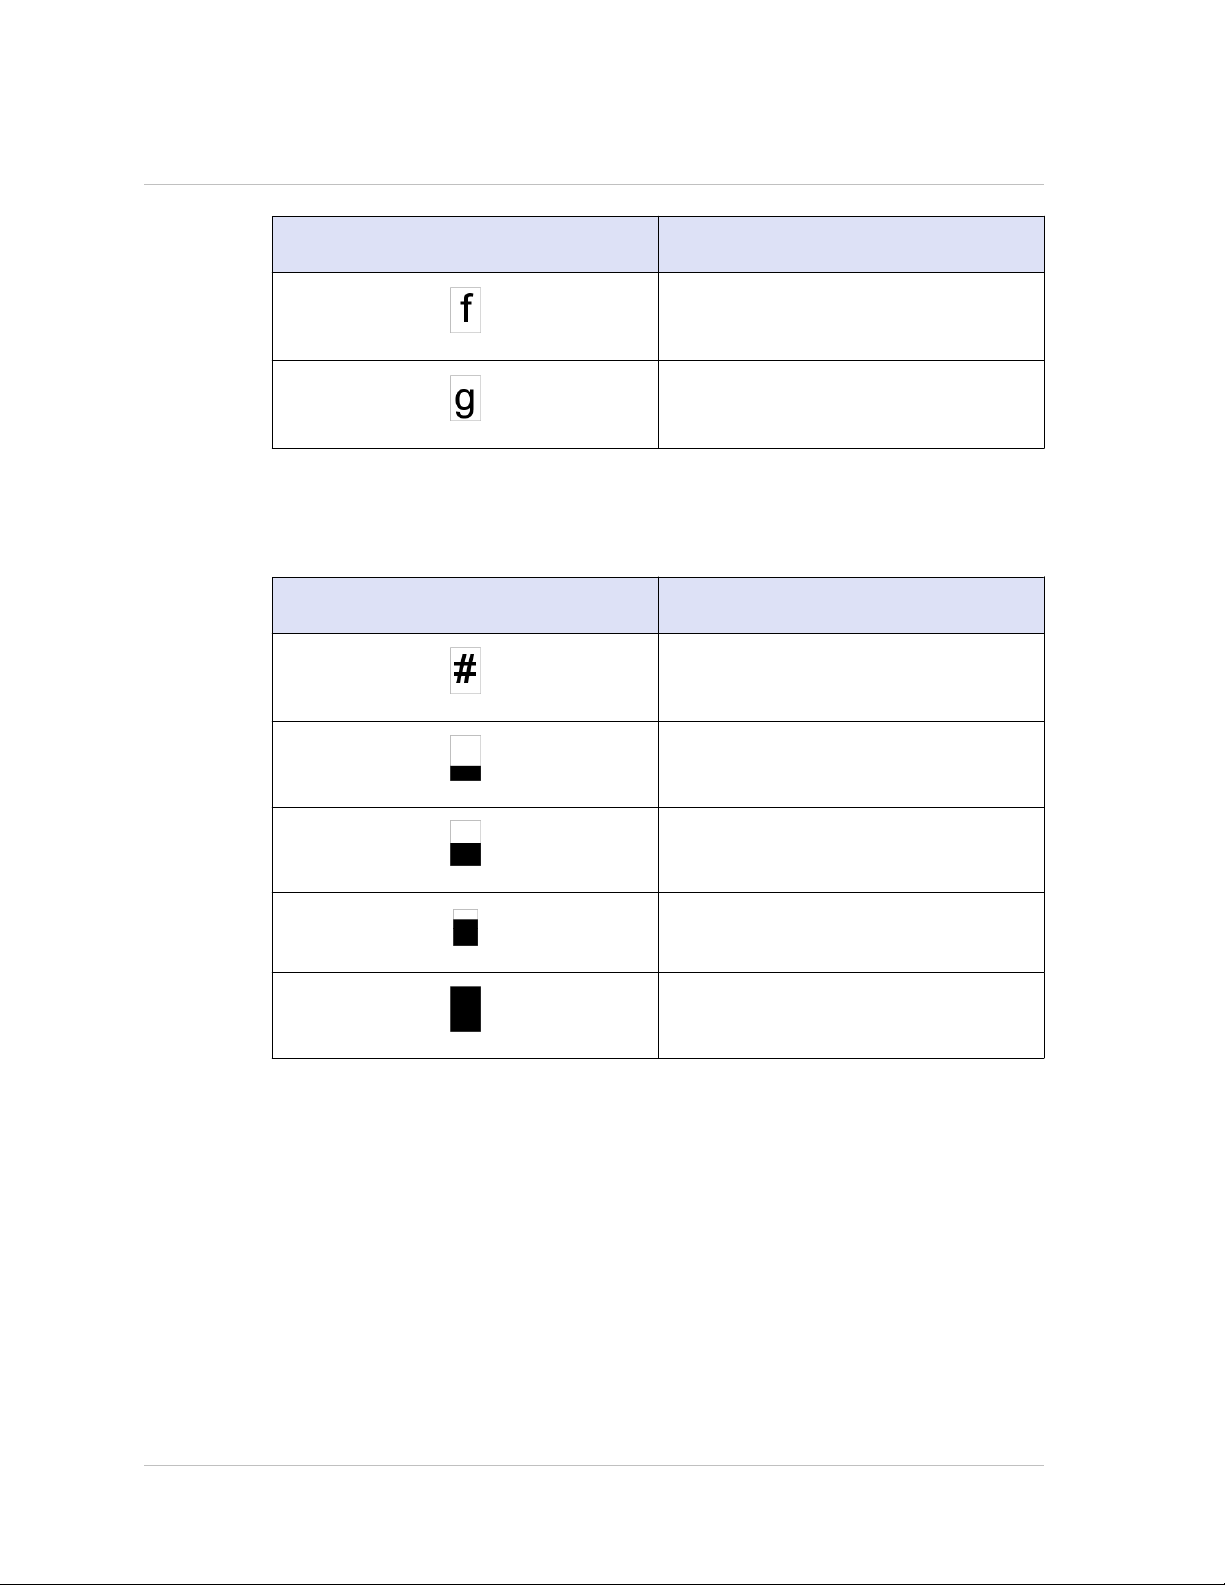
Chapter 1 Introduction to the Hardware Platforms
S row abbreviation/symbol Indicates
The following table defines the various abbreviations and symbols that appear in the
R row of the port information screen.
Table 1-2. Port Abbreviations and Symbols for R Row
R row abbreviation/symbol Indicates
A rate of 100 megabits per second, half
duplex mode, and flow control OFF.
A rate of 1 gigabit per second, half
duplex mode, and flow control OFF.
The port is disabled.
Ports
Receive speed is about 10% of line
speed.
Receive speed is about 50% of line
speed.
Receive speed is about 75% of line
speed.
Receive speed is about 100% of line
speed.
Ports are used to connect the appliance to external devices. NetScaler appliances
support RS232 serial ports, 10/100/1000Base-T copper Ethernet ports, 1-gigabit copper
and fiber 1G SFP ports, and 10-gigabit fiber SFP+ and XFP ports. All NetScaler
appliances have a combination of some or all of these ports. For details on the type
and number of ports available on your appliance, see the section describing that
platform.
16
Page 17

RS232 Serial Port
The RS232 serial console port on the front panel of each appliance provides a
connection between the appliance and a computer, allowing direct access to the
appliance for initial configuration or troubleshooting.
All hardware platforms ship with an appropriate serial cable used to connect your
computer to the appliance. For instructions on connecting your computer to the
appliance, see "Installing the Hardware."
Copper Ethernet Ports
The copper Ethernet ports installed on many models of the appliance are standard RJ45
ports.
There are two types of copper Ethernet ports that may be installed on your appliance:
10/100BASE-T port
The 10/100BASE-T port has a maximum transmission speed of 100 megabits per
second (Mbps). Most platforms have at least one 10/100BASE-T port.
10/100/1000BASE-T port
The 10/100/1000BASE-T port has a maximum transmission speed of 1 gigabit per
second, ten times faster than the other type of copper Ethernet port. Most platforms
have at least one 10/100/1000Base-T port.
Citrix NetScaler Hardware Installation and Setup Guide
To connect any of these ports to your network, you plug one end of a standard Ethernet
cable into the port and plug the other end into the appropriate network connector.
Management Ports
Management ports are standard copper Ethernet ports (RJ45), which are used for direct
access to the appliance for system administration functions.
1G SFP, 10G SFP+, and XFP Ports
A 1G SFP port can operate at a speed of 1 Gbps. It accepts either a copper 1G SFP
transceiver, for operation as a copper Ethernet port, or a fiber 1G SFP transceiver for
operation as a fiber optic port.
The 10G SFP+ and XFP ports are high-speed ports that can operate at speeds of up to
10 Gbps. You need a fiber optic cable to connect to a 10G SFP+ or XFP port. If the other
end of the fiber optic cable is attached to a 1G SFP port, the 10G SFP+ port
automatically negotiates to match the speed of the 1G SFP port.
The following tables list the maximum distance specifications for NetScaler pluggable
media (1G SFP, 10G SFP+, and XFP transceivers).
Note: The tables are categorized by 1G pluggable media and 10G pluggable media.
The 10G SFP+ modules are dual-speed capable and support both 1G and 10G,
depending on the peer switch that the model connects to. These are listed in both
tables.
17
Page 18

Chapter 1 Introduction to the Hardware Platforms
Both tables have the following columns:
SKU: Citrix maintains multiple SKUs for the same part.
w
Description: The price list description of the part.
w
Transmit Wavelength: The nominal transmit wavelength.
w
Cable/Fiber Type: Fiber characteristics affect the maximum transmit distance
w
achievable. This is especially true with 10G on multi-mode fiber (MMF), where
various dispersion components become dominant. For more information, see
http://www.thefoa.org/tech/ref/basic/fiber.html.
Typical Reach: Maximum transmit distance.
w
Products: Some chassis are available with different media options. Use the
w
appropriate data sheet to confirm that your particular chassis type supports the
media.
1G Pluggable Media
The following table lists the maximum distance specifications for 1G transceivers.
Table 1-3. Copper 1G SFP Distance Specifications
SKU Description Transmitt
er
Waveleng
th (nm)
EW3A0000235,
EW3B0000235,
EW3C0000235,
EW3D0000235,
EW3E0000235,
EW3F0000235,
EW3P0000143,
EW3X0000235,
EW3Z0000087
Table 1-4. Short Reach Fiber 1G SFP Distance Specifications
SKU Description Transmitt
Citrix
NetScaler
1G SFP
Ethernet
Copper
(100m) - 4
Pack
n/a Category 5
er
Waveleng
th (nm)
Cable Type Typi
(Cat-5)
Copper
Cable
Fiber Type Typi
Products
cal
Reac
h
(m)
100mMPX 7500/9500,
MPX
8200/8400/8600/8
800, MPX
9700/10500/12500
/15500,
12000-10G, 9010
FIPS, MPX
22040/22060/2208
0/22100/22120
Products
cal
Reac
h
(m)
18
EW3A0000234,
EW3B0000234,
Citrix
NetScaler
850nm
(nominal)
50/125um
MMF,
550mMPX 7500/9500,
MPX
Page 19
Citrix NetScaler Hardware Installation and Setup Guide
EW3C0000234,
EW3D0000234,
EW3E0000234,
EW3F0000234,
EW3P0000142,
EW3X0000234,
EW3Z0000086
Table 1-5. Short Reach Fiber 1G SFP Distance Specifications
SKU Description Transmitt
1G SFP
Ethernet SX
(300m) - 4
Pack
2000MHzkm (OM3)
50/125um
MMF,
500MHz-km
(OM2)
50/125um
MMF,
400MHz-km
62.5/125u
m MMF,
200MHz-km
(OM1)
62.5/125u
m MMF,
160MHz-km
Fiber Type Typi
er
Waveleng
th (nm)
550
m
550
m
300
m
300
m
cal
Reac
h
(m)
8200/8400/8600/8
800, MPX
9700/10500/12500
/15500,
12000-10G, 9010
FIPS, MPX
22040/22060/2208
0/22100/22120
Products
EW3A0000710,
EW3B0000710,
EW3C0000710,
EW3D0000710,
EW3E0000710,
EW3F0000710,
EW3P0000557,
EW3X0000710,
EW3Z0000585
Citrix
NetScaler
1G SFP
Ethernet
Short Range
(300m) -
Single
850nm
(nominal)
50/125um
MMF,
2000MHz-
km (OM3)
50/125um
MMF,
500MHz-km
(OM2)
50/125um
MMF,
400MHz-km
62.5/125u
m MMF,
200MHz-km
(OM1)
62.5/125u
m MMF,
160MHz-km
550mMPX
8200/8400/8600/8
800, MPX
9700/10500/12500
/15500, MPX
550
m
550
m
275
m
220
m
17500/19500/2150
0, MPX
11500/13500/1450
0/16500/18500/20
500, MPX
22040/22060/2208
0/22100/22120
19
Page 20

Chapter 1 Introduction to the Hardware Platforms
Table 1-6. Long Reach Fiber 1G SFP Distance Specifications
SKU Description Transmitt
er
Waveleng
th (nm)
EW3A0000712,
EW3B0000712,
EW3C0000712,
EW3D0000712,
EW3E0000712,
EW3F0000712,
EW3P0000559,
EW3X0000712,
EW3Z0000587
Table 1-7. Long Reach Fiber 1G SFP Distance Specifications
SKU Description Transmitt
Citrix
NetScaler
1G SFP
Ethernet LX
- Single
1310nm
(nominal)
er
Waveleng
th (nm)
Fiber Type Typi
9/125um
SMF
Fiber Type Typi
cal
Reac
h
(m)
10
km
cal
Reac
h
(m)
Products
MPX 7500/9500,
MPX
8200/8400/8600/8
800, MPX
9700/10500/12500
/15500,
12000-10G, 9010
FIPS, MPX
22040/22060/2208
0/22100/22120
Products
EW3A0000711,
EW3B0000711,
EW3C0000711,
EW3D0000711,
EW3E0000711,
EW3F0000711,
EW3P0000558,
EW3X0000711,
EW3Z0000586
Citrix
NetScaler
1G SFP
Ethernet
Long Range
(10km) -
Single
10 GE Pluggable Media
The following table lists the maximum distance specifications for 10G transceivers.
Table 1-8. Short Reach Fiber 10G SFP+ Distance Specifications
SKU Description Transmitt
1310nm
(nominal)
er
Waveleng
th (nm)
9/125um
SMF
Fiber Type Typi
10
km
cal
Reac
h
(m)
MPX
8200/8400/8600/8
800, MPX
9700/10500/12500
/15500, MPX
17500/19500/2150
0, MPX
11500/13500/1450
0/16500/18500/20
500, MPX
22040/22060/2208
0/22100/22120
Products
20
Page 21
Citrix NetScaler Hardware Installation and Setup Guide
EW3A0000710,
EW3B0000710,
EW3C0000710,
EW3D0000710,
EW3E0000710,
EW3F0000710,
EW3P0000557,
EW3X0000710,
EW3Z0000585
Table 1-9. Short Reach XFP (10G) Distance Specifications
Citrix
NetScaler
10G SFP+
Ethernet
Short Range
(300m) -
Single
850nm
(nominal)
50/125um
MMF,
2000MHz-
km (OM3)
50/125um
MMF,
500MHz-km
(OM2)
50/125um
MMF,
400MHz-km
62.5/125u
m MMF,
200MHz-km
(OM1)
62.5/125u
m MMF,
160MHz-km
300mMPX
8200/8400/8600/8
800, MPX
9700/10500/12500
/15500, MPX
82 m
66 m
33 m
26 m
17500/19500/2150
0, MPX
11500/13500/1450
0/16500/18500/20
500, MPX
17550/19550/2055
0/21550, MPX
22040/22060/2208
0/22100/22120
SKU Description Transmitt
er
Waveleng
th (nm)
EW3A0000713,
EW3B0000713,
EW3C0000713,
EW3D0000713,
EW3E0000713,
EW3F0000713,
EW3P0000560,
EW3X0000713,
EW3Z0000588
Citrix
NetScaler
XFP Short
Range 10
Gigabit
Ethernet(30
0m) -
Single
850nm
(nominal)
Fiber Type Typi
cal
Reac
h
(m)
50/125um
MMF,
2000MHz-
km (OM3)
50/125um
MMF,
500MHz-km
(OM2)
50/125um
MMF,
400MHz-km
62.5/125u
m MMF,
200MHz-km
(OM1)
300m12000-10G, MPX
82 m
66 m
33 m
Products
15000/17000
21
Page 22

Chapter 1 Introduction to the Hardware Platforms
62.5/125u
26 m
m MMF,
160MHz-km
Table 1-10. Long Reach Fiber 10G SFP+ Distance Specifications
SKU Description Transmitt
er
Waveleng
th (nm)
Fiber Type Typi
cal
Reac
h
(m)
EW3A0000711,
EW3B0000711,
EW3C0000711,
EW3D0000711,
EW3E0000711,
EW3F0000711,
EW3P0000558,
Citrix
NetScaler
10G SFP+
Ethernet
Long Range
(10km) -
Single
1310nm
(nominal)
9/125um
SMF
10
km
EW3X0000711,
EW3Z0000586
Products
MPX
8200/8400/8600/8
800, MPX
9700/10500/12500
/15500, MPX
17500/19500/2150
0, MPX
11500/13500/1450
0/16500/18500/20
500, MPX
17550/19550/2055
0/21550, MPX
22040/22060/2208
0/22100/22120
22
Table 1-11. Long Reach Fiber XFP (10G) Distance Specifications
SKU Description Transmitt
er
Waveleng
th (nm)
Fiber Type Typi
cal
Reac
h
(m)
EW3A0000714,
EW3B0000714,
EW3C0000714,
EW3D0000714,
EW3E0000714,
EW3F0000714,
EW3P0000561,
EW3X0000714,
Citrix
NetScaler
XFP Long
Range 10
Gigabit
Ethernet(10
km) -
Single
1310nm
(nominal)
9/125um
SMF
10
km
EW3Z0000589
Products
12000-10G, MPX
15000/17000
Page 23
Citrix NetScaler Hardware Installation and Setup Guide
Table 1-12. Citrix Direct Attached (DAC) Copper TwinAx 10G SFP+ Passive Cables
Specifications
SKU Description Products
3007776 Citrix NetScaler 1m
DAC SFP+ Cable for
up to 1m distance
3007777 Citrix NetScaler 3m
DAC SFP+ Cable for
up to 3m distance
3007778 Citrix NetScaler 5m
DAC SFP+ Cable for
up to 5m distance
Table 1-13. Cisco DAC TwinAx Passive Cables Specifications
MPX 8200/8400/8600/8800, MPX
17500/19500/21500, MPX
11500/13500/14500/16500/1850
0/20500, MPX
17550/19550/20550/21550, MPX
22040/22060/22080/22100/2212
0
MPX 8200/8400/8600/8800, MPX
17500/19500/21500, MPX
11500/13500/14500/16500/1850
0/20500, MPX
17550/19550/20550/21550, MPX
22040/22060/22080/22100/2212
0
MPX 8200/8400/8600/8800, MPX
17500/19500/21500, MPX
11500/13500/14500/16500/1850
0/20500, MPX
17550/19550/20550/21550, MPX
22040/22060/22080/22100/2212
0
Cisco Part Number Description
SFP-H10Gb-CU1M 10GBASE-CU SFP+ Cable 1 Meter
SFP-H10Gb-CU3M 10GBASE-CU SFP+ Cable 3 Meter
SFP-H10Gb-CU5M 10GBASE-CU SFP+ Cable 5 Meter
Note: For more information, contact Cisco sales support.
LED Port-Status Indicators
Note: This section applies to the MPX 5500, MPX 5550/5650, MPX 7500/9500, MPX
8200/8400/8600/8800, MPX 9700/10500/12500/15500, MPX 17500/19500/21500,
MPX 11500/13500/14500/16500/18500/20500, MPX 17550/19550/20550/21550, and
MPX 22040/22060/22080/22100/22120 appliances.
23
Page 24

Chapter 1 Introduction to the Hardware Platforms
The port LEDs show whether a link is established and traffic is flowing through the
port. The following table describes the LED indicators for each port. There are two LED
indicators for each port type.
Table 1-14. LED port-status indicators
Port Type LED Location LED Function LED Color LED Indicates
10G SFP+ (10
Gbps)
1G SFP (1
Gbps)
Left Link/ Activity Off No link.
Solid green Link is
established but
no traffic is
passing
through the
port.
Blinking green Traffic is
passing
through the
port.
Right Speed Off No connection.
Solid green Traffic rate of
10 gigabits per
second.
Left Link/ Activity Off No link.
Solid green Link is
established but
no traffic is
passing
through the
port.
24
Ethernet
(RJ45)
Blinking green Traffic is
passing
through the
port.
Right Speed Off No connection.
Yellow Traffic rate of
1 gigabit per
second.
Left Speed Off No connection,
or a traffic
rate of 10
Page 25

Citrix NetScaler Hardware Installation and Setup Guide
Port Type LED Location LED Function LED Color LED Indicates
megabits per
second (Mbps).
Green Traffic rate of
100 Mbps.
Yellow Traffic rate of
1 gigabit per
second.
Right Link/ Activity Off No link.
Solid green Link is
established but
no traffic is
passing
through the
port.
Blinking green Traffic is
passing
through the
port.
Management
(RJ45)
Left Speed Off No connection,
or a traffic
rate of 10
megabits per
second (Mbps).
Green Traffic rate of
100 Mbps.
Amber Traffic rate of
1 gigabit per
second.
Right Link/ Activity Off No link.
Solid yellow Link is
established but
no traffic is
passing
through the
port.
Blinking yellow Traffic is
passing
through the
port.
25
Page 26

Chapter 1 Introduction to the Hardware Platforms
Field Replaceable Units
Citrix NetScaler field replaceable units (FRU) are NetScaler components that can be
quickly and easily removed from the appliance and replaced by the user or a technician
at the user's site. The FRUs in a NetScaler appliance can include a CompactFlash card,
DC or AC power supplies, and solid-state or hard-disk drives, and a direct attach cable
(DAC).
Note: The solid-state or hard-disk drive stores your configuration information, which
has to be restored from a backup after replacing the unit.
Power Supply
For appliances containing two power supplies, the second power supply acts as a
backup. The MPX 22040/22060/22080/22100/22120 can accommodate four power
supplies, and require two power supplies for proper operation. The third and fourth
power supplies act as backup.
The appliance ships with a standard power cord that plugs into the appliance’s power
supply and an NEMA 5-15 plug on the other end for connecting to the power outlet on
the rack or in the wall.
For power-supply specifications, see "Hardware Platforms," which describes the various
platforms and includes a table summarizing the hardware specifications.
Note: If you suspect that a power-supply fan is not working, please see the description
of your platform. On some platforms, what appears to be the fan does not turn, and the
actual fan turns only when necessary.
For each power supply, a bicolor LED indicator shows the condition of the power supply.
The LEDs of the AC power supplies for MPX 15000 and 17000 appliances are different
from the LEDs of the other appliances.
Table 1-15. LED Power Supply Indicators
Power Supply Type LED Color LED Indicates
AC OFF No power to any power
supply.
Flashing RED No power to this power
supply.
Flashing GREEN Power supply is in standby
mode.
GREEN Power supply is functional.
26
RED Power supply failure.
Page 27

Citrix NetScaler Hardware Installation and Setup Guide
Power Supply Type LED Color LED Indicates
DC OFF No power to any power
supply.
Flashing RED No power to this power
supply.
Flashing BLUE Power supply is in standby
mode.
BLUE Power supply is functional.
RED Power supply failure.
MPX 15000 and 17000 OFF Power supply is not
plugged in to a power
source. If the LED is off
when the power supply is
plugged in, the power
supply has a malfunction.
AMBER Power supply has been
plugged in for less than a
few seconds. If the LED
does not turn GREEN, the
power supply has a
malfunction.
GREEN Power supply is
functioning properly.
BLINKING Power supply has a
malfunction
Note: The power supply on the NetScaler MPX 5500 and MPX 5550/5650 appliances
is not field replaceable.
Electrical Safety Precautions for Power Supply Replacement
Make sure that the appliance has a direct physical connection to earth ground
w
during normal use. When installing or repairing an appliance, always connect the
ground circuit first and disconnect it last.
Always unplug any appliance before performing repairs or upgrades.
w
Never touch a power supply when the power cord is plugged in. As long as the power
w
cord is plugged in, line voltages are present in the power supply even if the power
switch is turned off.
27
Page 28
Chapter 1 Introduction to the Hardware Platforms
Replacing an AC Power Supply
Citrix NetScaler MPX platforms can accommodate two power supplies, except the MPX
22040/22060/22080/22100/22120 platform which can accommodate four power
supplies. All NetScaler appliances function properly with a single power supply, except
the MPX 22040/22060/22080/22100/22120 platform which needs two power supplies
for proper operation. The other power supplies serves as a backup. All power supplies
must be of the same type (AC or DC).
Note: If the appliance has only one power supply, you have to shut down the
appliance before replacing the power supply. If the appliance has two power supplies,
you can replace one power supply without shutting down the appliance, provided the
other power supply is working, and if the appliance has four power supplies, you can
replace one or two power supplies without shutting down the appliance, provided the
other two power supplies are working.
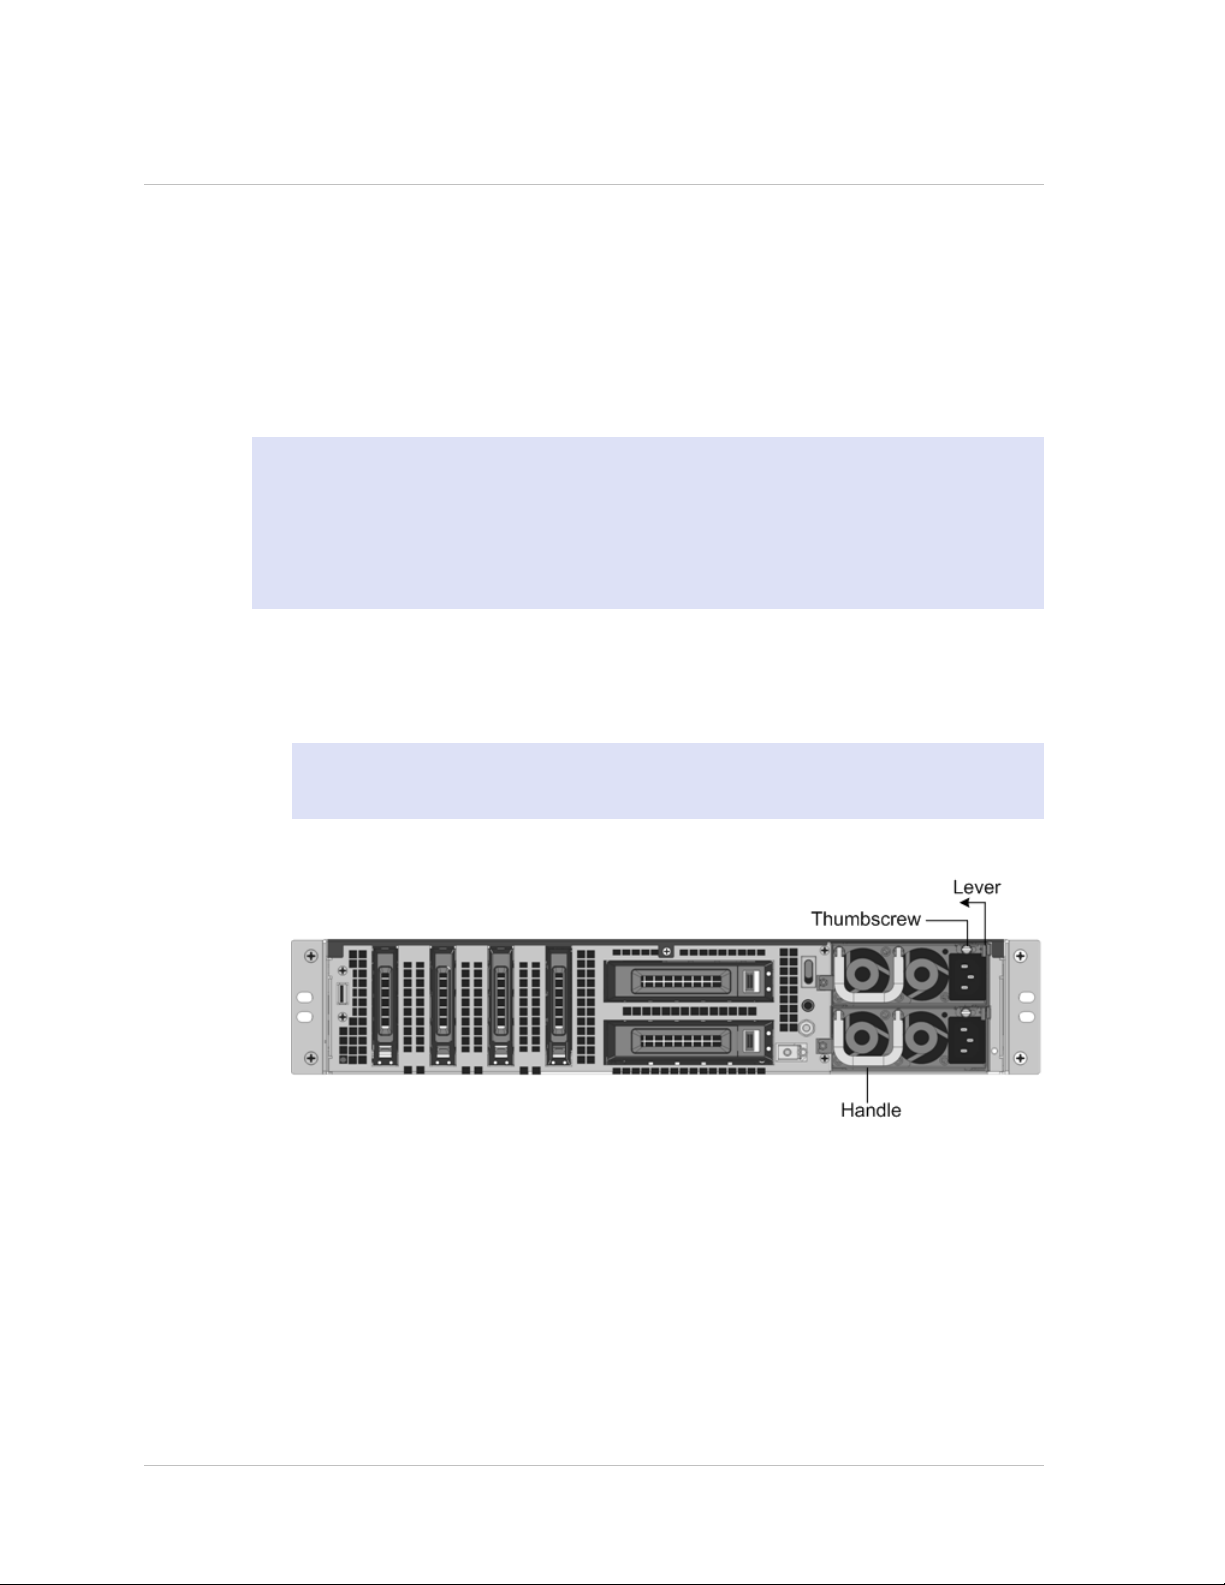
To install or replace an AC power supply on a Citrix NetScaler appliance
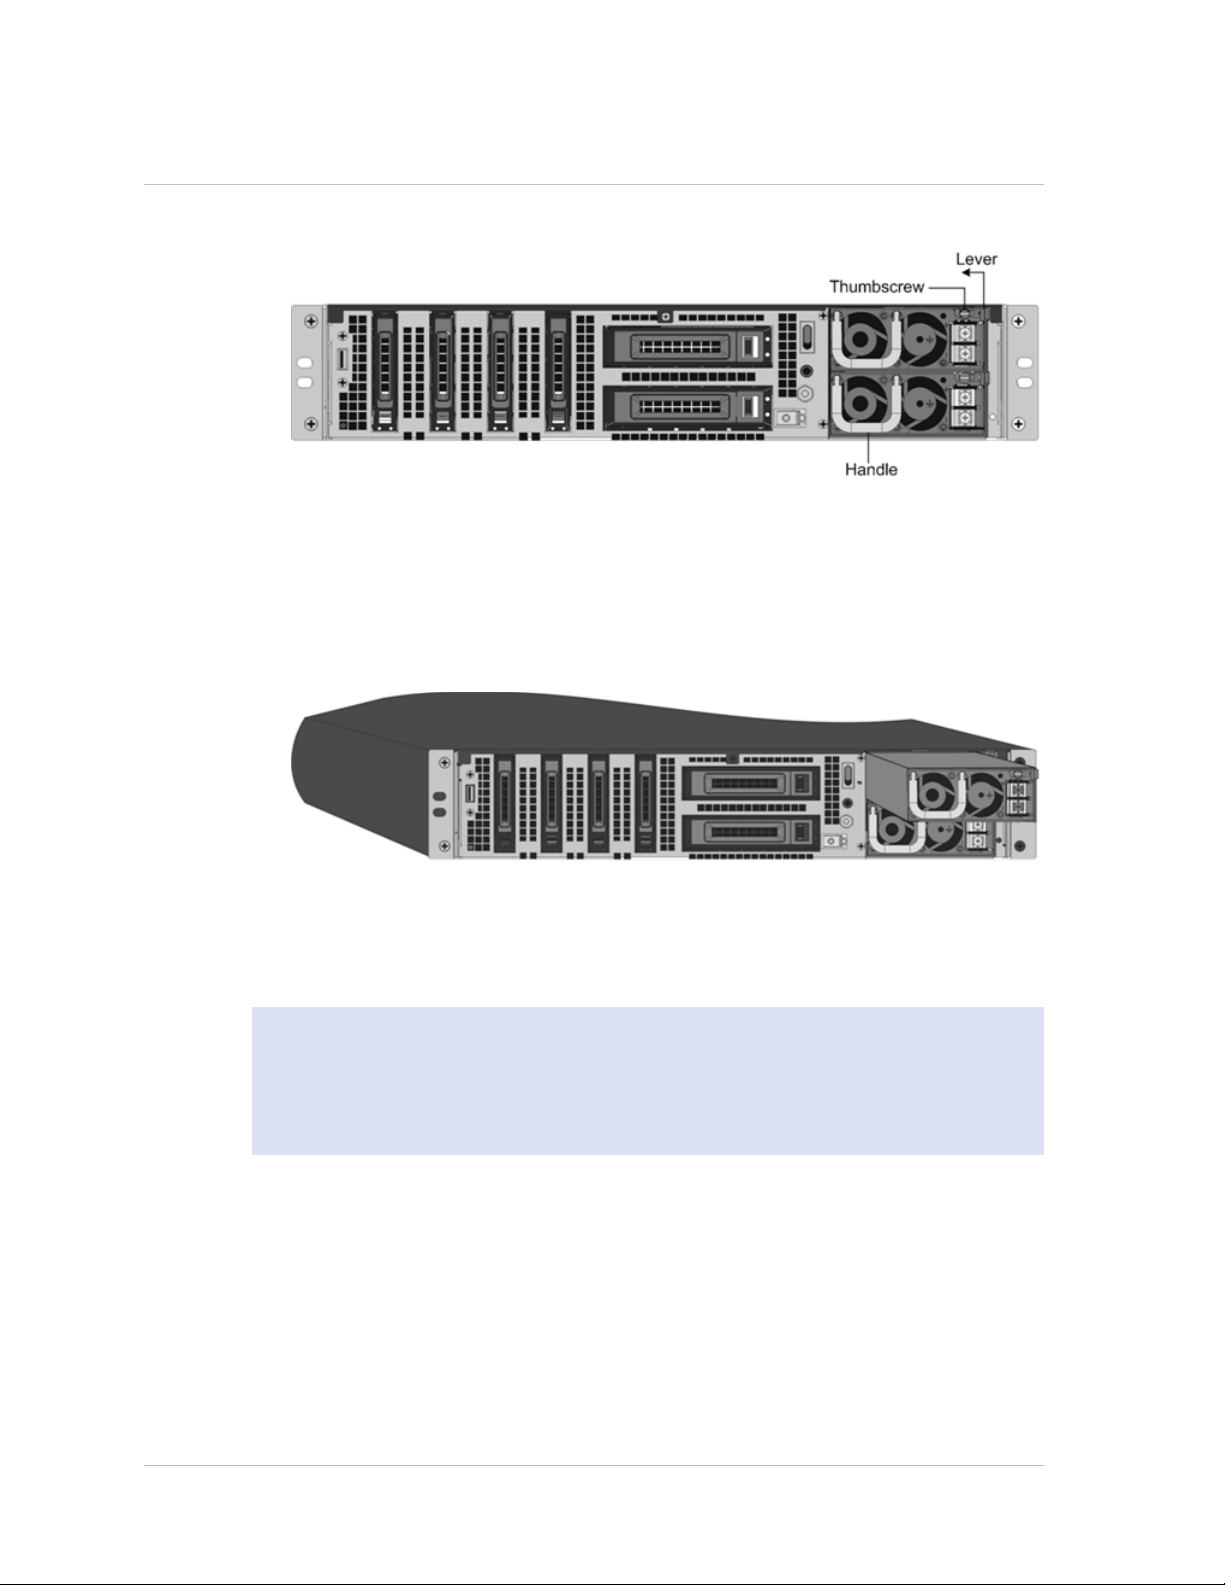
1. Align the semicircular handle perpendicular to the power supply. Loosen the
thumbscrew and press the lever toward the handle and pull out the existing power
supply, as shown in the following figure.
Note: The illustration in the following figures might not represent the actual
NetScaler appliance.
Figure 1-11. Removing the Existing AC Power Supply
2. Carefully remove the new power supply from its box.
3. On the back of the appliance, align the power supply with the power supply slot.
4. Insert the power supply into the slot and press against the semicircular handle
until you hear the power supply snap into place.
28
Page 29
Citrix NetScaler Hardware Installation and Setup Guide
Figure 1-12. Inserting the Replacement AC Power Supply
5. Connect the power supply to a power source. If connecting all power supplies, plug
separate power cords into the power supplies and connect them to separate wall
sockets.
Note: NetScaler appliances emit a high-pitched alert if one power supply fails or if you
connect only one power cable to an appliance in which two power supplies are
installed. To silence the alarm, press the small red button on the back panel of the
appliance. The disable alarm button is functional only when the appliance has two
power supplies.
Replacing a DC Power Supply
Citrix NetScaler MPX platforms can accommodate two power supplies, except the MPX
22040/22060/22080/22100/22120 platform which can accommodate four power
supplies. All NetScaler appliances function properly with a single power supply, except
the MPX 22040/22060/22080/22100/22120 platform which needs two power supplies
for proper operation. The other power supplies serves as a backup. All power supplies
must be of the same type (AC or DC).
Note: If the appliance has only one power supply, you have to shut down the
appliance before replacing the power supply. If the appliance has two power supplies,
you can replace one power supply without shutting down the appliance, provided the
other power supply is working, and if the appliance has four power supplies, you can
replace one or two power supplies without shutting down the appliance, provided the
other two power supplies are working.
To install or replace a DC power supply on a Citrix NetScaler appliance
1. Loosen the thumbscrew and press the lever towards the handle and pull out the
existing power supply, as shown in the following figure.
Note: The illustration in the following figures might not represent the actual
NetScaler appliance.
29
Page 30
Chapter 1 Introduction to the Hardware Platforms
Figure 1-13. Removing the Existing DC Power Supply
2. Carefully remove the new power supply from its box.
3. On the back of the appliance, align the power supply with the power supply slot.
4. Insert the power supply into the slot while pressing the lever towards the handle.
Apply firm pressure to insert the power supply firmly into the slot.
Figure 1-14. Inserting the Replacement DC Power Supply
5. When the power supply is completely inserted into its slot, release the lever.
6. Connect the power supply to a power source. If connecting all power supplies, plug
separate power cords into the power supplies and connect them to separate wall
sockets.
Note: NetScaler appliances emit a high-pitched alert if one power supply fails or if you
connect only one power cable to an appliance in which two power supplies are
installed. To silence the alarm, press the small red button on the back panel of the
appliance. The disable alarm button is functional only when the appliance has two
power supplies.
CompactFlash Card
The NetScaler software is stored on either the solid-state drive or the CompactFlash
card. The following MPX platforms store the NetScaler software on the CompactFlash
card:
Citrix NetScaler MPX 5500
w
Citrix NetScaler MPX 7500 and MPX 9500
w
Citrix NetScaler MPX 9700, MPX 10500, MPX 12500, and MPX 15500
w
Citrix NetScaler MPX 15000
w
30
Page 31

Citrix NetScaler Hardware Installation and Setup Guide
Citrix NetScaler MPX 17000
w
Note: The CompactFlash card is mounted as /flash on the above platforms.
The CompactFlash card specifications vary by NetScaler hardware platform. A
CompactFlash card from one platform does not necessarily work on a different
platform.
Replacing a CompactFlash Card
Note: These instructions apply to the Citrix® NetScaler® MPX 5500, MPX 7500/9500,
MPX 9700/10500/12500/15500, MPX 15000, and MPX 17000 appliances only.
Replacement CompactFlash cards contain a preinstalled version of the NetScaler
software and a generic configuration file (ns.conf), but they do not contain SSL-related
certificates and keys, or custom boot settings. Configuration files and customized
settings must be restored from a backup storage location at the customer site, if
available. The files to be restored might include:
/flash/nsconfig/ns.conf: The current configuration file.
w
/flash/nsconfig/ZebOS.conf: The ZebOS configuration file.
w
/flash/nsconfig/license: The licenses for the NetScaler features.
w
/flash/nsconfig/ssl: The SSL certificates and keys required for encrypting data to
w
clients or to backend servers.
/nsconfig/rc.netscaler: Customer-specific boot operations (optional).
w
Note: Verify that the card you receive is the correct type for your NetScaler appliance.
To replace a CompactFlash card
1. At the NetScaler command prompt, exit to the shell prompt. Type:
shell
2. Shut down the NetScaler appliance by typing one of the following commands at the
shell prompt.
• On an MPX appliance, type:
shutdown -p now
• On a non-MPX appliance, type:
shutdown
3. Locate the CompactFlash slot on the back panel of the appliance.
4. Disengage the CompactFlash by pushing the lever to the right of the CompactFlash
slot. If necessary, use a pen or small screwdriver to push the lever in fully. Pull the
existing flash card out of the slot.
31
Page 32

Chapter 1 Introduction to the Hardware Platforms
Note: The illustration in the following figures might not represent the actual
NetScaler appliance.
Figure 1-15. Removing the Existing CompactFlash Card
5. Insert the new flash card received from Citrix.
Important: When you insert the card, make sure that the arrow on top of the card
is pointing toward the CompactFlash slot. Position the connector grid on the edge
of the CompactFlash card to meet the matching connector pins inside the
CompactFlash slot.
Figure 1-16. Inserting the Replacement CompactFlash Card
6. Turn on the NetScaler appliance.
When the appliance starts, it no longer has the previous working configuration.
Therefore, the appliance is reachable only through the default IP address of
192.168.100.1/16, or through the console port.
7. Log on to the default IP address by using a web browser, or connect to the serial
console by using a console cable, to perform the initial configuration.
8. Upload a platform license and any optional feature licenses, including universal
licenses, to the NetScaler appliance. For more information, see the licensing
chapter of the "Citrix NetScaler Getting Started Guide."
9. Once the correct NetScaler software version is loaded, you can restore the working
configuration. Copy a previous version of the ns.conf file to the /nsconfig directory
by using an SCP utility or by pasting the previous configuration into the /nsconfig/
ns.conf file from the NetScaler command prompt. To load the new ns.conf file,
restart the NetScaler appliance by entering the reboot command at the NetScaler
command prompt.
32
Page 33

Citrix NetScaler Hardware Installation and Setup Guide
Solid-State Drive
A solid-state drive (SSD) is a high-performance device that stores data in solid-state
flash memory. The MPX solid-state drives contain the boot loader configuration file,
configuration file (ns.conf), licenses, and for some models, the NetScaler software and
the user data.
The NetScaler software is stored on either the SSD or the CompactFlash card. The
following MPX platforms store the NetScaler software on the SSD. The SSD is mounted
as /flash.
Citrix NetScaler MPX 5550 and MPX 5650
w
Citrix NetScaler MPX 8200, MPX 8400, MPX 8600, and MPX 8800
w
Citrix NetScaler MPX 11500, MPX 13500, MPX 14500, MPX 16500, MPX 18500, and
w
MPX 20500
Citrix NetScaler MPX 17500, MPX 19500, and MPX 21500
w
Citrix NetScaler MPX 17550, MPX 19550, MPX 20550, and MPX 21550
w
Citrix NetScaler MPX 22040, MPX 22060, MPX 22080, MPX 22100, and MPX 22120
w
Note: On the MPX 5550/5650 and MPX 8200/8400/8600/8800 appliances, both /
flash and /var are mounted from different partitions of the same SSD drive.
Replacing a Solid-State Drive
Note: These instructions apply to the Citrix NetScaler MPX 5550/5650, MPX
8200/8400/8600/8800, MPX 11500/13500/14500/16500/18500/20500, MPX
17500/19500/21500, MPX 17550/19550/20550/21550, and MPX
22040/22060/22080/22100/22120 appliances.
Replacement solid-state drives (SSDs) contain a pre-installed version of the NetScaler
software and a generic configuration file (ns.conf), but they do not contain SSL-related
certificates and keys, or custom boot settings. Configuration files and customized
settings must be restored to a replacement drive from a backup storage location at the
customer site, if available. The files to be restored might include:
/flash/nsconfig/ns.conf: The current configuration file.
w
/flash/nsconfig/ZebOS.conf: The ZebOS configuration file.
w
/flash/nsconfig/license: The licenses for the NetScaler features.
w
/flash/nsconfig/ssl: The SSL certificates and keys required for encrypting data to
w
clients or to backend servers.
/nsconfig/rc.netscaler: Customer-specific boot operations (optional).
w
To replace a solid-state drive
1. At the NetScaler command prompt, exit to the shell prompt. Type:
shell
33
Page 34

Chapter 1 Introduction to the Hardware Platforms
2. Shut down the NetScaler appliance by typing the following command at the shell
prompt:
shutdown –p now
3. Locate the SSD on the back panel of the appliance. Push the safety latch of the
drive cover to the right or down, depending on the platform, while pulling out on
the drive handle to disengage. Pull out the faulty drive.
Note: The illustration in the following figures might not represent the actual
NetScaler appliance.
Figure 1-17. Removing the Existing Solid-State Drive
4. Verify that the replacement SSD is the correct type for the platform.
5. Pick up the new SSD, open the drive handle fully to the left or up, and insert the
drive into the slot as far as possible. To seat the drive, close the handle flush with
the rear of the appliance so that the drive locks securely into the slot.
Important: When you insert the drive, make sure that the Citrix product label is at
the top if the drive is inserted horizontally or at the right if the drive is inserted
vertically.
Figure 1-18. Inserting the Replacement Solid-State Drive
6. Turn on the NetScaler appliance. When the appliance starts, it no longer has the
previous working configuration. Therefore, the appliance is reachable only through
the default IP address of 192.168.100.1/16, or through the console port.
34
7. Log on to the default IP address by using a web browser, or connect to the serial
console by using a console cable, to perform the initial configuration.
Page 35

Citrix NetScaler Hardware Installation and Setup Guide
8. Upload a platform license and any optional feature licenses, including universal
licenses, to the NetScaler appliance. For more information, see the licensing
chapter of the "Citrix NetScaler Getting Started Guide."
9. Once the correct NetScaler software version is loaded, you can restore the working
configuration. Copy a previous version of the ns.conf file to the /nsconfig directory
by using an SCP utility or by pasting the previous configuration into the /nsconfig/
ns.conf file from the NetScaler command prompt. To load the new ns.conf file, you
must restart the NetScaler appliance by entering the reboot command at the
NetScaler command prompt.
Hard Disk Drive
A hard disk drive (HDD) stores logs and other data files. Files stored on the HDD include
the newnslog files, dmesg and messages files, and any core/crash files. The HDD comes
in various capacities, depending on the Citrix NetScaler platform. Hard drives are used
for storing files required at runtime. An HDD is mounted as /var.
The following MPX platforms support HDD:
Citrix NetScaler MPX 9700, MPX 10500, MPX 12500, and MPX 15500
w
Citrix NetScaler MPX 11500, MPX 13500, MPX 14500, MPX 16500, MPX 18500, and
w
MPX 20500
Citrix NetScaler MPX 15000
w
Citrix NetScaler MPX 17000
w
Citrix NetScaler MPX 17500, MPX 19500, and MPX 21500
w
Citrix NetScaler MPX 17550, MPX 19550, MPX 20550, and MPX 21550
w
Citrix NetScaler MPX 22040, MPX 22060, MPX 22080, MPX 22100, and MPX 22120
w
Replacing a Hard Disk Drive
A hard disk drive (HDD) stores log files and other user files. Collection of new log files
begins upon boot-up with the new HDD. Product documentation can be downloaded
from "MyCitrix.com" and reinstalled to the /var/netscaler/doc location.
To install a hard disk drive
1. At the NetScaler command prompt, exit to the shell prompt. Type:
shell
2. Shut down the NetScaler appliance by typing one of the following commands at the
shell prompt.
• On an MPX appliance, type:
shutdown –p now
• On a non-MPX appliance, type:
shutdown
3. Locate the hard disk drive on the back panel of the appliance.
35
Page 36

Chapter 1 Introduction to the Hardware Platforms
4. Verify that the replacement hard disk drive is the correct type for the NetScaler
platform.
5. Disengage the hard disk drive by pushing the safety latch of the drive cover to the
right or down, depending on the platform, while pulling out on the drive handle to
disengage. Pull out the faulty drive.
Note: The illustration in the following figures might not represent the actual
NetScaler appliance.
Figure 1-19. Removing the Existing Hard Disk Drive
6. Pick up the new disk drive, open the drive handle fully to the left, and insert the
new drive into the slot as far as possible. To seat the drive, close the handle flush
with the rear of the appliance so that the hard drive locks securely into the slot.
Important: When you insert the drive, make sure that the Citrix product label is at
the top.
Figure 1-20. Inserting the Replacement Hard Disk Drive
7. Turn on the NetScaler appliance. The appliance starts the NetScaler software and
reads the configuration file from the CompactFlash card.
Direct Attach Cable
A direct attach cable (DAC) assembly is a high performance integrated duplex data link
for bi-directional communication. The cable is compliant with the IPF MSA (SFF-8432)
for mechanical form factor and SFP+ MSA for direct attach cables. The cable, which
can be up to 5 meters long, is data-rate agnostic. Supporting speeds in excess of 10
Gbps, it is a cost-effective alternative to optical links (SFP+ transceivers and fiber optic
cables.) The transceiver with DAC is hot-swappable. You can insert and remove the
transceiver with the attached cable without shutting down the appliance. The Citrix
NetScaler appliance supports only passive DAC.
36
Important:
Page 37

Citrix NetScaler Hardware Installation and Setup Guide
DAC is supported only on 10G ports. Do not insert a DAC into a 1G port.
w
Do not attempt to unplug the integrated copper cable from the transceiver and
w
insert a fiber cable into the transceiver.
Installing a Direct Attach Cable
Note: The illustrations in the following figures are only for reference and might not
represent the actual NetScaler appliance.
To install or remove a direct attach cable
1. To install the DAC, slide it into the 10G port on the appliance, as shown in the
following figure. You will hear a click when the DAC properly fits into the port.
Figure 1-21. Inserting a DAC into the 10G port
2. To remove the DAC, pull the tab on the top of the DAC, and then pull the DAC out
of the port, as shown in the following figure.
Figure 1-22. Removing a DAC from the 10G port
37
Page 38

Chapter 1 Introduction to the Hardware Platforms
Hardware Platforms
The various NetScaler hardware platforms offer a wide range of features,
communication ports, and processing capacities. All the MPX platforms have multicore
processors.
Citrix NetScaler 9010 FIPS
The Citrix NetScaler 9010 Federal Information Processing Standards (FIPS) appliance is a
2U appliance, with 1 single-core processor, and 2 GB of memory.
Note: The NetScaler nCore build is not supported on this hardware platform.
The following figure shows the front panel of the 9010 FIPS appliance with copper
Ethernet ports.
Figure 1-23. Citrix NetScaler 9010 FIPS front panel, with copper Ethernet ports
38
The following figure shows the front panel of the 9010 FIPS appliance with fiber 1G SFP
ports.
Figure 1-24. Citrix NetScaler 9010 FIPS front panel, with 1G SFP ports
The following components are visible on the front panel of the 9010 appliance:
RS232 serial console port.
w
Four ports, numbered 1/1, 1/2, 1/3, and 1/4 from left to right.
w
Note: The network port numbers on all appliances consist of two numbers separated
by a forward slash. The first number is the port adapter slot number. The second
number is the interface port number. Ports on appliances are numbered sequentially
starting with 1.
The following figure shows the back panel of the 9010 FIPS appliance.
Page 39

Citrix NetScaler Hardware Installation and Setup Guide
Figure 1-25. Citrix NetScaler 9010 FIPS appliance, back panel
The following components are visible on the back panel of the 9010 FIPS appliance:
Power switch, which turns off power to the appliance, just as if you were to unplug
w
both power supplies.
Non-maskable interrupt (NMI) Button that is used at the request of Technical
w
Support and produces a core dump on the appliance. You must use a pen, pencil, or
other pointed object to press this red button, which is recessed to prevent
unintentional activation.
Disable alarm button, which silences the alarm that the appliance sounds when it is
w
receiving power from only one of its power supplies. Press this button to prevent the
power alarm from sounding when you have plugged the appliance into only one
power outlet or when one power supply is malfunctioning and you wish to continue
operating the appliance until it is repaired.
Dual power supplies, each rated at 500 watts, 110-220 volts. You plug separate
w
power cords into the power supplies and connect them to separate wall sockets.
The appliance functions properly with a single power supply; the extra power supply
serves as a backup.
10/100BASE-T copper Ethernet port, numbered 0/1.
w
Removable CompactFlash card that is used to store the NetScaler software.
w
Removable hard-disk drive that stores user data.
w
Citrix NetScaler 12000-10G
The Citrix NetScaler 12000-10G appliance is a 2U appliance, with 2 single-core
processors, and 4 GB of memory.
Note: The NetScaler nCore build is not supported on this hardware platform.
The following figure shows the front panel of the 12000-10G appliance.
39
Page 40

Chapter 1 Introduction to the Hardware Platforms
Figure 1-26. Citrix 12000-10G appliance, front panel
The following components are visible on the front panel of the 12000-10G appliance:
RS232 serial console port.
w
Eight 1G SFP ports, numbered 1/1, 1/2, 1/3, 1/4, 1/5, 1/6, 1/7, and 1/8 from left
w
to right, and two XFP (10-Gigabit Small Form-Factor Pluggable) ports, numbered 1/9
and 1/10. When facing the bezel, the upper LEDs to the left of each optical 1G SFP
port represent connectivity. They are lit and amber in color when active. The lower
LEDs represent throughput. They are lit and green when active.
Note: The network port numbers on all appliances consist of two numbers
separated by a forward slash. The first number is the port adapter slot number. The
second number is the interface port number. Ports on appliances are numbered
sequentially starting with 1.
The following figure shows the back panel of the 12000-10G appliance.
Figure 1-27. Citrix NetScaler 12000-10G appliance, back panel
The following components are visible on the back panel of the 12000-10G appliance:
Power switch, which turns off power to the appliance, just as if you were to unplug
w
both power supplies.
40
Non-maskable interrupt (NMI) button, which signals the appliance to perform an
w
orderly shutdown after saving all files. You must use a pen, pencil, or other pointed
object to press this button, which is located inside a small hole to prevent it being
pressed accidentally.
Page 41

Citrix NetScaler Hardware Installation and Setup Guide
Disable alarm button, which silences the alarm that the appliance sounds when it is
w
receiving power from only one of its power supplies. Press this button to prevent the
power alarm from sounding when you have plugged the appliance into only one
power outlet or when one power supply is malfunctioning and you wish to continue
operating the appliance until it is repaired.
Dual power supplies, each rated at 500 watts, 110-220 volts. You plug separate
w
power cords into the power supplies and connect them to separate wall sockets.
The appliance functions properly with a single power supply; the extra power supply
serves as a backup.
10/100BASE-T copper Ethernet port, numbered 0/1.
w
Removable CompactFlash card that is used to store the NetScaler software.
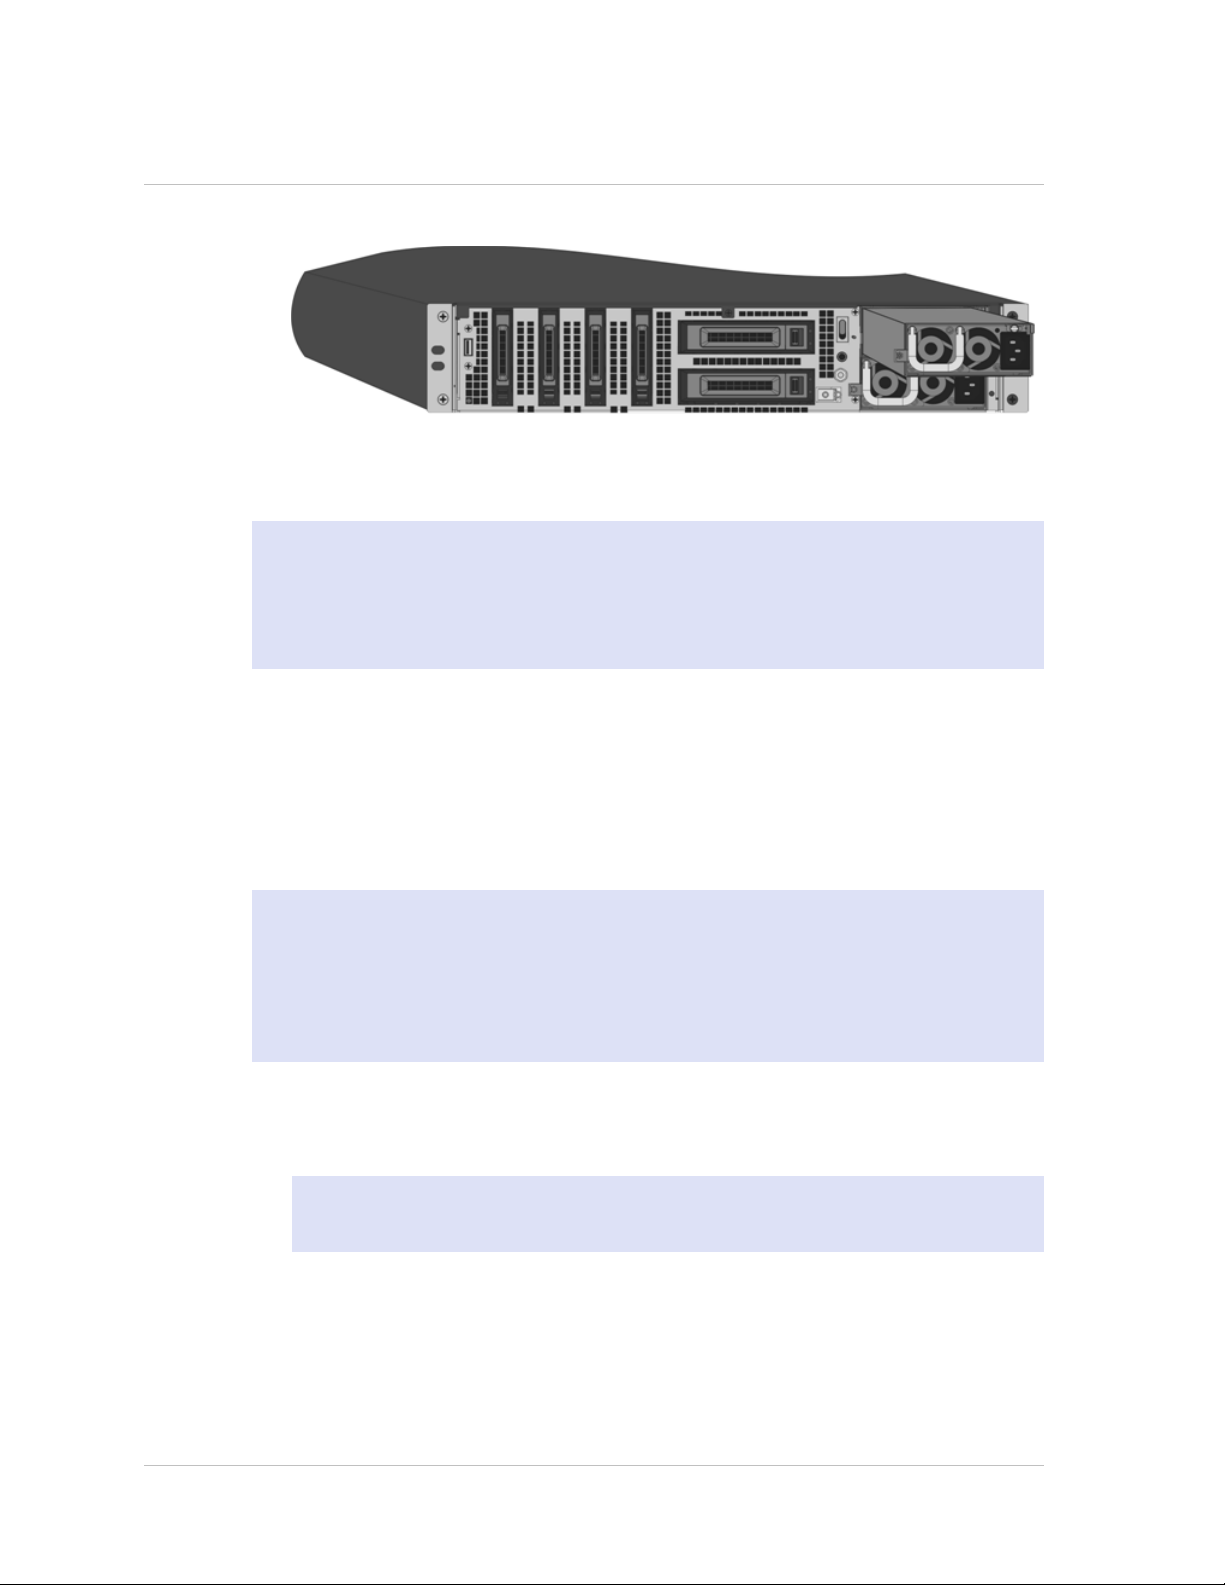
w
Removable hard-disk drive that stores user data.
w
Citrix NetScaler MPX 5500
The Citrix NetScaler MPX 5500 is a 1U appliance, with 1 dual-core processor, and 4
gigabytes (GB) of memory.
The following figure shows the front panel of the MPX 5500.
Figure 1-28. Citrix NetScaler MPX 5500, front panel
The MPX 5500 has the following ports:
RS232 serial console port.
w
Two 10/100/1000Base-T copper Ethernet management ports, numbered 0/1 and 0/2
w
from left to right. You can use these ports to connect directly to the appliance for
system administration functions.
Four 10/100/1000Base-T copper Ethernet ports numbered 1/1, 1/2, 1/3, and 1/4
w
from left to right.
Note: The network port numbers on all appliances consist of two numbers separated
by a forward slash. The first number is the port adapter slot number. The second
number is the interface port number. Ports on appliances are numbered sequentially
starting with 1.
The following figure shows the back panel of the MPX 5500.
41
Page 42

Chapter 1 Introduction to the Hardware Platforms
Figure 1-29. Citrix NetScaler MPX 5500, back panel
The following components are visible on the back panel of the MPX 5500:
Four GB removable CompactFlash card that is used to store the NetScaler software.
w
Power switch, which turns off power to the MPX 5500, just as if you were to unplug
w
the power supply. Press the switch for five seconds to turn off the power.
Removable hard-disk drive (HDD) that is used to store user data. Appliances shipped
w
before February, 2012 store user data on a HDD. In appliances shipped after
February, 2012, a solid-state drive replaces the HDD. Both types of drive have the
same functionality and support the same software releases.
USB port (reserved for a future release).
w
Non-maskable interrupt (NMI) Button that is used at the request of Technical
w
Support and produces a core dump on the NetScaler. You must use a pen, pencil, or
other pointed object to press this red button, which is recessed to prevent
unintentional activation.
Power supply rated at 300 watts, 110-220 volts. The power-supply fan is designed to
w
turn on only when the internal temperature of the power supply reaches a certain
value. You cannot see the fan turning on the back panel. What you can see is the
fixed part of the fan that holds the spinning motor.
Citrix NetScaler MPX 5550 and MPX 5650
The Citrix NetScaler models MPX 5550 and MPX 5650 are 1U appliances. Each model has
one quad-core processor and 8 gigabytes (GB) of memory.
The following figure shows the front panel of the MPX 5550/5650 appliance.
Figure 1-30. Citrix NetScaler MPX 5550/5650, front panel
Depending on the model, the appliance has the following ports:
42
RS232 serial console port.
w
Page 43

Citrix NetScaler Hardware Installation and Setup Guide
Two 10/100/1000Base-T copper Ethernet management ports (RJ45), numbered 0/1
w
and 0/2 from left to right. The management port is used to connect directly to the
appliance for system administration functions.
Six 10/100/1000Base-T copper Ethernet ports numbered 1/1, 1/2, 1/3, 1/4, 1/5,
w
and 1/6 from left to right.
The following figure shows the back panel of the MPX 5550/5650 appliance.
Figure 1-31. Citrix NetScaler MPX 5550/5650 appliance, back panel
The following components are visible on the back panel of the MPX 5550/5650
appliance:
160 GB removable solid-state drive, which is used to store the NetScaler software
w
and the user data.
Power switch, which turns off power to the appliance, just as if you were to unplug
w
the power supply. Press the switch for five seconds to turn off the power.
USB port (reserved for a future release).
w
Non-maskable interrupt (NMI) button, which is used at the request of Technical
w
Support to produce a NetScaler core dump. You must use a pen, pencil, or other
pointed object to press this red button, which is recessed to prevent unintentional
activation.
Single power supply, rated at 300 watts, 110-220 volts.
w
Citrix NetScaler MPX 7500 and MPX 9500
The Citrix NetScaler MPX 7500/9500 are 1U appliances, each with 1 quad-core
processor, and 8 gigabytes (GB) of memory. The MPX 7500/9500 appliances are
available in two port configurations: 8x10/100/1000Base-T copper Ethernet ports and
4x1G SFP + 4x10/100/1000Base-T copper Ethernet ports.
The following figure shows the front panel of the MPX 7500/9500 (8x10/100/1000BaseT copper Ethernet ports) appliances.
43
Page 44

Chapter 1 Introduction to the Hardware Platforms
Figure 1-32. Citrix NetScaler MPX 7500/9500 (8x10/100/1000Base-T copper
Ethernet ports), front panel
The following figure shows the front panel of the MPX 7500/9500 (4x1G SFP +
4x10/100/1000Base-T copper Ethernet ports) appliances.
Figure 1-33. Citrix NetScaler MPX 7500/9500 (4x1G SFP + 4x10/100/1000Base-T
copper Ethernet ports), front panel
Depending on the model, the appliance has the following ports:
RS232 serial console port.
w
Two 10/100/1000Base-T copper Ethernet management ports, numbered 0/1 and 0/2
w
from left to right. These ports are used to connect directly to the appliance for
system administration functions.
Network Ports
w
• MPX 7500/9500 (8x10/100/1000Base-T copper Ethernet ports). Eight
10/100/1000Base-T copper Ethernet ports numbered 1/1, 1/2, 1/3, and 1/4 on
the top row from left to right, and 1/5, 1/6, 1/7, and 1/8 on the bottom row
from left to right.
• MPX 7500/9500 (4x1G SFP + 4x10/100/1000Base-T copper Ethernet ports). Four
1-gigabit copper or fiber 1G SFP ports numbered 1/1, 1/2, 1/3, and 1/4 on the
top row from left to right, and four 10/100/1000BASE-T copper Ethernet ports
(RJ45) numbered 1/5, 1/6, 1/7, and 1/8 on the bottom row from left to right.
The following figure shows the back panel of the MPX 7500/9500 appliance.
Figure 1-34. Citrix NetScaler MPX 7500/9500, back panel
44
Page 45

Citrix NetScaler Hardware Installation and Setup Guide
The following components are visible on the back panel of the MPX 7500/9500:
Four-gigabyte removable CompactFlash card that is used to store the NetScaler
w
software.
Power switch, which turns off power to the MPX 7500/9500, just as if you were to
w
unplug the power supply. Press the switch for five seconds to turn off the power.
Removable hard-disk drive (HDD) that is used to store user data. Appliances shipped
w
before February, 2012 store user data on a HDD. In appliances shipped after
February, 2012, a solid-state drive replaces the HDD. Both types of drive have the
same functionality and support the same software releases.
USB port (reserved for a future release).
w
Non-maskable interrupt (NMI) button that is used at the request of Technical
w
Support and produces a core dump on the appliance. You must use a pen, pencil, or
other pointed object to press this red button, which is recessed to prevent
unintentional activation.
Disable alarm button. This button is functional only when the appliance has two
w
power supplies.
Press this button to stop the power alarm from sounding when you have plugged the
MPX 7500/9500 into only one power outlet or when one power supply is
malfunctioning and you want to continue operating the MPX 7500/9500 until it is
repaired.
Citrix NetScaler MPX 8200, MPX 8400, MPX 8600, and MPX 8800
The Citrix NetScaler models MPX 8200, MPX 8400, MPX 8600, and MPX 8800 are 1U
appliances. Each model has one quad-core processor and 32 gigabytes (GB) of memory.
The MPX 8200/8400/8600/8800 appliances are available in two port configurations:
Six 10/100/1000Base-T copper Ethernet ports and six 1G SFP ports
w
(6x10/100/1000Base-T copper Ethernet ports + 6x1G SFP)
Six 10/100/1000Base-T copper Ethernet ports and two 10G SFP+ ports
w
(6x10/100/1000Base-T copper Ethernet ports + 2x10G SFP+)
The following figure shows the front panel of the MPX 8200/8400/8600/8800
(6x10/100/1000Base-T copper Ethernet ports + 6x1G SFP) appliance.
Figure 1-35. Citrix NetScaler MPX 8200/8400/8600/8800 (6x10/100/1000Base-T
copper Ethernet ports + 6x1G SFP), front panel
45
Page 46

Chapter 1 Introduction to the Hardware Platforms
The following figure shows the front panel of the MPX 8200/8400/8600/8800
(6x10/100/1000Base-T copper Ethernet ports + 2x10G SFP+) appliance.
Figure 1-36. Citrix NetScaler MPX 8200/8400/8600/8800 (6x10/100/1000Base-T
copper Ethernet ports + 2x10G SFP+), front panel
Depending on the model, the appliance has the following ports:
RS232 serial console port.
w
One 10/100Base-T copper Ethernet Port (RJ45), also called LOM port. You can use
w
this port to remotely monitor and manage the appliance independently of the
NetScaler software.
One 10/100/1000Base-T copper Ethernet management port (RJ45), numbered 0/1.
w
The management port is used to connect directly to the appliance for system
administration functions.
Network Ports
w
• MPX 8200/8400/8600/8800 (6x10/100/1000Base-T copper Ethernet ports + 6x1G
SFP). Six 10/100/1000BASE-T copper Ethernet ports (RJ45) numbered 1/1, 1/2,
1/3, 1/4, 1/5, and 1/6 on the top row from left to right, and six 1-gigabit copper
or fiber 1G SFP ports numbered 1/7, 1/8, 1/9, 1/10, 1/11, and 1/12 on the
bottom row from left to right.
• MPX 8200/8400/8600/8800 (6x10/100/1000Base-T copper Ethernet ports + 2x10G
SFP+). Six 10/100/1000BASE-T copper Ethernet ports (RJ45) numbered 1/1, 1/2,
1/3, 1/4, 1/5, and 1/6 on the top row from left to right and two 10-gigabit SFP+
ports numbered 10/1 and 10/2 on the bottom row from left to right.
The following figure shows the back panel of the MPX 8200/8400/8600/8800 appliance.
Figure 1-37. Citrix NetScaler MPX 8200/8400/8600/8800 appliance, back panel
46
The following components are visible on the back panel of the MPX
8200/8400/8600/8800 appliance:
Page 47

Citrix NetScaler Hardware Installation and Setup Guide
256 GB removable solid-state drive, which is used to store the NetScaler software
w
and the user data.
Power switch, which turns off power to the appliance, just as if you were to unplug
w
the power supply. Press the switch for five seconds to turn off the power.
USB port (reserved for a future release).
w
Non-maskable interrupt (NMI) button, which is used at the request of Technical
w
Support to produce a NetScaler core dump. You must use a pen, pencil, or other
pointed object to press this red button, which is recessed to prevent unintentional
activation.
Disable alarm button, which is nonfunctional. This button is functional only if you
w
install a second power supply.
Press this button to stop the power alarm from sounding when you have plugged the
appliance into only one power outlet or when one power supply is malfunctioning
and you want to continue operating the appliance until it is repaired.
Single power supply, rated at 450 watts, 110-220 volts.
w
Citrix NetScaler MPX 9700, MPX 10500, MPX 12500, and MPX 15500
The Citrix NetScaler MPX 9700/10500/12500/15500 are 2U appliances, each with 2
quad-core processors, and 16 gigabytes (GB) of memory. All these appliances are also
available in a 10G model and a FIPS model.
The following figure shows the front panel of the MPX 9700/10500/12500/15500.
Figure 1-38. Citrix NetScaler MPX 9700/10500/12500/15500, front panel
The following figure shows the front panel of the MPX 9700/10500/12500/15500 10G.
47
Page 48

Chapter 1 Introduction to the Hardware Platforms
Figure 1-39. Citrix NetScaler MPX 9700/10500/12500/15500 10G, front panel
The following figure shows the front panel of the MPX 9700/10500/12500/15500 FIPS.
Figure 1-40. Citrix NetScaler MPX 9700/10500/12500/15500 FIPS, front panel
*The FIPS Management Port (Level 3 Mode) is reserved for a future release.
Caution: Do not insert a USB device into the FIPS Management Port. This will
cause the FIPS card to fail.
Depending on the model, the appliance has the following ports:
FIPS Management Port (reserved for a future release).
w
RS232 serial Console Port.
w
Two 10/100/1000Base-T copper Ethernet Management Ports (RJ45), numbered 0/1
w
and 0/2 from left to right. These ports are used to connect directly to the appliance
for system administration functions.
Network Ports
w
• MPX 9700/10500/12500/15500. Eight copper or fiber 1G SFP ports numbered 1/1,
1/2, 1/3, and 1/4 on the first row from left to right, and 1/5, 1/6, 1/7, and 1/8
on the second row from left to right. Eight 10/100/1000BASE-T copper Ethernet
Ports (RJ45) numbered 1/9, 1/10, 1/11, and 1/12 on the third row from left to
right, and 1/13, 1/14, 1/15, and 1/16 on the fourth row from left to right.
• MPX 9700/10500/12500/15500 10G and MPX 9700/10500/12500/15000 FIPS. Two
10G SFP+ Ports numbered 10/1 and 10/2 on the top row, eight 1-gigabit copper
or fiber 1G SFP Ports numbered 1/1, 1/2, 1/3, and 1/4 on the middle row from
left to right, and 1/5, 1/6, 1/7, and 1/8 on the bottom row from left to right.
48
Page 49

Citrix NetScaler Hardware Installation and Setup Guide
Important: The 10-gigabit ports on this appliance are labeled 10/1 and 10/2.
The following figure shows the back panel of the MPX 9700/10500/12500/15500
appliances, including the 10G model and FIPS model.
Figure 1-41. Citrix NetScaler MPX 9700/10500/12500/15500, MPX
9700/10500/12500/15500 FIPS, and MPX 9700/10500/12500/15500 10G, back
panel
*The USB Port is reserved for a future release.
The following components are visible on the back panel of the MPX
9700/10500/12500/15500, including the 10G model and FIPS model:
Four GB removable CompactFlash Card that is used to store the NetScaler software.
w
Power Switch, which turns off power to the appliance, just as if you were to unplug
w
the power supply. Press the switch for five seconds to turn off the power.
Removable Hard Disk Drive that is used to store user data.
w
USB Port (reserved for a future release).
w
Non-maskable interrupt (NMI) Button that is used at the request of Technical
w
Support and produces a core dump on the NetScaler. You must use a pen, pencil, or
other pointed object to press this red button, which is recessed to prevent
unintentional activation.
Disable Alarm Button. This button is functional only when the appliance has two
w
power supplies.
Press this button to stop the power alarm from sounding when you have plugged the
appliance into only one power outlet or when one power supply is malfunctioning
and you want to continue operating the appliance until it is repaired.
Dual Power Supplies, each rated at 450 watts, 110-220 volts.
w
49
Page 50

Chapter 1 Introduction to the Hardware Platforms
Citrix NetScaler MPX 11500, MPX 13500, MPX 14500, MPX 16500, MPX 18500, and MPX 20500
The Citrix NetScaler models MPX 11500/13500/14500/16500/18500/20500 are 2U
appliances. Each model has two 6-core processors for a total of 12 physical cores (24
cores with hyper-threading), and 48 gigabytes (GB) of memory.
The following figure shows the front panel of the MPX
11500/13500/14500/16500/18500/20500 appliance.
Figure 1-42. Citrix NetScaler MPX 11500/13500/14500/16500/18500/20500
appliance, front panel
50
The MPX 11500/13500/14500/16500/18500/20500 appliances have the following ports:
10/100Base-T copper Ethernet Port (RJ45), also called LOM port. You can use this
w
port to remotely monitor and manage the appliance independently of the NetScaler
software.
Note: The LEDs on the LOM port are not operational by design.
RS232 serial console port.
w
Two 10/100/1000Base-T copper Ethernet management ports (RJ45), numbered 0/1
w
and 0/2 from left to right. These ports are used to connect directly to the appliance
for system administration functions.
Eight 1G SFP ports numbered 1/1, 1/2, 1/3, 1/4 from top to bottom in the first
w
column, and 1/5, 1/6, 1/7, and 1/8 from top to bottom in the second column.
Four 10G SFP+ ports numbered 10/1 and 10/2 from top to bottom in the first
w
column, and 10/3 and 10/4 from top to bottom in the second column.
The following figure shows the back panel of the MPX
11500/13500/14500/16500/18500/20500 appliance.
Page 51

Citrix NetScaler Hardware Installation and Setup Guide
Figure 1-43. Citrix NetScaler MPX 11500/13500/14500/16500/18500/20500
appliance, back panel
The following components are visible on the back panel of the MPX
11500/13500/14500/16500/18500/20500 appliance:
160 GB removable solid-state drive that is used to store the NetScaler software.
w
USB port (reserved for a future release).
w
Power switch, which turns off power to the appliance, just as if you were to unplug
w
the power supply. Press the switch for five seconds to turn off the power.
Non-maskable interrupt (NMI) Button that is used at the request of Technical
w
Support and produces a core dump on the NetScaler. You must use a pen, pencil, or
other pointed object to press this red button, which is recessed to prevent
unintentional activation.
Two removable hard-disk drives that are used to store user data.
w
Disable alarm button. This button is functional only when the appliance has two
w
power supplies.
Press this button to stop the power alarm from sounding when you have plugged the
appliance into only one power outlet or when one power supply is malfunctioning
and you want to continue operating the appliance until it is repaired.
Dual power supplies, each rated at 650 watts, 110-220 volts.
w
Citrix NetScaler MPX 15000
The Citrix NetScaler MPX 15000 appliance is a 2U appliance, with 2 dual-core
processors, and 16 GB of memory. The MPX 15000 is a high-capacity hardware platform
intended for heavy use in enterprise and service provider environments. The following
figure shows the front panel of the MPX 15000 appliance.
51
Page 52

Chapter 1 Introduction to the Hardware Platforms
Figure 1-44. Citrix NetScaler MPX 15000 appliance, front panel
The appliance has the following ports:
RS232 serial console port.
w
10/100/1000BASE-T copper Ethernet management port, numbered 0/1.
w
Two XFP (10-Gigabit Small Form-Factor Pluggable) fiber optic ports, numbered from
w
left to right 1/1 and 1/2.
Eight 10/100/1000BASE-T copper Ethernet ports, numbered from upper left to
w
bottom right 1/3, 1/4, 1/5, 1/6, 1/7, 1/8, 1/9, and 1/10.
When facing the bezel, the upper LEDs to the left of each port represent connectivity.
They are lit and amber in color when active. The lower LEDs represent throughput.
They are lit and green when active.
Note: The network port numbers on all appliances consist of two numbers separated
by a forward slash. The first number is the port adapter slot number and will always be
either 0 or 1. The second number is the interface port number. Ports on appliances are
numbered sequentially starting with 1.
The following figure shows the back panel of the MPX 15000 appliance.
Figure 1-45. Citrix NetScaler MPX 15000 appliance, back panel
The following components are visible on the back panel of the MPX 15000 appliance:
52
Removable hard-disk drive that is used to store user data.
w
Dual power supplies, each rated at 500 watts, 110-220 volts.
w
Page 53

Citrix NetScaler Hardware Installation and Setup Guide
You plug separate power cords into the power supplies and connect them to
separate wall sockets. The MPX 15000 functions properly with a single power supply;
the extra power supply serves as a backup.
Non-maskable interrupt (NMI) button, which signals the MPX 15000 to perform an
w
orderly shutdown after saving all files. You must use a pen, pencil, or other pointed
object to press this button, which is located inside a small hole to prevent it from
being pressed accidentally.
Removable CompactFlash card that is used to store the NetScaler software.
w
Citrix NetScaler MPX 17000
The Citrix NetScaler MPX 17000 appliance is a 2U appliance, with 2 quad-core
processors, and 32 GB of memory. The MPX 17000 is a high-capacity hardware platform
intended for any high traffic, intensive processing data center environment. There are
two MPX 17000 models: the four network-port model and the ten network-port model.
The following figure shows the front panel of the MPX 17000, four network-port model.
Figure 1-46. Citrix NetScaler MPX 17000 four network-port model, front panel
Depending on the model, the appliance has the following ports:
RS232 serial console port.
w
10/100/1000BASE-T copper Ethernet management port, numbered 0/1.
w
Network Ports
w
• MPX 17000 four network-port model. Four XFP (10-Gigabit Small Form-Factor
Pluggable) ports, numbered from upper left to bottom right 1/1, 1/2, 1/3, and
1/4.
• MPX 17000 ten network-port model. Two XFP ports, numbered from left to right
1/1 and 1/2 and eight 10/100/1000BASE-T Ethernet ports, numbered from upper
left to bottom right 1/3, 1/4, 1/5, 1/6, 1/7, 1/8, 1/9 and 1/10.
Note: The network port numbers on all appliances consist of two numbers
separated by a forward slash. The first number is the port adapter slot number and
will always be either 0 or 1. The second number is the interface port number. Ports
on appliances are numbered sequentially starting with 1.
53
Page 54

Chapter 1 Introduction to the Hardware Platforms
When facing the bezel, the upper LEDs to the left of each port represent connectivity.
They are lit and amber in color when active. The lower LEDs represent throughput.
They are lit and green when active.
The following figure shows the back panel of the MPX 17000 appliance.
Figure 1-47. Citrix NetScaler MPX 17000 appliance, back panel
The following components are visible on the back of the MPX 17000 appliance:
Removable hard-disk drive that is used to store user data.
w
Dual power supplies, each rated at 500 watts, 110-220 volts.
w
You plug separate power cords into the power supplies and connect them to
separate wall sockets. The MPX 17000 functions properly with a single power supply;
the extra power supply serves as a backup.
Non-maskable interrupt (NMI) button, which signals the MPX 17000 to perform an
w
orderly shutdown after saving all files. You must use a pen, pencil, or other pointed
object to press this button, which is located inside a small hole to prevent it from
being pressed accidentally.
Removable CompactFlash card that is used to store the NetScaler software.
w
Citrix NetScaler MPX 17500, MPX 19500, and MPX 21500
The Citrix NetScaler models MPX 17500/19500/21500 are 2U appliances. Each model
has two 6-core processors and 48 gigabytes (GB) of memory.
The following figure shows the front panel of the MPX 17500/19500/21500 appliance.
Figure 1-48. Citrix NetScaler MPX 17500/19500/21500 appliance, front panel
54
Page 55

Citrix NetScaler Hardware Installation and Setup Guide
The MPX 17500/19500/21500 appliances have the following ports:
RS232 serial console port.
w
Two 10/100/1000Base-T copper Ethernet management ports (RJ45), numbered 0/1
w
and 0/2 from left to right. These ports are used to connect directly to the appliance
for system administration functions.
Eight 10G SFP+ ports numbered 10/1, 10/2, 10/3, and 10/4 on the top row from left
w
to right, and 10/5, 10/6, 10/7, and 10/8 on the bottom row from left to right.
The following figure shows the back panel of the MPX 17500/19500/21500 appliance.
Figure 1-49. Citrix NetScaler MPX 17500/19500/21500 appliance, back panel
The following components are visible on the back panel of the MPX 17500/19500/21500
appliance:
160 GB removable solid-state drive that is used to store the NetScaler software.
w
USB port (reserved for a future release).
w
Power switch, which turns off power to the appliance, just as if you were to unplug
w
the power supply. Press the switch for five seconds to turn off the power.
Non-maskable interrupt (NMI) button that is used at the request of Technical
w
Support and produces a core dump on the NetScaler. You must use a pen, pencil, or
other pointed object to press this red button, which is recessed to prevent
unintentional activation.
Removable hard-disk drive that stores user data.
w
Disable alarm button. This button is functional only when the appliance has two
w
power supplies.
Press this button to stop the power alarm from sounding when you have plugged the
appliance into only one power outlet or when one power supply is malfunctioning
and you want to continue operating the appliance until it is repaired.
Dual power supplies, each rated at 650 watts, 110-220 volts.
w
55
Page 56

Chapter 1 Introduction to the Hardware Platforms
Citrix NetScaler MPX 17550, MPX 19550, MPX 20550, and MPX 21550
The Citrix NetScaler models MPX 17550, MPX 19550, MPX 20550, and MPX 21550 are 2U
appliances. Each model has two 6-core processors for a total of 12 physical cores (24
cores with hyper-threading), and 96 gigabytes (GB) of memory.
The following figure shows the front panel of the MPX 17550/19550/20550/21550
appliance.
Figure 1-50. Citrix NetScaler MPX 17550/19550/20550/21550 appliance, front panel
The MPX 17550/19550/20550/21550 appliance has the following ports:
10/100Base-T copper Ethernet Port (RJ45), also called LOM port. You can use this
w
port to remotely monitor and manage the appliance independently of the NetScaler
software.
Note: The LEDs on the LOM port are not operational by design.
RS232 serial console port.
w
Two 10/100/1000Base-T copper Ethernet management ports (RJ45), numbered 0/1
w
and 0/2 from left to right. These ports are used to connect directly to the appliance
for system administration functions.
Eight 10G SFP+ ports numbered 10/1, 10/2, 10/3, and 10/4 on the top row from left
w
to right, and 10/5, 10/6, 10/7, and 10/8 on the bottom row from left to right.
The following figure shows the back panel of the MPX 17550/19550/20550/21550
appliance.
56
Page 57

Citrix NetScaler Hardware Installation and Setup Guide
Figure 1-51. Citrix NetScaler MPX 17550/19550/20550/21550 appliance, back panel
The following components are visible on the back panel of the MPX
17550/19550/20550/21550 appliance:
160 GB removable solid-state drive that is used to store the NetScaler software.
w
USB port (reserved for a future release).
w
Power switch, which turns off power to the appliance, just as if you were to unplug
w
the power supply. Press the switch for five seconds to turn off the power.
Non-maskable interrupt (NMI) button that is used at the request of Technical
w
Support and produces a core dump on the NetScaler. You must use a pen, pencil, or
other pointed object to press this red button, which is recessed to prevent
unintentional activation.
Two removable hard-disk drives that store user data.
w
Disable alarm button. This button is functional only when the appliance has two
w
power supplies.
Press this button to stop the power alarm from sounding when you have plugged the
appliance into only one power outlet or when one power supply is malfunctioning
and you want to continue operating the appliance until it is repaired.
Dual power supplies, each rated at 850 watts, 110-220 volts.
w
Citrix NetScaler MPX 22040, MPX 22060, MPX 22080, MPX 22100, and MPX 22120
The Citrix NetScaler MPX 22040/22060/22080/22100/22120 are 2U appliances. Each
model has two 8-core processors, and 256 gigabytes (GB) of memory. The MPX
22040/22060/22080/22100/22120 appliances are available in two port configurations:
Twelve 1G SFP ports and twenty-four 10G SFP+ ports (12x1G SFP + 24x10G SFP+)
w
Twenty-four 10G SFP+ ports (24x10G SFP+)
w
The following figure shows the front panel of the MPX
22040/22060/22080/22100/22120 (12x1G SFP + 24x10G SFP+) appliance.
57
Page 58

Chapter 1 Introduction to the Hardware Platforms
Figure 1-52. Citrix NetScaler MPX 22040/22060/22080/22100/22120 (12x1G SFP +
24x10G SFP+), front panel
The following figure shows the front panel of the MPX
22040/22060/22080/22100/22120 (24x10G SFP+) appliance.
Figure 1-53. Citrix NetScaler MPX 22040/22060/22080/22100/22120 (24x10G SFP+),
front panel
58
Depending on the model, the appliance has the following ports:
RS232 serial Console Port.
w
10/100Base-T copper Ethernet Port (RJ45), also called LOM port. You can use this
w
port to remotely monitor and manage the appliance independently of the NetScaler
software.
Two 10/100/1000Base-T copper Ethernet Management Ports (RJ45), numbered 0/1
w
and 0/2 from left to right. These ports are used to connect directly to the appliance
for system administration functions.
Network Ports
w
• MPX 22040/22060/22080/22100/22120 (12x1G SFP + 24x10G SFP+). Twelve
copper or fiber 1G SFP ports and twenty-four 10G SFP+ ports.
• MPX 22040/22060/22080/22100/22120 (24x10G SFP+). Twenty-four 10G SFP+
ports.
Page 59

Citrix NetScaler Hardware Installation and Setup Guide
The following figure shows the back panel of the MPX 22040/22060/22080/22100/22120
appliances.
Figure 1-54. Citrix NetScaler MPX 22040/22060/22080/22100/22120, back panel
The following components are visible on the back panel of the MPX
22040/22060/22080/22100/22120 appliance:
Power switch, which turns off power to the appliance, just as if you were to unplug
w
the power supply. Press the switch for five seconds to turn off the power.
Two 256 GB removable solid-state drives. The leftmost solid-state drive stores the
w
NetScaler software. The other solid-state drive stores user data.
Two 1TB removable hard disk drives that are used to store user data.
w
Four power supplies, each rated at 750 watts, 100-240 volts. A minimum of two
w
power supplies are required for proper operation. The extra power supplies act as
backup.
Summary of Hardware Specifications
The following tables summarize the specifications of the hardware platforms.
Table 1-16. Standard Platform Summary
9010 FIPS 12000-10G
Processor 1 single-core 2 single-cores
Memory 2 GB 4 GB
Number of Power Supplies 2 2
Power Supply input voltage &
frequency
100-240 VAC
47-63 Hz
100-240 VAC
47-63 Hz
59
Page 60

Chapter 1 Introduction to the Hardware Platforms
9010 FIPS 12000-10G
Maximum Power Consumption 500 W 500 W
Weight 52 lbs
23.59 kg
52 lbs
23.59 kg
Height 2U 2U
Width EIA 310-D EIA 310-D
Depth 24 in or 61 cm 24 in or 61 cm
Operating Temperature 0–40° C
32–104° F
Humidity range (non-
5%–95% 5%–95%
0–40° C
32–104° F
condensing)
Safety Certifications TUV TUV
EMC & Susceptibility FCC Class A, CB, FCC,
CE, VCCI, C-Tick, NOM
FCC Class A, CB, FCC,
CE, VCCI, C-Tick, NOM,
SASO/CITC
60
Compliance RoHS, WEEE RoHS, WEEE
Table 1-17. MPX Platform Summary
MPX 5500 MPX 5550/MPX
5650
MPX 7500/MPX
9500
MPX 15000
Processors 1 dual-core 1 quad-core 1 dual-core 2 quad-core
Memory 4 GB 8 GB 8 GB 16 GB
Ports - 1G 4x10/100/10
00Base-T
copper
Ethernet
ports
6x10/100/1000Base
-T copper Ethernet
ports
8x10/100/1000B
ase-T copper
Ethernet ports
model:
8x10/100/10
00Base-T
copper
Ethernet
ports
8x10/100/1000Ba
se-T copper
Ethernet ports
Page 61

Citrix NetScaler Hardware Installation and Setup Guide
MPX 5500 MPX 5550/MPX
5650
Ports - 10G NA NA NA NA
Number of
Power
Supplies
AC Power
Supply input
voltage,
frequency, &
current
1 1
100–240 VAC
50–60 Hz
3–1.5 A
100–240 VAC
50–60 Hz
2.5 A
MPX 7500/MPX
9500
4x1G SFP +
4x10/100/1000B
ase-T copper
Ethernet ports
model:
4xcopper/fiber
1G SFP ports,
4x10/100/1000Ba
se-T copper
Ethernet ports
1 with second
optional
100–240 VAC
50–60 Hz
3–1.5 A
MPX 15000
2
100–240 VAC
47–63 Hz
Maximum
Power
Consumption
Heat
Dissipation
Weight 22 lbs
Height 1U 1U 1U 2U
Width EIA 310-D
260 W 300 W 260 W 700 W
887 BTU per
hour
9.98 kg
for 19-inch
racks
630 BTU per hour 887 BTU per hour
32 lbs
14.5 kg
EIA 310-D for 19inch racks
23 lbs with one
power supply
10.43 kg with one
power supply
EIA 310-D for 19inch racks
52 lbs
23.58 kg
EIA 310-D for
19-inch racks
61
Page 62

Chapter 1 Introduction to the Hardware Platforms
MPX 5500 MPX 5550/MPX
Depth 21.75 in or
55 cm
Operating
0–40° C
Temperature
32–104° F
Humidity
5%–95% 5%–95% 5%–95% 5%–95%
range (noncondensing)
Safety
CSA CSA CSA UL & TUV-C
Certification
s
EMC &
Susceptibilit
y
FCC (Part 15
Class A), CE,
C-Tick, CCC,
KCC, NOM,
PCT, VCCI,
SASO, SABS
5650
MPX 7500/MPX
9500
MPX 15000
24.02 in or 61 cm 21.75 in or 55 cm 18.5 in or 47
cm
0–40° C
32–104° F
FCC (Part 15 Class
A), CE, C-Tick,
VCCI-A, CCC, KCC,
NOM, SASO, SABS,
PCT
0–40° C
32–104° F
FCC (Part 15 Class
A), CE, C-Tick,
CCC, KCC, NOM,
PCT, VCCI, SASO,
SABS
0–35° C
32–95° F
FCC (Part 15
Class A),
DoC, CE,
VCCI, CNS,
AN/NES
Compliance RoHS, WEEE RoHS, WEEE RoHS, WEEE RoHS, WEEE
Table 1-18. MPX Platform Summary (contd.)
MPX 17000 MPX 8200/MPX
8400/MPX
8600/MPX 8800
MPX 9700/MPX
10500/MPX
12500/MPX
15500
MPX
11500/MPX
13500/MPX
14500/MPX
16500/MPX
18500/ MPX
20500
Processors 2 quad-core 1 quad-core 2 quad-core 2 six-core
Memory 32 GB 32 GB 16 GB 48 GB
Ports - 1G Ten network-
port model:
6x1G SFP +
6x10/100/1000
Base-T copper
Ethernet model:
8x10/100/1000
Base-T copper
Ethernet ports,
8xcopper/fiber
8x1G SFP ports
1G SFP ports
62
Page 63

Citrix NetScaler Hardware Installation and Setup Guide
MPX 17000 MPX 8200/MPX
8x10/100/1000Ba
se-T copper
Ethernet ports
Ports - 10G Four network-
port model:
4x10G XFP ports
Ten networkport model:
8400/MPX
8600/MPX 8800
6xcopper/fiber
1G SFP ports,
6x10/100/1000B
ase-T copper
Ethernet ports
2x10G SFP+
6x10/100/1000
Base-T copper
Ethernet model:
6xcopper/fiber
1G SFP ports
2x10G SFP+
6x10/100/1000
Base-T copper
Ethernet model:
2x10G SFP+ Ports
MPX 9700/MPX
10500/MPX
12500/MPX
15500
10G and FIPS
model:
8xcopper/fiber
1G SFP ports
10G and FIPS
model:
2x10G SFP+
ports
MPX
11500/MPX
13500/MPX
14500/MPX
16500/MPX
18500/ MPX
20500
4x10G SFP+
ports
Number of
Power
Supplies
AC Power
Supply
input
voltage,
frequency,
& current
Maximum
Power
Consumpti
on
2x10G XFP ports
2 1 2 2
100–240 VAC
47–63 Hz
700 W 450 W 450 W 650 W
100–240 VAC
50–60 Hz
2.5 A
100–240 VAC
50–60 Hz
4.5–2.5 A
100–240 VAC
50–60 Hz
6.5–3.5 A
63
Page 64

Chapter 1 Introduction to the Hardware Platforms
MPX 17000 MPX 8200/MPX
8400/MPX
8600/MPX 8800
MPX 9700/MPX
10500/MPX
12500/MPX
15500
MPX
11500/MPX
13500/MPX
14500/MPX
16500/MPX
18500/ MPX
20500
Heat
Dissipation
Weight 52 lbs
23.59 kg
630 BTU per
hour
32 lbs
14.52 kg
1550 BTU per
hour
31 lbs
14.06 kg
2200 BTU per
hour
46 lbs
20.87 kg
Height 2U 1U 2U 2U
Width EIA 310-D for 19-
inch racks
Depth 18.5 in or 47 cm 24.01 in or 61
EIA 310-D for 19inch racks
cm
EIA 310-D for
19-inch racks
24.5 in or 62
cm
EIA 310-D for
19-inch racks
28 in or 71.68
cm
Operating
0–35° C
0–40° C
0–40° C
0–40° C
Temperatu
re
Humidity
32–95° F
5%–95% 5%–95% 5%–95% 5%–95%
32–104° F
32–104° F
32–104° F
range
(noncondensing
)
Safety
UL & TUV-C TUV CSA CSA
Certificatio
ns
EMC &
Susceptibili
ty
FCC (Part 15
Class A), DoC,
CE, VCCI, CNS,
AN/NES
FCC (Part 15
Class A), CE, CTick, VCCI-A
FCC (Part 15
Class A), CE, CTick, KCC,
NOM, PCT,
VCCI, SASO,
SABS
FCC (Part 15
Class A), CE,
C-Tick, VCCI,
CCC, KC, NOM,
GOST, SABS,
SASO
ComplianceRoHS, WEEE RoHS, WEEE RoHS, WEEE RoHS, SVHC,
WEEE
64
Page 65

Citrix NetScaler Hardware Installation and Setup Guide
Table 1-19. MPX Platform Summary (contd.)
MPX 17500/MPX
19500/MPX 21500
Processors 2 six-core 2 six-core 2 eight-core
Memory 48 GB 96 GB 256 GB
Ports - 1G NA NA 12x1G SFP + 24x10G
Ports - 10G 8x10G SFP+ ports 8x10G SFP+
MPX
17550/MPX
19550/MPX
20550/MPX
21550
ports
MPX 22040/MPX
22060/MPX 22080/MPX
22100/MPX 22120
SFP+ model:
12xcopper/fiber 1G SFP
ports
12x1G SFP + 24x10G
SFP+ model:
24x10G SFP+ ports
24x10G SFP+ ports
model:
24x10G SFP+ ports
Number of
Power Supplies
AC Power
Supply input
voltage,
frequency, &
current
Maximum
Power
Consumption
2 2 4
100–240 VAC
50–60 Hz
6.5–3.5 A
650 W 850 W 12x1G SFP + 24x10G
100–240 VAC
50–60 Hz
6.5–3.5 A
12x1G SFP + 24x10G
SFP+ model:
100-240VAC
50/60Hz
6.0-12.0A
24x10G SFP+ model:
100-240VAC
50/60Hz
6.5-15.5A
SFP+ model:
1050 W
65
Page 66

Chapter 1 Introduction to the Hardware Platforms
MPX 17500/MPX
19500/MPX 21500
Heat
2200 BTU per hour 2900 BTU per
Dissipation
Weight 40 lbs
18.14 kg
MPX
17550/MPX
19550/MPX
20550/MPX
21550
hour
40 lbs
18.14 kg
MPX 22040/MPX
22060/MPX 22080/MPX
22100/MPX 22120
24x10G SFP+ model:
1400 W
12x1G SFP + 24x10G
SFP+ model:
2,000-2,6000 BTU per
hour
24x10G SFP+ model:
2,700-3,800 BTU per
hour
85 lbs
38.56 kg
Height 2U 2U 2U
Width EIA 310-D for 19-inch
racks
Depth 24.75 in or 62.865 cm 24.75 in or
EIA 310-D for
19-inch racks
EIA 310-D for 19-inch
racks
28¼ in or 72 cm
62.865 cm
Operating
0–40° C
0–40° C
0–40° C
Temperature
Humidity range
32–104° F
5%–95% 5%–95% 20%–80%
32–104° F
32–104° F
(noncondensing)
Safety
TUV TUV CSA
Certifications
EMC &
Susceptibility
FCC (Part 15 Class A),
CE, C-Tick, VCCI-A
FCC (Part 15
Class A), CE, CTick, VCCI-A
FCC (Part 15 Class A),
CE (EN55022/55024), CTick, VCCI
66
Page 67

Citrix NetScaler Hardware Installation and Setup Guide
MPX 17500/MPX
19500/MPX 21500
Compliance RoHS, WEEE RoHS, WEEE RoHS, WEEE
MPX
17550/MPX
19550/MPX
20550/MPX
21550
MPX 22040/MPX
22060/MPX 22080/MPX
22100/MPX 22120
67
Page 68

Chapter 1 Introduction to the Hardware Platforms
68
Page 69

Chapter 2
Preparing for Installation
Topics:
• Unpacking the Appliance
• Preparing the Site and Rack
• Cautions and Warnings
Before you install your new appliance, carefully unpack your
appliance and make sure that all parts were delivered. Once
you are satisfied that your appliance has been delivered to
your expectations, verify that the location where the
appliance will be installed meets temperature and power
requirements and that the server cabinet or floor-to-ceiling
cabinet is securely bolted to the floor and has sufficient
airflow.
Only trained and qualified personnel should install, maintain,
or replace the appliance, and efforts should be taken to
ensure that all cautions and warnings are followed.
69
Page 70

Chapter 2 Preparing for Installation
Unpacking the Appliance
The hardware accessories for your particular appliance, such as cables, adapters, and
rail kit, vary depending on the hardware platform you ordered. Unpack the box that
contains your new appliance on a sturdy table with plenty of space and inspect the
contents.
Use the following list to verify that you received everything that should have been
included in the box.
The appliance you ordered
w
One RJ-45 to DB-9 adapter
w
One 6 ft RJ-45/DB-9 cable
w
The following list specifies the number of power cables included for each appliance
w
model:
• One power cable for the MPX 5500, MPX 5550/5650, MPX 7500/9500, and MPX
8200/8400/8600/8800 appliances
• Two power cables for the 9010 FIPS, 12000-10G, MPX 15000, MPX 17000, MPX
9700/10500/12500/15500, MPX 11500/13500/14500/16500/18500/20500, MPX
17500/19500/21500, and MPX 17550/19550/20550/21550 appliances
• Four power cables for the MPX 22040/22060/22080/22100/22120 appliance
Note: Make sure that a power outlet is available for each cable.
Note: For Brazilian customers, Citrix does not ship a power cable. Use a cable that
conforms to the ABNT NBR 14136:2002 standard.
One standard 4-post rail kit
w
Note: If the kit that you received does not fit your rack, contact your Citrix sales
representative to order the appropriate kit.
In addition to the items included in the box with your new appliance, you will need the
following items to complete the installation and initial configuration process.
Ethernet cables for each additional Ethernet port that you will connect to your
w
network
One available Ethernet port on your network switch or hub for each NetScaler
w
Ethernet port you want to connect to your network
Note: Transceiver modules are sold separately. Contact your Citrix sales
representative to order transceiver modules for your appliance. Only transceivers
supplied by Citrix are supported on the appliance.
70
Page 71

Citrix NetScaler Hardware Installation and Setup Guide
A computer to serve as a management workstation
w
Preparing the Site and Rack
There are specific site and rack requirements for the NetScaler appliance. You must
make sure that adequate environmental control and power density are available. Racks
must be bolted to the ground, have sufficient airflow, and have adequate power and
network connections. Preparing the site and rack are important steps in the installation
process and help ensure a smooth installation.
Site Requirements
The appliance should be installed in a server room or server cabinet with the following
features:
Environment control
An air conditioner, preferably a dedicated computer room air conditioner (CRAC),
capable of maintaining the cabinet or server room at a temperature of no more than
21 degrees C/70 degrees F at altitudes of up to 2100 m/7000 ft, or 15 degrees C/60
degrees F at higher altitudes, a humidity level no greater than 45 percent, and a
dust-free environment.
Power density
Wiring capable of handling at least 4,000 watts per rack unit in addition to power
needs for the CRAC.
Rack Requirements
The rack on which you install your appliance should meet the following criteria:
Rack characteristics
Racks should be either integrated into a purpose-designed server cabinet or be the
floor-to-ceiling type, bolted down at both top and bottom to ensure stability. If you
have a cabinet, it should be installed perpendicular to a load-bearing wall for
stability and sufficient airflow. If you have a server room, your racks should be
installed in rows spaced at least 1 meter/3 feet apart for sufficient airflow. Your rack
must allow your IT personnel unfettered access to the front and back of each server
and to all power and network connections.
Power connections
At minimum, two standard power outlets per unit.
Network connections
71
Page 72

Chapter 2 Preparing for Installation
At minimum, four Ethernet connections per rack unit.
Space requirements
One empty rack unit for the Citrix NetScaler 7000, MPX 5500, MPX 5550/5650, MPX
7500/9500, and MPX 8200/8400/8600/8800, and two consecutive empty rack units
for all other appliance models.
Note: You can order the following rail kits separately.
Compact 4-post rail kit, which fits racks of 23 to 33 inches.
w
2-post rail kit, which fits 2-post racks.
w
Cautions and Warnings
Electrical Safety Precautions
Caution: During installation or maintenance procedures, wear a grounding wrist
strap to avoid ESD damage to the electronics of the appliance. Use a conductive wrist
strap attached to a good earth ground or to the appliance. You can attach it to the
connector beside the ESD symbol on the back.
Follow basic electrical safety precautions to protect yourself from harm and the
appliance from damage.
Be aware of the location of the emergency power off (EPO) switch, so that you can
w
quickly remove power to the appliance if an electrical accident occurs.
Remove all jewelry and other metal objects that might come into contact with
w
power sources or wires before installing or repairing the appliance. When you touch
both a live power source or wire and ground, any metal objects can heat up rapidly
and may cause burns, set clothing on fire, or fuse the metal object to an exposed
terminal.
Use a regulating, uninterruptible power supply (UPS) to protect the appliance from
w
power surges and voltage spikes, and to keep the appliance operating in case of
power failure.
Never stack the appliance on top of any other server or electronic equipment.
w
All appliances are designed to be installed on power systems that use TN earthing.
w
Do not install your device on a power system that uses either TT or IT earthing.
Make sure that the appliance has a direct physical connection to the earth during
w
normal use. When installing or repairing an appliance, always make sure that the
ground circuit is connected first and disconnected last.
72
Page 73

Citrix NetScaler Hardware Installation and Setup Guide
Make sure that a fuse or circuit breaker no larger than 120 VAC, 15 A U.S. (240 VAC,
w
16 A international) is used on all current-carrying conductors on the power system
to which your appliances are connected.
Do not work alone when working with high voltage components.
w
Always disconnect the appliance from power before removing or installing any
w
component. When disconnecting power, first shut down the appliance, and then
unplug the power cords of all the power supply units connected to the appliance. As
long as the power cord is plugged in, line voltages can be present in the power
supply, even when the power switch is OFF.
Do not use mats designed to decrease static electrical discharge as protection from
w
electrical shock. Instead, use rubber mats that have been specifically designed as
electrical insulators.
Make sure that the power source can handle the appliance's maximum power
w
consumption rating with no danger of an overload. Always unplug any appliance
before performing repairs or upgrades.
Do not overload the wiring in your server cabinet or on your server room rack.
w
During thunderstorms, or anticipated thunderstorms, avoid performing any hardware
w
repairs or upgrades until the danger of lightning has passed.
When you dispose of an old appliance or any components, follow any local and
w
national laws on disposal of electronic waste.
To prevent possible explosions, replace expired batteries with the same model or a
w
manufacturer-recommended substitute and follow the manufacturer’s instructions
for battery replacement.
Never remove a power supply cover or any sealed part that has the following label:
w
Appliance Precautions
Determine the placement of each component in the rack before you install the rail.
w
Install the heaviest appliance first, at the bottom of the rack, and then work
w
upward. Distribute the load on the rack evenly. An unbalanced rack is hazardous.
Allow the power supply units and hard drives to cool before touching them.
w
Install the equipment near an electrical outlet for easy access.
w
Mount equipment in a rack with sufficient airflow for safe operation.
w
For a closed or multiple-unit rack assembly, the ambient operating temperature of
w
the rack environment might be greater than the ambient temperature of the room.
73
Page 74

Chapter 2 Preparing for Installation
Therefore, consider the lowest and highest operating temperatures of the
equipment when making a decision about where to install the appliance in the rack.
Rack Precautions
Make sure that the leveling jacks on the bottom of the rack are fully extended to
w
the floor, with the full weight of the rack resting on them.
For a single-rack installation, attach a stabilizer to the rack.
w
For a multiple-rack installation, couple (attach) the racks together.
w
Always make sure that the rack is stable before extending a component from the
w
rack.
Extend only one component at a time. Extending two or more simultaneously might
w
cause the rack to become unstable.
The handles on the left and right of the front panel of the appliance should be used
w
only for extending the appliance out of the rack. Do not use these handles for
mounting the appliance on the rack. Use the rack-rail hardware, described later,
instead.
74
Page 75

Chapter 3
Installing the Hardware
Topics:
• Rack Mounting the Appliance
• Installing and Removing 1G
SFP Transceivers
• Installing and Removing XFP
and 10G SFP+ Transceivers
• Connecting the Cables
• Switching on the Appliance
After you have determined that the location where you will
install your appliance meets the environmental standards and
the server rack is in place according to the instructions, you
are ready to install the hardware. After you mount the
appliance, you are ready to connect it to the network, to a
power source, and to the console terminal that you will use
for initial configuration. To complete the installation, you turn
on the appliance. Be sure to observe the cautions and
warnings listed with the installation instructions.
75
Page 76

Chapter 3 Installing the Hardware
Rack Mounting the Appliance
Most appliances can be installed in standard server racks that conform to EIA-310-D
specification. The appliances ship with a set of rails, which you must install before you
mount the appliance. The only tools that you need for installing an appliance are a
Phillips screwdriver and a flathead screwdriver.
Caution: If you are installing the appliance as the only unit in the rack, mount it at
the bottom. If the rack contains other units, make sure that the heaviest unit is at the
bottom. If the rack has stabilizing devices available, install them before mounting the
appliance.
The following table lists the different hardware platforms and the rack units required
for each platform.
Table 3-1. Height Requirements For Each Platform
Platform Number of rack units
7000 One rack unit
9010 FIPS, 12000-10G Two rack units
MPX 5500 One rack unit
MPX 5550/5650 One rack unit
MPX 7500/9500 One rack unit
MPX 8200/8400/8600/8800 One rack unit
MPX 9700/10500/12500/15500 Two rack units
MPX 15000, MPX 17000 Two rack units
MPX 11500/13500/14500/16500/18500/20500 Two rack units
MPX 17500/19500/21500 Two rack units
MPX 17550/19550/20550/21550 Two rack units
MPX 22040/22060/22080/22100/22120 Two rack units
76
Page 77

Citrix NetScaler Hardware Installation and Setup Guide
Each appliance ships with a mounting rail kit that contains two rail assemblies, one for
the left side and the other for the right side of the appliance, and screws to attach the
rails. An assembly consists of an inner rail and a rack rail. The supplied rail kit is 28
inches long (38 inches extended). Contact your Citrix sales representative to order a
23-inch (33 inches extended) rail kit.
Note: The same rail kit is used for both square-hole and round-hole racks. See
"Installing the Rail Assembly to the Rack" for specific instructions for threaded, roundhole racks.
To mount the appliance, you must first install the rails and then install the appliance in
the rack.
Perform the following tasks to mount the appliance:
Remove the inner rails from the rail assembly.
w
Attach the inner rails to the appliance.
w
Install the rack rails on the rack.
w
Install the appliance in the rack.
w
The appliance is shipped with rack-rail hardware. This hardware consists of two inner
rails that you attach to the appliance, one on each side, and a rack-rail assembly that
you attach to the rack. The following figure illustrates the steps involved in mounting
the Citrix NetScaler appliance to a rack.
To remove the inner rails from the rail assembly
1. Place the rail assembly on a flat surface.
2. Slide out the inner rail toward the front of the assembly.
3. Depress the latch until the inner rail comes all the way out of the rail assembly.
4. Repeat steps 1 through 3 to remove the second inner rail.
To attach the inner rails to the appliance
1. Position the right inner rail behind the handle on the right side of the appliance.
2. Align the holes on the rail with the corresponding holes on the side of the
appliance.
3. Attach the rail to the appliance with the provided screws: 4 per side for a 1U
appliance and 5 per side for a 2U appliance, as shown in the following figure.
77
Page 78

Chapter 3 Installing the Hardware
Figure 3-1. Attaching inner rails
4. Repeat steps 1 through 3 to install the left inner rail on the other side of the
appliance.
To install the rack rails on the rack
1. If you have a round-hole, threaded rack, skip to step 3.
2. Install square nut retainers into the front post and back post of the rack as shown
in the following figures. Before inserting a screw, be sure to align the square nut
with the correct hole for your 1U or 2U appliance. The three holes are not evenly
spaced.
Figure 3-2. Installing Retainers into the Front Rack Posts
Figure 3-3. Installing Retainers into the Rear Rack Posts
3. Install the adjustable rail assembly into the rack as shown in the following figures.
Use a screw to lock the rear rail flange into the rack. With the screw securing the
rail in place, you can optionally remove the latching spring.
78
Page 79

Citrix NetScaler Hardware Installation and Setup Guide
Figure 3-4. Installing the Rail Assembly to the Rack
To install the appliance in the rack
1. Align the inner rails, attached to the appliance, with the rack rails.
2. Slide the appliance into the rack rails, keeping the pressure even on both sides.
3. Verify that the appliance is locked in place by pulling it all the way out from the
rack.
79
Page 80

Chapter 3 Installing the Hardware
Figure 3-5. Rack Mounting the Appliance
Installing and Removing 1G SFP Transceivers
Note: This section applies to the 9010 FIPS, 12000-10G, MPX 8200/8400/8600/8800,
MPX 9700/10500/12500/15500, MPX 11500/13500/14500/16500/18500/20500, and
MPX 22040/22060/22080/22100/22120 appliances.
A Small Form-Factor Pluggable (SFP) is a compact transceiver that can operate at
speeds of up to 1 gigabit per second and is available in both copper and fiber types.
Inserting a 1G SFP copper transceiver converts the 1G SFP port to a 1000BASE-T port.
Inserting a 1G SFP fiber transceiver converts the 1G SFP port to a 1000BASE-X port.
Auto-negotiation is enabled by default on the 1G SFP port into which you insert your 1G
SFP transceiver. As soon as a link between the port and the network is established, the
speed and mode are matched on both ends of the cable.
Note: The 1G SFP transceiver is hot-swappable from release 9.3 build 42.2 and later
on the NetScaler appliances that use the e1k interface. The following platforms
support 1G SPF transceivers:
MPX 7500/9500
w
MPX 8200/8400/8600/8800
w
MPX 9700/10500/12500/15500
w
MPX 11500/13500/14500/16500/18500/20500
w
80
MPX 22040/22060/22080/22100/22120
w
Page 81

Citrix NetScaler Hardware Installation and Setup Guide
Caution: NetScaler appliances do not support 1G SFP transceivers from vendors
other than Citrix Systems. Attempting to install third-party 1G SFP transceivers on your
NetScaler appliance voids the warranty.
Insert 1G SFP transceivers into the 1G SFP ports on the front panel of the appliance.
Frequent installation and removal of transceivers shortens their life span. Follow the
removal procedure carefully to avoid damaging the 1G SFP transceiver or the
appliance.
Caution: Do not install the transceivers with the cables attached. Doing so can
damage the cable, the connector, or the optical interface of the transceiver.
To install a 1G SFP transceiver
1. Remove the 1G SFP transceiver carefully from its box.
Danger: Do not look directly into fiber optic transceivers or cables. They emit
laser beams that can damage your eyes.
2. Align the 1G SFP transceiver to the front of the 1G SFP transceiver port on the
front panel of the appliance, as shown in the following figure.
Note: The illustration in the following figures might not represent your actual
appliance.
Figure 3-6. Installing a 1G SFP transceiver
3. Hold the 1G SFP transceiver between your thumb and index finger and insert it into
the 1G SFP transceiver port, pressing it in until you hear the transceiver snap into
place.
81
Page 82

Chapter 3 Installing the Hardware
4. Lock the transceiver.
5. Verify that the LED is green and blinks twice, which indicates that the transceiver
is functioning correctly.
6. If you are using a fiber 1G SFP transceiver, do not remove the dust caps attached
to the transceiver and the cable until you are ready to insert the cable.
To remove a 1G SFP transceiver
1. Disconnect the cable from the 1G SFP transceiver. If you are using a fiber optic
cable, replace the dust cap on the cable before putting it away.
Danger: Do not look directly into fiber optic transceivers or cables. They emit
laser beams that can damage your eyes.
2. Unlock the 1G SFP transceiver.
3. Hold the 1G SFP transceiver between your thumb and index finger and slowly pull
it out of the port.
4. If you are removing a fiber 1G SFP transceiver, replace the dust cap before putting
it away.
5. Put the 1G SFP transceiver into its original box or another appropriate container.
Installing and Removing XFP and 10G SFP+ Transceivers
Note: This section applies to the 12000 10G, MPX 8200/8400/8600/8800, MPX
9700/10500/12500/15500, MPX 15000, MPX 17000, MPX
11500/13500/14500/16500/18500/20500, MPX 17500/19500/21500, MPX
17550/19550/20550/21550, and MPX 22040/22060/22080/22100/22120 appliances.
A 10-Gigabit Small Form-Factor Pluggable (XFP or SFP+) is a compact optical
transceiver that can operate at speeds of up to 10 gigabits per second. The 12000 10G,
MPX 15000, and MPX 17000 appliances use XFP transceivers and the MPX
8200/8400/8600/8800, MPX 9700/10500/12500/15500, MPX
11500/13500/14500/16500/18500/20500, MPX 17500/19500/21500, MPX
17550/19550/20550/21550, and MPX 22040/22060/22080/22100/22120 appliances use
10G SFP+ transceivers. Autonegotiation is enabled by default on the XFP/10G SFP+
ports into which you insert your XFP/10G SFP+ transceiver. As soon as a link between
the port and the network is established, the mode is matched on both ends of the
cable and for 10G SFP+ transceivers, the speed is also autonegotiated.
82
Note: An XFP transceiver is not hot-swappable on the NetScaler appliances. You
must restart a NetScaler appliance after you insert an XFP transceiver.
Page 83

Citrix NetScaler Hardware Installation and Setup Guide
However, the 10G SFP+ transceiver is hot-swappable from release 9.3 build 57.5 and
later on the NetScaler appliances that use the ixgbe (ix) interface. The following
platforms support 10G SPF+ transceivers:
MPX 8200/8400/8600/8800
w
MPX 9700/10500/12500/15500 10G and 10G FIPS
w
MPX 11500/13500/14500/16500/18500/20500
w
MPX 17500/19500/21500
w
MPX 17550/19550/20550/21550
w
MPX 22040/22060/22080/22100/22120
w
The following platforms support XFP transceivers:
MPX 15000
w
MPX 17000
w
Caution: NetScaler appliances do not support XFP/10G SFP+ transceivers
provided by vendors other than Citrix Systems. Attempting to install third-party
XFP/10G SFP+ transceivers on your NetScaler appliance voids the warranty.
Insert the XFP/10G SFP+ transceivers into the XFP/10G SFP+ ports on the front panel of
the appliance. Frequent installation and removal of transceivers shortens their life
span. Follow the removal procedure carefully to avoid damaging the transceiver or the
appliance.
Caution: Do not install the transceivers with the cables attached. Doing so can
damage the cable, the connector, or the optical interface of the transceiver.
To install an XFP/10G SFP+ transceiver
1. Remove the XFP/10G SFP+ transceiver carefully from its box.
Danger: Do not look directly into fiber optic transceivers and cables. They
emit laser beams that can damage your eyes.
2. Align the XFP/10G SFP+ transceiver to the front of the XFP/10G SFP+ transceiver
port on the front panel of the appliance.
3. Hold the XFP/10G SFP+ transceiver between your thumb and index finger and
insert it into the XFP/10G SFP+ transceiver port, pressing it in until you hear the
transceiver snap into place.
4. Move the locking hinge to the DOWN position as shown in the following figure.
83
Page 84

Chapter 3 Installing the Hardware
Figure 3-7. Locking an XFP transceiver
5. Verify that the LED is green and blinks twice, which indicates that the transceiver
is functioning correctly.
6. Do not remove the dust caps attached to the transceiver and cable until you are
ready to insert the cable.
To remove an XFP/10G SFP+ transceiver
1. Disconnect the cable from the XFP/10G SFP+ transceiver. Replace the dust cap on
the cable before putting it away.
Danger: Do not look directly into fiber optic transceivers or cables. They emit
laser beams that can damage your eyes.
2. Unlock the XFP/10G SFP+ transceiver by moving the locking hinge to the UP
position.
3. Hold the XFP/10G SFP+ transceiver between your thumb and index finger and
slowly pull it out of the port.
4. Replace the dust cap on the transceiver before putting it away.
5. Put the XFP/10G SFP+ transceiver into its original box or another appropriate
container.
84
Page 85

Citrix NetScaler Hardware Installation and Setup Guide
Connecting the Cables
When the appliance is securely mounted on the rack, you are ready to connect the
cables. Ethernet cables and the optional console cable are connected first. Connect the
power cable last.
Danger: Before installing or repairing the appliance, remove all jewelry and other
metal objects that might come in contact with power sources or wires. When you touch
both a live power source or wire and ground, any metal objects can heat up rapidly
and cause burns, set clothing on fire, or fuse the metal object to an exposed terminal.
Connecting the Ethernet Cables
Ethernet cables connect your appliance to the network. The type of cable you need
depends on the type of port used to connect to the network. Use a category 5e or
category 6 Ethernet cable with a standard RJ-45 connector on a 10/100/1000BASE-T
port or 1G SFP copper transceiver. Use a fiber optic cable with an LC duplex connector
with a 1G SFP fiber transceiver, 10G SFP+, or XFP transceiver. The type of connector at
the other end of the fiber optic cable depends on the port of the device that you are
connecting to.
To connect an Ethernet cable to a 10/100/1000BASE-T port or 1G SFP copper transceiver
1. Insert the RJ-45 connector on one end of your Ethernet cable into an appropriate
port on the front panel of the appliance, as shown in the following figure.
Figure 3-8. Inserting an Ethernet cable
2. Insert the RJ-45 connector on the other end into the target device, such as a
router or switch.
3. Verify that the LED glows amber when the connection is established.
85
Page 86

Chapter 3 Installing the Hardware
To connect the Ethernet cable to a 1G SFP fiber, 10G SFP+, or XFP transceiver
1. Remove the dust caps from the transceiver and cable.
2. Insert the LC connector on one end of the fiber optic cable into the appropriate
port on the front panel of the appliance.
3. Insert the connector on the other end into the target device, such as a router or
switch.
4. Verify that the LED glows amber when the connection is established.
Connecting the Console Cable
You can use the console cable to connect your appliance to a computer or terminal,
from which you can configure the appliance. Alternatively, you can use a computer
connected to the network. Before connecting the console cable, configure the
computer or terminal to support VT100 terminal emulation, 9600 baud, 8 data bits, 1
stop bit, parity, and flow control set to NONE. Then connect one end of the console
cable to the RS232 serial port on the appliance and the other end to the computer or
terminal.
To connect the console cable to a computer or terminal
1. Insert the DB-9 connector at the end of the cable into the console port that is
located on the front panel of the appliance, as shown in the following figure.
Figure 3-9. Inserting a console cable
Note: To use a cable with an RJ-45 converter, insert the optional converter
provided into the console port and attach the cable to it.
2. Insert the RJ-45 connector at the other end of the cable into the serial port of the
computer or terminal.
Connecting the Power Cable
An MPX 5500, MPX 5550/5650, MPX 7500/9500, MPX 8200/8400/8600/8800, and 7000
appliance has one power cable. All the other appliances come with two power cables,
but they can also operate if only one power cable is connected, except the MPX
22040/22060/22080/22100/22120 which comes with four power cables and requires
86
Page 87

Citrix NetScaler Hardware Installation and Setup Guide
two power cables for proper operation. A separate ground cable is not required,
because the three-prong plug provides grounding.
To connect the appliance to the power source
1. Connect one end of the power cable to the power outlet on the back panel of the
appliance, next to the power supply, as shown in the following figure.
Figure 3-10. Inserting a power cable
2. Connect the other end of the power cable to a standard 110V/220V power outlet.
3. If a second power supply is provided, repeat steps 1 and 2 to connect the second
power supply.
Note: The 9010 FIPS, 12000-10G, MPX 9700/10500/12500/15500, MPX
11500/13500/14500/16500/18500/20500, MPX 17500/19500/21500, and MPX
17550/19550/20550/21550 appliances emit a high-pitched alert if one power
supply fails or if you connect only one power cable to the appliance. To silence the
alarm, you can press the small red button located on the back panel of the
appliance.
Switching on the Appliance
After you have installed the appliance in a rack and connected the cables, verify that
the power cable is properly connected. If you have installed a second power supply,
make sure the second cable is connected to an outlet for a different circuit than the
first. After verifying the connections, you are ready to switch on the appliance.
To switch on the appliance
1. Verify that the appliance is connected through a console or Ethernet port.
This will ensure that you can configure the appliance after it is switched on.
2. Press the ON/OFF toggle power switch on the back panel of the appliance.
87
Page 88

Chapter 3 Installing the Hardware
Figure 3-11. Power switch on back panel
3. Verify that the LCD on the front panel is backlit and the start message appears, as
shown in the following figure.
Figure 3-12. LCD startup screen
Caution: Be aware of the location of the emergency power off (EPO) switch, so
that if an electrical accident occurs you can quickly remove power from the appliance.
88
Page 89

Chapter 4
Initial Configuration
Topics:
• Using the LCD Keypad
• Using the NetScaler Serial
Console
• Using the Setup Wizard
• Using DHCP for Initial
Access
• Accessing a NetScaler by
Using SSH Keys and No
Password
• Changing the Administrative
Password
After you have installed your appliance in a rack, you are
ready to perform the initial configuration. Once initial
configuration is complete, refer to the specific configuration
guides for the features you will be using.
Initial configuration is the same for the multifunction Citrix
NetScaler, the dedicated Access Gateway Enterprise Edition,
and the dedicated Citrix® Application Firewall™ appliances.
To perform the initial configuration on the MPX 5500, MPX
5550/5650, MPX 7500/9500, MPX 8200/8400/8600/8800, MPX
9700/10500/12500/15500, MPX
11500/13500/14500/16500/18500/20500, MPX
17500/19500/21500, MPX 17550/19550/20550/21550, and MPX
22040/22060/22080/22100/22120 appliances, you can also
use the LCD keypad on the front panel of the appliance. To
perform the initial configuration, you can use the serial
console or the setup wizard. You can access the setup wizard
from any computer that is on the same network as the new
NetScaler appliance. However, because this method uses the
NetScaler default IP address, you must install and configure
one NetScaler appliance at a time. If you want to configure a
new appliance from a remote network, or if you want to
install multiple NetScaler appliances and then configure them
without using the console port, you can use Dynamic Host
Configuration Protocol (DHCP) to assign each new appliance
an IP address at which you can access the appliance for
remote configuration.
For initial configuration, use nsroot as both the administrative
user name and the password. For subsequent access, use the
password assigned during initial configuration.
After you complete the initial configuration of the appliance,
you can configure secure access to your appliance. As a
result, you are no longer prompted for a password when
logging on. This is especially helpful in environments for
which you would otherwise have to keep track of a large
number of passwords.
89
Page 90
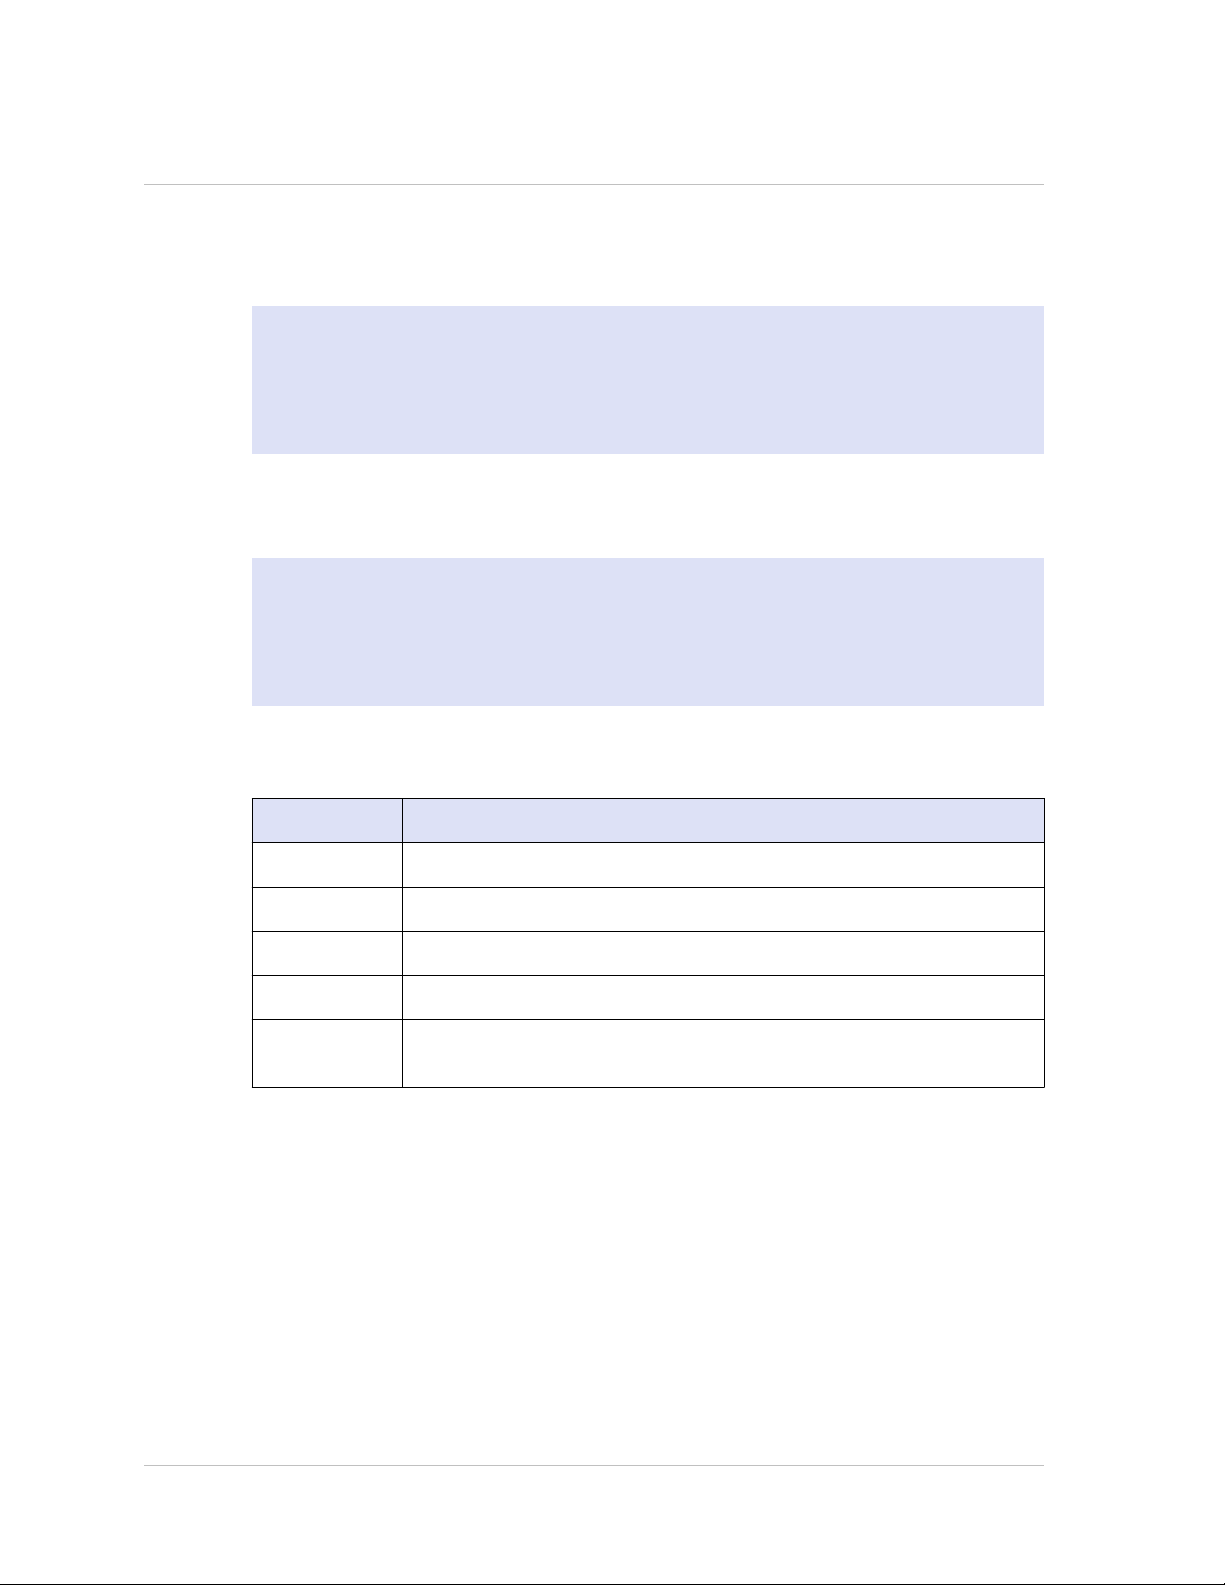
Chapter 4 Initial Configuration
Using the LCD Keypad
Note: The following section is applicable to MPX 5500, MPX 5550/5650, MPX
7500/9500, MPX 8200/8400/8600/8800, MPX 9700/10500/12500/15500, MPX
11500/13500/14500/16500/18500/20500, MPX 17500/19500/21500, MPX
17550/19550/20550/21550, and MPX 22040/22060/22080/22100/22120 appliances
only.
When you first install the appliance, you can configure the initial settings by using the
LCD keypad on the front panel of the appliance. The keypad interacts with the LCD
display module, which is also on the front panel of these appliances.
Note: You can use the LCD keypad for initial configuration on a new appliance with the
default configuration. The configuration file (ns.conf) should contain the following
command and default values.
set ns config -IPAddress 192.168.100.1 -netmask 255.255.0.0
The functions of the different keys are explained in the following table.
Table 4-1. LCD Key Functions
Key Function
< Moves the cursor one digit to the left.
> Moves the cursor one digit to the right.
^ Increments the digit under the cursor.
v Decrements the digit under the cursor.
. Processes the information, or terminates the configuration, if none
of the values are changed. This key is also known as the ENTER key.
To perform the initial configuration by using the LCD keypad press the "<" key.
You are prompted to enter the subnet mask, NetScaler IP address (NSIP), and gateway
in that order respectively. The subnet mask is associated with both the NSIP and
default gateway IP address. The NSIP is the IPv4 address of the NetScaler appliance.
The default gateway is the IPv4 address for the router, which will handle external IP
traffic that the NetScaler cannot otherwise route. The NSIP and the default gateway
should be on the same subnet.
If you enter a valid value for the subnet mask, such as 255.255.255.224, you are
prompted to enter the IP address. Similarly, if you enter a valid value for the IP
address, you are prompted to enter the gateway address. If the value you entered is
90
Page 91

Citrix NetScaler Hardware Installation and Setup Guide
invalid, the following error message appears for three seconds, where xxx.xxx.xxx.xxx
is the IP address you entered, followed by a request to re-enter the value.
Invalid addr!
xxx.xxx.xxx.xxx
If you press the ENTER (.) key without changing any of the digits, the software
interprets this as a user exit request. The following message will be displayed for three
seconds.
Exiting menu...
xxx.xxx.xxx.xxx
If all the values entered are valid, when you press the ENTER key, the following
message appears.
Values accepted,
Rebooting...
The subnet mask, NSIP, and gateway values are saved in the configuration file.
Note: For information about deploying a high availability (HA) pair, see "Configuring
High Availability."
Using the NetScaler Serial Console
When you first install the appliance, you can configure the initial settings by using the
serial console. With the serial console, you can change the system IP address, create a
subnet or mapped IP address, configure advanced network settings, and change the
time zone.
Note: To locate the serial console port on your appliance, see "RS232 Serial Console
Port" in "Ports."
To configure initial settings by using a serial console
1. Connect the console cable into your appliance. For more information, see
"Connecting the Console Cable" in "Connecting the Cables."
2. Run the vt100 terminal emulation program of your choice on your computer to
connect to the appliance and configure the following settings:
9600 baud, 8 data bits, 1 stop bit, parity, and flow control set to NONE.
3. Press ENTER.
The terminal screen displays the Logon prompt.
91
Page 92

Chapter 4 Initial Configuration
Note: You might have to press ENTER two or three times, depending on which
terminal program you are using.
4. Log on to the appliance with the administrator credentials.
Your sales representative or Citrix Customer Service can provide you with the
administrator credentials.
5. At the prompt, type config ns to run the NetScaler configuration script.
6. To complete the initial configuration of your appliance, follow the prompts.
Note: To prevent an attacker from breaching your ability to send packets to the
appliance, choose a non-routable IP address on your organization's LAN as your
appliance IP address.
You can replace steps 5 and 6 with the following NetScaler commands. At the
NetScaler command prompt, type:
set ns config -ipaddress<IPAddress> -netmask<subnetMask>
add ns ip<IPAddress> <subnetMask> -type<type>
add route<network> <netmask> <gateway>
set system user <userName> -password
save ns config
reboot
Example
set ns config -ipaddress 10.102.29.60 -netmask
255.255.255.0
add ns ip 10.102.29.61 255.255.255.0 -type snip
add route 0.0.0.0 0.0.0.0 10.102.29.1
set system user nsroot -password
Enter password: *****
Confirm password: *****
save ns config
reboot
You have now completed initial configuration of your appliance.
To continue configuring the appliance, choose one of the following options:
Citrix NetScaler.
If you are configuring your appliance as a standard NetScaler with other licensed
features, see "Load Balancing."
Citrix® Application Firewall™.
92
If you are configuring your appliance as a standalone application firewall, see
"Application Firewall."
Page 93

Citrix NetScaler Hardware Installation and Setup Guide
Access Gateway.
If you are configuring your appliance as an Access Gateway, see "Access Gateway
9.3, Enterprise Edition."
Note: For information about deploying a high availability (HA) pair, see
"Configuring High Availability."
Using the Setup Wizard
To configure the appliance by using the Setup Wizard in the configuration utility, you
need an administrative computer configured on the same network as the appliance. To
run the configuration utility, the Java RunTime Environment (JRE) version 1.4.2_04 or
later must be installed on the workstation or laptop. You can use the Setup Wizard to
configure the following initial settings on the appliance:
System IP address and subnet mask
w
Subnet or Mapped IP address and subnet mask
w
Host name
w
Default gateway
w
Time zone
w
Licenses
w
Administrator password
w
Important: Before running the Setup Wizard, you should download your licenses from
the Citrix Web site and put them in a location on your computer or another device
where you can access them from your Web browser during configuration.
Note: If the appliance is configured with the default IP address, licenses are not
installed on the appliance, or the mapped or subnet IP address is not configured, the
configuration utility automatically opens the Setup Wizard when you log on to the
appliance.
To configure initial settings by using the Setup Wizard
1. In a Web browser, type: http://192.168.100.1
Note: The NetScaler software is preconfigured with a default IP address and
associated netmask. The default IP address is 192.168.100.1 and the default
netmask is 255.255.0.0.
93
Page 94

Chapter 4 Initial Configuration
2. In User Name and Password, type the administrator credentials.
You can obtain the initial user name and password from your sales representative
or from Citrix Customer Service.
3. In Start in, select Configuration, and then click Login.
4. In the Setup Wizard, click Next, and then follow the instructions in the wizard.
Note: To prevent an attacker from breaching your ability to send packets to the
appliance, choose a non-routable IP address on your organization's LAN as your
appliance IP address.
You have now completed initial configuration of your appliance. To continue
configuring the appliance, choose one of the following options:
Citrix NetScaler.
If you are configuring your appliance as a standard NetScaler with other licensed
features, see "Load Balancing."
Citrix® Application Firewall™.
If you are configuring your appliance as a standalone application firewall, see
"Application Firewall."
Access Gateway.
If you are configuring your appliance as an Access Gateway, see "Access Gateway
9.3, Enterprise Edition."
Note: For information about deploying a high availability (HA) pair, see
"Configuring High Availability."
Using DHCP for Initial Access
Note: The terms NetScaler, NetScaler appliance, and appliance are used
interchangeably.
For initial configuration of a NetScaler appliance, Dynamic Host Configuration Protocol
(DHCP) can eliminate dependency on the console by providing a subnet IP (SNIP)
address at which you can access the appliance to configure it remotely. You can also
use DHCP after initial configuration if, for example, you want to move a NetScaler to a
different subnet.
94
To use DHCP, you must first specify the NetScaler vendor class identifier on a DHCP
server. Optionally, you can also specify the pool of IP addresses from which your
NetScaler appliance can acquire an IP address. If a pool is not specified, the address is
acquired from the general pool.
Page 95

Citrix NetScaler Hardware Installation and Setup Guide
A new NetScaler appliance does not have a configuration file. When you connect an
appliance without a configuration file to the network, its DHCP client automatically
polls the DHCP server for an IP address. If you have specified the NetScaler vendor class
identifier on the DHCP server, the server returns an address. You can also enable the
DHCP client on a previously configured appliance.
Prerequisites
To use DHCP, you must:
1. Note the system ID (sysid) on the serial number sticker on the back panel of the
appliance. On an older appliance, the system ID may not be available. In this case,
use the MAC address instead of the system ID.
2. Set up a DHCP server and configure it with the NetScaler vendor class identifier.
To configure a Linux/UNIX DHCP server for the NetScaler appliance
1. Specify "citrix-NS" as the vendor class identifier for the NetScaler appliance by
adding the following configuration to the server's dhcpd.conf file. The subclass
declaration must be inside the subnet declaration.
option space auto;
option auto.key code 1 = text;
class "citrix-1" {
match option vendor-class-identifier;
}
subclass "citrix-1" "citrix-NS"{
vendor-option-space auto;
option auto.key "citrix-NS";
Note: The location of the dhcpd.conf file can be different in different versions
and flavors of the Linux/UNIX-based operating system (for example, in FreeBSD
6.3 the file is present in the /etc/ folder). For the location, see the dhcpd man
page of the DHCP server.
2. If you do not want NetScaler appliances to use IP addresses from the general pool,
specify a pool of addresses for the appliance. You must include this pool
declaration inside the subnet declaration. For example, adding the following
configuration to the dhcpd.conf file specifies a pool of IP addresses ranging from
192.168.2.120 to 192.168.2.127.
pool {
allow members of "citrix-1";
range 192.168.2.120 192.168.2.127;
option subnet-mask 255.255.255.0;
}
95
Page 96

Chapter 4 Initial Configuration
3. Terminate the DHCP process and restart it to reflect the change to the
configuration file. At the shell prompt, type:
killall dhcpd
dhcpd&
option space auto;
option auto.key code 1 = text;
class "citrix-1" {
match option vendor-class-identifier;
}
subnet 192.168.2.0 netmask 255.255.255.0 {
option routers10.217.242.1;
option domain-name"jeffbr.local";
option domain-name-servers8.8.8.8;
default-lease-time 21600;
max-lease-time 43200;
subclass "citrix-1" "citrix-NS" {
vendor-option-space auto;
option auto.key "citrix-NS";
}
pool {
allow members of "citrix-1";
range 192.168.2.120 192.168.2.127;
option subnet-mask 255.255.255.0;
}
}
Sample DHCP configuration (dhcpd.conf)
Implementing an Initial NetScaler Configuration from a Remote Computer
When a new NetScaler appliance (or any appliance that does not have a configuration
file) starts, it automatically polls the DHCP server for an IP address and provides the
DHCP server with its sysid. The DHCP server selects one IP address from its pool and
assigns it as a subnet IP (SNIP) address to the appliance. The DHCP server includes the
sysid of the appliance and the IP address that it assigns to the appliance in the server's
dhcpd.leases file. To find the IP address currently assigned to your appliance, look in
the dhcpd.leases file for the last entry with the sysid of your appliance in the uid or
client-hostname field. Verify that the binding state in this entry is active. If the binding
state is not active but free, the IP address is not yet associated with the appliance.
You can use this address to connect to the appliance and remotely configure the initial
settings. For example, you can change the IP address, subnet mask, and gateway
settings that were fetched from the DHCP server. After completing the initial
configuration, you can manually return the DHCP IP address to the server pool.
96
Page 97

Citrix NetScaler Hardware Installation and Setup Guide
Alternatively, restarting the appliance automatically releases the DHCP IP address back
to the server pool.
You can find out the SNIP address assigned to the appliance from the NetScaler console
or from the DHCP server.
To find the SNIP address from the NetScaler console
At the console prompt, type:
> sh dhcpParams
DHCP Client on next reboot is ON
DHCP Client Current State: Active
DHCP Client Default route save: OFF
DHCP acquired IP:192.168.2.127
DHCP acquired Netmask:255.255.255.0
DHCP acquired Gateway:192.168.2.1
Done
To find the SNIP address from the DHCP server
Look in the dhcpd.leases file for the last entry with the sysid of your appliance in the
uid or client-hostname field.
Example: The following entry in a DHCP server's dhcpd.leases file verifies the binding
state of the appliance whose sysid is 45eae1a8157e89b9314f.
lease 192.168.2.127 {
starts 3 2013/08/19 00:40:37;
ends 3 2013/08/19 06:40:37;
cltt 3 2013/08/19 00:40:37;
binding state active;
next binding state free;
hardware ethernet 00:d0:68:11:f4:d6;
uid "45eae1a8157e89b9314f";
client-hostname "45eae1a8157e89b9314f";
In the above example, the binding state is ACTIVE and the IP address assigned to the
appliance is 192.168.2.127.
The following table describes DHCP-related CLI commands that you might want to use
when configuring a new NetScaler appliance.
Table 4-2. NetScaler CLI commands for using DHCP with a new NetScaler Appliance
Task At the NetScaler command prompt,
type:
To verify the DHCP fetched details, such
as IP address, subnet mask, and gateway
on the appliance
> sh dhcpParams
97
Page 98

Chapter 4 Initial Configuration
Task At the NetScaler command prompt,
type:
To release the DHCP IP address and
return it to the IP address pool on the
DHCP server when the NetScaler
configuration is complete
> release dhcpIP
Using DHCP When a Configuration File is Present
If you need to move a NetScaler appliance to a different subnet, such as from a testing
environment to a production environment, you can use DHCP to access an appliance
that already has a configuration file. Before moving the appliance, enable its DHCP
client and save the configuration. As a result, when the appliance restarts, it
automatically polls the DHCP server for an IP address. If you did not enable the DHCP
client and save the configuration before shutting down the appliance, you will need to
connect to the appliance through the console and dynamically run the DHCP client on
the appliance. The DHCP server will then provide an IP address, a gateway, and a
subnet mask. You can use the IP address to access the appliance and configure the
other settings remotely.
If the DHCP client is enabled in the configuration file, you should disable it and then
save the configuration file. If the DHCP client is enabled, the appliance will poll the
DHCP server again for an IP address when it restarts.
The following table lists the NetScaler CLI commands associated with each task.
98
Table 4-3. NetScaler CLI commands for using DHCP with a previously configured
NetScaler Appliance
Task At the NetScaler command prompt,
type:
To dynamically run the DHCP client to
fetch an IP address from the DHCP server
To configure the DHCP client to run when
the appliance restarts
To prevent the DHCP client from running
when the appliance restarts
> set dhcpParams dhcpClient on
> set dhcpParams dhcpClient on
> save config
> set dhcpParams dhcpClient off
> save config
Note: This is required only if the ON
setting was saved.
Page 99

Citrix NetScaler Hardware Installation and Setup Guide
Task At the NetScaler command prompt,
type:
To save the DHCP acquired route so that
it is available when the appliance
restarts
To prevent saving the DHCP acquired
route (default behavior)
> set dhcpParams -dhcpclient on saveroute on
> save config
> set dhcpParams -dhcpclient on saveroute off
> save config
Note: This is required only if the ON
setting was saved.
Accessing a NetScaler by Using SSH Keys and No Password
If you administer a large number of NetScaler appliances, storing and looking up
passwords for logging on to individual appliances can be cumbersome. To avoid being
prompted for passwords, you can set up secure shell access with public key encryption
on each appliance.
NetScaler features can also use SSH key based authentication for internal
communication when the nsinternal user is disabled (by using the set ns config -
internaluserlogin disabled command). In such cases, the key name must be set as
"ns_comm_key".
To set up access using SSH keys, you must generate the public-private key pair on a
client and copy the public key to the remote NetScaler appliance.
To generate the keys and connect to a remote NetScaler by using SSH keys
1. On a client (Linux client or a NetScaler) change directory to /root/.ssh.
cd /root/.ssh
2. Generate the public-private key pair.
ssh-keygen -t <key_type> -f <optional_key_file_name>
Example: To create an RSA key with default file name.
ssh-keygen -t rsa
99
Page 100

Chapter 4 Initial Configuration
3. Press ENTER when prompted for a file name for the key pair.
4. Press ENTER two times when prompted for a passphrase.
Note: If the client is a NetScaler appliance, move the private key file to a
persistent location such as sub-directories of the /flash and /var directories.
5. Log on to the remote NetScaler appliance from the client by using a file transfer
protocol, and perform the following:
a. Change directory to /nsconfig/ssh. At the prompt, type:
cd /nsconfig/ssh
b. Use the binary transfer mode to copy the public key to this directory.
bin
put id_rsa.pub
6. Open a connection to the remote NetScaler appliance by using an SSH client, such
as PuTTY, and perform the following:
a. Log on to the remote appliance using the administrator credentials.
b. Go to the NetScaler shell.
> shell
c. At the shell prompt, change the directory to /nsconfig/ssh.
root@ns# cd /nsconfig/ssh
d. Append the public key to the authorized_keys file. At the shell prompt,
type:
root@ns# cat id_rsa.pub >> authorized_keys
Note: If the authorized_keys file does not exist at the appliance, you need
to first create the file and then append the contents.
e. Change the permission of the /flash, nsconfig, and ssh directories to 755.
root@ns# chmod 755 /flash
root@ns# chmod 755 /flash/nsconfig
root@ns# chmod 755 /flash/nsconfig/ssh
f. Change the permission of the authorized_keys file to 744.
100
root@ns# chmod 744 authorized_keys
 Loading...