

Page 1

Citrix NetScaler Administration Guide
Citrix® NetScaler® 9.3
Page 2

Copyright and Trademark Notice
©
CITRIX SYSTEMS, INC., 2012. ALL RIGHTS RESERVED. NO PART OF THIS DOCUMENT MAY BE
REPRODUCED OR TRANSMITTED IN ANY FORM OR BY ANY MEANS OR USED TO MAKE DERIVATIVE WORK
(SUCH AS TRANSLATION, TRANSFORMATION, OR ADAPTATION) WITHOUT THE EXPRESS WRITTEN
PERMISSION OF CITRIX SYSTEMS, INC.
ALTHOUGH THE MATERIAL PRESENTED IN THIS DOCUMENT IS BELIEVED TO BE ACCURATE, IT IS
PRESENTED WITHOUT WARRANTY OF ANY KIND, EXPRESS OR IMPLIED. USERS MUST TAKE ALL
RESPONSIBILITY FOR THE USE OR APPLICATION OF THE PRODUCT(S) DESCRIBED IN THIS MANUAL.
CITRIX SYSTEMS, INC. OR ITS SUPPLIERS DO NOT ASSUME ANY LIABILITY THAT MAY OCCUR DUE TO THE
USE OR APPLICATION OF THE PRODUCT(S) DESCRIBED IN THIS DOCUMENT. INFORMATION IN THIS
DOCUMENT IS SUBJECT TO CHANGE WITHOUT NOTICE. COMPANIES, NAMES, AND DATA USED IN
EXAMPLES ARE FICTITIOUS UNLESS OTHERWISE NOTED.
The following information is for FCC compliance of Class A devices: This equipment has been tested and found to
comply with the limits for a Class A digital device, pursuant to part 15 of the FCC rules. These limits are designed to
provide reasonable protection against harmful interference when the equipment is operated in a commercial
environment. This equipment generates, uses, and can radiate radio-frequency energy and, if not installed and used in
accordance with the instruction manual, may cause harmful interference to radio communications. Operation of this
equipment in a residential area is likely to cause harmful interference, in which case users will be required to correct the
interference at their own expense.
Modifying the equipment without Citrix' written authorization may result in the equipment no longer complying with FCC
requirements for Class A digital devices. In that event, your right to use the equipment may be limited by FCC
regulations, and you may be required to correct any interference to radio or television communications at your own
expense.
You can determine whether your equipment is causing interference by turning it off. If the interference stops, it was
probably caused by the NetScaler appliance. If the NetScaler equipment causes interference, try to correct the
interference by using one or more of the following measures:
Move the NetScaler equipment to one side or the other of your equipment.
Move the NetScaler equipment farther away from your equipment.
Plug the NetScaler equipment into an outlet on a different circuit from your equipment. (Make sure the NetScaler
equipment and your equipment are on circuits controlled by different circuit breakers or fuses.)
Modifications to this product not authorized by Citrix Systems, Inc., could void the FCC approval and negate your
authority to operate the product.
BroadCom is a registered trademark of BroadCom Corporation. Fast Ramp, NetScaler, and NetScaler Request Switch
are trademarks of Citrix Systems, Inc. Linux is a registered trademark of Linus Torvalds. Internet Explorer, Microsoft,
PowerPoint, Windows and Windows product names such as Windows NT are trademarks or registered trademarks of
the Microsoft Corporation. NetScape is a registered trademark of Netscape Communications Corporation. Red Hat is a
trademark of Red Hat, Inc. Sun and Sun Microsystems are registered trademarks of Sun Microsystems, Inc. Other
brand and product names may be registered trademarks or trademarks of their respective holders.
Software covered by the following third party copyrights may be included with this product and will also be subject to the
software license agreement: Copyright 1998 © Carnegie Mellon University. All rights reserved. Copyright © David L.
Mills 1993, 1994. Copyright © 1992, 1993, 1994, 1997 Henry Spencer. Copyright © Jean-loup Gailly and Mark Adler.
Copyright © 1999, 2000 by Jef Poskanzer. All rights reserved. Copyright © Markus Friedl, Theo de Raadt, Niels Provos,
Dug Song, Aaron Campbell, Damien Miller, Kevin Steves. All rights reserved. Copyright © 1982, 1985, 1986,
1988-1991, 1993 Regents of the University of California. All rights reserved. Copyright © 1995 Tatu Ylonen, Espoo,
Finland. All rights reserved. Copyright © UNIX System Laboratories, Inc. Copyright © 2001 Mark R V Murray. Copyright
1995-1998 © Eric Young. Copyright © 1995,1996,1997,1998. Lars Fenneberg. Copyright © 1992. Livingston
Enterprises, Inc. Copyright © 1992, 1993, 1994, 1995. The Regents of the University of Michigan and Merit Network,
Inc. Copyright © 1991-2, RSA Data Security, Inc. Created 1991. Copyright © 1998 Juniper Networks, Inc. All rights
reserved. Copyright © 2001, 2002 Networks Associates Technology, Inc. All rights reserved. Copyright (c) 2002
Networks Associates Technology, Inc. Copyright 1999-2001 © The Open LDAP Foundation. All Rights Reserved.
Copyright © 1999 Andrzej Bialecki. All rights reserved. Copyright © 2000 The Apache Software Foundation. All rights
reserved. Copyright (C) 2001-2003 Robert A. van Engelen, Genivia inc. All Rights Reserved. Copyright (c) 1997-2004
University of Cambridge. All rights reserved. Copyright (c) 1995. David Greenman. Copyright (c) 2001 Jonathan Lemon.
All rights reserved. Copyright (c) 1997, 1998, 1999. Bill Paul. All rights reserved. Copyright (c) 1994-1997 Matt Thomas.
Page 3

All rights reserved. Copyright © 2000 Jason L. Wright. Copyright © 2000 Theo de Raadt. Copyright © 2001 Patrik
Lindergren.
All rights reserved.
Last Updated: March 2012
Document code: May 21 2012 05:40:33
Page 4

Page 5

Contents
Preface..................................................................................................17
Formatting Conventions for NetScaler Documentation .....................................17
Documentation Available on the NetScaler Appliance .....................................18
Getting Service and Support ................................................................19
NetScaler Documentation Feedback ........................................................19
1 Authentication and Authorization..................................................................21
Configuring Users and Groups...............................................................22
Configuring User Accounts.............................................................22
To create a user account by using the NetScaler command line.................22
To modify or remove a user account by using the NetScaler command line.....23
Parameters for configuring a user account.......................................23
To configure a user account by using the configuration utility....................24
Configuring User Groups...............................................................24
To create a user group by using the NetScaler command line................... 24
To modify or remove a user group by using the NetScaler command line ...... 25
To bind a user to a group by using the NetScaler command line................ 25
To unbind a user from a group by using the NetScaler command line...........25
Parameters for configuring a user group .........................................26
To configure a user group by using the configuration utility...................... 26
Configuring Command Policies..............................................................27
Built-in Command Policies..............................................................27
Creating Custom Command Policies...................................................28
To create a command policy by using the NetScaler command line............. 30
To modify or remove a command policy by using the NetScaler command line
......................................................................................30
Parameters for configuring a command policy....................................30
To configure a command policy by using the configuration utility................ 31
Binding Command Policies to Users and Groups......................................31
To bind command policies to a user by using the NetScaler command line..... 32
To unbind command policies from a user by using the NetScaler command
line..................................................................................32
v
Page 6

Contents
Parameters for binding a command policy to a user..............................32
To bind command policies to a user by using the configuration utility............32
To bind command policies to a group by using the NetScaler command line
......................................................................................33
To unbind command policies from a group by using the NetScaler
command line......................................................................33
Parameters for binding a command policy to a group ...........................33
To bind command policies to a group by using the configuration utility..........34
Resetting the Default Administrator (nsroot) Password.....................................34
To reset the nsroot password...........................................................34
Example of a User Scenario.................................................................35
Configuration steps.....................................................................36
Configuring External User Authentication...................................................37
Configuring LDAP Authentication.......................................................38
To configure LDAP authentication by using the configuration utility..............40
Determining attributes in the LDAP directory.....................................41
Configuring RADIUS Authentication....................................................42
To configure RADIUS authentication by using the configuration utility...........42
Choosing RADIUS authentication protocols......................................42
Configuring IP address extraction.................................................43
Configuring TACACS+ Authentication..................................................44
To configure TACACS+ authentication by using the configuration utility.........44
Configuring NT4 Authentication........................................................44
To configure NT4 authentication by using the configuration utility...............45
Binding the Authentication Policies to the System Global Entity......................45
To bind an authentication policy globally by using the configuration utility.......45
To unbind a global authentication policy by using the configuration utility.......45
2 SNMP..................................................................................................47
Importing MIB Files to the SNMP Manager and Trap Listener..............................48
To import the MIB files to the SNMP manager and trap listener.......................48
Configuring the NetScaler to Generate SNMPv1 and SNMPv2 Traps.....................48
Enabling or Disabling an SNMP Alarm.................................................49
To enable or disable an SNMP alarm by using the command line...............49
To enable or disable an SNMP alarm by using the configuration utility..........49
Configuring Alarms......................................................................50
To configure an SNMP alarm by using the command line........................50
Parameters for configuring SNMP alarms........................................50
To configure SNMP alarms by using the configuration utility.....................51
vi
Page 7

Citrix NetScaler Administration Guide
Configuring Traps.......................................................................51
To add an SNMP trap by using the NetScaler command line....................51
Parameters for configuring SNMP traps ..........................................52
To configure SNMP Traps by using the configuration utility .....................52
Enabling Unconditional SNMP Trap Logging..........................................53
To enable or disable unconditional SNMP trap logging by using the NetScaler
command line......................................................................53
Parameters for unconditional SNMP trap logging ................................54
To enable or disable unconditional SNMP trap logging by using the
configuration utility.................................................................54
Configuring the NetScaler for SNMP v1 and v2 Queries....................................54
Specifying an SNMP Manager..........................................................54
To add an SNMP manager by using the NetScaler command line...............55
To add an SNMP manager by specifying its IP address, using the NetScaler
command line......................................................................55
To add an SNMP manager by specifying its host name, using the NetScaler
command line......................................................................56
Parameters for configuring an SNMP manager ..................................56
To add an SNMP manager by using the configuration utility ....................57
Specifying an SNMP Community.......................................................58
To specify an SNMP community by using the NetScaler command line ........58
Parameters for configuring an SNMP community string .........................58
To configure an SNMP community string by using the configuration utility .....58
To remove an SNMP community string by using the configuration utility........59
Configuring SNMP Alarms for Rate Limiting................................................59
Configuring an SNMP Alarm for Throughput or PPS..................................59
To configure an SNMP alarm for the throughput rate by using the NetScaler
command line .....................................................................60
To modify or remove the threshold values by using the NetScaler command
line .................................................................................60
To modify or remove the threshold values by using the NetScaler command
line .................................................................................61
Parameters for configuring an SNMP alarm for throughput or PPS .............61
To configure an SNMP alarm for throughput or PPS by using the configuration
utility ...............................................................................62
Configuring SNMP Alarm for Dropped Packets........................................62
To configure an SNMP alarm for packets dropped because of excessive
throughput, by using the NetScaler command line ...............................62
vii
Page 8

Contents
To configure an SNMP alarm for packets dropped because of excessive PPS,
by using the NetScaler command line ............................................62
Parameters for configuring an SNMP alarm for dropped packets................63
To configure an SNMP alarm for dropped packets by using the configuration
utility ...............................................................................63
Configuring the NetScaler for SNMPv3 Queries............................................63
Setting the Engine ID...................................................................64
To set the engine ID by using the NetScaler command line......................65
Parameters for setting the engine ID .............................................65
To set the engine ID by using configuration utility ................................65
Configuring a View......................................................................65
To add an SNMP view by using the NetScaler command line....................65
Parameters for configuring an SNMP view .......................................66
To configure an SNMP view by using the configuration utility ...................66
Configuring a Group.....................................................................66
To add an SNMP group by using the NetScaler command line..................66
Parameters for configuring an SNMP group .....................................67
To configure an SNMP group by using the configuration utility ..................67
Configuring a User......................................................................67
To configure a user by using the NetScaler command line.......................67
Parameters for configuring an SNMP user .......................................68
To configure an SNMP user by using the configuration utility ...................68
3 Audit Logging........................................................................................71
Configuring the NetScaler Appliance for Audit Logging.....................................73
Configuring Audit Servers...............................................................73
To configure a SYSLOG server action by using the command line..............73
To configure an NSLOG server action by using the command line..............74
Parameters for configuring auditing servers ......................................74
Log levels defined..................................................................75
To configure an auditing server action............................................76
Configuring Audit Policies...............................................................76
To configure a SYSLOG policy by using the command line......................76
To configure an NSLOG policy by using the command line......................77
Parameters for configuring audit policies .........................................77
To configure an audit server policy................................................78
Binding the Audit Policies Globally.....................................................78
To configure a SYSLOG policy by using the command line......................78
Parameters for binding the audit policies globally................................78
viii
Page 9

Citrix NetScaler Administration Guide
To globally bind the audit policy...................................................79
Configuring Policy-Based Logging......................................................79
Pre Requisites.....................................................................79
Configuring an Audit Message Action.............................................79
Binding Audit Message Action to a Policy.........................................81
Installing and Configuring the NSLOG Server...............................................81
Installing NSLOG Server on the Linux Operating System.............................82
To install the NSLOG server package on a Linux operating system.............82
To uninstall the NSLOG server package on a Linux operating system..........83
Installing NSLOG Server on the FreeBSD Operating System.........................83
To download NSLOG package from www.Citrix.com.............................83
To install the NSLOG server package on a FreeBSD operating system.........84
To uninstall the NSLOG server package on a FreeBSD operating system......84
Installing NSLOG Server Files on the Windows Operating System...................84
To download NSLOG package from www.Citrix.com.............................85
To install NSLOG server on a Windows operating system.......................85
To uninstall the NSLOG server on a Windows operating system................86
NSLOG Server Command Options.....................................................86
Adding the NetScaler Appliance IP Addresses on the NSLOG Server................87
To add the IP addresses of the NetScaler appliance.............................87
Verifying the NSLOG Server Configuration File........................................88
Running the NSLOG Server.................................................................88
To start audit server logging............................................................88
To stop audit server logging that starts as a background process in FreeBSD or
Linux.....................................................................................88
To stop audit server logging that starts as a service in Windows......................88
Customizing Logging on the NSLOG Server................................................89
Creating Filters..........................................................................89
To create a filter ...................................................................89
Specifying Log Properties...............................................................90
Default Settings for the Log Properties......................................................91
Sample Configuration File (audit.conf).......................................................92
4 Web Server Logging.................................................................................93
Configuring the NetScaler Appliance for Web Server Logging.............................94
Enabling or Disabling Web Server Logging............................................94
To enable or disable Web server logging by using the NetScaler command
line .................................................................................94
To enable or disable Web server logging by using the configuration utility......95
ix
Page 10

Contents
Modifying the Default Buffer Size.......................................................95
To modify the buffer size by using the NetScaler command line ................95
Parameter for modifying the buffer size...........................................95
To modify the buffer size by using the configuration utility........................96
Installing and Configuring the Client System for Web Server Logging.....................96
Installing NSWL Client on a Solaris Operating System................................97
To install the NSWL client package on a Solaris operating system.............. 97
To uninstall the NSWL client package on a Solaris operating system........... 98
Installing NSWL Client on a Linux Operating System..................................98
To install the NSWL client package on a Linux operating system................98
To uninstall the NSWL client package on a Linux operating system ............ 99
To get more information about the NSweblog RPM file ..........................99
To view the installed Web server logging files ....................................99
Installing NSWL Client on a FreeBSD Operating System.............................99
To install the NSWL client package on a FreeBSD operating system............99
To uninstall the NSWL client package on a FreeBSD operating system.......100
Installing NSWL Client on a Mac OS Operating System.............................100
To install the NSWL client package on a Mac OS operating system...........100
To uninstall the NSWL client package on a Mac OS operating system.........101
Installing NSWL Client on a Windows Operating System............................101
To download NSWL client package from www.Citrix.com.......................101
To install the NSWL client on a Windows system...............................101
To uninstall the NSWL client on a Windows system.............................102
Installing NSWL Client on an AIX Operating System.................................102
To install the NSWL client package on an AIX operating system...............102
To uninstall the NSWL client package on an AIX operating system............102
To get more information about the NSweblog RPM file.........................103
To view the installed Web server logging files...................................103
NSWL Client Command Options......................................................103
Adding the IP Addresses of the NetScaler Appliance................................104
To add the NSIP address of the NetScaler appliance...........................104
Verifying the NSWL Configuration File................................................105
To verify the configuration in the NSWL configuration file.......................105
Running the NSWL Client..................................................................105
To start Web server logging...........................................................105
To stop Web server logging started as a background process on the Solaris or
Linux operating systems...............................................................105
To stop Web server logging started as a service on the Windows operating system
.........................................................................................105
x
Page 11

Citrix NetScaler Administration Guide
Customizing Logging on the NSWL Client System........................................105
Creating Filters.........................................................................106
....................................................................................106
To create a filter ..................................................................107
To create a filter for a virtual server .............................................107
Specifying Log Properties.............................................................107
Understanding the NCSA and W3C Log Formats....................................109
NCSA Common Log Format.....................................................109
W3C Extended Log Format......................................................110
Entries.............................................................................111
Directives..........................................................................111
Fields..............................................................................112
Identifiers..........................................................................112
Creating a Custom Log Format........................................................114
Creating a Custom Log Format by Using the NSWL Library....................114
Creating a Custom Log Format Manually........................................115
Creating Apache Log Formats...................................................116
Sample Configuration File..................................................................116
Arguments for Defining a Custom Log Format.............................................118
Time Format Definition......................................................................121
5 Advanced Configurations..........................................................................125
Configuring Clock Synchronization.........................................................126
Setting Up Clock Synchronization by Using the CLI or the Configuration Utility.....126
To add an NTP server by using the NetScaler command line..................126
To modify or remove NTP servers by using the NetScaler command line......127
Parameters for configuring an NTP server......................................127
To configure an NTP server by using the configuration utility...................127
Starting or Stopping the NTP Daemon................................................128
To enable or disable NTP synchronization by using the NetScaler command
line................................................................................128
To enable or disable NTP synchronization by using the configuration utility...128
Configuring Clock Synchronization Manually.........................................128
To enable clock synchronization on your NetScaler by modifying the
ntp.conf file........................................................................128
Viewing the System Date and Time........................................................129
To view the system date and time by using the NetScaler command line...........129
To view the system date and time by using the configuration utility..................130
Configuring TCP Window Scaling..........................................................130
xi
Page 12

Contents
To configure window scaling by using the NetScaler command line.................131
Parameters for configuring window scaling...........................................131
To configure window scaling by using the configuration utility.......................132
Configuring Selective Acknowledgment....................................................132
To enable Selective Acknowledgment (SACK) by using the NetScaler command
line......................................................................................132
To enable SACK by using the Configuration Utility...................................133
Clearing the Configuration..................................................................133
To clear a configuration by using the NetScaler command line......................133
Parameters for clearing a configuration...............................................134
To clear a configuration by using the configuration utility.............................134
Viewing the HTTP Band Statistics..........................................................134
To view HTTP request and response size statistics by using the NetScaler
command line..........................................................................134
To view HTTP request and response size statistics by using the configuration utility
.........................................................................................135
To modify the band range by using the NetScaler command line....................135
Parameters for modifying the band range for HTTP request or response size
statistics................................................................................135
To modify the band range by using the configuration utility..........................136
Configuring HTTP Profiles..................................................................136
To add an HTTP profile by using the NetScaler command line......................136
Parameters for adding an HTTP profile...............................................137
To add an HTTP profile by using the configuration utility.............................138
Configuring TCP Profiles...................................................................138
To add a TCP profile by using the NetScaler command line.........................139
Parameters for creating a TCP profile................................................140
To add a TCP profile by using the configuration utility................................141
Specifying a TCP Buffer Size...............................................................142
To set the TCP buffer size in an entity-level TCP profile by using the NetScaler
command line..........................................................................142
Example...........................................................................143
To set the TCP buffer size in the global TCP profile by using the NetScaler
command line .........................................................................143
Example...........................................................................143
Parameters for setting the TCP buffer size in a TCP profile..........................144
To set the TCP buffer size in a TCP profile by using the NetScaler configuration
utility....................................................................................144
Optimizing the TCP Maximum Segment Size for a Virtual Server Configuration.........144
xii
Page 13

Citrix NetScaler Administration Guide
Specifying the MSS Value in a TCP Profile...........................................145
To specify the MSS value in a TCP profile by using the NetScaler command-
line................................................................................ 145
Parameters for specifying the MSS value in a TCP profile......................145
To specify the MSS value in a TCP profile by using the NetScaler configuration
utility...............................................................................145
Configuring the NetScaler to Learn the MSS Value from Bound Services...........146
To configure the NetScaler to learn the MSS for a virtual server by using the
NetScaler command-line.........................................................146
Parameters for configuring the NetScaler to learn the MSS for a virtual server
....................................................................................147
To configure the NetScaler to learn the MSS for a virtual server by using the
NetScaler configuration utility....................................................147
6 Web Interface........................................................................................149
How Web Interface Works..................................................................150
Prerequisites................................................................................150
Installing the Web Interface.................................................................151
To install the Web interface and JRE tar files by using the NetScaler command line
......................................................................................... 151
Parameters for installing the Web interface and JRE tar files .......................152
To install the Web interface and JRE tar files by using the configuration utility......152
Configuring the Web Interface..............................................................152
Parameters for configuring Web interface sites.......................................153
Configuring a Web Interface Site for LAN Users Using HTTP.......................155
To configure a Web interface site for LAN users using HTTP by using the
configuration utility................................................................156
To configure a Web interface site for LAN users using HTTP by using the
command line.....................................................................158
Configuring a Web Interface Site for LAN Users Using HTTPS......................159
To configure a Web interface site for LAN users using HTTPS by using the
configuration utility................................................................159
To configure a Web interface site for LAN users using HTTPS by using the
command line.....................................................................161
Configuring a Web Interface Site for Remote Users Using AGEE...................163
To configure a Web interface site for remote users using AGEE by using the
configuration utility................................................................164
To configure a Web interface site for remote users using AGEE by using the
command line.....................................................................165
xiii
Page 14

Contents
7 AppFlow.............................................................................................167
How AppFlow Works........................................................................168
Flow Records..........................................................................169
Templates..............................................................................169
Configuring the AppFlow Feature..........................................................170
Enabling or Disabling the AppFlow Feature..........................................171
To enable or disable the AppFlow feature by using the NetScaler command
line................................................................................171
To enable the AppFlow feature by using the configuration utility...............171
Specifying a Collector................................................................. 171
To specify a collector by using the NetScaler command line....................171
To remove a collector by using the NetScaler command line ..................172
Parameters for specifying a collector............................................172
To specify a collector by using the configuration utility..........................172
Configuring an AppFlow Action.......................................................172
To configure an AppFlow action by using the NetScaler command line........172
To modify or remove an AppFlow action by using the NetScaler command line
....................................................................................173
Parameters for configuring an AppFlow action..................................173
To configure an AppFlow action by using the configuration utility..............174
Configuring an AppFlow Policy........................................................174
To configure an AppFlow policy by using the NetScaler command line........174
To modify or remove an AppFlow policy by using the NetScaler command line
....................................................................................175
Parameters for configuring an AppFlow policy..................................175
To configure an AppFlow policy by using the configuration utility...............176
To add an expression by using the Add Expression dialog box.................176
Binding an AppFlow Policy............................................................177
To globally bind an AppFlow policy by using the NetScaler command line.....177
To bind an AppFlow policy to a specific virtual server by using the NetScaler
command line.....................................................................178
Parameters for binding an AppFlow policy......................................178
To globally bind an AppFlow policy by using the configuration utility...........178
To bind an AppFlow policy to a specific virtual server by using the
configuration utility................................................................179
Enabling AppFlow for Virtual Servers.................................................179
To enable AppFlow for a virtual server by using the NetScaler command line
....................................................................................179
xiv
Page 15

Citrix NetScaler Administration Guide
To enable AppFlow for a virtual server by using the configuration utility.......179
Enabling AppFlow for a Service.......................................................180
To enable AppFlow for a service by using the NetScaler command line.......180
To enable AppFlow for a service by using the configuration utility..............180
Setting the AppFlow Parameters......................................................180
To set the AppFlow Parameters by using the NetScaler Command Line.......180
To return AppFlow parameters to their default values by using the NetScaler
command line.....................................................................181
AppFlow Parameters.............................................................181
To set the AppFlow parameters by using the configuration utility...............182
8 Reporting Tool...................................................................................... 183
Using the Reporting Tool....................................................................184
To invoke the Reporting tool...........................................................184
Working with Reports..................................................................184
Using Built-in Reports............................................................185
Creating and Deleting Reports...................................................185
Modifying the Time Interval.......................................................186
Setting the Data Source and Time Zone.........................................187
Exporting and Importing Custom Reports.......................................187
Working with Charts...................................................................188
Adding a Chart....................................................................188
Modifying a Chart.................................................................188
Viewing a Chart...................................................................189
Deleting a Chart..................................................................192
Examples...............................................................................192
To display the trend report for CPU usage and memory usage for the last week
....................................................................................192
To compare the bytes received rate and the bytes transmitted rate between
two interfaces for the last week..................................................192
Stopping and Starting the Data Collection Utility...........................................193
To stop nscollect.......................................................................194
To start nscollect on the local system.................................................194
To start nscollect on the remote system...............................................195
Example...........................................................................195
xv
Page 16

Contents
xvi
Page 17

Preface
Learn about the Citrix® NetScaler® collection of documentation, including information
about support options and ways to send us feedback.
In This Preface:
w Formatting Conventions for NetScaler Documentation
w Documentation Available on the NetScaler Appliance
w Getting Service and Support
w NetScaler Documentation Feedback
For information about new features and enhancements for this release, see the Citrix
NetScaler 9.3 Release Notes at http://support.citrix.com/article/CTX128669.
Formatting Conventions for NetScaler Documentation
The NetScaler documentation uses the following formatting conventions.
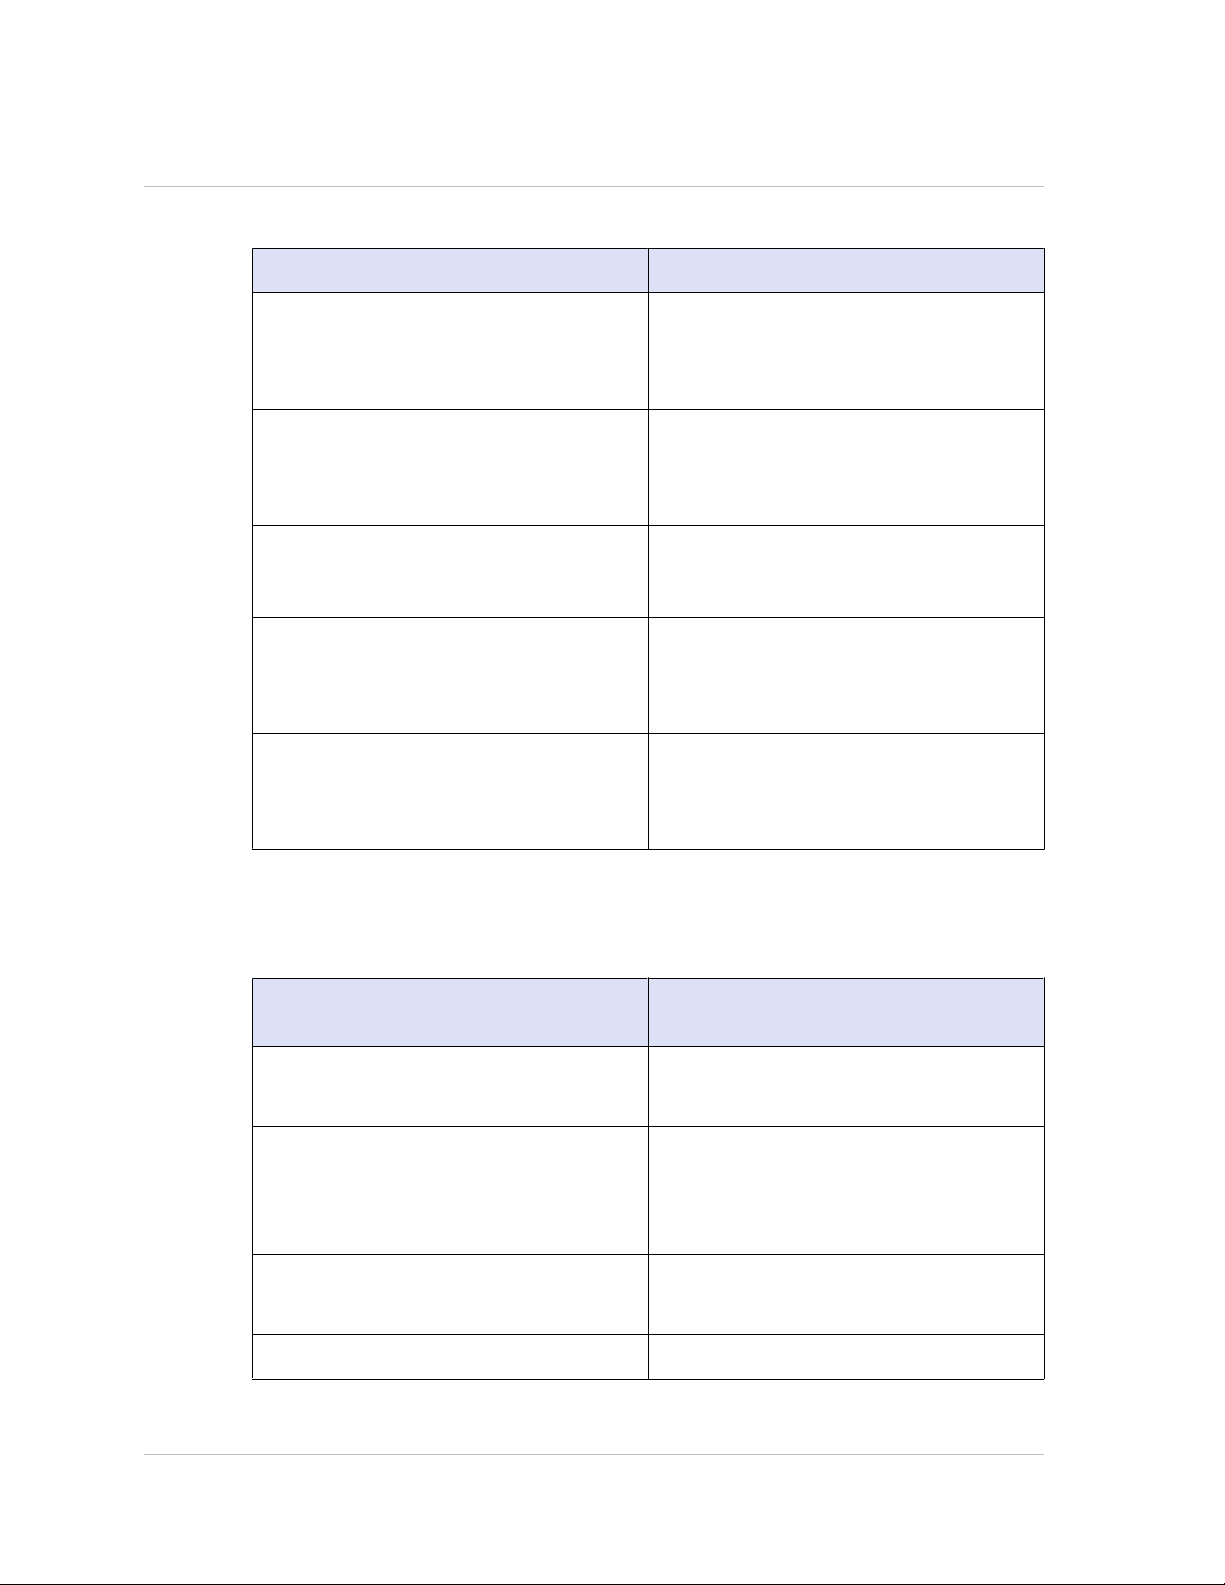
Table 1. Formatting Conventions
Convention Meaning
Boldface In text paragraphs or steps in a
procedure, information that you type
exactly as shown (user input), or an
element in the user interface.
Monospace
<angle brackets> A term enclosed in angle brackets is a
[ brackets ]
Text that appears in a command-line
interface. Used for examples of
command-line procedures. Also used to
distinguish interface terms, such as
names of directories and files, from
ordinary text.
variable placeholder, to be replaced with
an appropriate value. Do not enter the
angle brackets.
Optional items in command statements.
For example, in the following command,
[ -range <positiveInteger> ] means that
17
Page 18

Preface
Convention Meaning
you have the option of entering a range,
but it is not required:
add lb vserver <name> <serviceType>
<IPAddress> <port> [ -range
<positiveInteger>]
Do not type the brackets themselves.
| (vertical bar)
… (ellipsis) You can repeat the previous item or
A separator between options in braces or
brackets in command statements. For
example, the following indicates that
you choose one of the following load
balancing methods:
<lbMethod> = ( ROUNDROBIN |
LEASTCONNECTION |
LEASTRESPONSETIME | URLHASH |
DOMAINHASH | DESTINATIONIPHASH |
SOURCEIPHASH | SRCIPDESTIPHASH |
LEASTBANDWIDTH | LEASTPACKETS |
TOKEN | SRCIPSRCPORTHASH | LRTM |
CALLIDHASH | CUSTOMLOAD )
items in command statements. For
example, /route:<DeviceName>[ ,…]
means you can type additional
<DeviceNames> separated by commas.
Documentation Available on the NetScaler Appliance
A complete set of Citrix® NetScaler® documentation is available on the Documentation
tab of your NetScaler appliance and at http://support.citrix.com/ (PDF version), and at
http://edocs.citrix.com (HTML version). (The PDF version of the documents require
Adobe Reader, available at http://adobe.com/.)
To view the documentation
1. From a Web browser, log on to the NetScaler Appliance.
2. Click the Documentation tab.
3. To view a short description of each document, hover the mouse pointer over the
title. To open a document, click the title.
18
Page 19

Getting Service and Support
Citrix® offers a variety of resources for support with your Citrix environment, including
the following:
w The Knowledge Center is a self-service, Web-based technical support database that
contains thousands of technical solutions, including access to the latest hotfixes,
service packs, and security bulletins.
w Technical Support Programs for both software support and appliance maintenance
are available at a variety of support levels.
w The Subscription Advantage program is a one-year membership that gives you an
easy way to stay current with the latest product version upgrades and enhancements.
w Citrix Education provides official training and certification programs on virtually all
Citrix products and technologies.
For more information about Citrix services and support, see the Citrix Systems Support
Web site at http://www.citrix.com/lang/English/support.asp.
You can also participate in and follow technical discussions offered by the experts on
various Citrix products at the following sites:
Citrix NetScaler Administration Guide
w http://community.citrix.com
w http://twitter.com/citrixsupport
w http://forums.citrix.com/support
NetScaler Documentation Feedback
You are encouraged to provide feedback and suggestions so that we can enhance the
documentation. You can send an email to nsdocs_feedback@citrix.com. In the subject
line, specify "Documentation Feedback." Please include the title of the guide and the
page number in the email message.
You can also provide feedback through the Knowledge Center at http://
support.citrix.com/.
To provide feedback at the Knowledge Center home page
1. Go to the Knowledge Center home page at http://support.citrix.com/.
2. On the Knowledge Center home page, under Products, expand NetScaler, and then
click the NetScaler release for which you want to provide feedback.
3. On the Documentation tab, click the guide name, and then click Article Feedback.
4. On the Documentation Feedback page, complete the form, and then click Submit.
19
Page 20

Preface
20
Page 21

Chapter 1
Authentication and Authorization
Topics:
• Configuring Users and
Groups
• Configuring Command
Policies
• Resetting the Default
Administrator (nsroot)
Password
• Example of a User Scenario
• Configuring External User
Authentication
To configure Citrix® NetScaler® authentication and
authorization, you must first define the users who have access
to the NetScaler appliance, and then you can organize these
users into groups. After configuring users and groups, you
need to configure command policies to define types of access,
and assign the policies to users and/or groups.
You must log on as an administrator to configure users,
groups, and command policies. The default NetScaler
administrator user name is nsroot. After logging on as the
default administrator, you should change the password for the
nsroot account. Once you have changed the password, no user
can access the NetScaler appliance until you create an
account for that user. If you forget the administrator password
after changing it from the default, you can reset it to nsroot.
21
Page 22

Chapter 1 Authentication and Authorization
Configuring Users and Groups
You must define your users by configuring accounts for them. To simplify the
management of user accounts, you can organize them into groups.
You can also customize the NetScaler command-line prompt for a user. Prompts can be
defined in a user’s configuration, in a user-group configuration, and in the global
configuration. The prompt displayed for a given user is determined by the following
order of precedence:
1. Display the prompt as defined in the user's configuration.
2. Display the prompt as defined in the group configuration for the user’s group.
3. Display the prompt as defined in the system global configuration.
You can now specify a time-out value for inactive CLI sessions for a system user. If a
user's CLI session is idle for a time that exceeds the time-out value, the NetScaler
appliance terminates the connection. The timeout can be defined in a user’s
configuration, in a user-group configuration, and in the global configuration. The timeout for inactive CLI sessions for a user is determined by the following order of precedence:
1. Time-out value as defined in the user's configuration.
2. Time-out value as defined in the group configuration for the user’s group.
3. Time-out value as defined in the system global configuration.
Configuring User Accounts
To configure user accounts, you simply specify user names and passwords. You can
change passwords and remove user accounts at any time.
To create a user account by using the NetScaler command line
At the NetScaler command prompt, type the following command to create a user
account and verify the configuration:
w add system user <userName> [-promptString <string>] [-timeout <secs>]
w show system user
Example
> add system user user1
Enter password:
Confirm password:
Done
22
> add system user johnd -promptString user-%u-at-%T
Enter password:
Confirm password:
Done
Page 23

Citrix NetScaler Administration Guide
> show system user
1) User name: nsroot
2) User name: user1
3) User name: johnd Prompt String: user-%u-at%T Prompt Inherited From: User
Done
To modify or remove a user account by using the NetScaler command line
w To modify a user's password, type the set system user <userName> command and
the parameters to be changed, with their new values.
w To remove a user account, type the rm system user <userName> command.
Parameters for configuring a user account
userName (User Name)
A name for the user. The name can begin with a letter, number, or the underscore
symbol, and can consist of from 1 to 31 letters, numbers, and the hyphen (-), period
(.), pound (#), space ( ), at sign (@), equals (=), colon (:), and underscore (_) symbols.
password (Password)
A password that the user uses to log on.
promptString (CLI Prompt)
A name for the user’s NetScaler command-line prompt. The name can consist of
letters, numbers, the hyphen (-), period (.) pound (#), space ( ), at sign (@), equals
(=), colon (:), underscore (_) symbols, and the following variables:
w %u—Is replaced by the user name.
w %h—Is replaced by the host name of the NetScaler appliance.
w %t—Is replaced by the current time in 12-hour format.
w %T—Is replaced by the current time in 24-hour format.
w %d—Is replaced by the current date.
w %s—Is replaced by the state of the NetScaler appliance.
A maximum of 63 characters are allowed for this parameter. A variable (for example,
%u) is counted as two characters. The resulting prompt can be longer than 63
characters.
timeout (CLI Idle Session Timeout (Secs))
Time-out value, in seconds, for inactive CLI sessions for a system user. If a user's CLI
session is idle for a time that exceeds the time-out value, the NetScaler appliance
terminates the connection.
23
Page 24

Chapter 1 Authentication and Authorization
To configure a user account by using the configuration utility
1. In the navigation pane, expand System and click Users.
2. In the details pane, do one of the following:
• To create a user account, click Add.
• To modify an existing user account, select the user, and then click Open.
3. In the Create System User or Configure System User dialog box, set the following
parameters:
• User Name*(Cannot be changed for an existing user.)
• Password*
• Confirm Password*
• CLI Prompt
• CLI Idle Session Timeout (Secs)
* A required parameter
4. Click Create or OK, and then click Close.
A message appears in the status bar, stating that the user has been configured
successfully.
Configuring User Groups
After configuring a user group, you can easily grant the same access rights to everyone
in the group. To configure a group, you create the group and bind users to the group.
You can bind each user account to more than one group. Binding user accounts to
multiple groups may allow more flexibility when applying command policies.
To create a user group by using the NetScaler command line
At the NetScaler command prompt, type the following commands to create a user
group and verify the configuration:
w add system group <groupName> [-promptString <string>] [-timeout <secs>]
w show system group
Example
> add system group Managers -promptString GroupManagers-at-%h
Done
> show system group
1) Group name: group1
2) Group name: Managers Prompt String: GroupManagers-at-%h
Done
24
Page 25

Citrix NetScaler Administration Guide
To modify or remove a user group by using the NetScaler command line
w To modify a user group, type the set system group <groupName> command and the
parameters to be changed, with their new values.
w To remove a user group, type rm system group <groupName>.
To bind a user to a group by using the NetScaler command line
At the NetScaler command prompt, type the following commands to bind a user
account to a group and verify the configuration:
w bind system group <groupName> -userName <userName>
w show system group <groupName>
Example
> bind system group Managers -userName user1
Done
> bind system group Managers -userName johnd
Done
> show system group Managers
Group name: Managers Prompt String: GroupManagers-at-%h
User name: user1
User name: johnd
Done
> show system user user1
User name: user1 Prompt String: Group-Managers-at%h Prompt Inherited From: Group
Group name: Managers
Done
> show system user johnd
User name: johnd Prompt String: user-%u-at-%T
Prompt Inherited From: User
Group name: Managers
Done
To unbind a user from a group by using the NetScaler command line
At the NetScaler command prompt, type the following commands to unbind a user
account and verify the configuration:
25
Page 26

Chapter 1 Authentication and Authorization
w unbind system group <groupName> -userName <userName>
w show system group <groupName>
Parameters for configuring a user group
groupName (Group Name)
A name for the group you are creating. The name can begin with a letter, number, or
the underscore symbol, and can consist of from 1 to 31 letters, numbers, and the
hyphen (-), period (.), pound (#), space ( ), at sign (@), equals (=), colon (:), and
underscore (_) symbols. (Cannot be changed for existing groups.)
userName
The name that was assigned to a previously configured user.
promptString (CLI Prompt)
A name for the NetScaler command-line prompt for all the users that are part of this
group. The name can consist of letters, numbers, the hyphen (-), period (.), pound
(#), space ( ), at sign (@), equals (=), colon (:), underscore (_) symbols, and the
following variables:
w %u—Is replaced by the user name.
w %h—Is replaced by the host name of the NetScaler appliance.
w %t—Is replaced by the current time in 12-hour format.
w %T—Is replaced by the current time in 24-hour format.
w %d—Is replaced by the current date.
w %s—Is replaced by the state of the NetScaler appliance.
A maximum of 63 characters are allowed for this parameter. A variable (for example,
%u) is counted as two characters. The resulting prompt can be longer than 63
characters.
timeout (CLI Idle Session Timeout (Secs))
Time-out value, in seconds, for inactive CLI sessions for all the users that are part of
this group. If a user's CLI session is idle for a time that exceeds the time-out value,
the NetScaler appliance terminates the connection.
To configure a user group by using the configuration utility
1. In the navigation pane, expand System, and then click Groups.
2. In the details pane, do one of the following:
• To create a new user group, click Add.
• To modify an existing user group, select the group, and then click Open.
26
3. In the Create System Group or Configure System Group dialog box, set the
following parameters:
Page 27

Citrix NetScaler Administration Guide
• Group Name* (Required for a new group. Cannot be changed for an existing
group.)
• CLI Prompt
• CLI Idle Session Timeout (Secs)
* A required parameter
4. Under Members, select users from the Available Users list and click Add to move
them to the Configured Users list.
5. Click Create or OK, and then click Close.
A message appears in the status bar, stating that the group has been configured
successfully.
Configuring Command Policies
Command policies regulate which commands, command groups, vservers, and other
entities that users and user groups are permitted to use.
The Citrix® NetScaler® appliance provides a set of built-in command policies, and you
can configure custom policies. To apply the policies, you bind them to users and/or
groups.
Here are the key points to keep in mind when defining and applying command policies.
w You cannot create global command policies. Command policies must be bound
directly to NetScaler users and groups.
w Users or groups with no associated command policies are subject to the default (DENY-
ALL) command policy, and are therefore unable to execute any configuration
commands until the proper command policies are bound to their accounts.
w All users inherit the policies of the groups to which they belong.
w You must assign a priority to a command policy when you bind it to a user account
or group account. This enables the NetScaler to determine which policy has priority
when two or more conflicting policies apply to the same user or group.
w The following commands are available by default to any user and are unaffected by
any command you specify:
help cli, show cli attribute, clear cli prompt, alias, unalias, help, history, quit,
exit, whoami, config, set cli mode, unset cli mode, show cli mode, set cli
prompt, and show cli prompt.
Built-in Command Policies
The following table describes the built-in policies.
27
Page 28

Chapter 1 Authentication and Authorization
Table 1-1. Built-in Command Policies
Policy name Allows
read-only Read-only access to all show commands
operator Read-only access and access to
network Full access, except to the set and unset
superuser Full access. Same privileges as the
except show runningconfig, show
ns.conf, and the show commands for
the NetScaler command group.
commands to enable and disable services
and servers or place them in
ACCESSDOWN mode.
SSL commands, sh ns.conf, sh
runningconfig, and sh gslb
runningconfig commands.
nsroot user.
Creating Custom Command Policies
Regular expression support is offered for users with the resources to maintain more
customized expressions, and for those deployments that require the flexibility that
regular expressions offer. For most users, the built-in command policies are sufficient.
Users who need additional levels of control but are unfamiliar with regular expressions
may want to use only simple expressions, such as those in the examples provided in this
section, to maintain policy readability.
When you use a regular expression to create a command policy, keep the following in
mind.
w When you use regular expressions to define commands that will be affected by a
command policy, you must enclose the commands in double quotation marks. For
example, to create a command policy that includes all commands that begin with
show, type the following:
"^show .*$"
To create a command policy that includes all commands that begin with rm, type
the following:
"^rm .*$"
w Regular expressions used in command policies are not case sensitive.
The following table lists examples of regular expressions:
28
Page 29
Citrix NetScaler Administration Guide
Table 1-2. Examples of Regular Expressions for Command Policies
Command specification Matches these commands
"^rm\s+.*$" All remove actions, because all remove
actions begin with the rm string,
followed by a space and additional
parameters and flags.
"^show\s+.*$" All show commands, because all show
actions begin with the show string,
followed by a space and additional
parameters and flags.
"^shell$" The shell command alone, but not
combined with any other parameters or
flags.
"^add\s+vserver\s+.*$" All create vserver actions, which consist
of the add vserver command followed
by a space and additional parameters
and flags.
"^add\s+(lb\s+vserver)\s+.*" All create lb vserver actions, which
consist of the add lb vserver command
followed by a space and additional
parameters and flags.
The following table shows the command specifications for each of the built-in
command policies.
Table 1-3. Expressions Used in the Built-in Command Policies
Policy name Command specification regular
expression
read-only
operator
network
(^man.*)|(^show\s+(?!system)(?!ns
ns.conf)(?!ns runningConfig).*)|(^stat.*)
(^man.*)|(^show\s+(?!system)(?!ns
ns.conf)(?!ns runningConfig).*)|(^stat.*)|
(^set.*-accessdown.*)|(^(enable|disable)
(server|service).*)
^(?!shell)\S+\s+(?!system)(?!ns ns.conf)(?!
ns runningConfig).*
superuser .*
29
Page 30

Chapter 1 Authentication and Authorization
To create a command policy by using the NetScaler command line
At the NetScaler command prompt, type the following commands to create a command
policy and verify the configuration:
w add system cmdPolicy <policyname> <action> <cmdspec>
w sh system cmdPolicy
Example
> add system cmdPolicy read_all ALLOW (^show\s+(!
system)(!ns ns.conf)(!ns runningConfig).*)|
(^stat.*)
Done
> sh system cmdPolicy
1) Command policy: operator
2) Command policy: read-only
3) Command policy: network
4) Command policy: superuser
5) Command policy: allow_portaladmin
6) Command policy: read_all
Done
To modify or remove a command policy by using the NetScaler command line
w To modify a command policy, type the set system cmdPolicy <PolicyName>
command and the parameters to be changed, with their new values.
w To remove a command policy, type rm system cmdPolicy <PolicyName>.
Note: The built-in command policies cannot be removed.
Parameters for configuring a command policy
policyname
A name for the command policy you are creating. The name can begin with a letter,
number, or the underscore symbol, and can consist of from one to 31 letters,
numbers, and the hyphen (-), period (.), pound (#), space ( ), at sign (@), equals (=),
colon (:), and underscore (_) symbols. (Cannot be changed for existing policies.)
action
The action the policy applies when the command specification pattern matches.
Possible values: ALLOW, DENY
cmdspec
Rule (expression) that the policy uses for pattern matching.
30
Page 31

Citrix NetScaler Administration Guide
To configure a command policy by using the configuration utility
1. In the navigation pane, expand System, and then click Command Policies.
2. In the details pane, do one of the following:
• To create a command policy, click Add.
• To modify an existing command policy, select the command policy, and then
click Open.
3. In the Create Command Policy or Configure Command Policy dialog box, specify
values for the parameters, which correspond to the parameters described in
"Parameters for configuring a command policy" as shown:
• Policy Name*—policyname (Cannot be changed for an existing policy.)
• Action—action
• Command Spec*—cmdspec (You can type a complete expression directly into the
text area, or you can click Add or Regex Tokens for assistance. The Add icon
opens the Add Command dialog box, in which you can select a NetScaler entity
and then select an operation to perform on the entity. The Regex Tokens icon
displays regular expression tokens, which you can add to your expression by
selecting them.)
* A required parameter
4. Click Create or OK, and then click Close.
A message appears in the status bar, stating that the command policy has been
configured successfully.
Binding Command Policies to Users and Groups
Once you have defined your command policies, you must bind them to the appropriate
user accounts and groups.
When you bind a policy, you must assign it a priority so that the NetScaler appliance
can determine which command policy to follow when two or more applicable command
policies are in conflict.
Command policies are evaluated in the following order:
w Command policies bound directly to users and the corresponding groups are
evaluated according to priority number. A command policy with a lower priority
number is evaluated before one with a higher priority number. Therefore, any
privileges the lower-numbered command policy explicitly grants or denies are not
overridden by a higher-numbered command policy.
w When two command policies, one bound to a user account and other to a group,
have the same priority number, the command policy bound directly to the user
account is evaluated first.
31
Page 32

Chapter 1 Authentication and Authorization
To bind command policies to a user by using the NetScaler command line
At the NetScaler command prompt, type the following commands to bind a command
policy to a user and verify the configuration:
w bind system user <userName> -policyName <policyName> <priority>
w sh system user <userName>
Example
> bind system user user1 -policyName read_all 1
Done
> sh system user user1
User name: user1
Command Policy: read_all Priority:1
Done
To unbind command policies from a user by using the NetScaler command line
At the NetScaler command prompt, type the following commands to unbind a command
policy from a user and verify the configuration:
w unbind system user <userName> -policyName <policyName>
w sh system user <userName>
Parameters for binding a command policy to a user
userName
The name of an existing user account.
policyName
The name of an existing command policy.
priority
The priority assigned to this policy.
To bind command policies to a user by using the configuration utility
1. In the navigation pane, expand System, and then click Users.
2. In the details pane, select the user to which you want to bind a command policy,
and then click Open.
32
3. In the Configure System User dialog box, under Command Policies, all of the
command policies configured on your NetScaler appear on the list. Select the
check box next to the name of the policy you want to bind to this user.
Page 33

Citrix NetScaler Administration Guide
4. In the Priority column to the left, modify the default priority as needed to ensure
that the policy is evaluated in the proper order.
5. Click OK.
A message appears in the status bar, stating that the user has been configured
successfully.
To bind command policies to a group by using the NetScaler command line
At the NetScaler command prompt, type the following commands to bind a command
policy to a user group and verify the configuration:
w bind system group <groupName> -policyName <policyName> <priority>
w sh system group <groupName>
Example
> bind system group Managers -policyName read_all 1
Done
> sh system group Managers
Group name: Managers
User name: johnd
Command policy: read_all Priority:1
Done
To unbind command policies from a group by using the NetScaler command line
At the NetScaler command prompt, type the following commands to unbind a command
policy from a user group and verify the configuration:
w unbind system group <groupName> -policyName <policyName>
w sh system group <groupName>
Parameters for binding a command policy to a group
groupName
The name of an existing user group.
policyName
The name of an existing command policy.
priority
The priority assigned to this command policy.
33
Page 34

Chapter 1 Authentication and Authorization
To bind command policies to a group by using the configuration utility
1. In the navigation pane, expand System, and then click Groups.
2. In the details pane, select the group to which you want to bind a command policy,
and then click Open.
3. In the Configure System Group dialog box, under Command Policies, all the
command policies configured on your NetScaler appear on the list. Select the
check box next to the name of the policy you want to bind to this group.
4. In the Priority column to the left, modify the default priority as needed to ensure
that the policy is evaluated in the proper order.
5. Click OK.
A message appears in the status bar, stating that the group has been configured
successfully.
Resetting the Default Administrator (nsroot) Password
The nsroot account provides complete access to all features of the Citrix® NetScaler
appliance. Therefore, to preserve security, the nsroot account should be used only
when necessary, and only individuals whose duties require full access should know the
password for the nsroot account. Frequently changing the nsroot password is advisable.
If you lose the password, you can reset it to the default and then change it.
To reset the nsroot password, you must boot the NetScaler into single user mode,
mount the file systems in read/write mode, and remove the set NetScaler user nsroot
entry from the ns.conf file. You can then reboot, log on with the default password, and
choose a new password.
To reset the nsroot password
1. Connect a computer to the NetScaler serial port and log on.
Note: You cannot log on by using ssh to perform this procedure; you must
connect directly to the NetScaler appliance.
As the operating system starts, it displays the following message:
Hit [Enter] to boot immediately, or any other key for
command prompt.
®
34
Booting [kernel] in # seconds.
2. Press CTRL+C.
The following message appears:
Page 35

Citrix NetScaler Administration Guide
Type '?' for a list of commands, 'help' for more detailed help.
ok
3. Type boot -s and press the ENTER key to start the NetScaler in single user mode.
After the NetScaler boots, it displays the following message:
Enter full path name of shell or RETURN for /bin/sh:
4. Press the ENTER key to display the # prompt, and type the following commands to
mount the file systems:
fsck /dev/ad0s1a
mount /dev/ad0s1a /flash
5. Using a text editor of your choice, edit the /flash/nsconfig/ns.conf file and
remove the set system user nsroot entry.
6. Save the file and exit the text editor.
7. Type reboot and press the ENTER key to reboot the NetScaler.
When the NetScaler completes rebooting, it prompts for the user name and password.
8. Log on with the nsroot user credentials.
Once logged on to the NetScaler, you will be required to enter a new nsroot user
password.
9. Follow the prompts to change the password.
10. Exit the config ns menu.
Example of a User Scenario
The following example shows how to create a complete set of user accounts, groups,
and command policies and bind each policy to the appropriate groups and users. The
company, Example Manufacturing, Inc., has three users who can access the Citrix
NetScaler® appliance:
w John Doe. The IT manager. John needs to be able to see all parts of the NetScaler
configuration but does not need to modify anything.
w Maria Ramiez. The lead IT administrator. Maria needs to be able to see and modify
all parts of the NetScaler configuration except for NetScaler commands (which local
policy dictates must be performed while logged on as nsroot).
w Michael Baldrock. The IT administrator in charge of load balancing. Michael needs
to be able to see all parts of the NetScaler configuration, but needs to modify only
the load balancing functions.
The following table shows the breakdown of network information, user account names,
group names, and command policies for the sample company.
®
35
Page 36

Chapter 1 Authentication and Authorization
Table 1-4. Sample Values for Creating Entities
Field Value Note
NetScaler host name ns01.example.net N/A
User accounts johnd, mariar, and
michaelb
Groups Managers and SysOps All managers and all IT
Command Policies read_all, modify_lb, and
modify_all
The following description walks you through the process of creating a complete set of
user accounts, groups, and command policies on the NetScaler appliance named
ns01.example.net.
The description includes procedures for binding the appropriate user accounts and
groups to one another, and binding appropriate command policies to the user accounts
and groups.
This example illustrates how you can use prioritization to grant precise access and
privileges to each user in the IT department.
The example assumes that initial installation and configuration have already been
performed on the NetScaler.
John Doe, IT manager,
Maria Ramirez, IT
administrator and Michael
Baldrock, IT administrator.
administrators.
Allow complete read-only
access, Allow modify
access to load balancing,
and Allow complete
modify access.
Configuration steps
1. Use the procedure described in Configuring User Accounts on page 22 to create
user accounts johnd, mariar, and michaelb.
2. Use the procedure described in Configuring User Groups on page 24 to create user
groups Managers and SysOps, and then bind the users mariar and michaelb to the
SysOps group and the user johnd to the Managers group.
3. Use the procedure described in Creating Custom Command Policies on page 28 to
create the following command policies:
• read_all with action Allow and command spec "(^show\s+(?!system)(?!ns ns.conf)
(?!ns runningConfig).*)|(^stat.*)"
• modify_lb with action as Allow and the command spec "^set\s+lb\s+.*$"
• modify_all with action as Allow and the command spec "^\S+\s+(?!system).*"
36
Page 37

Citrix NetScaler Administration Guide
4. Use the procedure described in Binding Command Policies to Users and Groups on
page 31 to bind the read_all command policy to the SysOps group, with priority
value 1.
5. Use the procedure described in Binding Command Policies to Users and Groups on
page 31 to bind the modify_lb command policy to user michaelb, with priority
value 5.
The configuration you just created results in the following:
w John Doe, the IT manager, has read-only access to the entire NetScaler
configuration, but he cannot make modifications.
w Maria Ramirez, the IT lead, has near-complete access to all areas of the NetScaler
configuration, having to log on only to perform NetScaler-level commands.
w Michael Baldrock, the IT administrator responsible for load balancing, has read-only
access to the NetScaler configuration, and can modify the configuration options for
load balancing.
The set of command policies that applies to a specific user is a combination of
command policies applied directly to the user's account and command policies applied
to the group(s) of which the user is a member.
Each time a user enters a command, the operating system searches the command
policies for that user until it finds a policy with an ALLOW or DENY action that matches
the command. When it finds a match, the operating system stops its command policy
search and allows or denies access to the command.
If the operating system finds no matching command policy, it denies the user access to
the command, in accordance with the NetScaler appliance's default deny policy.
Note: When placing a user into multiple groups, take care not to cause unintended
user command restrictions or privileges. To avoid these conflicts, when organizing your
users in groups, bear in mind the NetScaler command policy search procedure and
policy ordering rules.
Configuring External User Authentication
External user authentication is the process of authenticating the users of the Citrix
NetScaler® appliance by using an external authentication server. The NetScaler
supports LDAP, RADIUS, TACACS+, and NT4 authentication servers. To configure external
user authentication, you must create authentication policies. You can configure one or
many authentication policies, depending on your authentication needs. An
authentication policy consists of an expression and an action. Authentication policies
use NetScaler classic expressions, which are described in detail in the Citrix NetScaler
Policy Configuration and Reference Guide at http://support.citrix.com/article/
CTX128673.
After creating an authentication policy, you bind it to the system global entity and
assign a priority to it. You can create simple server configurations by binding a single
authentication policy to the system global entity. Or, you can configure a cascade of
authentication servers by binding multiple policies to the system global entity. If no
®
37
Page 38

Chapter 1 Authentication and Authorization
authentication policies are bound to the system, users are authenticated by the
onboard system.
Note: User accounts must be configured on the NetScaler appliance before users can
be externally authenticated. You must first create an onboard system user for all users
who will access the appliance, so that you can bind command policies to the user
accounts. Regardless of the authentication source, users cannot log on if they are not
granted sufficient command authorization through command policies bound to their
user accounts or to a group of which they are a member.
Configuring LDAP Authentication
You can configure the NetScaler to authenticate user access with one or more LDAP
servers. LDAP authorization requires identical group names in Active Directory, on the
LDAP server, and on the NetScaler. The characters and case must also be the same.
By default, LDAP authentication is secured by using SSL/TLS protocol. There are two
types of secure LDAP connections. In the first type, the LDAP server accepts the SSL/
TLS connection on a port separate from the port used to accept clear LDAP
connections. After users establish the SSL/TLS connection, LDAP traffic can be sent
over the connection. The second type allows both unsecure and secure LDAP
connections and is handled by a single port on the server. In this scenario, to create a
secure connection, the client first establishes a clear LDAP connection. Then the LDAP
command StartTLS is sent to the server over the connection. If the LDAP server
supports StartTLS, the connection is converted to a secure LDAP connection by using TLS.
The port numbers for LDAP connections are:
w 389 for unsecured LDAP connections
w 636 for secure LDAP connections
w 3268 for Microsoft unsecure LDAP connections
w 3269 for Microsoft secure LDAP connections
LDAP connections that use the StartTLS command use port number 389. If port numbers
389 or 3268 are configured on the NetScaler, it tries to use StartTLS to make the
connection. If any other port number is used, connection attempts use SSL/TLS. If
StartTLS or SSL/TLS cannot be used, the connection fails.
When configuring the LDAP server, the case of the alphabetic characters must match
that on the server and on the NetScaler. If the root directory of the LDAP server is
specified, all of the subdirectories are also searched to find the user attribute. In large
directories, this can affect performance. For this reason, Citrix recommends that you
use a specific organizational unit (OU).
The following table lists examples of user attribute fields for LDAP servers.
38
Page 39

Citrix NetScaler Administration Guide
Table 1-5. User Attribute Fields for LDAP Servers
LDAP server User attribute Case sensitive?
Microsoft Active Directory Server sAMAccountName No
Novell eDirectory cn Yes
IBM Directory Server uid Yes
Lotus Domino CN Yes
Sun ONE directory
(formerly iPlanet)
The following table lists examples of the base distinguished name (DN).
Table 1-6. Examples of Base Distinguished Name
LDAP server Base DN
Microsoft Active Directory DC=citrix, DC=local
Novell eDirectory dc=citrix, dc=net
IBM Directory Server cn=users
Lotus Domino OU=City, O=Citrix, C=US
Sun ONE directory (formerly iPlanet) ou=People, dc=citrix, dc=com
The following table lists examples of the bind distinguished name (DN).
uid or cn Yes
Table 1-7. Examples of Bind Distinguished Name
LDAP server Bind DN
Microsoft Active Directory CN=Administrator, CN=Users, DC=citrix,
DC=local
Novell eDirectory cn=admin, dc=citrix, dc=net
IBM Directory Server LDAP_dn
39
Page 40

Chapter 1 Authentication and Authorization
LDAP server Bind DN
Lotus Domino CN=Notes Administrator, O=Citrix, C=US
Sun ONE directory (formerly iPlanet) uid=admin, ou=Administrators,
To configure LDAP authentication by using the configuration utility
1. In the navigation pane, expand System, and then click Authentication.
2. On the Policies tab, click Add.
3. In Name, type a name for the policy.
4. In Authentication Type, select LDAP. Next to Server, click New.
5. In Name, type the name of the server.
6. Under Server, in IP Address and Port, type the IP address and port number of the
LDAP server.
ou=TopologyManagement,
o=NetscapeRoot
7. Under Connection Settings, provide the following information:
• In Base DN (location of users), type the base DN under which users are located.
Base DN is usually derived from the Bind DN by removing the user name and
specifying the group where in which are located. Examples of syntax for base
DN are:
ou=users, dc=ace, dc=com
cn=Users, dc=ace, dc=com
• In Administrator Bind DN, type the administrator bind DN for queries to the
LDAP directory. Examples for syntax of bind DN are:
domain/user name
ou=administrator, dc=ace, dc=com
user@domain.name (for Active Directory)
cn=Administrator, cn=Users, dc=ace, dc=com
For Active Directory, the group name specified as cn=groupname is required.
The group name that is defined in the NetScaler must be identical to the group
name that is defined on the LDAP server. For other LDAP directories, the group
name either is not required or, if required, is specified as ou=groupname.
The NetScaler binds to the LDAP server, using the administrator credentials, and
then searches for the user. After locating the user, the NetScaler unbinds the
administrator credentials and rebinds with the user credentials.
40
• In Administrator Password and Confirm Administrator Password, type the
administrator password for the LDAP server.
Page 41

Citrix NetScaler Administration Guide
8. To retrieve additional LDAP settings automatically, click Retrieve Attributes. The
fields under Other Settings then populate automatically. If you do not want to do
this, skip to Step 12.
9. Under Other Settings, in Server Logon Name Attribute, type the attribute under
which the NetScaler should look for user logon names for the LDAP server that you
are configuring. The default is samAccountName.
10. In Group Attribute, leave the default memberOf for Active Directory or change it
to that of the LDAP server type you are using. This attribute enables the NetScaler
to obtain the groups associated with a user during authorization.
11. In Security Type, select the security type.
If you select PLAINTEXT or TLS for security, use port number 389. If you select
SSL, use port number 636.
12. To allow users to change their LDAP password, select Allow Password Change.
If you select PLAINTEXT as the security type, allowing users to change their
passwords is not supported.
13. Click Create.
14. In the Create Authentication Policy dialog box, next to Named Expressions,
select the expression, click Add Expression, click Create, and click Close.
After the LDAP server settings are configured on the NetScaler, bind the policy to the
system global entity. For more information about binding authentication policies
globally, see Binding the Authentication Policies to the System Global Entity on page
45.
Determining attributes in the LDAP directory
If you need help determining your LDAP directory attributes, you can easily look them
up with the free LDAP browser from Softerra.
You can download the LDAP browser from the Softerra LDAP Administrator Web site at
http://www.ldapbrowser.com. After the browser is installed, set the following attributes:
w The host name or IP address of your LDAP server.
w The port of your LDAP server. The default is 389.
w The base DN field can be left blank.
w The information provided by the LDAP browser can help you determine the base DN
needed for the Authentication tab.
w The Anonymous Bind check determines whether the LDAP server requires user
credentials for the browser to connect to it. If the LDAP server requires credentials,
leave the check box cleared.
After completing the settings, the LDAP browser displays the profile name in the left
pane and connects to the LDAP server.
41
Page 42

Chapter 1 Authentication and Authorization
Configuring RADIUS Authentication
You can configure the NetScaler appliance to authenticate user access with one or
more RADIUS servers. If you are using RSA SecurID, SafeWord, or Gemalto Protiva
products, use a RADIUS server.
Your configuration might require using a network access server IP address (NAS IP) or a
network access server identifier (NAS ID). When configuring your NetScaler to use a
RADIUS authentication server, use the following guidelines:
w If you enable use of the NAS IP, the appliance sends its configured IP address to the
RADIUS server, rather than the source IP address used in establishing the RADIUS
connection.
w If you configure the NAS ID, the appliance sends the identifier to the RADIUS server.
If you do not configure the NAS ID, the appliance sends its host name to the RADIUS
server.
w When the NAS IP is enabled, the appliance ignores any NAS ID that was configured
by using the NAS IP to communicate with the RADIUS server.
To configure RADIUS authentication by using the configuration utility
1. In the navigation pane, expand System, and then click Authentication.
2. On the Policies tab, click Add.
3. In Name, type a name for the policy.
4. In Authentication Type, select RADIUS.
5. Next to Server, click New.
6. In Name, type a name for the server.
7. Under Server, in IP Address, type the IP address of the RADIUS server.
8. In Port, type the port. The default is 1812.
9. Under Details, in Secret Key and Confirm Secret Key, type the RADIUS server secret.
10. In NAS ID, type the identifier number, and then click Create.
11. In the Create Authentication Policy dialog box, next to Named Expressions,
select the expression, click Add Expression, click Create, and click Close.
After the RADIUS server settings are configured on the NetScaler, bind the policy to the
system global entity. For more information about binding authentication policies
globally, see Binding the Authentication Policies to the System Global Entity on page
45.
Choosing RADIUS authentication protocols
42
The NetScaler appliance supports implementations of RADIUS that are configured to use
any of several protocols for user authentication, including:
Page 43

Citrix NetScaler Administration Guide
w Password Authentication Protocol
w Challenge-Handshake Authentication Protocol (CHAP)
w Microsoft Challenge-Handshake Authentication Protocol (MS-CHAP Version 1 and
Version 2)
If your deployment of the NetScaler is configured to use RADIUS authentication and
your RADIUS server is configured to use Password Authentication Protocol, you can
strengthen user authentication by assigning a strong shared secret to the RADIUS server.
Strong RADIUS shared secrets consist of random sequences of uppercase and lowercase
letters, numbers, and punctuation, and are at least 22 characters long. If possible, use
a random character generation program to determine RADIUS shared secrets.
To further protect RADIUS traffic, assign a different shared secret to each NetScaler
appliance or virtual server. When you define clients on the RADIUS server, you can also
assign a separate shared secret to each client. If you do this, you must configure
separately each NetScaler policy that uses RADIUS authentication.
Shared secrets are configured on the NetScaler when a RADIUS policy is created.
Configuring IP address extraction
You can configure the NetScaler to extract the IP address from a RADIUS server. When a
user authenticates with the RADIUS server, the server returns a framed IP address that
is assigned to the user. The following are attributes for IP address extraction:
w Allows a remote RADIUS server to supply an IP address from the internal network for
a user logged on to the NetScaler.
w Allows configuration for any RADIUS attribute using the type ipaddress, including
those that are vendor encoded.
When configuring the RADIUS server for IP address extraction, you configure the vendor
identifier and the attribute type.
The vendor identifier enables the RADIUS server to assign an IP address to the client
from a pool of IP addresses that are configured on the RADIUS server. The vendor ID and
attributes are used to make the association between the RADIUS client and the RADIUS
server. The vendor ID is the attribute in the RADIUS response that provides the IP
address of the internal network. A value of zero indicates that the attribute is not
vendor encoded. The attribute type is the remote IP address attribute in a RADIUS
response. The minimum value is one and the maximum value is 255.
A common configuration is to extract the RADIUS attribute framed IP address. The
vendor ID is set to zero or is not specified. The attribute type is set to eight.
To configure IP address extraction by using the configuration utility
1. In the navigation pane, expand System, and then click Authentication.
2. On the Policies tab, click Open.
3. In the Configure Authentication Policy dialog box, next to Server, click Modify.
4. Under Details, in Group Vendor Identifier, type the value.
43
Page 44

Chapter 1 Authentication and Authorization
5. In Group Attribute Type, type the value, and click OK twice.
Configuring TACACS+ Authentication
You can configure a TACACS+ server for authentication. Similar to RADIUS
authentication, TACACS+ uses a secret key, an IP address, and the port number. The
default port number is 49. To configure the NetScaler to use a TACACS+ server, provide
the server IP address and the TACACS+ secret. The port needs to be specified only when
the server port number in use is something other than the default port number of 49.
To configure TACACS+ authentication by using the configuration utility
1. In the navigation pane, expand System, and then click Authentication.
2. On the Policies tab, click Add.
3. In Name, type a name for the policy.
4. In Authentication Type, select TACACS.
5. Next to Server, click New.
6. In Name, type a name for the server.
7. Under Server, type the IP address and port number of the TACACS+ server.
8. Under TACACS server information, in TACACS Key and Confirm TACACS key, type
the key.
9. In Authorization, select ON and click Create.
10. In the Create Authentication Policy dialog box, next to Named Expressions,
select the expression, click Add Expression, click Create, and click Close.
After the TACACS+ server settings are configured on the NetScaler, bind the policy to
the system global entity. For more information about binding authentication policies
globally, see Binding the Authentication Policies to the System Global Entity on page
45.
Configuring NT4 Authentication
You can configure the NetScaler appliance to use Windows NT LAN Manager (NTLM)
authentication to authenticate users against the user database on a Windows NT 4.0
domain controller. A Windows NT 4.0 domain controller maintains domain user accounts
in a database on the Windows NT 4.0 server. A domain user account includes a user
name and password and other information about the user.
When a user logs on to the NetScaler, the user enters the user name and password
maintained in the domain user account on the Windows NT 4.0 server. The NetScaler
connects to the Windows NT 4.0 server and passes these credentials to the server. The
server authenticates the user. If you need to configure the NetScaler to authenticate
clients against a Windows NT 4.0 primary or backup domain controller, you need to
specify the server IP address, the domain name, and the domain administrator user
44
Page 45

Citrix NetScaler Administration Guide
name and password of the person who is authorized to administer the domain. These
parameters are necessary because the NetScaler joins the domain to communicate
authentication data.
NT4 authentication supports NTLMv1 and NTLMv2 authentication protocols only.
To configure NT4 authentication by using the configuration utility
1. In the navigation pane, expand System, and then click Authentication.
2. On the Policies tab, click Add.
3. In Name, type a name for the policy.
4. In Authentication Type, select NT4.
5. Next to Server, click New.
6. In Server, type the name of the server.
7. Complete the settings as they are configured on your Windows NT 4.0 server and
click Create.
8. In the Create Authentication Policy dialog box, next to Named Expressions,
select the expression, click Add Expression, click Create, and click Close.
When the settings for Windows NT 4.0 authentication are configured, bind the policy to
the system global entity. For more information about binding authentication policies
globally, see Binding the Authentication Policies to the System Global Entity on page
45.
Binding the Authentication Policies to the System Global Entity
When the authentication policies are configured, bind the policies to the system global
entity.
To bind an authentication policy globally by using the configuration utility
1. In the navigation pane, expand System, and then click Authentication.
2. On the Policies tab, click Global Bindings.
3. Under Details, click Insert Policy.
4. Under Policy Name, select the policy and click OK.
To unbind a global authentication policy by using the configuration utility
1. In the navigation pane, expand System, and then click Authentication.
45
Page 46

Chapter 1 Authentication and Authorization
2. On the Policies tab, click Global Bindings.
3. In the Bind/Unbind Authentication Policies dialog box, in Policy Name, select the
policy, click Unbind Policy and then click OK.
46
Page 47

Chapter 2
SNMP
Topics:
• Importing MIB Files to the
SNMP Manager and Trap
Listener
• Configuring the NetScaler to
Generate SNMPv1 and
SNMPv2 Traps
• Configuring the NetScaler for
SNMP v1 and v2 Queries
• Configuring SNMP Alarms for
Rate Limiting
• Configuring the NetScaler for
SNMPv3 Queries
You can use Simple Network Management Protocol (SNMP) to
configure the SNMP agent on the Citrix® NetScaler® appliance
to generate asynchronous events, which are called traps. The
traps are generated whenever there are abnormal conditions
on the NetScaler. The traps are then sent to a remote device
called a trap listener, which signals the abnormal condition
on the NetScaler appliance. Or, you can query the SNMP agent
for System-specific information from a remote device called
an SNMP manager. The agent then searches the management
information base (MIB) for the data requested and sends the
data to the SNMP manager.
The SNMP agent on the NetScaler can generate traps
compliant with SNMPv1 and SNMPv2 only. For querying, the
SNMP agent supports SNMP version 1 (SNMPv1), SNMP version 2
(SNMPv2), and SNMP version 3 (SNMPv3).
The following figure illustrates a network with a NetScaler
that has SNMP enabled and configured. In the figure, each
SNMP network management application uses SNMP to
communicate with the SNMP agent on the NetScaler. The
SNMP agent searches its management information base (MIB)
to collect the data requested by the SNMP Manager and
provides the information to the application.
Figure 2-1. NetScaler Supporting SNMP
47
Page 48

Chapter 2 SNMP
Importing MIB Files to the SNMP Manager and Trap Listener
You must download the following files to SNMP managers and trap listeners before you
start monitoring a NetScaler appliance.
w NS-MIB-smiv1.mib. This file is used by SNMPv1 managers and trap listeners.
w NS-MIB-smiv2.mib. This file is used by SNMPv2 and SNMPv3 managers and SNMPv2
trap listeners.
The MIB files include the following:
w A subset of standard MIB-2 groups. Provides the MIB-2 groups SYSTEM, IF, ICMP,
UDP, and SNMP.
w A NetScaler enterprise MIB. Provides NetScaler-specific configuration and statistics.
To import the MIB files to the SNMP manager and trap listener
w Logon to the Downloads page of NetScaler appliance GUI.
w Under SNMP Files, do one of the following:
a. If your SNMP management application is other than WhatsUpGold, download the
following files to your SNMP management application:
w NS-MIB-smiv2.mib
w NS-MIB-smiv1.mib
b. If you are using the WhatsUpGold SNMP management application, download only
the following files to the SNMP management application:
w mib.txt
w traps.txt
Configuring the NetScaler to Generate SNMPv1 and SNMPv2 Traps
You can configure the NetScaler to generate asynchronous events, which are called
traps. The traps are generated whenever there are abnormal conditions on the
NetScaler. The traps are sent to a remote device called a trap listener. This helps
administrators monitor the NetScaler and respond promptly to any issues.
48
The NetScaler provides a set of condition entities called SNMP alarms. When the
condition in any SNMP alarm is met, the NetScaler generates SNMP trap messages that
Page 49

Citrix NetScaler Administration Guide
are sent to the configured trap listeners. For example, when the LOGIN-FAILURE alarm
is enabled, a trap message is generated and sent to the trap listener whenever there is
a login failure on the NetScaler appliance.
To configure the NetScaler to generate traps, you need to enable and configure alarms.
Then, you specify trap listeners to which the NetScaler will send the generated trap
messages.
Enabling or Disabling an SNMP Alarm
The NetScaler generates traps only for SNMP alarms that are enabled. Some alarms are
enabled by default, but you can disable them.
When you enable an SNMP alarm, the NetScaler generates corresponding trap messages
when some events occur. Some NetScaler alarms are enabled by default.
To enable or disable an SNMP alarm by using the command line
At the NetScaler command prompt, type the following commands to set the parameters
and verify the configuration:
w enable snmp alarm <alarm name>
w sh snmp alarm <alarm name>
Example
> enable snmp alarm LOGIN-FAILURE
Done
> show snmp alarm LOGIN-FAILURE
Alarm Alarm Threshold Normal Threshold Time State
Severity Logging
----- --------------- ---------------- ----
-------- ------------- --------
1) LOGIN-FAILURE N/A N/A N/A ENABLED - ENABLED
Done
To enable or disable an SNMP alarm by using the configuration utility
1. In the navigation pane, expand System, expand SNMP, and then click Alarms.
2. In the details pane, select an alarm (for example, Login-Failure), and do one of
the following:
• To enable an alarm, click Enable.
• To disable an alarm, click Disable.
A message appears in the status bar, stating that the alarm is enabled or disabled
successfully.
49
Page 50

Chapter 2 SNMP
Configuring Alarms
The NetScaler provides a set of condition entities called SNMP alarms. When the
condition set for an SNMP alarm is met, the NetScaler generates SNMP traps messages
that are sent to the configured trap listeners. For example, when the LOGIN-FAILURE
alarm is enabled, a trap message is generated and sent to the trap listener whenever
there is a login failure on the NetScaler appliance.
You can assign an SNMP alarm with a severity level. When you do this, the
corresponding trap messages are assigned that severity level.
The following are the severity levels, defined in the NetScaler, in decreasing order of
severity.
w Critical
w Major
w Minor
w Warning
w Informational
For example, if you set a Warning severity level for the SNMP alarm named LOGINFAILURE, the trap messages generated when there is a login failure will be assigned
with the Warning severity level.
You can also configure an SNMP alarm to log the corresponding trap messages
generated whenever the condition on that alarm is met.
To configure an SNMP alarm by using the command line
At the NetScaler command prompt, type the following commands to configure an SNMP
alarm and verify the configuration:
w set snmp alarm <alarm Name> [-thresholdValue <positive_integer> [-normalValue
<positive_integer>]] [-time <secs>] [-state ( ENABLED | DISABLED )] [-severity
<severity>] [-logging ( ENABLED | DISABLED )]
w sh snmp alarm <alarm Name>
Parameters for configuring SNMP alarms
severity
Severity level of this alarm. Possible values: Critical, Major, Minor, Warning,
Informational. Default: Informational.
logging
Enable logging of SNMP trap messages by Syslog. Possible values: ENABLED and
DISABLED.
50
Page 51

To configure SNMP alarms by using the configuration utility
1. In the navigation pane, expand System, expand SNMP, and then click Alarms.
2. In the details pane, select an alarm (for example, Login-Failure), and then click
Open.
3. In the Configure SNMP Alarm dialog box, specify values for the following
parameters, which correspond to parameters described in "Parameters for
configuring SNMP alarms" as shown:
• Severity—severity
• Logging—logging
4. Click OK.
A message appears in the status bar, stating that the alarm has been configured
successfully.
Configuring Traps
After configuring the alarms, you need to specify the trap listener to which the
NetScaler appliance sends the trap messages. Apart from specifying parameters such as
IP address and the destination port of the trap listener, you can specify the type of trap
(either generic or specific) and the SNMP version.
Citrix NetScaler Administration Guide
You can configure a maximum of 20 trap listeners for receiving either generic or
specific traps.
You can also configure the NetScaler to send SNMP trap messages with a source IP,
other than the NetScaler IP address (NSIP), to a particular trap listener. You can set the
source IP to either a mapped IP address (MIP) or a subnet IP address (SNIP) configured
on the NetScaler appliance.
You can also configure the NetScaler to send trap messages to a trap listener on the
basis of a severity level. For example, if you set the severity level as Minor for a trap
listener, all trap messages of the severity level equal to or greater than Minor (Minor,
Major, and Critical) are sent to the trap listener.
If you have defined a community string for the trap listener, you must also specify a
community string for each trap that is to be sent to the listener. A trap listener for
which a community string has been defined accepts only trap messages that include a
community string matching the community string defined in the trap listener. Other
trap messages are dropped.
To add an SNMP trap by using the NetScaler command line
At the NetScaler command prompt, type the following commands to set the parameters
and verify the configuration:
w add snmp trap <trapClass> <trapDestination> -version ( V1 | V2 ) -destPort <port> -
communityName <string> -srcIP <ip_addr> -severity <severity>
51
Page 52

Chapter 2 SNMP
w show snmp trap
Parameters for configuring SNMP traps
Example
add snmp trap specific 10.102.29.3 -version V2 destPort 80 -communityName com1 -severity Major
Done
> show snmp trap
Type DestinationIP DestinationPort
Version SourceIP Min-Severity
Community
---- ------------- ---------------
------- -------- ------------
--------generic 10.102.29.9 162
V2 NetScaler IP N/A public
specific 10.102.29.9 162
V2 NetScaler IP - public
specific 10.102.29.3 80
V2 NetScaler IP Major com1
Done
trapClass
The trap type. Possible values: generic and specific.
version
SNMP version of the trap PDU to be sent.
trapDestination
IPv4 address of the trap listener.
destPort
Destination port of the trap. Default: 162. Minimum value: 1
scrIP
Source IP of the traps.
severity
Specify the severity level of trap messages. All generated trap messages of the
severity level up to the specified severity level will be sent to the trap listener.
Possible values: Critical, Major, Minor, Warning, and Informational.
Default: Informational.
communityName
The community string. Default: public.
52
To configure SNMP Traps by using the configuration utility
1. In the navigation pane, expand System, expand SNMP, and then click Traps.
Page 53

Citrix NetScaler Administration Guide
2. In the details pane, do one of the following:
• To create a new trap, click Add.
• To modify an existing trap, select the trap, and then click Open.
3. In the Create SNMP Trap Destination or Configure SNMP Trap dialog box, set the
following parameters:
• Type*—trapClass
• Version—version
• Destination IP Address*—trapDestination
• Destination Port—destPort
• Source IP Address—srcIP
• Minimum Severity—severity
• Community Name—communityName
*A required parameter
4. Click Create or OK, and then click Close.
A message appears in the status bar, stating that the trap has been configured
successfully.
Enabling Unconditional SNMP Trap Logging
By default, the NetScaler appliance logs any SNMP trap messages (for SNMP alarms in
which logging is enabled) when at least one trap listener is specified on the NetScaler
appliance. However, you can specify that SNMP trap messages be logged even when no
trap listeners are configured.
To enable or disable unconditional SNMP trap logging by using the NetScaler command line
At a NetScaler command prompt, type:
w set snmp option -snmpTrapLogging ( ENABLED | DISABLED )
w show snmp option
Example
> set snmp option -snmpset ENABLED
Done
> show snmp option
Snmpset: DISABLED SnmpTrapLogging:
ENABLED
Done
>
53
Page 54

Chapter 2 SNMP
Parameters for unconditional SNMP trap logging
SnmpTrapLogging (SNMP Trap Logging)
Enable the NetScaler appliance to log any SNMP traps messages (for those respective
SNMP alarms in which logging is enabled) even when no trap listeners are configured.
Possible Values: ENABLED, DISABLED. Default: DISABLED.
To enable or disable unconditional SNMP trap logging by using the configuration utility
1. In the navigation pane, expand System, and then click SNMP.
2. In the details pane, under Settings, click Configure SNMP Options.
3. In the Configure SNMP Options dialog box, select the SNMP Trap Logging check box.
4. Click OK.
Configuring the NetScaler for SNMP v1 and v2 Queries
You can query the NetScaler SNMP agent for system-specific information from a remote
device called SNMP managers. The agent then searches the management information
base (MIB) for the data requested and sends the data to the SNMP manager.
The following types of SNMP v1 and v2 queries are supported by the SNMP agent:
w GET
w GET NEXT
w ALL
w GET BULK
You can create strings called community strings and associate each of these to query
types. You can associate one or more community strings to each query type.
Community string are passwords and used to authenticate SNMP queries from SNMP
managers.
For example, if you associate two community strings, such as abc and bcd, to the query
type GET NEXT, the SNMP agent on the NetScaler appliance considers only those GET
NEXT SNMP query packets that contain abc or bcd as the community string.
Specifying an SNMP Manager
You must configure the NetScaler appliance to allow the appropriate SNMP managers to
query it. You must also provide the SNMP manager with the required NetScaler-specific
information. You can add up to a maximum of 100 SNMP managers or networks.
54
For an IPv4 SNMP manager you can specify a host name instead of the manager's IP
address. If you do so, you must add a DNS name server that resolves the host name of
Page 55

Citrix NetScaler Administration Guide
the SNMP manager to its IP address. You can add up to a maximum of five host-name
based SNMP managers.
If you do not configure at least one SNMP manager, the NetScaler appliance accepts
and responds to SNMP queries from all IP addresses on the network. If you configure
one or more SNMP managers, the appliance accepts and responds only to SNMP queries
from those specific IP addresses.
If you remove an SNMP manager from the NetScaler configuration, that manager can no
longer query the NetScaler.
To add an SNMP manager by using the NetScaler command line
At the NetScaler command prompt, type the following commands to set the parameters
and verify the configuration:
w add snmp manager <IPAddress> ... [-netmask <netmask>]
w show snmp manager
Example
> add snmp manager 10.102.29.10
Done
> show snmp manager
1) 10.102.29.5 255.255.255.255
Done
To add an SNMP manager by specifying its IP address, using the NetScaler command line
At the NetScaler command prompt, type the following commands to set the parameters
and verify the configuration:
w add snmp manager <IPAddress> ... [-netmask <netmask>]
w show snmp manager
Example
> add snmp manager 10.102.29.10
Done
> show snmp manager
1) 10.102.29.5 255.255.255.0
Done
> add snmp manager 10.102.29.15 10.102.29.30
Done
> show snmp manager
1) IP Address: 10.102.29.10
Netmask: 255.255.255.255
2) IP Address: 10.102.29.15
Netmask: 255.255.255.255
3) IP Address: 10.102.29.30
55
Page 56

Chapter 2 SNMP
To add an SNMP manager by specifying its host name, using the NetScaler command line
Important: If you specify the SNMP manager’s host name instead of its IP address,
you must configure a DNS name server to resolve the host name to the SNMP
manager’s IP address. For more information, see the instructions for adding a name
server in the Citrix NetScaler Traffic Management Guide. For a link to the guide, see
the Documentation Library.
At the NetScaler command prompt, type the following commands to set the parameters
and verify the configuration:
w add snmp manager <IPAddress> [-domainResolveRetry <integer>]
w show snmp manager
Netmask: 255.255.255.255
Done
Example
> add nameserver 10.103.128.15
Done
> show nameserver
1) 10.103.128.15 - State: UP
Done
> add snmp manager engwiki.eng.example.net –
domainResolveRetry 10
Done
> show snmp manager
1) Hostname: abc.com (Unresolved IP)
Resolve Retry: 7
2) Hostname: engwiki.eng.example.net
(10.217.3.249)
Resolve Retry: 10
Done
Parameters for configuring an SNMP manager
IPAddress
Can be any of the following:
w IPv4 address of the SNMP manager.
w IPv4 network address. The NetScaler appliance accepts and responds to SNMP
queries from any device on this network.
w Associated host name of an SNMP manager that has an IPv4 address. If you specify
a host name, you must add a DNS name server that resolves the host name of the
SNMP manager to its IP address.
56
Page 57

Citrix NetScaler Administration Guide
Note: The NetScaler appliance does not support host names for SNMP
managers that have IPv6 addresses.
netmask
Subnet of management stations. Used to grant access from entire subnets to the
NetScaler appliance.
domainResolveRetry
The duration, in seconds, for which the NetScaler appliance waits to send the next
DNS query to resolve the host name of the SNMP manager if the last query failed. If
last query succeeds, the NetScaler waits for the TTL time. Minimum value: 5.
Maximum value: 20940. Default value: 5.
To add an SNMP manager by using the configuration utility
1. In the navigation pane, expand System, expand SNMP, and then click Managers.
2. In the details pane, click Add.
3. In the Create SNMP Manager dialog box, specify values for the following
parameters, which correspond to parameters described in "Parameters for
configuring an SNMP manager" as shown:
• IP Address*—IPAddress
• Netmask—netmask
*A required parameter
4. In the Create SNMP Manager dialog box, do one of the following:
• To specify the host name of an SNMP manager, select Management Host and set
the following parameters:
w Host Name*—IPAddress
w Resolve Retry (secs)*—domainResolveRetry
Important: If you specify the SNMP manager’s host name instead of its IPv4
address, you must configure a DNS name server to resolve the host name to
the SNMP manager’s IP address. For more information, see the instructions
for adding a name server in the Citrix NetScaler Traffic Management Guide.
For a link to the guide, see the Documentation Library.
• To specify the IPv4 address of an SNMP manager, select Management Network
and set the following parameters:
w IP Address*—IPAddress
w Netmask—netmask
5. Click Create, and then click Close.
A message appears in the status bar, stating that the SNMP manager has been
configured successfully.
57
Page 58

Chapter 2 SNMP
Specifying an SNMP Community
You can create strings called community strings and associate them with the following
SNMP query types on the NetScaler:
w GET
w GET NEXT
w ALL
w GET BULK
You can associate one or more community strings to each query types. For example,
when you associate two community strings, such as abc and bcd, to the query type GET
NEXT, the SNMP agent on the NetScaler appliance considers only those GET NEXT SNMP
query packets that contain abc or bcd as the community string.
If you don't associate any community string to a query type then the SNMP agent
responds to all SNMP queries of that type.
To specify an SNMP community by using the NetScaler command line
At the NetScaler command prompt, type the following commands to set the parameters
and verify the configuration:
w add snmp community <communityName> <permissions>
w sh snmp community
Example
> add snmp community com all
Done
> show snmp community com
Community: com Permissions: ALL
Done
Parameters for configuring an SNMP community string
communityName
SNMP community string.
permissions
Access privileges. Possible values: GET, GET NEXT, GET BULK, ALL.
To configure an SNMP community string by using the configuration utility
58
1. In the navigation pane, expand System, expand SNMP, and then click Community.
Page 59

Citrix NetScaler Administration Guide
2. In the details pane, click Add.
3. In the Create SNMP Community dialog box, specify values for the following
parameters, which correspond to parameters described in "Parameters for
configuring an SNMP community string" as shown:
• Community String*—communityName
• Permission*—permissions
*A required parameter
4. Click Create, and then click Close.
A message appears in the status bar, stating that the SNMP community string has
been configured successfully.
To remove an SNMP community string by using the configuration utility
1. In the navigation pane, expand System, click SNMP, and then click Community.
2. In the details pane, select the community that you want to remove (for example,
Com_All), and then click Remove.
Configuring SNMP Alarms for Rate Limiting
Citrix® NetScaler® appliances such as the NetScaler MPX 10500, 12500, and 15500 are
rate limited. The maximum throughput (Mbps) and packets per second (PPS) are
determined by the license purchased for the appliance. For rate-limited platforms, you
can configure SNMP traps to send notifications when throughput and PPS approach their
limits and when they return to normal.
Throughput and PPS are monitored every seven seconds. You can configure traps with
high-threshold and normal-threshold values, which are expressed as a percentage of
the licensed limits. The appliance then generates a trap when throughput or PPS
exceeds the high threshold, and a second trap when the monitored parameter falls to
the normal threshold. In addition to sending the traps to the configured destination
device, the NetScaler logs the events associated with the traps in the /var/log/
ns.log file as EVENT ALERTSTARTED and EVENT ALERTENDED.
Exceeding the throughput limit can result in packet loss. You can configure SNMP
alarms to report packet loss.
For more information about SNMP alarms and traps, see Configuring the NetScaler to
Generate SNMPv1 and SNMPv2 Traps on page 48.
Configuring an SNMP Alarm for Throughput or PPS
To monitor both throughput and PPS, you must configure separate alarms.
59
Page 60

Chapter 2 SNMP
To configure an SNMP alarm for the throughput rate by using the NetScaler command line
At the NetScaler command prompt, type the following commands to configure the
SNMP alarm and verify the configuration:
w set snmp alarm PF-RL-RATE-THRESHOLD [-thresholdValue <positive_integer> [-
normalValue <positive_integer>]] [-state ( ENABLED | DISABLED )] [-severity
<severity>] [-logging ( ENABLED | DISABLED )]
w show snmp alarm PF-RL-RATE-THRESHOLD
Example
> set snmp alarm PF-RL-RATE-THRESHOLD thresholdValue 70 -normalValue 50
Done
> show snmp alarm PF-RL-RATE-THRESHOLD
Alarm Alarm Threshold
Normal Threshold Time State Severity
Logging
----- ---------------
---------------- ---- -------- -------------
--------
1) PF-RL-RATE-THRESHOLD 70
50 N/A DISABLED -
ENABLED
Done
60
To modify or remove the threshold values by using the NetScaler command line
w To modify the threshold values, type the set snmp alarm PF-RL-RATE-THRESHOLD
command and the parameters to be changed, with their new values.
w To remove the threshold values, type the unset snmp alarm PF-RL-RATE-
THRESHOLD command, followed by the –thresholdValue parameter, but do not
specify any value for the parameter.
Note: The normal-threshold value is automatically unset when you unset the highthreshold value.
To configure an SNMP alarm for PPS by using the NetScaler command
line
At the NetScaler command prompt, type the following commands to configure the
SNMP alarm for PPS and verify the configuration:
w set snmp alarm PF-RL-PPS-THRESHOLD [-thresholdValue <positive_integer> [-
normalValue <positive_integer>]] [-state ( ENABLED | DISABLED )] [-severity
<severity>] [-logging ( ENABLED | DISABLED )]
Page 61

w show snmp alarm PF-RL-PPS-THRESHOLD
Example
> set snmp alarm PF-RL-PPS-THRESHOLD thresholdValue 70 -normalValue 50
Done
> show snmp alarm PF-RL-PPS-THRESHOLD
Alarm
Alarm Threshold Normal
Threshold Time State
Severity Logging
-----
---------------
---------------- ------------
------------- --------
1) PF-RL-PPS-THRESHOLD
70
50
N/A ENABLED
- ENABLED
Done
Citrix NetScaler Administration Guide
To modify or remove the threshold values by using the NetScaler command line
w To modify the threshold values, type the set snmp alarm PF-RL-PPS-THRESHOLD
command and the parameters to be changed, with their new values.
w To remove the threshold values, type the unset snmp alarm PF-RL-PPS-THRESHOLD
command, followed by the –thresholdValue parameter, but do not specify any value
for the parameter.
Note: The normal-threshold value is automatically unset when you unset the highthreshold value.
Parameters for configuring an SNMP alarm for throughput or PPS
thresholdValue
The high threshold value, which triggers EVENT ALERTSTARTED. Minimum value: 1.
normalValue
The normal threshold value, which triggers EVENT ALERTENDED.
state
The current state of the alarm. Possible values: ENABLED, DISABLED. Default: ENABLED.
severity
The severity level of the alarm. Possible values: Critical, Major, Minor, Warning,
Informational. Default: SNMP_SEV_UNKNOWN.
61
Page 62

Chapter 2 SNMP
logging
Log the alarm. Possible values: ENABLED, DISABLED. Default value: ENABLED.
To configure an SNMP alarm for throughput or PPS by using the configuration utility
1. In the navigation pane, expand System, expand SNMP, and then click Alarms.
2. In the details pane, do one of the following:
3. Click Open.
4. In the Configure SNMP Alarm dialog box, specify values for the following
• Select PF-RL-RATE-THRESHOLD to configure the SNMP alarm for throughput rate.
• Select PF-RL-PPS-THRESHOLD to configure the SNMP alarm for packets per
second.
parameters, which correspond to parameters described in “Parameters for
configuring an SNMP alarm for throughput or PPS” as shown:
• Alarm Threshold—thresholdValue
• Alarm Threshold—thresholdValue
• Normal Threshold—normalValue
• Severity—severity
• Logging—logging
5. Select the Enable check box to enable the alarm.
6. Click OK, and then click Close.
Configuring SNMP Alarm for Dropped Packets
You can configure an alarm for packets dropped as a result of exceeding the throughput
limit and an alarm for packets dropped as a result of exceeding the PPS limit.
To configure an SNMP alarm for packets dropped because of excessive throughput, by using the NetScaler command line
At the NetScaler command prompt, type:
set snmp alarm PF-RL-RATE-PKTS-DROPPED [-state (ENABLED | DISABLED)] [-severity
<severity>] [-logging ( ENABLED | DISABLED )]
To configure an SNMP alarm for packets dropped because of excessive PPS, by using the NetScaler command line
62
At the NetScaler command prompt, type:
set snmp alarm PF-RL-PPS-PKTS-DROPPED [-state (ENABLED | DISABLED)] [-severity
<severity>] [-logging ( ENABLED | DISABLED )]
Page 63

Citrix NetScaler Administration Guide
Parameters for configuring an SNMP alarm for dropped packets
state
The current state of the alarm. Possible values: ENABLED, DISABLED. Default: ENABLED.
severity
The severity level of the alarm. Possible values: Critical, Major, Minor, Warning,
Informational. Default: SNMP_SEV_UNKNOWN.
logging
Log the alarm. Possible values: ENABLED, DISABLED. Default value: ENABLED.
To configure an SNMP alarm for dropped packets by using the configuration utility
1. In the navigation pane, expand System, expand SNMP, and then click Alarms.
2. In the details pane, do one of the following:
• Select PF-RL-RATE-PKTS-DROPPED to configure an SNMP alarm for packets
dropped because of excessive throughput.
• Select PF-RL-PPS-PKTS-DROPPED to configure an SNMP alarm for packets
dropped because of excessive PPS.
3. Click Open.
4. In the Configure SNMP Alarm dialog box, specify values for the following
parameters, which correspond to parameters described in “Parameters for
configuring an SNMP alarm for dropped packets” as shown:
• Severity—severity
• Logging—logging
5. Select the Enable check box to enable the alarm.
6. Click OK, and then click Close.
Configuring the NetScaler for SNMPv3 Queries
Simple Network Management Protocol Version 3 (SNMPv3) is based on the basic
structure and architecture of SNMPv1 and SNMPv2. However, SNMPv3 enhances the
basic architecture to incorporate administration and security capabilities, such as
authentication, access control, data integrity check, data origin verification, message
timeliness check, and data confidentiality.
To implement message level security and access control, SNMPv3 introduces the userbased security model (USM) and the view-based access control model (VACM).
w User-Based Security Model. The user-based security model (USM) provides message-
level security. It enables you to configure users and security parameters for the
SNMP agent and the SNMP manager. USM offers the following features:
63
Page 64

Chapter 2 SNMP
• Data integrity: To protect messages from being modified during transmission
• Data origin verification: To authenticate the user who sent the message request.
• Message timeliness: To protect against message delays or replays.
• Data confidentiality: To protect the content of messages from being disclosed to
w View-Based Access Control Model. The view-based access control model (VACM)
enables you to configure access rights to a specific subtree of the MIB based on
various parameters, such as security level, security model, user name, and view
type. It enables you to configure agents to provide different levels of access to the
MIB to different managers.
The Citrix NetScaler supports the following entities that enable you to implement the
security features of SNMPv3:
w SNMP Engines
w SNMP Views
w SNMP Groups
through the network.
unauthorized entities or individuals.
w SNMP Users
These entities function together to implement the SNMPv3 security features. Views are
created to allow access to subtrees of the MIB. Then, groups are created with the
required security level and access to the defined views. Finally, users are created and
assigned to the groups.
Note: The view, group, and user configuration are synchronized and propagated to
the secondary node in a high availability (HA) pair. However, the engine ID is neither
propagated nor synchronized as it is unique to each NetScaler appliance.
To implement message authentication and access control, you need to:
w Set the Engine ID
w Configure Views
w Configure Groups
w Configure Users
Setting the Engine ID
SNMP engines are service providers that reside in the SNMP agent. They provide
services such as sending, receiving, and authenticating messages. SNMP engines are
uniquely identified using engine IDs.
64
The NetScaler has a unique engineID based on the MAC address of one of its interfaces.
It is not necessary to override the engineID. However, if you want to change the engine
ID, you can reset it.
Page 65

Citrix NetScaler Administration Guide
To set the engine ID by using the NetScaler command line
At a NetScaler command prompt, type the following commands to set the parameters
and verify the configuration:
w set snmp engineId <engineID>
w show snmp engineId
Example
> set snmp engineId 8000173f0300c095f80c68
Done
> show snmp engineId
EngineID: 8000173f0300c095f80c68
Done
Parameters for setting the engine ID
EngineID
Engine ID of the SNMP agent.
To set the engine ID by using configuration utility
1. In the navigation pane, expand System, expand SNMP, and then click Users.
2. In the details pane, click Configure Engine ID.
3. In the Configure Engine ID dialog box, in the Engine ID text box, type an engine ID
(for example, 8000173f0300c095f80c68).
4. Click OK.
A message appears in the status bar, stating that the engine ID has been modified
successfully.
Configuring a View
SNMP views restrict user access to specific portions of the MIB. SNMP views are used to
implement access control.
To add an SNMP view by using the NetScaler command line
At a NetScaler command prompt, type the following commands to set the parameters
and verify the configuration:
w add snmp view <name> <subtree> -type ( included | excluded )
w sh snmp view <name>
Example
add snmp view View1 -type included
65
Page 66

Chapter 2 SNMP
Parameters for configuring an SNMP view
name
Name of the SNMP view.
subtree
Subtree of the MIB.
type
Whether the subtree needs to be included or excluded.
To configure an SNMP view by using the configuration utility
1. In the navigation pane, expand System, expand SNMP, and then click Views.
2. In the details pane, click Add.
3. In the Create SNMP View or Configure SNMP View dialog box, specify values for
the following parameters, which correspond to parameters described in
"Parameters for configuring an SNMP view" as shown:
• Name*—name
• Subtree*—subtree
• Type—type
*A required parameter
4. Click Create or OK, and then click Close.
A message appears in the status bar, stating that the SNMP view has been
configured successfully.
Configuring a Group
SNMP groups are logical aggregations of SNMP users. They are used to implement access
control and to define the security levels. You can configure an SNMP group to set access
rights for users assigned to that group, thereby restricting the users to specific views.
You need to configure an SNMP group to set access rights for users assigned to that group.
To add an SNMP group by using the NetScaler command line
At a NetScaler command prompt, type the following commands to set the parameters
and verify the configuration:
w add snmp group <name> <securityLevel> -readViewName <string>
w show snmp group <name> <securityLevel>
Example
add snmp group edocs_group2 authPriv -readViewName
edocs_read_view
Done
> show snmp group edocs_group2 authPriv
66
Page 67

Citrix NetScaler Administration Guide
1) Name: edocs_group2 SecurityLevel:
authPriv
ReadViewName: edocs_read_view
StorageType: volatile
Status: active
Done
Parameters for configuring an SNMP group
name
Name of the SNMP view.
securityLevel
The security level of the group. Possible values: noAuthNoPriv, authNoPriv, authPriv
readViewName
SNMP view to be associated with this group.
To configure an SNMP group by using the configuration utility
1. In the navigation pane, expand System, expand SNMP, and then click Groups.
2. In the details pane, click Add.
3. In the Create SNMP Group or Configure SNMP Group dialog box, specify values for
the following parameters, which correspond to parameters described in
"Parameters for configuring an SNMP group" as shown:
• Name*—name
• Security Level*—securityLevel
• Read View Name*—readViewName
*A required parameter
4. Click Create or OK, and then click Close.
A message appears in the status bar, stating that the SNMP group has been
configured successfully.
Configuring a User
SNMP users are the SNMP managers that the agents allow to access the MIBs. Each SNMP
user is assigned to an SNMP group.
You need to configure users at the agent and assign each user to a group.
To configure a user by using the NetScaler command line
At a NetScaler command prompt, type the following commands to set the parameters
and verify the configuration:
w add snmp user <name> -group <string> [-authType ( MD5 | SHA ) {-authPasswd } [-
privType ( DES | AES ) {-privPasswd }]]
67
Page 68

Chapter 2 SNMP
w show snmp user <name>
Parameters for configuring an SNMP user
name
The name of the SNMP user.
group
Specifyes the SNMP group name to which the SNMP user will belong.
Example
> add snmp user edocs_user -group edocs_group
Done
> show snmp user edocs_user
1) Name: edocs_user Group:
edocs_group
EngineID: 123abc456abc788 StorageType:
volatile
Status: active
Done
>
authType
The authentication type. Possible values: MD5, SHA.
authPasswd
Enter an authentication password.
privType
The encryption type. Possible values: DES, AES.
privPasswd
The encryption password. Maximum Length: 31
To configure an SNMP user by using the configuration utility
1. In the navigation pane, expand System, expand SNMP, and then click Users.
2. In the details pane, click Add.
3. In the Create SNMP User or Configure SNMP User dialog box, specify values for
the following parameters, which correspond to parameters described in
"Parameters for configuring an SNMP user" as shown:
• Name*—name
• Group Name*—group
• Authentication Type—authType
68
• Authentication Password—authPasswd
• Privacy Type—privType
• Privacy password—privPasswd
Page 69

Citrix NetScaler Administration Guide
*A required parameter
4. Click Create or OK, and then click Close.
A message appears in the status bar, stating that the SNMP user has been
configured successfully.
69
Page 70

Chapter 2 SNMP
70
Page 71

Chapter 3
Audit Logging
Topics:
• Configuring the NetScaler
Appliance for Audit Logging
• Installing and Configuring
the NSLOG Server
• Running the NSLOG Server
• Customizing Logging on the
NSLOG Server
• Default Settings for the Log
Properties
• Sample Configuration File
(audit.conf)
Auditing is a methodical examination or review of a condition
or situation. The Audit Logging feature enables you to log the
Citrix® NetScaler® states and status information collected by
various modules in the kernel and in the user-level daemons.
For audit logging, you have the options to configure SYSLOG,
the native NSLOG protocol, or both.
SYSLOG is a standard protocol for logging. It has two
components─ the SYSLOG auditing module, which runs on the
NetScaler appliance, and the SYSLOG server, which can run on
the underlying FreeBSD operating system (OS) of the
NetScaler appliance or on a remote system. SYSLOG uses user
data protocol (UDP) for the transfer of data.
Similarly, the native NSLOG protocol has two components─ the
NSLOG auditing module, which runs on the NetScaler
appliance, and the NSLOG server, which can run on the
underlying FreeBSD OS of the NetScaler appliance or on a
remote system. NSLOG uses transmission control protocol
(TCP) for transfer of data.
When you run NSLOG or a SYSLOG server, it connects to the
NetScaler appliance. The NetScaler appliance then starts
sending all the log information to the SYSLOG or NSLOG
server, and the server can filter the log entries before storing
them in a log file. An NSLOG or SYSLOG server can receive log
information from more than one NetScaler appliance and a
NetScaler appliance can send log information to more than
one SYSLOG server or NSLOG server.
The log information that a SYSLOG or NSLOG server collects
from a NetScaler appliance is stored in a log file in the form
of messages. These messages typically contain the following
information:
w The IP address of a NetScaler appliance that generated the
log message
w A time stamp
w The message type
w The predefined log levels (Critical, Error, Notice, Warning,
Informational, Debug, Alert, and Emergency)
w The message information
71
Page 72

Chapter 3 Audit Logging
To configure audit logging, you first configure the audit
modules on the NetScaler that involves creating audit policies
and specifying the NSLOG server or SYSLOG server
information. You then install and configure the SYSLOG or the
NSLOG server on the underlying FreeBSD OS of the NetScaler
appliance or on a remote system.
Note: Because SYSLOG is an industry standard for logging
program messages and because various vendors provide
support, this documentation does not include SYSLOG
server configuration information.
The NSLOG server has its own configuration file
(auditlog.conf). You can customize logging on the NSLOG
server system by making additional modifications to the
configuration file (auditlog.conf).
72
Page 73

Citrix NetScaler Administration Guide
Configuring the NetScaler Appliance for Audit Logging
Policies define the SYSLOG or NSLOG protocol, and server actions define what logs are
sent where. For server actions, you specify the system information, which runs the
SYSLOG or the NSLOG server.
The Citrix NetScaler logs the following information related to TCP connections:
w Source port
w Destination port
w Source IP
w Destination IP
w Number of bytes transmitted and received
w Time period for which the connection is open
Note: You can enable TCP logging on individual load balancing vservers. You must
bind the audit log policy to a specific load balancing vserver that you want to log.
Configuring Audit Servers
You can configure audit server actions for different servers and for different log levels.
To configure a SYSLOG server action by using the command line
At the NetScaler command prompt, type the following commands to set the parameters
and verify the configuration:
w add audit syslogAction <name> <serverIP> [-serverPort <port>] -logLevel <logLevel>
[-dateFormat ( MMDDYYYY | DDMMYYYY )]
w show audit syslogAction [<name>]
Example
> add audit syslogaction audit-action1 10.102.1.1 loglevel INFORMATIONAL -dateformat MMDDYYYY
Done
> show audit syslogaction audit-action1
1) Name: audit-action1
Server IP: 10.102.1.1 Port: 514
Loglevel : INFORMATIONAL
Date Format: MMDDYYYY
Time Zone: GMT_TIME
Facility: LOCAL0
Tcp Logging: NONE
ACL Logging: DISABLED
73
Page 74

Chapter 3 Audit Logging
UserDefinedLogging: No
AppFlow export: DISABLED
Done
To configure an NSLOG server action by using the command line
At the NetScaler command prompt, type the following commands to set the parameters
and verify the configuration:
w add audit nslogAction <name> <serverIP> [-serverPort <port>] -logLevel <logLevel> [-
dateFormat ( MMDDYYYY | DDMMYYYY )]
w show audit nslogAction [<name>]
Example
> add audit nslogAction nslog-action1 10.102.1.3 serverport 520 -loglevel INFORMATIONAL -dateFormat
MMDDYYYY
Done
> show nslogAction nslog-action1
1) Name: nslog-action1
Server IP: 10.102.1.3 Port: 520
Loglevel : INFORMATIONAL
Date Format: MMDDYYYY
Time Zone: GMT_TIME
Facility: LOCAL0
Tcp Logging: NONE
ACL Logging: DISABLED
UserDefinedLogging: No
AppFlow export: DISABLED
Done
74
Parameters for configuring auditing servers
name
The name of the SYSLOG server action or NSLOG server action.
serverIP
IP address of the auditing server.
serverPort
Port through which to communicate.
logLevel
Severity levels of messages to be logged. Possible values: ALL, NONE, or one or more
of the following:
w EMERGENCY
w ALERT
w CRITICAL
Page 75

Citrix NetScaler Administration Guide
w ERROR
w WARNING
w NOTICE
w INFORMATION
w DEBUG
dateFormat
Format of the date stamp. Possible values: MMDDYYYY, DDMMYYYY.
logFacility
The Facility value (RFC 3164) assigned to the log message. Uses numerical codes 0 to
7 to indicate the type of message originating from the NetScaler (for example, NS
and VPN). Possible values: LOCAL0 to LOCAL7. Default: LOCAL0.
timeZone
Time zone for the time stamp. Possible values: GMT and Local. Default: Local.
tcp
Log TCP events. Possible values: NONE, ALL.
acl
Log ACL events. Possible values: ENABLED, DISABLED.
userDefinedAuditlog
Enable user-configurable log messages. Possible values: YES, NO.
appflowExport
Export log messages to the AppFlow collectors. Possible values: ENABLED, DISABLED.
Default: DISABLED.
Log levels defined
EMERGENCY
Log errors indicating that the NetScaler is experiencing a critical problem that may
make it unusable.
ALERT
Log problems that are not critical to current operations but that indicate a need for
immediate corrective action to prevent a critical problem.
CRITICAL
Log critical conditions, which do not restrict current operations but may escalate to
a larger problem.
ERROR
Log messages related to failed NetScaler operations.
WARNING
Log issues that may result in critical errors.
NOTICE
Log events specified by the INFORMATION setting, but in greater detail.
75
Page 76

Chapter 3 Audit Logging
INFORMATION
Log actions taken by the NetScaler. This level is useful for troubleshooting problems.
DEBUG
Log extensive, detailed information to help developers troubleshoot problems.
To configure an auditing server action
1. In the navigation pane, expand System, expand Auditing, and then click Policies.
2. In the details pane, on the Servers tab, do one of the following:
• To create a new server action, click Add.
• To modify an existing server action, select the server, and then click Open.
3. In the Create Auditing Server or Configure Auditing Server dialog box, specify
values for the following parameters, which correspond to parameters described in
"Parameters for configuring auditing servers" as shown:
• Name*—name
• IP Address*—serverIP
• Port—serverPort
• Log Levels—logLevel
• Log Facility—logFacility
• Date format—dateFormat
• Time Zone—timeZone
• TCP Logging—tcp
• ACL Logging—acl
• User Configurable Log Messages—userDefinedAuditlog
• AppFlow Export—appflowExport
*A required parameter
4. Click Create or OK, and then click Close.
A message appears in the status bar, stating that the auditing server has been
configured successfully.
Configuring Audit Policies
The audit policies define the SYSLOG or NSLOG protocol.
To configure a SYSLOG policy by using the command line
76
At the NetScaler command prompt, type the following commands to set the parameters
and verify the configuration:
Page 77

Citrix NetScaler Administration Guide
w add audit syslogPolicy <name> <rule> <action>
w show audit syslogPolicy [<name>]
Example
> add audit syslogpolicy syslog-pol1 ns_true auditaction1
Done
> show audit syslogpolicy syslog-pol1
1) Name: syslog-pol1 Rule: ns_true
Action: audit-action1
Done
To configure an NSLOG policy by using the command line
At the NetScaler command prompt, type the following commands to set the parameters
and verify the configuration:
w add audit nslogPolicy <name> <rule> <action>
w show audit nslogPolicy [<name>]
Example
> add audit nslogPolicy nslog-pol1 ns_true nslogaction1
Done
> show audit nslogPolicy nslog-pol1
1) Name: nslog-pol1 Rule: ns_true
Action: nslog-action1
Done
Parameters for configuring audit policies
name
The name of NSLOG policy or SYSLOG policy.
rule
The name of the rule or expression that the policy will use. It currently supports only
the rule "ns_true."
This parameter is only for the command line.
In the configuration utility ns_true is internally assigned as a rule for the SYSLOG or
the NSLOG policy.
action
SYSLOG server action or the NSLOG server action. NSLOG server action is bind to a
NSLOG audit policy and SYSLOG server action is bind to a SYSLOG audit policy.
77
Page 78

Chapter 3 Audit Logging
To configure an audit server policy
1. In the navigation pane, expand System, expand Auditing, and then click Policies.
2. In the details pane, on the Policies tab, do one of the following:
• To create a new policy, click Add.
• To modify an existing policy, select the policy, and then click Open.
3. In the Create Auditing Policy or Configure Auditing Policy dialog box, specify
values for the following parameters, which correspond to parameters described in
"Parameters for configuring auditing policies" as shown:
• Name* ─ name
• Server* ─ action
*A required parameter
4. Click Create or OK, and then click Close.
A message appears in the status bar, stating that the auditing policy has been
configured successfully.
Binding the Audit Policies Globally
You must globally bind the audit log policies to enable logging of all Citrix® NetScaler
system events. By defining the priority level, you can set the evaluation order of the
audit server logging. Priority 0 is the highest and is evaluated first. The higher the
priority number, the lower is the priority of evaluation.
To configure a SYSLOG policy by using the command line
w bind system global [<policyName> [-priority <positive_integer>]]
w sh system global
Example
> bind system global nslog-pol1 -priority 20
Done
> sh system global
1) Policy Name: nslog-pol1 Priority: 20
2) Policy Name: syslog-pol1 Priority: 50
3) Policy Name: nslogpol9 Priority: 100
Done
Parameters for binding the audit policies globally
®
78
policyName
The name of the NSLOG or SYSLOG policy.
Page 79

Citrix NetScaler Administration Guide
priority
A numeric value that indicates when this policy is evaluated relative to others. A
lower priority is evaluated before a higher one.
To globally bind the audit policy
1. In the navigation pane, expand System, expand Auditing, and then click Policies.
2. In the details pane, on the Policies tab, click Global Bindings.
3. In the Bind/Unbind Auditing Global Policies dialog box, click Insert Policy.
4. Select the policy from the drop-down list that appears under Policy Name, and
then click OK.
A message appears in the status bar, stating that the auditing policy has been
globally bound.
Configuring Policy-Based Logging
You can configure policy-based logging for rewrite and responder policies. Audit
messages are then logged in a defined format when the rule in a policy evaluates to
TRUE. To configure policy-based logging, you configure an audit-message action that
uses default syntax expressions to specify the format of the audit messages, and
associate the action with a policy. The policy can be bound either globally or to a load
balancing or content switching virtual server. You can use audit-message actions to log
messages at various log levels, either in syslog format only or in both syslog and
newnslog formats.
Pre Requisites
w User Configurable Log Messages (userDefinedAuditlog) option is enabled for when
configuring the audit action server to which you want to send the logs in a defined
format. For more information about enabling policy-based logging on a audit action
server, see Binding the Audit Policies Globally on page 78.
w The related audit policy is bound to system global. For more information about
binding audit policies to system global, see Binding the Audit Policies Globally on
page 78.
Configuring an Audit Message Action
You can configure audit message actions to log messages at various log levels, either in
syslog format only or in both syslog and newnslog formats. Audit-message actions use
expressions to specify the format of the audit messages.
To create an audit message action by using the NetScaler command line
At the NetScaler command prompt, type:
add audit messageaction <name> <logLevel> <stringBuilderExpr> [-logtoNewnslog (YES|
NO)] [-bypassSafetyCheck (YES|NO)]
79
Page 80

Chapter 3 Audit Logging
To modify or remove an audit message action by using the NetScaler
command line
w To modify an audit message action, type the set audit messageaction command,
the name of the action, and the parameters to be changed, with their new values.
w To remove an audit message action, type the rm audit messageaction command and
the name of the action.
Example
> add audit messageaction log-act1 CRITICAL
'"Client:"+CLIENT.IP.SRC+" accessed "+H
TTP.REQ.URL' -bypassSafetyCheck YES
Done
> show audit messageaction log-act1
1) Name: log-act1
LogMsgStr: "Client:"+CLIENT.IP.SRC+"
accessed "+HTTP.REQ.URL
Loglevel:CRITICAL
Log2Newnslog:NO
BypassSafetyCheck : YES
Hits: 0
Undef Hits: 0
Action Reference Count: 0
Done
80
Parameters for configuring an audit message action
name
The name of the audit message action. The name can begin with a letter, number, or
the underscore symbol, and can consist of up to 127 characters including letters,
numbers, and hyphen (-), period (.) pound (#), space ( ), at sign (@), equal sign (=),
colon (:), and underscore (_) symbols.
logLevel
The log level for the message action. Possible values: EMERGENCY, ALERT, CRITICAL,
ERROR, WARNING, NOTICE, INFORMATIONAL, DEBUG, NONE.
stringBuilderExpr
The expression that defines the format of the log message. For a complete
description of NetScaler expressions, see the Citrix NetScaler Policy Configuration
and Reference Guide. For a link to the guide, see the Documentation Library.
bypassSafetyCheck
Bypass the safety check and allow unsafe expressions. Possible values: YES, NO.
Default: NO.
logtoNewnslog
Log messages in newnslog format in addition to logging them in syslog format.
Possible values: YES, NO. Default: NO.
Page 81

Citrix NetScaler Administration Guide
To configure an audit message action by using the configuration utility
1. In the navigation pane, expand System, expand Auditing, and then click Message
Actions.
2. In the details pane, do one of the following:
• To create a new audit message action, click Add.
• To modify an existing audit message action, select the action, and then click
Open.
3. In the Create Message Action or Configure Message Action dialog box, specify
values for the following parameters, which correspond to parameters described in
“Parameters for configuring an audit message action” as shown:
• Name*—name
• Log Level*—logLevel
• Log Message—stringBuilderExpr
• Bypass Safety Check—bypassSafetyCheck (To specify YES, select the check box.)
• Log in newnslog—logtoNewnslog (To specify YES, select the check box.)
*A required parameter
4. Click Create or OK, and then click Close. The audit message action that you
configured appears in the details pane.
Binding Audit Message Action to a Policy
After you have created an audit message action, you must bind it to a rewrite or
responder policy. For more information about binding log message actions to a rewrite
or responder policy, see the "Rewrite" or the "Responder" chapter of the Citrix
NetScaler Application Security Guide. For a link to the guide, see the Documentation
Library.
Installing and Configuring the NSLOG Server
During installation, the NSLOG server executable file (auditserver) is installed along
with other files. The auditserver executable file includes options for performing several
actions on the NSLOG server, including running and stopping the NSLOG server. In
addition, you use the auditserver executable to configure the NSLOG server with the IP
addresses of the NetScaler appliances from which the NSLOG server will start collecting
logs. Configuration settings are applied in the NSLOG server configuration file
(auditlog.conf).
Then, you start the NSLOG server by executing the auditserver executable. The NSLOG
server configuration is based on the settings in the configuration file. You can further
customize logging on the NSLOG server system by making additional modifications to
the NSLOG server configuration file (auditlog.conf).
The following table lists the operating systems on which the NSLOG server is supported.
81
Page 82

Chapter 3 Audit Logging
Table 3-1. Supported Platforms for the NSLOG Server
Operating system Software requirements
Windows
Linux
FreeBSD FreeBSD 4.9
The minimum hardware specifications for the platform running the NSLOG server are as
follows:
w Processor- Intel x86 ~501 megahertz (MHz)
w RAM - 512 megabytes (MB)
w Controller - SCSI
w Windows XP Professional
w Windows Server 2003
w Windows 2000/NT
w Red Hat Enterprise Linux AS release 4
(Nahant) - Linux version 2.6.9-5.EL
w Red Hat 3.4.3-9.EL4 - Linux version
2.6.9-5.ELsmp
w Red Hat Linux 3.2.2-5 - Linux version
2.4.20-8
Installing NSLOG Server on the Linux Operating System
Copy the installation files from the NetScaler product CD or download them from
ftp.netscaler.com. Log on to the Linux system as an administrator. Use the following
procedure to install the NSLOG server executable files on the system.
To install the NSLOG server package on a Linux operating system
1. At a Linux command prompt, type the following command to copy the
NSauditserver.rpm file to a temporary directory:
cp <path_to_cd>/Utilities/auditserver/Linux/NSauditserver.rpm /tmp
2. Type the following command to install the NSauditserver.rpm file:
rpm -i NSauditserver.rpm
This command extracts the files and installs them in the following directories:
82
Page 83

Citrix NetScaler Administration Guide
/usr/local/netscaler/etc
•
/usr/local/netscaler/bin
•
/usr/local/netscaler/samples
•
To uninstall the NSLOG server package on a Linux operating system
1. At a command prompt, type the following command to uninstall the audit server
logging feature:
rpm -e NSauditserver
2. For more information about the NSauditserver RPM file, use the following command:
rpm -qpi *.rpm
3. To view the installed audit server files use the following command:
rpm -qpl *.rpm
*.rpm: Specifies the file name.
Installing NSLOG Server on the FreeBSD Operating System
Before you can install the NSLOG server, you have to copy the NSLOG package from the
NetScaler product CD or download it from www.citrix.com. The NSLOG package has the
following name format AuditServer _<release number>-<build number>.zip
(for example, AuditServer_9.3-51.5.zip). This package contains NSLOG
installation packages for all supported platforms.
Note: NSLOG server is not supported on the underlying FreeBSD OS of the
NetScaler appliance.
To download NSLOG package from www.Citrix.com
1. In a web browser, go to www.citrix.com.
2. In the menu bar, click Log In.
3. Enter your login credentials, and then click Log In.
4. In the menu bar, click Downloads.
5. Search to find the page that provides the appropriate release number and build.
6. On that page, under Audit Servers, click Download to download the NSLOG
package, having the format AuditServer_<release number>-<build
number>.zip , to your local system (for example,
AuditServer_9.3-51.5.zip ).
83
Page 84

Chapter 3 Audit Logging
To install the NSLOG server package on a FreeBSD operating system
1. On the system to which you have downloaded the NSLOG package
AuditServer_<release number>-<build number>.zip (for example,
AuditServer_9.3-51.5.zip), extract the FreeBSD NSLOG server package
audserver_bsd-<release number>-<build number>.tgz (for example,
audserver_bsd-9.3-51.5.tgz) from the package.
2. Copy the FreeBSD NSLOG server package audserver_bsd-<release number><build number>.tgz (for example, audserver_bsd-9.3-51.5.tgz) to a
directory on a system running FreeBSD OS.
3. At a command prompt for the directory into which the FreeBSD NSLOG server
package was copied, run the following command to install the package:
pkg_add audserver_bsd-<release number>-<build number>.tgz
Example
pkg_add audserver_bsd-9.3-51.5.tgz
The following directories are extracted:
• <root directory extracted from the FreeBSD NSLOG server package tgz file>
\netscaler\bin (for example, /var/auditserver/netscaler/bin)
• <root directory extracted from the FreeBSD NSLOG server package tgz file>
\netscaler\etc (for example, /var/auditserver/netscaler/etc)
• <root directory extracted from the FreeBSD NSLOG server package tgz file>
\netscaler\samples (for example, /var/auditserver/samples)
4. At a command prompt, type the following command to verify that the package is
installed:
pkg_info | grep NSaudserver
To uninstall the NSLOG server package on a FreeBSD operating system
At a command prompt, type:
pkg_delete NSaudserver
Installing NSLOG Server Files on the Windows Operating System
Before you can install the NSLOG server, you have to copy the NSLOG package from the
NetScaler product CD or download it from www.citrix.com. The NSLOG package has the
following name format AuditServer _<release number>-<build number>.zip
84
Page 85

Citrix NetScaler Administration Guide
(for example, AuditServer_9.3-51.5.zip). This package contains NSLOG
installation packages for all supported platforms.
To download NSLOG package from www.Citrix.com
1. In a web browser, go to www.citrix.com.
2. In the menu bar, click Log In.
3. Enter your login credentials, and then click Log In.
4. In the menu bar, click Downloads.
5. Search to find the page that provides the appropriate release number and build.
6. On that page, under Audit Servers, click Download to download the NSLOG
package, having the format AuditServer_<release number>-<build
number>.zip , to your local system (for example,
AuditServer_9.3-51.5.zip ).
To install NSLOG server on a Windows operating system
1. On the system, where you have downloaded the NSLOG package
AuditServer_<release number>-<build number>.zip (for example,
AuditServer_9.3-51.5.zip), extract audserver_win-<release number><build number>.zip (for example, audserver_win-9.3-51.5.zip) from
the package.
2. Copy the extracted file audserver_<release number>-<build
number>.zip (for example, audserver_win-9.3-51.5.zip ) to a Windows
system on which you want to install the NSLOG server.
3. Unzip the audserver_<release number>-<build number>.zip file (for
example, audserver_win-9.3-51.5.zip ).
4. The following directories are extracted:
a. <root directory extracted from the Windows NSLOG server package zip file>\bin
(for example, C:\audserver_win-9.3-51.5\bin )
b. <root directory extracted from the Windows NSLOG server package zip file>\etc
( for example, C:\audserver_win-9.3-51.5\ etc )
c. < root directory extracted from the Windows NSLOG server package zip file >
\samples (for example, C:\audserver_win-9.3-51.5\ samples )
5. At a command prompt, run the following command from the <root directory
extracted from the Windows NSLOG server package zip file>\bin path:
audserver -install -f <directorypath>\auditlog.conf
<directorypath>: Specifies the path to the configuration file ( auditlog.conf ).
By default, log.conf is under <root directory extracted from Windows NSLOG
server package zip file>\samples directory. But you can copy
auditlog.conf to your desired directory.
85
Page 86

Chapter 3 Audit Logging
To uninstall the NSLOG server on a Windows operating system
At a command prompt, run the following from the <root directory extracted
from Windows NSLOG server package zip file>\bin path:
audserver -remove
NSLOG Server Command Options
The following table describes the commands that you can use to configure audit server
options.
Table 3-2. Audit Server Options
Audit server commands Specifies
audserver -help The available Audit Server options.
audserver -addns -f <path to
configuration file>
audserver -verify -f <path to
configuration file>
audserver -start -f <path to
configuration file>
audserver -stop
(Linux only)
The system that gathers the log
transaction data.
You are prompted to enter the IP address
of the NetScaler appliance.
Enter the valid user name and password.
Check for syntax or semantic errors in
the configuration file (for example,
auditlog.conf).
Start audit server logging based on the
settings in the configuration file
(auditlog.conf ).
Linux only: To start the audit server as a
background process, type the ampersand
sign (&) at the end of the command.
Stops audit server logging when audit
server is started as a background
process. Alternatively, use the Ctrl+C key
to stop audit server logging.
86
audserver -install -f <path to
configuration file>
(Windows only)
Installs the audit server logging client as
a service on Windows.
Page 87

Citrix NetScaler Administration Guide
Audit server commands Specifies
audserver -startservice
(Windows Only)
audserver -stopservice
(Windows Only)
audserver -remove Removes the audit server logging service
Run the audserver command from the directory in which the audit server executable is
present:
w On Windows: \ns\bin
Start the audit server logging service,
when you enter this command at a
command prompt.
You can also start audit server logging
from Start > Control Panel > Services.
Note: Audit server logging starts by
using the configuration settings in the
configuration file, for example,
auditlog.conf file specified in the
audit server install option.
Stop audit server logging.
from the registry.
w On Solaris and Linux: \usr\local\netscaler\bin
The audit server configuration files are present in the following directories:
w On Windows: \ns\etc
w On Linux: \usr\local\netscaler\etc
The audit server executable is started as ./auditserver in Linux and FreeBSD.
Adding the NetScaler Appliance IP Addresses on the NSLOG Server
In the configuration file (auditlog.conf), add the IP addresses of the NetScaler
appliances whose events must be logged.
To add the IP addresses of the NetScaler appliance
At a command prompt, type the following command:
audserver -addns -f <directorypath>\auditlog.conf
<directorypath>: Specifies the path to the configuration file (auditlog.conf).
87
Page 88

Chapter 3 Audit Logging
You are prompted to enter the information for the following parameters:
NSIP: Specifies the IP address of the NetScaler appliance, for example, 10.102.29.1.
Userid: Specifies the user name, for example, nsroot.
Password: Specifies the password, for example, nsroot.
If you add multiple NetScaler IP addresses (NSIP), and later you do not want to log all
of the NetScaler appliance event details, you can delete the NSIPs manually by
removing the NSIP statement at the end of the auditlog.conf file. For a high
availability (HA) setup, you must add both primary and secondary NetScaler IP
addresses to auditlog.conf by using the audserver command. Before adding the IP
address, make sure the user name and password exist on the system.
Verifying the NSLOG Server Configuration File
Check the configuration file (audit log.conf ) for syntax correctness to enable
logging to start and function correctly.
To verify configuration, at a command prompt, type the following command:
audserver -verify -f <directorypath>\auditlog.conf
<directorypath>: Specifies the path to the configuration file (audit log.conf).
Running the NSLOG Server
To start audit server logging
Type the following command at a command prompt:
audserver -start -f <directorypath>\auditlog.conf
<directorypath>: Specifies the path to the configuration file (audit log.conf).
To stop audit server logging that starts as a background process in FreeBSD or Linux
Type the following command:
audserver -stop
To stop audit server logging that starts as a service in Windows
Type the following command:
88
Page 89

Citrix NetScaler Administration Guide
audserver -stopservice
Customizing Logging on the NSLOG Server
You can customize logging on the NSLOG server by making additional modifications to
the NSLOG server configuration file (log.conf). Use a text editor to modify the
log.conf configuration file on the server system.
To customize logging, use the configuration file to define filters and log properties.
w Log filters. Filter log information from a NetScaler appliance or a set of NetScaler
appliances.
w Log properties. Each filter has an associated set of log properties. Log properties
define how to store the filtered log information.
Creating Filters
You can use the default filter definition located in the configuration file (audit
log.conf ), or you can modify the filter or create a new filter. You can create more
than one log filter.
Note: For consolidated logging, if a log transaction occurs for which there is no filter
definition, the default filter is used (if it is enabled.) The only way you can configure
consolidated logging of all the Citrix NetScaler appliances is by defining the default filter.
To create a filter
At the command prompt, type the following command in the configuration file
( auditlog.conf) :
filter <filterName> [IP <ip>] [NETMASK <mask>] [ON | OFF]
<filterName>: Specify the name of the filter (maximum of 64 alphanumeric characters).
<ip>: Specify the IP addresses.
<mask>: Specify the subnet mask to be used on a subnet.
Specify ON to enable the filter to log transactions, or specify OFF to disable the filter.
If no argument is specified, the filter is ON
Examples
filter F1 IP 192.168.100.151 ON
To apply the filter F2 to IP addresses 192.250.100.1 to
192.250.100.254:
filter F2 IP 192.250.100.0 NETMASK 255.255.255.0 ON
89
Page 90

Chapter 3 Audit Logging
filterName is a required parameter if you are defining a filter with other optional
parameters, such as IP address, or the combination of IP address and Netmask.
Specifying Log Properties
Log properties associated with the filter are applied to all the log entries present in the
filter. The log property definition starts with the key word BEGIN and ends with END as
illustrated in the following example:
BEGIN <filtername>
logFilenameFormat ...
logDirectory ...
logInterval ...
logFileSizeLimit ....
END
Entries in the definition can include the following:
w LogFilenameFormat specifies the file name format of the log file. The name of the
file can be of the following types:
• Static: A constant string that specifies the absolute path and the file name.
• Dynamic: An expression that includes the following format specifiers:
w Date (%{format}t)
w % creates file name with NSIP
Example
LogFileNameFormat Ex%{%m%d%y}t.log
This creates the first file name as Exmmddyy.log. New files are named:
Exmmddyy.log.0, Exmmddyy.log.1, and so on. In the following example, the
new files are crated when the file size reaches 100MB.
Example
LogInterval size
LogFileSize 100
LogFileNameFormat Ex%{%m%d%y}t
Caution: The date format %t specified in the LogFilenameFormat parameter
overrides the log interval property for that filter. To prevent a new file being created
every day instead of when the specified log file size is reached, do not use %t in
the LogFilenameFormat parameter.
w logDirectory specifies the directory name format of the log file. The name of the
file can be either of the following:
90
• Static: Is a constant string that specifies the absolute path and file name.
• Dynamic: Is an expression containing the following format specifiers:
Page 91

Citrix NetScaler Administration Guide
w Date (%{format}t)
w % creates directory with NSIP
The directory separator depends on the operating system. In Windows, use the
directory separator \.
Example:
LogDirectory dir1\dir2\dir3
In the other operating systems (Linux, FreeBsd, Mac, etc.), use the directory
separator /.
w LogInterval specifies the interval at which new log files are created. Use one of the
following values:
• Hourly: A file is created every hour. Default value.
• Daily: A file is created very day at midnight.
• Weekly: A file is created every Sunday at midnight.
• Monthly : A file is created on the first day of the month at midnight.
• None: A file is created only once, when audit server logging starts.
• Size: A file is created only when the log file size limit is reached.
Example
LogInterval Hourly
w LogFileSizeLimit specifies the maximum size (in MB) of the log file. A new file is
created when the limit is reached.
Note that you can override the loginterval property by assigning size as its value.
The default LogFileSizeLimit is 10 MB.
Example
LogFileSizeLimit 35
Default Settings for the Log Properties
The following is an example of the default filter with default settings for the log
properties:
begin default
logInterval Hourly
logFileSizeLimit 10
logFilenameFormat auditlog%{%y%m%d}t.log
end default
Following are two examples of defining the default filters:
91
Page 92

Chapter 3 Audit Logging
Example 1
Filter f1 IP 192.168.10.1
This creates a log file for NSI 192.168.10.1 with the default values of the log in effect.
Example 2
Filter f1 IP 192.168.10.1
begin f1
logFilenameFormat logfiles.log
end f1
This creates a log file for NSIP 192.168.10.1. Since the log file name format is
specified, the default values of the other log properties are in effect.
Sample Configuration File (audit.conf)
Following is a sample configuration file:
##############################
# This is the Auditserver configuration file
# Only the default filter is active
# Remove leading # to activate other filters
##############################
MYIP <NSAuditserverIP>
MYPORT 3023
# Filter filter_nsip IP <Specify the NetScaler IP address to
filter on > ON
# begin filter_nsip
# logInterval Hourly
# logFileSizeLimit 10
# logDirectory logdir\%A\
# logFilenameFormat nsip%{%d%m%Y}t.log
# end filter_nsip
Filter default
begin default
logInterval Hourly
logFileSizeLimit 10
logFilenameFormat auditlog%{%y%m%d}t.log
end default
92
Page 93

Chapter 4
Web Server Logging
Topics:
• Configuring the NetScaler
Appliance for Web Server
Logging
• Installing and Configuring
the Client System for Web
Server Logging
• Running the NSWL Client
• Customizing Logging on the
NSWL Client System
• Sample Configuration File
• Arguments for Defining a
Custom Log Format
• Time Format Definition
You can use the Web server logging feature to send logs of
HTTP and HTTPS requests to a client system for storage and
retrieval. This feature has two components: the Web log
server, which runs on the Citrix® NetScaler® appliance, and
the NetScaler Web Logging (NSWL) client, which runs on the
client system. When you run the client, it connects to the
NetScaler. The NetScaler buffers the HTTP and HTTPS request
log entries before sending them to the NSWL client, and the
client can filter the entries before storing them. You can log
HTTP and HTTPS requests for all of your Web servers on one
NSWL client system.
To configure Web server logging, you first enable the Web
logging feature on the NetScaler and configure the size of the
buffer for temporarily storing the log entries. Then, you
install NSWL on the client system. You then add the NetScaler
IP address (NSIP) to the NSWL configuration file. You are now
ready to start the NSWL client to begin logging. You can
customize Web server logging by making additional
modifications to the NSWL configuration file (log.conf).
93
Page 94

Chapter 4 Web Server Logging
Configuring the NetScaler Appliance for Web Server Logging
On the NetScaler appliance you need to enable the Web Server Logging feature, and
you can modify the size of the buffer that stores the logged information before sending
the logged information to the NetScaler Web Logging (NSWL) client.
Enabling or Disabling Web Server Logging
Web server logging is enabled by default.
To enable or disable Web server logging by using the NetScaler command line
At the NetScaler command prompt, type the following relevant commands to add or
remove Web server logging and verify the configuration:
w enable ns feature WL
w disable ns feature WL
w sh ns feature
Example
> enable ns feature WL
Done
sh ns feature
Feature Acronym Status
------- ------- ------
1) Web Logging WL ON
2) Surge Protection SP ON
.
.
.
24) NetScaler Push push OFF
Done
>
> disable ns feature WL
Done
sh ns feature
Feature Acronym Status
------- ------- ------
1) Web Logging WL OFF
2) Surge Protection SP ON
.
.
.
24) NetScaler Push push OFF
94
Page 95

Done
To enable or disable Web server logging by using the configuration utility
1. In the navigation pane, expand System, and then select Settings.
2. In the details pane, under Modes and Features, click Change advanced features.
3. In the Configure Advanced Features dialog box, select the Web Logging check box
to enable the Web logging feature, or clear the check box to disable the feature.
4. Click OK.
5. In the Enable/Disable Feature(s) dialog box, click Yes. A message appears in the
status bar, stating that the feature has been enabled or disabled.
Modifying the Default Buffer Size
You can change the default buffer size of 16 megabytes (MB) for Web server logging to
suit your requirements. To activate your modification, you must disable and reenable
Web server logging.
Citrix NetScaler Administration Guide
To modify the buffer size by using the NetScaler command line
At the NetScaler command prompt, type the following commands to modify the buffer
size and verify the configuration:
w set weblogparam-bufferSizeMB <size>
w sh weblogparam
Example
> set weblogparam -bufferSizeMB 32
> sh weblogparam
Web Logging parameters:
Log buffer size: 32MB
Done
Parameter for modifying the buffer size
Buffer Size
Memory (in megabytes) allocated for buffering the HTTP and HTTPS request log
entries before sending them to the NSWL client.
95
Page 96

Chapter 4 Web Server Logging
To modify the buffer size by using the configuration utility
1. In the navigation pane, expand System, and then click Settings.
2. In the details pane, under Settings, click Change global system settings.
3. In the Configure Global Settings dialog box, under Web Logging, enter a value in
the Buffer_Size (in MBytes) text box (for example, 32).
4. Click OK.
Installing and Configuring the Client System for Web Server Logging
During installation, the NSWL client executable file (nswl) is installed along with other
files. The nswl executable file includes options for performing several actions on the
NSWL client, including running and stopping the NSWL client. In addition, you use the
nswl executable to configure the NSWL client with the IP addresses of the NetScaler
appliances from which the NSWL client will start collecting logs. Configuration settings
are applied in the NSWL client configuration file (log.conf).
Then, you start the NSWL client by executing the nswl executable. The NSWL client
configuration is based on the settings in the configuration file. You can further
customize logging on the NSWL client system by making additional modifications to the
NSLOG server configuration file (auditlog.conf).
The following table lists the operating systems on which the NSWL client is supported.
Table 4-1. Supported Platforms for the NSWL Client
Operating system Version
Windows
Mac OS Mac OS 8.6 or later
Linux
w Windows XP Professional
w Windows Server 2003
w Windows 2000/NT
w Windows Server 2008
w Windows Server 2008 R2
w RedHat Linux 4 or later
w SUSE Linux Enterprise 9.3 or later
96
Solaris Solaris Sun OS 5.6 or later
Page 97

Citrix NetScaler Administration Guide
Operating system Version
FreeBSD FreeBSD 6.3 or later
The following table describes the minimum hardware specifications for the platform
running the NSWL client.
Table 4-2. Minimum Hardware Specification for Platforms Running the NSWL Client
Operating system Hardware requirements
For Windows / Linux / FreeBSD • Processor- Intel x86 ~501 megahertz
(MHz)
• RAM - 512 megabytes (MB)
• Controller - SCSI
For Solaris 2.6 • Processor - UltraSPARC-IIi 400 MHz
• RAM - 512 MB
• Controller - SCSI
If the NSWL client system cannot process the log transaction because of a CPU
limitation, the Web log buffer overruns and the logging process reinitiates.
Caution: Reinitiation of logging can result in loss of log transactions.
To temporarily solve a NSWL client system bottleneck caused by a CPU limitation, you
can tune the Web server logging buffer size on the NetScaler appliance. To solve the
problem, you need a client system that can handle the site's throughput.
Installing NSWL Client on a Solaris Operating System
Copy the installation files from the NetScaler product CD or download them from
ftp.netscaler.com. Log on to the Solaris system as an adminstrator. Use the following
procedure to install the NSWL executable and the other files on the system.
To install the NSWL client package on a Solaris operating system
1. At a command prompt, copy the NSweblog.tar file into a temporary directory using
the command:
cp <path_to_cd>/Utilities/weblog/Solaris/NSweblog.tar /tmp
2. Change to the temporary directory:
97
Page 98

Chapter 4 Web Server Logging
cd /tmp
3. Extract the files from the *.tar file with the following command:
tar xvf NSweblog.tar
A directory NSweblog is created in the temporary directory, and the files are
extracted to the NSweblog directory.
4. Install the package with the following command:
pkgadd -d
The list of available packages appears. In the following example, one NSweblog
package is shown:
1 NSweblog NetScaler Weblogging
(SunOS,sparc) 7.0
5. You are prompted to select the packages. Select the package number of the
NSweblog to be installed.
After you select the package number and press Enter, the files are extracted and
installed in the following directories:
• /usr/local/netscaler/etc
• /usr/local/netscaler/bin
• /usr/local/netscaler/samples
6. At a command prompt, type the following command to check whether the package
is installed:
pkginfo | grep NSweblog
To uninstall the NSWL client package on a Solaris operating system
At a command prompt, type:
pkgrm NSweblog
Installing NSWL Client on a Linux Operating System
Copy the installation files from the NetScaler product CD or download them from
ftp.netscaler.com. Log on to the Linux system as an administrator. Use the following
procedure to install the NSWL executable and the other files on the system.
To install the NSWL client package on a Linux operating system
98
1. At a command prompt, copy the NSweblog.rpm file into a temporary directory:
Page 99

Citrix NetScaler Administration Guide
cp <path_to_cd>/Utilities/weblog/Linux/NSweblog.rpm /tmp
2. To install the NSWL executable, use the following command:
rpm -i NSweblog.rpm
This command extracts the files and installs them in the following directories.
• /usr/local/netscaler/etc
• /usr/local/netscaler/bin
• /usr/local/netscaler/samples
To uninstall the NSWL client package on a Linux operating system
At a command prompt, type:
rpm -e NSweblog
To get more information about the NSweblog RPM file
At a command prompt, type:
rpm -qpi *.rpm
To view the installed Web server logging files
At a command prompt, type:
rpm -qpl *.rpm
Installing NSWL Client on a FreeBSD Operating System
Copy the installation files from the NetScaler product CD or download them from
ftp.netscaler.com. Log on to the FreeBSD system as an administrator. Use the following
procedure to install the NSWL executable and the other files on the system.
To install the NSWL client package on a FreeBSD operating system
1. At a command prompt, copy the NSweblog.tgz file into a temporary directory:
cp <path_to_cd>/Utilities/weblog/Freebsd/NSweblog.tgz /tmp
2. Change to the temporary directory:
cd /tmp
3. Install the package using the following command:
pkg_add NSweblog.tgz
99
Page 100

Chapter 4 Web Server Logging
This command extracts the files and installs them in the following directories.
• /usr/local/netscaler/etc
• /usr/local/netscaler/bin
• /usr/local/netscaler/samples
4. To verify that the package is installed, use the following command:
pkg_info | grep NSweblog
To uninstall the NSWL client package on a FreeBSD operating system
At a command prompt, type:
pkg_delete NSweblog
Installing NSWL Client on a Mac OS Operating System
Copy the installation files from the NetScaler product CD or download them from
ftp.netscaler.com. Log on to the Mac OS operating system as an administrator. Use the
following procedure to install the NSWL executable and the other files on the system.
To install the NSWL client package on a Mac OS operating system
1. At a command prompt, copy the NSweblog.tgz file into a temporary directory with
the following command:
cp <path_to_cd>/Utilities/weblog/macos/NSweblog.tgz /tmp
2. Change to the temporary directory:
cd /tmp
3. To install the package, use the pkg_add command:
pkg_add NSweblog.tgz
This command extracts the files and installs them in the following directories:
• /usr/local/netscaler/etc
• /usr/local/netscaler/bin
• /usr/local/netscaler/samples
4. To verify that the package is installed, use the following command:
pkg_info | grep NSweblog
100
 Loading...