

Page 1

Citrix NetScaler
Quick Start Guide: 7000 Platform
Citrix® NetScaler® 9.1
Page 2

Copyright and Trademark Notice
© CITRIX SYSTEMS, INC., 2009. ALL RIGHTS RESERVED. NO PART OF THIS DOCUMENT MAY BE REPRODUCED OR
TRANSMITTED IN ANY FORM OR BY ANY MEANS OR USED TO MAKE DERIVATIVE WORK (SUCH AS
TRANSLATION, TRANSFORMATION, OR ADAPTATION) WITHOUT THE EXPRESS WRITTEN PERMISSION OF CITRIX
SYSTEMS, INC.
ALTHOUGH THE MATERIAL PRESENTED IN THIS DOCUMENT IS BELIEVED TO BE ACCURATE, IT IS PRESENTED
WITHOUT WARRANTY OF ANY KIND, EXPRESS OR IMPLIED. USERS MUST TAKE ALL RESPONSIBILITY FOR THE
USE OR APPLICATION OF THE PRODUCT(S) DESCRIBED IN THIS MANUAL.
CITRIX SYSTEMS, INC. OR ITS SUPPLIERS DO NOT ASSUME ANY LIABILITY THAT MAY OCCUR DUE TO THE USE
OR APPLICATION OF THE PRODUCT(S) DESCRIBED IN THIS DOCUMENT. INFORMATION IN THIS DOCUMENT IS
SUBJECT TO CHANGE WITHOUT NOTICE. COMPANIES, NAMES, AND DATA USED IN EXAMPLES ARE FICTITIOUS
UNLESS OTHERWISE NOTED.
The following information is for FCC compliance of Class A devices: This equipment has been tested and found to comply with the
limits for a Class A digital device, pursuant to part 15 of the FCC rules. These limits are designed to provide reasonable protection
against harmful interference when the equipment is operated in a commercial environment. This equipment generates, uses, and can
radiate radio-frequency energy and, if not installed and used in accordance with the instruction manual, may cause harmful
interference to radio communications. Operation of this equipment in a residential area is likely to cause harmful interference, in
which case users will be required to correct the interference at their own expense.
Modifying the equipment without Citrix' written authorization may result in the equipment no longer complying with FCC
requirements for Class A digital devices. In that event, your right to use the equipment may be limited by FCC regulations, and you
may be required to correct any interference to radio or television communications at your own expense.
You can determine whether your equipment is causing interference by turning it off. If the interference stops, it wa s probab ly caused
by the NetScaler Request Switch™ 9000 Series equipment. If the NetScaler equipment causes interference, try to correct the
interference by using one or more of the following measures:
Move the NetScaler equipment to one side or the other of your equipment.
Move the NetScaler equipment farther away from your equipment.
Plug the NetScaler equipment into an outlet on a different circuit from your equipment. (Make sure the NetScaler equipment and
your equipment are on circuits controlled by different circuit breakers or fuses.)
Modifications to this product not authorized by Citrix Systems, Inc., could void the FCC approval and negate your authority to
operate the product.
BroadCom is a registered trademark of BroadCom Corporation. Fast Ramp, NetScaler, WANScaler, Citrix XenApp, and NetScaler
Request Switch are trademarks of Citrix Systems, Inc. Linux is a registered trademark of Linus Torvalds. Internet Explorer,
Microsoft, PowerPoint, Windows and W indows product names such as Windows NT are trademarks or registered trademarks of the
Microsoft Corporation. NetScape is a registered trademark of Netscape Communications Corporation. Red Hat is a trademark of Red
Hat, Inc. Sun and Sun Microsystems are registered trademarks of Sun Microsystems, Inc. Other brand and product names may be
registered trademarks or trademarks of their respective holders.
Software covered by the following third party copyrights may be included with this product and will also be subject to the software
license agreement: Copyright 1998 © Carnegie Mellon University. All rights reserved. Copyright © David L. Mills 1993, 1994.
Copyright © 1992, 1993, 1994, 1997 Henry Spencer. Copyright © Jean-loup Gailly and Mark Adler. Copyright © 1999, 2000 by Jef
Poskanzer. All rights reserved. Copyright © Markus Friedl, Theo de Raadt, Niels Provos, Dug Song, Aaron Campbell, Damien
Miller, Kevin Steves. All rights reserved. Copyright © 1982, 1985, 1986, 1988-1991, 1993 Regents of the University of California.
All rights reserved. Copyright © 1995 Tatu Ylonen, Espoo, Finland. All rights reserved. Copyright © UNIX System Laboratories,
Inc. Copyright © 2001 Mark R V Murray . Copyright 1995-1998 © Eric Young. Copyright © 1995,1996,1997,1998. Lars Fenneber g.
Copyright © 1992. Livingston Enterprises, Inc. Copyright © 1992, 1993, 1994, 1995. The Regents of the University of Michigan and
Merit Network, Inc. Copyright © 1991-2, RSA Data Security , Inc. Created 1991. Copyright © 1998 Juniper Networks, Inc. All rights
reserved. Copyright © 2001, 2002 Networks Associates Technology, Inc. All rights reserved. Copyright (c) 2002 Networks
Associates Technology, Inc. Copyright 1999-2001© The Open LDAP Foundation. All Rights Reserved. Copyright © 1999 Andrzej
Bialecki. All rights reserved. Copyright © 2000 The Apache Software Foundation. All rights reserved. Copyright (C) 2001-2003
Robert A. van Engelen, Genivia inc. All Rights Reserved. Copyright (c) 1997-2004 University of Cambridge. All rights reserved.
Copyright (c) 1995. David Greenman. Copyright (c) 2001 Jonathan Lemon. All rights reserved. Copyright (c) 1997, 1998, 1999. Bill
Paul. All rights reserved. Copyright (c) 1994-1997 Matt Thomas. All rights reserved. Copyright © 2000 Jason L. Wright. Copyright
© 2000 Theo de Raadt. Copyright © 2001 Patrik Lindergren. All rights reserved.
Last Updated: June 2009
Page 3
Quick Installation and Configuration
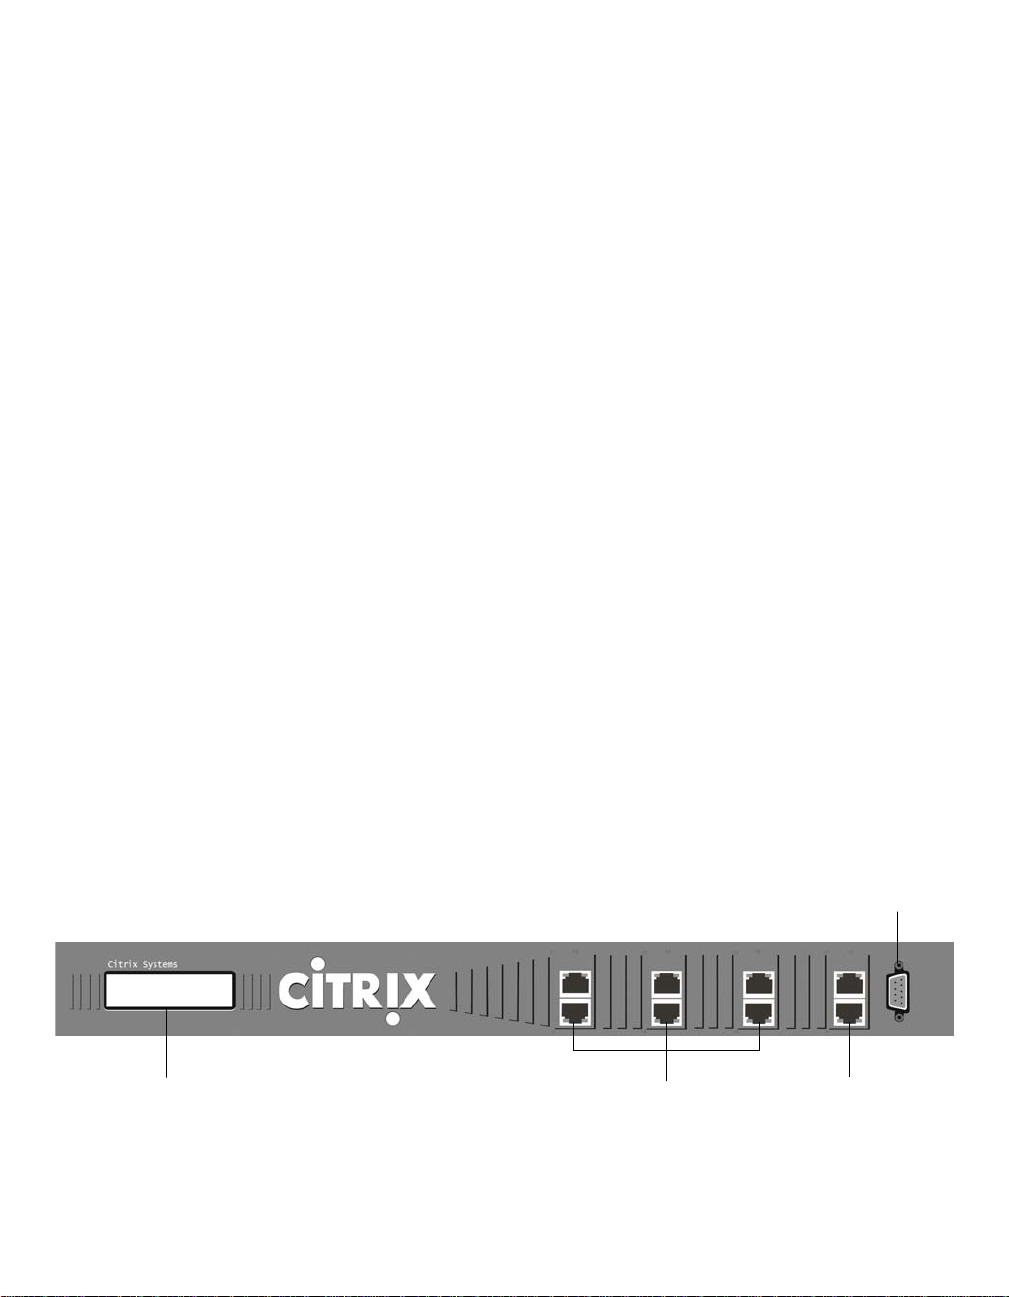
/&'
%$6(7
(WKHUQHW3RUWV
%$6(7
(WKHUQHW3RUWV
&RQVROH3RUW
Welcome to the Citrix NetScaler Application Delivery product line. Please take a minute to review the
following instructions before proceeding with the installation of the Citrix NetScaler 7000 appliance. If
you require further explanation of any item covered in this document, please see the NetScaler
Hardware Installation and Setup Guide.
Note NetScaler 9.1 nCore is not supported on this hardware platform.
Before You Begin
Before installing your Citrix NetScaler 7000, prepare all of the equipment and materials you will need
during the installation process. Completing this preparation up front will ensure a smooth installation
with minimal interruption.
Ensure that the following components and accessories are included:
• One NetScaler 7000 appliance
• One accessory kit that contains:
• One RJ-45 to DB-9 adapter
• One 6 ft RJ-45/DB-9 cable
• One 7000 Quick Start Guide
• One Citrix NetScaler Resource CD
• One AC power cable
• One mounting rail kit
In addition to the items listed above, the following items may also be required:
• Ethernet cables
• Ethernet switch ports to connect to the appliance
• Management workstation (PC or laptop)
• Ethernet crossover cables
The NetScaler Appliance
Your NetScaler appliance has the following parts. We will be referring to the different parts of the
NetScaler during setup and configuration.
Figure 1 The Citrix NetScaler 7000, Front Panel
1
Page 4
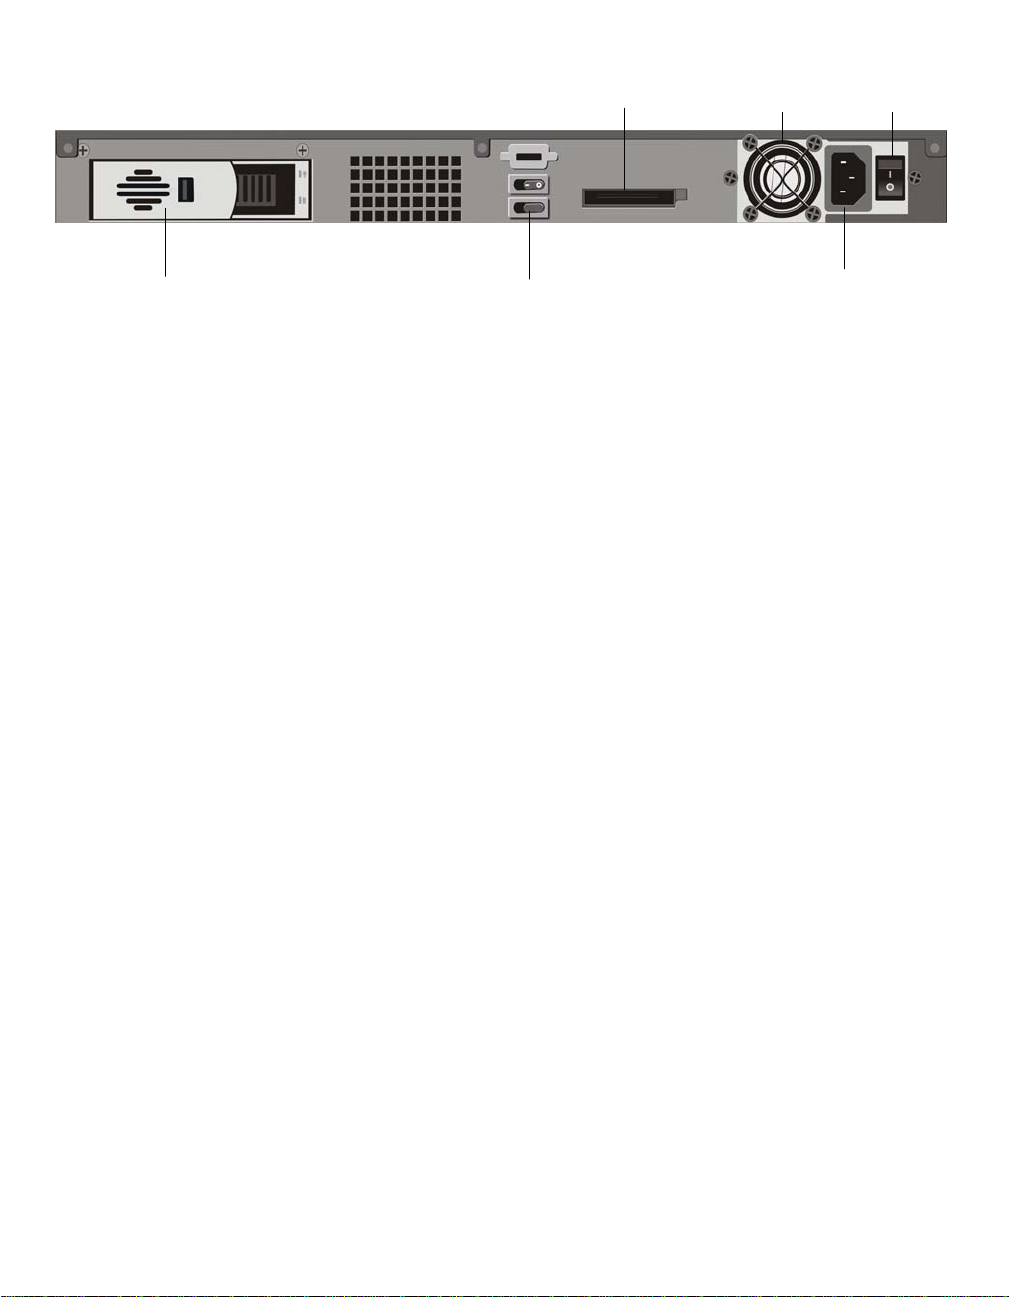
Figure 2 The Citrix NetScaler 7000, Back Panel
+DUG'LVN'ULYH
&RPSDFW)ODVK'ULYH
3RZHU6XSSO\
3RZHU6ZLWFK
)DQ
10,%XWWRQ
Configuration Requirements
Once the appliance is rack mounted, you will need the following information to complete the initial
setup:
•
NetScaler IP address: The NetScaler IP (NSIP) address is the management IP address of the
appliance.
•
Mapped IP address: The Mapped IP (MIP) address is used by the appliance to represent the client
when communicating with a server.
•
Default gateway: The IP address of the default gateway corresponds to the router that forwards
traffic outside of the system subnet.
•
Root password: The root user (nsroot) has full administrative privileges on the appliance. The root
password is used to authenticate the user.
2
Page 5

Installation
The following section describes the procedure for rack mounting the NetScaler hardware.
Note The illustrations in the following sections may not represent the actual NetScaler appliance.
Rack Mounting a Citrix NetScaler Appliance
The appliance is shipped with rack-rail hardware. This hardware consists of two inner rails that are
secured to the appliance, one on each side, and a ra ck ra il assem bly that is attached to the rack.
Figure 3 illustrates the steps involved in mounting the Citrix NetScaler appliance to a rack.
Figure 3 Rack Mounting a Citrix NetScaler Appliance
Appliance Precautions
• Determine the placement of each component in the rack before you install the rail.
• Install the heaviest appliance on the bottom of the rack first, and then work up. Equipment should
be mounted into a rack so that a hazardous condition does not arise due to uneven mechanical
loading.
• Allow the power supply units and hot swap hard drives to cool before touching them.
• Install the equipment near a socket outlet for easy access.
• Mount equipment into a rack with airflow sufficient for safe operation.
• If installed in a closed or multi-unit rack assembly, the amb ient operating temperature of the rack
environment may be greater than the ambient temperature of the room. Therefore, consider the
lowest and highest operating temperatures of the equipment when ma king a decision about where
to install the appliance in the rack.
Rack Precautions
• Ensure that the leveling jacks on the bottom of the rack are fully extended to the floor with the full
weight of the rack resting on them.
• In a single rack installation, attach a stabilizer to the rack.
• In multiple rack installations, couple (attach) the racks together.
3
Page 6

• Always make sure the rack is stable before extending a component from the rack.
• Extend only one component at a time, extending two or more simultaneously may cause the rack
to become unstable.
• The handles on the left and right of the front panel of the appliance should only be used for
extending the appliance out of the rack. These handles should not be used for mounting the
appliance on the rack. Rack-rail hardware described earlier should be used instead.
Connecting a NetScaler to the Network
Connect the interfaces on the appliance to the network ports on the appropriate switches using the
Ethernet/fiber optic cables.
Figure 4 Connecting a Citrix NetScaler Appliance to Your Network
Warning Connecting multiple network ports to the same switch or VLAN can result in a network loop.
Note By default, the NetScaler is configured to use auto-negotiatio n. When you inst all a NetScaler for
the first time, be sure to configure your o ther equipment to use auto-ne gotiation for the port s that
are connected to the NetScaler. After initial log on and configuration, you can choose to disable
auto-negotiation.
Connecting a NetScaler to a Power Source
The appliance has one power supply input. Connect the AC power cable to the inlet receptacle on the
back of the appliance and connect the other end of the power cable to a power outlet. Turn the
NetScaler ON by pressing the ON / OFF switch on the back of the unit. The Citrix logo and LCD on the
front of the NetScaler will illuminate after starting, and the LCD will indicate the operational status of
the appliance.
4
Page 7

Figure 5 Connecting a Citrix NetScaler Appliance to a Power Source
Note
If you wish to update to the latest release of the system software before proceeding, see the
NetScaler Migration Guide. This document is located in the /var/netscaler/doc directory on your
appliance. You can also access the document by logging on to the appliance using a Web
browser and selecting the Documentation tab in the configuration utility.
Electrical Safety Precautions
Basic electrical safety precautions should be followed to p rote ct yourself fr om har m and the ap plia nce
from damage.
• Be aware of the location of the emergency power of f switch to disconne ct the electrical outlet. If an
electrical accident occurs, you can quickly remove power from the appliance.
• Use of a regulating uninterruptible power supply (UPS) protects the appliance from power surges
and voltage spikes and keeps the appliance oper ating in case of power failure.
• Do not work alone when working with high voltage components.
• Always disconnect power from the appliance when removing or installing any component. When
disconnecting power, you should first shut down the appliance and then unplug the power cords of
all the power supply units connected to the appliance.
• Do not use mats designed to decrease st atic electrical discharge as protection from electrical
shock. Instead, use rubber mats that have been specifically designed as electrical insulators.
• The power supply cords must include a grounding plug and must be plugged into grounded
electrical outlets.
• Consideration should be given to the connection of the equipmen t to the power supply circuitry
and the effect of what a circuit overload might have. Appropriate consideration of equipment
nameplate railings should be used when addressing this concern.
• A reliable ground must be maintained at all times. To ensure this, the rack should be grounded.
Particular attention should be given to power supply connections othe r than the direct connection
to the branch circuit (for example, the use of power strips).
5
Page 8

Setting Up Connectivity
Before you can configure and manage the appliance, you will need to connect it to a management
workstation or network. To do this, use any one of the following methods.
• Use the default IP address to connect to the configuration utility.
• Use a serial console cable to connect to the command-line interface (CLI).
GUI-based Configuration
To set up the appliance using the configuration utility, you will need an administrative workstation or
laptop configured on the same network as the appliance. To run the configuration utility, you will also
need Java RunTime Environment (JRE) version 1.4.2_04 or later.
To configure the NetScaler using the configuration utility
1. Connect the NetScaler to a management workstation or network.
2. Open a browser and type:
Note The NetScaler is preconfigured with the IP address 192.168.100.1.
3. In
User Name, type nsroot.
4. In
Password, type nsroot.
5. In
Start in, select Configuration, and then click Login.
6. In the Setup Wizard, click Next and follow the instructions in the wizard.
7. To confirm that the NetScaler is configured correctly, you can either ping the new NetScaler IP
address (NSIP) or use the new NSIP to open the configuration utility in a browser.
CLI-based Configuration
To set up the appliance using the CLI, connect the serial cable to the console port. Access the
command line with a terminal emulator. For computers running Hyperterminal, Te ra Term, or Minicom
as terminal emulators, use the following settings:
• Baud rate: 9600
• Data bits: 8
• Parity: None
• Stop bits: 1
• Flow control: None
http://192.168.100.1
Use the following credentials for logging on to the NetScaler:
User name:
Password:
nsroot
nsroot
To configure the NetScaler using the CLI
At the NetScaler command prompt, type:
set ns config -ipaddress IPAddress -netmask Netmask
add ns ip IPAddress Netmask -type Type
add route Network Netmask Gateway
set system user nsroot Password
save ns config
reboot
Example
set ns config - ipaddress 10.102.29.60 - netmask 255.255.255.0
6
Page 9

add ns ip 10.102.29.61 255.255.255.0 -type mip
add route 0.0.0.0 0.0.0.0 10.102.29.1
set system user nsroot administrator
save ns config
reboot
Note For information about deploying a high availability (HA) pair, see the NetScaler Networking
Guide.
7
Page 10

System Specifications
The following table summarizes the specifications of the Citrix NetScaler 7000.
Specifications 7000
Processor 1 single-core
Memory 1 GB
Number of Power Supplies 1
Power Supply input voltage &
frequency
Maximum Power Consumption 250 W
Weight (lbs.) 28
Height 1U
Width EIA 310-D
Depth 24 in/
Operating T empe ratur e (degre e celsiu s) 0-40
Humidity range (non-condensing) 5%-95%
Safety Certifications UL & TUV-C
EMC & Susceptibility FCC Class A
Compliance RoHS
100-240 AC, 47-63Hz
61 cm
8
Page 11

Additional Information
In addition to the guide you are currently reading, the NetScaler Quick Start Guide, the following
guides for NetScaler 9.1 may contain information that is relevant and useful for your system environment.
• Citrix NetScaler Hardware Installation and Setup Guide. Hardware installation and initial configuration information for all hardware models and platforms.
• Citrix NetScaler Getting Started Guide. Core concepts, installation, and configuration instructions
for setting up a NetScaler for the first time. Includes hands-on labs that covers commonly used
features.
• Citrix NetScaler Migration Guide. Migration instructions for setting up a new version of a NetScaler
with a list of all new and deprecated commands and parameters, APIs, SNMP OIDs, and log messages.
• Citrix NetScaler Administration Guide. Manage and monitor the NetScaler using built-in features,
such as AAA policies, role-based authorization, SNMP, and statistical counters.
• Citrix NetScaler Traffic Management Guide. Configuration and installation information for traffic
management features, such as load balancing, content switching, and DNS.
• Citrix NetScaler Application Optimization Guide. Configuration and installation information for optimization features, such as integrated caching and TCP buffering. Most optimization features are
policy-based.
• Citrix NetScaler Application Security Guide. Configuration and installation information for security
features, such as Denial of Service (DoS) protection, content filtering, and rewrite.
• Citrix NetScaler Networking Guide. Configuration information for networking features with an
emphasis on dynamic routing.
• Citrix NetScaler Policy Configuration and Reference Guide . Con fig u ra tio n an d re fe re nce information for controlling the behavior of NetScaler functions by using advanced policies and expressions, classic policies and expressions, and HTTP callouts.
• Citrix Application Firewall Guide. Installation and configuration instructions for a standalone Citrix
Application Firewall and the integrated Citrix NetScaler Application Firewall feature.
• Citrix NetScaler Developer’s Guide. A guide for application developers who use XML API.
• Citrix NetScaler API Reference. A reference guide for application developers.
• Citrix NetScaler Command Reference Guide. A reference that includes all NetScaler commands.
• Citrix NetScaler Log Message Reference. A reference that includes syslog and Web server log
messages.
• Citrix NetScaler SNMP OID Reference. A reference that includes Simple Network Management
Protocol (SNMP) object identifiers for objects in the Management Information Base (MIB).
• Citrix NetScaler Release Notes. Up-to-date information about ne w fea tu re s an d kn ow n issu es.
A complete set of documentation is available on the Documentation tab of your NetScaler and from
http://support.citrix.com/.
9
Page 12

10
Page 13

Contact and Support Information
Phone: 800-4-CITRIX (800-424-8749) (United States and Canada only)
For country-specific numbers, visit the Support section at: http://www.citrix.com/
Customer Support Web Site: http://support.citrix.com/ or http://mycitrix.com/
Documentation Feedba c k: nsdocs_feedback@citrix.com
11
 Loading...