

Page 1

Citrix CloudPlatform
(powered by Apache
CloudStack) Version
4.5 Installation Guide
Revised March 13, 2015 06:00 pm IST
Citrix CloudPlatform
Page 2

Citrix CloudPlatform (powered by Apache CloudStack) Version 4.5 Installation Guide
Citrix CloudPlatform (powered by Apache CloudStack) Version
4.5 Installation Guide
Revised March 13, 2015 06:00 pm IST
Author Citrix CloudPlatform
© 2014 Citrix Systems, Inc. All rights reserved. Specifications are subject to change without
notice. Citrix Systems, Inc., the Citrix logo, Citrix XenServer, Citrix XenCenter, and CloudPlatform
are trademarks or registered trademarks of Citrix Systems, Inc. All other brands or products are
trademarks or registered trademarks of their respective holders.
If you you want to learn about installing CloudPlatform, read this document.
Page 3

1. About this Guide 1
1.1. About the Audience for this Guide ................................................................................. 1
1.2. Using the Product Documentation .................................................................................. 1
1.3. Experimental Features .................................................................................................. 1
1.4. Additional Information and Help ..................................................................................... 1
1.5. Contacting Support ....................................................................................................... 2
2. Planning for Your CloudPlatform Installation 3
2.1. CloudPlatform Installation Task Flow ............................................................................. 3
3. System Requirements 5
3.1. Operating System Requirements ................................................................................... 5
3.2. Hardware Requirements ................................................................................................ 5
3.3. Web Browser Requirements .......................................................................................... 5
3.4. Network Requirements .................................................................................................. 5
3.5. Ports that CloudPlatform Uses ...................................................................................... 6
4. Preinstallation Tasks 7
4.1. Preparing the Operating System to Host the Management Server .................................... 7
4.1.1. Downloading CloudPlatform Installation Package ................................................. 7
4.1.2. Verifying the Fully-Qualified Host Name .............................................................. 8
4.1.3. Setting the Value of SELinux Variable ................................................................. 8
4.1.4. Verifying Connectivity ......................................................................................... 8
4.1.5. Configuring a Local yum Repository .................................................................... 9
4.1.6. Configuring User Process Limits ......................................................................... 9
4.1.7. Enabling NTP for Synchronizing Time ............................................................... 10
4.1.8. Installing and Configuring the Database ............................................................ 11
4.1.9. Configuring Network File System (NFS) Shares ................................................. 13
5. Installing CloudPlatform Management Server 17
5.1. Install the Management Server on the First Host .......................................................... 17
5.2. Prepare the System VM Template ............................................................................... 19
5.3. Security Considerations for Management Server ........................................................... 21
5.3.1. Enabling HTTPS for CloudPlatform Management Server .................................... 21
5.3.2. Configuring SSL Ciphers for Management Servers ............................................. 23
5.4. Logging on to CloudPlatform Web UI ........................................................................... 23
6. Logging on to the Management Server Web UI 25
7. Configuring Cluster Management Server Set Up 27
7.1. Installing Additional CloudPlatform Management Servers .............................................. 27
7.1.1. Management Server Load Balancing ................................................................. 27
7.2. Replicating Database (Optional) ................................................................................... 27
7.2.1. Failover ............................................................................................................ 29
8. Installing the Usage Server (Optional) 31
8.1. Requirements for Installing the Usage Server ............................................................... 31
8.2. Steps to Install the Usage Server ................................................................................ 31
9. Upgrading CloudPlatform to the Latest Version 33
9.1. Upgrading from 4.3.x to 4.5.0 ...................................................................................... 33
9.2. Upgrading from 4.2.x to 4.5.0 ...................................................................................... 38
9.3. Upgrading from 3.0.x to 4.5.0 ...................................................................................... 43
9.4. Upgrading Operating System version of KVM Hosts to RHEL 6.3 from RHEL 6.0 or
6.1 .................................................................................................................................... 49
9.5. Updating the Existing vCenter Password for the VMware Clusters Created in
CloudPlatform 3.0.6 (VMware only) .................................................................................... 50
9.6. Upgrading vCenter Server Version 5.1 to Version 5.5 ................................................... 51
iii
Page 4

Citrix CloudPlatform (powered by Apache CloudStack) Version 4.5 Installation Guide
9.7. Upgrading KVM Agents (KVM Only) ............................................................................ 51
9.8. Upgrading Hyper-V Agents (Hyper-V Only) ................................................................... 52
9.9. Upgrading KVM Host Opearting System ....................................................................... 53
9.10. Upgrading KVM Hosts ............................................................................................... 54
9.11. Upgrading Secondary Storage VMs and Console Proxy VMs ....................................... 55
9.12. Upgrading the Virtual Routers Selectively ................................................................... 55
9.13. Changing a Standard vSwitch Zone to a VMware dvSwitch Zone (VMWare Only) .......... 56
9.14. Upgrade CloudPlatform Bare Metal Agent on PXE and DHCP Servers ......................... 56
9.15. Updating SystemVM.ISO ........................................................................................... 57
9.16. Upgrading and Applying Hotfix on XenServer Hypervisor Hosts ................................... 58
9.16.1. Upgrading to a New XenServer Version .......................................................... 58
9.16.2. Applying Hotfixes to a XenServer Cluster ........................................................ 60
9.16.3. Installing CloudPlatform XenServer Support Package (CSP) ............................. 63
9.16.4. Upgrading to XenServer 6.2 SP1 Hotfix XS62ESP1005 .................................... 63
9.17. Upgrading from Apache CloudStack to CloudPlatform ................................................. 64
A. Latest System VM Templates 65
Index 69
iv
Page 5

Chapter 1.
About this Guide
1.1. About the Audience for this Guide
This guide is meant for anyone responsible for installing CloudPlatform such as cloud administrators
and Information Technology (IT) administrators.
1.2. Using the Product Documentation
The following guides provide information about CloudPlatform:
• Citrix CloudPlatform (powered by Apache CloudStack) Installation Guide
• Citrix CloudPlatform (powered by Apache CloudStack) Concepts Guide
• Citrix CloudPlatform (powered by Apache CloudStack) Getting Started Guide
• Citrix CloudPlatform (powered by Apache CloudStack) Administration Guide
• Citrix CloudPlatform (powered by Apache CloudStack) Hypervisor Configuration Guide
• Citrix CloudPlatform (powered by Apache CloudStack) Developer's Guide
For complete information on any known limitations or issues in this release, see the Citrix
CloudPlatform (powered by Apache CloudStack) Release Notes.
For information about the Application Programming Interfaces (APIs) that is used in this product, see
the API documents that are available with CloudPlatform.
1.3. Experimental Features
CloudPlatform product releases include some experimental features for customers to test and
experiment with in non-production environments, and share any feedback with Citrix. For any issues
with these experimental features, customers can open a support ticket but Citrix cannot commit to
debugging or providing fixes for them.
The following experimental featues are inluded in this release:
• Advanced Networking in Baremetal
• Linux Containers
• Supported Management Server OS and Supported Hypervisors: RHEL7/CentOS 7 for experimental
use with Linux Containers
1.4. Additional Information and Help
Information on accessing Citrix Knowledge Center and about contacting technical support.
1
Page 6

Chapter 1. About this Guide
1.5. Contacting Support
The support team is available to help customers plan and execute their installations. To contact the
support team, log in to the support portal at support.citrix.com/cloudsupport1 by using the account
credentials you received when you purchased your support contract.
1
http://support.citrix.com/cloudsupport
2
Page 7
Chapter 2.
Planning for Your CloudPlatform
Installation
This chapter explains how you can plan for the successful installation of CloudPlatform in your
environment.
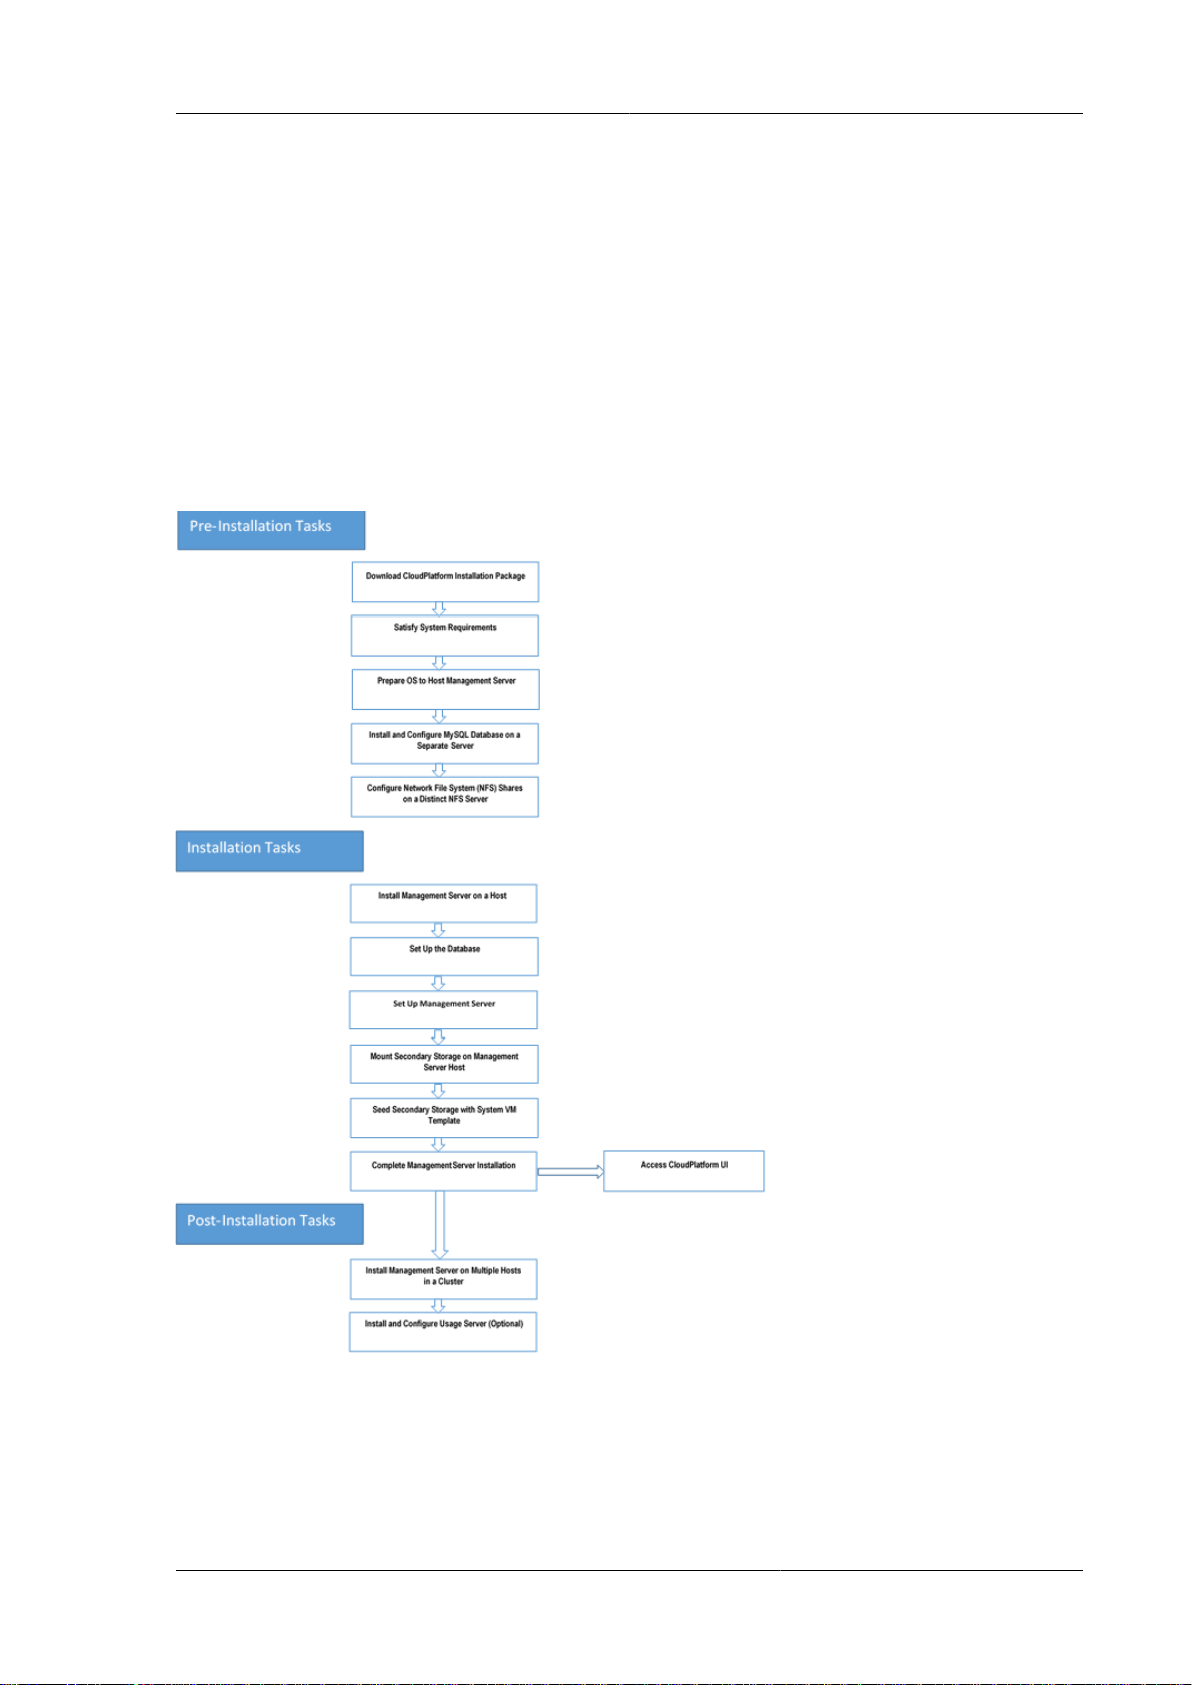
2.1. CloudPlatform Installation Task Flow
The following chart displays the tasks that you must complete to install CloudPlatform successfully.
Each box in the chart represents a task or a bunch of associated tasks that you must perform. The
arrows indicate the sequence in which you must perform these tasks.
3
Page 8

4
Page 9
Chapter 3.
System Requirements
This chapter describes the requirements for installing CloudPlatform Management Server.
3.1. Operating System Requirements
Following are the minimum Operating System requirements for installing CloudPlatform.
Preferred Operating Systems:
• RHEL versions 6.3, 6.4, 6.5, and 7 (64-bit)
• CentOS versions 6.3, 6.4, 6.5, and 7 (64-bit)
Note
RHEL 7 and CentOS 7 are supported only for experimental use with Linux Containers (LXC)
hypervisor.
Citrix recommends you to purchase a RHEL support license. Citrix support will not be helpful in
resolving issues with the underlying RHEL operating system.
3.2. Hardware Requirements
Following are the minimum hardware requirements for installing CloudPlatform:
• CPU - 64-bit X86 CPU
• Memory - 4 GB
• Hard Disk - 50 GB of local disk. Citrix recommends to use 500 GB when secondary storage is on
the same machine with Management Server.
3.3. Web Browser Requirements
The Web browsers that the CloudPlatform Web UI supports are:
• Mozilla Firefox versions 26 to 33
• Google Chrome 38.x
• Apple Safari 7.1
• Microsoft Internet Explorer versions 9, 10 and 11
3.4. Network Requirements
Following are the minimum network requirements for installing CloudPlatform. This section describes
the ports, protocol, firewall considerations, and so on, required for installing CloudPlatform
• One NIC card with static IP address.
• Fully-qualified domain name for the machine where you want to install the Management Server
software.
5
Page 10
Chapter 3. System Requirements
• Default user file-creation mode mask (umask). The value is 022.
If the value is not 022, several files might not be accessible to the cloud user, which would result in
installation failure.
• Red Hat Network Account - Enable SELinux on the RHEL Operating System.
3.5. Ports that CloudPlatform Uses
This section lists the ports that CloudPlatform and its entities use for communication.
Management Server
The following ports are opened on Management Server:
Port Function
8080 Default port for CloudPlatform web server.
8096 Port for the user or client to communicate with
Management Server (unauthenticated).
9090 Port for the communication among Management
Servers in a cluster.
8250 Port for the agents (hypervisor agents such as
KVM agent, Secondary Storage VM (SSVM),
and Console Proxy VM (CPVM)) to communicate
with Management Server.
MySQL Database Server
The following port is opened on MySQL database server:
Port Function
3306 Helps Management Server communicate with
MySQL database server.
System VMs
The following port is opened on System VMs (virtual router, Secondary storage VM (SSVM), and
(CPVM)):
Port Function
3922 Helps Management Server communicate with
system VMs.
Secondary Storage
The following port is opened on secondary storage:
Port Function
111/2049 Helps Management Server communicate with
secondary storage.
6
Page 11

Chapter 4.
Preinstallation Tasks
4.1. Preparing the Operating System to Host the Management Server
You must do the following tasks:
• Section 4.1.1, “Downloading CloudPlatform Installation Package ”
• Section 4.1.2, “Verifying the Fully-Qualified Host Name ”
• Section 4.1.3, “Setting the Value of SELinux Variable ”
• Section 4.1.4, “Verifying Connectivity ”
• Section 4.1.5, “Configuring a Local yum Repository ”
• Section 4.1.6, “Configuring User Process Limits ”
• Section 4.1.7, “Enabling NTP for Synchronizing Time ”
• Section 4.1.8, “Installing and Configuring the Database”
• Section 4.1.9, “Configuring Network File System (NFS) Shares ”
4.1.1. Downloading CloudPlatform Installation Package
This section describes how you can download the CloudPlatform version 4.5 installation package to
the system where you want to install Management Server.
1. Access the Citrix - Downloads website at https://www.citrix.com/English/ss/downloads/
Note
To download the installation packages, you must need an active My Citrix account.
2. On the left-side of the Citrix - Downloads website, under Find Downloads, select CloudPlatform
as the product and click Find.
3. On the CloudPlatform page, expand CloudPlatform 4.5 and navigate to the CloudPlatform 4.5
page to view the installation package information.
4. Identify the CloudPlatform 4.5 installation package that you want to download and click Download
on the right side.
5. In the Download Agreement page, select I have read and certify that I comply with the above
Export Control Laws and click Accept.
6. In the Citrix Download Manager page, click Download Now.
7
Page 12
Chapter 4. Preinstallation Tasks
A file with a name similar to CloudStack-VERSION-NOSVERSION.tar.gz will be downloaded to
your computer.
Section 5.1, “Install the Management Server on the First Host ”
4.1.2. Verifying the Fully-Qualified Host Name
To verify the Fully-Qualified Host Name of the host where you install Management server, do the
following:
1. Log-in to the operating system of the host using the root privileges.
2. Run the following command to verify the fully-qualified host name:
# hostname --fqdn
This must return a fully qualified host name. For example, managament1.lab.example.org. If the
command fail to elicit an appropriate result, you must verify whether the /etc/hosts file contains
the fully-qualified host name.
4.1.3. Setting the Value of SELinux Variable
Security-Enhanced Linux (SELinux), the Linux kernel security module, enables CloudPlatform to
support access control security policies. If you are using RHEL operating system, you must verify
whether SELinux is configured on your operating system. Then, you can set the value of SELinux
variable to "permissive".
1. Log on to the operating system of the host using the root privileges.
2. Check to see whether SELinux is installed on your machine. In RHEL, SELinux is installed and
enabled by default. Run the following command to verify this:
# rpm -qa | grep selinux
3. Using vi editor, edit the /etc/selinux/config file and set the value of the SELINUX variable to
“permissive”. This ensures that the permissive setting will be maintained after a system reboot.
# vi /etc/selinux/config
4. Run the following command to set the value of SELinux to permissive and make it effective
immediately, without requiring a system reboot.
# setenforce 0
4.1.4. Verifying Connectivity
To ensure that the computer where you want to install management server can connect to the
Internet, do the following:
1. Log-in to the operating system of the host using the root privileges.
2. Use the ping command to verify connectivity. For example, you can ping www.citrix.com.
8
Page 13
Configuring a Local yum Repository
# ping www.citrix.com
4.1.5. Configuring a Local yum Repository
If you do not have a Red Hat Network account, you need to configure a local Yum repository.
1. Log on to the operating system of the host using the root privileges.
2. If you are working with a physical host, insert the RHEL installation CD. If you are using a VM,
attach the RHEL ISO.
3. Mount the CDROM to /media.
4. Create a repo file at /etc/yum.repos.d/rhel6.repo. In this repo file, insert the following
lines:
[rhel]
name=rhel6
baseurl=file:///media
enabled=1
gpgcheck=0
Note
If you are using RHEL 7 and you do not have a Red Hat Network account, register it online from
the Red Hat site. Then, run the following:
# subscription-manager register --username <username> --password <password> --autoattach
# subscription-manager repos --enable=rhel-7-server-rpms
# subscription-manager repos --enable=rhel-7-server-optional-rpms
4.1.6. Configuring User Process Limits
For smoother functioning, it's recommended to increase the maximum user process limit on RHEL 6
platforms. The default value is 1024. To modify the value, perform the following:
1. Log in to the operating system of the host as a cloud user.
2. Modify the following:
# /etc/security/limits.d/90-nproc.conf
To increase the value to 2048, run the following:
# cloud soft nproc 2048
9
Page 14
Chapter 4. Preinstallation Tasks
Note
You must perform this configuration and set the nproc value to 2048 to ensure the
uninterupted collection of usage statistics and log rotation.
3. Log out.
A reboot is not required for this to take effect; however, the user must be logged out.
4. To check whether the value has been updated, run the following as the cloud user:
# ulimit -u
4.1.7. Enabling NTP for Synchronizing Time
NTP is required to synchronize the clocks of the servers in your cloud. To enable NTP on the host, do
the following:
1. Run the following command to install NTP:
# yum install ntp
2. Using vi editor, edit the NTP configuration file to point to your NTP server.
# vi /etc/ntp.conf
In the NTP configuration file, add one or more servers with the names of the NTP servers you
want to use.
For example:
server 0.xenserver.pool.ntp.org
server 1.xenserver.pool.ntp.org
server 2.xenserver.pool.ntp.org
server 3.xenserver.pool.ntp.org
3. Run the command to restart the NTP client.
# service ntpd restart
4. Make sure NTP will start again upon reboot.
# chkconfig ntpd on
10
Page 15
Installing and Configuring the Database
4.1.8. Installing and Configuring the Database
CloudPlatform uses a MySQL database server to store its data. Usually in an enterprise environment,
the CloudPlatform Management Server is installed on multiple nodes and the MySQL database is
installed on a separate node.
The following procedure explains how to install and configure MySQL database on a separate node.
4.1.8.1. Installing and Configuring MySQL Database on a Standalone Server
This section describes how to install MySQL on a standalone node, separate from the Management
Server. This configuration is intended for a deployment that includes several Management Server
nodes.
1. Check the version of MySQL that you have installed.
• For RHEL 6.x, you must install MySQL version 5.1.73 or higher.
If you have installed any previous versions of MySQL, do the following before you proceed:
a. Uninstall the MySQL version that is earlier than 5.1.73.
b. Log on as root user to your database node and run the following commands. If you are
going to install a replica database, then log-in to the master.
# yum install mysql-server
# chkconfig --level 35 mysqld on
• For RHEL 7.0, you must install MySQL version 5.6.21.
2. Edit the MySQL configuration and insert the following lines in the [mysqld] section.
Location of [mysqld] section is /etc/my.cnf or /etc/mysql/my.cnf, depending on your OS.
You can place these lines below the datadir line. The max_connections parameter should be
set to 350 multiplied by the number of Management Servers you are deploying. This example
assumes two Management Servers.
innodb_rollback_on_timeout=1
innodb_lock_wait_timeout=600
max_connections=700
log-bin=mysql-bin
binlog-format = 'ROW'
expire_logs_days=10
max_binlog_size=100M
skip-name-resolve
11
Page 16
Chapter 4. Preinstallation Tasks
Note
If you are not using the database replication, you can use the expire_logs_days
and the max_binlog_size parameters to truncate the MySQL binary logs. The
expire_logs_days parameter defines the number of days to store the binary log files. The
max_binlog_size parameter defines the maximum size of each bin log file.
The binlog-format variable is supported in MySQL versions 5.1 and greater. It is not
supported in MySQL 5.0. In some versions of MySQL, an underscore character is used in
place of the hyphen in the variable name. For the exact syntax and spelling of each variable,
consult the documentation for your version of MySQL.
3. Start the MySQL service, then invoke MySQL as the root user.
# service mysqld start
# mysql -u root
4. MySQL does not set a root password by default. It is very strongly recommended that you set
a root password as a security precaution. Run the following command, and substitute your own
desired root password for <password>. You can answer "Y" to all questions except "Disallow root
login remotely?". Remote root login is required to set up the databases.
mysql> SET PASSWORD = PASSWORD('password');
From now on, start MySQL with mysql -p so it will prompt you for the password.
5. To grant access privileges to remote users, perform the following steps.
a. Run the following command from the mysql prompt, then exit MySQL:
mysql> GRANT ALL PRIVILEGES ON *.* TO ‘root@%’ WITH GRANT OPTION;
mysql> exit
b. Restart the MySQL service.
# service mysqld restart
c. Open the MySQL server port (3306) in the firewall to allow remote clients to connect.
# iptables -I INPUT -p tcp --dport 3306 -j ACCEPT
d. Edit the /etc/sysconfig/iptables file and add the following lines at the beginning of the INPUT
chain.
-A INPUT -p tcp --dport 3306 -j ACCEPT
12
Page 17
Configuring Network File System (NFS) Shares
After you install Management Server on the first node, you must configure the database client on the
same node. For more information, see steps 4 and 5 of Section 5.1, “Install the Management Server
on the First Host ”
4.1.8.2. Security Consideration for MySQL
Ensure that you change the default passwords for all accounts after the MySQL installation by running
mysql_secure_installation. For more information, see mysql_secure_installation — Improve MySQL
Installation Security1.
4.1.9. Configuring Network File System (NFS) Shares
NFS Shares On a Distinct Node:
This section describes how to set up Network File System (NFS) shares for secondary and (optionally)
primary storage on an NFS server running on a separate node from the Management Server node.
The exact commands for the following steps may vary depending on the version of the operating
system that you use.
Warning
(KVM only) Ensure that no volume is already mounted at your NFS mount point.
1. On the storage server, create an NFS share for secondary storage. If you are using NFS for
primary storage, create a second NFS share. For example:
# mkdir -p /export/primary
# mkdir -p /export/secondary
2. To configure the new directories as NFS exports, edit /etc/exports. Export the NFS share(s) with
rw,async,no_root_squash. For example:
# vi /etc/exports
Insert the following line.
/export *(rw,async,no_root_squash)
3. Export the /export directory.
# exportfs -a
4. To mount the secondary storage on your Management Server, continue with the steps 5 and 6 of
Section 5.1, “Install the Management Server on the First Host ”. Then, restart the Management
Server host.
1
http://dev.mysql.com/doc/refman/5.7/en/mysql-secure-installation.html
13
Page 18

Chapter 4. Preinstallation Tasks
Two NFS shares called /export/primary and /export/secondary are now set up.
If you want to configure the NFS shares for primary and secondary storage on the Management
Server node, do with the following steps:
1. Edit the /etc/sysconfig/nfs file.
# vi /etc/sysconfig/nfs
Uncomment the following lines:
LOCKD_TCPPORT=32803
LOCKD_UDPPORT=32769
MOUNTD_PORT=892
RQUOTAD_PORT=875
STATD_PORT=662
STATD_OUTGOING_PORT=2020
2. Edit the /etc/sysconfig/iptables file.
# vi /etc/sysconfig/iptables
Add the following lines at the beginning of the INPUT chain:
-A INPUT -m state --state NEW -p udp --dport 111 -j ACCEPT
-A INPUT -m state --state NEW -p tcp --dport 111 -j ACCEPT
-A INPUT -m state --state NEW -p tcp --dport 2049 -j ACCEPT
-A INPUT -m state --state NEW -p tcp --dport 32803 -j ACCEPT
-A INPUT -m state --state NEW -p udp --dport 32769 -j ACCEPT
-A INPUT -m state --state NEW -p tcp --dport 892 -j ACCEPT
-A INPUT -m state --state NEW -p udp --dport 892 -j ACCEPT
-A INPUT -m state --state NEW -p tcp --dport 875 -j ACCEPT
-A INPUT -m state --state NEW -p udp --dport 875 -j ACCEPT
-A INPUT -m state --state NEW -p tcp --dport 662 -j ACCEPT
-A INPUT -m state --state NEW -p udp --dport 662 -j ACCEPT
3. Run the following commands:
# service iptables restart
# service iptables save
4. If NFS v4 communication is used between client and server, add your domain to /etc/idmapd.conf
on both the hypervisor host and Management Server.
# vi /etc/idmapd.conf
Remove the character # from the beginning of the Domain line in idmapd.conf and replace the
value in the file with your own domain. In the example below, the domain is company.com.
Domain = company.com
5. Restart the Management Server host.
14
Page 19

Configuring Network File System (NFS) Shares
Continue with Section 5.2, “Prepare the System VM Template ”
15
Page 20

16
Page 21
Chapter 5.
Installing CloudPlatform Management
Server
5.1. Install the Management Server on the First Host
The first step in installation, whether you are installing the Management Server on one host or many,
is to install the software on a single node.
Note
If you are planning to install the Management Server on multiple nodes for high availability, do not
proceed to the additional nodes yet. You can do this configuration later.
1. Log-in to the operating system of the host using the root privileges.
2. Untar the CloudPlatform installation file that you downloaded to your computer and run the
install.sh script that is available in it.
For more information on how to download the CloudPlatform installation file, see Section 4.1.1,
“Downloading CloudPlatform Installation Package ”.
Also, you can rename the following file and directory names with those you are using:
# tar xzf CloudPlatform-VERSION-N-OSVERSION.tar.gz
# cd CloudPlatform-VERSION-N-OSVERSION
# ./install.sh
You will see a few messages as the installer prepares, followed by a list of choices.
3. Choose M to install the Management Server software.
> M
Note
If you want to install MySQL database on the Management Server host, you can choose
the D option to do so. Then, you can run the ./install.sh script again and choose the M
option to install the Management Server software.
After the successful installation of Management Server, a message like “Complete! Done,” is
displayed.
4. To configure MySQL database client that you installed on a separate node, run the following
command to create the cloud user on the database.
17
Page 22
Chapter 5. Installing CloudPlatform Management Server
For more information on installing MySQL database on a separate node, see Section 4.1.8.1,
“Installing and Configuring MySQL Database on a Standalone Server ”
• dbpassword - Specify the password to be assigned to the cloud user. You can choose to
provide no password.
• dbhost - Provide the hostname or IP address of the database node.
Note
This argument will not be available if you have configured MySQL database on the same
node where you have installed CloudPlatform Management Server.
• deploy-as - Specify the user name and password of the user deploying the database. For
example, if you originally installed MySQL with user “root” and password “password”, provide -deploy-as=root:password.
• (Optional) encryption_type - Use file or web to indicate the technique used to pass in the
database encryption password. Default: file.
• (Optional) management_server_key - Substitute the default key that is used to encrypt
confidential parameters in the CloudPlatform properties file. Default: password. Citrix
recommends you to replace this with a more secure value.
• (Optional) database_key - Substitute the default key that is used to encrypt confidential
parameters in the CloudPlatform database. Default: password. Citrix recommends you to
replace this with a more secure value.
# cloudstack-setup-databases cloud:<dbpassword>@<dbhost> --deploy-as=root:<password> -e
<encryption_type> -m <management_server_key> -k <database_key>
5. Run a script that sets up iptables, rules, and SELinux for use by Management Server. This script
will also chkconfig off and start Management Server.
# cloudstack-setup-management
6. To mount the secondary storage on your Management Server, first you create a mount point
for secondary storage. For example:
# mkdir -p /mnt/secondary
For more information on configuring NFS shares, see Section 4.1.9, “Configuring Network File
System (NFS) Shares ”
7. Mount the secondary storage on your Management Server. Replace the example NFS server
name and NFS share paths below with your own.
# mount -t nfs nfsservername:/nfs/share/secondary /mnt/secondary
18
Page 23
Prepare the System VM Template
5.2. Prepare the System VM Template
Secondary storage must be seeded with a template that is used for CloudPlatform system VMs.
Note
When copying and pasting a command, make sure that you have pasted the command as a
single line. Some document viewers may introduce unwanted line breaks in copied text.
1. On the Management Server, run one or more of the following cloud-install-sys-tmplt
commands to retrieve and decompress the system VM template. Run the command for each
hypervisor type that you expect end users to run in this Zone.
2. If your secondary storage mount point is not named /mnt/secondary, substitute your own mount
point name.
If you set the CloudPlatform database encryption type to "web" when you set up the database, you
must now add the parameter -s <management-server-secret-key>.
This process will require approximately 5 GB of free space on the local file system and up to 30
minutes each time it runs.
For more information on latest SystemVM templates, see Appendix A, Latest System VM
Templates
• For XenServer:
# /usr/share/cloudstack-common/scripts/storage/secondary/cloud-installsys-tmplt -m /mnt/secondary -u http://download.cloud.com/templates/4.5/
systemvm64template-2014-12-18-4.5.0.0-xen.vhd.bz2 -h xenserver -s <optional-managementserver-secret-key> -F
• For KVM:
# /usr/share/cloudstack-common/scripts/storage/secondary/cloud-installsys-tmplt -m /mnt/secondary -u http://download.cloud.com/templates/4.5/
systemvm64template-2014-12-18-4.5.0.0-kvm.qcow2.bz2 -h kvm -s <optional-managementserver-secret-key> -F
• For vSphere:
# /usr/share/cloudstack-common/scripts/storage/secondary/cloud-installsys-tmplt -m /mnt/secondary -u http://download.cloud.com/templates/4.5/
systemvm64template-2014-12-18-4.5.0.0-vmware.ova -h vmware -s <optional-managementserver-secret-key> -F
19
Page 24

Chapter 5. Installing CloudPlatform Management Server
Note
CloudPlatform fails to create system VMs if you have provisioned your cloud infrastructure
on VMWare hypervisor. This occurs on each zone in your environment that is provisioned
on VMWare hypervisor.
This failure logs the following error message:
Message: Unable to unpack snapshot OVA file at: /var/cloudstack/mnt/
VM/7407677735140.6646923a/template/tmpl/1/8//routing-8.ova
To avoid this failure, you must manually run the following command on the templates folder
after you register the new VMWare system VM template.
chmod -R 0777 /path_to_secondary_storage_mount_point/template/
• For Hyper-V
# /usr/share/cloudstack-common/scripts/storage/secondary/cloud-installsys-tmplt -m /mnt/secondary -u http://download.cloud.com/templates/4.5/
systemvm64template-2014-12-18-4.5.0.0-hyperv.vhd.bz2 -h hyperv -s <optional-managementserver-secret-key> -F
• For LXC:
/usr/share/cloudstack-common/scripts/storage/secondary/cloud-installsys-tmplt -m /mnt/secondary -u http://download.cloud.com/templates/4.5/
systemvm64template-2014-12-18-4.5.0.0-kvm.qcow2.bz2 -h lxc -s <optional-managementserver-secret-key> -F
3. If you are using a separate NFS server, perform this step.
Warning
If you are using the Management Server as the NFS server, you need not perform this step.
Also you can skip the mounting, and directly run the command.
When the script has finished, unmount secondary storage and remove the created directory.
# umount /mnt/secondary
# rmdir /mnt/secondary
4. Repeat these steps for each secondary storage server.
20
Page 25

Security Considerations for Management Server
5.3. Security Considerations for Management Server
We recommend you to strictly follow the security instructions given in the following sections.
5.3.1. Enabling HTTPS for CloudPlatform Management Server
CloudPlatform Management Server runs on Tomcat, and by default the web interface is accessed
over HTTP on 8080/TCP. You can enable HTTPS on Tomcat to provide secure communication to the
CloudPlatform Management Server. If you enable HTTPS, the Management Server web interface will
be securely available at <https://yourserver:10285/client>, or optionally at <https://yourserver/client>.
1. Back up /etc/cloudstack/management/server.xml.
2. Edit /etc/cloudstack/management/server.xml.
Consider the following:
• By default the HTTPS configuration is commented out, so uncomment it and update it as
necessary.
• Ensure that the keystore file will need appropriate permissions.
• Include the password you will use for the certificate.
• Use an unprivileged port (1025/TCP or above) because Tomcat runs as the "cloud" user and
not root.
The following is the default code snippet under service catalina, which is commented out. You
can uncomment it and use port 8443 or change it to an unprivileged port, 1025/TCP or above.
<Connector port="8443" protocol="HTTP/1.1" SSLEnabled="true"
maxThreads="150" scheme="https" secure="true"
clientAuth="false" sslProtocols="TLSv1,TLSv1.1,TLSv1.2"
keystoreType="PKCS12"
keystoreFile="conf/cloud-localhost.pk12"
keystorePass="password"/>
Note
To enable HTTPS on Tomcat for providing secure communication to the CloudPlatform
Management Server, use TLS protocol versions 1.0, 1.1, or 1.2.
Ensure that the parameter name for tomcat versions prior to 6.0.38 is sslProtocols. For
version 6.0.38 and higher, the parameter name is sslEnabledProtocols.
3. Obtain the certificate:
a. Follow your organization's standard procedures to generate and obtain a certificate suitable
for securing a website. For example, generate a private key:
# openssl genrsa 1024 > cloud.key
21
Page 26

Chapter 5. Installing CloudPlatform Management Server
b. Generate a certificate signing request (CSR) with appropriate values:
# openssl req -new -key cloud.key > cloud.csr
To know more about generating Private Key and Certificate Signing Request (CSR)
for an existing Java keystore and import certificate signed by external SSL authority on
CloudPlatform management service, see http://support.citrix.com/article/CTX136431
c. Submit the CSR to a certificate authority (for example, DigiNotar) and get the certificate, or
generate a self-signed certificate as follows:
# openssl x509 -req -in cloud.csr -signkey cloud.key > cloud.crt
To know more about generating self-signed SSL certificate and configure CloudPlatform
management service to use this certificate, see http://support.citrix.com/article/CTX136351
4. Generate Keystore:
a. Create a PKCS12 format keystore by using the private key and signed certificate:
# openssl pkcs12 -export -in cloud.crt -inkey cloud.key -name cloud -passout
pass:password > /usr/share/cloudstack/management/conf/cloud-localhost.pk12
5. Restart CloudPlatform
a. Once the Tomcat configuration is updated and the keystore is in place, restart CloudPlatform:
# service cloud-management restart
b. Verify that Tomcat is listening on the configured port (10285/TCP in this example):
# netstat -plnt | grep 10285
c. If it is not working, check /var/log/cloudstack/management/catalina.out for error
messages.
6. Configure iptables:
a. If iptables is in use, update the rules to allow access to the configured port. For example:
# iptables -I INPUT 1 -p tcp -m tcp --dport 10285 -j ACCEPT
b. Verify connectivity to <https://yourserver:10285/client>.
c. Optionally, enable redirection from 443/TCP in iptables:
# iptables -t nat -A PREROUTING -i eth0 -p tcp --dport 443 -j REDIRECT --to-port
10285
d. Verify connectivity to <https://yourserver/client>.
e. Once iptables is configured correctly, save the changes:
22
Page 27

Configuring SSL Ciphers for Management Servers
# service iptables save
5.3.2. Configuring SSL Ciphers for Management Servers
Citrix recommend you to use ciphers with size higher than 128 bits for CloudPlatform Management
Server. Do not use weak ciphers such as RC4. For the ease of making these configuration changes,
a new configuration file, /etc/cloudstack/management/java.security.ciphers, has been
introduced. In this file, make the following change:
jdk.tls.disabledAlgorithms=DH keySize < 128, RSA keySize < 128, DES keySize
< 128, SHA1 keySize < 128, MD5 keySize < 128, RC4
This file name has been set in the JAVA_OPTS which overrides or appends the values from /
etc/cloudstack/management/java.security.ciphers to $JRE_HOME/lib/security/
java.security. This operation is performed when you start the Management Server.
Therefore, before starting the Management Server, ensure that the
security.overridePropertiesFile parameter is in $JRE_HOME/lib/security/
java.security is set to true. It implies that the values can be overriden in java.security file.
5.4. Logging on to CloudPlatform Web UI
After the successful installation of CloudPlatform in your environment, you can do the following:
• You can run the Web UI and log-in to the UI. This will help you understand CloudPlatform offerings
and the way you will interact with CloudPlatform on an ongoing basis.
Chapter 6, Logging on to the Management Server Web UI
• You can add the cloud infrastructure and try running some virtual machines on it. This will help you
watch how CloudPlatform manages the infrastructure.
For more information, refer to CloudPlatform (powered by Apache CloudStack) Version 4.5 Getting
Started Guide.
23
Page 28

24
Page 29

Chapter 6.
Logging on to the Management Server
Web UI
CloudPlatform Management Server provides a web-based UI that can be used by both administrators
and end users. The appropriate version of the UI is displayed depending on the credentials used to log
on.
The URL to log on to CloudPlatform is: (substitute your own management server IP address)
http://<management-server-ip-address>:8080/client
When you log on to CloudPlatform UI for the first time, a guided tour splash screen appears. On later
visits, you can specify the following to proceed to your Dashboard:
User name
The user name of your account. The default user name is admin.
Password
The password associated with the user name. The password for the default user name is password.
Domain
If you are a root user, leave this field blank.
If you are a user belongs to the sub-domains, enter the full path to the domain, excluding the root
domain.
For example, suppose multiple levels are created under the root domain, such as Comp1/hr. The
users in the Comp1 domain should enter Comp1 in the Domain field, whereas the users in the Comp1/
sales domain should enter Comp1/sales.
25
Page 30

26
Page 31

Chapter 7.
Configuring Cluster Management
Server Set Up
You can install the Management Server software on multiple hosts. Also, you can configure MySQL
database on multiple nodes and use them with the cluster of Management servers that you have
configured. You can, then, use a load-balancer to provide a virtual IP for each Management Server
and balance the load across these Management Servers.
7.1. Installing Additional CloudPlatform Management
Servers
On each additional host that you want to designate as Management Server, you must do the following:
• Install the Management Server software
• Configure the MySQL database client
In this case, you must not use the argument --deploy-as.
• Set up the OS for Management Server
For more information, see Section 5.1, “Install the Management Server on the First Host ”
After you perform these tasks, you can seed secondary storage with a template that is used for
CloudPlatform system VMs. For more information, see Appendix A, Latest System VM Templates
7.1.1. Management Server Load Balancing
CloudPlatform can use a load balancer to provide a virtual IP for multiple Management Servers. The
administrator is responsible for creating the load balancer rules for the Management Servers. The
application requires persistence or stickiness across multiple sessions. The following chart lists the
ports that should be load balanced and whether or not persistence is required.
Even if persistence is not required, enabling it is permitted.
Source Port Destination Port Protocol Persistence
Required?
80 or 443 8080 (or 20400 with
AJP)
8250 8250 TCP Yes
8096 8096 HTTP No
HTTP (or AJP) Yes
In addition to the above settings, the administrator is responsible for setting the 'host' global
configuration value from the management server IP to load balancer virtual IP address. If the 'host'
value is not set to the VIP for Port 8250 and one of your management servers crashes, the UI is still
available but the system VMs will not be able to contact the management server.
7.2. Replicating Database (Optional)
CloudPlatform supports database replication from one MySQL node to another. This is achieved using
standard MySQL replication. You may want to do this as insurance against MySQL server or storage
27
Page 32

Chapter 7. Configuring Cluster Management Server Set Up
loss. MySQL replication is implemented using a master/slave model. The master is the node that
the Management Servers are configured to use. The slave is a standby node that receives all write
operations from the master and applies them to a local, redundant copy of the database. The following
steps are a guide to implementing MySQL replication.
Note
Creating a replica is not a backup solution. You should develop a backup procedure for the
MySQL data that is distinct from replication.
1. Ensure that this is a fresh install with no data in the master.
2. Edit my.cnf on the master and add the following in the [mysqld] section below datadir.
log_bin=mysql-bin
server_id=1
The server_id must be unique with respect to other servers. The recommended way to achieve
this is to give the master an ID of 1 and each slave a sequential number greater than 1, so that the
servers are numbered 1, 2, 3, etc.
3. Restart the MySQL service:
# service mysqld restart
4. Create a replication account on the master and give it privileges. We will use the "cloud-repl" user
with the password "password". This assumes that master and slave run on the 172.16.1.0/24
network.
# mysql -u root
mysql> create user 'cloud-repl'@'172.16.1.%' identified by 'password';
mysql> grant replication slave on *.* TO 'cloud-repl'@'172.16.1.%';
mysql> flush privileges;
mysql> flush tables with read lock;
5. Leave the current MySQL session running.
6. In a new shell start a second MySQL session.
7. Retrieve the current position of the database.
# mysql -u root
mysql> show master status;
+------------------+----------+--------------+------------------+
| File | Position | Binlog_Do_DB | Binlog_Ignore_DB |
+------------------+----------+--------------+------------------+
| mysql-bin.000001 | 412 | | |
+------------------+----------+--------------+------------------+
28
Page 33

Failover
8. Note the file and the position that are returned by your instance.
9. Exit from this session.
10. Complete the master setup. Returning to your first session on the master, release the locks and
exit MySQL.
mysql> unlock tables;
11. Install and configure the slave. On the slave server, run the following commands.
# yum install mysql-server
# chkconfig mysqld on
12. Edit my.cnf and add the following lines in the [mysqld] section below datadir.
server_id=2
innodb_rollback_on_timeout=1
innodb_lock_wait_timeout=600
13. Restart MySQL.
# service mysqld restart
14. Instruct the slave to connect to and replicate from the master. Replace the IP address, password,
log file, and position with the values you have used in the previous steps.
mysql> change master to
-> master_host='172.16.1.217',
-> master_user='cloud-repl',
-> master_password='password',
-> master_log_file='mysql-bin.000001',
-> master_log_pos=412;
15. Then start replication on the slave.
mysql> start slave;
16. Optionally, open port 3306 on the slave as was done on the master earlier.
This is not required for replication to work. But if you choose not to do this, you will need to do it
when failover to the replica occurs.
7.2.1. Failover
This will provide for a replicated database that can be used to implement manual failover for the
Management Servers. CloudPlatform failover from one MySQL instance to another is performed by
the administrator. In the event of a database failure you should:
29
Page 34

Chapter 7. Configuring Cluster Management Server Set Up
1. Stop the Management Servers (via service cloudstack-management stop).
2. Change the replica's configuration to be a master and restart it.
3. Ensure that the replica's port 3306 is open to the Management Servers.
4. Make a change so that the Management Server uses the new database. The simplest process
here is to put the IP address of the new database server into each Management Server's /etc/
cloudstack/management/db.properties.
5. Restart the Management Servers:
# service cloudstack-management start
30
Page 35

Chapter 8.
Installing the Usage Server (Optional)
You can optionally install the Usage Server once the Management Server is configured properly. The
Usage Server takes data from the events in the system and enables usage-based billing for accounts.
When multiple Management Servers are present, the Usage Server may be installed on any number
of them. The Usage Servers will coordinate usage processing. A site that is concerned about
availability should install Usage Servers on at least two Management Servers.
8.1. Requirements for Installing the Usage Server
• The Management Server must be running when the Usage Server is installed.
• The Usage Server must be installed on the same server as a Management Server.
8.2. Steps to Install the Usage Server
1. Run ./install.sh.
# ./install.sh
You should see a few messages as the installer prepares, followed by a list of choices.
2. Choose "S" to install the Usage Server.
> S
3. Once installed, start the Usage Server with the following command.
# service cloudstack-usage start
The Administration Guide discusses further configuration of the Usage Server.
31
Page 36

32
Page 37

Chapter 9.
Upgrading CloudPlatform to the Latest
Version
The following sections describe the procedures for updating from the previous versions to the latest
version of CloudPlatform.
9.1. Upgrading from 4.3.x to 4.5.0
This section explains how to upgrade from CloudPlatform version 4.3.x to version 4.5.
Note
CloudPlatform fails to create system VMs if you have provisioned your cloud infrastructure
on VMWare hypervisor. This occurs on each zone in your environment that is provisioned on
VMWare hypervisor.
This failure logs the following error message:
Message: Unable to unpack snapshot OVA file at: /var/cloudstack/mnt/
VM/7407677735140.6646923a/template/tmpl/1/8//routing-8.ova
To avoid this failure, you must manually run the following command on the templates folder after
you register the new VMWare system VM template.
chmod -R 0777 /path_to_secondary_storage_mount_point/template/
Pre-Upgrade Procedure
1. Register the latest System VM templates.
For more information about the latest, hypervisor-specific system VM templates, refer to
Appendix A, Latest System VM Templates
2. Download the latest System VM to all the primary storages using the prepareTemplate API.
http://<management_server_ip_address>:8080/client/api?
command=prepareTemplate&templateid=a8813ba3-dfe8-48b2-a583-0cb19c9423b2&zoneid=ce9a82baf419-4041-b72b-1d2ee1483ba5&response=json&sessionkey=G8yD3LXsOi1p5KVSkAO62VXM%2BGE%3D
API response:
{ "preparetemplateresponse" : { "count":1 ,"template" : [
{"id":"a8813ba3-dfe8-48b2-a583-0cb19c9423b2","name":"systemvmvmware-4.5","displaytext":"systemvmvmware-4.5","ispublic":false,"created":"2015-01-06T14:13:19-0800","isready":true,
"passwordenabled":false,"format":"OVA","isfeatured":false,"crossZones":false,
"ostypeid":"1a7f544c-95e0-11e4-b6cc-ced18bec4952","ostypename": "Debian
GNU/Linux 7(64-bit)","account":"admin","zoneid":"ce9a82ba-f419-4041b72b-1d2ee1483ba5","zonename":"zone-1","status":"Download Complete","size":2621440000,
"templatetype":"USER","hypervisor":"VMware","domain":"ROOT",
33
Page 38

Chapter 9. Upgrading CloudPlatform to the Latest Version
"domainid":"1a240d26-95e0-11e4-b6ccced18bec4952","isextractable":false,"checksum":"01cb382894c35eab54a0b0d00a884931","tags":
[], "sshkeyenabled":false,"isdynamicallyscalable":false}] } }
3. (KVM on RHEL 6.0/6.1/6.2 only) If the existing CloudPlatform deployment includes one or more
clusters of KVM hosts that run on RHEL 6.0, RHEL 6.1, or RHEL 6.2 operating system, you must
first upgrade the operating system version of these hosts to RHEL 6.3.
To do this task, see Section 9.4, “Upgrading Operating System version of KVM Hosts to RHEL 6.3
from RHEL 6.0 or 6.1 ”
4. Run the following command on all active Usage Server hosts to stop the Usage servers that are
currently enabled.
# service cloudstack-usage stop
5. Run the following command on all Management Servers to stop the Management Server hosts.
# service cloudstack-management stop
6. Back up MySQL databases at the MySQL master.
It is assumed in the following procedures that you have set the root password on the MySQL
database as per the CloudPlatform best practices recommendation. In the following commands,
substitute your own MySQL root password.
# mysqldump -u root -p<mysql_password> cloud > cloud-backup.dmp
# mysqldump -u root -p<mysql_password> cloud_usage > cloud-usage-backup.dmp
Upgrade Procedure
1. Access https://www.citrix.com/downloads/cloudplatform.html and download CloudPlatform 4.5
onto the new management server host.
Note
You need a valid Citrix account to access this link and download CloudPlatform 4.5.
2. You will get a file with the file name in the format CloudPlatform-4.5.0-N-
OSVERSION.tar.gz. Untar the file and run the install.sh script that is available with it.
Before you run the following command, you must replace the file and the directory names with the
ones that you are using.
# tar xzf CloudPlatform-4.5.0-N-OSVERSION.tar.gz
# cd CloudPlatform-4.5.0-N-OSVERSION
# ./install.sh
You can see a few messages as the installer prepares, followed by a list of options from which you
can choose the option to perform the upgrade operation.
34
Page 39

Upgrading from 4.3.x to 4.5.0
3. Enter U to upgrade the package.
>U
You can view messages as the upgrade proceeds. After the upgrade is completed, you can view
the message like Complete! Done.
4. If you have made changes to your existing copy of the db.properties and the server.xml
configuration files in your previous-version of CloudPlatform installation, CloudPlatform preserves
those changes in the upgrade. However, you need to do the following steps to place these
changes in a new version of the file, which is compatible with version 4.5:
If the upgrade output in the previous step includes a message like the following, it indicates that
your old db.properties and server.xml files contain some custom content and you need to
merge the two files:
For db.properties file, the message appears as follows:
warning: /etc/cloud.rpmsave/management/db.properties created as /etc/cloudstack/
management/db.properties.rpmnew
For server.xml file, the message appears as follows:
warning: /etc/cloud.rpmsave/management/server.xml created as /etc/cloudstack/management/
server.xml.rpmnew
a. Backup the previous version of the db.properties or the server.xml file. For example:
(substitute the file name in these commands as needed)
For the db.properties file:
# mv /etc/cloudstack/management/db.properties /etc/cloudstack/management/
db.propertiesbackup
For the server.xml file:
# mv /etc/cloudstack/management/server.xml /etc/cloudstack/management/
server.xmlbackup
b. Copy the *.rpmsave file to create a new file.
For the db.properties file:
# cp -ap /etc/cloudstack/management/db.properties.rpmsave /etc/cloudstack/management/
db.properties
For the server.xml file:
# cp -ap /etc/cloudstack/management/server.xml.rpmsave /etc/cloudstack/management/
server.xml
c. Merge your changes from the backup file into the new file.
For the db.properties file:
35
Page 40

Chapter 9. Upgrading CloudPlatform to the Latest Version
# vi /etc/cloudstack/management/db.properties
For the server.xml file:
# vi /etc/cloudstack/management/server.xml
5. Repeat steps 1 - 6 on each management server node.
Post-Upgrade Procedure
1. If you are using VMWare or Hyper-V hypervisors, you must update SystemVM.ISO. Section 9.15,
“Updating SystemVM.ISO ”
2. Start the first Management Server.
# service cloudstack-management start
Wait until the databases are upgraded. After you confirm the database upgrade, start the other
Management Servers one at a time by running the this command on each node.
Note
After a successful CloudPlatform upgrade, you will be able to restart Management Server
successfully. If the upgrade is not completed successfully, you will face problems in restarting
Management Servers
3. Start the Usage Servers that you have stopped (if they were running on your previous version).
Perform this on each Usage Server host.
# service cloudstack-usage start
4. Do the following procedures, if required:
• (KVM Only) Upgrade and start the agent on a KVM host.
For more information, see Section 9.7, “Upgrading KVM Agents (KVM Only) ”
• (Hyper-V only) Upgrade and start the agent on a Hyper-V host.
For more information, see Section 9.8, “Upgrading Hyper-V Agents (Hyper-V Only) ”
5. Log on to the CloudPlatform UI using administrator privileges and check the status of the hosts.
All hosts must be in the Up state (except those hosts that you know to be offline). Depending on
the number of hosts, you may need to wait for 20 or 30 minutes to complete this.
Do not proceed to the next step until the hosts display in the Up state. If the hosts do not display in
the Up state, you need to contact Citrix support.
36
Page 41

Upgrading from 4.3.x to 4.5.0
Note
If you cannot log on to CloudPlatform UI, clear your browser cache and reload the page.
6. Upgrade Secondary Storage VMs and Console Proxy VMs.
For more information, see Section 9.11, “Upgrading Secondary Storage VMs and Console Proxy
VMs ”
7. Upgrade and restart virtual routers.
For more information, see Section 9.12, “Upgrading the Virtual Routers Selectively ”
8. (XenServer only) Upgrade all existing XenServer clusters to XenServer 6.2 SP1 Hotfix
XS62ESP1005.
For more information, see Section 9.16.4, “Upgrading to XenServer 6.2 SP1 Hotfix
XS62ESP1005”.
For instructions for upgrading XenServer software and applying hotfixes, see Section 9.16.2,
“Applying Hotfixes to a XenServer Cluster ”.
9. (VMware only) After upgrade, you can change a Standard vSwitch zone to a VMware dvSwitch
zone, if required.
For more information, see Section 9.13, “Changing a Standard vSwitch Zone to a VMware
dvSwitch Zone (VMWare Only) ”
Post-Upgrade Considerations
• Restart the network with setting cleanup to true if DHCP services run concurrently on two VRs.
Service monitoring is enabled for redundant VR, which causes DHCP services to run simultaneously
on two VRs. Stopping service monitoring for the existing routers should resolve this issue.
• Troubleshooting tip: If passwords which you know to be valid appear not to work after upgrade, or
other UI issues are seen, try clearing your browser cache and reloading the UI page.
• (VMware only) After upgrade, whenever you add a new VMware cluster to a zone that was created
with a previous version of CloudPlatform, the fields vCenter host, vCenter Username, vCenter
Password, and vCenter Datacenter are required. The Add Cluster dialog in the CloudPlatform user
interface incorrectly shows them as optional, and will allow you to proceed with adding the cluster
even though these important fields are blank. If you do not provide the values, you will see an error
message like "Your host and/or path is wrong. Make sure it's of the format http://hostname/path".
• We recommend you to use the following global configuration settings:
Global Parameter Value
deployment.planners.exclude SkipHeuresticsPlanner
ha.investigators.order SimpleInvestigator,XenServerInvestigator,
KVMInvestigator,HypervInvestigator,
37
Page 42

Chapter 9. Upgrading CloudPlatform to the Latest Version
Global Parameter Value
VMwareInvestigator,PingInvestigator,
ManagementIPSysVMInvestigator
system.vm.random.password true
xapiwait 60
• If you are using LDAP authentication, change the default values based on the LDAP server that you
are using:
LDAP Attribute OpenLDAP Active Directory
ldap.user.object inetOrgPerson user
ldap.username.attribute uid sAMAccountName
ldap.group.object groupOfUniqueNames group
ldap.group.user.uniquemember uniquemember member
9.2. Upgrading from 4.2.x to 4.5.0
This section explains how to upgrade from CloudPlatform version 4.2.x to version 4.5.
Pre-Upgrade Procedure
1. Register the latest System VM templates.
For more information about the latest, hypervisor-specific system VM templates, refer to
Appendix A, Latest System VM Templates
Note
CloudPlatform fails to create system VMs if you have provisioned your cloud infrastructure
on VMWare hypervisor. This occurs on each zone in your environment that is provisioned on
VMWare hypervisor.
This failure logs the following error message:
Message: Unable to unpack snapshot OVA file at: /var/cloudstack/mnt/
VM/7407677735140.6646923a/template/tmpl/1/8//routing-8.ova
To avoid this failure, you must manually run the following command on the templates folder
after you register the new VMWare system VM template.
chmod -R 0777 /path_to_secondary_storage_mount_point/template/
2. Download the latest System VM to all the primary storages using the prepareTemplate API.
http://<management_server_ip_address>:8080/client/api?
command=prepareTemplate&templateid=a8813ba3-dfe8-48b2-a583-0cb19c9423b2&zoneid=ce9a82baf419-4041-b72b-1d2ee1483ba5&response=json&sessionkey=G8yD3LXsOi1p5KVSkAO62VXM%2BGE%3D
38
Page 43

Upgrading from 4.2.x to 4.5.0
API response:
{ "preparetemplateresponse" : { "count":1 ,"template" : [
{"id":"a8813ba3-dfe8-48b2-a583-0cb19c9423b2","name":"systemvmvmware-4.5","displaytext":"systemvmvmware-4.5","ispublic":false,"created":"2015-01-06T14:13:19-0800","isready":true,
"passwordenabled":false,"format":"OVA","isfeatured":false,"crossZones":false,
"ostypeid":"1a7f544c-95e0-11e4-b6cc-ced18bec4952","ostypename":"Debian
GNU/Linux 7(64-bit)","account":"admin","zoneid":"ce9a82baf419-4041-b72b-1d2ee1483ba5","zonename":"zone-1","status": "Download
Complete","size":2621440000,"templatetype":"USER","hypervisor":"VMware","domain":
"ROOT","domainid":"1a240d26-95e0-11e4-b6ccced18bec4952","isextractable":false,"checksum":"01cb382894c35eab54a0b0d00a884931","tags":
[], "sshkeyenabled":false,"isdynamicallyscalable":false}] } }
3. (KVM on RHEL 6.0/6.1/6.2 only) If the existing CloudPlatform deployment includes one or more
clusters of KVM hosts that run on RHEL 6.0, RHEL 6.1, or RHEL 6.2 operating system, you must
first upgrade the operating system version of these hosts to RHEL 6.3.
To do this task, see Section 9.4, “Upgrading Operating System version of KVM Hosts to RHEL 6.3
from RHEL 6.0 or 6.1 ”
4. Run the following command on all active Usage Server hosts to stop the Usage servers that are
currently enabled.
# service cloudstack-usage stop
5. Run the following command on all Management Servers to stop the Management Server hosts.
# service cloudstack-management stop
6. Back up MySQL databases at the MySQL master.
It is assumed in the following procedures that you have set the root password on the MySQL
database as per the CCP best practices recommendation. In the following commands, substitute
your own MySQL root password.
# mysqldump -u root -p<mysql_password> cloud > cloud-backup.dmp
# mysqldump -u root -p<mysql_password> cloud_usage > cloud-usage-backup.dmp
Upgrade Procedure
1. Access https://www.citrix.com/downloads/cloudplatform.html and download CloudPlatform 4.5
onto the new management server host.
Note
You need a valid Citrix account to access this link and download CloudPlatform 4.5.
2. You will get a file with the file name in the format CloudPlatform-4.5.0-N-
OSVERSION.tar.gz. Untar the file and run the install.sh script that is available with it.
39
Page 44

Chapter 9. Upgrading CloudPlatform to the Latest Version
Before you run the following command, you must replace the file and the directory names with the
ones that you are using.
# tar xzf CloudPlatform-4.5.0-N-OSVERSION.tar.gz
# cd CloudPlatform-4.5.0-N-OSVERSION
# ./install.sh
You can see a few messages as the installer prepares, followed by a list of options from which you
can choose the option to perform the upgrade operation.
3. Enter U to upgrade the package.
>U
You can view messages as the upgrade proceeds. After the upgrade is completed, you can view
the message like Complete! Done.
4. If you have made changes to your existing copy of the db.properties and the server.xml
configuration files in your previous-version of CloudPlatform installation, CloudPlatform preserves
those changes in the upgrade. However, you need to do the following steps to place these
changes in a new version of the file, which is compatible with version 4.5:
If the upgrade output in the previous step includes a message like the following, it indicates that
your old db.properties and server.xml files contain some custom content and you need to
merge the two files:
For db.properties file, the message appears as follows:
warning: /etc/cloud.rpmsave/management/db.properties created as /etc/cloudstack/
management/db.properties.rpmnew
For server.xml file, the message appears as follows:
warning: /etc/cloud.rpmsave/management/server.xml created as /etc/cloudstack/management/
server.xml.rpmnew
a. Backup the previous version of the db.properties or the server.xml file. For example:
(substitute the file name in these commands as needed)
For the db.properties file:
# mv /etc/cloudstack/management/db.properties /etc/cloudstack/management/
db.propertiesbackup
For the server.xml file:
# mv /etc/cloudstack/management/server.xml /etc/cloudstack/management/
server.xmlbackup
b. Copy the *.rpmsave file to create a new file.
For the db.properties file:
40
Page 45

# cp -ap /etc/cloudstack/management/db.properties.rpmsave /etc/cloudstack/management/
db.properties
For the server.xml file:
# cp -ap /etc/cloudstack/management/server.xml.rpmsave /etc/cloudstack/management/
server.xml
c. Merge your changes from the backup file into the new file.
For the db.properties file:
# vi /etc/cloudstack/management/db.properties
For the server.xml file:
# vi /etc/cloudstack/management/server.xml
5. Repeat steps 1 - 6 on each management server node.
Upgrading from 4.2.x to 4.5.0
Post-Upgrade Procedure
1. If you are using VMWare or Hyper-V hypervisors, you must update SystemVM.ISO. Section 9.15,
“Updating SystemVM.ISO ”
2. Start the first Management Server.
# service cloudstack-management start
Wait until the databases are upgraded. After you confirm the database upgrade, start the other
Management Servers one at a time by running the this command on each node.
Note
After a successful CloudPlatform upgrade, you will be able to restart Management Server
successfully. If the upgrade is not completed successfully, you will face problems in restarting
Management Servers.
3. Start the Usage Servers that you have stopped (if they were running on your previous version).
Perform this on each Usage Server host.
# service cloudstack-usage start
4. Do the following procedures, if required:
• (KVM Only) Upgrade and start the agent on a KVM host.
For more information, see Section 9.7, “Upgrading KVM Agents (KVM Only) ”
41
Page 46

Chapter 9. Upgrading CloudPlatform to the Latest Version
• (Hyper-V only) Upgrade and start the agent on a Hyper-V host.
For more information, see Section 9.8, “Upgrading Hyper-V Agents (Hyper-V Only) ”
5. Log on to the CloudPlatform UI using administrator privileges and check the status of the hosts.
All hosts must be in the Up state (except those hosts that you know to be offline). Depending on
the number of hosts, you may need to wait for 20 or 30 minutes to complete this.
Do not proceed to the next step until the hosts display in the Up state. If the hosts do not display in
the Up state, you need to contact Citrix support.
Note
If you cannot log on to CloudPlatform UI, clear your browser cache and reload the page.
6. Upgrade Secondary Storage VMs and Console Proxy VMs.
For more information, see Section 9.11, “Upgrading Secondary Storage VMs and Console Proxy
VMs ”
7. Upgrade and restart virtual routers.
For more information, see Section 9.12, “Upgrading the Virtual Routers Selectively ”
8. (XenServer only) Upgrade all existing XenServer clusters to XenServer 6.2 SP1 Hotfix
XS62ESP1005.
For more information, see Section 9.16.4, “Upgrading to XenServer 6.2 SP1 Hotfix
XS62ESP1005”.
For instructions for upgrading XenServer software and applying hotfixes, see Section 9.16.2,
“Applying Hotfixes to a XenServer Cluster ”.
9. (VMware only) After upgrade, you can change a Standard vSwitch zone to a VMware dvSwitch
zone, if required.
For more information, see Section 9.13, “Changing a Standard vSwitch Zone to a VMware
dvSwitch Zone (VMWare Only) ”
Post-Upgrade Considerations
• Troubleshooting tip: If passwords which you know to be valid appear not to work after upgrade, or
other UI issues are seen, try clearing your browser cache and reloading the UI page.
• (VMware only) After upgrade, whenever you add a new VMware cluster to a zone that was created
with a previous version of CloudPlatform, the fields vCenter host, vCenter Username, vCenter
Password, and vCenter Datacenter are required. The Add Cluster dialog in the CloudPlatform user
interface incorrectly shows them as optional, and will allow you to proceed with adding the cluster
even though these important fields are blank. If you do not provide the values, you will see an error
message like "Your host and/or path is wrong. Make sure it's of the format http://hostname/path".
• We recommend you to use the following global configuration settings:
42
Page 47

Upgrading from 3.0.x to 4.5.0
Global Parameter Value
deployment.planners.exclude SkipHeuresticsPlanner
ha.investigators.order SimpleInvestigator,XenServerInvestigator,
KVMInvestigator,HypervInvestigator,
VMwareInvestigator,PingInvestigator,
ManagementIPSysVMInvestigator
system.vm.random.password true
xapiwait 60
• If you are using LDAP authentication, change the default values based on the LDAP server that you
are using:
LDAP Attribute OpenLDAP Active Directory
ldap.user.object inetOrgPerson user
ldap.username.attribute uid sAMAccountName
ldap.group.object groupOfUniqueNames group
ldap.group.user.uniquemember uniquemember member
9.3. Upgrading from 3.0.x to 4.5.0
This section explains how to upgrade from CloudPlatform version 3.0.x to version 4.5.
Pre-Upgrade Procedure
1. Register the latest System VM templates.
For more information about the latest, hypervisor-specific system VM templates, refer to
Appendix A, Latest System VM Templates
Note
CloudPlatform fails to create system VMs if you have provisioned your cloud infrastructure
on VMWare hypervisor. This occurs on each zone in your environment that is provisioned on
VMWare hypervisor.
This failure logs the following error message:
Message: Unable to unpack snapshot OVA file at: /var/cloudstack/mnt/
VM/7407677735140.6646923a/template/tmpl/1/8//routing-8.ova
To avoid this failure, you must manually run the following command on the templates folder
after you register the new VMWare system VM template.
chmod -R 0777 /path_to_secondary_storage_mount_point/template/
2. Download the latest System VM to all the primary storages using the prepareTemplate API.
43
Page 48

Chapter 9. Upgrading CloudPlatform to the Latest Version
http://<management_server_ip_address>:8080/client/api?
command=prepareTemplate&templateid=a8813ba3-dfe8-48b2-a583-0cb19c9423b2&zoneid=ce9a82baf419-4041-b72b-1d2ee1483ba5&response=json&sessionkey=G8yD3LXsOi1p5KVSkAO62VXM%2BGE%3D
API response:
{ "preparetemplateresponse" : { "count":1 ,"template" : [
{"id":"a8813ba3-dfe8-48b2-a583-0cb19c9423b2","name":"systemvmvmware-4.5","displaytext":"systemvmvmware-4.5","ispublic":false,"created":"2015-01-06T14:13:19-0800","isready":true,
"passwordenabled":false,"format":"OVA","isfeatured":false,"crossZones":false,
"ostypeid":"1a7f544c-95e0-11e4-b6cc-ced18bec4952","ostypename":"Debian
GNU/Linux 7(64-bit)", "account":"admin","zoneid":"ce9a82baf419-4041-b72b-1d2ee1483ba5","zonename":"zone-1","status": "Download
Complete","size":2621440000,"templatetype":"USER","hypervisor":"VMware","domain":
"ROOT","domainid":"1a240d26-95e0-11e4-b6ccced18bec4952","isextractable":false,"checksum":
"01cb382894c35eab54a0b0d00a884931","tags":
[],"sshkeyenabled":false,"isdynamicallyscalable":false}] } }
3. (KVM on RHEL 6.0/6.1/6.2 only) If the existing CloudPlatform deployment includes one or more
clusters of KVM hosts that run on RHEL 6.0, RHEL 6.1, or RHEL 6.2 operating system, you must
first upgrade the operating system version of these hosts to RHEL 6.3.
To do this task, see Section 9.4, “Upgrading Operating System version of KVM Hosts to RHEL 6.3
from RHEL 6.0 or 6.1 ”
4. Run the following command on all active Usage Server hosts to stop the Usage servers that are
currently enabled.
# service cloudstack-usage stop
5. Run the following command on all Management Servers to stop the Management Server hosts.
# service cloudstack-management stop
6. Back up MySQL databases at the MySQL master.
It is assumed in the following procedures that you have set the root password on the MySQL
database as per the CCP best practices recommendation. In the following commands, substitute
your own MySQL root password.
# mysqldump -u root -p<mysql_password> cloud > cloud-backup.dmp
# mysqldump -u root -p<mysql_password> cloud_usage > cloud-usage-backup.dmp
Upgrade Procedure
1. (RHEL/CentOS 5.x) If you are currently running CloudPlatform on RHEL/CentOS 5.x, use the
following command to set up an Extra Packages for Enterprise Linux (EPEL) repo:
rpm -Uvh http://mirror.pnl.gov/epel/5/i386/epel-release-5-4.noarch.rpm
2. Access https://www.citrix.com/downloads/cloudplatform.html and download CloudPlatform 4.5
onto the new management server host.
44
Page 49

Upgrading from 3.0.x to 4.5.0
Note
You need a valid Citrix account to access this link and download CloudPlatform 4.5.
3. You will get a file with the file name in the format CloudPlatform-4.5.0-N-
OSVERSION.tar.gz. Untar the file and run the install.sh script that is available with it.
Before you run the following command, you must replace the file and the directory names with the
ones that you are using.
# tar xzf CloudPlatform-4.5.0-N-OSVERSION.tar.gz
# cd CloudPlatform-4.5.0-N-OSVERSION
# ./install.sh
You can see a few messages as the installer prepares, followed by a list of options from which you
can choose the option to perform the upgrade operation.
4. Enter U to upgrade the package.
>U
You can view messages as the upgrade proceeds. After the upgrade is completed, you can view
the message like Complete! Done.
5. If you have made changes to your existing copy of the db.properties and the server.xml
configuration files in your previous-version of CloudPlatform installation, CloudPlatform preserves
those changes in the upgrade. However, you need to do the following steps to place these
changes in a new version of the file, which is compatible with version 4.5:
If the upgrade output in the previous step includes a message like the following, it indicates that
your old db.properties and server.xml files contain some custom content and you need to
merge the two files:
For db.properties file, the message appears as follows:
warning: /etc/cloud.rpmsave/management/db.properties created as /etc/cloudstack/
management/db.properties.rpmnew
For server.xml file, the message appears as follows:
warning: /etc/cloud.rpmsave/management/server.xml created as /etc/cloudstack/management/
server.xml.rpmnew
a. Backup the previous version of the db.properties or the server.xml file. For example:
(substitute the file name in these commands as needed)
For the db.properties file:
45
Page 50

Chapter 9. Upgrading CloudPlatform to the Latest Version
# mv /etc/cloudstack/management/db.properties /etc/cloudstack/management/
db.propertiesbackup
For the server.xml file:
# mv /etc/cloudstack/management/server.xml /etc/cloudstack/management/
server.xmlbackup
b. Copy the *.rpmsave file to create a new file.
For the db.properties file:
# cp -ap /etc/cloudstack/management/db.properties.rpmsave /etc/cloudstack/management/
db.properties
For the server.xml file:
# cp -ap /etc/cloudstack/management/server.xml.rpmsave /etc/cloudstack/management/
server.xml
c. Merge your changes from the backup file into the new file.
For the db.properties file:
# vi /etc/cloudstack/management/db.properties
For the server.xml file:
# vi /etc/cloudstack/management/server.xml
6. Repeat steps 1 - 6 on each management server node.
Post-Upgrade Procedure
1. Start the first Management Server.
# service cloudstack-management start
Wait until the databases are upgraded. After you confirm the database upgrade, start the other
Management Servers one at a time by running the this command on each node.
Note
After a successful CloudPlatform upgrade, you will be able to restart Management Server
successfully. If the upgrade is not completed successfully, you will face problems in restarting
M anagement Servers.
46
Page 51

Upgrading from 3.0.x to 4.5.0
2. Start the Usage Servers that you have stopped (if they were running on your previous version).
Perform this on each Usage Server host.
# service cloudstack-usage start
3. Do the following procedures, if required:
• (KVM Only) Upgrade and start the agent on a KVM host.
For more information, see Section 9.7, “Upgrading KVM Agents (KVM Only) ”
• (Hyper-V only) Upgrade and start the agent on a Hyper-V host.
For more information, see Section 9.8, “Upgrading Hyper-V Agents (Hyper-V Only) ”
4. Log on to the CloudPlatform UI using administrator privileges and check the status of the hosts.
All hosts must be in the Up state (except those hosts that you know to be offline). Depending on
the number of hosts, you may need to wait for 20 or 30 minutes to complete this.
Do not proceed to the next step until the hosts display in the Up state. If the hosts do not display in
the Up state, you need to contact Citrix support.
Note
If you cannot log on to CloudPlatform UI, clear your browser cache and reload the page.
5. Upgrade Secondary Storage VMs and Console Proxy VMs.
For more information, see Section 9.11, “Upgrading Secondary Storage VMs and Console Proxy
VMs ”
6. Upgrade and restart virtual routers.
For more information, see Section 9.12, “Upgrading the Virtual Routers Selectively ”
7. If you would like additional confirmation that the new system VM templates were correctly applied
when these system VMs were rebooted, SSH into the System VM and check the version.
Use one of the following techniques, depending on the hypervisor.
XenServer or KVM:
SSH in by using the link local IP address of the system VM. For example, in the command below,
substitute your own path to the private key used to log in to the system VM and your own link local
IP.
Run the following commands on the XenServer or KVM host on which the system VM is present:
# ssh -i /root/.ssh/id_rsa.cloud <link-local-ip> -p 3922
# cat /etc/cloudstack-release
The output should be like the following:
47
Page 52

Chapter 9. Upgrading CloudPlatform to the Latest Version
Cloudstack Release 4.5.0 Thu Dec 18 18:51:22 UTC 2014
ESXi
SSH in using the private IP address of the system VM. For example, in the command below,
substitute your own path to the private key used to log in to the system VM and your own private
IP.
Run the following commands on the Management Server:
# ssh -i /var/cloudstack/management/.ssh/id_rsa <private-ip> -p 3922
# cat /etc/cloudstack-release
The output should be like the following:
Cloudstack Release 4.5.0 Thu Dec 18 18:51:22 UTC 2014
8. If you want to close the admin port again (recommended in production systems), set
integration.api.port to null. Then restart the Management Server.
For information about how to set integration.api.port, see “Setting Configuration Parameters” in the
Citrix CloudPlatform Administration Guide.
9. (XenServer only) Upgrade all existing XenServer clusters to XenServer 6.2 SP1 Hotfix
XS62ESP1005.
For more information, see Section 9.16.4, “Upgrading to XenServer 6.2 SP1 Hotfix
XS62ESP1005”.
For instructions for upgrading XenServer software and applying hotfixes, see Section 9.16.2,
“Applying Hotfixes to a XenServer Cluster ”.
10. (VMware only) After upgrade, you can change a Standard vSwitch zone to a VMware dvSwitch
zone, if required.
For more information, see Section 9.13, “Changing a Standard vSwitch Zone to a VMware
dvSwitch Zone (VMWare Only) ”
Post-Upgrade Considerations
• Troubleshooting tip: If passwords which you know to be valid appear not to work after upgrade, or
other UI issues are seen, try clearing your browser cache and reloading the UI page.
• (VMware only) After upgrade, whenever you add a new VMware cluster to a zone that was created
with a previous version of CloudPlatform, the fields vCenter host, vCenter Username, vCenter
Password, and vCenter Datacenter are required. The Add Cluster dialog in the CloudPlatform user
interface incorrectly shows them as optional, and will allow you to proceed with adding the cluster
even though these important fields are blank. If you do not provide the values, you will see an error
message like "Your host and/or path is wrong. Make sure it's of the format http://hostname/path".
• We recommend you to use the following global configuration settings:
Global Parameter Value
deployment.planners.exclude SkipHeuresticsPlanner
48
Page 53

Upgrading Operating System version of KVM Hosts to RHEL 6.3 from RHEL 6.0 or 6.1
Global Parameter Value
ha.investigators.order SimpleInvestigator,XenServerInvestigator,
KVMInvestigator,HypervInvestigator,
VMwareInvestigator,PingInvestigator,
ManagementIPSysVMInvestigator
system.vm.random.password true
xapiwait 60
• If you are using LDAP authentication, change the default values based on the LDAP server that you
are using:
LDAP Attribute OpenLDAP Active Directory
ldap.user.object inetOrgPerson user
ldap.username.attribute uid sAMAccountName
ldap.group.object groupOfUniqueNames group
ldap.group.user.uniquemember uniquemember member
9.4. Upgrading Operating System version of KVM Hosts to
RHEL 6.3 from RHEL 6.0 or 6.1
If your existing CloudPlatform deployment includes one or more clusters of KVM hosts that run RHEL
6.0 or RHEL 6.1, you must first upgrade the operating system version on those hosts to RHEL 6.3.
You must do this upgrade before you upgrade CloudPlatform.
Run the following commands on every KVM host.
1. Download the CloudPlatform 4.5.0.0 RHEL 6.3 binaries from https://www.citrix.com/downloads/
cloudplatform.html.
2. Extract the binaries:
# cd /root
# tar xvf CloudPlatform-4.5.0.0-rhel6.tar.gz
3. Create a CloudPlatform 4.5 qemu repo:
# cd CloudPlatform-4.5.0.0-rhel6/6.3
# createrepo
4. Prepare the yum repo for upgrade. Edit the file /etc/yum.repos.d/rhel63.repo. For example:
[upgrade]
name=rhel63
baseurl=url-of-your-rhel6.3-repo
enabled=1
gpgcheck=0
[cloudstack]
name=cloudstack
baseurl=file:///root/CloudPlatform-4.5.0.0-rhel6/6.3
enabled=1
gpgcheck=0
49
Page 54

Chapter 9. Upgrading CloudPlatform to the Latest Version
5. Upgrade the host operating system from RHEL 6.0 to 6.3:
yum upgrade
9.5. Updating the Existing vCenter Password for the VMware Clusters Created in CloudPlatform 3.0.6 (VMware only)
If you have existing clusters created in CloudPlatform 3.0.6, additional steps are required to update
the existing vCenter password for each VMware cluster.
These steps will not affect running guests in the cloud. These steps are required only for clouds using
VMware clusters:
1. Stop the Management Server:
service cloudstack-management stop
2. Perform the following on each VMware cluster:
a. Encrypt the vCenter password:
java -classpath /usr/share/cloudstack-common/lib/jasypt-1.9.0.jar
org.jasypt.intf.cli.JasyptPBEStringEncryptionCLI encrypt.sh
input=<_your_vCenter_password_> password="`cat /etc/cloudstack/management/key`"
verbose=false
Save the output from this step for later use. You need to add this in the cluster_details and
vmware_data_center tables in place of the existing password.
b. Find the ID of the cluster from the cluster_details table:
mysql -u <username> -p<password>
select * from cloud.cluster_details;
c. Update the existing password with the encrypted one:
update cloud.cluster_details set value = <_ciphertext_from_step_i_> where id =
<_id_from_step_ii_>;
d. Confirm that the table is updated:
select * from cloud.cluster_details;
e. Find the ID of the VMware data center that you want to work with:
select * from cloud.vmware_data_center;
f. Change the existing password to the encrypted one:
50
Page 55

Upgrading vCenter Server Version 5.1 to Version 5.5
update cloud.vmware_data_center set password = <_ciphertext_from_step_i_> where id =
<_id_from_step_v_>;
g. Confirm that the table is updated:
select * from cloud.vmware_data_center;
3. Start the CloudPlatform Management server
service cloudstack-management start
9.6. Upgrading vCenter Server Version 5.1 to Version 5.5
To upgrade VMWare vCenter Server from version 5.1 to version 5.5, perform the following procedure:
1. Run the following command on all the Usage Server hosts to stop the CloudPlatform Usage
Servers that are currently running:
# service cloudstack-usage stop
2. Run the following command on all Management server hosts to stop the CloudPlatform
Management Servers:
# service cloudstack-management stop
3. Upgrade vCenter Server from version 5.1 to 5.5 as described at: Methods of upgrading to vCenter
Server 5.5
1
4. Run the following command on each CloudPlatform Management Server separately to start it:
#service cloudstack-management start
5. Start all CloudPlatform Usage Servers.
#service cloudstack-usage start
9.7. Upgrading KVM Agents (KVM Only)
The following procedure will not affect the running guests in the cloud. This procedure is required only
for clouds using KVM as hosts and only on the KVM hosts.
1
http://kb.vmware.com/selfservice/microsites/search.do?language=en_US&cmd=displayKC&externalId=2053130
51
Page 56

Chapter 9. Upgrading CloudPlatform to the Latest Version
Note
After the software upgrade on a KVM machine, the Ctrl+Alt+Del button on the console view of a
VM doesn't work. Use Ctrl+Alt+Insert to log in to the console of the VM.
1. Copy the CloudPlatform 4.5.0.0.tgz file, download it to the host, untar it, and change to the
resulting directory.
2. Stop the running agent.
# service cloudstack-agent stop
3. Update the agent software.
# ./install.sh
4. Choose "U" to update the packages.
5. Upgrade all the existing bridge names to new bridge names by running this script:
# cloudstack-agent-upgrade
6. Install a libvirt hook with the following commands:
# mkdir /etc/libvirt/hooks
# cp /usr/share/cloudstack-agent/lib/libvirtqemuhook /etc/libvirt/hooks/qemu
# chmod +x /etc/libvirt/hooks/qemu
7. Restart libvirtd.
# service libvirtd restart
8. Start the agent.
# service cloudstack-agent start
9.8. Upgrading Hyper-V Agents (Hyper-V Only)
The following procedure will not affect the running guests in the cloud. This procedure is required only
for clouds using Hyper-V as hosts and only on the Hyper-V hosts.
1. Copy the CloudPlatform 4.5.0.0.tgz file, download it to the Hyper-V host, and untar it.
2. Run the CloudPlatform-4.5.X-hypervagent.msi installer as an Administrator.
Press the Ctrl + Shift key when you right-click the Agent Installer MSI to run as another user. You
can select Administrator from the given options.
3. Provide the Domain user credentials when prompted.
52
Page 57

Upgrading KVM Host Opearting System
The Domain user is part of the Hyper-V Administrators and local Administrators group on the host.
When the agent installation is finished, the agent runs as a service on the host machine.
4. In the Ready to Update CloudStack Hyper-V Agent Installation panel, click Update to run the
Hyper-V agent upgrade process to completion.
To upgrade Hyper-V Agent MSI using command line, run the following command:
# msiexec /i CloudStackAgentSetup.msi /quiet /qn /norestart /log install.log
SERVICE_USERNAME=>username< SERVICE_PASSWORD=>password<INSTALL_CERTIFICATE="False"
9.9. Upgrading KVM Host Opearting System
1. Perform the following steps to remove the existing patched qemu binaries and install default qemu
binaries:
a. Stop the running cloudstack agent on the KVM host.
b.
yum clean all
c.
rpm -e --nodeps qemu-kvm qemu-img
d.
yum install qemu-kvm qemu-img
2. Run the yum upgradecommand.
3. Recover libvirt related configuration files as follows:
a. Edit /etc/sysconfig/libvirtd. Ensure that this file has the following two lines at end:
export CGROUP_DAEMON='cpu:/virt'
LIBVIRTD_ARGS=-l
b. Edit /etc/libvirt/qemu.conf. Ensure that this file has the following lines at the end:
cgroup_controllers=["cpu"]
security_driver="none"
user="root"
group="root"
vnc_listen="0.0.0.0"
c. Edit /etc/libvirt/libvirtd.conf. Ensure that this file has the following lines at the end:
listen_tcp=1
tcp_port="16509"
auth_tcp="none"
53
Page 58

Chapter 9. Upgrading CloudPlatform to the Latest Version
listen_tls=0
4. Restart the libvirtd service.
9.10. Upgrading KVM Hosts
If the OS version of the KVM host is RHEL 6.2 and lower, you must upgrade the KVM host OS version
to RHEL 6.3 or higher as follows:
Note
Before you upgrade KVM host OS, ensure that Management Server is not upgraded.
1. If the OS version of the KVM host is RHEL 6.2 and lower, you must upgrade the KVM host OS
version to RHEL 6.3 or higher:
a. From the CloudPlatform Management Server UI, place the host in the maintenance mode.
Note
Before you upgrade KVM host OS, ensure that Management Server is not upgraded.
b. Go to the KVM host and upgrade the host OS based on the steps in Section 9.9, “Upgrading
KVM Host Opearting System ”
c. Start the cloudstack agent:
service cloudstack-agent start
d. Cancel the host maintenance. Make sure that the host is in the Up state.
e. Perform these steps on all the KVM hosts to upgrade their opearting systems to RHEL 6.3 or
higher.
2. If OS version of the KVM host is RHEL 6.3 but with older version of CCP installed, the OS
upgrade is not mandatory.
a. Ensure that Management Server is not upgraded. Then, place the host in maintenance mode
through CloudPlatform UI.
b. Decide whether you want to upgrade the version of RHEL. If you want to upgrade, follow the
steps in Section 9.9, “Upgrading KVM Host Opearting System ”.
c. Remove the existing patched qemu binaries. see Step 1 in Section 9.9, “Upgrading KVM Host
Opearting System ”.
d. Stop and then start the CloudPlatform agent:
54
Page 59

Upgrading Secondary Storage VMs and Console Proxy VMs
service cloudstack-agent restart
e. Cancel the host maintenance. Ensure that the host is in the Up state.
f. Continue with the above steps on all the KVM hosts.
3. Upgrade Management Server. For more information, refer to the appropriate topic from the
following:
Section 9.1, “Upgrading from 4.3.x to 4.5.0 ”
Section 9.2, “Upgrading from 4.2.x to 4.5.0 ”
Section 9.3, “Upgrading from 3.0.x to 4.5.0 ”
4. Upgrade each KVM agent. For more information, refer to Section 9.7, “Upgrading KVM Agents
(KVM Only) ”
9.11. Upgrading Secondary Storage VMs and Console
Proxy VMs
Perform the following on all the System VMs including Secondary Storage VMs and Console Proxy
VMs:
1. Upgrade Secondary Storage VMs and Console Proxy VMs either from the UI or by using
the following script. To upgrade the system VMs using the script, you must stop and
start the system VMs using the cloudstack-sysvmadm script. Ensure that the value of
integration.api.port is set to 8096. If not, set the value to 8096 and restart Management
Server:
# cloudstack-sysvmadm -d <IP address> -u cloud -p <password> -s -l <location-log-file>
<IP Address> is the IP address of the cloud database server. If you have not specified this,
it will display as root. Also, you can specify any location to collect the logs. Default location is
cloud.log under current directory.
9.12. Upgrading the Virtual Routers Selectively
Perform the following procedure to selectively upgrade the virtual routers:
1. Log in to the CloudPlatform UI as the root administrator.
2. In the left navigation, choose Infrastructure.
3. On Virtual Routers, click View More.
All the VRs are listed in the Virtual Routers page.
4. In Select View drop-down, select desired grouping based on your requirement:
You can use either of the following:
• Group by zone
• Group by pod
55
Page 60

Chapter 9. Upgrading CloudPlatform to the Latest Version
• Group by cluster
• Group by account
5. Click the group which has the virtual routers to be upgraded.
6. Click the Upgrade button to upgrade all the virtual routers.
For example, if you have selected Group by zone, select the name of the desired zone .
7. Click OK to confirm.
9.13. Changing a Standard vSwitch Zone to a VMware
dvSwitch Zone (VMWare Only)
After upgrade, if you want to change a Standard vSwitch zone to a VMware dvSwitch Zone, perform
the following:
1. Ensure that the Public and Guest traffics are not on the same network as the Management and
Storage traffic.
2. Set vmware.use.dvswitch to true.
3. Access the physical network for the Public and guest traffic, then change the traffic labels as given
below:
<dvSwitch name>,<VLANID>,<Switch Type>
For example: dvSwitch18,,vmwaredvs
VLANID is optional.
4. Stop the Management server.
5. Start the Management server.
6. Add the new VMware dvSwitch-enabled cluster to this zone.
9.14. Upgrade CloudPlatform Bare Metal Agent on PXE and
DHCP Servers
If you installed Bare Metal clusters using a previous version of CloudPlatform, use the following steps
to upgrade the Bare Metal agent in order to get the latest bug fixes for 4.5.
1. Log in as root to the host or virtual machine running the Bare Metal PXE server and DHCP server.
2. Download CloudPlatform 4.5.0.0 onto the PXE or DHCP server. Get the software from the
following link:
https://www.citrix.com/English/ss/downloads/.
56
Page 61

Updating SystemVM.ISO
Note
You need a valid Citrix account to access this link and download CloudPlatform 4.5.
3. Upgrade the CloudPlatform packages. You should have a file in the form of “CloudPlatform-4.5.0N-OSVERSION.tar.gz”. Untar the file, then run the install.sh script inside it. Replace the file and
directory names below with those you are using:
# tar xzf CloudPlatform-4.5.0-N-OSVERSION.tar.gz
# cd CloudPlatform-4.5.0-N-OSVERSION
# ./install.sh
You should see a few messages as the installer prepares, followed by a list of choices.
4. Choose "U" to upgrade the package
>U
You should see some output as the upgrade proceeds, ending with a message like "Complete!
Done."
5. Run the Bare Metal setup script:
cloudstack-setup-baremetal
9.15. Updating SystemVM.ISO
Note
You must perform this procedure if you are provisioning your cloud infrastructure on Hyper-V.
Normally, you do not perform this procedure if you are upgrading CloudPlatform with other
supported hypervisors. However, if you are applying a hotfix to update systemVMs, you must
perform this procedure.
Note
On CloudPlatform versions 3.0.5.x and 3.0.7.x systemvm.iso will get propagated automatically;
therefore, no separate procedure is required.
Perform the following based on the hypervisor that you use:
57
Page 62

Chapter 9. Upgrading CloudPlatform to the Latest Version
• XenServer: No action is required.
• KVM
a. On the KVM host, stop the CloudPlatform agent.
b. Upgrade the CloudPlatform agent.
c. Restart the CloudPlatform agent.
d. Stop and Start SystemVMs.
• Hyper-V (for CloudPlatform versions 4.3 and above)
a. Stop all the Management Servers.
b. Remove systemvm-4.3.x.x.iso from the systemvm directory in the Secondary Storage
directory, \\<secondary_storage_path>\systemvm\.
c. Remove systemvm-4.3.x.x.iso from each Hyper-V host.
The location of the file is C:\Users\Public\Documents\Hyper-V\Virtual Hard Disks.
d. Start the Management Server.
e. Destroy SystemVMs.
New SystemVMs will be spawned and the new iso, systemvm-4.3.x.x.iso, is copied to the
secondary storage and Hypervisor host.
• VMware
a. Stop all the Management Servers.
b. Remove the old systemvm<version>.iso file from the systemvm directory, \
\<secondary_storage_path>\systemvm\.
Where <version> denotes the Management Server version number.
c. Start the Management Server.
Verify if the new systemvm.iso is pushed to the systemvm folder in the Secondary Storage
directory.
d. Stop and Start SystemVMs.
9.16. Upgrading and Applying Hotfix on XenServer
Hypervisor Hosts
In CloudPlatform 4.5.0, you can upgrade XenServer hypervisor host software without having
to disconnect the XenServer cluster. You can upgrade XenServer 5.6 GA, or 5.6 FP1 to any
newer version that is supported by CloudPlatform. The actual upgrade is described in XenServer
documentation, but there are some additional steps you must perform before and after the upgrade.
9.16.1. Upgrading to a New XenServer Version
To upgrade XenServer hosts when running CloudPlatform 4.5.0.0:
58
Page 63
Upgrading to a New XenServer Version
1. Edit the file /etc/cloudstack/management/environment.properties and add the following line:
manage.xenserver.pool.master=false
2. Restart the Management Server to put the new setting into effect.
# service cloudstack-management restart
3. Find the host name of the master host in your XenServer cluster (pool):
a. Run the following command on any host in the pool, and make a note of the host-uuid of the
master host:
# xe pool-list
b. Now run the following command, and find the host that has a host-uuid that matches the
master host from the previous step. Make a note of this host's name. You will need to input it
in a later step.
# xe host-list
4. On CloudPlatform, put the master host into maintenance mode. Use the host name you
discovered in the previous step.
Note
In the latest XenServer upgrade procedure, even after putting the master host into
maintenance mode, the master host continues to stay as master.
Any VMs running on this master will be automatically migrated to other hosts, unless there is only
one UP host in the cluster. If there is only one UP host, putting the host into maintenance mode
will stop any VMs running on the host.
5. Disconnect the XenServer cluster from CloudPlatform. It will remain disconnected only long
enough to upgrade one host.
a. Log in to the CloudPlatform UI as root.
b. Navigate to the XenServer cluster, and click Actions – Unmanage.
c. Watch the cluster status until it shows Unmanaged.
6. Upgrade the XenServer software on the master host:
a. Insert the XenServer CD.
b. Reboot the host.
c. Upgrade to the newer version of XenServer. Use the steps in XenServer documentation.
59
Page 64

Chapter 9. Upgrading CloudPlatform to the Latest Version
7. Cancel the maintenance mode on the master host.
8. Reconnect the XenServer cluster to CloudPlatform.
a. Log in to the CloudPlatform UI as root.
b. Navigate to the XenServer cluster, and click Actions – Manage.
c. Watch the status to see that all the hosts come up.
9. Upgrade the slave hosts in the cluster:
a. Put a slave host into maintenance mode.
Wait until all the VMs are migrated to other hosts.
b. Upgrade the XenServer software on the slave.
c. Cancel maintenance mode for the slave.
d. Repeat steps a through c for each slave host in the XenServer pool.
10. You might need to change the OS type settings for VMs running on the upgraded hosts, if any of
the following apply:
• If you upgraded from XenServer 5.6 GA to XenServer 5.6 SP2, change any VMs that have the
OS type CentOS 5.5 (32-bit), Oracle Enterprise Linux 5.5 (32-bit), or Red Hat Enterprise Linux
5.5 (32-bit) to Other Linux (32-bit). Change any VMs that have the 64-bit versions of these same
OS types to Other Linux (64-bit).
• If you upgraded from XenServer 5.6 SP2 to XenServer 6.0.2 or higher, change any VMs that
have the OS type CentOS 5.6 (32-bit), CentOS 5.7 (32-bit), Oracle Enterprise Linux 5.6 (32bit), Oracle Enterprise Linux 5.7 (32-bit), Red Hat Enterprise Linux 5.6 (32-bit) , or Red Hat
Enterprise Linux 5.7 (32-bit) to Other Linux (32-bit). Change any VMs that have the 64-bit
versions of these same OS types to Other Linux (64-bit).
• If you upgraded from XenServer 5.6 to XenServer 6.0.2 or higher, do all of the above.
9.16.2. Applying Hotfixes to a XenServer Cluster
1. Edit the file /etc/cloudstack/management/environment.properties and add the following line:
manage.xenserver.pool.master=false
2. Restart the Management Server to put the new setting into effect.
# service cloudstack-management restart
3. Find the host name of the master host in your XenServer cluster (pool):
a. Run the following command on any host in the pool, and make a note of the host-uuid of the
master host:
# xe pool-list
60
Page 65

Applying Hotfixes to a XenServer Cluster
b. Now run the following command, and find the host that has a host-uuid that matches the
master host from the previous step. Make a note of this host's name. You will need to input it
in a later step.
# xe host-list
4. On CloudPlatform, put the master host into maintenance mode. Use the host name you
discovered in the previous step.
Any VMs running on this master will be automatically migrated to other hosts, unless there is only
one UP host in the cluster. If there is only one UP host, putting the host into maintenance mode
will stop any VMs running on the host.
5. Disconnect the XenServer cluster from CloudPlatform. It will remain disconnected only long
enough to hotfix one host.
a. Log on to the CloudPlatform UI as root.
b. Navigate to the XenServer cluster, and click Actions – Unmanage.
c. Watch the cluster status until it shows Unmanaged.
d. If pool HA is enabled , disable pool HA.
6. Hotfix the master host:
a. Add the XenServer hot fixes to the master host.
i. Assign a UUID to the update file:
xe patch-upload file-name=XS602E015.xsupdate
The command displays the UUID of the update file:
33af688e-d18c-493d-922b-ec51ea23cfe9
ii. Repeat the xe patch-upload command for all other XenServer updates:
XS62ESP1005.xsupdate, XS62ESP1003.xsupdate.
Take a note of the UUIDs of the update files. The UUIDs are required in the next step.
b. Apply XenServer hot fixes to master host:
xe patch-apply host-uuid=<master uuid> uuid=<hotfix uuid>
c. Repeat xe patch-apply command for all the hot fixes.
d. Install the required CSP files.
xe-install-supplemental-pack <csp-iso-file>
e. Restart the master host.
7. Cancel the maintenance mode on the master host.
61
Page 66

Chapter 9. Upgrading CloudPlatform to the Latest Version
8. Reconnect the XenServer cluster to CloudPlatform.
a. Log on to the CloudPlatform UI as root.
b. Navigate to the XenServer cluster, and click Actions – Manage.
c. Watch the status to see that all the hosts come up.
9. Hotfix the slave hosts in the cluster:
a. Put a slave host into maintenance mode.
Wait until all the VMs are migrated to other hosts.
b. Apply the XenServer hot fixes to the slave host:
xe patch-apply host-uuid=<slave uuid> uuid=<hotfix uuid>
c. Repeat Step a through b for each slave host in the XenServer pool.
d. Install the required CSP files.
xe-install-supplemental-pack <csp-iso-file>
e. Restart the slave hosts.
Wait until all the slave hosts are up. It might take several minutes for the hosts to come up.
10. Cancel the maintenance mode on the slave hosts.
11. Put the master host to maintenance and unmanage the cluster.
12. If pool HA was disabled (in step3), enable pool HA by providing the heartbeat Storage Repository:
# xe pool-ha-enable heartbeat-sr-uuids="uuid of the HA SR"
Note
When you re-enable pool HA, ensure that you use xe pool-ha-enable with the
heartbeat-sr-uuids parameter pointing to the correct HA Storage Repository. If the
heartbeat-sr-uuids parameter is skipped, any Storage Repository is randomly picked up
for HA, which should be avoided.
13. You might need to change the OS type settings for VMs running on the upgraded hosts, if any of
the following apply:
• If you upgraded from XenServer 5.6 SP2 to XenServer 6.0.2, change any VMs that have the
OS type CentOS 5.6 (32-bit), CentOS 5.7 (32-bit), Oracle Enterprise Linux 5.6 (32-bit), Oracle
Enterprise Linux 5.7 (32-bit), Red Hat Enterprise Linux 5.6 (32-bit) , or Red Hat Enterprise Linux
5.7 (32-bit) to Other Linux (32-bit). Change any VMs that have the 64-bit versions of these same
OS types to Other Linux (64-bit).
62
Page 67

Installing CloudPlatform XenServer Support Package (CSP)
• If you upgraded from XenServer 5.6 GA or 5.6 FP1 to XenServer 6.0.2, change any VMs
that have the OS type CentOS 5.5 (32-bit), CentOS 5.6 (32-bit), CentOS 5.7 (32-bit), Oracle
Enterprise Linux 5.5 (32-bit), Oracle Enterprise Linux 5.6 (32-bit), Oracle Enterprise Linux 5.7
(32-bit), Red Hat Enterprise Linux 5.5 (32-bit), Red Hat Enterprise Linux 5.6 (32-bit) , or Red
Hat Enterprise Linux 5.7 (32-bit) to Other Linux (32-bit). Change any VMs that have the 64-bit
versions of these same OS types to Other Linux (64-bit).
9.16.3. Installing CloudPlatform XenServer Support Package (CSP)
Ensure that you install CloudPlatform XenServer Support Package (CSP) to enable security groups,
elastic load balancing, and elastic IP on XenServer.
If your hosts on versions prior to 6.2 operated on bridge mode with CSP packages installed, after
upgrade, run only the following to restore the desired Security Groups configuration:
1. If the XenServer host is part of a zone that uses basic networking, disable Open vSwitch (OVS):
# xe-switch-network-backend bridge
2. Restart the host machine when prompted.
3. If you are using XenServer 6.1 or higher, perform the following:
a. Run the following commands:
echo 1 > /proc/sys/net/bridge/bridge-nf-call-iptables
echo 1 > /proc/sys/net/bridge/bridge-nf-call-arptables
b. To persist the above changes across reboots, set the following values in the /etc/sysctl.conf
file. Run the following command:
sysctl -p /etc/sysctl.conf
Set these to 1:
net.bridge.bridge-nf-call-iptables = 1
net.bridge.bridge-nf-call-arptables = 1
9.16.4. Upgrading to XenServer 6.2 SP1 Hotfix XS62ESP1005
It is highly recommended that all XenServer clusters are upgraded to XenServer 6.2 SP1 Hotfix
XS62ESP1005. You can upgrade from any prior version of XenServer to the latest version, which
might include multiple hops as part of a single upgrade process. For example, if you are upgrading
from 6.0.2, upgrade the master host by using the upgrade path given below, followed by each slave
host upgrading to XenServer 6.2 SP1 Hotfix XS62ESP1005 by using this same upgrade path:
1. XenServer 6.0.2 to XenServer 6.2
2. XenServer 6.2 to XenServer 6.2 SP1
3. XenServer 6.2 SP1 to XenServer 6.2 SP1 Hotfix XS62ESP1005
After upgrading, ensure that XenServer Pool HA is enabled.
63
Page 68

Chapter 9. Upgrading CloudPlatform to the Latest Version
9.17. Upgrading from Apache CloudStack to CloudPlatform
You can upgrade from Apache CloudStack 4.5 to CloudPlatform 4.5. The procedure that you need
to follow for this upgrade is similar to the procedure for upgrading from the previous versions of
CloudPlatform to CloudPlatform 4.5.
The following sections in this guide describe the procedure that you must follow to upgrade from the
previous versions of CloudPlatform to CloudPlatform 4.5:
• Section 9.1, “Upgrading from 4.3.x to 4.5.0 ”
• Section 9.2, “Upgrading from 4.2.x to 4.5.0 ”
• Section 9.3, “Upgrading from 3.0.x to 4.5.0 ”
64
Page 69

Appendix A. Latest System VM Templates
To register the system VM template, do the following:
1. Log on to the CloudPlatform UI as root administrator.
2. In the CloudPlatform UI, add a new System VM template for each hypervisor type that is used in
your cloud. In the left-side navigation bar, click Templates.
Note
In each zone, add a system VM template for the hypervisor that is used in that zone. Citrix
strongly recommends using the same type of hypervisors in a zone to avoid operational
issues.
3. In the right-side pane, in the Select view list box, select Templates and click Register template.
4. In the Register template dialog box, specify the values depending on the hypervisor type and
click OK.
For more information about the latest, hypervisor-specific system VM templates, refer to the
following table:
Ensure that the template downloads successfully and enters the READY state. Proceed after the
templates are downloaded successfully.
Note
If you use more than one type of hypervisors in your cloud, repeat these steps to download
the system VM template for each hypervisor type. If you do not repeat the steps for each
hypervisor type, the upgrade will fail.
The following table displays the System VM templates available with the CloudPlatform version 4.5:
Hypervisor Description
XenServer Name: systemvm-xenserver-4.5
Description: systemvm-xenserver-4.5
URL: http://download.cloud.com/templates/4.5/
systemvm64template-2014-12-18-4.5.0.0xen.vhd.bz2
Zone: (4.3 and beyond) Choose the zone where
this hypervisor is used. If your CloudPlatform
65
Page 70

Appendix A. Latest System VM Templates
Hypervisor Description
deployment includes multiple zones running
XenServer, select each zone and individually
register the template to make the template
available in all the XenServer zones.
(Prior to version 4.3): Choose the zone where
this hypervisor is used. If your CloudPlatform
deployment includes multiple zones running
XenServer, choose All Zones to make the
template available in all the zones.
Hypervisor: XenServer
Format: VHD
OS Type: Debian GNU/Linux 7.0 (64-bit) (or the
highest Debian release number available in the
dropdown)
Extractable: no
Password Enabled: no
Public: no
Featured: no
Section 9.1, “Upgrading from 4.3.x to 4.5.0 ”
Section 9.2, “Upgrading from 4.2.x to 4.5.0 ”
Section 9.3, “Upgrading from 3.0.x to 4.5.0 ”
KVM Name: systemvm-kvm-4.5
Description: systemvm-kvm-4.5
URL: http://download.cloud.com/templates/4.5/
systemvm64template-2014-12-18-4.5.0.0kvm.qcow2.bz2
Zone: (4.3 and beyond) Choose the zone where
this hypervisor is used. If your CloudPlatform
deployment includes multiple zones running
KVM, select each zone and individually register
the template to make the template available in all
the zones.
66
(Prior to version 4.3): Choose the zone where
this hypervisor is used. If your CloudPlatform
deployment includes multiple zones running
KVM, choose All Zones to make the template
available in all the zones.
Hypervisor: KVM
Format: QCOW2
Page 71

Hypervisor Description
OS Type: Debian GNU/Linux 7.0 (64-bit) (or the
highest Debian release number available in the
dropdown)
Extractable: no
Password Enabled: no
Public: no
Featured: no
Section 9.1, “Upgrading from 4.3.x to 4.5.0 ”
Section 9.2, “Upgrading from 4.2.x to 4.5.0 ”
Section 9.3, “Upgrading from 3.0.x to 4.5.0 ”
VMware Name: systemvm-vmware-4.5
Description: systemvm-vmware-4.5
URL: http://download.cloud.com/templates/4.5/
systemvm64template-2014-12-18-4.5.0.0vmware.ova
Zone: Zone: (4.3 and beyond) Choose the
zone where this hypervisor is used. If your
CloudPlatform deployment includes multiple
zones running VMware hypervisor, select each
zone and individually register the template to
make the template available in all the zones.
(Prior to version 4.3): Choose the zone where
this hypervisor is used. If your CloudPlatform
deployment includes multiple zones running
VMware hypervisor, choose All Zones to make
the template available in all the zones.
Hypervisor: VMware
Format: OVA
OS Type: Debian GNU/Linux 7.0 (64-bit) (or the
highest Debian release number available in the
dropdown)
Extractable: no
Password Enabled: no
Public: no
Featured: no
Section 9.1, “Upgrading from 4.3.x to 4.5.0 ”
67
Page 72

Appendix A. Latest System VM Templates
Hypervisor Description
Section 9.2, “Upgrading from 4.2.x to 4.5.0 ”
Section 9.3, “Upgrading from 3.0.x to 4.5.0 ”
Hyper-V
(Applies to versions 4.3 and above)
Name: systemvm-hyperv-4.5
Description: systemvm-hyperv-4.5
URL: http://download.cloud.com/templates/4.5/
systemvm64template-2014-12-18-4.5.0.0hyperv.vhd.bz2
Zone: Choose the zone where this hypervisor is
used. If your CloudPlatform deployment includes
multiple zones running Hyper-V, choose All
Zones to make the template available in all the
Hyper-V zones.
Hypervisor: Hyper-V
Format: VHD
OS Type: Debian GNU/Linux 7.0 (64-bit) (or the
highest Debian release number available in the
dropdown)
Extractable: no
Password Enabled: no
Public: no
Featured: no
Section 9.1, “Upgrading from 4.3.x to 4.5.0 ”
Section 9.2, “Upgrading from 4.2.x to 4.5.0 ”
Section 9.3, “Upgrading from 3.0.x to 4.5.0 ”
68
Page 73

Index
A
apply hotfix
XenServer cluster, 60
XenServer host, 58
connectivity, 8
Management Server installation, 17
MySQL
install on a standalone node, 11
MySQL database
failover, 29
replication, 27
B
browser requirements, 5
C
Change vSwitch Zone to dvSwitch Zone, 56
CloudPlatform
log on, 23
ports, 6
CloudPlatform Management Server
enable HTTPS, 21
SSL cipher, 23
configure local Yum repo, 9
configure Network File System (NFS) shares, 13
configure NFS server
separate node, 13
configure user process limits, 9
D
database failover, 29
E
enabling NTP, 10
H
hardware requirements, 5
I
installation
Additional CloudPlatform Management
Servers, 27
browser requirements, 5
download package, 7
hardware requirements, 5
network requirements, 5
OS requirements, 5
task flow, 3
installation task flow, 3
M
Management Server
install on first host, 17
load balancing, 27
Management Server host
verify host name, 8
management server host
N
network requirements, 5
NFS shares
primary storage, 13
secondary storage, 13
O
OS requirements, 5
P
ports, 6
preinstallation tasks
SELinux variable, 8
R
replicating database, 27
RHEL
upgrade OS version, 49
user process limits, 9
S
secondary storage
system VM template, 19
SELinux variable, 8
synchronize time, 10
system VM template, 19
U
update
SystemVM.ISO, 57
update vCenter password, 50
upgrade
3.0.x to 4.5.0, 43
4.2.x to 4.5.0, 38
4.3.x to 4.5.0, 33
Apache CloudStack 4.5 to CloudPlatform 4.5.,
64
Bare Metal agent, 56
console proxy VMs, 55
Hyper-V agents, 52
kvm agents, 51
KVM host OS, 53
secondary storage VMs, 55
virtual routers selective, 55
VRs, 55
69
Page 74

Index
XenServer host, 58
70
 Loading...