

Page 1
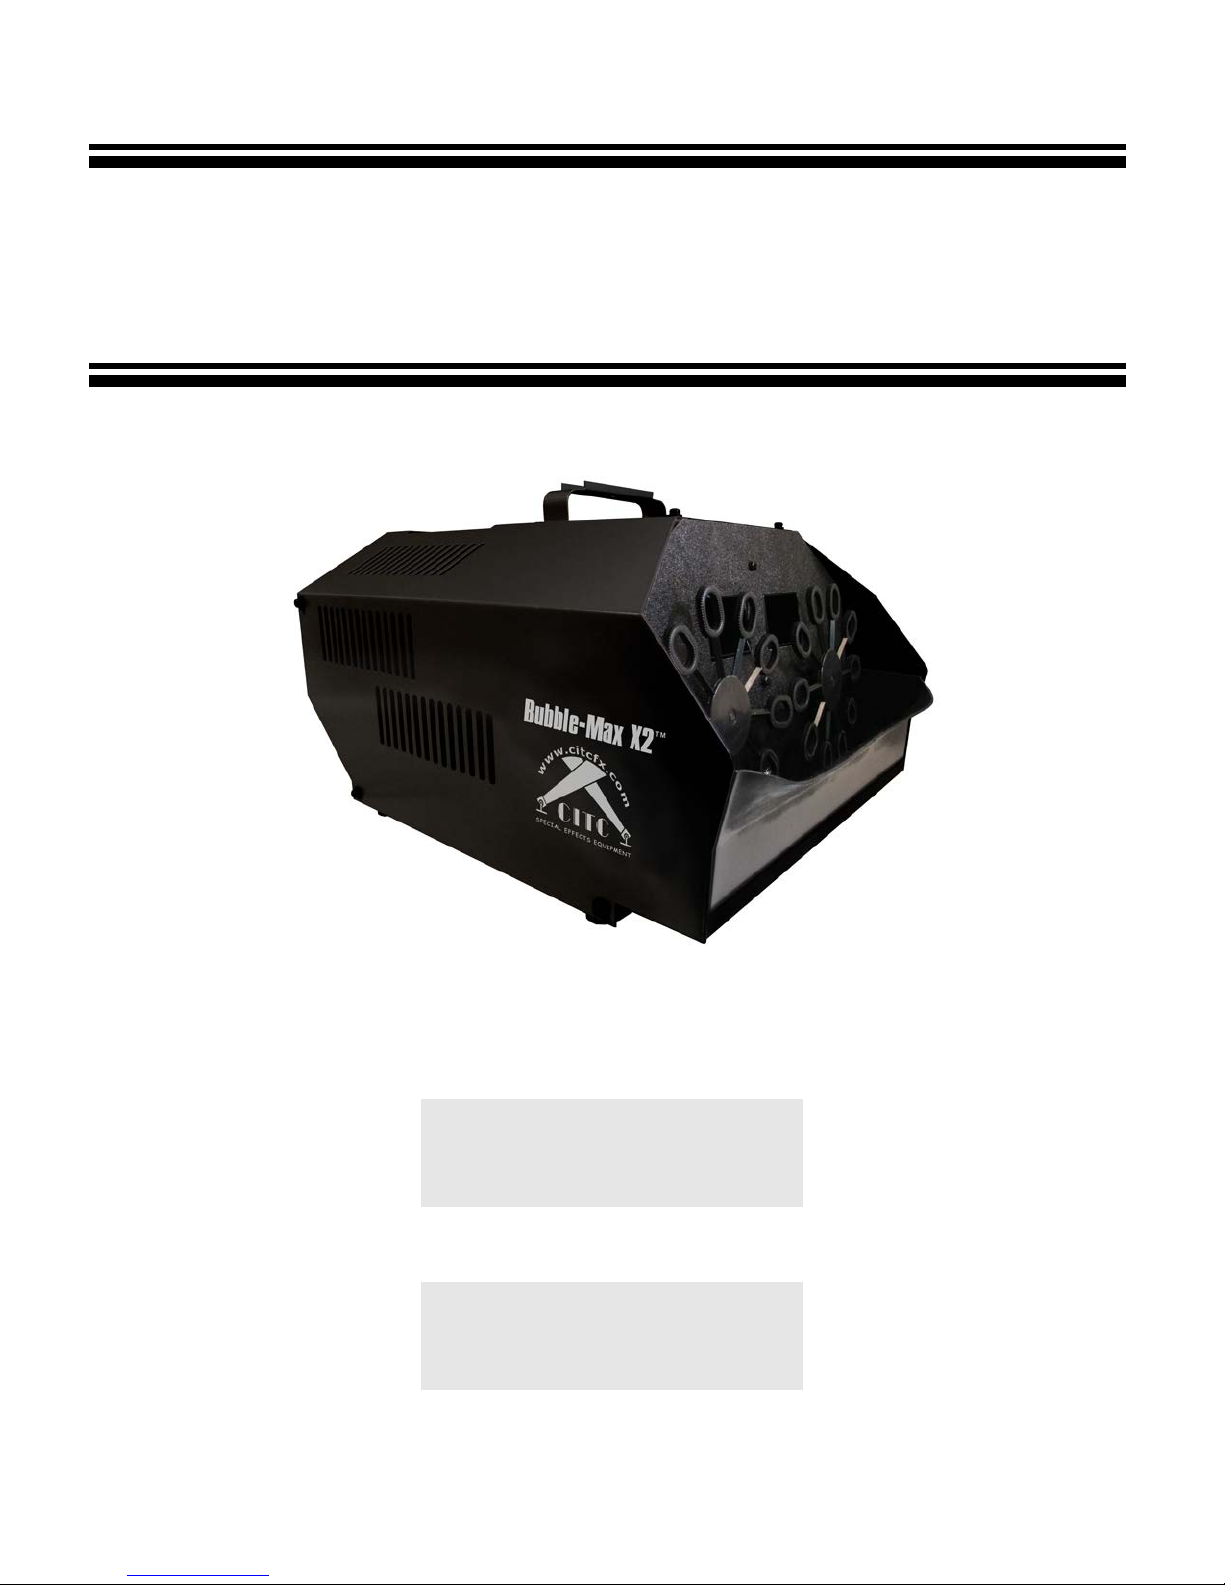
BUBBLE-MAX X2 AUTO-FILL SYSTEM
P/N 100218 (120V)
P/N 100219 (230V)
P/N 100222 (120V)
P/N 100223 (230V)
Operating Instructions
TM
(MACHINE ONLY)
(SYSTEM)
Page 2

Thank you for purchasing this Bubble-Max X2 Auto-Fill System™!
To ensure proper operation of this unit, please take some time to read
the manual carefully.
We believe you will enjoy years of great service if you properly care for
your new Bubble-Max X2 Auto-Fill System™.
CITC
1420 80th St. SW #D
Everett, WA 98203
(888) 786-CITC
www.citcfx.com
1
Page 3

1. Equipment Supplied
3
2. Accessories
3
3. Description
4
4. Safety Instructions
4
5. Operating the Bubble-Max X2 Auto-Fill
System™
4
4
4
5
5
5
6
6. Technical Data
6
7. Limited Warranty Conditions
7-8
Contents
5.1 Selecting The Location
5.2 Electrical Power Requirements
5.3 Hooking Things Up
5.4 Operation
5.5 Cleaning
5.6 Troubleshooting
2
Page 4

1. Equipment Supplied
•
•
•
•
Bubble-Max X2 Auto-Fill™ Machine 120V P/N 100218
4’ 6mm Intake Tubing w/ Fil ter
4’ 10mm Drain Tubing
Instruction Booklet & Warr ant y Car d
FOR Bubble Max System:
Anti-skid material & rubber strap.
Stand (On 230Vac System, transformer installed on underside of stand.)
Mounting Plate
3-speed 120VAC Director Jr. Fan P/N 10013 1
FOR 230Vac System:
Step Up / Step Down Transformer, 200W, 230Vac P/N 25 004 5
Fuse for Transformer
3 Outlet Adapter
Universal Plug Adapter
FOR Bubble Max Hanging System:
Anti-skid material.
C-clamp, safety cable, brac ket , bol ts and wing nuts.
Bolt with spacer nut installed on Bubble Max handle.
Stand (On 230Vac Hanging System, transformer installed on underside of stand.)
3-speed 120VAC Director Jr. Fan P/N 100131 w/ rubber strap attached.
3 Large zip ties. (Used to mount fan to stand.)
2. Accessories
Hanging Bracket w/ Safety Cable
C-Clamp
DMX FX-15™ Switch Pack
Spare Fuses
Please check whether all the products you ordered are supplied.
3
Page 5

3. Description of the Bubble-Max X2 Auto-Fill System™
Get more bubbles for a longer period of time. The Bubble-Max X2 Auto-Fill is a
revolutionary new product in the bubble machine industry. Not only can your Bubble-Max
X2 Auto-Fill™ continuously produce bubbles , it can do it without the labor of having to fill
every few hours.
4. Safety Instructions
WARNING: Read and understand all labels and
operating instructi ons be f ore attempting installation.
o No user serviceable parts. Taking apart the Bubble Max Auto-Fill System™ will void
your warranty. Never open the machine without dis connecting power first!
o RISK OF ELECTRICAL SHOCK- This device is supplied with a grounding conductor.
To reduce risk of electrical shock, connect only to properly grounded, grounding type
receptacles. Never remove the third prong from the plug.
o If you have any doubts about the capacity or grounding of your existing circuits,
consult a qualified electrician.
o Do not operate or store in wet locations. Be sure area around the unit is dry before
applying electrical power.
o When operating on 230V, you must plug both the Bubble Max Auto-Fill™ machine
and Director Jr. Fan into the supplied step up / step down transformer.
o Be aware that the bubble fluid is very slippery. If the machine is mounted near the
floor, bubbles breaking there will make a smooth floor slick.
5. Operating the Bubble-Max X2 Auto-Fill System™
5.1 Selecting The Location
Secure a level, dry location for the stand to rest solidly on the floor or hang suspended. If
suspending the Bubble-Max X2 Auto-Fill™, you must use a safety cable. Make sure that
your Bubble-Max X2 Auto-Fill™ is pointed in a direction that leaves an open area out in
front so that the bubbles can fly without restriction. Ensure the front of the machine is not
directed towards anything that could cause a hazardous or unsafe environment.
5.2 Electrical Power Requirements
The Bubble-Max X2 Auto-Fill™ requires a grounded 120V circuit for operation. For 230V
operation, you must have use a step up / step down voltage transformer to convert the
voltage to 120V, and both the Bubble-Max X2 Auto-Fill™ machine and the 3-Speed
Director Jr.™ Fan must be plugged into the voltage transfor mer . The Bubble-Max X2
Auto-Fill™ uses a 1 amp fuse, which can be replaced. If you have any doubts about the
capacity or grounding of your existing circuits, consult a qualified electrician.
4
Page 6

5.3 Hooking Things Up
• Connect the smaller diameter 6mm tubing to the fitting labeled “INTAKE” by pushing it
in securely. Connect the larger diameter 10mm tubing to the fitting labeled “DRAIN” by
pushing it in securely. If using an attached fluid container, it must not rest higher than the
machine. The drain tube must drain into a container which is lower than the machine.
Place the included anti-skid material on the top of the stand. Lower the Bubble-Max X2
Auto-Fill™ machine so it lays perpendicular to the top of the stand.
• If this is a hanging system, slide hanging bracket ov er Bubble-Max X2 Auto-Fill™
and attach to through bolt. Attach bolt, nut and washers onto both sides of hanging
bracket and tighten. Attach c-clamp with washer and split washer. Wrap rubber strap
around 3-Speed Director Jr.™ Fan. Use included zip-tie to attach rubber strap securely
around the center support of the fan. Center the Director Jr.™ Fan onto the front edge of
the stand. Use another zip-tie to tighten the front of the Director Jr.™ Fan to the front
edge of the stand. Using two more zip-ties, attach each end of the rubber strap to the
sides of the stand. Make certain the zip-ties are tight.
• If this is a non-hanging system, use the included black rubber strap to strap the
Bubble-Max X2 Auto-Fill™ machine onto the stand. Place the 3-Speed Director Jr.™
Fan underneath the stand. Adjust the fan to create the desired effect.
5.4 Operation
• Fill the fluid reservoir in front of the unit until the wand is covered. Be aware the
machine has a second reservoir inside that is filling to the same level.
• Turn on the Bubble-Max X2 Auto-Fill™ machine using the large illuminated power switch.
• To operate both wands, the smaller black switch should be in the “I” position. To operate
using a single wand, the switch must be placed in the “0” position.
• Do No t allow the pump to run dry. Doing so can ruin the pump and void your
warranty.
5.5 Cleaning
You must clean your machine every 10 days to maintain ideal bubble production.
In hot or dry conditions the bubble fluid can evaporate even quicker. This can leave a
residue behind on the wand wheel, reservoirs and pump that can hinder the operation of
your machine. Follow this cleaning schedule to keep your Bubble-Max X2 Auto-Fill™
running efficiently.
• Unplug the Bubble-Max X2 Auto-Fill™ from the electrical power source.
• Tilt the machine forward to slowly pour the bubble fluid from the front reservoir . If you tip
the machine too far, the fluid in the rear reservoir may spill over.
• Insert the 6mm tube from the “INTAKE” fitting into a gallon+ of warm water. Place the
10mm tube from the “DRAIN” fitting into a separate container. This container must sit
below the drain fitting for the water to drain properly. The capacity of this container must
equal the amount of warm water being placed into the Bubble-Max X2 Auto-Fill™.
• Run one or two gallons of warm water through the Bubble Max in this manner.
• CAUTION: Allowing the pump to run without water or bubble fluid will void your warranty.
5
Page 7
• Unplug the Bubble-Max X2 Auto-Fill™ from the electrical power source.
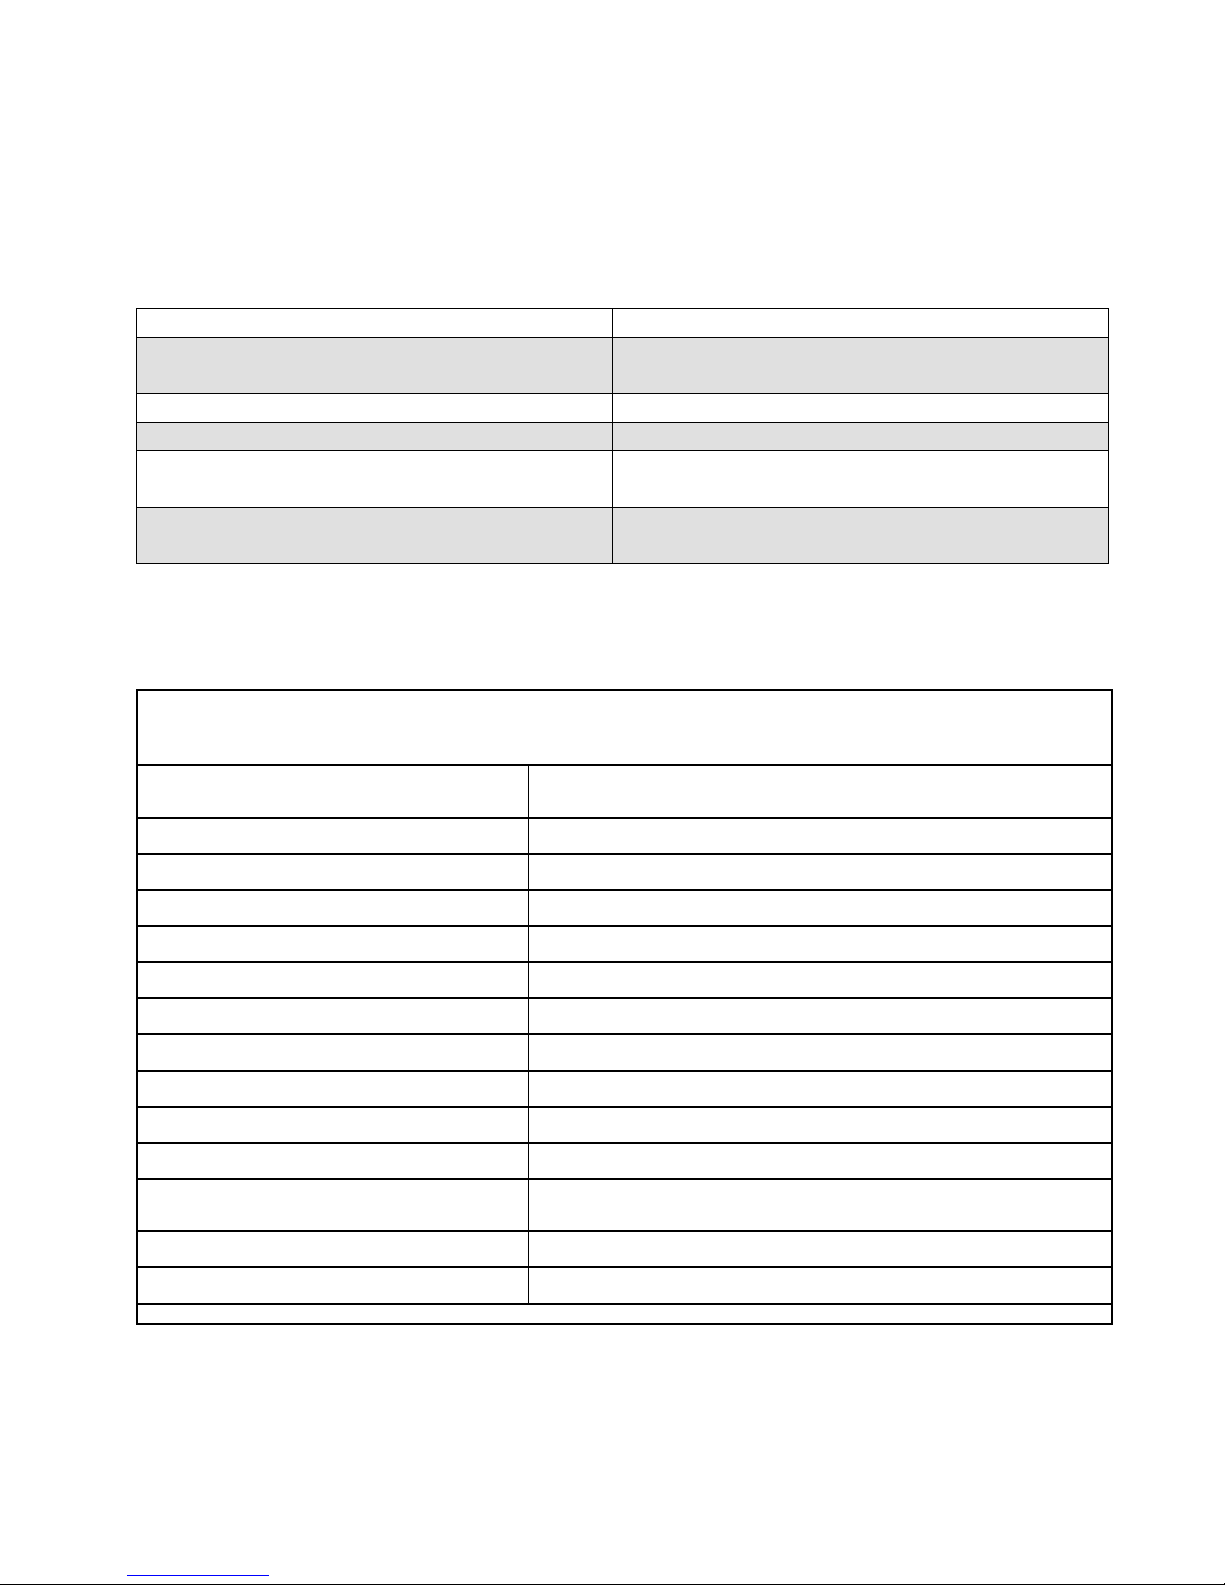
Problem:
Solution:
- Check power.
- Check fuse.
Decreased bubble output.
- Clean the machine.
Pump will not turn off.
- Check switch is in “OPERATE” position.
Tube is leaking at “INTAKE” or “DRAIN”
fitting.
- Check that tubes are fully inserted into the
fittings.
- Check that nothing is hindering the
movement of the wand wheel.
Bubble-Max X2 Auto-Fill System™
P/N 100222 (120V) • P/N 100223 (230V)
Dimensions
(Machine, Fan and Stand)
20” x 16.75” x 27”
(51cm x43cm x 69cm)
Weight (Machine, Fan and Stand)
29 lbs. (113.2kg)
Wand Wheel
20 Wands (10 Left, 10 Right)
Bubbles Per Minute
1200-1400
Bubble Size
1.25” – 3” (3cm – 8cm)
Fluid Capacity
1 qt.
Consumption
1 cup = 20 min. / 3 qt. = 4 hours
Wind Speed (Director Jr. Fan™)
4, 6, or 8 MP H
Distance (Director Jr. Fan™)
15’ – 40’ (4.5m – 12m)
CFM (Director Jr. Fan™)
132/194/258
RPM (Director Jr. Fan™)
1100/1600/2100
Electrical Supply
Bubble-Max X2 Auto-Fill™ 120 VAC, 1A, 50/60 Hz
Director Jr. Fan™ 120 VAC, 1.2A 50/60 Hz
Fuse
Limited Warranty
One Year
Rev. 01/23/2018
• Carefully tilt the machine forward to slowly pour the water from the front reservoir. If you
tip the machine too far, the water in the rear reservoir may spill over.
5.6 Troubleshooting
Wand whee l, pump, and fan not operating.
Wand wheel is chattering.
6. Technical Data
Bubble-Max X2 Auto-Fill™ 1A – 125 VAC
6
Page 8

7. One Year Limited Warranty
Model: ________________ Purchased on (date): ________________
Serial number: ________________ Purchased from: ________________
Congratulations!
You can now look forward to many years of reliable operation and outstanding performance.
Thank you for making CITC your personal choice in special effects equipment. Please take a
moment to fil l out the top of this war r anty, and then keep it – with the receipt – in a safe
place.
If you would like to receive information about specials, sales, and new products, please log
on to www.citcfx.com and click on the “Contact Us” link.
We appreciate your business, and wish to provide you with a quality product that will serve
you for many years to come. Once again, thank you for choosing CITC, and enjoy your new
entertainment product!
LIMITED WARRANTY CONDITIONS
This limited warranty guarantees to the original purchaser that this product shall be free of
defects in material and workmanship, under normal use, for a period of one year from the
date of purchase shown on the sales receipt. This warranty covers parts and labor providing
the product is returned to CITC in the original shipping carton and packaging. The warranty
for electrical is a (90) NINETY DAY limited warranty.
Damage resulting from shipping, accidents, misuse, negligence, unauthorized repairs or
modification is not covered by this warranty. Using any fluid other than what is recommended
for this machine will void warranty. No liability is accepted for injury or for loss, damage or
expense resulting from any interruption whatsoever in the operation of the product or from
any consequential loss arising there from. No liability is accepted for normal wear and tear.
We wish to satisfy YOU, our customer, and have implemented many measures to prevent
problems and assure customer satisfaction. However, should you need a missing part or
have a functional problem with your product, please call:
(888) 786-CITC, from 7:30 am – 4:00 pm (Pacific Time), Monday – Friday, except for
holidays. Our customer service department will respond to your problems immediately.
Subject to the following conditions, CITC will repair any defect or fault in the unit if it is
caused by a proven factory defect within one year of delivery to the end user.
Insignificant deviations of the regular product quality does not guarantee replacement
rights, nor do faults or defects caused by water, by generally abnormal environment
conditions or Force Majeure:
1. Faulty parts or equipment will be repaired or replaced (manufacturer’s choice) with
correct parts. Faulty units must be shipped to CITC at customer’s expense. Call for
an RMA# - AN RMA# MUST COME WITH THE UNIT. Payment arrangements for
repair must be made before receiving your RMA#, in case the unit is not covered
under this limited warranty.
2. Repairs/replacements will only be made with the approval of the customer.
7
Page 9

3. Exposure to outside elements voids Warranty. Unit cannot be used outdoors or in wet
weather without complete protection against the elements. Even then, high salty or
humid conditions will cause instant corrosion of connectors and will void Warranty.
4. The customer loses all rights for limited warranty services if any repairs or
adjustments are done to the units by unauthorized persons, and/or if spare parts are
used, which are not approved by CITC. The right of limited warranty service is also
lost if a fluid other than appropriate CITC fluid has been used or if units are sent in
without first emptyi ng the equip me nt o f flui d.
5. Freight costs to and from CITC, when under the limited warranty services, are the
responsibility of the customer. Customer must place appropriate insurance on return
of product. However, if product is returned due to factory defect within the first year,
CITC will cover the cost of returning the repaired unit to the customer.
6. Limited warranty services do not cause an extension of the limited warranty period or
the start of a new limited warranty period. The warranty of replaced parts ends with
the limited warranty period of the whole unit.
7. Further claims, especially for damages, losses etc. outside the unit are excluded.
Send unit to:
CITC
RMA # XXXXXXX
1420 80th St. SW #D
Everett, WA 98203
1420 80th St. SW, Everett, WA 98203
425-776-4950 FAX: 425-776-5129
www.citcfx.com [email protected]
Find us on Facebook!
www.facebook.com/CITCFX
February 26, 2016
8
 Loading...