

Page 1

Infrared Control
Valve
Installation
Guide
Page 2

Supplied Parts
1. Sensor Unit
2. Solenoid Valve
3. Mounting Bracket
(for cavity walls or ceiling tiles)
4. Remote Valve Plug & Gasket
5. Mounting Screws M3.5 x 40mm (x2)
1
2
1. Introduction
The infrared urinal flush control (IRC) valve automatically manages the
supply of water to a urinal cistern.
The IRC is only to be used in conjunction with a cistern and is suitable for
fixing to solid or cavity walls and false ceilings, or directly onto pipework.
The IRC sensor unit can be installed separately from the solenoid valve.
6. Solenoid Mounting Screw M3 x 30mm
3
4
5
6
Not Supplied
2 core low voltage cable for remotely installed applications
Do not power unit until installation is complete and wiring carried
out to BS7671 IEE regulations.
Isolate water supply before powering up.
Adjust valve to fill in 30 min
(See Page 11 Section 6)
Occupancy detected valve opens for 30 min
0 MIN
30 MIN
On detection of movement in the washroom, the IRC activates a 30 minute
cycle allowing water to flow into the cistern.
After 25 min infrared sensor
looks again for occupancy
Cistern flushes when full
FIT IN ACCORDANCE WITH WATER REGULATIONS
Under the water regulations, urinals should use no more than 7.5 litres
per bowl per hour (10 litres for a single bowl)
2 www.cistermiser.co.uk
During the last five minutes of the 30 minute cycle the sensor ‘looks’ for
movement. If no movement is detected during these five minutes the
valve will close. If the sensor detects movement a new 30 minute cycle is
activated. If no movement is detected for 12 hours the IRC will activate a
hygiene cycle.
www.cistermiser.co.uk 3
Page 3
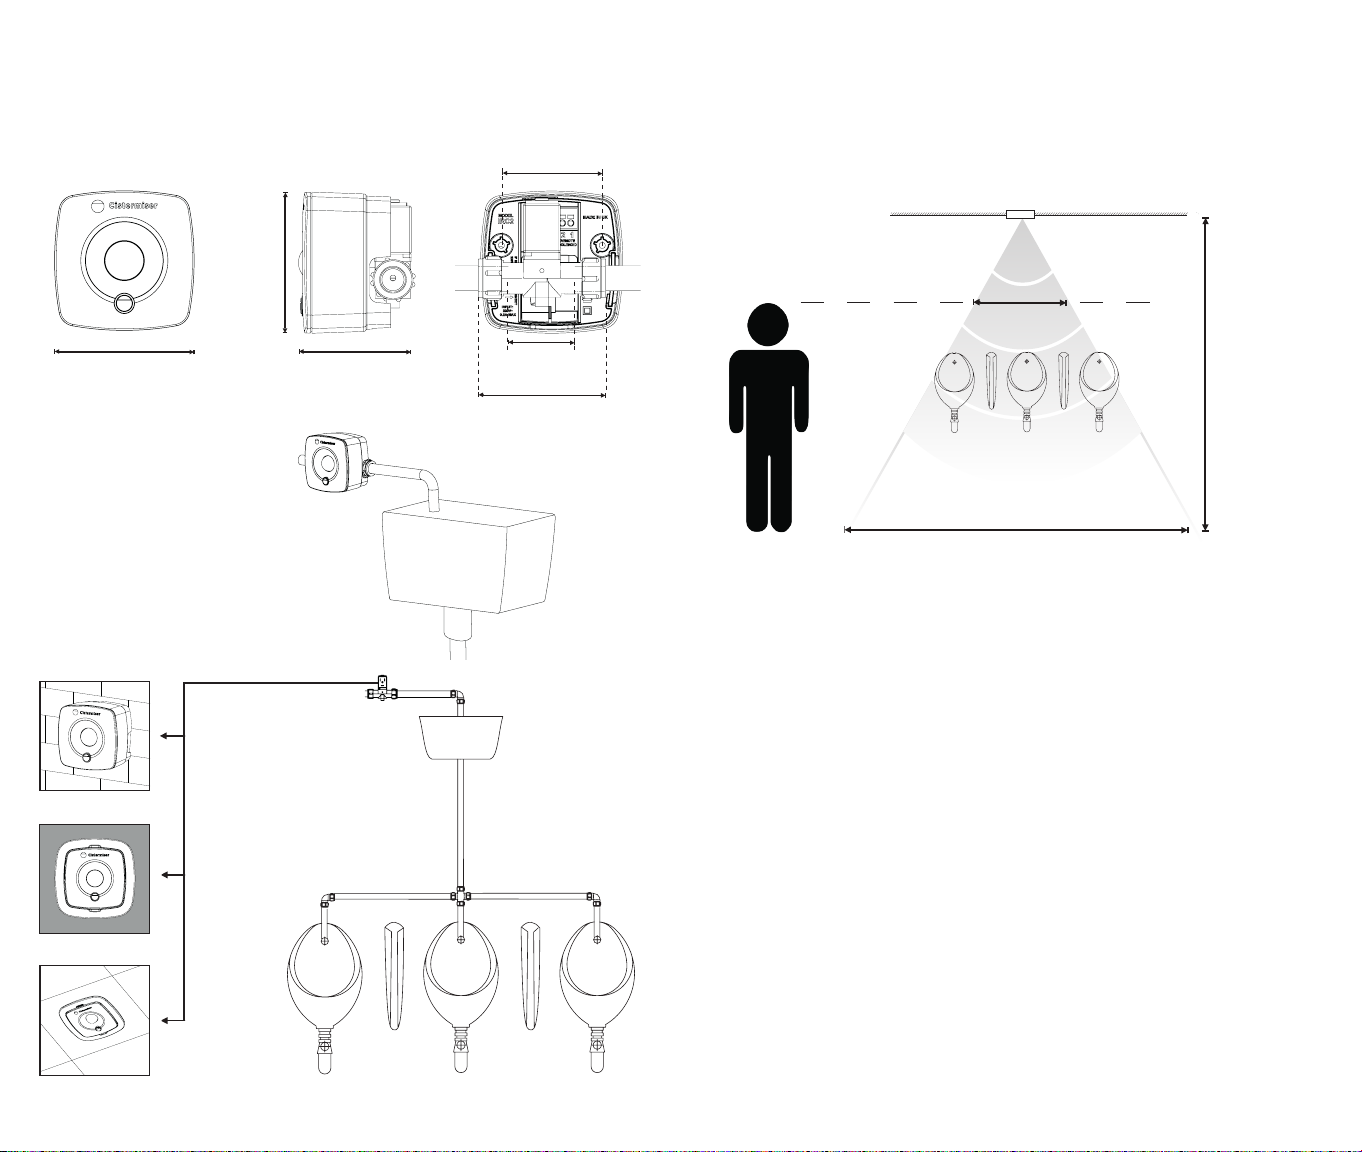
2. Positioning
Side viewFront view
85mm
85mm
Pipe Mounted
(Battery-powered only)
Remote Mounted
(Mains and/or Battery-powered only)
Solid Wall
Cable: 1mm² (max 10m)
68mm
Back view
60mm
Fixing centres
40mm (min)
Pipe cut-out
76mm
Solenoid valve
Sensor range
Sensor
Typical UK
125 Degrees
Male Height
1.7 m
2.7m
9.2m
Maximum detection range 2.5m NOT TO SCALE
Ceiling
Typical
Ceiling
Height 2.4m
Floor level
Cavity Wall
Ceiling
4 www.cistermiser.co.uk
www.cistermiser.co.uk 5
Page 4
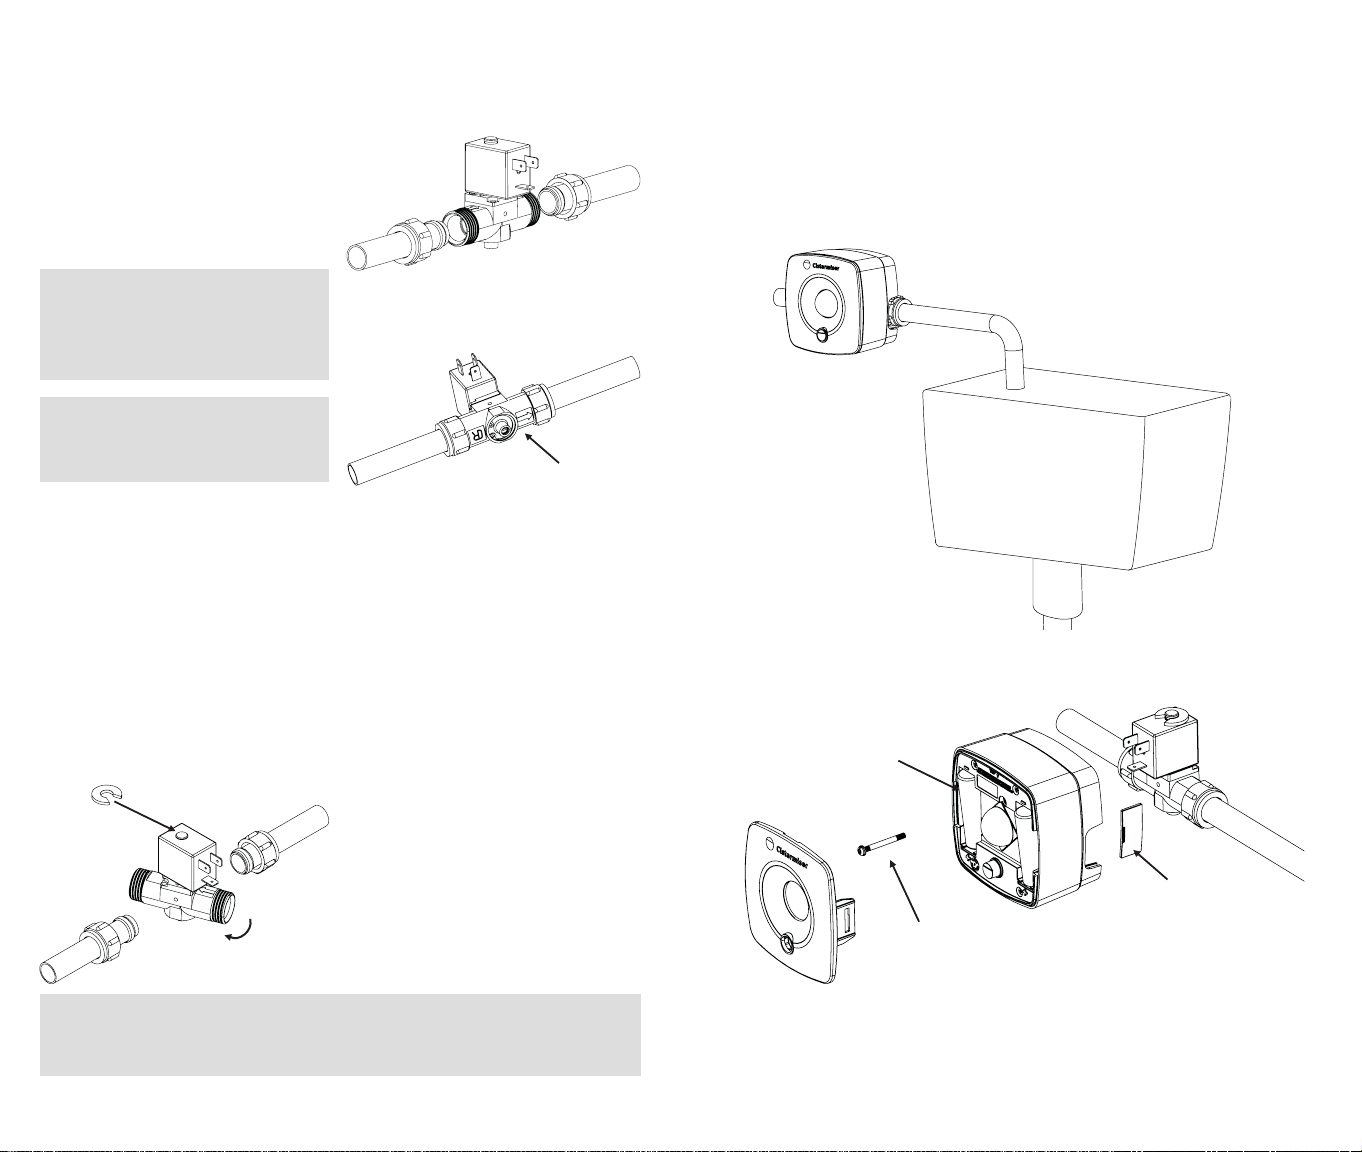
3. Valve installation
4. Sensor installation
Install the valve on the 15mm pipe
feeding the cistern.
It is good plumbing practice to install
anisolation valve upstream from the
IRCvalve.
NOTE: The valve should be
positioned with the directional
arrow pointing in the same
direction
with the solenoid on top.
NOTE: There should be no
restriction, such as a petcock or
bibtap, after the valve.
as the flow of the water
Changing the flow
direction
In some installations the solenoid
head may be facing the wall and the
sensor cannot be fitted. You can turn
the head around using the following
action:
• Remove the solenoid coil clip (1)
• Lift the solenoid (2) and rotate the
valve body (3)
• Replace the solenoid coil clip (1)
Pipe Mounted
(Battery-powered only)
Water
flow
direction
Insert
Batteries
1
2
3
NOTE: Where one cistern feeds multiple
outlets are evenly distributed and balanced so the cistern gives equal flush.
NOTE: One IRC is required for every cistern.
6 www.cistermiser.co.uk
urinal outlets, ensure the urinal
Solenoid
Mounting
Screw
Remove
Side
Covers
www.cistermiser.co.uk 7
Page 5
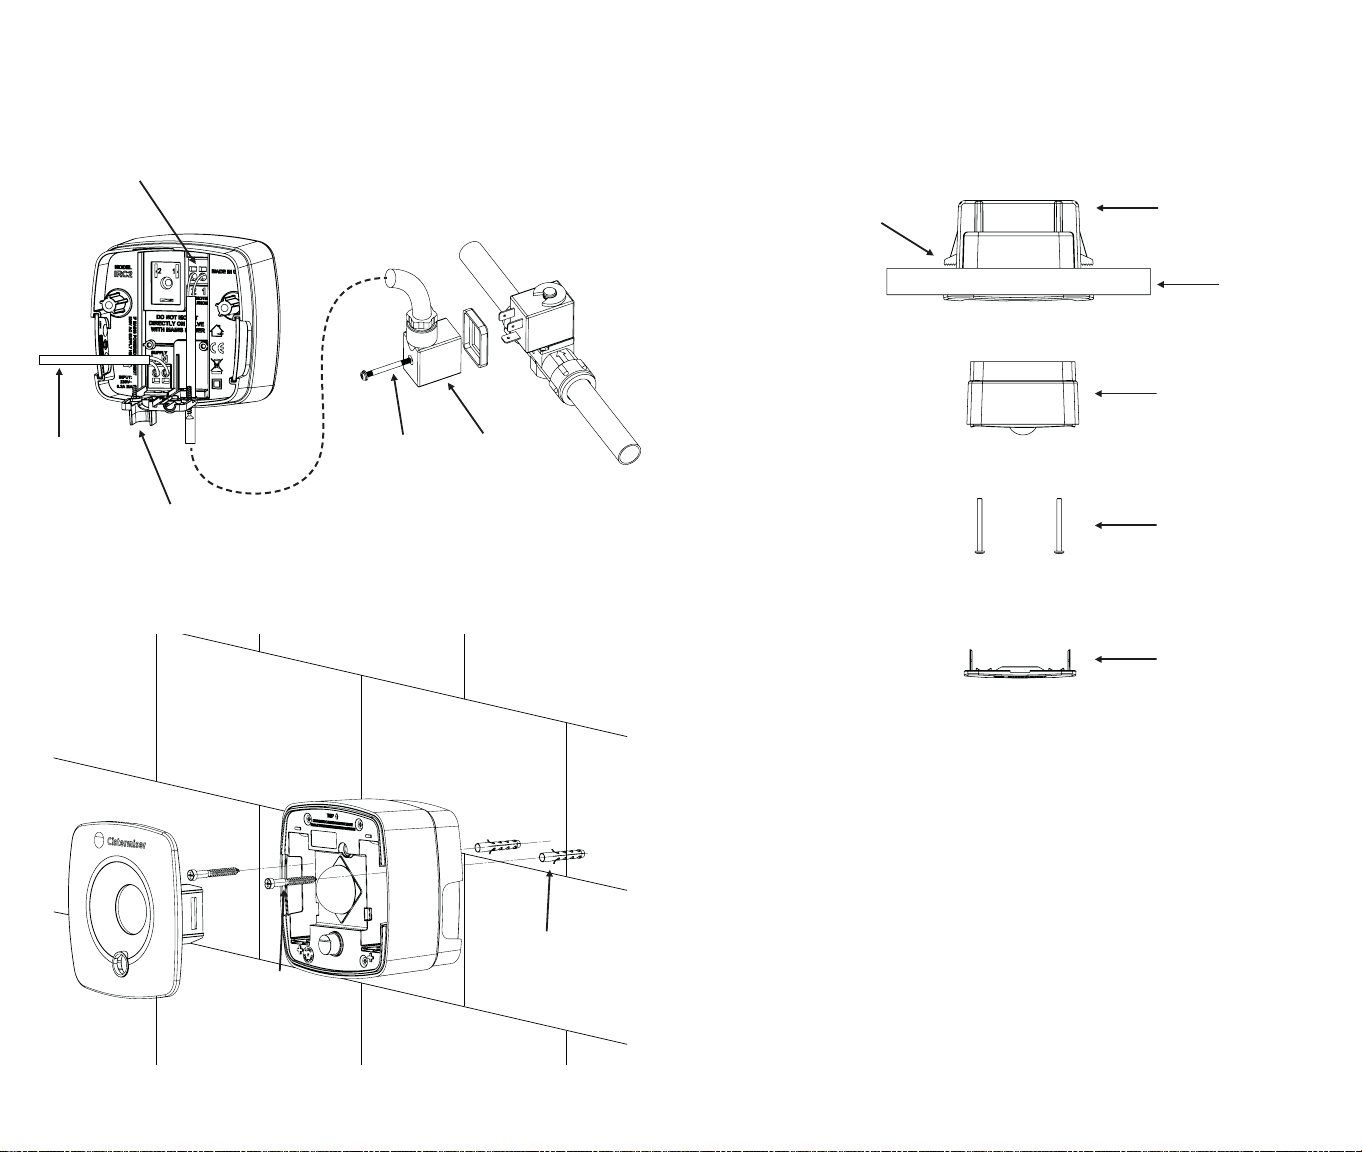
Remote sensor
(Mains and/or Battery-powered)
Connect cable from solenoid using the floating socket supplied
Make sure cable polarity is correct: 1 to 1 and 2 to 2
If mains
power is
used connect
230v here
Cable 1mm2
(max 10m)
to solenoid
Secure cable
clamp after wiring
Solenoid
mounting
screw
Floating
socket
Solid wall/ceiling
Cavity wall/ceiling
(Flush mounted)
Use mounting bracket to secure sensor in a cavity wall/ceiling
Use
template
in box to
cut hole
Mounting
bracket
Sensor
Mounting screws
locate at the back
of the battery
compartment
(hand tight only)
Front cover
Wall/
ceiling/tile
(not supplied)
8 www.cistermiser.co.uk
Wall fixings
(not supplied)
Suitable
screws
www.cistermiser.co.uk 9
Page 6
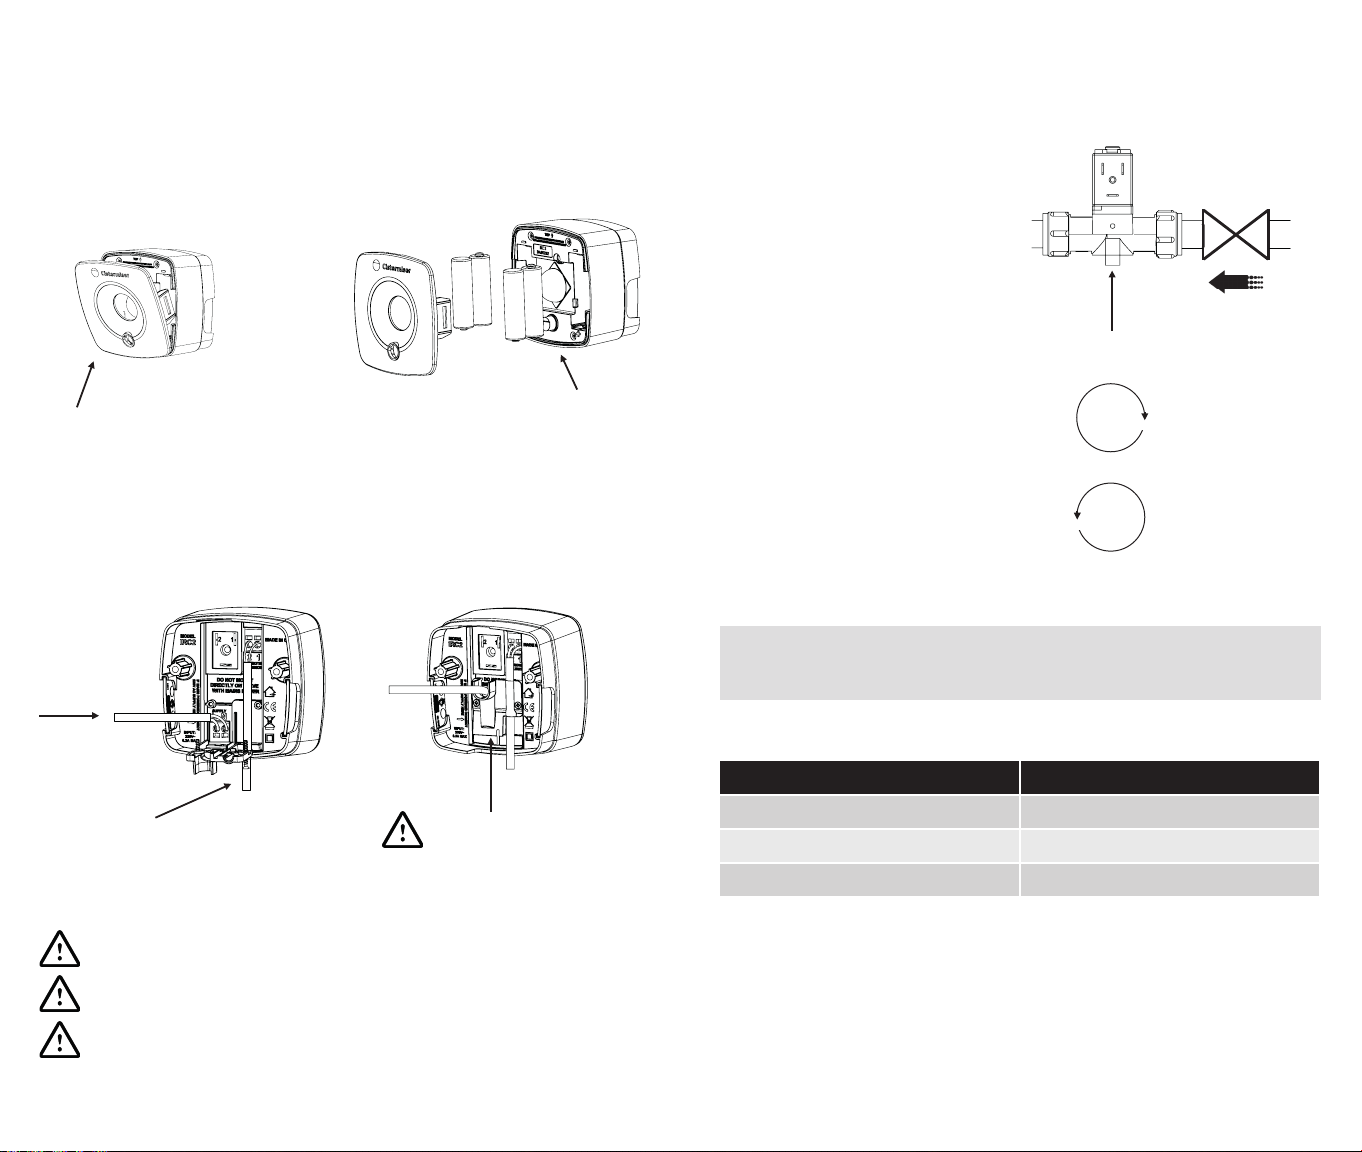
5. Power
6. Commissioning
Pipe mounted installations are Battery-powered only but Remote mounted
installations can be
Battery-powered and/or Mains-powered
Battery
Remove
front
cover
Insert
4 x AA
Batteries
Mains
Mains cable specification:
Nominal 230V ± 10% AC 50Hz
230V
Mains
Once all is installed, the flow rate
will need to be adjusted to suit the
particular installation.
Using the flow regulator on the
bottom of the solenoid, you can
either increase or decrease the flow
of water. Ideally the cistern should
flush once every 30 minutes.
Adjust the valve by turning the screw
at the base of the brass valve body;
clockwise to reduce the flow and
anticlockwise to increase the flow.
NOTE: Use the table below to set your cistern to flush once every 30
minutes. Adjust the flow through the valve so it takes the time below to
fill a measuring cup to 100ml.
Flow regulator
Clockwise:
reduces the
flow rate
Anti-clockwise:
increases the
flow rate
To solenoid
Solenoid cable specification:
CSA= 1mm²
Length 10m (max) from sensor
to solenoid
Do not mount a valve with Mains power directly onto pipework
When fitted directly onto pipework, only use Battery power
230V to be installed by a qualified electrician on a 3 Amp fused spur
Secure cable clamp
after wiring
10 www.cistermiser.co.uk
Cistern size Time to fill 100ml
4.5L 40 sec
9.0L 20 sec
13.5L 13.5 sec
www.cistermiser.co.uk 11
Page 7
7. Test & economy modes
8. Usage advice and specification
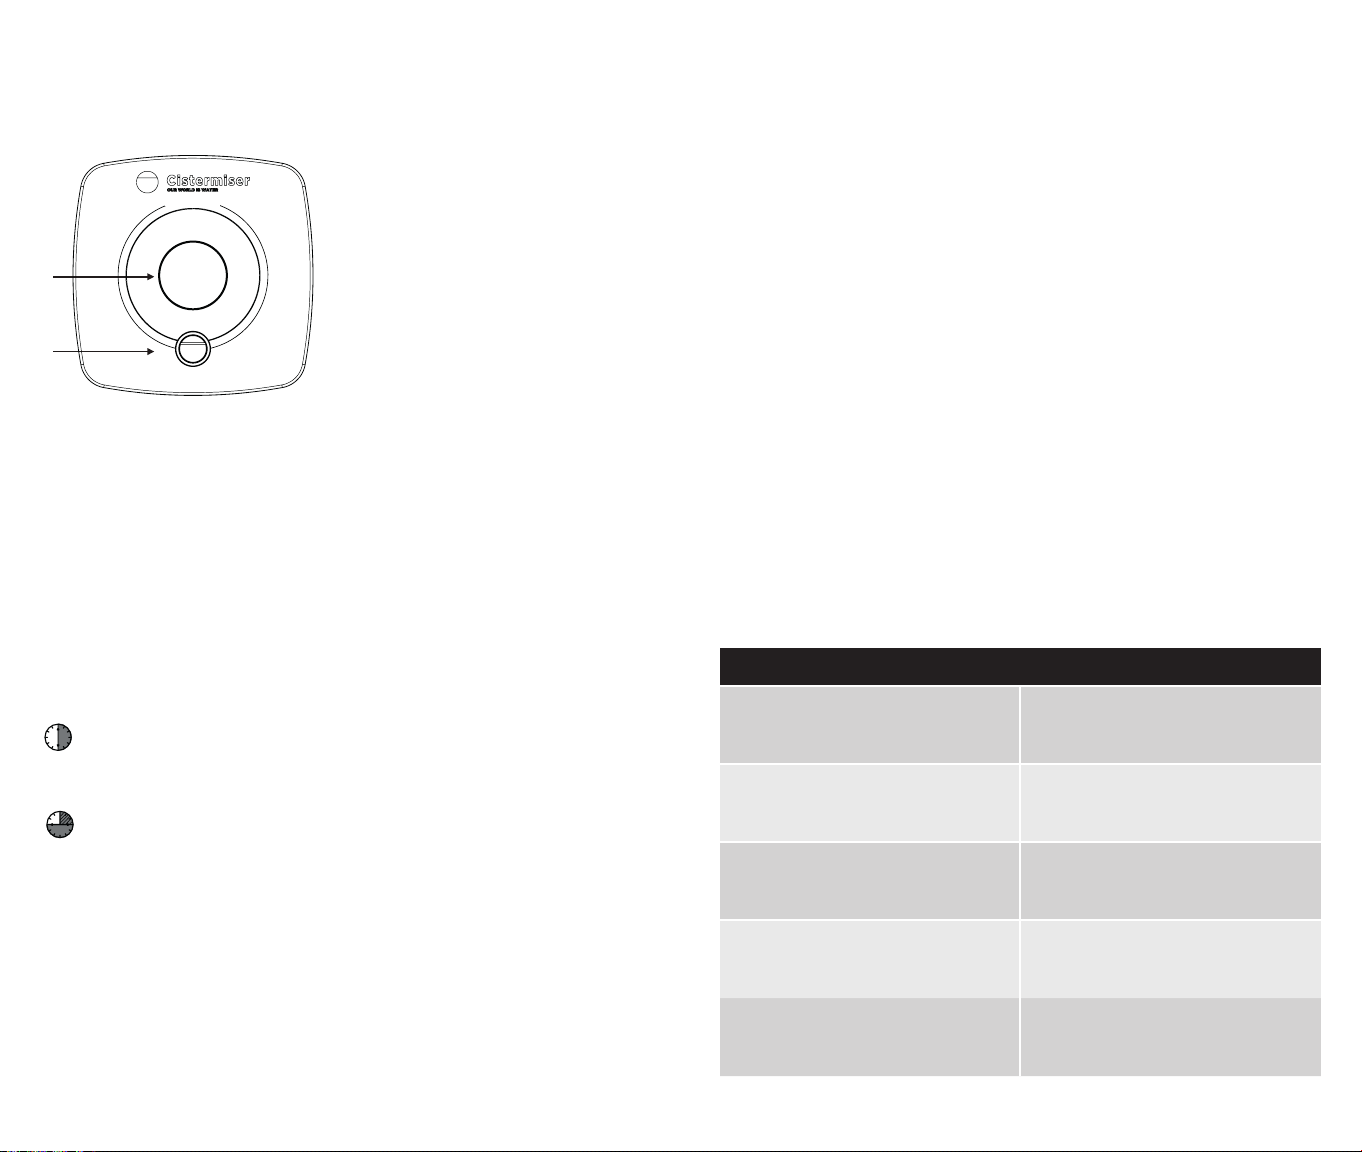
Test cycle
When the test button (2) is held down
for over 2 seconds and less than 10
seconds then released the unit will go
into Test mode.
It will first test the valve and the sensor
1
2
will show amber, flashing each time the
valve opens or closes. It will perform
this action 5 times.
The unit will then test the sensor and
only flash amber to confirm that it
picks up any motion. Your movement
around the room will highlight this is
working.
The test cycle can be halted at any
point by pressing the Test button
and releasing straight away.
Switching sensor mode
Holding down the test button (2) for longer than 10 seconds will switch
between Normal and Economy modes.
Whilst the test button is held down the sensor light (1) will show the mode
that it is in:
• Solid green indicates Normal mode
• Flashing green indicates Economy mode
Normal mode
30 MIN
When a presence is detected the valve will remain open for
30 minutes. Whilst in operation a single green flash will be seen.
Economy mode
15 MIN +
30 MIN
• If the sensor detects movement in the last 5 minutes
• The unit is supplied in Normal mode.
• When powered down the unit will remember the mode it is in.
When a presence is detected the valve delays opening for
15 minutes and then will open for 30 minutes.
Whilst in operation a double green flash will be seen.
of either mode’s 30 minutes cycle it will reactivate
a new cycle.
Power
Mains Supply: Nominal 230V ± 10% AC 50Hz 20mA
Battery Supply: 6V from 4 x alkaline AA (LR6) batteries
Batteries (recommended): Duracell Plus (Gold Top) MN1500
Operating Life: Up to three years with recommended
Capacity 2700mAh
batteries depending on washroom
usage.
Solenoid valve
6V Latching Valve: UK WRAS approved. One valve per
sensor unit.
Pressure range
Supply Pressure: 0.1 - 6.0 bar. Integral slow-fill flow
LED sequence
GREEN flash once every 3 seconds
GREEN flash once every 2 seconds
AMBER flash
RED flash
regulator. If supply pressure is above
6.0 bar, fit a pressure reducing valve.
Valve open – battery powered
Valve open – mains powered.
Start up or Test cycle
Low power
NOTE: At any point that the test button is pressed and released the valve
will close until there is movement in front of the sensor.
12 www.cistermiser.co.uk
RED double
Fault
www.cistermiser.co.uk 13
Page 8

9. Frequently asked questions
Test mode does not function
Ensure unit is powered. Change batteries
No power
Power supply fault
if battery powered; ensure mains
electrical power is functioning if mains
powered.
Disconnect one source of power and
check by pushing the test button. When
the sensor is mounted directly on the
valve it should be battery powered
ONLY. Also check remote wiring if sensor
is remote from valve.
Water is continuously flowing through the valve
Once activated the valve remains open
for a period of 30 minutes and will
reactivate if someone comes within
User perception
No power
Valve incorrectly fitted
the range of the sensor in the last five
minutes of the 30 minute period. The
valve appears to work continuously as
long as someone is in the washroom.
The power has failed while the valve is
in the ‘open’ position. Ensure the unit
is powered. Change batteries if battery
powered; ensure mains electrical power is
functioning if mains powered. Go through
test cycle when power is restored.
Ensure the arrow on the brass body is
pointing in the direction of water flow.
No water passing the valve
Ensure water supply is turned on and
Water supply
Blockage on the outlet pipe
Mesh filter blocked on inlet
Flow regulator
High water pressure
(above 6 bar)
No power
Economy mode
reaching the valve. The valve is suitable
for water pressures of 0.1 to 6 bar.
If a petcock or bibtap has been fitted,
ensure it is removed or fully open.
Instructions state there should be no
restriction after the valve.
Remove valve. Check to ensure filter on
the inlet side of the valve is clear.
Ensure the flow regulator is fully opened;
when the valve is letting water run, turn
down to the required flow rate.
Fit pressure reducing valve before the
IRC valve.
Ensure unit is powered. Change batteries
if battery powered; ensure mains
electrical power is functioning if mains
powered.
The unit has been put into economy
mode. See section 7 to reverse this.
The valve remains shut when the room is
occupied but opens at other times
If the valve and sensor have been set up
remotely, ensure the remote wiring is
Incorrect remote wiring
wired as follows: ‘1’ to ‘1’ and ‘2’ to ‘2’. If
you find the wiring is connected ‘1’ to ‘2’
and ‘2’ to ‘1’ then the valve is working in
reverse.
Water flow rate through the valve seems to be
very slow
Increase the flow rate by turning the flow
regulator anti-clockwise until you reach
Flow regulation
Mesh filter blocked
your desired flow rate; ideally it should fill
the cistern once per activation and then
flush. See Step 6 ‘Commissioning’.
Check to ensure filter on the inlet side of
the valve is clear.
14 www.cistermiser.co.uk
www.cistermiser.co.uk 15
Page 9

Water flow rate through the valve is fast and the
cistern is flushing too frequently
Commissioning checklist
Decrease the flow rate by turning the
flow regulator clockwise until you reach
Flow regulator
your desired flow rate. Ideally it should fill
the cistern once per activation (i.e. every
30 minutes) and then flush. See Step 6
‘Commissioning’.
I have just changed the batteries and there is no
power to the unit
Check battery orientation; ensure
Battery orientation
there is not excessive corrosion on
battery terminals. Ensure batteries are a
reputable brand.
IRC
The warranty on Cistermiser products can
be extended within one year of date of
manufacture, at no cost, to three years from the
date of installation. Once the valve has been
YEAR
extended
warranty
3
Product serial number
Installation address
Installer’s name
Telephone number
Email address
No.
Activity Checked Date
1. Flush pipework prior to installation.
2. Ensure the flow direction through the valve is correct.
installed, complete the product commissioning
checklist below to demonstrate compliance with
the installation instructions. Email a photograph
of this completed form to warranty@cistermiser.
co.uk or post to Cistermiser, Unit 1, Woodley
Park Estate, 59-69 Reading Road, Woodley,
Berks, RG5 3AN.
Cistermiser product warranty and extended
warranty
Cistermiser products are
guaranteed for 12 months from
the date of manufacture. The
guarantee is for faulty products
and parts only: there is no labour
warranty. If you believe your
product is faulty, please either
contact Cistermiser directly on
0118 969 1611 or at support@
cistermiser.co.uk, with a
photograph and the serial
16 www.cistermiser.co.uk
number, to help diagnose the
cause of the problem.
The warranty on Cistermiser
products can be extended within
one year of date of manufacture,
at no cost, to three years from
the date of installation (see
details on page 13). Please make
a note of the serial number and
take a photograph of the
installation before you leave site.
3. Ceiling mounted: ensure sensor range will cover
urinal area.
4. Electrical connections: ensure mains or battery power
is connected. If mains powered, ensure mains adaptor
is wired to 3A fused spur.
5. Remote solenoid: check connections from sensor to
solenoid are correctly wired. i.e. terminal 1 to 1
and terminal 2 to 2 between the sensor box and the
solenoid.
6. Set flow rate as described in section 6.
7. Run the test cycle as described in section 7.
www.cistermiser.co.uk 17
Page 10
Cistermiser range
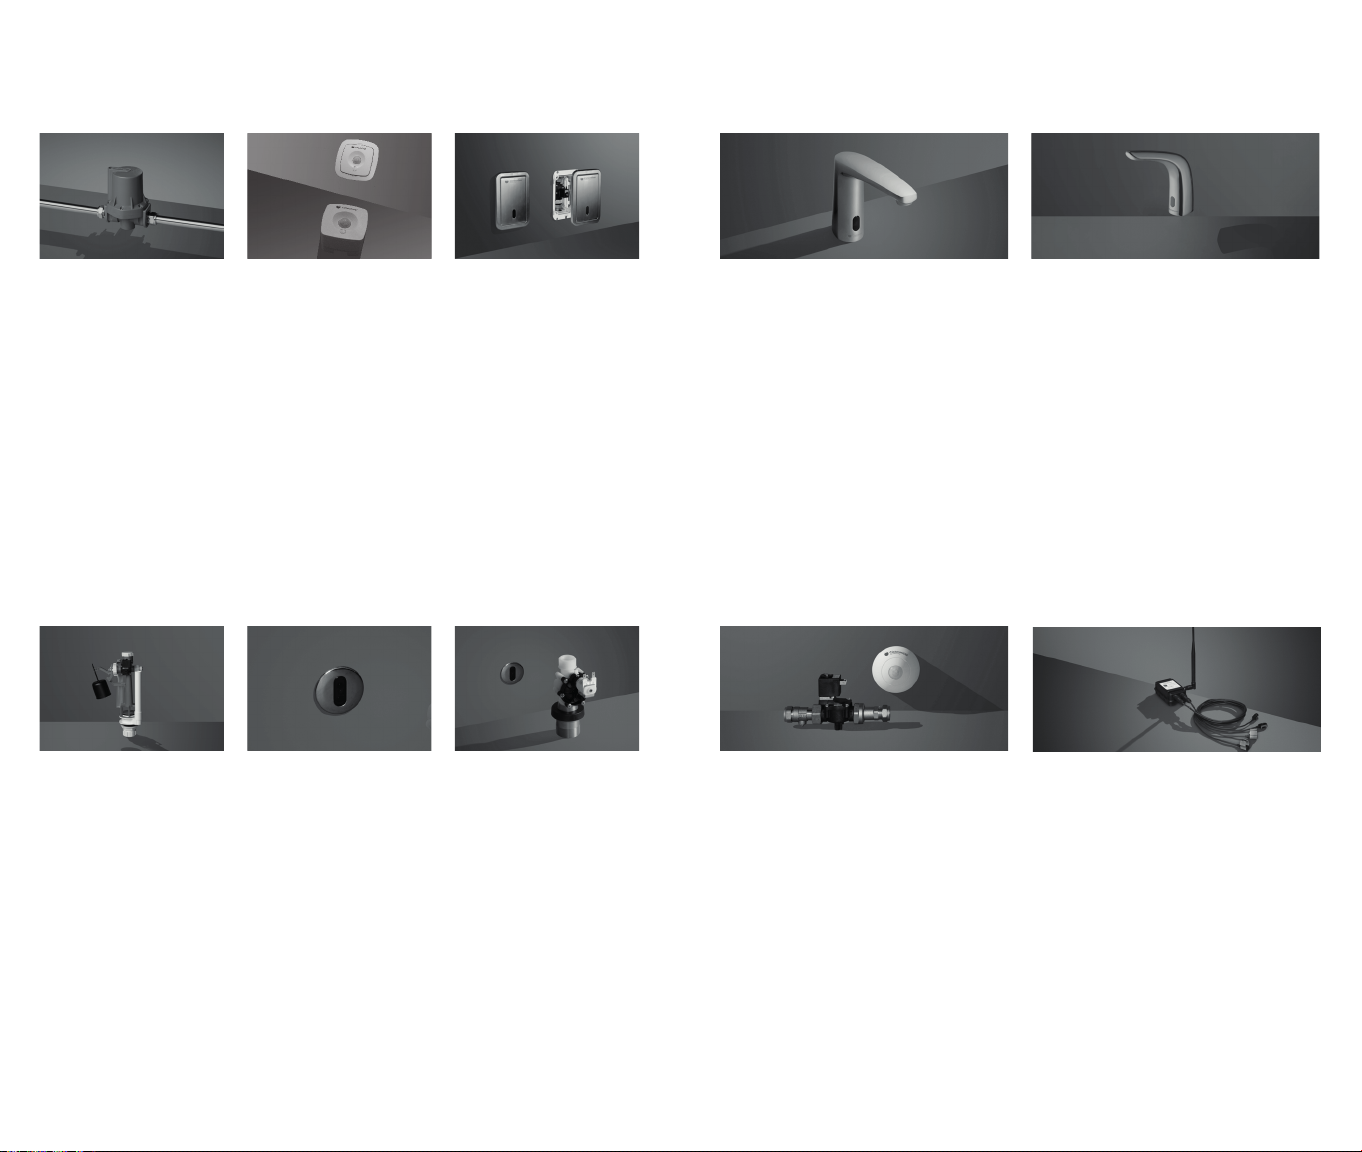
Urinal Flushing
Hydraulic Valve
An automatic urinal
flush control valve
which reduces water
consumption. The
valve uses a simple
patented mechanism
which prevents water
waste by ensuring
that the auto-flush
cistern is only filled,
and can only flush,
when the washroom is
used.
Toilet Flushing
Infrared Control
(IRC) Valve
This valve
automatically
manages the water
supply to the urinal
cistern and reduces
water consumption by
up to 80%. The PIR
sensor detects
movement and
activates the solenoid
valve, allowing water
into a urinal cistern.
Direct Flush Valve
An infrared sensor
controlled urinal valve.
It automatically
flushes individual
urinals after use,
ensuring the highest
level of hygiene from
the minimum volume
of water.
Infrared Taps
Novatap
A contemporary deck-mounted
chrome tap. Theinfrared control
reduces water and energy usage
and eliminates the risk that the tap
may be left running.
Washroom Control
Vectatap
An elegantly designed infraredtap
with thebenefit ofhygienic handsfree operation. Vectatapimproves
water and energy eciency and
includes auto-shut o andhygiene
flush features.
Remote Monitoring
Easyflush Wave
An infrared, hands-free
and water-conserving
WC cistern flush valve
suitable for concealed
or exposed cisterns.
Easy to install in
retrofits or new
installations, its notouch dual flush WC
cistern valve promotes
water economy and
hygiene in domestic
and commercial
washrooms.
18 www.cistermiser.co.uk
Easyflush Walkaway
An infrared controlled
automatic WC cistern
flush valve that is
suitable for concealed
cisterns. The valve
flushes once the user
exits the cubicle. Ideal
for use in
environments where
hygiene and water
economy are
concerns.
Easyflush Direct
An infrared electronic
flushing system that
removes the need for
a WC cistern by taking
its water feed straight
from the mains supply.
Ideal for high trac
areas as the system
allows for a second
flush without a delay.
Sensazone
An innovative system to conserve
water andenergy. Occupancy is
monitored by sensors; when
someone enters the washroom all
services controlled by Sensazone
are activated – the hot and cold
water, lighting andextractor fans.
LinkThru
The latest innovation from
Cistermiser, LinkThru TMU delivers
remote real-time monitoring of
water temperatures on a 24/7 basis.
LinkThru TMU harnesses the power
of the Internet of Things to monitor
water temperatures and helps to
ensure Building Owner compliance
with HSG274, reducing the risk of
Legionella.
www.cistermiser.co.uk 19
Page 11

Davidson Holdings’ brands
Salamander is one of the UK’s
leading manufacturers of pumps for
boosting water pressure for
showers, bathrooms and whole
house supply in domestic and small
commercial tank-fed systems.
www.salamanderpumps.co.uk
Kerao manufacture delayed action
float valves, which provide an
accurate and eective method of
controlling the level of stored cold
water in tanks both with and
without raised float valve chambers.
The range is used in domestic,
commercial and industrial
applications worldwide.
www.keraflo.co.uk
Homeboost is an intelligent pump
from Salamander Pumps that
recognises when water flow is less
than 12 ltrs/min and automatically
boosts theperformance of the
incoming mains water up to 12 ltrs/
min.
www.home-boost.co.uk
Talon is the UK market leader in the
manufacture and supply of plastic
pipe clips, pipe collars and fixing
plugs, plus a range of cover profiles
for concealing pipework.
www.talon.co.uk
Combimate is a domestic limescale
prevention device that prevents
limescale build-up and soft water
corrosion in combination boilers
and other domestic hot water
appliances.
www.combimate.co.uk
Pendock manufacture solutions to
the challenges of enclosing
structures and perimeter casings for
building interiors. The range
includes pipe boxing, column and
HVAC casings, radiator covers and
washroom cubicles.
www.pendock.co.uk
Cistermiser Limited
Unit 1, Woodley Park Estate, 59-69 Reading Road,
Woodley, Reading, Berkshire RG5 3AN
t: +44 (0) 118 969 1611
e: [email protected] www.ourworldiswater.co.uk
Cistermiser is a subsidiary of Davidson Holdings Ltd. IPAC/15 Rev5
 Loading...