

Page 1
www.zvrs.com/Z70
Z
70
USER GUIDE
Welcome to the
ZVRS Family!
Congratulations,
you are now
a user of our
new Z70!
Page 2

Table of Contents
1. What is in the Package? .................................................................................... 3
2. Plug and Play Instructions .................................................................................4
3. Settings (Dark vs. Light) ....................................................................................7
4. Items on the Z70 that ties in with Your Prole ................................................. 10
4.1 Contacts ....................................................................................................10
4.1.1 How to Search through your Contacts ...............................................11
4.1.2 How to Add .........................................................................................12
4.1.3 How to Edit a Contact ......................................................................... 13
4.1.4 How to Delete .....................................................................................14
4.1.5 Adding Contacts from Recents on the Z70 ........................................16
4.2 Video Mail ..................................................................................................17
4.2.1 Knowing Who Your Message is from .................................................. 18
4.2.2 Knowing which Messages have been Viewed ....................................18
4.2.3 Deleting Video Mail Messages on your Z70 ........................................ 19
4.3 Call 911 ...................................................................................................... 20
5. Additional Features of the Z70 ........................................................................21
5.1 Call Support ............................................................................................... 21
5.2 Recents ...................................................................................................... 22
5.3 Number Look Up .......................................................................................23
5.4 Adjusting Webcam/Privacy Screen............................................................27
6. Accessories ..................................................................................................... 29
6.1 Firey .........................................................................................................29
6.1.1 Setting up your Firey set ...................................................................29
6.1.2 Pairing your Firey Set to the Z70 ....................................................... 30
6.1.3 Testing your Firey Set to make sure it works ....................................32
6.2 Neck Loop; Headset and Handset Accessories ........................................ 33
6.2.1 Neck Loop ........................................................................................... 33
6.2.2 Bluetooth Headset ..............................................................................33
6.2.3 Handset ............................................................................................... 33
7. Frequently Asked Questions ...........................................................................34
2
Page 3

1. What is in the Package?
To make sure
you have
1. Ethernet cable (2.9m/9.5ft)
everything
you need
before set
up, the
following
items should
be within the
package:
1. Power adapter and regional
power cable
3. Cleaning cloth
The Firey is an accessory and is not always included with the package. If your order came with a Firey, you should see
this within the package when you rst receive your Z70.
If your order did not include a Firey, please do not expect to see this within the package.
Once you have conrmed you have everything, you are now ready to start setting up your new Z70!
3
Page 4

2. Plug and Play Instructions
Now that you have everything you need to proceed and set up your new Z70, let’s get
started!
1) Take out your Z70.
2) Take the round end of the power adapter and plug it in the Z70 as indicated
3) Take the three-pronged end of the power adapter and plug it in an outlet or a
power strip.
4
Page 5
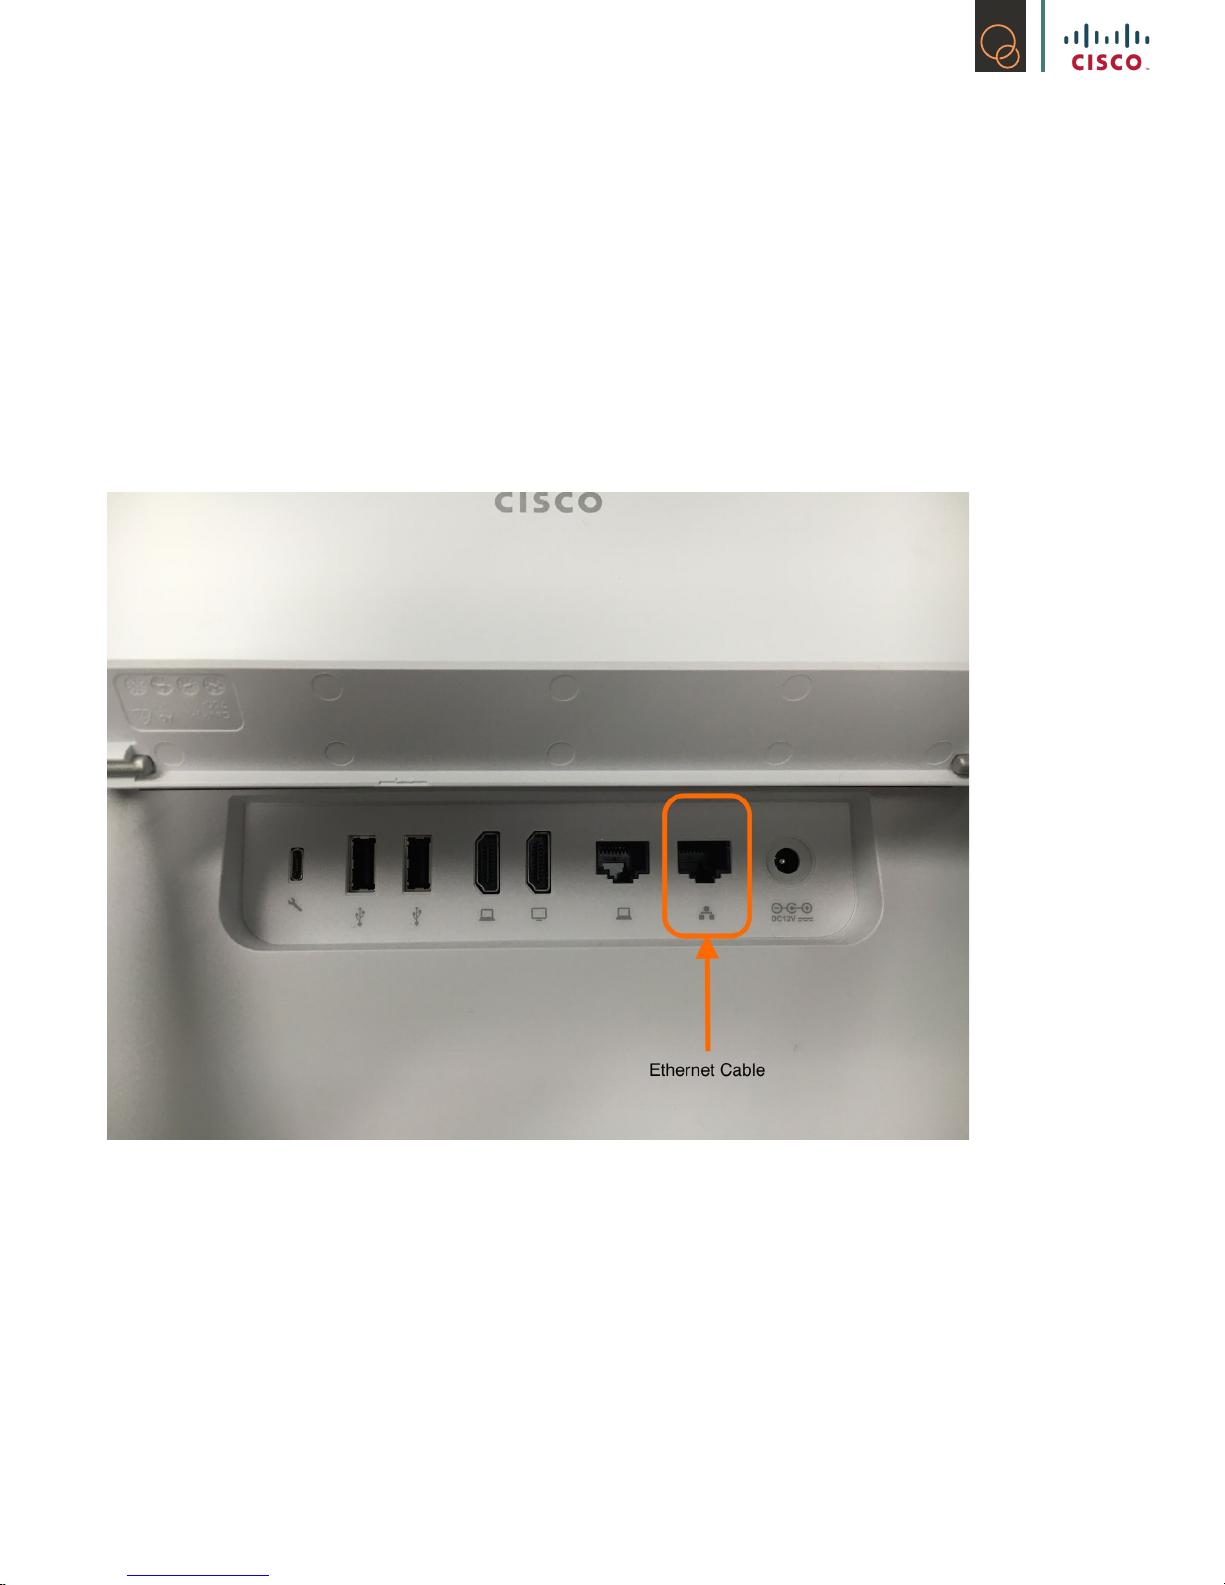
4) Take the Ethernet cable and plug one end into the back of the Z70, please see photograph for
the correct network port to use.
5) Take the other end of the Ethernet cable and insert it into a port on your modem or router.
6) Turn the power on by pressing the power button in the lower right hand corner of the Z70.
5
Page 6
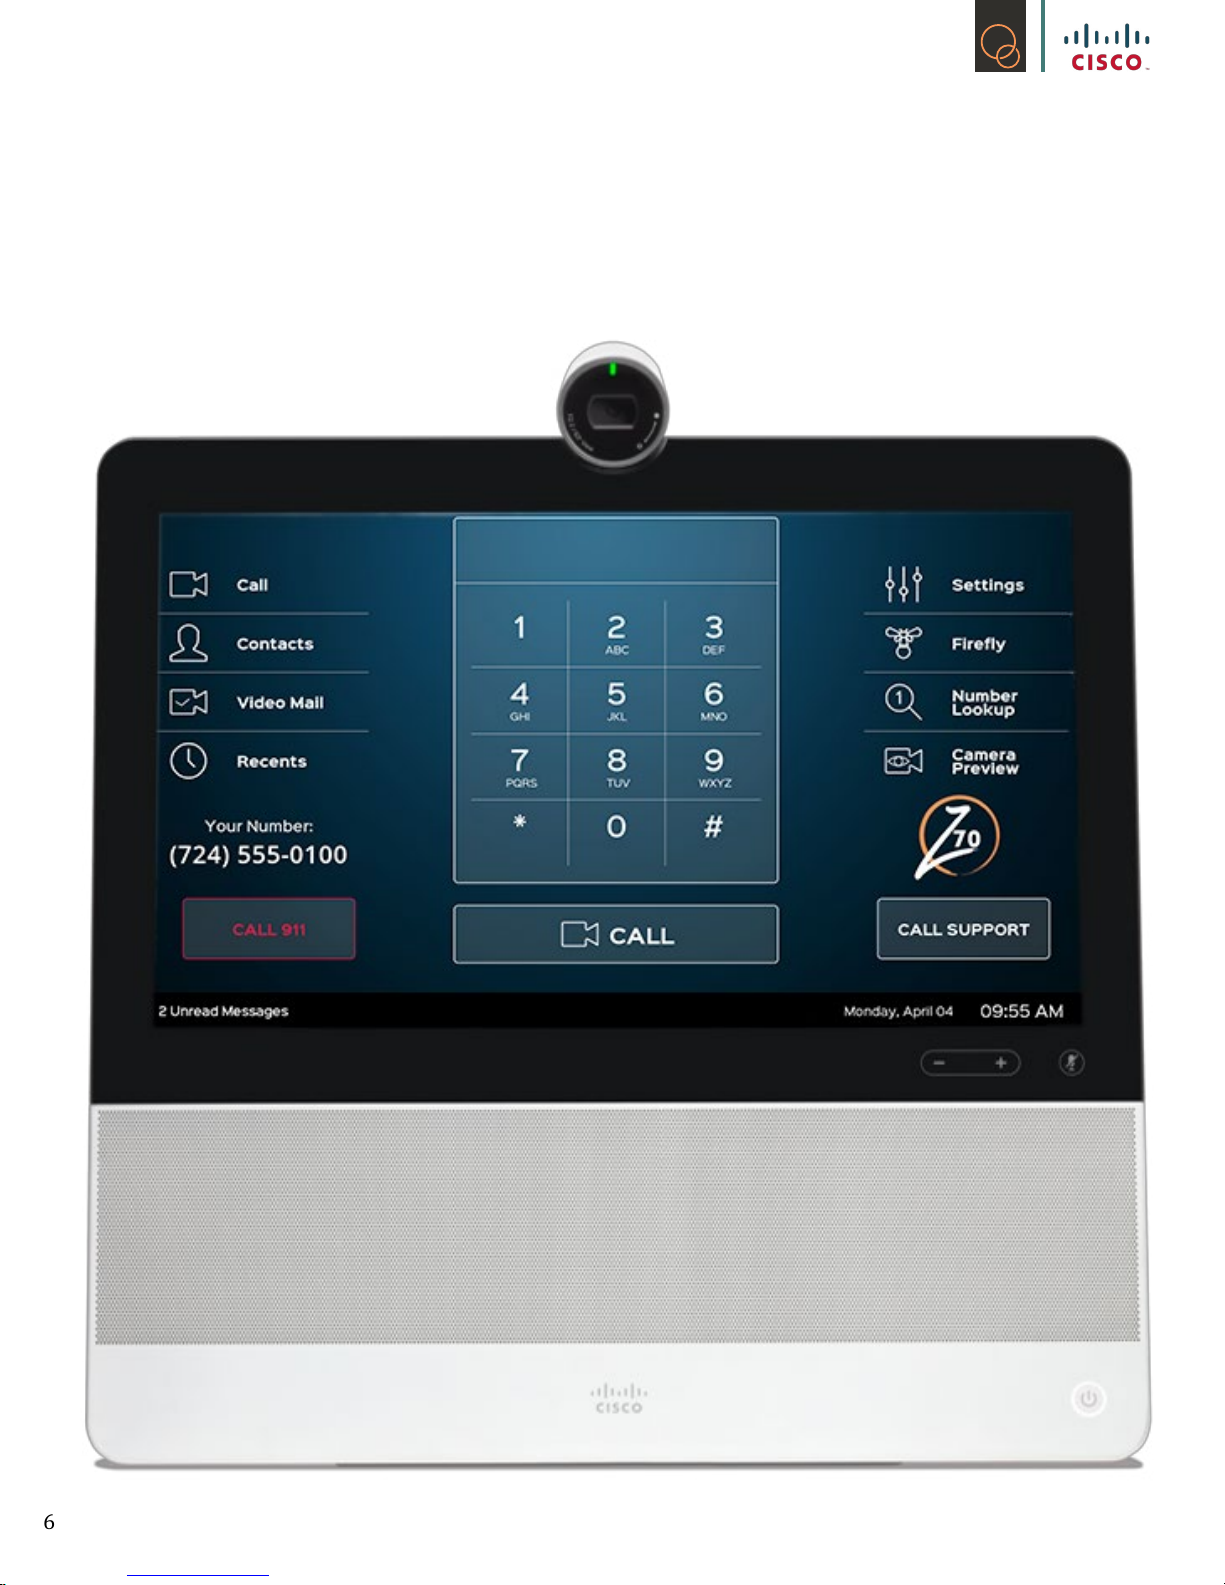
Once your Z70 is set up, it should look like this:
6
Page 7

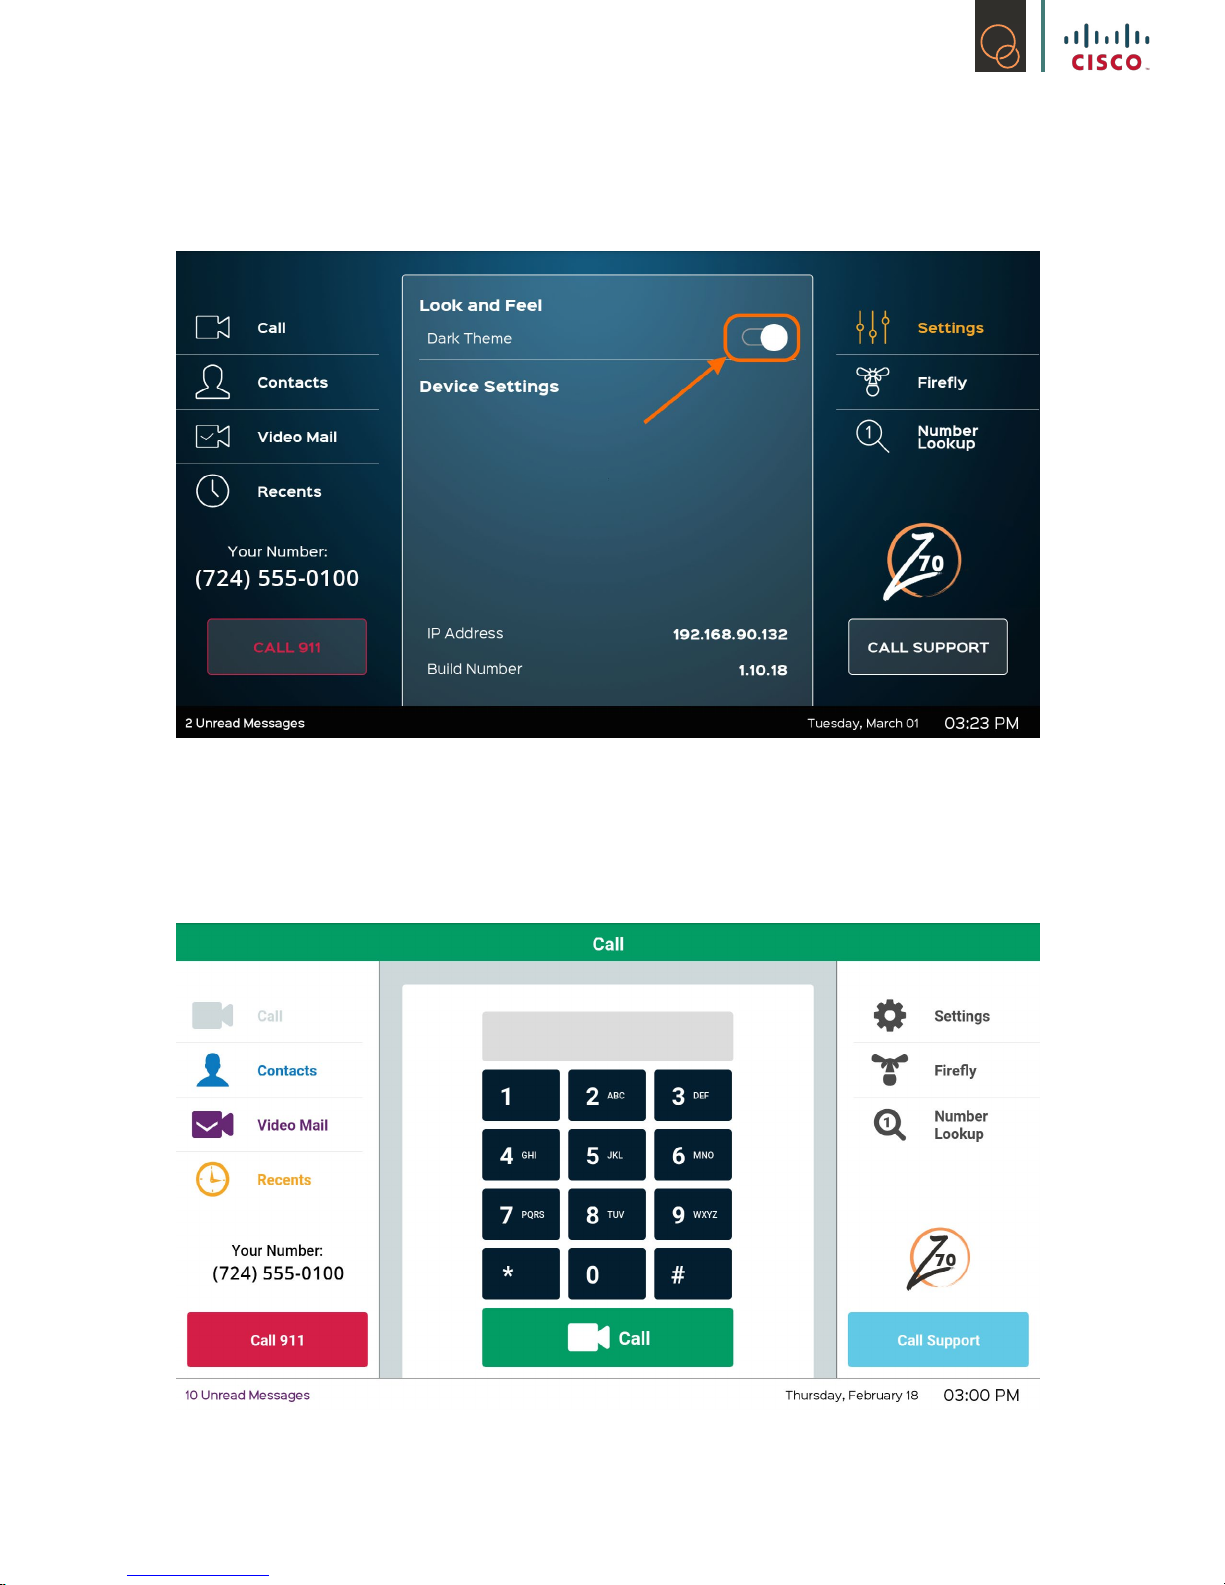
3. Settings (Dark vs. Light)
Once your Z70 is turned on, you have the option of changing the theme. We have provided two
different types of themes, Dark and Light.
Please feel free to play around with both themes until you decide which one works best for you.
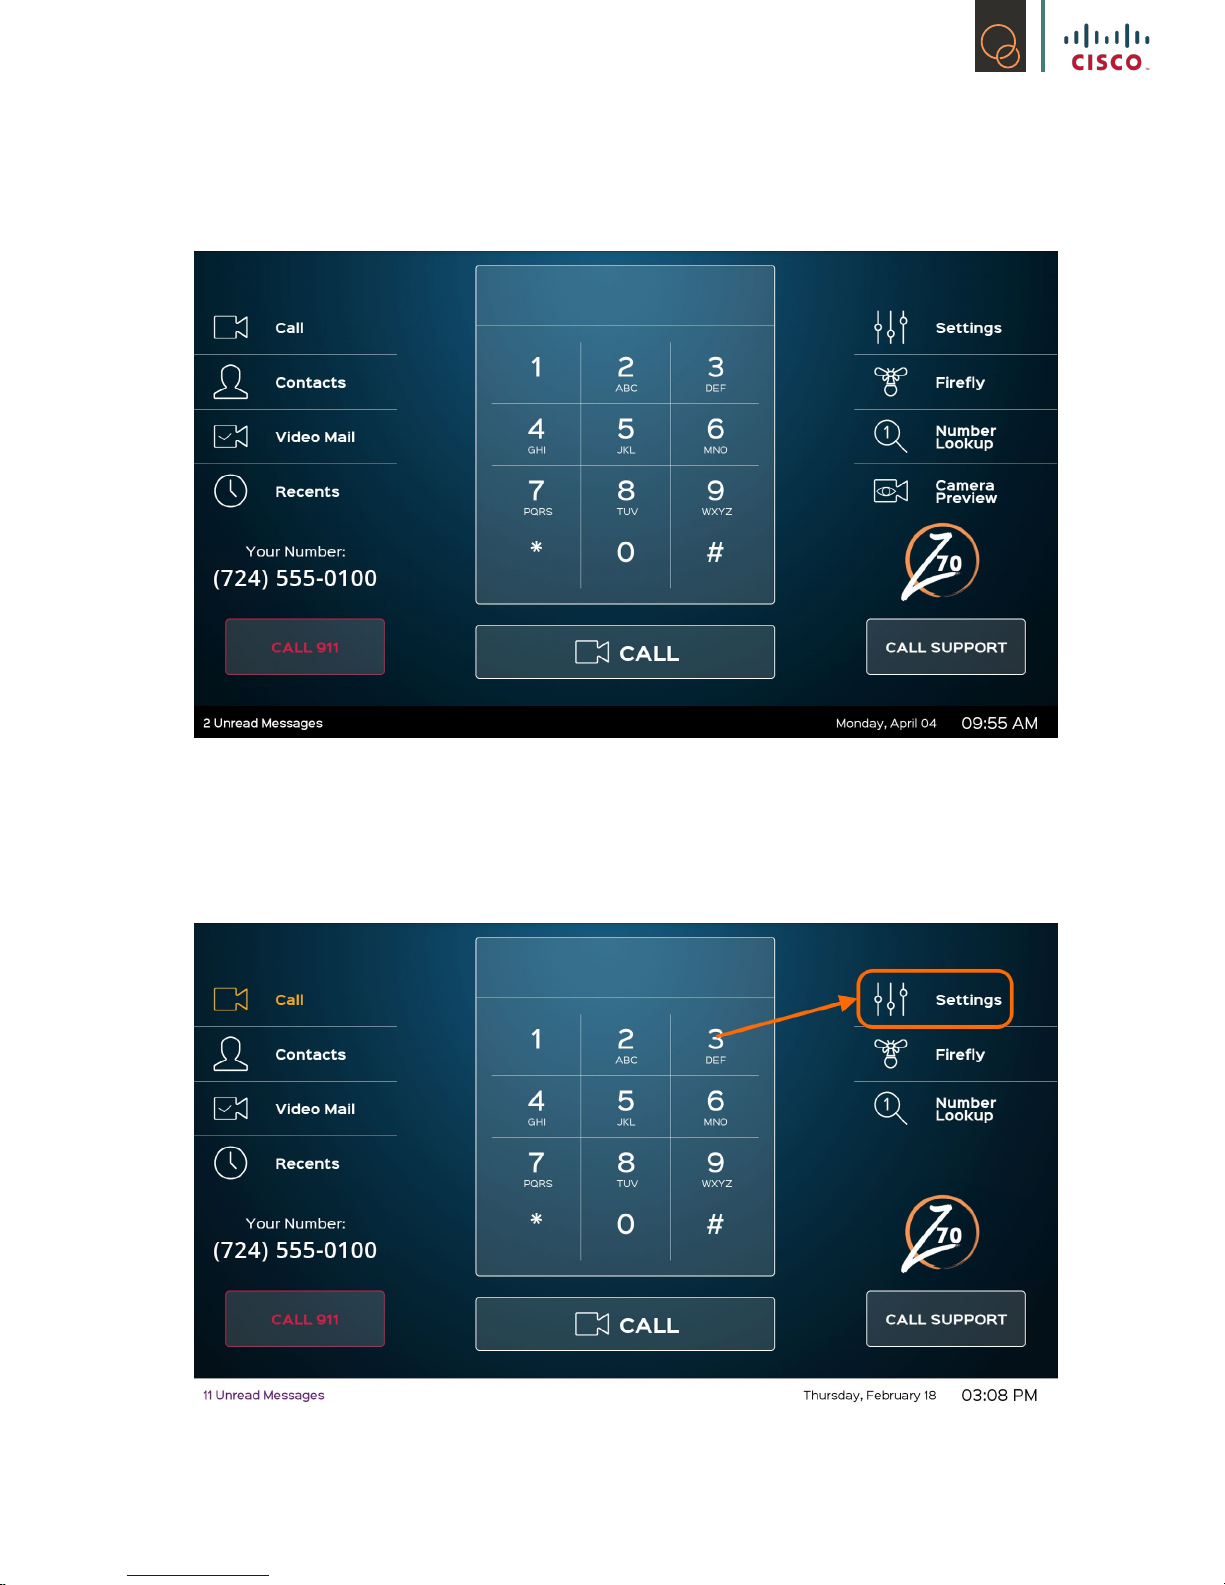
1) Go to Settings on your Z70
2) Go to Look and Feel, touch the circle.
7
Page 8
3) The Z70 will adjust their appearance to the opposite theme that you started with.
4) If you don’t like the darker theme, please go to Settings again.
8
Page 9
5) Touch the circle under “Look and Feel” again.
6) The Z70 will return to the lighter theme.
9
Page 10
4. Items on the Z70 that tie in with Your Prole
Now you’ve turned on your Z70 and selected your preferred theme, and we know you’re ready to
start using it!
You will see several items on the Z70. We are showing you which of these will be tied in with your
prole.
10
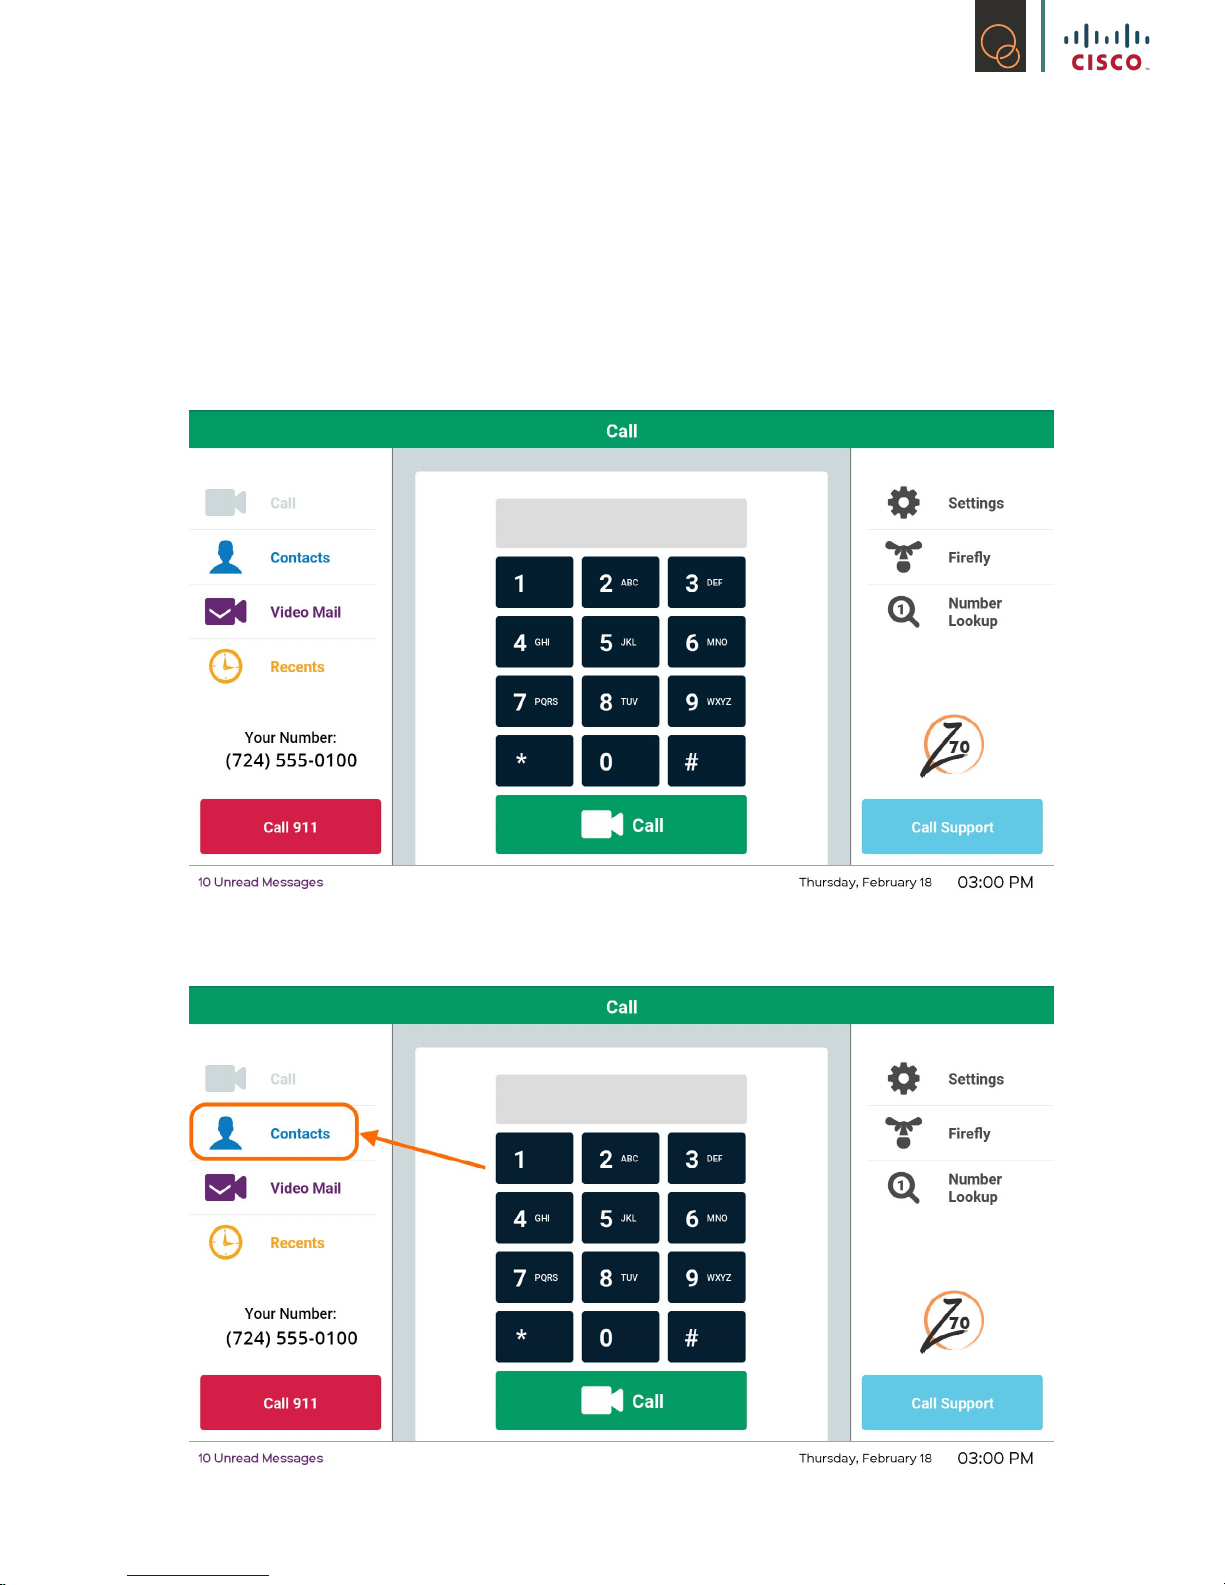
4.1 Contacts
Page 11
Your Z70 has the ability to add contacts directly on the phone, which will also be added to your
contacts on your prole automatically. The only current limitation is not being able to label any
contacts as Spanish. The solution for this is to make sure you add those type of contacts on your
prole directly.
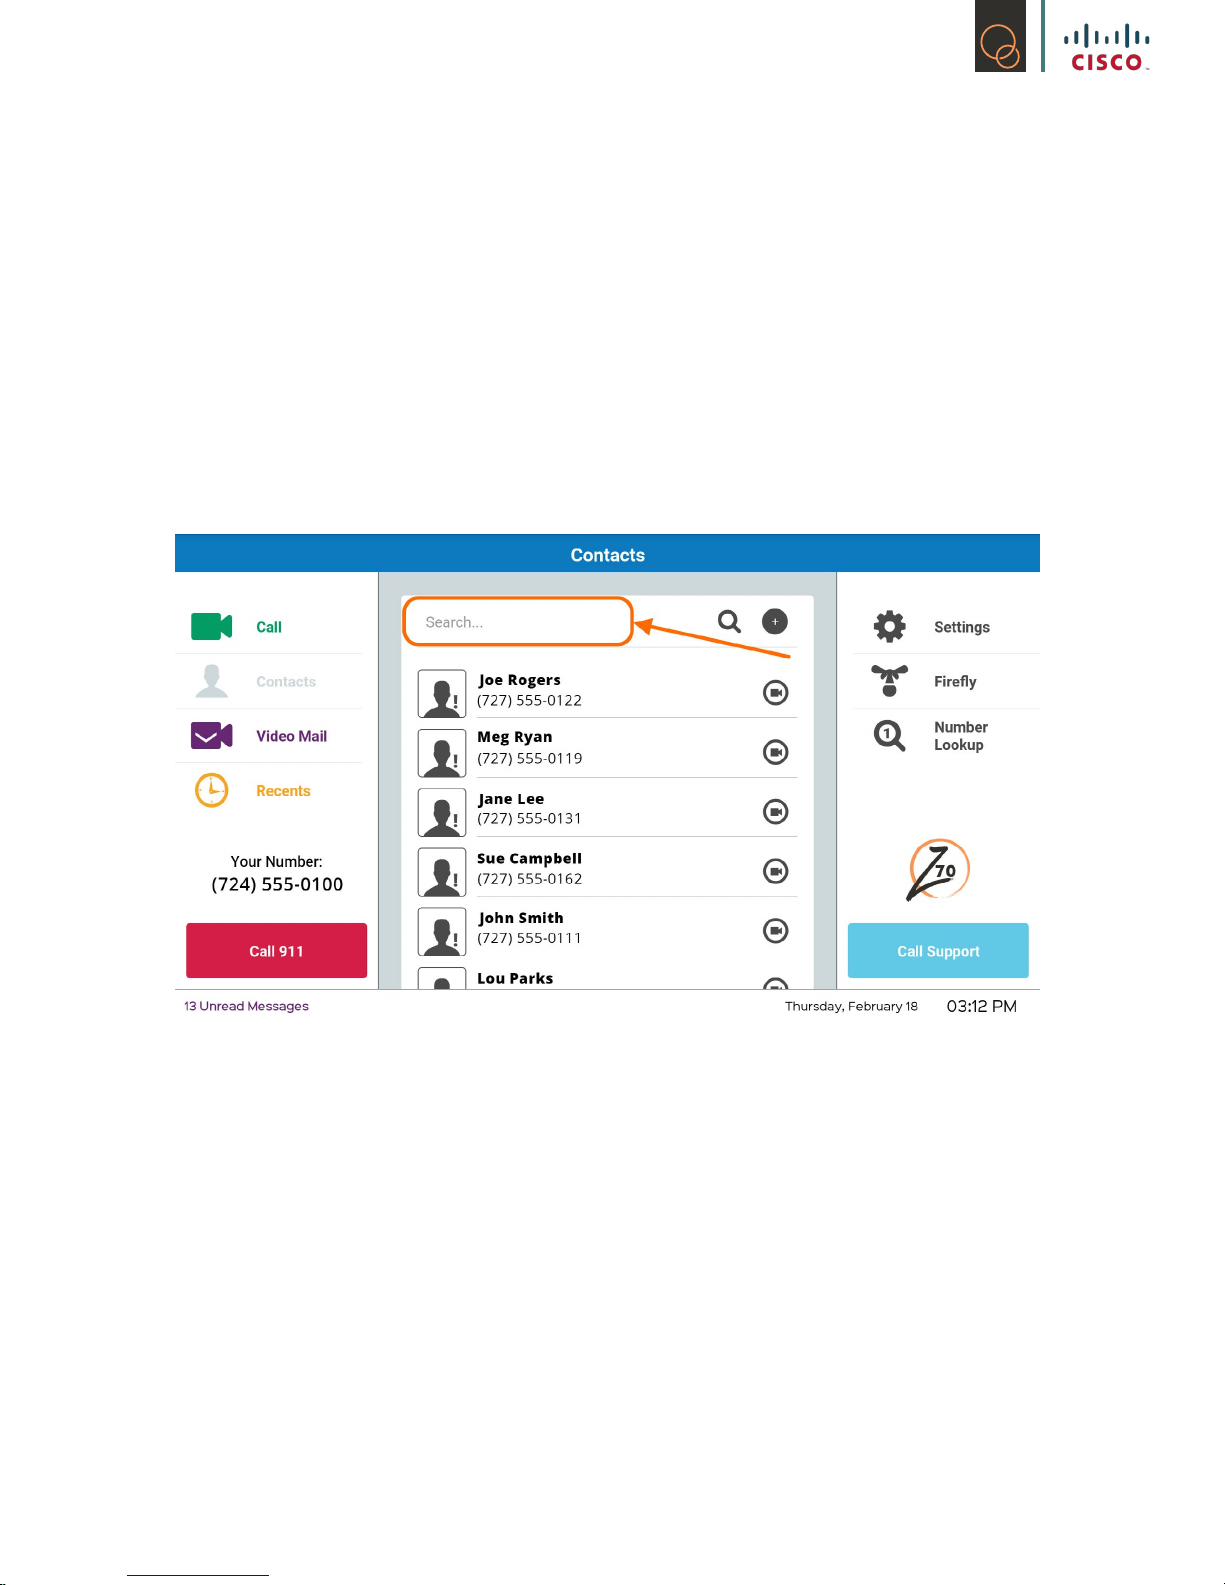
4.1.1 How to Search through your Contacts
Type in the name of the person you are searching for in the Search eld.
Results will show up below the Search eld.
11
Page 12

4.1.2 How to Add
1) Go to Contacts
2) Tap + as shown below:
3) Type in your contact’s name, click Next
12
Page 13

4) Type in your contact’s phone number, click Done
5) Your new contact has been added!
4.1.3 How to Edit a Contact
1) Select the specic contact you want to edit
13
Page 14

2) In the top right corner of the contact information, select the pencil icon
3) You are now able to edit and update your contact with the keyboard on the screen just like
Step #3 and #4 in 4.1.2: How to Add
4) Once the information is updated, click on Done
5) Your contact’s information has been updated!
4.1.4 How to Delete
1) Select the specic contact you want to delete
14
Page 15

2) Tap on the garbage icon as shown below:
3) You will get a pop up asking you to conrm the deletion of your contact. Tap “Delete”
4) Your contact has been deleted!
15
Page 16

4.1.5 Adding Contacts from Recents on the Z70
You are able to add contacts from the Recents section of the Z70. Here’s how!
1) Go into Recents
2) From the list of Recent Calls, select the entry labeled ‘Unknown’ that you would like to add to
your contacts by tapping the + icon
16
Page 17

3) You will only need to add your contact’s name as the phone number will already be listed,
then click on Done
4) You have successfully added a contact from Recents!
4.2 Video Mail
An additional feature that the Z70 has is the Video Mail feature. This is available on all of our
products!
17
Page 18

4.2.1 Knowing Who Your Message is from
If the person who left you a Video Mail has their name in your contacts, then their name will show up
on the message.
If the person who left you a Video Mail message is not in your contacts, it will show up on the Z70 as
Unknown.
4.2.2 Knowing which Messages have been Viewed
Messages are viewable from either the Z70 or on your prole on the website. On the Z70 if the
caller’s name or the word “Unknown” is BOLD, this means the message is new and needs to be
viewed. If you have already viewed the message, the bold font will be turned off.
18
Page 19

4.2.3 Deleting Video Mail Messages on your Z70
Once you have viewed your Video Mail and desire to remove it, you can do this directly from your
Z70!
1) Go to Video Mail list
2) Tap the garbage icon of the specic Video Mail that you want to delete.
3) Your Video Mail has been deleted!
19
Page 20

4.3 Call 911
With the Z70 we are able to provide you with a quick connection to 911 whenever an emergency
happens. Your address on your prole must be updated and current before you can make a 911
call.
Since the Z70 is a touchscreen videophone, we realize that from time to time, you may accidentally
touch the “Call 911” button. This is why we have programmed the Z70 to ask: “Is this an emergency
call?”
If it is an emergency call, you can tap on “Yes”, if not, tap on “No” instead.
20
Page 21

5. Additional Features of the Z70
We also have a few additional features on the Z70 that does not tie in with your prole.
5.1 Call Support
When this button is touched, you will be immediately connected to our Customer Experience Team
queue, to wait for the next available Customer Experience Team Member to assist you with any
inquiries or technical issues you may be having.
21
Page 22

5.2 Recents
This is the area on your Z70 that you can review to see all of the recent calls that were received or
made from the Z70.
You are able to add contacts directly from the Recents list. Please refer to 4.1.5 for a step-by-step
guide.
When you see a downward arrow, it means that the recent call was someone trying to call you. An
upward arrow means that you recently made a call.
22
Page 23

You have two options to remove calls from the Recents list. If you want to remove all of the recent
calls at once, you have the option of selecting “Clear All”.
If you want to remove just one recent call, you can swipe the specic recent call you want to remove.
5.3 Number Look Up
Number Look Up is a neat feature that we added to the Z70 for your convenience! Instead of going
to your computer and trying to nd the phone number of a business or a restaurant that you want to
call, just use the Number Look Up feature, right there on your Z70!
23
Page 24

1) Touch the Number LookUp button, you will see a map appear in the center of your screen
2) Touch the Search bar above the map to type in what you are searching for
24
Page 25

3) Type in your search
4) Results will appear in the map. Additional dropped pins will be provided if there are
alternatives to what you are looking for.
25
Page 26

5) Find the result you are looking for, touch that result to get detailed information.
6) Once you are satised that this is the correct business or restaurant that you want to call,
touch the detailed information.
26
Page 27

7) Touch the green camera icon to call the business or restaurant through our friendly
interpreters!
5.4 Adjusting Webcam/Privacy Screen
The Z70 comes with a built in webcam, which can be adjusted for best viewing capabilities. There
is also a silver dial on the webcam itself, that when adjusted, will open and close the shutter on the
webcam.
When the webcam shutter is closed, it will look like this:
All calls made with the privacy shutter closed will display a black screen to the caller on the other
end.
27
Page 28

When the webcam shutter is open, which is the ideal setting for allowing the other caller to be able
to see you, it will look like this:
28
Page 29

6. Accessories
The Z70 is Bluetooth compatible, we strongly recommend only using approved Bluetooth devices
with your Z70.
6.1 Firey
6.1.1 Setting up your Firey set
1) Unpack your Firey Master and Firey Remote from their boxes.
2) Make sure to plug both units in a power source.
3) Turn both Master and Remote over.
4) Find a paperclip or a tack.
5) Find the holes on the Master and Remote as shown here:
6) Format both Firey units by pressing the link button until light disappears.
7) To pair both Firey units together, press Link button and wait until blue light on both units
blink.
8) Unplug the power until the green light goes off then plug it back in.
9) The Remote should blink quickly for 3-5 seconds then disappear.
10) Your Firey units are now paired to each other!
11) You are now ready to start pairing it to your Z70!
29
Page 30

6.1.2 Pairing your Firey Set to the Z70
1) Go to Firey on your Z70
2) If your Firey set is not turned on, you will notice this sentence “No Firey devices nearby” on
your Z70 screen:
30
Page 31

3) When you turn your Firey set on, it will take some time for the Z70 and the Firey set
to nd each other over Bluetooth. Once they do, you will see Firey xxxx – Tap to Pair.
4) After you have tapped to pair, you will notice that the Z70 and the Firey are now
communicating with each other, there is no action needed from you at this time:
31
Page 32

5) When your Z70 and the Firey set is paired with each other you will see this on your screen:
6.1.3 Testing your Firey Set to make sure it works
You can do a self-test on your Firey’s connection to the Z70 by tapping on “Start Test”.
When you tap on Self Test, your connected Firey set will ash, which means they are working as
they should be.
32
Page 33

6.2 Neck Loop; Headset and Handset Accessories
Even though ZVRS does not provide a Bluetooth Headset as an accessory to the Z70, we can
make recommendations. The Z70 does not only work with Bluetooth Headsets, they also work with
headsets or neck loops that have audio jacks. The Z70 is equipped with a 3.5mm audio port.
When you start having issues with the audio settings on the Z70 you will receive the support you
need from ZVRS, however, the following recommendations are third party products and ZVRS will
not be able to provide support for what you purchase.
6.2.1 Neck Loop
This selection is suitable for any customer who has a hearing aid/cochlear implant that has a
T-function. Basically, this is a switch on the hearing that the person switches to manually. We
recommend the Clear Sounds CLA7-V2 Amplied Power Neck Loop.
6.2.2 Bluetooth Headset
This selection will be good for any customer who has a hearing aid/cochlear implant with or
without the T-function. It requires a little adjustment to ensure that the headset is placed over the
microphone or the hearing aid. We recommend a BLUETTEK Stereo Wireless Bluetooth Headset,
however, most Bluetooth Headsets should work.
6.2.3 Handset
This selection will be good for any customer who prefers the handset over the neck loop or the
Bluetooth Headset. We recommend AMC Retro 3.5mm Telephone Handset Receiver.
33
Page 34

7. Frequently Asked Questions
As a new user of the Z70 we can imagine you may have some questions, we have gathered a list of
the commonly asked questions to provide you with access to information to try to resolve any simple
issues yourself. If these FAQ’s are not helpful, please contact our Customer Experience Team by
touching the “Call Support” button on your Z70.
Q: Why is my Z70 not turned on?
A: Make sure your Z70 is plugged in or touch the power button to turn it on.
Q: Why is my Z70 showing “Waiting for Server”?
A: Make sure the Ethernet Cable on your Z70 is plugged in the right network port on the Z70.
Q: How do I turn on my self-view?
A: Click on “Video Camera” icon on the upper right corner of your screen while you are in a call.
Q: Why am I seeing a black screen on self-view and I’m not in a call?
A: Please adjust the silver ring on the camera to open the camera’s privacy shutter.
34
 Loading...