

Page 1

2.4
GHz
802.11g
Wireless-G
Model No.
USB Network Adapter
User Guide
WIRELESS
with SRX400
WUSB54GX4
Page 2
Wireless-G USB Network Adapter with SRX400
Copyright and Trademarks
Specifications are subject to change without notice. Linksys is a registered trademark or trademark of Cisco
Systems, Inc. and/or its affiliates in the U.S. and certain other countries. Copyright © 2006 Cisco Systems, Inc. All
rights reserved. Other brands and product names are trademarks or registered trademarks of their respective
holders.
WARNING: This product contains chemicals, including lead, known
to the State of California to cause cancer, and birth defects or other
reproductive harm. Wash hands after handling.
How to Use This User Guide
This User Guide has been designed to make understanding networking with the Wireless-G USB Network Adapter
with SRX400 easier than ever. Look for the following items when reading this User Guide:
This checkmark means there is a note of interest and is something you should pay
special attention to while using the Wireless-G USB Network Adapter with SRX400.
This exclamation point means there is a caution or warning and is something that
could damage your property or the Wireless-G USB Network Adapter with SRX400.
This question mark provides you with a reminder about something you
might need to do while using the Wireless-G USB Network Adapter with
SRX400.
In addition to these symbols, there are definitions for technical terms that are presented like this:
word: definition.
Also, each figure (diagram, screenshot, or other image) is provided with a figure number and description, like
this:
Figure 0-1: Sample Figure Description
Figure numbers and descriptions can also be found in the “List of Figures” section in the “Table of Contents”.
WUS54GX4-UG-60215NC BW
Page 3

Wireless-G USB Network Adapter with SRX400
Table of Contents
Chapter 1: Introduction 1
Welcome 1
What’s in This User Guide? 1
Chapter 2: Planning Your Wireless Network 3
Network Topology 3
Roaming 3
Network Layout 4
Chapter 3: Getting to Know the Wireless-G USB Network Adapter with SRX400 5
Chapter 4: Setting Up and Connecting the Wireless-G USB Network Adapter with SRX400 6
Starting the Setup Wizard 6
Setting Up the Adapter 7
Chapter 5: Using the Wireless Network Monitor 17
Accessing the Wireless Network Monitor 17
Link Information Screens 17
Site Survey 20
Profiles 22
Creating a New Profile 23
Appendix A: Troubleshooting 33
Common Problems and Solutions 33
Frequently Asked Questions 34
Appendix B: Using Windows XP Wireless Zero Configuration 37
Appendix C: Wireless Security 40
Security Precautions 40
Security Threats Facing Wireless Networks 40
Appendix D: Windows Help 43
Appendix E: Glossary 44
Appendix F: Specifications 49
Appendix G: Warranty Information 50
Appendix H: Regulatory Information 51
Appendix I: Contact Information 57
Page 4

Wireless-G USB Network Adapter with SRX400
List of Figures
Figure 3-1: USB Network Adapter with SRX400’s USB Port 5
Figure 3-2: USB Network Adapter with SRX400’s LEDs 5
Figure 4-1: Setup Wizard’s Welcome Screen 6
Figure 4-2: Setup Wizard’s License Agreement 6
Figure 4-3: Connecting the Adapter Screen 7
Figure 4-4: Available Wireless Network Screen 7
Figure 4-5: Available Wireless Network Screen 8
Figure 4-6: WEP Key Needed for Connection 8
Figure 4-7: WPA-Personal Needed for Connection 9
Figure 4-8: WPA2-Personal Needed for Connection 9
Figure 4-9: Congratulations Screen 9
Figure 4-10: Available Wireless Network Screen 10
Figure 4-11: Network Settings Screen 10
Figure 4-12: Wireless Mode Screen 11
Figure 4-13: Ad-Hoc Mode Settings Screen 11
Figure 4-14: Wireless Security Screen 12
Figure 4-15: Wireless Security - WEP Screen 12
Figure 4-16: Wireless Security - WPA Personal Screen 13
Figure 4-17: Wireless Security - WPA2 Personal Screen 13
Figure 4-18: Wireless Security - WPA Enterprise Using EAP-TLS Screen 14
Figure 4-19: Wireless Security - WPA Enterprise Using PEAP Screen 14
Figure 4-20: Wireless Security - RADIUS Screen 15
Figure 4-21: Wireless Security - PEAP Screen 15
Figure 4-22: Confirm New Settings Screen 16
Figure 4-23: Congratulations Screen 16
Figure 5-1: Wireless Network Monitor Icon 17
Figure 5-2: Link Information Screen 17
Figure 5-3: More Information - Wireless Network Status Screen 18
Figure 5-4: More Information - Wireless Network Statistics Screen 19
Figure 5-5: Site Survey Screen 20
Figure 5-6: WEP Key Needed for Connection 20
Figure 5-7: WPA-Personal Needed for Connection 21
Figure 5-8: WPA2-Personal Needed for Connection 21
Page 5

Wireless-G USB Network Adapter with SRX400
Figure 5-9: Profiles Screen 22
Figure 5-10: Import a Profile 22
Figure 5-11: Export a Profile 22
Figure 5-12: Create a New Profile 23
Figure 5-13: Available Wireless Network Screen 23
Figure 5-14: Available Wireless Network Screen 24
Figure 5-15: WEP Key Needed for Connection 24
Figure 5-16: WPA-Personal Needed for Connection 25
Figure 5-17: WPA2-Personal Needed for Connection 25
Figure 5-18: Congratulations Screen 25
Figure 5-19: Available Wireless Network Screen 26
Figure 5-20: Network Settings Screen 26
Figure 5-21: Wireless Mode Screen 27
Figure 5-22: Ad-Hoc Mode Settings 27
Figure 5-23: Wireless Security Screen 28
Figure 5-24: Wireless Security - WEP Screen 28
Figure 5-25: Wireless Security - WPA Personal Screen 29
Figure 5-26: Wireless Security - WPA2 Personal Screen 29
Figure 5-27: Wireless Security - WPA Enterprise Using EAP-TLS Screen 30
Figure 5-28: Wireless Security - WPA Enterprise Using PEAP Screen 30
Figure 5-29: Wireless Security - RADIUS Screen 31
Figure 5-30: Wireless Security - RADIUS Screen 31
Figure 5-31: Confirm New Settings Screen 32
Figure 5-32: Congratulations Screen 32
Figure B-1: Wireless Network Monitor Icon 37
Figure B-2: Windows XP - Use Windows XP Wireless Configuration 37
Figure B-3: Windows XP Wireless Configuration Icon 37
Figure B-4: Available Wireless Network 38
Figure B-5: No Wireless Security 38
Figure B-6: Network Connection - Wireless Security 39
Figure B-7: Wireless Network Connection 39
Page 6

Wireless-G USB Network Adapter with SRX400
Chapter 1: Introduction
Welcome
Thank you for choosing the Wireless-G USB Network Adapter with SRX400. With this Adapter, your wireless
networking experience will be faster and easier than ever.
How does the Adapter do this? Like all wireless products, the Adapter allows for greater range and mobility
within your wireless network, whether it’s using the Wireless-G (802.11g) or Wireless-B (802.11b) standard. But
with SRX400, your speed and range are even better than before. And with USB, connection is simple.
network: a series of computers or devices
connected for the purpose of data sharing,
storage, and/or transmission between users.
But what does all of this mean?
Networks are useful tools for sharing computer resources. You can access one printer from different computers
and access data located on another computer's hard drive. Networks are even used for playing multiplayer video
games. So, networks are not only useful in homes and offices, they can also be fun.
PCs equipped with wireless cards and adapters can communicate without cumbersome cables. By sharing the
same wireless settings, within their transmission radius, they form a wireless network.
The included Setup Wizard walks you through configuring the Adapter to your wireless network settings, step by
step. Use the instructions in this Guide to help you set up and connect the Adapter using the Setup Wizard. These
instructions should be all you need to get the most out of the Adapter.
What’s in This User Guide?
This user guide covers the steps for setting up and using the Wireless-G USB Network Adapter with SRX400.
• Chapter 1: Introduction
This chapter describes the Adapter’s applications and this User Guide.
• Chapter 2: Planning Your Wireless Network
This chapter discusses a few of the basics about wireless networking.
• Chapter 3: Getting to Know the Wireless-G USB Network Adapter with SRX400
This chapter describes the physical features of the Adapter.
adapter: a device that adds network functionality
to your PC.
802.11b: an IEEE wireless networking standard
that specifies a maximum data transfer rate of
11Mbps and an operating frequency of 2.4GHz.
802.11g an IEEE wireless networking standard that
specifies a maximum data transfer rate of 54Mbps
and an operating frequency of 2.4GHz.
• Chapter 4: Setting Up and Connecting the Wireless-G USB Network Adapter with SRX400
This chapter shows you how to set up and connect the Adapter.
Chapter 1: Introduction
Welcome
1
Page 7

Wireless-G USB Network Adapter with SRX400
• Chapter 5: Using the Wireless Network Monitor
This chapter explains how to use the Adapter’s Wireless Network Monitor.
• Appendix A: Troubleshooting
This appendix describes some problems and solutions, as well as frequently asked questions, regarding
installation and use of the Adapter.
• Appendix B: Using Windows XP Wireless Zero Configuration
This chapter instructs you on how to use Window XP Wireless Zero Configuration.
• Appendix C: Wireless Security
This appendix discusses security issues regarding wireless networking and measures you can take to help
protect your wireless network.
• Appendix D: Windows Help
This appendix describes how you can use Windows Help for instructions about networking, such as installing
the TCP/IP protocol.
• Appendix E: Glossary
This appendix gives a brief glossary of terms frequently used in networking.
• Appendix F: Specifications
This appendix provides the Adapter’s technical specifications.
• Appendix G: Warranty Information
This appendix supplies the Adapter’s warranty information.
• Appendix H: Regulatory Information
This appendix supplies the Adapter’s regulatory information.
• Appendix I: Contact Information
This appendix provides contact information for a variety of Linksys resources, including Technical Support.
Chapter 1: Introduction
What’s in This User Guide?
2
Page 8

Wireless-G USB Network Adapter with SRX400
Chapter 2: Planning Your Wireless Network
Network Topology
A wireless network is a group of computers, each equipped with one wireless adapter. Computers in a wireless
network must be configured to share the same radio channel. Several PCs equipped with wireless cards or
adapters can communicate with one another to form an ad-hoc network.
Linksys wireless adapters also provide users access to a wired network when using an access point or wireless
router. An integrated wireless and wired network is called an infrastructure network. Each wireless PC in an
infrastructure network can talk to any computer in a wired network infrastructure via the access point or wireless
router.
An infrastructure configuration extends the accessibility of a wireless PC to a wired network, and can double the
effective wireless transmission range for two wireless adapter PCs. Since an access point is able to forward data
within a network, the effective transmission range in an infrastructure network can be doubled.
Roaming
Infrastructure mode also supports roaming capabilities for mobile users. Roaming means that you can move your
wireless PC within your network and the access points will pick up the wireless PC's signal, providing that they
both share the same channel and SSID.
topology: the physical layout of a network.
ad-hoc: a group of wireless devices
communicating directly with each other (peerto-peer) without the use of an access point.
access point: a device that allows wirelessequipped computers and other devices to
communicate with a wired network. Also used to
expand the range of a wireless network
infrastructure: a wireless network that is
bridged to a wired network via an access point.
roaming: the ability to take a wireless device
from one access point's range to another without
losing the connection.
Before you consider enabling roaming, choose a feasible radio channel and optimum access point position.
Proper access point positioning combined with a clear radio signal will greatly enhance performance.
Chapter 2: Planning Your Wireless Network
Network Topology
ssid: your wireless network's name.
3
Page 9

Wireless-G USB Network Adapter with SRX400
Network Layout
Linksys wireless access points and wireless routers have been designed for use with 802.11b and 802.11g
products. Products using the 802.11g and 802.11b standards can communicate with each other.
Access points and wireless routers are compatible with 802.11b and 802.11g adapters, such as the notebook
adapters for your laptop computers, PCI adapters for your desktop PCs, and USB adapters for when you want to
enjoy USB connectivity. Wireless products will also communicate with a wireless print server.
When you wish to connect your wired network with your wireless network, network ports on access points and
wireless routers can be connected to any of Linksys's switches or routers.
switch: a data switch that connects computing devices
to host computers, allowing a large number of devices
to share a limited number of ports
With these, and many other, Linksys products, your networking options are limitless. Go to the Linksys website at
www.linksys.com for more information about wireless products.
router: a networking device that connects multiple
networks together
Chapter 2: Planning Your Wireless Network
Network Layout
4
Page 10
Wireless-G USB Network Adapter with SRX400
Chapter 3: Getting to Know the Wireless-G USB Network Adapter with SRX400
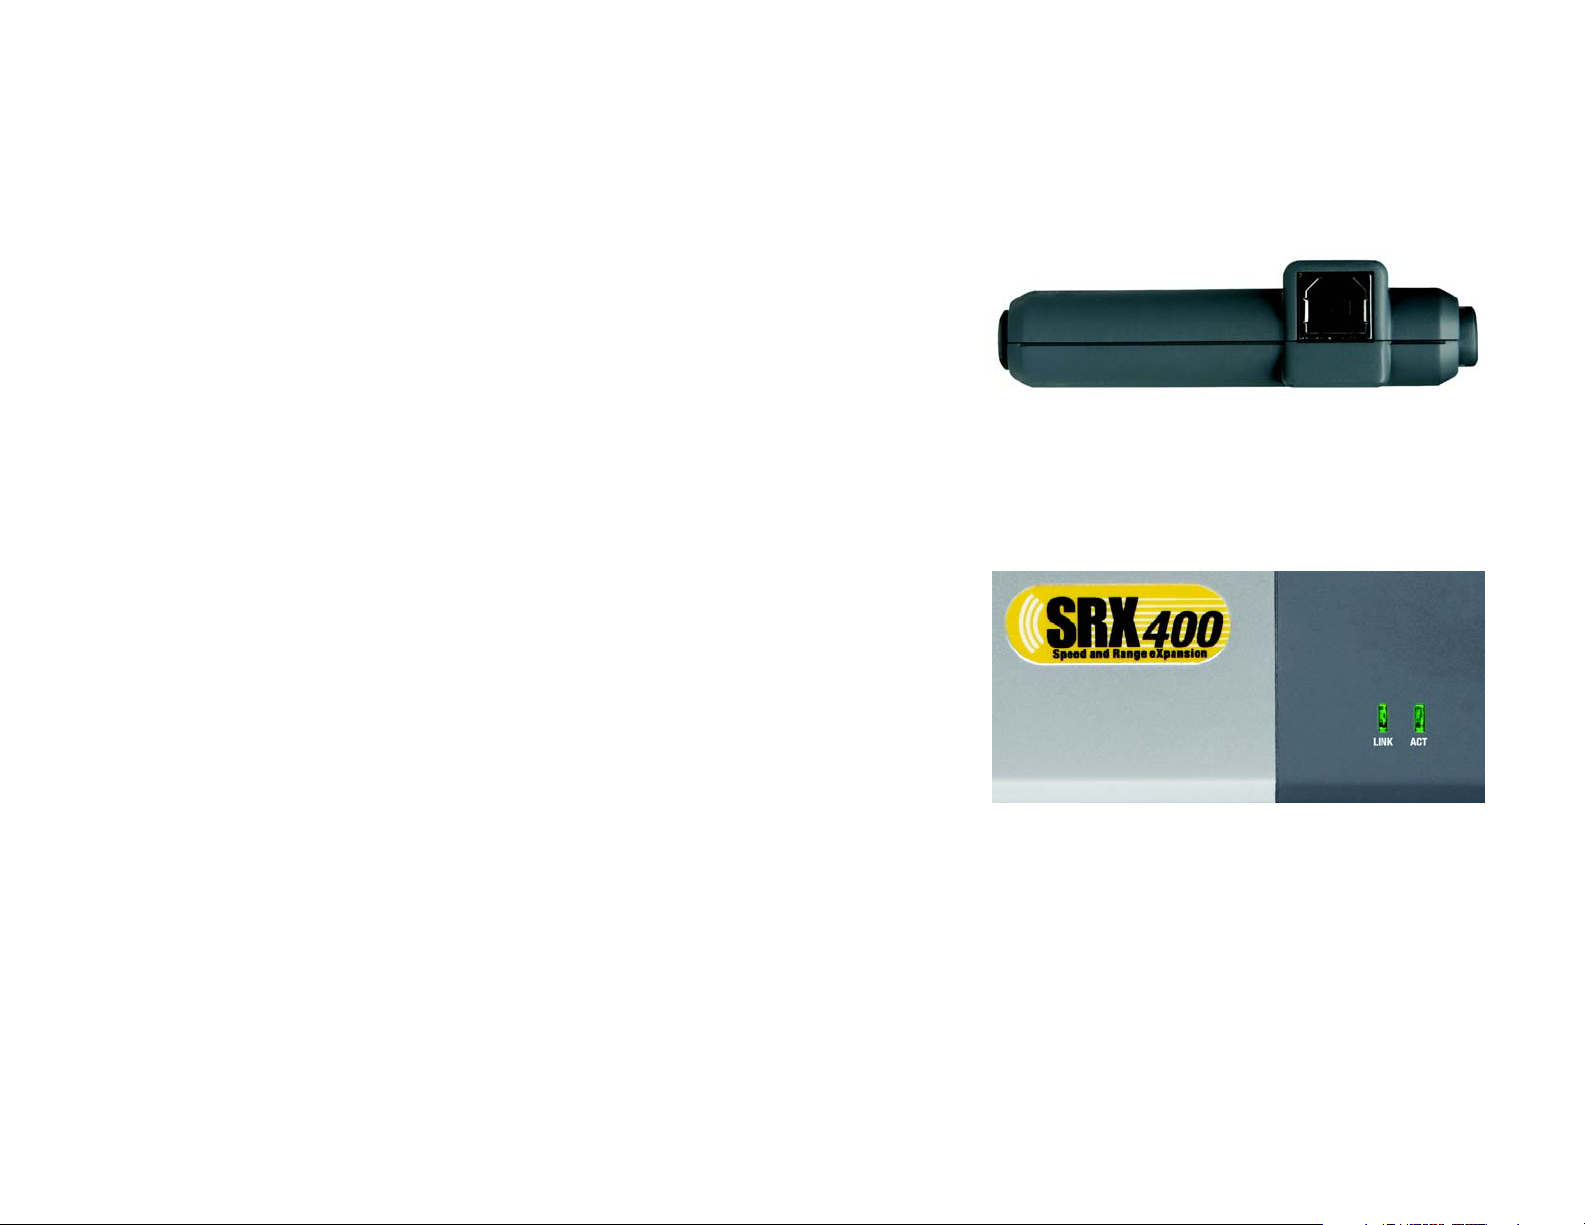
The USB Port
The USB Port is where you connect the USB cable.
Figure 3-1: USB Network Adapter’s USB Port
The LEDs
The USB Network Adapter’s LEDs displays information about network activity.
LINK Green. The LINK LED lights up when the Adapter has an active connection.
ACT Green. The ACT LED flashes when there is network activity.
Chapter 3: Getting to Know the Wireless-G USB Network Adapter with SRX400
Figure 3-2: USB Network Adapter’s LEDs
5
Page 11

Wireless-G USB Network Adapter with SRX400
Chapter 4: Setting Up and Connecting the Wireless-G USB Network Adapter with SRX400
The Wireless-G USB Network Adapter with SRX400 is set up with the Setup Wizard that comes on the CD
enclosed with the Adapter. This chapter will guide you through the setup procedure.
IMPORTANT: Do not connect the Adapter until you are instructed to
do so or the setup will not work.
Starting the Setup Wizard
To begin the setup process, insert the Setup Wizard CD-ROM into your CD-ROM drive. The Setup Wizard should
run automatically, and the Welcome screen should appear. If it does not, click the Start button and choose Run.
In the field that appears, enter D:\setup.exe (if “D” is the letter of your CD-ROM drive).
On the Welcome screen, you have the following choices:
Click Here to Start - Click the Click Here to Start button to begin the software installation process.
User Guide - Click the User Guide button to open this User Guide.
Exit - Click Exit to exit the Setup Wizard.
1. To install the Adapter, click the Click Here to Start button on the Welcome screen.
2. After reading the License Agreement, click Next if you agree and want to continue the installation, or click
Cancel to end the installation.
Chapter 4: Setting Up and Connecting the Wireless-G USB Network Adapter with SRX400
Starting the Setup Wizard
Figure 4-1: Setup Wizard’s Welcome Screen
Figure 4-2: Setup Wizard’s License Agreement
6
Page 12
Wireless-G USB Network Adapter with SRX400
3. Windows will begin copying the files onto your PC.
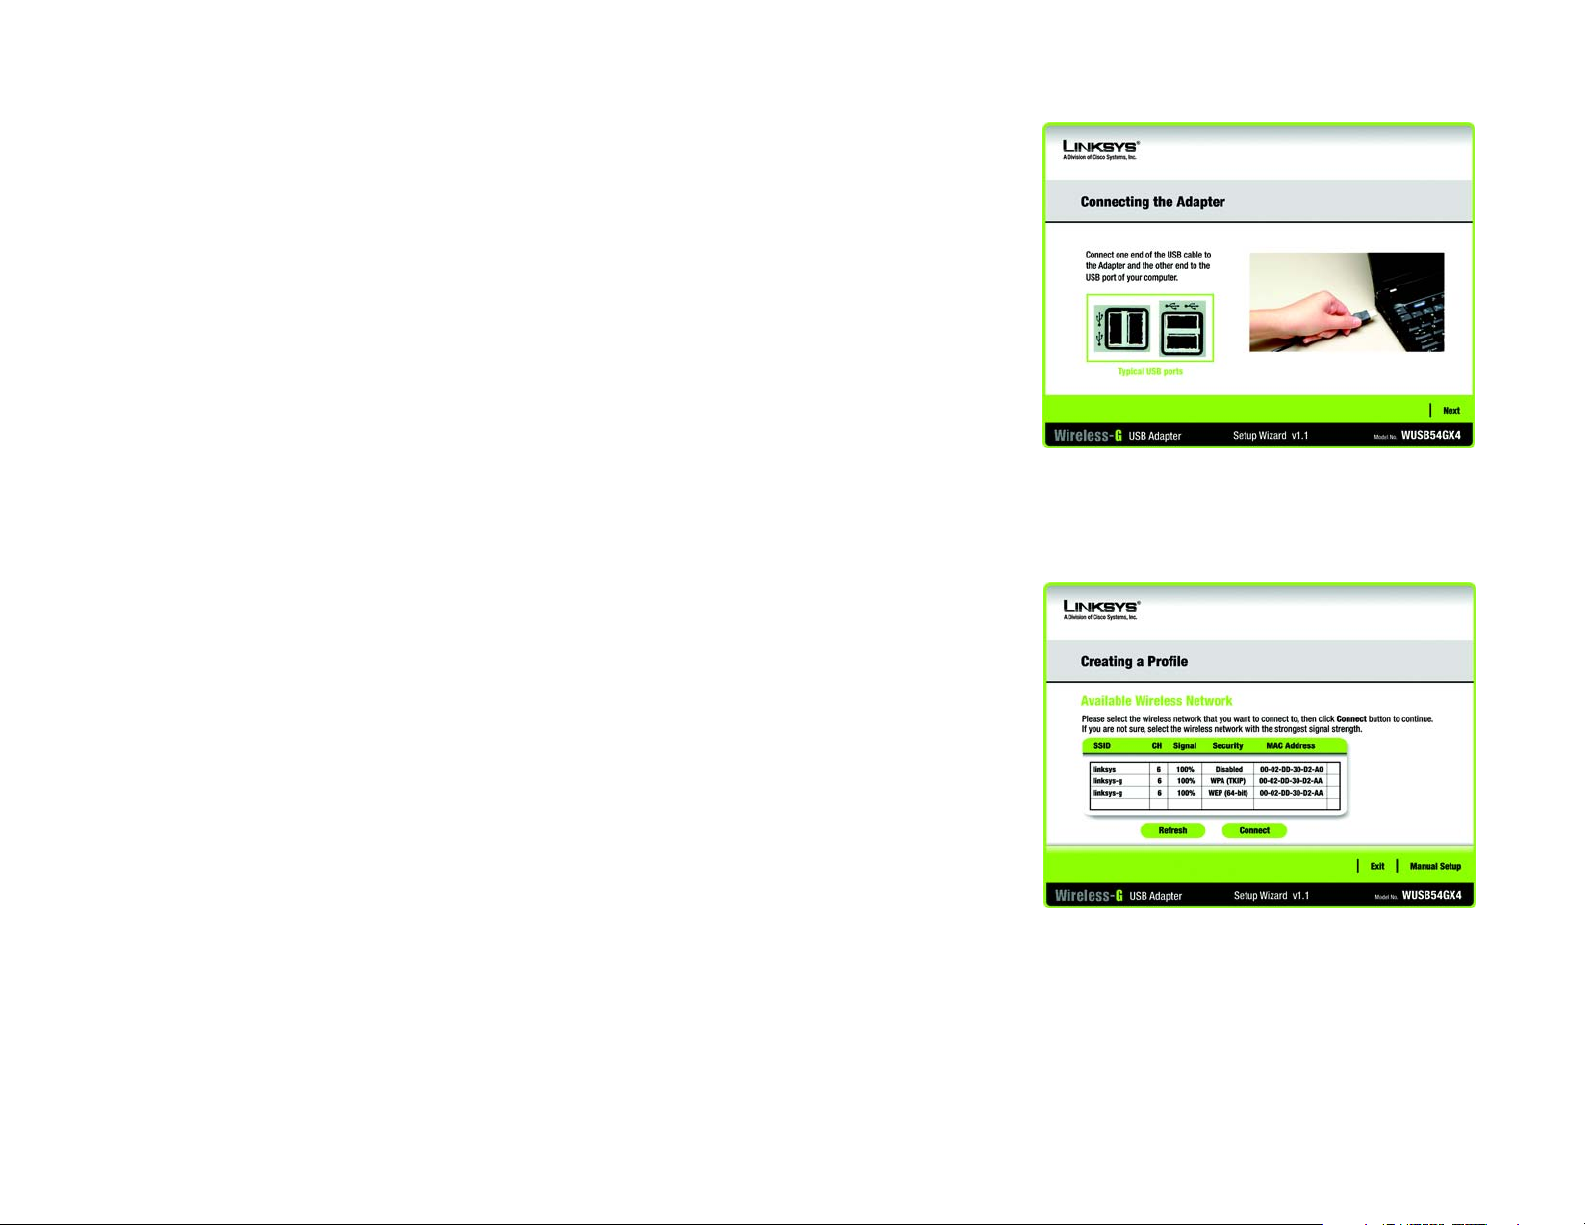
4. The Setup Wizard will now prompt you to install the Adapter into your PC. Click Next. Connect one end of the
supplied USB cable into the USB port of the USB Network Adapter with SRX400 and connect the other end into
the USB port of your computer. Adjust the antennas and continue the Setup Wizard.
Setting Up the Adapter
When the Setup Wizard resumes, the next screen to appear will be the Available Wireless Network screen.
This screen provides two options for setting up the Adapter.
Figure 4-3: Connecting the Adapter Screen
• Available Wireless Network. Most users should use this option. The networks available to this Adapter will
be listed on this screen. You can choose one of these networks and click the Connect button to connect to it.
Click the Refresh button to update the Available Wireless Network list.
• Manual Setup. To set up the Adapter manually, select Manual Setup.
The setup for each option is described, step by step, under the appropriate heading on the following pages.
Click Exit to close the Setup Wizard, if you wish to set up the Adapter later.
Chapter 4: Setting Up and Connecting the Wireless-G USB Network Adapter with SRX400
Setting Up the Adapter
Figure 4-4: Available Wireless Network Screen
7
Page 13
Wireless-G USB Network Adapter with SRX400
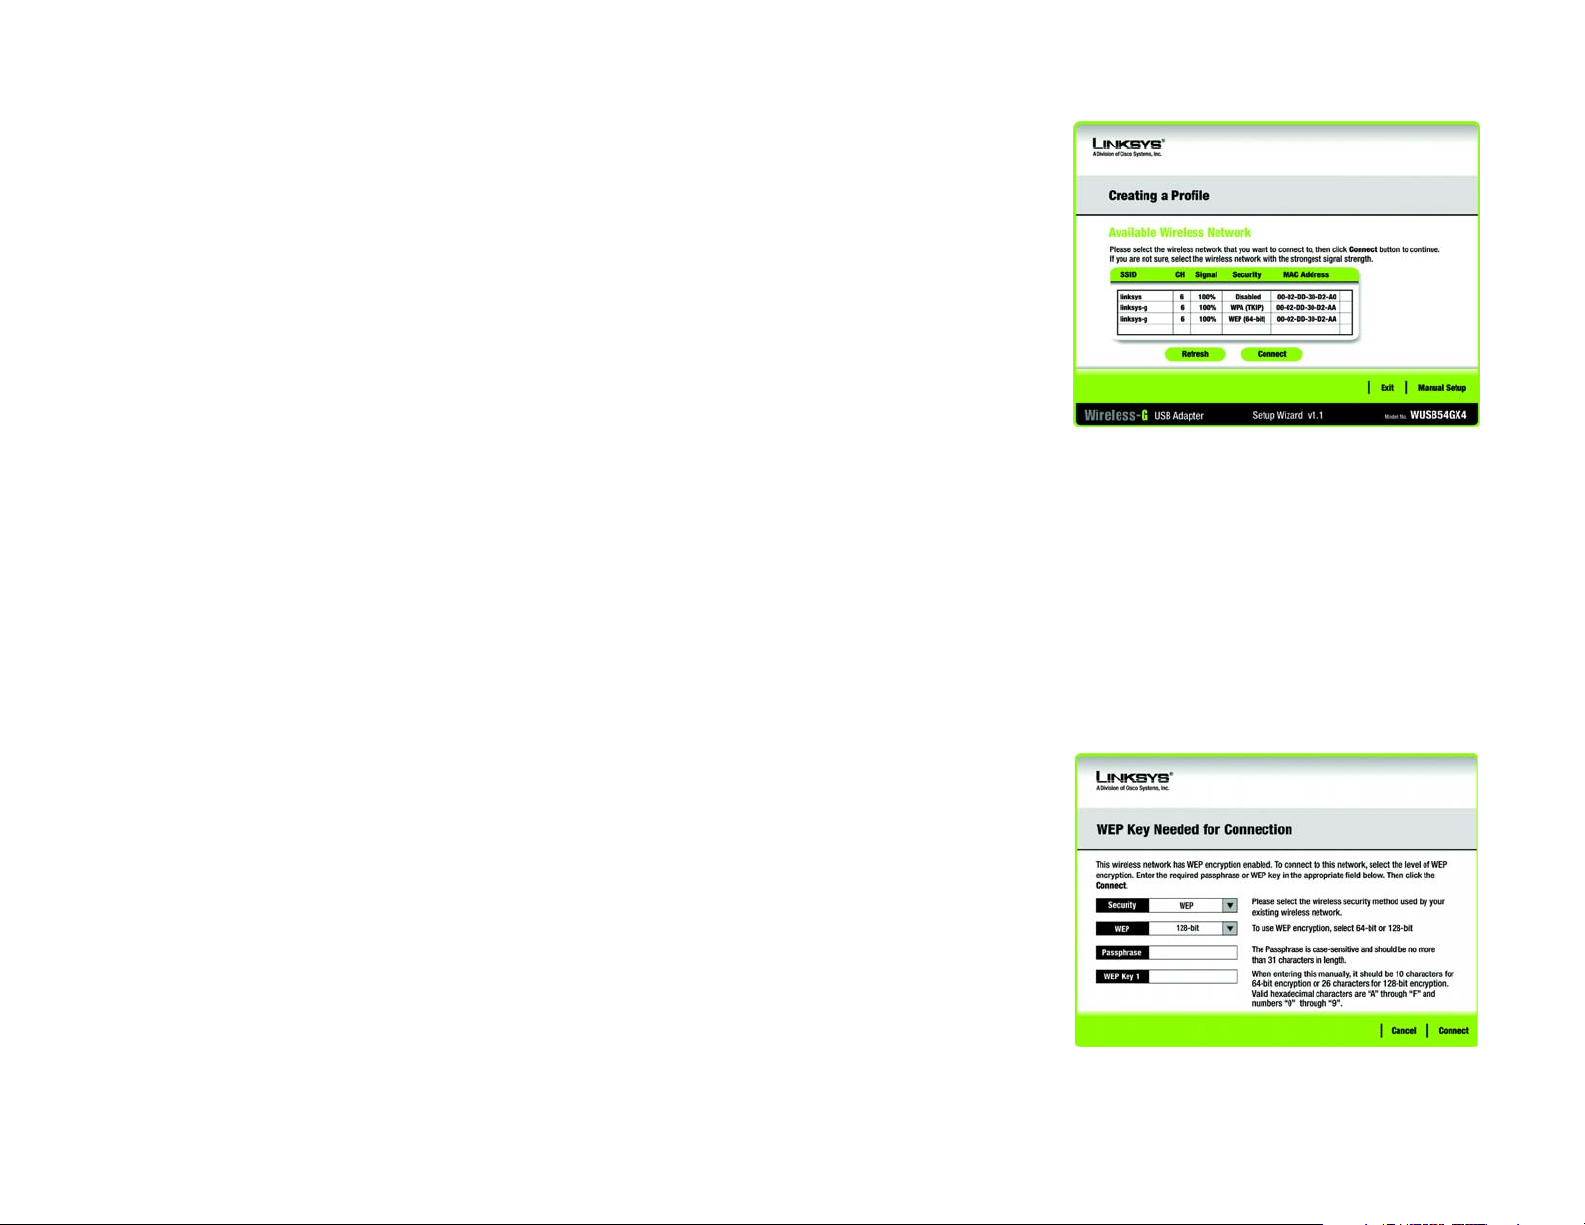
Setting Up the Adapter with an Available Network
The available networks are listed in the table on the center of the screen by SSID. Select the wireless network you
wish to connect to and click the Connect button. (If you do not see your network listed, you can click the Refresh
button to bring the list up again.) If the network utilizes wireless security, you will need to configure security on
the Adapter. If not, you will be taken directly to the Congratulations screen.
1. If wireless security has been enabled on this network, you will see a wireless security screen. If your network
uses WEP (Wired Equivalent Privacy) encryption, the WEP Key Needed for Connection screen will appear. If
your network uses WPA Personal or WPA2 Personal security, a screen will appear for one of those encryption
methods.
WEP Key Needed for Connection
Select the level of encryption you want to use, 64-bit or 128-bit.
Then, enter a passphrase or WEP key.
Passphrase - Enter a passphrase in the Passphrase field, so a WEP key is automatically generated. The
passphrase is case-sensitive and should not be longer than 31 alphanumeric characters. It must match the
passphrase of your other wireless network devices and is compatible with Linksys wireless products only. (If
you have any non-Linksys wireless products, enter the WEP key manually on those products.)
WEP Key 1 - The WEP key you enter must match the WEP key of your wireless network. For 64-bit
encryption, enter exactly 10 hexadecimal characters. For 128-bit encryption, enter exactly 26 hexadecimal
characters. Valid hexadecimal characters are “0” to “9” and “A” to “F”.
Then, click Connect and proceed to the Congratulations screen. To cancel the connection, click Cancel.
Figure 4-5: Available Wireless Network Screen
encryption: encoding data transmitted in a network.
wep (wired equivalent privacy): a method of encrypting
network data transmitted on a wireless network for
greater security.
wpa (wi-fi protected access): a wireless security
protocol using TKIP (Temporal Key Integrity Protocol)
encryption, which can be used in conjunction with a
RADIUS server.
Chapter 4: Setting Up and Connecting the Wireless-G USB Network Adapter with SRX400
Setting Up the Adapter
Figure 4-6: WEP Key Needed for Connection
8
Page 14
Wireless-G USB Network Adapter with SRX400
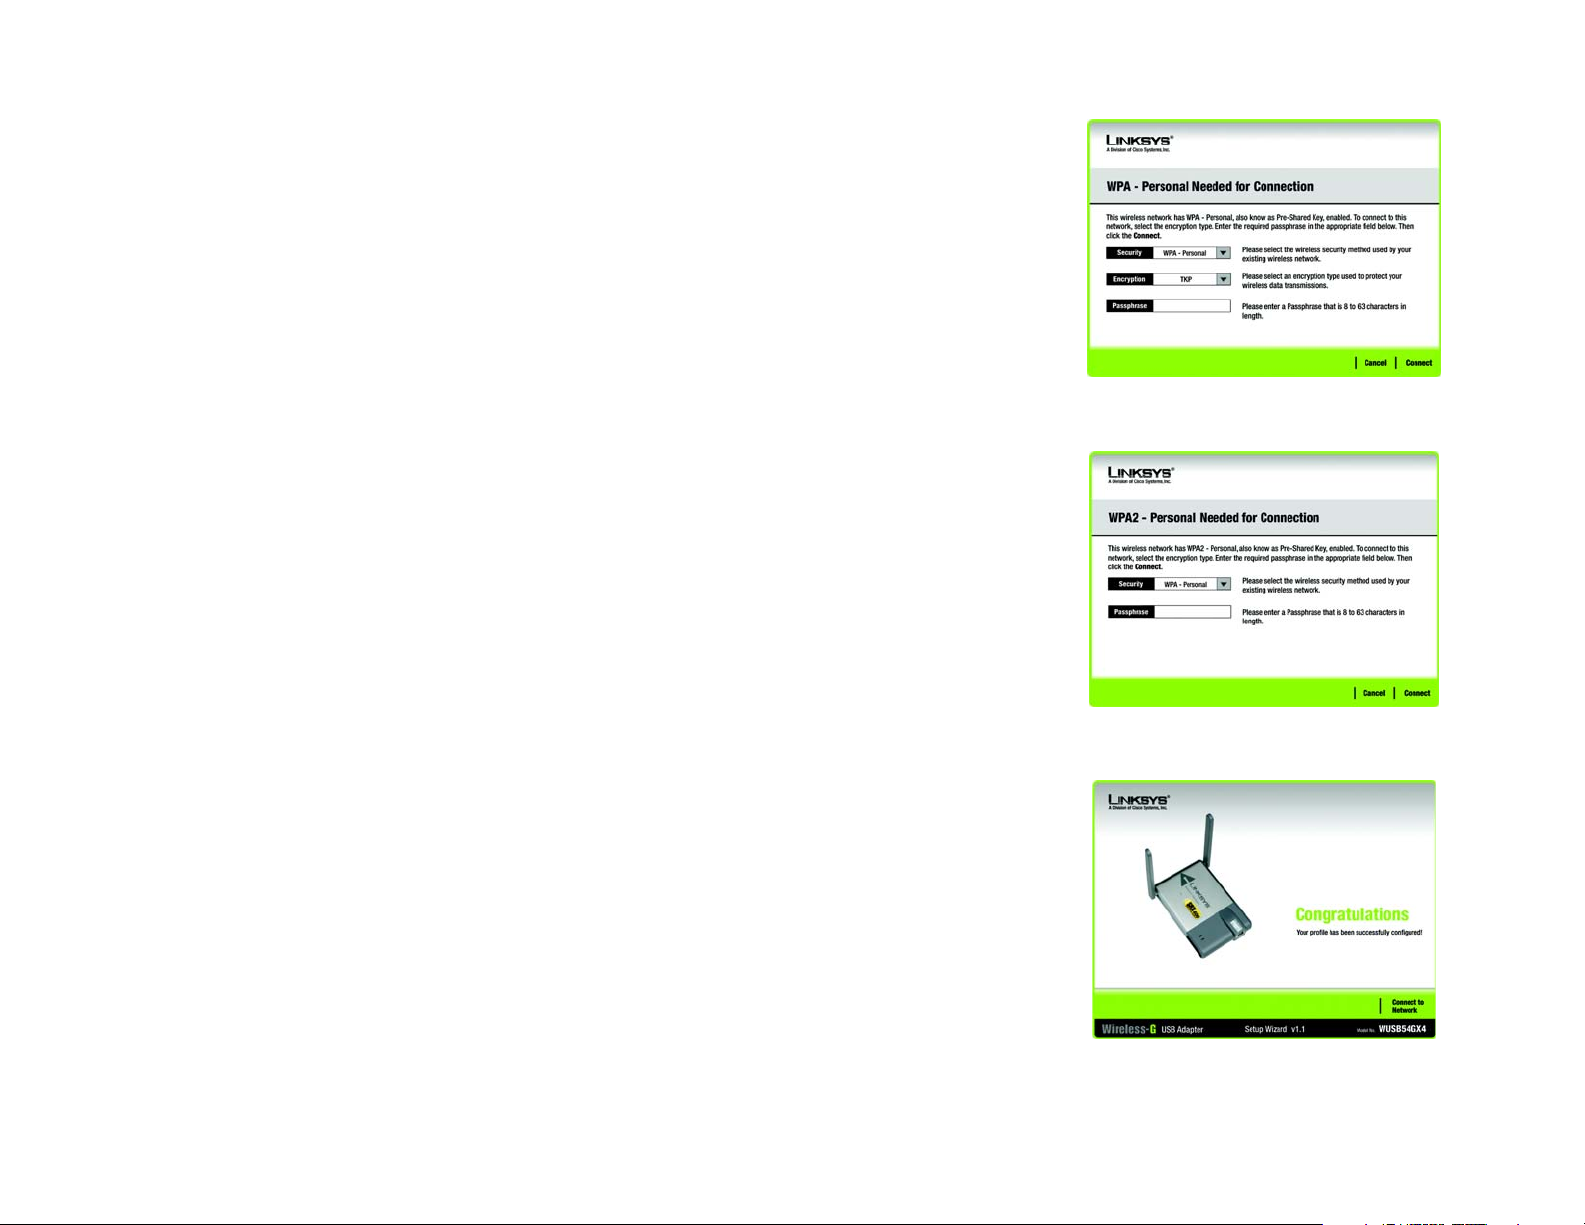
WPA-Personal for Connection
WPA Personal offers two encryption methods, TKIP and AES, with dynamic encryption keys. Select one of
these methods. Then enter a passphrase.
Encryption - Select the type of algorithm you want to use, TKIP or AES, from the Encryption drop-down
menu.
Passphrase - Enter a Passphrase, also called a pre-shared key, of 8-63 characters in the Passphrase field.
The longer and more complex your Passphrase is, the more secure your network will be.
Then, click Connect and proceed to the Congratulations screen. To cancel the connection, click Cancel.
WPA2 - Personal Needed for Connection
AES is automatically used as the encryption method. Enter a passphrase on this screen.
Passphrase - Enter a Passphrase, also called a pre-shared key, of 8-63 characters in the Passphrase field.
The longer and more complex your Passphrase is, the more secure your network will be.
Then, click Connect and proceed to the Congratulations screen. To cancel the connection, click Cancel.
2. After the Adapter has been configured for the network, the Congratulations screen will appear. Click Connect
to Network to connect to your network.
Congratulations! Setup is complete.
Figure 4-7: WPA-Personal Needed for Connection
Figure 4-8: WPA2-Personal Needed for Connection
To check the link information, search for available wireless networks, or make additional configuration
changes, refer to “Chapter 5: Using the Wireless Network Monitor.”
Chapter 4: Setting Up and Connecting the Wireless-G USB Network Adapter with SRX400
Setting Up the Adapter
Figure 4-9: Congratulations Screen
9
Page 15
Wireless-G USB Network Adapter with SRX400
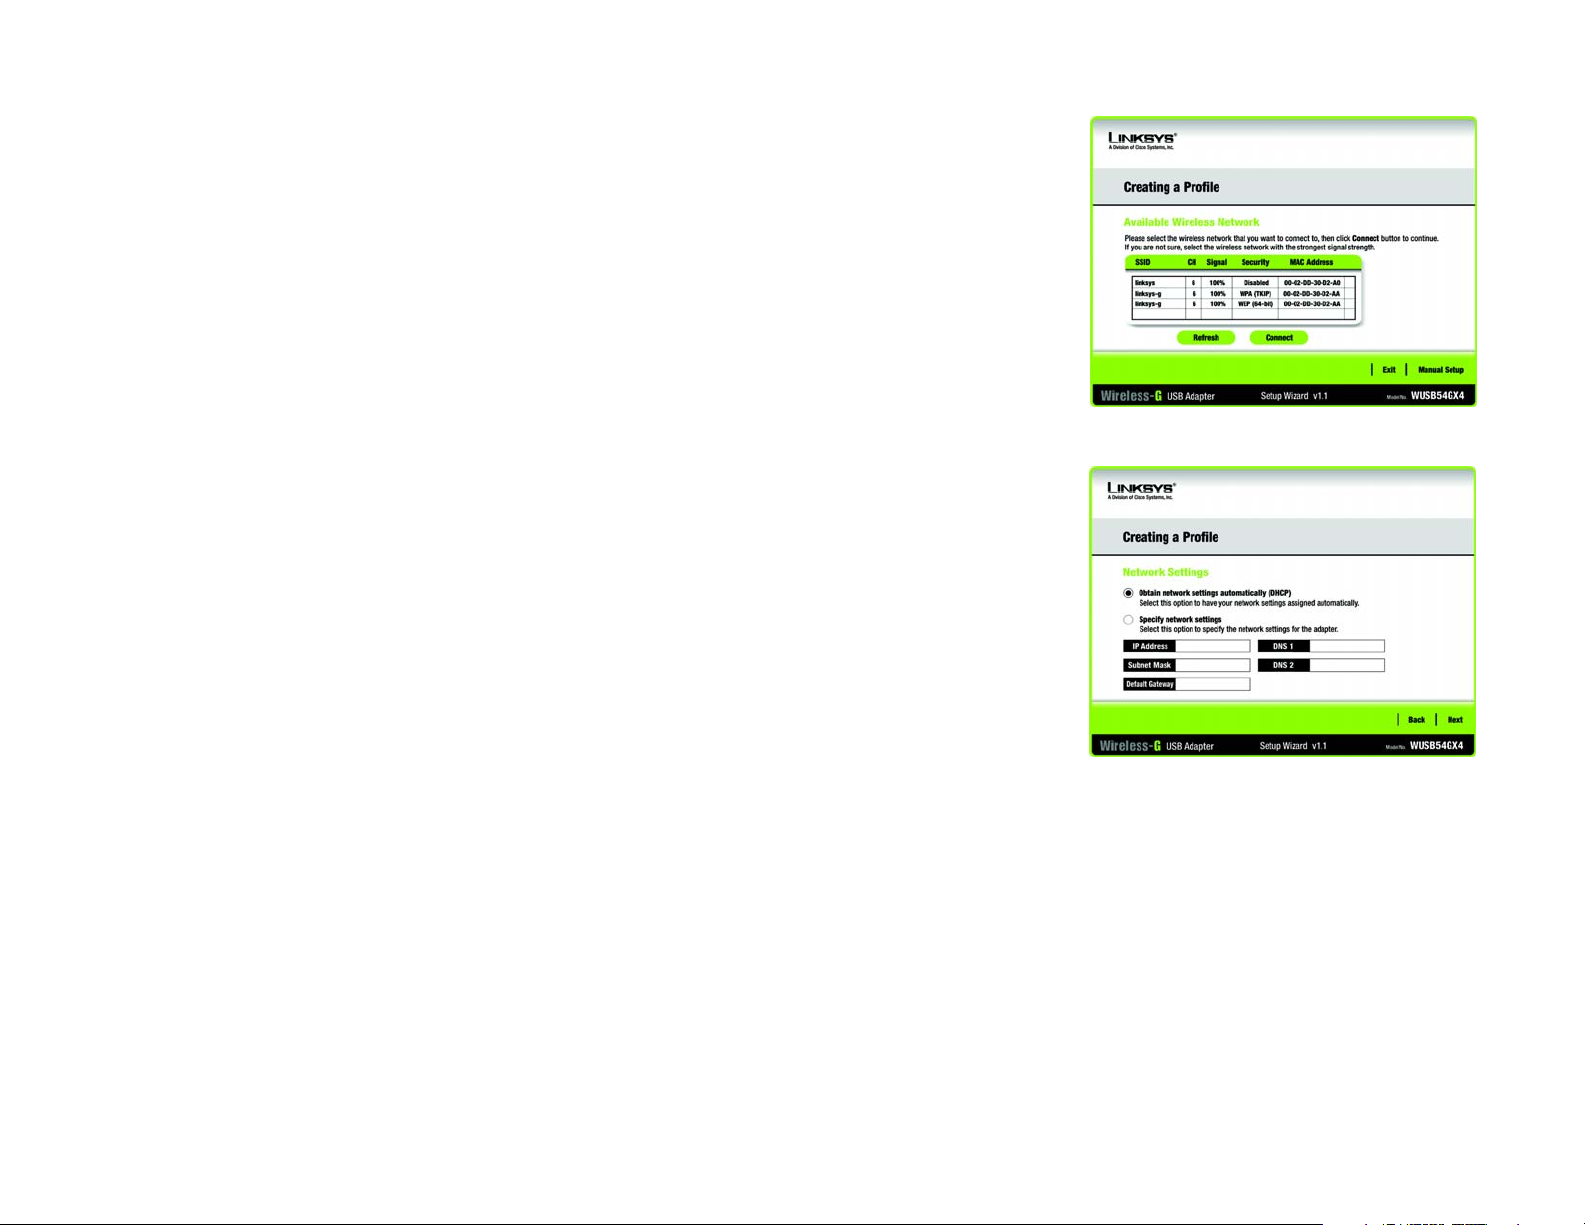
Setting Up the Adapter with Manual Setup
Click Manual Setup on the Available Wireless Network screen to set up the Adapter manually.
1. After clicking Manual Setup, the Network Settings screen will appear. If your network has a router or other
DHCP server, click the radio button next to Obtain network settings automatically (DHCP).
If your network does not have a DHCP server, click the radio button next to Specify network settings. Enter
an IP Address, Subnet Mask, Default Gateway, and DNS addresses appropriate for your network. You must
specify the IP Address and Subnet Mask on this screen. If you are unsure about the Default Gateway and DNS
addresses, leave these fields empty.
IP Address - This IP Address must be unique to your network.
Subnet Mask - The Adapter’s Subnet Mask must be the same as your wired network’s Subnet Mask.
Default Gateway - Enter the IP address of your network’s Gateway here.
DNS 1 and DNS 2 - Enter the DNS address of your wired Ethernet network here.
Figure 4-10: Available Wireless Network Screen
Click Next to continue, or click Back to return to the Available Wireless Network screen.
Chapter 4: Setting Up and Connecting the Wireless-G USB Network Adapter with SRX400
Setting Up the Adapter
Figure 4-11: Network Settings Screen
ip address: the address used to identify a computer or
device on a network.
subnet mask: an address code that determines the size of
a network.
default gateway: a device that forwards
Internet traffic from your local area network.
dns (domain name server): the IP address of your ISP's server,
which translates the names of websites into IP addresses.
10
Page 16
Wireless-G USB Network Adapter with SRX400
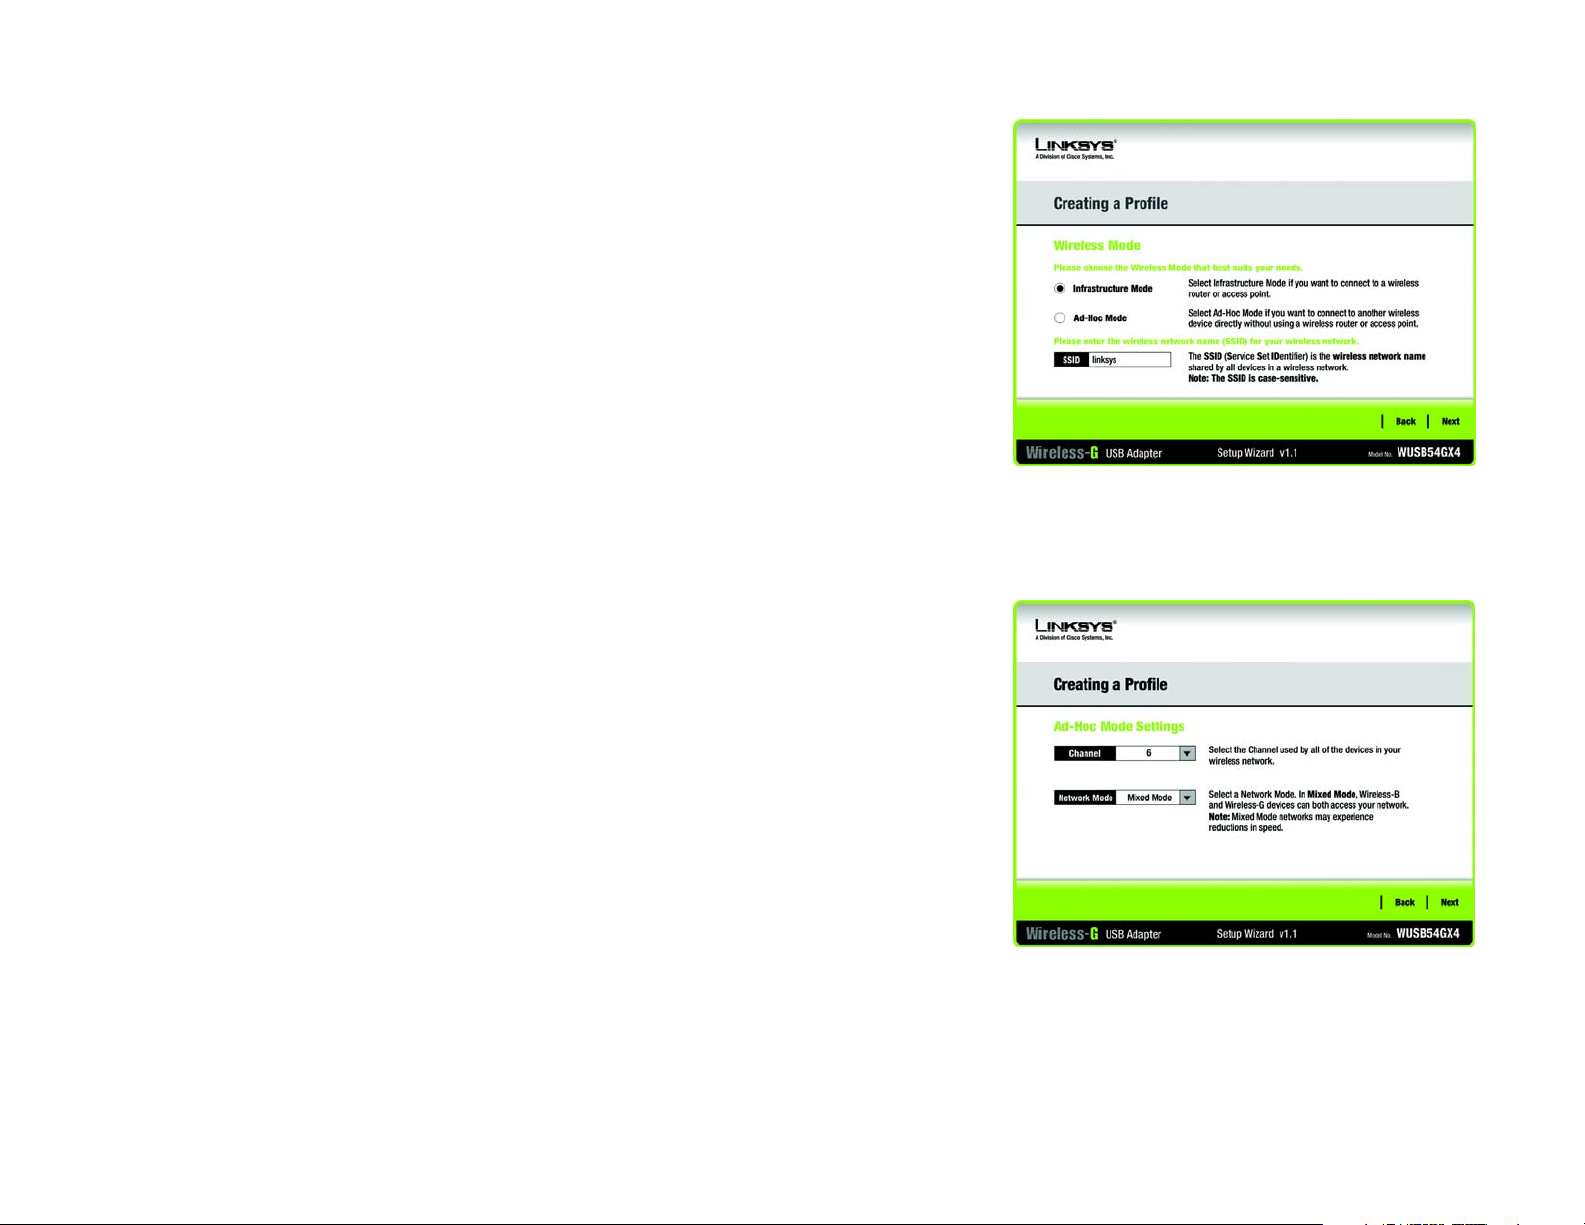
2. The Wireless Mode screen shows a choice of two wireless modes. Click the Infrastructure Mode radio
button if you want to connect to a wireless router or access point. Click the Ad-Hoc Mode radio button if you
want to connect to another wireless device directly without using a wireless router or access point. Then,
enter the SSID for your network.
Infrastructure Mode - Use this mode if you want to connect to a wireless router or access point.
Ad-Hoc Mode - Use this mode if you want to connect to another wireless device directly without using a
wireless router or access point.
SSID - This is the wireless network name that must be used for all the devices in your wireless network. It is
case- sensitive and should be a unique name to help prevent others from entering your network.
Click Next to continue or Back to return to the previous screen.
3. If you chose Infrastructure Mode, go to Step 4 now. If you chose Ad-Hoc Mode, the Ad-Hoc Mode Settings
screen will appear. Select your channel and network mode settings on this screen.
Channel - Select the correct channel for your wireless network. The channel you choose should match the
channel set on the other devices in your wireless network. If you are unsure about which channel to use, keep
the default setting.
Click Next to continue or click Back to change any settings.
Figure 4-12: Wireless Mode Screen
Figure 4-13: Ad-Hoc Mode Settings Screen
Chapter 4: Setting Up and Connecting the Wireless-G USB Network Adapter with SRX400
Setting Up the Adapter
11
Page 17
Wireless-G USB Network Adapter with SRX400
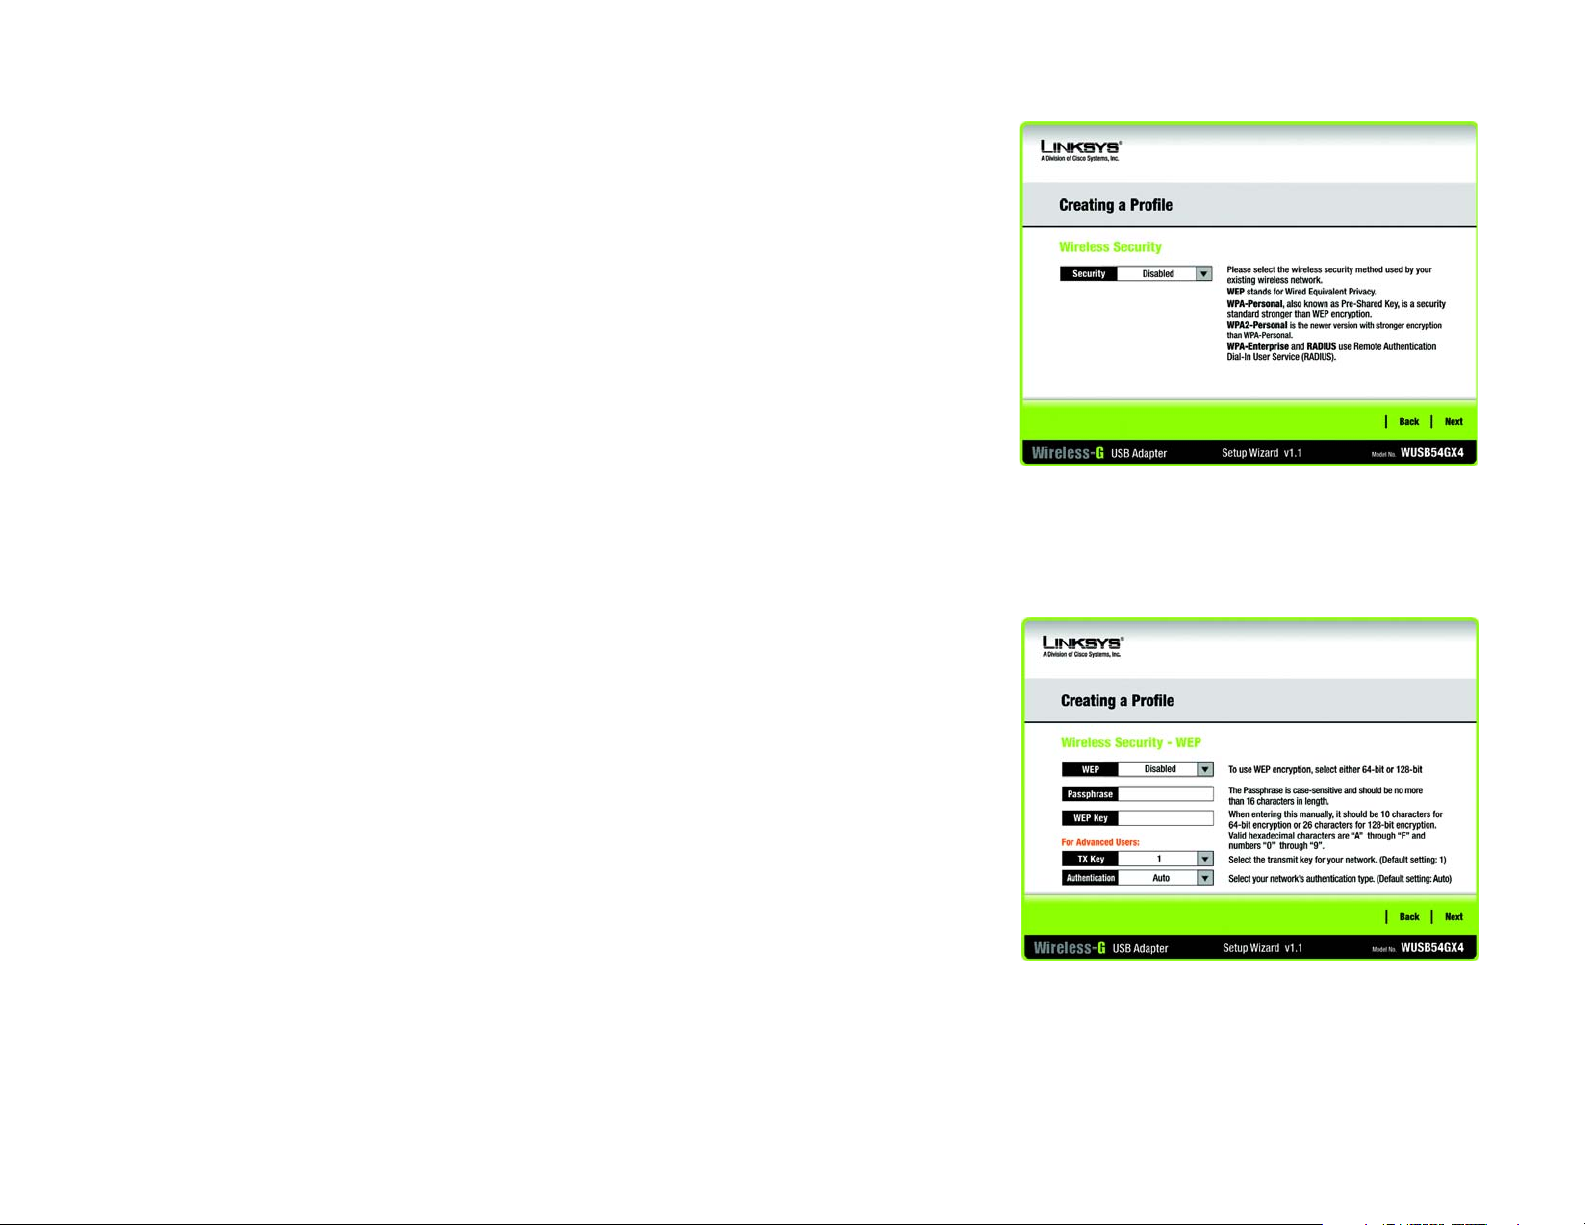
4. The Wireless Security screen will appear.
If your wireless network doesn’t use wireless security, select Disabled and then click the Next button to
continue. Proceed to Step 5.
From the Security drop-down menu, select the security method you want to use: WEP, WPA Personal, WPA2
Personal, WPA Enterprise, or RADIUS. WEP stands for Wired Equivalent Privacy, and WPA uses a security
standard stronger than WEP encryption. RADIUS stands for Remote Authentication Dial-In User Service. Then
proceed to the appropriate instructions for your security method.
WEP
Select a level of WEP encryption to use, and then enter a passphrase or WEP key.
WEP - To use WEP encryption, select 64-bit or 128-bit characters from the drop-down menu.
Passphrase - Instead of manually entering a WEP key, you can enter a passphrase in the Passphrase field, so
a WEP key is automatically generated. This case-sensitive passphrase must match the passphrase of your
other wireless network devices and is compatible with Linksys wireless products only. (If you have any nonLinksys wireless products, enter the WEP key manually on those products.)
WEP Key- The WEP key you enter must match the WEP key of your wireless network. If you are using 64-bit
WEP encryption, then the key must consist of exactly 10 hexadecimal characters. If you are using 128-bit
WEP encryption, then the key must consist of exactly 26 hexadecimal characters. Valid hexadecimal
characters are “0” to “9” and “A” to “F”.
Advanced Users:
TX Key - The default transmit key number is 1. If your network’s access point or wireless router uses transmit
key number 2, 3, or 4, select the appropriate number from the TX Key drop-down box.
Authentication - The default is set to Auto, where it auto-detects for Shared Key or Open system. Shared
Key is when both the sender and the recipient share a WEP key for authentication. Open key is when the
sender and the recipient do not share a WEP key for authentication. All devices on your network must use the
same authentication type.
Click the Next button to continue to the Confirm New Settings screen or the Back button to return to the
previous screen.
Figure 4-14: Wireless Security Screen
Figure 4-15: Wireless Security - WEP Screen
Chapter 4: Setting Up and Connecting the Wireless-G USB Network Adapter with SRX400
Setting Up the Adapter
12
Page 18
Wireless-G USB Network Adapter with SRX400
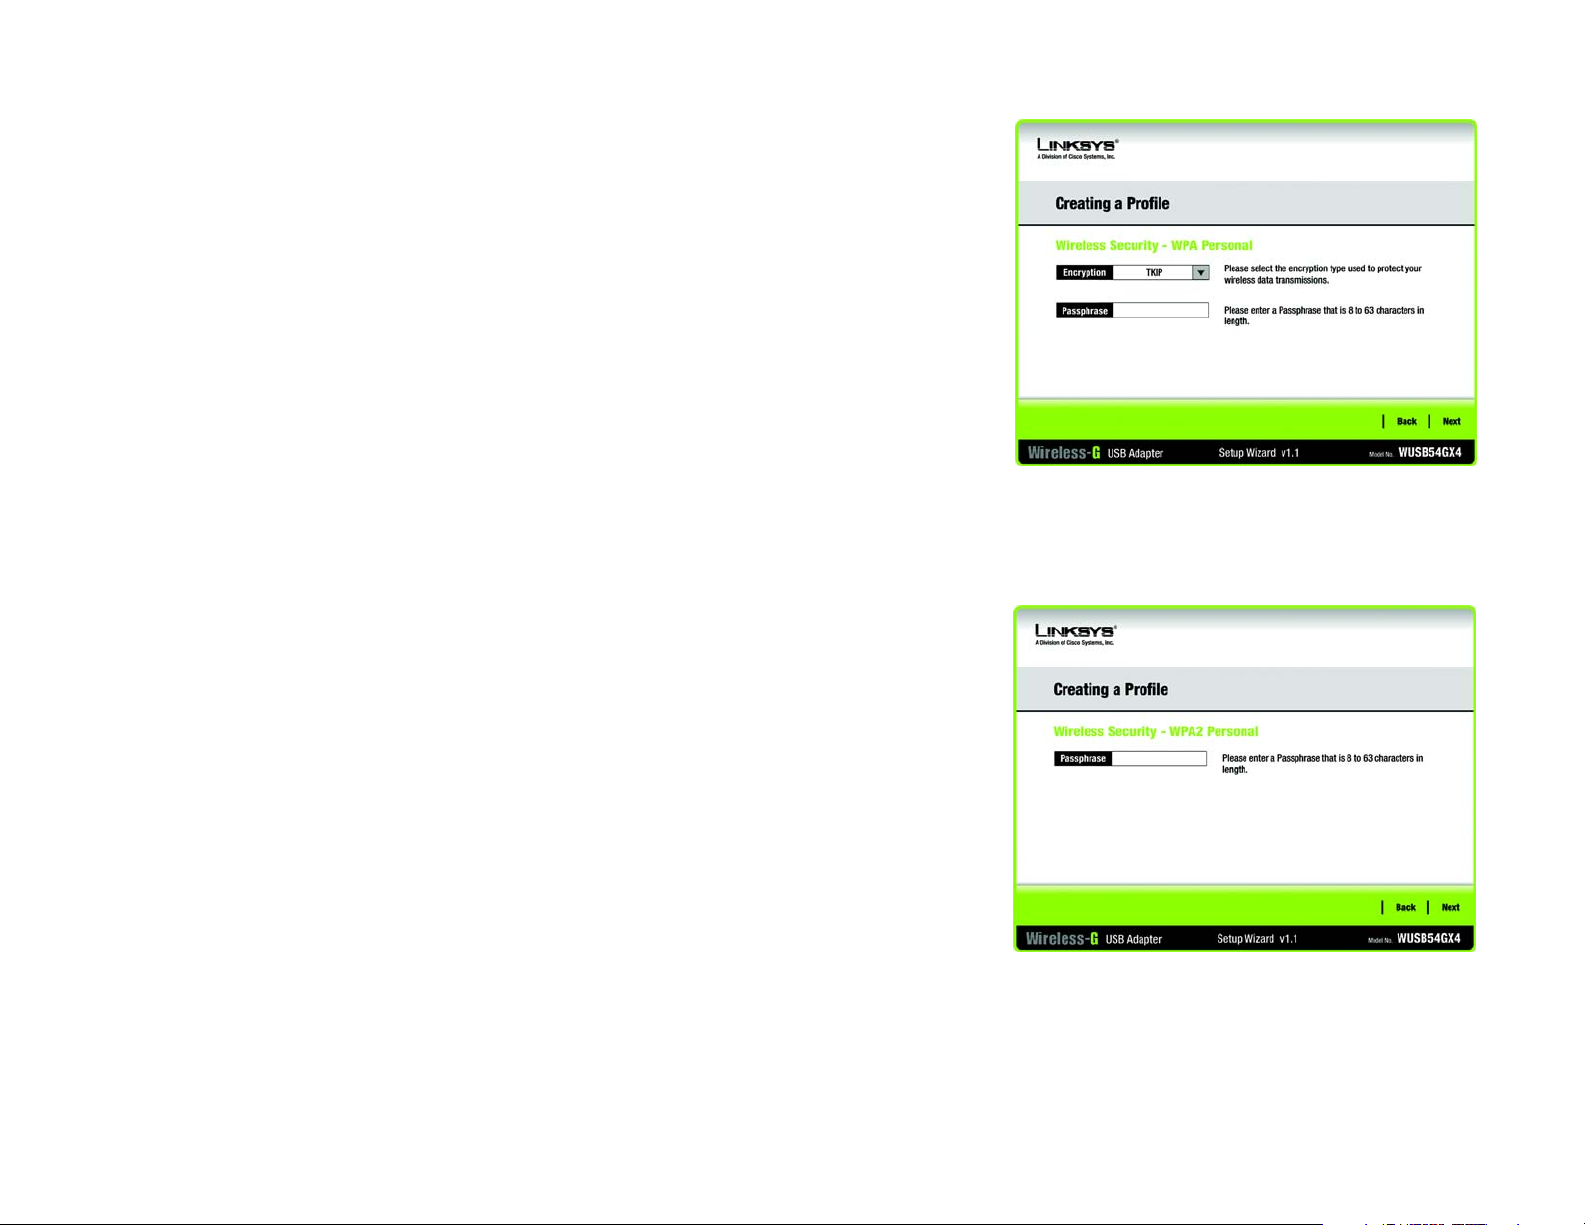
WPA Personal
Select an encryption method, TKIP or AES, and then enter a passphrase.
Encryption - Select the type of algorithm, TKIP or AES, from the Encryption drop-down menu.
Passphrase - Enter a Passphrase of 8-63 characters in the Passphrase field.
Click the Next button to continue to the Confirm New Settings screen or the Back button to return to the
previous screen.
WPA2 Personal
WPA2 Personal automatically uses AES, which is a stronger encryption method than TKIP. Enter a passphrase
on this screen.
Figure 4-16: Wireless Security - WPA Personal Screen
Passphrase - Enter a Passphrase of 8-63 characters in the Passphrase field.
Click the Next button to continue to the Confirm New Settings screen or the Back button to return to the
previous screen.
Chapter 4: Setting Up and Connecting the Wireless-G USB Network Adapter with SRX400
Setting Up the Adapter
Figure 4-17: Wireless Security - WPA2 Personal Screen
13
Page 19
Wireless-G USB Network Adapter with SRX400
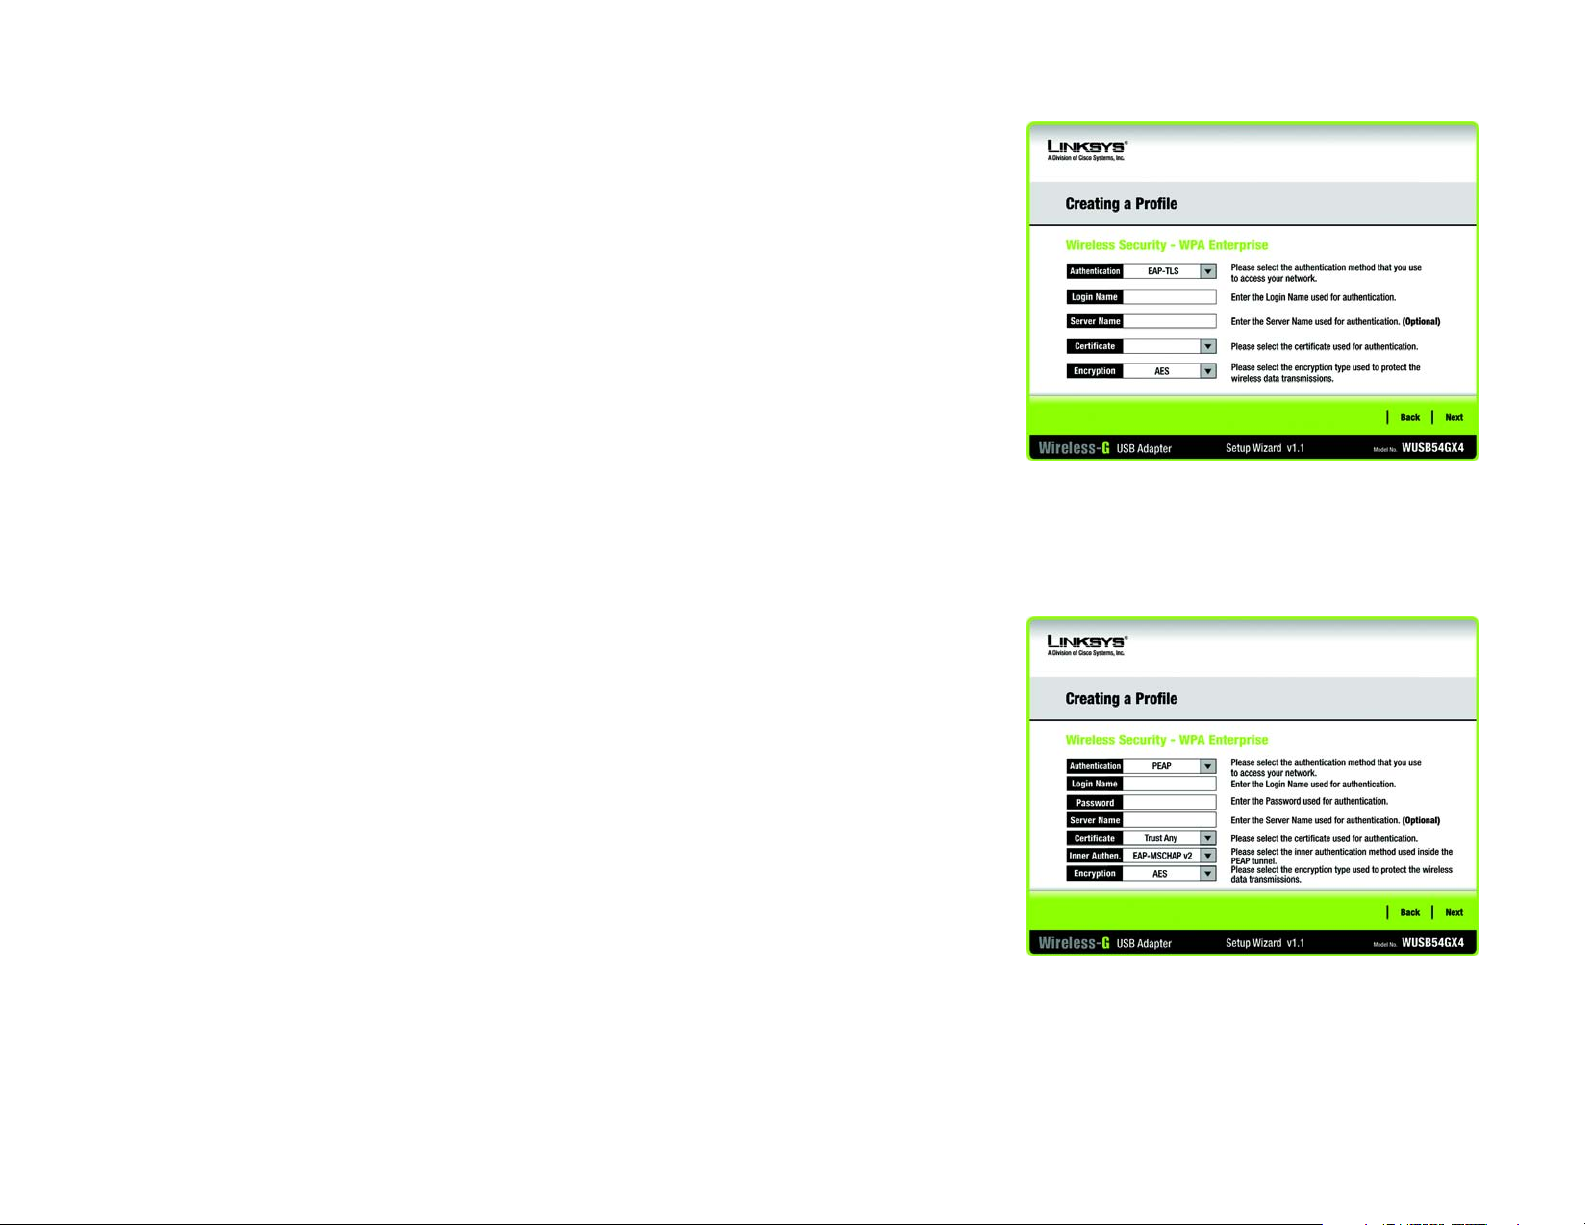
WPA Enterprise
WPA Enterprise is used in coordination with a RADIUS server. (This should only be used when a RADIUS server
is connected to the Router.) WPA Enterprise offers two encryption methods, TKIP and AES, with dynamic
encryption keys. It offers two authentication methods, EAP-TLS and PEAP. Select one of these methods and
follow the appropriate instructions below.
EAP-TLS
Login Name - Enter the login name of your wireless network.
Server Name - Enter the name of the authentication server (this is optional).
Certificate - Select the certificate you have installed to authenticate you on your wireless network. If you
want to use any certificate, keep the default setting, Trust Any.
Encryption - Select the type of algorithm you want to use, TKIP or AES.
PEAP
Login Name - Enter the login name of your wireless network.
Password - Enter the password of your wireless network.
Server Name - Enter the name of the authentication server (this is optional).
Certificate - Select the certificate you have installed to authenticate you on your wireless network. If you
want to use any certificate, keep the default setting, Trust Any.
Inner Authen. - Select the authentication method used inside the PEAP tunnel.
Encryption - Select the type of algorithm you want to use, TKIP or AES.
Click the Next button to continue to the Confirm New Settings screen or the Back button to return to the
previous screen.
Figure 4-18: Wireless Security - WPA Enterprise Using
EAP-TLS Screen
Figure 4-19: Wireless Security - WPA Enterprise Using
PEAP Screen
Chapter 4: Setting Up and Connecting the Wireless-G USB Network Adapter with SRX400
Setting Up the Adapter
14
Page 20

Wireless-G USB Network Adapter with SRX400
RADIUS
RADIUS uses the security of a RADIUS server. (This should only be used when a RADIUS server is connected to
the Router.) It offers two authentication methods, EAP-TLS and PEAP. Select one of these methods and follow
the appropriate instructions below.
EAP-TLS
Login Name - Enter the login name of your wireless network.
Server Name - Enter the name of the authentication server (this is optional).
Certificate - Select the certificate you have installed to authenticate you on your wireless network. If you
want to use any certificate, keep the default setting, Trust Any.
PEAP
Login Name - Enter the login name of your wireless network.
Password - Enter the password of your wireless network.
Figure 4-20: Wireless Security - RADIUS Screen
Server Name - Enter the name of the authentication server (this is optional).
Certificate - Select the certificate you have installed to authenticate you on your wireless network.
Inner Authen. - Select the authentication method used inside the PEAP tunnel.
Encryption - Select the type of algorithm you want to use, TKIP or AES.
Click the Next button to continue to the Confirm New Settings screen or the Back button to return to the
previous screen.
Chapter 4: Setting Up and Connecting the Wireless-G USB Network Adapter with SRX400
Setting Up the Adapter
radius (remote authentication dial-in user service): a
protocol that uses an authentication server to control
network access.
Figure 4-21: Wireless Security - PEAP Screen
15
Page 21

Wireless-G USB Network Adapter with SRX400
5. The next screen displays all of the Adapter’s settings. If these are correct, click Save to save these settings to
your hard drive. If these settings are not correct, click Back to change your settings.
6. After the software has been successfully installed, the Congratulations screen will appear. Click Connect to
Network to connect to your network. Click Return to Profiles screen to open the Wireless Network
Monitor’s Profiles screen. For more information about the Wireless Network Monitor, refer to “Chapter 5:
Using the Wireless Network Monitor.”
Figure 4-22: Confirm New Settings Screen
Congratulations! Setup is complete.
To check the link information, search for available wireless networks, or make additional configuration
changes, refer to “Chapter 5: Using the Wireless Network Monitor.”
Chapter 4: Setting Up and Connecting the Wireless-G USB Network Adapter with SRX400
Setting Up the Adapter
Figure 4-23: Congratulations Screen
16
Page 22

Wireless-G USB Network Adapter with SRX400
Chapter 5: Using the Wireless Network Monitor
Use the Wireless Network Monitor to check the link information, search for available wireless networks, or
create profiles that hold different configuration settings.
Accessing the Wireless Network Monitor
After setting up and connecting the Adapter, the Wireless Network Monitor icon will appear in your PC’s system
tray. If the Wireless Network Monitor is enabled, then the icon will be green. If the Wireless Network Monitor is
disabled or the Adapter is not connected, then the icon will be gray.
Link Information Screens
The opening screen of the Wireless Network Monitor is the Link Information screen. From this screen, you can
find out how strong the current wireless signal is and how good the connection’s quality is. You can also click the
More Information button to view additional status and statistics about the current wireless connection. To
search for available wireless networks, click the Site Survey tab. To perform configuration changes or create
connection profiles, click the Profiles tab.
Link Information
The Link Information screen displays network mode, signal strength, and link quality information about the
current connection. It also provides a button to click for additional status information.
NOTE: The Wireless Network Monitor should only be
accessed AFTER installing the Adapter. For more
information on setting up and connecting the
Adapter, refer to “Chapter 4: Setting Up and
Connecting the Wireless-G USB Network Adapter with
SRX400.”
Figure 5-1: Wireless Network Monitor Icon
Ad-Hoc Mode or Infrastructure Mode - The screen indicates whether the Adapter is currently working in Ad-
Hoc or Infrastructure mode.
Signal Strength - The Signal Strength bar indicates signal strength.
Link Quality - The Link Quality bar indicates the quality of the wireless network connection.
Click the More Information button to view additional information about the wireless network connection on the
Wireless Network Status screen.
Chapter 5: Using the Wireless Network Monitor
Accessing the Wireless Network Monitor
Figure 5-2: Link Information Screen
17
Page 23

Wireless-G USB Network Adapter with SRX400
Wireless Network Status
The Wireless Network Status screen provides information on your current network settings.
Status - This shows the status of the wireless network connection.
SSID - This is the unique name of the wireless network.
Wireless Mode - The mode of the wireless network currently in use is displayed here.
Transfer Rate - The data transfer rate of the current connection is shown here.
Channel - This is the channel to which the wireless network devices are set.
Security - The status of the wireless security feature is displayed here.
Authentication - This is your wireless network’s authentication method.
IP Address - The IP Address of the Adapter is displayed here.
Subnet Mask - The Subnet Mask of the Adapter is shown here.
Default Gateway - The Default Gateway address of the Adapter is displayed here.
DNS - This is the DNS address of the Adapter.
DHCP Client - This displays the Adapter’s status as a DHCP client.
MAC Address- The MAC address of the wireless network’s access point or wireless router is shown here.
Signal Strength - The Signal Strength bar indicates the signal strength.
Link Quality - The Link Quality bar indicates the quality of the wireless network connection.
Click the Back button to return to the initial Link Information screen. Click the Statistics button to go to the
Wireless Network Statistics screen. Click the Save to Profile button to save the currently active connection
settings to a profile.
Figure 5-3: More Information - Wireless Network
Status Screen
Chapter 5: Using the Wireless Network Monitor
Link Information Screens
18
Page 24

Wireless-G USB Network Adapter with SRX400
Wireless Network Statistics
The Wireless Networks Statistics screen provides statistics on your current network settings.
Transmit Rate - This is the data transfer rate of the current connection. (In Auto mode, the Adapter dynamically
shifts to the fastest data transfer rate possible at any given time.)
Receive Rate - This is the rate at which data is received.
Packets Received - This shows the number of packets received by the Adapter, in real time, since connecting to
the wireless network or since the Refresh Statistics button was last pressed.
Packets Transmitted - This shows the number of packets transmitted from the Adapter, in real time, since
connecting to the wireless network or since the Refresh Statistics button was last pressed.
Bytes Received - This shows the number of bytes received by the Adapter, in real time, since connecting to the
wireless network or since the Refresh Statistics button was last pressed.
Bytes Transmitted - This shows the number of bytes transmitted from the Adapter, in real time, since connecting
to the wireless network or since the Refresh Statistics button was last pressed.
Driver Version - This shows the version of the Adapter’s driver.
Noise Level - This shows the level of background noise affecting the wireless signal. A lower reading translates
into a higher quality signal.
Figure 5-4: More Information - Wireless Network
Statistics Screen
Signal Strength - This is the intensity of the wireless signal received by the Adapter.
Up Time - This indicates the length of the most recent connection to a wireless network.
Total Up Ti m e - This indicates the cumulative total of the Adapter’s connection time.
Signal Strength - The Signal Strength bar indicates the signal strength.
Link Quality - The Link Quality bar indicates the quality of the wireless network connection.
Refresh - Click the Refresh button to reset the statistics.
Click the Back button to return to the initial Link Information screen. Click the Status button to go to the Wireless
Network Status screen. Click the Save to Profile button to save the currently active connection settings to
a profile.
Chapter 5: Using the Wireless Network Monitor
Link Information Screens
19
Page 25

Wireless-G USB Network Adapter with SRX400
Site Survey
The Site Survey screen displays a list of available networks in the table on the left. The table shows each
network’s SSID, Channel, and the quality of the wireless signal the Adapter is receiving. You may click SSID,
CH (Channel), or Signal, to sort by that field.
SSID - The SSID or unique name of the wireless network is displayed here.
CH - This is the channel that the network uses.
Signal - This is the percentage of signal strength, from 0 to 100%.
Site Information
For each network selected, the following settings are listed:
SSID - This the SSID or unique name of the wireless network.
Wireless Mode - This is the mode of the wireless network currently in use.
Channel - This is the channel to which the wireless network devices are set.
Security - The status of the wireless security feature is displayed here.
MAC Address- The MAC address of the wireless network’s access point is displayed here.
Refresh - Click the Refresh button to perform a new search for wireless devices.
Connect - To connect to one of the networks on the list, select the wireless network, and click the Connect
button. If the network has wireless security enabled, a screen requiring security information will appear.
If the network has WEP encryption enabled, then you will see the WEP Key Needed for Connection screen. Select
the appropriate level of WEP encryption, 64-bit or 128-bit Then enter the network’s Passphrase or WEP Key. To
connect to the network, click Connect. To cancel the connection, click Cancel.
Figure 5-5: Site Survey Screen
Figure 5-6: WEP Key Needed for Connection
Chapter 5: Using the Wireless Network Monitor
Site Survey
20
Page 26

Wireless-G USB Network Adapter with SRX400
If the network has WPA Personal security enabled, then you will see the WPA-Personal Needed for Connection
screen. Select the appropriate encryption type, TKIP or AES. Enter the network’s Passphrase or pre-shared key in
the Passphrase field. To connect to the network, click Connect. To cancel the connection, click Cancel.
If the network has WPA2 Personal security enabled, then you will see the WPA2-Personal Needed for Connection
screen. Enter the network’s Passphrase or pre-shared key in the Passphrase field. To connect to the network,
click Connect. To cancel the connection, click Cancel.
Figure 5-7: WPA-Personal Needed for Connection
Chapter 5: Using the Wireless Network Monitor
Site Survey
Figure 5-8: WPA2-Personal Needed for Connection
21
Page 27

Wireless-G USB Network Adapter with SRX400
Profiles
The Profiles screen lets you save different configuration profiles for different network setups. The table on the left
displays a list of available profiles with their profile names and SSIDs.
Profile - The name of the profile is displayed here.
SSID - The SSID or unique name of the wireless network is displayed here.
Site Information
For each profile selected, the following are listed:
Wireless Mode - This is the mode of the wireless network currently in use.
Channel - This is the channel to which the wireless network devices are set.
Security - The status of the wireless security feature is displayed here.
Authentication - The authentication setting for the network is shown here.
Connect - To connect to a wireless network using a specific profile, select the profile, and click the Connect
button.
New - Click New to create a new profile. See the next section, “Creating a New Profile,” for detailed instructions.
Edit - Select the profile you want to change, and then click Edit.
Import - Click Import to import a profile that has been saved in another location. Select the appropriate file, and
click the Open button.
Export - Select the profile you want to save in a different location, and click Export. Direct Windows to the
appropriate folder, and click the Save button.
NOTE: If you want to export more than one profile, you have to export them one at a time.
Delete - Select the profile you want to delete, and then click Delete.
Figure 5-9: Profiles Screen
Figure 5-10: Import a Profile
Figure 5-11: Export a Profile
Chapter 5: Using the Wireless Network Monitor
Profiles
22
Page 28

Wireless-G USB Network Adapter with SRX400
Creating a New Profile
On the Profiles screen, click the New button to create a new profile. Enter a name for the new profile, and click
the OK button. Click the Cancel button to return to the Profiles screen without entering a name.
The Available Wireless Network screen provides two options for setting up a profile.
• Available Wireless Network. Most users should use this option. The networks available to this Adapter will
be listed on this screen. You can choose one of these networks and click the Connect button to connect to it.
Click the Refresh button to update the Available Wireless Network list.
• Manual Setup. To set up the Adapter manually, select Manual Setup.
The setup for each option is described, step by step, under the appropriate heading on the following pages.
Click Exit to close the Setup Wizard, if you wish to set up the Adapter later.
Figure 5-12: Create a New Profile
Chapter 5: Using the Wireless Network Monitor
Creating a New Profile
Figure 5-13: Available Wireless Network Screen
23
Page 29

Wireless-G USB Network Adapter with SRX400
Setting Up the Adapter with an Available Network
The available networks are listed in the table on the center of the screen by SSID. Select the wireless network you
wish to connect to and click the Connect button. (If you do not see your network listed, you can click the Refresh
button to bring the list up again.) If the network utilizes wireless security, you will need to configure security on
the Adapter. If not, you will be taken directly to the Congratulations screen.
1. If wireless security has been enabled on this network, you will see a wireless security screen. If your network
uses WEP (Wired Equivalent Privacy) encryption, the WEP Key Needed for Connection screen will appear. If
your network uses WPA Personal or WPA2 Personal security, a screen will appear for one of those encryption
methods.
WEP Key Needed for Connection
Select the level of encryption you want to use, 64-bit or 128-bit.
Figure 5-14: Available Wireless Network Screen
Then, enter a passphrase or WEP key.
Passphrase - Enter a passphrase in the Passphrase field, so a WEP key is automatically generated. The
passphrase is case-sensitive and should not be longer than 31 alphanumeric characters. It must match the
passphrase of your other wireless network devices and is compatible with Linksys wireless products only. (If
you have any non-Linksys wireless products, enter the WEP key manually on those products.)
WEP Key 1 - The WEP key you enter must match the WEP key of your wireless network. For 64-bit
encryption, enter exactly 10 hexadecimal characters. For 128-bit encryption, enter exactly 26 hexadecimal
characters. Valid hexadecimal characters are “0” to “9” and “A” to “F”.
Then, click Connect and proceed to the Congratulations screen. To cancel the connection, click Cancel.
Chapter 5: Using the Wireless Network Monitor
Creating a New Profile
Figure 5-15: WEP Key Needed for Connection
24
Page 30

Wireless-G USB Network Adapter with SRX400
WPA-Personal for Connection
WPA Personal offers two encryption methods, TKIP and AES, with dynamic encryption keys. Select one of
these methods. Then enter a passphrase.
Encryption - Select the type of algorithm you want to use, TKIP or AES, from the Encryption drop-down
menu.
Passphrase - Enter a Passphrase, also called a pre-shared key, of 8-63 characters in the Passphrase field.
The longer and more complex your Passphrase is, the more secure your network will be.
Then, click Connect and proceed to the Congratulations screen. To cancel the connection, click Cancel.
WPA2 - Personal Needed for Connection
AES is automatically used as the encryption method. Enter a passphrase on this screen.
Passphrase - Enter a Passphrase, also called a pre-shared key, of 8-63 characters in the Passphrase field.
The longer and more complex your Passphrase is, the more secure your network will be.
Then, click Connect and proceed to the Congratulations screen. To cancel the connection, click Cancel.
2. After the Adapter has been configured for the network, the Congratulations screen will appear. Click Connect
to Network to connect to your network.
Congratulations! The profile is complete.
Figure 5-16: WPA-Personal Needed for Connection
Figure 5-17: WPA2-Personal Needed for Connection
Chapter 5: Using the Wireless Network Monitor
Creating a New Profile
Figure 5-18: Congratulations Screen
25
Page 31

Wireless-G USB Network Adapter with SRX400
Setting Up the Adapter with Manual Setup
Click Manual Setup on the Available Wireless Network screen to set up the Adapter manually.
1. After clicking Manual Setup, the Network Settings screen will appear. If your network has a router or other
DHCP server, click the radio button next to Obtain network settings automatically (DHCP).
If your network does not have a DHCP server, click the radio button next to Specify network settings. Enter
an IP Address, Subnet Mask, Default Gateway, and DNS addresses appropriate for your network. You must
specify the IP Address and Subnet Mask on this screen. If you are unsure about the Default Gateway and DNS
addresses, leave these fields empty.
IP Address - This IP Address must be unique to your network.
Subnet Mask - The Adapter’s Subnet Mask must be the same as your wired network’s Subnet Mask.
Default Gateway - Enter the IP address of your network’s Gateway here.
DNS 1 and DNS 2 - Enter the DNS address of your wired Ethernet network here.
Click Next to continue, or click Back to return to the Available Wireless Network screen.
Figure 5-19: Available Wireless Network Screen
Figure 5-20: Network Settings Screen
Chapter 5: Using the Wireless Network Monitor
Creating a New Profile
26
Page 32

Wireless-G USB Network Adapter with SRX400
2. The Wireless Mode screen shows a choice of two wireless modes. Click the Infrastructure Mode radio
button if you want to connect to a wireless router or access point. Click the Ad-Hoc Mode radio button if you
want to connect to another wireless device directly without using a wireless router or access point. Then,
enter the SSID for your network.
Infrastructure Mode - Use this mode if you want to connect to a wireless router or access point.
Ad-Hoc Mode - Use this mode if you want to connect to another wireless device directly without using a
wireless router or access point.
SSID - This is the wireless network name that must be used for all the devices in your wireless network. It is
case- sensitive and should be a unique name to help prevent others from entering your network.
Click Next to continue or Back to return to the previous screen.
3. If you chose Infrastructure Mode, go to Step 4 now. If you chose Ad-Hoc Mode, the Ad-Hoc Mode Settings
screen will appear. Select your channel and network mode settings on this screen.
Channel - Select the correct channel for your wireless network. The channel you choose should match the
channel set on the other devices in your wireless network. If you are unsure about which channel to use, keep
the default setting.
Click Next to continue or click Back to change any settings.
Figure 5-21: Wireless Mode Screen
Figure 5-22: Ad-Hoc Mode Settings
Chapter 5: Using the Wireless Network Monitor
Creating a New Profile
27
Page 33

Wireless-G USB Network Adapter with SRX400
4. The Wireless Security screen will appear.
If your wireless network doesn’t use wireless security, select Disabled and then click the Next button to
continue. Proceed to Step 5.
From the Security drop-down menu, select the security method you want to use: WEP, WPA Personal, WPA2
Personal, WPA Enterprise, or RADIUS. WEP stands for Wired Equivalent Privacy, and WPA uses a security
standard stronger than WEP encryption. RADIUS stands for Remote Authentication Dial-In User Service. Then
proceed to the appropriate instructions for your security method.
WEP
Select a level of WEP encryption to use, and then enter a passphrase or WEP key.
WEP - To use WEP encryption, select 64-bit or 128-bit characters from the drop-down menu.
Passphrase - Instead of manually entering a WEP key, you can enter a passphrase in the Passphrase field, so
a WEP key is automatically generated. This case-sensitive passphrase must match the passphrase of your
other wireless network devices and is compatible with Linksys wireless products only. (If you have any nonLinksys wireless products, enter the WEP key manually on those products.)
WEP Key- The WEP key you enter must match the WEP key of your wireless network. If you are using 64-bit
WEP encryption, then the key must consist of exactly 10 hexadecimal characters. If you are using 128-bit
WEP encryption, then the key must consist of exactly 26 hexadecimal characters. Valid hexadecimal
characters are “0” to “9” and “A” to “F”.
Advanced Users:
TX Key - The default transmit key number is 1. If your network’s access point or wireless router uses transmit
key number 2, 3, or 4, select the appropriate number from the TX Key drop-down box.
Authentication - The default is set to Auto, where it auto-detects for Shared Key or Open system. Shared
Key is when both the sender and the recipient share a WEP key for authentication. Open key is when the
sender and the recipient do not share a WEP key for authentication. All devices on your network must use the
same authentication type.
Click the Next button to continue to the Confirm New Settings screen or the Back button to return to the
previous screen.
Figure 5-23: Wireless Security Screen
Figure 5-24: Wireless Security - WEP Screen
Chapter 5: Using the Wireless Network Monitor
Creating a New Profile
28
Page 34

Wireless-G USB Network Adapter with SRX400
WPA Personal
Select an encryption method, TKIP or AES, and then enter a passphrase.
Encryption - Select the type of algorithm, TKIP or AES, from the Encryption drop-down menu.
Passphrase - Enter a Passphrase of 8-63 characters in the Passphrase field.
Click the Next button to continue to the Confirm New Settings screen or the Back button to return to the
previous screen.
WPA2 Personal
WPA2 Personal automatically uses AES, which is a stronger encryption method than TKIP. Enter a passphrase
on this screen.
Figure 5-25: Wireless Security - WPA Personal Screen
Passphrase - Enter a Passphrase of 8-63 characters in the Passphrase field.
Click the Next button to continue to the Confirm New Settings screen or the Back button to return to the
previous screen.
Chapter 5: Using the Wireless Network Monitor
Creating a New Profile
Figure 5-26: Wireless Security - WPA2 Personal Screen
29
Page 35

Wireless-G USB Network Adapter with SRX400
WPA Enterprise
WPA Enterprise is used in coordination with a RADIUS server. (This should only be used when a RADIUS server
is connected to the Router.) WPA Enterprise offers two encryption methods, TKIP and AES, with dynamic
encryption keys. It offers two authentication methods, EAP-TLS and PEAP. Select one of these methods and
follow the appropriate instructions below.
EAP-TLS
Login Name - Enter the login name of your wireless network.
Server Name - Enter the name of the authentication server (this is optional).
Certificate - Select the certificate you have installed to authenticate you on your wireless network. If you
want to use any certificate, keep the default setting, Trust Any.
Encryption - Select the type of algorithm you want to use, TKIP or AES.
PEAP
Login Name - Enter the login name of your wireless network.
Password - Enter the password of your wireless network.
Server Name - Enter the name of the authentication server (this is optional).
Certificate - Select the certificate you have installed to authenticate you on your wireless network. If you
want to use any certificate, keep the default setting, Trust Any.
Inner Authen. - Select the authentication method used inside the PEAP tunnel.
Encryption - Select the type of algorithm you want to use, TKIP or AES.
Click the Next button to continue to the Confirm New Settings screen or the Back button to return to the
previous screen.
Figure 5-27: Wireless Security - WPA Enterprise Using
EAP-TLS Screen
Figure 5-28: Wireless Security - WPA Enterprise Using
PEAP Screen
Chapter 5: Using the Wireless Network Monitor
Creating a New Profile
30
Page 36

Wireless-G USB Network Adapter with SRX400
RADIUS
RADIUS uses the security of a RADIUS server. (This should only be used when a RADIUS server is connected to
the Router.) It offers two authentication methods, EAP-TLS and PEAP. Select one of these methods and follow
the appropriate instructions below.
EAP-TLS
Login Name - Enter the login name of your wireless network.
Server Name - Enter the name of the authentication server (this is optional).
Certificate - Select the certificate you have installed to authenticate you on your wireless network. If you
want to use any certificate, keep the default setting, Trust Any.
PEAP
Login Name - Enter the login name of your wireless network.
Password - Enter the password of your wireless network.
Server Name - Enter the name of the authentication server (this is optional).
Certificate - Select the certificate you have installed to authenticate you on your wireless network.
Figure 5-29: Wireless Security - RADIUS Screen
Inner Authen. - Select the authentication method used inside the PEAP tunnel.
Encryption - Select the type of algorithm you want to use, TKIP or AES.
Click the Next button to continue to the Confirm New Settings screen or the Back button to return to the
previous screen.
Chapter 5: Using the Wireless Network Monitor
Creating a New Profile
Figure 5-30: Wireless Security - RADIUS Screen
31
Page 37

Wireless-G USB Network Adapter with SRX400
5. The next screen displays all of the Adapter’s settings. If these are correct, click Save to save these settings to
your hard drive. If these settings are not correct, click Back to change your settings.
6. After the software has been successfully installed, the Congratulations screen will appear. Click Connect to
Network to connect to your network. Click Return to Profiles screen to open the Wireless Network
Monitor’s Profiles screen.
Figure 5-31: Confirm New Settings Screen
Congratulations! The profile is complete.
Chapter 5: Using the Wireless Network Monitor
Creating a New Profile
Figure 5-32: Congratulations Screen
32
Page 38

Wireless-G USB Network Adapter with SRX400
Appendix A: Troubleshooting
This appendix consists of two parts: “Common Problems and Solutions” and “Frequently Asked Questions.” This
appendix provides solutions to problems that may occur during the installation and operation of the Wireless-G
USB Network Adapter. Read the description below to solve your problems. If you can't find an answer here, check
the Linksys website at www.linksys.com.
Common Problems and Solutions
1.My computer does not recognize the USB Network Adapter.
• Make sure that the USB Network Adapter is properly inserted into the USB port.
• Also, make sure that the USB Controller is enabled in the BIOS. Check with your motherboard User Guide for
more information.
2. The USB Network Adapter does not work properly.
• Reinsert the USB Network Adapter into the notebook or desktop’s USB port.
• Right-click on My Computer, and select Properties. Select the Adapter, then chose the Device Manager tab,
and click on the Network Adapter. You will find the USB Network Adapter if it is installed successfully. If you
see a yellow exclamation mark, the resources may be conflicting and you must follow the steps below:
• Uninstall the driver software from your PC.
• Restart your PC and repeat the hardware and software installation as specified in this User Guide.
3. I cannot communicate with the other computers linked via Ethernet in the Infrastructure
configuration.
• Make sure that the notebook or desktop is powered on.
• Make sure that your USB Network Adapter is configured on the same channel, SSID, and WEP as the other
computers in the Infrastructure configuration..
Appendix A: Troubleshooting
Common Problems and Solutions
33
Page 39

Wireless-G USB Network Adapter with SRX400
Frequently Asked Questions
Can I run an application from a remote computer over the wireless network?
This will depend on whether or not the application is designed to be used over a network. Consult the
application’s user guide to determine if it supports operation over a network.
Can I play computer games with other members of the wireless network?
Yes, as long as the game supports multiple players over a LAN (local area network). Refer to the game’s user
guide for more information.
What is the IEEE 802.11b standard?
It is one of the IEEE standards for wireless networks. The 802.11b standard allows wireless networking hardware
from different manufacturers to communicate, provided that the hardware complies with the 802.11b standard.
The 802.11b standard states a maximum data transfer rate of 11Mbps and an operating frequency of 2.4GHz.
What is the IEEE 802.11g standard?
It is one of the IEEE standards for wireless networks. The 802.11g standard allows wireless networking hardware
from different manufacturers to communicate, provided that the hardware complies with the 802.11g standard.
The 802.11g standard states a maximum data transfer rate of 54Mbps and an operating frequency of 2.4GHz.
What IEEE 802.11b features are supported?
The product supports the following IEEE 802.11b functions:
• CSMA/CA plus Acknowledge protocol
• Multi-Channel Roaming
• Automatic Rate Selection
• RTS/CTS feature
• Fragmentation
• Power Management
•
What IEEE 802.11g features are supported?
The product supports the following IEEE 802.11g functions:
• CSMA/CA plus Acknowledge protocol
• OFDM protocol
• Multi-Channel Roaming
• Automatic Rate Selection
• RTS/CTS feature
• Fragmentation
• Power Management
Appendix A: Troubleshooting
Frequently Asked Questions
34
Page 40

Wireless-G USB Network Adapter with SRX400
What is ad-hoc mode?
When a wireless network is set to ad-hoc mode, the wireless-equipped computers are configured to
communicate directly with each other. The ad-hoc wireless network will not communicate with any wired
network.
What is infrastructure mode?
When a wireless network is set to infrastructure mode, the wireless network is configured to communicate with a
wired network through a wireless access point.
What is roaming?
Roaming is the ability of a portable computer user to communicate continuously while moving freely throughout
an area greater than that covered by a single access point. Before using the roaming function, the workstation
must make sure that it is the same channel number with the access point of dedicated coverage area.
To achieve true seamless connectivity, the wireless LAN must incorporate a number of different functions. Each
node and access point, for example, must always acknowledge receipt of each message. Each node must
maintain contact with the wireless network even when not actually transmitting data. Achieving these functions
simultaneously requires a dynamic RF networking technology that links access points and nodes. In such a
system, the user’s end node undertakes a search for the best possible access to the system. First, it evaluates
such factors as signal strength and quality, as well as the message load currently being carried by each access
point and the distance of each access point to the wired backbone. Based on that information, the node next
selects the right access point and registers its address. Communications between end node and host computer
can then be transmitted up and down the backbone.
As the user moves on, the end node’s RF transmitter regularly checks the system to determine whether it is in
touch with the original access point or whether it should seek a new one. When a node no longer receives
acknowledgment from its original access point, it undertakes a new search. Upon finding a new access point, it
then re-registers, and the communication process continues.
What is ISM band?
The FCC and their counterparts outside of the U.S. have set aside bandwidth for unlicensed use in the ISM
(Industrial, Scientific and Medical) band. Spectrum in the vicinity of 2.4 GHz, in particular, is being made available
worldwide. This presents a truly revolutionary opportunity to place convenient high-speed wireless capabilities in
the hands of users around the globe.
What is Spread Spectrum?
Spread Spectrum technology is a wideband radio frequency technique developed by the military for use in
reliable, secure, mission-critical communications systems. It is designed to trade off bandwidth efficiency for
reliability, integrity, and security. In other words, more bandwidth is consumed than in the case of narrowband
transmission, but the trade-off produces a signal that is, in effect, louder and thus easier to detect, provided that
Appendix A: Troubleshooting
Frequently Asked Questions
35
Page 41

Wireless-G USB Network Adapter with SRX400
the receiver knows the parameters of the spread-spectrum signal being broadcast. If a receiver is not tuned to
the right frequency, a spread-spectrum signal looks like background noise. There are two main alternatives,
Direct Sequence Spread Spectrum (DSSS) and Frequency Hopping Spread Spectrum (FHSS).
What is DSSS? What is FHSS? And what are their differences?
Frequency-Hopping Spread-Spectrum (FHSS) uses a narrowband carrier that changes frequency in a pattern that
is known to both transmitter and receiver. Properly synchronized, the net effect is to maintain a single logical
channel. To an unintended receiver, FHSS appears to be short-duration impulse noise. Direct-Sequence SpreadSpectrum (DSSS) generates a redundant bit pattern for each bit to be transmitted. This bit pattern is called a chip
(or chipping code). The longer the chip, the greater the probability that the original data can be recovered. Even if
one or more bits in the chip are damaged during transmission, statistical techniques embedded in the radio can
recover the original data without the need for retransmission. To an unintended receiver, DSSS appears as low
power wideband noise and is rejected (ignored) by most narrowband receivers.
Would the information be intercepted while transmitting on air?
The Adapter features two-fold protection in security. On the hardware side, as with Direct Sequence Spread
Spectrum technology, it has the inherent security feature of scrambling. On the software side, the Adapter offers
a variety of security methods, including WEP and WPA, to enhance security and access control. For more
information, refer to “Appendix C: Wireless Security.”
What is WEP?
WEP is Wired Equivalent Privacy, a data privacy mechanism based on a shared key algorithm, as described in the
IEEE 802.11 standard. For more information, refer to “Appendix C: Wireless Security.”
What is WPA?
WPA is Wi-Fi Protected Access, a wireless security protocol that can be used in conjunction with a RADIUS server.
For more information, refer to “Appendix C: Wireless Security.”
What is RADIUS?
RADIUS is Remote Authentication Dial-In User Service, which uses an authentication server to control network
access. For more information, refer to “Appendix C: Wireless Security.”
Appendix A: Troubleshooting
Frequently Asked Questions
36
Page 42

Wireless-G USB Network Adapter with SRX400
Appendix B: Using Windows XP Wireless Zero Configuration
If your computer is running Windows XP, then this choice will be available. If you want to use Windows XP
Wireless Zero Configuration to control the Adapter, instead of using the Wireless Network Monitor, then rightclick on the Wireless Network Monitor and select Use Windows XP Wireless Configuration.
If you want to switch back to the Wireless Network Monitor, right-click the Wireless Network Monitor icon, and
select Use Linksys Wireless Network Monitor.
Figure B-1: Wireless Network Monitor Icon
Figure B-2: Windows XP - Use Windows XP
Wireless Configuration
1. After installing the Adapter, the Windows XP Wireless Zero Configuration icon will appear in your computer’s
system tray. Double-click the icon.
NOTE: For more information about Windows XP Wireless Zero Configuration, refer to
Windows Help.
Appendix B: Using Windows XP Wireless Zero Configuration
Figure B-3: Windows XP Wireless Configuration Icon
37
Page 43

Wireless-G USB Network Adapter with SRX400
2. The screen that appears will show any available wireless network. Select the network you want. Click the
Connect button.
If your network does not have wireless security enabled, go to step 3.
If your network does have wireless security enabled, go to step 4.
NOTE: Steps 2 and 3 are the instructions and
screenshots for Windows XP with Service Pack 2
installed.
Figure B-4: Available Wireless Network
3. If your network does not have wireless security enabled, click the Connect Anyway button to connect the
Adapter to your network.
Appendix B: Using Windows XP Wireless Zero Configuration
Figure B-5: No Wireless Security
38
Page 44

Wireless-G USB Network Adapter with SRX400
4. If your network uses WEP encryption as its wireless security method, enter the WEP Key used in the
Network Key and Confirm network key fields. If your network uses WPA Personal for wireless security, enter
the Passphrase used in the Network Key and Confirm network key fields. Click the Connect button.
Figure B-6: Network Connection - Wireless Security
NOTE: Windows XP Wireless Configuration does not
support the use of a passphrase. Enter the exact WEP
key used by your wireless router or access point.
5. Your wireless network will appear as Connected when your connection is active.
For more information about wireless networking on a Windows XP computer, click the Start button, select Help,
and choose Support. Enter the keyword wireless in the field provided, and press the Enter key.
You are now connected to your wireless network.
Appendix B: Using Windows XP Wireless Zero Configuration
Figure B-7: Wireless Network Connection
39
Page 45

Wireless-G USB Network Adapter with SRX400
Appendix C: Wireless Security
Linksys wants to make wireless networking as safe and easy for you as possible. The current generation of
Linksys products provide several network security features, but they require specific action on your part for
implementation. So, keep the following in mind whenever you are setting up or using your wireless network.
Security Precautions
The following is a complete list of security precautions to take (at least steps 1 through 5 should be followed):
1. Change the default SSID.
2. Disable SSID Broadcast.
3. Change the default password for the Administrator account.
4. Enable MAC Address Filtering.
5. Change the SSID periodically.
6. Use the highest encryption algorithm possible. Use WPA if it is available. Please note that this may reduce
your network performance.
7. Change the encryption keys periodically.
Security Threats Facing Wireless Networks
Wireless networks are easy to find. Hackers know that in order to join a wireless network, wireless networking
products first listen for “beacon messages”. These messages can be easily decrypted and contain much of the
network’s information, such as the network’s SSID (Service Set Identifier). Here are the steps you can take:
Change the administrator’s password regularly. With every wireless networking device you use, keep in mind
that network settings (SSID, WEP keys, etc.) are stored in its firmware. Your network administrator is the only
person who can change network settings. If a hacker gets a hold of the administrator’s password, he, too, can
change those settings. So, make it harder for a hacker to get that information. Change the administrator’s
password regularly.
Appendix C: Wireless Security
Security Precautions
NOTE: Some of these security features are
available only through the network router or
access point. Refer to the router or access
point’s documentation for more information.
40
Page 46

Wireless-G USB Network Adapter with SRX400
SSID. There are several things to keep in mind about the SSID:
1. Disable Broadcast
2. Make it unique
3. Change it often
Most wireless networking devices will give you the option of broadcasting the SSID. While this option may be
more convenient, it allows anyone to log into your wireless network. This includes hackers. So, don’t broadcast
the SSID.
Wireless networking products come with a default SSID set by the factory. (The Linksys default SSID is “linksys”.)
Hackers know these defaults and can check these against your network. Change your SSID to something unique
and not something related to your company or the networking products you use.
Change your SSID regularly so that any hackers who have gained access to your wireless network will have to
start from the beginning in trying to break in.
MAC Addresses. Enable MAC Address filtering. MAC Address filtering will allow you to provide access to only
those wireless nodes with certain MAC Addresses. This makes it harder for a hacker to access your network with
a random MAC Address.
WEP Encryption. Wired Equivalent Privacy (WEP) is often looked upon as a cure-all for wireless security
concerns. This is overstating WEP’s ability. Again, this can only provide enough security to make a hacker’s job
more difficult.
There are several ways that WEP can be maximized:
1. Use the highest level of encryption possible
2. Use “Shared Key” authentication
3. Change your WEP key regularly
WPA. Wi-Fi Protected Access (WPA) is the newest and best available standard in Wi-Fi security. Four modes are
available: WPA-Personal, WPA2-Personal, WPA-Enterprise, and RADIUS. WPA-Personal gives you a choice of two
encryption methods: TKIP (Temporal Key Integrity Protocol), which utilizes a stronger encryption method and
incorporates Message Integrity Code (MIC) to provide protection against hackers, and AES (Advanced Encryption
Standard), which utilizes a symmetric 128-Bit block data encryption. WPA2-Personal only uses AES encryption,
which is stronger than TKIP. WPA-Enterprise offers two encryption methods, TKIP and AES, with dynamic
encryption keys. RADIUS (Remote Authentication Dial-In User Service) utilizes a RADIUS server for authentication.
Appendix C: Wireless Security
Security Threats Facing Wireless Networks
IMPORTANT: Always remember that each
device in your wireless network MUST use
the same encryption method and encryption
key or your wireless network will not function
properly.
41
Page 47

Wireless-G USB Network Adapter with SRX400
WPA-Personal. If you do not have a RADIUS server, select the type of algorithm you want to use, TKIP or AES,
and enter a password in the Passphrase field of 8-63 characters.
WPA2-Personal. Enter a password in the Passphrase field of 8-63 characters.
WPA-Enterprise. WPA used in coordination with a RADIUS server. (This should only be used when a RADIUS
server is connected to the Router or other device.) WPA-Enterprise offers two encryption methods, TKIP and
AES, with dynamic encryption keys. Enter the RADIUS server’s IP Address and port number, along with a key
shared between the device and the server. Last, enter a Group Key Renewal period, which instructs the device
how often it should change the encryption keys.
RADIUS. WEP used in coordination with a RADIUS server. (This should only be used when a RADIUS server is
connected to the Router or other device.) First, enter the RADIUS server’s IP Address and port number, along
with a key shared between the device and the server. Then, select a WEP key and a level of WEP encryption,
and either generate a WEP key through the Passphrase or enter the WEP key manually.
Implementing encryption may have a negative impact on your network’s performance, but if you are transmitting
sensitive data over your network, encryption should be used.
These security recommendations should help keep your mind at ease while you are enjoying the most flexible
and convenient technology Linksys has to offer.
Appendix C: Wireless Security
Security Threats Facing Wireless Networks
42
Page 48

Wireless-G USB Network Adapter with SRX400
Appendix D: Windows Help
Almost all wireless products require Microsoft Windows. Windows is the most used operating system in the world
and comes with many features that help make networking easier. These features can be accessed through
Windows Help and are described in this appendix.
TCP/IP
Before a computer can communicate with an access point or wireless router, TCP/IP must be enabled. TCP/IP is a
set of instructions, or protocol, all PCs follow to communicate over a network. This is true for wireless networks
as well. Your PCs will not be able to utilize wireless networking without having TCP/IP enabled. Windows Help
provides complete instructions on enabling TCP/IP.
Shared Resources
If you wish to share printers, folder, or files over your network, Windows Help provides complete instructions on
utilizing shared resources.
Network Neighborhood/My Network Places
Other PCs on your network will appear under Network Neighborhood or My Network Places (depending upon the
version of Windows you're running). Windows Help provides complete instructions on adding PCs to your
network.
Appendix D: Windows Help
43
Page 49

Wireless-G USB Network Adapter with SRX400
Appendix E: Glossary
This glossary contains some basic networking terms you may come across when using this product. For more
advanced terms, see the complete Linksys glossary at http://www.linksys.com/glossary.
Access Point - A device that allows wireless-equipped computers and other devices to communicate with a
wired network. Also used to expand the range of a wireless network.
Ad-hoc - A group of wireless devices communicating directly with each other (peer-to-peer) without the use of
an access point.
AES (Advanced Encryption Standard) - A security method that uses symmetric 128-bit block data encryption.
Bandwidth - The transmission capacity of a given device or network.
Bit - A binary digit.
Boot - To start a device and cause it to start executing instructions.
Broadband - An always-on, fast Internet connection.
Browser - An application program that provides a way to look at and interact with all the information on the
World Wide Web.
Byte - A unit of data that is usually eight bits long
Cable Modem - A device that connects a computer to the cable television network, which in turn connects to the
Internet.
Daisy Chain - A method used to connect devices in a series, one after the other.
DDNS (Dynamic Domain Name System) - Allows the hosting of a website, FTP server, or e-mail server with a
fixed domain name (e.g., www.xyz.com) and a dynamic IP address.
Default Gateway - A device that forwards Internet traffic from your local area network.
DHCP (Dynamic Host Configuration Protocol) - A networking protocol that allows administrators to assign
temporary IP addresses to network computers by "leasing" an IP address to a user for a limited amount of time,
instead of assigning permanent IP addresses.
Appendix E: Glossary
44
Page 50

Wireless-G USB Network Adapter with SRX400
DMZ (Demilitarized Zone) - Removes the Router's firewall protection from one PC, allowing it to be "seen" from
the Internet.
DNS (Domain Name Server) - The IP address of your ISP's server, which translates the names of websites into IP
addresses.
Domain - A specific name for a network of computers.
Download - To receive a file transmitted over a network.
DSL (Digital Subscriber Line) - An always-on broadband connection over traditional phone lines.
Dynamic IP Address - A temporary IP address assigned by a DHCP server.
EAP (Extensible Authentication Protocol) - A general authentication protocol used to control network access.
Many specific authentication methods work within this framework.
Encryption - Encoding data transmitted in a network.
Ethernet - IEEE standard network protocol that specifies how data is placed on and retrieved from a common
transmission medium.
Firewall - A set of related programs located at a network gateway server that protects the resources of a
network from users from other networks.
Firmware - The programming code that runs a networking device.
FTP (File Transfer Protocol) - A protocol used to transfer files over a TCP/IP network.
Full Duplex - The ability of a networking device to receive and transmit data simultaneously.
Gateway - A device that interconnects networks with different, incompatible communications protocols.
Half Duplex - Data transmission that can occur in two directions over a single line, but only one direction at a
time.
HTTP (HyperText Transport Protocol) - The communications protocol used to connect to servers on the World
Wide Web.
Infrastructure - A wireless network that is bridged to a wired network via an access point.
IP (Internet Protocol) - A protocol used to send data over a network.
Appendix E: Glossary
45
Page 51

Wireless-G USB Network Adapter with SRX400
IP Address - The address used to identify a computer or device on a network.
IPCONFIG - A Windows 2000 and XP utility that displays the IP address for a particular networking device.
IPSec (Internet Protocol Security) - A VPN protocol used to implement secure exchange of packets at the IP layer.
ISP (Internet Service Provider) - A company that provides access to the Internet.
LAN - The computers and networking products that make up your local network.
MAC (Media Access Control) Address - The unique address that a manufacturer assigns to each networking
device.
Mbps (MegaBits Per Second) - One million bits per second; a unit of measurement for data transmission.
NAT (Network Address Translation) - NAT technology translates IP addresses of a local area network to a different
IP address for the Internet.
Network - A series of computers or devices connected for the purpose of data sharing, storage, and/or
transmission between users.
Packet - A unit of data sent over a network.
Passphrase - Used much like a password, a passphrase simplifies the WEP encryption process by automatically
generating the WEP encryption keys for Linksys products.
Ping (Packet INternet Groper) - An Internet utility used to determine whether a particular IP address is online.
POP3 (Post Office Protocol 3) - A standard mail server commonly used on the Internet.
Port - The connection point on a computer or networking device used for plugging in cables or adapters.
Power over Ethernet (PoE) - A technology enabling an Ethernet network cable to deliver both data and power.
PPPoE (Point to Point Protocol over E
thernet) - A type of broadband connection that provides authentication
(username and password) in addition to data transport.
PPTP (Point-to-Point Tunneling Protocol) - A VPN protocol that allows the Point to Point Protocol (PPP) to be
tunneled through an IP network. This protocol is also used as a type of broadband connection in Europe.
RADIUS (Remote Authentication Dial-In User Service) - A protocol that uses an authentication server to control
network access.
Appendix E: Glossary
46
Page 52

Wireless-G USB Network Adapter with SRX400
RJ-45 (Registered Jack-45) - An Ethernet connector that holds up to eight wires.
Roaming - The ability to take a wireless device from one access point's range to another without losing the
connection.
Router - A networking device that connects multiple networks together.
Server - Any computer whose function in a network is to provide user access to files, printing, communications,
and other services.
SMTP (Simple Mail Transfer Protocol) - The standard e-mail protocol on the Internet.
SNMP (Simple Network Management Protocol) - A widely used network monitoring and control protocol.
SPI (Stateful Packet Inspection) Firewall - A technology that inspects incoming packets of information before
allowing them to enter the network.
SSID (Service Set IDentifier) - Your wireless network's name.
Static IP Address - A fixed address assigned to a computer or device that is connected to a network.
Static Routing - Forwarding data in a network via a fixed path.
Subnet Mask - An address code that determines the size of the network.
Switch - 1. A data switch that connects computing devices to host computers, allowing a large number of
devices to share a limited number of ports. 2. A device for making, breaking, or changing the connections in an
electrical circuit.
TCP (Transmission Control Protocol) - A network protocol for transmitting data that requires acknowledgement
from the recipient of data sent.
TCP/IP (Transmission Control Protocol/Internet Protocol) - A set of instructions PCs use to communicate over a
network.
Telnet - A user command and TCP/IP protocol used for accessing remote PCs.
TFTP (Trivial File Transfer Protocol) - A version of the TCP/IP FTP protocol that has no directory or password
capability.
Throughput - The amount of data moved successfully from one node to another in a given time period.
Appendix E: Glossary
47
Page 53

Wireless-G USB Network Adapter with SRX400
TKIP (Temporal Key Integrity Protocol) - a wireless encryption protocol that provides dynamic encryption keys for
each packet transmitted.
Topology - The physical layout of a network.
TX Rate - Transmission Rate.
Upgrade - To replace existing software or firmware with a newer version.
Upload - To transmit a file over a network.
URL (Uniform Resource Locator) - The address of a file located on the Internet.
VPN (Virtual Private Network) - A security measure to protect data as it leaves one network and goes to another
over the Internet.
WAN (Wide Area Network)- The Internet.
WEP (Wired Equivalent Privacy) - A method of encrypting network data transmitted on a wireless network for
greater security.
WLAN (Wireless Local Area Network) - A group of computers and associated devices that communicate with
each other wirelessly.
WPA (Wi-Fi Protected Access) - a wireless security protocol using TKIP (Temporal Key Integrity Protocol)
encryption, which can be used in conjunction with a RADIUS server.
Appendix E: Glossary
48
Page 54

Wireless-G USB Network Adapter with SRX400
Appendix F: Specifications
Model WUSB54GX4
Standards 802.11g, 802.11b
LEDs Link, Act
# of Antennas Two
RF Pwr (EIRP) in dBm 17 dBm (b), 14 dBm (g)
Security Features WPA, WPA2 WEP, and 802.1x
WEP Key Bits 64/128bit
Dimensions 4.53" x 3.15" x 0.79"
(115 mm x 80 mm x 20 mm)
Unit Weight 2.7 oz. (0.077 kg)
Power 3.3V ± 5%
Certifications FCC, CE, ICES-003, Wi-Fi, WHQL
Operating Temp. 0° C to 60° C (32° F to 140° F)
Storage Temp. -20° C to 85° C (-4° F to 185° F)
Operating Humidity Max. 90% Non-Condensing
Storage Humidity 5% to 90% Non-Condensing
Appendix F: Specifications
49
Page 55

Wireless-G USB Network Adapter with SRX400
Appendix G: Warranty Information
LIMITED WARRANTY
Linksys warrants to You that, for a period of three years (the “Warranty Period”), your Linksys Product will be substantially
free of defects in materials and workmanship under normal use. Your exclusive remedy and Linksys' entire liability under
this warranty will be for Linksys at its option to repair or replace the Product or refund Your purchase price less any
rebates. This limited warranty extends only to the original purchaser.
If the Product proves defective during the Warranty Period call Linksys Technical Support in order to obtain a Return
Authorization Number, if applicable. BE SURE TO HAVE YOUR PROOF OF PURCHASE ON HAND WHEN CALLING. If You are
requested to return the Product, mark the Return Authorization Number clearly on the outside of the package and include a
copy of your original proof of purchase. RETURN REQUESTS CANNOT BE PROCESSED WITHOUT PROOF OF PURCHASE. You
are responsible for shipping defective Products to Linksys. Linksys pays for UPS Ground shipping from Linksys back to You
only. Customers located outside of the United States of America and Canada are responsible for all shipping and handling
charges.
ALL IMPLIED WARRANTIES AND CONDITIONS OF MERCHANTABILITY OR FITNESS FOR A PARTICULAR PURPOSE ARE LIMITED
TO THE DURATION OF THE WARRANTY PERIOD. ALL OTHER EXPRESS OR IMPLIED CONDITIONS, REPRESENTATIONS AND
WARRANTIES, INCLUDING ANY IMPLIED WARRANTY OF NON-INFRINGEMENT, ARE DISCLAIMED. Some jurisdictions do not
allow limitations on how long an implied warranty lasts, so the above limitation may not apply to You. This warranty gives
You specific legal rights, and You may also have other rights which vary by jurisdiction.
This warranty does not apply if the Product (a) has been altered, except by Linksys, (b) has not been installed, operated,
repaired, or maintained in accordance with instructions supplied by Linksys, or (c) has been subjected to abnormal
physical or electrical stress, misuse, negligence, or accident. In addition, due to the continual development of new
techniques for intruding upon and attacking networks, Linksys does not warrant that the Product will be free of
vulnerability to intrusion or attack.
TO THE EXTENT NOT PROHIBITED BY LAW, IN NO EVENT WILL LINKSYS BE LIABLE FOR ANY LOST DATA, REVENUE OR PROFIT,
OR FOR SPECIAL, INDIRECT, CONSEQUENTIAL, INCIDENTAL OR PUNITIVE DAMAGES, REGARDLESS OF THE THEORY OF
LIABILITY (INCLUDING NEGLIGENCE), ARISING OUT OF OR RELATED TO THE USE OF OR INABILITY TO USE THE PRODUCT
(INCLUDING ANY SOFTWARE), EVEN IF LINKSYS HAS BEEN ADVISED OF THE POSSIBILITY OF SUCH DAMAGES. IN NO EVENT
WILL LINKSYS’ LIABILITY EXCEED THE AMOUNT PAID BY YOU FOR THE PRODUCT. The foregoing limitations will apply even
if any warranty or remedy provided under this Agreement fails of its essential purpose. Some jurisdictions do not allow the
exclusion or limitation of incidental or consequential damages, so the above limitation or exclusion may not apply to You.
Please direct all inquiries to: Linksys, P.O. Box 18558, Irvine, CA 92623.
Appendix G: Warranty Information
50
Page 56

Wireless-G USB Network Adapter with SRX400
Appendix H: Regulatory Information
FCC Statement
This product has been tested and complies with the specifications for a Class B digital device, pursuant to Part 15 of the
FCC Rules. These limits are designed to provide reasonable protection against harmful interference in a residential
installation. This equipment generates, uses, and can radiate radio frequency energy and, if not installed and used
according to the instructions, may cause harmful interference to radio communications. However, there is no guarantee
that interference will not occur in a particular installation. If this equipment does cause harmful interference to radio or
television reception, which is found by turning the equipment off and on, the user is encouraged to try to correct the
interference by one or more of the following measures:
• Reorient or relocate the receiving antenna
• Increase the separation between the equipment or devices
• Connect the equipment to an outlet other than the receiver's
• Consult a dealer or an experienced radio/TV technician for assistance
FCC Radiation Exposure Statement
This equipment complies with FCC radiation exposure limits set forth for an uncontrolled environment. This equipment
should be installed and operated with minimum distance 20cm between the radiator and your body.
Safety Notices
Caution: To reduce the risk of fire, use only No.26 AWG or larger telecommunication line cord.
Do not use this product near water, for example, in a wet basement or near a swimming pool.
Avoid using this product during an electrical storm. There may be a remote risk of electric shock from lightning.
Industry Canada (Canada)
This device complies with Canadian ICES-003 and RSS210 rules.
Cet appareil est conforme aux normes NMB-003 et RSS210 d'Industry Canada.
Appendix H: Regulatory Information
51
Page 57

Wireless-G USB Network Adapter with SRX400
User Information for Consumer Products Covered by EU Directive 2002/96/EC on Waste Electric and Electronic
Equipment (WEEE)
This document contains important information for users with regards to the proper disposal and recycling of Linksys
products. Consumers are required to comply with this notice for all electronic products bearing the following symbol:
Appendix H: Regulatory Information
52
Page 58

Wireless-G USB Network Adapter with SRX400
Appendix H: Regulatory Information
53
Page 59

Wireless-G USB Network Adapter with SRX400
Appendix H: Regulatory Information
54
Page 60

Wireless-G USB Network Adapter with SRX400
Appendix H: Regulatory Information
55
Page 61

Wireless-G USB Network Adapter with SRX400
For more information, visit www.linksys.com.
Appendix H: Regulatory Information
56
Page 62

Wireless-G USB Network Adapter with SRX400
Appendix I: Contact Information
Need to contact Linksys?
Visit us online for information on the latest products and updates
to your existing products at: http://www.linksys.com or
ftp.linksys.com
Can't find information about a product you want to buy
on the web? Do you want to know more about networking
with Linksys products? Give our advice line a call at: 800-546-5797 (LINKSYS)
Or fax your request in to: 949-823-3002
If you experience problems with any Linksys product,
you can call us at: 800-326-7114
Don't wish to call? You can e-mail us at: support@linksys.com
If any Linksys product proves defective during its warranty period,
you can call the Linksys Return Merchandise Authorization
department for obtaining a Return Authorization Number at: 949-823-3000
(Details on Warranty and RMA issues can be found in the Warranty
Information section in this Guide.)
Appendix I: Contact Information
57
 Loading...