

Page 1

Cisco UCS B200 M5 Blade Server Installation and Service Note
First Published: 2017-07-14
Last Modified: 2017-08-25
Americas Headquarters
Cisco Systems, Inc.
170 West Tasman Drive
San Jose, CA 95134-1706
USA
http://www.cisco.com
Tel: 408 526-4000
800 553-NETS (6387)
Fax: 408 527-0883
Page 2

THE SPECIFICATIONS AND INFORMATION REGARDING THE PRODUCTS IN THIS MANUAL ARE SUBJECT TO CHANGE WITHOUT NOTICE. ALL STATEMENTS,
INFORMATION, AND RECOMMENDATIONS IN THIS MANUAL ARE BELIEVED TO BE ACCURATE BUT ARE PRESENTED WITHOUT WARRANTY OF ANY KIND,
EXPRESS OR IMPLIED. USERS MUST TAKE FULL RESPONSIBILITY FOR THEIR APPLICATION OF ANY PRODUCTS.
THE SOFTWARE LICENSE AND LIMITED WARRANTY FOR THE ACCOMPANYING PRODUCT ARE SET FORTH IN THE INFORMATION PACKET THAT SHIPPED WITH
THE PRODUCT AND ARE INCORPORATED HEREIN BY THIS REFERENCE. IF YOU ARE UNABLE TO LOCATE THE SOFTWARE LICENSE OR LIMITED WARRANTY,
CONTACT YOUR CISCO REPRESENTATIVE FOR A COPY.
The following information is for FCC compliance of Class A devices: This equipment has been tested and found to comply with the limits for a Class A digital device, pursuant to part 15
of the FCC rules. These limits are designed to provide reasonable protection against harmful interference when the equipment is operated in a commercial environment. This equipment
generates, uses, and can radiate radio-frequency energy and, if not installed and used in accordance with the instruction manual, may cause harmful interference to radio communications.
Operation of this equipment in a residential area is likely to cause harmful interference, in which case users will be required to correct the interference at their own expense.
The following information is for FCC compliance of Class B devices: This equipment has been tested and found to comply with the limits for a Class B digital device, pursuant to part 15
of the FCC rules. These limits are designed to provide reasonable protection against harmful interference in a residential installation. This equipment generates, uses and can radiate radio
frequency energy and, if not installed and used in accordance with the instructions, may cause harmful interference to radio communications. However, there is no guarantee that interference
will not occur in a particular installation. If the equipment causes interference to radio or television reception, which can be determined by turning the equipment off and on, users are
encouraged to try to correct the interference by using one or more of the following measures:
Reorient or relocate the receiving antenna.
•
Increase the separation between the equipment and receiver.
•
Connect the equipment into an outlet on a circuit different from that to which the receiver is connected.
•
Consult the dealer or an experienced radio/TV technician for help.
•
Modifications to this product not authorized by Cisco could void the FCC approval and negate your authority to operate the product
The Cisco implementation of TCP header compression is an adaptation of a program developed by the University of California, Berkeley (UCB) as part of UCB’s public domain version
of the UNIX operating system. All rights reserved. Copyright©1981, Regents of the University of California.
NOTWITHSTANDING ANY OTHER WARRANTY HEREIN, ALL DOCUMENT FILES AND SOFTWARE OF THESE SUPPLIERS ARE PROVIDED "AS IS" WITH ALL FAULTS.
CISCO AND THE ABOVE-NAMED SUPPLIERS DISCLAIM ALL WARRANTIES, EXPRESSED OR IMPLIED, INCLUDING, WITHOUT LIMITATION, THOSE OF
MERCHANTABILITY, FITNESS FOR A PARTICULAR PURPOSE AND NONINFRINGEMENT OR ARISING FROM A COURSE OF DEALING, USAGE, OR TRADE PRACTICE.
IN NO EVENT SHALL CISCO OR ITS SUPPLIERS BE LIABLE FOR ANY INDIRECT, SPECIAL, CONSEQUENTIAL, OR INCIDENTAL DAMAGES, INCLUDING, WITHOUT
LIMITATION, LOST PROFITS OR LOSS OR DAMAGE TO DATA ARISING OUT OF THE USE OR INABILITY TO USE THIS MANUAL, EVEN IF CISCO OR ITS SUPPLIERS
HAVE BEEN ADVISED OF THE POSSIBILITY OF SUCH DAMAGES.
Any Internet Protocol (IP) addresses and phone numbers used in this document are not intended to be actual addresses and phone numbers. Any examples, command display output, network
topology diagrams, and other figures included in the document are shown for illustrative purposes only. Any use of actual IP addresses or phone numbers in illustrative content is unintentional
and coincidental.
Cisco and the Cisco logo are trademarks or registered trademarks of Cisco and/or its affiliates in the U.S. and other countries. To view a list of Cisco trademarks, go to this URL: http://
www.cisco.com/go/trademarks. Third-party trademarks mentioned are the property of their respective owners. The use of the word partner does not imply a partnership
relationship between Cisco and any other company. (1110R)
©
2017 Cisco Systems, Inc. All rights reserved.
Page 3

CONTENTS
Preface
CHAPTER 1
CHAPTER 2
Preface vii
Audience vii
Conventions vii
Related Cisco UCS Documentation ix
Obtaining Documentation and Submitting a Service Request ix
Overview 1
Cisco UCS B200 M5 Blade Server 1
External Features Overview 2
LEDs 2
Buttons 4
Local Console Connection 4
Drive Bays 5
Graphics Processing Unit 5
Installing a Blade Server 7
CHAPTER 3
Installing a Half-width Blade Server 7
Server Configuration 9
Powering Off a Blade Server 9
Removing a Blade Server 9
Server Troubleshooting 10
Servicing a Blade Server 11
Replacing a Drive 11
Removing a Blade Server Drive 12
Installing a Blade Server Drive 12
Removing a Blade Server Cover 13
Cisco UCS B200 M5 Blade Server Installation and Service Note
iii
Page 4

Contents
Internal Components 14
Diagnostics Button and LEDs 15
Installing the Front Mezzanine Storage Module 15
Mini-Storage Module 16
Embedded SATA RAID Requirements 17
Embedded SATA RAID Controller Considerations 17
Embedded SATA RAID: Two SATA Controllers 17
Enabling SATA Mode 18
Installing LSI MegaSR Drivers For Windows and Linux 18
Downloading the MegaSR Drivers 18
Microsoft Windows Server Drivers 19
Installing Microsoft Windows Server Drivers 19
Updating Microsoft Windows Server Drivers 20
Linux Drivers 20
Downloading the Driver Image File 20
Preparing Physical Thumb Drive for Linux 21
Installing the Red Hat Enterprise Linux Driver 21
Installing the SUSE Linux Enterprise Server Driver 23
Removing the Mini-Storage Module 25
Installing the Mini-Storage Module 25
Removing the SATA 3.0 M.2 Cards 26
Installing the SATA 3.0 M.2 Cards 27
Removing and Installing CPUs and Heatsinks 28
CPU Configuration Rules 28
Tools Required for CPU Replacement 28
Replacing a CPU and Heatsink 28
Additional CPU-Related Parts to Order with CPU RMA 35
Supported DIMMs 35
Installing a DIMM or DIMM Blank 36
DIMMs and Channels 37
Memory Performance 38
Memory Mirroring and RAS 39
Installing a Virtual Interface Card in the mLOM Slot 39
Installing a Rear Mezzanine Module in Addition to the mLOM VIC 40
NVIDIA P6 Graphics Processing Unit 42
Cisco UCS B200 M5 Blade Server Installation and Service Note
iv
Page 5

Contents
Installing an NVIDIA GPU Card in the Front of the Server 43
Installing an NVIDIA GPU Card in the Rear of the Server 46
Enabling the Trusted Platform Module 49
CHAPTER 4
APPENDIX A
Technical Specifications 51
Physical Specifications for the Cisco UCS B200 M5 Blade Server 51
NVIDIA Licensing Information 53
NVIDIA GRID License Server Overview 53
Registering Your Product Activation Keys with NVIDIA 55
Downloading the GRID Software Suite 55
Installing NVIDIA GRID License Server Software 55
Platform Requirements for NVIDIA GRID License Server 56
Installing on Windows 56
Installing on Linux 57
Installing GRID Licenses From the NVIDIA Licensing Portal to the License Server 57
Accessing the GRID License Server Management Interface 57
Reading Your License Server's MAC Address 58
Installing Licenses From the Licensing Portal 58
Viewing Available Licenses 58
Viewing Current License Usage 59
Managing GRID Licenses 59
Acquiring a GRID License on Windows 59
Acquiring a GRID License on Linux 60
Installing Drivers to Support the NVIDIA GPU Cards 61
1. Updating the Server BIOS Firmware 61
2. Activating the Server BIOS Firmware 62
3. Updating the NVIDIA Drivers 62
Cisco UCS B200 M5 Blade Server Installation and Service Note
v
Page 6

Contents
Cisco UCS B200 M5 Blade Server Installation and Service Note
vi
Page 7

Preface
Audience
To use this installation guide, you must be familiar with electronic circuitry and wiring practices and preferably
be an electronic or electromechanical technician who has experience with electronic and electromechanical
equipment.
Only trained and qualified service personnel (as defined in IEC 60950-1 and AS/NZS60950) should install,
replace, or service the equipment. Install the system in accordance with the U.S. National Electric Code if
you are in the United States.
Conventions
Audience, page vii
•
Conventions, page vii
•
Related Cisco UCS Documentation, page ix
•
Obtaining Documentation and Submitting a Service Request, page ix
•
GUI elements
Document titles
System output
CLI commands
IndicationText Type
GUI elements such as tab titles, area names, and field labels appear in this font.
Main titles such as window, dialog box, and wizard titles appear in this font.
Document titles appear in this font.
In a Text-based User Interface, text the system displays appears in this font.TUI elements
Terminal sessions and information that the system displays appear in this
font.
CLI command keywords appear in this font.
Variables in a CLI command appear in this font.
Cisco UCS B200 M5 Blade Server Installation and Service Note
vii
Page 8

Conventions
Preface
IndicationText Type
Elements in square brackets are optional.[ ]
Note
{x | y | z}
Required alternative keywords are grouped in braces and separated by vertical
bars.
[x | y | z]
Optional alternative keywords are grouped in brackets and separated by vertical
bars.
string
A nonquoted set of characters. Do not use quotation marks around the string or
the string will include the quotation marks.
Nonprinting characters such as passwords are in angle brackets.< >
Default responses to system prompts are in square brackets.[ ]
!, #
An exclamation point (!) or a pound sign (#) at the beginning of a line of code
indicates a comment line.
Means reader take note. Notes contain helpful suggestions or references to material not covered in the
document.
Tip
Timesaver
Caution
Warning
Means the following information will help you solve a problem. The tips information might not be
troubleshooting or even an action, but could be useful information, similar to a Timesaver.
Means the described action saves time. You can save time by performing the action described in the
paragraph.
Means reader be careful. In this situation, you might perform an action that could result in equipment
damage or loss of data.
IMPORTANT SAFETY INSTRUCTIONS
This warning symbol means danger. You are in a situation that could cause bodily injury. Before you
work on any equipment, be aware of the hazards involved with electrical circuitry and be familiar with
standard practices for preventing accidents. Use the statement number provided at the end of each warning
to locate its translation in the translated safety warnings that accompanied this device.
SAVE THESE INSTRUCTIONS
viii
Cisco UCS B200 M5 Blade Server Installation and Service Note
Page 9

Preface
Related Cisco UCS Documentation
Documentation Roadmaps
For a complete list of all B-Series documentation, see the Cisco UCS B-Series Servers Documentation Roadmap
available at the following URL: http://www.cisco.com/go/unifiedcomputing/b-series-doc.
For a complete list of all C-Series documentation, see the Cisco UCS C-Series Servers Documentation Roadmap
available at the following URL: http://www.cisco.com/go/unifiedcomputing/c-series-doc.
For information on supported firmware versions and supported UCS Manager versions for the rack servers
that are integrated with the UCS Manager for management, refer to Release Bundle Contents for Cisco UCS
Software.
Other Documentation Resources
Follow Cisco UCS Docs on Twitter to receive document update notifications.
Related Cisco UCS Documentation
Obtaining Documentation and Submitting a Service Request
For information on obtaining documentation, submitting a service request, and gathering additional information,
see the monthly What's New in Cisco Product Documentation, which also lists all new and revised Cisco
technical documentation.
Subscribe to the What's New in Cisco Product Documentation as a Really Simple Syndication (RSS) feed
and set content to be delivered directly to your desktop using a reader application. The RSS feeds are a free
service and Cisco currently supports RSS version 2.0.
Follow Cisco UCS Docs on Twitter to receive document update notifications.
Cisco UCS B200 M5 Blade Server Installation and Service Note
ix
Page 10

Obtaining Documentation and Submitting a Service Request
Preface
Cisco UCS B200 M5 Blade Server Installation and Service Note
x
Page 11

Overview
This chapter contains the following sections:
Cisco UCS B200 M5 Blade Server, page 1
•
External Features Overview, page 2
•
Drive Bays, page 5
•
Graphics Processing Unit , page 5
•
Cisco UCS B200 M5 Blade Server
The Cisco UCS B200 M5 is a density-optimized, half-width blade server that supports two CPU sockets for
the Intel Xeon Processor Scalable Family of CPUs. The server supports the following features:
24 DDR4 DIMMs
•
CHAPTER 1
1 front mezzanine module (storage or graphics processing unit (GPU))
•
1 modular LAN on motherboard (mLOM) module
•
1 rear mezzanine module (I/O or GPU)
•
A mini-storage module with dual SATA 3.0 M.2 cards or secure digital (SD) cards
•
You can install up to eight UCS B200 M5 blade servers in a UCS 5108 chassis, mixing with other models of
Cisco UCS blade servers in the chassis if desired.
Cisco UCS B200 M5 Blade Server Installation and Service Note
1
Page 12

External Features Overview
Subject to chassis power configuration.Note
Figure 1: Cisco UCS B200 M5 Blade Server Front Panel
Overview
Note
The asset pull tag is a blank plastic tag that pulls out from the front panel. You can add your own asset
tracking label to the asset pull tag and not interfere with the intended air flow of the server.
External Features Overview
The features of the blade server that are externally accessible are described in this section.
Blade ejector handle2Asset pull tag1
Drive bay 14Ejector thumb screw3
Power button and LED6Drive bay 25
Blade health LED8Network link status LED7
Reset button10Local console connection9
-Locate button and LED11
LEDs
2
Server LEDs indicate whether the blade server is in active or standby mode, the status of the network link,
the overall health of the blade server, and whether the server is set to give a blinking blue locator light from
the locator button.
Cisco UCS B200 M5 Blade Server Installation and Service Note
Page 13
Overview
LEDs
The removable drives also have LEDs indicating hard disk access activity and disk health.
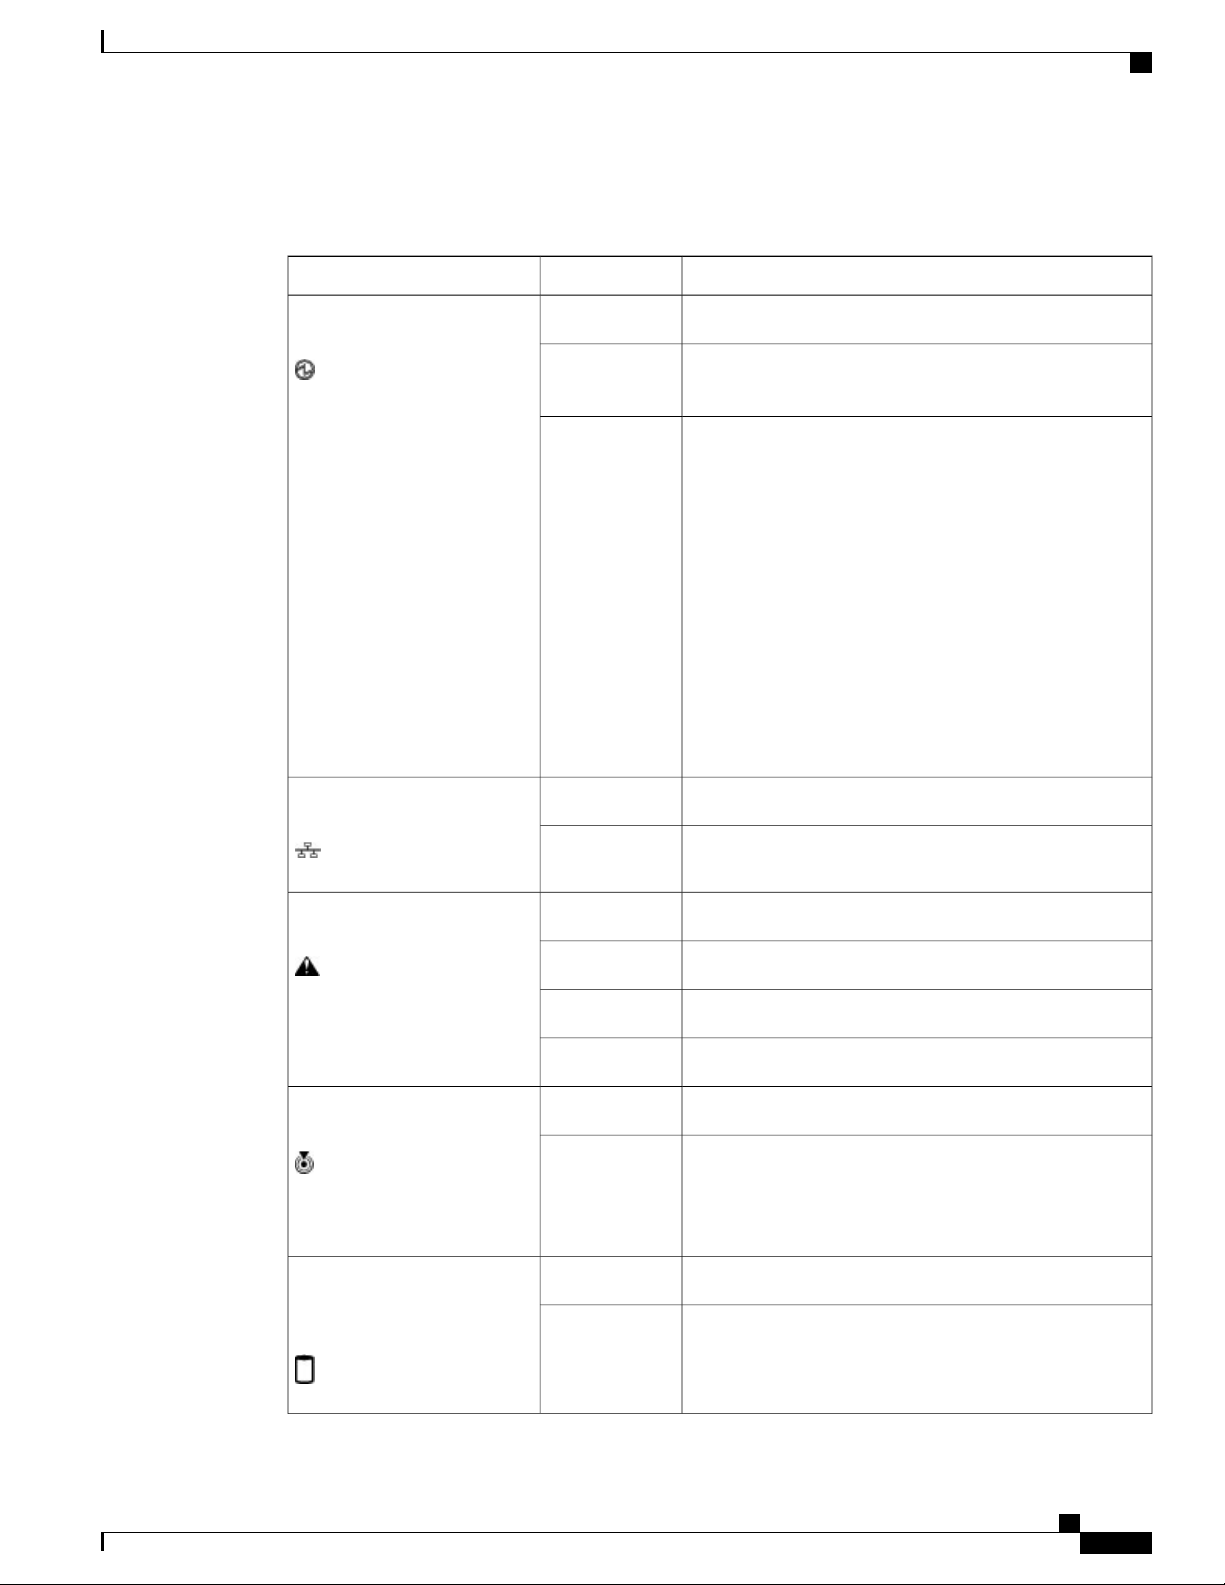
Table 1: Blade Server LEDs
DescriptionColorLED
Power off.OffPower
Green
Amber
Main power state. Power is supplied to all server
components and the server is operating normally.
Standby power state. Power is supplied only to the service
processor of the server so that the server can still be
managed.
Note
The front-panel power button is disabled by
default. It can be re-enabled through Cisco UCS
Manager. After it's enabled, if you press and
release the front-panel power button, the server
performs an orderly shutdown of the 12 V main
power and goes to standby power state. You
cannot shut down standby power from the
front-panel power button. See the Cisco UCS
Manager Configuration Guides for information
about completely powering off the server from
the software interface.
None of the network links are up.OffLink
At least one network link is up.Green
Power off.OffHealth
(Disk Drive)
Blinking blue 1
Hz
Cisco UCS B200 M5 Blade Server Installation and Service Note
Normal operation.Green
Minor error.Amber
Critical error.Blinking Amber
Blinking is not enabled.OffBlue locator button and LED
Blinking to locate a selected blade—If the LED is not
blinking, the blade is not selected. You can control the
blinking in UCS Manager or by using the blue locator
button/LED.
Inactive.OffActivity
Outstanding I/O to disk drive.Green
3
Page 14

Buttons
Overview
DescriptionColorLED
Buttons
OffHealth
(Disk Drive)
Flashing Amber
4 hz
The Reset button is recessed in the front panel of the server. You can press the button with the tip of a paper
clip or a similar item. Hold the button down for five seconds, and then release it to restart the server if other
methods of restarting do not work.
The locator function for an individual server may get turned on or off by pressing the locator button/LED.
The front-panel power button is disabled by default. It can re-enabled through Cisco UCS Manager. After it's
enabled, The power button allows you to manually take a server temporarily out of service but leave it in a
state where it can be restarted quickly. If the desired power state for a service profile associated with a blade
server is set to "off," using the power button or Cisco UCS Manager to reset the server will cause the desired
power state of the server to become out of sync with the actual power state and the server may unexpectedly
shut down at a later time. To safely reboot a server from a power-down state, use the Boot Server action in
Cisco UCS Manager.
Can mean either no fault detected or the drive is not
installed.
Rebuild drive active.
If the Activity LED is also flashing amber, a drive rebuild
is in progress.
Fault detected.Amber
Local Console Connection
The local console connector allows a direct connection to a blade server to allow operating system installation
and other management tasks to be done directly rather than remotely. The port uses the KVM dongle cable
that provides a connection into a Cisco UCS blade server; it has a DB9 serial connector, a VGA connector
for a monitor, and dual USB ports for a keyboard and mouse. With this cable, you can create a direct connection
Cisco UCS B200 M5 Blade Server Installation and Service Note
4
Page 15

Overview
Drive Bays
to the operating system and the BIOS running on a blade server. A KVM cable ships standard with each blade
chassis accessory kit.
Figure 2: KVM Cable for Blade Servers
1
connection
Drive Bays
The Cisco UCS B200 M5 blade server has a front mezzanine slot that can support either a storage module or
a graphics processing unit (GPU). The storage module has two drive bays that can be configured with any
combination of 2.5-inch SAS, SATA, or NVMe drives. A blanking panel (UCSB-LSTOR-BK) must cover
all empty drive bays.
Graphics Processing Unit
An NVIDIA GPU can be installed in the front mezzanine slot of the server. When the GPU is installed, the
drive bay is not present. Two blanking panels (UCSB-LSTOR-BK) are required when the GPU is installed
in the front mezzanine slot. For additional information about the GPU, see NVIDIA P6 Graphics Processing
Unit, on page 42.
DB9 serial connector2Connector to blade server local console
2-port USB connector for a mouse and keyboard4VGA connector for a monitor3
Cisco UCS B200 M5 Blade Server Installation and Service Note
5
Page 16

Graphics Processing Unit
Overview
Cisco UCS B200 M5 Blade Server Installation and Service Note
6
Page 17

Installing a Blade Server
This chapter contains the following sections:
Installing a Half-width Blade Server, page 7
•
Server Configuration, page 9
•
Powering Off a Blade Server, page 9
•
Removing a Blade Server, page 9
•
Server Troubleshooting, page 10
•
Installing a Half-width Blade Server
The Cisco UCS B200 M5 blade server and other half-width blade servers are interoperable in a UCS chassis
with any other UCS blade servers. To install a half-width blade server, follow these steps:
CHAPTER 2
Before You Begin
The blade server must have its cover installed before installing it into the chassis to ensure adequate airflow.
Cisco UCS B200 M5 Blade Server Installation and Service Note
7
Page 18

Installing a Half-width Blade Server
Procedure
Installing a Blade Server
Step 1
Grasp the front of the blade server and place your other hand under the blade to support it.
Figure 3: Positioning a Blade Server in the Chassis
Step 2
Step 3
Step 4
Step 5
Open the ejector levers in the front of the blade server.
Gently slide the blade into the opening until you cannot push it any farther.
Press the ejector so that it catches the edge of the chassis and presses the blade server all the way in.
Tighten the captive screw on the front of the blade to no more than 3 in-lbs. Tightening only with bare fingers
is unlikely to lead to stripped or damaged captive screws.
Step 6
Cisco UCS Manager automatically reacknowledges, reassociates, and recommissions the server, provided
any hardware changes are allowed by the service profile. Upon completion of discovery, power on the server
using Cisco UCS Manager.
Cisco UCS B200 M5 Blade Server Installation and Service Note
8
Page 19

Installing a Blade Server
Server Configuration
Cisco UCS blade servers should be configured and managed using Cisco UCS Manager. For details, see the
Configuration Guide for the version of Cisco UCS Manager that you are using. The configuration guides are
available at the following URL: http://www.cisco.com/en/US/products/ps10281/products_installation_and_
configuration_guides_list.html
Powering Off a Blade Server
You can also shut down servers remotely using Cisco UCS Manager or CIMC. For details, see the
Tip
Configuration Guide for the version of Cisco UCS Manager that you are using. The configuration guides
are available at the following URL: http://www.cisco.com/en/US/products/ps10281/products_installation_
and_configuration_guides_list.html
Server Configuration
Step 1
Step 2
Step 3
Step 4
Procedure
If you are local to the server, check the color of the Power Status LED for each server in the chassis that you
want to power off.
Green indicates that the server is running and must be shut down before it can be safely powered off.
•
Go to Step 2.
Amber indicates that the server is already in standby mode and can be safely powered off. Go to Step
•
3.
If you previously enabled front power button control through Cisco UCS Manager, press and release the
Power button, then wait until the Power Status LED changes to amber. Otherwise, you cannot press the front
power button because it is disabled by default.
The operating system performs a graceful shutdown and the server goes to standby mode.
Caution
(Optional) If you are shutting down all blade servers in a chassis, disconnect the power cords from the chassis
to completely power off the servers.
Remove the appropriate servers from the chassis.
To avoid data loss or damage to your operating system, you should always invoke a graceful
shutdown of the operating system.
Removing a Blade Server
Using UCS Manager, decommission the server before physically removing the server. To remove a blade
server from the chassis, follow these steps:
Cisco UCS B200 M5 Blade Server Installation and Service Note
9
Page 20

Server Troubleshooting
Procedure
Installing a Blade Server
Step 1
Step 2
Step 3
Step 4
Step 5
Loosen the captive screws on the front of the blade.
Remove the blade from the chassis by pulling the ejector lever on the blade until it unseats the blade server.
Slide the blade part of the way out of the chassis, and place your other hand under the blade to support its
weight.
Once removed, place the blade on an antistatic mat or antistatic foam if you are not immediately reinstalling
it into another slot.
If the slot is to remain empty, install a blank faceplate (N20-CBLKB1) to maintain proper thermal temperature
and keep dust out of the chassis.
Server Troubleshooting
For general troubleshooting information, see the Cisco UCS Manager Troubleshooting Reference Guide.
Cisco UCS B200 M5 Blade Server Installation and Service Note
10
Page 21

CHAPTER 3
Servicing a Blade Server
This chapter contains the following sections:
Replacing a Drive, page 11
•
Removing a Blade Server Cover, page 13
•
Internal Components, page 14
•
Diagnostics Button and LEDs, page 15
•
Installing the Front Mezzanine Storage Module, page 15
•
Mini-Storage Module, page 16
•
Removing and Installing CPUs and Heatsinks, page 28
•
Supported DIMMs, page 35
•
Installing a DIMM or DIMM Blank, page 36
•
DIMMs and Channels, page 37
•
Memory Performance, page 38
•
Memory Mirroring and RAS, page 39
•
Installing a Virtual Interface Card in the mLOM Slot, page 39
•
Installing a Rear Mezzanine Module in Addition to the mLOM VIC, page 40
•
NVIDIA P6 Graphics Processing Unit, page 42
•
Enabling the Trusted Platform Module, page 49
•
Replacing a Drive
The Cisco UCS B200 M5 blade server uses an optional front storage mezzanine module that has two drive
bays for hard disks or SSD drives, either 2.5-inch SAS, SATA, or NVMe. The storage mezzanine module
also supports a RAID controller. If you purchased the server without the front storage mezzanine module
configured as a part of the system, a pair of blanking panels may be in place. These panels should be removed
before installing disk drives, but should remain in place to ensure proper cooling and ventilation if the drive
bays are unused.
Cisco UCS B200 M5 Blade Server Installation and Service Note
11
Page 22

Removing a Blade Server Drive
You can remove and install disk drives without removing the blade server from the chassis.
Servicing a Blade Server
Caution
To avoid data loss or damage to your operating system, always perform drive service during a scheduled
maintenance window.
The drives supported in this blade server come with the hot-plug drive sled attached. Empty hot-plug drive
sled carriers (containing no drives) are not sold separately from the drives. A list of currently supported drives
is in the Cisco UCS B200 M5 Blade Server Data Sheet on the Cisco UCS B-Series Blade Servers Data Sheets
page.
Before upgrading or adding a drive to a running blade server, check the service profile in Cisco UCS Manager
and make sure the new hardware configuration will be within the parameters allowed by the service profile.
To prevent ESD damage, wear grounding wrist straps during these procedures.Caution
Removing a Blade Server Drive
To remove a drive from a blade server, follow these steps:
Procedure
Step 1
Step 2
Step 3
Push the release button to open the ejector, and then pull the drive from its slot.
Caution
Place the drive on an antistatic mat or antistatic foam if you are not immediately reinstalling it in another
server.
Install a drive blanking panel to maintain proper airflow and keep dust out of the drive bay if it will remain
empty.
To prevent data loss, make sure that you know the state of the system before removing a
drive.
Installing a Blade Server Drive
To install a drive in a blade server, follow these steps:
Procedure
Step 1
Step 2
Step 3
Cisco UCS B200 M5 Blade Server Installation and Service Note
12
Place the drive ejector into the open position by pushing the release button.
Gently slide the drive into the opening in the blade server until it seats into place.
Push the drive ejector into the closed position.
You can use Cisco UCS Manager to format and configure RAID services. For details, see the Configuration
Guide for the version of Cisco UCS Manager that you are using. The configuration guides are available at
Page 23

Servicing a Blade Server
the following URL: http://www.cisco.com/en/US/products/ps10281/products_installation_and_configuration_
guides_list.html
If you need to move a RAID cluster, see the Cisco UCS Manager Troubleshooting Reference Guide.
Removing a Blade Server Cover
To remove the cover of the blade server, follow these steps:
Procedure
Removing a Blade Server Cover
Step 1
Step 2
Press and hold the button down as shown in the figure below.
While holding the back end of the cover, pull the cover back and then up.
Figure 4: Removing the Cover of the Blade Server
Cisco UCS B200 M5 Blade Server Installation and Service Note
13
Page 24

Internal Components
Internal Components
The following figure shows the internal components of the Cisco UCS B200 M5 blade server.
Figure 5: Inside View of the Cisco UCS B200 M5 Blade Server
Servicing a Blade Server
Note
2Front mezzanine connector1
When the front mezzanine storage module is installed, the USB connector is underneath it. Use the small
cutout opening in the storage module to visually determine the location of the USB connector when you
need to insert a USB drive. When the NVIDIA GPU is installed in the front mezzanine slot, you cannot
see the USB connector.
USB connector (populated)
An internal USB 3.0 port is supported. A 16
GB USB drive (UCS-USBFLSHB-16GB) is
available from Cisco. A clearance of 0.950
inches (24.1 mm) is required for the USB
device to be inserted and removed.
CPU 1 socket (populated)4DIMM slots3
CPU 2 socket6CPU heat sink install guide pins5
Diagnostic button8Mini storage connector7
Rear mezzanine connector10mLOM connector9
Cisco UCS B200 M5 Blade Server Installation and Service Note
14
Page 25

Servicing a Blade Server
Diagnostics Button and LEDs
At blade start-up, POST diagnostics test the CPUs, DIMMs, HDDs, and rear mezzanine modules, and any
failure notifications are sent to Cisco UCS Manager. You can view these notifications in the Cisco UCS
Manager System Error Log or in the output of the show tech-support command. If errors are found, an amber
diagnostic LED also lights up next to the failed component. During run time, the blade BIOS and component
drivers monitor for hardware faults and will light up the amber diagnostic LED as needed.
LED states are saved, and if you remove the blade from the chassis the LED values will persist for up to 10
minutes. Pressing the LED diagnostics button on the motherboard causes the LEDs that currently show a
component fault to light for up to 30 seconds for easier component identification. LED fault values are reset
when the blade is reinserted into the chassis and booted, and the process begins from its start.
If DIMM insertion errors are detected, they may cause the blade discovery process to fail and errors will be
reported in the server POST information, which is viewable using the UCS Manager GUI or CLI. DIMMs
must be populated according to specific rules. The rules depend on the blade server model. Refer to the
documentation for a specific blade server for those rules.
Faults on the DIMMs or rear mezzanine modules also cause the server health LED to light solid amber for
minor error conditions or blinking amber for critical error conditions.
Diagnostics Button and LEDs
Installing the Front Mezzanine Storage Module
The Cisco UCS B200 M5 blade server uses an optional front mezzanine storage module that can provide
support for two drive bays and RAID controller or NVMe-based PCIe SSD support functionality.
To install the front mezzanine storage module, follow these steps:
Cisco UCS B200 M5 Blade Server Installation and Service Note
15
Page 26

Mini-Storage Module
Servicing a Blade Server
Procedure
Step 1
Step 2
Step 3
Remove the connectors’ protective covers from both the front mezzanine storage module and the motherboard.
Place the storage module over the front mezzanine connector and the two standoff posts on the motherboard
at the front of the servers.
Press down on the drive bay cage where it is labeled "Press Here to Install" until the storage module clicks
into place.
Figure 6: Front Mezzanine Storage Module
Step 4
Using a Phillips-head screwdriver, tighten the four screws to secure the storage module. The locations of the
screws are labeled "Secure Here."
Mini-Storage Module
The server has a mini-storage module option that plugs into a motherboard socket to provide additional internal
storage. The mini-storage module can be one of the following types:
An SD card module that supports dual redundant SD cards.
•
An M.2 SSD module that supports two SATA M.2 SSDs.
•
The server includes an embedded SATA MegaRAID controller that can be used to control internal SATA
M.2 drives. This controller supports RAID levels 0 and 1.
Cisco UCS B200 M5 Blade Server Installation and Service Note
16
Page 27

Servicing a Blade Server
Embedded SATA RAID Requirements
Note
VMware ESX/ESXi or any other virtualized environments are not supported for use with the embedded
MegaRAID controller. Hypervisors such as Hyper-V, Xen, or KVM are also not supported for use with
the embedded MegaRAID controller.
Embedded SATA RAID Requirements
The embedded SATA RAID controller requires the following items:
The embedded SATA RAID controller must be enabled in Cisco UCS Manager.
•
M.2 mini-storage module with two SATA M.2 SSDs.
•
The software RAID controller requires UEFI boot mode; legacy boot mode is not supported.
•
(Optional) LSI MegaSR drivers for Windows or Linux.
•
If you use an embedded RAID controller with Linux, both the pSATA and the sSATA controller must
•
be set to LSI SW RAID mode.
Embedded SATA RAID Controller Considerations
Note the following considerations:
The default setting for this embedded controller hub is SATA RAID 0 and 1 support for two M.2 SATA
•
drives. The hub is divided into two SATA controllers that have different functions. See Embedded SATA
RAID: Two SATA Controllers, on page 17.
When you order the server with this embedded controller, the controller is enabled. Instructions for
•
enabling the controller are included for the case in which a server is reset to defaults. See Enabling
SATA Mode, on page 18.
The required drivers for this controller are already installed and ready to use. However, if you will use
•
this controller with Windows or Linux, you must download and install additional drivers for those
operating systems. See Installing LSI MegaSR Drivers For Windows and Linux, on page 18.
Embedded SATA RAID: Two SATA Controllers
The embedded RAID platform controller hub (PCH) is split into two controllers: primary SATA (pSATA)
and secondary SATA (sSATA). These two controllers are seen as separate RAID controllers in UCS Manager.
The primary pSATA controller is disabled.
•
The secondary sSATA controller controls two internal M.2 SATA drives, when they are present in the
•
M.2 mini-storage module option.
Each controller is listed separately in Cisco UCS Manager. You can enable or disable the sSATA
•
controller in Cisco UCS Manager. See Enabling SATA Mode, on page 18.
Cisco UCS B200 M5 Blade Server Installation and Service Note
17
Page 28

Enabling SATA Mode
Enabling SATA Mode
Perform this procedure in Cisco UCS Manager.
Procedure
Servicing a Blade Server
Step 1
Step 2
Set the SATA mode.
a) To change the M.2 state for the sSATA controller, change it in the storage sub-profile of the service profile
that is assigned to the blade server. Choices are:
• LSI SW RAID SWR—Enable the embedded sSATA RAID controller for control of internal SATA
M.2 drives.
• AHCI—Enable control of the internal SATA M.2 drives by AHCI through your OS rather than the
embedded RAID controller.
• Disabled—Disable the embedded sSATA RAID controller.
Press F10 to save your changes and exit.
Installing LSI MegaSR Drivers For Windows and Linux
Note
The required drivers for this controller are already installed and ready to use. However, if you will use
this controller with Windows or Linux, you must download and install additional drivers for those operating
systems.
This section explains how to install the LSI MegaSR drivers for the following supported operating systems:
Microsoft Windows Server
•
Red Hat Enterprise Linux (RHEL)
•
SUSE Linux Enterprise Server (SLES)
•
For the specific supported OS versions, see the Hardware and Software Compatibility Matrix for your server
release.
Downloading the MegaSR Drivers
The MegaSR drivers are included in the B-Series driver ISO for your server and OS.
Procedure
Step 1
Cisco UCS B200 M5 Blade Server Installation and Service Note
18
Find the drivers ISO file download for your server online and download it to a temporary location on your
workstation:
Page 29

Servicing a Blade Server
Installing LSI MegaSR Drivers For Windows and Linux
a)
See the following URL: http://www.cisco.com/cisco/software/navigator.html.
b) Click Servers - Unified Computing in the middle column.
c) Click UCS B-Series Blade Server Software in the right-hand column.
d) Click Unified Computing System (UCS) Drivers.
e) Click the release number that you are downloading.
f)
Click Download to download the drivers’ ISO file.
g) Verify the information on the next page, and then click Proceed With Download.
Step 2
Continue through the subsequent screens to accept the license agreement and then browse to a location where
you want to save the driver ISO file.
Microsoft Windows Server Drivers
Installing Microsoft Windows Server Drivers
The Windows Server operating system automatically adds the driver to the registry and copies the driver to
the appropriate directory.
Before You Begin
Before you install this driver on the sSATA embedded controller, you must configure a RAID drive group.
To access the configuration utility, open the BIOS Setup Utility, go to the Advanced tab, and then choose
the utility instance for the sSATA embedded controller: LSI Software RAID Configuration Utility (sSATA).
Procedure
Step 1
Step 2
Download the Cisco UCS B-Series drivers’ ISO, as described in Downloading the MegaSR Drivers, on page
18.
Prepare the drivers on a USB thumb drive:
a) Burn the ISO image to a disk.
b) Browse the contents of the drivers folders to the location of the embedded MegaRAID drivers:
/<OS>/Storage/Intel/B600/
c) Expand the Zip file, which contains the folder with the MegaSR driver files.
d) Copy the expanded folder to a USB thumb drive.
Step 3
Step 4
Start the Windows driver installation using one of the following methods:
To install from local media, connect an external USB DVD drive to the server (if the server does not
•
have a DVD drive installed), and then insert the first Windows installation disk into the DVD drive.
Skip to Step 6.
• To install from remote ISO, log in to the server’s Cisco IMC interface and continue with the next step.
Launch a Virtual KVM console window and click the Virtual Media tab.
a) Click Add Image and browse to select your remote Windows installation ISO file.
Cisco UCS B200 M5 Blade Server Installation and Service Note
19
Page 30

Installing LSI MegaSR Drivers For Windows and Linux
b) Check the check box in the Mapped column for the media that you just added, and then wait for mapping
to complete.
Servicing a Blade Server
Step 5
Step 6
Step 7
Power cycle the server.
Press F6 when you see the F6 prompt during bootup. The Boot Menu window opens.
On the Boot Manager window, choose the physical disk or virtual DVD and press Enter. The Windows
installation begins when the image is booted.
Step 8
Step 9
Press Enter when you see the prompt, “Press any key to boot from CD.”
Observe the Windows installation process and respond to prompts in the wizard as required for your preferences
and company standards.
Step 10
When Windows prompts you with “Where do you want to install Windows,” install the drivers for embedded
MegaRAID:
a) Click Load Driver. You are prompted by a Load Driver dialog box to select the driver to be installed.
b) Connect the USB thumb drive that you prepared in Step 3 to the target server.
c) On the Windows Load Driver dialog, click Browse.
d) Use the dialog box to browse to the location of the drivers folder on the USB thumb drive, and then click
OK.
Windows loads the drivers from the folder and when finished, the driver is listed under the prompt, “Select
the driver to be installed.”
e) Click Next to install the drivers.
Updating Microsoft Windows Server Drivers
Procedure
Step 1
Step 2
Step 3
Click Start, point to Settings, and then click Control Panel.
Double-click System, click the Hardware tab, and then click Device Manager. Device Manager starts.
In Device Manager, double-click SCSI and RAID Controllers, right-click the device for which you are
installing the driver, and then click Properties.
Step 4
On the Driver tab, click Update Driver to open the Update Device Driver wizard, and then follow the wizard
instructions to update the driver.
Linux Drivers
Downloading the Driver Image File
See Downloading the MegaSR Drivers, on page 18 for instructions on downloading the drivers. The Linux
driver is included in the form of dud-[driver version].img, which is the boot image for the embedded
MegaRAID stack.
Cisco UCS B200 M5 Blade Server Installation and Service Note
20
Page 31

Servicing a Blade Server
Installing LSI MegaSR Drivers For Windows and Linux
Note
The LSI MegaSR drivers that Cisco provides for Red Hat Linux and SUSE Linux are for the original GA
versions of those distributions. The drivers do not support updates to those OS kernels.
Preparing Physical Thumb Drive for Linux
This topic describes how to prepare physical Linux thumb drive from the driver image files.
This procedure requires a CD or DVD drive that you can use to burn the ISO image to disk; and a USB thumb
drive.
Alternatively, you can mount the dud.img file as a virtual floppy disk, as described in the installation procedures.
For RHEL and SLES, you can use a driver disk utility to create disk images from image files.
Procedure
Step 1
Download the Cisco UCS B-Series drivers ISO, as described in Downloading the MegaSR Drivers, on page
18 and save it to your Linux system.
Step 2
Extract the dud.img file:
a) Burn the ISO image to a disc.
b) Browse the contents of the drivers folders to the location of the embedded MegaRAID drivers:
/<OS>/Storage/Intel/B600/
c) Expand the Zip file, which contains the folder with the driver files.
Step 3
Step 4
Step 5
Step 6
Copy the driver update disk image dud-[driver version].img to your Linux system.
Insert a blank USB thumb drive into a port on your Linux system.
Create a directory and mount the DUD image to that directory:
Example:
mkdir <destination_folder>
mount -oloop <driver_image> <destination_folder>
Copy the contents in the directory to your USB thumb drive.
Installing the Red Hat Enterprise Linux Driver
For the specific supported OS versions, see the Hardware and Software Compatibility Matrix for your server
release.
This topic describes the fresh installation of the RHEL device driver on systems that have the embedded
MegaRAID stack.
Note
If you use an embedded RAID controller with Linux, both the pSATA and the sSATA controller must be
set to LSI SW RAID mode.
Cisco UCS B200 M5 Blade Server Installation and Service Note
21
Page 32

Installing LSI MegaSR Drivers For Windows and Linux
Before You Begin
Before you install this driver on the sSATA embedded controller, you must configure a RAID drive group.
To access the configuration utility, open the BIOS Setup Utility, go to the Advanced tab, and then choose
the utility instance for the sSATA embedded controller: LSI Software RAID Configuration Utility (sSATA).
Procedure
Servicing a Blade Server
Step 1
Step 2
Step 3
Step 4
Prepare the dud.img file using one of the following methods:
To install from physical disk, use the procedure in Preparing Physical Thumb Drive for Linux, on page
•
21, then continue with step 4.
• To install from virtual disk, download the Cisco UCS B-Series drivers’ ISO, as described in Downloading
the MegaSR Drivers, on page 18, then continue with the next step.
Extract the dud.img (or .iso) file:
a) Burn the ISO image to a disk.
b) Browse the contents of the drivers folders to the location of the embedded MegaRAID drivers:
/<OS>/Storage/Intel/B600/
c) Copy the dud-<driver version>.img (or .iso) file to a temporary location on your workstation.
Start the Linux driver installation using one of the following methods:
To install from local media, connect an external USB DVD drive to the server (if the server does not
•
have a DVD drive installed) and then insert the first RHEL installation disk into the drive. Then continue
with Step 6.
• To install from remote ISO, log in to the server’s Cisco IMC interface. Then continue with the next step.
Launch a Virtual KVM console window and click the Virtual Media tab.
a) Click Add Image and browse to select your remote RHEL installation ISO file.
b) Click Add Image again and browse to select your dud.img (or .iso) file.
c) Check the boxes in the Mapped column for the media that you just added, then wait for mapping to
complete.
Step 5
Step 6
Step 7
Power-cycle the target server.
Press F6 when you see the F6 prompt during bootup. The Boot Menu window opens.
On the Boot Manager window, select the physical disk or virtual disk and press Enter.
The RHEL installation begins when the image is booted.
Step 8
Cisco UCS B200 M5 Blade Server Installation and Service Note
22
Enter one of the following commands at the boot prompt:
For RHEL 6.x (32- and 64-bit), enter:
•
linux dd blacklist=isci blacklist=ahci nodmraid noprobe=<atadrive number>
For RHEL 7.x (32- and 64-bit), enter:
•
linux dd modprobe.blacklist=ahci nodmraid
Page 33

Servicing a Blade Server
Installing LSI MegaSR Drivers For Windows and Linux
Step 9
Step 10
Step 11
Step 12
Step 13
Step 14
Note
The noprobe values depend on the number of drives. For example, to install RHEL 6.5 on a RAID
5 configuration with three drives, enter:
Linux dd blacklist=isci blacklist=ahci nodmraid noprobe=ata1 noprobe=ata2
Press Enter.
The prompt asks whether you have a driver disk.
Use the arrow key to choose Yes, and then press Enter.
Choose fd0 to indicate that you have a disk with the driver on it.
Do one of the following actions:
If you prepared the dud.img file on a physical thumb drive, insert the thumb drive to the target server
•
and then press Enter.
If you mapped the dud.img (or .iso) file as a virtual disk, choose the location of the virtual disk.
•
The installer locates and loads the driver for your device. The following message appears:
Loading megasr driver...
Follow the RHEL installation procedure to complete the installation.
Reboot the target server.
Installing the SUSE Linux Enterprise Server Driver
For the specific supported OS versions, see the Hardware and Software Compatibility Matrix for your server
release.
This topic describes the fresh installation of the SLES driver on systems that have the embedded MegaRAID
stack.
Note
If you use an embedded RAID controller with Linux, both the pSATA and the sSATA controller must be
set to LSI SW RAID mode.
Before You Begin
Before you install this driver on the sSATA embedded controller, you must configure a RAID drive group.
To access the configuration utility, open the BIOS Setup Utility, go to the Advanced tab, and then choose
the utility instance for the sSATA embedded controller: LSI Software RAID Configuration Utility (sSATA).
Procedure
Step 1
Prepare the dud.img (or .iso) file using one of the following methods:
To install from physical disk, use the procedure in Preparing Physical Thumb Drive for Linux, on page
•
21, then continue with step 4.
• To install from virtual disk, download the Cisco UCS B-Series drivers’ ISO, as described in Downloading
the MegaSR Drivers, on page 18, then continue with the next step.
Cisco UCS B200 M5 Blade Server Installation and Service Note
23
Page 34

Installing LSI MegaSR Drivers For Windows and Linux
Servicing a Blade Server
Step 2
Step 3
Step 4
Step 5
Step 6
Step 7
Extract the dud.img (or .iso) file:
a) Burn the ISO image to a disk.
b) Browse the contents of the drivers folders to the location of the embedded MegaRAID drivers:
/<OS>/Storage/Intel/B600/
c) Copy the dud-<driver version>.img (or .iso) file to a temporary location on your workstation.
Start the Linux driver installation using one of the following methods:
To install from local media, connect an external USB DVD drive to the server (if the server does not
•
have a DVD drive installed) and then insert the first SLES installation disk into the drive. Then continue
with Step 6.
• To install from remote ISO, log in to the server’s Cisco IMC interface. Then continue with the next step.
Launch a Virtual KVM console window and click the Virtual Media tab.
a) Click Add Image and browse to select your remote SLES installation ISO file.
b) Click Add Image again and browse to select your dud.img (or .iso) file.
c) Check the check boxes in the Mapped column for the media that you just added, then wait for mapping
to complete.
Power-cycle the target server.
Press F6 when you see the F6 prompt during bootup. The Boot Menu window opens.
On the Boot Manager window, select the physical disk or virtual disk and press Enter.
The SLES installation begins when the image is booted.
Step 8
Step 9
Step 10
Step 11
Step 12
Step 13
Step 14
Step 15
Step 16
When the first SLES screen appears, choose Installation.
Enter the following command in the Boot Options field:
For SLES 12, enter:
•
brokenmodules=ahci
Press F6 for the driver and choose Yes.
Do one of the following actions:
If you prepared the dud.img (or .iso) file on a physical thumb drive, insert the thumb drive to the target
•
server and then press Enter.
If you mapped the dud.img (or .iso) file as a virtual disk, choose the location of the virtual disk.
•
Yes appears under the F6 Driver heading.
Press Enter to choose Installation.
Press OK.
The following message is displayed: LSI Soft RAID Driver Updates added.
At the menu, choose the driver update medium and press the Back button.
Follow the SLES installation wizard to complete the installation.
Reboot the target server.
Cisco UCS B200 M5 Blade Server Installation and Service Note
24
Page 35

Servicing a Blade Server
Removing the Mini-Storage Module
This task describes how to remove the mini-storage module.
Procedure
Removing the Mini-Storage Module
Step 1
Step 2
Pull out on the holder clips to disengage the module.
Pull up on the storage module to remove it.
Figure 7: Removing the Mini-Storage Module
Installing the Mini-Storage Module
This task describes how to install the mini-storage module.
Cisco UCS B200 M5 Blade Server Installation and Service Note
25
Page 36

Removing the SATA 3.0 M.2 Cards
Procedure
Servicing a Blade Server
Step 1
Step 2
Align the two holes on the module with the holder pins.
Push the module into the holder on both ends, making sure the holder clips snap in. Push on the four corners
of the module to fully install it. Avoid touching board components.
Figure 8: Installing the Mini-Storage Module
Note
Note the orientation of the SD cards. They should be inserted with the label facing
up.
Removing the SATA 3.0 M.2 Cards
This task describes how to remove the SATA 3.0 M.2 cards from the M.2 mini-storage module.
Cisco UCS B200 M5 Blade Server Installation and Service Note
26
Page 37

Servicing a Blade Server
Installing the SATA 3.0 M.2 Cards
Procedure
Step 1
Using a #1 Phillips-head screwdriver, loosen the screw securing the M.2 card to the top of the M.2 mini-storage
module.
Step 2
Step 3
Pull the M.2 card from the module connector.
Repeat these steps to remove the M.2 card from the bottom of the M.2 mini-storage module.
Installing the SATA 3.0 M.2 Cards
This task describes how to install the SATA 3.0 M.2 cards into the M.2 mini-storage module.
Procedure
Step 1
Step 2
Step 3
Align the gold fingers on the M.2 card with the module connector on the top of the M.2 mini-storage module,
and then fully push the M.2 card into the module connector.
Using a #1 Phillips-head screwdriver, tighten the provided screw to secure the M.2 card to the M.2 mini-storage
module.
Repeat these steps to install the M.2 card on the bottom of the M.2 mini-storage module.
Figure 9: Installing the SATA 3.0 M.2 Cards
Cisco UCS B200 M5 Blade Server Installation and Service Note
27
Page 38

Removing and Installing CPUs and Heatsinks
Removing and Installing CPUs and Heatsinks
CPU Configuration Rules
This server has two CPU sockets on the motherboard. Each CPU supports six DIMM channels (12 DIMM
slots). See DIMMs and Channels, on page 37.
The server can operate with one CPU or two identical CPUs installed.
•
The minimum configuration is at least CPU 1 installed. Install CPU 1 first, and then CPU 2.
•
The following restrictions apply when using a single-CPU configuration:
The maximum number of DIMMs is 12 (only CPU 1 channels A, B, C, D, E, F).
◦
The rear mezzanine slot is unavailable.
◦
The maximum combined memory allowed in the 12 DIMM slots is 768 GB. To populate the 12 DIMM
•
slots with more than 768 GB of combined memory, you need to use a CPU with a SKU that ends with
an "M", for example, UCS-CPU-6134M.
Servicing a Blade Server
Tools Required for CPU Replacement
You need the following tools and equipment for this procedure:
• T-30 Torx driver—Supplied with replacement CPU.
• #1 flat-head screwdriver—Supplied with replacement CPU.
• CPU assembly tool—Supplied with replacement CPU. Can be ordered separately as Cisco PID
UCS-CPUAT=.
• Heatsink cleaning kit—Supplied with replacement CPU. Can be ordered separately as Cisco PID
UCSX-HSCK=.
• Thermal interface material (TIM)—Syringe supplied with replacement CPU. Use only if you are reusing
your existing heatsink (new heatsinks have pre-applied TIM). Can be ordered separately as Cisco PID
UCS-CPU-TIM=.
Replacing a CPU and Heatsink
Caution
CPUs and their sockets are fragile and must be handled with extreme care to avoid damaging pins. The
CPUs must be installed with heatsinks and thermal interface material to ensure cooling. Failure to install
a CPU correctly might result in damage to the server.
Cisco UCS B200 M5 Blade Server Installation and Service Note
28
Page 39

Servicing a Blade Server
Replacing a CPU and Heatsink
Procedure
Step 1
Remove the existing CPU/heatsink assembly from the server.
a) Shut down and remove power from the server.
b) Slide the server out the front of the chassis.
c) Remove the top cover from the server as described in Removing a Blade Server Cover, on page 13.
d) Use the T-30 Torx driver that is supplied with the replacement CPU to loosen the four captive nuts that
secure the heatsink with the attached CPU assembly to the motherboard standoffs.
Note
Alternate loosening the heatsink nuts evenly so that the heatsink remains level as it is raised.
Loosen the heatsink nuts in the order shown on the heatsink label: 4, 3, 2, 1.
e) Lift straight up on the CPU/heatsink assembly and set it heatsink-down on an antistatic surface.
Note
Make sure to hold the heatsink along the fin edges and not the fin walls to prevent damaging the
heatsink.
Figure 10: Removing the CPU/Heatsink Assembly
Cisco UCS B200 M5 Blade Server Installation and Service Note
29
Page 40

Replacing a CPU and Heatsink
Servicing a Blade Server
Heatsink captive nuts (two on each side)2Heatsink1
CPU socket on motherboard4CPU carrier (below heatsink in this view)3
-T-30 Torx driver5
Step 2
Separate the heatsink from the CPU assembly (the CPU assembly includes the CPU and the CPU carrier):
a) Place the heatsink with CPU assembly so that it is oriented upside-down as shown in the following figure.
Note the thermal-interface material (TIM) breaker location. TIM BREAKER is stamped on the CPU carrier
next to a small slot.
Figure 11: Separating the CPU Assembly From the Heatsink
CPU2CPU carrier1
CPU-carrier inner-latch nearest to the TIM
4TIM BREAKER slot in CPU carrier3
breaker slot
CPU carrier inner-latch at corner opposite of
5
breaker slot
Cisco UCS B200 M5 Blade Server Installation and Service Note
30
6#1 flat-head screwdriver inserted into TIM
TIM breaker slot
Page 41

Servicing a Blade Server
Step 3
Replacing a CPU and Heatsink
-CPU carrier outer latches7
b) Pinch inward on the CPU-carrier inner-latch that is nearest the TIM breaker slot and then push up to
disengage the clip from its slot in the heatsink corner.
c) Insert the blade of a #1 flat-head screwdriver into the slot marked TIM BREAKER.
d) Gently rotate the screwdriver to lift the CPU heat spreader until the TIM on the heatsink separates from
the CPU.
Note
Use caution to avoid damaging the heatsink surface. Do not allow the screwdriver tip to touch or
damage the green CPU substrate.
e) Pinch the CPU-carrier inner-latch at the corner opposite the TIM breaker and push up to disengage the
clip from its slot in the heatsink corner.
f) On the remaining two corners of the CPU carrier, gently pry outward on the outer-latches and then lift the
CPU-assembly from the heatsink.
Note
Handle the CPU-assembly by the plastic carrier only. Do not touch the CPU surface. Do not
separate the CPU from the carrier.
The new CPU assembly is shipped on a CPU assembly tool. Take the new CPU assembly and CPU assembly
tool out of the carton.
If the CPU assembly and CPU assembly tool become separated, note the alignment features shown in the
following figure for the correct orientation. The pin 1 triangle on the CPU carrier must be aligned with the
angled corner on the CPU assembly tool.
Cisco UCS B200 M5 Blade Server Installation and Service Note
31
Page 42

Replacing a CPU and Heatsink
Servicing a Blade Server
Caution
CPUs and their sockets are fragile and must be handled with extreme care to avoid damaging
pins.
Figure 12: CPU Assembly Tool, CPU Assembly, and Heatsink Alignment Features
CPU assembly (CPU in plastic carrier)2CPU assembly tool1
Angled corner on heatsink (pin 1 alignment
4Heatsink3
feature)
Angled corner on CPU assembly tool (pin 1
5
feature)
Step 4
Cisco UCS B200 M5 Blade Server Installation and Service Note
32
Apply new TIM.
6Triangle cut into carrier (pin 1 alignment
alignment feature)
Page 43

Servicing a Blade Server
Replacing a CPU and Heatsink
Note
The heatsink must have new TIM on the heatsink-to-CPU surface to ensure proper cooling and
performance.
If you are installing a new heatsink, it is shipped with a pre-applied pad of TIM. Go to step 5.
•
If you are reusing a heatsink, you must remove the old TIM from the heatsink and then apply new TIM
•
to the CPU surface from the supplied syringe. Continue with step a below.
a) Apply the Bottle #1 cleaning solution that is included with the heatsink cleaning kit (UCSX-HSCK=), as
well as the spare CPU package, to the old TIM on the heatsink and let it soak for a least 15 seconds.
b) Wipe all of the TIM off the heatsink using the soft cloth that is included with the heatsink cleaning kit.
Be careful to avoid scratching the heatsink surface.
c) Completely clean the bottom surface of the heatsink using Bottle #2 to prepare the heatsink for installation.
d) Using the syringe of TIM provided with the new CPU (UCS-CPU-TIM=), apply 4 cubic centimeters of
thermal interface material to the top of the CPU. Use the pattern shown in the following figure to ensure
even coverage.
Figure 13: Thermal Interface Material Application Pattern
Step 5
Step 6
Caution
Use only the correct heatsink for your CPU. CPU 1 uses heatsink UCSB-HS-M5-F and CPU
2 uses heatsink UCSB-HS-M5-R.
With the CPU assembly on the CPU assembly tool, set the heatsink onto the CPU assembly.
a) Place the heatsink onto the CPU by aligning the Pin 1 corner of the heatsink with the Pin 1 tab of the CPU
carrier for the correct orientation.
b) Push down gently until you hear the corner latches of the CPU carrier click onto the heatsink corners.
c) Inspect all four latches to verify they are fully engaged.
Caution
In the following step, use extreme care to avoid touching or damaging the CPU contacts or the
CPU socket pins.
Install the CPU/heatsink assembly to the server.
a) Lift the heatsink with attached CPU assembly from the CPU assembly tool.
Note
Make sure to hold the heatsink along the fin edges and not the fin walls to prevent damaging the
heatsink.
b) Align the CPU with heatsink over the CPU socket on the motherboard, as shown in the following figure.
Cisco UCS B200 M5 Blade Server Installation and Service Note
33
Page 44

Replacing a CPU and Heatsink
Note the alignment features. The pin 1 angled corner on the heatsink must align with the pin 1 angled
corner on the CPU socket. The CPU socket alignment pins must properly align with the slots on the CPU
carrier and heatsink. Take note of the two different sizes of the alignment pins.
Figure 14: Installing the Heatsink/CPU Assembly to the CPU Socket
Servicing a Blade Server
CPU socket alignment post (two)2Guide hole in assembly (two)1
Angled corner on heatsink (pin 1 alignment
4CPU socket leaf spring3
feature)
5
CPU socket leaf spring threaded standoffs6Angled corner on socket (pin 1 alignment
feature)
-CPU socket alignment threaded standoffs7
Cisco UCS B200 M5 Blade Server Installation and Service Note
34
Page 45

Servicing a Blade Server
Additional CPU-Related Parts to Order with CPU RMA
c) Set the heatsink with CPU assembly down onto the CPU socket.
d) Use the T-30 Torx driver that is supplied with the replacement CPU to tighten the four captive nuts that
secure the heatsink to the motherboard standoffs.
Caution
e) Replace the top cover to the server.
f) Replace the server in the chassis.
g) Wait for Cisco UCS Manager to complete its discovery of the server before powering it on.
Alternate tightening the heatsink nuts evenly so that the heatsink remains level while it is
installed. Tighten the heatsink nuts in the order shown on the heatsink label: 1, 2, 3, 4. The
captive nuts must be fully tightened so that the leaf springs on the CPU socket lie flat.
Additional CPU-Related Parts to Order with CPU RMA
When a return material authorization (RMA) of the CPU occurs for a Cisco UCS B-Series server, additional
parts might not be included with the CPU spare bill of materials (BOM). The TAC engineer might need to
add the additional parts to the RMA to help ensure a successful replacement.
• Scenario 1—You are reusing the existing heatsinks:
Heat sink cleaning kit (UCSX-HSCK=)
◦
Thermal interface material (TIM) kit for M5 servers (UCS-CPU-TIM=)
◦
• Scenario 2—You are replacing the existing heatsinks:
Heatsink for CPU 1: UCSC-HS-M5-F=
◦
Heatsink for CPU 2: UCSC-HS-M5-R=
◦
Heatsink cleaning kit (UCSX-HSCK=)
◦
• Scenario 3—You have a damaged CPU carrier:
CPU Carrier: UCS-M5-CPU-CAR=
◦
A CPU heatsink cleaning kit is good for up to four CPU and heatsink cleanings. The cleaning kit contains
two bottles of solution, one to clean the CPU and heatsink of old TIM and the other to prepare the surface of
the heatsink.
New heatsink spares come with a pre-applied pad of TIM. It is important to clean any old TIM off of the CPU
surface prior to installing the heatsinks. Therefore, even when you are ordering new heatsinks, you must order
the heatsink cleaning kit.
Supported DIMMs
The DIMMs that this blade server supports are updated frequently. A list of supported and available DIMMs
is in Cisco UCS B200 M5 Specification Sheet.
Do not use any DIMMs other than those listed in the specification sheet. Doing so may irreparably damage
the server and result in down time.
Cisco UCS B200 M5 Blade Server Installation and Service Note
35
Page 46

Installing a DIMM or DIMM Blank
Installing a DIMM or DIMM Blank
To install a DIMM or a DIMM blank (UCS-DIMM-BLK=) into a slot on the blade server, follow these steps.
Procedure
Servicing a Blade Server
Step 1
Step 2
Step 3
Step 4
Open both DIMM connector latches.
Press evenly on both ends of the DIMM until it clicks into place in its slot.
Note
Press the DIMM connector latches inward slightly to seat them fully.
Populate all slots with a DIMM or DIMM blank. A slot cannot be empty.
Figure 15: Installing Memory
Ensure that the notch in the DIMM aligns with the slot. If the notch is misaligned, it is possible to
damage the DIMM, the slot, or both.
Cisco UCS B200 M5 Blade Server Installation and Service Note
36
Page 47

Servicing a Blade Server
DIMMs and Channels
The blade server contains 24 DIMM slots—12 per CPU. The maximum combined memory allowed in the 12
DIMM slots is 768 GB. To populate the 12 DIMM slots with more than 768 GB of combined memory, you
need to use a CPU with a SKU that ends with an "M", for example, UCS-CPU-6134M.
Each set of 12 DIMMs is arranged into six channels, where each channel has two DIMMs. Each DIMM slot
is numbered 1 or 2, and each DIMM slot 1 is blue and each DIMM slot 2 is black. Each channel is identified
by a letter:
Channels A, B, C, D, E, and F are for CPU 1.
•
Channels G, H, J, K, L, and M are for CPU 2.
•
The following figure shows how DIMMs and channels are physically laid out and numbered. The DIMM
slots for CPU 1, which is at the front of the server, are above and below the CPU and heatsink. The DIMM
slots for CPU 2, which is at the rear of the server, are above and below the CPU and heatsink.
DIMMs should be evenly distributed based on the number of CPUs installed. Do not mix DIMM types
(LRDIMM, RDIMM, TSV-RDIMMs).
DIMMs and Channels
Only Cisco memory is supported. Third-party DIMMs are not tested or supported.Caution
Figure 16: Physical Location of DIMM Slots
Cisco UCS B200 M5 Blade Server Installation and Service Note
37
Page 48

Memory Performance
Servicing a Blade Server
DIMM slots for CPU 22DIMM slots for CPU 11
A DIMM channel has either one or two DIMMs. For those channels with one DIMM, a DIMM blank must
be installed. A slot cannot be empty. For installation instructions, see Installing a DIMM or DIMM Blank,
on page 36.
The following table provides the DIMM population order:
Table 2: Supported DIMM Population Order
CPU 2 installed slotsCPU 1 installed slotsNumber of DIMMs per CPU
G1A11 (Blue slots)
G1, H1A1, B12 (Blue slots)
G1, H1, J1A1, B1, C13 (Blue slots)
G1, H1, K1, L1A1, B1, D1, E14 (Blue slots)
10 (Blue and black slots)
11 (Blue and black slots)
12 (Blue and black slots)
Memory Performance
A1, B1, C1, D1, E1, F1, A2, B2, D2,
E2
A1, B1, C1, D1, E1, F1, A2, B2, C2,
D2, E2
A1, B1, C1, D1, E1, F1, A2, B2, C2,
D2, E2, F2
G1, H1, J1, K1, L1A1, B1, C1, D1, E15 (Blue slots)
G1, H1, J1, K1, L1, M1A1, B1, C1, D1, E1, F16 (Blue slots)
G1, H1, J1, K1, L1, M1, G2A1, B1, C1, D1, E1, F1, A27 (Blue and black slots)
G1, H1, K1, L1, G2, H2, K2, L2A1, B1, D1, E1, A2, B2, D2, E28 (Blue and black slots)
G1, H1, J1, K1, L1, G2, H2, K2, L2A1, B1, C1, D1, E1, A2, B2, D2, E29 (Blue and black slots)
G1, H1, J1, K1, L1, M1, G2, H2, K2,
L2
G1, H1, J1, K1, L1, M1, G2, H2, J2,
K2, L2
G1, H1, J1, K1, L1, M1, G2, H2, J2,
K2, L2, M2
When considering the memory configuration of the blade server, there are several things to consider. For
example:
When mixing DIMMs of different densities (capacities), the highest density DIMM goes in slot 1 then
•
in descending density.
Besides DIMM population and choice, the selected CPU(s) can have some effect on performance.
•
Cisco UCS B200 M5 Blade Server Installation and Service Note
38
Page 49

Servicing a Blade Server
Memory Mirroring and RAS
Memory Mirroring and RAS
The Intel CPUs within the blade server support memory mirroring only when an even number of channels
are populated with DIMMs. Furthermore, if memory mirroring is used, DRAM size is reduced by 50 percent
for reasons of reliability.
Installing a Virtual Interface Card in the mLOM Slot
The Cisco Virtual Interface Card (VIC) 1340 is a specialized card that provides dual 2 x 10 Gb of Ethernet
or Fiber Channel over Ethernet (FCoE) connectivity to each blade server. It plugs into the dedicated VIC
connector that supports the modular LAN on motherboard (mLOM) slot. It is the only card that can be plugged
into the mLOM slot connector. It provides connectivity through Cisco UCS 6200 and 6300 Series Fabric
Interconnects. The Cisco VIC 1300 Series (1340 and 1380) is compatible with the UCS 6200 Series Fabric
Interconnects and UCS 6300 Series Fabric Interconnects.
Step 1
Step 2
Step 3
You must remove the rear mezzanine module to service it.Note
To install Cisco VIC 1340 in the blade server, follow these steps.
Procedure
Position the VIC connector above the motherboard connector and align the captive screw to the standoff post
on the motherboard.
Firmly press the VIC connector into the motherboard connector where “PRESS HERE TO INSTALL” is
stated.
Tighten the captive screw.
Cisco UCS B200 M5 Blade Server Installation and Service Note
39
Page 50

Installing a Rear Mezzanine Module in Addition to the mLOM VIC
To remove a VIC, reverse the above procedure. You might find it helpful when removing the connector
Tip
from the motherboard to gently rock the board along the length of the connector until it loosens.
Figure 17: Installing a VIC in the mLOM Slot
Servicing a Blade Server
Installing a Rear Mezzanine Module in Addition to the mLOM
VIC
All supported rear mezzanine modules have a common installation process. A list of currently supported and
available rear mezzanine modules for this server is in the Cisco UCS B200 M5 Blade Server Data Sheet on
the Cisco UCS B-Series Blade Servers Data Sheets page.
The UCS B200 M5 blade server has two rear mezzanine slots that support the VIC 1340 and VIC 1380 cards.
The VIC 1340 installs in the mLOM slot. The VIC 1380 installs in the rear mezzanine slot, which can also
be used for the VIC port expander, the NVIDIA P6 GPU, and non-I/O mezzanine cards.
The VIC 1340 and VIC 1380 require a Cisco UCS 6200 Series Fabric Interconnect or Cisco UCS 6300 Series
Fabric Interconnect, and they support the Cisco Nexus 2208XP, 2204XP, 2348UPQ FEX modules.
If you are switching from one type of rear mezzanine module to another, before you physically perform the
switch, download the latest device drivers and load them into the server’s operating system. For more
information, see the firmware management chapter of one of the Cisco UCS Manager software configuration
guides.
Cisco UCS B200 M5 Blade Server Installation and Service Note
40
Page 51

Servicing a Blade Server
Installing a Rear Mezzanine Module in Addition to the mLOM VIC
Procedure
Step 1
Step 2
Step 3
Position the rear mezzanine module above the motherboard connector (callout 1) and align the two rear
mezzanine module captive screws to the standoff posts on the motherboard.
Firmly press the rear mezzanine module into the motherboard connector (callout 2) where “PRESS HERE
TO INSTALL” is stated.
Tighten the two rear mezzanine module captive screws (callout 3).
Removing a rear mezzanine module is the reverse of installing it. You might find it helpful when
Tip
removing the rear mezzanine module from the motherboard to gently rock the rear mezzanine module
along the length of the motherboard connector until it loosens.
Figure 18: Installing a Rear Mezzanine Module
Cisco UCS B200 M5 Blade Server Installation and Service Note
41
Page 52

NVIDIA P6 Graphics Processing Unit
NVIDIA P6 Graphics Processing Unit
The NVIDIA P6 graphics processing unit (GPU) card provides graphics and computing capabilities to the
server. There are two supported versions of the NVIDIA P6 GPU card:
UCSB-GPU-P6-F can be installed only in the front mezzanine slot of the server. For installation
•
instructions, see Installing an NVIDIA GPU Card in the Front of the Server, on page 43.
UCSB-GPU-P6-R can be installed only in the rear mezzanine slot (slot 2) of the server. For installation
•
instructions, see Installing an NVIDIA GPU Card in the Rear of the Server, on page 46.
The following figure shows the installed NVIDIA P6 GPU in the front and rear mezzanine slots.
Figure 19: NVIDIA GPU Installed in the Front and Rear Mezzanine Slots
Servicing a Blade Server
Rear GPU2Front GPU1
-Custom standoff screw3
Cisco UCS B200 M5 Blade Server Installation and Service Note
42
Page 53

Servicing a Blade Server
Installing an NVIDIA GPU Card in the Front of the Server
Installing an NVIDIA GPU Card in the Front of the Server
The following figure shows the front NVIDIA P6 GPU (UCSB-GPU-P6-F).
Figure 20: NVIDIA P6 GPU That Installs in the Front of the Server
Cisco UCS B200 M5 Blade Server Installation and Service Note
43
Page 54

Installing an NVIDIA GPU Card in the Front of the Server
Servicing a Blade Server
1
2Leg with thumb screw that attaches to the
server motherboard at the front
Figure 21: Top Down View of the NVIDIA P6 GPU for the Front of the Server
Handle to press down on when installing
the GPU
1
2Leg with thumb screw that attaches to the
server motherboard
Thumb screw that attaches to a standoff
below
To install the NVIDIA GPU, follow these steps:
Before You Begin
Before installing the NVIDIA P6 GPU (UCSB-GPU-P6-F) in the front mezzanine slot:
Upgrade the Cisco UCS domain that the GPU will be installed into to a version of Cisco UCS Manager
•
that supports this card. Refer to the latest version of the Release Notes for Cisco UCS Software at the
following URL for information about supported hardware: http://www.cisco.com/c/en/us/support/
servers-unified-computing/ucs-manager/products-release-notes-list.html.
Remove the front mezzanine storage module if it is present. You cannot use the storage module in the
•
front mezzanine slot when the NVIDIA P6 GPU is installed in the front of the server.
Cisco UCS B200 M5 Blade Server Installation and Service Note
44
Page 55

Servicing a Blade Server
Installing an NVIDIA GPU Card in the Front of the Server
Procedure
Step 1
Step 2
Step 3
Step 4
Step 5
Position the GPU in the correct orientation to the front of the server (callout 1) as shown in the following
figure.
Install the GPU into the server. Press down on the handles (callout 5) to firmly secure the GPU.
Tighten the thumb screws (callout 3) at the back of the GPU with the standoffs (callout 4) on the motherboard.
Tighten the thumb screws on the legs (callout 2) to the motherboard.
Install the drive blanking panels.
Figure 22: Installing the NVIDIA GPU in the Front of the Server
2Front of the server1
Leg with thumb screw that attaches to the
motherboard
Standoff on the motherboard4Thumbscrew to attach to standoff below3
5
Handle to press down on to firmly install
–
the GPU
Cisco UCS B200 M5 Blade Server Installation and Service Note
45
Page 56

Installing an NVIDIA GPU Card in the Rear of the Server
Installing an NVIDIA GPU Card in the Rear of the Server
If you are installing the UCSB-GPU-P6-R to a server in the field, the option kit comes with the GPU itself
(CPU and heatsink), a T-shaped installation wrench, and a custom standoff to support and attach the GPU to
the motherboard. The following figure shows the three components of the option kit.
Figure 23: NVIDIA P6 GPU (UCSB-GPU-P6-R) Option Kit
Servicing a Blade Server
T-shaped wrench2NVIDIA P6 GPU (CPU and heatsink)1
-Custom standoff3
Cisco UCS B200 M5 Blade Server Installation and Service Note
46
Page 57

Servicing a Blade Server
Installing an NVIDIA GPU Card in the Rear of the Server
Before You Begin
Before installing the NVIDIA P6 GPU (UCSB-GPU-P6-R) in the rear mezzanine slot:
Upgrade the Cisco UCS domain that the GPU will be installed into to a version of Cisco UCS Manager
•
that supports this card. Refer to the latest version of the Release Notes for Cisco UCS Software at the
following URL for information about supported hardware: http://www.cisco.com/c/en/us/support/
servers-unified-computing/ucs-manager/products-release-notes-list.html.
Remove any other card, such as a VIC 1480, VIC 1380, or VIC port expander card from the rear
•
mezzanine slot. You cannot use any other card in the rear mezzanine slot when the NVIDIA P6 GPU
is installed.
Cisco UCS B200 M5 Blade Server Installation and Service Note
47
Page 58

Installing an NVIDIA GPU Card in the Rear of the Server
Procedure
Servicing a Blade Server
Step 1
Step 2
Step 3
Step 4
Use the T-shaped wrench that comes with the GPU to remove the existing standoff at the back end of the
motherboard.
Install the custom standoff in the same location at the back end of the motherboard.
Position the CPU over the connector on the motherboard and align all the captive screws to the standoff posts
(callout 1).
Tighten the captive screws (callout 2).
Figure 24: Installing the NVIDIA P6 GPU in the Rear Mezzanine Slot
Cisco UCS B200 M5 Blade Server Installation and Service Note
48
Page 59

Servicing a Blade Server
Enabling the Trusted Platform Module
The Trusted Platform Module (TPM) is a component that can securely store artifacts used to authenticate the
server. These artifacts can include passwords, certificates, or encryption keys. A TPM can also be used to
store platform measurements that help ensure that the platform remains trustworthy. Authentication (ensuring
that the platform can prove that it is what it claims to be) and attestation (a process helping to prove that a
platform is trustworthy and has not been breached) are necessary steps to ensure safer computing in all
environments. It is a requirement for the Intel Trusted Execution Technology (TXT) security feature, which
must be enabled in the BIOS settings for a server equipped with a TPM.
Procedure
Enabling the Trusted Platform Module
Step 1
Install the TPM hardware.
a) Power off, decommission, and remove the blade server from the chassis.
b) Remove the top cover from the server as described in Removing a Blade Server Cover, on page 13.
c) Install the TPM to the TPM socket on the server motherboard and secure it using the one-way screw that
is provided. See the figure below for the location of the TPM socket.
d) Return the blade server to the chassis, power it on, and allow it to be automatically reacknowledged,
reassociated, and recommissioned.
e) Continue with enabling TPM support in the server BIOS in the next step.
Figure 25: TPM Socket Location
Step 2
TPM socket on motherboard2Front of server1
Enable TPM Support in the BIOS.
a) In the Cisco UCS Manager Navigation pane, click the Servers tab.
b) On the Servers tab, expand Servers > Policies.
Cisco UCS B200 M5 Blade Server Installation and Service Note
49
Page 60

Enabling the Trusted Platform Module
c) Expand the node for the organization where you want to configure the TPM.
d) Expand BIOS Policies and select the BIOS policy for which you want to configure the TPM.
e) In the Work pane, click the Advanced tab.
f) Click the Trusted Platform sub-tab.
g) To enable TPM support, click Enable or Platform Default.
h) Click Save Changes.
i) Continue with the next step.
Servicing a Blade Server
Step 3
Enable TXT Support in the BIOS Policy.
Follow the procedures in the Cisco UCS Manager Configuration Guide for the release that is running on the
server.
Cisco UCS B200 M5 Blade Server Installation and Service Note
50
Page 61

CHAPTER 4
Technical Specifications
This chapter contains the following sections:
Physical Specifications for the Cisco UCS B200 M5 Blade Server, page 51
•
Physical Specifications for the Cisco UCS B200 M5 Blade Server
ValueSpecification
1.95 inches (50 mm)Height
8.00 inches (203 mm)Width
24.4 inches (620 mm)Depth
Weight
Base server weight = 9.51 lbs (4.31 kg) (no HDDs, no CPUs, no DIMMs, no
mezzanine adapters or memory)
Minimally configured server = 11.29 lbs (5.12 kg) (no HDDs, 1 CPU, 8 DIMMs,
VIC 1340 but no additional mezzanine adapter)
Fully configured server = 16 lbs (7.25 kg) (2 HDDs, 2 CPUs, 24 DIMMs, VIC
1340 and additional mezzanine adapter both populated)
Cisco UCS B200 M5 Blade Server Installation and Service Note
51
Page 62

Physical Specifications for the Cisco UCS B200 M5 Blade Server
Technical Specifications
Cisco UCS B200 M5 Blade Server Installation and Service Note
52
Page 63

APPENDIX A
NVIDIA Licensing Information
This chapter contains the following sections:
NVIDIA GRID License Server Overview, page 53
•
Registering Your Product Activation Keys with NVIDIA, page 55
•
Downloading the GRID Software Suite, page 55
•
Installing NVIDIA GRID License Server Software, page 55
•
Installing GRID Licenses From the NVIDIA Licensing Portal to the License Server, page 57
•
Managing GRID Licenses, page 59
•
Installing Drivers to Support the NVIDIA GPU Cards, page 61
•
NVIDIA GRID License Server Overview
The NVIDIA Tesla P6 GPU combines Tesla and GRID functionality when you enable the licensed GRID
features GRID vGPU and GRID Virtual Workstation. You enable these features during OS boot by borrowing
a software license that is served over the network from the NVIDIA GRID License Server virtual appliance.
The license is returned to the GRID License Server when the OS shuts down.
The NVIDIA Tesla P6 GPU has dual personality. It can work in Compute (Tesla) and GRID mode. Only
GRID mode needs a license.
Cisco UCS B200 M5 Blade Server Installation and Service Note
53
Page 64

NVIDIA GRID License Server Overview
You obtain the licenses that are served by the GRID License Server from the NVIDIA Licensing Portal as
downloadable license files, which you install into the GRID License Server via its management interface. See
the following figure.
Figure 26: GRID Licensing Architecture
NVIDIA Licensing Information
There are three editions of GRID licenses that enable three different classes of GRID features. The GRID
software automatically selects the license edition based on the features that you are using. See the following
table.
Table 3: GRID Licensing Editions
GRID FeaturesGRID License Edition
Virtual GPUs for business desktop computingGRID Virtual GPU (vGPU)
Virtual GPUs for mid-range workstation computingGRID Virtual Workstation
GRID Virtual Workstation - Extended
Virtual GPUs for high-end workstation computing
Workstation graphics on GPU pass-through
Cisco UCS B200 M5 Blade Server Installation and Service Note
54
Page 65

NVIDIA Licensing Information
Registering Your Product Activation Keys with NVIDIA
Registering Your Product Activation Keys with NVIDIA
After your order is processed, NVIDIA sends you a Welcome email that contains your product activation
keys (PAKs) and a list of the types and quantities of licenses that your purchased.
Procedure
Step 1
Step 2
Step 3
Step 4
Select the Log In link, or the Register link if you do not already have an account.
The NVIDIA Software Licensing Center > License Key Registration dialog opens.
Complete the License Key Registration form and then click Submit My Registration Information.
The NVIDIA Software Licensing Center > Product Information Software Dialog opens.
If you have additional PAKs, click Register Additional Keys. For each additional key, complete the form
on the License Key Registration dialog, and then click Submit My Registration Information.
Agree to the terms and conditions and set a password when prompted.
Downloading the GRID Software Suite
Procedure
Step 1
Step 2
Step 3
Return to the NVIDIA Software Licensing Center > Product Information Software dialog box.
Click Current Releases.
Click the NVIDIA GRID link to access the Product Download dialog. This dialog includes download links
for:
The NVIDIA License Manager software
•
The gpumodeswitch utility
•
The host driver software
•
Step 4
Use the links to download the software.
Installing NVIDIA GRID License Server Software
For full instructions and troubleshooting information, see the NVIDIA GRID License Server User Guide. Also
see the NVIDIA GRID License Server Release Notes for the latest information about your release. Both
documents are available at the following URL:
http://www.nvidia.com
Cisco UCS B200 M5 Blade Server Installation and Service Note
55
Page 66

Platform Requirements for NVIDIA GRID License Server
Platform Requirements for NVIDIA GRID License Server
The hosting platform can be a physical or a virtual machine. NVIDIA recommends using a host that is
•
dedicated to running only the License Server.
The hosting platform must run a supported Windows OS.
•
The hosting platform must have a constant IP address.
•
The hosting platform must have at least one constant Ethernet MAC address.
•
The hosting platform's date and time must be set accurately.
•
Installing on Windows
Before You Begin
The License Server requires a Java Runtime Environment and an Apache Tomcat installation. Apache Tomcat
is installed when you use the NVIDIA installation wizard for Windows.
NVIDIA Licensing Information
Step 1
Step 2
Step 3
Step 4
Step 5
Step 6
Procedure
Download and install the latest Java 32-bit Runtime Environment from https://www.oracle.com/downloads/
index.html.
Note
Create a server interface.
a) In the NVIDIA Software Licensing Center dialog box, click Grid Licensing > Create License Server.
b) In the Create Server dialog box, fill in your desired server details.
c) Save the .bin file that is generated to your license server for installation.
Unzip the NVIDIA License Server installer Zip file that you downloaded previously and run setup.exe.
Accept the EULA for the NVIDIA License Server software and the Apache Tomcat software. Tomcat is
installed automatically during the License Server installation.
Use the installer wizard to step through the installation.
Note
To verify the installation, open a web browser on the License Server host and connect to the URL
http://localhost:8080/licserver. If the installation was successful, you see the NVIDIA Licenses Client Manager
interface.
Install the 32-bit Java Runtime Environment, regardless of whether your platform is Windows 32-bit
or 64-bit.
In the Choose Firewall Options dialog box, select the ports to be opened in the firewall. NVIDIA
recommends that you use the default setting, which opens port 7070 but leaves port 8080 closed.
Cisco UCS B200 M5 Blade Server Installation and Service Note
56
Page 67

NVIDIA Licensing Information
Installing on Linux
Before You Begin
The License Server requires a Java Runtime Environment and an Apache Tomcat installation. Use the following
commands to install both separately before installing the License Server on Linux.
Procedure
Installing on Linux
Step 1
Step 2
Step 3
Step 4
Verify that Java was installed with your Linux installation:
java -version
If a Java version does not display, use your Linux package manager to install Java:
sudo yum install java
Use your Linux package manager to install the Tomcat and Tomcat webapp packages.
a) Install Tomcat:
sudo yum install java
b) Enable the Tomcat service for automatic startup on boot:
sudo systemctl enable tomcat.service
c) Start the Tomcat service:
sudo systemctl start tomcat.service
d) To verify that the Tomcat service is operational, open a web browser on the License Server host and
connect to the URL http://localhost:8080. If the installation was successful, you see the Tomcat webapp.
Install the License Server.
a) Unpack the License Server tar file:
tar xfz NVIDIA-linux-2015.09-0001.tgz
b) Run the unpacked setup binary as root:
sudo./setup.bin
c) Accept the EULA and then continue with the installation wizard to finish the installation.
Note
To verify the installation, open a web browser on the License Server host and connect to the URL
http://localhost:8080/licserver. If the installation was successful, you see the NVIDIA License Client Manager
interface.
In the Choose Firewall options dialog, select the ports to be opened in the firewall. NVIDIA
recommends that you use the default setting, which opens port 7070 but leaves port 8080 closed.
Installing GRID Licenses From the NVIDIA Licensing Portal to the License Server
Accessing the GRID License Server Management Interface
Open a web browser on the License Server host and access the URL http://localhost:8080/licserver.
Cisco UCS B200 M5 Blade Server Installation and Service Note
57
Page 68

Reading Your License Server's MAC Address
If you configure the License Server host's firewall to permit remote access to the License Server, the
management interface is accessible from remote machines at the URL http://localhost:8080/licserver.
Reading Your License Server's MAC Address
Your License Server's Ethernet MAC address is used as an identifier when registering the License Server with
NVIDIA's Licensing Portal.
Procedure
NVIDIA Licensing Information
Step 1
Step 2
Step 3
Access the GRID License Server Management Interface in a browser.
In the left-side License Server panel, select Configuration.
In the License Server Configuration panel, from the Server host ID pull-down menu, select your License
Server's Ethernet MAC address.
Note
It is important to use the same Ethernet ID consistently to identify the server when generating licenses
on NVIDIA's Licensing Portal. NVIDIA recommends that you select one entry for a primary,
non-removable Ethernet interface on the platform.
Installing Licenses From the Licensing Portal
Procedure
Step 1
Step 2
Step 3
Step 4
Step 5
Access the GRID License Server Management Interface in a browser.
In the left-side License Server panel, select Configuration.
From the License Server Configuration menu, click Choose File.
Browse to the license .bin file that you generated earlier and want to install, and click Open.
Click Upload.
The license file installs on your License Server. When the installation is complete, you see the confirmation
message, "Successfully applied license file to license server."
Viewing Available Licenses
Use the following procedure to view the licenses that are installed and available and their properties.
Cisco UCS B200 M5 Blade Server Installation and Service Note
58
Page 69

NVIDIA Licensing Information
Procedure
Viewing Current License Usage
Step 1
Step 2
Step 3
Access the GRID License Server Management Interface in a browser.
In the left-side License Server panel, select Licensed Feature Usage.
Click a feature in the Feature column to see detailed information about the current usage of that feature.
Viewing Current License Usage
Use the following procedure to view information about that licenses that are currently in-use and borrowed
from the server.
Procedure
Step 1
Step 2
Step 3
Access the GRID License Server Management Interface in a browser.
In the left-side License Server panel, select Licensed Clients.
To view detailed information about a single licensed client, click its Client ID in the list.
Managing GRID Licenses
Features that require GRID licensing run at reduced capability until a GRID license is acquired.
Acquiring a GRID License on Windows
To acquire a GRID license on Windows, use the following procedure.
Procedure
Step 1
Step 2
Open the NVIDIA Control Panel using one of the following methods:
Right-click the Windows desktop and select NVIDIA Control Panel from the menu.
•
Open the Windows Control Panel and double-click the NVIDIA Control Panel icon.
•
In the NVIDIA Control Panel left pane under Licensing, select Manage License.
Cisco UCS B200 M5 Blade Server Installation and Service Note
59
Page 70

Acquiring a GRID License on Linux
The Manage License task pane opens and shows the current license edition being used. The GRID software
automatically selects the license edition based on the feature that you are using. The default is Tesla
(unlicensed).
Step 3
If you want to acquire a license for GRID Virtual Workstation, under License Edition, select GRID Virtual
Workstation.
Step 4
In the License Server field, enter the address of your local GRID License Server.
The address can be a domain name or an IP address.
NVIDIA Licensing Information
Step 5
In the Port Number field, enter your port number or leave it set to the default used by the server, which is
7070.
Step 6
Select Apply.
The system requests the appropriate license edition from your configured License Server. After a license is
successfully acquired, the features of that license edition are enabled.
After you configure licensing settings in the NVIDIA Control Panel, the settings persist across reboots.Note
Acquiring a GRID License on Linux
To acquire a GRID license on Linux, use the following procedure.
Procedure
Step 1
Step 2
Step 3
Step 4
Edit the configuration file:
sudo vi /etc/nvidia/gridd.conf
Edit the ServerUrl line with the address of your local GRID License Server.
The address can be a domain name or an IP address. See the Sample Configuration File.
Append the port number (default 7070) to the end of the address with a colon. See the Sample Configuration
File.
Edit the FeatureType line with an integer for the license type. See the Sample Configuration File.
GRID vGPU = 1
•
GRID Virtual Workstation = 2
•
Step 5
Restart the nvidia-gridd service:
sudo service nvidia-gridd restart
The service automatically acquires the license edition that you specified in the FeatureType line. You can
confirm this in /var/log/messages.
After you configure licensing settings in gridd.conf, the settings persist across reboots.Note
Sample Configuration File
# /etc/nvidia/gridd.conf - Configuration file for NVIDIA Grid Daemon
# Description: Set License Server URL
# Data type: string
# Format: "<address>:<port>"
Server URL=10.31.20.45:7070
Cisco UCS B200 M5 Blade Server Installation and Service Note
60
Page 71

NVIDIA Licensing Information
Installing Drivers to Support the NVIDIA GPU Cards
# Description: set Feature to be enabled
# Data type: integer
# Possible values:
# 1 => for GRID vGPU
# 2 => for GRID Virtual Workstation
FeatureType=1
Installing Drivers to Support the NVIDIA GPU Cards
After you install the hardware, you must update to the correct level of server BIOS, activate the BIOS firmware,
and then install NVIDIA drivers and other software in this order:
1. Updating the Server BIOS Firmware
Caution
Step 1
Step 2
Step 3
Step 4
Step 5
Step 6
Install the latest Cisco server BIOS for your blade server by using Cisco UCS Manager.
You must do this procedure before you update the NVIDIA drivers.Note
Do not remove the hardware that contains the endpoint or perform any maintenance on it until the update
process completes. If the hardware is removed or otherwise unavailable due to maintenance, the firmware
update fails. This failure might corrupt the backup partition. You cannot update the firmware on an endpoint
with a corrupted backup partition.
Procedure
In the Navigation pane, click Equipment.
On the Equipment tab, expand Equipment > Chassis > Chassis Number > Servers.
Click the Name of the server for which you want to update the BIOS firmware.
On the Properties page in the Inventory tab, click Motherboard.
In the Actions area, click Update BIOS Firmware.
In the Update Firmware dialog box, do the following:
a) From the Firmware Version drop-down list, select the firmware version to which you want to update the
endpoint.
b) Click OK.
Cisco UCS Manager copies the selected firmware package to the backup memory slot, where it remains until
you activate it.
Step 7
(Optional) Monitor the status of the update in the Update Status field.
The update process can take several minutes. Do not activate the firmware until the firmware package you
selected displays in the Backup Version field in the BIOS area of the Inventory tab.
Cisco UCS B200 M5 Blade Server Installation and Service Note
61
Page 72

2. Activating the Server BIOS Firmware
What to Do Next
Activate the server BIOS firmware.
2. Activating the Server BIOS Firmware
Procedure
NVIDIA Licensing Information
Step 1
Step 2
Step 3
Step 4
Step 5
Step 6
In the Navigation pane, click Equipment.
On the Equipment tab, expand Equipment > Chassis > Chassis Number > Servers.
Click the Name of the server for which you want to activate the BIOS firmware.
On the Properties page in the Inventory tab, click Motherboard.
In the Actions area, click Activate BIOS Firmware.
In the Activate Firmware dialog box, do the following:
a) Select the appropriate server BIOS version from the Version To Be Activated drop-down list.
b) If you want to set only the start-up version and not change the version running on the server, check Set
Startup Version Only.
If you configure Set Startup Version Only, the activated firmware moves into the pending-next-reboot
state and the server is not immediately rebooted. The activated firmware does not become the running
version of firmware until the server is rebooted.
c) Click OK.
What to Do Next
Update the NVIDIA drivers.
3. Updating the NVIDIA Drivers
After you update the server BIOS, you can install NVIDIA drivers to your hypervisor virtual machine.
Procedure
Step 1
Step 2
Step 3
Step 4
Step 5
Cisco UCS B200 M5 Blade Server Installation and Service Note
62
Install your hypervisor software on a computer. Refer to your hypervisor documentation for the installation
instructions.
Create a virtual machine in your hypervisor. Refer to your hypervisor documentation for instructions.
Install the NVIDIA drivers to the virtual machine. Download the drivers from http://www.nvidia.com/
Download/index.aspx.
Restart the server.
Check that the virtual machine is able to recognize the NVIDIA card. In Windows, use the Device Manager
and look under Display Adapters.
Page 73

NVIDIA Licensing Information
3. Updating the NVIDIA Drivers
Cisco UCS B200 M5 Blade Server Installation and Service Note
63
Page 74

3. Updating the NVIDIA Drivers
NVIDIA Licensing Information
Cisco UCS B200 M5 Blade Server Installation and Service Note
64
 Loading...