

Page 1

Cisco
Unified Communications
500 Series
IP PBX Setup Guide
Version 1.0
Last Update: 02/14/2011
Page 1
Page 2

Cisco Unified Communications 500 Series
DISCLAIMER
The attached document is provided as a basic guideline for setup and configuration of Cisco
Unified Communications 500 Series IP PBX systems with MegaPath’s SIP Trunking service,
based on MegaPath’s testing and validation process. It does not include advanced
configurations to enable features such as voicemail, Find-Me-Follow-Me, etc. MegaPath is
not responsible for customer IP PBX configurations. For more information on advanced
features, please refer to your IP PBX documentation.
OVERVIEW
Cisco Unified Communications 500 series IP PBX (www.cisco.com) is an “all-in-one”
converged IP PBX solution featuring built-in PBX functionality, voicemail, SIP gateway, IP
router, Gigabit uplinks, Power of Ethernet (PoE) ports, Firewall, VPN, and DSU/CSU. The
steps outlined in this guide reflect the process used by MegaPath to successfully configure
MegaPath’s SIP trunks on the described software/hardware versions only.
SUPPORTED HARDWARE MODELS
The following hardware models are interoperable and described with this setup guide:
Cisco UC 520
Cisco UC 540
Cisco UC 560
SUPPORTED SOFTWARE DEPLOYMENTS
The following software deployments are interoperable and described with this setup guide:
• Cisco Configuration Assistant: v3.0
• Cisco Software Pack: v8.1.0
• Cisco IOS: (UC500-ADVIPSERVICESK9-M), v15.1(2)T2
• System Bootstrap ROM: v12.4 (11r)XW3
REQUIRED INFORMATION
The following software deployments are supported with this setup guide:
Maximum Channels __________________________________________________
Host ______________________________________________________________
Username _________________________ Password ________________________
Page 2
Page 3

Model
Cisco UC 520
Cisco UC 540
Cisco UC 560
Feature
Highlights
8 to 64 IP phone
station support
Four to 8 analog
trunks or two to 4
BRI digital trunks
Optional single
T1/E1 voice interface
(PRI and CAS)
Integrated voicemail
16 hours voicemail
storage
Automated attendant
Integrated business
productivity
applications
Integrated security
Music on hold
Optional on board
wireless access
Simple system
configuration and
management
Eight to 32 phone
station support
Four to 8 analog
trunks or two to 4
BRI digital trunks
Optional single
T1/E1 voice interface
(PRI and CAS)
Integrated voicemail
32 hours voicemail
storage
Automated attendant
Integrated business
productivity
applications
Integrated security
Music on hold
On board wireless
included
Simple system
configuration and
management
16 to 104 phone
station support
Four to 12 analog
trunks or two to 6
BRI digital trunks
Optional one or two
T1/E1 voice interface
(PRI and CAS)
Integrated voicemail
32 or 64 hours
voicemail storage
Automated attendant
Integrated business
productivity
applications
Integrated security
Music on hold
Wireless support
with the Cisco AP
500 Series Wireless
Access Point
Simple system
configuration and
management
Cisco Unified Communications 500 Series
Appendix: Cisco Unified Communications 500 Series Setup
The Cisco Unified Communications 500 Series is comprised of three primary models with
numerous options and configurations available to each. Below is a high-level comparison of
the Unified Communications 520, 540 and 560.
Page 3
A.1. Cisco Configuration Assistant Setup
To use the Cisco Configuration Assistant to create and save the initial
software configuration, please follow the steps below:
1) If necessary, install Configuration Assistant on a PC to be used to manage
the configuration of the UC 500. See the Getting Started with Cisco
Configuration Assistant document at www.cisco.com/go/configassist or on
the CD-ROM that shipped with your product for more information.
Page 4
Welcome and Overview
Cisco Unified Communications 500 Series
2) Launch Configuration Assistant. See the Getting Started with Cisco
Configuration Assistant document at www.cisco.com/go/configassist or on
the CD-ROM that shipped with your product for more information.
a) Factory default username and password are cisco/cisco
3) Using an RJ-45-to-RJ-45 Ethernet cable, connect the Ethernet port of the
PC on which the Cisco Configuration Assistant is installed to a PoE port on
the front panel of the UC 500.
4) Use the Configuration Assistant to perform the following tasks. For more
information, see online help.
a) Connect to a New Community.
b) Accept the default values to create the initial configuration.
Note – If you are installing a single-site key system configuration, change
the “Voice System Type” setting from PBX to Key System Configuration.
c) Save the configuration
5) Confirm that the UC 500 appears in the Topology View.
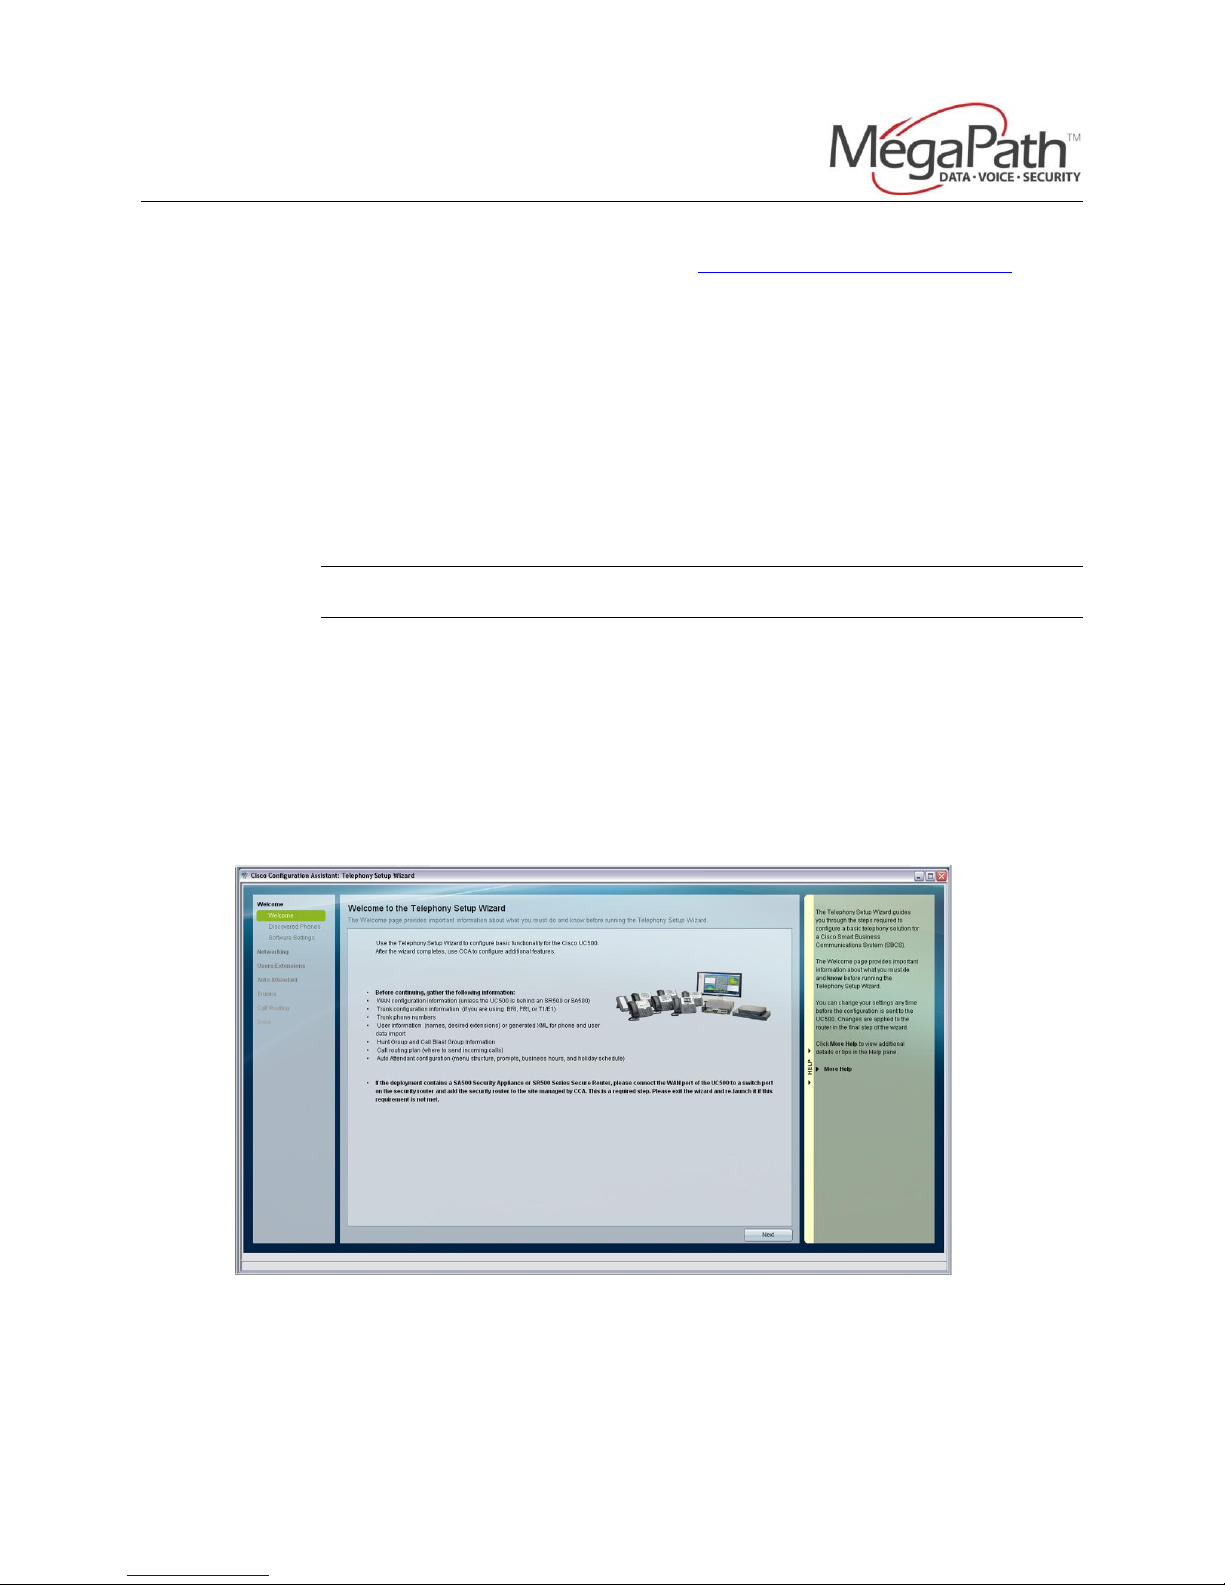
A.2. Telephony Setup Wizard
When running Cisco Configuration Assistant for the first time, the Telephony
Setup Wizard will start automatically and guide you through configuring basic
settings on the Cisco UC500
Page 4
Page 5

Page 6

Software Upgrade and License Management
Configuring System Access settings
Cisco Unified Communications 500 Series
A.2.2 Welcome - Software Settings
This screen displays licensing and software version information.
Additional user licenses can be added and the system software version
can be upgraded here.
A.2.3 Networking – System Access
Configure the UC500 system hostname and administrator access
credentials on this screen.
Page 6
Page 7

Choose Locale
Cisco Unified Communications 500 Series
Note – Login credentials configured here apply to both Cisco
Configuration Assistant and CLI access.
A.2.4 Networking – Choose Locale
Select “Custom” and choose the “North American-10-Digit” dial plan
template.
A.2.5 Networking – WAN
Configure WAN Internet settings here, making sure to specify CIDR
notation in the “IP Address” field which will automatically populate the
“Subnet Mask” field.
Page 7
Page 8

Configuring WAN settings
Configuring Local LAN settings
Cisco Unified Communications 500 Series
Note – Using a static IP address is highly recommended. No testing or
verification of behavior using a DHCP assigned IP address was
completed.
A.2.6 Networking – Local LAN
If needed, configure Local LAN settings here including voice and data
VLANs. This step is optional and these settings will function with the
default configuration.
Page 8
Page 9

Users Setup Summary
Cisco Unified Communications 500 Series
A.2.7 Users/Extensions and Auto Attendant
Options in this section are customer specific and configuration will not
be covered. Navigate through this section to configure the following:
Extension digit length
Access Code for outside dialing
Voicemail extension
Create and configure an Auto Attendant, customize prompts
and actions
Configure FXS (analog) ports
Create Users
o Assign User extensions
o Assign User phones
Create and configure Hunt Groups
Page 9
Page 10

Auto Attendant Setup Summary
Error displayed when all FXO ports have been disabled
Cisco Unified Communications 500 Series
A.2.8 Trunks – FXO Ports
Configure FXO (analog) Trunk settings here. SIP Trunk settings are not
included in the wizard and will be covered later in this document.
Note – At least one FXO port must remain active during setup or the
error displayed below will be received. This port can be disabled once
the configuration wizard is complete.
A.2.9 Done – Applying and Saving the Configuration
Now that the Telephony Setup Wizard is complete, click “Apply
Configuration” to apply the settings to the running configuration.
Page 10
Page 11

Wizard Summary – Apply Configuration
Writing settings to the running configuration
Cisco Unified Communications 500 Series
Writing the configuration can take some time, please allow it to
complete and do not close Cisco Configuration Assistant while in
process.
Telephony Setup Wizard is now complete. Click “Save Config and Exit
Wizard” to save the running configuration to the startup configuration,
and exit the wizard.
Page 11
Page 12

Completed Telephony Setup Wizard
Cisco Unified Communications 500 Series
A.3. Additional Voice Configuration
To finish configuration for SIP Trunking on the UC 500 Series IP-PBX,
additional settings must be entered outside of the Telephony Setup Wizard
and SIP Trunk sections. Please complete these steps prior to configuring
the SIP Trunk.
A.3.1 DNS Server and Domain Hostname
1. Navigate to Configure Routing IP Addresses
2. Select the “Device Configuration” tab
a. Domain Name: speakeasy.net
b. Enable Domain Lookup: Checked
c. Current Servers: These should have been configured during
Telephony Setup Wizard and the primary and secondary DNS
server addresses should appear here. If not, enter DNS server
IP information under New Server Enter a valid IP Address
then click “Add”.
3. Click “OK” to save the settings
Page 12
Page 13

Adding DNS and Domain Hostname
Cisco Unified Communications 500 Series
A.3.2 QoS/Traffic Shaping
The Cisco Unified Communications 500 Series IP-PBX supports DSCP
and will mark packets for prioritization if Traffic Shaping is configured
and active. Once enabled, signaling (SIP) is marked with DSCP CS4
and media (RTP) is marked with DSCP CS5.
DSCP QoS is honored through MegaPath’s network. If Internet
connectivity is provided by an off-net third party then Quality of
Service cannot be guaranteed. Other providers may or may not honor
DSCP packet marking and standard best practice is to strip the ToS
byte at the provider’s network edge.
Note – Traffic Shaping MUST be configured and active in order to
activate DSCP marking and utilize QoS prioritization across MegaPath’s
network.
To configure the Cisco UC 500 Series for DSCP marking, please follow
the steps outlined below:
1. Navigate to Configure Routing Internet Connection
2. Under “WAN Interfaces”, FastEthernet0/0 should be listed, select
this interface and click “Modify”
3. The “Modify Internet Connections” window should display, click the
“Traffic Shaping” tab
a. Traffic Shaping: Checked
b. Upstream Bandwidth [kbps]: Approximately 92% of actual
Page 13
upstream bandwidth as defined by speed tests. For example, a
Page 14

Select and Modify WAN Interface
Setting and Activating Traffic Shaping/QoS
Cisco Unified Communications 500 Series
T1 circuit at 1536k would be set at 1428k to account for IP
overhead.
c. Media Reservation: Testing was completed with the default
setting of 50% WAN bandwidth reservation however this may
be adjusted as needed to meet customer requirements.
4. Click “OK” in the “Modify Internet Connection” window, then once
more in the “Internet Connection” window to save the new
settings.
Page 14
Page 15

Cisco Unified Communications 500 Series
A.4. SIP Trunk Configuration
The Cisco Unified Communications 500 Series IP-PBX can be configured for
different types LAN/WAN topologies and different methods of communicating
with the SIP server. Testing was focused on the following:
1. Direct Internet connection on public IP (UC500 Router Internet)
a. Using SRV record resolution for SIP Server address
b. Using A record resolution for SIP Server address
2. SIP Proxy connection using NAT (UC500 Edgemarc 4552 as SIP Proxy
Router Internet)
Configuration and behavior varies between the different methods/topologies
and is outlined when necessary in this guide.
A.4.1 Configure SIP Trunk
1. Navigate to Configure Telephony Ports and Trunks SIP
Trunk
2. Select the “Generic SIP Trunk Provider” template from the “Service
Provider” dropdown menu which configures the following default
settings:
a. Voice Codec: G.711-ulaw only. Secondary codecs are not
included in this template and must be configured using the CLI.
b. Fax Codec: G.711
c. DTMF (dual-tone multi-frequency) payload: 101
d. SIP Registration: Registers main number only. Additional DID
registration is not included in this template and must be
configured using the CLI.
e. SIP Registration Expiry Timer: Set at 3600 seconds. The
Edgemarc 4552 SIP Proxy and MegaPath SBCs reply with a
reset expiry timer of 60 seconds in the 200 OK response to a
successful registration so the UC500 will re-register every 60
seconds regardless of the configured timer value.
3. Configure as outlined below based on the solution in use at the
customer site.
Page 15
Page 16

SIP Trunk Service Provider Selection
Generic SIP Trunk Provider Configuration
Cisco Unified Communications 500 Series
A.4.1.1.1 Direct Internet Connection – SRV Resolution
Page 16
Using SRV records as the SIP server/registrar allows for
redundancy in the case that the primary server is not reachable.
This is the recommended configuration, however if A record
resolution is preferred or required please refer to the next section
titled “Direct Internet Connection – A Record Resolution” for
configuration instructions.
Page 17

Cisco Unified Communications 500 Series
The UC 500 Series is configured by default to attempt and resolve
the SIP server address as both A and SRV records, input the SRV
address as follows:
1. Proxy Server (primary): <st>1-siptrunk-
srv.voice.speakeasy.net (replace <st> with the state
abbreviation of the customer site, for example Washington
state would be wa1-siptrunk-srv.voice.speakeasy.net)
2. (secondary): Leave blank
3. Registrar Server: <st>1-siptrunk-srv.voice.speakeasy.net
4. Outbound Proxy Server: <st>1-siptrunk-
srv.voice.speakeasy.net
5. Maximum Number of Calls: The number of SIP Trunks assigned
to the customer
6. Digest Authentication
a. Username: provisioned trunk group username
b. Password: provisioned trunk group password
7. Domain Name Service
a. SIP Domain Name: speakeasy.net (input this if blank)
b. DNS Service Address: Primary DNS server address (input
this if blank)
8. User Credentials: Leave blank, this is only used if each DID
requires a unique username and password to authenticate.
Due to the way that SRV resolves, the Cisco UC500 needs
to be explicitly configured to allow the SBC IP addresses.
The following step should only apply when using SRV. If
skipped, registrations will fail as the UC500 will not
recognize the server as authorized and therefore will not
respond.
9. Within the SIP Trunk window, click the “Advanced Options” tab.
Click “Add” and input each of the following addresses:
a. 64.81.79.177
b. 216.254.95.160
Page 17
c. 64.81.79.160
d. 216.254.95.177
Note – These IP addresses may change at any time without
prior notice!
Page 18

Allowing SBC IP Addresses
Outbound SIP Trunk and CLID/Main Number Configuration
Cisco Unified Communications 500 Series
10. Click “OK” to apply settings
11. A “User Confirmation” window will display, enter the following
information:
a. SIP Trunk Add Generic SIP Trunk Provider as a SIP Trunk
options to Outgoing Numbers in the Dial Plan?: Checked
b. Caller ID Company Main Number: Enter primary DID, this
will be used as the primary register number as well as for
outbound CLID
c. Click “OK”
Page 18
Page 19

Invalid SIP Server Reachability Error
Cisco Unified Communications 500 Series
12. Due to the use of SRV DNS, the UC 500 produces an error that
the SIP server is not reachable although registration has likely
succeeded. This error may appear one or more times, ignore it
and click “OK” to continue.
13. SIP Trunk configuration using SRV is now complete. Please
continue to configuring Dial Plans.
Page 19
 Loading...