

Cisco Small Business VC220 Quick Start Manual
Quick Start Guide
Cisco Small Business
VC 220 Dome WDR Day/Night PoE Network
Camera
Package Contents
• Cisco VC 220 Network Camera
• Power Adapter
• Two L-Shaped Audio Cables
• Mounting and Installation Accessories including a TORX
™
screwdriver
• I/O Connector
• Setup and Documentation CD — includes localized Quick Start
Guides in French, German, Italian, and Spanish
• Quick Start Guide

2 VC 220 Dome WDR Day/Night PoE Network Camera Quick Start Guide
Welcome
Thank you for choosing the Cisco VC 220 Dome Wide Dynamic Range
(WDR) Day/Night PoE Network Camera. The Cisco VC 220 network
camera is a high-performance web-ready camera, and can be part of a
flexible surveillance system.
This guide describes how to physically install your Cisco VC 220 network
camera and how to install and launch the provided Setup Wizard.

VC 220 Dome WDR Day/Night PoE Network Camera Quick Start Guide 3
Before You Begin
Before you begin the installation, make sure that you have the following
equipment and services:
• At least one computer running Microsoft Internet Explorer 6.x, or later
(other browsers can be used but may have limited functionality)
• An active LAN IP connection
After the basic hardware installation, Cisco strongly recommends that you
run the Setup Wizard on the CD-ROM for first-time software installation of
the camera. Advanced users can set up the Cisco VC 220 directly from the
web interface of the camera.
It is suggested that you install the software – see “Getting Started with
the Configuration” section on page 11 – before you replace the dome
cover on the camera. This is because after the software is installed, you
will be able to use the web-based configuration utility to see how the lens
should be adjusted and how the camera needs to be focused.
See “Suggested Next Steps” section on page 12 for instructions on lens
and focusing adjustments, and how to replace the dome cover. The
recommended order of steps is as follows:
• “Mounting Your Cisco VC 220 Camera” section on page 8
• “Connecting the Equipment” section on page 9
• “Verifying the Hardware Installation” section on page 11
• “Getting Started with the Configuration” section on page 11
• “Adjusting the Lens” section on page 12
• “Attaching the Dome Cover” section on page 13
The supplied screwdriver is exclusively designed to match the dome
screws, which prevents the cover from being removed by an unauthorized
individual. Do not discard the screwdriver because you may need to
remove the dome cover at a later time.
1
4 VC 220 Dome WDR Day/Night PoE Network Camera Quick Start Guide
Product Overview
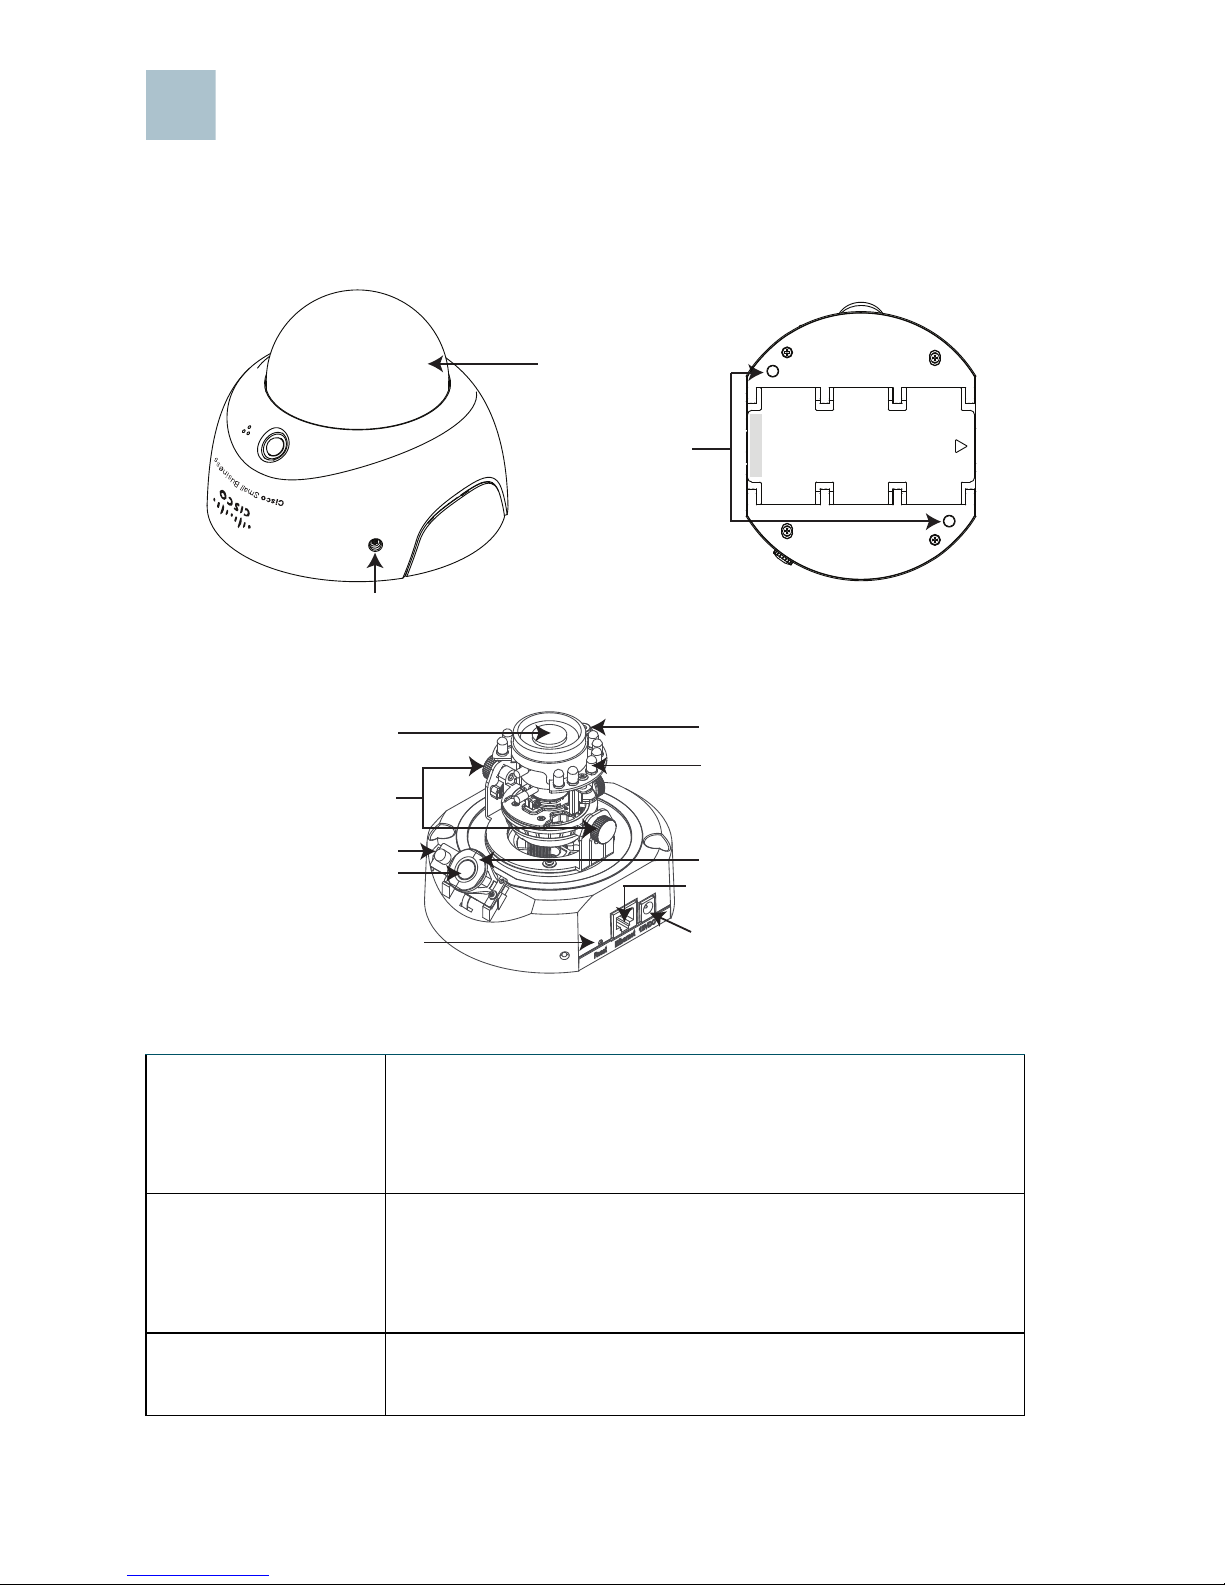
Descriptive Diagrams
The following illustrations show the major components of the camera.
Lens and Tilt
Screws
Allows you to make pan/tilt 3-axis adjustments. For wall
or ceiling mounting on an unlevel plane, you can rotate
the 3rd axis to straighten the view. See “Adjusting the
Lens” section on page 12.
Built-in Microphone Features a built-in microphone mounted on the front of
the camera. The camera also has a connection for an
external microphone on the rear. Connecting an external
microphone disables the built-in microphone.
Passive Infrared
(PIR) Sensor
Alerts you to movement up to 5 M (16.4 feet) based on
thermal detection.
2
Mounting Holes
Dome Cover
Tamper-resistant screw
MAC: 002129727D24
Lens
Tilt Screw
Built-in Microphone
PIR Sensor
IR LEDs
Power Cord Port
Ethernet RJ45 Port
Recessed Reset Button
Status LED
Light Sensor

VC 220 Dome WDR Day/Night PoE Network Camera Quick Start Guide 5
Light Sensor Detects the amount of ambient light and switches the
camera from day to night. If light is too low, the light
sensor triggers the IR LEDs to turn on.
12 Infrared (IR)
LEDs
Enables operation in complete darkness. The ring of IR
LEDs are built-in with a working range of 15 m (50 feet).
Status LED Indicates the following status:
LED Off—The power is off or the LED status is turned off.
Flashing green in one second intervals—Th e ca mer a
and network is functioning.
Steady orange—The camera can’t detect a networking
signal; thus the camera is not functioning. For example,
the Ethernet cable is not attached.
Flashing orange—The PIR sensor noted movement.
Flashing green rapidly—The firmware is being
upgraded.
Flashing orange rapidly—The camera’s default settings
are being restored.
Alternating flashing green and orange—Video has
been lost.
Recessed Reset
Button
Use a bent paperclip to press the Reset button. The
Reset button has two functions:
Restart—Press and hold the Reset button for less than
five seconds to reset the camera.
Restore Factory Defaults—Press and hold the Reset
button for 10 seconds to restore factory defaults.
Ethernet RJ45 Port Connects your Cisco VC 220 camera to a Power over
Ethernet (PoE) switch or router, or to a PoE power injector
(not provided) for connection to a non-PoE switch or
router. The LEDs surrounding the Ethernet port indicate
the following status:
Green—Indicates network and data activity. Light should
be steady when camera is on and flashing when data is
transmitted or received.
Amber—Indicates PoE. Should be steady when using
PoE.
Power Included. Connects your Cisco VC 220 camera to 12 V
power (1 Amp) when not using PoE.
 Loading...