

Page 1
Quick Start Guide
Cisco Small Business
200 Series 8-Port Smart Switches
Page 2

Welcome
1
Thank you for choosing the Cisco 200 Series 8-Port Smart Switch, a Cisco
Small Business network communications device. This device is designed
to be operational right out-of-the-box as a standard bridge. In the default
configuration, it will forward packets between connecting devices after
powered up.
Package Contents
• Cisco SG200-08 or SG200-08P Smart Switch.
• Power Adapter.
• This Quick Start Guide.
• Product CD.
This guide will familiarize you with the layout of the smart switch and
describe how to deploy the device in your network. For additional
information, see www.cisco.com/smb.
Mounting the Cisco Switch
There are two ways to mount the switch:
• Set the switch on a flat surface.
• Mount the switch on a wall
Do not deploy the device in a location where any of the following
conditions exist:
High Ambient Temperature—The ambient temperature must not
exceed 104 degrees Fahrenheit (40 degrees Centigrade).
Reduced Air Flow—Both side panels must be unobstructed to prevent
overheating.
Mechanical Overloading—The device should be level, stable, and
secure to prevent it from sliding or shifting out-of-position.
Circuit Overloading—Adding the device to the power outlet must not
overload that circuit.
2 200 Series 8-Port Smart Switches
Page 3
Wall Mounting
1
2
4
3
NOTE The switch should be mounted so that the ports face up or down.
Do not mount the switch with the ports to the side, as this causes strain
on the connections.
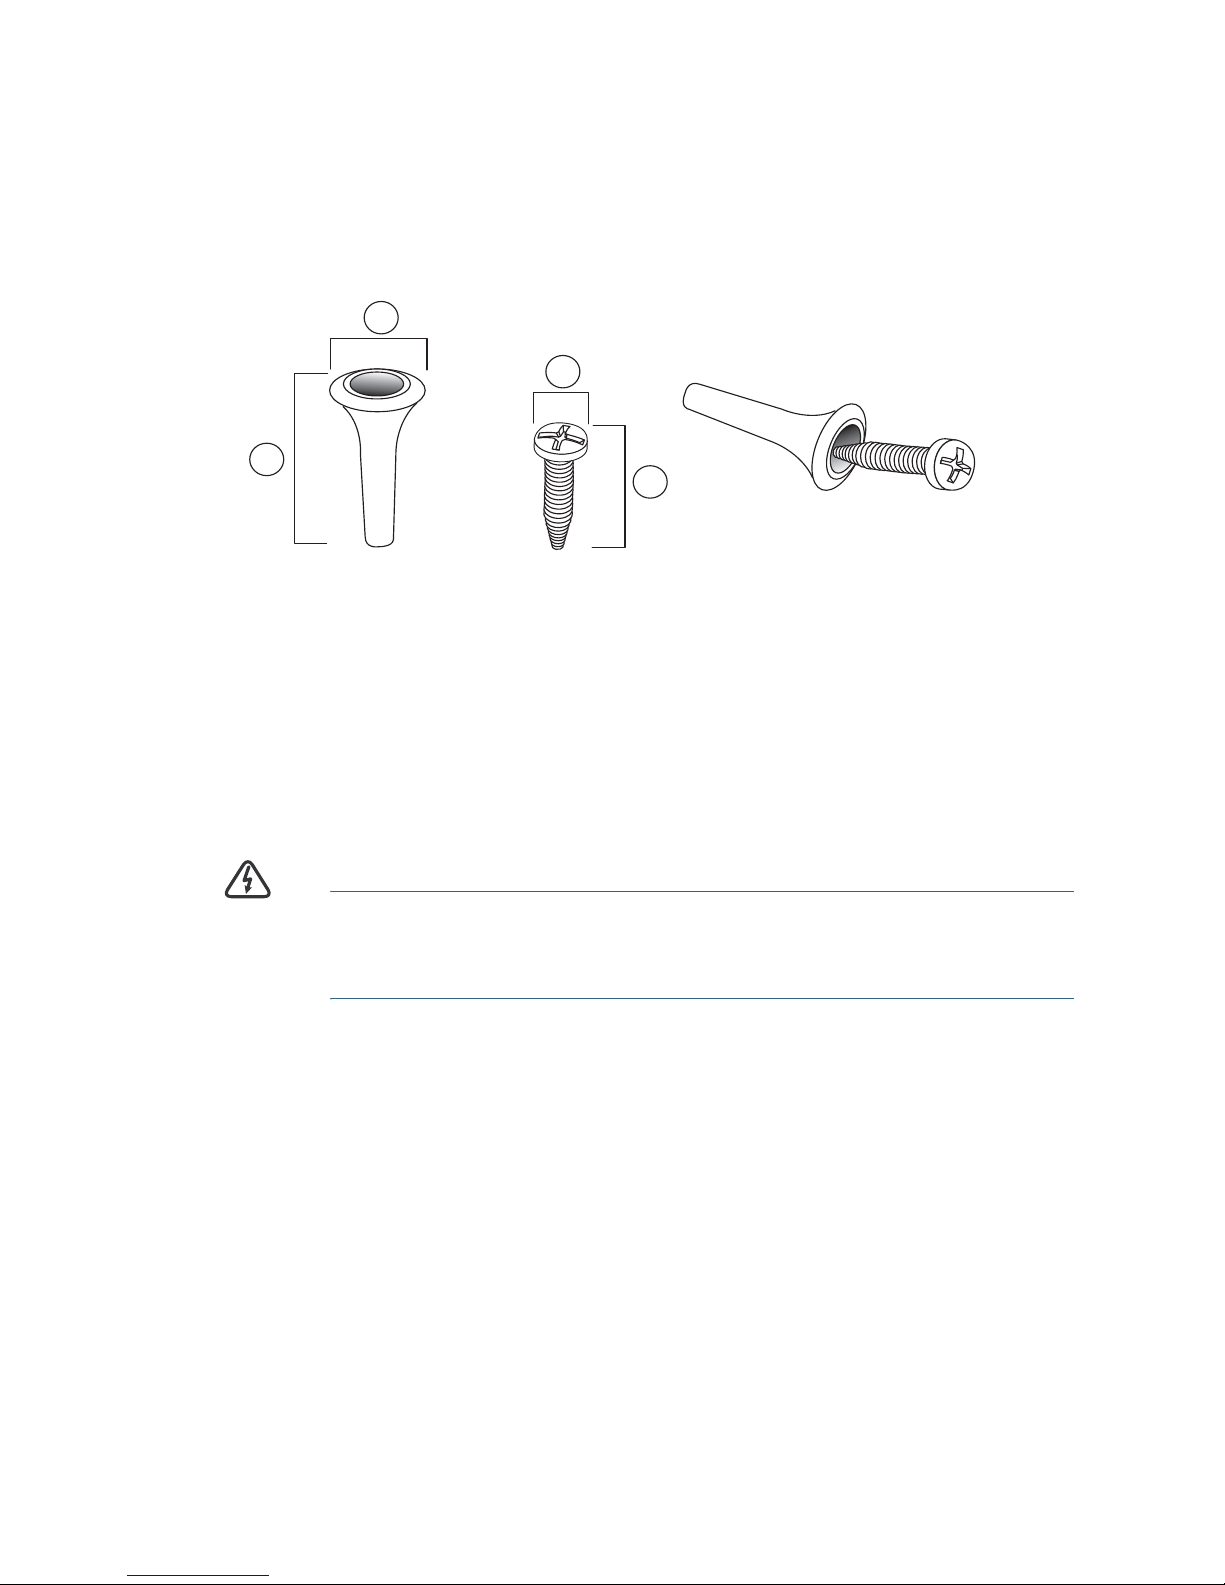
There is a wall-mount kit packed with your switch. The dimensions for the
mount kit are as follows:
1 0.4 in/8 mm 2 0.9 in/22.2 mm 3 0.3 in/6.8 mm 4 0.7 in/17.6 mm
Mount the smart switch to the wall by drilling two pilot holes 95 mm (3.7
inches) apart, attaching the provided anchors and screws to the wall, then
sliding the switch into position on the screws.
The switch must have a minimum of 5 inches (130 mm) of clearance on all
sides.
WARNING Insecure mounting might damage the device or cause injury.
Cisco is not responsible for damages incurred by insecure wallmounting.
200 Series 8-Port Smart Switches 3
Page 4
Connecting Network Devices
2
To connect the smart switch to the network:
STEP 1 Connect the Ethernet cable to the Ethernet port of a computer,
printer, network storage, or other network device.
STEP 2 Connect the other end of the Ethernet cable to one of the
numbered smart switch Ethernet ports.
The LED of the port lights if the device connected is active. Refer to
Features of the Cisco Small Business Smart Switch, page 8 for
details about the different ports and LEDs on each switch.
STEP 3 Repeat Step 1 and Step 2 for each device you want to connect to
the smart switch.
NOTE Cisco recommends using Cat5 or better cable for Gigabit
connectivity. When you connect your network devices, do not exceed
the maximum cabling distance of 328 feet (100 meters). It can take up to
one minute for attached devices or the LAN to be operational after they
are connected. This is normal behavior.
Power over Ethernet Considerations
If your switch is one of the Power over Ethernet (PoE) models, consider the
following power requirement:
• As a Power Sourcing Equipment (PSE) device, the switch can deliver a
maximum of 15.4 Watts per PoE port to a Powered Device (PD).
• The total power budget available for all devices is 32 Watts.
• Ports 1-4 are PoE ports, 5-8 are standard Ethernet ports.
WARNING The switch should be connected only to PoE networks without
routing to the outside plant
4 200 Series 8-Port Smart Switches
Page 5

Configuring the Cisco Small Business
3
Smart Switch
Before You Begin
Verify that a computer with Microsoft Internet Explorer (version 6 or higher)
or Firefox (version 2.0 or higher) is available.
Accessing and Managing Your Switch Using the WebBased Interface
In order to access the switch with a web-based interface, you must know
the Management IP address of the switch. The default configuration of the
switch is to use its factory default IP address of 192.168.1.254 until it has
obtained an IP address from a DHCP server, or it has been changed to a
static IP address.
When the switch is using the factory default IP address, its System LED
flashes continuously. When the switch is using a DHCP assigned IP
address or an administrator configured static IP address, the system LED
lights steady.
NOTE If the smart switch IP address is changed, either by a DHCP server
or manually, your access to the smart switch will be lost and you must
use the new IP address to configure the switch.
Use the Web-Based Interface
To configure the smart switch:
STEP 1 Power on the computer and the switch.
STEP 2 Connect the computer to the switch. You can connect to the same
IP subnet as the switch by connecting them directly with an
Ethernet cable, or by connecting to the same LAN where the
switch is located through other switches. You can also connect
your computer to the switch from another IP subnet through one or
more IP routers.
STEP 3 Set up the IP configuration on your computer.
a. If the switch is using the default static IP address of
192.168.1.254, you must choose an IP address in the range of
192.168.1.2—192.168.1.253 that is not already being used by
another device.
b. If the IP addresses will be assigned by DHCP, make sure your
DHCP server is running and can be reached from the switch
and the computer. You might need to disconnect and
200 Series 8-Port Smart Switches 5
Page 6

reconnect the devices for them to discover their new IP
addresses from the DHCP server.
NOTE Details on how to change the IP address on your computer
depend upon the type of architecture and operating system you are
using. See your computer’s local Help and Support functionality
and search for “IP Addressing.”
STEP 4 Open a Web browser window. If you are prompted to install an
Active-X plug-in when connecting to the device, follow the
prompts to accept the plug-in.
STEP 5 Enter the switch IP address in the address bar and press Enter. For
example, http://192.168.1.254.
The Smart Switch Login page
STEP 6 Enter the login information:
displays.
Username is cisco
Default password is cisco (passwords are case sensitive)
STEP 7 If this is the first time that you have logged on with the default
username and password, the
Change Password
page opens. Enter
a new administrator password and then click Apply.
CAUTION Make sure that any configuration changes that you made are
saved before exiting from the web-based interface by
clicking on the Save icon, then clicking Apply. Exiting before
you save your configuration will result in all changes being
lost.
The Getting Started window displays. You are now ready to configure the
switch. Refer to the
Guide
for further information.
Cisco Small Business Smart Switch Administration
Next Steps
• If you are not using DHCP on your network, set the connection
type on the smart switch to Static and change the static IP
address and subnet mask to match your network topology.
• Save your settings.
• Return your computer to its original settings.
These tasks can be accomplished by using the procedures in the Cisco
Small Business Smart Switch Administration Guide.
6 200 Series 8-Port Smart Switches
Page 7

Troubleshoot Your Connection
If you cannot access your switch from the web-based interface, the switch
may not be reachable from your computer. You can test network
connections by using the ping command. The following example shows
how to use "ping" in a Windows environment:
STEP 1 Open a command window by using Start > Run and enter cmd.
STEP 2 At the Command window prompt enter ping and the smart switch
IP address. For example ping 192.168.1.254 (the default IP address
of the smart switch).
If you can reach the switch, you should get a reply similar to the
following:
Pinging 192.168.1.254 with 32 bytes of data:
Reply from 192.168.1.254: bytes=32 time<1ms TTL=128
If you cannot reach the switch, you should get a reply similar to the
following:
Pinging 192.168.1.254 with 32 bytes of data:
Request timed out.
Possible Causes and Resolutions
No Power:
Power up the switch and your computer if they are turned off.
Bad Ethernet connection:
Check the LEDs for proper indications. Check the connectors of the
Ethernet cable to ensure they are firmly plugged into the switch and
your computer.
Wrong or conflicting IP address:
Make sure that you are using the correct IP address of the switch. You
can verify the correct IP address of the switch with your network
administrator. The System LED provides an indication of where the
switch received the IP address, see Section 4 for details.
Make sure that no other device is using the same IP address as the
switch.
No IP route:
If the switch and your computer are in different IP subnets, you need
one or more routers to route the packets between the two subnets.
200 Series 8-Port Smart Switches 7
Page 8

• Unusually long access time:
4
5
Due to the spanning tree loop detection logic, adding new connections
might take 30 to 60 seconds for the affected interfaces and/or LAN to
become operational.
Features of the Cisco Small Business
Smart Switch
This section describes the exterior of the smart switches including ports,
LEDs, and connections.
Back Panel Ports
The Ethernet ports are located on the back panel of the switch.
RJ-45 Ethernet Ports—Use these ports to connect network devices, such
as computers, printers, and access points, to the switch. If your switch
supports PoE, ports 1-4 can provide PoE and ports 5-8 are standard
Ethernet ports.
Front Panel LEDs
The LEDs are located on the front of the switch.
System LED—(Green) Lights steady when the switch is powered on, and
flashes when booting, performing self tests, and acquiring an IP address. If
the LED flashes amber, the switch has detected a hardware failure.
LINK/ACT LED—(Green) Lights steady when a link between the
corresponding port and another device is detected. Flashes when the port
is passing traffic.
Side Panel
Power—The Power port is where you will connect the switch to power.
Returning the Device to the Factory
Default Settings
The 8-Port Smart Switch models does not have a Reset button. To return
the device to factory default settings, follow the instructions in the Cisco
Small Business Smart Switch Administration Guide.
8 200 Series 8-Port Smart Switches
Page 9

Support
6
Where to Go From Here
Cisco Small Business Support
Community
Cisco Small Business Support
and Resources
Phone Support Contacts www.cisco.com/en/US/support/tsd_cisco_
Cisco Small Business Firmware
Downloads
Product Documentation
Cisco Small Business Smart
Switches
Regulatory, Compliance, and
Safety Information
Warranty Information www.cisco.com/go/warranty
www.cisco.com/go/smallbizsupport
www.cisco.com/go/smallbizhelp
small_business_support_center_contacts.html
www.cisco.com/go/smallbizfirmware
Select a link to download firmware for Cisco
Small Business Products. No login is required.
www.cisco.com/go/200switches
www.cisco.com/en/US/docs/switches/lan/
csbms/sfe2000/release/notes/
Class_A_Switches_RCSI.pdf
Cisco Small Business
Cisco Partner Central for Small
Business (Partner Login
Required)
Cisco Small Business Home www.cisco.com/smb
www.cisco.com/web/partners/sell/smb
200 Series 8-Port Smart Switches 9
Page 10

10 200 Series 8-Port Smart Switches
Page 11

200 Series 8-Port Smart Switches 11
Page 12

Americas Headquarters
Cisco Systems, Inc.
170 West Tasman Drive
San Jose, CA 95134-1706
USA
http://www.cisco.com
Small Business Support US: 1-866-606-1866 (Toll Free, 24/7)
Small Business Support Global Contact Numbers
Cisco and the Cisco Logo are trademarks of Cisco Systems, Inc. and/or its affiliates in the U.S.
and other countries. A listing of Cisco's trademarks can be found at www.cisco.com/go/
trademarks. Third party trademarks mentioned are the property of their respective owners.
The use of the word partner does not imply a partnership relationship between Cisco and any
other company. (1005R)
© 2010 Cisco Systems, Inc. All rights reserved.
78-19516-01
 Loading...