

Page 1
CLI GUIDE
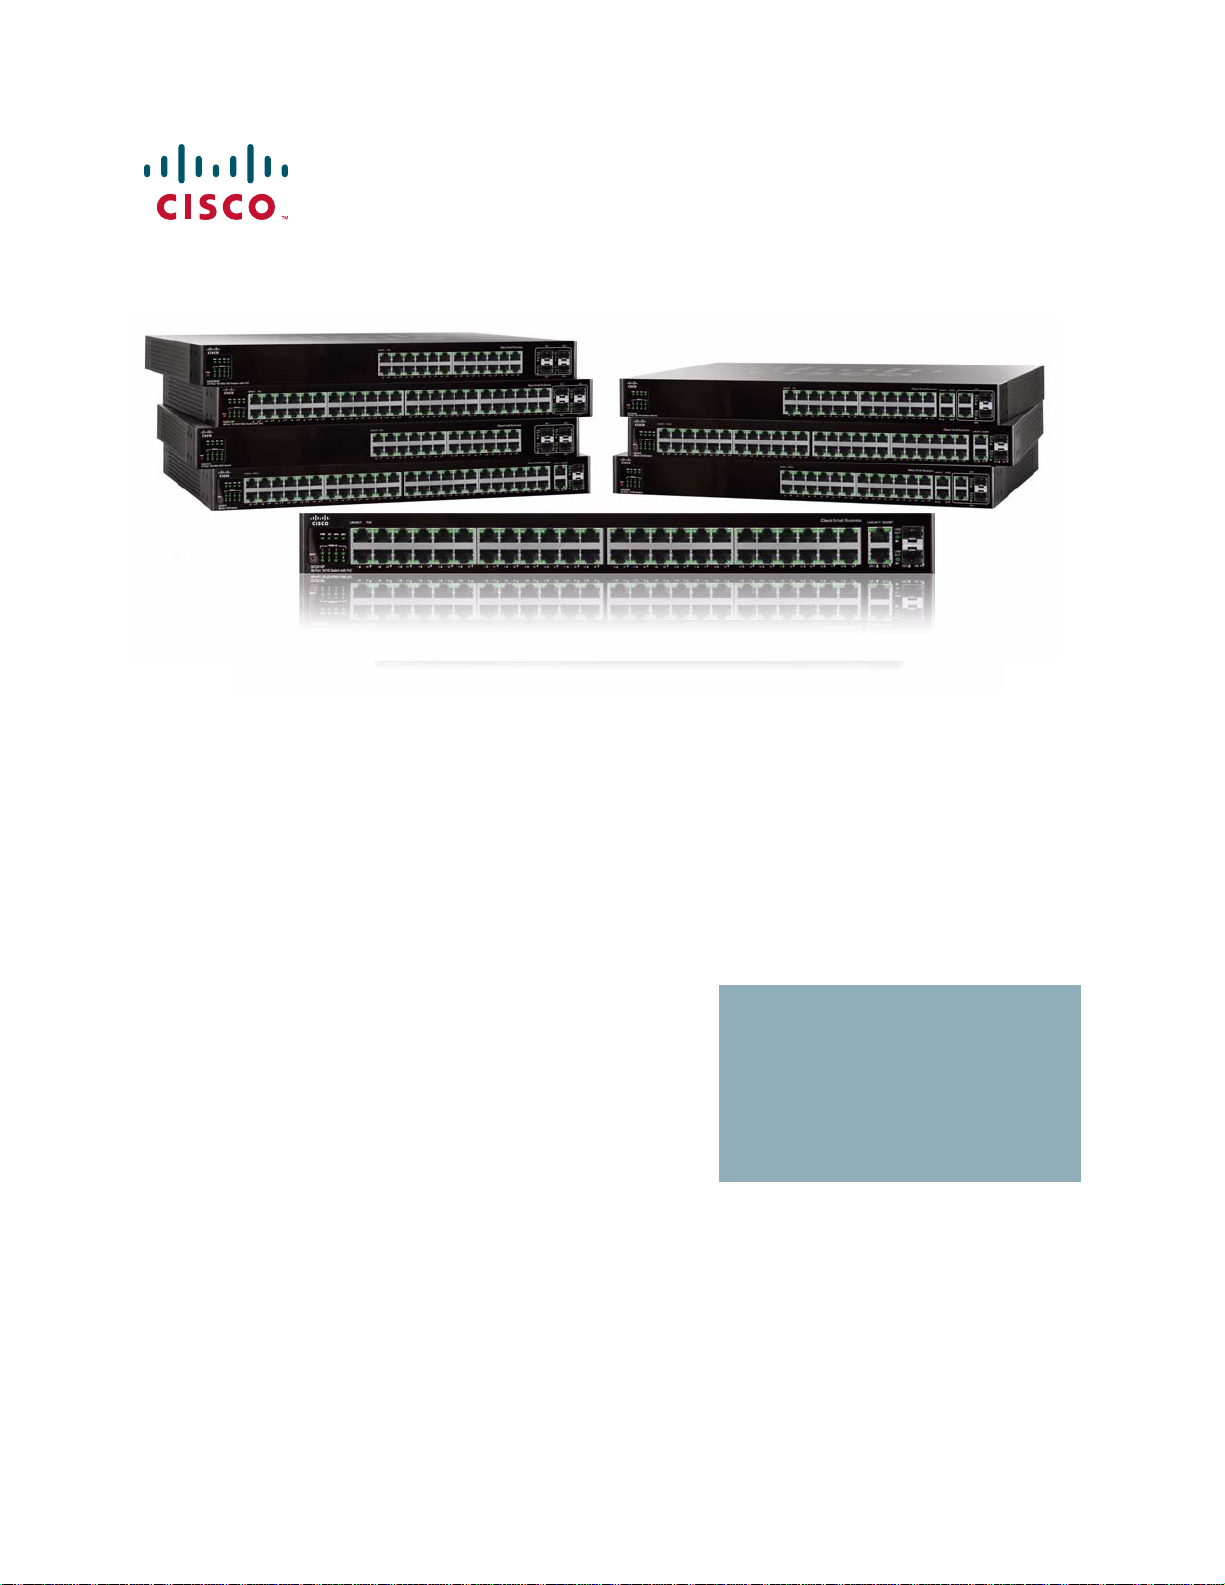
Cisco Small Business 300 1.1 Series Managed Switch Administration Guide
Page 2

Contents
Table of Contents
1 Introduction ............................................................................................................................ 17
2 User Interface Commands.................................................................................................... 33
enable . . . . . . . . . . . . . . . . . . . . . . . . . . . . . . . . . . . . . . . . . . . . . . . . . . . . . . . . . . . . . . . . . . . . . . . . . . . . . . . . . . 33
disable . . . . . . . . . . . . . . . . . . . . . . . . . . . . . . . . . . . . . . . . . . . . . . . . . . . . . . . . . . . . . . . . . . . . . . . . . . . . . . . . . . 34
login . . . . . . . . . . . . . . . . . . . . . . . . . . . . . . . . . . . . . . . . . . . . . . . . . . . . . . . . . . . . . . . . . . . . . . . . . . . . . . . . . . . . 34
configure . . . . . . . . . . . . . . . . . . . . . . . . . . . . . . . . . . . . . . . . . . . . . . . . . . . . . . . . . . . . . . . . . . . . . . . . . . . . . . . . 35
exit (Configuration) . . . . . . . . . . . . . . . . . . . . . . . . . . . . . . . . . . . . . . . . . . . . . . . . . . . . . . . . . . . . . . . . . . . . . . 36
exit (EXEC) . . . . . . . . . . . . . . . . . . . . . . . . . . . . . . . . . . . . . . . . . . . . . . . . . . . . . . . . . . . . . . . . . . . . . . . . . . . . . . 36
end . . . . . . . . . . . . . . . . . . . . . . . . . . . . . . . . . . . . . . . . . . . . . . . . . . . . . . . . . . . . . . . . . . . . . . . . . . . . . . . . . . . . . 37
help . . . . . . . . . . . . . . . . . . . . . . . . . . . . . . . . . . . . . . . . . . . . . . . . . . . . . . . . . . . . . . . . . . . . . . . . . . . . . . . . . . . . . 38
history . . . . . . . . . . . . . . . . . . . . . . . . . . . . . . . . . . . . . . . . . . . . . . . . . . . . . . . . . . . . . . . . . . . . . . . . . . . . . . . . . . 39
history size . . . . . . . . . . . . . . . . . . . . . . . . . . . . . . . . . . . . . . . . . . . . . . . . . . . . . . . . . . . . . . . . . . . . . . . . . . . . . . 40
terminal history . . . . . . . . . . . . . . . . . . . . . . . . . . . . . . . . . . . . . . . . . . . . . . . . . . . . . . . . . . . . . . . . . . . . . . . . . 41
terminal history size . . . . . . . . . . . . . . . . . . . . . . . . . . . . . . . . . . . . . . . . . . . . . . . . . . . . . . . . . . . . . . . . . . . . . 41
terminal datadump . . . . . . . . . . . . . . . . . . . . . . . . . . . . . . . . . . . . . . . . . . . . . . . . . . . . . . . . . . . . . . . . . . . . . . 42
show history . . . . . . . . . . . . . . . . . . . . . . . . . . . . . . . . . . . . . . . . . . . . . . . . . . . . . . . . . . . . . . . . . . . . . . . . . . . . 43
show privilege . . . . . . . . . . . . . . . . . . . . . . . . . . . . . . . . . . . . . . . . . . . . . . . . . . . . . . . . . . . . . . . . . . . . . . . . . . 44
do . . . . . . . . . . . . . . . . . . . . . . . . . . . . . . . . . . . . . . . . . . . . . . . . . . . . . . . . . . . . . . . . . . . . . . . . . . . . . . . . . . . . . . . 45
banner login . . . . . . . . . . . . . . . . . . . . . . . . . . . . . . . . . . . . . . . . . . . . . . . . . . . . . . . . . . . . . . . . . . . . . . . . . . . . . 46
login-banner . . . . . . . . . . . . . . . . . . . . . . . . . . . . . . . . . . . . . . . . . . . . . . . . . . . . . . . . . . . . . . . . . . . . . . . . . . . . 48
show banner . . . . . . . . . . . . . . . . . . . . . . . . . . . . . . . . . . . . . . . . . . . . . . . . . . . . . . . . . . . . . . . . . . . . . . . . . . . . 49
3 Macro Commands.................................................................................................................. 50
macro name . . . . . . . . . . . . . . . . . . . . . . . . . . . . . . . . . . . . . . . . . . . . . . . . . . . . . . . . . . . . . . . . . . . . . . . . . . . . . 50
macro apply . . . . . . . . . . . . . . . . . . . . . . . . . . . . . . . . . . . . . . . . . . . . . . . . . . . . . . . . . . . . . . . . . . . . . . . . . . . . 53
macro description . . . . . . . . . . . . . . . . . . . . . . . . . . . . . . . . . . . . . . . . . . . . . . . . . . . . . . . . . . . . . . . . . . . . . . . 55
macro global . . . . . . . . . . . . . . . . . . . . . . . . . . . . . . . . . . . . . . . . . . . . . . . . . . . . . . . . . . . . . . . . . . . . . . . . . . . . 57
macro global description . . . . . . . . . . . . . . . . . . . . . . . . . . . . . . . . . . . . . . . . . . . . . . . . . . . . . . . . . . . . . . . . 58
show parser macro . . . . . . . . . . . . . . . . . . . . . . . . . . . . . . . . . . . . . . . . . . . . . . . . . . . . . . . . . . . . . . . . . . . . . 59
4 RSA and Certificate Commands........................................................................................... 62
crypto key generate dsa . . . . . . . . . . . . . . . . . . . . . . . . . . . . . . . . . . . . . . . . . . . . . . . . . . . . . . . . . . . . . . . . 62
crypto key generate rsa . . . . . . . . . . . . . . . . . . . . . . . . . . . . . . . . . . . . . . . . . . . . . . . . . . . . . . . . . . . . . . . . . 62
show crypto key mypubkey . . . . . . . . . . . . . . . . . . . . . . . . . . . . . . . . . . . . . . . . . . . . . . . . . . . . . . . . . . . . 63
crypto certificate generate . . . . . . . . . . . . . . . . . . . . . . . . . . . . . . . . . . . . . . . . . . . . . . . . . . . . . . . . . . . . . . 64
crypto certificate request . . . . . . . . . . . . . . . . . . . . . . . . . . . . . . . . . . . . . . . . . . . . . . . . . . . . . . . . . . . . . . . 66
crypto certificate import . . . . . . . . . . . . . . . . . . . . . . . . . . . . . . . . . . . . . . . . . . . . . . . . . . . . . . . . . . . . . . . . 67
show crypto certificate mycertificate . . . . . . . . . . . . . . . . . . . . . . . . . . . . . . . . . . . . . . . . . . . . . . . . . . . 69
5 System Management Commands ........................................................................................ 71
ping . . . . . . . . . . . . . . . . . . . . . . . . . . . . . . . . . . . . . . . . . . . . . . . . . . . . . . . . . . . . . . . . . . . . . . . . . . . . . . . . . . . . 71
traceroute . . . . . . . . . . . . . . . . . . . . . . . . . . . . . . . . . . . . . . . . . . . . . . . . . . . . . . . . . . . . . . . . . . . . . . . . . . . . . . 74
telnet . . . . . . . . . . . . . . . . . . . . . . . . . . . . . . . . . . . . . . . . . . . . . . . . . . . . . . . . . . . . . . . . . . . . . . . . . . . . . . . . . . . . 77
resume . . . . . . . . . . . . . . . . . . . . . . . . . . . . . . . . . . . . . . . . . . . . . . . . . . . . . . . . . . . . . . . . . . . . . . . . . . . . . . . . . . 81
hostname . . . . . . . . . . . . . . . . . . . . . . . . . . . . . . . . . . . . . . . . . . . . . . . . . . . . . . . . . . . . . . . . . . . . . . . . . . . . . . . 82
78-20269-01 Command Line Interface Reference Guide 2
Page 3

reload . . . . . . . . . . . . . . . . . . . . . . . . . . . . . . . . . . . . . . . . . . . . . . . . . . . . . . . . . . . . . . . . . . . . . . . . . . . . . . . . . . . 82
service cpu-utilization . . . . . . . . . . . . . . . . . . . . . . . . . . . . . . . . . . . . . . . . . . . . . . . . . . . . . . . . . . . . . . . . . . . 83
show cpu utilization . . . . . . . . . . . . . . . . . . . . . . . . . . . . . . . . . . . . . . . . . . . . . . . . . . . . . . . . . . . . . . . . . . . . . 84
show users . . . . . . . . . . . . . . . . . . . . . . . . . . . . . . . . . . . . . . . . . . . . . . . . . . . . . . . . . . . . . . . . . . . . . . . . . . . . . . 85
show sessions . . . . . . . . . . . . . . . . . . . . . . . . . . . . . . . . . . . . . . . . . . . . . . . . . . . . . . . . . . . . . . . . . . . . . . . . . . 86
show system . . . . . . . . . . . . . . . . . . . . . . . . . . . . . . . . . . . . . . . . . . . . . . . . . . . . . . . . . . . . . . . . . . . . . . . . . . . . 87
show version . . . . . . . . . . . . . . . . . . . . . . . . . . . . . . . . . . . . . . . . . . . . . . . . . . . . . . . . . . . . . . . . . . . . . . . . . . . . 88
show version md5 . . . . . . . . . . . . . . . . . . . . . . . . . . . . . . . . . . . . . . . . . . . . . . . . . . . . . . . . . . . . . . . . . . . . . . 89
system resources routing . . . . . . . . . . . . . . . . . . . . . . . . . . . . . . . . . . . . . . . . . . . . . . . . . . . . . . . . . . . . . . . 90
show system resources . . . . . . . . . . . . . . . . . . . . . . . . . . . . . . . . . . . . . . . . . . . . . . . . . . . . . . . . . . . . . . . . . 91
set system mode . . . . . . . . . . . . . . . . . . . . . . . . . . . . . . . . . . . . . . . . . . . . . . . . . . . . . . . . . . . . . . . . . . . . . . . . 92
show system mode . . . . . . . . . . . . . . . . . . . . . . . . . . . . . . . . . . . . . . . . . . . . . . . . . . . . . . . . . . . . . . . . . . . . . 93
show system languages . . . . . . . . . . . . . . . . . . . . . . . . . . . . . . . . . . . . . . . . . . . . . . . . . . . . . . . . . . . . . . . . 93
show system tcam utilization . . . . . . . . . . . . . . . . . . . . . . . . . . . . . . . . . . . . . . . . . . . . . . . . . . . . . . . . . . . . 94
show services tcp-udp . . . . . . . . . . . . . . . . . . . . . . . . . . . . . . . . . . . . . . . . . . . . . . . . . . . . . . . . . . . . . . . . . . 95
show system id . . . . . . . . . . . . . . . . . . . . . . . . . . . . . . . . . . . . . . . . . . . . . . . . . . . . . . . . . . . . . . . . . . . . . . . . . 96
show cpu input rate . . . . . . . . . . . . . . . . . . . . . . . . . . . . . . . . . . . . . . . . . . . . . . . . . . . . . . . . . . . . . . . . . . . . . 96
Contents
6 Clock Commands ................................................................................................................... 98
clock set . . . . . . . . . . . . . . . . . . . . . . . . . . . . . . . . . . . . . . . . . . . . . . . . . . . . . . . . . . . . . . . . . . . . . . . . . . . . . . . . 98
clock source . . . . . . . . . . . . . . . . . . . . . . . . . . . . . . . . . . . . . . . . . . . . . . . . . . . . . . . . . . . . . . . . . . . . . . . . . . . . 98
clock timezone . . . . . . . . . . . . . . . . . . . . . . . . . . . . . . . . . . . . . . . . . . . . . . . . . . . . . . . . . . . . . . . . . . . . . . . . . 99
clock summer-time . . . . . . . . . . . . . . . . . . . . . . . . . . . . . . . . . . . . . . . . . . . . . . . . . . . . . . . . . . . . . . . . . . . .100
clock dhcp timezone . . . . . . . . . . . . . . . . . . . . . . . . . . . . . . . . . . . . . . . . . . . . . . . . . . . . . . . . . . . . . . . . . . . 102
sntp authentication-key . . . . . . . . . . . . . . . . . . . . . . . . . . . . . . . . . . . . . . . . . . . . . . . . . . . . . . . . . . . . . . . . 103
sntp authenticate . . . . . . . . . . . . . . . . . . . . . . . . . . . . . . . . . . . . . . . . . . . . . . . . . . . . . . . . . . . . . . . . . . . . . . 104
sntp trusted-key . . . . . . . . . . . . . . . . . . . . . . . . . . . . . . . . . . . . . . . . . . . . . . . . . . . . . . . . . . . . . . . . . . . . . . . 105
sntp broadcast client enable . . . . . . . . . . . . . . . . . . . . . . . . . . . . . . . . . . . . . . . . . . . . . . . . . . . . . . . . . . . 106
sntp unicast client enable . . . . . . . . . . . . . . . . . . . . . . . . . . . . . . . . . . . . . . . . . . . . . . . . . . . . . . . . . . . . . . 107
sntp server . . . . . . . . . . . . . . . . . . . . . . . . . . . . . . . . . . . . . . . . . . . . . . . . . . . . . . . . . . . . . . . . . . . . . . . . . . . . .107
show clock . . . . . . . . . . . . . . . . . . . . . . . . . . . . . . . . . . . . . . . . . . . . . . . . . . . . . . . . . . . . . . . . . . . . . . . . . . . . .110
show sntp configuration . . . . . . . . . . . . . . . . . . . . . . . . . . . . . . . . . . . . . . . . . . . . . . . . . . . . . . . . . . . . . . . . 111
show sntp status . . . . . . . . . . . . . . . . . . . . . . . . . . . . . . . . . . . . . . . . . . . . . . . . . . . . . . . . . . . . . . . . . . . . . . . 113
7 Configuration and Image File Commands......................................................................... 115
copy . . . . . . . . . . . . . . . . . . . . . . . . . . . . . . . . . . . . . . . . . . . . . . . . . . . . . . . . . . . . . . . . . . . . . . . . . . . . . . . . . . . 115
write memory . . . . . . . . . . . . . . . . . . . . . . . . . . . . . . . . . . . . . . . . . . . . . . . . . . . . . . . . . . . . . . . . . . . . . . . . . . 120
write . . . . . . . . . . . . . . . . . . . . . . . . . . . . . . . . . . . . . . . . . . . . . . . . . . . . . . . . . . . . . . . . . . . . . . . . . . . . . . . . . . . 121
delete . . . . . . . . . . . . . . . . . . . . . . . . . . . . . . . . . . . . . . . . . . . . . . . . . . . . . . . . . . . . . . . . . . . . . . . . . . . . . . . . . . 121
dir . . . . . . . . . . . . . . . . . . . . . . . . . . . . . . . . . . . . . . . . . . . . . . . . . . . . . . . . . . . . . . . . . . . . . . . . . . . . . . . . . . . . . .122
more . . . . . . . . . . . . . . . . . . . . . . . . . . . . . . . . . . . . . . . . . . . . . . . . . . . . . . . . . . . . . . . . . . . . . . . . . . . . . . . . . . .124
boot system . . . . . . . . . . . . . . . . . . . . . . . . . . . . . . . . . . . . . . . . . . . . . . . . . . . . . . . . . . . . . . . . . . . . . . . . . . . 125
show bootvar . . . . . . . . . . . . . . . . . . . . . . . . . . . . . . . . . . . . . . . . . . . . . . . . . . . . . . . . . . . . . . . . . . . . . . . . . .126
show running-config . . . . . . . . . . . . . . . . . . . . . . . . . . . . . . . . . . . . . . . . . . . . . . . . . . . . . . . . . . . . . . . . . . . 126
show startup-config . . . . . . . . . . . . . . . . . . . . . . . . . . . . . . . . . . . . . . . . . . . . . . . . . . . . . . . . . . . . . . . . . . .129
8 Auto-Configuration ..............................................................................................................133
boot host auto-config . . . . . . . . . . . . . . . . . . . . . . . . . . . . . . . . . . . . . . . . . . . . . . . . . . . . . . . . . . . . . . . . . .133
78-20269-01 Command Line Interface Reference Guide 3
Page 4

show boot . . . . . . . . . . . . . . . . . . . . . . . . . . . . . . . . . . . . . . . . . . . . . . . . . . . . . . . . . . . . . . . . . . . . . . . . . . . . . 133
ip dhcp tftp-server ip address . . . . . . . . . . . . . . . . . . . . . . . . . . . . . . . . . . . . . . . . . . . . . . . . . . . . . . . . .134
ip dhcp tftp-server file . . . . . . . . . . . . . . . . . . . . . . . . . . . . . . . . . . . . . . . . . . . . . . . . . . . . . . . . . . . . . . . . .135
show ip dhcp tftp-server . . . . . . . . . . . . . . . . . . . . . . . . . . . . . . . . . . . . . . . . . . . . . . . . . . . . . . . . . . . . . . .135
ip dhcp information option . . . . . . . . . . . . . . . . . . . . . . . . . . . . . . . . . . . . . . . . . . . . . . . . . . . . . . . . . . . . . 136
show ip dhcp information option . . . . . . . . . . . . . . . . . . . . . . . . . . . . . . . . . . . . . . . . . . . . . . . . . . . . . . .137
Contents
9 Management ACL Commands............................................................................................138
management access-list . . . . . . . . . . . . . . . . . . . . . . . . . . . . . . . . . . . . . . . . . . . . . . . . . . . . . . . . . . . . . . . 138
permit (Management) . . . . . . . . . . . . . . . . . . . . . . . . . . . . . . . . . . . . . . . . . . . . . . . . . . . . . . . . . . . . . . . . . . 139
deny (Management) . . . . . . . . . . . . . . . . . . . . . . . . . . . . . . . . . . . . . . . . . . . . . . . . . . . . . . . . . . . . . . . . . . . .140
management access-class . . . . . . . . . . . . . . . . . . . . . . . . . . . . . . . . . . . . . . . . . . . . . . . . . . . . . . . . . . . . .142
show management access-list . . . . . . . . . . . . . . . . . . . . . . . . . . . . . . . . . . . . . . . . . . . . . . . . . . . . . . . . . 142
show management access-class . . . . . . . . . . . . . . . . . . . . . . . . . . . . . . . . . . . . . . . . . . . . . . . . . . . . . . 143
10 Network Management Protocol (SNMP) Commands...................................................... 145
snmp-server . . . . . . . . . . . . . . . . . . . . . . . . . . . . . . . . . . . . . . . . . . . . . . . . . . . . . . . . . . . . . . . . . . . . . . . . . . .145
snmp-server community . . . . . . . . . . . . . . . . . . . . . . . . . . . . . . . . . . . . . . . . . . . . . . . . . . . . . . . . . . . . . . . 145
snmp-server view . . . . . . . . . . . . . . . . . . . . . . . . . . . . . . . . . . . . . . . . . . . . . . . . . . . . . . . . . . . . . . . . . . . . . .148
snmp-server group . . . . . . . . . . . . . . . . . . . . . . . . . . . . . . . . . . . . . . . . . . . . . . . . . . . . . . . . . . . . . . . . . . . . 149
snmp-server user . . . . . . . . . . . . . . . . . . . . . . . . . . . . . . . . . . . . . . . . . . . . . . . . . . . . . . . . . . . . . . . . . . . . . . 151
snmp-server filter . . . . . . . . . . . . . . . . . . . . . . . . . . . . . . . . . . . . . . . . . . . . . . . . . . . . . . . . . . . . . . . . . . . . . .153
snmp-server host . . . . . . . . . . . . . . . . . . . . . . . . . . . . . . . . . . . . . . . . . . . . . . . . . . . . . . . . . . . . . . . . . . . . . . 154
snmp-server engineID remote . . . . . . . . . . . . . . . . . . . . . . . . . . . . . . . . . . . . . . . . . . . . . . . . . . . . . . . . . 156
snmp-server enable traps . . . . . . . . . . . . . . . . . . . . . . . . . . . . . . . . . . . . . . . . . . . . . . . . . . . . . . . . . . . . . .157
snmp-server trap authentication . . . . . . . . . . . . . . . . . . . . . . . . . . . . . . . . . . . . . . . . . . . . . . . . . . . . . . .158
snmp-server contact . . . . . . . . . . . . . . . . . . . . . . . . . . . . . . . . . . . . . . . . . . . . . . . . . . . . . . . . . . . . . . . . . . . 159
snmp-server location . . . . . . . . . . . . . . . . . . . . . . . . . . . . . . . . . . . . . . . . . . . . . . . . . . . . . . . . . . . . . . . . . . 159
snmp-server set . . . . . . . . . . . . . . . . . . . . . . . . . . . . . . . . . . . . . . . . . . . . . . . . . . . . . . . . . . . . . . . . . . . . . . . 160
show snmp . . . . . . . . . . . . . . . . . . . . . . . . . . . . . . . . . . . . . . . . . . . . . . . . . . . . . . . . . . . . . . . . . . . . . . . . . . . . 161
show snmp engineID . . . . . . . . . . . . . . . . . . . . . . . . . . . . . . . . . . . . . . . . . . . . . . . . . . . . . . . . . . . . . . . . . . .162
show snmp views . . . . . . . . . . . . . . . . . . . . . . . . . . . . . . . . . . . . . . . . . . . . . . . . . . . . . . . . . . . . . . . . . . . . . . 163
show snmp groups . . . . . . . . . . . . . . . . . . . . . . . . . . . . . . . . . . . . . . . . . . . . . . . . . . . . . . . . . . . . . . . . . . . . . 164
show snmp filters . . . . . . . . . . . . . . . . . . . . . . . . . . . . . . . . . . . . . . . . . . . . . . . . . . . . . . . . . . . . . . . . . . . . . .165
show snmp users . . . . . . . . . . . . . . . . . . . . . . . . . . . . . . . . . . . . . . . . . . . . . . . . . . . . . . . . . . . . . . . . . . . . . . 166
11 Web Server Commands ......................................................................................................167
ip http server . . . . . . . . . . . . . . . . . . . . . . . . . . . . . . . . . . . . . . . . . . . . . . . . . . . . . . . . . . . . . . . . . . . . . . . . . . . 167
ip http timeout-policy . . . . . . . . . . . . . . . . . . . . . . . . . . . . . . . . . . . . . . . . . . . . . . . . . . . . . . . . . . . . . . . . . .167
ip http secure-server . . . . . . . . . . . . . . . . . . . . . . . . . . . . . . . . . . . . . . . . . . . . . . . . . . . . . . . . . . . . . . . . . . 168
ip https certificate . . . . . . . . . . . . . . . . . . . . . . . . . . . . . . . . . . . . . . . . . . . . . . . . . . . . . . . . . . . . . . . . . . . . . . 169
show ip http . . . . . . . . . . . . . . . . . . . . . . . . . . . . . . . . . . . . . . . . . . . . . . . . . . . . . . . . . . . . . . . . . . . . . . . . . . . . 170
show ip https . . . . . . . . . . . . . . . . . . . . . . . . . . . . . . . . . . . . . . . . . . . . . . . . . . . . . . . . . . . . . . . . . . . . . . . . . . 170
12 Teletype Network (Telnet), Secure Shell (SSH) and Secure Login (Slogin) Commands ....
172
ip telnet server . . . . . . . . . . . . . . . . . . . . . . . . . . . . . . . . . . . . . . . . . . . . . . . . . . . . . . . . . . . . . . . . . . . . . . . . . 172
ip ssh server . . . . . . . . . . . . . . . . . . . . . . . . . . . . . . . . . . . . . . . . . . . . . . . . . . . . . . . . . . . . . . . . . . . . . . . . . . . 172
user-key . . . . . . . . . . . . . . . . . . . . . . . . . . . . . . . . . . . . . . . . . . . . . . . . . . . . . . . . . . . . . . . . . . . . . . . . . . . . . . .173
78-20269-01 Command Line Interface Reference Guide 4
Page 5

key-string . . . . . . . . . . . . . . . . . . . . . . . . . . . . . . . . . . . . . . . . . . . . . . . . . . . . . . . . . . . . . . . . . . . . . . . . . . . . . . 174
crypto key pubkey-chain ssh . . . . . . . . . . . . . . . . . . . . . . . . . . . . . . . . . . . . . . . . . . . . . . . . . . . . . . . . . . 176
show crypto key pubkey-chain ssh . . . . . . . . . . . . . . . . . . . . . . . . . . . . . . . . . . . . . . . . . . . . . . . . . . . .177
show ip ssh . . . . . . . . . . . . . . . . . . . . . . . . . . . . . . . . . . . . . . . . . . . . . . . . . . . . . . . . . . . . . . . . . . . . . . . . . . . . 178
Contents
13 Line Commands....................................................................................................................180
line . . . . . . . . . . . . . . . . . . . . . . . . . . . . . . . . . . . . . . . . . . . . . . . . . . . . . . . . . . . . . . . . . . . . . . . . . . . . . . . . . . . . . 180
speed . . . . . . . . . . . . . . . . . . . . . . . . . . . . . . . . . . . . . . . . . . . . . . . . . . . . . . . . . . . . . . . . . . . . . . . . . . . . . . . . . . 180
autobaud . . . . . . . . . . . . . . . . . . . . . . . . . . . . . . . . . . . . . . . . . . . . . . . . . . . . . . . . . . . . . . . . . . . . . . . . . . . . . . . 181
exec-timeout . . . . . . . . . . . . . . . . . . . . . . . . . . . . . . . . . . . . . . . . . . . . . . . . . . . . . . . . . . . . . . . . . . . . . . . . . . .182
show line . . . . . . . . . . . . . . . . . . . . . . . . . . . . . . . . . . . . . . . . . . . . . . . . . . . . . . . . . . . . . . . . . . . . . . . . . . . . . . . 183
14 Bonjour Commands..............................................................................................................185
bonjour enable . . . . . . . . . . . . . . . . . . . . . . . . . . . . . . . . . . . . . . . . . . . . . . . . . . . . . . . . . . . . . . . . . . . . . . . . .185
bonjour interface range . . . . . . . . . . . . . . . . . . . . . . . . . . . . . . . . . . . . . . . . . . . . . . . . . . . . . . . . . . . . . . . .185
show bonjour . . . . . . . . . . . . . . . . . . . . . . . . . . . . . . . . . . . . . . . . . . . . . . . . . . . . . . . . . . . . . . . . . . . . . . . . . . 186
15 Authentication, Authorization and Accounting (AAA) Commands ................................. 188
aaa authentication login . . . . . . . . . . . . . . . . . . . . . . . . . . . . . . . . . . . . . . . . . . . . . . . . . . . . . . . . . . . . . . . .188
aaa authentication enable . . . . . . . . . . . . . . . . . . . . . . . . . . . . . . . . . . . . . . . . . . . . . . . . . . . . . . . . . . . . . .189
ip http authentication . . . . . . . . . . . . . . . . . . . . . . . . . . . . . . . . . . . . . . . . . . . . . . . . . . . . . . . . . . . . . . . . . .191
show authentication methods . . . . . . . . . . . . . . . . . . . . . . . . . . . . . . . . . . . . . . . . . . . . . . . . . . . . . . . . . .192
password . . . . . . . . . . . . . . . . . . . . . . . . . . . . . . . . . . . . . . . . . . . . . . . . . . . . . . . . . . . . . . . . . . . . . . . . . . . . . .194
enable password . . . . . . . . . . . . . . . . . . . . . . . . . . . . . . . . . . . . . . . . . . . . . . . . . . . . . . . . . . . . . . . . . . . . . . 195
username . . . . . . . . . . . . . . . . . . . . . . . . . . . . . . . . . . . . . . . . . . . . . . . . . . . . . . . . . . . . . . . . . . . . . . . . . . . . . . 196
show user accounts . . . . . . . . . . . . . . . . . . . . . . . . . . . . . . . . . . . . . . . . . . . . . . . . . . . . . . . . . . . . . . . . . . . .197
passwords complexity enable . . . . . . . . . . . . . . . . . . . . . . . . . . . . . . . . . . . . . . . . . . . . . . . . . . . . . . . . . 198
passwords complexity <attributes> . . . . . . . . . . . . . . . . . . . . . . . . . . . . . . . . . . . . . . . . . . . . . . . . . . . . 200
passwords aging . . . . . . . . . . . . . . . . . . . . . . . . . . . . . . . . . . . . . . . . . . . . . . . . . . . . . . . . . . . . . . . . . . . . . . 202
show passwords configuration . . . . . . . . . . . . . . . . . . . . . . . . . . . . . . . . . . . . . . . . . . . . . . . . . . . . . . . . 203
16 Remote Authentication Dial-In User Service (RADIUS) Commands.............................. 205
radius-server host . . . . . . . . . . . . . . . . . . . . . . . . . . . . . . . . . . . . . . . . . . . . . . . . . . . . . . . . . . . . . . . . . . . . . . 205
radius-server key . . . . . . . . . . . . . . . . . . . . . . . . . . . . . . . . . . . . . . . . . . . . . . . . . . . . . . . . . . . . . . . . . . . . . .207
radius-server retransmit . . . . . . . . . . . . . . . . . . . . . . . . . . . . . . . . . . . . . . . . . . . . . . . . . . . . . . . . . . . . . . .208
radius-server source-ip . . . . . . . . . . . . . . . . . . . . . . . . . . . . . . . . . . . . . . . . . . . . . . . . . . . . . . . . . . . . . . . . 209
radius-server source-ipv6 . . . . . . . . . . . . . . . . . . . . . . . . . . . . . . . . . . . . . . . . . . . . . . . . . . . . . . . . . . . . . . 210
radius-server timeout . . . . . . . . . . . . . . . . . . . . . . . . . . . . . . . . . . . . . . . . . . . . . . . . . . . . . . . . . . . . . . . . . . 210
radius-server deadtime . . . . . . . . . . . . . . . . . . . . . . . . . . . . . . . . . . . . . . . . . . . . . . . . . . . . . . . . . . . . . . . . 211
show radius-servers . . . . . . . . . . . . . . . . . . . . . . . . . . . . . . . . . . . . . . . . . . . . . . . . . . . . . . . . . . . . . . . . . . .212
17 Terminal Access Controller Access-Control System Plus (TACACS+) Commands ....214
tacacs-server host . . . . . . . . . . . . . . . . . . . . . . . . . . . . . . . . . . . . . . . . . . . . . . . . . . . . . . . . . . . . . . . . . . . . . 214
tacacs-server key . . . . . . . . . . . . . . . . . . . . . . . . . . . . . . . . . . . . . . . . . . . . . . . . . . . . . . . . . . . . . . . . . . . . . . 215
tacacs-server timeout . . . . . . . . . . . . . . . . . . . . . . . . . . . . . . . . . . . . . . . . . . . . . . . . . . . . . . . . . . . . . . . . . .216
tacacs-server source-ip . . . . . . . . . . . . . . . . . . . . . . . . . . . . . . . . . . . . . . . . . . . . . . . . . . . . . . . . . . . . . . . .217
show tacacs . . . . . . . . . . . . . . . . . . . . . . . . . . . . . . . . . . . . . . . . . . . . . . . . . . . . . . . . . . . . . . . . . . . . . . . . . . .217
18 Syslog Commands ...............................................................................................................219
logging on . . . . . . . . . . . . . . . . . . . . . . . . . . . . . . . . . . . . . . . . . . . . . . . . . . . . . . . . . . . . . . . . . . . . . . . . . . . . . .219
78-20269-01 Command Line Interface Reference Guide 5
Page 6

logging host . . . . . . . . . . . . . . . . . . . . . . . . . . . . . . . . . . . . . . . . . . . . . . . . . . . . . . . . . . . . . . . . . . . . . . . . . . .220
logging console . . . . . . . . . . . . . . . . . . . . . . . . . . . . . . . . . . . . . . . . . . . . . . . . . . . . . . . . . . . . . . . . . . . . . . . . 221
logging buffered . . . . . . . . . . . . . . . . . . . . . . . . . . . . . . . . . . . . . . . . . . . . . . . . . . . . . . . . . . . . . . . . . . . . . . . 222
clear logging . . . . . . . . . . . . . . . . . . . . . . . . . . . . . . . . . . . . . . . . . . . . . . . . . . . . . . . . . . . . . . . . . . . . . . . . . . .223
logging file . . . . . . . . . . . . . . . . . . . . . . . . . . . . . . . . . . . . . . . . . . . . . . . . . . . . . . . . . . . . . . . . . . . . . . . . . . . . .224
clear logging file . . . . . . . . . . . . . . . . . . . . . . . . . . . . . . . . . . . . . . . . . . . . . . . . . . . . . . . . . . . . . . . . . . . . . . .225
file-system logging . . . . . . . . . . . . . . . . . . . . . . . . . . . . . . . . . . . . . . . . . . . . . . . . . . . . . . . . . . . . . . . . . . . . . 225
logging aggregation on . . . . . . . . . . . . . . . . . . . . . . . . . . . . . . . . . . . . . . . . . . . . . . . . . . . . . . . . . . . . . . . . 226
logging aggregation aging-time . . . . . . . . . . . . . . . . . . . . . . . . . . . . . . . . . . . . . . . . . . . . . . . . . . . . . . . . 227
show logging . . . . . . . . . . . . . . . . . . . . . . . . . . . . . . . . . . . . . . . . . . . . . . . . . . . . . . . . . . . . . . . . . . . . . . . . . . 227
show logging file . . . . . . . . . . . . . . . . . . . . . . . . . . . . . . . . . . . . . . . . . . . . . . . . . . . . . . . . . . . . . . . . . . . . . . . 229
show syslog-servers . . . . . . . . . . . . . . . . . . . . . . . . . . . . . . . . . . . . . . . . . . . . . . . . . . . . . . . . . . . . . . . . . . . 230
Contents
19 Remote Network Monitoring (RMON) Commands...........................................................232
show rmon statistics . . . . . . . . . . . . . . . . . . . . . . . . . . . . . . . . . . . . . . . . . . . . . . . . . . . . . . . . . . . . . . . . . . . 232
rmon collection stats . . . . . . . . . . . . . . . . . . . . . . . . . . . . . . . . . . . . . . . . . . . . . . . . . . . . . . . . . . . . . . . . . . 234
show rmon collection stats . . . . . . . . . . . . . . . . . . . . . . . . . . . . . . . . . . . . . . . . . . . . . . . . . . . . . . . . . . . . .235
show rmon history . . . . . . . . . . . . . . . . . . . . . . . . . . . . . . . . . . . . . . . . . . . . . . . . . . . . . . . . . . . . . . . . . . . . .236
rmon alarm . . . . . . . . . . . . . . . . . . . . . . . . . . . . . . . . . . . . . . . . . . . . . . . . . . . . . . . . . . . . . . . . . . . . . . . . . . . . .239
show rmon alarm-table . . . . . . . . . . . . . . . . . . . . . . . . . . . . . . . . . . . . . . . . . . . . . . . . . . . . . . . . . . . . . . . . 241
show rmon alarm . . . . . . . . . . . . . . . . . . . . . . . . . . . . . . . . . . . . . . . . . . . . . . . . . . . . . . . . . . . . . . . . . . . . . . . 242
rmon event . . . . . . . . . . . . . . . . . . . . . . . . . . . . . . . . . . . . . . . . . . . . . . . . . . . . . . . . . . . . . . . . . . . . . . . . . . . . .244
show rmon events . . . . . . . . . . . . . . . . . . . . . . . . . . . . . . . . . . . . . . . . . . . . . . . . . . . . . . . . . . . . . . . . . . . . . 245
show rmon log . . . . . . . . . . . . . . . . . . . . . . . . . . . . . . . . . . . . . . . . . . . . . . . . . . . . . . . . . . . . . . . . . . . . . . . . .246
rmon table-size . . . . . . . . . . . . . . . . . . . . . . . . . . . . . . . . . . . . . . . . . . . . . . . . . . . . . . . . . . . . . . . . . . . . . . . . 247
20 802.1x Commands...............................................................................................................249
aaa authentication dot1x . . . . . . . . . . . . . . . . . . . . . . . . . . . . . . . . . . . . . . . . . . . . . . . . . . . . . . . . . . . . . . .249
dot1x system-auth-control . . . . . . . . . . . . . . . . . . . . . . . . . . . . . . . . . . . . . . . . . . . . . . . . . . . . . . . . . . . . .250
dot1x port-control . . . . . . . . . . . . . . . . . . . . . . . . . . . . . . . . . . . . . . . . . . . . . . . . . . . . . . . . . . . . . . . . . . . . . . 250
dot1x reauthentication . . . . . . . . . . . . . . . . . . . . . . . . . . . . . . . . . . . . . . . . . . . . . . . . . . . . . . . . . . . . . . . . . 252
dot1x timeout reauth-period . . . . . . . . . . . . . . . . . . . . . . . . . . . . . . . . . . . . . . . . . . . . . . . . . . . . . . . . . . .252
dot1x timeout quiet-period . . . . . . . . . . . . . . . . . . . . . . . . . . . . . . . . . . . . . . . . . . . . . . . . . . . . . . . . . . . . . 253
dot1x timeout tx-period . . . . . . . . . . . . . . . . . . . . . . . . . . . . . . . . . . . . . . . . . . . . . . . . . . . . . . . . . . . . . . . .254
dot1x max-req . . . . . . . . . . . . . . . . . . . . . . . . . . . . . . . . . . . . . . . . . . . . . . . . . . . . . . . . . . . . . . . . . . . . . . . . . 255
dot1x timeout supp-timeout . . . . . . . . . . . . . . . . . . . . . . . . . . . . . . . . . . . . . . . . . . . . . . . . . . . . . . . . . . . . 256
dot1x timeout server-timeout . . . . . . . . . . . . . . . . . . . . . . . . . . . . . . . . . . . . . . . . . . . . . . . . . . . . . . . . . .257
show dot1x . . . . . . . . . . . . . . . . . . . . . . . . . . . . . . . . . . . . . . . . . . . . . . . . . . . . . . . . . . . . . . . . . . . . . . . . . . . .258
show dot1x users . . . . . . . . . . . . . . . . . . . . . . . . . . . . . . . . . . . . . . . . . . . . . . . . . . . . . . . . . . . . . . . . . . . . . .262
show dot1x statistics . . . . . . . . . . . . . . . . . . . . . . . . . . . . . . . . . . . . . . . . . . . . . . . . . . . . . . . . . . . . . . . . . . 263
clear dot1x statistics . . . . . . . . . . . . . . . . . . . . . . . . . . . . . . . . . . . . . . . . . . . . . . . . . . . . . . . . . . . . . . . . . . . 266
dot1x host-mode . . . . . . . . . . . . . . . . . . . . . . . . . . . . . . . . . . . . . . . . . . . . . . . . . . . . . . . . . . . . . . . . . . . . . .266
dot1x violation-mode . . . . . . . . . . . . . . . . . . . . . . . . . . . . . . . . . . . . . . . . . . . . . . . . . . . . . . . . . . . . . . . . . . 267
dot1x guest-vlan . . . . . . . . . . . . . . . . . . . . . . . . . . . . . . . . . . . . . . . . . . . . . . . . . . . . . . . . . . . . . . . . . . . . . . .269
dot1x guest-vlan timeout . . . . . . . . . . . . . . . . . . . . . . . . . . . . . . . . . . . . . . . . . . . . . . . . . . . . . . . . . . . . . . . 269
dot1x guest-vlan enable . . . . . . . . . . . . . . . . . . . . . . . . . . . . . . . . . . . . . . . . . . . . . . . . . . . . . . . . . . . . . . . 270
dot1x mac-authentication . . . . . . . . . . . . . . . . . . . . . . . . . . . . . . . . . . . . . . . . . . . . . . . . . . . . . . . . . . . . . . 271
show dot1x advanced . . . . . . . . . . . . . . . . . . . . . . . . . . . . . . . . . . . . . . . . . . . . . . . . . . . . . . . . . . . . . . . . . 272
78-20269-01 Command Line Interface Reference Guide 6
Page 7

Contents
21 Ethernet Configuration Commands ...................................................................................274
interface . . . . . . . . . . . . . . . . . . . . . . . . . . . . . . . . . . . . . . . . . . . . . . . . . . . . . . . . . . . . . . . . . . . . . . . . . . . . . . .274
interface range . . . . . . . . . . . . . . . . . . . . . . . . . . . . . . . . . . . . . . . . . . . . . . . . . . . . . . . . . . . . . . . . . . . . . . . . .274
shutdown . . . . . . . . . . . . . . . . . . . . . . . . . . . . . . . . . . . . . . . . . . . . . . . . . . . . . . . . . . . . . . . . . . . . . . . . . . . . . . 275
description . . . . . . . . . . . . . . . . . . . . . . . . . . . . . . . . . . . . . . . . . . . . . . . . . . . . . . . . . . . . . . . . . . . . . . . . . . . . .276
speed . . . . . . . . . . . . . . . . . . . . . . . . . . . . . . . . . . . . . . . . . . . . . . . . . . . . . . . . . . . . . . . . . . . . . . . . . . . . . . . . . . 276
duplex . . . . . . . . . . . . . . . . . . . . . . . . . . . . . . . . . . . . . . . . . . . . . . . . . . . . . . . . . . . . . . . . . . . . . . . . . . . . . . . . .277
negotiation . . . . . . . . . . . . . . . . . . . . . . . . . . . . . . . . . . . . . . . . . . . . . . . . . . . . . . . . . . . . . . . . . . . . . . . . . . . . . 278
flowcontrol . . . . . . . . . . . . . . . . . . . . . . . . . . . . . . . . . . . . . . . . . . . . . . . . . . . . . . . . . . . . . . . . . . . . . . . . . . . . .279
mdix . . . . . . . . . . . . . . . . . . . . . . . . . . . . . . . . . . . . . . . . . . . . . . . . . . . . . . . . . . . . . . . . . . . . . . . . . . . . . . . . . . .280
back-pressure . . . . . . . . . . . . . . . . . . . . . . . . . . . . . . . . . . . . . . . . . . . . . . . . . . . . . . . . . . . . . . . . . . . . . . . . .280
port jumbo-frame . . . . . . . . . . . . . . . . . . . . . . . . . . . . . . . . . . . . . . . . . . . . . . . . . . . . . . . . . . . . . . . . . . . . . .281
clear counters . . . . . . . . . . . . . . . . . . . . . . . . . . . . . . . . . . . . . . . . . . . . . . . . . . . . . . . . . . . . . . . . . . . . . . . . . . 282
set interface active . . . . . . . . . . . . . . . . . . . . . . . . . . . . . . . . . . . . . . . . . . . . . . . . . . . . . . . . . . . . . . . . . . . . .282
show interfaces configuration . . . . . . . . . . . . . . . . . . . . . . . . . . . . . . . . . . . . . . . . . . . . . . . . . . . . . . . . . . 283
show interfaces status . . . . . . . . . . . . . . . . . . . . . . . . . . . . . . . . . . . . . . . . . . . . . . . . . . . . . . . . . . . . . . . . .284
show interfaces advertise . . . . . . . . . . . . . . . . . . . . . . . . . . . . . . . . . . . . . . . . . . . . . . . . . . . . . . . . . . . . . . 285
show interfaces description . . . . . . . . . . . . . . . . . . . . . . . . . . . . . . . . . . . . . . . . . . . . . . . . . . . . . . . . . . . . 286
show interfaces counters . . . . . . . . . . . . . . . . . . . . . . . . . . . . . . . . . . . . . . . . . . . . . . . . . . . . . . . . . . . . . .287
show port jumbo-frame . . . . . . . . . . . . . . . . . . . . . . . . . . . . . . . . . . . . . . . . . . . . . . . . . . . . . . . . . . . . . . . .290
storm-control broadcast level kbps . . . . . . . . . . . . . . . . . . . . . . . . . . . . . . . . . . . . . . . . . . . . . . . . . . . . 291
storm-control broadcast level . . . . . . . . . . . . . . . . . . . . . . . . . . . . . . . . . . . . . . . . . . . . . . . . . . . . . . . . .291
storm-control include-multicast . . . . . . . . . . . . . . . . . . . . . . . . . . . . . . . . . . . . . . . . . . . . . . . . . . . . . . . . 293
show storm-control . . . . . . . . . . . . . . . . . . . . . . . . . . . . . . . . . . . . . . . . . . . . . . . . . . . . . . . . . . . . . . . . . . . . 293
22 PHY Diagnostics Commands.............................................................................................. 295
show cable-diagnostics cable-length . . . . . . . . . . . . . . . . . . . . . . . . . . . . . . . . . . . . . . . . . . . . . . . . . . 295
show fiber-ports optical-transceiver . . . . . . . . . . . . . . . . . . . . . . . . . . . . . . . . . . . . . . . . . . . . . . . . . . . 295
23 Power over Ethernet (PoE) Commands............................................................................. 298
power inline . . . . . . . . . . . . . . . . . . . . . . . . . . . . . . . . . . . . . . . . . . . . . . . . . . . . . . . . . . . . . . . . . . . . . . . . . . . .298
power inline priority . . . . . . . . . . . . . . . . . . . . . . . . . . . . . . . . . . . . . . . . . . . . . . . . . . . . . . . . . . . . . . . . . . . .298
power inline usage-threshold . . . . . . . . . . . . . . . . . . . . . . . . . . . . . . . . . . . . . . . . . . . . . . . . . . . . . . . . . . 299
power inline traps enable . . . . . . . . . . . . . . . . . . . . . . . . . . . . . . . . . . . . . . . . . . . . . . . . . . . . . . . . . . . . . . 300
power inline limit . . . . . . . . . . . . . . . . . . . . . . . . . . . . . . . . . . . . . . . . . . . . . . . . . . . . . . . . . . . . . . . . . . . . . . . 300
power inline limit-mode . . . . . . . . . . . . . . . . . . . . . . . . . . . . . . . . . . . . . . . . . . . . . . . . . . . . . . . . . . . . . . . .301
show power inline . . . . . . . . . . . . . . . . . . . . . . . . . . . . . . . . . . . . . . . . . . . . . . . . . . . . . . . . . . . . . . . . . . . . . 302
show power inline consumption . . . . . . . . . . . . . . . . . . . . . . . . . . . . . . . . . . . . . . . . . . . . . . . . . . . . . . .304
24 EEE Commands .................................................................................................................... 306
eee enable (global) . . . . . . . . . . . . . . . . . . . . . . . . . . . . . . . . . . . . . . . . . . . . . . . . . . . . . . . . . . . . . . . . . . . . .306
eee enable (interface) . . . . . . . . . . . . . . . . . . . . . . . . . . . . . . . . . . . . . . . . . . . . . . . . . . . . . . . . . . . . . . . . . .306
eee lldp enable . . . . . . . . . . . . . . . . . . . . . . . . . . . . . . . . . . . . . . . . . . . . . . . . . . . . . . . . . . . . . . . . . . . . . . . .307
show eee . . . . . . . . . . . . . . . . . . . . . . . . . . . . . . . . . . . . . . . . . . . . . . . . . . . . . . . . . . . . . . . . . . . . . . . . . . . . . . 307
25 Green Ethernet .....................................................................................................................313
green-ethernet energy-detect (global) . . . . . . . . . . . . . . . . . . . . . . . . . . . . . . . . . . . . . . . . . . . . . . . . .313
green-ethernet energy-detect (interface) . . . . . . . . . . . . . . . . . . . . . . . . . . . . . . . . . . . . . . . . . . . . . .313
show green-ethernet . . . . . . . . . . . . . . . . . . . . . . . . . . . . . . . . . . . . . . . . . . . . . . . . . . . . . . . . . . . . . . . . . . . 314
78-20269-01 Command Line Interface Reference Guide 7
Page 8

green-ethernet short-reach (global) . . . . . . . . . . . . . . . . . . . . . . . . . . . . . . . . . . . . . . . . . . . . . . . . . . . . 316
green-ethernet short-reach (interface) . . . . . . . . . . . . . . . . . . . . . . . . . . . . . . . . . . . . . . . . . . . . . . . . . 316
green-ethernet power-meter reset . . . . . . . . . . . . . . . . . . . . . . . . . . . . . . . . . . . . . . . . . . . . . . . . . . . .317
Contents
26 Port Channel Commands ....................................................................................................319
port-channel load-balance . . . . . . . . . . . . . . . . . . . . . . . . . . . . . . . . . . . . . . . . . . . . . . . . . . . . . . . . . . . .320
show interfaces port-channel . . . . . . . . . . . . . . . . . . . . . . . . . . . . . . . . . . . . . . . . . . . . . . . . . . . . . . . . . . 320
27 Address Table Commands.................................................................................................. 323
bridge multicast filtering . . . . . . . . . . . . . . . . . . . . . . . . . . . . . . . . . . . . . . . . . . . . . . . . . . . . . . . . . . . . . . .323
bridge multicast mode . . . . . . . . . . . . . . . . . . . . . . . . . . . . . . . . . . . . . . . . . . . . . . . . . . . . . . . . . . . . . . . . . 323
bridge multicast address . . . . . . . . . . . . . . . . . . . . . . . . . . . . . . . . . . . . . . . . . . . . . . . . . . . . . . . . . . . . . . . 325
bridge multicast forbidden address . . . . . . . . . . . . . . . . . . . . . . . . . . . . . . . . . . . . . . . . . . . . . . . . . . . . 327
bridge multicast ip-address . . . . . . . . . . . . . . . . . . . . . . . . . . . . . . . . . . . . . . . . . . . . . . . . . . . . . . . . . . . . 328
bridge multicast forbidden ip-address . . . . . . . . . . . . . . . . . . . . . . . . . . . . . . . . . . . . . . . . . . . . . . . . . 329
bridge multicast source group . . . . . . . . . . . . . . . . . . . . . . . . . . . . . . . . . . . . . . . . . . . . . . . . . . . . . . . . .330
bridge multicast forbidden source group . . . . . . . . . . . . . . . . . . . . . . . . . . . . . . . . . . . . . . . . . . . . . . 332
bridge multicast ipv6 mode . . . . . . . . . . . . . . . . . . . . . . . . . . . . . . . . . . . . . . . . . . . . . . . . . . . . . . . . . . . .333
bridge multicast ipv6 ip-address . . . . . . . . . . . . . . . . . . . . . . . . . . . . . . . . . . . . . . . . . . . . . . . . . . . . . . . 335
bridge multicast ipv6 forbidden ip-address . . . . . . . . . . . . . . . . . . . . . . . . . . . . . . . . . . . . . . . . . . . .336
bridge multicast ipv6 source group . . . . . . . . . . . . . . . . . . . . . . . . . . . . . . . . . . . . . . . . . . . . . . . . . . . .337
bridge multicast ipv6 forbidden source group . . . . . . . . . . . . . . . . . . . . . . . . . . . . . . . . . . . . . . . . .338
bridge multicast unregistered . . . . . . . . . . . . . . . . . . . . . . . . . . . . . . . . . . . . . . . . . . . . . . . . . . . . . . . . . . 340
bridge multicast forward-all . . . . . . . . . . . . . . . . . . . . . . . . . . . . . . . . . . . . . . . . . . . . . . . . . . . . . . . . . . . .341
bridge multicast forbidden forward-all . . . . . . . . . . . . . . . . . . . . . . . . . . . . . . . . . . . . . . . . . . . . . . . . .342
mac address-table static . . . . . . . . . . . . . . . . . . . . . . . . . . . . . . . . . . . . . . . . . . . . . . . . . . . . . . . . . . . . . . 343
clear mac address-table . . . . . . . . . . . . . . . . . . . . . . . . . . . . . . . . . . . . . . . . . . . . . . . . . . . . . . . . . . . . . . . 344
mac address-table aging-time . . . . . . . . . . . . . . . . . . . . . . . . . . . . . . . . . . . . . . . . . . . . . . . . . . . . . . . . . 344
port security . . . . . . . . . . . . . . . . . . . . . . . . . . . . . . . . . . . . . . . . . . . . . . . . . . . . . . . . . . . . . . . . . . . . . . . . . . .345
port security mode . . . . . . . . . . . . . . . . . . . . . . . . . . . . . . . . . . . . . . . . . . . . . . . . . . . . . . . . . . . . . . . . . . . . .346
port security max . . . . . . . . . . . . . . . . . . . . . . . . . . . . . . . . . . . . . . . . . . . . . . . . . . . . . . . . . . . . . . . . . . . . . .347
show mac address-table . . . . . . . . . . . . . . . . . . . . . . . . . . . . . . . . . . . . . . . . . . . . . . . . . . . . . . . . . . . . . .348
show mac address-table count . . . . . . . . . . . . . . . . . . . . . . . . . . . . . . . . . . . . . . . . . . . . . . . . . . . . . . . .349
show bridge multicast mode . . . . . . . . . . . . . . . . . . . . . . . . . . . . . . . . . . . . . . . . . . . . . . . . . . . . . . . . . . .350
show bridge multicast address-table . . . . . . . . . . . . . . . . . . . . . . . . . . . . . . . . . . . . . . . . . . . . . . . . . .351
show bridge multicast unregistered . . . . . . . . . . . . . . . . . . . . . . . . . . . . . . . . . . . . . . . . . . . . . . . . . . . . 354
show ports security . . . . . . . . . . . . . . . . . . . . . . . . . . . . . . . . . . . . . . . . . . . . . . . . . . . . . . . . . . . . . . . . . . . . 355
show ports security addresses . . . . . . . . . . . . . . . . . . . . . . . . . . . . . . . . . . . . . . . . . . . . . . . . . . . . . . . . 356
bridge multicast reserved-address . . . . . . . . . . . . . . . . . . . . . . . . . . . . . . . . . . . . . . . . . . . . . . . . . . . . 357
show bridge multicast reserved-addresses . . . . . . . . . . . . . . . . . . . . . . . . . . . . . . . . . . . . . . . . . . . .358
28 Port Monitor Commands ..................................................................................................... 360
port monitor . . . . . . . . . . . . . . . . . . . . . . . . . . . . . . . . . . . . . . . . . . . . . . . . . . . . . . . . . . . . . . . . . . . . . . . . . . . .360
show ports monitor . . . . . . . . . . . . . . . . . . . . . . . . . . . . . . . . . . . . . . . . . . . . . . . . . . . . . . . . . . . . . . . . . . . .362
29 Spanning-Tree Commands ................................................................................................. 363
spanning-tree . . . . . . . . . . . . . . . . . . . . . . . . . . . . . . . . . . . . . . . . . . . . . . . . . . . . . . . . . . . . . . . . . . . . . . . . . .363
spanning-tree mode . . . . . . . . . . . . . . . . . . . . . . . . . . . . . . . . . . . . . . . . . . . . . . . . . . . . . . . . . . . . . . . . . . . 363
spanning-tree forward-time . . . . . . . . . . . . . . . . . . . . . . . . . . . . . . . . . . . . . . . . . . . . . . . . . . . . . . . . . . . . 364
78-20269-01 Command Line Interface Reference Guide 8
Page 9

spanning-tree hello-time . . . . . . . . . . . . . . . . . . . . . . . . . . . . . . . . . . . . . . . . . . . . . . . . . . . . . . . . . . . . . . .365
spanning-tree max-age . . . . . . . . . . . . . . . . . . . . . . . . . . . . . . . . . . . . . . . . . . . . . . . . . . . . . . . . . . . . . . . .366
spanning-tree priority . . . . . . . . . . . . . . . . . . . . . . . . . . . . . . . . . . . . . . . . . . . . . . . . . . . . . . . . . . . . . . . . . .367
spanning-tree disable . . . . . . . . . . . . . . . . . . . . . . . . . . . . . . . . . . . . . . . . . . . . . . . . . . . . . . . . . . . . . . . . . . 368
spanning-tree cost . . . . . . . . . . . . . . . . . . . . . . . . . . . . . . . . . . . . . . . . . . . . . . . . . . . . . . . . . . . . . . . . . . . . . 368
spanning-tree port-priority . . . . . . . . . . . . . . . . . . . . . . . . . . . . . . . . . . . . . . . . . . . . . . . . . . . . . . . . . . . . . 369
spanning-tree portfast . . . . . . . . . . . . . . . . . . . . . . . . . . . . . . . . . . . . . . . . . . . . . . . . . . . . . . . . . . . . . . . . .370
spanning-tree link-type . . . . . . . . . . . . . . . . . . . . . . . . . . . . . . . . . . . . . . . . . . . . . . . . . . . . . . . . . . . . . . . . 371
spanning-tree pathcost method . . . . . . . . . . . . . . . . . . . . . . . . . . . . . . . . . . . . . . . . . . . . . . . . . . . . . . . .372
spanning-tree bpdu (Global) . . . . . . . . . . . . . . . . . . . . . . . . . . . . . . . . . . . . . . . . . . . . . . . . . . . . . . . . . . .373
spanning-tree bpdu (Interface) . . . . . . . . . . . . . . . . . . . . . . . . . . . . . . . . . . . . . . . . . . . . . . . . . . . . . . . . . 374
spanning-tree bpduguard . . . . . . . . . . . . . . . . . . . . . . . . . . . . . . . . . . . . . . . . . . . . . . . . . . . . . . . . . . . . .375
clear spanning-tree detected-protocols . . . . . . . . . . . . . . . . . . . . . . . . . . . . . . . . . . . . . . . . . . . . . . . 376
spanning-tree mst priority . . . . . . . . . . . . . . . . . . . . . . . . . . . . . . . . . . . . . . . . . . . . . . . . . . . . . . . . . . . . . . 376
spanning-tree mst max-hops . . . . . . . . . . . . . . . . . . . . . . . . . . . . . . . . . . . . . . . . . . . . . . . . . . . . . . . . . . . 377
spanning-tree mst port-priority . . . . . . . . . . . . . . . . . . . . . . . . . . . . . . . . . . . . . . . . . . . . . . . . . . . . . . . .378
spanning-tree mst cost . . . . . . . . . . . . . . . . . . . . . . . . . . . . . . . . . . . . . . . . . . . . . . . . . . . . . . . . . . . . . . . . . 379
spanning-tree mst configuration . . . . . . . . . . . . . . . . . . . . . . . . . . . . . . . . . . . . . . . . . . . . . . . . . . . . . . . 380
instance (MST) . . . . . . . . . . . . . . . . . . . . . . . . . . . . . . . . . . . . . . . . . . . . . . . . . . . . . . . . . . . . . . . . . . . . . . . . 381
name (MST) . . . . . . . . . . . . . . . . . . . . . . . . . . . . . . . . . . . . . . . . . . . . . . . . . . . . . . . . . . . . . . . . . . . . . . . . . . . . 382
revision (MST) . . . . . . . . . . . . . . . . . . . . . . . . . . . . . . . . . . . . . . . . . . . . . . . . . . . . . . . . . . . . . . . . . . . . . . . . . . 382
show (MST) . . . . . . . . . . . . . . . . . . . . . . . . . . . . . . . . . . . . . . . . . . . . . . . . . . . . . . . . . . . . . . . . . . . . . . . . . . . .383
exit (MST) . . . . . . . . . . . . . . . . . . . . . . . . . . . . . . . . . . . . . . . . . . . . . . . . . . . . . . . . . . . . . . . . . . . . . . . . . . . . . . 384
abort (MST) . . . . . . . . . . . . . . . . . . . . . . . . . . . . . . . . . . . . . . . . . . . . . . . . . . . . . . . . . . . . . . . . . . . . . . . . . . . . 384
show spanning-tree . . . . . . . . . . . . . . . . . . . . . . . . . . . . . . . . . . . . . . . . . . . . . . . . . . . . . . . . . . . . . . . . . . . .385
show spanning-tree bpdu . . . . . . . . . . . . . . . . . . . . . . . . . . . . . . . . . . . . . . . . . . . . . . . . . . . . . . . . . . . . . .401
Contents
30 Virtual Local Area Network (VLAN) Commands...............................................................403
vlan database . . . . . . . . . . . . . . . . . . . . . . . . . . . . . . . . . . . . . . . . . . . . . . . . . . . . . . . . . . . . . . . . . . . . . . . . . . 403
vlan . . . . . . . . . . . . . . . . . . . . . . . . . . . . . . . . . . . . . . . . . . . . . . . . . . . . . . . . . . . . . . . . . . . . . . . . . . . . . . . . . . . .403
show vlan . . . . . . . . . . . . . . . . . . . . . . . . . . . . . . . . . . . . . . . . . . . . . . . . . . . . . . . . . . . . . . . . . . . . . . . . . . . . . .404
default-vlan vlan . . . . . . . . . . . . . . . . . . . . . . . . . . . . . . . . . . . . . . . . . . . . . . . . . . . . . . . . . . . . . . . . . . . . . . .406
show default-vlan-membership . . . . . . . . . . . . . . . . . . . . . . . . . . . . . . . . . . . . . . . . . . . . . . . . . . . . . . .407
interface vlan . . . . . . . . . . . . . . . . . . . . . . . . . . . . . . . . . . . . . . . . . . . . . . . . . . . . . . . . . . . . . . . . . . . . . . . . . . 408
interface range vlan . . . . . . . . . . . . . . . . . . . . . . . . . . . . . . . . . . . . . . . . . . . . . . . . . . . . . . . . . . . . . . . . . . . . 409
name . . . . . . . . . . . . . . . . . . . . . . . . . . . . . . . . . . . . . . . . . . . . . . . . . . . . . . . . . . . . . . . . . . . . . . . . . . . . . . . . . . .410
switchport protected-port . . . . . . . . . . . . . . . . . . . . . . . . . . . . . . . . . . . . . . . . . . . . . . . . . . . . . . . . . . . . .410
show interfaces protected-ports . . . . . . . . . . . . . . . . . . . . . . . . . . . . . . . . . . . . . . . . . . . . . . . . . . . . . . .411
switchport mode . . . . . . . . . . . . . . . . . . . . . . . . . . . . . . . . . . . . . . . . . . . . . . . . . . . . . . . . . . . . . . . . . . . . . . .412
switchport access vlan . . . . . . . . . . . . . . . . . . . . . . . . . . . . . . . . . . . . . . . . . . . . . . . . . . . . . . . . . . . . . . . .413
switchport trunk allowed vlan . . . . . . . . . . . . . . . . . . . . . . . . . . . . . . . . . . . . . . . . . . . . . . . . . . . . . . . . . 414
switchport trunk native vlan . . . . . . . . . . . . . . . . . . . . . . . . . . . . . . . . . . . . . . . . . . . . . . . . . . . . . . . . . . . 415
switchport general allowed vlan . . . . . . . . . . . . . . . . . . . . . . . . . . . . . . . . . . . . . . . . . . . . . . . . . . . . . . .416
switchport general pvid . . . . . . . . . . . . . . . . . . . . . . . . . . . . . . . . . . . . . . . . . . . . . . . . . . . . . . . . . . . . . . . . 418
switchport general ingress-filtering disable . . . . . . . . . . . . . . . . . . . . . . . . . . . . . . . . . . . . . . . . . . . . 420
switchport general acceptable-frame-type . . . . . . . . . . . . . . . . . . . . . . . . . . . . . . . . . . . . . . . . . . . .421
switchport customer vlan . . . . . . . . . . . . . . . . . . . . . . . . . . . . . . . . . . . . . . . . . . . . . . . . . . . . . . . . . . . . . . 422
78-20269-01 Command Line Interface Reference Guide 9
Page 10

map mac macs-group . . . . . . . . . . . . . . . . . . . . . . . . . . . . . . . . . . . . . . . . . . . . . . . . . . . . . . . . . . . . . . . . . .422
switchport general map macs-group vlan . . . . . . . . . . . . . . . . . . . . . . . . . . . . . . . . . . . . . . . . . . . . . . 424
show vlan macs-groups . . . . . . . . . . . . . . . . . . . . . . . . . . . . . . . . . . . . . . . . . . . . . . . . . . . . . . . . . . . . . . . .425
switchport forbidden default-vlan . . . . . . . . . . . . . . . . . . . . . . . . . . . . . . . . . . . . . . . . . . . . . . . . . . . . .426
switchport forbidden vlan . . . . . . . . . . . . . . . . . . . . . . . . . . . . . . . . . . . . . . . . . . . . . . . . . . . . . . . . . . . . .426
switchport default-vlan tagged . . . . . . . . . . . . . . . . . . . . . . . . . . . . . . . . . . . . . . . . . . . . . . . . . . . . . . . . 427
show interfaces switchport . . . . . . . . . . . . . . . . . . . . . . . . . . . . . . . . . . . . . . . . . . . . . . . . . . . . . . . . . . . . 429
ip internal-usage-vlan . . . . . . . . . . . . . . . . . . . . . . . . . . . . . . . . . . . . . . . . . . . . . . . . . . . . . . . . . . . . . . . . . .432
show vlan internal usage . . . . . . . . . . . . . . . . . . . . . . . . . . . . . . . . . . . . . . . . . . . . . . . . . . . . . . . . . . . . . . .433
Contents
31 Internet Group Management Protocol (IGMP) Snooping Commands ...........................435
ip igmp snooping (Global) . . . . . . . . . . . . . . . . . . . . . . . . . . . . . . . . . . . . . . . . . . . . . . . . . . . . . . . . . . . . . . 435
ip igmp snooping vlan . . . . . . . . . . . . . . . . . . . . . . . . . . . . . . . . . . . . . . . . . . . . . . . . . . . . . . . . . . . . . . . . . 435
ip igmp snooping vlan mrouter . . . . . . . . . . . . . . . . . . . . . . . . . . . . . . . . . . . . . . . . . . . . . . . . . . . . . . . . 436
ip igmp snooping vlan mrouter interface . . . . . . . . . . . . . . . . . . . . . . . . . . . . . . . . . . . . . . . . . . . . . . . 437
ip igmp snooping vlan forbidden mrouter interface . . . . . . . . . . . . . . . . . . . . . . . . . . . . . . . . . . . . 438
ip igmp snooping vlan static . . . . . . . . . . . . . . . . . . . . . . . . . . . . . . . . . . . . . . . . . . . . . . . . . . . . . . . . . . . 439
ip igmp snooping vlan querier . . . . . . . . . . . . . . . . . . . . . . . . . . . . . . . . . . . . . . . . . . . . . . . . . . . . . . . . . 440
ip igmp snooping vlan querier address . . . . . . . . . . . . . . . . . . . . . . . . . . . . . . . . . . . . . . . . . . . . . . . . 441
ip igmp snooping vlan querier version . . . . . . . . . . . . . . . . . . . . . . . . . . . . . . . . . . . . . . . . . . . . . . . . .442
ip igmp robustness . . . . . . . . . . . . . . . . . . . . . . . . . . . . . . . . . . . . . . . . . . . . . . . . . . . . . . . . . . . . . . . . . . . .442
ip igmp query-interval . . . . . . . . . . . . . . . . . . . . . . . . . . . . . . . . . . . . . . . . . . . . . . . . . . . . . . . . . . . . . . . . . .443
ip igmp query-max-response-time . . . . . . . . . . . . . . . . . . . . . . . . . . . . . . . . . . . . . . . . . . . . . . . . . . . . . 444
ip igmp last-member-query-count . . . . . . . . . . . . . . . . . . . . . . . . . . . . . . . . . . . . . . . . . . . . . . . . . . . . . 445
ip igmp last-member-query-interval . . . . . . . . . . . . . . . . . . . . . . . . . . . . . . . . . . . . . . . . . . . . . . . . . . .446
ip igmp snooping vlan immediate-leave . . . . . . . . . . . . . . . . . . . . . . . . . . . . . . . . . . . . . . . . . . . . . . . .446
show ip igmp snooping mrouter . . . . . . . . . . . . . . . . . . . . . . . . . . . . . . . . . . . . . . . . . . . . . . . . . . . . . . . 447
show ip igmp snooping interface . . . . . . . . . . . . . . . . . . . . . . . . . . . . . . . . . . . . . . . . . . . . . . . . . . . . . . 448
show ip igmp snooping groups . . . . . . . . . . . . . . . . . . . . . . . . . . . . . . . . . . . . . . . . . . . . . . . . . . . . . . . . 449
32 IPv6 MLD Snooping Commands......................................................................................... 451
ipv6 mld snooping (Global) . . . . . . . . . . . . . . . . . . . . . . . . . . . . . . . . . . . . . . . . . . . . . . . . . . . . . . . . . . . . .451
ipv6 mld snooping vlan . . . . . . . . . . . . . . . . . . . . . . . . . . . . . . . . . . . . . . . . . . . . . . . . . . . . . . . . . . . . . . . . . 451
ipv6 mld robustness . . . . . . . . . . . . . . . . . . . . . . . . . . . . . . . . . . . . . . . . . . . . . . . . . . . . . . . . . . . . . . . . . . . 452
ipv6 mld snooping mrouter . . . . . . . . . . . . . . . . . . . . . . . . . . . . . . . . . . . . . . . . . . . . . . . . . . . . . . . . . . . .453
ipv6 mld snooping mrouter interface . . . . . . . . . . . . . . . . . . . . . . . . . . . . . . . . . . . . . . . . . . . . . . . . . .454
ipv6 mld snooping forbidden mrouter interface . . . . . . . . . . . . . . . . . . . . . . . . . . . . . . . . . . . . . . . .455
ipv6 mld snooping static . . . . . . . . . . . . . . . . . . . . . . . . . . . . . . . . . . . . . . . . . . . . . . . . . . . . . . . . . . . . . . . 455
ipv6 mld query-interval . . . . . . . . . . . . . . . . . . . . . . . . . . . . . . . . . . . . . . . . . . . . . . . . . . . . . . . . . . . . . . . .456
ipv6 mld query-max-response-time . . . . . . . . . . . . . . . . . . . . . . . . . . . . . . . . . . . . . . . . . . . . . . . . . . . . 457
ipv6 mld last-member-query-count . . . . . . . . . . . . . . . . . . . . . . . . . . . . . . . . . . . . . . . . . . . . . . . . . . . .458
ipv6 mld last-member-query-interval . . . . . . . . . . . . . . . . . . . . . . . . . . . . . . . . . . . . . . . . . . . . . . . . . .459
ipv6 mld snooping vlan immediate-leave . . . . . . . . . . . . . . . . . . . . . . . . . . . . . . . . . . . . . . . . . . . . . . . 459
show ipv6 mld snooping mrouter . . . . . . . . . . . . . . . . . . . . . . . . . . . . . . . . . . . . . . . . . . . . . . . . . . . . . . 460
show ipv6 mld snooping interface . . . . . . . . . . . . . . . . . . . . . . . . . . . . . . . . . . . . . . . . . . . . . . . . . . . . . 461
show ipv6 mld snooping groups . . . . . . . . . . . . . . . . . . . . . . . . . . . . . . . . . . . . . . . . . . . . . . . . . . . . . . .462
33 Link Aggregation Control Protocol (LACP) Commands ..................................................464
78-20269-01 Command Line Interface Reference Guide 10
Page 11

lacp system-priority . . . . . . . . . . . . . . . . . . . . . . . . . . . . . . . . . . . . . . . . . . . . . . . . . . . . . . . . . . . . . . . . . . . . 464
lacp port-priority . . . . . . . . . . . . . . . . . . . . . . . . . . . . . . . . . . . . . . . . . . . . . . . . . . . . . . . . . . . . . . . . . . . . . . . 464
lacp timeout . . . . . . . . . . . . . . . . . . . . . . . . . . . . . . . . . . . . . . . . . . . . . . . . . . . . . . . . . . . . . . . . . . . . . . . . . . . . 465
show lacp . . . . . . . . . . . . . . . . . . . . . . . . . . . . . . . . . . . . . . . . . . . . . . . . . . . . . . . . . . . . . . . . . . . . . . . . . . . . . .466
show lacp port-channel . . . . . . . . . . . . . . . . . . . . . . . . . . . . . . . . . . . . . . . . . . . . . . . . . . . . . . . . . . . . . . . .469
Contents
34 GARP VLAN Registration Protocol (GVRP) Commands ..................................................471
gvrp enable (Global) . . . . . . . . . . . . . . . . . . . . . . . . . . . . . . . . . . . . . . . . . . . . . . . . . . . . . . . . . . . . . . . . . . . 471
gvrp enable (Interface) . . . . . . . . . . . . . . . . . . . . . . . . . . . . . . . . . . . . . . . . . . . . . . . . . . . . . . . . . . . . . . . . . 471
gvrp vlan-creation-forbid . . . . . . . . . . . . . . . . . . . . . . . . . . . . . . . . . . . . . . . . . . . . . . . . . . . . . . . . . . . . . . . 472
gvrp registration-forbid . . . . . . . . . . . . . . . . . . . . . . . . . . . . . . . . . . . . . . . . . . . . . . . . . . . . . . . . . . . . . . . .473
clear gvrp statistics . . . . . . . . . . . . . . . . . . . . . . . . . . . . . . . . . . . . . . . . . . . . . . . . . . . . . . . . . . . . . . . . . . . . 473
show gvrp configuration . . . . . . . . . . . . . . . . . . . . . . . . . . . . . . . . . . . . . . . . . . . . . . . . . . . . . . . . . . . . . . .474
show gvrp statistics . . . . . . . . . . . . . . . . . . . . . . . . . . . . . . . . . . . . . . . . . . . . . . . . . . . . . . . . . . . . . . . . . . . .475
show gvrp error-statistics . . . . . . . . . . . . . . . . . . . . . . . . . . . . . . . . . . . . . . . . . . . . . . . . . . . . . . . . . . . . . . 476
35 IP Addressing Commands...................................................................................................478
ip address . . . . . . . . . . . . . . . . . . . . . . . . . . . . . . . . . . . . . . . . . . . . . . . . . . . . . . . . . . . . . . . . . . . . . . . . . . . . . 478
ip address dhcp . . . . . . . . . . . . . . . . . . . . . . . . . . . . . . . . . . . . . . . . . . . . . . . . . . . . . . . . . . . . . . . . . . . . . . . 479
renew dhcp . . . . . . . . . . . . . . . . . . . . . . . . . . . . . . . . . . . . . . . . . . . . . . . . . . . . . . . . . . . . . . . . . . . . . . . . . . . .481
ip default-gateway . . . . . . . . . . . . . . . . . . . . . . . . . . . . . . . . . . . . . . . . . . . . . . . . . . . . . . . . . . . . . . . . . . . . . 482
show ip interface . . . . . . . . . . . . . . . . . . . . . . . . . . . . . . . . . . . . . . . . . . . . . . . . . . . . . . . . . . . . . . . . . . . . . . 482
arp . . . . . . . . . . . . . . . . . . . . . . . . . . . . . . . . . . . . . . . . . . . . . . . . . . . . . . . . . . . . . . . . . . . . . . . . . . . . . . . . . . . . . 483
arp timeout (Global) . . . . . . . . . . . . . . . . . . . . . . . . . . . . . . . . . . . . . . . . . . . . . . . . . . . . . . . . . . . . . . . . . . . .484
ip arp proxy disable . . . . . . . . . . . . . . . . . . . . . . . . . . . . . . . . . . . . . . . . . . . . . . . . . . . . . . . . . . . . . . . . . . . .485
ip proxy-arp . . . . . . . . . . . . . . . . . . . . . . . . . . . . . . . . . . . . . . . . . . . . . . . . . . . . . . . . . . . . . . . . . . . . . . . . . . . . 486
clear arp-cache . . . . . . . . . . . . . . . . . . . . . . . . . . . . . . . . . . . . . . . . . . . . . . . . . . . . . . . . . . . . . . . . . . . . . . . . 486
show arp . . . . . . . . . . . . . . . . . . . . . . . . . . . . . . . . . . . . . . . . . . . . . . . . . . . . . . . . . . . . . . . . . . . . . . . . . . . . . . .487
show arp configuration . . . . . . . . . . . . . . . . . . . . . . . . . . . . . . . . . . . . . . . . . . . . . . . . . . . . . . . . . . . . . . . . . 488
interface ip . . . . . . . . . . . . . . . . . . . . . . . . . . . . . . . . . . . . . . . . . . . . . . . . . . . . . . . . . . . . . . . . . . . . . . . . . . . . .489
ip helper-address . . . . . . . . . . . . . . . . . . . . . . . . . . . . . . . . . . . . . . . . . . . . . . . . . . . . . . . . . . . . . . . . . . . . . . 490
show ip helper-address . . . . . . . . . . . . . . . . . . . . . . . . . . . . . . . . . . . . . . . . . . . . . . . . . . . . . . . . . . . . . . . .491
ip domain name . . . . . . . . . . . . . . . . . . . . . . . . . . . . . . . . . . . . . . . . . . . . . . . . . . . . . . . . . . . . . . . . . . . . . . .492
ip name-server . . . . . . . . . . . . . . . . . . . . . . . . . . . . . . . . . . . . . . . . . . . . . . . . . . . . . . . . . . . . . . . . . . . . . . . . .493
ip host . . . . . . . . . . . . . . . . . . . . . . . . . . . . . . . . . . . . . . . . . . . . . . . . . . . . . . . . . . . . . . . . . . . . . . . . . . . . . . . . . 494
clear host . . . . . . . . . . . . . . . . . . . . . . . . . . . . . . . . . . . . . . . . . . . . . . . . . . . . . . . . . . . . . . . . . . . . . . . . . . . . . . 495
clear host dhcp . . . . . . . . . . . . . . . . . . . . . . . . . . . . . . . . . . . . . . . . . . . . . . . . . . . . . . . . . . . . . . . . . . . . . . . .496
show hosts . . . . . . . . . . . . . . . . . . . . . . . . . . . . . . . . . . . . . . . . . . . . . . . . . . . . . . . . . . . . . . . . . . . . . . . . . . . . . 497
36 IPv6 Addressing Commands ..............................................................................................499
ipv6 enable . . . . . . . . . . . . . . . . . . . . . . . . . . . . . . . . . . . . . . . . . . . . . . . . . . . . . . . . . . . . . . . . . . . . . . . . . . . .499
ipv6 address autoconfig . . . . . . . . . . . . . . . . . . . . . . . . . . . . . . . . . . . . . . . . . . . . . . . . . . . . . . . . . . . . . . . 500
ipv6 icmp error-interval . . . . . . . . . . . . . . . . . . . . . . . . . . . . . . . . . . . . . . . . . . . . . . . . . . . . . . . . . . . . . . . . 501
show ipv6 icmp error-interval . . . . . . . . . . . . . . . . . . . . . . . . . . . . . . . . . . . . . . . . . . . . . . . . . . . . . . . . . .502
ipv6 address . . . . . . . . . . . . . . . . . . . . . . . . . . . . . . . . . . . . . . . . . . . . . . . . . . . . . . . . . . . . . . . . . . . . . . . . . . .502
ipv6 address link-local . . . . . . . . . . . . . . . . . . . . . . . . . . . . . . . . . . . . . . . . . . . . . . . . . . . . . . . . . . . . . . . . . 503
ipv6 unreachables . . . . . . . . . . . . . . . . . . . . . . . . . . . . . . . . . . . . . . . . . . . . . . . . . . . . . . . . . . . . . . . . . . . . . 504
ipv6 default-gateway . . . . . . . . . . . . . . . . . . . . . . . . . . . . . . . . . . . . . . . . . . . . . . . . . . . . . . . . . . . . . . . . . .505
78-20269-01 Command Line Interface Reference Guide 11
Page 12

show ipv6 interface . . . . . . . . . . . . . . . . . . . . . . . . . . . . . . . . . . . . . . . . . . . . . . . . . . . . . . . . . . . . . . . . . . . .506
show IPv6 route . . . . . . . . . . . . . . . . . . . . . . . . . . . . . . . . . . . . . . . . . . . . . . . . . . . . . . . . . . . . . . . . . . . . . . . .508
ipv6 nd dad attempts . . . . . . . . . . . . . . . . . . . . . . . . . . . . . . . . . . . . . . . . . . . . . . . . . . . . . . . . . . . . . . . . . .509
ipv6 host . . . . . . . . . . . . . . . . . . . . . . . . . . . . . . . . . . . . . . . . . . . . . . . . . . . . . . . . . . . . . . . . . . . . . . . . . . . . . . . 510
ipv6 neighbor . . . . . . . . . . . . . . . . . . . . . . . . . . . . . . . . . . . . . . . . . . . . . . . . . . . . . . . . . . . . . . . . . . . . . . . . . . 511
ipv6 set mtu . . . . . . . . . . . . . . . . . . . . . . . . . . . . . . . . . . . . . . . . . . . . . . . . . . . . . . . . . . . . . . . . . . . . . . . . . . . .512
show ipv6 neighbors . . . . . . . . . . . . . . . . . . . . . . . . . . . . . . . . . . . . . . . . . . . . . . . . . . . . . . . . . . . . . . . . . . . 513
clear ipv6 neighbors . . . . . . . . . . . . . . . . . . . . . . . . . . . . . . . . . . . . . . . . . . . . . . . . . . . . . . . . . . . . . . . . . . .515
Contents
37 Tunnel Commands ...............................................................................................................516
interface tunnel . . . . . . . . . . . . . . . . . . . . . . . . . . . . . . . . . . . . . . . . . . . . . . . . . . . . . . . . . . . . . . . . . . . . . . . .516
tunnel mode ipv6ip . . . . . . . . . . . . . . . . . . . . . . . . . . . . . . . . . . . . . . . . . . . . . . . . . . . . . . . . . . . . . . . . . . . . . 516
tunnel isatap router . . . . . . . . . . . . . . . . . . . . . . . . . . . . . . . . . . . . . . . . . . . . . . . . . . . . . . . . . . . . . . . . . . . . 517
tunnel source . . . . . . . . . . . . . . . . . . . . . . . . . . . . . . . . . . . . . . . . . . . . . . . . . . . . . . . . . . . . . . . . . . . . . . . . . . 518
tunnel isatap query-interval . . . . . . . . . . . . . . . . . . . . . . . . . . . . . . . . . . . . . . . . . . . . . . . . . . . . . . . . . . . .519
tunnel isatap solicitation-interval . . . . . . . . . . . . . . . . . . . . . . . . . . . . . . . . . . . . . . . . . . . . . . . . . . . . . . . 520
tunnel isatap robustness . . . . . . . . . . . . . . . . . . . . . . . . . . . . . . . . . . . . . . . . . . . . . . . . . . . . . . . . . . . . . . . 521
show ipv6 tunnel . . . . . . . . . . . . . . . . . . . . . . . . . . . . . . . . . . . . . . . . . . . . . . . . . . . . . . . . . . . . . . . . . . . . . . . 522
38 DHCP Relay Commands......................................................................................................524
ip dhcp relay enable (Global) . . . . . . . . . . . . . . . . . . . . . . . . . . . . . . . . . . . . . . . . . . . . . . . . . . . . . . . . . . . 524
ip dhcp relay enable (Interface) . . . . . . . . . . . . . . . . . . . . . . . . . . . . . . . . . . . . . . . . . . . . . . . . . . . . . . . . 524
ip dhcp relay address . . . . . . . . . . . . . . . . . . . . . . . . . . . . . . . . . . . . . . . . . . . . . . . . . . . . . . . . . . . . . . . . . . 525
show ip dhcp relay . . . . . . . . . . . . . . . . . . . . . . . . . . . . . . . . . . . . . . . . . . . . . . . . . . . . . . . . . . . . . . . . . . . . . 526
39 IP Routing Protocol-Independent Commands..................................................................529
ip route . . . . . . . . . . . . . . . . . . . . . . . . . . . . . . . . . . . . . . . . . . . . . . . . . . . . . . . . . . . . . . . . . . . . . . . . . . . . . . . .529
show ip route . . . . . . . . . . . . . . . . . . . . . . . . . . . . . . . . . . . . . . . . . . . . . . . . . . . . . . . . . . . . . . . . . . . . . . . . . .530
40 ACL Commands....................................................................................................................533
ip access-list . . . . . . . . . . . . . . . . . . . . . . . . . . . . . . . . . . . . . . . . . . . . . . . . . . . . . . . . . . . . . . . . . . . . . . . . . . 533
permit ( IP ) . . . . . . . . . . . . . . . . . . . . . . . . . . . . . . . . . . . . . . . . . . . . . . . . . . . . . . . . . . . . . . . . . . . . . . . . . . . . 534
deny ( IP ) . . . . . . . . . . . . . . . . . . . . . . . . . . . . . . . . . . . . . . . . . . . . . . . . . . . . . . . . . . . . . . . . . . . . . . . . . . . . . . 536
ipv6 access-list . . . . . . . . . . . . . . . . . . . . . . . . . . . . . . . . . . . . . . . . . . . . . . . . . . . . . . . . . . . . . . . . . . . . . . . .539
permit ( IPv6 ) . . . . . . . . . . . . . . . . . . . . . . . . . . . . . . . . . . . . . . . . . . . . . . . . . . . . . . . . . . . . . . . . . . . . . . . . . . 540
deny ( IPv6 ) . . . . . . . . . . . . . . . . . . . . . . . . . . . . . . . . . . . . . . . . . . . . . . . . . . . . . . . . . . . . . . . . . . . . . . . . . . . 542
mac access-list . . . . . . . . . . . . . . . . . . . . . . . . . . . . . . . . . . . . . . . . . . . . . . . . . . . . . . . . . . . . . . . . . . . . . . . .544
permit ( MAC ) . . . . . . . . . . . . . . . . . . . . . . . . . . . . . . . . . . . . . . . . . . . . . . . . . . . . . . . . . . . . . . . . . . . . . . . . . 545
deny (MAC) . . . . . . . . . . . . . . . . . . . . . . . . . . . . . . . . . . . . . . . . . . . . . . . . . . . . . . . . . . . . . . . . . . . . . . . . . . . . 546
service-acl . . . . . . . . . . . . . . . . . . . . . . . . . . . . . . . . . . . . . . . . . . . . . . . . . . . . . . . . . . . . . . . . . . . . . . . . . . . . .548
absolute . . . . . . . . . . . . . . . . . . . . . . . . . . . . . . . . . . . . . . . . . . . . . . . . . . . . . . . . . . . . . . . . . . . . . . . . . . . . . . .549
periodic . . . . . . . . . . . . . . . . . . . . . . . . . . . . . . . . . . . . . . . . . . . . . . . . . . . . . . . . . . . . . . . . . . . . . . . . . . . . . . . . 550
show time-range . . . . . . . . . . . . . . . . . . . . . . . . . . . . . . . . . . . . . . . . . . . . . . . . . . . . . . . . . . . . . . . . . . . . . . . 551
show access-lists . . . . . . . . . . . . . . . . . . . . . . . . . . . . . . . . . . . . . . . . . . . . . . . . . . . . . . . . . . . . . . . . . . . . . .552
show interfaces access-lists . . . . . . . . . . . . . . . . . . . . . . . . . . . . . . . . . . . . . . . . . . . . . . . . . . . . . . . . . . .554
clear access-lists counters . . . . . . . . . . . . . . . . . . . . . . . . . . . . . . . . . . . . . . . . . . . . . . . . . . . . . . . . . . . . . 554
show interfaces access-lists counters . . . . . . . . . . . . . . . . . . . . . . . . . . . . . . . . . . . . . . . . . . . . . . . . . 555
41 Quality of Service (QoS) Commands .................................................................................557
qos . . . . . . . . . . . . . . . . . . . . . . . . . . . . . . . . . . . . . . . . . . . . . . . . . . . . . . . . . . . . . . . . . . . . . . . . . . . . . . . . . . . . . 557
78-20269-01 Command Line Interface Reference Guide 12
Page 13

qos advanced-mode trust . . . . . . . . . . . . . . . . . . . . . . . . . . . . . . . . . . . . . . . . . . . . . . . . . . . . . . . . . . . . . . 558
show qos . . . . . . . . . . . . . . . . . . . . . . . . . . . . . . . . . . . . . . . . . . . . . . . . . . . . . . . . . . . . . . . . . . . . . . . . . . . . . . 559
class-map . . . . . . . . . . . . . . . . . . . . . . . . . . . . . . . . . . . . . . . . . . . . . . . . . . . . . . . . . . . . . . . . . . . . . . . . . . . . . .560
show class-map . . . . . . . . . . . . . . . . . . . . . . . . . . . . . . . . . . . . . . . . . . . . . . . . . . . . . . . . . . . . . . . . . . . . . . .561
match . . . . . . . . . . . . . . . . . . . . . . . . . . . . . . . . . . . . . . . . . . . . . . . . . . . . . . . . . . . . . . . . . . . . . . . . . . . . . . . . . .562
policy-map . . . . . . . . . . . . . . . . . . . . . . . . . . . . . . . . . . . . . . . . . . . . . . . . . . . . . . . . . . . . . . . . . . . . . . . . . . . . .563
class . . . . . . . . . . . . . . . . . . . . . . . . . . . . . . . . . . . . . . . . . . . . . . . . . . . . . . . . . . . . . . . . . . . . . . . . . . . . . . . . . . . 564
show policy-map . . . . . . . . . . . . . . . . . . . . . . . . . . . . . . . . . . . . . . . . . . . . . . . . . . . . . . . . . . . . . . . . . . . . . .565
trust . . . . . . . . . . . . . . . . . . . . . . . . . . . . . . . . . . . . . . . . . . . . . . . . . . . . . . . . . . . . . . . . . . . . . . . . . . . . . . . . . . . .566
set . . . . . . . . . . . . . . . . . . . . . . . . . . . . . . . . . . . . . . . . . . . . . . . . . . . . . . . . . . . . . . . . . . . . . . . . . . . . . . . . . . . . .568
police . . . . . . . . . . . . . . . . . . . . . . . . . . . . . . . . . . . . . . . . . . . . . . . . . . . . . . . . . . . . . . . . . . . . . . . . . . . . . . . . . .569
service-policy . . . . . . . . . . . . . . . . . . . . . . . . . . . . . . . . . . . . . . . . . . . . . . . . . . . . . . . . . . . . . . . . . . . . . . . . . .570
qos aggregate-policer . . . . . . . . . . . . . . . . . . . . . . . . . . . . . . . . . . . . . . . . . . . . . . . . . . . . . . . . . . . . . . . . . 571
show qos aggregate-policer . . . . . . . . . . . . . . . . . . . . . . . . . . . . . . . . . . . . . . . . . . . . . . . . . . . . . . . . . . . 572
police aggregate . . . . . . . . . . . . . . . . . . . . . . . . . . . . . . . . . . . . . . . . . . . . . . . . . . . . . . . . . . . . . . . . . . . . . . .573
wrr-queue cos-map . . . . . . . . . . . . . . . . . . . . . . . . . . . . . . . . . . . . . . . . . . . . . . . . . . . . . . . . . . . . . . . . . . . . 574
wrr-queue bandwidth . . . . . . . . . . . . . . . . . . . . . . . . . . . . . . . . . . . . . . . . . . . . . . . . . . . . . . . . . . . . . . . . . . 575
priority-queue out num-of-queues . . . . . . . . . . . . . . . . . . . . . . . . . . . . . . . . . . . . . . . . . . . . . . . . . . . . . 577
traffic-shape . . . . . . . . . . . . . . . . . . . . . . . . . . . . . . . . . . . . . . . . . . . . . . . . . . . . . . . . . . . . . . . . . . . . . . . . . . . 578
traffic-shape queue . . . . . . . . . . . . . . . . . . . . . . . . . . . . . . . . . . . . . . . . . . . . . . . . . . . . . . . . . . . . . . . . . . . .578
rate-limit (Ethernet) . . . . . . . . . . . . . . . . . . . . . . . . . . . . . . . . . . . . . . . . . . . . . . . . . . . . . . . . . . . . . . . . . . . . .579
rate-limit (VLAN) . . . . . . . . . . . . . . . . . . . . . . . . . . . . . . . . . . . . . . . . . . . . . . . . . . . . . . . . . . . . . . . . . . . . . . . 580
qos wrr-queue wrtd . . . . . . . . . . . . . . . . . . . . . . . . . . . . . . . . . . . . . . . . . . . . . . . . . . . . . . . . . . . . . . . . . . . .581
show qos wrr-queue wrtd . . . . . . . . . . . . . . . . . . . . . . . . . . . . . . . . . . . . . . . . . . . . . . . . . . . . . . . . . . . . . 582
show qos interface . . . . . . . . . . . . . . . . . . . . . . . . . . . . . . . . . . . . . . . . . . . . . . . . . . . . . . . . . . . . . . . . . . . . . 583
wrr-queue . . . . . . . . . . . . . . . . . . . . . . . . . . . . . . . . . . . . . . . . . . . . . . . . . . . . . . . . . . . . . . . . . . . . . . . . . . . . . . 585
qos wrr-queue threshold . . . . . . . . . . . . . . . . . . . . . . . . . . . . . . . . . . . . . . . . . . . . . . . . . . . . . . . . . . . . . . . 586
qos map policed-dscp . . . . . . . . . . . . . . . . . . . . . . . . . . . . . . . . . . . . . . . . . . . . . . . . . . . . . . . . . . . . . . . . .587
qos map dscp-queue . . . . . . . . . . . . . . . . . . . . . . . . . . . . . . . . . . . . . . . . . . . . . . . . . . . . . . . . . . . . . . . . . .588
qos map dscp-dp . . . . . . . . . . . . . . . . . . . . . . . . . . . . . . . . . . . . . . . . . . . . . . . . . . . . . . . . . . . . . . . . . . . . . . 589
qos trust (Global) . . . . . . . . . . . . . . . . . . . . . . . . . . . . . . . . . . . . . . . . . . . . . . . . . . . . . . . . . . . . . . . . . . . . . . .590
qos trust (Interface) . . . . . . . . . . . . . . . . . . . . . . . . . . . . . . . . . . . . . . . . . . . . . . . . . . . . . . . . . . . . . . . . . . . .591
qos cos . . . . . . . . . . . . . . . . . . . . . . . . . . . . . . . . . . . . . . . . . . . . . . . . . . . . . . . . . . . . . . . . . . . . . . . . . . . . . . . .592
qos dscp-mutation . . . . . . . . . . . . . . . . . . . . . . . . . . . . . . . . . . . . . . . . . . . . . . . . . . . . . . . . . . . . . . . . . . . . .592
qos map dscp-mutation . . . . . . . . . . . . . . . . . . . . . . . . . . . . . . . . . . . . . . . . . . . . . . . . . . . . . . . . . . . . . . . . 593
show qos map . . . . . . . . . . . . . . . . . . . . . . . . . . . . . . . . . . . . . . . . . . . . . . . . . . . . . . . . . . . . . . . . . . . . . . . . . 594
clear qos statistics . . . . . . . . . . . . . . . . . . . . . . . . . . . . . . . . . . . . . . . . . . . . . . . . . . . . . . . . . . . . . . . . . . . . . 595
qos statistics policer . . . . . . . . . . . . . . . . . . . . . . . . . . . . . . . . . . . . . . . . . . . . . . . . . . . . . . . . . . . . . . . . . . .596
qos statistics aggregate-policer . . . . . . . . . . . . . . . . . . . . . . . . . . . . . . . . . . . . . . . . . . . . . . . . . . . . . . . 596
qos statistics queues . . . . . . . . . . . . . . . . . . . . . . . . . . . . . . . . . . . . . . . . . . . . . . . . . . . . . . . . . . . . . . . . . . . 597
show qos statistics . . . . . . . . . . . . . . . . . . . . . . . . . . . . . . . . . . . . . . . . . . . . . . . . . . . . . . . . . . . . . . . . . . . . . 598
security-suite enable . . . . . . . . . . . . . . . . . . . . . . . . . . . . . . . . . . . . . . . . . . . . . . . . . . . . . . . . . . . . . . . . . . .600
security-suite dos protect . . . . . . . . . . . . . . . . . . . . . . . . . . . . . . . . . . . . . . . . . . . . . . . . . . . . . . . . . . . . . .601
security-suite dos syn-attack . . . . . . . . . . . . . . . . . . . . . . . . . . . . . . . . . . . . . . . . . . . . . . . . . . . . . . . . . .603
security-suite deny martian-addresses . . . . . . . . . . . . . . . . . . . . . . . . . . . . . . . . . . . . . . . . . . . . . . . . 604
security-suite deny syn . . . . . . . . . . . . . . . . . . . . . . . . . . . . . . . . . . . . . . . . . . . . . . . . . . . . . . . . . . . . . . . .606
security-suite deny icmp . . . . . . . . . . . . . . . . . . . . . . . . . . . . . . . . . . . . . . . . . . . . . . . . . . . . . . . . . . . . . . .607
Contents
78-20269-01 Command Line Interface Reference Guide 13
Page 14

security-suite deny fragmented . . . . . . . . . . . . . . . . . . . . . . . . . . . . . . . . . . . . . . . . . . . . . . . . . . . . . . . . 609
show security-suite configuration . . . . . . . . . . . . . . . . . . . . . . . . . . . . . . . . . . . . . . . . . . . . . . . . . . . . . . 610
Contents
42 Voice VLAN Commands.......................................................................................................612
voice vlan state . . . . . . . . . . . . . . . . . . . . . . . . . . . . . . . . . . . . . . . . . . . . . . . . . . . . . . . . . . . . . . . . . . . . . . . . 612
voice vlan refresh . . . . . . . . . . . . . . . . . . . . . . . . . . . . . . . . . . . . . . . . . . . . . . . . . . . . . . . . . . . . . . . . . . . . . . 614
voice vlan id . . . . . . . . . . . . . . . . . . . . . . . . . . . . . . . . . . . . . . . . . . . . . . . . . . . . . . . . . . . . . . . . . . . . . . . . . . . . 615
voice vlan vpt . . . . . . . . . . . . . . . . . . . . . . . . . . . . . . . . . . . . . . . . . . . . . . . . . . . . . . . . . . . . . . . . . . . . . . . . . . 616
voice vlan dscp . . . . . . . . . . . . . . . . . . . . . . . . . . . . . . . . . . . . . . . . . . . . . . . . . . . . . . . . . . . . . . . . . . . . . . . .617
voice vlan oui-table . . . . . . . . . . . . . . . . . . . . . . . . . . . . . . . . . . . . . . . . . . . . . . . . . . . . . . . . . . . . . . . . . . . . 618
voice vlan cos mode . . . . . . . . . . . . . . . . . . . . . . . . . . . . . . . . . . . . . . . . . . . . . . . . . . . . . . . . . . . . . . . . . . .620
voice vlan cos . . . . . . . . . . . . . . . . . . . . . . . . . . . . . . . . . . . . . . . . . . . . . . . . . . . . . . . . . . . . . . . . . . . . . . . . . . 621
voice vlan aging-timeout . . . . . . . . . . . . . . . . . . . . . . . . . . . . . . . . . . . . . . . . . . . . . . . . . . . . . . . . . . . . . . . 621
voice vlan enable . . . . . . . . . . . . . . . . . . . . . . . . . . . . . . . . . . . . . . . . . . . . . . . . . . . . . . . . . . . . . . . . . . . . . . 622
show voice vlan . . . . . . . . . . . . . . . . . . . . . . . . . . . . . . . . . . . . . . . . . . . . . . . . . . . . . . . . . . . . . . . . . . . . . . . . 623
show voice vlan local . . . . . . . . . . . . . . . . . . . . . . . . . . . . . . . . . . . . . . . . . . . . . . . . . . . . . . . . . . . . . . . . . . 626
43 Smartport Commands .........................................................................................................629
macro auto (Global) . . . . . . . . . . . . . . . . . . . . . . . . . . . . . . . . . . . . . . . . . . . . . . . . . . . . . . . . . . . . . . . . . . . .629
macro auto smartport (Interface) . . . . . . . . . . . . . . . . . . . . . . . . . . . . . . . . . . . . . . . . . . . . . . . . . . . . . . . 630
macro auto trunk refresh . . . . . . . . . . . . . . . . . . . . . . . . . . . . . . . . . . . . . . . . . . . . . . . . . . . . . . . . . . . . . . .631
macro auto resume . . . . . . . . . . . . . . . . . . . . . . . . . . . . . . . . . . . . . . . . . . . . . . . . . . . . . . . . . . . . . . . . . . . . 632
macro auto persistent . . . . . . . . . . . . . . . . . . . . . . . . . . . . . . . . . . . . . . . . . . . . . . . . . . . . . . . . . . . . . . . . . .633
macro auto smartport type . . . . . . . . . . . . . . . . . . . . . . . . . . . . . . . . . . . . . . . . . . . . . . . . . . . . . . . . . . . . .634
macro auto processing cdp . . . . . . . . . . . . . . . . . . . . . . . . . . . . . . . . . . . . . . . . . . . . . . . . . . . . . . . . . . . . 636
macro auto processing lldp . . . . . . . . . . . . . . . . . . . . . . . . . . . . . . . . . . . . . . . . . . . . . . . . . . . . . . . . . . . . 637
macro auto processing type . . . . . . . . . . . . . . . . . . . . . . . . . . . . . . . . . . . . . . . . . . . . . . . . . . . . . . . . . . .638
macro auto user smartport macro . . . . . . . . . . . . . . . . . . . . . . . . . . . . . . . . . . . . . . . . . . . . . . . . . . . . . . 639
macro auto built-in parameters . . . . . . . . . . . . . . . . . . . . . . . . . . . . . . . . . . . . . . . . . . . . . . . . . . . . . . . . . 640
show macro auto processing . . . . . . . . . . . . . . . . . . . . . . . . . . . . . . . . . . . . . . . . . . . . . . . . . . . . . . . . . . 641
show macro auto smart-macros . . . . . . . . . . . . . . . . . . . . . . . . . . . . . . . . . . . . . . . . . . . . . . . . . . . . . . . 642
show macro auto ports . . . . . . . . . . . . . . . . . . . . . . . . . . . . . . . . . . . . . . . . . . . . . . . . . . . . . . . . . . . . . . . . . 643
smartport switchport trunk allowed vlan . . . . . . . . . . . . . . . . . . . . . . . . . . . . . . . . . . . . . . . . . . . . . . .645
smartport switchport trunk native vlan . . . . . . . . . . . . . . . . . . . . . . . . . . . . . . . . . . . . . . . . . . . . . . . . .646
44 Link Layer Discovery Protocol (LLDP) Commands..........................................................648
lldp run . . . . . . . . . . . . . . . . . . . . . . . . . . . . . . . . . . . . . . . . . . . . . . . . . . . . . . . . . . . . . . . . . . . . . . . . . . . . . . . . 648
lldp transmit . . . . . . . . . . . . . . . . . . . . . . . . . . . . . . . . . . . . . . . . . . . . . . . . . . . . . . . . . . . . . . . . . . . . . . . . . . .648
lldp receive . . . . . . . . . . . . . . . . . . . . . . . . . . . . . . . . . . . . . . . . . . . . . . . . . . . . . . . . . . . . . . . . . . . . . . . . . . . .649
lldp timer . . . . . . . . . . . . . . . . . . . . . . . . . . . . . . . . . . . . . . . . . . . . . . . . . . . . . . . . . . . . . . . . . . . . . . . . . . . . . . . 650
lldp hold-multiplier . . . . . . . . . . . . . . . . . . . . . . . . . . . . . . . . . . . . . . . . . . . . . . . . . . . . . . . . . . . . . . . . . . . . .651
lldp reinit . . . . . . . . . . . . . . . . . . . . . . . . . . . . . . . . . . . . . . . . . . . . . . . . . . . . . . . . . . . . . . . . . . . . . . . . . . . . . .652
lldp tx-delay . . . . . . . . . . . . . . . . . . . . . . . . . . . . . . . . . . . . . . . . . . . . . . . . . . . . . . . . . . . . . . . . . . . . . . . . . . .652
lldp optional-tlv . . . . . . . . . . . . . . . . . . . . . . . . . . . . . . . . . . . . . . . . . . . . . . . . . . . . . . . . . . . . . . . . . . . . . . . . 653
lldp management-address . . . . . . . . . . . . . . . . . . . . . . . . . . . . . . . . . . . . . . . . . . . . . . . . . . . . . . . . . . . . . 654
lldp notifications . . . . . . . . . . . . . . . . . . . . . . . . . . . . . . . . . . . . . . . . . . . . . . . . . . . . . . . . . . . . . . . . . . . . . . . 655
lldp notifications interval . . . . . . . . . . . . . . . . . . . . . . . . . . . . . . . . . . . . . . . . . . . . . . . . . . . . . . . . . . . . . . .656
lldp lldpdu . . . . . . . . . . . . . . . . . . . . . . . . . . . . . . . . . . . . . . . . . . . . . . . . . . . . . . . . . . . . . . . . . . . . . . . . . . . . . 657
78-20269-01 Command Line Interface Reference Guide 14
Page 15

lldp med . . . . . . . . . . . . . . . . . . . . . . . . . . . . . . . . . . . . . . . . . . . . . . . . . . . . . . . . . . . . . . . . . . . . . . . . . . . . . . .658
lldp med notifications topology-change . . . . . . . . . . . . . . . . . . . . . . . . . . . . . . . . . . . . . . . . . . . . . . . . 659
lldp med fast-start repeat-count . . . . . . . . . . . . . . . . . . . . . . . . . . . . . . . . . . . . . . . . . . . . . . . . . . . . . . . 659
lldp med network-policy (global) . . . . . . . . . . . . . . . . . . . . . . . . . . . . . . . . . . . . . . . . . . . . . . . . . . . . . . . 660
lldp med network-policy (interface) . . . . . . . . . . . . . . . . . . . . . . . . . . . . . . . . . . . . . . . . . . . . . . . . . . . . 662
lldp med network-policy voice auto . . . . . . . . . . . . . . . . . . . . . . . . . . . . . . . . . . . . . . . . . . . . . . . . . . . . 663
clear lldp table . . . . . . . . . . . . . . . . . . . . . . . . . . . . . . . . . . . . . . . . . . . . . . . . . . . . . . . . . . . . . . . . . . . . . . . . 664
lldp med location . . . . . . . . . . . . . . . . . . . . . . . . . . . . . . . . . . . . . . . . . . . . . . . . . . . . . . . . . . . . . . . . . . . . . . . 665
show lldp configuration . . . . . . . . . . . . . . . . . . . . . . . . . . . . . . . . . . . . . . . . . . . . . . . . . . . . . . . . . . . . . . . . 666
show lldp med configuration . . . . . . . . . . . . . . . . . . . . . . . . . . . . . . . . . . . . . . . . . . . . . . . . . . . . . . . . . . . 668
show lldp local tlvs-overloading . . . . . . . . . . . . . . . . . . . . . . . . . . . . . . . . . . . . . . . . . . . . . . . . . . . . . . . . 670
show lldp local . . . . . . . . . . . . . . . . . . . . . . . . . . . . . . . . . . . . . . . . . . . . . . . . . . . . . . . . . . . . . . . . . . . . . . . . . 671
show lldp statistics . . . . . . . . . . . . . . . . . . . . . . . . . . . . . . . . . . . . . . . . . . . . . . . . . . . . . . . . . . . . . . . . . . . . . 673
show lldp neighbors . . . . . . . . . . . . . . . . . . . . . . . . . . . . . . . . . . . . . . . . . . . . . . . . . . . . . . . . . . . . . . . . . . . 674
Contents
45 CDP Commands ...................................................................................................................681
cdp run . . . . . . . . . . . . . . . . . . . . . . . . . . . . . . . . . . . . . . . . . . . . . . . . . . . . . . . . . . . . . . . . . . . . . . . . . . . . . . . . 681
cdp enable . . . . . . . . . . . . . . . . . . . . . . . . . . . . . . . . . . . . . . . . . . . . . . . . . . . . . . . . . . . . . . . . . . . . . . . . . . . . .682
cdp pdu . . . . . . . . . . . . . . . . . . . . . . . . . . . . . . . . . . . . . . . . . . . . . . . . . . . . . . . . . . . . . . . . . . . . . . . . . . . . . . . .682
cdp advertise-v2 . . . . . . . . . . . . . . . . . . . . . . . . . . . . . . . . . . . . . . . . . . . . . . . . . . . . . . . . . . . . . . . . . . . . . . .683
cdp appliance-tlv enable . . . . . . . . . . . . . . . . . . . . . . . . . . . . . . . . . . . . . . . . . . . . . . . . . . . . . . . . . . . . . . .684
cdp mandatory-tlvs validation . . . . . . . . . . . . . . . . . . . . . . . . . . . . . . . . . . . . . . . . . . . . . . . . . . . . . . . . . .685
cdp source-interface . . . . . . . . . . . . . . . . . . . . . . . . . . . . . . . . . . . . . . . . . . . . . . . . . . . . . . . . . . . . . . . . . . .686
cdp log mismatch duplex . . . . . . . . . . . . . . . . . . . . . . . . . . . . . . . . . . . . . . . . . . . . . . . . . . . . . . . . . . . . . .686
cdp log mismatch voip . . . . . . . . . . . . . . . . . . . . . . . . . . . . . . . . . . . . . . . . . . . . . . . . . . . . . . . . . . . . . . . . .687
cdp log mismatch native . . . . . . . . . . . . . . . . . . . . . . . . . . . . . . . . . . . . . . . . . . . . . . . . . . . . . . . . . . . . . . . 688
cdp device-id format . . . . . . . . . . . . . . . . . . . . . . . . . . . . . . . . . . . . . . . . . . . . . . . . . . . . . . . . . . . . . . . . . . .689
cdp timer . . . . . . . . . . . . . . . . . . . . . . . . . . . . . . . . . . . . . . . . . . . . . . . . . . . . . . . . . . . . . . . . . . . . . . . . . . . . . . 689
cdp holdtime . . . . . . . . . . . . . . . . . . . . . . . . . . . . . . . . . . . . . . . . . . . . . . . . . . . . . . . . . . . . . . . . . . . . . . . . . . .690
clear cdp counters . . . . . . . . . . . . . . . . . . . . . . . . . . . . . . . . . . . . . . . . . . . . . . . . . . . . . . . . . . . . . . . . . . . . 691
clear cdp table . . . . . . . . . . . . . . . . . . . . . . . . . . . . . . . . . . . . . . . . . . . . . . . . . . . . . . . . . . . . . . . . . . . . . . . . . 691
show cdp . . . . . . . . . . . . . . . . . . . . . . . . . . . . . . . . . . . . . . . . . . . . . . . . . . . . . . . . . . . . . . . . . . . . . . . . . . . . . . 692
show cdp entry . . . . . . . . . . . . . . . . . . . . . . . . . . . . . . . . . . . . . . . . . . . . . . . . . . . . . . . . . . . . . . . . . . . . . . . . 693
show cdp interface . . . . . . . . . . . . . . . . . . . . . . . . . . . . . . . . . . . . . . . . . . . . . . . . . . . . . . . . . . . . . . . . . . . . 695
show cdp neighbors . . . . . . . . . . . . . . . . . . . . . . . . . . . . . . . . . . . . . . . . . . . . . . . . . . . . . . . . . . . . . . . . . . . 696
show cdp tlv . . . . . . . . . . . . . . . . . . . . . . . . . . . . . . . . . . . . . . . . . . . . . . . . . . . . . . . . . . . . . . . . . . . . . . . . . . . 700
show cdp traffic . . . . . . . . . . . . . . . . . . . . . . . . . . . . . . . . . . . . . . . . . . . . . . . . . . . . . . . . . . . . . . . . . . . . . . .704
46 Revision History ...................................................................................................................706
78-20269-01 Command Line Interface Reference Guide 15
Page 16

1Introduction
Overview
This chapter describes the CLI command modes, how to access the CLI, and the
CLI command editing features.
CLI Command Modes
1
The Command Line Interface (CLI) is divided into four command modes. The
command modes are (in the order in which they are accessed):
• User EXEC mode
• Privileged EXEC mode
• Global Configuration mode
• Interface Configuration mode
Each command mode has its own unique console prompt and set of CLI
commands. Entering a question mark at the console prompt displays a list of
available commands for the current mode and for the level of the user. Specific
commands are used to switch from one mode to another.
User EXEC Mode
Users with level 1 initially log into User EXEC mode. User EXEC mode is used for
tasks that do not change the configuration, such as performing basic tests and
listing system information.
The user-level prompt consists of the Switch host name followed by the angle
bracket >:
Console>
The default host name is Console unless it is changed via the hostname command
in Global Configuration mode.
78-20269-01 Command Line Interface Reference Guide 17
Page 17

Introduction
1
To access the next higher mode (Privileged EXEC mode), use the enable
command and enter the password for the higher level when prompted.
Privileged EXEC Mode
Users with levels 7 and 15 initially log into Privileged EXEC mode, which is
password-protected to prevent unauthorized use, as many of its commands set
operating system parameters. The password is not displayed on the screen and is
case-sensitive.
Only users with command level of 7 or 15 can access this mode.
To enter this mode from User EXEC mode, follow these steps:
STEP 1 At the prompt enter the enable command and press Enter. A password prompt is
displayed.
STEP 2 Enter the password to go the next level and press Enter. (For security purposes,
each character in the password is replaced by *). The Privileged EXEC mode
prompt, consisting of the Switch host name followed by, is displayed.
Console#
To return from the Privileged EXEC mode to the User EXEC mode, use the disable
command.
The following example illustrates how to access Privileged EXEC mode and then
return to User EXEC mode:
Console>
Console> enable
Enter Password: ******
Console#
Console# disable
Console>
78-20269-01 Command Line Interface Reference Guide 18
Page 18

Introduction
1
Global Configuration Mode
The Global Configuration mode is used to configure features at the system level,
and not at the interface level.
Only users with command level of 7 or 15 can access this mode.
To access Global Configuration mode from Privileged EXEC mode, enter the
configure command at the Privileged EXEC mode prompt and press Enter. The
Global Configuration mode prompt, consisting of the device host name followed
by (config)#, is displayed:
Console(config)#
Use any of the following commands to return from Global Configuration mode to
the Privileged EXEC mode:
exit
end
Ctrl+Z
The following example shows how to access Global Configuration mode and
return to Privileged EXEC mode:
Console#
Console# configure
Console(config)# exit
Console#
Interface or Line Configuration Modes
Various submodes may be entered from Global Configuration mode. These
submodes enable performing commands on a group of interfaces or lines.
For instance to perform several operations on a specific port or range of ports, you
can enter the Interface Configuration mode for that interface.
The following example enters Interface Configuration mode for ports gi1-5 and
then sets their speed:
78-20269-01 Command Line Interface Reference Guide 19
Page 19

Introduction
1
Console#
Console# configure
Console(config)# interface range gi1-5
Console(config-if)#speed 10
Console(config-if)#exit
Console(config)#
The exit command returns to Global Configuration mode.
The following submodes are available:
• Interface — Contains commands that configure a specific interface (port,
VLAN, port channel, or tunnel) or range of interfaces. The Global
Configuration mode command interface is used to enter the Interface
Configuration mode. The interface Global Configuration command is used
to enter this mode.
• Line Interface — Contains commands used to configure the management
connections for the console, Telnet and SSH. These include commands such
as line timeout settings, etc. The line Global Configuration command is used
to enter the Line Configuration command mode.
• VLAN Database — Contains commands used to configure a VLAN as a
whole. The vlan database Global Configuration mode command is used to
enter the VLAN Database Interface Configuration mode.
• Management Access List — Contains commands used to define
management access-lists. The management access-list Global
Configuration mode command is used to enter the Management Access
List Configuration mode.
• Port Channel — Contains commands used to configure port-channels; for
example, assigning ports to a port-channel. Most of these commands are
the same as the commands in the Ethernet interface mode, and are used to
manage the member ports as a single entity. The interface port-channel
Global Configuration mode command is used to enter the Port Channel
Interface Configuration mode.
• QoS — Contains commands related to service definitions. The qos Global
Configuration mode command is used to enter the QoS services
configuration mode.
78-20269-01 Command Line Interface Reference Guide 20
Page 20

Introduction
• MAC Access-List — Configures conditions required to allow traffic based
on MAC addresses. The mac access-list Global Configuration mode
command is used to enter the MAC access-list configuration mode.
To return from any Interface Configuration mode to the Global Configuration mode,
use the exit command.
User (Privilege) Levels
Users may be created with one of the following user levels:
• Level 1 — Users with this level can only run User EXEC mode commands.
Users at this level cannot access the web GUI.
• Level 7 — Users with this level can run commands in the User EXEC mode
and a subset of commands in the Privileged EXEC mode. Users at this level
cannot access the web GUI.
1
• Level 15 — Users with this level can run all commands. Only users at this
level can access the web GUI.
A system administrator (user with level 15) can create passwords that allow a
lower level user to temporarily become a higher level user. For example, the user
may go from level 1 to level 7, level 1 to 15, or level 7 to level 15.
The passwords for each level are set (by an administrator) using the following
command:
level
enable password [
encrypted-password}
Users with a lower level can raise their level by entering the command: enable and
the password for level 7 or 15. A user can go from level 1 to level 7 or directly to
level 15. The higher level holds only for the current session.
The disable command returns the user to a lower level.
To create a user and assign it a user level, use the username command. Only users
with command level 15, can create users at this level.
privilege-level]{password|
encrypted
78-20269-01 Command Line Interface Reference Guide 21
Page 21

Introduction
1
Example — Create passwords for level 7 and 15 (by the administrator)
Console>configure
Console<conf># enable password level 7 level7@abc
Console<conf># enable password level 15 level15@abc
Console<conf>#
Create a user with user level 1:
Console>
Console> username john password john1234 privilege 1
Console>
Example 2— Switch between Level 1 to Level 15. The user must know the
password.
Console>
Console> enable
Enter Password: ****** (this is the password for level 15
- level15@abc)
Console>
NOTE If authentication of passwords is performed on RADIUS or TACACS+ servers, the
passwords assigned to user level 7 and user level 15 must be configured on the
external server and associated with the $enable7$ and $enable15$ user names,
respectively. See the Authentication, Authorization and Accounting (AAA)
Commands chapter for details.
78-20269-01 Command Line Interface Reference Guide 22
Page 22

Introduction
Accessing the Command Line Interface
The Command Line Interface (CLI) can be accessed from a terminal or computer
by performing one of the following tasks:
• Running a terminal application, such as HyperTerminal, on a computer that is
directly connected to the Switch’s console port,
—or—
• Running a Telnet session from a command prompt on a computer with a
network connection to the Switch.
• Using SSH.
NOTE Telnet and SSH are disabled by default on the switch.
1
If access is via a Telnet connection, ensure that the following conditions are met
before using CLI commands:
• The switch has a defined IP address.
• Corresponding management access is granted.
• There is an IP path such that the computer and the switch can reach each
other.
Using HyperTerminal over the Console Interface
NOTE When using HyperTerminal with Microsoft® Windows® 2000, ensure that
Windows® 2000 Service Pack 2 or later is installed on your computer. The arrow
keys will not function properly using HyperTerminal’s VT100 emulation in
Windows® 2000 prior to Service Pack 2. For information on Windows® 2000
service packs, go to www.microsoft.com.
The Switch’s RS-232 serial console port provides a direct connection to a
computer’s serial port using a standard DB-9 null-modem or crossover cable.
Once the computer and Switch are connected, run a terminal application to
access the Command Line Interface.
78-20269-01 Command Line Interface Reference Guide 23
Page 23
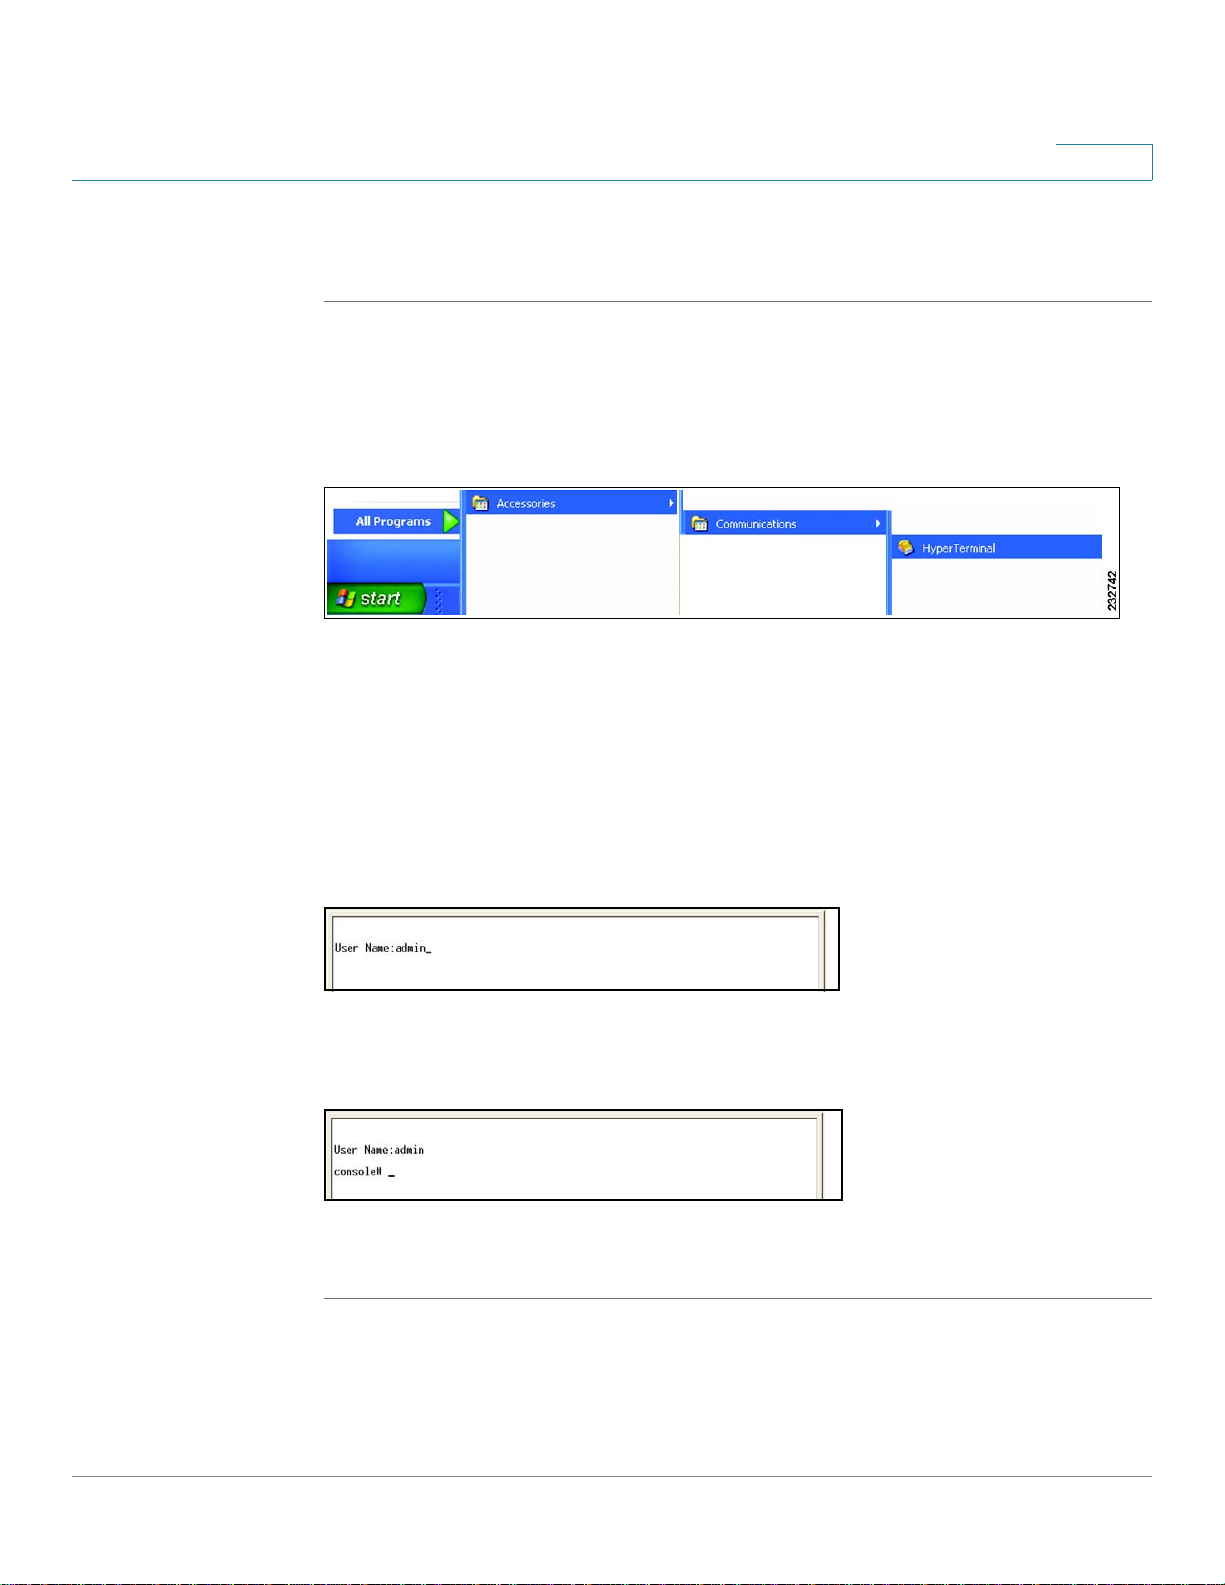
Introduction
1
To access the Command Line Interface using the HyperTerminal application,
perform the following steps:
STEP 1 Click the Start button.
STEP 2 Select All Programs > Accessories > Communications > HyperTerminal.
Figure1 Start > All Programs > Accessories > Communications >
HyperTerminal
STEP 3 Enter a name for this connection. Select an icon for the application, then click OK.
STEP 4 Select a port to communicate with the switch. Select COM1 or COM2.
STEP 5 Set the serial port settings, then click OK.
STEP 6 When the
and press Enter.
Figure 2 Command Line User Name Prompt
The console# prompt is displayed. This prompt is where you enter CLI commands.
Figure 3 Command Line
You can now enter CLI commands to manage the switch. For detailed information
on CLI commands, refer to the appropriate chapter(s) of this Reference Guide.
Command Line Interface
appears, enter admin at the
User Name
prompt
78-20269-01 Command Line Interface Reference Guide 24
Page 24
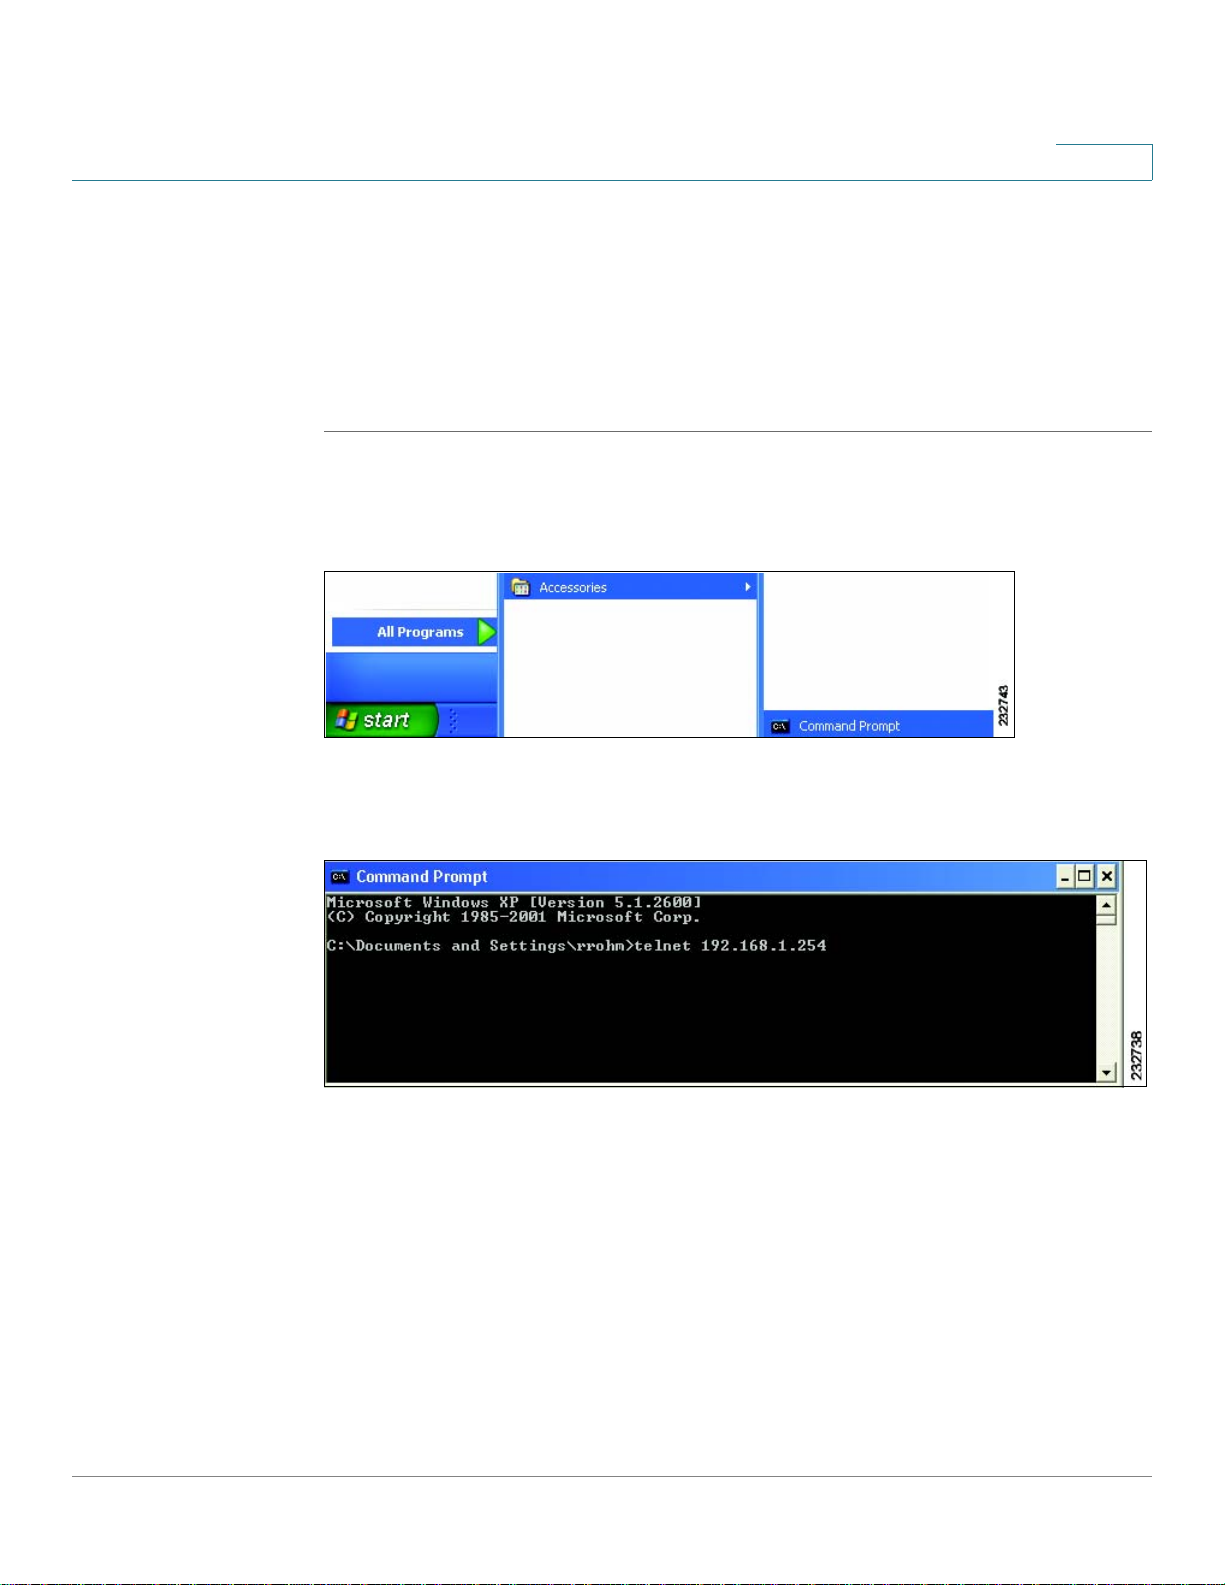
Introduction
1
Using Telnet over an Ethernet Interface
Telnet provides a method of connecting to the Command Line Interface over an IP
network.
To establish a telnet session from the command prompt, perform the following
steps:
STEP 1 Click Start, then select All Programs > Accessories > Command Prompt to open a
command prompt.
Figure 4 Start > All Programs > Accessories > Command Prompt
STEP 2 At the prompt, enter telnet 1<IP address of switch>, then press Enter.
Figure 5 Command Prompt
STEP 3 The
Command Line Interface
will be displayed.
78-20269-01 Command Line Interface Reference Guide 25
Page 25

Introduction
Editing Features
Entering Commands
A CLI command is a series of keywords and arguments. Keywords identify a
command, and arguments specify configuration parameters. For example, in the
command show interfaces status Gigabitethernet 1,
are keywords, Gigabitethernet is an argument that specifies the interface type,
and
To enter commands that require parameters, enter the required parameters after
the command keyword. For example, to set a password for the administrator,
enter:
Console(config)# username admin password alansmith
When working with the CLI, the command options are not displayed. The standard
command to request help is ?.
1
specifies the port.
1
show, interfaces
and
status
There are two instances where help information can be displayed:
• Keyword lookup — The character ? is entered in place of a command. A list
of all valid commands and corresponding help messages are is displayed.
• Partial keyword lookup — If a command is incomplete and or the character
? is entered in place of a parameter, the matched keyword or parameters
for this command are displayed.
To assist in using the CLI, there is an assortment of editing features. The following
features are described:
• Terminal C o m m a n d B u f fer
• Command Completion
• Interface Naming Conventions
• Keyboard Shortcuts
Term in al C om ma nd Buf fer
Every time a command is entered in the CLI, it is recorded on an internally
managed Command History buffer. Commands stored in the buffer are maintained
on a First In First Out (FIFO) basis. These commands can be recalled, reviewed,
modified, and reissued. This buffer is not preserved across device resets.
78-20269-01 Command Line Interface Reference Guide 26
Page 26

Introduction
1
Keyword Description
Up-Arrow key
Ctrl+P
Down-Arrow key Returns to more recent commands in the
By default, the history buffer system is enabled, but it can be disabled at any time.
For more information on enabling or disabling the history buffer, refer to the history
command.
There is a standard default number of commands that are stored in the buffer. The
standard number of 10 commands can be increased to 216. By configuring 0, the
effect is the same as disabling the history buffer system. For more information on
configuring the command history buffer, refer to the history size command.
To display the history buffer, refer to the show history command.
Recalls commands in the history buffer,
beginning with the most recent command.
Repeat the key sequence to recall
successively older commands.
history buffer after recalling commands
with the up-arrow key. Repeating the key
sequence will recall successively more
recent commands.
Negating the Effect of Commands
For many configuration commands, the prefix keyword no can be entered to
cancel the effect of a command or reset the configuration to the default value. This
Reference Guide provides a description of the negation effect for each CLI
command.
Command Completion
If the command entered is incomplete, invalid or has missing or invalid parameters,
then the appropriate error message is displayed. This assists in entering the
correct command. By pressing Ta b after an incomplete command is entered, the
system will attempt to identify and complete the command. If the characters
already entered are not enough for the system to identify a single matching
command, press ? to display the available commands matching the characters
already entered.
78-20269-01 Command Line Interface Reference Guide 27
Page 27

Introduction
1
Interface Naming Conventions
Interface ID
Within the CLI, interfaces are denoted by concatenating the following elements:
• Type of interface: The following types of interfaces are found on the
various types of devices:
- Fast Ethernet (10/100 bits) - This can be written as FastEthernet or fa.
- Gigabit Ethernet ports (10/100/1000 bits) - This can be written either
Gigabit Ethernet or gi or GE.
- LAG (Port Channel) - This can be written as either Port-Channel or po.
- VLAN - This is written as VLAN
- Tunnel - This is written as tunnel or tu
• Number of interface: Number of port, LAG, tunnel or VLAN
The syntax for this is:
{<port-type>[ ]<port-number>}|{port-channel | po }[
]<port-channel-number> | {tunnel | tu}[ ]<tunnel-number> |
vlan[ ]<vlan-id>
78-20269-01 Command Line Interface Reference Guide 28
Page 28

Introduction
1
Sample of these various options are shown in the example below:
console#configure
console(config)#interface GigabitEthernet 1
console(config)#interface GE 1
console(config-if)#interface gi1
console(config)#interface FastEthernet 1
console(config)#interface fa1
console(config-if)#interface po1
console(config-if)# interface vlan 1
Interface Range
Interfaces may be described on an individual basis or within a range. The interface
range command has the following syntax:
<interface-range> ::=
{<port-type>[ ][<first-port-number>[ - <last-port-number]}|
port-channel[ ]<first-port-channel-number>[ -
<last-port-channel-number>] |
tunnel[ ]<first-tunnel-number>[ - <last-tunnel-number>] |
vlan[ ]<first-vlan-id>[ - <last-vlan-id>]
A sample of this command is shown in the example below:
console#configure
cconsole(config-if)#interface range gi1-5
Interface List
A combination of interface types can be specified in the interface range
command in the following format:
<range-list> ::= <interface-range> | <range-list>, <
interface-range>
Up to five ranges can be included.
78-20269-01 Command Line Interface Reference Guide 29
Page 29

Introduction
1
NOTE Range lists can contain either ports and port-channels or VLANs. Combinations of
port/port-channels and VLANs are not allowed
The space after the comma is optional.
When a range list is defined, a space after the first entry and before the comma (,)
must be entered.
A sample of this command is shown in the example below:
console#configure
cconsole(config-if)#interface range gi1-5, vlan 1-2
Keyboard Shortcuts
The CLI has a range of keyboard shortcuts to assist in editing the CLI commands.
The following table describes the CLI shortcuts.
Keyboard Key
Up-arrow Recalls commands from the history buffer,
Down-arrow Returns the most recent commands from the
Ctrl+A Moves the cursor to the beginning of the
Ctrl+E Moves the cursor to the end of the command line.
Ctrl+Z / End Returns back to the Privileged EXEC mode from
Backspace Deletes one character left to the cursor position.
Description
beginning with the most recent command. Repeat
the key sequence to recall successively older
commands.
history buffer after recalling commands with the
up arrow key. Repeating the key sequence will
recall successively more recent commands.
command line.
any configuration mode.
78-20269-01 Command Line Interface Reference Guide 30
Page 30

Introduction
1
CLI Command Conventions
When entering commands there are certain command entry standards that apply
to all commands. The following table describes the command conventions.
Convention
[ ] In a command line, square brackets indicate an optional entry.
{ } In a command line, curly brackets indicate a selection of
parameter
press key Names of keys to be pressed are shown in bold.
Ctrl+F4 Keys separated by the + character are to be pressed
Screen Display Fixed-width font indicates CLI prompts, CLI commands entered by
all When a parameter is required to define a range of ports or
Description
compulsory parameters separated the | character. One option must
be selected. For example, flowcontrol {auto|on|off} means that for
the flowcontrol command, either auto, on, or off must be selected.
Italic text indicates a parameter.
simultaneously on the keyboard
the user, and system messages displayed on the console.
parameters and all is an option, the default for the command is all
when no parameters are defined. For example, the command
interface range port-channel has the option of either entering a
range of channels, or selecting all. When the command is entered
without a parameter, it automatically defaults to all.
Copying and Pasting Text
Up to 1000 lines of text (or commands) can be copied and pasted into the device.
NOTE It is the user’s responsibility to ensure that the text copied into the device consists
of legal commands only.
When copying and pasting commands from a configuration file, make sure that the
following conditions exist:
• A device Configuration mode has been accessed.
78-20269-01 Command Line Interface Reference Guide 31
Page 31

Introduction
• The commands contain no encrypted data, like encrypted passwords or
keys. Encrypted data cannot be copied and pasted into the device except
for encrypted passwords where the keyword encrypted is used before the
encrypted data (for instance in the enable password command).
Layer 2 and Layer 3
The switch can operate in Switch mode (Layer 2) or Router mode (Layer 3).
The default mode is Switch mode (Layer 2 Mode). To change the mode of the
switch, use the following CLI command.:
set system mode {router | switch}
This command performs a system reboot.
1
In Layer 2 mode, the switch forwards packets as a VLAN-aware bridge. In Layer 3
mode, the switch performs both IPv4 routing and VLAN-aware bridging.
If Layer 2 mode is selected, a single IP address is supported on the default VLAN.
The user also must configure a default gateway.
If Layer 3 mode is selected, the user can manage the device on any IP interface
configured on the device, as long as a default route is configured. In Layer 3 mode,
the switch routes traffic between IP VLANs, and bridges traffic with VLANs.
When the switch operates in Layer 3 mode, the following features are not
supported:
• Protocol-based VLANs
• MAC-based VLANs
• VLAN Rate Limit
• DVA, Multicast TV VLAN
• Per flow policing
78-20269-01 Command Line Interface Reference Guide 32
Page 32

User Interface Commands
2 User Interface Commands
2.1 enable
The enable EXEC mode command enters the Privileged EXEC mode.
Syntax
2
enable [
Parameters
privilege-level—Specifies the privilege level at which to enter the system. (Range:
1, 7, 15)
Default Configuration
The default privilege level is 15.
Command Mode
EXEC mode
Example
The following example enters privilege level 7.
Console>
enter password:**********
privilege-level
enable 7
]
Console#Accepted
The following example enters privilege level 15.
Console>
enter password:**********
Console#Accepted
78-20269-01 Command Line Interface Reference Guide 33
enable
Page 33

User Interface Commands
2
2.2 disable
The disable Privileged EXEC mode command leaves the Privileged EXEC mode
and returns to the User EXEC mode.
Syntax
disable [
Parameters
privilege-level—Reduces the privilege level to the specified privileged level. If
privilege level is left blank, the level is reduce to 1.
Default Configuration
The default privilege level is 1.
Command Mode
Privileged EXEC mode
Example
The following example returns the user to user level 7.
Console#
Console>
privilege-level
disable 7
]
2.3 login
The login EXEC mode command enables changing the user that is logged in.
When this command is logged in, the user is prompted for a username/password.
Syntax
login
Parameters
N/A
78-20269-01 Command Line Interface Reference Guide 34
Page 34

User Interface Commands
2
Default Configuration
N/A
Command Mode
EXEC mode
Example
The following example enters Privileged EXEC mode and logs in with username
‘admin’.
Console>
User Name:admin
Password:*****
Console#
login
2.4 configure
The configure Privileged EXEC mode command enters the Global Configuration
mode.
Syntax
configure [
Parameters
terminal—Enter the Global Configuration mode with or without the keyword
terminal.
Command Mode
terminal
]
Privileged EXEC mode
Example
The following example enters Global Configuration mode.
Console#
Console(config)#
78-20269-01 Command Line Interface Reference Guide 35
configure
Page 35

User Interface Commands
2
2.5 exit (Configuration)
The exit command exits any configuration mode to the next highest mode in the
CLI mode hierarchy.
Syntax
exit
Parameters
N/A
Default Configuration
N/A
Command Mode
All commands in configuration modes.
Examples
The following examples change the configuration mode from Interface
Configuration mode to Privileged EXEC mode.
Console(config-if)#
Console(config)#
exit
exit
2.6 exit (EXEC)
The exit EXEC mode command closes an active terminal session by logging off
the device.
Syntax
exit
Parameters
N/A
78-20269-01 Command Line Interface Reference Guide 36
Page 36

User Interface Commands
2
Default Configuration
N/A
Command Mode
EXEC mode
Example
The following example closes an active terminal session.
Console>
exit
2.7 end
The end command ends the current configuration session and returns to the
Privileged EXEC mode.
Syntax
end
Parameters
N/A
Default Configuration
N/A
Command Mode
All configuration modes
Example
The following example ends the Global Configuration mode session and returns to
the Privileged EXEC mode.
Console(config)#
Console#
78-20269-01 Command Line Interface Reference Guide 37
end
Page 37

User Interface Commands
2
2.8 help
The help command displays a brief description of the Help system.
Syntax
help
Parameters
N/A
Default Configuration
N/A
Command Mode
All command modes
Example
The following example describes the Help system.
Console#
Help may be requested at any point in a command by entering a question mark
'
?
'. If nothing matches the currently entered incomplete command, the help
list is empty. This indicates that there is no command matching the input as
it currently appears. If the request is within a command, press the Backspace
key and erase the entered characters to a point where the request results in
a match.
Help is provided when:
1. There is a valid command and a help request is made for entering a
parameter or argument (e.g. 'show ?'). All possible parameters or arguments
for the entered command are then displayed.
2. An abbreviated argument is entered and a help request is made for
arguments matching the input (e.g. 'show pr?').
help
78-20269-01 Command Line Interface Reference Guide 38
Page 38

User Interface Commands
2
2.9 history
The history Line Configuration mode command enables saving commands that
have been entered. Use the no form of this command to disable the command.
Syntax
history
no history
Parameters
N/A
Default Configuration
Enabled.
Command Mode
Line Configuration mode
User Guidelines
This command enables saving user-entered commands for a specified line. You
can return to previous lines by using the up or down arrows.
The following are related commands:
• Use the terminal history size EXEC mode command to enable or disable this
command for the current terminal session.
• Use the history size Line Configuration mode command to set the number
of commands that are saved in the history.
Example
The following example enables the command for Telnet
Console(config)#
line telnet
.
Console(config-line)#
78-20269-01 Command Line Interface Reference Guide 39
history
Page 39

User Interface Commands
2
2.10 history size
The history size Line Configuration mode command changes the maximum
number of user commands that are saved in the history buffer for a particular line.
Use the no form of this command to reset the command history buffer size to the
default value.
Syntax
history size
no history size
Parameters
number-of-commands—Specifies the number of commands the system records
in its history buffer. (Range: 10–
Default Configuration
The default command history buffer size is 10 commands.
Command Mode
Line Configuration mode
User Guidelines
This command configures the command history buffer size for a particular line.
Use the terminal history size EXEC mode command to configure the command
history buffer size for the current terminal session.
The allocated command history buffer is per terminal user, and is taken from a
shared buffer. If there is not enough space available in the shared buffer, the
command history buffer size cannot be increased above the default size.
number-of-commands
207)
Example
The following example changes the command history buffer size to 100 entries for
Te l n e t .
Console(config)#
Console(config-line)#
78-20269-01 Command Line Interface Reference Guide 40
line telnet
history size
100
Page 40

User Interface Commands
2
2.11 terminal history
The terminal history EXEC mode command enables the command history function
for the current terminal session, meaning it is not stored in the Running
Configuration file. Use the no form of this command to disable the command.
Syntax
terminal history
terminal no history
Default Configuration
The default configuration for all terminal sessions is defined by the history Line
Configuration mode command.
Command Mode
EXEC mode
User Guidelines
The command enables the command history for the current session. The default is
determined by the history Line Configuration mode command.
Example
The following example disables the command history function for the current
terminal session.
Console>
terminal no history
2.12 terminal history size
The terminal history size EXEC mode command changes the command history
buffer size for the current terminal session, meaning it is not stored in the Running
Configuration file. Use the no form of this command to reset the command history
buffer size to the default value.
Syntax
terminal history size
terminal no history size
78-20269-01 Command Line Interface Reference Guide 41
number-of-commands
Page 41

User Interface Commands
2
Parameters
number-of-commands—Specifies the number of commands the system maintains
in its history buffer. (Range: 10–207)
Default Configuration
The default configuration for all terminal sessions is defined by the history size
Line Configuration mode command.
Command Mode
EXEC mode
User Guidelines
The terminal history size EXEC command changes the command history buffer
size for the current terminal session. Use the history Line Configuration mode
command to change the default history buffer size.
The maximum number of commands in all buffers is 207.
Example
The following example sets the command history buffer size to 20 commands for
the current terminal session.
Console>
terminal history size
20
2.13 terminal datadump
The terminal datadump EXEC mode command enables dumping all the output of a
show command without prompting. Use the no form of this command to disable
dumping.
Syntax
terminal datadump
no terminal datadump
Parameters
N/A
78-20269-01 Command Line Interface Reference Guide 42
Page 42

User Interface Commands
2
Default Configuration
When printing, dumping is disabled and printing is paused every 24 lines.
Command Mode
EXEC mode
User Guidelines
By default, a More prompt is displayed when the output contains more than 24
lines. Pressing the Enter key displays the next line; pressing the Spacebar displays
the next screen of output.
The terminal datadump command enables dumping all output immediately after
entering the show command by removing the pause.
The width is currently not limited (previously the limit was 77 chars), and the width
of the line being printed on the terminal is based on the terminal itself.
This command is relevant only for the current session.
Example
The following example dumps all output immediately after entering a show
command.
Console>
terminal datadump
2.14 show history
The show history EXEC mode command lists commands entered in the current
session.
Syntax
show history
Parameters
N/A
Default Configuration
N/A
78-20269-01 Command Line Interface Reference Guide 43
Page 43

User Interface Commands
2
Command Mode
EXEC mode
User Guidelines
The buffer includes executed and unexecuted commands.
Commands are listed from the first to the most recent command.
The buffer remains unchanged when entering into and returning from configuration
modes.
Example
The following example displays all the commands entered while in the current
Privileged EXEC mode.
Console#
SW version 3.131 (date 23-Jul-2005 time 17:34:19)
HW version 1.0.0
Console#
15:29:03 Jun 17 2005
Console#
show version
show clock
show history
3 commands were logged (buffer size is 10)
show version
show clock
show history
2.15 show privilege
The show privilege EXEC mode command displays the current privilege level.
Syntax
show privilege
Parameters
N/A
78-20269-01 Command Line Interface Reference Guide 44
Page 44

User Interface Commands
2
Default Configuration
N/A
Command Mode
EXEC mode
Example
The following example displays the privilege level for the user logged on.
Console#
Current privilege level is 15
show privilege
2.16 do
The do command executes an EXEC-level command from Global Configuration
mode or any configuration submode.
Syntax
command
do
Parameters
command—Specifies the EXEC-level command to execute.
Command Mode
All configuration modes
Example
The following example executes the show vlan Privileged EXEC mode command
from Global Configuration mode.
Example
Console (Config)#
Vlan Name Ports Type Authorization
---- ---- --------------------------- -------- -------------
78-20269-01 Command Line Interface Reference Guide 45
do show vlan
Page 45

User Interface Commands
2
1 1 gi1-39,Po1,Po2, other Required
2 2 gi1 dynamicGvrp Required
10 v0010 gi1 permanent Not Required
11 V0011 gi1,gi3 permanent Required
20 20 gi1 permanent Required
30 30 gi1,gi3 permanent Required
31 31 gi1 permanent Required
91 91 gi1,gi4 permanent Required
4093 guest-vlan gi1,gi3 permanent Guest
console(config)#
2.17 banner login
Use the banner login command in Global Configuration mode to specify a
message to be displayed before the username and password login prompts. This
banner is applied automatically on all the CLI interfaces: Console, Telnet and SSH
and also on the WEB GUI. Use the no form of this command to delete the existing
login banner.
Syntax
banner login
no banner login
Parameters
d message-text d
• d—Delimiting character of user’s choice—a pound sign (#), for example.
You cannot use the delimiting character in the banner message.
• message-text—Message text. The message must start on a new line. You
can enter multi-line messages. You can include tokens in the form of
$(token) in the message text. Tokens are replaced with the corresponding
configuration variable (see User Guidelines). The message can contain up
to 1000 characters (after every 510 characters, you must press <Enter> to
continue).
Default Configuration
Disabled (no Login banner is displayed).
78-20269-01 Command Line Interface Reference Guide 46
Page 46

User Interface Commands
2
Command Mode
Global Configuration mode
User Guidelines
Follow this command with one or more blank spaces and a delimiting character of
your choice. Then enter one or more lines of text, terminating the message with
the second occurrence of the delimiting character.
Use tokens in the form of $(token) in the message text to customize the banner. The
tokens are described in the table below:
Token Information displayed in the banner
$(hostname) Displays the host name for the device.
$(domain) Displays the domain name for the device.
$(bold) Indicates that the next text is a bold text. Using this
token again indicates the end of the bold text.
$(inverse) Indicates that the next text is an inverse text. Using this
token again indicates the end of the inverse text.
$(contact) Displays the system contact string.
$(location) Displays the system location string.
$(mac-addre
ss)
Use the no banner login Line Configuration command to disable the Login banner
on a particular line or lines.
Example
The following example sets a Login banner that uses tokens. The percent sign (%)
is used as a delimiting character. Note that the $(token) syntax is replaced by the
corresponding configuration variable.
Displays the base MAC address of the device.
Device(config)# banner login %
Enter TEXT message. End with the character '%'.
You have entered $(hostname).$(domain)
%
78-20269-01 Command Line Interface Reference Guide 47
Page 47

User Interface Commands
2
When the login banner is executed, the user will see the following banner:
You have entered host123.ourdomain.com
2.18 login-banner
Use the login-banner command in Line Configuration mode to enable the display
of login banners. Use the no form of this command to disable the display of login
banners.
Syntax
login-banner
no login-banner
Parameters
N/A
Default Configuration
Enabled
Command Mode
Line Configuration mode
Example
console#
console(config)# line console
console(config-line)# login-banner
console(config-line)# exit
console(config)# line telnet
console(config-line)# login-banner
console(config-line)# exit
configure
console(config)# line ssh
console(config-line)# login-banner
78-20269-01 Command Line Interface Reference Guide 48
Page 48

User Interface Commands
2
2.19 show banner
Use the show banner commands in EXEC mode to display the banners that have
been defined.
Syntax
show banner login
Parameters
N/A
Command Mode
EXEC mode
Examples
console#
-------------------------------------------------------------
Banner: Login
Line SSH: Enabled
Line Telnet: Enabled
Line Console: Enabled
show banner login
78-20269-01 Command Line Interface Reference Guide 49
Page 49

Macro Commands
3 Macro Commands
3.1 macro name
There are two types of macros that can be created with the macro name Global
Configuration mode command:
• Global macros are macros that are simple a group of CLI commands that
can be used at any time.
• Smartport macros are associated with Smartport types (see Section 43
"Smartport Commands" ). For each Smartport macro there must be an anti
macro that concatenates no_ with the name of the Smartport macro.
If a macro by the name you assign, already exists, this macro overrides the
previously-defined one.
3
Use the no form of this command to delete the macro definition.
Syntax
macro name
no macro name
Parameters
macro-name—Name of the macro. Macro names are case sensitive.
Default Configuration
The command has no default setting.
Command Mode
Global Configuration mode
User Guidelines
A macro is a script that contains CLI commands and is assigned a name by the
user. It can contain up to 3000 characters and 200 lines.
[macro-name]
[macro-name]
A macro can contain up to three keywords/parameters. A keyword is a name
prefixed with a '$' character, for example, $a_keyword. The keywords in the
macro’s CLI commands are substituted with the values specified when you invoke
the macro by using the macro apply/trace and macro global apply/trace CLI
commands.
78-20269-01 Command Line Interface Reference Guide 50
Page 50

Macro Commands
3
Use the following guidelines to create a macro:
• Use the macro name command to assign a name to the macro.
• Enter one macro command per line.
• Use the @ character to end the macro.
• Use the # character at the beginning of a line to enter comment text within
the macro. In addition, # is used to identify certain preprocessor commands
that can only be used within a macro. There are two possible preprocessor
commands:
- #macro key description - Each macro can be configured with up to 3
keyword and description pairs. When a macro is displayed from the GUI,
its keywords and descriptions are displayed (if they exist).
The syntax for this preprocessor command is as follows:
- #macro key description: $
- #$
keyword2: description_string
- #$
keyword3: description_string
Parameters:
- keyword - A keyword must be prefixed with '$'
- description-string - description of the keyword
keyword1: description_string
- #macro keywords - This preprocessor command accepts up to 3
keywords. The command creates a CLI help string with the keywords for
the macro. The help string will be displayed if help on the macro is
requested from the macro apply/trace and macro global apply trace
commands. The GUI also uses the keywords specified in the command
as the parameter names for the macro. See Example 2 and 3 below for a
description of how this command is used in the CLI.
The syntax for this preprocessor command is as follows:
- #macro keywords: $
keyword-name1 $keyword-name2
Parameter:
- keyword-name - User-defined name of the keyword (parameter)
prefixed with '$'
It is important to consider the scope of any user-defined macro. Because of the
potential hazards of applying unintended configurations, do not change
78-20269-01 Command Line Interface Reference Guide 51
Page 51

Macro Commands
3
configuration modes within the macro by using commands such as exit, end, or
interface
interface-id
macros in the various configuration modes.
You can modify a macro by creating a new macro with the same name as the
existing macro. The newer macro overwrites the existing macro. The exceptions to
this are the macros and corresponding anti-macros for Smartport. For example,
you cannot edit the host and the no_host macros.
Examples
Example 1 - The following example shows how to create a macro that when
applied configures the duplex mode and speed of a port.
. With few exceptions, there are other ways of executing
Switch(config)#
Enter macro commands one per line. End with the character ‘@’.
macro description
no negotiation
duplex full
negotiation
@
macro name
dup
dup
Example 2 - The following example shows how to create the same macro as in
Example 1, but in this example, the macro has the parameters: DUPLEX and
SPEED. When the macro is run, the values of DUPLEX and SPEED must be
provided by the user. The macro keywords command enables the user to receive
help for the macro as shown in Example 3.
Switch(config) #
Enter macro commands one per line. End with the character ‘@’.
duplex $DUPLEX
macro name
duplex
speed $SPEED
macro keywords
#
@
$DUPLEX $SPEED
Example 3 - The following example shows how to display the keywords using the
help character ? (as defined by the macro keywords command above):
switch<config-if>#
78-20269-01 Command Line Interface Reference Guide 52
macro apply
duplex ?
Page 52

Macro Commands
3
WORD <1-32> Keyword to replace with value e.g. $DUPLEX, $SPEED
<cr>
Switch<config-if> #
WORD<1-32> First parameter value
<cr>
Switch<config-if> #
WORD<1-32> Second parameter value
Example 4 - The following example shows how to set the duplex mode of port gi1
to full and to set its speed to 100 Mb/s.
switch<config-if>#
switch<config-if>#
macro apply
macro apply
interface
macro apply
duplex $DUPLEX ?
duplex $DUPLEX full $SPEED ?
gi1
duplex $DUPLEX full $SPEED 100
3.2 macro apply
Use the macro apply/trace Interface Configuration command to either:
• Apply a macro to an interface without displaying the actions being
performed
• Apply a macro to the interface while displaying the actions being
performed
Syntax
macro {
{value}] [parameter-name3 {value}
Parameters
apply | trace} macro-name [parameter-name1 {value}] [parameter-name2
]
• apply—Apply a macro to the specific interface.
• trace—Apply and trace a macro to the specific interface.
• macro-name—Name of the macro.
•
parameter-name value
macro, specify its name and value. You can enter up to three
parameter-value pairs. Parameter keyword matching is case sensitive. All
matching occurrences of the parameter name in the macro are replaced
with the corresponding value.
—(Optional) For each parameter defined in the
78-20269-01 Command Line Interface Reference Guide 53
Page 53

Macro Commands
3
Default Configuration
The command has no default setting.
Command Mode
Interface Configuration mode
User Guidelines
The macro apply Interface Configuration mode command hides the commands of
the macro from the user while it is being run. For debugging purposes, the macro
trace command displays the commands along with any errors which are
generated by them as they are executed." In this way, you can debug the macro
and find syntax or configuration errors.
When you run a macro, if commands in it fail because of a syntax or configuration
error, the macro continues to apply the remaining commands to the interface.
If you apply a macro that contains parameters in its commands, the command fails
if you do not provide the values for the parameters. You can use the macro apply
macro-name
have defined these with the #macro keywords preprocessor command).
with a '?' to display the help string for the macro keywords (if you
Parameter (keyword) matching is case sensitive. All matching occurrences of the
parameter are replaced with the provided value. Any full match of a keyword, even
if it is part of a large string, is considered a match and replaced by the
corresponding value.
When you apply a macro to an interface, the switch automatically generates a
macro description command with the macro name. As a result, the macro name is
appended to the macro history of the interface. You can display the macro history
of an interface using the show parser macro description command.
A macro applied to an interface range behaves the same way as a macro applied
to a single interface. When a macro is applied to an interface range, it is applied
sequentially to each interface within the range. If a macro command fails on one
interface, it is nonetheless applied to the remaining interfaces.
Examples.
Example 1 - The following is an example of a macro being applied to an interface
with the trace option.
Switch(config) #
Switch<config-if> #
interface
macro trace dup
gi2
Applying command… ‘duplex full’
78-20269-01 Command Line Interface Reference Guide 54
Page 54

Macro Commands
3
Applying command… ‘speed 100’
Switch<config-if> #
Example 2 - The following is an example of a macro being applied without the
trace option.
Switch(config) #
Switch<config-if> #
Switch<config-if> #
interface
macro apply
gi2
duplex $DUPLEX full $SPEED 100
Example 3 - The following is an example of an incorrect macro being applied.
switch(config-if)#
Applying command...'duplex full'
Applying command...'speed auto'
% bad parameter value
macro trace dup
3.3 macro description
Use the macro description Interface Configuration mode command to append a
description, for example, a macro name, to the macro history of an interface. Use
the no form of this command to clear the macro history of an interface. When the
macro is applied to an interface, the switch automatically generates a macro
description command with the macro name. As a result, the name of the macro is
appended to the macro history of the interface.
Syntax
macro description
text
no macro description
Parameters
text—Description text. The text can contain up to 160 characters. The text must be
double quoted if it contains multiple words.
Default Configuration
The command has no default setting.
78-20269-01 Command Line Interface Reference Guide 55
Page 55

Macro Commands
3
Command Mode
Interface Configuration mode
User Guidelines
When multiple macros are applied on a single interface, the description text is a
concatenation of texts from a number of previously-applied macros.
You can verify your setting by entering the show parser macro description
privileged EXEC mode command.
Example
Switch(config) #
Switch<config-if> #
Switch<config-if> #
Switch(config) #
Switch<config-if> #
Switch<config-if> # end
Switch #
Interface Macro Description
--------- --------------------------------------------------------
gi2 dup
gi3 duplex
-----------------------------------------------------------------
Switch(config) #
Switch<config-if> #
Switch<config-if> #
show parser macro description
interface
interface
interface
gi2
macro apply
end
gi3
macro apply duplex
gi2
no macro description
end
dup
$DUPLEX full $SPEED 100
Switch #
Interface Macro Description
-------- ---------------------------------------------------------
gi3 duplex
78-20269-01 Command Line Interface Reference Guide 56
show parser macro description
Page 56

Macro Commands
3
3.4 macro global
Use the macro global Global Configuration command to apply a macro to a switch
or to apply and trace a macro configuration on a switch.
Syntax
macro global {
[parameter-name2 {value}] [parameter -name3 {value}
Parameters
apply | trace} macro-name [parameter-name1 {value}]
• apply—Apply a macro to the switch.
• trace—Apply and trace a macro to the switch.
• macro-name—Specify the name of the macro.
• parameter-name
are specific to the switch. You can enter up to three parameter-value pairs.
Parameter keyword matching is case sensitive. All matching occurrences of
the parameters are replaced with the corresponding value.
Default Configuration
The command has no default setting.
Command Mode
Global Configuration mode
value
—(Optional) Specify unique parameter values that
]
User Guidelines
You can use the macro global trace macro-name Global Configuration mode
command to apply and show the macros running on the switch or to debug the
macro in order to locate any syntax or configuration errors.
If a command fails because of a syntax error or a configuration error when you
apply a macro, the macro continues to apply the remaining commands to the
switch.
Use the parameter-name, value keywords to designate values specific to the
switch when creating a macro that requires the assignment of unique value.
Keyword matching is case sensitive. All matching occurrences of the keyword are
replaced with the corresponding value. Any full match of a keyword, even if it is
part of a large string, is considered a match and replaced by the corresponding
value.
78-20269-01 Command Line Interface Reference Guide 57
Page 57

Macro Commands
3
If you apply a macro that contains keywords in its commands, the command fails if
you do not specify the proper values for the keywords when you apply the macro.
You can use the macro global apply macro-name with a '?' to display the help
string for the macro keywords. You define the keywords in the help string using the
preprocessor command #macro keywords when you define a macro.
When you apply a macro in Global Configuration mode, the switch automatically
generates a global macro description command with the macro name. As a result,
the macro name is appended to the global macro history. You can display the
global macro history using the show parser macro description command.
Example.
The following is an example of a macro being defined and then applied to the
switch with the trace option.
Switch(config)#
Enter macro commands one per line. End with the character ‘@’.
line console
exec-timeout $timeout-interval
@
Switch(config)#
Applying command… ‘line console’
Applying command… ‘exec-timeout 100’
Switch(config)#
macro name
macro global trace
console-timeout
console-timeout $timeout-interval 100
3.5 macro global description
Use the macro global description Global Configuration command to enter a
description which is used to indicate which macros have been applied to the
switch. Use the no form of this command to remove the description.
Syntax
macro global description
no macro global description
Parameters
text—Description text. The text can contain up to 160 characters.
78-20269-01 Command Line Interface Reference Guide 58
text
Page 58

Macro Commands
3
Default Configuration
The command has no default setting.
Command Mode
Global Configuration mode
User Guidelines
When multiple global macros are applied to a switch, the global description text is
a concatenation of texts from a number of previously applied macros.
You can verify your settings by entering the show parser macro description
privileged EXEC mode command.
Examples
Switch(conf)#
macro global description
"set console timeout interval"
3.6 show parser macro
Use the show parser macro User EXEC mode command to display the parameters
for all configured macros or for one macro on the switch.
Syntax
show parser macro [
macro-name}
Parameters
• brief
]
—
Display the name of all macros.
• description [interface
interfaces or if an interface is specified, display the macro descriptions for
that interface.
• name
the macro name.
macro-name—
{brief | description [interface interface-id] | name
interface-id]—
Display information about a single macro identified by
Display the macro descriptions for all
Command Mode
User EXEC mode
78-20269-01 Command Line Interface Reference Guide 59
Page 59

Macro Commands
3
Examples
Example 1 - This is a partial output example from the show parser macro
command.
Switch#
Total number of macros = 6
--------------------------------------------------------------
Macro name : cisco-global
Macro type : default global
# Enable dynamic port error recovery for link state
# failures
<output truncated>
--------------------------------------------------------------
Macro name : cisco-desktop
Macro type : default interface
# macro keywords $AVID
# Basic interface - Enable data VLAN only
# Recommended value for access vlan (AVID) should not be 1
switchport access vlan $AVID
show parser macro
switchport mode access
<output truncated>
------------------------------------description [interface
. . .
Example 2 - This is an example of output from the show parser macro name
command.
Switch#
Macro name : standard-switch10
Macro type : customizable
macro description standard-switch10
78-20269-01 Command Line Interface Reference Guide 60
show parser macro
standard-switch10
Page 60

Macro Commands
3
# Trust QoS settings on VOIP packets
auto qos voip trust
# Allow port channels to be automatically formed
channel-protocol pagp
Example 3 - This is an example of output from the show parser macro brief
command.
Switch#
default global : cisco-global
default interface: cisco-desktop
default interface: cisco-phone
default interface: cisco-switch
default interface: cisco-router
customizable : snmp
show parser macro
brief
Example 4 - This is an example of output from the show parser macro description
command.
Switch#
Global Macro(s): cisco-global
show parser macro description
This is an example of output from the show parser macro description interface
command.
Switch#
Interface Macro Description
--------------------------------------------------------------
gi2 this is test macro
--------------------------------------------------------------
78-20269-01 Command Line Interface Reference Guide 61
show parser macro description interface
gi2
Page 61

RSA and Certificate Commands
4 RSA and Certificate Commands
4.1 crypto key generate dsa
The crypto key generate dsa Global Configuration mode command generates
DSA key pairs.
Syntax
crypto key generate dsa
Default Configuration
DSA key pairs do not exist.
Command Mode
4
Global Configuration mode
User Guidelines
DSA keys are generated in pairs - one public DSA key and one private DSA key.
If the device already has DSA keys, a warning is displayed with a prompt to
replace the existing keys with new keys.
This command is not saved in the router configuration. However, the keys
generated by this command are saved in the private configuration (which is never
displayed to the user or backed up to another device).
Example
The following example generates DSA key pairs.
Console(config)#
crypto key generate dsa
4.2 crypto key generate rsa
The crypto key generate rsa Global Configuration mode command generates RSA
key pairs.
Syntax
crypto key generate rsa
78-20269-01 Command Line Interface Reference Guide 62
Page 62

RSA and Certificate Commands
Default Configuration
RSA key paris do not exist.
Command Mode
Global Configuration mode
User Guidelines
RSA keys are generated in pairs - one public RSA key and one private RSA key.
If the device already has RSA keys, a warning is displayed with a prompt to
replace the existing keys with new keys.
This command is not saved in the router configuration; however, the keys
generated by this command are saved in the private configuration (which is never
displayed to the user or backed up to another device).
4
Example
The following example generates RSA key pairs.
Console(config)#
crypto key generate rsa
4.3 show crypto key mypubkey
The show crypto key mypubkey Privileged EXEC mode command displays the
device SSH public keys.
Syntax
show crypto key mypubkey
Parameters
[rsa | dsa]
• rsa—Displays the RSA key.
• dsa—Displays the DSA key.
Command Mode
Privileged EXEC mode
78-20269-01 Command Line Interface Reference Guide 63
Page 63

RSA and Certificate Commands
Example
The following example displays the SSH public RSA keys on the device.
4
Console#
RSA key data:
005C300D 06092A86 4886F70D 01010105 00034B00 30480241 00C5E23B 55D6AB22
04AEF1BA A54028A6 9ACC01C5 129D99E4 64CAB820 847EDAD9 DF0B4E4C 73A05DD2
BD62A8A9 FA603DD2 E2A8A6F8 98F76E28 D58AD221 B583D7A4 71020301 87685768
Fingerprint(Hex): 77:C7:19:85:98:19:27:96:C9:CC:83:C5:78:89:F8:86
Fingerprint(Bubble Babble): yteriuwt jgkljhglk yewiury hdskjfryt gfhkjglk
show crypto key mypubkey rsa
4.4 crypto certificate generate
The crypto certificate generate Global Configuration mode command generates a
self-signed certificate for HTTPS.
Syntax
crypto certificate
common- name] [ou organization-unit] [or organization] [loc location] [st state] [cu
country] [duration days
number
]
generate
[key-generate [length]] [passphrase string] [cn
Parameters
• number—Specifies the certificate number. (Range: 1–2)
• key-generate—Regenerates SSL RSA key.
• length—Specifies the SSL's RSA key length. (Range: 512–2048)
• passphrase string—Specifies the passphrase used for exporting the
certificate in PKCS12 file format. (Length: 8–96 characters)
• cn common-name—Specifies the fully qualified device URL or IP address.
(Length: 1–64 characters)
• ou organization-unit—Specifies the organization-unit or department name.
(Length: 1–64 characters)
• or organization—Specifies the organization name. (Length: 1–64
characters)
78-20269-01 Command Line Interface Reference Guide 64
Page 64

RSA and Certificate Commands
Default Configuration
The default certificate number is 1.
The default SSL’s RSA key length is 1024.
If passphrase string is not specified, the certificate is not exportable.
If cn common-name is not specified, it defaults to the device’s lowest static IPv6
address (when the certificate is generated), or to the device’s lowest static IPv4
address if there is no static IPv6 address, or to 0.0.0.0 if there is no static IP
address.
4
• loc location—Specifies the location or city name. (Length: 1–64 characters)
• st state—Specifies the state or province name. (Length: 1–64 characters)
• cu country—Specifies the country name. (Length: 2 characters)
• duration days—Specifies the number of days a certification is valid. (Range:
30–3650)
If duration days is not specified, it defaults to 365 days.
Command Mode
Global Configuration mode
User Guidelines
This command is not saved in the router configuration. However, the certificate and
keys generated by this command are saved in the private configuration (which is
never displayed to the user or backed up to another device).
When exporting a RSA key pair to a PKCS#12 file, the RSA key pair is as secure as
the passphrase. Keep the passphrase secure.
If the RSA key does not exist, you must use the parameter key-generate.
Example
The following example generates a self-signed certificate for HTTPS.
Console#
crypto certificate generate key-generate
78-20269-01 Command Line Interface Reference Guide 65
Page 65

RSA and Certificate Commands
4.5 crypto certificate request
The crypto certificate request Privileged EXEC mode command generates and
displays a certificate request for HTTPS.
Syntax
4
crypto certificate
organization] [loc location] [st state] [cu country]
Parameters
number
request
common-name [ou organization-unit] [or
• number—Specifies the certificate number. (Range: 1–2)
• common-name—Specifies the device’s fully qualified URL or IP address.
(Length: 1–64 characters)
• ou
• or
• loc
• st
• cu
Command Mode
Privileged EXEC mode
organization-unit
(Length: 1–64 characters)
organization
location
state
country
—Specifies the location or city name. (Length: 1–64 characters)
—Specifies the state or province name. (Length: 1–64 characters)
—Specifies the country name. (Length: 2 characters)
—Specifies the organization-unit or department name.
—Specifies the organization name. (Length: 1–64 characters)
User Guidelines
Use this command to export a certificate request to a Certification Authority. The
certificate request is generated in Base64-encoded X.509 format.
Before generating a certificate request, first generate a self-signed certificate
using the crypto certificate generate Global Configuration mode command to
generate the keys. The certificate fields must be re-entered.
After receiving the certificate from the Certification Authority, use the crypto
certificate import Global Configuration mode command to import the certificate
into the device. This certificate replaces the self-signed certificate.
78-20269-01 Command Line Interface Reference Guide 66
Page 66

RSA and Certificate Commands
Example
The following example displays the certificate request for HTTPS.
4
Console#
-----BEGIN CERTIFICATE REQUEST-----
MIwTCCASoCAQAwYjELMAkGA1UEBhMCUFAxCzAJBgNVBAgTAkNDMQswCQYDVQQH
EwRDEMMAoGA1UEChMDZGxkMQwwCgYDVQQLEwNkbGQxCzAJBgNVBAMTAmxkMRAw
DgKoZIhvcNAQkBFgFsMIGfMA0GCSqGSIb3DQEBAQUAA4GNADCBiQKBgQC8ecwQ
HdML0831i0fh/F0MV/Kib6Sz5p+3nUUenbfHp/igVPmFM+1nbqTDekb2ymCu6K
aKvEbVLF9F2LmM7VPjDBb9bb4jnxkvwW/wzDLvW2rsy5NPmH1QVl+8Ubx3GyCm
/oW93BSOFwxwEsP58kf+sPYPy+/8wwmoNtDwIDAQABoB8wHQYJKoZIhvcNAQkH
MRDjEyMwgICCAgICAICAgIMA0GCSqGSIb3DQEBBAUAA4GBAGb8UgIx7rB05m+2
m5ZZPhIwl8ARSPXwhVdJexFjbnmvcacqjPG8pIiRV6LkxryGF2bVU3jKEipcZa
g+uNpyTkDt3ZVU72pjz/fa8TF0n3
-----END CERTIFICATE REQUEST-----
CN= router.gm.com
crypto certificate
1
request
0= General Motors
C= US
4.6 crypto certificate import
The crypto certificate import Global Configuration mode command imports a
certificate signed by a Certification Authority for HTTPS.
Syntax
crypto certificate
Parameters
number—Specifies the certificate number. (Range: 1–2)
78-20269-01 Command Line Interface Reference Guide 67
number
import
Page 67

RSA and Certificate Commands
Command Mode
Global Configuration mode
User Guidelines
To end the session, use a blank line.
The imported certificate must be based on a certificate request created by the
crypto certificate request privileged EXEC command.
If the public key found in the certificate does not match the device's SSL RSA key,
the command fails.
This command is not saved in the router configuration. However, the certificate
imported by this command is saved in the private configuration (which is never
displayed to the user or backed up to another device).
Example
4
The following example imports a certificate signed by Certification Authority for
HTTPS.
Console(config)#
-----BEGIN CERTIFICATE-----
dHmUgUm9vdCBDZXJ0aWZpZXIwXDANBgkqhkiG9w0BAQEFAANLADBIAkEAp4HS
nnH/xQSGA2ffkRBwU2XIxb7n8VPsTm1xyJ1t11a1GaqchfMqqe0kmfhcoHSWr
yf1FpD0MWOTgDAwIDAQABo4IBojCCAZ4wEwYJKwYBBAGCNxQCBAYeBABDAEEw
CwR0PBAQDAgFGMA8GA1UdEwEB/wQFMAMBAf8wHQYDVR0OBBYEFAf4MT9BRD47
ZvKBAEL9Ggp+6MIIBNgYDVR0fBIIBLTCCASkwgdKggc+ggcyGgclsZGFwOi8v
L0VByb3h5JTIwU29mdHdhcmUlMjBSb290JTIwQ2VydGlmaWVyLENOPXNlcnZl
-----END CERTIFICATE-----
Certificate imported successfully.
Issued to: router.gm.com
crypto certificate
1
import
Issued by: www.verisign.com
Valid from: 8/9/2003 to 8/9/2004
Subject: CN= router.gm.com, 0= General Motors, C= US
78-20269-01 Command Line Interface Reference Guide 68
Page 68

RSA and Certificate Commands
Finger print: DC789788 DC88A988 127897BC BB789788
4.7 show crypto certificate mycertificate
The show crypto certificate mycertificate Privileged EXEC mode command
displays the device SSL certificates.
Syntax
4
show crypto certificate mycertificate [
Parameters
number—Specifies the certificate number. (Range: 1–
Command Mode
Privileged EXEC mode
Example
The following example displays SSL certificate # 1 present on the device.
Console#
-----BEGIN CERTIFICATE-----
dHmUgUm9vdCBDZXJ0aWZpZXIwXDANBgkqhkiG9w0BAQEFAANLADBIAkEAp4HS
nnH/xQSGA2ffkRBwU2XIxb7n8VPsTm1xyJ1t11a1GaqchfMqqe0kmfhcoHSWr
yf1FpD0MWOTgDAwIDAQABo4IBojCCAZ4wEwYJKwYBBAGCNxQCBAYeBABDAEEw
show crypto certificate mycertificate
number
]
2
1
CwR0PBAQDAgFGMA8GA1UdEwEB/wQFMAMBAf8wHQYDVR0OBBYEFAf4MT9BRD47
ZvKBAEL9Ggp+6MIIBNgYDVR0fBIIBLTCCASkwgdKggc+ggcyGgclsZGFwOi8v
L0VByb3h5JTIwU29mdHdhcmUlMjBSb290JTIwQ2VydGlmaWVyLENOPXNlcnZl
-----END CERTIFICATE-----
Issued by: www.verisign.com
Valid from: 8/9/2003 to 8/9/2004
Subject: CN= router.gm.com, 0= General Motors, C= US
78-20269-01 Command Line Interface Reference Guide 69
Page 69

RSA and Certificate Commands
Finger print: DC789788 DC88A988 127897BC BB789788
4
78-20269-01 Command Line Interface Reference Guide 70
Page 70

System Management Commands
5 System Management Commands
5.1 ping
Use the ping EXEC mode command to send ICMP echo request packets to
another node on the network.
Syntax
5
ping [ip]
[timeout time_out]
ping ipv6
[timeout time_out]
Parameters
{ipv4-address | hostname} [size packet_size] [count packet_count]
{ipv6-address | hostname} [size packet_size] [count packet_count]
• ip—Use IPv4 to check the network connectivity.
• ipv6—Use IPv6 to check the network connectivity.
• ipv4-address—IPv4 address to ping.
• ipv6-address—Unicast or Multicast IPv6 address to ping. When the IPv6
address is a Link Local address (IPv6Z address), the outgoing interface
name must be specified. Refer to the User Guidelines of this command for
the interface name syntax.
• hostname—Hostname to ping (160 characters. Maximum label size: 63.)
• size
packet_size
tag. The default is 64 bytes. (IPv4:64–1518, IPv6: 68–1518)
—Number of bytes in the packet not including the VLAN
• count
The default is 4 packets. If 0 is entered, it pings until stopped (0–65535).
• time
65535 milliseconds. The default is 2000 milliseconds (50–65535).
Default Usage
N/A
Command Mode
EXEC mode
78-20269-01 Command Line Interface Reference Guide 71
packet_count
time-out
—Timeout in milliseconds to wait for each reply, from 50 to
—Number of packets to send, from 1 to 65535 packets.
Page 71

System Management Commands
User Guidelines
Press Esc to stop pinging. Following are sample results of the ping command:
5
• Destination does not respond—If the host does not respond, a “no answer
from host” appears within 10 seconds.
• Destination unreachable—The gateway for this destination indicates that
the destination is unreachable.
• Network or host unreachable—The switch found no corresponding entry in
the route table.
The format of an IPv6Z address is: <
• interface-name =
<physical-port-name> | 0
• integer = <
decimal-number> | <integer><decimal-number
• decimal-number =
vlan<integer> | po<integer> | isatap<integer> |
0 | 1 | 2 | 3 | 4 | 5 | 6 | 7 | 8 | 9
ipv6-link-local-address>%<interface-name
>
>
• physical-port-name = Designated port number, for example gi1. If the
physical-port-name = 0, then it is not defined and the default interface is
used
.
When using the ping ipv6 command to check network connectivity of a directly
attached host using its link local address, the egress interface may be specified in
the IPv6Z format. If the egress interface is not specified, the default interface is
selected.
When using the ping ipv6 command with a Multicast address, the information
displayed is taken from all received echo responses.
Examples
Example 1- Ping an IP address.
Console>
Pinging 10.1.1.1 with 64 bytes of data:
64 bytes from 10.1.1.1: icmp_seq=0. time=11 ms
64 bytes from 10.1.1.1: icmp_seq=1. time=8 ms
64 bytes from 10.1.1.1: icmp_seq=2. time=8 ms
64 bytes from 10.1.1.1: icmp_seq=3. time=7 ms
78-20269-01 Command Line Interface Reference Guide 72
ping ip
10.1.1.1
Page 72

System Management Commands
----10.1.1.1 PING Statistics----
4 packets transmitted, 4 packets received, 0% packet loss
round-trip (ms) min/avg/max = 7/8/11
Example 2 - Ping a site.
5
Console>
Pinging yahoo.com [66.218.71.198] with 64 bytes of data:
64 bytes from 10.1.1.1: icmp_seq=0. time=11 ms
64 bytes from 10.1.1.1: icmp_seq=1. time=8 ms
64 bytes from 10.1.1.1: icmp_seq=2. time=8 ms
64 bytes from 10.1.1.1: icmp_seq=3. time=7 ms
----10.1.1.1 PING Statistics----
4 packets transmitted, 4 packets received, 0% packet loss
round-trip (ms) min/avg/max = 7/8/11
ping ip
yahoo.com
Example 3 - Ping an IPv6 address.
console>
Pinging 3003::11 with 64 bytes of data:
64 bytes from 3003::11: icmp_seq=1. time=0 ms
64 bytes from 3003::11: icmp_seq=2. time=50 ms
ping ipv6
3003::11
64 bytes from 3003::11: icmp_seq=3. time=0 ms
64 bytes from 3003::11: icmp_seq=4. time=0 ms
----3003::11 PING Statistics----
4 packets transmitted, 4 packets received, 0% packet loss
round-trip (ms) min/avg/max = 0/12/50
console>
Pinging FF02::1 with 64 bytes of data:
64 bytes from 3003::11: icmp_seq=1. time=0 ms
78-20269-01 Command Line Interface Reference Guide 73
ping ipv6
FF02::1
Page 73

System Management Commands
64 bytes from 3003::33: icmp_seq=1. time=70 ms
64 bytes from 3003::11: icmp_seq=2. time=0 ms
64 bytes from 3003::55: icmp_seq=1. time=1050 ms
64 bytes from 3003::33: icmp_seq=2. time=70 ms
64 bytes from 3003::55: icmp_seq=2. time=1050 ms
64 bytes from 3003::11: icmp_seq=3. time=0 ms
64 bytes from 3003::33: icmp_seq=3. time=70 ms
64 bytes from 3003::11: icmp_seq=4. time=0 ms
64 bytes from 3003::55: icmp_seq=3. time=1050 ms
64 bytes from 3003::33: icmp_seq=4. time=70 ms
64 bytes from 3003::55: icmp_sq=4. time=1050 ms
5
---- FF02::1 PING Statistics----
4 packets transmitted, 12 packets received
5.2 traceroute
To display the routes that packets will take when traveling to their destination, use
the traceroute EXEC mode command.
Syntax
traceroute ip
packet_count] [timeout time_out] [source ip-address] [tos tos
traceroute ipv6
packet_count] [timeout time_out] [source ip-address] [tos tos
Parameters
{ipv4-address | hostname} [size packet_size] [ttl max-ttl] [count
]
{ipv6-address | hostname} [size packet_size] [ttl max-ttl] [count
]
• ip—Use IPv4 to discover the route.
• ipv6—Use IPv6 to discover the route.
• ipv4-address—IPv4 address of the destination host. (Range: Valid IP
address)
• ipv6-address—IPv6 address of the destination host.
78-20269-01 Command Line Interface Reference Guide 74
Page 74

System Management Commands
5
• hostname—Hostname of the destination host. (Range: 1–160 characters.
Maximum label size: 63)
• size
• ttl
packet_size
tag. The default is 64 bytes. (IPv4:64-1518, IPv6: 68-1518)
max-ttl
traceroute command terminates when the destination is reached or when
this value is reached. (Range: 1–255)
• count
The default count is 3. (Range: 1–10)
• timeout
packet. The default is 3 seconds. (Range: 1–60)
• source
a source address for the probes. The device selects the optimal source
address by default. (Range: Valid IP address)
• tos
Default Usage
N/A
tos
0–255)
—Number of bytes in the packet not including the VLAN
—The largest TTL value that can be used. The default is 30. The
packet_count
time_out
ip-address
—The Type-Of-Service byte in the IP Header of the packet. (Range:
—The number of probes to be sent at each TTL level.
—The number of seconds to wait for a response to a probe
—One of the interface addresses of the device to use as
Command Mode
EXEC mode
User Guidelines
The traceroute command works by taking advantage of the error messages
generated by routers when a datagram exceeds its time-to-live (TTL) value.
The traceroute command starts by sending probe datagrams with a TTL value of
one. This causes the first router to discard the probe datagram and send back an
error message. The traceroute command sends several probes at each TTL level
and displays the round-trip time for each.
The traceroute command sends out one probe at a time. Each outgoing packet can
result in one or two error messages. A "time exceeded” error message indicates
that an intermediate router has seen and discarded the probe. A "destination
unreachable" error message indicates that the destination node has received the
probe and discarded it because it could not deliver the packet. If the timer goes
off before a response comes in, the traceroute command prints an asterisk (*).
78-20269-01 Command Line Interface Reference Guide 75
Page 75

System Management Commands
The traceroute command terminates when the destination responds, when the
maximum TTL is exceeded, or when the user interrupts the trace with Esc.
The traceroute command is not relevant to IPv6 link local addresses.
Example
5
Router>
Type Esc to abort.
Tracing the route to umaxp1.physics.lsa.umich.edu (141.211.101.64)
1 i2-gateway.stanford.edu (192.68.191.83) 0 msec 0 msec 0 msec
2 STAN.POS.calren2.NET (171.64.1.213) 0 msec 0 msec 0 msec
3 SUNV--STAN.POS.calren2.net (198.32.249.73) 1 msec 1 msec 1 msec
4 Abilene--QSV.POS.calren2.net (198.32.249.162) 1 msec 1 msec 1 msec
5 kscyng-snvang.abilene.ucaid.edu (198.32.8.103) 33 msec 35 msec 35 msec
6 iplsng-kscyng.abilene.ucaid.edu (198.32.8.80) 47 msec 45 msec 45 msec
7 so-0-2-0x1.aa1.mich.net (192.122.183.9) 56 msec 53 msec 54 msec
8 atm1-0x24.michnet8.mich.net (198.108.23.82) 56 msec 56 msec 57 msec
9 * * *
10 A-ARB3-LSA-NG.c-SEB.umnet.umich.edu(141.211.5.22)58 msec 58msec 58 msec
11 umaxp1.physics.lsa.umich.edu (141.211.101.64) 62 msec 63 msec 63 msec
Trace completed
traceroute ip
umaxp1.physics.lsa.umich.edu
The following table describes the significant fields shown in the display:
Field Description
1 Indicates the sequence number of the router
in the path to the host.
i2-gateway.stanford.
edu
192.68.191.83 IP address of this router.
1 msec 1 msec 1
msec
78-20269-01 Command Line Interface Reference Guide 76
Host name of this router.
Round-trip time for each of the probes that
are sent.
Page 76

System Management Commands
The following are characters that can appear in the traceroute command output:
Field Description
* The probe timed out.
? Unknown packet type.
A Administratively unreachable. Usually, this output
F Fragmentation required and DF is set.
H Host unreachable.
N Network unreachable.
P Protocol unreachable.
Q Source quench.
5
indicates that an access list is blocking traffic.
R Fragment reassembly time exceeded
S Source route failed.
U Port unreachable.
5.3 telnet
The telnet EXEC mode command enables logging on to a host that supports
Te l n e t .
Syntax
telnet {
Parameters
ip-address
• ip-address
• hostname
Maximum label length: 63 characters.)
|
hostname
—
Specifies the destination host IP address (IPv4 or IPv6).
—
Specifies the destination host name. (Length: 1-160 characters.
} [
port
] [
keyword
...]
• port
78-20269-01 Command Line Interface Reference Guide 77
—
Specifies the decimal TCP port number or one of the keywords
listed in the Ports table in the User Guidelines.
Page 77

System Management Commands
Default Configuration
The default port is the Telnet port (23) on the host.
By default, Telnet is disabled.
Command Mode
EXEC mode
User Guidelines
Telnet software supports special Telnet commands in the form of Telnet
sequences that map generic terminal control functions to operating
system-specific functions. To enter a Telnet sequence, press the escape
sequence keys (Ctrl-shift-6) followed by a Telnet command character.
5
• keyword—Specifies the one or more keywords listed in the Keywords
table in the User Guidelines.
Special Telnet Sequences
Telnet Sequence Purpose
Ctrl-shift-6-b Break
Ctrl-shift-6-c Interrupt Process (IP)
Ctrl-shift-6-h Erase Character (EC)
Ctrl-shift-6-o Abort Output (AO)
Ctrl-shift-6-t Are You There? (AYT)
Ctrl-shift-6-u Erase Line (EL)
At any time during an active Telnet session, available Telnet commands can be
listed by pressing the
A sample of this list follows.
Console> ?
/help
?/help
keys at the system prompt.
[Special telnet escape help]
^^ B sends telnet BREAK
^^ C sends telnet IP
78-20269-01 Command Line Interface Reference Guide 78
Page 78

System Management Commands
^^ H sends telnet EC
^^ O sends telnet AO
^^ T sends telnet AYT
^^ U sends telnet EL
?/help suspends the session (return to system command prompt)
Several concurrent Telnet sessions can be opened, enabling switching between
the sessions. To open a subsequent session, the current connection has to be
suspended by pressing the escape sequence keys (Ctrl-shift-6) and x to return to
the system command prompt. Then open a new connection with the telnet EXEC
mode command.
This command lists concurrent Telnet connections to remote hosts that were
opened by the current Telnet session to the local device. It does not list Telnet
connections to remote hosts that were opened by other Telnet sessions.
5
Keywords Table
Options Description
/echo Enables local echo.
/quiet Prevents onscreen display of all messages from
the software.
/source-interfaceSpecifies the source interface.
/stream Turns on stream processing, which enables a raw
TCP stream with no Telnet control sequences. A
stream connection does not process Telnet
options and can be appropriate for connections
to ports running UNIX-to-UNIX Copy Program
(UUCP) and other non-Telnet protocols.
Ctrl-shift-6 x Returns to the System Command Prompt.
Ports Table
Keyword Description Port Number
BGP Border Gateway Protocol 179
chargen Character generator 19
78-20269-01 Command Line Interface Reference Guide 79
Page 79

System Management Commands
Keyword Description Port Number
cmd Remote commands 514
daytime Daytime 13
discard Discard 9
domain Domain Name Service 53
echo Echo 7
exec Exec 512
finger Finger 79
ftp File Transfer Protocol 21
ftp-data FTP data connections 20
5
gopher Gopher 70
hostname NIC hostname server 101
ident Ident Protocol 113
irc Internet Relay Chat 194
klogin Kerberos login 543
kshell Kerberos shell 544
login Login 513
lpd Printer service 515
nntp Network News Transport
Protocol
pim-auto-rpPIM Auto-RP 496
pop2 Post Office Protocol v2 109
pop3 Post Office Protocol v3 110
119
smtp Simple Mail Transport
Protocol
sunrpc Sun Remote Procedure Call 111
78-20269-01 Command Line Interface Reference Guide 80
25
Page 80

System Management Commands
Keyword Description Port Number
syslog Syslog 514
tacacs TAC Access Control System 49
talk Talk 517
telnet Telnet 23
time Time 37
uucp Unix-to-Unix Copy Program 540
whois Nickname 43
www World Wide Web 80
Example
5
The following example displays logging in to IP address 176.213.10.50 via Telnet.
Console>
telnet
176.213.10.50
5.4 resume
The resume EXEC mode command enables switching to another open Telnet
session.
Syntax
resume [
Parameters
connection—Specifies the connection number. (Range: 1-4 connections.)
Default Configuration
The default connection number is that of the most recent connection.
connection
]
Command Mode
EXEC mode
78-20269-01 Command Line Interface Reference Guide 81
Page 81

System Management Commands
Example
The following command switches to open Telnet session number 1.
5
Console>
resume
1
5.5 hostname
The hostname Global Configuration mode command specifies or modifies the
device host name. Use the no form of the command to remove the existing host
name.
Syntax
hostname
no hostname
Parameters
Name—Specifies the device host name. (Length: 1-63). The hostname must start
with a letter, end with a letter or digit, and have as interior characters only letters,
digits, and hyphens.
Default Configuration
name
No host name is defined.
Command Mode
Global Configuration mode
Example
The following example specifies the device host name as ‘enterprise’.
Console(config)#
enterprise(config)#
hostname
enterprise
5.6 reload
The reload Privileged EXEC mode command reloads the operating system.
78-20269-01 Command Line Interface Reference Guide 82
Page 82

System Management Commands
Syntax
reload
Parameters
N/A
Default Usage
N/A
Command Mode
Privileged EXEC mode
Example
The following example reloads the operating system.
5
Console#
This command will reset the whole system and disconnect your current session.
Do you want to continue? (y/n) [n]
reload
5.7 service cpu-utilization
The service cpu-utilization Global Configuration mode command enables
measuring CPU utilization. Use the no form of this command to restore the default
configuration.
Syntax
service cpu-utilization
no service cpu-utilization
Parameters
N/A
Default Configuration
Measuring CPU utilization is disabled.
78-20269-01 Command Line Interface Reference Guide 83
Page 83

System Management Commands
Command Mode
Global Configuration mode
User Guidelines
Use the service cpu utilization command to measure information on CPU
utilization.
Example
The following example enables measuring CPU utilization.
5
Console(config)#
service cpu-utilization
5.8 show cpu utilization
The show cpu utilization Privileged EXEC mode command displays information
about CPU utilization.
Syntax
show cpu utilization
Parameters
N/A
Default Usage
N/A
Command Mode
Privileged EXEC mode
User Guidelines
Use the show cpu-utilization command to enable measuring CPU utilization.
Example
The following example displays CPU utilization information.
78-20269-01 Command Line Interface Reference Guide 84
Page 84

System Management Commands
5
Console#
CPU utilization service is on.
CPU utilization
--------------------------------------------------
five seconds: 5%; one minute: 3%; five minutes: 3%
show cpu utilization
5.9 show users
The show users EXEC mode command displays information about the active
users.
Syntax
show users
Parameters
N/A
Default Usage
N/A
Command Mode
EXEC mode
78-20269-01 Command Line Interface Reference Guide 85
Page 85

System Management Commands
Example
The following example displays information about the active users.
5
Console#
Username
----------
Bob
John
Robert
Betty
Sam
show users
Protocol
-----------
Serial
SSH
HTTP
Telnet
Location
------------
172.16.0.1
172.16.0.8
172.16.1.7
172.16.1.6
5.10 show sessions
The show sessions EXEC mode command displays open Telnet sessions.
Syntax
show sessions
Parameters
N/A
Default Usage
N/A
Command Mode
EXEC mode
User Guidelines
The show sessions command displays Telnet sessions to remote hosts opened by
the current Telnet session to the local device. It does not display Telnet sessions to
remote hosts opened by other Telnet sessions to the local device.
78-20269-01 Command Line Interface Reference Guide 86
Page 86

System Management Commands
Example
The following example displays open Telnet sessions.
5
Console#
Connection
----------
1
2
show sessions
Host
-------------
Remote router
172.16.1.2
Address
----------
172.16.1.1
172.16.1.2
Port
-----
23
23
Byte
----
89
8
The following table describes significant fields shown above.
Field Description
Connection The connection number.
Host The remote host to which the device is connected
through a Telnet session.
Address The remote host IP address.
Port The Telnet TCP port number.
Byte The number of unread bytes for the user to see on
the connection.
5.11 show system
The show system EXEC mode command displays system information.
Syntax
show system
Parameters
There are no parameters for this command.
Command Mode
EXEC mode
78-20269-01 Command Line Interface Reference Guide 87
Page 87

System Management Commands
Example
The following example displays the system information.
5
console#
switch151400(config)#exit
switch151400#show system
System Description: 20-port Gigabit Managed Switch
System Up Time (days,hour:min:sec): 03,02:27:46
System Contact:
System Name: switch151400
System Location:
System MAC Address: 00:24:ab:15:14:00
System Object ID: 1.3.6.1.4.1.9.6.1.83.20.1
show system
5.12 show version
The show version EXEC mode command displays system version information.
Syntax
show version
Parameters
N/A
Default Usage
N/A
Command Mode
EXEC mode
Example
The following example displays system version information.
78-20269-01 Command Line Interface Reference Guide 88
Page 88

System Management Commands
5
console >
SW Version 1.1.0.5 ( date 15-Sep-2010 time 10:31:33 )
Boot Version 1.1.0.2 ( date 04-Sep-2010 time 21:51:53 )
HW Version V01
show version
5.13 show version md5
Use the show version md5 EXEC mode command to display external MD5 digest
of firmware.
Syntax
show version md5
Parameters
N/A
Default Usage
N/A
Command Mode
EXEC mode
Example
>
show version md5
Filename Status MD5 Digest
-------- ------- ----------------------------------
image1 Active 23FA000012857D8855AABC7577AB5562
image2 Not Active 23FA000012857D8855AABEA7451265456
boot 23FA000012857D8855AABC7577AB8999
mage1 Not Active 23FA000012857D8855AABC757FE693844
image2 Active 23FA000012857D8855AABC7577AB5562
boot 23FA000012857D8855AABC7577AC9999
78-20269-01 Command Line Interface Reference Guide 89
Page 89

System Management Commands
5.14 system resources routing
The system resources routing Global Configuration mode command configures
the routing table maximum size. Use the no form of this command to return to the
default size.
Syntax
5
system resources routing
no system resources routing
Parameters
routes hosts interfaces
• routes—Specifies the maximum number of remote networks in the routing
table.
• hosts—Specifies the maximum number of directly attached hosts.
• interfaces—Specifies the maximum number of IP interfaces.
Default Configuration
Hosts: 2-100, default = 100
Routes: 1-32, default = 32
IP Interfaces: 2-32, default = 32
Command Mode
Global Configuration mode
User Guidelines
The settings are effective after reboot.
Example
The following example configures the routing table maximum size.
Console#
78-20269-01 Command Line Interface Reference Guide 90
system resources routing
20 23 5
Page 90

System Management Commands
5.15 show system resources
The show system resources routings EXEC mode command displays system
routing and tcam resource information.
Syntax
5
show system resources {
Parameters
routing—Displays the number of hosts, routers and IP interfaces that are available.
tcam—Displays the number of TCAM rules that are available.
Command Mode
EXEC mode
Example
Example 1 - The following example displays the system routing resources
information. The values in the Current Value column show what resources are
currently available. The values in the After Reboot Value column show what
resources will be available after reboot as a result of system resources routing
command.
Console>
show system resources routing
routing
|
tcam
}
Parameters Current Value After Reboot Value
-------------- ---------------- -------------------
Hosts: 100 100
Routes: 32 32
IP Interfaces: 32 32
Example 2 - The following example displays the system routing resources
information. The values in the Current Value column show what resources are
currently available. The values in the After Reboot Value column show what
resources will be available after reboot as a result of system resources routing
command.
Console>
78-20269-01 Command Line Interface Reference Guide 91
show system resources tcam
Page 91

System Management Commands
TCAM resources
--------------
Maximum number of miscellaneous TCAM rules: 314
Used number of miscellaneous TCAM rules: 26
Maximum number of routing TCAM rules: 196
Used number of routing TCAM rules: 3
5.16 set system mode
The set system mode Privileged EXEC mode command puts the device into
switch mode (Layer 2 mode) or router mode (Layer 3 mode).
Syntax
5
set system mode {
Parameters
router | switch}
• router—Specifies that the device functions as a switch-router.
• switch—Specifies that the device functions as a switch.
Default Configuration
The default configuration is switch mode (Layer 2).
Command Mode
Privileged EXEC mode
User Guidelines
After executing the command, the Startup Configuration file is deleted and the
device is rebooted. It is highly recommended to back up the Startup Configuration
file before executing this command.
Example
The following example configures the device to function as a switch-router (Layer
3), with QoS and Policy based VLANs.
Console#
78-20269-01 Command Line Interface Reference Guide 92
set system mode router
Page 92

System Management Commands
5.17 show system mode
The show system mode EXEC mode command displays information on features
control.
Syntax
show system mode
Parameters
N/A
Default Usage
N/A
Command Mode
5
EXEC mode
Example
The following example displays system mode information.
Console>
Feature State
------------------- ---------
Mode: Router
Qos: Active
Policy-based-vlans: Active
show system mode
5.18 show system languages
The show system languages EXEC mode command displays the list of supported
languages.
Syntax
show system languages
78-20269-01 Command Line Interface Reference Guide 93
Page 93

System Management Commands
Parameters
N/A
Default Usage
N/A
Command Mode
EXEC mode
Example
The following example displays the languages configured on the device. Number
of Sections indicates the number of languages permitted on the device.
5
Console>
Language Name Unicode Name Code Num of Sections
--------------- -------------- ------ -------------
English English en-US 2
Japanese µùѵ£¼F¬P ja-JP 2
show system languages
5.19 show system tcam utilization
The show system tcam utilization EXEC mode command displays the Ternary
Content Addressable Memory (TCAM) utilization.
Syntax
show system tcam utilization
Parameters
N/A
Default Usage
N/A
Command Mode
EXEC mode
78-20269-01 Command Line Interface Reference Guide 94
Page 94

System Management Commands
Example
The following example displays TCAM utilization information.
5
Console>
TCAM utilization: 58%
show system tcam utilization
5.20 show services tcp-udp
Use the show services tcp-udp Privileged EXEC mode command to display
information about the active TCP and UDP services.
Syntax
show services tcp-udp
Parameters
N/A
Command Mode
Privileged EXEC mode
User Guidelines
The output does not show sessions where the device is a TCP/UDP client.
Examples
Console #
Type Local IP Address Remote IP address Service Name State
---------------------- ------------------- ------------- -----------
TCP All:22 SSH LISTEN
TCP All:23 Telnet LISTEN
TCP All:80 HTTP LISTEN
TCP All:443 HTTPS LISTEN
TCP 172.16.1.1:23 172.16.1.18:8789 Telnet ESTABLISHED
TCP6 All-23 Telnet LISTEN
78-20269-01 Command Line Interface Reference Guide 95
show services tcp-udp
Page 95

System Management Commands
TCP6 fe80::200:b0ff:fe00:0-23 Telnet
UDP All:161 SNMP
UDP6A ll-161 SNMP
5.21 show system id
The show system id EXEC mode command displays the system identity
information.
Syntax
show system id
Parameters
5
fe80::200:b0ff:fe00:0-8999 ESTABLISHED
There are no parameters for this command.
Command Mode
EXEC mode
Example
The following example displays the system identity information.
Console>
serial number 114
show system id
5.22 show cpu input rate
The show cpu input rate EXEC mode command displays the rate of input frames to
the CPU in packets per seconds (pps).
Syntax
show cpu input rate
Command Mode
EXEC mode
78-20269-01 Command Line Interface Reference Guide 96
Page 96

System Management Commands
User Guidelines
Example
The following example displays CPU input rate information.
5
Console#
Input Rate to CPU is 1030 pps.
show cpu input rate
78-20269-01 Command Line Interface Reference Guide 97
Page 97

Clock Commands
6 Clock Commands
6.1 clock set
The clock set Privileged EXEC mode command manually sets the system clock.
Syntax
6
clock set
Parameters
hh:mm:ss
{[
day month
] | [
month day
]}
year
• hh:mm:ss—Specifies the current time in hours (military format), minutes,
and seconds. (Range: hh: 0-23, mm: 0-59, ss: 0-59)
• day—Specifies the current day of the month. (Range: 1-31)
• month—Specifies the current month using the first three letters of the
month name. (Range: Jan–Dec)
• year—Specifies the current year. (Range: 2000–2037)
Command Mode
Privileged EXEC mode
User Guidelines
It is recommended that the user enter the local clock time and date.
Example
The following example sets the system time to 13:32:00 on March 7th, 2005.
Console#
clock set
13:32:00 7 Mar 2005
6.2 clock source
The clock source Global Configuration mode command configures an external
time source for the system clock. Use the no form of this command to disable the
external time source.
78-20269-01 Command Line Interface Reference Guide 98
Page 98

Clock Commands
6
Syntax
clock source {sntp}
no clock source
Parameters
sntp—Specifies that an SNTP server is the external clock source.
Default Configuration
There is no external clock source.
Command Mode
Global Configuration mode
Example
The following example configures an SNTP server as an external time source for
the system clock.
Console(config)#
clock source sntp
6.3 clock timezone
Use the clock timezone Global Configuration command to set the time zone for
display purposes. Use the no form of this command to set the time to Coordinated
Universal Time (UTC) or Greenwich Mean Time (GMT), which is the same.
Syntax
clock timezone
no clock timezone
Parameters
zone hours-offset [minutes-offset]
• zone—The acronym of the time zone.(Range: Up to 4 characters)
• hours-offset—Hours difference from UTC. (Range: (-12)–(+13))
• minutes-offset—Minutes difference from UTC. (Range: 0–59)
78-20269-01 Command Line Interface Reference Guide 99
Page 99

Clock Commands
6
Default Configuration
Offsets are 0.
Acronym is empty.
Command Mode
Global Configuration mode
User Guidelines
The system internally keeps time in UTC, so this command is used only for display
purposes and when the time is manually set.
Example
console(config)#
clock timezone
abc +2 minutes 32
6.4 clock summer-time
Use one of the formats of the clock summer-time Global Configuration command
to configure the system to automatically switch to summer time (Daylight Saving
Time). Use the no form of this command to configure the software not to
automatically switch to summer time.
Syntax
clock summer-time
month hh:mm}} [offset]
clock summer-time
[offset]
clock summer-time
[offset]
no clock summer-time
zone recurring {usa | eu | {week day month hh:mm week day
zone date day month year hh:mm date month year hh:mm
zone date month day year hh:mm month day year hh:mm
Parameters
• zone—The acronym of the time zone to be displayed when summer time is
in effect. (Range: up to 4 characters)
78-20269-01 Command Line Interface Reference Guide 100
Page 100

Clock Commands
6
• recurring—Indicates that summer time starts and ends on the
corresponding specified days every year.
• date—Indicates that summer time starts on the first date listed in the
command and ends on the second date in the command.
• usa—The summer time rules are the United States rules.
• eu—The summer time rules are the European Union rules.
• week—Week of the month. Can be 1–4, first, last.
• day—Day of the week (first three characters by name, such as Sun).
• date—Date of the month. (Range: 1–31)
• month—Month (first three characters by name, such as Feb).
• year—year (no abbreviation). (Range: 2000–2097)
• hh:mm—Time (military format) in hours and minutes. (Range: hh:mmhh: 0-23,
mm: 0-59)
• offset—Number of minutes to add during summer time (default is 60).
(Range: 1440)
Default Configuration
Summer time is disabled.
Command Mode
Global Configuration mode
User Guidelines
In both the date and recurring forms of the command, the first part of the command
specifies when summer time begins, and the second part specifies when it ends.
All times are relative to the local time zone. The start time is relative to standard
time. The end time is relative to summer time. If the starting month is
chronologically after the ending month, the system assumes that you are in the
southern hemisphere.
USA rules for Daylight Saving Time:
• From 2007:
- Start: Second Sunday in March
- End: First Sunday in November
78-20269-01 Command Line Interface Reference Guide 101
 Loading...