

Page 1

Cisco NAC Guest Server Installation and Configuration Guide
Release 1.1.0
March 2008
Americas Headquarters
Cisco Systems, Inc.
170 West Tasman Drive
San Jose, CA 95134-1706
USA
http://www.cisco.com
Tel: 408 526-4000
800 553-NETS (6387)
Fax: 408 527-0883
Text Part Number: OL-15986-01
Page 2

THE SPECIFICATIONS AND INFORMATION REGARDING THE PRODUCTS IN THIS M ANUAL ARE SUBJECT TO CHA NGE WITHOUT NO TICE. ALL
STATEMENTS, INFORMATION, AND RECOMMENDATIONS IN THIS MANUAL ARE BELIEVED TO BE ACCURATE BUT ARE PRESENTED WITHOUT
WARRANTY OF ANY KIND, EXPRESS OR IMPLIED. USERS MUST TAKE FULL RESPONSI BILITY FOR THEIR APPLICA TION OF ANY PRODUCT S.
THE SOFTWARE LICENSE AND LIMITED WARRANTY FOR THE ACCOMPANYING PRODUCT ARE SET FORT H IN THE INFORMATION PACKET T HAT
SHIPPED WITH THE PRODUCT AND ARE INCORPORATED HEREIN BY THIS REFERENCE. IF YOU ARE UNABLE TO LOCATE THE SOFTWARE LICENSE
OR LIMITED WARRANTY, CONTACT YOUR CISCO REPRESENTATIVE FOR A COPY.
The Cisco implementation of TCP head er compressi on is an adap tation of a program developed by the Universi ty of Ca lifornia, Berk eley (UCB) as part of UCB ’s public
domain version of the UNIX operatin g system. All rights reserved . Copyri ght © 1981 , Rege nts of the Uni versity of Calif ornia.
NOTWITHSTANDING ANY OTHER WARRANTY HEREIN, ALL DOCUMENT FILES AND SOFTWARE OF THE SE SUPPLIERS ARE PROVIDED “AS IS” WITH
ALL FAULTS. CISCO AND THE ABOVE-NAMED SUPPLIERS DISCLAI M ALL WARRANTIE S, EXPRESSED OR
LIMITATION, THOSE OF MERCHANTABILITY, FITNESS FOR A PARTICULAR PURPOSE AND NO NINFRINGEM ENT OR ARISING FROM A COURS E OF
DEALING, USAGE, OR TRADE PRACTICE.
IN NO EVENT SHALL CISCO OR ITS SUPPLIERS BE LIABLE FOR ANY INDIRECT, SPECIAL, CONSEQUENTIAL, OR INCIDENTAL DAMAGES, INCLUDING ,
WITHOUT LIMITATION, LOST PROFITS OR LOSS OR DAMAGE TO DATA ARISING OUT OF THE USE OR INABILITY TO USE THIS MANUAL, EVEN IF CISCO
OR ITS SUPPLIERS HAVE BEEN ADVISED OF THE POSSIBILITY OF SUCH DAMAGE S.
CCDE, CCVP, Cisco Eos, Cisco StadiumVision, the Cisco logo, DCE, and Welcome to the Human Net work are trademar ks; Changing the Way We Work, Live, Play, and
Learn is a service mark; and Access Registrar, Aironet, AsyncOS, Bringing the Meeting To You, Catalyst, CCDA, CCDP, CCIE, CCIP, CCNA, CCNP, CCSP, Cisco, the
Cisco
Certified Internetwork Expert logo, Cisco IOS, Cis co Press, Cis co S ystems, Cisco Syste ms Ca pita l, th e Cis co Systems logo, Cisco Unity, Collaboration Without
Limitation, Enter prise /Solv er, EtherC ha nnel , EtherFast, EtherSwitch, Event Center, Fast Step, Follow Me Browsing, FormShare, GigaDrive, HomeLink, Internet Quotient,
IOS, iPhone, IP/TV, iQ Expertise, the iQ logo, iQ Net Readiness Scorecard, iQuick Study, IronPort, the IronPort
MGX, Networkers, Networking Academy, Network Registrar, PCNow, PIX, PowerPanels, ProConnect, ScriptShare, SenderBase, SMARTnet, Spectrum Expert, StackWise,
The Fastest Way to Increase Your Internet Quotient, TransPath, WebEx, and the WebEx
United States and certain other countries.
All other trademarks mentioned in this document or Website are the property of their respective owners. The use of the word partner does not imply a partnership relationship
between Cisco and any other company. (0801 R)
Any Internet Protocol (IP) addresses used in this document are not intended to be actual addresses. Any examples, command display output, and figures included in the
document are shown for illustrative purposes only. Any use of actual IP addresses in illustrative content is unint entional an d coinc idental.
Cisco NAC Guest Server Installation and Configuration Gu ide
© 2008 Cisco Systems, Inc. All rights res erved.
logo are registered trademarks of Cisco Systems, Inc. and/or its affiliates in the
IMPLIED, INCLUDING, WI TH OUT
logo, LightStream, Linksys, MediaTone, MeetingPlace,
Page 3

About This Guide ix
CONTENTS
CHAPTER
CHAPTER
CHAPTER
1 Welcome to Cisco NAC Guest Server 1-1
Introduction 1-1
Guest Access Concepts 1-1
Before You Start 1-2
Package Contents 1-2
Rack Mounting 1-3
Cisco NAC Guest Server Licensing 1-3
Upgrading Firmware 1-3
Additional Information 1-4
2 Installing Cisco NAC Guest Server 2-1
Connecting the Cisco NAC Guest Server 2-1
Command Line Configuration 2-3
Configure IP Address and Default Gateway 2-3
Change Root Password 2-5
Re-Imaging the Appliance 2-6
3 System Setup 3-1
OL-15986-01
Accessing the Administration Interface 3-1
Obtain and Install Cisco NAC Guest Server License 3-2
Access Cisco NAC Guest Server Administration Interface 3-3
Configuring Network Settings 3-4
Date and Time Settings 3-5
SSL Certificate 3-7
Accessing the Guest Server using HTTP or HTTPS 3-7
Generating Temporary Certificates/ CSRs/ Private Key 3-8
Downloading Certificate Files 3-9
Downloading the CSR and Certificate 3-9
Downloading the Private Key 3-9
Upload Certificate Files 3-10
Configuring Administrator Authentication 3-10
Add New Admin Account 3-10
Cisco NAC Guest Server Installation and Configuration Guide
iii
Page 4

Contents
Edit Existing Admin Account 3-11
Delete Existing Admin Account 3-13
CHAPTER
4 Configuring Sponsor Authentication 4-1
Configuring Local Sponsor Authentication 4-1
Add New Local User Account 4-1
Edit Existing User Account 4-3
Delete Existing User Account 4-4
Configuring Active Directory (AD) Authentication 4-5
Add Active Directory Domain Controller 4-6
Edit Existing Domain Controller 4-7
Delete Existing Domain Controller Entry 4-9
Configuring LDAP Authentication 4-9
Add an LDAP Server 4-11
Edit an Existing LDAP Server 4-12
Delete an Existing LDAP Server Entry 4-14
Configuring RADIUS Authentication 4-15
Add a RADIUS Server 4-16
Edit an Existing RADIUS Server 4-17
Delete an Existing RADIUS Server Entry 4-18
Configuring Sponsor Authentication Settings 4-18
Changing the Order of Authentication Servers 4-18
Sponsor Timeouts 4-19
CHAPTER
CHAPTER
iv
5 Configuring User Group Permissions 5-1
Adding User Groups 5-1
Editing User Groups 5-4
Deleting User Groups 5-6
Specifying the Order of User Groups 5-7
Mapping to Active Directory Groups 5-8
Mapping to LDAP Groups 5-8
Mapping to RADIUS Groups 5-10
6 Configuring Guest Policies 6-1
Setting the Username Policy 6-1
Setting the Password Policy 6-2
Setting the Guest Details Policy 6-3
Cisco NAC Guest Server Installation and Configuration Guide
OL-15986-01
Page 5

Contents
CHAPTER
CHAPTER
CHAPTER
7 Integrating with Cisco NAC Appl iance 7-1
Adding Clean Access Manager Entries 7-1
Editing Clean Access Manager Entries 7-3
Deleting Clean Access Manager Entries 7-4
Configuring the CAM for Reporting 7-4
Adding a RADIUS Accounting Server 7-5
Configure the CAM to Format RADIUS Accounting Data 7-6
8 Configuring RADIUS Clients 8-1
Overview 8-1
Adding RADIUS Clients 8-2
Editing RADIUS Clients 8-3
Deleting RADIUS Clients 8-4
9 Guest Account Notification 9-1
Configuring Email Notification 9-2
Configuring SMS Notification 9-3
CHAPTER
CHAPTER
10 Customizing the Application 10-1
User Interface Templates 10-1
Adding a User Interface Template 10-2
Editing a User Interface Template 10-2
Editing the Print Template 10-4
Editing the Email Template 10-5
Editing the SMS Template 10-6
Using Account Durations 10-7
Deleting a Template 10-8
Setting the Default Interface Mapping 10-8
Setting User Default Redirection 10-9
11 Backup and Restore 11-1
Configuring Backup Settings 11-2
Taking a snapshot 11-2
Scheduling a Backup 11-3
Restoring Backups 11-3
OL-15986-01
Cisco NAC Guest Server Installation and Configuration Guide
v
Page 6

Contents
CHAPTER
CHAPTER
12 Replication and High Availability 12-1
Setting up replication 12-1
Configuring Provisioning 12-3
Replication Status 12-4
Recovering from Failures 12-4
Network Connectivity 12-4
Device Failure 12-5
Deployment Considerations 12-5
Connectivity 12-5
Load Balancing 12-6
Web Interface 12-6
RADIUS Interface 12-6
12-7
13 Logging and Troubleshooting 13-1
System Logging 13-1
Log Files 13-2
Downloading the log files 13-2
Application Logging 13-2
Email Logging 13-2
RADIUS Logging 13-2
CAM Update Logging 13-3
Web Server Logging 13-3
CHAPTER
CHAPTER
vi
14 Licensing 14-1
Licensing 14-1
15 Sponsor Documentation 15-1
Introduction to Cisco NAC Guest Server 15-1
Connecting to the Guest Server 15-1
Creating Guest User Accounts 15-4
Print Account Details 15-6
Email Account Details 15-6
Text Message Account Details (SMS) 15-6
Multiple Guest Accounts 15-7
Creating Multiple Accounts from Text Entry 15-7
Creating Multiple Accounts from CSV File 15-8
Creating Multiple Random Accounts 15-8
Cisco NAC Guest Server Installation and Configuration Guide
OL-15986-01
Page 7

Printing/Email/SMS Multiple Accounts 15-9
Viewing Multiple Account Groups 15-10
Viewing Multiple Account Groups 15-10
Finding Multiple Account Groups by username 15-11
Finding Multiple Account Groups on the Active Accounts Report. 15-11
Editing Guest Accounts 15-12
Suspending Guest Accounts 15-12
Viewing Active Accounts and Resending Details 15-13
Reporting on Guest Users 15-13
Contents
APPENDIX
A Open Source License Acknowledgements A-1
Notices A-1
OpenSSL/Open SSL Project A-1
License Issues A-1
OL-15986-01
Cisco NAC Guest Server Installation and Configuration Guide
vii
Page 8

Contents
viii
Cisco NAC Guest Server Installation and Configuration Guide
OL-15986-01
Page 9

About This Guide
March 5, 2008, OL-15986-01
This preface includes the following sections:
• Audience
• Purpose
• Document Conventions
• Product Documentation
• Obtaining Documentation and Submitting a Service Request
Audience
This guide is for network adm inistrato rs who are im plement ing Cisco NAC Guest Server to provision
guest access on their networks. Cisco NAC Guest Server works alongside Cisco NAC Appliance, Cisco
Unified Wireless Networks and other Cisco Network Enforcement devices to provide the captive portal
and enforcement point for guest access.
Purpose
The Cisco NAC Guest Server Install ation and Co nfiguration Guid e describes how to install and
configure the Cisco NAC Guest Server appliance. It describes the simple initial installation of the
appliance via CLI and the configuration and administration of the Guest Access Portal through the
web-based interface .
Document Conventions
Item Convention
Indicates command line output. Screen font
Indicates informat ion you ente r. Boldface screen f ont
Indicates variables for which you supply values. Italic screen font
OL-15986-01
Cisco NAC Guest Server Installation and Configuration Guide
ix
Page 10

Item Convention
Indicates web admin conso le modules, me nus, tabs, links an d
submenu link s.
Indicates a menu item to be selected. Administration > User Pages
Product Documentation
Table 1 lists documents are available for Cisco NAC Guest Server on Cisco.com at the following URL:
http://www.cisco.com/en/US/products/ps6128/tsd_products_sup port_se ries_home .html
Tip To access external URLs referenced in this document, right-click the link in Adobe Acrobat and select
“Open in Weblink in Browser.”
Table 1 Cisco NAC Appliance Document Set
About This Guide
Boldface font
Document Title Refer to This Document For Information On:
Release Notes for Cisco NAC Guest Server,
Release 1.1.0
Cisco NAC Guest Server Installation and
Configuration Guide (this docu ment )
Cisco NAC Appliance Service Co ntract /
Licensing Support
Cisco NAC Appliance Product Literature Online in ks to Ord er ing Gui de Bu lle tin s, D ata
Cisco NAC Appliance - Clean Access Manager
Installation and C onfiguration G uide
Cisco NAC Appliance - Clean Access Server
Installation and C onfiguration G uide
Cisco Wireless LAN Controller Configuration
Guide, Rel eas e 4.0
Details on the latest Cisco NAC Guest Server
release.
Hardware information, initi al installation, setup and
configuration instructions for Cisco NAC Guest
Server.
Information on serv ice cont r act su ppo rt, lic ensing
support and RMA su ppo rt f or Ci sco NAC
Appliance, Cisco NAC Profiler and Cisco NAC
Guest Server.
Sheets, Q&A and Chalk Talk presentations
Configuration guides for NAC Appliance Manager
and Server
Configuration inform ation for Cisco Wireless LAN
Controllers
Obtaining Documentation and Su bmitting a Service Reque st
For information on obtaining docume ntatio n, submittin g a service request, an d gatherin g additiona l
information, see the monthly What’s
revised Cisco
http://www.cisco.com/en/US/docs/general/whatsnew/whatsnew.html
Subscribe to the What’s New in Cisco Product Documentation as a Really Simple Syndication (RSS) feed
and set content to be delivered directly to your desktop using a reader application. The RSS feeds are a free
service and Cisco currently supports RSS version 2.0.
Cisco NAC Guest Server Installation and Configuration Guide
x
technical documentation, at:
New in Cisco Product Documentation, which also lists all new and
OL-15986-01
Page 11

Introduction
CHA PTER
1
Welcome to Cisco NAC Guest Server
The Cisco NAC Guest Server is a complete provisioning and reporting system that provides temporary
network access for guests, visitor s, contra ctors, consultants or cu stomer s. The Guest Ser ver works
alongside Cisco NAC Appliance or Cisco Wireless LAN Controller which provide the captive portal and
enforcemen t poin t for gue st ac cess.
Cisco NAC Guest Server allows any user with privileges to ea sily cre ate tem porar y g ue st ac c ounts and
sponsor guests. Cisco NAC Guest Server performs full authentication of sponsors, the users who create
guest accounts, and allows spo nsors t o provide a ccou nt d eta ils t o th e gue st by p rint out, em ail o r SMS.
The entire experience , from user accou nt cre ation to gu est netwo rk acces s, is stor ed for au dit and
reporting.
When guest accounts are created, they are eit her pro visioned wit hin the Cisco N AC Appliance Manager
(Clean Access Manager) or stored within the built-in database on the Cisco NAC Guest Server. When
using the Guest Server’s built-in database, external network access devices, such as the Cisco Wireless
LAN Controller, can authenticate users against the Guest Server using the RADIUS (Remote
Authentication Dial In User Service) protocol.
The Cisco NAC Guest Server provisions the guest account for the amount of time specified when the
account is created. Up on e xpiry o f the a ccount , the Gu est Ser ver either deletes the a ccount directly from
the Cisco NAC Appliance Manager or sends a RADIUS message whi ch notifies the network ac cess
device (NAD) of the amount of valid time remaining for the account before the NAD should remove the
user.
Cisco NAC Guest Server provides vital guest network access accounting by consolidating the entire
audit trail from g ue st a ccoun t c re ation t o gue st u s e of t he a cco unt so t hat repor ts can be pe rfo rm ed
through a centra l ma nage ment inter face.
Guest Access Concepts
Cisco NAC Guest Server makes use of a number of terms to explain the co mpone nts ne ed ed to provide
guest access.
Guest User
The Guest User is the person who needs a user account to access the network.
OL-15986-01
Cisco NAC Guest Server Installation and Configuration Guide
1-1
Page 12

Before You Start
Chapter 1 Welcome to Cisco NAC Guest Server
Sponsor
The Sponsor is t he pe rson w ho c reate s th e gue st u ser a cco unt. Th is per son i s of ten an em ploy ee o f the
organization that provides the network ac cess. Sponso rs can be spec ific individuals with cert ain job
roles, or can be any employee who can authenticate against a corporate directory such as Microsoft
Active Directory (AD).
Network Enforcement Devic e
These devices a re th e ne tw o rk i nf ras truc ture co mpo nent s th at p ro v id e t he n etw o r k acc ess. Additionally,
network enforceme nt device are resp onsibl e f or pu shing guest use rs to a ca ptive portal wh er e they c an
enter their guest account details. When a guest enters his or her temporary user name and password, the
network enforcement device checks those credentials against the guest accounts created by the Guest
Server.
Guest Server
This is the Cisco NAC Guest Server , which ties t ogethe r all the piec es of guest a ccess. T he Guest Se rver
links the sponsor creating the guest account, the account details passed to the guest, the guest
authentication against the network enforcement device, and the network enforcement device’s
verification of the guest with the Guest Server. Additionally, the Cisco NAC Guest Server consolidates
accounting informa tion fro m network enfo rcemen t devices to provide a singl e point of gue st access
reporting.
Before You Start
This section describes the fo llowing:
• Package Contents
• Rack Mounting
• Cisco NAC Guest Server Li cens ing
• Upgrading Firmware
• Additional Information
Package Contents
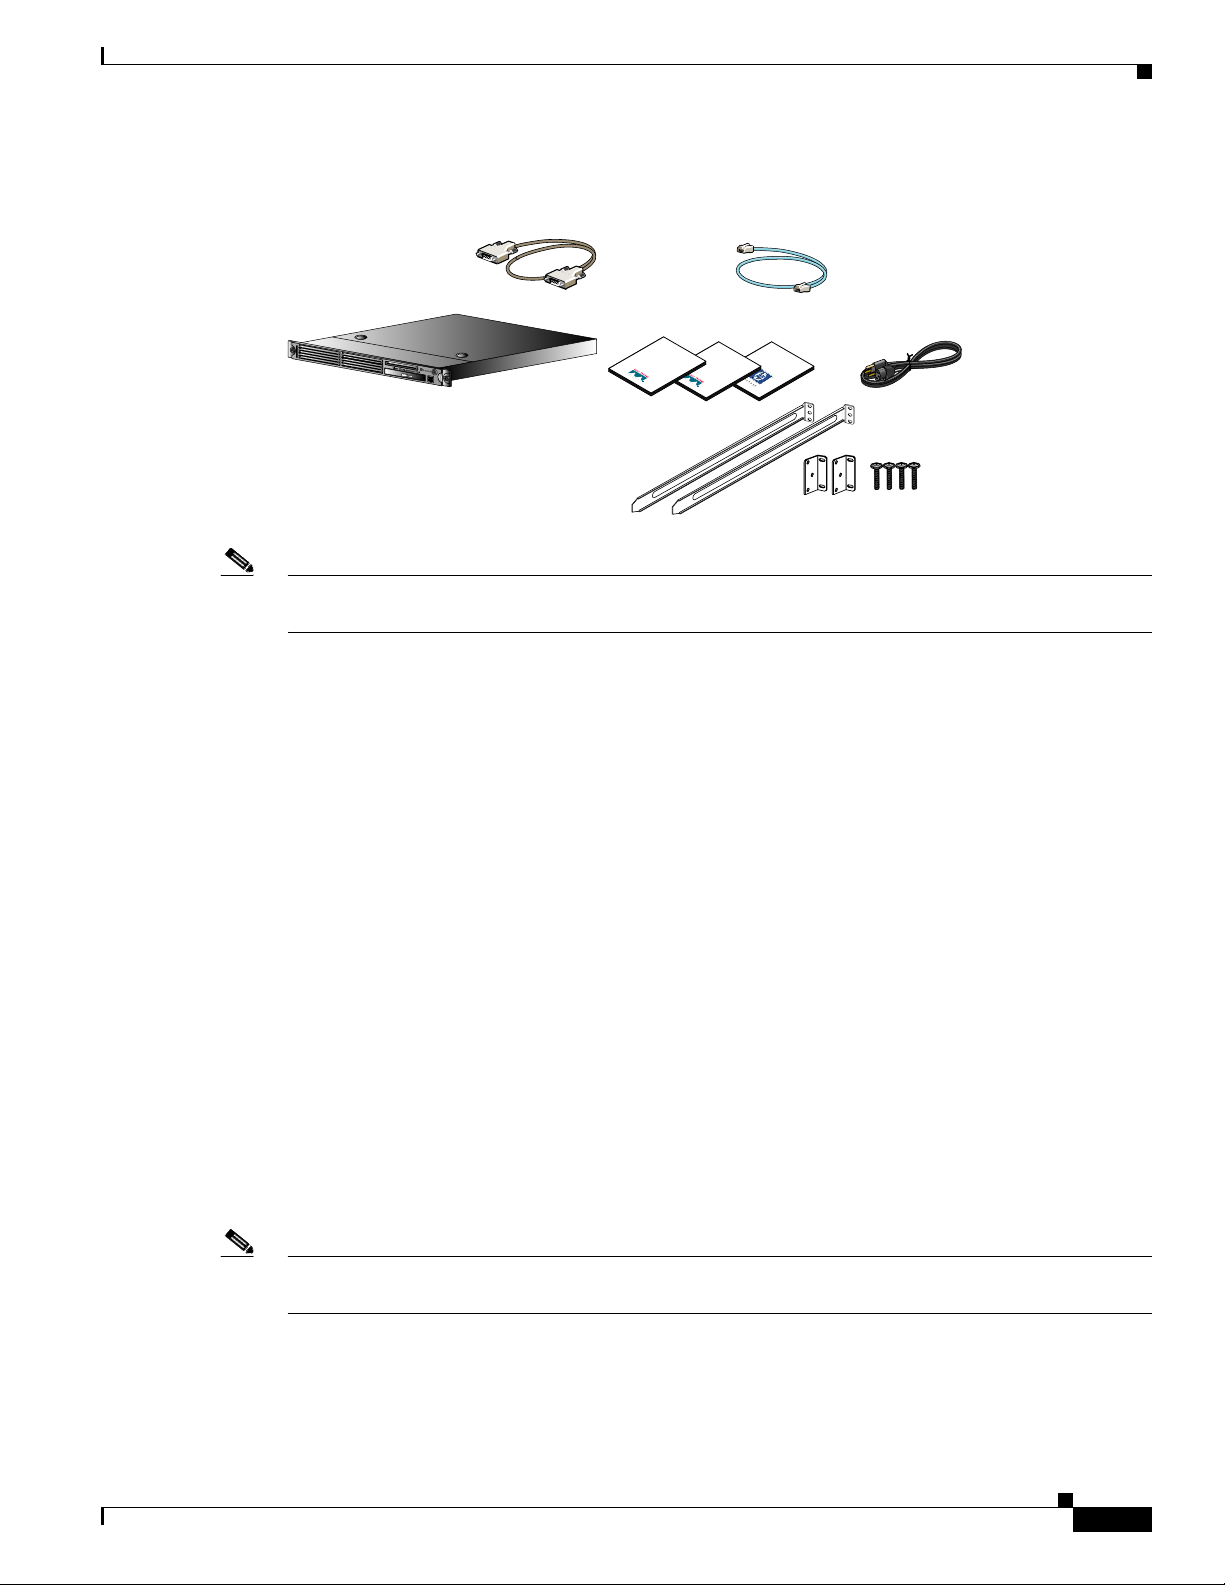
Verify the contents of the packing box (Figure 1-1) to ensure that you have received all items necessary
to install your Cisco NAC Guest Server. Save the packing material in case you need to repack the unit.
If any item is missing or damaged, cont act your Ci sco repre sentative or reseller fo r instructi ons.
1-2
Cisco NAC Guest Server Installation and Configuration Guide
OL-15986-01
Page 13
Chapter 1 Welcome to Cisco NAC Guest Server
185434
rd
Rack mounting kit
DB-9 serial null modem cable
Figure 1-1 Shipping Box Contents
Before You Start
RJ-45 cable
(straight-through)
Cisco NAC Guest Server
Note Because product sof tware is p re load ed on to t he Cisco NAC Guest Server applia nce, the sh ipping
contents do not include a separate software installation CD.
Rack Mounting
The Cisco NAC Guest Server occupie s o ne rac k unit ( 1U ). A rack -mo unti ng kit is inc lude d in t he
shipment. For rack-mounting information and instructions, refer to the 1U Rack Hardware Installation
Instructions for HP Products document also included in the shipment .
Cisco NAC Guest Server Licensing
Documentation
Information
Cisco
Cisco NAC
Getting Started
Appliance
Packet
Guide
Important
Information
Safety
AC power co
Yo u need to obta in a nd insta ll a FlexLM p rod uct l icen se f or your Ci sco NAC Guest Server via i ts web
interface for your system to work. See
on how to obtain and install license(s) for your system.
For additional details, refer to Cisco NAC Appliance Service Contract / Licensing Su ppo rt.
Upgrading Firmware
The Cisco NAC Guest Server is based on th e C is co NAC Appliance 331 0 (NAC-3310) hardware
platform. The Cisco NAC Guest Server appliance is subject to any system B IOS/Fir mware upgrad es
required for the server model on whi ch it is based . NAC-3310 is based on the HP ProLiant DL140 G3
and may require per iodi c firm ware upg ra des.
OL-15986-01
Note For further details refer to Supported Hardware and System Requirements for Cisco NAC Appliance
(Cisco Clean Acce ss) .
Accessing the Administration Interface, page 3-1 for instructions
Cisco NAC Guest Server Installation and Configuration Guide
1-3
Page 14

Before You Start
Additional Information
For late-breaking or additional details for this release, refer to the Release Notes for Cisco NAC Guest
Server, Release 1.0.0.
For the latest online updates to this guide, visit
http://www.cisco.com/en/US/products/ps6128/products_installation_and_configuration_guides_list.ht
ml
See Product Documentation for a list of related documentation for Cisco NAC Guest Server.
For details on how to obtain technical support, refer to section Obtaining Documentation and Submitting
a Service Request .
Chapter 1 Welcome to Cisco NAC Guest Server
1-4
Cisco NAC Guest Server Installation and Configuration Guide
OL-15986-01
Page 15

CHA PTER
Installing Cisco NAC Guest Server
This chapter contains the following sections:
• Connecting the Cisco NAC Guest Server
• Command Line Configuration
• Re-Imaging the Appliance
Connecting the Cisco NAC Guest Server
The Cisco NAC Guest Server is based on th e C is co NAC Appliance 331 0 (NAC-3310) hardware
platform and comes prelo aded wi th a d efaul t system image. When y ou rece i ve the Gue st Serv er , perfor m
the initial configuration described in
CD installation to re-image the appliance, refer to Re-Imaging the Appliance for instructions.
T o perform initial con figuration, you will ne ed to connect to your appliance an d access its command line,
as described be low.
Command Line Co nfigurat ion , p age 2-3. If you need to perfo rm
2
OL-15986-01
Step 1 You can access the Cisco NAC Guest Server command line in one of two ways:
a. Connect a monitor and keyboard directly to the machine via the keyboard/video monitor connectors
on the back panel of the machine (
b. Connec t a null modem serial cable fr om a workstation (PC/laptop ) to the serial port on the appl iance.
Open a serial connection on the workstation using terminal emulation software (such as
HyperTerminal or SecureCRT) with settings set to 9600 baud, 8 data bits, no parity, 1 stop bit, no
flow control.
Step 2 Connect a stra ight -th rou gh Ca tegory 5 Eth ern et cabl e to the eth0 (NIC 1) 1 0/ 100 /1000 Eth er net p ort o n
the back panel of the appli ance an d to your local ar ea network.
Step 3 Connect the AC power cord to t he ba ck pa nel o f the appl ia nce a nd to a g rou nded AC outlet , and power
on the appliance(
Step 4 Proceed to the instructions in Command Line Configurat ion, pag e 2-3.
Figure 2-1).
Figure 2-2)(pref er re d m eth od).
Cisco NAC Guest Server Installation and Configuration Guide
2-1
Page 16
Connecting the Cisco NAC Guest Server
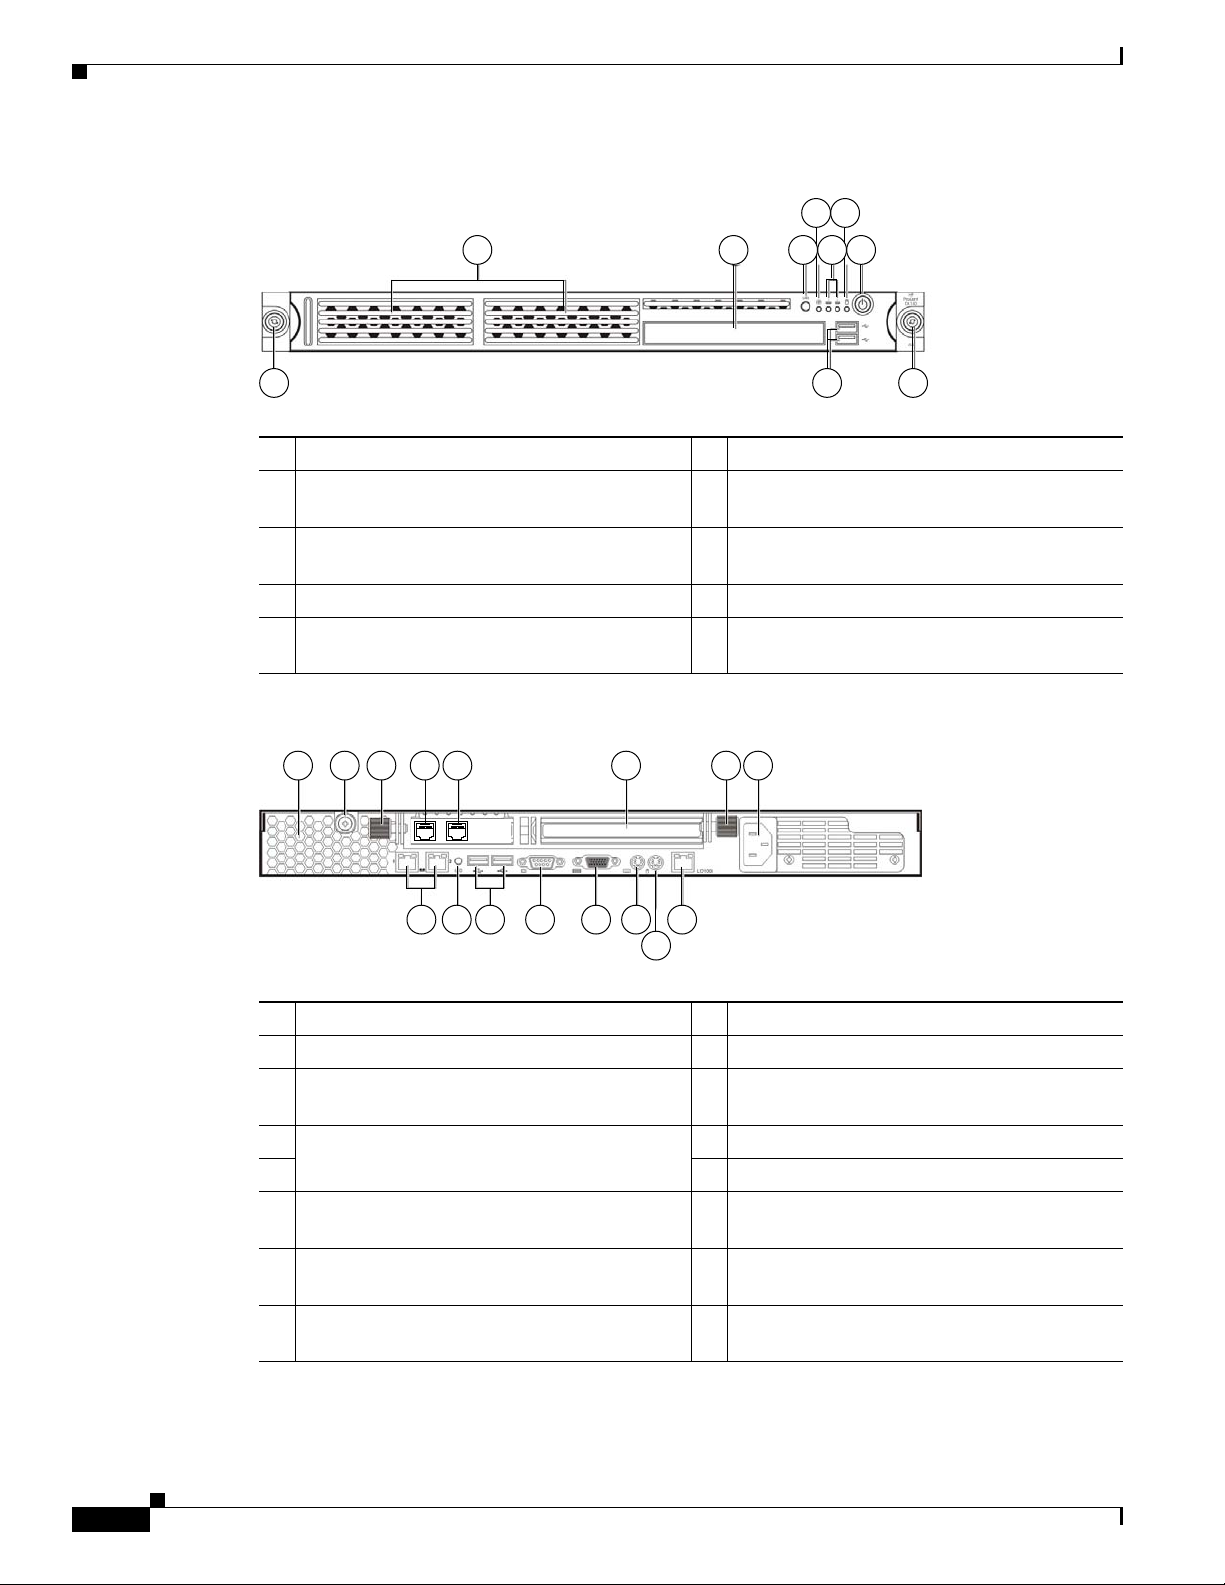
Figure 2-1 Cisco NAC Guest Server Front Panel
Chapter 2 Installing Cisco NAC Guest Server
4 6
1 2 3
5 7
180955
8 9 8
1 Hard disk drive (HDD) bay 6 HDD activity LED indicator (green)
CD-ROM/DVD drive
2
UID (Unit identification) button with LED
indicator (blue)
3
Power button with LED indicator (bicolor:
green/amber)
7
Thumbscrews for the front bezel
8
4 System health LED indicator (amber) 9 Front USB ports
Activity/link status L ED indi ca tors f or NI C 1
(eth0) and NIC2 (eth1) (green)
5
Figure 2-2 Cisco NAC Guest Server Rear Panel
2 31 6 3 7
54
180957
151312111098
14
1 Ventilation holes 9 UID button with LED indicator (blue)
2 Thumbscrew for the top cover 10 Rear USB ports (black)
Thumbscrews for the PCI riser board
assembly
3
4 NIC 3 (eth2) and NIC 4 (eth3) PCI Express
GbE LAN (RJ-45) ports (Intel)
5 13 PS/2 keyboard port ( purpl e)
Standard height/full-length PCI E xpress
x16/PCI-X riser board slot cover
6
Power supply ca ble so cket
7
Video port (blue)
11
12 Serial port
PS/2 mouse port (gree n)
14
10/100 Mbps iLO LAN port for IPM I
management (RJ-45)
15
NIC 1 (eth0) and NIC 2 (eth1) integrated GbE
LAN (RJ-45) ports (Broadcom)
8
2-2
Cisco NAC Guest Server Installation and Configuration Guide
OL-15986-01
Page 17
Chapter 2 Installing Cisco NAC Guest Server
Note The three LAN ports each have their own LED indicators for activity/link status and network speed.
Command Line Configuration
A very minimal amount of command line configuration is needed on the Cisco NAC Guest Server
appliance. This is to perform two tasks.
• Configure IP Address and Default Gateway, page 2-3 so that the appliance can be accessed on the
network
• Change Root Password, page 2-5 on the appliance from the default
Configure IP Address and Default Gateway
Command Line Configuration
To allow the appliance to be accessed on the ne twork you nee d to configure the IP addre ss and defaul t
gateway for the first interface on the appliance (eth0 or NIC1). To configure these details perform the
following steps.
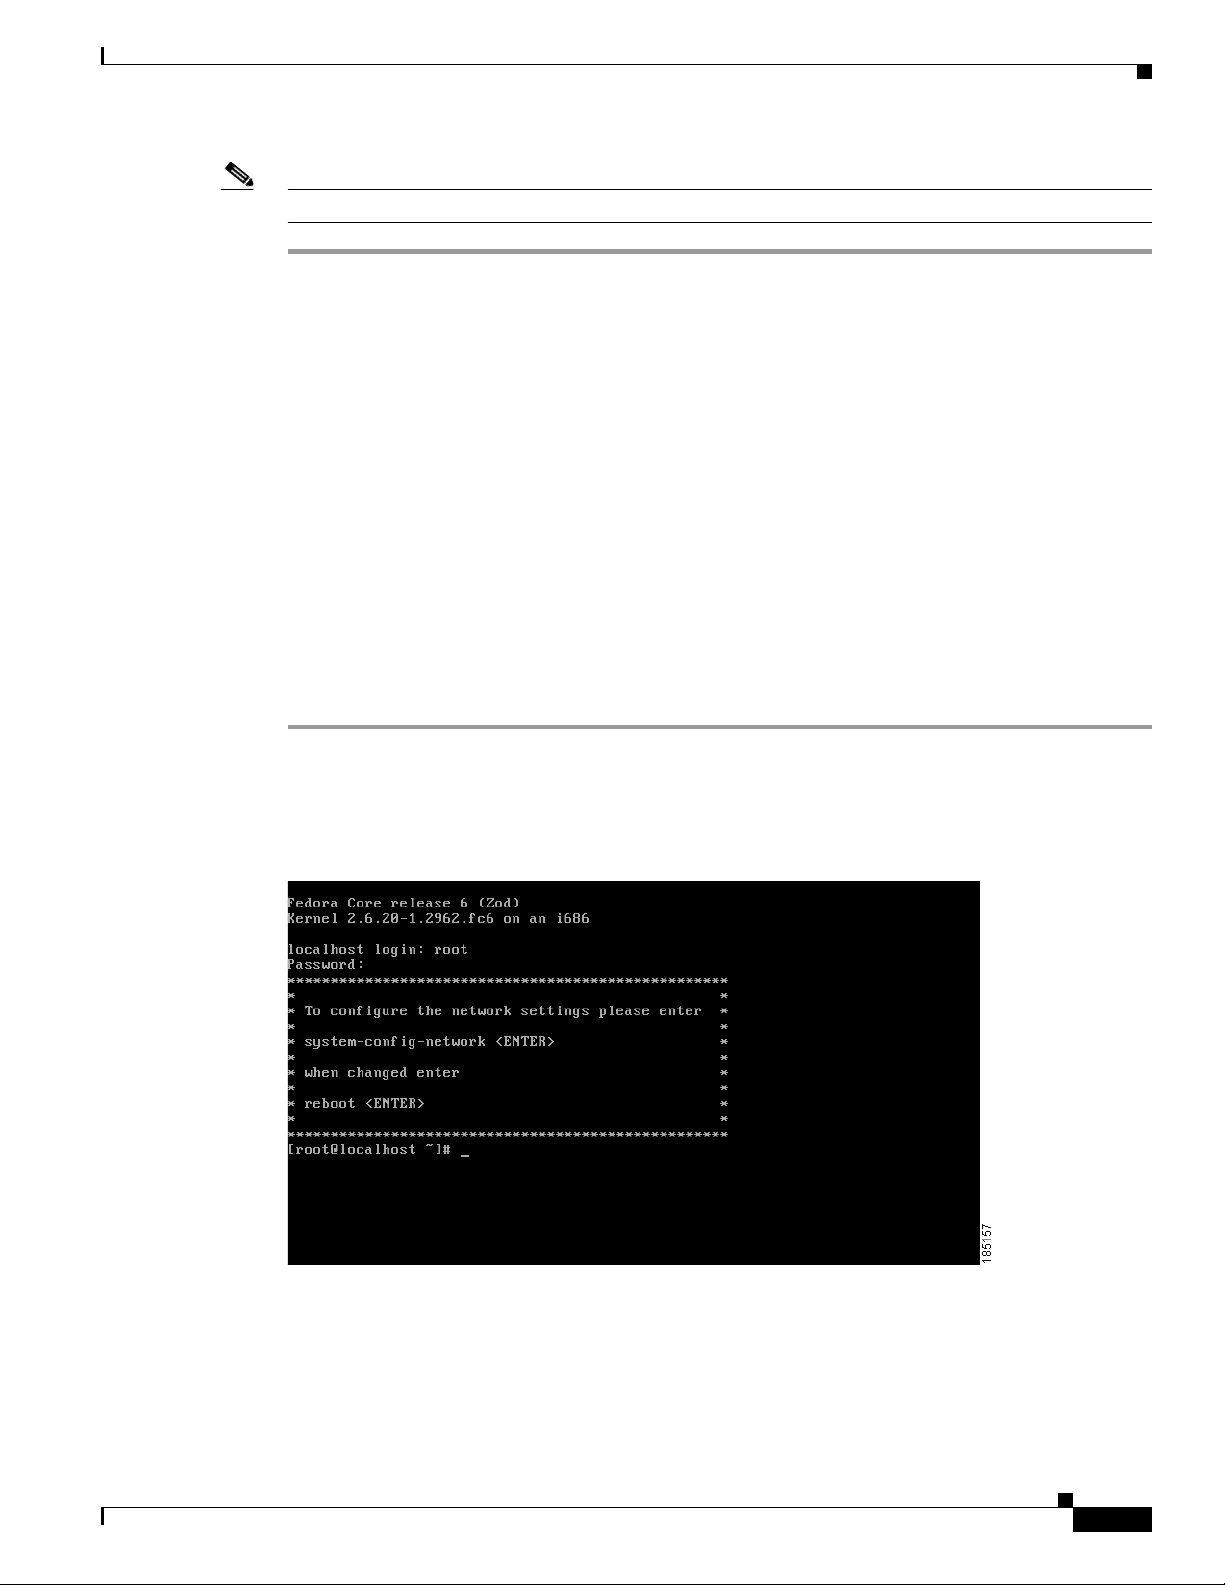
Step 1 Using either keyboar d and monit or conn ection t o the appli ance, or seri al consol e conne ction,
authenticate to the command line interface. The user name for the console is root and th e default
password is cisco (
Figure 2-3 Authenticate to the Console
Figure 2-3).
OL-15986-01
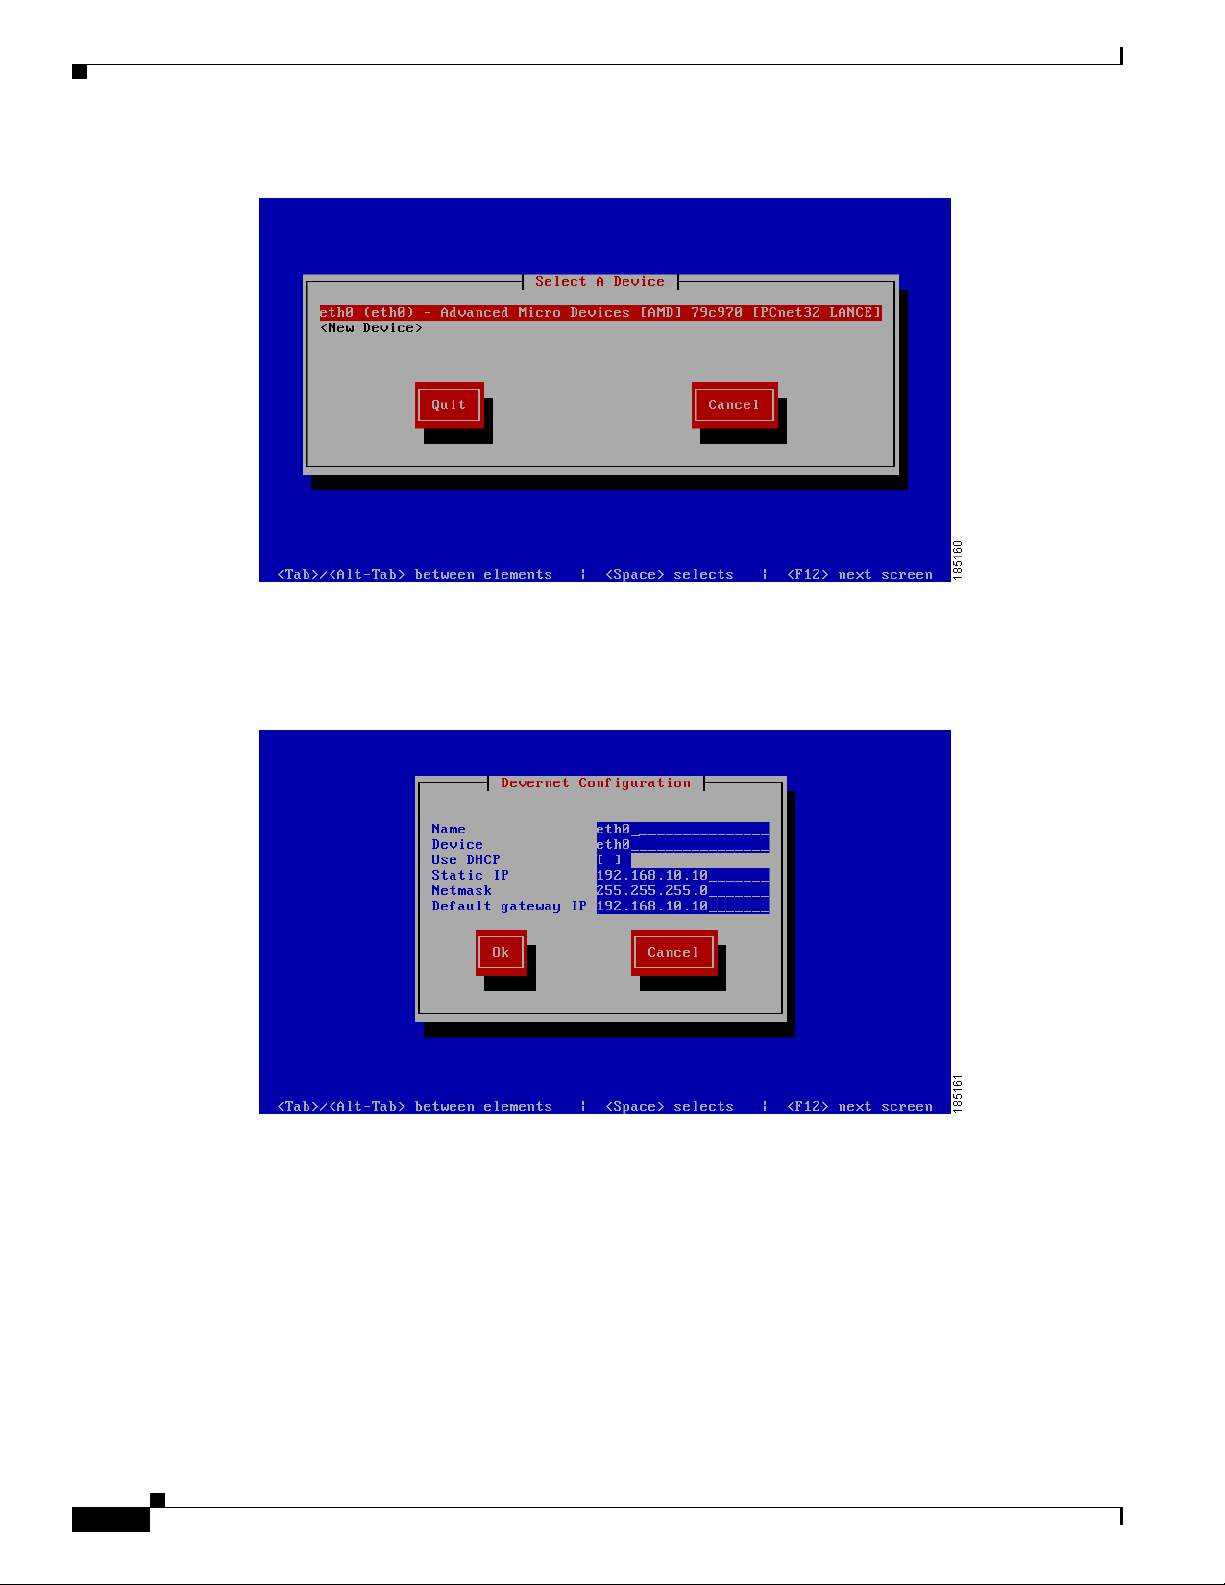
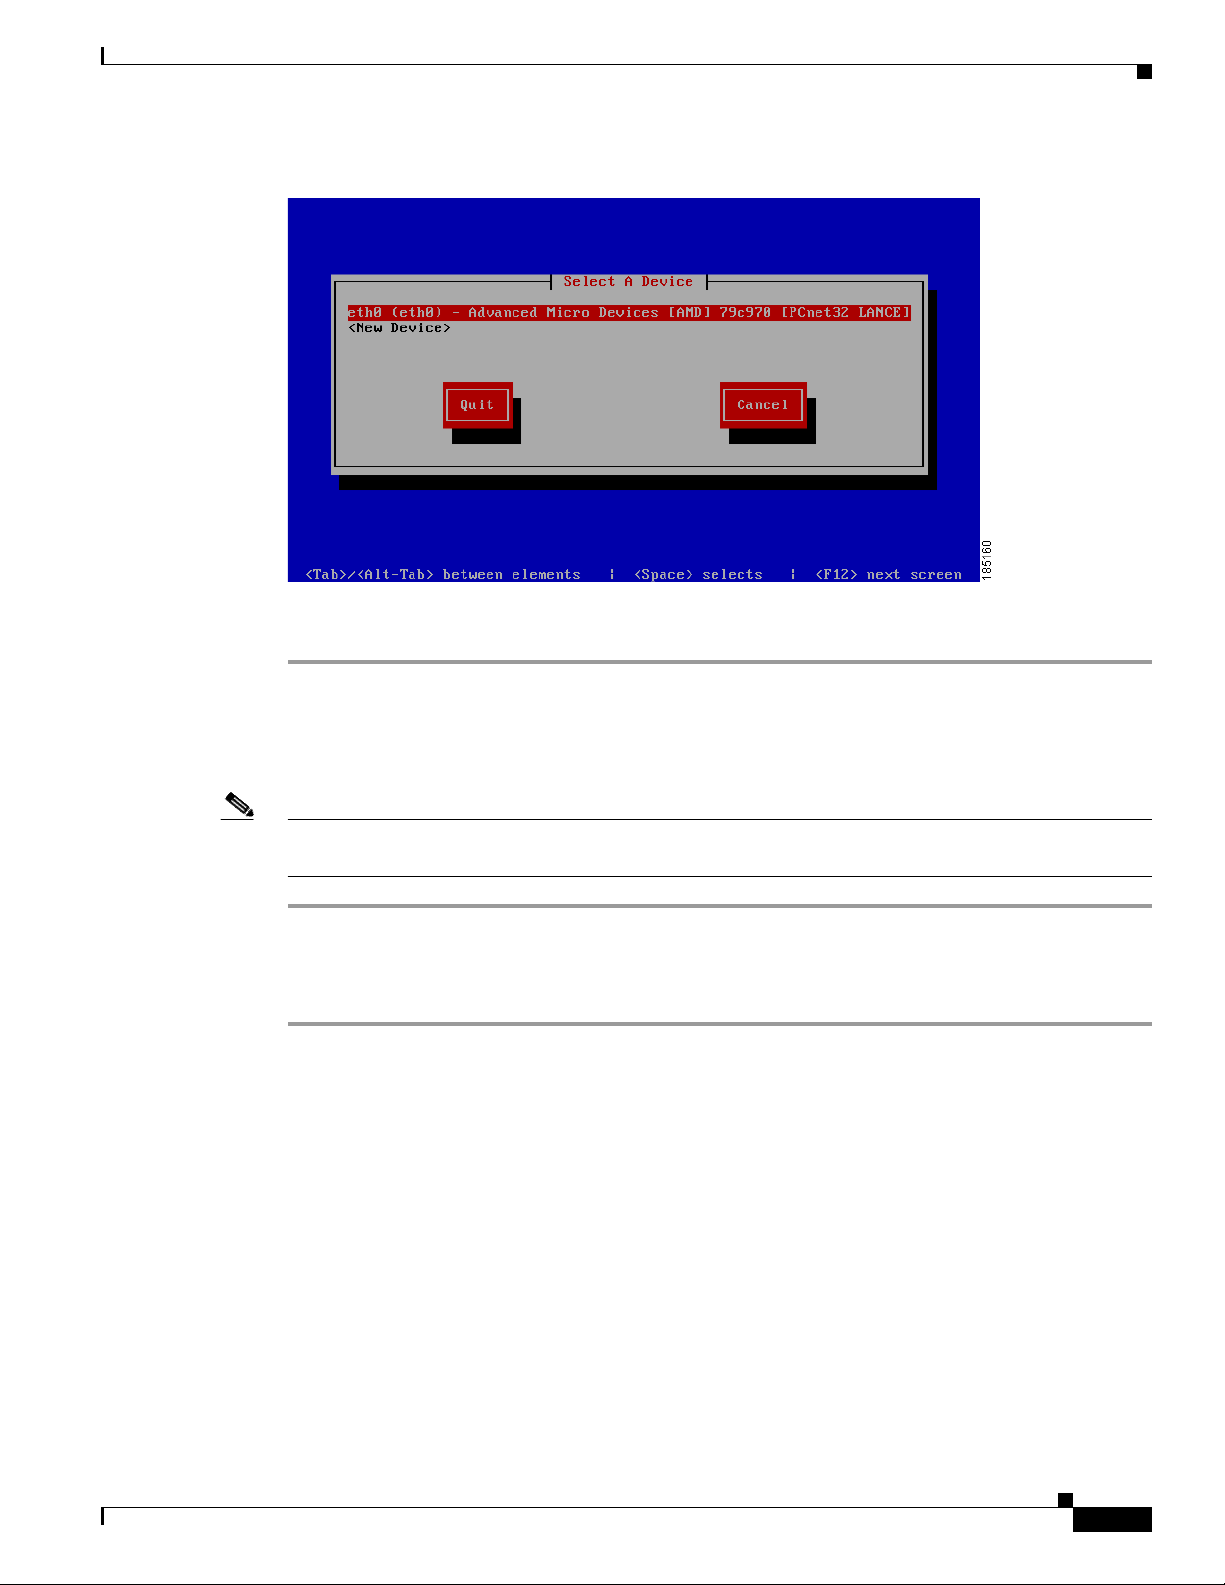
Step 2 To configure the network settings, type the co mm an d syst em-c onfig-network an d pr ess <Enter>. The
Select A Device me nu ap pe ar s (
Figure 2-4).
Cisco NAC Guest Server Installation and Configuration Guide
2-3
Page 18
Command Line Configuration
Figure 2-4 Choose eth0 Interface
Step 3 Select the eth0 interface from the list using the up and down arrow keys and press <Enter>.
Chapter 2 Installing Cisco NAC Guest Server
Step 4 You can now enter all the correct network settings for the appliance (Figure 2-5).
Figure 2-5 Change Network Configuration Details
Enter the following information:
• Static IP—The IP Address that you want to assign to the Cisco NAC Guest Server
• Netmask—The corresponding subnet mask
2-4
• Default gateway IP—The de fault gateway for the network
You can use the Tab key, Arrow keys or <Enter> to move between fields,. When f inished, ta b to the OK
button and press <Enter>.
Step 5 Exit the system-config-network by selecting Quit from the network selection screen (Figure 2-6).
Cisco NAC Guest Server Installation and Configuration Guide
OL-15986-01
Page 19
Chapter 2 Installing Cisco NAC Guest Server
Figure 2-6 Quit the Utility
Step 6 At the command line either reboot the appliance by typing reboot and pressing <Enter> or follow the
instructions to
Command Line Configuration
Change Root Password, page 2-5 be fo re e nt eri ng reboot.
Change Root Password
Note You should change the ro ot p assword from the default of cisc o, it is advised to use a complex password
for enhanced security.
Step 1 From the command line enter the command passwd and press <Enter>.
Step 2 Enter the n ew password and pr ess <Ent er>.
Step 3 Repeat the password and press <Enter>.
Continue to System Setup, page 3-1 to access and configure the admin console.
OL-15986-01
Cisco NAC Guest Server Installation and Configuration Guide
2-5
Page 20
Re-Imaging the Appliance
Re-Imaging the Appliance
When the Cisco NAC Guest Server is shipped, the system image already preloaded on the unit, so
imaging is unnecessary. If you need to re-image the appliance to factory defaults, you can download the
system image ISO from Cisco Secure Software Downloads on Cisco.Com and burn this ISO file to a
blank CD-ROM.Once you have the system image on a bootable CD, you can perform the following steps
to install the system image onto the appliance. Refer to the
Release 1.1.0 for additional details.
Caution Imaging the appliance will delete all data on the appliance, there will be no method of recovery of data
from the Guest Server after imaging has been started. Make sure to backup any data that you need before
starting this process.
Step 1 Insert the bootable CD into the CD-ROM drive of the Cisco NAC Guest Server appliance.
Step 2 Decide whethe r to perfor m the insta llation usi ng a connect ed keyboard and mon itor or over a serial
console. Connect either a keyboard and monitor to the back of the unit, or attach a null modem cable to
the serial port on the back of the appliance. From the computer the serial cable is attached you will need
to run a terminal emulati on pr ogram with setting s set to 9600 baud , 8 data bi ts, no par ity, 1 stop bit, no
flow control.
Step 3 Once you have connected to the appliance and inserted the CD containing the image, power on the
appliance. Switch the applianc e on, or if alre ady starte d switch it off and the n back on agai n.
Chapter 2 Installing Cisco NAC Guest Server
Release Notes for Cisco NAC Guest Server,
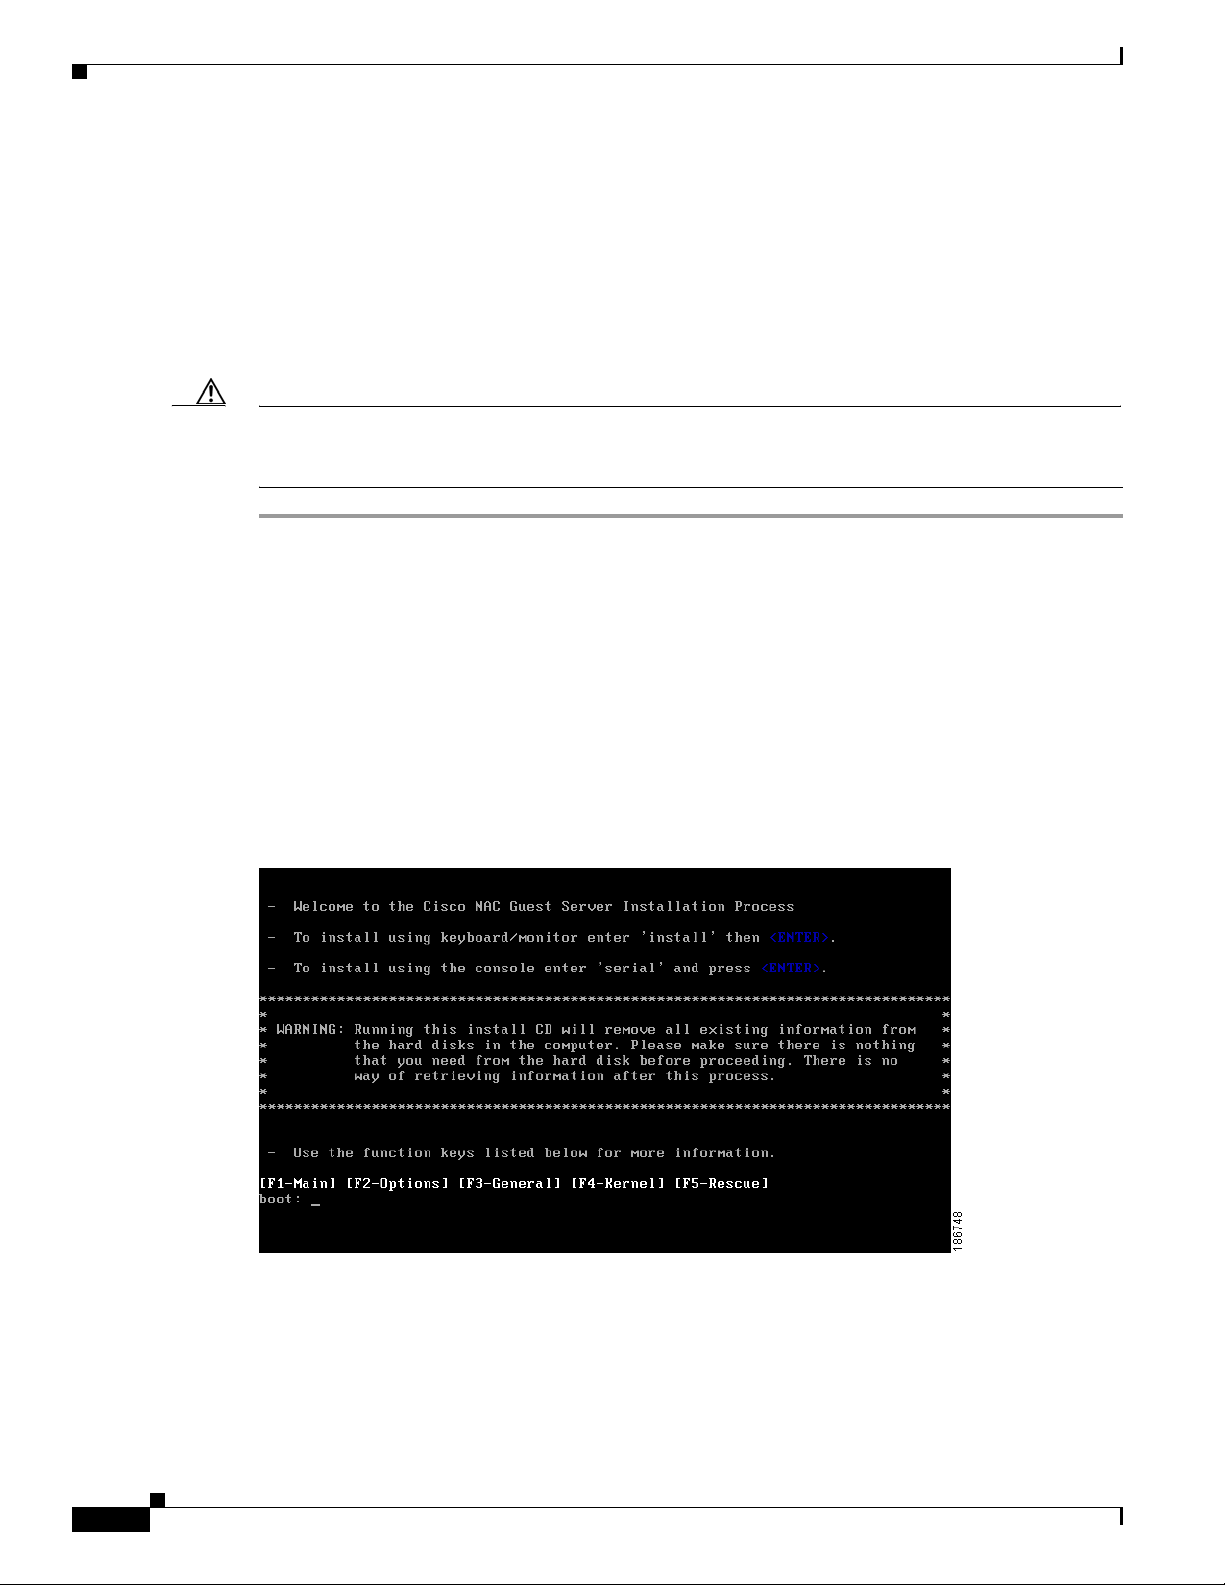
Step 4 The appl ian ce s hould now bo ot f rom the C D -ROM drive and the in itia l i nsta ll sc re en di sp lays
(
Figure 2-7).
Figure 2-7 Initial Install Screen
Step 5 At the Initial Install Screen, choose how to run the installation according to how you are connected to
the appliance.
• If directly connecte d using a keyboard an d monitor, type insta ll and press <Enter>.
• If you using a serial connect ion, type serial a t the boot prom pt, then pre ss <Enter>.
2-6
Cisco NAC Guest Server Installation and Configuration Guide
OL-15986-01
Page 21
Chapter 2 Installing Cisco NAC Guest Server
Note If you press <Enter> by mistake on a serial connection, the imaging process will still run, but
there is no display until the appliance reboots at the end of the process.
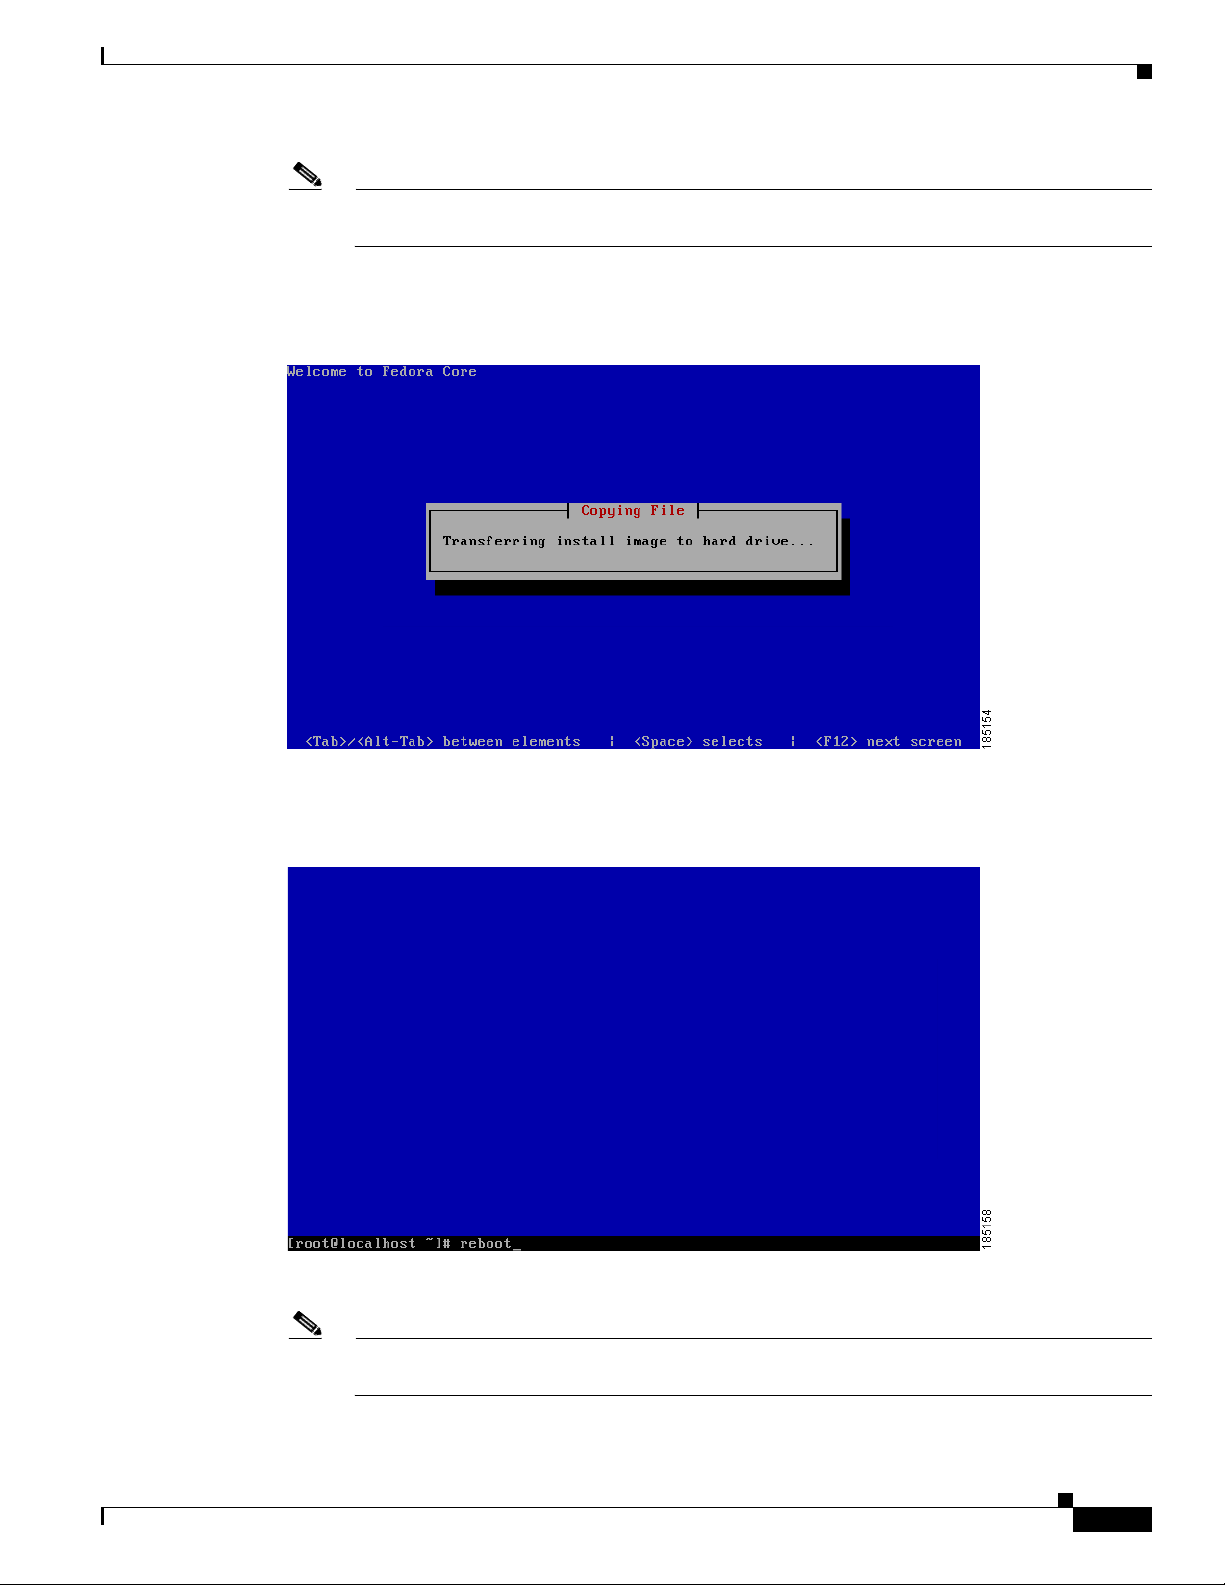
Step 6 The system image automatically installs on the hard disk (Figure 2-8).
Figure 2-8 Transferring Install Image
Re-Imaging the Appli ance
Step 7 When the install image is successfully, transferred the system reboots automatically (Figure 2-9).
Figure 2-9 Appliance Reboots
Step 8 The CD-ROM automatically ejects from the appliance.
Note Remove the CD and stor e it sa fely so tha t the a pplia nc e do es no t ac cide ntal ly re boot fr om i t a t
a later time.
OL-15986-01
Cisco NAC Guest Server Installation and Configuration Guide
2-7
Page 22

Re-Imaging the Appliance
Step 9 The appliance boots and runs the final setu p of the image automatical ly . The imaging process is comple te
when the login screen displays (
Figure 2-10 Imaging Complete
Figure 2-10).
Chapter 2 Installing Cisco NAC Guest Server
Step 10 Login as user root, and con tinue to th e instru ctions in Command Lin e Configuratio n, page 2-3 to
complete the installation.
2-8
Cisco NAC Guest Server Installation and Configuration Guide
OL-15986-01
Page 23

CHA PTER
System Setup
The system can be configured through the web interface to provide the networking configuration for the
appliance and other system settings that are important such as time and SSL certificate. The Cisco NAC
Guest Server is administered entirely using a web interface over either HTTP or HTTPS.
This chapter includes the following sections:
• Accessing the Administration Interface
• Configuring Network Settings
• Date and Time Settings
• SSL Certificate
• Configuring Administrator Authentication
Accessing the Administration Interface
3
Upon first accessing the web administration interface of the Cisco NAC Guest Server, you will need to
install a product license. You can obtain a license using the instructions in the PAK shipped with the
appliance or by registering for a evaluation license at
https://tools.cisco.com/SWIFT/Licensing/PrivateRegistrationServlet?FormId=146.
Note For additional details on evaluation licenses refer to Cisco N AC Appliance Service Contract / Licensing
Support.
This section describes the fo llowing:
• Obtain and Install Cisco NAC Guest Server License
• Access Cisco NAC Guest Server Administration Interface
OL-15986-01
Cisco NAC Guest Server Installation and Configuration Guide
3-1
Page 24

Accessing the Admin is tration Interface
Obtain and Install Cisco NAC Guest Server License
Use the following steps to obtain and install your FlexLM product license files for Cisco NAC Guest
Server.
Step 1 With FlexLM lic en si ng, y ou will receiv e a Product Author iza tio n Key (PAK) for each Guest Serv e r t ha t
you purchase. The PAK is affixed as a sticky label on the Software License Claim Certificate card that
is included in y our p ac kage .
Chapter 3 System Setup
Warning
Step 2 Log in as a registered CCO user and fill out the Customer Registration form found at the PAK Cisco
The PAK is NOT the Cisco NAC Guest Server license. The PAK is used to obtain the Cisco NAC Guest
Server license, as described below.
Technical Support site:
http://www.cisco.com/go/license. During customer registration, sub mit each
PAK you receive and the eth0 MAC address of your Cisco NAC Guest Server.
Warning
The eth0 MAC address entered for the Guest Server must be in UPPER CASE (i.e. hexadecimal letters
must be capitalized). Do not enter colons (“:”) in between characters.
Please follow the instructions on the license web pages carefully to ensure that the correct MAC
addresses are entered.
Step 3 For each PAK that you submit, a license file is generated and sent to you via email.
Step 4 Save each license file you receive to disk.
Step 5 Open a web brows er to th e Ci sco NAC Guest Ser ver admin int er face by ente rin g th e IP address that yo u
configured throug h the co mm and l ine a s the U RL.
• For HTTP access, open http://<guest_server_ip_address>/admin
• For HTTPS access, open https://<guest_server_ip_address>/admin
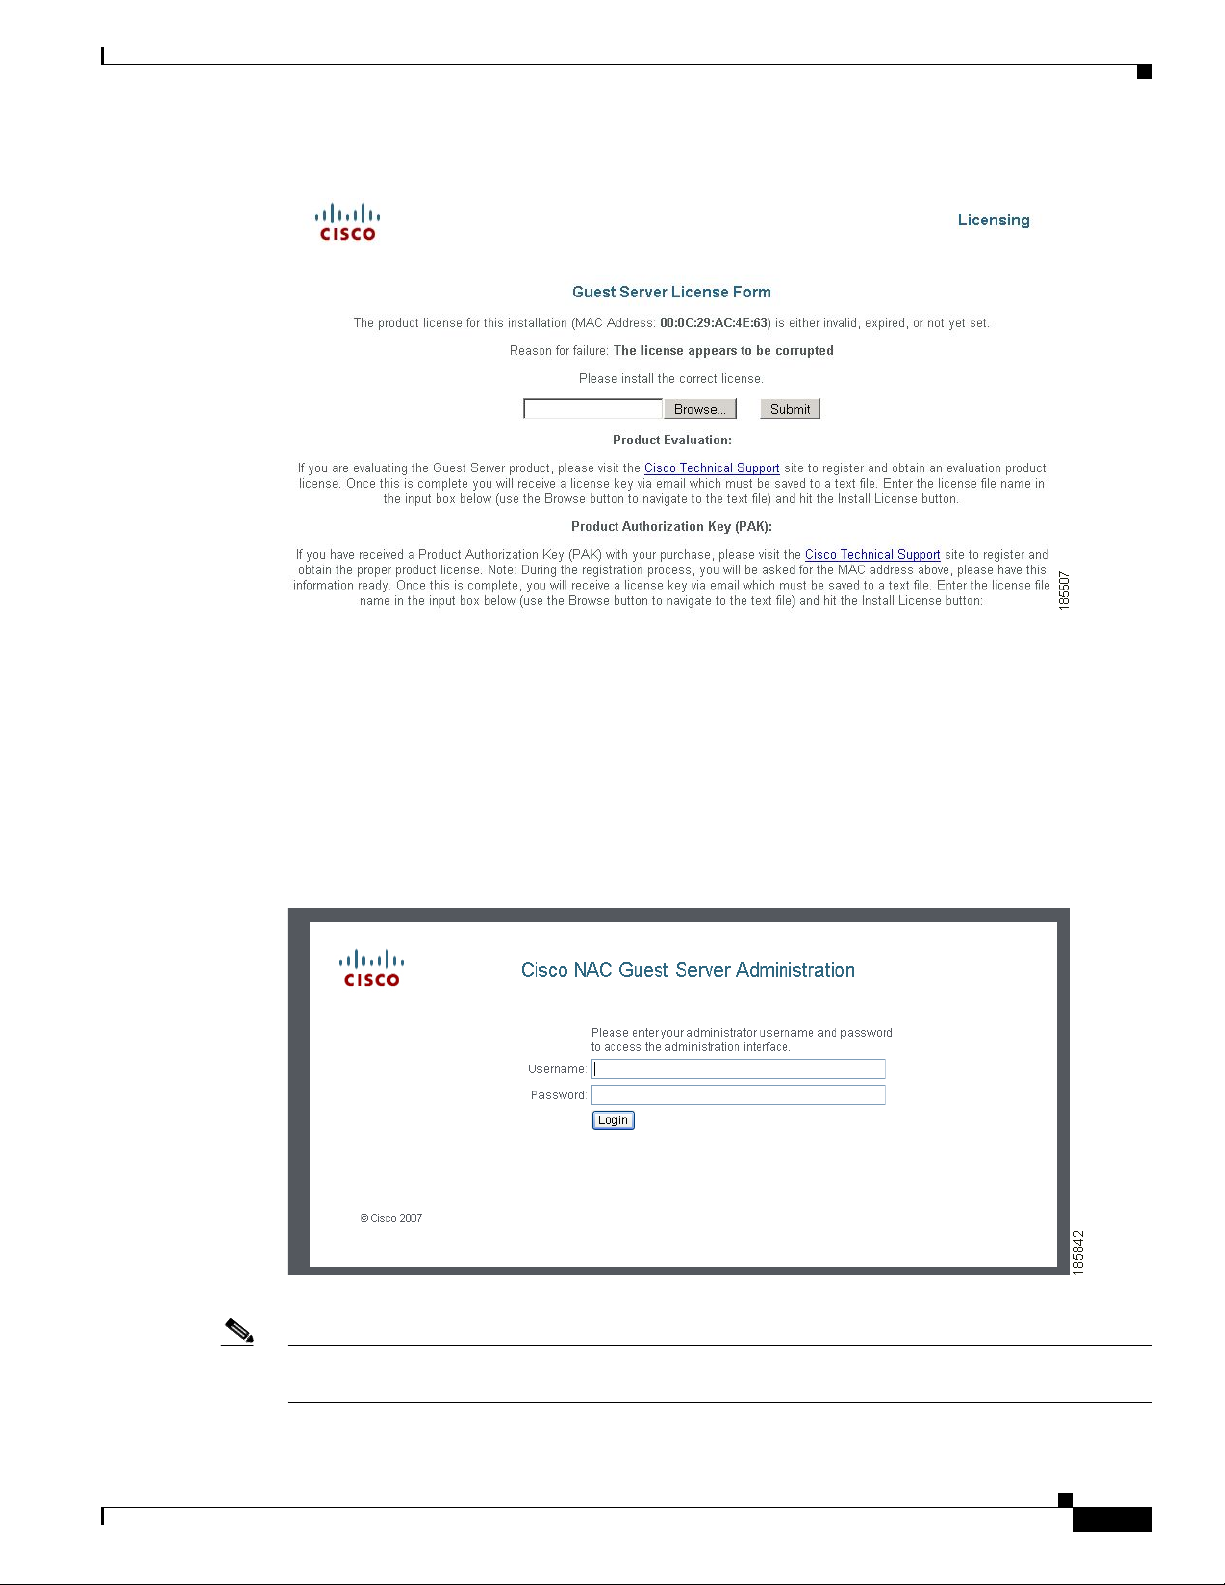
Step 6 In the Guest Server License Form(Figure 3-1), click the Browse button and locate the license file.
3-2
Cisco NAC Guest Server Installation and Configuration Guide
OL-15986-01
Page 25
Chapter 3 System Setup
Accessing the Administration Interface
Figure 3-1 Guest Server License Form (example)
Step 7 Click Submit to install the license.
Access Cisco NAC Guest Server Administration Interface
Step 8 The Cis co NAC Guest Ser ver A dm i nis tra tio n in te rfa ce ( Fi gure 3-2) displays. This is the administrator
interface to the appliance.
Step 9 Login as the admin user. The default user name/password i s admin/admin.
Figure 3-2 Admin Login
OL-15986-01
Note Cisco recommends setting up SSL access and change the default admin user password for security. Refer
to SSL Certificate, page 3-7 and Edit Existing Admin Account, page 3-11 for details.
Cisco NAC Guest Server Installation and Configuration Guide
3-3
Page 26
Configuring Network Settings
Step 10 After the license is installed, the administrator interface is brought up in web browser as follows:
• For HTTP access, open http://<guest_server_ip_address>/admin
• For HTTPS access, open https://<guest_server_ip_address>/admin
Note Entering the Guest Server IP address without the” /admin” as the URL brings up the sponsor interface.
See Chapter 4, “Configuring Sponsor A uthenti cation” for details.
Configuring Network Settings
Configure remaining network settings before performing any other operation. This minimizes the need
to restart the appliance later on.
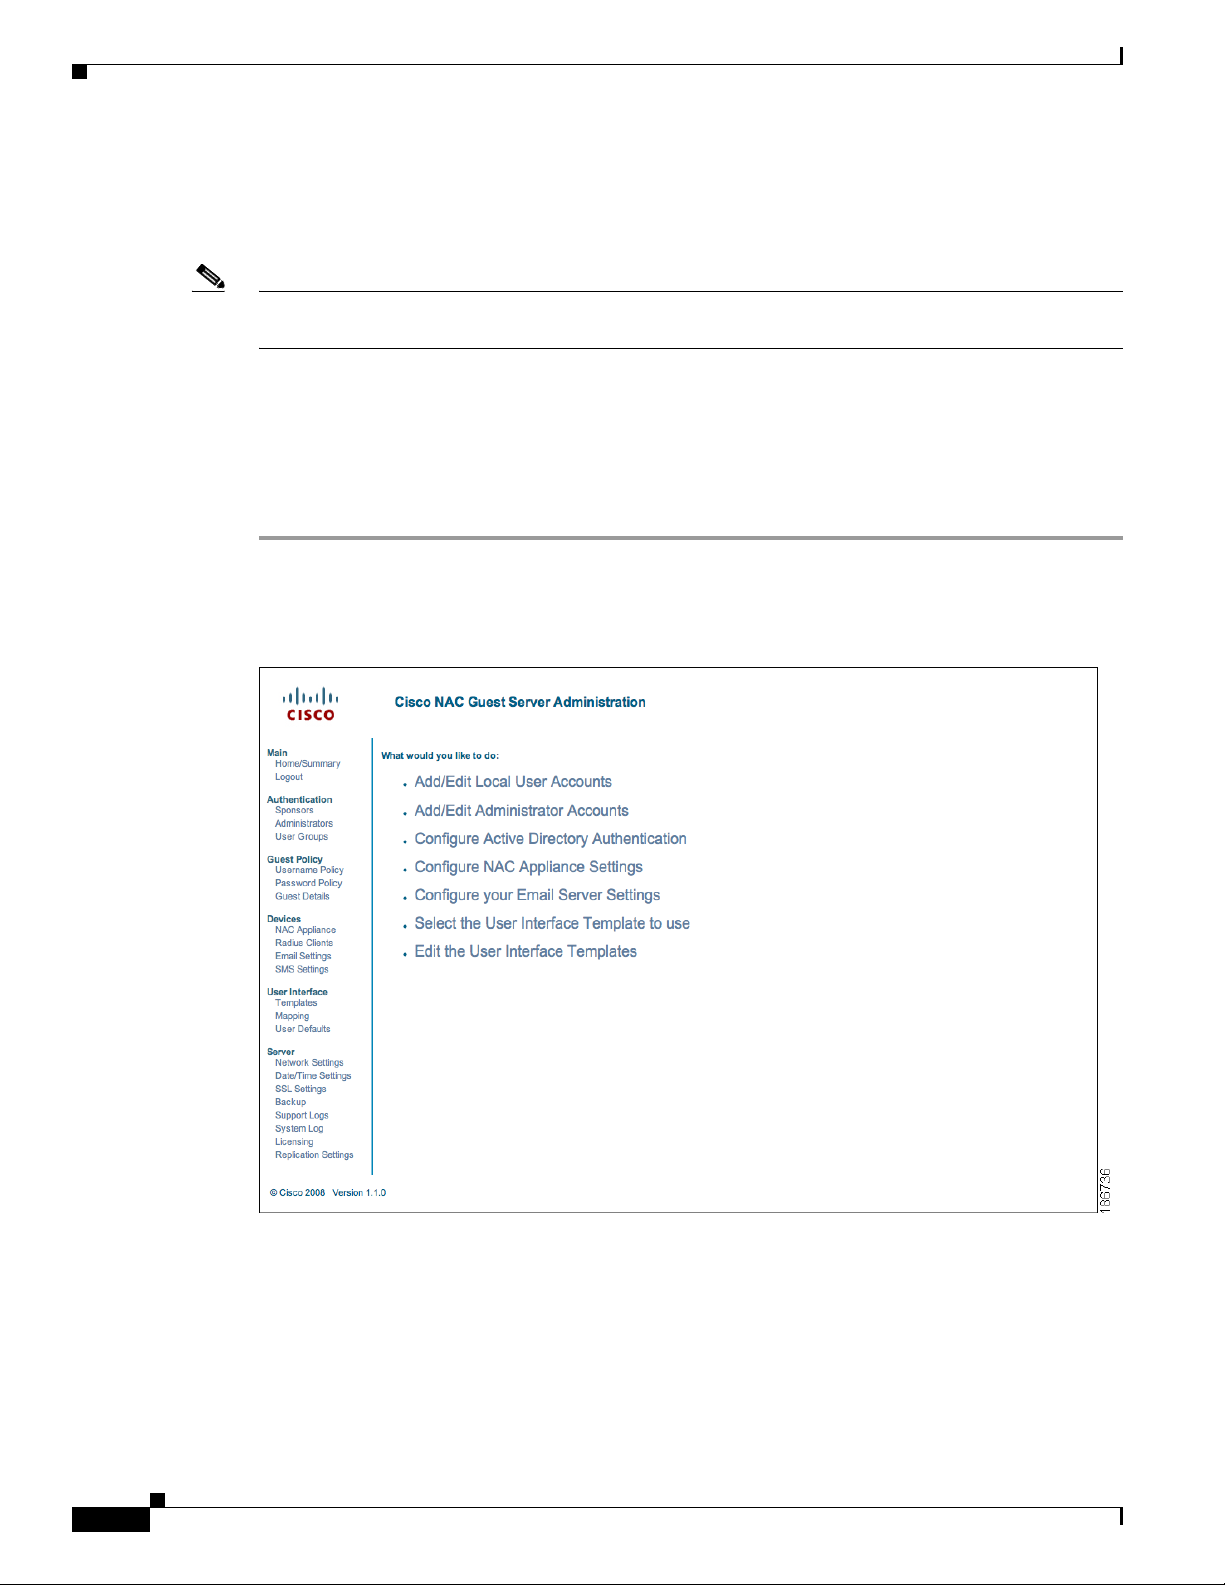
Step 1 From the admi nist rati on home pa ge se le ct Server > Network Settings from the left hand menu
(
Figure 3-3).
Chapter 3 System Setup
Figure 3-3 Administr ation Home Page
3-4
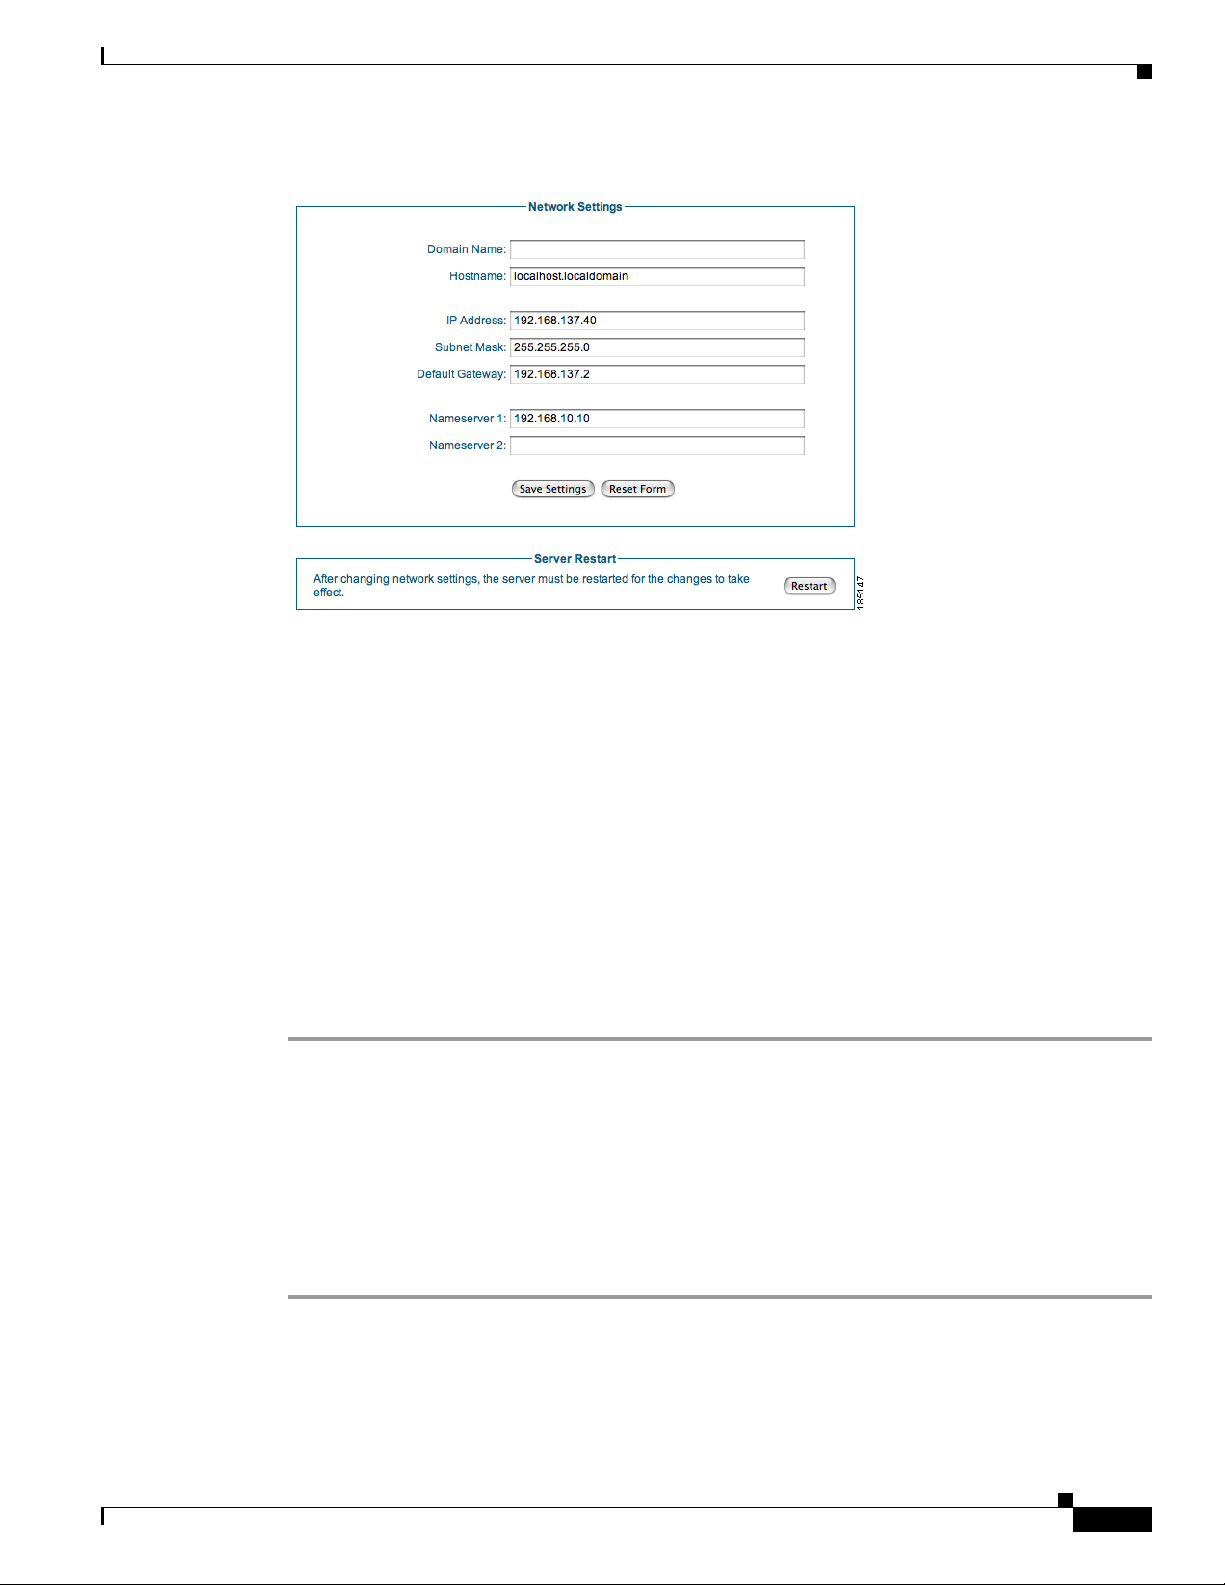
Step 2 The Network Sett ings page provide s all the ne twork setting s that ca n be change d on the appli ance
(
Figure 3-4).
Cisco NAC Guest Server Installation and Configuration Guide
OL-15986-01
Page 27
Chapter 3 System Setup
Date and Time Settings
Figure 3-4 Networ k Settings
Yo u can chan ge the fol lowing Network Settin gs:
• Domain Name—Ente r the domai n name for your organizati on (e.g. ci sco.co m)
• Hostname—Enter the name of the appliance as defined in DNS (without DNS suffix)
• IP Address—Enter the IP address of the eth0 interface on the appliance
• Subnet Mask—Enter the c orresp onding subn et mask
• Default Gateway—The default gateway for the network to which the appliance is connected
• Nameserver 1—IP addr e ss of t he pri mar y D NS ser ver
• Nameserver 2—IP address of the secondary DNS server
Step 3 Click the Save S e t t i n g s button to save the changes that you made.
Step 4 Once ch an ge s a re s aved, y ou ne ed t o res tar t t he G ues t S er ver t o en sure all p roc es ses us e th e co rr ect I P
address. Click th e Restart button, and the rest art proc ess will begin on th e Gues t Server within 60
seconds.
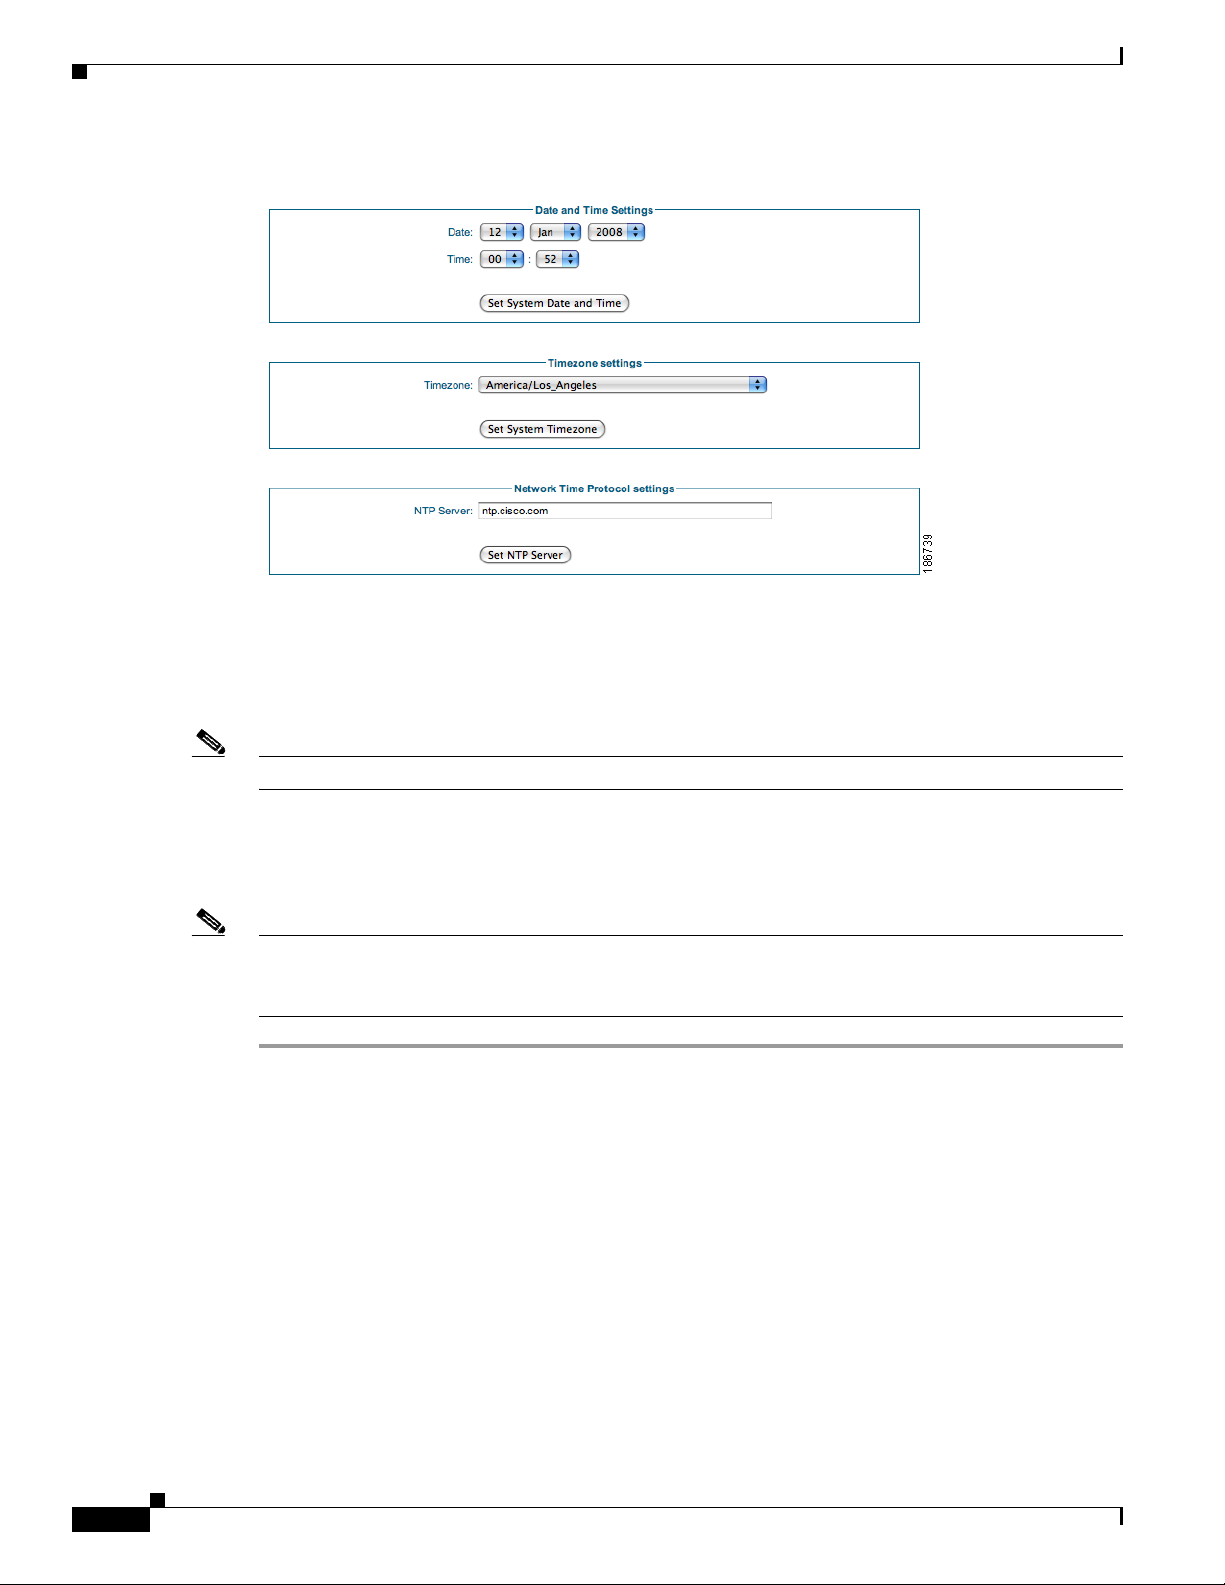
Date and Time Settings
Correct date and time are critical to the Cisco NAC Guest Server. The Guest Server authenticates guest
users based upon t he t ime th eir a ccou nts are valid. I t i s im por tant for the tim e t o be c orrec t so gu est
accounts are created and removed at the correct time. If possible, Cisco recommends using a Network
Time Protocol (NTP) server to synchronize the time and date.
OL-15986-01
Step 1 From the administration interface select Server > Date/Time Settings from the left hand menu
(
Figure 3-5).
Cisco NAC Guest Server Installation and Configuration Guide
3-5
Page 28
Date and Time Settings
Step 2 Select the correct Date and Time for the location of the Guest Server.
Chapter 3 System Setup
Figure 3-5 Date/Time Settings
Step 3 Click the Set System Date and Time button to apply the time and date.
Step 4 Select the correct Timezone for the location of the Guest Server.
Step 5 Apply the settings by clicking the Set System Timezone button.
Note If you change the time zone, this action automatically adjusts the date and time on the server.
Step 6 If you have an NTP se rver available on the net work, ente r the a ddr ess of t he NT P server.
Step 7 Click the Set NTP Server button. This sa ves the settings and restarts the NTP proces s so the new settings
take effect.
Note When setting the NTP server it may take some time for synchronization to occur . Synchroniza tion occurs
much faster if the time is set to be close to the NTP serve r (and saved with the Set button) before clicking
the Set NTP Server button.
3-6
Cisco NAC Guest Server Installation and Configuration Guide
OL-15986-01
Page 29
Chapter 3 System Setup
SSL Certificate
Both sponsors and administrators can access the Cisco NAC Guest Server using either HTTP or HTTPS.
For more secure access Cisco recommends using HTTPS access.
This section describes the fo llowing
• Accessing the Guest Server using HTTP or HTTPS
• Generating Temporary Certificates/ CSRs/ Private Key
• Downloading Certificate Files
• Upload Certificate Files
Accessing the Guest Se rver us ing HTT P or HT TPS
Yo u can co nfigure wheth er sponsors and admin istrators ac cess the portal using HTTP, both HTTP and
HTTPS, or HTTPS only.
SSL Certificate
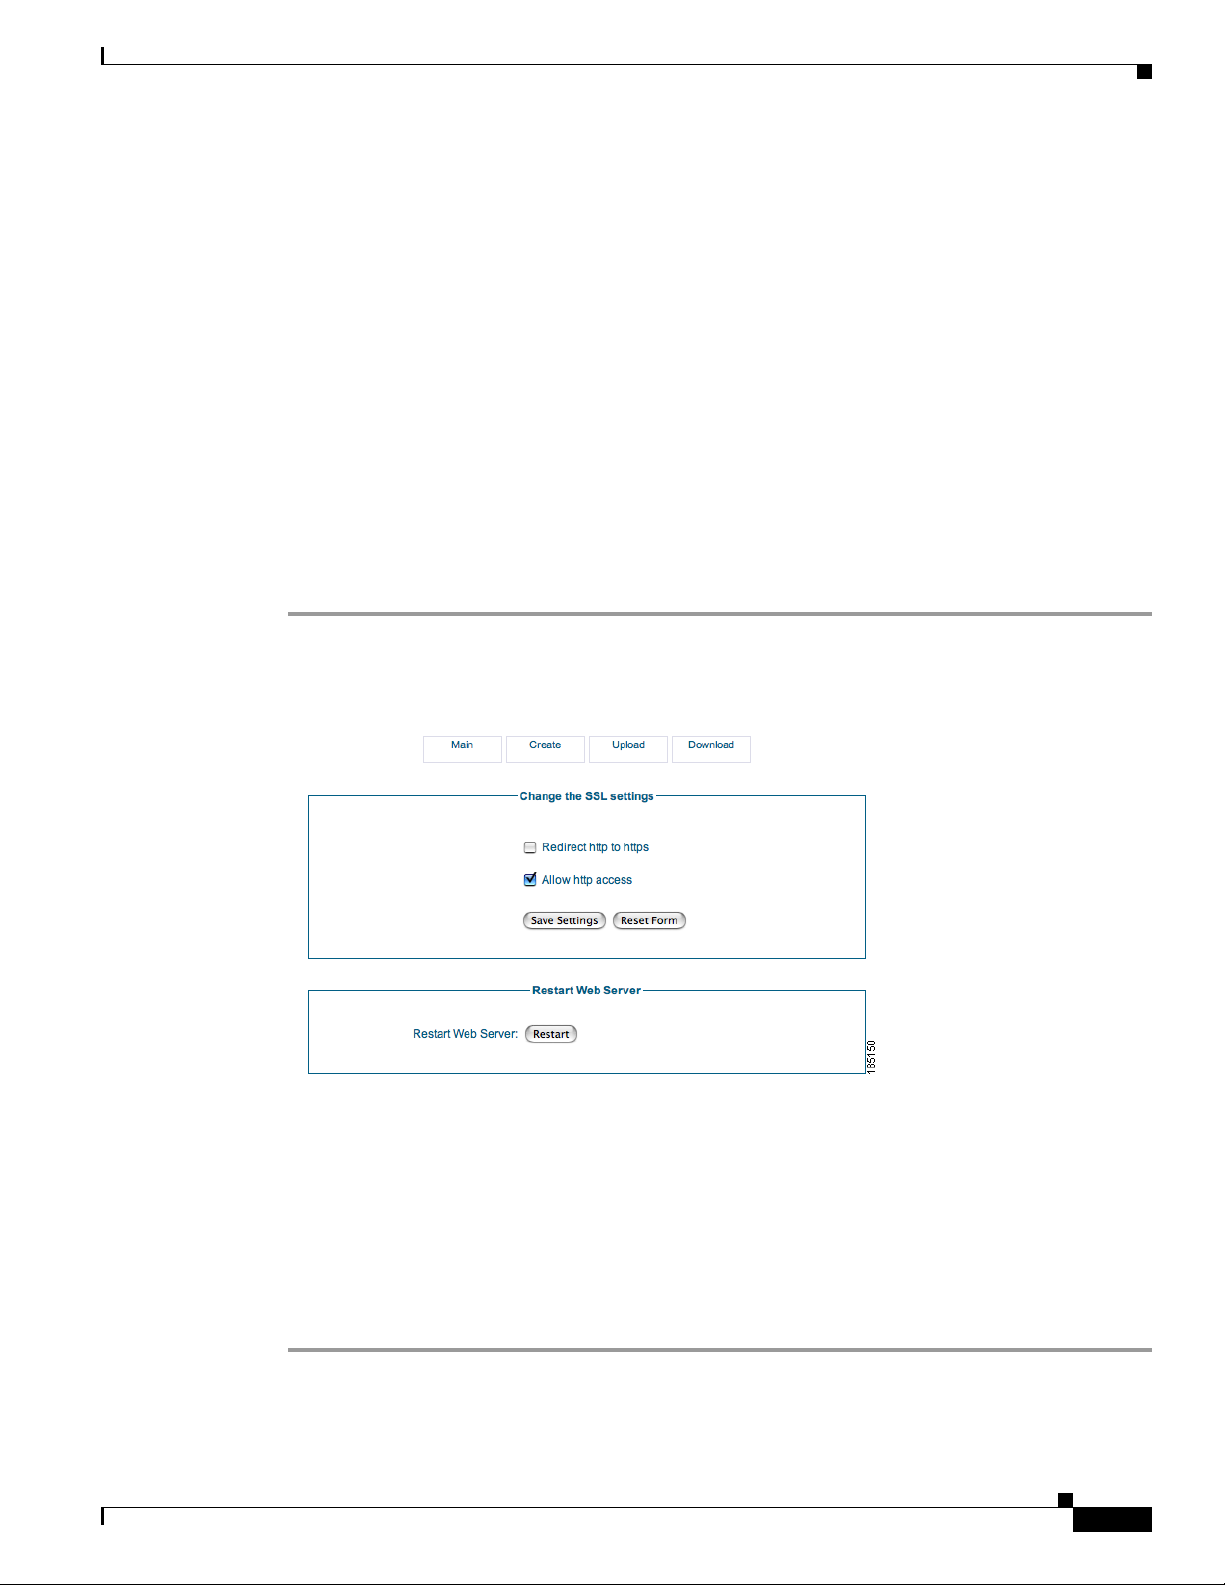
Step 1 From the administration interface, select Server > SSL Settings from the left hand m enu ( Figure 3-6).
Figure 3-6 SSL Settings Main Page
Step 2 The Main SSL Settings page provides t he following options:
• Redirect http to https—W hen enable d, any sponsor or adm inistrat or acce ssing the Gu est Server
using HTTP is automatically redirected to the HTTPS interface. If this setting is not enabled, then
no redirection occurs .
OL-15986-01
• Allow http access—When enabled, allows sponsors and administrators to access the portal with
standard HTTP. If this is not enabled, sponso rs and admi nistrato rs are redi rected if the first option
is set, or if not set, are shown a web page explaining that HTTP ac cess is not available.
Step 3 When you h ave made your cha nge s, c lick the Save Settings button.
Cisco NAC Guest Server Installation and Configuration Guide
3-7
Page 30
SSL Certificate
Note The Main SSL Settings page also provides the Restart Web Server button. You need to restart the Web
Server component of the appliance when new certificates are generated or uploaded to the appliance.
Clicking the Restart button makes the Guest Server use the new certificates.
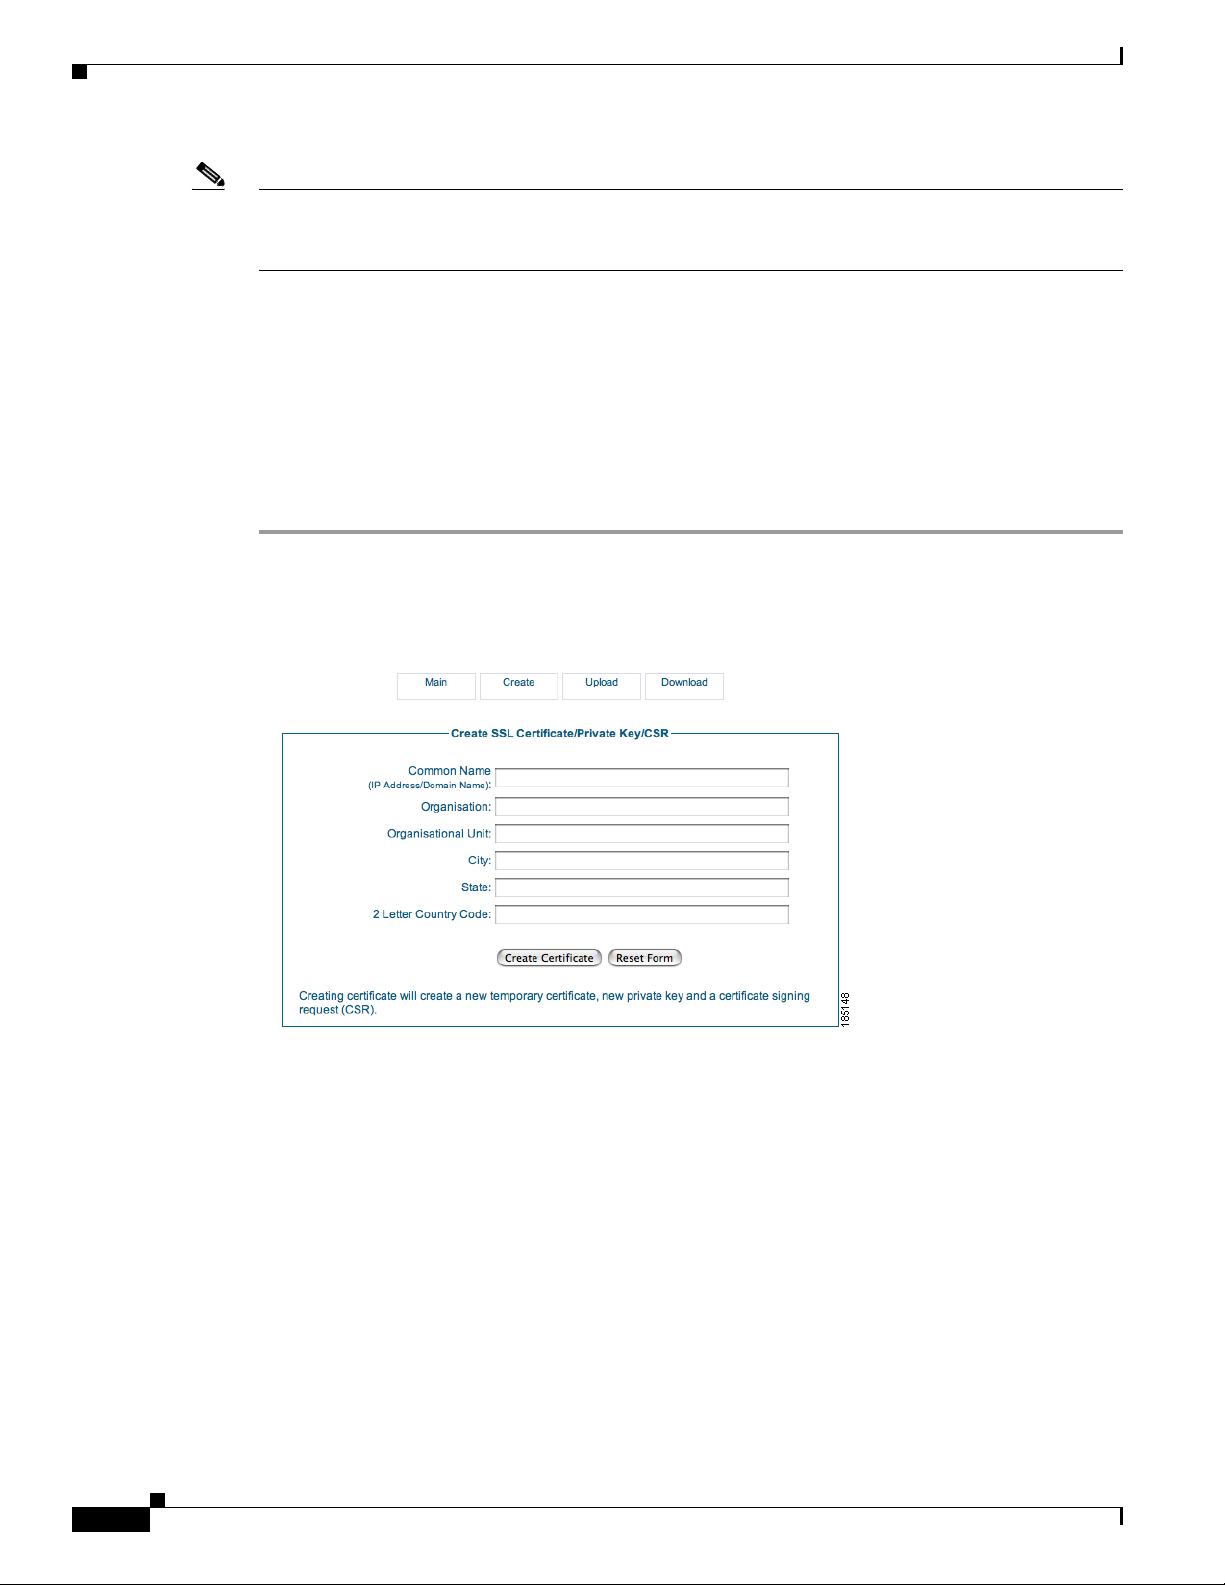
Generating Temporary Certificates/ CSRs/ Private Key
Cisco NAC Guest Server ships with a default certificate installed. If you are planning on using HTTPS,
Cisco highly recommends generating a new temporary certificate/private key. When doing this, a
certificate signing request (CSR) is also generated that can be used to obtain a CA signed certificate.
The whole process of generating a temporary certificate, CSR and private key is performed on the Create
page. Entering the correct details on the Create page automatically generates the required files.
Step 1 From the administration interface, select Server > SSL Settings from the left hand menu, then select
Create from the menu at the top of the p age (
Figure 3-7 Create SSL Page
Figure 3-7).
Chapter 3 System Setup
3-8
Step 2 Enter the details on the screen to provide the details for the temporary certificate and CSR.
• Common Name—This is either the IP address of the Cisco NAC Guest Ser v er, or the fully qualif ied
domain name (FQDN) for the Guest Server. The FQDN must resolve correctly in DNS.
• Organization—The na me o f your o rganizati on o r com pa ny.
• Organizational Unit—The nam e of the depar tment or business un it that owns the device.
• City—The city where the server is located.
• State—The state where the server is located.
• 2 Letter Country Code—The 2 letter ISO abbreviation for the country where the Guest Server is
located, such as US for United States, GB for Great Britai n or United Ki ngdom.
Step 3 Click Cr eate Cert if icate. This creates a temporary self-signed certificate, a new private key and also the
corresponding C SR w hic h can be u sed fo r obt a ining a cer tificat e f rom a C er tificate A utho rit y ( CA).
Cisco NAC Guest Server Installation and Configuration Guide
OL-15986-01
Page 31

Chapter 3 System Setup
Step 4 To use the new temporary certificate you must restart the web server process. Click the Main tab from
the top of the screen, then click the Restart Web Server button (
Note If you want the CSR, you ca n download it f rom the download pa ge as d escr ib ed i n Downloading
Certificate Files, page 3-9.
Downloading Certificate Files
Downloading the CSR and Certificate
You will need to download the CSR from the appliance so that it can be sent to a Certificate Authority
to obtain a certificate. Cisco strongly recommends backing up the certificate and private key.
Step 1 From the administration interface select Server > SSL Settings from the left hand me nu.
Step 2 Select Download from the menu at the top of the page (Figure 3-8).
SSL Certificate
Figure 3-6).
Figure 3-8 Download Certificate Files
Step 3 Click the relevant link to download the CSR or SSL Certificate.
Step 4 Save the SSL Certificate to a secure backup location .
Downloading the Private Key
The private key can only be obtained through an SFTP connection to the Guest Ser ver. For windows
platforms, you can get a fr ee SFTP cli ent from
Step 1 Open an SFTP connection to the Cisco NAC Guest Server, the authentication credentials are the same
as for the command line . This is t he usernam e of root and the pass word you have assigned for this
account. The default password is cisco, Cisco recommends you change this as detailed in
Configuration, page 2-3.
Step 2 Download the /etc/pki/tls/private/localhost.key file and store it in a secure backup locati on.
http://winscp.net.
Command Line
OL-15986-01
Cisco NAC Guest Server Installation and Configuration Guide
3-9
Page 32

Configuring Administrator Authentication
Upload Certificate Files
The Cisco NA C Guest Server prov ides a method of importing/uploading certif icate files to the appliance.
The Upload SSL Certifi cate p ages i s used to in stal l a CA-signed certificate o r t o re store files previously
backed up.
Note The certificate files are n ot bac ked up as part of a ny backup pr oc ess. You must manually back them up
as described in Downloading Certificate Files, page 3-9.
Step 1 From the administration interface select Server > SSL Settings from the left hand me nu.
Step 2 Select Upload from the menu at the top of the page (Figure 3-9).
Figure 3-9 Upload Certificate Files
Chapter 3 System Setup
Step 3 In the Upload SSL Certificate page, click th e Browse button to locate the SSL Certificate file, Root CA
Certificate or Private Key file you want to upload and click the Upload button.
Configuring Administrator Authenticati on
Cisco NAC Guest Server has a single d efaul t admi nist rator a ccou nt, cal led “ a dmin.” The Admin
Accounts pages under the Authentication menu allow you to create, edit and delete additional
administrator accounts.
This section describes the fo llowing
• Add New Admin Account
• Edit Existi ng Admi n Acc oun t
• Delete Existing Admin Account
Add New Admin Account
Step 1 From the administration interface select Authentication > Admin istrat ors from the l eft hand menu.
3-10
Cisco NAC Guest Server Installation and Configuration Guide
OL-15986-01
Page 33

Chapter 3 System Setup
Step 2 In the Adm in Ac c ounts page ( Figure 3-10), click the Add User button.
Configuring Administrator Authentication
Figure 3-10 Admin Accounts
Figure 3-11 Add Admin User
Step 3 In the Add Adm i nistra tor pa ge ( Fig ure 3-11), enter all the admin user credentials.
• First Name—Type the first name of the admin user
• Surname—Type the last name of the admin user.
• Email Address—Type the email address of the admin user
• Username—Type the user name for the admin account.
• Password—Type the password for the admin accoun t.
• Repeat Password—Retype th e password f or the adm in a ccou nt
Step 4 Click the Add Administrator button.
• If there are any err ors, th e a ccou nt is not ad ded and a n er ror messa ge d isplay s at th e to p of th e p age.
• If successfully added, a success message displays at the top of the page and you can add additional
admin accounts.
Edit Existing Admin Account
Yo u can mod ify the settin gs of admi n account s that are already cre ated .
OL-15986-01
Cisco NAC Guest Server Installation and Configuration Guide
3-11
Page 34

Configuring Administrator Authentication
Step 1 From the administration interface select Authentication > Administrators from the le ft hand me nu.
Figure 3-12 Admin Users to Edit
Step 2 In the Adm in Ac count s page (Figure 3-12), select the user from the list and click the Edit User button.
Step 3 In the Edit Administrator page (Figure 3-13), edit the user credentials.
Chapter 3 System Setup
Figure 3-13 Edit Admin Account
• First Name—Edit the first name of the admin user
• Surname—Edit the las t name of the admi n user.
• Email Address—Edit the email address of the admin user
• Username—Edit the user name for the admin account.
Note Leaving the Password and Repea t Password fields e mpty keeps the existing p assword.
3-12
• Password—Edit the password for the admin account.
• Repeat Password—Edit the password for th e admin ac count.
Step 4 Click the Save S ettin g s button.
• If there are any errors, the acc ount is not cha nged an d an error me ssage displa ys at the top of the
page.
Cisco NAC Guest Server Installation and Configuration Guide
OL-15986-01
Page 35

Chapter 3 System Setup
• If successfully ch an ged, a succ ess me ssage d ispl ays a t t he t op of t he pa ge a nd yo u ca n ma ke
additional change s to the sa me ad min acc oun t.
Delete Existing Admin Account
Yo u can re move existing ad mi n ac c ount s fr om the a dmi nist rat ion i n terfa ce.
Step 1 From the administration interface select Authentication > Admin istrat ors f rom t he l eft hand menu.
Figure 3-14 Select Admin Account to Delete
Configuring Administrator Authentication
Step 2 In the Admin Accou nts pa ge(Figure 3-14), select the user from the list and click the Delete User button.
Step 3 At the prompt “ Are you sure you want to delete the user”, click OK to delete the user or Cancel to cancel
the deletion.
If successfully deleted, a success message displays at the top of the page and you can perform additional
admin account oper ation s.
OL-15986-01
Cisco NAC Guest Server Installation and Configuration Guide
3-13
Page 36

Configuring Administrator Authentication
Chapter 3 System Setup
3-14
Cisco NAC Guest Server Installation and Configuration Guide
OL-15986-01
Page 37

CHA PTER
4
Configuring Sponsor Authentication
Sponsors are the people who use Cisco NAC Guest Server to create guest accounts. Sponsor
authentication is the method used to authenticate sponsor users on the Guest Server. There are four
options available:
• Local User Authentication—Create sponsor accounts directly on the Cisco NAC Guest Server.
See Configuring Local Sponsor Authen ticatio n
• Active Di rectory Authe nticatio n—Authentic ate spo nsors a gainst an e x isting Ac ti v e Di rectory (AD)
implementation. See
• LDAP Authentication—Authen ticate spon sors against a Lightwe ight Dir ectory Acce ss Protoco l
(LDAP) server. See
• RADIUS Authentication—Authenticate sponsors against a RADIUS server. See Configuring
RADIUS Authentication.
You may s pecify multiple authentication services for authenticating sponsors to the Cisco NAC Guest
Server and then specify the order in which you want to authenticate sponsors. For details see
Sponsor Authentication Settings.
Configuring Active Directory (AD) Authentication.
Configuring LDAP Authentication.
Configuring
Configuring Local Sponsor Authentication
Local authentication allow s you to set up sponsor user accounts directly on the Cisco N A C Guest Server.
Local authentication allows you to do the following:
• Add New Local User Account
• Edit Existi ng User A cco unt
• Delete Existing User Account
Add New Local User Account
Step 1 From the administration interface select Authentication > Sponsors > Local User Database from the
menu (
Figure 4-1).
Cisco NAC Guest Server Installation and Configuration Guide
OL-15986-01
4-1
Page 38

Configuring Local Sponsor Authentication
Figure 4-1 Local Us ers
Step 2 Click the Add User button to bring up the local sponsor co nfiguration page (Figure 4-2).
Figure 4-2 Add Local Us er
Chapter 4 Configuring Sponsor Authentication
4-2
Step 3 In the Add a Local User Account page, enter all the sponsor user credentials:
• First Name—Type the first name of the sponsor.
• Last Name—Type the last name of the sponsor.
• Username—Type the user name for the spo nsor a c count .
• Password—Type the password for the sponsor account.
• Repeat Password—Retype th e pa ssword f or the sponso r ac count
• Groups—Select the grou p f or the sponso r ac count from the dr opd own. Chapter 5, “Configuring
User Group Permissi ons” pr ovides further deta ils on groups.
• Email Address—Type email address of the sponsor.
Step 4 Click the Add User button.
• If there are any errors, th e account is not ad de d and an error mes sage displays at th e top of the page.
Cisco NAC Guest Server Installation and Configuration Guide
OL-15986-01
Page 39

Chapter 4 Configuring Sponsor A uth entication
• If successfully added, a success message displays at the top of the page and you can add additional
user accounts.
Edit Existing User Account
Yo u can mod ify the settin gs of lo cal us er accou nts th at are al ready creat ed.
Step 1 From the administration interface select Authentication > Sponsors > Local User Database from the
menu (
Figure 4-3).
Figure 4-3 Local Us ers to Edit
Configuring Local Sponsor Authentication
Step 2 Select the user from the list and click the Edit User butto n .
Step 3 In the Edit a Lo cal U ser Acco unt pa ge, edit the use r cred ent ials (Fi gure 4-4).
Figure 4-4 Edit Local Sponsor Account
• First Name—Edit the first n ame fo r th e sponsor a ccou nt.
• Last Name—Edit t he l ast name for t he s pons or ac coun t.
OL-15986-01
Cisco NAC Guest Server Installation and Configuration Guide
4-3
Page 40

Configuring Local Sponsor Authentication
Note Leaving the Password and Repea t Password fields e mpty keeps the existing p assword.
• Password—Change the password for the sponsor accou nt.
• Repeat Password—Retype the ch anged pass word for the spo nsor accou nt.
• Groups—Select the grou p f or the sponso r ac count from the dr opd own. Chapter 5, “Configuring
User Group Permissi ons” pr ovides further deta ils on groups.
• Email Address—Edit the email address of the sponsor.
Step 4 Click the Save S ettin g s button.
• If there are any errors, the acc ount is not cha nged an d an error me ssage displa ys at the top of the
page.
• If successfully ch an ged, a succ ess me ssage d ispl ays a t t he t op of t he pa ge a nd yo u ca n ma ke
additional changes to the sa m e use r ac c ount.
Chapter 4 Configuring Sponsor Authentication
Delete Existing User Account
Yo u can delet e existing sponso r user acco unts from t he admini stration interface .
Step 1 From the administration interface select Authentication > Sponsors > Local User Database from the
menu(
Figure 4-5).
Figure 4-5 Select User to Delete
Step 2 Select the user from the list and click the Delete User button.
Step 3 Confirm deletion of th e u ser a t the p rom pt.
4-4
• If successfully de lete d, a succ ess me ssa ge d ispl ays a t t he top o f th e page and yo u c an p erfo rm
additional local user ac coun t operat ions .
Cisco NAC Guest Server Installation and Configuration Guide
OL-15986-01
Page 41

Chapter 4 Configuring Sponsor A uth entication
Configuring Active Directory (AD) Authentication
Configuring Active Directory (AD) Authentication
Active Directory Authentication authenticates sponsor users to the Guest Server using their existing AD
user accounts. This keep s sp onsors fro m having to reme m ber a no ther se t o f user n ame s and pa sswords
just to authenticate to the Guest Serve r . It also enable s the administr ator to quickl y roll out Guest Access
because there is n o n ee d to c rea te an d m a nage a dditi onal sp onso r ac co unts. A ct ive Directory
authentication allows you to do the following:
• Add Active Directory Domain Contro ller
• Edit Exis ti n g D o m ain Contro ll e r
• Delete Existing Domain Controller Entry
AD authentication supports authentication against multiple domain controllers. The domain controllers
can be part of the s ame A ctive Director y to p rovide resi lienc e, o r they c an be in different Ac tive
Directories so that the Guest Server can authenticate sponsor users from separate domains, even where
no trust relationship is configured .
All Activ e Directory Authentication is per formed against indi vidual domain cont roller entries. A domain
controller entry consists of 6 items:
• Server Name—A text description to identify the domain controller. As a best practice, Cisco
recommends identi fying the domai n control ler an d the account suffix in this field (although it ca n
be set to anything tha t yo u cho ose .)
• User Account Suffix—Every user in Act ive Directory has a f ull user lo gon na m e whic h appe a rs as
“username@domain.” Typing the @domain suffix (including the @ symbol) in this field allows
sponsor users not t o have to en ter t hei r full u ser l og on na me.
• Domain Controller IP Addre ss—The IP add ress of the do main con troller tha t the sponsor use r
authenticates against.
• Base DN—The root of t he A c tive Directory. This allows an LDAP search to be p erfor me d t o find
the user group of t he spon sor.
• AD Username— The u ser a cco unt t h at has pe rm issions t o sea rc h the AD . T his al lows an L DAP
search for the user group of the sponsor.
• AD Password—The password for the user account that has permissions to search the AD.
T o allow you to authenticate different user account suffixes against the same domain controller, you can
create multiple domain controller entries with the same IP address and different user Account suffixes.
All that needs to be different in each entry is the Server Name, User Account Suffix and Base DN.
To provide resilience in the event of a domain controller failure, you can enter multiple entries for the
same User Account Suffix with d ifferent Domain Contr oll er I P A ddr esses. Al l that needs to be different
in each entry is the Server Name.
The Guest Server attempts to authenticate sponsors against each Domain Controller entry according to
the Authentication Order specified in
Configuring Sponsor Authentication Setti ngs, page 4-18.
OL-15986-01
Cisco NAC Guest Server Installation and Configuration Guide
4-5
Page 42

Configuring Active Di rectory (AD) Authenticat ion
Add Active Directory Domain Controller
Step 1 From the administration interface select Authentication > Sponsors > Active Directory Servers from
the menu. (
Figure 4-6 Active Directory Authenticatio n
Figure 4-6).
Chapter 4 Configuring Sponsor Authentication
Step 2 Click the Add DC butt on.
Step 3 In the Add Active Directory Domain Controller page, enter all the details for authenticating against a
specific AD Domain Controller (
Figure 4-7 Add Active Directory Domain Controller
• Server Name—Type a text description of the AD Server Name and account suffix for the domain
Figure 4-7).
controller, for example: CCA.CI SCO.C OM.
4-6
• User Account Suffix—Type the User Account Suffix and incl ude the l eadin g @, for exampl e:
@cca.cisco.com. Every AD user has a full user logon name that appears as “username@domain.”
To allow sponsors not to have to type their full user logon name, type the @domain part (including
the @ symbol) in this field.
• Domain Controller —Type the IP address or DNS name for the dom ain contro ller. This is the IP
address of the DC against which the sponsor authenticates.
Cisco NAC Guest Server Installation and Configuration Guide
OL-15986-01
Page 43

Chapter 4 Configuring Sponsor A uth entication
• Base DN—Type the Base Distinguished Name (DN) of the domain controller. This is the name of
the root of the di rect ory tree. It is used so that w hen gr oup search es a re perf orm ed, t he Gues t Serv er
knows from where to start. An example of the base DN for the domain cca. cisco.com is
DC=cca,DC=cisc o,DC =com .
• AD Username—Type a username that has permissions to searc h the Active Directory using LDAP.
This allows the Guest Server find out details about users such as the list of groups to which they
belong.
• AD Password—In addition to the AD Username, type the password for that account.
• Confirm AD Password— Retype the password to make sure it is correct.
• Status—Select the status of the Domain Controller. If it is set to Active, the Guest Server will use
it for authenticating sponsors. If it is set to Disabled, it will not be used.
Step 4 Optionally click the Test Connection button to verify the settings are correct for the domai n controller.
The Test Connection will authenticate with the specified AD Username and Password to verify the
settings.
Step 5 Click the Add Domain Controller butto n .
Configuring Active Directory (AD) Authentication
Edit Existing Domain Controller
Step 1 From the administration interface select Authentication > Sponsor > A ctive Director y Servers from
the menu.
Step 2 Select the Active Directory Domain Controller from the list and click the Edit DC button (Figure 4-8).
Figure 4-8 Select Domain Controller to Edit
Step 3 In the Active Directory Domain Controller page (Figure 4-9), edit the details for authenticating against
this AD domain controller.
OL-15986-01
Cisco NAC Guest Server Installation and Configuration Guide
4-7
Page 44

Configuring Active Di rectory (AD) Authenticat ion
Figure 4-9 Edit DC Settings
Chapter 4 Configuring Sponsor Authentication
Step 4 Modify set tings as need ed:
• User Account Suffix—Edit the User Ac count Suffix and includ e the lead ing @, for examp le:
@cca.cisco.com. Every AD user has a full user logon name that appears as “username@domain.”
To allow sponsors not to have to type their full user logon name, type the @domain part (including
the @ symbol) in this field.
• Domain Controller IP Address—Edit the IP ad dress for the domain controller. This is the IP address
of the DC against which the sponsor authenticates.
• Base DN—Edit the Base Distinguished Name (DN) of the domain controller. This is the name of
the root of the di rect ory tree. It is used so that w hen gr oup sea rches a re perf orm ed, t he Gues t Serv er
knows from where to start. An example of the base DN for the domain cca. cisco.com is
DC=cca,DC=cisc o,DC =com .
• AD Username—Edit the username that has permissions to search the Active Directory using LDAP .
This allows the Guest Server find out details about users such as the list of groups to which they
belong.
Note If you do not want to change the password, leaving both passwor d entries em pty preserves the
existing password.
• AD Password—Edit the password for that AD user account that has search permissions.
• Confirm AD Password—Retype the password to make sure it is correct.
• Status—Select the status of the Domain Controller. If it is set to Active, the Guest Server will use
it for authenticating sponsors. If it is set to Disabled, it will not be used .
4-8
Step 5 Optionally click the Test Connection button to verify the settings are correct for the domai n controller.
The Test Connection will authenticate with the specified AD Username and Password to verify the
settings.
Step 6 Click the Save S ettin g s button.
Cisco NAC Guest Server Installation and Configuration Guide
OL-15986-01
Page 45

Chapter 4 Configuring Sponsor A uth entication
Delete Existing Domain Controller Entry
Step 1 From the administration interface, select Authentication > Sponsor > Active Directory Servers from
the menu.
Step 2 Select the domain controller from the list (Figure 4-10).
Figure 4-10 Delete Domain Controller entries
Configuring LDAP Authentication
Step 3 Click the Delete DC button.
Step 4 Confirm deletion of the Domain Cont roller at the promp t.
If there are any errors, the DC is not changed and an error message displays at the top of the page. If
successfully deleted, a succe ss me ssage disp lays at t he top of the p age and you can per for m ad ditio na l
Domain Controller operations.
Configuring LDAP Authentication
LDAP Authentication authenticates sponsor users to the Guest Server using their existing LDAP user
accounts. This keeps sponsors from having to reme mber ano ther set of user nam es and passwords just
to authenticate to the Guest Server. It also enables the administrator to quickly roll out Guest Access
because there is no need to create and manage additional sponsor accounts. LDAP authentication allows
you to do the following:
• Add an LDAP Server
• Edit an Existing LDAP Server
• Delete an Existing LDAP Server Entry
LDAP authentication supports authentication against multiple LDAP Servers.
An LDAP server entry consists of multiple items:
OL-15986-01
• LDAP Server Name—A text description to identify the LDAP Server.
• LDAP Server URL—This is the URL to access the LDAP server such as ldap://ldap.cisco.com.
• Port—The TCP port used to contact the LDAP server, such as port 389.
• Ve rsio n—Th e LDAP version to use (versi on 1, 2 or 3).
Cisco NAC Guest Server Installation and Configuration Guide
4-9
Page 46

Configuring LDAP Authentication
• Base DN—This is the Distinguished Name of the container object where an LDAP search to find
the user begins, such as O U=E ng ineeri ng,O =Ci sco.
• User Search Filter—The User Search Filter de f ines how user entries are n amed in th e LDAP server.
For example, you can define them as uid (uid=%US ERNAME%) or cn (cn=%USE RNAME%).
• Group Mapping—There are two main methods that LDAP servers use for assigning users to groups:
1. Storing the group membership in an attri bute of the user objec t. W ith this meth od the user ob ject
2. Storing the user membership in an attribute of the group object. With this method there is a
T o determine which method to use, Cisco recommends checking the LDAP documentation for your
server or using an L DAP browser like t he one available at
the attributes of the server.
• Username—The us er accoun t that has perm issions to searc h the L D AP ser ver. This is needed so that
the Cisco NAC Guest Server can search for the user account and gro up mapping informatio n.
• Password—The password for the user account t hat has permissi ons to search the LDAP server.
Chapter 4 Configuring Sponsor Authentication
has one or more attributes that list the grou ps that the user is a member of. If you r LDAP server
uses this method of storing group membership, you need to enter the name of the attribute which
holds the groups the use r is a mem be r of.
group object that contains a list of the users who are members of the group. If your LDAP server
uses this method, you need to specify the group to check under the LDAP mapping section of a
User Group you want t o m atch t h e user to.
http://www.ldapbrowser.com/ to check
To provide resilience in the event of an LDAP server failure, you can enter multiple entries for high
availability LDAP servers pointing to the same database. All that needs to be different in each entry is
the Server name and URL.
The Guest Server attempts to authenticate sponsors against each LDAP server entry in the order specified
by Authentication Order detailed in the
Configuring Sponsor Authen ticatio n Se ttings sec tion.
To verify that you have the corr ec t L DAP cred en tial s fo r co nne cti ng t o yo ur LDAP server, Cisco
recommends testing an LDAP browser like the one available at
http://www.ldapbrowser.com/.
4-10
Cisco NAC Guest Server Installation and Configuration Guide
OL-15986-01
Page 47

Chapter 4 Configuring Sponsor A uth entication
Add an LDAP Server
Step 1 From the administration interface select Authentication > Sponsor s > LDAP Servers from the menu
(
Figure 4-11).
Figure 4-11 LDAP Authentication
Step 2 Click the Add LDAP butto n .
Step 3 In the Add LDAP Server page, enter all the details for authenticating against a specific LDAP server
(
Figure 4-12).
Configuring LDAP Authentication
Figure 4-12 Add LDAP Server
OL-15986-01
Cisco NAC Guest Server Installation and Configuration Guide
4-11
Page 48

Configuring LDAP Authentication
• LDAP Server Name—Type a text description of the LDAP Server Name. For example:
Cisco LDAP - ldap.cisco.c om.
• LDAP Server URL—Enter the URL for accessing the LDAP server, such as ldap://ldap.cisco.com
or ldaps://ldap.cisco.com.
• Port—Enter the TCP port used to connect to the LDAP server. The common port for LDAP is 389.
• Ve rsion— The version of LDAP that the server supports (version 1, 2 or 3).
• Base DN—This is the Distinguished Name of the container object where an LDAP search to find
the user will be started from, such as OU=U sers,O=Ci sco.co m or OU=Engi neering, O=Cisco.
• User Search Filter—The User Search Filter de f ines how user entries are n amed in th e LDAP server.
For example you can d efine them t o be uid (u id= %USE RNAME%) or cn (cn= %U SERNAME%).
The %USERNAME% should be placed where the username will be inserted in a search.
• Group Mapping—There are two main methods that LDAP servers use for assigning users to groups:
1. Storing the group membership in an attri bute of the user objec t. W ith this meth od the user ob ject
Chapter 4 Configuring Sponsor Authentication
has one or more attributes that list the grou ps that the user is a member of. If you r LDAP server
uses this method of storing group membership, you need to enter the name of the attribute which
holds the groups the use r i s a m em ber of. Thi s att ribute m ay be ca lle d som ethi n g like
groupMembership, m em berO f, o r g roup.
2. Storing the user membership in an attribute of the group object. With this method there is a
group object that contains a list of the users who are members of the group. If your LDAP server
uses this method, you need to specify the group to check under the LDAP mapping section of a
User Group you want t o m atch t h e user to.
T o determine which method to use, Cisco recommends checking the LDAP documentation for your
server or using an L DAP browser like t he one available at
the attributes of the server.
• Username—The us er accoun t that has perm issions to searc h the L D AP ser ver. This is needed so that
the Cisco NAC Guest Server can search for the user account and gro up mapping informatio n.
• Password—The password for the user account t hat has permissi ons to search the LDAP server.
• Confirm Password—Repeat the password to make sure it matches.
• Status—Select the status of the LDAP server. If it is set to Active the Guest Server will use it for
authenticating sponsors. If it is set to Disabled it will not be used.
Step 4 Optionally click the Test Connection button to verify the settings are correct for the LDAP server. The
Test Connection will bind with the username and password specified to the LDAP server to verify that
it can bind successfully.
Step 5 Click the Add LDAP Server button.
Edit an Existing LDAP Server
http://www.ldapbrowser.com/ to check
4-12
Step 1 From the administration interface select Authentication > Spons or > LDAP Servers from the menu.
Step 2 Select the Active Dir ect ory Do main Cont roll er fro m t he list an d clic k t he Edit DC button (Figure 4- 13).
Cisco NAC Guest Server Installation and Configuration Guide
OL-15986-01
Page 49

Chapter 4 Configuring Sponsor A uth entication
Figure 4-13 Select LDAP Server to Edit
Step 3 In the LDAP Server pa ge ( Figure 4- 14), edit the details for authenticating against this LDAP server.
Figure 4-14 Edit LDAP Server Settings
Configuring LDAP Authentication
OL-15986-01
Step 4 Modify set tings as need ed:
• LDAP Server URL—Enter the URL for accessing the LDAP server, such as ldap://ldap.cisco.com
or ldaps://ldap.cisco.com.
• Port—Enter the TCP port used to connect to the LDAP server. The common port for LDAP is 389.
• Ve rsion— The version of LDAP that the server supports (version 1, 2 or 3).
• Base DN—This is the Distinguished Name of the container object where an LDAP search to find
the user will be started from, such as OU=U sers,O=Ci sco.co m or OU=Engi neering, O=Cisco.
Cisco NAC Guest Server Installation and Configuration Guide
4-13
Page 50

Configuring LDAP Authentication
• User Search Filter—The User Search Filter de f ines how user entries are n amed in th e LDAP server.
For example you can d efine them t o be uid (u id= %USE RNAME%) or cn (cn= %U SERNAME%).
The %USERNAME% should be placed where the username will be inserted in a search.
• Group Mapping—There are two main methods that LDAP servers use for assigning users to groups:
1. Storing the group membership in an attri bute of the user objec t. W ith this meth od the user ob ject
2. Storing the user membership in an attribute of the group object. With this method there is a
T o determine which method to use, Cisco recommends checking the LDAP documentation for your
server or using an L DAP browser like t he one available at
the attributes of the server.
• Username—The us er accoun t that has perm issions to searc h the L D AP ser ver. This is needed so that
the Cisco NAC Guest Server can search for the user account and gro up mapping informatio n.
Chapter 4 Configuring Sponsor Authentication
has one or more attributes that list the grou ps that the user is a member of. If you r LDAP server
uses this method of storing group membership, you need to enter the name of the attribute which
holds the groups the use r i s a m em ber of. Thi s att ribute m ay be ca lle d som ethi n g like
groupMembership, m em berO f, o r g roup.
group object that contains a list of the users who are members of the group. If your LDAP server
uses this method, you need to specify the group to check under the LDAP mapping section of a
User Group you want t o m atch t h e user to.
http://www.ldapbrowser.com/ to check
• Password—The password for the user account t hat has permissi ons to search the LDAP server.
• Confirm Password—Repeat the password to make sure it matches.
Note If you do not want to change the password, leaving both passwor d entries em pty preserves the
existing password.
• Status—Select the status of the LDAP Server. If it is set to Active the Guest Server will use it for
authenticating sponsors. If it is set to Disabled it will not be used.
Step 5 Optionally click the Test Connection button to verify the settings are correct for the LDAP server. The
Test Connection will bind with the username and password specified to the LDAP server to verify that
it can bind successfully.
Step 6 Click the Save S ettin g s button.
Delete an Existing LDAP Server Entry
Step 1 From the administration interface select Authentication > Spons or > LDAP Servers from the menu.
Step 2 Select the LDAP Server from the list (Figure 4-15).
4-14
Cisco NAC Guest Server Installation and Configuration Guide
OL-15986-01
Page 51

Chapter 4 Configuring Sponsor A uth entication
Figure 4-15 Delete LDAP Server entries
Step 3 Click the Delete LDAP button .
Step 4 Confirm deletion of the L DAP Server at the p rompt .
If there are any errors, the LDAP Server is not changed and an error message displays at the top of the
page. If successfully deleted , a success messa ge displays at the top of the pa ge and you can per form
additional LDAP Server operations.
Configuring RADIUS Authentication
Configuring RADIUS Authentication
RADIUS Authentication authenticates sponsor users to the Guest Server using their existing RADIUS
user accounts. This keep s sp onsors fro m having to reme m ber a no ther se t o f user n ame s and pa sswords
just to authenticate to the Guest Serve r . It also enable s the administr ator to quickl y roll out Guest Access
because there is no nee d to crea te and ma nage addi tional sponsor ac counts. RADIUS au the nticat ion
allows you to do the following:
• Add a RADIUS Server
• Edit an Existing RADIUS Server
• Delete an Existing RADIUS Server Entry
RADIUS authentication supports authentication against multiple RADIUS servers, you can
A RADIUS server entry consists of multiple items:
• RADIUS Server Name—A text description to identify the LDAP Server.
• Server IP Address—This is the IP Address of the RADIUS Server.
• Port—The UDP port to conta ct the ldap se rver, commonly either 16 45 or 1812.
• Secret—The shared secret used to secure communications between the RADIUS server and the
Cisco NAC Guest Server.
OL-15986-01
Cisco NAC Guest Server Installation and Configuration Guide
4-15
Page 52

Configuring RADIUS Authentication
Add a RADIUS Server
Step 1 From the administration i nterface select A uthenticati on > Sponsors > RADIUS Servers from the menu
(
Figure 4-16).
Figure 4-16 RADIUS Authentication
Step 2 Click the Add Radius button.
Step 3 In the Add RADIUS Server page, enter all the details for authenticating against a specific RADIUS
server (
Figure 4-17).
Chapter 4 Configuring Sponsor Authentication
Figure 4-17 Add RADIUS Server
• Server Name—Type a text description of the RADIUS Server Name, for exampl e:
Cisco RADIUS - radius.cisco.com.
• Server IP Address—Enter the IP address or domain name of the RADIUS server.
• Port—Enter the UDP port used to connect to the RADIUS server. The common ports for RADIUS
authentication ar e port s 1645 or 1812.
• Radius Secret—The sh ared secre t used to secu re the communi cations betw een the Cisco NA C Guest
Server and the RADIUS server.
• Status—Select the status of the RADIUS Server. If it is set to Active, the Guest Server will use it
for authenticating sponsors. If it is set to Disabled, it will not be used.
Step 4 Click the Add Radius Server butto n .
4-16
Cisco NAC Guest Server Installation and Configuration Guide
OL-15986-01
Page 53

Chapter 4 Configuring Sponsor A uth entication
Edit an Existing RADIUS Server
Step 1 From the administration interface select Authentication > Sponsor > Radius Servers from the menu.
Step 2 Select the RADIUS server from the list and click the Edit Radius butto n ( Figure 4-18).
Figure 4-18 Select RADIUS Server to Edit
Step 3 In the RADIUS Server Details page (Figure 4-19), edit the details for authenticating against this
RADIUS server.
Configuring RADIUS Authentication
Figure 4-19 Edit RADIUS Server Settings
Step 4 Modify set tings as need ed:
• Server IP Address—Enter the IP address or domain name of the RADIUS server.
• Port—Enter the UDP port used to connect to the RADIUS server. The common ports for RADIUS
authentication ar e port s 1645 or 1812.
• Radius Secret—The sh ared secre t used to secu re the communi cations betw een the Cisco NA C Guest
Server and the RADIUS server.
Note If you do not want to change the shared se cret, leaving both secret en tries empty prese rves the
existing sh ar ed s e cr et.
OL-15986-01
• Status —Select the status of the RADIUS Server. If it is set to Active, the Guest Server will use it
for authenticating sponsors. If it is set to Disabled, it will not be used.
Cisco NAC Guest Server Installation and Configuration Guide
4-17
Page 54

Configuring Sponsor Authe nti cation Settings
Step 5 Click the Save S ettin g s button.
Delete an Existing RADIUS Server Entry
Step 1 From the administration interface select Authentication > Sponsor > Radius Servers from the menu.
Step 2 Select the RADIUS server from the list (Figure 4-20).
Figure 4-20 Delete RADIUS Server Entries
Chapter 4 Configuring Sponsor Authentication
Step 3 Click the Delete Radius button.
Step 4 Confirm deletion of the RADIU S server at the pro mpt.
If there are any errors, the RADIUS server is not changed and an error message displays at the top of the
page.If successfu lly del eted, a succ e ss mes sag e di splays at th e top of the page an d you ca n perf orm
additional RADIUS ope ra tions.
Configuring Sponsor Authentication Settings
Changing the Order of Authentication Servers
When a sponsor authen ticates agains t the Cisco N A C Guest Ser ver it tri es each authent ication serv er that
has been defined in order until it successful ly authen ticates a spon sor. If none of the authenticatio n
servers can auth ent icate the spo nso r an er ror mes sage is ret urned .
As you can define many different authentication servers of different kinds you can order them in any way
that you want on a server-by-server basis.
Step 1 From the administration interface select Authentication > Sponsor > Authentication Order from the
menu (
Figure 4-21).
4-18
Cisco NAC Guest Server Installation and Configuration Guide
OL-15986-01
Page 55

Chapter 4 Configuring Sponsor A uth entication
Figure 4-21 Authentication Order.
The first server to be authenticated against is at the top of the list and the last at the bottom.
Step 2 Select the server that you want to re-order from the list and click either the move up or move down
button. Perform this action with all the servers until they are in the correct order.
Step 3 To save the authentication order click the Change Order button .
Sponsor Timeouts
Configuring Sponsor Authentication Settings
When a sponsor is logged in to the Cisco NAC Guest Server they should be logged out after a period of
inactivity. You can set the inactivity period through the sponsor settings page.
Step 1 From the administration interface select Authentication > Sponsor > Settings from the menu
(
Figure 4-22).
Figure 4-22 Session Timeouts.
Step 2 Enter the session timeout value (in minutes). When a sponsor has been inactive for this amount of time,
their session expire and the n ext act ion they pe rfor m takes the m to the lo gin p ag e.
Step 3 Click the Save S ettin g s button to save the session timeout.
OL-15986-01
Cisco NAC Guest Server Installation and Configuration Guide
4-19
Page 56

Configuring Sponsor Authe nti cation Settings
Chapter 4 Configuring Sponsor Authentication
4-20
Cisco NAC Guest Server Installation and Configuration Guide
OL-15986-01
Page 57

CHA PTER
5
Configuring User Group Permissions
User groups are the me thod by whi ch t o assign pe rm issio ns to the s pons ors. You can set role-based
permissions for sponsors to allow or restrict access to different functions, such as creating accounts,
modifying accounts, gene rating re ports, an d sendi ng accoun t details to guests by email or SM S.
Once you have created a user group you should then create mapping rules to map the sponsor to a group
based upon information returned from the authentication server such as Active Directory Group, LDAP
Group membership, or RADIUS Class attribute.
Tip By default all users are assigned to the DEFA ULT group. I f you only want to have a single classification
of sponsors, you c a n edi t th e DE FAULT group.
This chapter describes the following:
• Adding User Group s
• Editing User Groups
• Deleting User Groups
• Specifying the Order of U se r G roups
• Mapping to Active Directory Groups
• Mapping to LDAP Groups
• Mapping to RADIUS Groups
Adding User Groups
Yo u can crea te a new sponsor user group usi ng the following steps.
Step 1 From the administration interface select Authentication > User Grou ps fro m th e l eft hand me nu
(
Figure 5-1).
OL-15986-01
Cisco NAC Guest Server Installation and Configuration Guide
5-1
Page 58

Adding User Groups
Step 2 Click the Add Group button to add a new user group.
Step 3 From the Add a New User Group page (Figure 5-2), enter the name for a new user group.
Chapter 5 Configuring User Group Permissions
Figure 5-1 User Groups
Figure 5-2 Add New User Group
Step 4 Click the Add Group button to add a user group. You can now edit the settings for the new user group.
(
Figure 5-3).
Figure 5-3 Edit New User Group
5-2
Step 5 Set Permissions for the new User Group as follows:
Cisco NAC Guest Server Installation and Configuration Guide
OL-15986-01
Page 59

Chapter 5 Configuring User Gro up Permissions
• Allow Login—Select Yes to allow sponsors in this group to access the Cisco NAC Guest Server.
Otherwise, select No.
• Create Account—Select Yes to allow sponsors to create guest account s. Select No otherwise .
• Create Bulk Accounts—Select Yes to allow sponsors to be able to create multiple accounts at a time
by pasting in the details. Otherwise, select No.
• Create Random Accounts—Sel ect Yes to allow sponsors to be able to create multiple random
accounts without initially capturing guests details. Otherwise, select No.
• Import CSV— Select Yes to allow sponsors to be able to create multiple accounts at a time by
importing the details from a CSV file. Otherwise, select No.
• Send Email—Select Yes to allow sponsors to send account details via email from the Guest Server
to the guest user. Otherwise, select No.
• Send SMS—Select Yes to allow sponsors to send account details via SMS from the Guest Se rver to
the guest user. Otherwise, select No.
• Edit Account—Choose one of the following permissions for editing the end date/time on guest
accounts:
–
No—Sponsors are not allowed to edit any accounts.
Adding User Groups
–
Own Account—Spo nsor s are all owed to ed i t on ly t he a cco unts they c reate d.
–
All Accounts—Sponsors a re allowed to edit any guest ac counts.
• Suspend Account—Ch oose o ne of t he foll owing op tions f or susp endi ng a ccoun ts :
–
No—Sponsors are not allowed to suspend any accounts.
–
Own Account—Spo nsor s are a llowed to susp en d o nly th e a ccoun t s they c rea ted .
–
All Accounts—Sponsors are allowed to suspend any guest accounts.
• Active Accounts—Choose one of the following permissions for viewing reporting details for active
accounts
–
No—Sponsors are n ot a ll owed to view repor tin g det ai ls on a ny acc oun ts.
–
Own Account—Spo nsors a re a ll owed to vi ew reporti ng detai ls f or only the ac count s th ey
created.
–
All Accounts—Sponsors are allowed to view reporting details on any active guest accounts.
• Full Reporting—Choos e one of the fo llowing permissions for runni ng full repor ting:
–
No—Sponsors are n ot a llowed to run ful l repo rt ing on any acco unts.
–
Own Account—Sponsors are allowed to run full reporting for only the accounts they created.
–
All Accounts—Sponsors a re allowed to run full repor ting on any active guest account s.
• Number of days in the future—This sp ecif ies h o w lon g in the future t hat gu ests can c reate ac counts.
Specify the maximum number of days that they are allowed to create accounts in the future.
OL-15986-01
• Maximum duration o f acc oun t—Thi s specifies t he m axim um l engt h (i n days) tha t the sp onso r ca n
configure for an account .
• Show account dates as—This defines the metho d a sponsor can use to specify wh en an acc ount is
valid. There are two options :
–
Start Date/End Date —The s ponsor i s sho wn a cal endar th ey c an use to speci fy the time and date
an account s tart s an d end s .
Cisco NAC Guest Server Installation and Configuration Guide
5-3
Page 60

Editing User Groups
–
Template Options—You can specify a list of preset durations that the sponsor can use when
creating accoun ts, suc h as 1 h our, 1 day, or 3 days. If t his i s sele cte d the tem pla te opti ons are
shown on the Create Guest page. The maximum template option cannot be greater than the value
specified in the maximum duration.
Step 6 Click the Save Group button to add the group with the permi ssions spec ified.
Note Until you click the Save Group button on this screen, th e group wi ll not be creat ed.
Step 7 Follow the instructions in Mapping to Active Directory Groups, page 5-8, Mapping to LDAP Groups,
page 5-8 or Mapping to RADIU S G roups, page 5-10 so that yo u can corre ctly m ap users t o your g rou p
based upon group inf orm ati on f rom t he au th entic a tion se rver.
Editing User Groups
The following steps describe how to edit sponsor user gro ups.
Chapter 5 Configuring User Group Permissions
Step 1 From the administration interface select Authentication > User Grou ps fro m th e l eft hand me nu .
Step 2 Select the group y ou wish to edit a nd click the Edit Group bu tt o n (Figure 5- 4).
Figure 5-4 Select the User group to Edit
Step 3 In the Edit an existing User Group page (Figure 5-5), change the settings for the group .
5-4
Cisco NAC Guest Server Installation and Configuration Guide
OL-15986-01
Page 61

Chapter 5 Configuring User Gro up Permissions
Figure 5-5 Edit User Group
Editing User Groups
Step 4 Edit Permissions for the User Group as follows:
• Allow Login—Select Yes to allow sponsors in this group to access the Cisco NAC Guest Server.
Otherwise, select No.
• Create Account—Select Yes to allow sponsors to create gu est acc ounts. Othe rwise , select No.
• Create Bulk Accounts—Se lect Yes to allow sponsors to be able to create multiple accounts at a time
by pasting in the details. Otherwise, select No.
• Create Random Accounts—Sel ect Yes to allow sponsors to be able to create multiple random
accounts without initially capturing guests details. Otherwise, select No.
• Import CSV— Select Yes to allow sponsors to be able to create multiple accounts at a time by
importing the details from a CSV file. Otherwise, select No.
• Send Email—Select Yes to allow sponsors to send account details via email from the Guest Server
to the guest user. Otherwise, select No.
• Send SMS—Select Yes to allow sponsors to send account details via SMS from the Guest Se rver to
the guest user. Otherwise, select No.
• Edit Account—Choose one of the following permissions for editing the end date/time on guest
accounts:
–
No—Sponsors are not allowed to edit any accounts.
–
Own Account—Spo nsor s are all owed to ed i t on ly t he a cco unts they c reate d.
–
All Accounts—Sponsors a re allowed to edit any guest ac counts.
• Suspend Account—Ch oose o ne of t he foll owing op tions f or susp endi ng a ccoun ts :
OL-15986-01
–
No—Sponsors are not allowed to suspend any accounts.
–
Own Account—Spo nsor s are a llowed to susp en d o nly th e a ccoun t s they c rea ted .
–
All Accounts—Sponsors are allowed to suspend any guest accounts.
Cisco NAC Guest Server Installation and Configuration Guide
5-5
Page 62

Deleting User Groups
Chapter 5 Configuring User Group Permissions
• Active Accounts—Choose one of the following permissions for viewing reporting details for active
accounts
–
No—Sponsors are n ot a ll owed to view repor tin g det ai ls on a ny acc oun ts.
–
Own Account—Spo nsors a re a ll owed to vi ew reporti ng detai ls f or only the ac count s th ey
created.
–
All Accounts—Sponsors are allowed to view reporting details on any active guest accounts.
• Full Reporting—Choos e one of the fo llowing permissions for runni ng full repor ting:
–
No—Sponsors are n ot a llowed to run ful l repo rt ing on any acco unts.
–
Own Account—Sponsors are allowed to run full reporting for only the accounts they created.
–
All Accounts—Sponsors a re allowed to run full repor ting on any active guest accoun ts.
• Number of days in the future—This sp ecif ies h o w lon g in the future t hat gu ests can c reate ac counts.
Specify the maximum number of days that they are allowed to create accounts in the future.
• Maximum duration o f acc oun t—Thi s specifies t he m axim um l engt h (i n days) tha t the sp onso r ca n
configure for an account .
• Show account dates as—This defines the metho d a sponsor can use to specify wh en an acc ount is
valid. There are two opt ions:
–
Start Date/End Date —The s ponsor i s sho wn a cal endar th ey c an use to speci fy the time and date
an account s tart s an d end s .
–
Template Options—You can specify a list of preset durations that the sponsor can use when
creating accoun ts, suc h as 1 h our, 1 day, or 3 days. If t his i s sele cte d the tem pla te opti ons are
shown on the Create Guest page. The maximum template option cannot be greater than the value
specified in the maximum duration.
Step 5 Click the Save Group button to save the changes to the group.
Step 6 Follow the instruction in Mapping to Active Directory Groups, page 5-8, Mapping to LDAP Groups,
page 5-8 or Mapping to RADIU S G roups, page 5-10 so that yo u can corre ctly m ap users t o your g rou p
based upon group inf orm ati on f rom t he au th entic a tion se rver.
Deleting User Groups
Step 1 From the administration interface select Authentication > User Grou ps fro m th e l eft hand me nu .
5-6
Cisco NAC Guest Server Installation and Configuration Guide
OL-15986-01
Page 63

Chapter 5 Configuring User Gro up Permissions
Figure 5-6 List Groups to Delete
Step 2 Select the group you wi sh to delete and click the Delete Group butt o n ( Figur e 5-6).
Step 3 Confirm deletion at t he prompt .
Note If any Local Users are part of thi s group, you must delet e the user befo re dele ting the use r group.
Alternatively, you can move Local Users to a nothe r group t o “emp t y” i t be fo re d ele tin g the use r gro up.
Specifying the Order of User Groups
Specifying the Order of User Groups
When a sponsor logs in to the Cisco NAC Guest Server, the system checks each group in turn to see if
the sponsor should be given the privileges of that group. The groups are processed in the order in which
they appear in the User Groups list box (
the privileges of the DEFAULT group.
Step 1 From the administration interface select Authentication > User Grou ps fro m th e l eft hand me nu .
Figure 5-7 Order User Groups
Step 2 Select the gr oup y ou wish t o ord er and c lick the up or down button until the group is in position
(
Figure 5-7).
Figure 5-7). If a user does not match a user group, they are given
OL-15986-01
Step 3 Repeat for al l gr oups un t il t hey appe ar in t he o rder yo u r equi re.
Step 4 Click the Change Order button to save the order.
Cisco NAC Guest Server Installation and Configuration Guide
5-7
Page 64

Mapping to Active Directo ry Groups
Mapping to Active Directory Groups
If a sponsor authenticates to the Cisco N A C Guest Serv er using Acti ve Directory authentica tion then the
Cisco NAC Guest Server can map them into a user group by their membership in Active Directory
groups.
If you have configured AD aut hen tic ati on ( as descr ibe d in Co nfigurin g Ac tive Directory ( AD)
Authentication, page 4-5), then the Guest Server automatically retrieves a list of all the groups
configured within all the AD servers configured.
Selecting an Active Direct ory Gr oup fro m the dr opdown provide s all spo nsor use rs who ar e i n th is AD
group the permissions of this group.
Step 1 Select Active Directory Mapping from the top menu when in the add user group or ed it user group
screen.
Figure 5-8 Active Directory Group Mapping
Chapter 5 Configuring User Group Permissions
Step 2 Select the group you wish to mat ch agains t and clic k the Ass ig n Group button.
Note By default, Active Directory only returns a maximum of 1000 groups in response to a Cisco NAC Guest
Server search. If you have more th an 1000 gr oup s and have not i ncr ea sed th e LDAP search siz e, i t i s
possible that the group you want to match will not appear. In this situation, you can manually enter the
group name in the Ac tive Directo ry Group combo bo x.
Mapping to LDAP Groups
If a sponsor authenticates to the Cisco NAC Guest Server using LDAP authentication then the Cisco
NAC Guest Server can ma p them int o a u ser gr oup by the ir me mber shi p of LDAP group s.
Based on the settings of the LDAP server that you authenticate against the Cisco NA C Guest Ser ver will
use one of two method s f or mapp ing the spo nsor usin g g roup infor ma tion.
There are two mai n met hods t hat LDAP servers use f or assi gning u ser s to gr oups .
Cisco NAC Guest Server Installation and Configuration Guide
5-8
OL-15986-01
Page 65

Chapter 5 Configuring User Gro up Permissions
1. Storing the group membership in an attri bute of the user objec t. W ith this meth od the user ob ject
has one or more attributes that list the grou ps that the user is a member of. If your LDAP server
uses this method of storing group membership then you need to enter t h e name of the attribute
which holds the groups the user is a member of.
2. Storing the user membership in an attribute of the group object. With this method there is a
group object that contains a list of the users who are members of the group. If your LDAP server
uses this method then yo u ne ed to sp ecify the group to chec k u nde r th e L DAP mapping section
of a User Group you want to m a tch the user to.
When you define the LDAP server you will have specified one of these options.
If the LDAP server supports the first option then you will have to specify to check the user attribute for
a certain string.
If the LDAP server supports th e second option then you will need to enter the full DN of the group you
want to check membership of. The Cisco NAC Guest Server will then look in the attribute to make sure
that it contains t h e na me of t h e user who ha s log ged i n.
Step 1 Select LDAP Mapping from the top menu when in the add user gro up or edit user gr oup screen
(
Figure 5-9).
Mapping to LDAP Groups
Figure 5-9 LDAP Group Mapping
Step 2 If your LDAP server uses user attributes to store group membership then enter the group name to check
is either conta ine d or eq ua ls t he sp ec ified st ring .
Step 3 If your LDAP server stores group membership in the group object then specify the full DN of the group
you want to check and the name of the attribute that will be checked for the sponsors username.
Step 4 Click the Assign Attributes button to save the LDAP group m appi ng.
Note Yo u can specif y both opti ons for the sa me grou p. The opti on that you ch eck de pends on the set ting on
the LDAP server with which the sponsor successfully authenticates.
OL-15986-01
Cisco NAC Guest Server Installation and Configuration Guide
5-9
Page 66

Mapping to RADIUS Gr oups
Mapping to RADIUS Groups
If a sponsor authenticates to the Cisco NAC Guest Server using RADIUS authentication then the Cisco
NA C Guest Server can map them into a user group b y using information returne d to the Cisco NA C Guest
Server in the authentication request.
The information must be placed into the class attribute on the RADIUS server.
Step 1 Select Radius Mapping from the t op me nu wh en i n the add us er gr oup or edi t u ser g rou p pag e
(
Figure 5-10).
Figure 5-10 RADIUS Group Mapping
Chapter 5 Configuring User Group Permissions
Step 2 Enter the str ing you want to mat ch agai ns t th e c lass a ttribute t hat is re turn ed in t he RA D IUS
authentication reply. You can specify from the drop-down if you want to exactly match the string (equals
the string) or match a substring (contains the string).
Step 3 Click the Assign Group button.
5-10
Cisco NAC Guest Server Installation and Configuration Guide
OL-15986-01
Page 67

Configuring Guest Policies
Organizations commonly have policies in place for creating accounts for their internal users and
systems, such as t he for mat or l engt h of t he u ser na me a nd /or co mplexit y o f pa ssword. Th e Cisco NAC
Guest Server allows you to c on figure gue st use r name and pa ssword c reat ion poli cies t o m atc h y our
organization’s policy or to create a policy specific to guest accounts.
Yo u can also use th e guest det ai ls po licy to de fine spec ific gue st user info rm ati on on t he C isco NAC
Guest Server.
Setting the Username Policy
The Username Policy determ ines how to create user name s for all guest ac counts.
Step 1 From the administration interface, select Guest Policy > Username Policy from the left hand me nu
(
Figure 6-1).
CHA PTER
6
Figure 6-1 Guest Username Policy
OL-15986-01
Cisco NAC Guest Server Installation and Configuration Guide
6-1
Page 68

Setting the Password Polic y
Step 2 Choose one of thr ee options fo r creat ing the use r name for th e guest ac count .
• Username Policy 1 (email)
• Username Policy 2 (FirstLast)
• Username Policy 3 (Random)
Chapter 6 Configuring Gue st Policies
Use the guest’s email address as the username. If an overlapping account with the same email
address exists, a random number is added to the end of the email address to make the username
unique. Overlapping accounts are accounts that have the same email address and are valid for an
overlapping period o f ti m e.
Create a username based on combini ng the first name and last name of t he guest. You can set a
Minimum Usernam e Length for this u sername from 1 to 20 ch aract ers (defaul t is 10). U ser nam es
shorter than the minimum length are padded up to the minimum specified length with a random
number.
Create a username based upon a rand o m mi xtu r e of Alphabetic, Num er i c or Ot he r ch ar acters. Type
the characters to include to generate the random characters and the number to use from each set of
characters .
Note The total length of the username is determined by the total number of characters included.
Step 3 When done, cli ck Set Policy to have the username policy take effect.
Setting the Password Policy
The password policy determines how to create the password for all guest accounts.
Step 1 From the administration interface, select Guest Policy > Password Policy from the left hand me nu
(
Figure 6-2).
6-2
Cisco NAC Guest Server Installation and Configuration Guide
OL-15986-01
Page 69

Chapter 6 Configuring Guest Policie s
Figure 6-2 Password Policy
Step 2 In the Alphabetic Characters section, enter the characters to use in the password and the amount to
include.
Step 3 In the Numeric Characters section , enter the numerals to u se in the password and the amount to includ e.
Setting the Guest Details Policy
Step 4 In the Other Characters section, enter the special characters to use in the password and the amount to
include.
Caution For passwords, use only the following characters for the “Other Characters” field: ! $ ^ & * ( ) - _ = +
[ ] { } ; : @ # ~ , > ?.
Do not use the following characters in the “Other Characters” field, as they are not supported by the
Clean Access Manager API: £ % < ¬ ` ' \ |.
Step 5 Click Set Policy to save the settings.
Note The total length of the password is determined by the total number of characters included. You can
choose between 0 a nd 20 c hara cte rs pe r ty pe (al ph abeti c, n um eric , or o ther ).
Setting the Guest Details Policy
The guest details policy determines what data the sponsor needs to enter to create a guest account.
Step 1 From the administration interface, select Guest Policy > Guest D eta ils from the left hand menu
(
Figure 6-3).
OL-15986-01
Cisco NAC Guest Server Installation and Configuration Guide
6-3
Page 70

Setting the Guest Details Policy
Figure 6-3 Guest Details Policy
Step 2 You can specify one of three settings for each requirement:
Chapter 6 Configuring Gue st Policies
• Required—If a field is set to required it is displayed on the create guest page and it is mandatory for
the sponsor to complete.
• Optional—If a field is se t to opt ion al it i s d isplay ed on t he c rea te guest pag e however the spons or
can choose not to compl ete the field.
• Unused—If a field is set to u nuse d the n it i s not d isp lay ed on t he cr e ate gue st pa ge and no value i s
required.
Step 3 Click the Save S ettin g s button to save the guest details policy.
Note There are five additional fields that can have any information that you require entered into them. These
are described on t he sc reen a s Op tion 1 thr oug h Op tion 5 . If you wa nt to use these fields, Cisc o
recommends customizing the text that is shown to the sponsor by editing the templates as described in
User Interface Templates, page 10-1.
6-4
Cisco NAC Guest Server Installation and Configuration Guide
OL-15986-01
Page 71

CHA PTER
7
Integrating with Cisco NAC Appliance
This chapter describes the following:
• Adding Clean Acce ss Mana ger En tri es
• Editing Clean Access Manager Entries
• Deleting Clean Access Manager Entries
• Configuring the CAM for Reporting
Guest users commonly authenticate to networks via a captive portal through which they provide their
authentication deta ils using a web br owser. Cisco NAC Appliance provides a secure gues t user access
portal which administrators can customize.
The Cisco NAC Guest Server integrates with the Clean Access Manager through the use of the Cisco
NAC Appliance API. This is an HTTPS-based API that requires the Guest Server to communicate with
the Clean Access Manager, also known as the Clean Access Manager (CAM).
Note Refer to the “A PI Support” section of the applicable Cisco NAC Appliance - Clean Access Manager
Installation and Configuration Guide for details on the Cisco NAC Appliance API.
The Cisco NAC Guest Server creates the guest user accounts on the CAM as Local User accounts
assigned to a sp ecific rol e t hat you de fine for gu est use rs. T he Gue st Se rver c reate s n ew accounts t hat
are valid every minute. Every minute it also removes accoun ts that have expired. When accoun ts are
suspended, the Guest Server removes both the accounts from the CAM and the guest users from the
network if they are logged in.
The Clean Access Manager ca n also send acc ountin g informat ion to the Cisco NAC Guest Server via
RADIUS accounting. This informat ion is used fo r repor ting and trac king of guest s by access time and
IP address.
You may add multiple Clean Access Managers to the Cisco NAC Guest Server. When accounts are
provisioned they are created on all ac tive Clean Access Ma nagers th at are de fined.
Adding Clean Access Manager Entries
The following steps describe how to configure t he Ci sco NAC Guest Server and Cisco NAC Appliance
Manager so that they can communi cate wi th one anothe r. You must add API informati on to the Cisco
NAC Guest Server for each Clean Access Manager on which you want the Guest Server to create
accounts.
OL-15986-01
Cisco NAC Guest Server Installation and Configuration Guide
7-1
Page 72

Adding Clean Access Manager Entries
Step 1 From the Guest Server administration interface, select Devices > NAC Appliance from the left hand
menu (
Figure 7-1).
Figure 7-1 Cisco NAC Appliances
Step 2 Click the Add NAC button (Figure 7-2).
Figure 7-2 Add Clean Access Manager
Chapter 7 Integrating with Cisco NAC Appliance
7-2
Step 3 Enter the following settings in the NAC Appliance Details page (Figure 7-2):
• Name—Type a descriptive name for the Clean Access Manager.
• Hostname of Address—Type the DNS name or IP address for the CAM.
• Admin Username—Ent er an admi n usernam e which has API permission to th e CAM.
• Password—Type the password for the account.
• Repeat Password—Retype the password to en sure it matc hes correc tly.
• Role—Type the name of the User Role on the CAM to which you will assign guest users. This
should match exactly with the User Role name configured on the CA M, incl uding co rrec t case.
• Server Status—Set the status to be Active for the CAM to have accounts provisioned on it by the
Cisco NAC Guest Server.
Step 4 Click the Add NAC Manager button.
Step 5 Optionally click the Test Connection button to ensure that the settings are working correctly.
Cisco NAC Guest Server Installation and Configuration Guide
OL-15986-01
Page 73

Chapter 7 Integrating with Cisco NA C Appliance
Step 6 In the Clea n Access Manager adm in console, navigate to Monitoring > Event Logs and verify that the
account nacguest_test was successfully created and then deleted.
Editing Clean Access Manager En tries
The following steps describe how to edit an existing entry for a Clean Access Manager.
Step 1 From the Guest Server administration interface, select Devices > NAC Appliance from the left hand
menu (
Figure 7-3).
Figure 7-3 List of Cisco NAC Appliances
Editing Clean Access Manager Entries
Step 2 Select the Cisco NAC Appliance that you want to edit from the list and click the Edit NAC butt on
(
Figure 7-4).
Figure 7-4 Edit a Clean Access Manager
Step 3 In the NAC Appliance Settings page (Figure 7-4), enter the following settings:
OL-15986-01
Cisco NAC Guest Server Installation and Configuration Guide
7-3
Page 74

Deleting Clean Access Manager Entries
• Hostname of Address—Type the DNS name or IP address for the CAM.
• Admin Username—Ent er an admi n usernam e which has API permission to th e CAM.
• Password—Type the password for the account.
• Repeat Password—Retype the password to en sure it matc hes correc tly.
• Role—Type the name of the User Role on the CAM to which you will assign guest users. This
should match exactly with the User Role name configured on the CA M, incl uding co rrec t case.
• Server Status—Set the status to be Active for the CAM to have accounts provisioned on it by the
Cisco NAC Guest Server.
Step 4 Click the Save S e t t i n g s button.
Step 5 Optionally click the Test Connection button to ensure that the settings are working correctly.
Step 6 In the Clea n Access Manager adm in console, navigate to Monitoring > Event Logs and verify that the
account nacguest_test was successfully created and then deleted.
Chapter 7 Integrating with Cisco NAC Appliance
Deleting Clean Access Manager Ent ries
The following steps describe how to delete Cisco NAC Appliance entries.
Step 1 From the Guest Server administration interface, select Devices > NAC Appliance from the left hand
menu (
Figure 7-5).
Figure 7-5 List of Cisco NAC Appliances
Step 2 Select the Cisco NAC Appliance that you want to delete from the list and click the Delete NAC button.
You will receive a warning message which you must agree to for the appliance entry to be deleted.
Configuring the CAM for Reporting
In order for the Cisco NAC Guest Server to correctly display details for gu est users when reporti ng is
run, you need to configure the CAM to send RADIUS accounting information to the Guest Server.
Additionally, the CAM needs to format the information correctly.
Cisco NAC Guest Server Installation and Configuration Guide
7-4
OL-15986-01
Page 75

Chapter 7 Integrating with Cisco NA C Appliance
Note For detailed instructions on how to access and configure settings on the CAM, refer to the applicable
Cisco NAC Appliance - Clean Access Manager In stal lation and Co nfiguration Guid e.
Adding a RADIUS Accounting Server
Step 1 Log into t he C A M web conso le as an adm in us er w it h an a ppr opriat e pa ssword (de fault
username/password is admin/cisco 123).
Note Any CAM admin user with Edit pr ivileges can perform t his con figuration.
Step 2 Navigate to User Manag ement > Auth Servers > Accounting > Server Config
Figure 7-6 Configure RADIUS Accounting Server
Configuring the CAM for Reporting
OL-15986-01
Step 3 Click the checkbox for Enable RADIUS Accounting and configure the following fields:
• Server Name— Type the IP address of the Cisco NAC Guest Server
• Server Port —Type 1813 as the port
• Timeout (sec)—Type a timeout value; 10 seconds is typically sufficient.
• Shared Secret—Type the shared secret used with the Cisco NA C Gue s t Se rver. This must m atch the
shared secret conf igured on the Guest Ser ver when adding the C AM as a RADIUS client to th e Guest
Server, as described in
Adding RADIUS Clients, pa ge 8-2. Make sure both shar ed se crets are t he
same.
• NAS-IP-Address—Type the address of the CAM itself as the NAS-IP-Address.
Step 4 Click the Update button.
Cisco NAC Guest Server Installation and Configuration Guide
7-5
Page 76

Chapter 7 Integrating with Cisco NAC Appliance
Configurin g the CAM for Reporting
Configure the CAM to Format RADIUS Accounting Data
The CAM can be conf igured to place man y dif feren t attrib utes into the RADIU S account ing pack ets and
the attributes them selves can be form at te d in m any different ways. You need to configure the CAM to
send attribute information in a specific format so that the Cisco NAC Guest Server can understand it.
Note Refer to the “RADIUS Accounting” section of the applicable Cisco NAC Appliance - Clean Access
Manager Installation and Configuration Guide for additional details.
Step 1 Log into the CAM admin console, and navigate to User Management > Auth Servers > Accounting >
Shared Events (
Figure 7-7 Shared Events
Figure 7-7).
Step 2 On the Shared Events page, click the Edit button to the right of the User_Name attributes entry
7-6
Cisco NAC Guest Server Installation and Configuration Guide
OL-15986-01
Page 77

Chapter 7 Integrating with Cisco NA C Appliance
Figure 7-8 Edit User Name Attribute
Configuring the CAM for Reporting
Step 3 In the Edit User_Name attribute page (Figure 7-8), click the Reset Element button to remove the
existing samp le d ata for ma t.
Step 4 Select User Name from the Add D ata drop down me nu.
Step 5 Click the Add Data button.
Step 6 Click the Commit Changes button .
Step 7 The main Shared Events lists page reappears (Figure 7-9). Verify that the Data column lists
“[User_Name]”.
Figure 7-9 Shared Events with Username Changed
Step 8 Click the New Entry... link to the right of the page (Figure 7-9) to add additional attributes.
OL-15986-01
Cisco NAC Guest Server Installation and Configuration Guide
7-7
Page 78

Configurin g the CAM for Reporting
Figure 7-10 Add Calling Station Id Attribute
Chapter 7 Integrating with Cisco NAC Appliance
Step 9 In the New Shared Events attribute form (Figure 7-10), select Calling_Station_Id from the Send
RADIUS Attributes dropd own menu.
Step 10 Click the Change Attribute butt o n .
Step 11 Select User IP from the Add Data dropdown menu.
Step 12 Click the Add Data button.
Step 13 Click Commit Changes.
Note Remember to add the CAM as a RADIUS client using the instructions in Chapter 8, “Configuring
RADIUS Clients.”
7-8
Cisco NAC Guest Server Installation and Configuration Guide
OL-15986-01
Page 79

Overview
CHA PTER
8
Configuring RADIUS Clients
This chapter describes the following
• Overview
• Adding RADIUS Cli ents
• Editing RADIUS Clients
• Deleting RADIUS Clients
Remote Authentication Dial In User Service (RADIUS) is an AAA (authentication, authorization and
accounting) pr otoc ol. Cisco NAC Guest Server uses t he RA D IUS p rot oco l t o auth en ticat e a nd audi t
guests who login through RADIUS-capable network enforcement devices, such as Cisco Wireless LAN
Controllers.
Although the Cisco NAC Appliance uses its own API a nd a di fferent met hod fo r c rea tin g ac count s and
authenticating users, as described in
RADIUS Accounting to record user activity and therefore still needs to be configured as a RADIUS
client.
When a guest authentic ates against a RADIUS clien t, such as the W ir eless LAN Cont roller , the RADI US
client uses RADIUS authentication to ask the Cisco NAC Guest Server whether the user authentication
is valid. If the guest authentication is valid, the Cisco NAC Guest Server returns a message stating that
the user is valid and the amount of time remaining before the user session expires. The RADIUS client
must honor the sessi on-t ime out attri bute to re move the gue st w h en t he g ue st a ccoun t t ime expir es.
Note The Cisco Wireless LAN Controller needs to be specifically configured to Allow AAA Override. This
enables it to honor the session-timeout attribute returned to it by the Cisco NAC Guest Server.
In addition to authentication, the RADIUS client device reports details to the Cisco NAC Guest Server,
such as the time the session started, time session ended, user IP address, and so on. This information is
transported over the RADIUS Accounting protocol.
Tip If there is a Firewall b etween the Cisco NA C Guest Serv er and the RADIUS client, you will need to allow
traffic from UDP Port 1812 (RADIUS authentication) and UDP Port 1813 (RADIUS accounting) to pass.
Chapter 7, “Integrating with Cisco NAC Appliance,”it still uses
OL-15986-01
Cisco NAC Guest Server Installation and Configuration Guide
8-1
Page 80

Adding RADIUS Client s
Note Any time you make a change to a RADIUS component on the Cisco NAC Guest Server, you will need
to Restart the RADIUS service for the changes to become active.
Adding RADIUS Clients
Step 1 From the administration interface select Devices > Radius Clients from the left hand menu.
Figure 8-1 RADIUS Clients
Chapter 8 Configuring RADIUS Clients
Step 2 In the Radius Clients page (Figure 8-1), click the Add Radius button to add a RADIUS client.
Figure 8-2 Add RADIUS Client
Step 3 In the Add Radi us Clie nt pa ge (Fi gure 8-2), type a de scri ptive Name for the RADIUS client.
Step 4 Type the IP Address of the RADIUS client. This needs to match the IP address from which the RADIUS
request originates.
8-2
Cisco NAC Guest Server Installation and Configuration Guide
OL-15986-01
Page 81

Chapter 8 Configuring RADIU S C lients
Step 5 Type a shared Secret for the RADIUS client. This must match the shared secret specified in the
configuration of the RADI US c lie nt.
Step 6 Retype the shared secret in the Confirm Secret field.
Step 7 Type a Descriptio n o f t h e cl ie nt a nd any ot her i n for mat ion neede d.
Step 8 If you want the RADIUS client to send any additional attributes upon successful authentication enter the
attribute name and value and click the Add button. You can enter as many attributes as you need. If you
want to remove an attribute select the attribute from the table and click the Delete button.
Step 9 Click the Add Radius Client button.
Step 10 From the administration inte rface select Device s > Radius Clients (Figure 8-1)from the left hand menu.
Step 11 Click the Restart button to restart the RADIUS service to make the changes take effect.
Editing RADIUS Clients
Editing RADIUS Clients
Step 1 From the administration interface select Devices > Radius Clients from the left hand menu.
Figure 8-3 RADIUS Clients List
Step 2 In the Radius Clients page (Figure 8-3), select the RADIUS client from the list and click the Edit R adius
button.
OL-15986-01
Cisco NAC Guest Server Installation and Configuration Guide
8-3
Page 82

Deleting RADIUS Clie nts
Step 3 In the Edit Radius Client page (Figure 8-4), edit the IP Address of the RADIUS client.
Chapter 8 Configuring RADIUS Clients
Figure 8-4 Edit RADIUS Client
Step 4 Edit the shared secret used between the client and the Cisco NAC Guest Server in the Secret and
Confirm Secret fi elds.
Step 5 Make any desired c hange s to the Description.
Step 6 If you want the RADIUS client to send an y additional attrib utes upon succ essful authen tication enter the
attribute name and value and click the Add button. You can enter as many attributes as you need. If you
want to remove an attribute select the attribute from the table and click the Delete button.
Step 7 Click Save Settings.
Step 8 From the administration interface select D evices > Radius Cli ents (Figure 8-1)from the left hand menu.
Step 9 Click the Restart button to restart the RADIUS service to make the changes take effect.
Deleting RADIUS Clients
Step 1 From the administration interface select Devices > Radius Clients from the left hand menu.
8-4
Cisco NAC Guest Server Installation and Configuration Guide
OL-15986-01
Page 83

Chapter 8 Configuring RADIU S C lients
Figure 8-5 List RADIUS Clients
Step 2 In the Radius Clients page (Figure 8-5), select the RADIUS client from the list.
Step 3 Click the Delete Radius button and confirm the action.
Step 4 From the administration interface select D evices > Radius Cli ents (Figure 8-1)from the left hand menu.
Deleting RADIUS Clients
Step 5 Click the Restart button to restart the RADIUS service to make the changes take effect.
Note Any time you make a change to a RADIUS component, you will need to restart the RADIUS service for
the changes to become active.
OL-15986-01
Cisco NAC Guest Server Installation and Configuration Guide
8-5
Page 84

Deleting RADIUS Clie nts
Chapter 8 Configuring RADIUS Clients
8-6
Cisco NAC Guest Server Installation and Configuration Guide
OL-15986-01
Page 85

CHA PTER
9
Guest Account Notification
When a guest account is crea ted, the de tails of th e accoun t need to be p assed from the sponsor to the
guest. The Cisco NAC Guest Server provides a number of ways to do this:
• Manually reading the details to the guest from the screen
• Printing the details out on paper
• Sending the details in an email
• Sending the details as an SMS text message
Sponsors always have the option o f re adin g a nd p rint ing out gue st a cco unt detai ls t o gue sts.
Email and SMS text message notification require email servers to be configured, but can be configured
based upon policy.
Note Email and SMS guest account no tif ication p olicies need to be conf igur ed globally, then enabled per user
group for individual sponsor permissions.
This chapter describes the following
• Configuring Email Notification
• Configuring SMS Notification
OL-15986-01
Cisco NAC Guest Server Installation and Configuration Guide
9-1
Page 86

Configuring Email Notifica ti on
Configuring Email Notification
The following steps describe how to configure email settings for the Cisco NAC Guest Server to
correctly deliver guest account details via email.
Step 1 From the administration interface, select Devices > Email Settings from the left hand menu.
Figure 9-1 Email Settings
Chapter 9 Guest Account Notification
Step 2 In the Email Settings page (Figure 9-1), click Yes for the Enable Email option to enable email
functionality globally for the Cisco NAC Guest Server.
Step 3 For SMTP Server, type the IP address of the outbound SMTP server to which you need to deliver email.
If you enter localh ost, or lea ve th is field e mpty , t he Cisco N A C Guest Serv er attempts to deli ver the email
directly to the guest’s SMTP server.
Step 4 In the Sent From E mai l A ddress field, typ e the ema il addr ess fr om w hic h y ou wa nt gu est noti fication
emails to be sent (for example, host@company.com).
Step 5 Click the Save S ettin g s button.
Step 6 Click the Restart button. After any change to email settings, you need to Restart the Sendmail service
by clicking the Restart button so that the settings take effect.
9-2
Cisco NAC Guest Server Installation and Configuration Guide
OL-15986-01
Page 87

Chapter 9 Guest Account Notification
Configuring SMS Notification
Short Message Service (SMS) is delivered through an SMS gateway service that supports SMTP (Simple
Mail Transport Protocol) delivery. You need to have an internal SMS gateway service or subscribe to an
external service to be able to deliver guest details via SMS.
Step 1 From the administration interface select Devices > SMS Settings from the left hand menu.
Figure 9-2 SMS Settings
Configuring SMS Notification
Step 2 In the SMS Settings page (Figure 9-2), change the Enable SMS option to Yes to globally enable SMS on
the Cisco NAC Guest Server.
Step 3 SMS requires an SMTP server to deliver the email to the SMS gateway. Click the Email Settings link
to configure the SMTP Server as described
Step 4 In the Sent From field, type the sending email address for the email to be sent to the SMS gateway.
Step 5 Click Save Settings.
Note Depending on how details are routed to the SMS provider, you will need to customi ze t he SMS porti on
Configuring Email Notification.
of the User Interf ace templa te to in clud e the gu est’s mobile phone number in the corr ect fo rmat for y our
SMS gateway. See Editing the SMS Template, page 10-6 for details.
OL-15986-01
Cisco NAC Guest Server Installation and Configuration Guide
9-3
Page 88

Configuring SMS Notific ation
Chapter 9 Guest Account Notification
9-4
Cisco NAC Guest Server Installation and Configuration Guide
OL-15986-01
Page 89

Customizing the Application
This chapter describes the following
• User Interface Templates
• Adding a User Interface Template
• Editing a User Interface Template
• Deleting a Template
• Setting the Default Interface Mapping
• Setting User Default Redirection
User Interface Templates
Cisco NAC Guest Server allows you to customize the sponsor user interface text and guest notification
text using User Interface Templates. You can change the labels for the sponso r interface , provide
different instructions for guest users, or create a translated template to provide the sponsor interface and
guest instructions in another language altogether.
Cisco NAC Guest Server provides a default template (in English) that can be used as is without any
further modification. If you want to change the default presentation for sponsors and guests, you can add
one or multiple t emp lat es tha t yo u can store se para te ly on the Guest Ser ver a nd modi fy as desi red .
CHA PTER
10
OL-15986-01
Once your user interface template is configured, you will need to set the default template mapping so
that the Guest Server starts using the correct template. Once a sponsor has authenticated they can choose
a different template to use and save it in the preferences. This enables each sponsor to have the
application displayed in a different template or language.
If you are customizi ng the inte rface fo r anothe r langua ge, crea te a new templat e for the lang uage and
edit all pages with the translated text.
Typically, you create a customi ze d te mp late wh en you nee d t o mo di fy the ac co unt deta ils and
instructions that are pr ovided to the guest, such as the Acceptable Use Policy. Cisco NAC Guest Server
provides Print, Email, and SMS templates that allow you to customize the information that is printed,
emailed, or text m essage d t o g uest s.
Note When customizing, it is a g ood idea to open t he sponsor inter face in a second bro wser for re ference. Thi s
allows you to view how the configuration tabs map to the actual sponsor interface p ages. You can bring
up the sponsor in terfa ce by e nte ring t he G ues t Se rver IP a ddress w ith out the “/a dm in” a s the UR L, fo r
example, http://<guest_server_ip_address> or https://<guest_server_ip_address>.
Cisco NAC Guest Server Installation and Configuration Guide
10-1
Page 90

Adding a User Interface Template
Adding a User Interface Template
When you add a new template, it is automatically based on the default template to facilitate editing.
Step 1 From the administration interface select User Interface > Templates from the left hand me nu.
Figure 10 -1 User Interface Templates
Chapter 10 Customizing the Application
Step 2 On the User Interface Templates page (Figure 10-1), click the Add Template button
Figure 10 -2 Add Template Page
Step 3 In the Add New Template page (Figure 10-2), type a Template Name. Th is can be any de sc riptive text
to identify the template later from the Current Templates list (Figure 10-1).
Step 4 Click the Add Template button.
The Edit User Interface Template page for the new template displays, initially with all details copied
from the default template. If you only need to make small changes, this allows you not to have to retype
all the entries.
Step 5 Modify these se ttin gs as de sire d, a s de scribe d in Editing a User Interface Template, page 10-2 next.
Editing a User Interface Templ ate
10-2
Tip When customizing, it is a g ood idea to open t he sponsor inter face in a second bro wser for re ference. Thi s
allows you to view how the configuration tabs map to the actual sponsor interface p ages. You can bring
up the sponsor in terfa ce by e nte ring the G uest Server IP addr ess w ithout the “/a dm in” as t he U RL , for
example, http://<guest_server_ip_address> or https://<guest_server_ip_address>.
Cisco NAC Guest Server Installation and Configuration Guide
OL-15986-01
Page 91

Chapter 10 Customizing the Applicat io n
Step 1 From the administration interface select User Interface > Templates from the left hand me nu.
Figure 10 -3 User Interface Templates
Step 2 From the Current Templates list (Figure 10-3), select the template that you want to edit.
Step 3 Click the Edit Template button. The Edit User Interface page for the template displays (Figure 10-4).
Editing a User Interface Template
Figure 10-4 Edit Template
Step 4 Click the menu at the t op of the page to select any of the sponsor pa ges that you want to edit .
Step 5 Make any chan ges t o th e fields an d c lick th e Save Templat e butto n . So me exam pl e ed its ar e de scr ib ed
in the following sections:
OL-15986-01
• Editing the Print Template
• Editing the Email Template
• Editing the SMS Template
Cisco NAC Guest Server Installation and Configuration Guide
10-3
Page 92

Editing a User Interface Tem plate
Editing the Print Template
The Print Template page contains the guest account details that the sponsor can bring up in a browser to
print out for handing to the guest afte r the account is crea ted. The page is configure d in HTML and can
be fully customized.
Tip Navigating to Reporting > Act iv e Ac counts on the sponsor interface and clicking the Print button next
to the guest account entry brings up the output of the Print Template for printing.
Step 1 Go to User Interface > Templates and click the Edit Template button for the te mplate yo u wan t to edi t
in the Current Templates list.
Step 2 In the Edit User Interface page, click the Print Template tab at the top of the page to bring up the Print
Template configuration page (
Figure 10-5 Print Template Page
Chapter 10 Customizing the Application
Figure 10-5).
10-4
Step 3 Change the Page Title as desired (default is “Guest User Details”).
Step 4 In the Page Bo dy text field, e dit t he d efau lt HTM L c ode for t he w eb p ag e. T he Page Bo dy co nta ins a ll
the HTML that sits between the BODY tags on a HTML page. All HTML outside these tags is used by
the application.
Step 5 In the HTML code you can use the following special variables to replace th em wi th the details from the
created guest account.
• %USERNAME% = The Userna me cr eated for the gu est
• %PASSWORD% = The Password created for the guest
• %STARTTIME% = The time from w hich the gu est acc oun t wi ll be valid
• %ENDTIME% = The time the guest account will expire
• %FIRSTNAME% = The first name of the guest
• %LASTNAME% = The last name of the guest
Cisco NAC Guest Server Installation and Configuration Guide
OL-15986-01
Page 93

Chapter 10 Customizing the Applicat io n
Step 6 Click the Save Templa t e button to save you r cha ng es.
Editing the Email Template
The Email Template page contains the guest account details that the sponsor can email to the guest after
creating the accou nt. The pa ge is co nfigured in HTM L and ca n be fully customi zed.
Tip Navigating to Reporting > Activ e Accounts on the sponsor interface and clicking the Email button next
to the guest account entry brings up the output of the Email Template and also emails the guest.
Step 1 Go to User Interface > Templates and click the Edit Template button for the te mplate yo u wan t to edi t
in the Current Templates list.
Step 2 In the Edit User Interface page, click the Email Template tab at the top of the page to bring up the Email
Template configuration page (
Editing a User Interface Template
Figure 10-6).
Figure 10-6 Email Template Page
Step 3 Change the Page Title as desired (default is “Guest User Account Details”).
Step 4 Change the Email Subject as desired.
Step 5 In the Email Body text field, edit the default email text to be sent to the guest page.
Step 6 In the Email Body you can use the following special variables to replace them with the details from the
created guest account.
OL-15986-01
• %USERNAME% = The Username created for the guest
• %PASSWORD% = The Password created for the guest
• %STARTTIME% = The time from w hich the gu est acc oun t wi ll be valid
• %ENDTIME% = The time the guest account will expire
• %FIRSTNAME% = The first name of the guest
• %LASTNAME% = The last name of the guest
Cisco NAC Guest Server Installation and Configuration Guide
10-5
Page 94

Editing a User Interface Tem plate
Step 7 Click the Save Templa t e button to save you r cha ng es.
Editing the SMS Template
The SMS Template page contains the guest account details that the sponsor can text message to the guest
after creating the acc ount. T he c on tents of the text messa ge c an b e fu lly c ustom ize d.
Tip Navigating to Reporting > Active Acc ounts on the sp o nsor inter f a ce an d clic king the SMS button next
to the guest acco unt entr y b ring s u p the outpu t of the SMS Template and also text m essage s th e guest.
Step 1 Go to User Interface > Templates and click the Edit Template button for the te mplate yo u wan t to edi t
in the Current Templates list.
Step 2 In the Edit User Interface page, click the SMS Template tab at the top of the page to bring up the SMS
Template configuration page (
Chapter 10 Customizing the Application
Figure 10-7).
Figure 10-7 SMS Template Page
Step 3 Change the SMS Subject as desired.
Step 4 Change the SMS Destination to be the email address of the SMS gateway that you use.
T o send the text message to mobile phone number of the guest, use the variable %MOBILENUMBER%.
The %MOBILENUMB ER% variable is repl aced by the mobil e phone num ber, including countr y code
of the guest as entered b y the spo nsor. For example, if the country co de s elected is the UK (+ 44) and the
guest’s phone number is 055 5 55-555 5, the n %MO BI LEN UMBE R% w ill c on tain 445 555 55555.
10-6
Note The initial plus symbol (“+”) is not inserted and the initial 0, any spaces, or hyphens (“-”) are
removed from the phone number. If you need “+” to be inserted, then enter
+%MOBILENUMBER%.
Cisco NAC Guest Server Installation and Configuration Guide
OL-15986-01
Page 95

Chapter 10 Customizing the Applicat io n
Step 5 The SMS Body cont ains be the SMS t ext to be sent to the guest . In the SMS Body you can use the
following special variables to replace them with the details from the created guest account.
• %USERNAME% = The Username created for the guest
• %PASSWORD% = The Password created for the guest
• %STARTTIME% = The time from w hich the gu est acc oun t wi ll be valid
• %ENDTIME% = The time the guest account will expire
• %FIRSTNAME% = The first name of the guest
• %LASTNAME% = The last name of the guest
• %MOBILENUMBER% = The mobile number of the guest
Step 6 Click the Save Templa t e button to save you r cha ng es.
Using Account Durations
Account durations are another way the sponsor can specify how long they want the guest account to
remain valid. By default, th e sp onsor m ust specif y star t and e nd d ate s and t ime s fr om a dr op d own box
and popup calendar. By defining preset account durations you provide the sponso r with the a bility to
simply select the length of time starting from when they click the button to create the account.
Editing a User Interface Template
Step 1 Select User Interface > T emplates and click the Edit T emplate butto n for the template you want to edit
in the Current Templates list.
Step 2 From the menu at the top of the page sele ct Accounts > Account Duration. The Account Durations
screen appears (
Figure 10-8 Account Duration
Step 3 Click the Add Duration button to add a new account duratio n (Figure 10-9).
Figure 10-8).
OL-15986-01
Cisco NAC Guest Server Installation and Configuration Guide
10-7
Page 96

Deleting a Template
Step 4 Enter a description that you want to appear in the sponsor interface, such as “1 Hour.”
Step 5 Select the de sire d durat ion f rom t he dro p d own menu.
Step 6 Click the Add Duration Option button. You are taken back to the account durations list (Figure 10-8).
Step 7 If you want to edit or delete an account option, select the entry from the list and click the appropriate
Note The Account Duratio ns option s onl y appe ar on t he spon sor’s screen if the user gr oup for the spon sor is
Chapter 10 Customizing the Application
Figure 10-9 Add Account Duration
button.
set to Create Account By: Template Options. See
only account duration options that appear are the durations within the maximum duration set on the
sponsors user group .
Adding User Groups, page 5-1 for more details. The
Deleting a Template
Step 1 From the administration interface select User Interface > Templates from the left hand menu .
Step 2 Select the template you want to delete from the Current Templates list and click the Delete Template
button.
Step 3 Confirm deletion of the template.
Setting the Default Interface Mapping
Once you have created your template you need to make the template active. This is a global operation
for the Cisco NAC Guest Server.
Step 1 From the administration interface select User Interface > Mapp ing fro m the lef t hand men u.
10-8
Cisco NAC Guest Server Installation and Configuration Guide
OL-15986-01
Page 97

Chapter 10 Customizing the Applicat io n
Figure 10-10 Default User Interface Mapping
Step 2 Select the T emplate from the dropdo wn list. This wi ll become the template used for the sponsor and guest
user interface.
Step 3 Click the Set Template button.
Setting User Default Redirection
There are a number of opti ons that ea ch spon sor may wan t to cu stomiz e for th eir environment so that
they don’t need to make changes every time they log in to the sponsor interface. The items you can
change are the tem plat e ( for an oth er la ngu age) , th e t ime z one, a nd t he t e leph one c ou nt ry c ode .
Setting User Default Redirection
Sponsors can change these settings from their Preferences page once they are logged in. However , to ease
the situation for first time users of the application you can choose to direct sponsors to their preference
page on their first login to the system.
Step 1 From the administration interface select User Interface > User Defaults from t he l eft hand me nu.
Figure 10-11 User Defaults
Step 2 Check the ch eck box if you want the sponso rs to b e redi rec ted to t he pre fere nce s pa ges upon the ir first
login to the syste m. I f y ou don ’t then make su re i t i s unche cked.
Step 3 Click the Save S ettin g s button.
OL-15986-01
Cisco NAC Guest Server Installation and Configuration Guide
10-9
Page 98

Setting User Default Redirection
Chapter 10 Customizing the Application
10-10
Cisco NAC Guest Server Installation and Configuration Guide
OL-15986-01
Page 99

CHA PTER
11
Backup and Restore
Yo u should bac kup the C isco NAC Guest Server on a regu lar basi s so that in the event of a har dware
failure you do not loose critical data. The Cisco NAC Guest Server backup process backs up the system
setup, account data base, an d all a ud it r ecor ds e nabl ing y ou to r ecover everything you ne ed in the event
of a failure. You can either create a “point in time” snapshot, or schedule system back-ups to be
automatically saved on the Cisco NAC Guest Server or a remote FTP server.
This chapter includes the following sections:
• Configuring Backup Settings
• Restoring Backups
OL-15986-01
Cisco NAC Guest Server Installation and Configuration Guide
11-1
Page 100

Configuring Backup Set ti ngs
Configuring Backup Settings
Step 1 From the admi nist rati on home pa ge se le ct Server > Backup from the left hand menu (Figure 11-1).
Figure 11-1 Backup Settings
Chapter 11 Backup and Restore
Taking a snapshot
Yo u have the option of saving a point in time snap shot which w ill allow you to download a backup of
the Cisco NAC Guest Server at this exact moment.
Step 1 To save a snapshot backup, clic k the Snapshot button at the bottom of the form (Figure 11-1).
Yo u are pro mpted by your web browser to save the backup file to disk.
Cisco NAC Guest Server Installation and Configuration Guide
11-2
OL-15986-01
 Loading...