

Page 1

Cisco MeetingPlace Audio Server Release 5.2
DVD-ROM Upgrade Procedure
Cisco MeetingPlace Audio Server Release 5.2 supports a new DVD-ROM drive that replaces the Travan
NS20 tape drive.
Note You must upgrade the Cisco MeetingPlace 8112 before upgrading Cisco MeetingPlace Audio Server
Release 5.0.2 or Release 5.1.0 to Release 5.2.
Contents
Cisco MeetingPlace Audio Server Release 5.2 DVD-ROM Upgrade Procedure provides instructions for
removing the Travan NS20 tape drive and installing the DVD-ROM drive. For regulatory and compliance
information for Cisco MeetingPlace Audio Servers, see Regulatory Compliance and Safety Information
for Cisco MeetingPlace Products.
• Audience, page 1
• Scope, page 2
• Required Hardware and Software, page 2
• Required Tools and Equipment, page 3
• How to Upgrade to the Cisco MeetingPlace Audio Server Release 5.2 DVD-ROM, page 3
• Additional References, page 15
• Obtaining Documentation, page 16
• Documentation Feedback, page 17
• Cisco Product Security Overview
• Obtaining Technical Assistance, page 18
• Obtaining Additional Publications and Information, page 19
Audience
78-16489-01
This upgrade procedure is for Network Consulting Engineers (NCE) or fully trained Cisco partners.
Cisco MeetingPlace Audio Server Release 5.2 DVD-ROM Upgrade Procedure
1
Page 2

Scope
Scope
This document provides instructions for removing the tape drive and installing the DVD-ROM drive in
to the Cisco MeetingPlace 8112.
To locate additional information about the Cisco MeetingPlace 8112 or other Cisco MeetingPlace
products, see the “Additional References” section on page 15.
Required Hardware and Software
You need the following hardware and software to upgrade to the Cisco MeetingPlace Audio Server
Release 5.2 DVD-ROM:
Required Hardware and Software
The following is required to upgrade to the Cisco MeetingPlace Audio Server Release 5.2 DVD-ROM:
• MP-8112-DVD-KIT=Cisco MeetingPlace 8112 DVD-ROM Retrofit Kit
• Cisco MeetingPlace 8112 DVD-ROM Kit (must be returned)—Contact your NCE to obtain this kit,
which contains the following items:
–
BIOS 5.2 IDE Enable Diskette
–
Update Diskette for M3 DVD-ROM Retrofit Kit
–
Cisco MeetingPlace 8112 power cable for hard drives, CD-ROM, and floppy drive
–
Internal 4-drop SCSI cable
–
7” VGA monitor
–
Slim keyboard
In addition to the software in the Cisco MeetingPlace 8112 DVD-ROM Kit, the following software is
required:
Note When you upgrade from Cisco MeetingPlace Audio Server Release 5.0.2 or Release 5.1.0 to
Release 5.2, you must upgrade the hardware before you upgrade the software.
• MP-AUDIO-CD-5.2.0=Cisco MeetingPlace 8100 Audio Conference Software 5.2.0 Media Kit
• MP-MT-CD-5.2.0=Cisco MeetingPlace MeetingTime 5.2.0 Media Kit
• MP-BACKUP-CD5.2.0=Cisco MeetingPlace Network Backup Gateway 5.2 Media Kit
Recommended Hardware
We recommend that you have the following hardware for contingency:
• MP-8112-CPU=Cisco MeetingPlace 8112 CPU Card
Cisco MeetingPlace Audio Server Release 5.2 DVD-ROM Upgrade Procedure
2
78-16489-01
Page 3

Required Tools and Equipment
Required Tools and Equipment
To upgrade to the Cisco MeetingPlace Audio Server Release 5.2 DVD-ROM, you need the following
tools and equipment:
• Computer with terminal emulation software installed
• DB9-female-to-DB9-female null-modem cable
• Phillips #2 screwdriver
• ESD protection
• Small flashlight
• Blank diskette
• Releasable cable tie
How to Upgrade to the Cisco MeetingPlace Audio Server
Release 5.2 DVD-ROM
To upgrade to the Cisco MeetingPlace Audio Server Release 5.2 DVD-ROM, perform the following
procedures in the order shown:
• Saving the License Keys, page 3
• Powering Down the Cisco MeetingPlace 8112, page 4
• Removing the Tape Drive from the Cisco MeetingPlace 8112, page 4
• Installing the DVD-ROM Drive into the Cisco MeetingPlace 8112, page 7
• Upgrading the Cisco MeetingPlace 8112 BIOS, page 9
• Troubleshooting BIOS Upgrade Failure, page 11
• Installing the DVD-ROM Drive Software, page 13
• Verifying the Cisco MeetingPlace Audio Server Release 5.2 DVD-ROM Upgrade, page 14
Saving the License Keys
To save the license keys, perform the following steps:
Step 1 By using the null-modem cable, connect the laptop to the COM1 service port on the front of the
Cisco MeetingPlace 8112.
Step 2 Through a Telnet session or HyperTerminal, log in as a technician.
The tech$ prompt appears.
78-16489-01
Step 3 Insert a blank disk into the floppy disk drive.
Cisco MeetingPlace Audio Server Release 5.2 DVD-ROM Upgrade Procedure
3
Page 4
How to Upgrade to the Cisco MeetingPlace Audio Server Release 5.2 DVD-ROM
Step 4 To save the license keys, enter savelicense.
You can use these license keys if you need to reinstall the original CPU.
Step 5 Remove the disk from the floppy disk drive.
Powering Down the Cisco MeetingPlace 8112
To power down the Cisco MeetingPlace 8112, perform the following steps:
Step 1 At the tech$ prompt, enter halt disable.
Step 2 To power down the system, enter y and press Enter.
Step 3 Wait for the “**** LynxOS is down ****” message to appear.
Step 4 Turn the power switch to the off position.
Step 5 Unplug the main power cable from the server.
Removing the Tape Drive from the Cisco MeetingPlace 8112
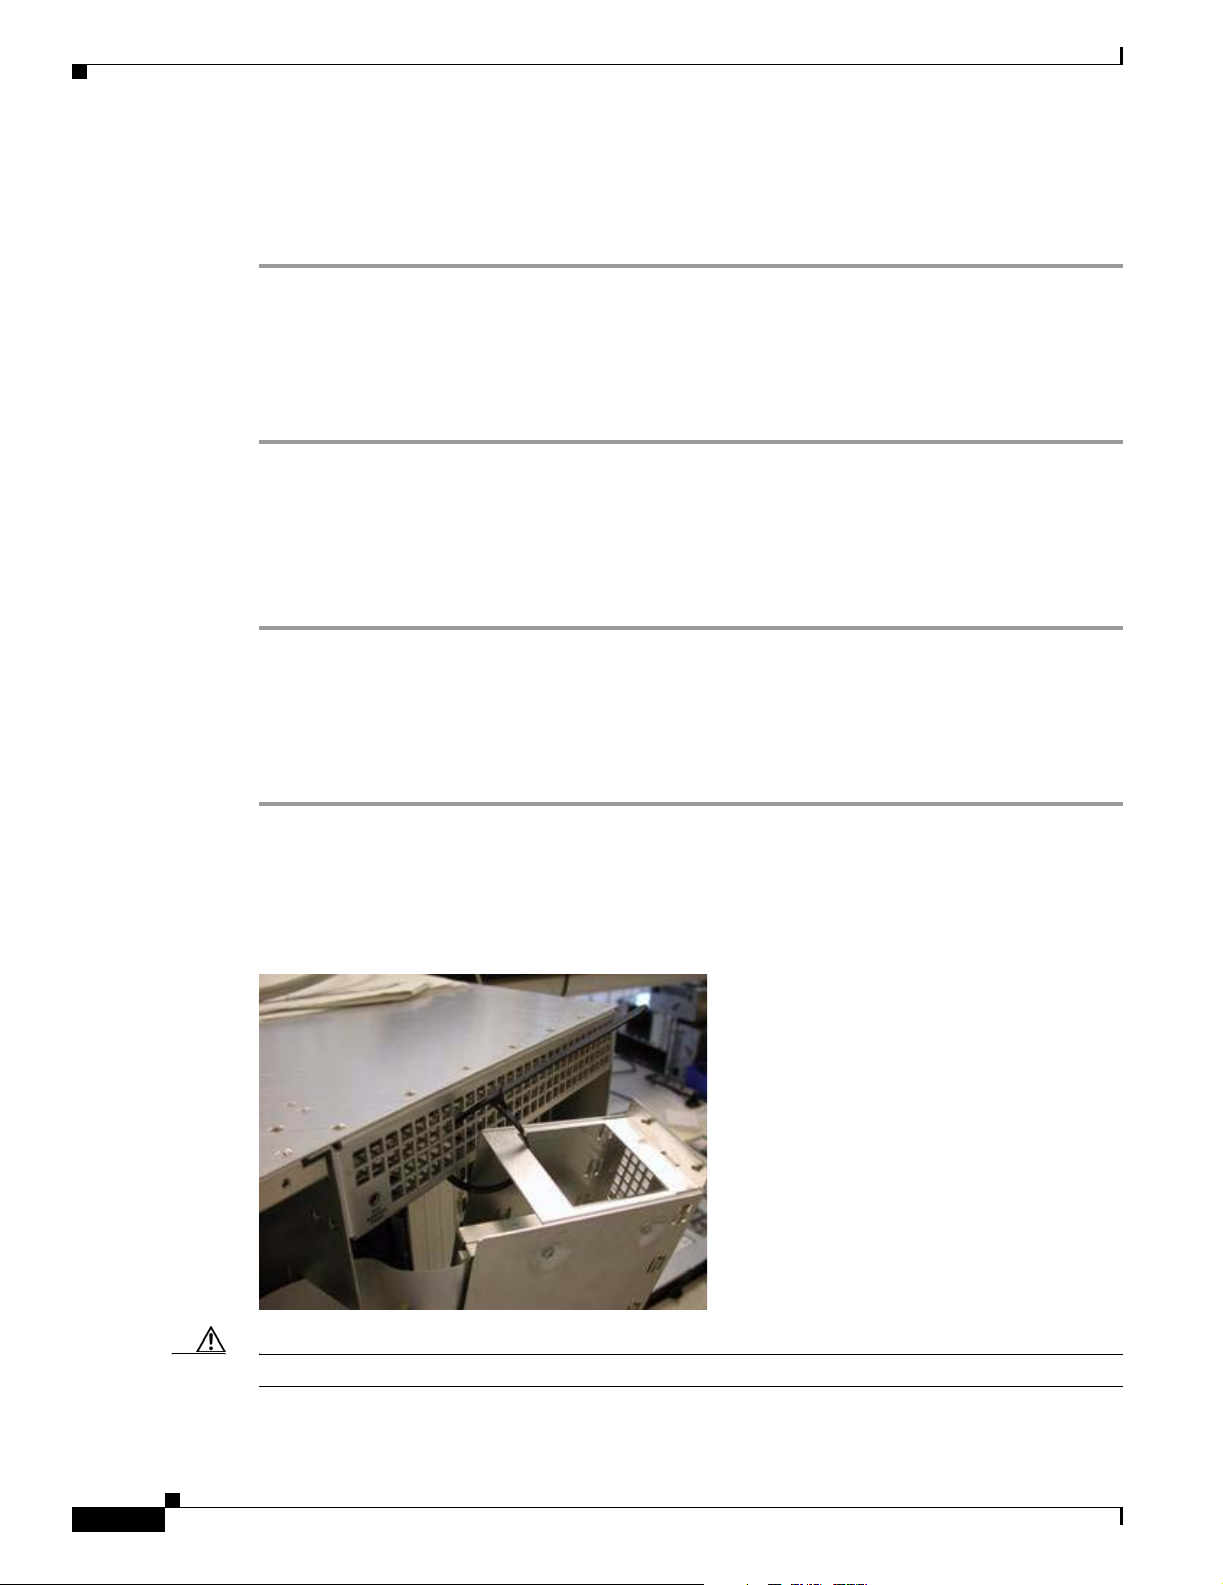
To remove the tape drive from the Cisco MeetingPlace 8112, perform the following steps:
Step 1 From the back of the Cisco MeetingPlace 8112, loosen the screws on the floppy disk housing, located
on the upper left side.
Step 2 Slowly slide out the floppy disk housing and secure the housing to the back of the
Cisco MeetingPlace 8112 with a releasable tie wrap, as shown in Figure 1.
Figure 1 Secured Floppy Disk Housing
Caution Do not allow the housing to hang by the attached cables.
Cisco MeetingPlace Audio Server Release 5.2 DVD-ROM Upgrade Procedure
4
78-16489-01
Page 5
How to Upgrade to the Cisco MeetingPlace Audio Server Release 5.2 DVD-ROM
Step 3 Disconnect the power cable, a small connector with four connected wires, from the floppy disk drive in
the housing, as shown in Figure 2.
Figure 2 Floppy Disk Drive Inside the Housing
Power Cable
SCSI Cable
Step 4
Follow the internal pale yellow SCSI cable, as shown in Figure 2, from the floppy disk drive to identify
its connection to the tape drive, located at the top right and partially covered by the backplane.
Step 5 Disconnect the SCSI cable from the tape drive.
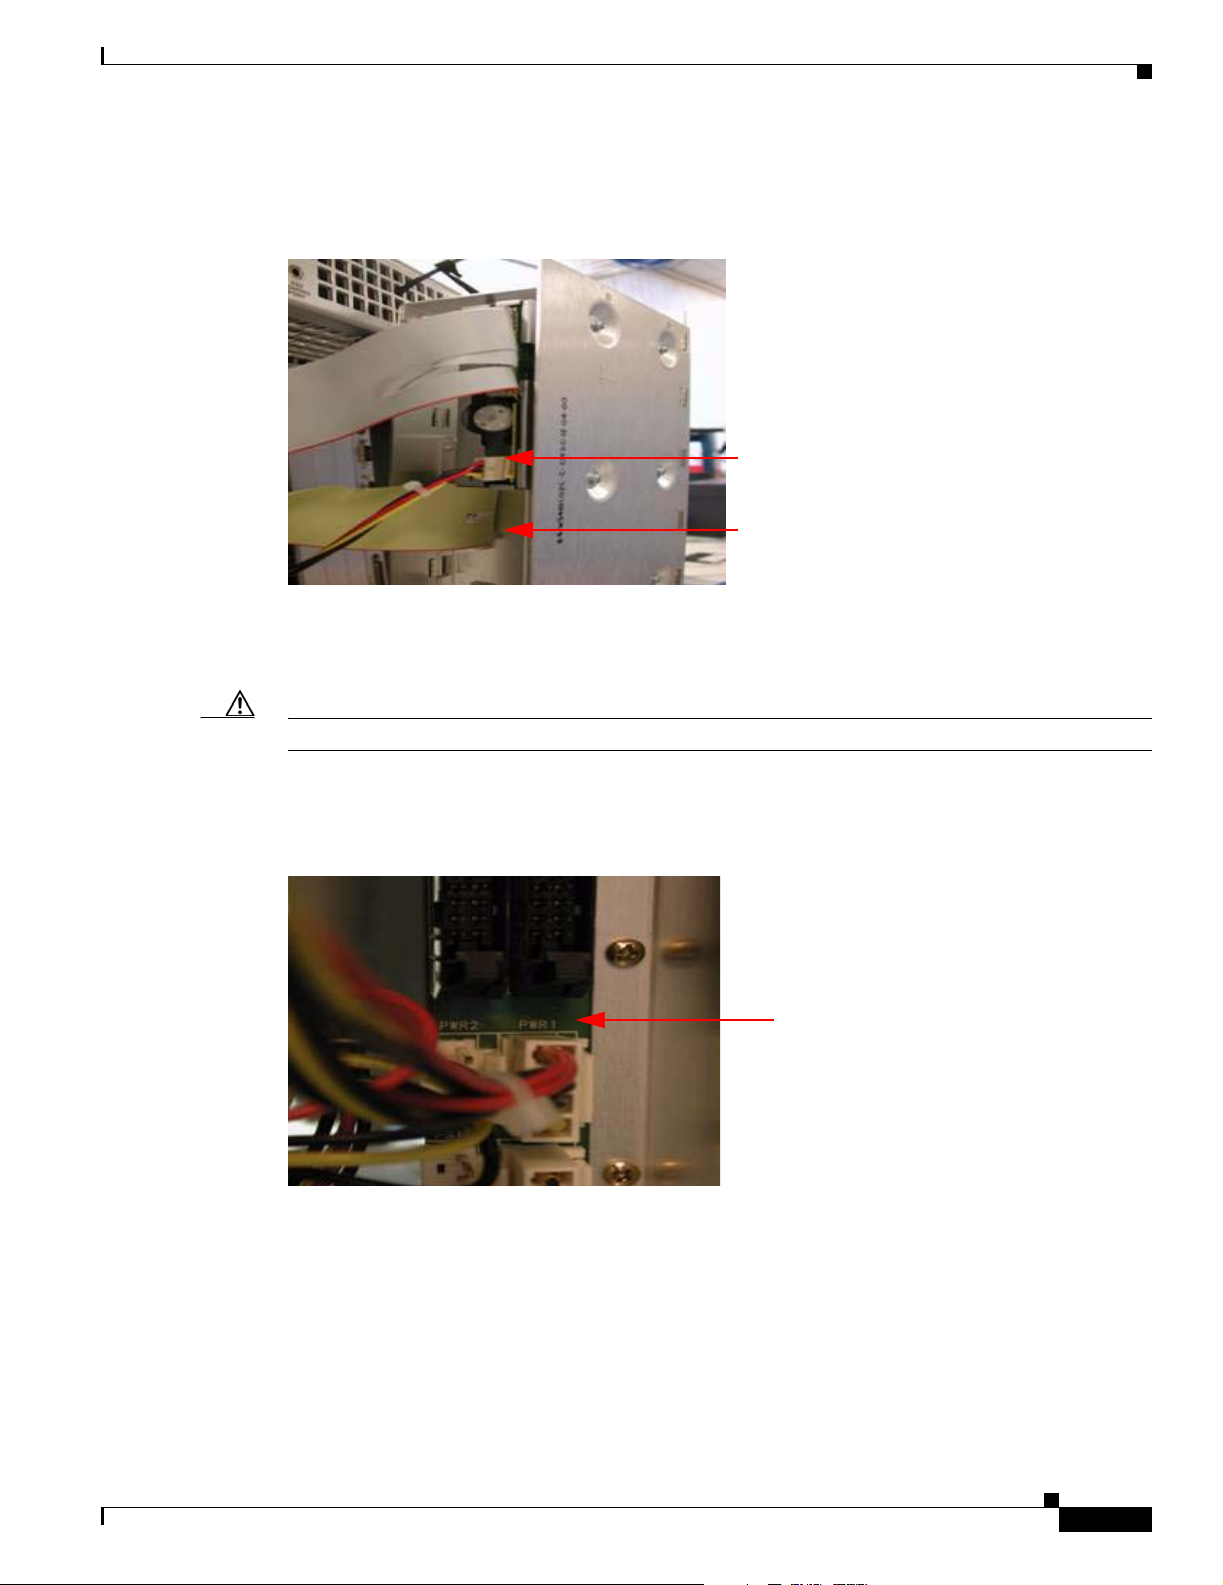
Caution Do not to pull off the cable from the hard drives.
Step 6 Follow the power cable that you disconnected in Step 3 to the power source connector at the PWR1
receptacle, which is labeled on the backplane power source, as shown in Figure 3.
Figure 3 PWR1 Receptacle
78-16489-01
Step 7
Disconnect the connector at PWR1.
Cisco MeetingPlace Audio Server Release 5.2 DVD-ROM Upgrade Procedure
5
Page 6
How to Upgrade to the Cisco MeetingPlace Audio Server Release 5.2 DVD-ROM
Step 8 Remove the power cable from the top disk drive on the top left from back of server, as shown in Figure 4.
Note There are two cables connected: the pale yellow SCSI cable and the power cable. Do not remove the
SCSI cable from the disk drive.
You may need to move other cables out of the way to see the connector. Make sure that the power cable
is not tangled with other cables. The power cable will need to extend when you slide out with the tape
drive.
Figure 4 Power Cable Connector on Top Disk Drive
Step 9
At the front of the Cisco MeetingPlace 8112, remove the faceplate to the drive bay by loosening the four
screws at the corners of the drive bay.
Note Do not turn the drive keys.
Power Cable Connector
Cisco MeetingPlace Audio Server Release 5.2 DVD-ROM Upgrade Procedure
6
78-16489-01
Page 7

How to Upgrade to the Cisco MeetingPlace Audio Server Release 5.2 DVD-ROM
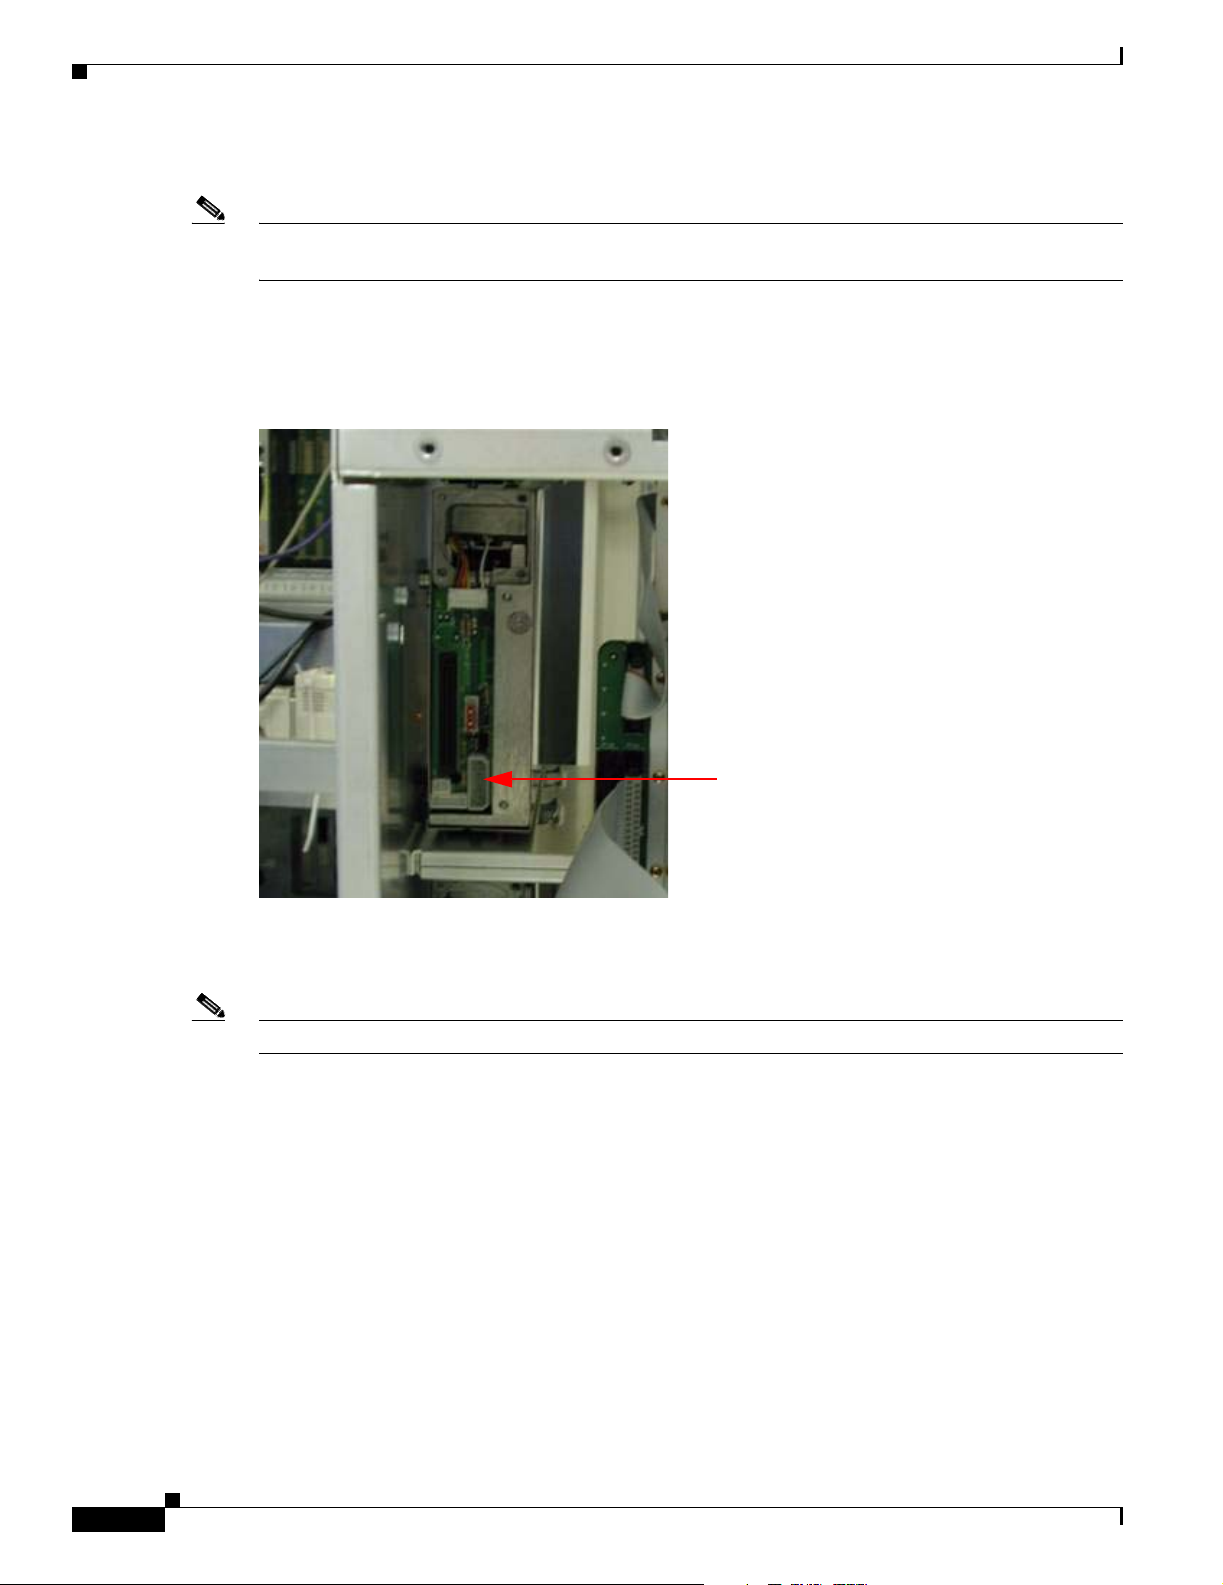
Step 10 Loosen the two screws holding the tape drive in the drive bay, as shown in Figure 5.
Figure 5 Captive Screws on the Drive Bay
Step 11
Slowly slide out the tape drive. You should be able to slide out the tape drive such that it narrowly clears
the bay.
Tip If you cannot slide out the tape drive, go to the back of the server to see what is preventing the tape drive
from sliding out.
Step 12 Disconnect the power cable from the tape drive.
Step 13 Remove the tape drive.
Installing the DVD-ROM Drive into the Cisco MeetingPlace 8112
Step 1 Connect one end of the IDE cable to the DVD-ROM drive. The IDE cable is keyed, as shown in Figure 6,
and can only be connected one way.
Figure 6 IDE Cable
78-16489-01
Step 2
From the front of the server, hold the DVD-ROM drive with the ejector button on the top and place the
IDE cable, connector end first, into the drive bay.
Step 3 Slide in the IDE cable into the drive bay as far as possible so that you can access the cable from the back
of the Cisco MeetingPlace 8112.
Step 4 Connect the power cable, the previous tape drive power cable, to the DVD-ROM drive.
Cisco MeetingPlace Audio Server Release 5.2 DVD-ROM Upgrade Procedure
7
Page 8

How to Upgrade to the Cisco MeetingPlace Audio Server Release 5.2 DVD-ROM
Step 5 If you have to pull out the power cable to connect it to the DVD-ROM drive, make sure that you put the
power cable back into the drive bay. Slide the power cable back in as far as possible so that you can
access the cable from the back of the server.
Step 6 Slide the DVD-ROM drive into the drive bay. You may not be able to fully insert the DVD-ROM drive
because the IDE cable may bunch up.
Step 7 Go to the back of server and carefully straighten out the IDE cable.
Step 8 Verify that the IDE cable clips are open and insert the IDE cable connector to the PIDEA receptacle,
located above the PWR1 receptacle, as shown in Figure 7.
When you push in the connector, the top and bottom clips of the receptacle secure the connector.
Figure 7 PIDEA Receptacle
PIDEA Receptacle
Step 9 Reconnect the power cable connector with the red wire on top to the disk drive, located at top left. This
connector is keyed and can only be inserted one way.
Step 10 Reconnect the power cable connector with the red wire on top to the PWR1 receptacle. Use a flashlight
to ensure proper connection. This connector is keyed and can only be inserted one way.
Caution If you do not reconnect the power cable connector properly, the server will be damaged and will not boot
up.
Step 11 Go to the front of the server and insert fully the DVD-ROM drive into the drive bay and tighten the
captive screws.
Step 12 Replace the face plate of the drive bay and fasten the four screws.
Step 13 After completing the installation, verify all the connections.
Step 14 Remove the releasable tie wrap that is securing the floppy drive housing to the back of the server.
Step 15 Reconnect the power cable connector with the red wire on top to the floppy disk drive. This connector
is keyed and can only be inserted one way.
Step 16 Slide the floppy drive housing back into the server and fasten the four screws. Take care not to pinch any
cables.
Cisco MeetingPlace Audio Server Release 5.2 DVD-ROM Upgrade Procedure
8
78-16489-01
Page 9

How to Upgrade to the Cisco MeetingPlace Audio Server Release 5.2 DVD-ROM
Upgrading the Cisco MeetingPlace 8112 BIOS
Caution During this process, ensure that the power to the Cisco MeetingPlace 8112 is not turned off at any time.
To upgrade the Cisco MeetingPlace 8112 server BIOS, perform the following steps:
Step 1 Attach the monitor (LILLIPUT) to the Video port on the CPU card of the Cisco MeetingPlace 8112.
Step 2 Attach the power cable to the monitor (LILLIPUT) and power source.
Step 3 Attach the keyboard to the Keyboard/Mouse port on the CPU card of the Cisco MeetingPlace 8112.
Step 4 Turn on the monitor (LILLIPUT).
Step 5 Plug in the main power cable to the Cisco MeetingPlace 8112 and switch the server power to ON.
Step 6 To get the log in prompt, press enter a couple of times; then, log in as a technician.
Step 7 At the tech$ prompt, enter restart disable.
The server will start to come up immediately, and you will see “Press F2 to Enter Set Up” on the bottom
left side of the monitor (LILLIPUT).
Step 8 To enter setup mode, press F2.
The BIOS Setup Utility appears, as shown in Figure 8.
Figure 8 BIOS Setup Utility Main Screen
78-16489-01
Cisco MeetingPlace Audio Server Release 5.2 DVD-ROM Upgrade Procedure
9
Page 10

How to Upgrade to the Cisco MeetingPlace Audio Server Release 5.2 DVD-ROM
Step 9 By using the right arrow key, choose Advanced, as shown in Figure 9.
Figure 9 Advanced Screen
Step 10
Step 11 In the Task Section of the Embedded Flash screen, press Enter.
Step 12 By using the down arrow, choose Program BIOS, as shown in Figure 10, and press Enter.
By using the down arrow key, choose Embedded Flash, as shown in Figure 9, and press Enter.
Figure 10 Embedded Flash Screen
10
Step 13
Verify that Device is set to Diskette Drive, as shown in Figure 10.
If Device is not set to Disk Drive, use the down arrow key to choose Device and use the + key ('shift' '+'
key) combination to choose Diskette Drive.
Step 14 Insert the BIOS 5.2 upgrade diskette into the floppy disk drive.
Step 15 By using the down arrow, choose Execute and press Enter, as shown in Figure 10.
It may take up several minutes for the upgrade to begin. The Cisco MeetingPlace 8112 restarts.
Cisco MeetingPlace Audio Server Release 5.2 DVD-ROM Upgrade Procedure
78-16489-01
Page 11

How to Upgrade to the Cisco MeetingPlace Audio Server Release 5.2 DVD-ROM
Step 16 During the server reboot, watch for the BIOS revision SMM5370LATUDE BIOS 1.0EA02 on the
monitor (LILLIPUT), as shown in Figure 11. This revision appears for approximately 8 seconds and
verifies that the BIOS was upgraded.
Figure 11 BIOS Revision
BIOS Revision
Step 17
Step 18 Disconnect the monitor (LILLIPUT) and the keyboard from the Cisco MeetingPlace 8112 and
Remove the BIOS disk from the floppy disk drive.
disconnect the power cable to the monitor and power source.
What to Do Next
• If the BIOS upgrade fails and the CPU is not functional (Cisco MeetingPlace 8112 does not reboot),
proceed to the “Troubleshooting BIOS Upgrade Failure” section on page 11.
• If the BIOS upgrade is successful and the server reboots, proceed to “Installing the DVD-ROM
Drive Software” section on page 13.
Troubleshooting BIOS Upgrade Failure
Caution Only use the procedures in this section if the BIOS upgrade fails and the server does not reboot.
1. Verifying the BIOS Upgrade
2. Replacing the CPU and Updating the License Keys
Verifying the BIOS Upgrade
Step 1 Manually power down the Cisco MeetingPlace 8112.
Step 2 Reconnect the monitor (LILLIPUT) and keyboard to the Cisco MeetingPlace 8112.
Step 3 After the fans have stopped, wait 30 seconds; then, turn on power to the Cisco MeetingPlace 8112.
Step 4 When the server begins booting up, press F2 on the monitor (LILLIPUT) to enter setup mode.
or
78-16489-01
Cisco MeetingPlace Audio Server Release 5.2 DVD-ROM Upgrade Procedure
11
Page 12

How to Upgrade to the Cisco MeetingPlace Audio Server Release 5.2 DVD-ROM
If the server does not boot up (you cannot get into the Setup mode on the monitor), contact Cisco TAC
as described in the “Obtaining Technical Assistance” section on page 18 before you proceed to the
“Replacing the CPU and Updating the License Keys” section on page 12.
Step 5 In Setup mode, press the right arrow to choose the Advanced menu.
Step 6 By using the Down arrow, choose IDE Configuration and press Enter.
Step 7 Verify that the Local Bus IDE field is set to Both, as shown in Figure 12. To exit, press ESC.
Note Do not save when you are prompted.
Figure 12 IDE Configuration Screen
Should be set
to“Both”
Step 8
If the Cisco MeetingPlace 8112 comes up after exiting the BIOS, proceed to the “Installing the
DVD-ROM Drive into the Cisco MeetingPlace 8112” section on page 7.
or
If the server does not come up after exiting the BIOS, contact Cisco TAC as described in the “Obtaining
Technical Assistance” section on page 18 before you proceed to the “Replacing the CPU and Updating
the License Keys” section on page 12.
Replacing the CPU and Updating the License Keys
To replace the CPU and update the license keys, perform the following steps:
Step 1 Obtain new license keys by contacting Cisco TAC.
Step 2 Verify that the power is off on the Cisco MeetingPlace 8112 and your laptop is connected to the service
port on the front of the server with the null-modem cable.
Step 3 Remove the old CPU card and replace it with the new CPU card.
Step 4 Place the old CPU card in the anti-static bag from which you removed the new CPU card.
Step 5 Power up the server.
Step 6 Log in as a technician.
Step 7 Check for alarms.
Step 8 Verify that there is a modem line connected to the server.
12
Cisco MeetingPlace Audio Server Release 5.2 DVD-ROM Upgrade Procedure
78-16489-01
Page 13

How to Upgrade to the Cisco MeetingPlace Audio Server Release 5.2 DVD-ROM
Step 9 Inform Cisco TAC that you are ready for the license key replacement.
Step 10 Perform full functionality testing.
Step 11 Return the old CPU card to manufacturing.
Installing the DVD-ROM Drive Software
Step 1 By using the null modem cable, connect the laptop to the COM1 service port on the front of the
Cisco MeetingPlace 8112.
Step 2 Log in to the server as a technician through a telnet session or HyperTerminal.
Tip We recommend that you log your session.
Step 3 Insert the Update Diskette for M3 DVD-ROM into the floppy disk drive.
Step 4 To install the DVD-ROM software on the system hard drive, enter update at the tech$ prompt and choose
d for diskette.
Step 5 When the system reminds you to wait for the blinking light to stop, press Enter.
Step 6 After the light stops blinking, remove the diskette from the floppy disk drive.
The server is now upgraded to use the DVD-ROM drive.
Step 7 Insert the CD-ROM that contains the test image into the DVD-ROM drive.
Step 8 At the tech$ prompt, enter update.
Step 9 When prompted, choose 1 for CD and press Enter.
Step 10 When prompted to continue or abort, press Enter.
After the update is completed, a CD mounted OK message and more system options appear.
Step 11 To perform the CD Test, choose 1 when you are asked to choose the desired set.
Step 12 When you are prompted to install the CD Test, enter y. Sample output from a CD test is shown in the
“Installing the DVD-ROM Software Example” section on page 13.
Step 13 If the test passes, proceed to “Verifying the Cisco MeetingPlace Audio Server Release 5.2 DVD-ROM
Upgrade” section on page 14.
or
If the test fails, contact Cisco TAC.
Installing the DVD-ROM Software Example
The following is sample output from a CD-ROM test that passes.
server: tech$ update
Update is from
1) CD
2) Diskette
3) Remote File
78-16489-01
Cisco MeetingPlace Audio Server Release 5.2 DVD-ROM Upgrade Procedure
13
Page 14

How to Upgrade to the Cisco MeetingPlace Audio Server Release 5.2 DVD-ROM
4) Local File
q) (Quit Update)
Enter choice: 1
Please insert the update CD in the drive, then
wait for the drive to be quiet before continuing.
Press <ENTER> to continue or <CONTROL-C> to abort.
CD mounted OK; checking for update sets...
There is more than one update set on the CD.
Please pick the desired set from the following list:
1) CD Test
2) MP Server 5.2.x
q) Quit
Enter Choice: 1
You wish to install: CD Test
Is this correct? (y or n) y
This test verifies proper operation of the CD drive.
The test image checksum matches.
Starting scan of the CD image. You should see no error messages.
When complete, a report should show the file system size and transfer speed.
dd: read 1341440 bytes; wrote 1341440 bytes; speed = 601.0 KB/s.
PASSED
Verifying the Cisco MeetingPlace Audio Server Release 5.2 DVD-ROM Upgrade
After the upgrade is successful, perform the following applicable system-wide checks to verify that the
Cisco MeetingPlace system is fully functional:
• Verifying VoIP and PSTN Telephony with a Cisco MeetingPlace System, page 14
• Scheduling and Attending New Meetings with a Cisco MeetingPlace System, page 14
• Recording Conferences with a Cisco MeetingPlace System, page 15
• Verifying Cisco MeetingPlace Gateway Functionality, page 15
Verifying VoIP and PSTN Telephony with a Cisco MeetingPlace System
• Verify that users can dial in or out of the Cisco MeetingPlace system using PSTN or VoIP.
• Confirm that the server is playing meeting prompts in the correct languages.
• Dial the DID number of the server.
The Cisco MeetingPlace system answers the call, and you hear the “Welcome to MeetingPlace”
prompt.
• Schedule an immediate meeting on each server. Join the meeting and press #31 to dial another phone
number.
Scheduling and Attending New Meetings with a Cisco MeetingPlace System
14
• Schedule and attend an immediate meeting via the phone interface.
• Schedule and attend a future meeting via the phone interface.
• Via the appropriate Cisco MeetingTime workstation client, log in through a System Manager profile
and schedule and attend an immediate meeting.
Cisco MeetingPlace Audio Server Release 5.2 DVD-ROM Upgrade Procedure
78-16489-01
Page 15

Recording Conferences with a Cisco MeetingPlace System
• Schedule a meeting with recording turned on. Verify that the meeting was recorded and that the
recording was retrievable after the meeting.
• Schedule a meeting with recording turned off. During the meeting, turn on recording. Verify that the
meeting is recorded and that the recording is retrievable after the meeting.
Verifying Cisco MeetingPlace Gateway Functionality
• Verify Cisco MeetingPlace notification gateway functionality by performing the following steps:
1. Schedule a meeting with both sending and receiving notification enabled.
2. Verify that the meeting notification is sent via e-mail.
• Verify Cisco MeetingPlace for Outlook scheduling functionality by performing the following steps:
1. Schedule a meeting by using the Cisco MeetingPlace for Outlook scheduling form.
2. Verify that a confirmation message is sent back to the meeting scheduler indicating that the
meeting scheduling operations succeeded.
• Verify Cisco MeetingPlace Web Conferencing functionality by performing the following steps:
1. Schedule a meeting through Cisco MeetingPlace Web Conferencing.
Additional References
2. Attend a web conference.
3. Share and collaborate a document.
4. Test the slide show.
5. Test annotations.
Additional References
• Regulatory Compliance and Safety Information for Cisco MeetingPlace 8100 Series
http://www.cisco.com/univercd/cc/td/doc/product/conf/mtgplace/rcsi/index.htm
• Addendum to Latitude MeetingPlace Documentation
http://www.cisco.com/univercd/cc/td/doc/product/conf/mtgplace/addendum.htm
• Customer Engineering Guide for Cisco MeetingPlace Audio Server 5.2
http://www.cisco.com/univercd/cc/td/doc/product/conf/mtgplace/audio/52/52ceg/index.htm
• Cisco MeetingPlace Audio Server 5.2 System Manager's Guide for Cisco MeetingPlace 8100 series
http://www.cisco.com/univercd/cc/td/doc/product/conf/mtgplace/audio/52/5206smg2.pdf
• Cisco MeetingPlace Audio Server 5.2 Installation Planning Guide for Cisco MeetingPlace 8100
series
http://www.cisco.com/univercd/cc/td/doc/product/conf/mtgplace/audio/52/5206ipg3.pdf
78-16489-01
Cisco MeetingPlace Audio Server Release 5.2 DVD-ROM Upgrade Procedure
15
Page 16

Obtaining Documentation
Obtaining Documentation
Cisco documentation and additional literature are available on Cisco.com. Cisco also provides several
ways to obtain technical assistance and other technical resources. These sections explain how to obtain
technical information from Cisco Systems.
Cisco.com
You can access the most current Cisco documentation at this URL:
http://www.cisco.com/univercd/home/home.htm
You can access the Cisco website at this URL:
http://www.cisco.com
You can access international Cisco websites at this URL:
http://www.cisco.com/public/countries_languages.shtml
Documentation DVD
Cisco documentation and additional literature are available in a Documentation DVD package, which
may have shipped with your product. The Documentation DVD is updated regularly and may be more
current than printed documentation. The Documentation DVD package is available as a single unit.
Registered Cisco.com users (Cisco direct customers) can order a Cisco Documentation DVD (product
number DOC-DOCDVD=) from the Ordering tool or Cisco Marketplace.
Cisco Ordering tool:
http://www.cisco.com/en/US/partner/ordering/
Cisco Marketplace:
http://www.cisco.com/go/marketplace/
Ordering Documentation
You can find instructions for ordering documentation at this URL:
http://www.cisco.com/univercd/cc/td/doc/es_inpck/pdi.htm
You can order Cisco documentation in these ways:
• Registered Cisco.com users (Cisco direct customers) can order Cisco product documentation from
the Ordering tool:
http://www.cisco.com/en/US/partner/ordering/
• Nonregistered Cisco.com users can order documentation through a local account representative by
calling Cisco Systems Corporate Headquarters (California, USA) at 408 526-7208 or, elsewhere in
North America, by calling 1 800 553-NETS (6387).
16
Cisco MeetingPlace Audio Server Release 5.2 DVD-ROM Upgrade Procedure
78-16489-01
Page 17

Documentation Feedback
You can send comments about technical documentation to bug-doc@cisco.com.
You can submit comments by using the response card (if present) behind the front cover of your
document or by writing to the following address:
Cisco Systems
Attn: Customer Document Ordering
170 West Tasman Drive
San Jose, CA 95134-9883
We appreciate your comments.
Cisco Product Security Overview
Cisco provides a free online Security Vulnerability Policy portal at this URL:
http://www.cisco.com/en/US/products/products_security_vulnerability_policy.html
From this site, you can perform these tasks:
• Report security vulnerabilities in Cisco products.
• Obtain assistance with security incidents that involve Cisco products.
Documentation Feedback
• Register to receive security information from Cisco.
A current list of security advisories and notices for Cisco products is available at this URL:
http://www.cisco.com/go/psirt
If you prefer to see advisories and notices as they are updated in real time, you can access a Product
Security Incident Response Team Really Simple Syndication (PSIRT RSS) feed from this URL:
http://www.cisco.com/en/US/products/products_psirt_rss_feed.html
Reporting Security Problems in Cisco Products
Cisco is committed to delivering secure products. We test our products internally before we release them,
and we strive to correct all vulnerabilities quickly. If you think that you might have identified a
vulnerability in a Cisco product, contact PSIRT:
• Emergencies— security-alert@cisco.com
• Nonemergencies— psirt@cisco.com
Tip We encourage you to use Pretty Good Privacy (PGP) or a compatible product to encrypt any sensitive
information that you send to Cisco. PSIRT can work from encrypted information that is compatible with
PGP versions 2.x through 8.x.
Never use a revoked or an expired encryption key. The correct public key to use in your correspondence
with PSIRT is the one that has the most recent creation date in this public key server list:
http://pgp.mit.edu:11371/pks/lookup?search=psirt%40cisco.com&op=index&exact=on
78-16489-01
Cisco MeetingPlace Audio Server Release 5.2 DVD-ROM Upgrade Procedure
17
Page 18

Obtaining Technical Assistance
In an emergency, you can also reach PSIRT by telephone:
• 1 877 228-7302
• 1 408 525-6532
Obtaining Technical Assistance
For all customers, partners, resellers, and distributors who hold valid Cisco service contracts, Cisco
Technical Support provides 24-hour-a-day, award-winning technical assistance. The Cisco Technical
Support Website on Cisco.com features extensive online support resources. In addition, Cisco Technical
Assistance Center (TAC) engineers provide telephone support. If you do not hold a valid Cisco service
contract, contact your reseller.
Cisco Technical Support Website
The Cisco Technical Support Website provides online documents and tools for troubleshooting and
resolving technical issues with Cisco products and technologies. The website is available 24 hours a day,
365 days a year, at this URL:
http://www.cisco.com/techsupport
Access to all tools on the Cisco Technical Support Website requires a Cisco.com user ID and password.
If you have a valid service contract but do not have a user ID or password, you can register at this URL:
http://tools.cisco.com/RPF/register/register.do
Note Use the Cisco Product Identification (CPI) tool to locate your product serial number before submitting
a web or phone request for service. You can access the CPI tool from the Cisco Technical Support
Website by clicking the Too l s & R e so u rc es link under Documentation & Tools. Choose Cisco Product
Identification Tool from the Alphabetical Index drop-down list, or click the Cisco Product
Identification Tool link under Alerts & RMAs. The CPI tool offers three search options: by product ID
or model name; by tree view; or for certain products, by copying and pasting show command output.
Search results show an illustration of your product with the serial number label location highlighted.
Locate the serial number label on your product and record the information before placing a service call.
Submitting a Service Request
Using the online TAC Service Request Tool is the fastest way to open S3 and S4 service requests. (S3
and S4 service requests are those in which your network is minimally impaired or for which you require
product information.) After you describe your situation, the TAC Service Request Tool provides
recommended solutions. If your issue is not resolved using the recommended resources, your service
request is assigned to a Cisco TAC engineer. The TAC Service Request Tool is located at this URL:
http://www.cisco.com/techsupport/servicerequest
For S1 or S2 service requests or if you do not have Internet access, contact the Cisco TAC by telephone.
(S1 or S2 service requests are those in which your production network is down or severely degraded.)
Cisco TAC engineers are assigned immediately to S1 and S2 service requests to help keep your business
operations running smoothly.
18
Cisco MeetingPlace Audio Server Release 5.2 DVD-ROM Upgrade Procedure
78-16489-01
Page 19

To open a service request by telephone, use one of the following numbers:
Asia-Pacific: +61 2 8446 7411 (Australia: 1 800 805 227)
EMEA: +32 2 704 55 55
USA: 1 800 553-2447
For a complete list of Cisco TAC contacts, go to this URL:
http://www.cisco.com/techsupport/contacts
Definitions of Service Request Severity
To ensure that all service requests are reported in a standard format, Cisco has established severity
definitions.
Severity 1 (S1)—Your network is “down,” or there is a critical impact to your business operations. You
and Cisco will commit all necessary resources around the clock to resolve the situation.
Severity 2 (S2)—Operation of an existing network is severely degraded, or significant aspects of your
business operation are negatively affected by inadequate performance of Cisco products. You and Cisco
will commit full-time resources during normal business hours to resolve the situation.
Severity 3 (S3)—Operational performance of your network is impaired, but most business operations
remain functional. You and Cisco will commit resources during normal business hours to restore service
to satisfactory levels.
Severity 4 (S4)—You require information or assistance with Cisco product capabilities, installation, or
configuration. There is little or no effect on your business operations.
Obtaining Additional Publications and Information
Obtaining Additional Publications and Information
Information about Cisco products, technologies, and network solutions is available from various online
and printed sources.
• Cisco Marketplace provides a variety of Cisco books, reference guides, and logo merchandise. Visit
Cisco Marketplace, the company store, at this URL:
http://www.cisco.com/go/marketplace/
• Cisco Press publishes a wide range of general networking, training and certification titles. Both new
and experienced users will benefit from these publications. For current Cisco Press titles and other
information, go to Cisco Press at this URL:
http://www.ciscopress.com
• Pack et magazine is the Cisco Systems technical user magazine for maximizing Internet and
networking investments. Each quarter, Packet delivers coverage of the latest industry trends,
technology breakthroughs, and Cisco products and solutions, as well as network deployment and
troubleshooting tips, configuration examples, customer case studies, certification and training
information, and links to scores of in-depth online resources. You can access Packet magazine at
this URL:
http://www.cisco.com/packet
78-16489-01
Cisco MeetingPlace Audio Server Release 5.2 DVD-ROM Upgrade Procedure
19
Page 20

Obtaining Additional Publications and Information
• iQ Magazine is the quarterly publication from Cisco Systems designed to help growing companies
learn how they can use technology to increase revenue, streamline their business, and expand
services. The publication identifies the challenges facing these companies and the technologies to
help solve them, using real-world case studies and business strategies to help readers make sound
technology investment decisions. You can access iQ Magazine at this URL:
http://www.cisco.com/go/iqmagazine
• Internet Protocol Journal is a quarterly journal published by Cisco Systems for engineering
professionals involved in designing, developing, and operating public and private internets and
intranets. You can access the Internet Protocol Journal at this URL:
http://www.cisco.com/ipj
• World-class networking training is available from Cisco. You can view current offerings at
this URL:
http://www.cisco.com/en/US/learning/index.html
20
Cisco MeetingPlace Audio Server Release 5.2 DVD-ROM Upgrade Procedure
78-16489-01
 Loading...