

Page 1
DVC-1000
i2 eye
TM
(Patent Pending)
Broadband VideoPhone
Manual
Building Networks for People
v2.0
Page 2

Contents
Introduction ................................................................................................... 3
Package Contents.........................................................................................4
Features & Benefits ......................................................................................5
Connections ................................................................................................. 5
LEDs ............................................................................................................ 6
Getting Started.............................................................................................. 7
Using the Remote Control.............................................................................7
Using the Onscreen Keyboard ......................................................................9
Using the Setup Wizard .............................................................................. 10
Using a Telephone with the DVC-1000......................................................... 13
Using the DVC-1000.................................................................................... 14
Using the Configuration Menu...................................................................... 19
Using the DVC-1000 with Routers, Gateways or Modems ........................... 33
Troubleshooting .......................................................................................... 39
Frequently Asked Questions ....................................................................... 47
Glossary of Terms....................................................................................... 50
Technical Specifications.............................................................................. 53
Contacting Technical Support...................................................................... 55
Warranty and Registration........................................................................... 56
Page 3

Introduction
Imagine having high-quality, extremely low-cost video conferencing from a standalone, easy to use communication appliance. The D-Link i2eye
Broadband VideoPhone accomplishes this. D-Link i2eye
TM
TM
DVC-1000
introduces the
world of video conferencing over the Internet, to bring you and your family, friends
and colleagues together, in real time, anytime! The previously complicated
process of conducting a video conference is simplified with the i2eye
TM
DVC-
1000. Since the DVC-1000 is a stand-alone device, you do not need a computer
to video conference over the Internet. The i2eye
TM
DVC-1000 is such a
revolutionary leap in technology that D-Link calls it a VideoPhone. Connect a
television for viewing, an optional standard telephone for privacy, plug in a
standard Ethernet network cable connected to your broadband Internet
connection and you are ready to use your i2eye
Using advanced video compression technology, the i2eye
TM
DVC-1000 VideoPhone.
TM
DVC-1000
VideoPhone maximizes the image and audio quality within the available
bandwidth. It is an ideal solution for consumers and small businesses with highspeed broadband Internet access. There is no delay in waiting for a PC to boot
up before using your i2eye
TM
DVC-1000 VideoPhone, and you don’t have to be
a computer expert. Using the Internet, in place of conventional dial-up phone
lines, maximizes your existing broadband investment. The remote control
included with the i2eye
TM
DVC-1000 makes it easy to answer an incoming
videoconference call or dial out to initiate your own videoconference. The builtin caller ID provides privacy protection. You know who is calling before you
answer and the audio or video can be turned off whenever desired.
This manual provides the instructions to install and use your D-Link i2eye
TM
DVC-1000 Broadband VideoPhone. Please take a moment to get acquainted
with this manual to make your VideoPhone experience go as smoothly as
possible.
Page 4
Package Contents
n D-Link i2eye
TM
D VC-1000 Broadband VideoPhone
n Power Ada pter
n Instruction Manual
n Quick Installation Guide
n Remote Control
n Standard Composite RCA Audio / Video Cable
n Cat 5 RJ-45 Ethernet Cable
Note: Using a power supply with a different voltage than the one included with the DVC-1000
will cause damage and void the warranty for this product.
S ys tem Req u ir em en t s
n Connection to broadband Internet (Cable modem, DSL modem,T-1 or Ethernet
network) at each end of the connection
n Television with standard composite audio and video inputs (RCA jacks) or with a
RF modulator to enable a TV without AV jacks to be connected with the antenna
terminal
n Optional: Standard telephone (but recommended)
n Optional: You can connect the i2eye
video capture device that allows input of standard composite video (using RCA
Jacks)
n Optional: An external microphone can be connected to the pink Mic port on the
rear of the device for improved audio quality when a group of people are originating the i2eye
TM
DVC-1000 call.
TM
DVC-1000 to a PC equipped with a
4
Page 5

Features & Benefits
n Stand-alone operation - No computer needed
n Uses broadband cable/DSL or network connections for high-quality video
n H.323 Internet video-conferencing standard compliant
n Easy to use
n Use your existing broadband network
n Easy Setup Wizard
n Picture-in-Picture view or full-screen view
n Remote control included
n Speed Dialing
n Advanced video and audio privacy protection
n Built-in Caller ID
n Auto mapping of IP Address
n Answer incoming calls using telephone or remote control
n Video and / or audio mute
n Adjustable tilt and focus lens
n Up to 30 frames per second
n High quality 352 x 288 resolution
n Automatic detection of system upgrades
n 1 Year Warranty
Connections
5
Page 6
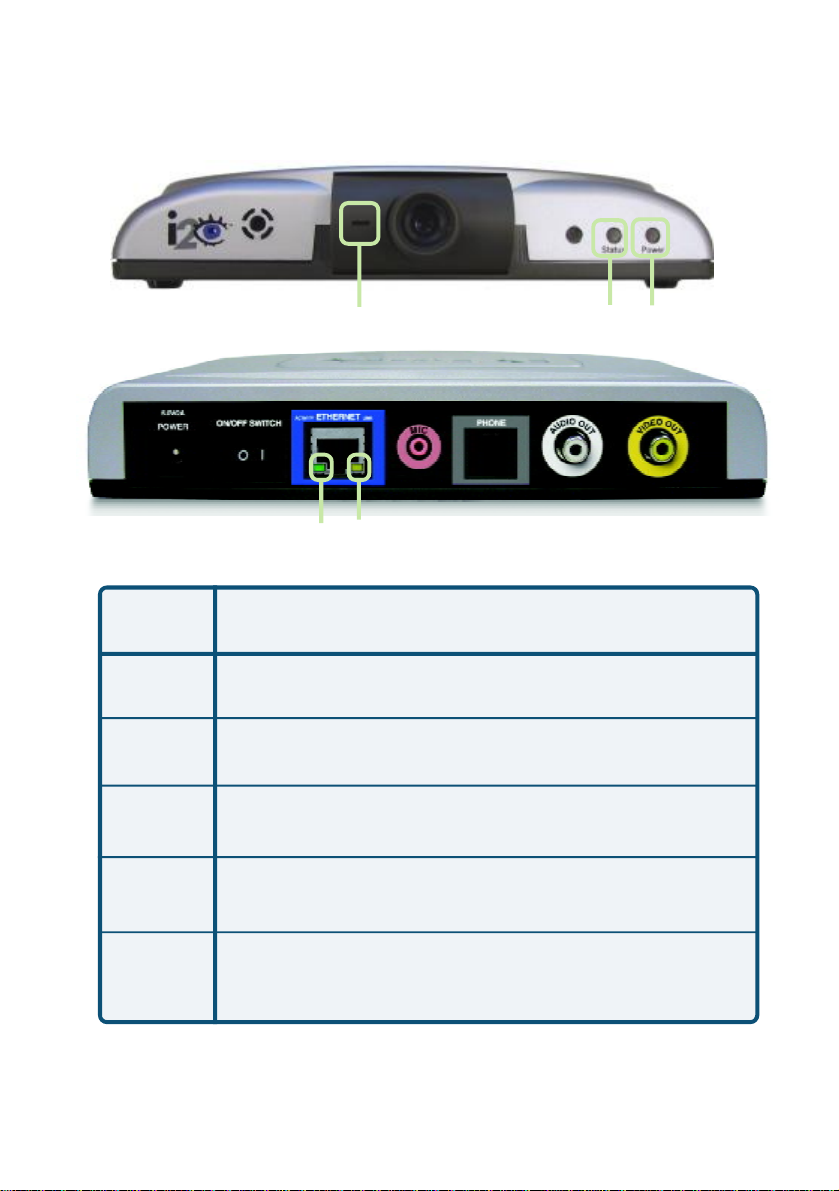
LEDs
LED stands for Light-Emitting Diode. The i2eye
following LEDs for monitoring its operation.
i2 eye
Call Monitor
Link StatusActivity
LED
Power
Front, far right.
A green light indicates the i2eye
LED Location and Activity
TM
TM
DVC-1000 has the
Status
DVC-1000 is ON.
Power
Status
Call
Monitor
Link Status
Activity
Front to the left of the power light. This light turns on briefly
at power up. It is then off during normal operation.
Front, left side of lens. Steady red light indicates video is
being sent.
Back, right. Steady green light indicates the network
connection is good.
Back, left. Steady or blinking yellow light indicates the
TM
i2eye
DVC-1000 is transmitting data.
6
Page 7

Getting Started
BEFORE YOU BEGIN!
Read Using the DVC-1000 with Routers, Gateways or Broadband Modems on
page 33 in this manual if you are using the DVC-1000 VideoPhone with a Router,
Gateway or Broadband Modem.
The DVC-1000 needs to be set-up before use. Use the Quick
Installation Guide (included with the DVC-1000) to perform the hardware instal-
lation. Each cable (video, audio, Ethernet and AC power) supplied for the i2eye
TM
has a different color on the end that connects to the DVC-1000. Plug the cables
into the matching color coded connector on the back of DVC-1000. You can
also plug the optional telephone and/or external microphone into the DVC-1000.
To help you with these connections, there is an illustration on the bottom of the
unit.
There is an easy to use Setup Wizard built-in to the DVC-1000 to accomplish
the set-up. You will need to enter your name, your phone number and your Internet
connection information in order to use your VideoPhone.
Using the Remote Control
Information for the Setup Wizard is entered by using the intelligent remote control included with the DVC-1000. The remote is used to enter numbers, letters,
special characters and to make selections from an on-screen keyboard. The
on-screen keyboard is activated by pressing ENTER on the remote control.
The on-screen keyboard is only activated in a field where text is required.
You will use the arrow keys on the remote control along with the ENTER,
CANCEL and number keys to enter information in the Setup Wizard screens.
Where a numeric input is required, such as a telephone number or IP address,
enter it directly by pressing the number keys. The * (asterisk--sometimes called
a “star” key) is used to enter a “.” (period also called a “dot”.)
When you are entering alphanumeric information, the left arrow key performs a
backspace, deleting the character to the left of the cursor. The following page
contains a breakdown of the features of the remote control.
7
Page 8

Remote Control Layout
Use the arrow keys along
with the ENTER, CANCEL
and number keys to enter
information in the Setup
Wizard screen.
The * (asterisk--sometimes
called a “star” key) is used to
enter a “.” (period also called
a “ dot”.)
When entering alphanumeric
information, the left arrow
key performs a backspace,
deleting the character to the
left of the on-screen cursor.
Speakerphone Mode
When a numeric
input is required,
(e.g., a telephone number or
IP Address)
enter it directly
by pressing the
number keys.
Number sign
Cancel
ENTER key
Full-screen or
Picture-inPicture
Self-view or
Remote View
Adjust Contrast
Mute Audio
Mute Video
8
Page 9
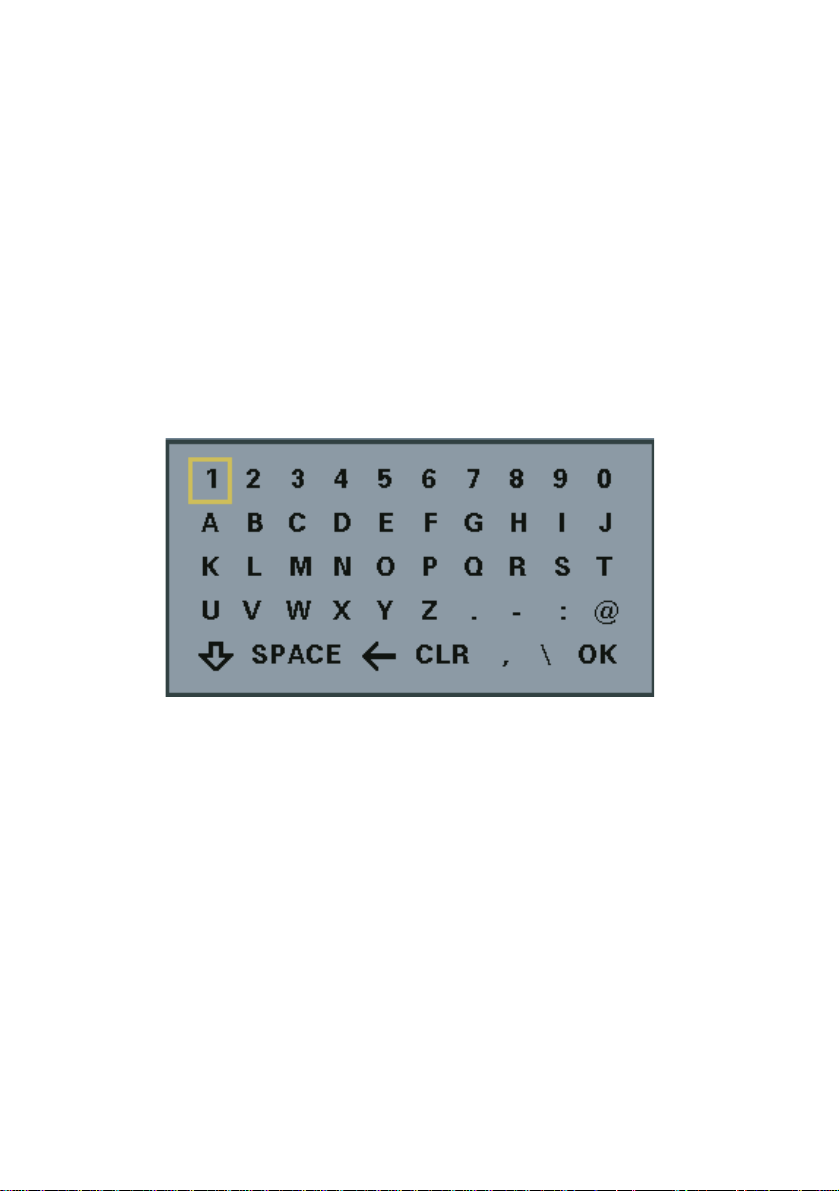
Using the On-Screen Keyboard
The DVC-1000 uses a keyboard that appears on-screen to enter words or alphanumeric characters into the Setup Wizard screens. When the cursor is
located in a setup screen that requires characters to be entered, press the
ENTER key to bring up the on-screen keyboard.
The keyboard will only appear if the cursor is located in an area of the screen
that allows text or numbers to be entered.
To enter text use the arrow keys on the remote control to move the cursor to the
required character. Press the ENTER key on the remote control to actually put
the character on the screen. Continue entering characters until you have “typed”
the characters that are needed.
When you are finished entering text and numbers, move the cursor to
highlight OK on the screen and press ENTER; or alternatively you can press
the CANCEL key on the remote to remove the keyboard from the screen,
leaving what you typed on the screen.
The keyboard allows entering any of the following:
• Numbers 0 through 9
• Upper case Letters A through Z
• Lower case letters a through z
• Special characters: period (.), dash (-), colon (:), at sign (@),
space, backspace (to delete a character to the left), comma
(,) , and a slash (/).
When you are entering letters, the first letter entered is automatically entered
as UPPER case. The bottom left “arrow” on the screen is a Shift key. This
allows you to change from UPPER to lower case. The keypad features
“wraparound” capability. Pressing continuously on the “right” arrow will
navigate you through all the rows of the alphabet.
9
Page 10
Using the Setup Wizard
The following descriptions of the Setup Wizard screens will help you
understand the purpose and procedures for providing the required
information.
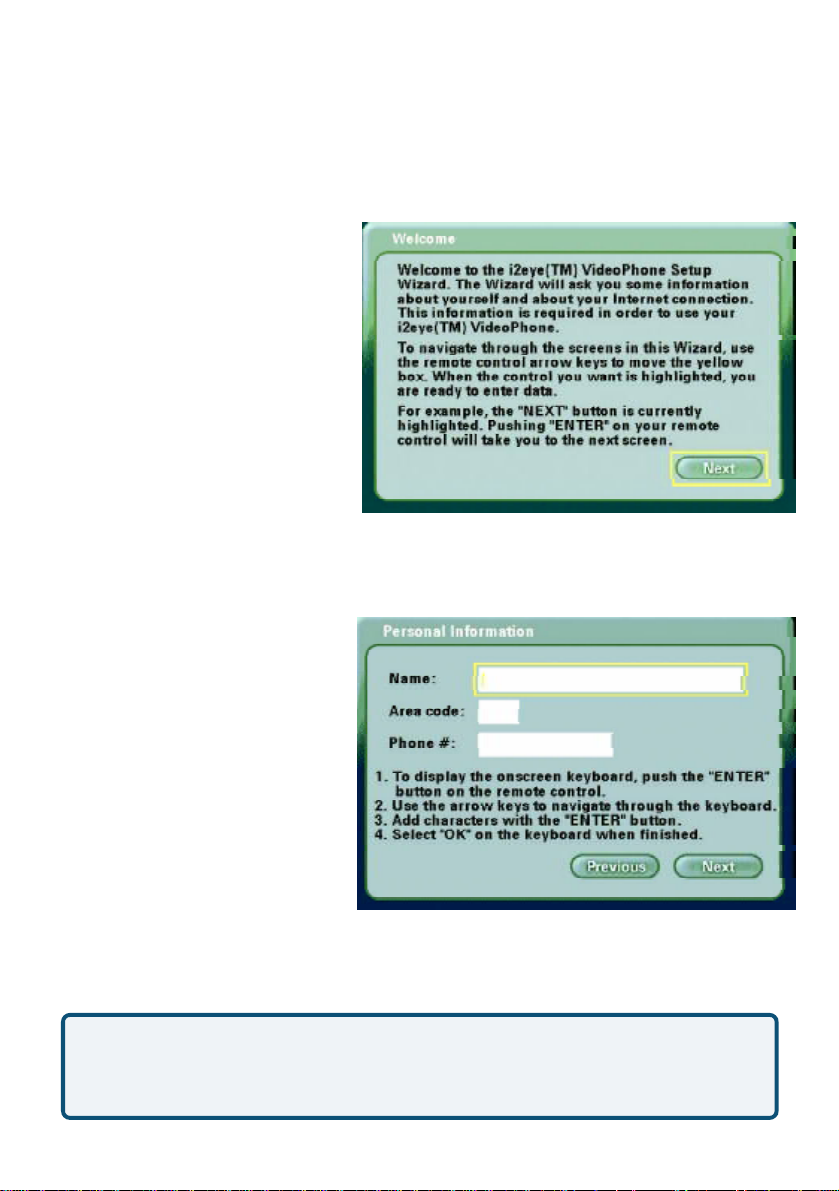
Welcome Screen
The first screen that displays on
the initial startup is the Wecome
Screen. This screen explains
what information is needed to
complete the setup and also
explains how to use the remote
control to navigate through the
Setup Wizard. Press ENTER
on the remote control to continue
to the next screen.
Personal Information Screen
This is where you enter your
name, area code and phone
number. The bottom of the
screen has instructions on using
the on-screen keyboard.
After the information is entered highlight the NEXT button and press ENTER on the
remote control to continue.
The phone number you enter is one you create for family, friends and others to
call you. You can use your regular phone number or make up a new one. Only
your name will be displayed at the other end of the video call. Your phone
number will not be visible to anyone else.
10
Page 11
Using the Setup Wizard (continued)
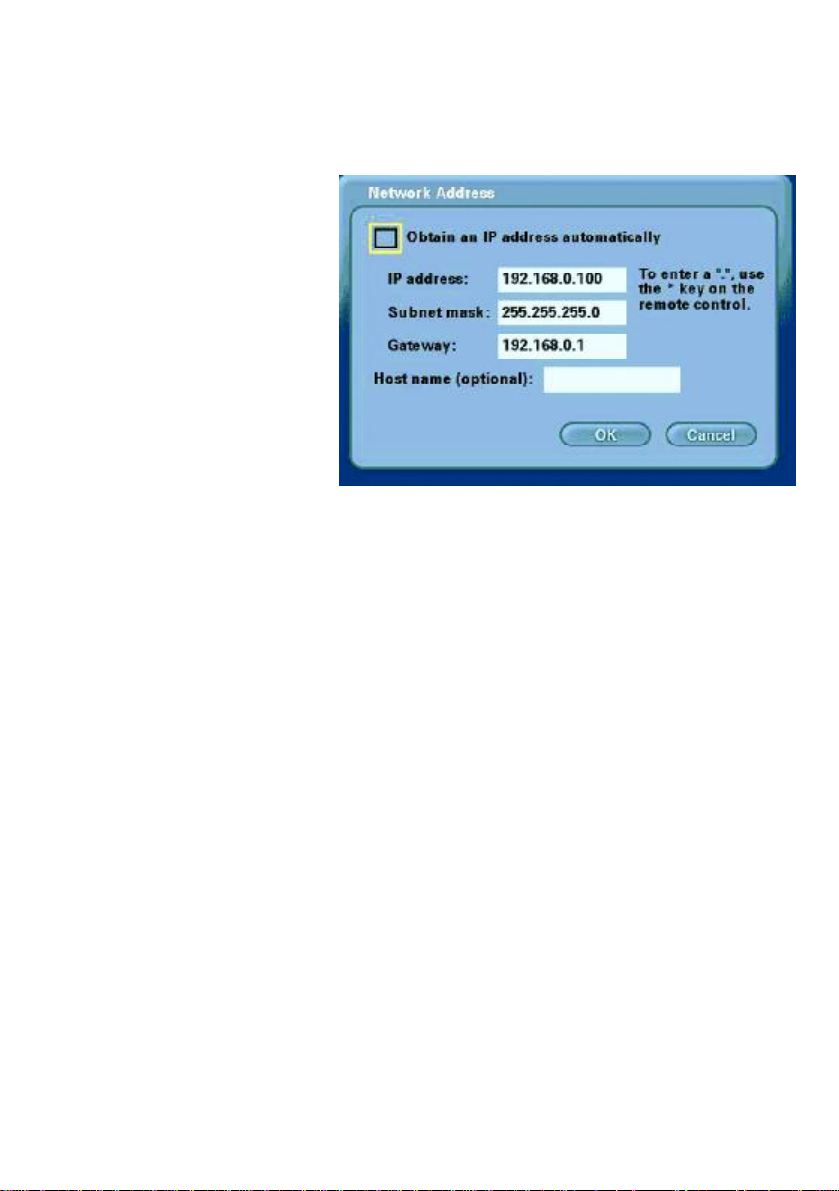
Network Address Screen
The Network Address
screen asks for information
that is needed to connect a
VideoPhone call over the
Internet. Most home users
with a cable or DSL modem
can leave the checkbox
checked to obtain an IP
Address automatically.
If you know you cannot be
assigned an IP Address
automatically through a DHCP server, then uncheck the checkbox and enter
your IP Address, Subnet mask and Gateway.
Obtain an IP Address automatically (Default)
The application will attempt to obtain the IP Address from the DHCP server.
When this is checked, the other settings on this screen are automatically
grayed. Also, if this setting is checked, you will skip the DNS screen,
described on the next page, as the DNS will be set automatically.
IP Address, Subnet mask, Gateway
If necessary, enter each of these settings for the DVC-1000. You will be able
to obtain the IP Address, subnet mask and gateway address from your router
configuration settings, ISP or network administrator.
Host name (optional):
Your Internet Service provider may require you to provide a host name to
connect to the Internet. If this is required you can enter it here. Today, this is
rarely required on a broadband connection and this setting is optional.
Press OK to continue.
11
Page 12
Using the Setup Wizard (continued)
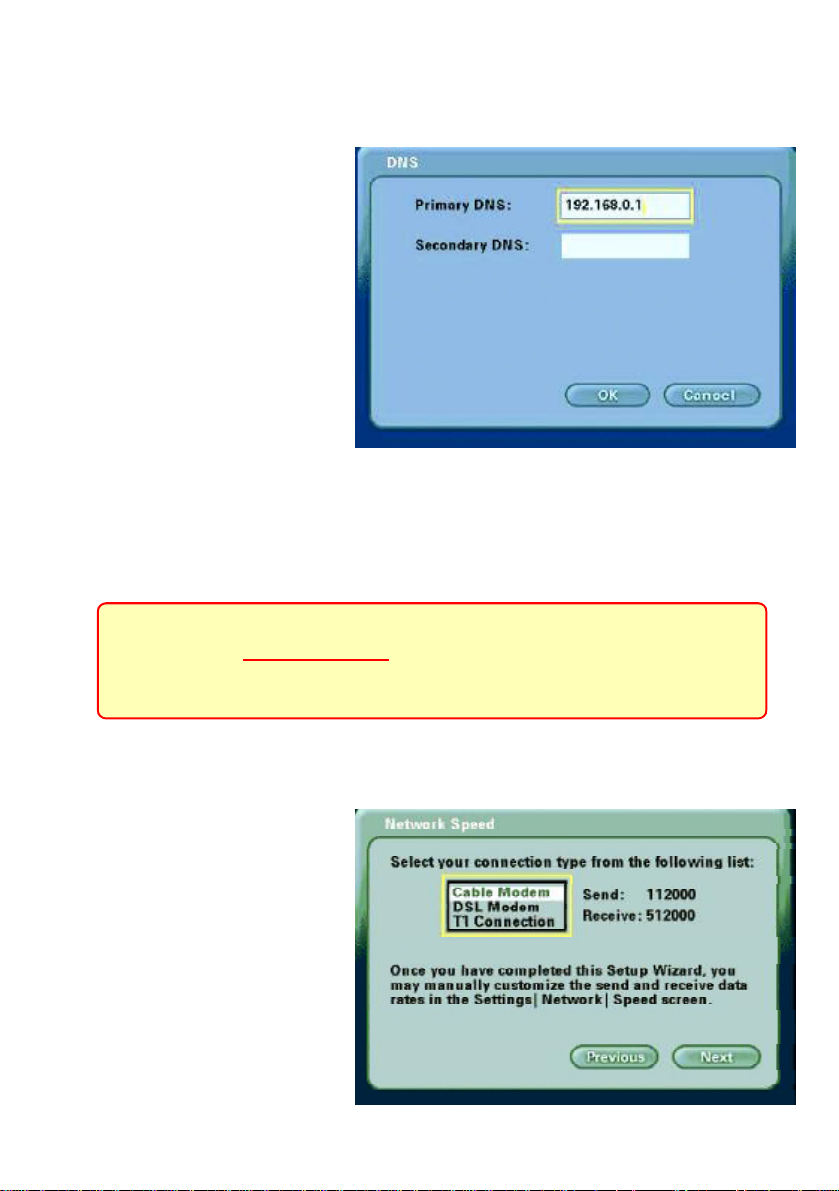
DNS (Domain Naming System) Screen
If you entered an IP address
in the Network Address
screen (described on the
previous page) you will see
the screen for setting DNS
server addresses. The DNS
screen asks for information
regarding the Domain Name
System (DNS) server.
You should be able to get
both of these settings from
your router configuration settings, ISP or your network administrator. Only
the primary DNS server address is required, though it is best to have both the
primary and secondary addresses.
Press OK to continue.
The Domain Name System (DNS) translates Internet domain names
(for example www.dlink.com, which is easy for humans to use and
remember) to IP Addresses, which are what computers use to find
each other on the Internet.
Network Speed Screen
The Network Speed screen
asks you to select the type of
broadband Internet connection you use. Each choice
has default send and receive
speeds defined for you. If you
need to change these settings after completing the
Setup Wizard, this can be
done by selecting the Set-
tings > Network > Speed
screen.
Press Next to continue.
12
Page 13

Using the Setup Wizard (continued)
System Restart
A warning message now
appears asking to restart the
DVC-1000 VideoPhone to
complete the setup. Press
the Yes button to accomplish
a restart.
Congratulations! You are now ready to make and
receive i2eye VideoPhone calls.
Using a Telephone with the DVC-1000
Although optional, it is recommended that you connect a standard telephone
to the DVC-1000 VideoPhone.
The telephone that you use for the DVC-1000 VideoPhone will not
be connected to your phone jack. You will use the telephone as a
means of conducting and receiving calls over the Internet only.
The telephone handset is used to place video calls just as you would with a
regular phone call. You dial a VideoPhone number to reach a party on the other
end of the VideoPhone call. You can speak through the telephone, listen to the
other party in privacy, and even switch to the Speakerphone Mode on the
DVC-1000 to share the audio with others. This can all be controlled by the remote control. When the phone is picked up, the microphone is muted.
If the VideoPhone number you are calling has a different area code, you will
need to dial a “1”, the 3-digit area code and the 7-digit number. The DVC-1000
requires using a “ 1” in calls outside your area code to correctly look up the
phone number.
If you are calling within the same area code, you will only dial the 7-digit num-
ber.
13
Page 14
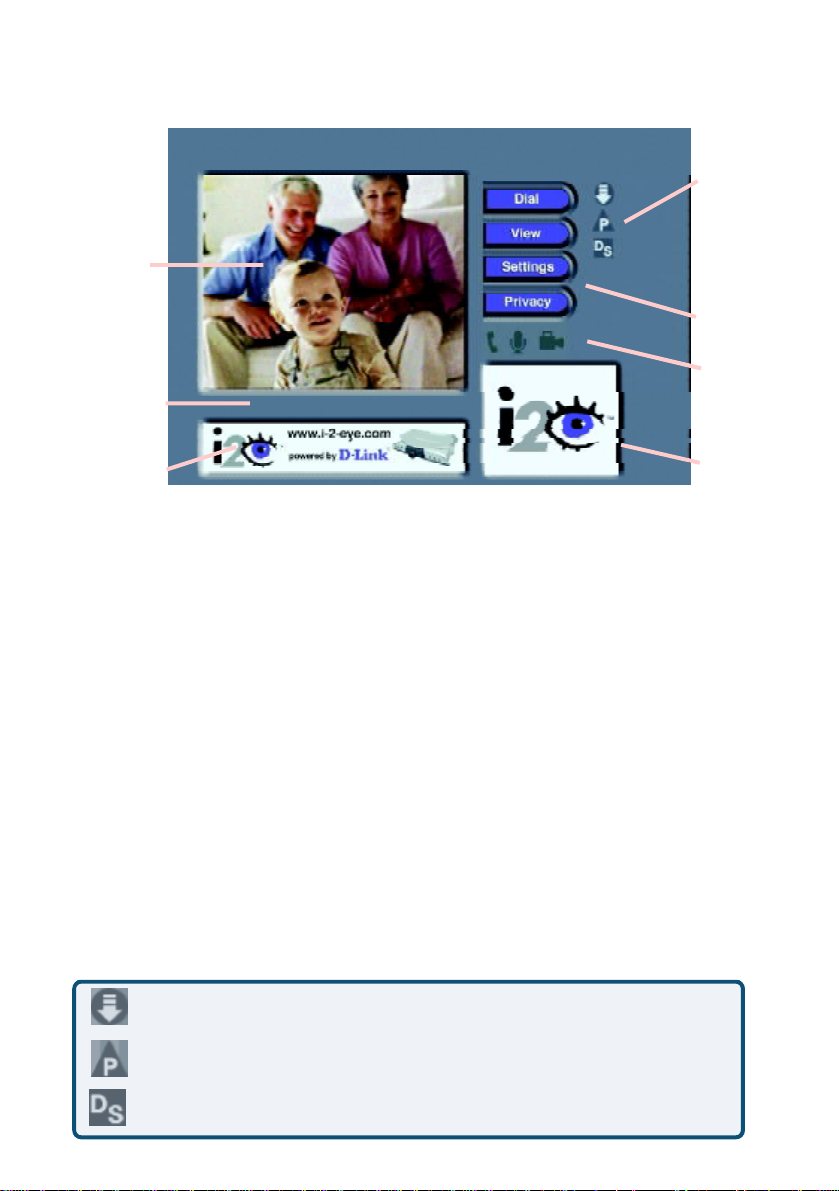
Using the DVC-1000
Layout of the i2eye Main Screen
Status
Icons
Main
Window
Status
Message
Area
Banner
Window
After you have correctly setup the i2eye VideoPhone using the Setup Wizard
you will see the above Main Screen each time you turn on the VideoPhone.
There is a larger Main Window that displays the self-view until a call is
connected and then displays the party you are calling. The smaller Self-View
Window then displays the self-view when a call is connected. The self-view
is a cropped image of what the other party is actually seeing. To flip the
images that are in the Main Window and Self-View Window press the
Self/Remote button on the remote control.
Main
Settings
Buttons
Privacy
Status
Icons
Self-View
Window
Status Icons
The Status Icons appear only briefly at startup. The DVC-1000 uses icons to
indicate its status. The icons display on the top right side of the Main Screen.
If an icon is displayed, this indicates the operation is not complete. The icon
will disappear after the operation completes. If the icon appears with a yellow
“X” through it, this means the operation was unsuccessful. If the Directory
Service status icon is displayed with an “X” through it, you can still make
videophone calls by inputting the IP Address of the phone that you are calling.
(See the Manual Dial screen on page 20.) This is a list of the status icons:
Looking for i2eye updates
Obtaining the Public IP Address (Router’s Address)
DVC-1000 is registering with the Directory Service
14
Page 15
Using the DVC-1000 (continued)
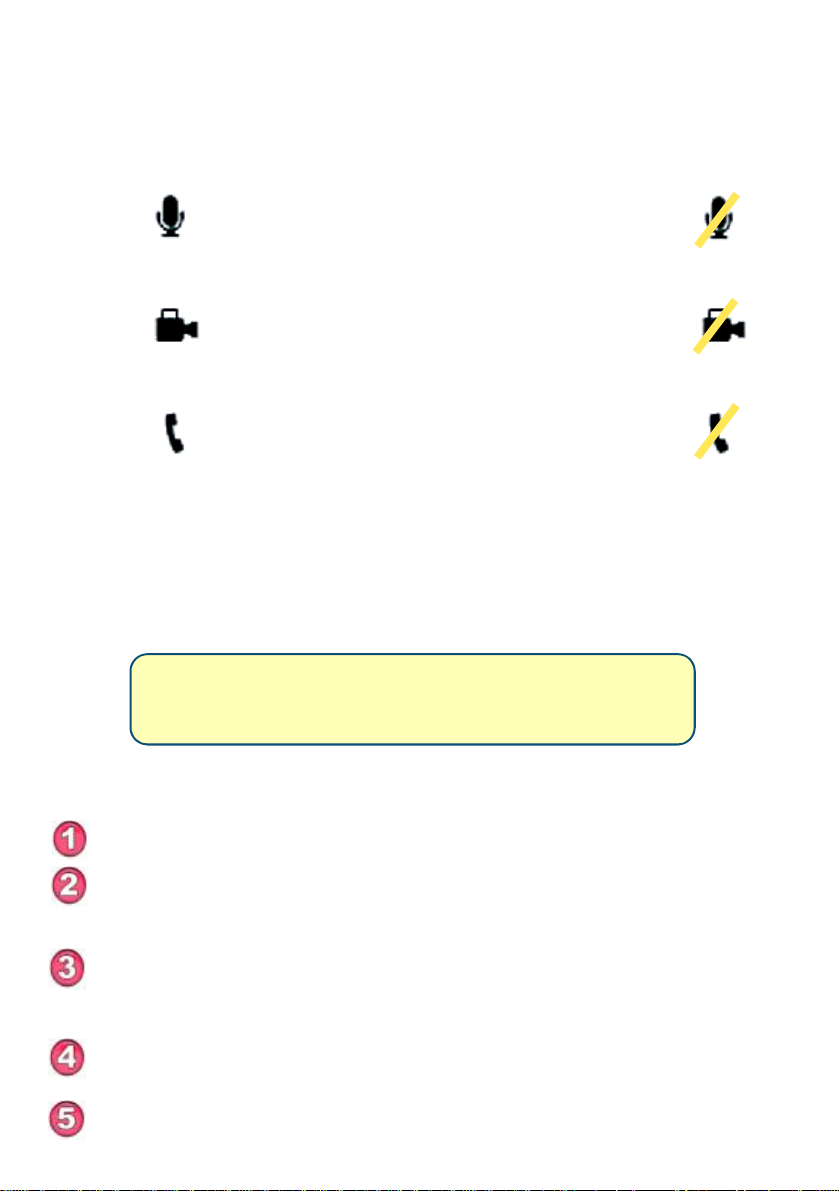
Privacy Status Icons
Privacy Status Icons appear on the Main Screen.
Please see the previous page for an illustration.
If you select Audio Privacy in Privacy Settings
Audio
window, the other party will not hear you and the
audio icon will appear with a slash through it.
Video
Do Not
Disturb
If you select Video Privacy in Privacy Settings
window, the other party will not see you and the
video icon will appear with a slash through it.
If you select Do Not Disturb in Privacy Settings
window, the other party will not see you and the
video icon will appear with a slash through it.
Answering an Incoming VideoPhone call
Just like a regular phone call, picking up the telephone handset will answer
the DVC-1000 VideoPhone. You may also use the remote control to answer
by pressing the ENTER key when the “ Answer” button on the screen is
highlighted in a dialog box.
If the telephone attached to your DVC-1000 VideoPhone is
a cordless model, press TALK on your phone to accept
the call.
Placing a Speed-dial VideoPhone Call with the Telephone
Handset
Pick up the telephone handset.
The DVC-1000 VideoPhone senses the telephone is off the hook and a
prompt appears on the screen asking you to either enter a phone
number or press # key to select the speed dial list.
The speed dial menu appears, displaying the speed dial number
assigned to the party you want to call. Press the speed dial number on
the handset.
The DVC-1000 VideoPhone rings while you wait for your call to be
answered by the party on the other end of the call.
When the other party answers, the VideoPhone call is connected.
15
Page 16
Using the DVC-1000 (continued)
Placing a Manual Dial VideoPhone Call with the Telephone
Handset
Pick up the telephone handset.
The DVC-1000 VideoPhone senses the phone is off the hook and
a prompt appears on the screen asking you to either enter a
phone number or press # key to select the speed dial list.
Enter the phone number in the DVC-1000 VideoPhone just as you
would if you were using a regular phone.
The DVC-1000 VideoPhone rings while you wait for your call to be
answered by the party on the other end of the call.
When the other party answers, the VideoPhone call is connected.
If the other party has activated their video privacy, you will not see them; but
you will be able to hear them. If they have activated audio privacy, you can
see them; but not hear them. If you have activated your video or audio
privacy, the other party will not see or hear you.
Placing a Manual Dial VideoPhone Call Using the Remote
From the DVC-1000 VideoPhone Main Menu, select DIAL. The
speed dial list appears on the screen.
Navigate with the arrow keys to Manual Dial and press ENTER.
You can enter a phone number if you and the party you are
calling are connected to the directory service, or you can enter
an IP address (See page 18 for an example of an IP address). If
you are not connected to the directory service, the phone
number box will be grayed out on your screen.
Enter the phone number or IP address and select Dial.
You will hear ringing while you wait for your call to be accepted.
16
Page 17

Using the DVC-1000 (continued)
Speakerphone Mode
The DVC-1000 has a Speakerphone Mode if the call needs to be shared
with more than one person, or when it is desirable to talk without using the
telephone handset. In Speakerphone Mode, the speaker on the television and
the microphone in the DVC-1000 VideoPhone are used.
When a call is answered using the remote control, or a call is placed using
the remote control, the DVC-1000 VideoPhone is automatically in
Speakerphone Mode.
Speakerphone mode is a half-duplex audio mode , which means that only one end of the
call may talk at a time. If you are talking, you will not hear the person on the other end.
Because half-duplex allows only one side to talk at a time, if you are in a loud environment,
you will have difficulty hearing the other side because the loud side stays active, and audio
may not come through from the other side.
Making a Speakerphone Call into a Private Call
If you are sharing a VideoPhone call with a group using the Speakerphone
Mode and wish to conduct a private conversation, pick up the telephone
handset and turn down the audio on the televison. The others in the group will
not be able to hear the conversation.
Making a Private Call into a Speakerphone Call
If a VideoPhone call is in progress using the telephone handset,
Speakerphone mode can be enabled:
Press the Speakerphone button on the DVC-1000 remote control.
When the dialog appears on the video display telling you to hang
up the phone, go ahead and hang up the phone.
Speakerphone mode is now active.
When in Speakerphone mode, you should face the DVC-1000 VideoPhone
unit when you speak so the microphone will pick up all your words. Speak
louder as you move further from the microphone. The recommended
distance from the microphone in speakerphone mode is 6 to 8 feet.
If Speakerphone mode is not enabled by pressing the
‘Speakerphone’ button on the remote control, hanging up the
handset will hang up the video call.
17
Page 18

Using the DVC 1000 (continued)
Entering Phone Numbers
Phone numbers may be entered in the following formats (the dash is entered
automatically):
1-949-555-1212: The 1 is required if you are calling outside your local
area.
555-1212: Will work only within the local area code.
The local area code is specified in the Settings > Personal Info screen.
Entering IP Addresses
Valid entry for the IP address field would include:
205.104.32.20 (Dials a VideoPhone, or other H.323 videoconferencing
device, at this IP address)
18
Page 19

Using the Configuration Menu
Main Screen
After starting the DVC-1000 VideoPhone, the Main Screen is displayed. The
self-view image should be displaying in the larger window.
The following buttons reside on the main screen:
Dial -
Set up a speed dial list and choose from several methods of
placing a call to other VideoPhones. You may choose to
manually make a call with either another i2eye VideoPhone
number, enter an IP Address, or select an entry on the speed
dial list.
View -
Settings -
Privacy -
If this warning screen appears, click OK
and you will be shown the IP Address
configuration screen. Manually input the
IP Address. You can also check the
Troubleshooting Section in this manual
for more information.
Allows you to specify what is seen on the main application
screen. Choose full screen view or the default view, as well
as Internet connection status.
Change settings relating to video calls, personal information
and network information.
Select from several methods of audio and video privacy.
19
Page 20

Using the Configuration Menu (continued)
Main Screen > Dial
Mom and Dad
D-Link
Grandma
Mary
The Dial screen contains the speed dial list as well as buttons to manage the
Speed Dial List and make manual VideoPhone calls
Speed Dial List -
Manual Dial -
This list contains up to 10 Speed Dial entries. Click the
Add button to add to this list. A name is dialed by
highlighting the item and pressing the ENTER button on
the remote.
Allows the manual dialing of another user by telephone
number or IP Address.
When you click Manual Dial in the screen above, the
window below will appear.
To enter the number or address, use the remote’s
number pad or the on-screen keyboard.
Click Dial to start the VideoPhone call.
20
Page 21

Using the Configuration Menu (continued)
Main Screen > Dial (continued)
Add -
Remove Edit -
To add a Speed Dial entry, enter a name and a number
(or address) using the remote’s number pad or the onscreen keyboard.
949-555-1212
Click OK to complete the addition of a Speed Dial entry.
Removes a selected entry from the Speed Dial List.
Allows the modification of either the name or number
(or address) of a selected Speed Dial entry.
Close -
If this Warning screen
appears, an invalid IP
Address has been
entered. Please correct
the IP Address and try
again.
Closes the Dial screen, saving the current entries in
the Speed Dial List.
21
Page 22

Using the Configuration Menu (continued)
Main Screen > View
The View screen allows the user to modify what the main screen may look
like.
Default View -
This is the standard view showing both the
larger main view window and the smaller selfview window.
Full Screen View -
Display Connection
Status -
Details (Button)
View Connection Details -
The main video window is seen in this view.
When no call is in progress, the self-view will
display. Once a call is connected, the remote
caller’s video will display as well as a self-view
picture-in-picture.
This view is the same as the default view with
the addition of connection status information
appearing in the lower left corner of the main
screen.
Click this button to view the connection details.
Items such as video and audio formats and call
rates will be displayed. The connection details
can be viewed only while the DVC-1000
VideoPhone is on a call.
22
Page 23

Using the Configuration Menu (continued)
Main Screen > Settings
The Settings screen contains four buttons that allow the application to be
customized in different ways. Each of these settings are detailed starting on
the next page.
General -
Personal
Information -
Network -
Update -
Close -
Controls settings that adjust the way you view, listen and use
the DVC-1000 VideoPhone.
Contains information about the user and edits user
information.
The Network Settings screen has four buttons that allow
you to set up your network address, DNS address, public
IP Address, as well as the desired network speed.
DVC-1000 will look for system updates each time it starts up.
This setting allows you to search for an update manually.
Closes the Settings Screen and returns you to the Main screen.
23
Page 24

Using the Configuration Menu (continued)
Main Screen > Settings >General
Always answer
incoming calls-
Turn on video privacy
when answering calls -
Play sound with
user input -
Automatically adjust
video contrast -
Select this checkbox to allow the DVC-1000 to
automatically accept any incoming call. If this
checkbox is not selected and a call is received, a
dialog will appear that will ask if the receiver wants
to accept the incoming call. When this checkbox
is selected, the incoming call will be answered
without any ring.
When this checkbox is selected, Video Privacy
will be turned on whenever a call is received. This
would block the caller from seeing the receiver of
the call until the receiver turns off the Video
Privacy feature.
Select this checkbox to hear a beep with each
function pressed on the remote control. You will
hear no sound when using the remote control if
this is not selected.
Select this checkbox to specify automatic
adjustment of the video contrast. When the
checkbox is selected, the video contrast is
automatically adjusted every 30 seconds. The
Contrast button on the remote control triggers
an adjustment of the video contrast regardless of
the selection state of the checkbox.
24
Page 25

Using the Configuration Menu (continued)
Main Screen >Settings > Personal Information
555-1212
Name-
Area Code
& Phone # -
Enter your name here. When a call is placed from your
VideoPhone, the name you enter will be displayed as a Caller
ID on the remote end of the call. Unless the VideoPhone you
call has auto-answer turned on, the party you wish to call will
decide whether or not to accept your call based on this name.
The number is one you create for friends, family, and others
to call you. This is not associated with your home phone,
though you may wish to use your home phone number to
make remembering the number easier. Or you may make up
a new one. This phone number will not be visible to any other
users.
25
Page 26

Using the Configuration Menu (continued)
Main Screen > Settings > Network
Address
DNS
Public IP
Speed
Controls how the DVC-1000 obtains an IP Address.
Allows you to enter a primary and secondary DNS
address.
This screen controls how a Public IP Address is
obtained. If the Public IP button is “greyed out” it
means that your network is unable to obtain an IP
Address. Please see #17 in the Troubleshooting
section in this manual for more information.
Allows for setting a speed that best matches your
current connection.
26
Page 27

Using the Configuration Menu (continued)
Main Screen > Settings > Network > Address
Obtain an IP Address
automatically -
IP Address Subnet mask Gateway -
Host name (optional) -
When this screen
appears, Click OK to
save the changes and
restart the system.
The DVC-1000 VideoPhone will attempt to
obtain the IP Address from the DHCP server.
When this is checked (the default), the other
settings on this screen are automatically grayed.
These are all Internet settings that need to be
provided by your router configuration settings,
ISP or network administrator. These will be
grayed if the checkbox (above) is checked.
Used for reporting the host name to the router/
home gateway in the DHCP table. This is rarely
used and is optional.
27
Page 28

Using the Configuration Menu (continued)
Main Screen > Settings > Network > DNS
Primary DNS -
Secondary DNS
The Domain Name System (DNS) translates Internet domain
names (for example www.dlink.com which is easy for people to
use and remember) to IP addresses, which are what computers
use to find each other on the Internet.
Enter the Primary Internet DNS (Domain Name System).
These are Internet server addresses that you should be
able to obtain from your router configuration settings,
ISP or network administrator.
Enter the Secondary DNS address if you have one.
Though both primary and secondary DNS addresses are
preferred, only the primary address is required.
28
Page 29

Using the Configuration Menu (continued)
Main Screen > Settings > Network > Public IP Address
This screen allows you to configure, view, or edit the VideoPhone’s public IP
Address.
If you are sharing a broadband connection with another device (such as a PC), you
typically will need a router to accomplish the sharing of the connection. Your router will
usually have a Network Address Translation (NAT) mode installed. The NAT affects the
IP address of the DVC-1000 and any other devices sharing your Internet Connection.
See the glossary on page 44 for a description of a NAT.
Auto-detect public
IP Address -
Use Private IP
Address -
Specify public IP-
Public IP address-
This is the default and recommended setting. If the DVC-1000 is
behind a NAT, and you leave this checkbox selected, the
VideoPhone will automatically use your public IP Address for
placing and receiving calls. On the majority of Cable and DSL
broadband systems leaving this checked will result in simplified
installation and use.
(Optional) Select this checkbox if you want to use your
VideoPhone within a private network (LAN). If your IP Address is
private, the VideoPhone will not be able to place or receive calls
outside the private network.
(Optional) Select this checkbox if you want to manually change
the DVC-1000 VideoPhone’s public IP Address.
Using the number pad on the remote or the on-screen keyboard,
enter the public IP Address. (Only available when Specify public
IP is selected.)
29
Page 30

Using the Configuration Menu (continued)
Main Screen > Settings > Network > Network Speed
The Network Speed screen offers you the option of selecting the speed that
is the best match for your current network or connection.
Change the settings by selecting the send or receive Change button and
select the value desired by moving the selection up or down in the list box.
Overestimating these settings may affect the call quality and is therefore
not recommended. Contact your ISP, network administrator, or look in your
modem manual for correct values. The send and receive settings can be
different speeds. Typically Cable and DSL modems receive at a higher
speed and send at a lower speed.
30
Page 31

Using the Configuration Menu (continued)
Main Screen > Settings > Update
The Update screen has several functions:
Set the checkbox to automatically check for updates of the DVC1000 VideoPhone.
Check for an update right now.
Display the current version information.
Set Defaults will restore all settings to factory defaults. This will
erase all speed dial entries that have been added.
If you select Check Now for an Update then the DVC-1000 will check for an
update. If an update is found the following message will appear.
Clicking YES will begin an update of the firmware in the DVC-1000. A
restart of the DVC-1000 is required after the update is complete.
31
Page 32

Using the Configuration Menu (continued)
Main Screen > Privacy
Audio Privacy -
Video Privacy -
Do not Disturb -
Audio Privacy prevents the audio on your side from
being sent to the remote caller. No one on the other
end of the VideoPhone call will be able to hear you if
this setting is checked, although they can see you.
Video Privacy keeps your video from being sent to
the remote caller. The person on the other end of the
videoconference call will not be able to see you if this
setting is checked.
This setting will keep a caller from being able to
connect with your VideoPhone. When a caller tries to
connect with you, they will receive a message
indicating that you are unavailable.
32
Page 33

Using the DVC-1000
with Routers, Gateways and
Broadband Modems
The D-Link DI-614+ and the DI-604 Routers have a firmware upgrade that
allows for easy configuration of the i2eye. With the DI-614+, DI-604 and
the firmware upgrade, you will not need to manually configure the ports. If
you have other Routers or you are having difficulty with the i2eye, please
read the information on page 34 - page 38 to learn how to open ports on
routers.
In the DI-614+ configuration utility, go to the Advanced>Applications screen
and check the D-Link DVC-1000 box in the Special Applications list. No other
port configuration is needed with the D-Link DI-614+ and DI-604 with the firmware
upgrades.
33
Page 34

Using the DVC-1000 with Routers, Gateways
or Broadband Modems (continued)
Opening Ports on Your Routers and Gateways
The firewall security features built into most routers and gateways prevent
users from accessing the video and audio of their DVC-1000.
A router connects to the Internet through a series of numbered ports. The
ports used by the DVC-1000 are blocked from access over the Internet by the
firewall features of the router.
You need to open the ports on your router to the Internet to allow access to
the DVC-1000.
The router or gateway that you are using may be different from the example
shown on the following pages. However, the general procedure for opening
ports will be similar. (If you do not have a D-Link router, look for Virtual
Server, Firewall Rules, Port Forwarding, Advanced or Firewall in your router’s
configuration utility.)
In the example that follows we begin by opening the Web configuration utility
and going to Advanced > Virtual Server.
Follow the steps on the next 2 pages to open the ports on your router for
successful operation of the DVC-1000.
34
Page 35

Using the DVC-1000 with Routers, Gateways
or Broadband Modems (continued)
Opening Ports on Your Routers and Gateways (continued)
How to open ports on a router
A
B
C
D
153258
E
153258
F
G
A total of 7 ports must be opened for the DVC-1000 to work with most routers
or firewalls. To open these ports, please do the following:
A. Click Enabled
B. Give the Virtual Server a Name (such as i2eye)
C. Under Private IP, enter the IP Address obtained from the
DVC-1000
(How to obtain an IP Address from the DVC-1000:
Turn the DVC-1000 ON. Using the remote control
highlight the Settings button on the Main Screen.
Navigate to Settings>Network>Network Address
>IP Address)
D. Under Protocol Type, choose Both (TCP and UDP)
E. Under Private Port and Public Port, enter 153258
F. Under Schedule, click Always
G. Click Apply to save this entry
35
Page 36

Using the DVC-1000 with Routers, Gateways
or Broadband Modems (continued)
Opening Ports on Your Routers and Gateways (continued)
You have now completed the entering of one port to be opened. You will need to
open six more ports.
Repeat steps A through G five more times for each one of the following five
ports: 15329, 15330, 15331, 15332 and 15333.
The last port will be opened slightly differently:
n
Repeat steps A through C on the previous page.
n
n
n
n
You have now completed the opening of the 7 ports. Your DVC-1000 is ready to
use with your router or gateway!
(Important: Not all routers and gateways are the same; please refer to your
user manual for specific instructions on opening ports.)
Choose TCP as the Protocol Type
Enter 1720 as the Private Port and Public Port
Under Schedule, Click Always
Click Apply to complete
36
Page 37

Using the DVC-1000 with Routers,
Gateways, or Broadband Modems
(continued)
From the following sections, choose the heading that best applies to your
equipment or networking configuration.
Network With Multiple Public IP Addresses
A Public IP Address is visible on the Internet. (Most commonly found in
business environments.)
Recommended Procedure: If there is an available public IP address, simply
enter the IP address, subnet mask, and gateway into the applicable fields
under the network settings page. If the network has a DHCP server, select
the checkbox under the network settings that says, “Automatically obtain IP
address.” (The network administrator will be able to tell you whether or not
the network has a DHCP server.)
Potential Issues: Some firewalls are configured in a way that could potentially
restrict H.323 data flow. Most current corporate firewalls are H.323
compliant. If this is the case, configuring the firewall is accomplished by
simply opening the necessary H.323 ports into the network:
Port 1720 (TCP)
Ports 15328 – 15333 (UDP & TCP)
If your particular firewall does not have this option, consult the firewall’s
documentation on how to open specific ports needed for H.323
communications.
Broadband Modem and One PC
(This is the most common scenario found in a home or home office that
currently has one PC connected to its broadband modem.)
Recommended Procedure: Request from your ISP an additional public IP
address. With a second public IP address, the Video Phone will be visible to
the outside world just as the existing PC. The ISP can either assign a static
IP address or allow you to dynamically request the IP address via DHCP.
Follow the instructions in Broadband Modem Only section, below, depending
on what your ISP requires.
Because most broadband modems have only one Ethernet port, it will be
necessary to install a hub or switch between the modem and the rest of the
network. Using an Ethernet cable, connect the modem’s Ethernet port to the
applicable WAN port on the hub. Once that is done, you can plug the PC and
DVC-1000 Video Phone into any other available port.
37
Page 38

Using the DVC-1000 with Routers,
Gateways, or Broadband Modems
(continued)
Broadband Modem, Multiple PCs and a Hub
Commonly found in small offices, home offices, or homes with more than one PC where
multiple public IP addresses are available.
In order to install the DVC-1000 Video Phone as another device behind a hub assign an
available public IP address to the Video Phone.
Refer to the Broadband Modem Only section, below, for detailed installation
instructions.
Broadband Modem, Multiple PCs and a Router
Commonly found in small offices, home offices, or homes with more than one PC where
only one public IP address is available.
Refer to the Using a Router/Home gateway on the previous page for detailed
installation instructions.
Broadband Modem Only
This section applies only in the instance that the broadband connection is used exclusively
with the DVC-1000 Video phone and there are no PCs or other devices connected to the
broadband modem.)
Recommended Procedure: Many ISPs act as DHCP servers and dynamically assign a
public IP address whenever the modem requests one. If your ISP has a DHCP server,
select the checkbox under the network settings that says, “ Automatically obtain IP
address.” By choosing this option, you are not required to know the IP address,
gateway, subnet mask, or DNS numbers. They will all be filled in automatically.
If DHCP is not an option, all of the networking values will have to be manually entered.
Simply enter the public IP address, subnet Mask, gateway, and DNS numbers given
to you by the ISP into the appropriate network settings fields.
Potential Issues: In order for the DVC-1000 Video Phone to function properly over the
Internet, there must exist a public IP address for the world to see. If your ISP is acting
as a NAT and assigning private IP addresses, you will have to request a public IP
address in order for your Video Phone to be able to receive calls.
38
Page 39

Troubleshooting
1. Cannot make a call using a phone number.
Check that you did not misdial the number. If the person you are
calling is outside of your area code, you must dial a “1” before the
area code and then the number.
The VideoPhone is not connected to the Internet.
The VideoPhone is not registered with the directory service.
It may take the VideoPhone up to 10 minutes to register. Verify all
network settings, including DNS.
Far side of the call is not registered with the directory
service. If you are calling someone who has an endpoint besides
a DVC-1000 VideoPhone, you will have to make direct IP calls to
them. If the far side has a DVC-1000 VideoPhone and you cannot
connect to them via the directory service, they are probably not
registered.
2. Error Message displays on main screen.
VideoPhone could not register with a directory service.
Sometimes it takes the VideoPhone up to ten minutes to register.
Verify all network settings, including DNS. Check your network
settings.
3. Cannot make direct IP calls.
VideoPhone is not connected to the Internet. See the Internet
Connection section in this Troubleshooting Guide.
The person you are trying to call is unreachable. Ensure the
IP address of the person you are trying to call is correct.
39
Page 40

Troubleshooting (continued)
4. Telephone or televison produces an off-hook signal.
Telephone is off the hook. Hang up the phone.
5.Telephone or television produces a fast busy signal.
Person you are trying to call is not registered with the
directory service. Call the person using direct IP or wait until the
person is registered with the directory service.
Person you are trying to call is in a call or has rejected your
call. Try your call at a later time.
6. Picking up the phone displays a window with speed dial list or
brings up a message about no entries in the speed dial list.
VideoPhone is not registered with the directory service.
Sometimes it takes the VideoPhone up to ten minutes to register.
Verify all network settings, including DNS. See Network section for
reference.
7. Telephone doesn’t ring with an incoming call.
VideoPhone is set for Auto-Answer. If the VideoPhone is set
up for Auto-Answer then the phone will not ring with an incoming
call. Fix by turning off Auto-Answer via the Settings/General menu.
Telephone is not properly plugged in. Ensure that the phone is
properly plugged into the VideoPhone. If the telephone is not selfpowered, ensure that it is properly plugged into a power supply.
Consult your telephone user manual for reference.
Telephone ringer is off. Make sure the ringer on the phone is
turned on. Consult your telephone user manual for reference.
8. VideoPhone freezes-up while answering a call.
VideoPhone is not functioning properly behind a firewall.
See next section, “No video in a call” solution.
40
Page 41

Troubleshooting (continued)
9. No video in a call.
Video cables are not plugged in correctly. Ensure that your
video cables are correctly plugged into the TV. Make sure that the
TV is set for video input. Consult your TV manual for reference.
Incorrect network speeds. See Incorrect Network Speeds
Section in this Troubleshooting Guide.
VideoPhone is not functioning properly behind a firewall.
Place the IP address of the VideoPhone in the DMZ of the firewall.
Consult your routers documentation or your network administrator
for help on doing this.
Port forward the appropriate ports to the VideoPhone. The
VideoPhone needs ports 1720 (TCP) and ports 15328-15333
(TCP and UDP) open to function properly. Consult your routers
documentation or your network administrator for help on doing
this.
VideoPhone is not functioning properly behind NAT.
Go to Settings/Network/Public IP. Press Enter on the remote
when the cursor is over “Auto detect public IP Address.” If the
VideoPhone is unable to detect the public IP Address, it should
be entered manually using “Use specific IP Address.” The
VideoPhone’s public IP Address is given to you by either your ISP
or network administrator.
10. Poor video in a call.
Camera out of focus. The far site should focus their camera by
twisting the knob on the VideoPhone until the image is in focus.
Incorrect Network Speeds. See Incorrect Network Speeds
Section in this Trouble Shooting Guide
Excessive motion in the picture you are receiving. A
background with less motion provides a better, smoother video
picture.
41
Page 42

Troubleshooting (continued)
11. Video freezes during a call.
Far side muted their video. If the far side mutes their video you
will not be able to see him or her.
Network is congested. Give the VideoPhone a couple of
minutes to try to recover, or disconnect the call and try again at a
later time.
12. No audio in call.
Audio cables are not plugged in correctly. Ensure that your
audio cables are correctly plugged into the TV. Make sure that the
TV is set for video input. Check the volume level on the TV.
Consult your TV manual for reference.
Telephone is not set-up properly. Plug the telephone into the
back of the VideoPhone. If the telephone is powered (cordless)
make sure that it is plugged into a power supply. Consult your
telephone user manual for reference.
VideoPhone is not functioning properly behind a firewall.
Place the IP Address of the VideoPhone in the DMZ of the firewall.
Consult your router’s documentation or your network administrator
for help on doing this.
Port forward the appropriate ports to the VideoPhone. The
VideoPhone needs ports 1720 (TCP) and ports 15328-15333
(TCP and UDP) open to function properly. Consult your router’s
documentation or your network administrator for help on doing
this.
42
Page 43

Troubleshooting (continued)
VideoPhone is not functioning properly behind NAT. Go to
Settings/Network/Public IP. Select “Auto detect public IP Address.
” If the VideoPhone is unable to detect the public IP Address, it
should be entered manually using “Use specific IP Address.” The
public IP Address is given to you by either your ISP or your
network administrator.
Incorrect network speeds. See the Incorrect Network
Speeds section in this Troubleshooting Guide
Volume is adjusted incorrectly. You can adjust the volume on
the TV as you would when watching a television show. You might
also be able to adjust the volume on your telephone. Consult your
TV and/or telephone user guide for support.
13 Audio stops during a call.
Far side muted their audio. If the far side mutes their audio you
will not be able to hear him or her.
Network is congested. Give the VideoPhone a couple of
minutes to try to recover, or disconnect the call and try again at a
later time.
14. Audio has a echo.
Far side television is too loud. The far side television volume
needs to be turned down.
15. Excessive delay during a conversation.
Incorrect network speed settings (too fast). Decrease the
send/receive speeds and attempt the call again.
(Settings|Network|Speed)
43
Page 44

Troubleshooting (continued)
16. Error Displays on main screen.
VideoPhone cannot obtain public IP Address (Router’s
address). See “VideoPhone cannot obtain IP Address
automatically” section below.
17. VideoPhone cannot obtain IP Address automatically
Not properly connected to a DHCP server. Check connection
to LAN, by verifying a link light on the back of the VideoPhone.
Make sure that the router is set-up for DHCP. Consult either your
router’s user manual for reference or your network administrator.
IP Address is not accessible to the VideoPhone. Need to
statically assign an IP Address, subnet mask, gateway and DNS
values. These values will be given to you either by your ISP or your
network administrator. If the VideoPhone is on a private network
consult your router’s user manual or network administrator.
Modem not enabled to assign more than one private IP (This
is common in DSL environments) Reset modem. Once
booted, connect the VideoPhone and allow theDHCP function to
assign an IP.
18. Public IP button is not enabled.
VideoPhone hasn’t been able to detect IP Address yet.
The VideoPhone can take up to ten minutes to auto detect the
public IP Address. Be sure you wait long enough. Also check the
DNS settings in the Network>DNS screen.
19. VideoPhone reports packet loss.
Incorrect Network Speeds. See Incorrect Network Speeds
section in this Troubleshooting Guide.
Network line is congested. If the packet loss is from one to six
percent it will probably be due to network congestion. The
VideoPhone will be able to recover.
44
Page 45

Troubleshooting (continued)
20. VideoPhone is not connected to the Internet.
Ethernet cable is not properly plugged into the
VideoPhone. Ensure that the RJ-45 cable is properly plugged
into the back of the VideoPhone. A steady green light on the
Ethernet port indicates a valid link has been made.
Invalid DNS entries. The VideoPhone requires at least one valid
DNS entry. Consult your ISP or network administrator for the DNS
IP Addresses.
Invalid IP, subnet mask and/or gateway. All three of these
values have to be correct for the VideoPhone to function properly.
Recheck all of these values. Consult your ISP or network
administrator for these values.
21. Incorrect Network Speeds.
Incorrect entries for network speed. Consult your ISP or
network administrator to verify the correct send and receive
speeds for your VideoPhone.
Incorrect entries for network speed. While in a call, turn on
Connection Status via the View Menu. If the VideoPhone is
reporting packet loss, decrease your receive speed until the
VideoPhone reports zero percent packet loss. If you are not
reading any packet loss, increase your download speed, to the
point where you do not report packet loss. The far side might need
to increase their upload speed to be greater than or equal to your
download speed.
45
Page 46

Troubleshooting (continued)
22. VideoPhone does not boot up.
Video is not being displayed on television.
Ensure that the video and audio cables are plugged in correctly to
both the VideoPhone and television. The television should be set
for video input. Consult your television user manual for support.
The VideoPhone doesn’t have power or is not turned on.
Ensure that the AC adapter is plugged into an outlet and the other
end is plugged into the VideoPhone. The switch on the back of the
VideoPhone must be set to 1 to power on.
Not enough time given to finish booting.
The boot up process could take several minutes. Be sure you wait
long enough. If the VideoPhone still doesn’t boot up, turn it off for
one to two minutes and then turn it back on.
23. Error Displays on Main Screen.
Unable to find an Update Server.
No Internet connection.
Update Server is unavailable.
Local setting may be incorrect.
Firewall not allowing FTP out.
In all these cases, contact your System Administrator.
46
Page 47

Frequently Asked Questions
1
What is D-Link´s i2eye?
i2eye (TM) is a breakthrough communications video appliance that
provides IP videoconferencing and connects to any standard television.
Simple to install and use, the small unit sits on top of the television and
contains a video camera that can stream up to 30 frames per second
over the Internet to friends, family and business associates.
When connecting my DVC-1000 behind a router or firewall, what
2
ports do I need to open?
The VideoPhone needs ports 1720 (TCP) and ports 15328-15333 (TCP
and UDP) open to function properly. Consult your router’s documentation
or your network administrator for help on doing this. Check the D-Link
Tech Support website for more information regarding specific ports to
open on your D-Link routers.
I’ve seen videophones that connect using the phone line, and the
3
picture is always small and choppy. How is i2eye different?
i2eye connects over high-speed broadband, and it delivers up to 30
frames per second. Videophones using a slow analog plain old telephone
line can’t deliver smooth video pictures over their small LCD display. They
show what appears to be a series of still pictures rather than full motion
video
4
What is the D-Link LDAP Directory Service?
The D-Link LDAP Directory Service is a D-Link hosted server which will allow
you to register a “phone number” with your DVC-1000 VideoPhone. When
someone with a DVC-1000 dials this “phone number”, your DVC-1000 will
ring and you will be able to accept a call. In the same manner you can call
others by dialing their “phone number”. This allows you to contact another
DVC-1000 without knowing it´s IP address. All DVC-1000 which are con-
nected to a broadband modem will have the capability of using the D-Link
LDAP Directory Service.
5
Can I use the DVC-1000 with a computer and monitor instead of a
TV?
Yes. The DVC-1000 can be used with a computer and monitor instead of
a TV. However, you will need a TV Tuner / Video Capture device or a
video card that accepts video input from an RCA jack.
47
Page 48

Frequently Asked Question (continued)
6
How large will the image be?
As large as the TV screen. i2eye supports three screen formats. The
first is a picture-in-picture mode that has the incoming video covering
about half the television screen and the outbound video in a smaller
window. The second is full screen mode. This mode displays the incoming video across the entire television screen. The third is connection
status mode. This mode displays the picture-in-picture mode and gives
you an idea of the upload and download speed.
7
Can I use the DVC-1000 with a non-D-Link directory service?
No. The DVC-1000 is designed to automatically connect to the D-Link
Directory Service. This is a free service and is available to anyone with
a DVC-1000. The Directory Service allows for calling another DVC-1000
Videophone by using a phone number instead of using an IP Address.
8
Do I need a PC to use i2eye?
i2eye is a complete standalone system that handles all the communications,
so you don’t need a PC. Just connect it to the TV and broadband connection
and go. You can also use it with any PC with video input capabilities.
Can I connect i2eye without wires?
9
Yes, there is an optional DWL-810+ device that allows you to configure your
complete system without wires (note: you need a wireless router or access
point). The DWL-810+ bridges from i2eye’s wired Ethernet connection to the
AirPlus wireless router or access point that is connected to the cable or DSL
modem.
10
How easy is i2eye to setup?
Very easy. When users first turn on i2eye they will be walked through a
Set-up Wizard that is designed to get the videophone up and working
quickly. The wizard asks for the information needed to connect to a
broadband Internet connection. Once the information is sent, i2eye will
connect to the D-Link i2eye server. The server will assign a 10-digit
“Internet telephone number” to the device. It will not be necessary to
work with cumbersome IP addresses when you want to communicate
using the i2eye.
48
Page 49

Frequently Asked Question (continued)
C
m
What devices can I connect to with the DVC-1000?
11
With the DVC-1000 you can connect to any hardware or software that is H.
323 compatible. If you are not sure if your hardware or software is H.323
compatible, please contact the manufacturer/developer. If you are using a P
with a Windows operating system, you can use NetMeeting with any webca
to connect to the DVC-1000. NetMeeting is a common H.323 compatible
software application.
*Note: The DVC-1000 does not support SIP.
What standards drive i2eye?
12
i2eye is based on the H.323 industry standard video streaming over IP
protocol. This ensures that any H.323 compliant device will
communicate together seamlessly. i2eye is a broadband appliance that
draws from D-Link’s sixteen years of experience as a leading Ethernet
manufacturer.
13
Do I have to take every call?
i2eye’s configuration menu provides settings for three types of privacy:
Audio Privacy, Video Privacy, and Do Not Disturb, so you are in
control.
When the Audio Privacy is activated, incoming callers will be able to
see video from your end, but not hear you. When the Video Privacy is
activated, incoming callers will be able to hear audio from your end, but
not see you. And when Do Not Disturb is activated, incoming callers will
receive a message indicating that you are not available.
49
Page 50

Glossary of Terms
Bandwidth: A measure of the rate at which data can be sent through the
network. This value is usually given in bits per second (bps) or kilobits
per second (kbps).
CIF (Common Intermediate Format): An intermediate video format. When
D-Link DVC-1000 video is transmitted over a network, the sizes will
be CIF, QCIF, or SQCIF. The VideoPhone will default to CIF. CIF
resolution is 352 x 288.
DHCP (Dynamic Host Configuration Protocol): A protocol that network
devices use to obtain an IP address, subnet mask, gateway and DNS
addresses automatically. A DHCP server can be a router, ISP server,
or PC running Internet connection sharing. See Static IP address.
Directory Service: A service that allows users to make video conferencing
calls with telephone numbers. It does this by correlating telephone
numbers to actual public IP addresses.
DNS (Domain Name System): A system used to translate computer names
into IP addresses. For example, a DNS server would translate www.
dlink.com into 192.152.81.1
DSL (Digital Subscribers Line): A technology that delivers digital
information at a high speed through a user’s telephone line. The most
common DSL is ADSL (Asymmetrical Digital Subscribers Line) where
the download speed is usually much higher than the upload speed.
Ethernet: The port on the back of the DVC-1000 VideoPhone that is used to
send and receive data over a network.
Far side: The remote connection of the videoconference. Your connection is
the Local Connection.
Firewall: A security mechanism placed between networks, which restricts
certain types of data to devices behind the firewall.
H.323: Standard defining videoconferencing over the Internet.
50
Page 51

Glossary of Terms (continued)
Home Gateway: A term commonly interchanged with router.
IP Address (Internet Protocol Address): An IP Address is a number that
identifies a computer connected to the Internet. Every computer that
is connected to the Internet must have a unique IP Address. An IP
Address consists of four sections separated by periods. Each section
contains an 8-bit value represented as a number ranging from 0 to
255.
Public IP Address: An IP Address that is not behind a NAT. This IP
Address is visible from the Internet.
Private IP Address: An IP Address that is behind a NAT, which is not
visible to the Internet. The preferred ranges for private IP Address are
either 192.168.x.x or 10.0.0.x.
Dynamic IP Address: An IP Address for a particular network device
(PC, VideoPhone, router) that is dynamically assigned by a router or
ISP and will not remain the same from session to session. See
DHCP.
Static IP Address: An IP Address for a particular network device (PC,
VideoPhone, router) that doesn’t change. See DHCP.
ISP (Internet Service Provider): A commercial organization that provides
subscribers with access to the Internet.
LAN (Local Area Network): A network that is designed to span small
distances. These are most commonly used in small buildings,
businesses and homes with multiple PCs. See WAN.
NAT (Network Address Translation): A technology that allows multiple
network devices to share the same IP Address. NAT devices forward
all incoming and outgoing information to the correct network devices.
Most NAT devices have firewall capabilities.
QCIF (Quarter Common Intermediate Format): An intermediate video
format. QCIF resolution is 176x144. The DVC-1000 VideoPhone will
send QCIF-sized video only if the remote endpoint cannot decode
CIF.
51
Page 52

Glossary of Terms (continued)
QoS (Quality of Service): Allows guaranteed bandwidth and packet delivery
between network devices over a network.
Router: A device that attaches two or more network devices and forwards
data accordingly. Most consumer type routers act as DHCP servers,
NATs and simple firewalls.
DMZ (Demilitarized Zone): Devices set up to be in the router’s DMZ
will see all network traffic.
Port Forwarding: The router will forward public-side incoming
information to a specified device on the private side. The router will
forward only the data that is received on the specified ports. This is
usually set through the advanced settings in the router’s web
interface. Also known as Virtual Server or Firewall Rules.
Ports: A port is a specified path in which data travels. Each type of
data that is transmitted over the Internet travels down a specified port.
A router will forward information from one port to another, and a
firewall will open only a specified number of ports.
SQCIF (Subquarter Common Intermediate Format): An intermediate video
format. SQCIF resolution is 128x96. The DVC-1000 VideoPhone will
send SQCIF-sized video only if the remote endpoint cannot decode
CIF or QCIF.
SLIC (Subscriber-Line Interface Circuit): Provides a phone’s analog dial
tone, busy tone, dual-tone multiple-frequency (DTMF) generation and
decoding, caller ID and ring-signaling functions. The SLIC allows the
DVC-1000 to work with a standard telephone without connecting to
the phone system.
TCP (Transmission Control Protocol): An Internet protocol used by the
DVC-1000 VideoPhone in addition to UDP.
UDP (User Datagram Protocol): The Internet protocol most commonly
used by the DVC-1000 VideoPhone to send and receive audio and
video data.
WAN (Wide Area Network): A network that is designed to span large
distances. See LAN.
52
Page 53

Technical Specifications
Internal Processor
ARM-9 ASIC Communication Processor
Standards Compliant
ITU H.323 (IP communications)
Video: H.263
Audio: G.711, G.723
Data Rates/Frame Rates
96 Kbps— 512 Kbps
Up to 30fps
Video
Up to 30fps CIF (352 x 288 pixels), QCIF (176 x 144)
Picture-In-Picture (PIP)
Automatic brightness control
DVC-1000 Robust Video
Audio
Telephone interface- Full Duplex Audio
Echo cancellation
Voice only to and from Voice over IP endpoints
Half-duplex speakerphone
Input/Output
Camera
LED Indicators
Power
Audio Out
Video Out (NTSC)
10BaseT Ethernet (RJ-45)
SLIC for telephone
External Microphone
Manual tilt
Manual focus
Power
Status
Video monitor
Network link and transmit
53
Page 54

Technical Specifications (continued)
User Interface
Dialing
Diagnostics
Quality of service measurement
Manual or auto answer
Incoming Caller ID
Privacy shutter via video mute and/or audio mute
Do Not Disturb mode
Answer using infrared remote control or the telephone
Dialing Capabilities
Speed dial list with ten entries
Manual dialing with telephone handset using Directory Service
Manual dialing with direct IP entry
Remote Software Update
Software update, automatic or manual
Network Requirements
IP-based network including Ethernet, Token Ring, Cable, DSL, Frame,
FDDI,T-1 and ATM LAN
Fixed IP with subnet mask, DNS and gateway or DHCP
Physical
DVC-1000 VideoPhone: height x depth x width
1.50" (38mm) x 6.08" (155mm) x 8.07" (205mm)
Weight:
14 oz. (.398kg)
Electrical
Power supply:
Auto-switching 2 Amp; 5.0 Volt output
Patent Pending
54
Page 55

Contacting Technical Support
Technical Support
You can find the most recent software and user documentation on the i2eye
website.
D-Link provides free technical support for customers within the United States and
Canada for the duration of the warranty period on this product.
U.S. and Canadian customers can contact D-Link technical support through our
web site or by phone.
Tech Support for customers within the United States:
D-Link i2Eye Technical Support over the Telephone:
(800) 93-i2EYE
24 hours a day, seven days a week
D-Link Technical Support over the Internet:
http://www.i-2-eye.com
email: support@i-2-eye.com
Tech Support for customers within Canada:
D-Link Technical Support over the Telephone:
(800) 361-5265
Monday to Friday 8:30am to 9:00pm EST
D-Link Technical Support over the Internet:
http://support.dlink.ca
email:support@dlink.ca
55
Page 56

Warranty and Registration
Subject to the terms and conditions set forth herein, D-Link Systems, Inc. (“D-Link”) provides this Limited
warranty for its product only to the person or entity that originally purchased the product from:
n D-Link or its authorized reseller or distributor and
n Products purchased and delivered within the fifty states of the United States, the District of
Columbia, U.S. Possessions or Protectorates, U.S. Military Installations, addresses with an
APO or FPO.
Limited Warranty: D-Link warrants that the hardware portion of the D-Link products described below
will be free from material defects in workmanship and materials from the date of original retail purchase
of the product, for the period set forth below applicable to the product type (“ Warranty Period”), except
as otherwise stated herein.
1-Year Limited Warranty for the Product(s) is defined as follows:
n Hardware (excluding power supplies) One (1) Year
n Power Supplies One (1) Year
n Spare parts and spare kits Ninety (90) days
D-Link’s sole obligation shall be to repair or replace the defective Hardware during the Warranty Period
at no charge to the original owner or to refund at D-Link’s sole discretion. Such repair or replacement will
be rendered by D-Link at an Authorized D-Link Service Office. The replacement Hardware need not be
new or have an identical make, model or part. D-Link may in its sole discretion replace the defective
Hardware (or any part thereof) with any reconditioned product that D-Link reasonably determines is
substantially equivalent (or superior) in all material respects to the defective Hardware. Repaired or
replacement Hardware will be warranted for the remainder of the original Warranty Period from the date
of original retail purchase. If a material defect is incapable of correction, or if D-Link determines in its sole
discretion that it is not practical to repair or replace the defective Hardware, the price paid by the original
purchaser for the defective Hardware will be refunded by D-Link upon return to D-Link of the defective
Hardware. All Hardware (or part thereof) that is replaced by D-Link, or for which the purchase price is
refunded, shall become the property of D-Link upon replacement or refund.
Limited Software Warranty: D-Link warrants that the software portion of the product (“ Software”)
will substantially conform to D-Link’s then current functional specifications for the Software, as set forth
in the applicable documentation, from the date of original retail purchase of the Software for a period of
ninety (90) days (“ Warranty Period”), provided that the Software is properly installed on approved
hardware and operated as contemplated in its documentation. D-Link further warrants that, during the
Warranty Period, the magnetic media on which D-Link delivers the Software will be free of physical
defects. D-Link’s sole obligation shall be to replace the non-conforming Software (or defective media)
with software that substantially conforms to D-Link’s functional specifications for the Software or to
refund at D-Link’s sole discretion. Except as otherwise agreed by D-Link in writing, the replacement
Software is provided only to the original licensee, and is subject to the terms and conditions of the
license granted by D-Link for the Software. Software will be warranted for the remainder of the original
Warranty Period from the date or original retail purchase. If a material non-conformance is incapable of
correction, or if D-Link determines in its sole discretion that it is not practical to replace the non-conforming
Software, the price paid by the original licensee for the non-conforming Software will be refunded by DLink; provided that the non-conforming Software (and all copies thereof) is first returned to D-Link. The
license granted respecting any Software for which a refund is given automatically terminates.
Non-Applicability of Warranty: The Limited Warranty provided hereunder for hardware and software
of D-Link’s products will not be applied to and does not cover any refurbished product and any product
purchased through the inventory clearance or liquidation sale or other sales in which D-Link, the sellers,
or the liquidators expressly disclaim their warranty obligation pertaining to the product and in that case,
the product is being sold “ As-Is” without any warranty whatsoever including, without limitation, the
Limited Warranty as described herein, notwithstanding anything stated herein to the contrary.
Submitting A Claim: The customer shall return the product to the original purchase point based on its
return policy. In case the return policy period has expired and the product is within warranty, the
customer shall submit a claim to D-Link as outlined below:
n The customer must submit with the product as part of the claim a written description of the
Hardware defect or Software nonconformance in sufficient detail to allow D-Link to confirm
the same.
56
Page 57

n The original product owner must obtain a Return Material Authorization (“ RMA”) number from
the Authorized D-Link Service Office and, if requested, provide written proof of purchase of
the product (such as a copy of the dated purchase invoice for the product) before the warranty
service is provided.
n After an RMA number is issued, the defective product must be packaged securely in the
original or other suitable shipping package to ensure that it will not be damaged in transit, and
the RMA number must be prominently marked on the outside of the package. Do not include any
manuals or accessories in the shipping package. D-Link will only replace the defective portion
of the Product and will not ship back any accessories.
n The customer is responsible for all in-bound shipping charges to D-Link. No Cash on Delivery
(“COD”) is allowed. Products sent COD will either be rejected by D-Link or become the property
of D-Link. Products shall be fully insured by the customer and shipped to D-Link Systems,
Inc., 53 Discovery Drive, Irvine, CA 92618. D-Link will not be held responsible for any
packages that are lost in transit to D-Link. The repaired or replaced packages will be shipped
to the customer via UPS Ground or any common carrier selected by D-Link, with shipping
charges prepaid. Expedited shipping is available if shipping charges are prepaid by the customer
and upon request.
D-Link may reject or return any product that is not packaged and shipped in strict compliance with the
foregoing requirements, or for which an RMA number is not visible from the outside of the package. The
product owner agrees to pay D-Link’s reasonable handling and return shipping charges for any product
that is not packaged and shipped in accordance with the foregoing requirements, or that is determined by
D-Link not to be defective or non-conforming.
What Is Not Covered: This limited warranty provided by D-Link does not cover: Products, if in D-Link’s
judgment, have been subjected to abuse, accident, alteration, modification, tampering, negligence, misuse,
faulty installation, lack of reasonable care, repair or service in any way that is not contemplated in the
documentation for the product, or if the model or serial number has been altered, tampered with, defaced
or removed; Initial installation, installation and removal of the product for repair, and shipping costs;
Operational adjustments covered in the operating manual for the product, and normal maintenance;
Damage that occurs in shipment, due to act of God, failures due to power surge, and cosmetic damage;
Any hardware, software, firmware or other products or services provided by anyone other than DLink; Products that have been purchased from inventory clearance or liquidation sales or other sales in
which D-Link, the sellers, or the liquidators expressly disclaim their warranty obligation pertaining to the
product. Repair by anyone other than D-Link or an Authorized D-Link Service Office will void this
Warranty.
Disclaimer of Other Warranties: EXCEPT FOR THE LIMITED WARRANTY SPECIFIED HEREIN, THE
PRODUCT IS PROVIDED “AS-IS” WITHOUT ANY WARRANTY OF ANY KIND WHATSOEVER INCLUDING,
WITHOUT LIMITATION, ANY WARRANTY OF MERCHANTABILITY, FITNESS FOR A PARTICULAR PURPOSE
AND NON-INFRINGEMENT. IF ANY IMPLIED WARRANTY CANNOT BE DISCLAIMED IN ANY TERRITORY
WHERE A PRODUCT IS SOLD, THE DURATION OF SUCH IMPLIED WARRANTY SHALL BE LIMITED TO
NINETY (90) DAYS. EXCEPT AS EXPRESSLY COVERED UNDER THE LIMITED WARRANTY PROVIDED
HEREIN, THE ENTIRE RISK AS TO THE QUALITY, SELECTION AND PERFORMANCE OF THE PRODUCT IS
WITH THE PURCHASER OF THE PRODUCT.
Limitation of Liability: TO THE MAXIMUM EXTENT PERMITTED BY LAW, D-LINK IS NOT LIABLE
UNDER ANY CONTRACT, NEGLIGENCE, STRICT LIABILITY OR OTHER LEGAL OR EQUITABLE THEORY
FOR ANY LOSS OF USE OF THE PRODUCT, INCONVENIENCE OR DAMAGES OF ANY CHARACTER,
WHETHER DIRECT, SPECIAL, INCIDENTAL OR CONSEQUENTIAL (INCLUDING, BUT NOT LIMITED TO,
DAMAGES FOR LOSS OF GOODWILL, LOSS OF REVENUE OR PROFIT, WORK STOPPAGE, COMPUTER
FAILURE OR MALFUNCTION, FAILURE OF OTHER EQUIPMENT OR COMPUTER PROGRAMS TO WHICH DLINK’S PRODUCT IS CONNECTED WITH, LOSS OF INFORMATION OR DATA CONTAINED IN, STORED ON,
OR INTEGRATED WITH ANY PRODUCT RETURNED TO D-LINK FOR WARRANTY SERVICE) RESULTING
FROM THE USE OF THE PRODUCT, RELATING TO WARRANTY SERVICE, OR ARISING OUT OF ANY
BREACH OF THIS LIMITED WARRANTY, EVEN IF D-LINK HAS BEEN ADVISED OF THE POSSIBILITY OF
SUCH DAMAGES. THE SOLE REMEDY FOR A BREACH OF THE FOREGOING LIMITED WARRANTY IS
REPAIR, REPLACEMENT OR REFUND OF THE DEFECTIVE OR NON-CONFORMING PRODUCT. THE MAXIMUM
LIABILITY OF D-LINK UNDER THIS WARRANTY IS LIMITED TO THE PURCHASE PRICE OF THE PRODUCT
COVERED BY THE WARRANTY. THE FOREGOING EXPRESS WRITTEN WARRANTIES AND REMEDIES ARE
EXCLUSIVE AND ARE IN LIEU OF ANY OTHER WARRANTIES OR REMEDIES, EXPRESS, IMPLIED OR
STATUTORY
57
Page 58

Governing Law: This Limited Warranty shall be governed by the laws of the State of California. Some
states do not allow exclusion or limitation of incidental or consequential damages, or limitations on how
long an implied warranty lasts, so the foregoing limitations and exclusions may not apply. This limited
warranty provides specific legal rights and the product owner may also have other rights which vary
from state to state.
Trademarks: D-Link is a registered trademark of D-Link Systems, Inc. Other trademarks or registered
trademarks are the property of their respective manufacturers or owners.
Copyright Statement: No part of this publication or documentation accompanying this Product may
be reproduced in any form or by any means or used to make any derivative such as translation,
transformation, or adaptation without permission from D-Link Corporation/D-Link Systems, Inc., as
stipulated by the United States Copyright Act of 1976. Contents are subject to change without prior
notice. Copyright© 2002 by D-Link Corporation/D-Link Systems, Inc. All rights reserved.
CE Mark Warning: This is a Class B product. In a domestic environment, this product may cause radio
interference, in which case the user may be required to take adequate measures.
FCC Statement: This equipment has been tested and found to comply with the limits for a Class B digital
device, pursuant to part 15 of the FCC Rules. These limits are designed to provide reasonable protection
against harmful interference in a residential installation. This equipment generates, uses, and can radiate
radio frequency energy and, if not installed and used in accordance with the instructions, may cause
harmful interference to radio communication. However, there is no guarantee that interference will not
occur in a particular installation. If this equipment does cause harmful interference to radio or television
reception, which can be determined by turning the equipment off and on, the user is encouraged to try
to correct the interference by one or more of the following measures:
n Reorient or relocate the receiving antenna.
n Increase the separation between the equipment and receiver.
n Connect the equipment into an outlet on a circuit different from that to which the receiver is
connected.
n Consult the dealer or an experienced radio/TV technician for help.
Register your D-Link product online at http://www.i-2-eye.com
(02/28/2003)
58
 Loading...