

Page 1

Installing Management Center for
Cisco Security Agents 5.2
Americas Headquarters
Cisco Systems, Inc.
170 West Tasman Drive
San Jose, CA 95134-1706
USA
http://www.cisco.com
Tel: 408 526-4000
800 553-NETS (6387)
Fax: 408 527-0883
Customer Order Number: DOC-78-17916
Page 2

THE SPECIFICATIONS AND INFORMATION REGARDING THE PRODUCTS IN THIS MANUAL ARE SUBJECT TO CHANGE WITHOUT
NOTICE. ALL STATEMENTS, INFORMATION, AND RECOMMENDATIONS IN THIS MANUAL ARE BELIEVED TO BE ACCURATE BUT
ARE PRESENTED WITHOUT WARRANTY OF ANY KIND, EXPRESS OR IMPLIED. USERS MUST TAKE FULL RESPONSIBILITY FOR
THEIR APPLICATION OF ANY PRODUCTS.
THE SOFTW ARE LICENSE AND LIMITED WARRANTY FOR THE ACCOMPANYING PRODUCT ARE SET FOR TH IN THE INFORMATION
PACKET THAT SHIPPED WITH THE PRODUCT AND ARE INCORPORATED HEREIN BY THIS REFERENCE. IF YOU ARE UNABLE TO
LOCATE THE SOFTWARE LICENSE OR LIMITED WARRANTY, CONTACT YOUR CISCO REPRESENTATIVE FOR A COPY.
The Cisco implementation of TCP header compression is an adaptation of a program developed by the University of California, Berkeley (UCB) as
part of UCB’s public domain version of the UNIX operating system. All rights reserved. Copyright © 1981, Regents of the University of California.
NOTWITHSTANDING ANY OTHER WARRANTY HEREIN, ALL DOCUMENT FILE S AND SOFTWARE OF THESE SUPPLIERS ARE
PROVIDED “AS IS” WITH ALL FAULTS. CISCO AND THE ABOVE-NAMED SUPPLIERS DISCLAIM ALL WARRANTIES, EXPRESSED
OR
IMPLIED, INCLUDING, WITHOUT L IMITATION, THO SE OF MERCHAN TABILITY, FITNESS F OR A PARTICULAR PURPOSE AND
NONINFRINGEMENT OR ARISING FROM A COURSE OF DEALING, USAGE, OR TRADE PRACTICE.
IN NO EVENT SHALL CISCO OR ITS SUPPLIERS BE LI ABLE F OR ANY IN DIRECT, SPECIAL, CONSEQUENTIAL, OR INCIDENTAL
DAMAGES, INCLUDING, WITHOUT LIMITAT ION, LOST PROFITS OR LOSS OR DAMAGE TO DATA ARISING OUT OF THE USE OR
INABILITY TO USE THIS MANUAL, EVEN IF CISCO OR ITS SUPPLIERS HAVE BEEN ADVISED OF THE POSSIBILITY OF SUCH
DAMAGES.
CCVP, the Cisco Logo, and the Cisco Square Bridge logo are tradem arks of Cisco Systems, Inc.; Changing the Way We Work, Live, Play, and Learn
is a service mark of Cisco Systems, Inc.; and Access Registrar, Aironet, BPX, Catalyst, CCDA, CCDP, CCIE, CCIP, CCNA, CCNP, CCSP, Cisco,
the Cisco Certified Internetwork Expert logo, Cisco IOS, Cisco Press, Cisco Systems, Cisco Systems Capital, the Cisco Systems logo, Cisco Unity,
Enterprise/Solver, EtherChannel, EtherFast, Ether Switch, Fast Step, Follow Me B rowsing, FormShare, Gig aDrive, GigaStack, HomeLi nk, Internet
Quotient, IOS, IP/TV, iPhone, iQ Expertise, the iQ logo, iQ Net Readiness Scorecard, iQuick Study, LightStream, Linksys, MeetingPlace, MGX,
Networking Academy, Network Registrar, Packet, PIX, ProConnect, RateMUX, ScriptShare, SlideCast, SMARTnet, StackWise, The Fastest Way
to Increase Your Internet Quotient, and TransPath are registered trademarks of Cisco Systems, Inc. and/or its affiliates in the United States and certain
other countries.
All other trademarks mentioned in this document or Website are the property of their respective owners. The use of the word partner does not imply
a partnership relationship between Cisco and any other company. (0609R)
Installing Management Center for Cisco Security Agents 5.2
Copyright © 2007 Cisco Systems, Inc. All rights reserved.
Page 3

CONTENTS
Preface v
Audience 1-v
Conventions 1-vi
Obtaining Documentation 1-vii
Cisco.com 1-vii
Product Documentation DVD 1-vii
Ordering Documentation 1-viii
Documentation Feedback 1-viii
Cisco Product Security Overview 1-viii
Reporting Security Problems in Cisco Products 1-ix
Product Alerts and Field Notices 1-x
Obtaining Technical Assistance 1-x
Cisco Support Website 1-x
Submitting a Service Request 1-xi
Definitions of Service Request Severity 1-xii
Obtaining Additional Publications and Information 1-xiii
CHAPTER
78-17916-01
1 Preparing to Install 1-1
How the Cisco Security Agent Works 1-1
Cisco Security Agent Overview 1-2
Before Proceeding 1-3
System Requirements 1-3
Environment Requirements 1-9
Book Title
i
Page 4

Contents
DNS and WINS Environments 1-9
Browser Requirements 1-9
Time and Date Requirements 1-10
Port Availability 1-10
Windows Cluster Support 1-11
Internationalization Support 1-11
Internationalization Support Tables 1-12
About CSA MC 1-17
CHAPTER
CHAPTER
2 Deployment Planning 2-1
Overview 2-1
Piloting the Product 2-2
Running a Pilot Program 2-2
Scalable Deployments 2-3
Hardware Sizing 2-3
Software Considerations 2-5
Configuration Recommendations for Scalability 2-5
Factors in Network Sizing 2-6
Factors in Database Sizing 2-7
Policy Tuning and Troubleshooting 2-7
Overall Guidelines 2-7
Using Test Mode 2-10
Disabling Specific Rules 2-11
Caching and Resetting Query Responses 2-12
Setting Up Exception Rules 2-13
3 Installing the Management Center for Cisco Security
Agents 3-1
Overview 3-1
Book Title
ii
78-17916-01
Page 5

Licensing Information 3-2
Installing V5.2 and Migrating Configurations and Hosts from Previous
Versions 3-3
Installation and Migration Overview 3-3
Local and Remote DB Installation Overview 3-6
Installing CSA MC with a Local Database 3-8
Installing CSA MC with a Remote Database 3-21
Installing CSA MC with a Previous Version’s Database (Same System
Installation) 3-32
Note for installing two CSA MCs on two separate machines 3-37
Installation Log 3-38
Accessing Management Center for Cisco Security Agents 3-39
Migration Instructions 3-40
Initiating Secure Communications 3-44
Internet Explorer 7.0: Importing the Root Certificate 3-48
Contents
CHAPTER
78-17916-01
Uninstalling Management Center for Cisco Security Agents 3-49
Copying Cisco Trust Agent Installer Files 3-50
4 Quick Start Configuration 4-1
Overview 4-1
Access Management Center for Cisco Security Agents 4-2
Administrator Roles in CSA MC 4-3
Administrator Authentication 4-3
Cisco Security Agent Policies 4-4
Configure a Group 4-5
Build an Agent Kit 4-7
The Cisco Security Agent 4-11
View Registered Hosts 4-12
Configure a Rule Module 4-12
Book Title
iii
Page 6

Contents
Configure a Policy 4-18
Attach a Rule Module to a Policy 4-19
Attach a Policy to a Group 4-19
Generate Rule Programs 4-20
APPENDIX
APPENDIX
A Cisco Security Agent Installation and Overview A-1
Overview A-1
Downloading and Installing A-2
The Cisco Security Agent User Interface A-4
Installing the Solaris Agent A-6
Installing the Linux Agent A-8
B Third Party Copyright Notices B-1
iv
Book Title
78-17916-01
Page 7

Audience
Preface
This manual describes how to configure the Management Center for Cisc o
Security Agents on Microsoft Windows 2003 operating systems and the Cisco
Security Agent on supported Microsoft Windows 2003, Microsoft Windows XP,
Microsoft Windows 2000, Microsoft Windows NT, Sun Solaris 9, Sun Solaris 8,
RedHat Enterprise Linux 4.0, and RedHat Enterprise Linux 3.0 operating
systems.
In addition to the information contained in this manual, the release notes contain
the latest information for this release. Note that this manual does not provide
tutorial information on the use of any operating systems.
This manual is for system managers or network administrators who install,
configure, and maintain Management Center for Cisco Security Agents softw are.
Installers should be knowledgeable about networking concepts and system
management and have experience installing software on Windows operating
systems.
78-17916-01
Installing Management Center for Cisco Security Agents 5.2
v
Page 8

Conventions
Conventions
This manual uses the following conventions.
Convention Purpose Example
Bold text User interface field names and
menu options.
Italicized text Used to emphasize text. You m u s t save your
Keys connected
by the plus sign
Keys not
connected by plus
signs
Monospaced
font
Keys pressed simultaneously. Ctrl+Alt+Delete
Keys pressed sequentially. Esc 0 2 7
Text displayed at the command
line.
Click the Groups option. The
Groups edit page appears.
configuration before you can
deploy your rule sets.
>ping www.example.com
Preface
vi
Tip Identifies information to help you get the most bene fit from your product.
Note Means reader take note. Notes identify important information that you should
reflect upon before continuing, contain helpful suggestions, or pro vide references
to materials not contained in the document.
Caution Means read er be ca reful . In this situation, you might do something that could
result in equipment damage, loss of data, or a potential breach in your network
security.
Installing Management Center for Cisco Security Agents 5.2
78-17916-01
Page 9

Preface
Obtaining Documentation
Cisco documentation and additional literature are available on Cisco.com. This
section explains the product documentation resources that Cisco offers.
Cisco.com
You can access the most current Cisco documentation at this URL:
http://www.cisco.com/techsupport
You can access the Cisco website at this URL:
http://www.cisco.com
You can access international Cisco website s at this URL:
http://www.cisco.com/public/countries_languages.shtml
Product Documentation DVD
Obtaining Documentation
78-17916-01
The Product Documentation DVD is a library of technical product docu mentation
on a portable medium. The DVD enables you to access installation, configuration,
and command guides for Cisco hardware and software products. With the DVD,
you have access to the HTML documentation and some of the PDF
the Cisco website at this URL:
http://www.cisco.com/univercd/home/home.htm
The Product Documentation DVD is created and released regularly. DVDs are
available singly or by subscription. Registered Cisco.com users can order a
Product Documentation DVD (product number DOC-DOCDVD= or
DOC-DOCDVD=SUB) from Cisco
Store at this URL:
http://www.cisco.com/go/marketplace/docstore
Installing Management Center for Cisco Security Agents 5.2
Marketplace at the Product Documentation
files found on
vii
Page 10

Documentation Feedback
Ordering Documentation
You must be a registered Cisco.com user to access Cisco Marketplace. Registered
users may order Cisco documentation at the Pr odu ct Documentation Store at this
URL:
http://www.cisco.com/go/marketplace/docstore
If you do not have a user ID or password, you can register at this URL:
http://tools.cisco.com/RPF/register/register.do
Documentation Feedback
You can provide feedback about Cisco technical documentation on the
Cisco
Support site area by entering your comments in the feedback form av ailable
in every online document.
Preface
Cisco Product Security Overview
Cisco provides a free online Security Vulnerability Policy portal at this URL:
http://www.cisco.com/en/US/products/products_security_vulnerability_policy.h
tml
From this site, you will find information about how to do the following:
• Report security vulnerabilities in Cisco products
• Obtain assistance with security incidents that involve Cisco products
• Register to receive security information from Cisco
A current list of security advisories, security notices, and security responses for
Cisco products is available at this URL:
http://www.cisco.com/go/psirt
Installing Management Center for Cisco Security Agents 5.2
viii
78-17916-01
Page 11

Preface
To se e security advisories, security notices, and security responses as they are
updated in real time, you can subscribe to t he Product Security Incident Response
Team Really Simple Syndication (PSIRT RSS) feed. Information about how to
subscribe to the PSIRT RSS feed is found at this URL:
http://www.cisco.com/en/US/products/products_psirt_rss_feed.html
Reporting Security Problems in Cisco Products
Cisco is committed to delivering secure p rod ucts. We test our products internally
before we release them, and we strive to correct all vulnerabilities quickly. If you
think that you have identified a vulnerability in a Cisco product, contact PSIRT:
• For emergencies only — security-alert@cisco.com
An emergency is either a condition in which a system is under active attack
or a condition for which a severe and urgent security vulnerability should be
reported. All other conditions are considered nonemergencies.
• For nonemergencies — psirt@cisco.com
In an emergency, you can also reach PSIRT by telephone:
• 1 877 228-7302
• 1 408 525-6532
Cisco Product Security Overview
78-17916-01
Tip W e encourage you to use Pretty Good Priv ac y (PGP ) or a compatible product (for
example, GnuPG) to encrypt any sensitive information that you send to Cisco.
PSIRT can w or k with informat ion that has been encrypted with PGP v ersions
through
9.x.
2.x
Never use a revoked encryption key or an expired encryption key. The correct
public key to use in your correspondence with PSIRT is the one linked in the
Contact Summary section of the Security Vulnerability Policy page at this
URL:
http://www.cisco.com/en/US/products/products_security_vulnerability_policy.h
tml
The link on this page has the current PGP key ID in use.
Installing Management Center for Cisco Security Agents 5.2
ix
Page 12

Product Alerts and Field Notices
If you do not have or use PGP, contact PSIRT to find other means of encrypting
the data before sending any sensitive material.
Product Alerts and Field Notices
Modifications to or updates abou t Cisco products are annou nced in Cisco Product
Alerts and Cisco
the Product Alert T ool o n Cisco.com. This tool enable s you to create a profile and
choose those products for which you want to receive information.
To acces s the Product Alert Tool, you must be a registered Cisco.com user.
Registered users can access the tool at this URL:
http://tools.cisco.com/Support/PAT/do/ViewMyProfiles.do?local=en
To register as a Cisco.com user, go to this URL:
http://tools.cisco.com/RPF/register/register.do
Field Notices. You can receive these announcements by using
Preface
Obtaining Technical Assistance
Cisco Technical Support provides 24-hour-a-day award-winning technical
assistance. The Cisco
support resources. In addition, if you have
Cisco
Technical Assistance Center ( TAC) engineers provide telephon e support. If
you do not have a valid Cisco service contract, contact your reseller.
Cisco Support Website
The Cisco Support website provides online d ocuments and tools fo r
troubleshooting and resolving technical issues with Cisco products and
technologies. The website is available 24
http://www.cisco.com/en/US/support/index.html
Installing Management Center for Cisco Security Agents 5.2
x
Support website on Cisco.com features extensive online
a valid Cisco service contract,
hours a day at this URL:
78-17916-01
Page 13
Preface
Obtaining Technical Assistance
Access to all tools on the Cisco Support website requires a Cisco.com user ID and
password. If you have a valid service contract but do not have a user ID or
password, you can register at this URL:
http://tools.cisco.com/RPF/register/register.do
Note Before you submit a request for service online or by phone, use the
Cisco
Product Identification Tool to locate your product serial number. You can
access this tool from the Cisco
Support website by clicking the Get Tools &
Resources link, clicking the All Tools (A-Z) tab, and then choosing
Cisco
Product Identification Tool from the alphabetical list. This tool offers
three search options: by
product ID or model nam e; by tree view; or, for certain
products, by copying and pasting show command output. Search results show an
illustration of your product with the serial number label location highlighted.
Locate the serial number label on your product and record the information
before placing a service call.
Tip Displaying and Searching on Cisco.com
If you suspect that the browser is not refreshing a web page, force the browser to
update the web page by holding down the Ctrl key while pressing F5.
To find technical information, narrow your search to look in technical
documentation, not the entire
the Cisco.com home page, click the Advanced
on the resulting page and then click the Technical
radio button.
Cisco.com website. After using the Search box on
Search link next to the Search box
Support & Documentation
To provide feedback about the Cisco.com website or a particular technical
document, click Contacts & Feedback at the top of any Cisco.com web page.
Submitting a Service Request
Using the online TAC Service Request Tool is the fastest way to open S3 and S4
service requests. (S3
minimally impaired or for which you require product information.) After you
describe your situation, the TAC
78-17916-01
and S4 service requests are those in which your network is
Installing Management Center for Cisco Security Agents 5.2
Service Request Tool provides recommended
xi
Page 14

Obtaining Technical Assistance
solutions. If your issue is not resolved using the recommended resources, your
service request is assigned to a Cisco engineer. The TAC Service Request Tool is
located at this URL:
http://www.cisco.com/techsupport/servicerequest
For S1 or S2 service requests, or if you do not have Internet access, contact the
Cisco
production network is down or severely degraded.) Cisco engineers are assigned
immediately to S1 and S2 service requests to help keep your business operations
running smoothly.
To open a service request by telephone, use one of the following numbers:
Asia-Pacific: +61 2 8446 7411
Australia: 1 800 805 227
EMEA: +32 2 704 55 55
USA: 1 800 553 2447
For a complete list of Cisco TAC contacts, go to this URL:
http://www.cisco.com/techsupport/contacts
Preface
TAC by telephone. (S1 or S2 service requests are those in which your
Definitions of Service Request Severity
To ensure that all service requests are reported in a standard format, Cisco has
established severity definitions.
Severity 1 (S1)—An existing network is “down” or there is a critical impact to
your business operations. You and Cisco will commit all necessary resources
around the clock to resolve the situation.
Severity 2 (S2)—Operation of an existing network is severely degraded, or
significant aspects of your business operations are negatively affected by
inadequate performance of Cisco products. You and Cisco will commit full-time
resources during normal business hours to resolve the situation.
Severity 3 (S3)—Operation al performance of the netwo rk is impaired while most
business operations remain functional. You and Cisco will commit resources
during normal business hours to restore service to sa tisfactory levels.
Severity 4 (S4)—You require information or assistance with Cisco product
capabilities, installation, or configuration. There is little or no effect on your
business operations.
Installing Management Center for Cisco Security Agents 5.2
xii
78-17916-01
Page 15

Preface
Obtaining Additional Publications and Information
Obtaining Additional Publications and Information
Information about Cisco products, technologies, and network solutions is
available from various online and printed sources.
• The Cisco Online Subscription Center is the website where you can sign up
for a variety of Cisco e-mail newslette rs and oth er communicati ons. Create a
profile and then select the subscriptions that you would like to receive. To
visit the Cisco
http://www.cisco.com/offer/subscribe
• The Cisco Product Quic k Refer ence Guide is a handy, compact reference tool
that includes brief product overvie ws, k ey features, samp le part numbers, and
abbreviated technical specifications for many Cisco
through channel partners. It is updated twice a year and includes the latest
Cisco channel product offerings. To order and find out more about the
Cisco
Product Quick Reference Guide, go to this URL:
http://www.cisco.com/go/guide
• Cisco Marketplace provides a variety of Cisco books, reference guides,
documentation, and logo me rchandis e. Visit Cisco
company store, at this
Online Subscription Center, go to this URL:
products that are sold
Marketplace, the
URL:
78-17916-01
http://www.cisco.com/go/marketplace/
• Cisco Press publishes a wide range of general networking, training, and
certification titles. Both new and experienced users will benefit from these
publications. For current Cisco
Cisco
Press at this URL:
Press titles and other information, go to
http://www.ciscopress.com
• Internet Protocol Journal is a quarterly journal published by Cisco for
engineering professionals involved in designing, developing, and operating
public and private internets and intranets. You can access the Internet
Protocol Journal at this URL:
http://www.cisco.com/ipj
• Networking products offered b y Cisco, as well as customer support services,
can be obtained at this
URL:
http://www.cisco.com/en/US/products/index.html
Installing Management Center for Cisco Security Agents 5.2
xiii
Page 16

Obtaining Additional Publications and Information
• Networking Professionals Connection is an interactive website where
networking professionals share questions, suggestions, and information
about networking products and technologies with Cisco experts and other
networking professionals. Join a discussion at this URL:
http://www.cisco.com/discuss/networking
• “What’s New in Cisco Documentation” is an online publication th at provides
information about the latest documentation releases for Cisco products.
Updated monthly, this online publication is organized by product category to
direct you quickly to the documentation for your products. You can view the
latest release of “What’s New in Cisco
http://www.cisco.com/univercd/cc/td/doc/abtunicd/136957.htm
• World-class networking training is available from Cisco. You can view
current offerings at this
http://www.cisco.com/en/US/learning/index.html
Preface
Documentation” at this URL:
URL:
xiv
Installing Management Center for Cisco Security Agents 5.2
78-17916-01
Page 17

CHA P T ER
Preparing to Install
How the Cisco Security Agent Works
The Cisco Security Agent provides distributed security to your enterprise by
deploying agents that defend against the proliferation of attacks across networks
and systems. These agents operate using a set of rules pr ovided by the
Management Center for Cisco Security Agents and selectively assigned to each
client node on your network by the network administrator.
This section includes the following topics.
• Cisco Security Agent Overview, page 1-2
• Before Proceeding, page 1-3
• System Requirements, page 1-3
• Environment Requirements, page 1-9
• DNS and WINS Environments, page 1-9
1
78-17916-01
• Browser Requirements, page 1-9
• Time and Date Requirements, page 1-10
• Port Availability, page 1-10
• Windows Cluster Support, page 1-11
• Internationalization Support, page 1-11
• Internationalization Support Tables, page 1-12
• About CSA MC, page 1-17
Installing Management Center for Cisco Security Agents 5.2
1-1
Page 18
Cisco Security Agent Overview
Cisco Security Agent Overview
Cisco Security Agent contains two components:
• The Management Center for Cisco Security Agents (CSA MC)- inst al ls on a
secured server and includes a web server, a configuration database, and a
web-based user interface.
• The Cisco Security Agent (the agent)- installs on desktops and servers across
your enterprise and enforces security policies on those systems.
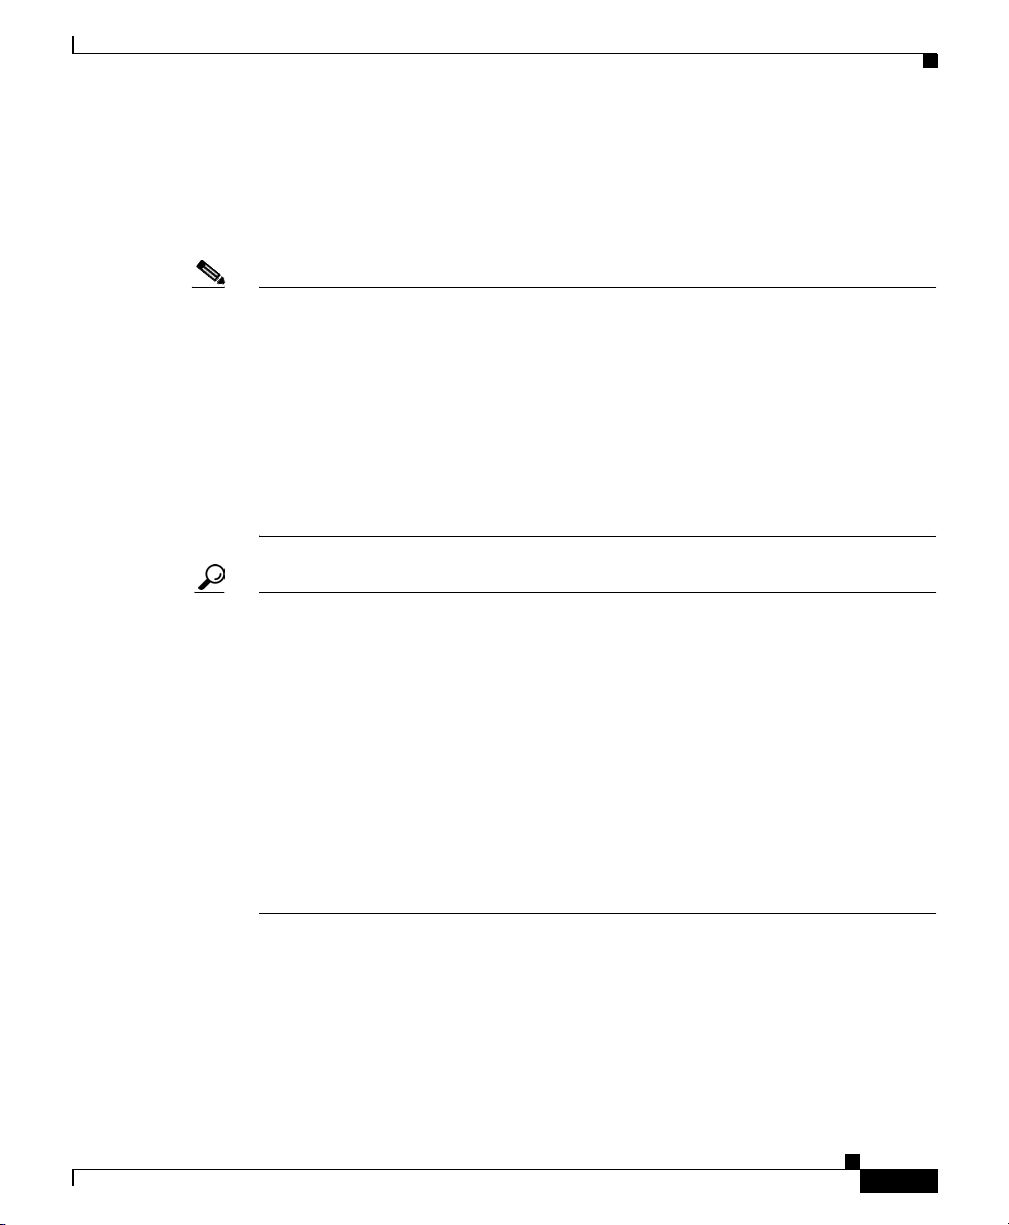
Administrators configure security policies on CSA MC using the web-based
interface. They distribute these policies to agents installed on end user systems
and servers. Policies can allow or deny specific system actions. The agents check
policies before allowing applications access to system resources.
Figure 1-1 Product Deployment
Chapter 1 Preparing to Install
1-2
Installing Management Center for Cisco Security Agents 5.2
78-17916-01
Page 19

Chapter 1 Preparing to Install
Before Proceeding
Before installing CSA MC software, refer to the Release Notes for up-to-date
information. Not doing so can result in the misconfiguration of your system.
Make sure that your system is compatible with the Cisco product you are
installing and that it has the appropriate software installed.
Read through the following information before installing the CSA MC software.
System Requirements
Note The acronym CSA MC is used to represent the Management Center for Cisco
Security Agents.
Table 1-1 shows the minimum CSA MC server requirements for Windows 2003
systems. These requirements are sufficient if you are running a pilot of the
product or for deployments up to 1.000 agents. If yo u are planning to deplo y CSA
MC with more than 1.000 agents, these requirements are insufficient. See
Scalable Deployments, page 2-3 for more detailed system requirements.
Before Proceeding
78-17916-01
Ta b l e 1-1 Minimum Server Requirements
System Component Requirement
Hardware • IBM PC-compatible computer
• Color monitor with video card capable of
16-bit
Processor 1 GHz or faster Pentium processor
Operating System Windows 2003 R2 Standard or Enterprise
Editions
Note T o run terminal services on the CSA MC
system, you must edit the MC policy.
File System NTFS
Memory 1 GB minimum memory
Installing Management Center for Cisco Security Agents 5.2
1-3
Page 20

System Requirements
Chapter 1 Preparing to Install
System Component Requirement
Virtu al Me mory 2 GB virtual memory
Hard Drive Space 9 GB minimum available disk drive space
• Pager alerts require a Hayes Compatible Modem.
• For optimal viewing of the CSA MC UI, you should set your display to a
resolution of 1024x768 or higher.
• On a system where CSA MC has never been installed, the CSA MC setup
program first installs Microsoft SQL Server Express and the required .NET
environment. If the CSA MC installation detects any other database type
attached to an existing installation of Microsoft SQL Server Express, the
installation will abort. This d atabase configuration is not supported.
If you are planning to deploy no more th an 1 ,000 agents , the shi pped version
of Microsoft SQL Server Express should be adequate. For a larger
deployment, you also have the option of installing Microsoft SQL Server
2005 or Microsoft SQL Server 2000 instead of using the Mi crosoft SQL
Server Express database that is provided. Note that of you are using SQL
Server 2005 or 2000, it must be licensed separately and it must be installed
on the system before you begin the CSA MC installation. See
Chapter 3,
“Installing the Management Center for Cisco Security Agents” fo r
details.
W e also reco mmend that you format the disk t o which you are installing CSA
MC as NTFS. FAT32 limits all file sizes to 4 GB.
1-4
Installing Management Center for Cisco Security Agents 5.2
78-17916-01
Page 21

Chapter 1 Preparing to Install
To run the Cisco Security Agent on Windows servers and desktop systems, the
requirements are as follows:
System Component Requirement
Processor Intel Pentium 200 MHz or higher
Operating Systems • Windows Server 2003 (Standard,
System Requirements
Ta b l e 1-2 Agent Requirements (Windows)
Note Up to eight physical processors are
supported.
Enterprise, We b, or Small Business
Editions) Service Pack 0 or 1
• Windows XP (Professional, Tablet PC
Edition 2005, or Home Edition) Service
Pack 0, 1, or 2
• Windows 2000 (Professional, Server or
Advanced Server) with Service Pack 0, 1, 2,
3, or 4
78-17916-01
• Windows NT (Workstation, Server or
Enterprise Server) with Service Pack 6a
Note Citrix Metaframe and Citrix XP are
supported. Terminal Services are
supported on Windows 2003, Windows
XP, and Windows 2000 (Terminal
Services are not supported on Windows
NT.)
Supported language versions are as follows:
• For Windows 2003, XP, and 2000, all
language versions, except Arabic and
Hebrew, are supported.
• For Windows NT, US English is the only
supported language version.
Memory 128 MB minimum—all supported Windows
platforms
Installing Management Center for Cisco Security Agents 5.2
1-5
Page 22

System Requirements
Chapter 1 Preparing to Install
System Component Requirement
Hard Drive Space 50 MB or higher
Note This includes program and data.
Network Ethernet or Dial up
Note Maximum of 64 IP addresses supported
on a system.
1-6
Installing Management Center for Cisco Security Agents 5.2
78-17916-01
Page 23

Chapter 1 Preparing to Install
T o run the Cisco Security Agent on your Solaris serv er systems, the requirements
are as follows:
System Component Requirement
Processor UltraSPARC 400 MHz or higher
Operating Systems Solaris 9, 64 bit, patch version 111711-11 or
Memory 256 MB minimum
Hard Drive Space 50 MB or higher
Network Ethernet
System Requirements
Ta b l e 1-3 Agent Requirements (Solaris)
Note Uni-processor, dual pro cessor, and quad
processor systems are supported.
higher, and 111712-11 or higher installed.
Solaris 8, 64 bit 12/02 Edition or higher (This
corresponds to kernel Generic_108528-18 or
higher.)
Note If you have the minimal Sun Solaris 8
installation (Core group) on the system
to which you are installing the agent, the
Solaris machine will be missing certain
libraries and utilities the agent requires.
Before you install the agent, you must
install the "SUNWlibCx" library which
can be found on the Solaris 8 Software
disc (1 of 2) in the /Solaris_8/Product
directory. Install using the pkgadd -d .
SUNWlibCx command.
Note This includes program and data.
Note Maximum of 64 IP addresses supported
on a system.
78-17916-01
Installing Management Center for Cisco Security Agents 5.2
1-7
Page 24

System Requirements
Caution On Solaris systems running Cisco Security Agents, if you add a new type of
Chapter 1 Preparing to Install
Ethernet interface to the system, you must reboot that system twice for the agent
to detect it and apply rules to it accordingly.
To run the Cisco Security Agent on your Linux systems, the requirements are as
follows:
Ta b l e 1-4 Agent Requirements (Linux)
System Component Requirement
Processor 500 MHz or faster x86 processor (32 bits only)
Note Uni-processor, dual pro cessor, and quad
processor systems are supported.
Operating Systems RedHat Enterprise Linux 4.0 WS, ES, or AS
RedHat Enterprise Linux 3.0 WS, ES, or AS
Memory 256 MB minimum
Hard Drive Space 50 MB or higher
Note This includes program and data.
Network Ethernet
Note Maximum of 64 IP addresses supported
on a system.
1-8
Note Agent systems must be able to communicate with CSA MC over HTTPS.
Note The Cisco Security Agent uses approximately 30 MB of memory. This applies to
agents running on all supported Windows and UNIX platforms.
Installing Management Center for Cisco Security Agents 5.2
78-17916-01
Page 25

Chapter 1 Preparing to Install
Caution When upgrading or changing operating systems, uninstall the agent first. When
the new operating system is in place, you can install a new agent kit. Because the
agent installation examines the operating system at install time and copies
components accordingly, existing agent components may not be compatible with
operating system changes.
Environment Requirements
The following are recommendations for a secure setup and deployment of CSA
MC.
• The system on which you are installi ng the CSA MC software should be
placed in a physically secure, locked down location with restricted access.
• Do not install any software on the CSA MC system that is not required by the
product itself.
• You must have administrator privi leges on the system in question to perform
the installation.
• The CSA MC system must have a static IP address or a fixed DHCP address.
Environment Requirements
DNS and WINS Environments
For agents and browsers to successfully communicate with CSA MC, the CSA
MC machine name must be resolvable through DNS (Domain Name Service) or
WINS (Windows Internet Naming Service)
Browser Requirements
You use a web browser to access CSA MC either locally or from a remote system.
Browser requirements are as follows:
Internet Explorer:
• Version 6.0 or later
Installing Management Center for Cisco Security Agents 5.2
78-17916-01
.
1-9
Page 26

Environment Requirements
• You must have cookies enabled. This means using a maximum setting of
"medium" as your Internet security setting. Locate this feature f rom the
following menu, Tools>Internet Options. Click the Security tab.
• JavaScript must be enabled.
• If you are using Internet Explorer Version 6.0 SP1 or higher, your CSA
MC FQDN cannot contain non-alphanumeric characters ot her than '-' and
'.' . For example, if the server system name contains an underscore "_",
CSA MC will not work properly.
FireFox:
• Version 1.5.0.x or higher
• You must have cookies enabled. Locate this feature from the following
menu, Tools>Options>Privacy>Cookies.
• JavaScript must be enabled.
Time and Date Requirements
Chapter 1 Preparing to Install
Before you install CSA MC, make sure that the system to which you plan install
the software has the correct and current time, date, and time zone settings. If these
settings are not current, you will encounter MC/agent certificate issues.
Port Availability
CSA MC acts as a web server and requires that no other web server software is
running on the CSA MC system. Having multiple web servers running on the
same system causes port conflicts.
Caution By default, Windows 2003 has the World Wide Web Publishing service running.
If the CSA MC installation detects this service runnin g, the CSA MC inst allation
will disable all Web publishing services in order for its own installation to
proceed.
Installing Management Center for Cisco Security Agents 5.2
1-10
78-17916-01
Page 27

Chapter 1 Preparing to Install
Windows Cluster Support
Cisco Security Agent supports Network Load Balancing and Server Cluster for
Windows 2003 and 2000 Server platforms. Cluster support may require certain
network permissions to operate. As with o ther network services , your CSA M C
policies must account for these network permissions. (Component Load
Balancing, and Solaris and Linux Clusters are not officially supported in this
release.)
Internationalization Support
All Cisco Security Agent kits contain localized support for English, French,
German, Italian, Japanese, Korean, Simplified Chinese, and Spanish language
desktops. This support is automatic in each agent kit and no action is required by
the administrator. The agent UI, events , and help system will appear in the
language of the end user’s desktop.
The following table lists CSA localized support and qualification for various OS
types.
Internationalization Support
78-17916-01
Ta b l e 1-5 CSA Localizations
Language Operating System Localized Qualified
Chinese (Simplified) Windows 2000 Yes Yes
Win dow s XP Yes Yes
Windows 2003 Yes Yes
French Windows 2000 Yes Yes
Win dow s XP Yes Yes
Windows 2003 Yes Yes
German Windows 2000 Yes Yes
Win dow s XP Yes Yes
Windows 2003 Yes Yes
Italian Windows 2000 Yes Yes
Win dow s XP Yes Yes
Installing Management Center for Cisco Security Agents 5.2
1-11
Page 28

Internationalization Support
Language Operating System Localized Qualified
Japanese Windows 2000 Yes Yes
Korean Windows 2000 Yes Yes
Spanish Windows 2000 Yes Yes
Chapter 1 Preparing to Install
Windows 2003 Yes Yes
Win dow s XP Yes Yes
Windows 2003 Yes Yes
Win dow s XP Yes Yes
Windows 2003 Yes Yes
Win dow s XP Yes Yes
Windows 2003 Yes Yes
Explanation of terms:
Localized: Cisco Security Agent kits contain localized support for the
languages identified in
Table 1-5. This support is automatic in each agent kit
and no action is required by the administrator. The agent UI, events, and help
system will appear in the language of the end user’s desktop. All localized
languages are agent qualified and supported. (CSA MC is not localized.)
Qualified: The Cisco Security Agent was tested on these language pl atforms.
Cisco security agent drivers are able to handle the local characters in file
paths and registry paths. All qualified langua ges are suppo rted.
Supported: The Cisco Security Agent is suitable to run on these language
platforms. The localized characters are supported by all agent functions.
Refer to the following tables.
Internationalization Support Tables
The following tables detail the level of support for each localized version of
Windows operating systems. Note that support for a localized operating
system is different from localized agent. A localized operating system may be
supported even though the corresponding language is not translated in the agent.
In this case, the dialogs will appear in English. The tables below define the
operating system support, not agent language support. Note, for Multilingual User
Installing Management Center for Cisco Security Agents 5.2
1-12
78-17916-01
Page 29

Chapter 1 Preparing to Install
Interface (MUI) supported languages, installs are always in English (Installshield
does not support MUI), and the UI/dialogs are in English unless the desktop is
Chinese (Simplified), French, German, Italian, Japanese, Korean, or Spanish.
Any Windows 2000, Windows XP or Windows 2003 platforms/versions not
mentioned in the tables below should be treated as not supported.
The following letter combinations are used to describe the level of support:
Internationalization Support
Ta b l e 1-6
Support Level Key
L Agent localized, supported and qualified. (Note: L(S) –
Localized and supported only)
T Supported and qualified.
S Supported but not qualified – Bugs will be fixed when
reported by customers, but the e xact configuration was not
tested.
NA Not applicable – Microsoft does not ship this combination.
NS Not supported.
Ta b l e 1-7 Windows 2000 Support
Advanced
Professional Server
Server
MUI T S S
Arabic NS NA NA
Chinese (Simplified) L L(S) L(S)
Chinese (Traditional) T S S
Czech S S NA
Danish T NA NA
Dutch S S NA
English L L L
Finnish S NA NA
French L L(S) L(S)
German L L(S) L(S)
78-17916-01
Installing Management Center for Cisco Security Agents 5.2
1-13
Page 30

Internationalization Support
Greek S NA NA
Hebrew NS NA NA
Hungarian S S NA
Italian L L(S) NA
Japanese L L(S) L(S)
Korean L L(S) L(S)
Norwegian S NA NA
Polish T T NA
Portuguese S S NA
Russian S S NA
Spanish L L(S) L(S)
Swedish S S NA
Turkish S S NA
Professional Server
Chapter 1 Preparing to Install
Advanced
Server
1-14
Ta b l e 1-8 Windows XP Support
Professional Home
Arabic NS NS
Chinese (Simplified) L L(S)
Chinese (Traditional) T S
Chinese (Hong Kong) S S
Czech S S
Danish T S
Dutch S S
English L L
Finnish S S
French L L(S)
German L L(S)
Installing Management Center for Cisco Security Agents 5.2
78-17916-01
Page 31

Chapter 1 Preparing to Install
Greek S S
Hebrew NS NS
Hungarian S S
Italian L L(S)
Japanese L L(S)
Korean L L(S)
Norwegian S S
Polish T T
Portuguese S S
Russian S S
Spanish L L(S)
Swedish S S
Turkish S S
Internationalization Support
Professional Home
78-17916-01
Ta b l e 1-9 Windows 2003 Support
Standard Web Enterprise
Chinese (Simplified) L L(S) L(S)
Chinese (Traditional) T S S
Chinese (Hong Kong) S S S
Czech S S S
Dutch S NA NA
English L L L
French L L(S) L(S)
German L L(S) L(S)
Hungarian S S S
Italian L L(S) L(S)
Japanese L L(S) L(S)
Korean L L(S) L(S)
Installing Management Center for Cisco Security Agents 5.2
1-15
Page 32

Internationalization Support
Polish T T T
Portuguese S S S
Russian S S S
Spanish L L(S) L(S)
Swedish S S S
Turkish S S S
On non-localized but tested and supported language platforms, the administrator
is responsible for policy changes arising from directory naming variations
between languages.
If the previous operating system tables do not indicate that CSA is localized (L)
then the system administrator is responsible for checking to ensure that the toke ns
are in the language they expect and the directory path is the one they intend to
protect.
To determine if language tokens are correct, follow this procedure:
Chapter 1 Preparing to Install
Standard Web Enterprise
1-16
Step 1 Move your mouse over Systems in the menu bar and select Hosts from the
drop-down menu.
Step 2 Click the link to the host name using the language you want to verify.
Step 3 In the Host Status area, click the Detailed Status and Diagnostics link.
Step 4 Click the Diagnose button.
Look at the folder information in the Data area of the Diagnosis Data page. (See
Figure 1-2.) These are the values of the directory tokens CSA needs for
localization. Make sure that the fol der paths are in the language you expect and
that they protect the correct directory.
Installing Management Center for Cisco Security Agents 5.2
78-17916-01
Page 33

Chapter 1 Preparing to Install
Figure 1-2 Diagnosis for Localized Host
About CSA MC
About CSA MC
The CSA MC user interface installs as part of t h e ove r a ll C isco Security Agent
solution installation. It is through a web-based interface that all security policies
are configured and distributed to agents. CSA MC provides monitoring and
reporting tools, letting you generate reports with varying views of your network
enterprise health and status. Providing this web-based user interface allows an
administrator to access CSA MC from any machine running a web brow ser.
See the User Guide for further details.
78-17916-01
Installing Management Center for Cisco Security Agents 5.2
1-17
Page 34

About CSA MC
Chapter 1 Preparing to Install
Figure 1-3 CSA MC, Top Level View
1-18
Installing Management Center for Cisco Security Agents 5.2
78-17916-01
Page 35

Overview
CHA P T ER
2
Deployment Planning
This section provides information on deploying the product as part of pilot
program and scaling the product to 100,000 agent deployments.
This section contains the following topics:
• Piloting the Product, page 2-2
• Running a Pilot Program, page 2-2
• Scalable Deployments, page 2-3
• Hardware Sizing, page 2-3
• Software Considerations, page 2-5
• Configuration Recommendations for Scalability, page 2-5
• Factors in Network Sizing, page 2-6
• Factors in Database Sizing, page 2-7
78-17916-01
• Policy Tuning and Troubleshooting, page 2-7
• Overall Guidelines, page 2-7
• Using Test Mode, page 2-10
• Disabling Specific Rules, page 2-11
• Caching and Resetting Query Resp onses, page 2-12
• Setting Up Exception Rules, page 2-13
Installing Management Center for Cisco Security Agents 5.2
2-1
Page 36

Piloting the Product
Piloting the Product
Before deploying Cisco Security Agents (CSA) on a large scale, it is critical that
you run a manageable and modest initial pilot of the product. Even in a CSA
upgrade situation, a pilot program is required. Due to the un ique configuration of
every individual enterprise, the pre-configured policies that ship with CSA will
not fit ev ery site perfectly. A certain amount of policy tuning is al ways n ecessary.
This tuning is best done on a small sample of systems that are representative of
the whole.
Once the pilot is operating satisfactorily, with CSA protecting systems using
properly tuned policies, you can turn your pilot into a larger deployment.
The following sections provide a guideline for conducting a pilot of CSA and
deploying the product on a large scale.
Running a Pilot Program
Your pilot program should proceed in the following manner:
Chapter 2 Deployment Planning
2-2
• How large should a pilot program be? Select a logical, manageable, sample
of systems on which agents will be installed. A good rule of thumb is to make
your pilot approximately one /one-hundredth the size of what the entire
deployment will be.
Details:
–
If your entire deployment will be very small, be sure to pilot at least
15-20 systems.
–
If your entire deployment will be very large, roll out your pilot in steps.
For example, do not pilot 1,000 systems initially and all at once. Start
with a smaller sample and gradually expand the pilot.
The pilot should include machines that you can access readily (either yourself
or through a responsive end-user). If you will eventually be installing agents
on multiple, supported operating systems, your pilot should includ e machines
running those operating systems. Again, systems in your pilot should be
representative of the whole deployment to which you intend to scale.
Installing Management Center for Cisco Security Agents 5.2
78-17916-01
Page 37

Chapter 2 Deployment Planning
• How long should a pilot pr ogra m run? Basically, the deploying and tuning of
policies is an iterative process. Initially, you will have a great deal of event
log noise to parse. You must examine the data coming in and edit your
policies accordingly.
Details:
–
Although every site is different, it would not be unusual to run a pilot
program for approximately 90 days. All possible application usage
should take place within the pilot time frame. It is important to note that
this recommended time frame allows you to exercise applications, their
deployment and usage, within an ent ire fiscal quarter. The idea being,
every application you use and every manner is which you use it will
occur during this piloting period.
Scalable Deployments
The Cisco Security Agent V5.x release offers scaling of agents to 100,000
systems. To reach this deployment number, there are recommended multi-tiered
CSA MC server system hardware, CPU, and memory requirements. Please refer
to the following section.
Scalable Deployments
Hardware Sizing
This section provides three server configuration examples and three hardware
configuration examples. The server and hardware combinations will be charted in
three tables providing information on how many agents can be deployed using
each server and hardware configuration combination. This should give you an
idea of how to configure CSA to scale up to a 100,000 agent deployment .
For the purpose of this guide, we will use three server configuration examples.
Server Configurations:
1. Single server
2. Two servers: one server for polling and configuration, one database server
3. Three servers: one server for polling, one server for configuration, one
We will use the following hardware configurations.
78-17916-01
database server
Installing Management Center for Cisco Security Agents 5.2
2-3
Page 38

Scalable Deployments
Chapter 2 Deployment Planning
Hardware Configurations:
1. Single processor Pentium 4 (3Ghz+) with 2 GB RAM
2. Dual processor Xeon (2.5 Ghz+) with 4 GB RAM
3. Quad processor Xeon (2.5 Ghz+) with 8 GB RAM
4. Eight-Way Xeon (2.5 Ghz+) with 8 GB RAM
The following tables approximate the number of agents you could deploy with
each server configuration installed on one of four hardware configurations
provided.
Ta b l e 2-1 Server Configuration 1: Single Server
Hardware Configuration Number of Agents
Hardware Configuration 1 2,500
Hardware Configuration 2 5,000
Hardware Configuration 3 10,000
Hardware Configuration 4 20,000
2-4
Ta b l e 2-2 Server Configuration 2: Two Servers
Hardware Configuration Number of Agents
Hardware Configuration 1 7,500
Hardware Configuration 2 15,000
Hardware Configuration 3 30,000
Hardware Configuration 4 75,000
Ta b l e 2-3 Server Configuration 3: Three Servers
Hardware Configuration Number of Agents
Hardware Configuration 1 10,000
Hardware Configuration 2 20,000
Hardware Configuration 3 50,000
Hardware Configuration 4 100,000
Installing Management Center for Cisco Security Agents 5.2
78-17916-01
Page 39

Chapter 2 Deployment Planning
Software Considerations
• CSA MC is only supported on Windows 2003 R2 Standard and Enterprise
operating systems. Only Hardware Configurations 1 and 2 (referenced in
previous tables) support Windows 2003 R2 Standard. Hardware
Configuration 3 with 8GB RAM requires Windows 2003 R2 Enterprise to
take advantage of the increased memory. Refer to the Microsoft web site
product information section for details.
• T o support an y deployment o ver 1,000 agents, you sh ould use Microsoft SQL
Server 2005 in lieu of Microsoft SQL Server Express. Only Hardware
Configuration 1 supports Microsoft SQL Serv er 2005 W or kgroup or Standard
editions with their 4GB RAM limitation.
Note Y our memory consumption needs should dictate your CSA MC operating
system choice, i.e. Window s 2003 R2 Standard and Enterprise.
Configuration Recommendations for Scalability
Scalable Deployments
78-17916-01
If you intend to scale to a deployment of approximately 100,000 agents, there are
some configuration recommendations you should consider.
Set Polling Interval
With 100,000 agen ts deployed across your enterp rise, you want to ensur e that
no more than 20 agents are communicating with the MC approximately every
second or so. Therefore, with a deployment of this size, it is recommended
that you set the polling interval to no less than 1 hour. You can have some
systems polling in every hour and others polling in later than that. But on
average, a 1 hour or higher polling interval is appropriate. Be sure to have the
polling hint functionality enabled, as well.
Use Content Engines
For large deployments, i t is highly recommended that you use con tent engines
with transparent web caching. It makes sense to direct groups of agents to
different content engines in large deployment scenarios. Content engines
reduce the load on the MC by caching rule downloads and software updates.
Installing Management Center for Cisco Security Agents 5.2
2-5
Page 40

Scalable Deployments
Factors in Network Sizing
You can use the following data points for computing product network usage. The
following numbers average tasks based on the upper limit of a 100,000 agent
deployment.
Agent and Configuration Statistics
• Number of agents: 100,000
• Polling interval: 24 hours
• Event retention: 60 days
• Event updates: 3 per agent per day
Task Size Statistics
• Hint message: 1 Kb
• Poll size: 2 Kb
• Event update size: 2.5 Kb
• Policy update size: 35 Kb
• Agent update size: 9,000 Kb
• Agent update (with CTA): 16,000 Kb
Chapter 2 Deployment Planning
2-6
• Tracker (Product only): 100 Kb
• Tracker (Product and non-verbose network): 2,000 Kb
• Tracker (Product and verbose network): 8,000 Kb
Tracker Agent Installation Statistics
• Number of agents in Tracker (Product only) group: 1,000
• Number of agents in Tracker (Product and non-verbose network) group: 100
• Number of agents in Tracker (Product and verbose network) group: 10
Bandwidth Statistics
• Downstream from CSA MC: 1333.33 Kb/sec, continuous
• Upstream to CSA MC: 3600 Kb/sec, continuous
• Policy update (downstream): 5833.33 Kb/sec, during update timeframe
• Agent update (downstream): 2666666.67 Kb/sec, during update timeframe
Installing Management Center for Cisco Security Agents 5.2
78-17916-01
Page 41

Chapter 2 Deployment Planning
• Agent update (with CTA) (downstream): 16666.67 Kb/sec, during update
timeframe
As an example of how you could compute network load using the data points
provided here, take 100,000 agents, each generating an average of 3 events per
day, and multiply Event update size, by number of Event updates, by number of
agents, per a time frame of your choosing and average out a network load.
Factors in Database Sizing
You can use the following data points for computing database sizing. The
following numbers a v erage tabl e size based on th e upper l imit of a 100,0 00 agent
deployment.
• Event table size: 11707.02 Mb
• Formatted event table: 13658.20 Mb
• Other tables: 20000 Mb
• Total database size; 45365.23 Mb
Policy Tuning and Troubleshooting
Policy Tuning and Troubleshooting
Once you have started your CSA pilot, you need to tune the policies to suit your
needs and troubleshoot any problems that occur.
Overall Guidelines
This section presents some overall guidelin es for tuning and t roubleshooting your
CSA pilot. Please read through this section carefully and consider the specific
needs and requirements of your pilot before moving on to actually using the
techniques. Here are the most important guidelines to follow when tuning and
troubleshooting policies:
• Never directly modify one of the supplied groups, policies, or rule modules.
If you need to change a group, policy, or rule module, make sure you clone
and rename it first so you preserve it for use later. Modifying the supplied
groups, policies, and rule modules directly makes it difficult to back out of
any inadvertent mistakes.
Installing Management Center for Cisco Security Agents 5.2
78-17916-01
2-7
Page 42

Policy Tuning and Troubleshooting
• Use the supplied groups and if necessary define additional groups for each
distinct desktop and server type in your network. In your pilot, you should
have some participants that are using each desktop and server type so you can
tune and troubleshoot all policies before deployment.
Group membership is cumulative, which can be useful in tuning and
troubleshooting. For example, at the beginning of a pilot, participating hosts
that are Windows desktops would be attached to the All Windows and
Desktops - All Types groups on the Systems -> Groups menu. Once you
have tuned the basic desktop policies, you might attach some of those hosts
to the Desktops - Remote or mobile group. Once you are satisfied with the
performance of the remote/mobile policies, you could define a new group for
a specific department’s applications, attach hosts to the new group, and pilot
those policies.
• Start piloting all groups in test mode and examine the event log (Events ->
Event Log menu) for possible tuning and troubleshooting needs before
moving to enforcement mode (also known as live mode). With the current
release, you can place all policies fo r a group in test mode or a single rule
module in test mode. Therefore, as you tune and troubl eshoot, you can
incrementally move rule modules to enforcement mode if need be. Keep in
mind when using test mode that the area under test is completely vulnerable
from a security standpoint.
• Policy tuning and troubleshooting is an iterative process. Focus on a single
policy for improvement at a time and then verify that the tuning and
troubleshooting techniques did what you expected before deploying the
improved policy.
Chapter 2 Deployment Planning
2-8
• Prioritize the security features you want to implement with CSA policies.
You can also prioritize applications and groups. By having clear priorities
and working through a single policy improvement at a time, you can manage
the complexity of deploying lar ge polic y sets in lar ge networks. F or example,
based on priorities, you can keep a specific rule module in test mode while
the rest of the rule modules in th e policy are in live mode.
• Large policy sets can generate enormous numbers of log messages, so you
need to use the tools provided that help f ilt er o ut e xtraneous information and
isolate the specific policy to be improved or behavior to be studied. For
example, you can log only the events that result in Deny actions or create an
exception rule that stops logging a specif ic ev ent to reduce the ov erall number
of log messages. In addition, host diagnostics can be used to filter rules based
on the user state (that is, the user and group) the host is in, such as only
Installing Management Center for Cisco Security Agents 5.2
78-17916-01
Page 43

Chapter 2 Deployment Planning
• Set up separate agent kits to support the different features of your pilot. For
There are two general approaches to policy creation, and the approach you choose
affects how you tune and troubleshoot the policies:
• Using the supplied Desktop and Server group policies plus a few
Policy Tuning and Troubleshooting
logging the behavior of the rules used by members of the Administrator
group. Monitor policies can be used in clever ways to focus in on specific
behavior without interrupting applications and services.
example, you might have some desktop kits that have all policies in test
mode, some desktop kits with a basic set of well-tested policies in live mode
plus one experimental policy in test mode, and so forth. Labelling these kits
clearly will help your pilot participants download the rig ht set of policies you
want to test and give you clear feedback on areas needing improvement.
application-specific policies. In this scenario, you attach each participating
host to the following groups:
–
<All <platform>>
–
Desktops - All types or Servers - All types
–
A task-specific group, such as Servers - Apache Web Servers or
Servers - SQL Server 2000
Then, you attach each group to the following policies:
78-17916-01
–
A V irus Scanner polic y . CSA supplies policies for Nor ton, McAfee, and
Trend antivirus software. If you are using a different antivirus product,
you might need to use the generic Virus Scanner policy, or clone it and
make modifications to suit your virus scanner application.
–
An Installation A pplications polic y. CSA supplies installation software
policies for Windows, Linux, and Solaris.
Note If you do not attach antivirus and installation policies to each
participating group of hosts, the CSA event logs will contain a large
number of false positives, making it difficult to manage the pilot.
After attaching the Desktop and Server groups, Virus Scanner policy, and
Installation Application policy, you are ready to create agent kits, start the
pilot, examine the ev ent log, and stage the n ext policy add itions. For example,
if you have a prioritized list of applications to protect, start with the first on
the list, use the Analysis -> Application Behavior Investigation tool to
Installing Management Center for Cisco Security Agents 5.2
2-9
Page 44

Policy Tuning and Troubleshooting
• Creating a completely custom set of policies. In this scenario, you have a
Using Test Mode
CSA policies can execute in live mode, where they enforce rules by denying or
allowing events, or test mode , where the y indicate in the e vent log wh at the action
would have been to the given event. All entries in the event log for rules in test
mode begin with the label
to rules under test. In general, you start a pilot in test mode and gradually change
over to live mode as you examine the performance of each policy. You can use
test mode in two different ways:
Chapter 2 Deployment Planning
understand the behavior of the application, craft a polic y , pl ace it in test mode
on the pilot machines, and examine the event log. Use the techniques in the
rest of this section to tune/troubleshoot that application’s policy, re-examine
the event log, and if you are satisfied with the result, place the application’s
policy in live mode on the pilot machines. You repeat these steps with each
application on your prioritized list.
team of network security experts who have assembled a detailed list of
security features and studied the many supplied rule modules. The experts use
the Analysis -> Application Behavior Investigation tool to thoroughly
study the applications for which they will write rules. Then, the experts will
craft custom policies by selecting the desired rule modules and rules. With
this custom approach, consider conducting a small pilot of a few systems in
a test lab and then expanding to a larger and more thorough pilot.
TESTMODE: to make it easy to scan for events relating
2-10
• Place all policies for a group in test mode.
From the Systems->Groups menu, you use the supplied Systems - test mode
group, which is available for Windows, Linux, and Solaris. You attach hosts
(both desktops and servers) to each appropriate test mode group. You can
make one or more agent kits available for download with the test mode
groups. Be sure to include “test mode” in the name of the agent kit.
When the “test mode” phase of the pilot is completed, you can unattach hosts
from the test mode groups to place the hosts in live mode.
• Place a specific rule module in test mode.
Installing Management Center for Cisco Security Agents 5.2
78-17916-01
Page 45

Chapter 2 Deployment Planning
Note When running your pilot, explain to participants the dif ference between test mode
and live mode, clearly label whether agent kits are for test mode or live mode, and
tell participants which kits to download and use durin g various phases of the pilot.
Test mode is not intended to be used inde finitely because the area under test is
completely vulnerable from a security standpoint. Groups and rule modu les in test
mode should move to live mode in a timely fashion. Once the pilot is over, you
need to carefully control which hosts if any are in test mode. You can remove the
test mode kits to ensure they do not get downloaded durin g deployment and
periodically monitor the Systems - test mode group to ensure that all pilot
participants have mi grated to li ve mode agent kits. You want to av oid the situation
where a security hole exists after deployment because some groups or rule
modules were inadvertently left in test mode.
Policy Tuning and Troubleshooting
If one of the rule modules within a policy is not behaving as expected, you
can place it in test mode while still keeping the remaining rule modules in li ve
mode. To do this, select the Test Mode checkbox on any Configuration ->
Rule Modules -> <platform> Rule Modules -> <module name> page.
Disabling Specific Rules
When you examine the event log with the Events -> Event Log menu, the
description of each event references the rule number. If you find a consistent
pattern of false positives with the same specific rule number, you can disable that
rule if desired. There are two different approaches to disabling rules:
• You can disable the rule te mporarily. At a later time, you can go back and
modify the rule, set up a query with a cached response, or set up an e xception
rule.
• You can disable the rule permanently if the rule protects a re source that you
don’t need protected as part of your security policy.
The easiest way to disable a rule is by clicking on the rule number at the bottom
of the event description in the event log. On the rule page, you click on the
Enabled checkbox to uncheck it and disable the rule. Once you generate the rules,
this rule will be disabled.
78-17916-01
Installing Management Center for Cisco Security Agents 5.2
2-11
Page 46

Policy Tuning and Troubleshooting
Caching and Resetting Query Responses
Rules can be configured with enforcement actions of allow, deny, terminate, or
query the user. In some cases, there are rules that already query the user but do so
repeatedly instead of caching the user’s response to make it persistent. In other
cases, there are rules that are generating a mix of false positives and valid
enforcements in the event log and need to be modified so they query the user and
cache the user’s response for the false positives.
You set up a query and cache the answer with different MC menus:
• To set up a query, you display the rule you wish to modify by cl icking on the
rule number in the event log. You then select Query User from the action
popup menu.
• To ca che the response for a query, select the Configuration -> Variables ->
Query Settings menu option, and then select the desired query from the page.
Then, click on the Enable “don’t ask again” option checkbox if it is not
already checked. When users receive the query and indicate they don’t want
to be asked this query again, their answer is cached.
Chapter 2 Deployment Planning
2-12
Note One trade-off of setting up a cached query response is that users can answer the
query inappropriately and then the inappropriate response becomes persistent.
After setting up a cached query response, review the ev ent log to make sure users
are responding appropriately to the query. If some users give inappropriate
responses, you can reset their agents and then give the users more information
about responding to the query.
If a user has responded to a query inap propriately a nd the respon se is being
cached, you can reset the user’s cache by doing the following:
1. Select the Systems -> Hosts menu option.
2. Click on the <hostname>.
3. Select User Query Responses and click on the Re set Ci sco Sec uri ty Agent
button.
Installing Management Center for Cisco Security Agents 5.2
78-17916-01
Page 47

Chapter 2 Deployment Planning
Setting Up Exception Rules
In some cases, you need two or more different rules to completely specify the
desired actions to a specific event. For example, you could have one rule that
denies all applications from writing to the //blizzard/webdocs directory and
another rule that allows the WebGuru application with authenticated user
webmaster to write to the //blizzard/webdocs directory. The second rule allowing
write access for WebGuru is considered an exception rule because it overrides a
small part of the overall deny rule for the //blizzard/webdocs/ directory. The MC
manipulates the precedence of exception rules so that they are evaluated before
the rules that they override.
Although you can create exception rules with th e MC rule pages, the easie st way
to create exception rules is using the Event Management Wizard from the event
log. The wizard tailors its behavior to the event from which you launch it. You
can use the wizard to create two general types of exception rules:
• Exception rules that under certain conditions allow an event that was denied
• Exception rules that stop logging similar events
To launch the wizard:
1. Select Events -> Event Log.
2. Click on the Wizard link at the bottom of the desired event’s description.
Policy Tuning and Troubleshooting
78-17916-01
The wizard asks you questions about the following:
• Whether the exception rule applies to the user/state conditions of the
triggering rule or the user/state conditions of the specific event where you
launched the wizard. If you want the exception to apply to all users, you
typically want the user/state conditions of the triggering rule (the default). If
you want to create an exception rule only for the user specified in the event,
you need to explicitly select the specific user state conditions radio button
• Whether the description of the proposed exception rule looks correct. Keep
in mind that if you need to make some small changes to the rule, such as the
applications specified, you can do so later. After the wizard finishes, you can
still modify the exception rule further before saving it.
• Whether you want to put this new exception rule in a separate exception rule
module (the default) or modify the rule module that triggered the event. In
most cases, you want to put this in a se parate exception ru le module so you
can preserve the supplied rule modules.
Installing Management Center for Cisco Security Agents 5.2
2-13
Page 48

Policy Tuning and Troubleshooting
• Whether you want the exception r ule based on the appl ication specified in the
event or whether you want to base it on a new application class.
After you click Finish in the wizard, the MC displays the new exception rule. At
this point, you should do the following:
1. Change the Description field to an appropriate name.
2. Examine the details in the when box. If necessary, you can change these
details to expand or narrow the conditions for the exception.
3. Click the Save button .
Chapter 2 Deployment Planning
2-14
Installing Management Center for Cisco Security Agents 5.2
78-17916-01
Page 49

Overview
CHA P T ER
3
Installing the Management Center for Cisco Security Agents
This chapter provides instructions for installing CSA MC. Once you have
reviewed the preliminary information outlined in the previous chapter, you are
ready to proceed.
It is through CSA MC that you create agent installation kits. The tools for creating
agent kits are installed as part o f CSA MC.
This section contains the following topics.
• Licensing Information, page 3-2
• Installing V5.2 and Migrating Configurations and Hosts from Previous
Versions, page 3-3
78-17916-01
• Installation and Migration Overview, page 3-3
• Local and Remote DB Installation Overview, page 3-6
• Installing CSA MC with a Local Database, page 3-8
• Installing CSA MC with a Remote Database, page 3-21
• Installing CSA MC with a Previous Version’s Database (Same System
Installation), page 3-32
• Note for installing two CSA MCs on two separate machines, page 3-37
Installing Management Center for Cisco Security Agents 5.2
3-1
Page 50

Chapter 3 Installing the Management Center for Cisco Security Agents
Licensing Information
• Installation Log, page 3-38
• Accessing Management Center for Cisco Security Agents, page 3-39
• Migration Instructions, page 3-40
• Initiating Secure Communications, page 3-44
• Uninstalling Management Center for Cisco Security Agents, page 3-49
• Copying Cisco Trust Agent Installer Files, page 3-50
Licensing Information
The Management Center for Cisco Security Agents product CD and product
download contains a license key which is automatically imported during the
installation and used to operate the MC itself. If you need further license keys,
before deploying Cisco Security Agents, you should obtain a license key from
Cisco. To receive your license key, you must use the Product Authorization Key
(PAK) label affixed to the claim certificate for CSA MC located in the separate
licensing envelope.
The information contained in your CSA MC license includes the number of
server-agent licenses that have been allotted to you. When you receive your
license from Cisco, you should copy it to the system to which you are installing
CSA MC (or to a file share accessible from the CSA MC system). Then you can
copy the license to the CSA MC directory in the following manner:
3-2
After installing CSA MC, to copy the license to the CSA MC directory, click
Maintenance in the menu bar and select License Information. The License
Information screen appears. You can browse to the license file by clicking the
Browse button. Once the license file is located, click the Upload button to copy
the file into the CSA MC directory.
Installing Management Center for Cisco Security Agents 5.2
78-17916-01
Page 51

Chapter 3 Installing the Management Center for Cisco Security Agents
Installing V5.2 and Migrating Configurations and Hosts from Previous Versions
Installing V5.2 and Migrating Configurations and
Hosts from Previous Versions
If you have previous versions (V5.1, V5.0, V4.5.x or V4.0.3) of the product
installed, installing Management Ce nter for Cisco Sec urity Agents 5 .2 does not
upgrade those previous versions. V5.2 configurations coexists with V5.1, but in
some cases it requires that V5.0 configurations and V4.x configuration be
migrated to V5.1 before then migrating to V5.2.
If you are reusing the same hardware, you must uninstall CSA MC V5.0 and VMS
from your Windows 2000 system, and then you can install 5.2 on your newly
installed Windows 2003 system. Then you could migrate older V5.0.x
configurations and hosts to your 5.2 MC using migration tools that are provided.
The migration procedure is more straightforward if you are not reusing the same
hardware. In that case, you could install Management Center for Cisco Security
Agents 5.2 on the Windows 2003 system and migrate configurations and hosts
from the Management Center for Cisco Security Agents 5.0 or 4.5.x or 4.0.3 on
the Windows 2000 system.
And if you are running Management Center for Cisco Security Agents 5.1 on
Windows 2003, the migration is quite simple.
All migration scenarios mentioned here are detailed in this chapter.
Note Migrating from versions of the product earlier than version 4.0.3 to version 5.2 is
not supported.
Installation and Migration Overview
The following migration to CSA MC V5.2 scenarios are supported. (See
Figure 3-1 for a graphical representation of these upgrade path in stallati on
scenarios.)
• Scenario 1 - Migrating V5.1 to V5.2 - Same System: You can install V5.2
on the same machine as V5.1 and the migration is done automatically.
Installing Management Center for Cisco Security Agents 5.2
78-17916-01
3-3
Page 52

Installation and Migration Overview
• Scenario 2 - Migrating V5.1 to V5.2 - Separate Systems: You can install
V5.2 on a new machine and use the provided migration tools to move V5.1
configurations and hosts to the newly installed V5.2 system.
• Scenario 3 - Migrating V5.0 to V5.1 to V5.2 - Same System: You can
install V5.2 on the same machine where V5.0 resided once V5.0 and VMS are
uninstalled, the database is backed up safely (if local DB) and the system is
running a Windows 2003 OS. Then you can use the migration tools provided
to access and migrate the backed-up V5.0 database while installi ng 5.1 and
5.2 MCs.
• Scenario 4 - Migrating V5.0 to V5.2 - Separate Systems: You can install
V5.2 on a new W indo ws 2003 system an d use the provided m igration tools to
move V5.0 configurations and hosts to the newly installed V5.2 system.
• Scenarios 5 and 6 - Migrating V4.5.x or 4.0.3 (4.x) to V5.2 - All: You can
install V5.2 on a new Windows 2003 system and use the provided migration
tools to move V4.5.x or 4.0.3 configurations and hosts to the newly installed
V5.2 system. You are running CSA MC V4.x on the same system where V5.2
will be installed. You must first upgrade to CSA MC V5.0 before you can
migrate to CSA MC V5.2 using one of the previously mentioned scenarios.
Chapter 3 Installing the Management Center for Cisco Security Agents
3-4
Installing Management Center for Cisco Security Agents 5.2
78-17916-01
Page 53

Chapter 3 Installing the Management Center for Cisco Security Agents
Figure 3-1 Supported Migration Paths
Installation and Migration Overview
78-17916-01
The CSA MC V5.2 installation does not automatically upgrade or overwrite the
older installations. Ultimately, the migration process will allow you to import
your older configuration items into the newly installed V5.2 system. It will also
allow you to migrate hosts to V5.2. After installing V5.2, it is expected that you
will spend some time examining how polic ies and other functionality has changed
between versions and you will gradually apply the V5.2 policies to the migrated
hosts.
Caution For Scenario 2 in Figure 3-1, you should not uninstall V5.1 until you have
migrated all agents to V5.2. Once you install V5.2, you can apply hotfixes to the
old V5.1 version, but you cannot install a V5.1 version of the product once the
V5.0 version is installed in a one system installation scenario.
If you do apply hotfix es t o an old V5.1 v ersion after y ou install V5.2, yo u ha v e to
manually restart the CSA MC system for both MCs to begin running again.
When you install CSA MC V5.2 on the same system as V5.1, you have multiple
versions to select from on the login page. The CSA MC V5.2 installation also
creates a new directory structure. Refer to the following:
Installing Management Center for Cisco Security Agents 5.2
3-5
Page 54

Chapter 3 Installing the Management Center for Cisco Security Agents
Local and Remote DB Installation Overview
Directory Paths Per Version
Cisco Systems\CSAMC\CSAMC52
Cisco Systems\CSAMC\CSAMC51
CSCOpx\CSAMC50
Local and Remote DB Installation Overview
You must have local administrator pri vileges on the system in question to perform
the CSA MC installation. Once you’ve verified system requirements, you can
begin the installation.
Caution After you install CSA MC, you should not change the name of the MC system.
Changing the system name after the product installation will cause agent/CSA
MC communication problems.
New Installation Configuration Options
For a new product install, you have three installation configuration options to
consider before launching the CSA MC installation process.
• You can install CSA MC and the database on the same machine. (Select the
Local Database radio button during the CSA MC installation.)
For a local database configuration, you ha ve the optio n of installing CSA MC
and the included Microsoft SQL Server Express Edition (provided with the
product) on the same system if you are planning to deploy no more than 1,000
agents. In this case, the CSA MC installation also installs its own version of
Microsoft SQL Server Express Edition on the system.
For a local database configuration, you also have the option of installing
Microsoft SQL Server 2005 instead of using the Microsoft SQL Server
Express Edition that is provided. Microsoft SQL Server Express Edition has
a 4 GB database size limit. In this case, you can hav e CSA MC and Microsoft
SQL Server 2005 on the same system depen ding on the number of agents you
are deploying (see
using SQL Server 2005, it must be licensed separately and it must be installed
on the system before you begin the CSA MC installation.
Installing Management Center for Cisco Security Agents 5.2
3-6
Scalable Deployments, page 2-3). Note that if you are
78-17916-01
Page 55

Chapter 3 Installing the Management Center for Cisco Security Agents
Local and Remote DB Installation Overview
Note If your plan is to use SQL Server 2005, it is recommended that you choose one of
the other installation configuration options rather than the local database
configuration.
Note Microsoft SQL Server 2005 is the latest SQL Server database release. That is the
database version that will be used for this installa tion section, b ut you should note
that SQL Server 2000 is also supported at this time.
• You can install CSA MC on one machine and install the database on a remote
machine. (Select the Remote Database radio button during the CSA MC
installation. Note that you must install a Cisco Security Agent on this remote
database to protect this system. See
Microsoft SQL Server 2005 and 2000
Remote Setup, page 3-22.)
Use this configuration option depending on the number of agents you are
deploying (see
Scalable Deployments, pag e 2-3). If you are using a separately
licensed, managed, and maintained SQL Server 2005 database, SQL Server
2005 must be installed and configured on the remote system before you begin
the CSA MC installation.
78-17916-01
Caution If you are installing CSA MC and the database to multiple machines, make sure
the clocks of each machine are in sync. If all clocks are not in sync, unexpected
behavior may occur.
• You can install two CSA MCs on two separate machines and install the
database on a remote machine. In this case, both CSA MCs use the same
remote database. (Select the Remote Database radio button during the CSA
MC installation. Note that you mu st install a C isco Se curity Ag ent on this
remote database to protect this system. See
Microsoft SQL Server 2005 and
2000 Remote Setup, page 3-22.)
This is the recommended configuration if yo u are deploying more than 5,000
agents and are using a separately licensed, managed, and maintained SQL
Server 2005 database. SQL Server 2005 must be installed and configured on
the remote system before you begin the MC installations.
Installing Management Center for Cisco Security Agents 5.2
3-7
Page 56

Chapter 3 Installing the Management Center for Cisco Security Agents
Local and Remote DB Installation Overview
Using this configuration, you can deploy up to 100,000 agents. Having two
CSA MCs lets you use one MC for host registration and polling and another
MC for editing configurations.
Caution If you are installing two CSA MCs with one of the MCs residing on the machine
where the database is installed, you must select the Remote Database radio button
during the installation of both MCs. Even though one MC is “local” to the
database, for the two MCs configuration to work properly, they must both be
configured to communication with the database as though it were remote.
Installing CSA MC with a Local Database
If you are installing both CSA MC and the database to t he same machine with the
provided Microsoft SQL Server Express database, you should install Microsoft
SQL Server Express Edition as part of the CSA MC installation. The CSA MC
installation runs the Microsoft SQL Server Express installation pro gram choosing
the Microsoft SQL Server Express settings the MC needs. During the MC
installation, if you want to install the database on a different system drive from
the MC, the install prompts allow you to do this.
It is recommended that you install SQL Server Express via the CSA MC installer.
If you install it manually as implied that you might do on
know that if you take the SQL Serv er Express defaults, then your su bsequent CSA
MC installation will fail. (See Cautio n below)
page 3-11, you should
3-8
Caution Because Microsoft SQL Server Express is provided on the CD separately, you
might be tempted to install it yourself manually. This is not recommended. If you
install it yourself, you must select specif ic non-defa ult settings for the d atabase to
work with CSA MC. Those settings are provided in another section here, see
Microsoft SQL Server Express Manual Installation Settings, page 3-20. But
again, this is not the recommended deployment.
Before beginning, exit any other programs y ou ha v e running on the system where
you are installing CSA MC.
To install the CSA MC, do the following:
Installing Management Center for Cisco Security Agents 5.2
78-17916-01
Page 57

Chapter 3 Installing the Management Center for Cisco Security Agents
Local and Remote DB Installation Overview
Step 1 Log on as a local Administrator on your Microsoft Server Windows 2003 R2
Standard or Enterprise system.
Step 2 Put the Management Center for Cisco Security Agents CD into the CDROM
drive. The welcome screen appears. Click Next to begin the installation. See
Figure 3-2. (If the installation does not start automatically, browse to the
setup.exe file on the CD and double click to begin the installation.)
Figure 3-2 CSA MC Installation Welcome Screen
78-17916-01
Step 3 After you click Next in the welcome screen, various system checks are performed
before the system installation continues.
Step 4 When the initial system checks are complete, you are prompted to accept the
license agreement. Accept the agreement by clicking Yes. See
Installing Management Center for Cisco Security Agents 5.2
Figure 3-3.
3-9
Page 58

Chapter 3 Installing the Management Center for Cisco Security Agents
Local and Remote DB Installation Overview
Figure 3-3 CSA MC EULA License Agreement
3-10
Step 5 The installati on check i f the needed ports are available.
Figure 3-4 Installation Port Check
Step 6 The installation next asks if you are upgrading from a V5.0 Management Center.
In this case, click No to continue. See
Figure 3-5. (If you are upgrading from a
V5.0 Management Center, click Yes and refe r to Installing CSA MC with a
Previous Version’s Database (Same System Installation), page 3-32.)
Installing Management Center for Cisco Security Agents 5.2
78-17916-01
Page 59

Chapter 3 Installing the Management Center for Cisco Security Agents
Local and Remote DB Installation Overview
Figure 3-5 Upgrade Question Window
Step 7 The install then begins by prompting you to select a database location. In this
case, you will keep the default selection of Local Database and click the Next
butto n . S e e
Figure 3-6 Database Setup Type
Figure 3-6.
78-17916-01
Step 8 If installing locally, the installatio n ne xt checks to see if you ha v e Mi crosoft SQL
Server Express Edition installed. CSA MC uses Microsoft SQL Server Express
Edition for its local configuration database. If this software is not detected, you
are prompted to install it. See
Installing Management Center for Cisco Security Agents 5.2
Figure 3-7.
3-11
Page 60

Chapter 3 Installing the Management Center for Cisco Security Agents
Local and Remote DB Installation Overview
Note For installations exceeding 1,000 agents, it is recommended that you
install Microsoft SQL Server 2005 instead of using the Microsoft SQL
Server Microsoft SQL Server Express Edition that is provided with the
product. Refer to
more information. If you are using Microsoft SQL Server 2005, refer to
Microsoft SQL Server 2005 and 2000 Local Installation Notes, page 3-19
for details.
Caution On a system where CSA MC has not previously been installed, the setup program
first installs Microsoft SQL Server Express Edition. If the CSA MC installati on
detects any other database type attached to an existing installation of Microsoft
SQL Server Express Edition, the installation will abort. This database
configuration is not qualified.
Figure 3-7 Install Microsoft SQL Server Express Edition Prompt
New Installation Configuration Options, page 3-6 for
3-12
Once you click Yes, you proceed thro ugh the Microsoft SQL Server Express
Edition installation. You are prompted to select an Microsoft SQL Serv er Express
Edition install directory. The Microsoft SQL Server Express Edition installation
only takes a few minutes.
Installing Management Center for Cisco Security Agents 5.2
78-17916-01
Page 61

Chapter 3 Installing the Management Center for Cisco Security Agents
Local and Remote DB Installation Overview
Figure 3-8 SQL Server Installation Directory Selection
78-17916-01
SQL Server Express Edition installs .NET Framework on the system and
continues to perform configuration tasks (see
Figure 3-9). The SQL Server
Express Edition windows that appear require no user action.
Installing Management Center for Cisco Security Agents 5.2
3-13
Page 62

Chapter 3 Installing the Management Center for Cisco Security Agents
Local and Remote DB Installation Overview
Figure 3-9 SQL Server Express Edition Configuration Status Window
Note When the Microsoft SQL Server Express Edition installation finishes, the CSA
MC installation automatically begins again. This time the installation detects the
Microsoft SQL Server Express Edition software and proceeds.
3-14
Step 9 You are prompted to select a CSA MC directory installation path. If you would
like to restore a previously backed up CSA MC database, you are prompted to
restore that database at this time. Either accept the default installation path or
browse to a different path to restore an database backup.
Step 10 You are next prompted to enter Administrator Name and Password information.
This the user name and password you will use to login in to CSA MC. See
Figure 3-10. Enter this information and click Next.
Installing Management Center for Cisco Security Agents 5.2
78-17916-01
Page 63

Chapter 3 Installing the Management Center for Cisco Security Agents
Local and Remote DB Installation Overview
Figure 3-10 Enter Administrator Name and Password
78-17916-01
Step 11 You are next prompted to select whether or not you want the system to
automatically reboot once the installation is complete (see
Figure 3-11). It is
required that you reboot the system after the installatio n is complete wh ether you
select Yes to have it done automatically or you choose to manually reboot at the
end.
Figure 3-11 Automatic Reboot Option Prompt
You are next prompted to begin the installation. Click the Install button (s e e
Figure 3-12).
Installing Management Center for Cisco Security Agents 5.2
3-15
Page 64

Chapter 3 Installing the Management Center for Cisco Security Agents
Local and Remote DB Installation Overview
Figure 3-12 Begin Install
3-16
The install then proceeds copying the necessary files to your system. (See
Figure 3-13.). The installation process then continues. (See Figure 3-14.)
Installing Management Center for Cisco Security Agents 5.2
78-17916-01
Page 65

Chapter 3 Installing the Management Center for Cisco Security Agents
Local and Remote DB Installation Overview
Figure 3-13 Copy Files
78-17916-01
Installing Management Center for Cisco Security Agents 5.2
3-17
Page 66

Chapter 3 Installing the Management Center for Cisco Security Agents
Local and Remote DB Installation Overview
Figure 3-14 Installation Proceeds
3-18
Note When the CSA MC installation completes, an agent installation automatically
begins. It is recommended that an agent protect the CSA MC system. (You may
uninstall the agent separately if you choose, but this is not the recommended
configuration.)
If an agent is already installed on a system to which you are installing CSA MC,
that agent will automatically be upgraded by the CSA MC agent installation.
When the MC and agent installs are complete, if you selected to have the system
reboot automatically, you are prompted that the automatic reboot will occur
within 5 minutes. If you selected not to have the system reboot automatically, it
is required that you manually reboot the system at this time.
Once the system reboots, should login to the MC and copy the license key file(s)
you received from Cisco Systems to your CSA MC. CSA MC ships with and
automatically uses a license for the MC and local agent. You must manually
import all other licenses through the MC Maintenance>License Information
window. See the User Guide for license import instructions.
Installing Management Center for Cisco Security Agents 5.2
78-17916-01
Page 67

Chapter 3 Installing the Management Center for Cisco Security Agents
Local and Remote DB Installation Overview
Microsoft SQL Server 2005 and 2000 Local Installation Notes
Note The following instructions are only intended for administrators ch oosing to install
CSA MC and Microsoft SQL Server 2005(or 2000) to the same system. These
instructions are not for administrators using CSA MC with a remote database. If
you are choosing to use Microsoft SQL Server 2005 as a remote database,
information is provided in the section titled
Database, page 3-21. All instructions apply to both Microsoft SQL Server 2005
and 2000 unless otherwise specified.
Caution CSA MC supports Microsoft SQL Server 2005 with Service Pack 0 , Service Pack
1, or Service Pack 2. You should note that if you install a SQL Server 2005 build
that is lower than build number 2153 (released after SP1), the service "SQL
Server Integration Services" will fa il upo n system reboot. You can manually start
the service or you can upgrade to Microsoft SQL Server 2005 SP1 build number
2153 or higher.
Installing CSA MC with a Remote
78-17916-01
For local database installations exceeding 1,000 agents, it is recommended that
you install Microsoft SQL Server 2005 instead of using the Microso ft SQL Server
Express Edition that is provided with the pro duct. Microsoft SQL Server Express
Edition has a 4 GB limit. SQL Server 2005 must be licensed separately and it must
be installed on the local system before you begin the CSA MC installation.
In order for Microsoft SQL Server 2005 to function properly with CSA MC, you
must select certain settings during the installation. Those settings are listed here.
(Refer to your Microsoft SQL Server 2005 manual for detailed installation
information.)
Note You should not change the default instance name of “MSSQLSERVER” for the
SQL Server 2005 database. If you ch ang e this , the CSA MC inst alla tion w ill no t
detect the database.
When installing Microsoft SQL Server 2005, choose the default settings except in
the following instances:
Installing Management Center for Cisco Security Agents 5.2
3-19
Page 68

Chapter 3 Installing the Management Center for Cisco Security Agents
Local and Remote DB Installation Overview
• In the Setup Type installation window, choose the Typical radio button and
in the Destination Folder section, click the various Browse buttons to install
SQL Server on the system.
• In the Services Accounts installation window, choose the Use the same
account for each service radio button. In the Service Settings section,
choose Use a Domain User Account. In the edit fields, enter a Username
and Password for the local administrator account.
• (For Microsoft SQL Server 2005 only) In the Components to Install screen,
select SQL Server Database Services.
• (For Microsoft SQL Server 2000 only) In the Choose Licensing Mode
installation window, select the Per Seat for radio button and then increment
the devices number field to a positive value—at least 1 or 2.
(For Microsoft SQL Server 2005 only) Reboot the system.
(For Microsoft SQL Server 2000 only) Reboot the system and install the most
recent service pack for SQL Server 2000. CSA MC has been qualified with
Service Pack 4. When installing the service pack, choose the default settings
except in the following instances
• When you install the service pack, in the Installation Folder screen, you
should select a drive that has at least 140 MB of free space. For the service
pack installation, choose the default settings in all instances.
• In the SA Password Warning installation screen, select the Ignore the
security threat warning, leave the password blank radio button.
• In the SQL Server 2000 Service Pack Setup installation screen, select the
Upgrade Microsoft Search and apply SQL Server 2000 SP4 (required)
checkbox.
Microsoft SQL Server Express Manual Installation Settings
Because Microsoft SQL Server Express is provided on the CD separately, during
a local database MC installation, you might be tempted to install Microsoft SQL
Server Express yourself manually. This is not recommended. If you install it
yourself, you must select specific non-default settings for the database to work
with CSA MC. Those settings are provided here. But again, this is not the
recommended deployment.
Installing Management Center for Cisco Security Agents 5.2
3-20
78-17916-01
Page 69

Chapter 3 Installing the Management Center for Cisco Security Agents
Local and Remote DB Installation Overview
Caution If you are installing both CSA MC and the database to the same machine with the
provided Microsoft SQL Server Express database, you should install Microsoft
SQL Server Express Edition as part of the CSA MC installation. The CSA MC
installation runs the Microsoft SQL Server Express installation pro gram choosing
the Microsoft SQL Server Express settings the MC needs. During the MC
installation, if you want to install the database on a different system drive from
the MC, the install prompts allow you to do this.
During the Microsoft SQL Server Express manual installation, you can simply
leave all the default settings except in the following cases:
• Registration information dialog - UNCHECK the “Hide advanced
configuration options” option.
• Instance name dialog - Choose the “Default instance” option.
• Service Account - Select “User the built-in system account” and from the
drop down menu, select “Local System”.
Installing CSA MC with a Remote Database
If you are installing one or two CSA MCs and their corresponding database to
different machines, you must first install and properly configure Microsoft SQL
Server 2005 on the remote system according to Microsoft’s instructions. You
should restrict access to this database machine as much as possible using any
access control systems you already have in place on your network.
Caution It is recommended that all installed CSA MCs and remote databases be placed on
a private LAN. If you cannot provide a private LAN, then you should follow
Microsoft’s recommendations for securing communication between database
servers and application servers.
Caution It is important that the time on the database server system closely match the time
on the CSA MC system. Both systems must be in the same time zone and you
should make sure both times are set correctly.
Installing Management Center for Cisco Security Agents 5.2
78-17916-01
3-21
Page 70

Chapter 3 Installing the Management Center for Cisco Security Agents
Local and Remote DB Installation Overview
Caution You must install a Cisco Security Agent on this remote database. This agent
should be in the following groups: Servers-SQL Server, Servers-All types,
Systems-Mission Critical, and Systems-Restricted Networking. You should
install this agent after the last CSA MC has be en installed and rebo oted.
Microsoft SQL Server 2005 and 2000 Remote Setup
Note The following section contains ov ervie w information for setting up the Microsoft
SQL Server 2005 or Microsoft SQL Server 2000 database to work correctly with
CSA MC. More detailed SQL Server configuration informatio n should be
obtained from your Microsoft documentation. All instructions apply to both
Microsoft SQL Server 2005 and 2000 unless otherwise specified.
Caution CSA MC supports Microsoft SQL Server 2005 with Service Pack 0, Service Pack
1, or Service Pack 2. You should note that if you install a SQL Server 2005 build
that is lower than build number 2153 (released after SP1), the service "SQL
Server Integration Services" will fa il upo n system reboot. You can manually start
the service or you can upgrade to Microsoft SQL Server 2005 SP1 build number
2153 or higher.
3-22
In order to enter the requested remote database information during the CSA MC
installation, you must first setup the SQL Server database system by doing the
following. (Note that these steps may be performed by your database
administrators. The procedure is detailed after the bullet list.)
• Create an empty database.
• You must configure a new login ID and password and associate it w ith a n ew
user ID which has the standard access rights on the CSA MC database,
including db_ddladmin, db_datareader, and db_datawriter. Note that the
login ID and user ID must be identical. (db_owner privileges are not
required.)
Installing Management Center for Cisco Security Agents 5.2
78-17916-01
Page 71

Chapter 3 Installing the Management Center for Cisco Security Agents
Local and Remote DB Installation Overview
• (SQL Server 2005 - only instruction) Right-click on the server name and vie w
Properties. On the left side of the Properties panel, click Permissions. In the
table containing the logins and roles, click on t he user id that has been created
for CSA MC. In the explicit permissions list for the user, for the permission
“View Server State”, check the box for “Grant”.
• (SQL Server 2005 - only instruction) Under the created CSA MC database,
select Schema. Create a new schema with a name that is identical to the user
id and login id. Click the Search button and locate the user. Attach this user
to the new schema and click OK. Return to the Users in the database.
Double-click the user id and select the newly created schema as the default
schema.
• Make sure the default language is set to English. Note that you should not
change the language default after CSA MC is installed.
• Make sure that the database is configured to accept SQL Server
authentication.
• You also need to create a file group for the database called “analysis” and it
must have at least one file attached.
More specifically, use the following procedure as a guideline:
78-17916-01
Step 1 Right click your SQL Server. Select the Security tab and set "Authentication" to
SQL Server and Windows. Then click OK.
Step 2 Stop and start sql server.
Step 3 Create new database "CS AMC52".
Step 4 Inside the DB properties, click Data Files and in the File Name box, type
"csamcanalysis", and in the Filegroup field type "ANALYSIS". Then click OK.
Step 5 Expand the "security" + and right-click Logins. Then create a new login. Use SQL
Server Authentication. Set Defaults -> Database = csamc52 database.
Note Do not click anything un der "server roles".
Step 6 In the "database access" section, permit access to csamc52 and give the role of
db_ddladmin. db_datareader and db datawriter permissions must also be
provided. Click OK.
Step 7 Restart the server.
Installing Management Center for Cisco Security Agents 5.2
3-23
Page 72

Chapter 3 Installing the Management Center for Cisco Security Agents
Local and Remote DB Installation Overview
Once this is configured, you can begin the CSA MC installation.
Before beginning, exit any other programs y ou ha v e running on the system where
you are installing CSA MC. To install the CSA MC, do the following:
Step 1 Log on as a local Administrator on your Microsoft Server Windows 2003 R2
Standard or Enterprise system.
Step 2 Management Cent er for Cisco Security Agents CD int o the CDROM drive. The
welcome screen appears. Click Next to begin the installation. (If the installation
does not start automatically, browse to the setup.exe file on the CD and double
click to begin the installation.)
Step 3 The Management Center for Cisco Security Agents appears. After you click Next
in the welcome screen, various system checks are performed before the system
installation continues.
Step 4 When the initial system checks are complete, you are prompted to accept the
license agreement. Accept the agreement by clicking Yes. See
Figure 3-15.
3-24
Installing Management Center for Cisco Security Agents 5.2
78-17916-01
Page 73

Chapter 3 Installing the Management Center for Cisco Security Agents
Local and Remote DB Installation Overview
Figure 3-15 CSA MC EULA License Agreement
78-17916-01
Step 5 The installation asks if you are upgrading from a V5.0 Management Center. In
this case, click No to continue. See
Figure 3-16. (If you are upgrading from a V5.0
Management Center, click Yes and refer to Installing CSA MC with a Previous
Version’s Database (Same System Installation), page 3-32.)
Figure 3-16 Upgrade Question Window
Step 6 The install begins by prompting you to choose a database setup type. In this case,
you will select the Remote Database radio button and click the Next button.
When you select the Remote Database radio button, you are next prompted to
enter the following information for the remote SQL Server database (see
Figure 3-17):
Installing Management Center for Cisco Security Agents 5.2
3-25
Page 74

Chapter 3 Installing the Management Center for Cisco Security Agents
Local and Remote DB Installation Overview
• Name of the server
• Name of the database
• Login ID
• Password
Figure 3-17 Remote Database Information
3-26
Step 7 Once you enter the database information and click Next, the installation attempts
to locate the database and verify that it is conf igured appropriately. If the database
is not setup correctly, you are prompted with this information and the installation
will not continue. Otherwise, the installation proceeds.
Step 8 You are next prompted to select a CSA MC directory installation path. Either
accept the default installation path or browse to a different path.
Installing Management Center for Cisco Security Agents 5.2
78-17916-01
Page 75

Chapter 3 Installing the Management Center for Cisco Security Agents
Local and Remote DB Installation Overview
Figure 3-18 Installation Directory
78-17916-01
Step 9 You are next prompted to enter Administrator Name and Password information.
This the user name and password you will use to login in to CSA MC. See
Figure 3-19. Enter this information and click Next.
Installing Management Center for Cisco Security Agents 5.2
3-27
Page 76

Chapter 3 Installing the Management Center for Cisco Security Agents
Local and Remote DB Installation Overview
Figure 3-19 Enter Administrator Name and Password
3-28
You are next prompted to select whether or not you want the system to
automatically reboot once the installation is complete (see
recommended that you reboot the system after the installation is complete
whether you select Yes to have it done automatically or you choose to manually
reboot at the end.
Figure 3-20 Automatic Reboot Option Prompt
You are next prompted to begin the installation. Click the Install button. (See
Figure 3-21.)
Installing Management Center for Cisco Security Agents 5.2
Figure 3-20). It is
78-17916-01
Page 77

Chapter 3 Installing the Management Center for Cisco Security Agents
Local and Remote DB Installation Overview
Figure 3-21 Begin Install
78-17916-01
The install then proceeds copying the necessary files to your system (see
Figure 3-22).
Installing Management Center for Cisco Security Agents 5.2
3-29
Page 78

Chapter 3 Installing the Management Center for Cisco Security Agents
Local and Remote DB Installation Overview
Figure 3-22 Copy Files
3-30
Once the copying is complete, the installation begins configuration and setup
tasks. See
Installing Management Center for Cisco Security Agents 5.2
Figure 3-23.
78-17916-01
Page 79

Chapter 3 Installing the Management Center for Cisco Security Agents
Local and Remote DB Installation Overview
Figure 3-23 Installation Proceeds
78-17916-01
Note When the CSA MC installation completes, an agent installation automatically
begins. It is recommended that an agent protect the CSA MC system and this is
done automatically for you. (You may uninstall the agent separately if you
choose, but this is not the recommended configuration.)
When the MC and agent installs are complete, if you selected to have the system
reboot automatically, you are prompted that the automatic reboot will occur
within 5 minutes. If you selected not to have the system reboot automatically, it
is recommended that you manually reboot the system at this time.
Once the system reboots, should login to the MC and copy the license key file(s)
you received from Cisco Systems to your CSA MC. CSA MC ships with and
automatically uses a license for the MC and local agent. You must manually
import all other licenses through the MC Maintenance>License Information
window. See the User Guide for license import instructions.
Installing Management Center for Cisco Security Agents 5.2
3-31
Page 80

Chapter 3 Installing the Management Center for Cisco Security Agents
Local and Remote DB Installation Overview
Installing CSA MC with a Previous Version’s Database (Same System Installation)
This section addresses the procedure for backing up and importing a 5.0 database
as part of CSA MC V5.2. same system installation. (Scenarios 3 and 5 in
Figure 3-1).
In order to perform this type of migration you must install a V5.1 MC along with
the V5.2 MC. You must use V5.1 to migrate your V5.0 hosts and data to the V5.2
product schema. V5.1 is provided as an interim tool for bringing all your data into
V5.2 correctly. The V5.2 installation installs both MCs, first 5.1 and then 5.2,
with one reboot at the end.
Note If you are migrating from CSA MC V4.x in a same system installation
scenario, you must first upgrade to CSA MC V5.0. Refer to the CSA MC
V5.0 Installation Guide for that procedure. Once you’ve completed that
upgrade, you can use the following procedure.
3-32
Step 1 Uninstall CSA MCV5.0 per the instructions in your CSA MC V5.0 Installation
Guide. (If V5.0 uses a local database, during the CSA MC V5.0 uninstall
procedure, when prompted, make sure to select to backup the datab ase. When the
uninstall completes, move the backed-up database to a different, network
accessible system.)
Step 2 Re-install that same system with the Windows 2003 R2 operating system.
Install CSA MC V5.2 as follows:
Step 3 Log on as a local Administrator on your Microsoft Server Windows 2003 R2
Standard or Enterprise system.
Step 4 Place the Manageme nt Center for C isco Security Agents CD into the CDROM
drive. The welcome screen appears. Click Next to begin the installation. See
Figure 3-24. (If the installation does not start automatically, browse to the
setup.exe file on the CD and double click to begin the installation.)
Installing Management Center for Cisco Security Agents 5.2
78-17916-01
Page 81

Chapter 3 Installing the Management Center for Cisco Security Agents
Local and Remote DB Installation Overview
Figure 3-24 CSA MC Installation Welcome Screen
78-17916-01
Step 5 After you click Next in the welcome screen, various system checks are performed
before the system installation continues.
Step 6 When the initial system checks are complete, you are prompted to accept the
license agreement. Accept the agreement by clicking Yes. See
Installing Management Center for Cisco Security Agents 5.2
Figure 3-25.
3-33
Page 82

Chapter 3 Installing the Management Center for Cisco Security Agents
Local and Remote DB Installation Overview
Figure 3-25 CSA MC EULA License Agreement
3-34
Step 7 The installation asks if you are upgrading from a V5.0 Management Center. In
this case, click Yes to continue. See
Figure 3-26.
Figure 3-26 Upgrade Question Window
Step 8 Select whether your V5.0 installation used a local or a remote database. See
Figure 3-27.
Installing Management Center for Cisco Security Agents 5.2
78-17916-01
Page 83

Chapter 3 Installing the Management Center for Cisco Security Agents
Local and Remote DB Installation Overview
Figure 3-27 Select V5.0 Database Type
78-17916-01
Step 9 If you select Local Database, you are next asked to browse to the location of the
backed-up V5.0 database. Once you’ve located the database, click Next to
continue. See
Figure 3-28.
If you select Remote Database, you are asked to enter data for accessing the
remote database. This remote database entry screen is the same as
Installing Management Center for Cisco Security Agents 5.2
Figure 3-17.
3-35
Page 84

Chapter 3 Installing the Management Center for Cisco Security Agents
Local and Remote DB Installation Overview
Figure 3-28 Browse to Backed-up V5.0 Database
3-36
Step 10 Once the V5.0 local or remote database is located, the installation will proceed to
install CSA MC V5.1.
Step 11 You must create a user name and password to login into the CSA MC V5.1. See
Figure 3-29. (You will later create another user and password for CSA MC V5.2).
Installing Management Center for Cisco Security Agents 5.2
78-17916-01
Page 85

Chapter 3 Installing the Management Center for Cisco Security Agents
Local and Remote DB Installation Overview
Figure 3-29 Username and Password Creation for V5.1
From here, you can continue by following the procedures detailed in Installing
CSA MC with a Local Database, page 3-8 or Installing CSA MC with a Remote
Database, page 3-21 depending on how you are installing the product. As stated
earlier, the installation will proceed by first installing V5.1 and then directly
begin the V5.2 installation with one reboot at the end of the procedure. For both
V5.1. and V5.2 installations, you must select a database type and setup usernames
and passwords as explained in the procedures referenced above.
Note for installing two CSA MCs on two separate machines
If you are installing two CSA MCs using one remote database, repeat the steps
detailed in this section, entering the same remote database information for the
second MC.
Installing Management Center for Cisco Security Agents 5.2
78-17916-01
3-37
Page 86

Local and Remote DB Installation Overview
Caution When installing two CSA MCs, the first MC you install automatically becomes
the polling and logging MC. The second MC acts as the c onfiguration MC . During
the installation process, the CSA MCs know the order in which the MCs were
installed and direct polling, logg ing, and m anageme nt tasks to the approp riate
MC.
Caution In a distributed MC en vironment , when installin g, upgradin g, or uninstall ing any
MC in the distributed conf iguration, the service must be stopped on the other MCs
and restarted later.
Installation Log
The installation of CSA MC produces a log file. This log file, called
"CSAMC-Install.log" and located in the \CSAMC52\log directory, provides a
detailed list of installation tasks that were performed. If there is a problem with
the installation, this text file should provide information on what task failed
during the install.
Chapter 3 Installing the Management Center for Cisco Security Agents
3-38
Note The installation of the agent produces a similar file called "CSAgent-Install.log"
and is located in the Cisco Systems\CSAgent\log directory on agent host systems.
Installing Management Center for Cisco Security Agents 5.2
78-17916-01
Page 87

Chapter 3 Installing the Management Center for Cisco Security Agents
Accessing Management Center for Cisco Security Agents
Accessing Management Center for Cisco Security
Agents
When the installation has completed and you’ve rebooted the system, a
Management Center for Cisco Security Agents [version number] shortcut icon is
placed on your desktop. Double-clicking this icon launches the MC in your
default browser.
Local Access
To a ccess CSA MC locally on the syste m hosting the CSA MC software:
• Double-click the shortcut icon added to your desktop during the
installation. This launches the management co nsole login screen in your
default browser.
Note See Initiating Secure Communications, page 3-44 if you cannot connect to CSA
MC.
Remote Access
78-17916-01
To a ccess CSA MC from a remote location,
• Launch a browser application on the remote host and enter the follo wing:
http://<management center system hostname>.<domain>
in the Address or Location f ield (dependi ng on the bro wser you’re using)
to access the Login view.
For example, enter http://stormcenter.cisco.com
Note In this example, CSA MC is installed on a host system with the name stormcenter.
Installing Management Center for Cisco Security Agents 5.2
3-39
Page 88

Chapter 3 Installing the Management Center for Cisco Security Agents
Accessing Management Center for Cisco Security Agents
Figure 3-30 CSA MC Login Window
Migration Instructions
The following section contains information for migrating to CSA MC V5.2 from
a previous version installed on the same system as CSA MC V5.2 and for a
previous version installed on a separat e machine. Both scenarios are covered here.
Note If you install 5.2 on the same system where you have 5.1 installed, the majority
of this migration is done automatically.
If you intend to migrate 5.1 Solaris agents, please read Solaris and Linux Agent
Migration, page 3-43 before starting your upgrade.
To migrate to V5.2, do the following:
Installing Management Center for Cisco Security Agents 5.2
3-40
78-17916-01
Page 89

Chapter 3 Installing the Management Center for Cisco Security Agents
Accessing Management Center for Cisco Security Agents
Step 1 Install the Management Center for Cisco Security Agents V5.2. See previous
sections for instructions.
• If you’re installing CSA MC V5.2 on the same machine running CSA MC
V5.1, an xml file containing V5.1 configuration items and several .dat files
containing host information are automatically generated by the installation
and ready for importing once the install is complete.
• If you’re installing CSA MC V5.2 on a different machine from the system
running V5.x or V4.x, after installing V5.2, you must copy and man ually run
an executable file on the V5.x or V4.x machine to create the xml and dat files
needed for importing V5.x or V4.x configurations and host information to
V5.2.
Step 2 If you have installed V5.2 on the same machine as V5.1, you can skip to the end
of Step 6. Otherwise, once you’ve installed CSA MC V5.2 and rebooted the
system, navigate to the CSCOpx\CSAMC52\migration directory. Copy the
appropriate file (named
prepare_<version>_migration.exe depending on
the version you’re migrating from, for example
to your V5.x or V4.x system. (You can copy it to any place on the system.)
Step 3 On your V5.x or V4.x system, disable agent security and run the
prepare_<version>_migration.exe file that you copied from the V5.2
system. (You must disable security in order to run the executable file and create
the import xml data.) This launches a command prompt which displays the
progress of the migration.
Step 4 When the prepare_<version>_migration.exe file is finished, on the V5.x or
V4.x system, navigate to the Cisco
Systems\CSAMC\CSAMC51\migration\export or
CSCOpx\CSAMC50\migration\export directory (again, directory name depends
on the version you’re migrating from) and locate several newly created files. Y our
configuration data is now in a file named
migration_data_export.xml. Your
host data (hosts and distinct host groupings) are now in several files, depending
on how many distinct host groupings existed, named
migration_host_data<number>.dat.
prepare_50_migration.exe)
78-17916-01
Using the data that is now wrapped up in th ese files allows you to import you r
existing policy configurations and your current host groupings, thereby
preserving the policy tuning and host group configurations for your new V5.2
installation.
Installing Management Center for Cisco Security Agents 5.2
3-41
Page 90

Chapter 3 Installing the Management Center for Cisco Security Agents
Accessing Management Center for Cisco Security Agents
Step 5 Next you copy the migration_data_export.xml and all the
migration_host_data<number>.dat
your V5.2 system. These files must exist together in the same directory on the
V5.2 system (although the directory name and location does not matter).
Step 6 Then from the V5.2 system, run the webmgr import utility from a command
prompt to pull the data into the new MC. You cannot use the CSA MC UI Import
utility to do this. That utility does not allow you to import the .dat files that are
associated with the .xml file as one grouping.
From a command prompt window on the V5.2 system, cd to the Cisco
Systems\CSAMC\CSAMC52\bin
%system%Cisco Systems\CSAMC\CSAMC52\bin>webmgr import
%path_to_xml_file%\migration_data_export.xml
Because the host .dat files are associat ed with the .xml f ile, this command import s
both the configuration and host data with the migration_data_export.xml file.
Step 7 Y ou must generate rules once the import is comple te. If you do not generate rules
at this point, you cannot upgrade agent host software as described in the next
section.
files from the V5.x or V4.x system to
directory and run the following:
3-42
Note CSA MC V5.2 ships with policies that contain new V5.2 functionality. This new
functionality does not match allV5.x or V4.x configurations. CSA MC
configuration item names are labeled with the release version number to
distinguish them from older (or newer) configuration items or items created by
administrators. When you import your older configuration, new V5.2 items are
not overwritten. You will likely have items from both versions in your CSA MC
V5.2. If the import process finds that t w o items ha ve the exact same contents and
the only difference is the V5.2 appended name field, the older item is not imported
and the newer V5.2 item is used in its place.
Step 8 To upgrade migrated V5.x or V4.x agents to V5.2, schedule V5.2 software
updates for older agents. You schedule this upgrade from the V5.x or V4.x
system. (Running the
prepare_<version>_migration.exe file placed a V5.2
software update on the V5.x or V4.x machine.)
Once the older agents receive the scheduled software update, they will point to
and register with the ne w CSA MC V5.2. The update contains the appropriate new
certificates to allow this to occur. Once hosts register with V5.2, they will be
associated with the correct groups based on the host migration that you performed
earlier.
Installing Management Center for Cisco Security Agents 5.2
78-17916-01
Page 91

Chapter 3 Installing the Management Center for Cisco Security Agents
Accessing Management Center for Cisco Security Agents
Note Agent kits are configuration items that do not migrate to the new v ersion. Because
host migration does not relate to agent kits, old agents kits are not considered to
be necessary migration items.
Also, configuration items that are not used (not attached to anything) do not
migrate to the new version.
Caution When upgrading V5.x or V4.x agents to software version 5.2, the upgrade
program disables the system network interfaces to ensure a secure upgrade
process. The agent service is also stopped to allow the update to occur. Once the
update is complete, the agent service is restarted and the network interfaces are
enabled. (Note, that secure upgrades are not supported for Windows NT systems.)
Once you have migrated all old agents to the newer version, you can uninstall the
old version of CSA MC. See
Uninstalling Management Center for Cisco Security
Agents, page 3-49.
Solaris and Linux Agent Migration
Caution Solaris agent versions 4.0.3.736 and any 4.5 or 4.5.1 can be upgraded to version
5.2. Earlier Solaris agents cannot be upgraded.
Only Linux agent version 4.5.1.638 and above can be upgraded to version 5.2.
Earlier Linux agents cannot be upgraded.
You should note that the Solaris host migration process is a bit different than
Windows and Linux migration.
Once scheduled, Solaris software upgrades must be launched manually by
accessing the csactl command line tool on the Solaris systems and typing in the
software update command. Wh en the u pdate is complete, netw ork connecti v ity is
disabled and remains disabled until t he system automatically reboots within 5
minutes. This reboot cannot be stopped. Therefore, once you launch the Solaris
software update, you must understand that the system will reboot when the update
completes.
78-17916-01
Installing Management Center for Cisco Security Agents 5.2
3-43
Page 92

Chapter 3 Installing the Management Center for Cisco Security Agents
Initiating Secure Communications
Upgrade Note
Newer versions of policies are not automatically attached to the auto-enrollment
groups during upgrade. If you want t o update the mandat ory policies, you can use
the CSA MC Compare tool to synchronize the existing auto-enrollment groups
with the new updated auto-enrollment groups added by the upgrade.
Initiating Secure Communications
CSA MC uses SSL to secure all communications between the CSA MC user
interface (locally and remotely) and the Management Center for Cisco Security
Agents server system itself. This way, all configuration data travels over secure
channels irrespective of the location of the CSA MC host system.
During installation, CSA MC generates private and public keys to be used for
secure communications between any system accessing the CSA MC user interface
and the CSA MC itself.
When your browser connects to the server, it receiv es the server’s certificate. You
are then prompted to accept this certificate. It is recommended that you import it
into your local certificate database so that you are not prompted to accept the
certificate each time you login. The following sections show the process of
importing certificates into Internet Explorer and Netscape Web browsers.
Internet Explorer: Importing the Root Certificate
Note If you are using Internet Explorer 7.0, you see an “Invalid Certificate” screen
when you first attempt to open a CSA MC browser window. See the end of this
section for further information.
Step 1 You import the certificate from the CSA MC login window. Click the Get root
certificate link. See
Step 2 Select the Open (this file from its current location) button and click OK.
Step 3 The certificate information box appears (see Figure 3-31). It contains information
on the system the certificate is issued to and it displays expiratio n dates. Click the
Install Certificate button to start the Certificate Manager Import Wizard.
Installing Management Center for Cisco Security Agents 5.2
3-44
Figure 3-30.
78-17916-01
Page 93

Chapter 3 Installing the Management Center for Cisco Security Agents
Figure 3-31 Certificate Information
Initiating Secure Communications
78-17916-01
Installing Management Center for Cisco Security Agents 5.2
3-45
Page 94

Initiating Secure Communications
Step 4 The first Certificate Manager Import page contains an overview of certificate
information. Click Next to continue.
Step 5 From the Select a Certificate Store page, make sure the Aut omatically sel ect the
certificate store based on the type of certificate radio bu tton is selected. Click
Next.
Figure 3-32 Certificate Wizard
Chapter 3 Installing the Management Center for Cisco Security Agents
3-46
Installing Management Center for Cisco Security Agents 5.2
78-17916-01
Page 95

Chapter 3 Installing the Management Center for Cisco Security Agents
Step 6 You’ve now imported your certificate for the server. Click the Finish button
Figure 3-33) to continue.
(
Figure 3-33 Certificate Wizard Finish Page
Initiating Secure Communications
78-17916-01
Installing Management Center for Cisco Security Agents 5.2
3-47
Page 96

Chapter 3 Installing the Management Center for Cisco Security Agents
Internet Explorer 7.0: Importing the Root Certificate
Step 7 Now, you must save the certificate. Click the Yes button in the Root Certificate
Store box.
Step 8 You are next prompted with a confirmation box informing you that your
certificate was created successfully.
Note You must perform this certificate import process the first time you login
to CSA MC from any remote machine. Once the certificate import is
complete, you can access the login page directly for all management
sessions. To access the login page remotely, enter the URL in the
following format.
http://<management center system hostname>.<domain>
For example, enter http://stormcenter.cisco.com
Caution If you have not obtained a valid license from Cisco, when you login to CSA MC,
you’ll receive a warning informing you that your license is not valid. Refer back
to page 3-2 for further licensing information.
Internet Explorer 7.0: Importing the Root Certificate
If you are using Internet Explorer 7.0, you see an “Invalid Certificate” screen
when you first attempt to open a CSA MC browser window. When that screen
appears, click the Continue to this website (not recommended) link, see
Figure 3-34. Then you can continue by following instructions in Internet
Explorer: Importing the Root Certificate, page 3-44.
You will only see this screen the first time you access the CSA MC browser in IE
7.0. Once you follow the instructions and import the root certificate, the screen
should not appear again.
Installing Management Center for Cisco Security Agents 5.2
3-48
78-17916-01
Page 97

Chapter 3 Installing the Management Center for Cisco Security Agents
Uninstalling Management Center for Cisco Security Agents
Figure 3-34 Internet Explorer 7.0 Certificate Screen
Uninstalling Management Center for Cisco Security
Agents
Uninstall the CSA MC software as follows:
Step 1 Click the uninstall CSA MC option on the system from Start>All
Programs>Cisco Systems>Uninstall Management Center for Cisco Security
Agents. This launches the uninstall program.
You must respond to uninstall confirmation and database back-up prompts during
the uninstall process. The CSA MC uninstall also removes the Cisco Security
Agent on the MC system.
Installing Management Center for Cisco Security Agents 5.2
78-17916-01
3-49
Page 98

Chapter 3 Installing the Management Center for Cisco Security Agents
Copying Cisco Trust Agent Installer Files
Note Uninstalling CSA MC does not uninstall the Microsoft SQL Server
Desktop Engine (database). You must uninstall this separately from the
Control Panel>Add/Remove Programs window if you are completely
removing the product from your system.
Caution If you are upgrading to a new version of CSA MC, or if you are reinstalling the
product on the same system, and you want to preserve yo ur current conf iguration,
you should select to Backup the Database during the uninstall when you are
prompted to do so. If you do not backup the database, the uninstall removes all
program files and configurations. (Note that this only applies to local database
installations. CSA MC does not provide a backup mechanism for remote databases.)
Copying Cisco Trust Agent Installer Files
Cisco Trust Agent (CTA) is an optional application you may install as part of an
agent kit. The goal of bundling CTA in an agent kit is to facilitate the distribution
of CTA. CTA is a separate application from CSA and has its own security
objectives.
3-50
If you intend to distribute CTA through an agent kit, copy your CTA installer files
to the system running CSA MC.
Note Distribution of CTA through agent kits is only supported for Windows versions
of CTA.
To c opy the CTA installer files, follow this procedure:
Step 1 Obtain the desired CTA installer files from Cisco Systems.
Caution If you are intending to install CTA version 2.1 or later, you must extract an .msi
installer file from the initial CtaAdminEx-xxx-xxx**.exe file you receive. If you
copy the .exe file itself to CSA MC, the CTA installation will fail. Simply
Installing Management Center for Cisco Security Agents 5.2
78-17916-01
Page 99

Chapter 3 Installing the Management Center for Cisco Security Agents
Copying Cisco Trust Agent Installer Files
double-click the CtaAdminEx-xxx-xxx**.exe file and agree to the EULA
(license) to extract the ctasetup-xxx-xxx.msi file. It is this msi file that you copy
to the CSA MC system.
Note It is the user’s responsibility to verify that they have obtained the correct
CTA installer files.
Step 2 Copy the CTA installer files to the
%Program Files%\CSAMC52\bin\webserver\htdocs\cta_kits directory.
The default Cisco Security Agent policies protect this directory. When you copy
the files into the directory, CSA prompts you to determine if you want to allow
the action. Select the Yes radio button and click Apply. Repeat this step for every
file you copy into this directory.
Note Refer to the Agent Kits section of the User Guide for information on installing the
CTA files you have just copied.
78-17916-01
Installing Management Center for Cisco Security Agents 5.2
3-51
Page 100

Chapter 3 Installing the Management Center for Cisco Security Agents
Copying Cisco Trust Agent Installer Files
3-52
Installing Management Center for Cisco Security Agents 5.2
78-17916-01
 Loading...