

Page 1

Cisco IP Phone Productivity Services User Guide
Corporate Headquarters
Cisco Systems, Inc.
170 West Tasman Drive
San Jose, CA 95134-1706
USA
http://www.cisco.com
Tel: 408 526-4000
800 553-NETS (6387)
Fax: 408 526-4100
Customer Order Number: DOC-7813565=
Text Part Number: 78-13565-01
Page 2

THE SPECIFICATIONS AND INFORMATION REGARDING THE PRODUCTS IN THIS MANUAL ARE SUBJECT TO CHANGE WITHOUT
NOTICE. ALL STATEMENTS, INFORMATION, AND RECOMMENDATIONS IN THIS MANUAL ARE BELIEVED TO BE ACCURATE BUT
ARE PRESENTED WITHOUT WARRANTY OF ANY KIND, EXPRESS OR IMPLIED. USERS MUST TAKE FULL RESPONSIBILITY FOR
THEIR APPLICATION OF ANY PRODUCTS.
THE SOFTWARE LICENSE AND LIMITED WARRANTY FOR THE ACCOMPANYING PRODUCT ARE SET FORTH IN THE INFORMATION
PACKET THAT SHIPPED WITH THE PRODUCT AND ARE INCORPORATED HEREIN BY THIS REFERENCE. IF YOU ARE UNABLE TO
LOCATE THE SOFTWARE LICENSE OR LIMITED WARRANTY, CONTACT YOUR CISCO REPRESENTATIVE FOR A COPY.
The Cisco implementation of TCP header compression is an adaptation of a program developed by the University of California, Berkeley (UCB) as
part of UCB’s public domain version of the UNIX operating system. All rights reserved. Copyright © 1981, Regents of the University of California.
NOTWITHSTANDING ANY OTHER WARRANTY HEREIN, ALL DOCUMENT FILES AND SOFTWARE OF THESE SUPPLIERS ARE
PROVIDED “AS IS” WITH ALL FAULTS. CISCO AND THE ABOVE-NAMED SUPPLIERS DISCLAIM ALL WARRANTIES, EXPRESSED
OR
IMPLIED, INCLUDING, WITHOUT LIMITATION, THOSE OF MERCHANTABILITY, FITNESS FOR A PARTICULAR PURPOSE AND
NONINFRINGEMENT OR ARISING FROM A COURSE OF DEALING, USAGE, OR TRADE PRACTICE.
IN NO EVENT SHALL CISCO OR ITS SUPPLIERS BE LIABLE FOR ANY INDIRECT, SPECIAL, CONSEQUENTIAL, OR INCIDENTAL
DAMAGES, INCLUDING, WITHOUT LIMITATION, LOST PROFITS OR LOSS OR DAMAGE TO DATA ARISING OUT OF THE USE OR
INABILITY TO USE THIS MANUAL, EVEN IF CISCO OR ITS SUPPLIERS HAVE BEEN ADVISED OF THE POSSIBILITY OF SUCH
DAMAGES.
AccessPath, AtmDirector, Browse with Me, CCIP, CCSI, CD-PAC, CiscoLink, the Cisco Pow er ed Network logo, Cisco Systems Networking
Academy, the Cisco Systems Networking Academy logo, Fast Step, Follow Me Browsing, FormShare, FrameShare, GigaStack, IGX, Internet
Quotient, IP/VC, iQ Breakthrough, iQ Expertise, iQ FastTrack, the iQ Logo, iQ Net Readiness Scorecard, MGX, the Networkers logo, Pac ket ,
RateMUX, ScriptBuilder, ScriptShare, SlideCast, SMARTnet, TransPath, Unity, Voice LAN, Wavelength Router, and WebViewer are trademarks of
Cisco Systems, Inc.; Changing the Way We Work, Live, Play, and Learn, Discover All That’s Possible, and Empowering the Internet Generation, are
service marks of Cisco Systems, Inc.; and Aironet, ASIST, BPX, Catalyst, CCDA, CCDP, CCIE, CCNA, CCNP, Cisco, the Cisco Certified
Internetwork Expert logo, Cisco IOS, the Cisco IOS logo, Cisco Systems, Cisco Systems Capital, the Cisco Systems logo, Enterprise/Solver,
EtherChannel, EtherSwitch, FastHub, FastSwitch, IOS, IP/TV, LightStream, MICA, Network Registrar, PIX, Post-Routing, Pre-Routing, Registrar,
StrataView Plus, Stratm, SwitchProbe, TeleRouter, and VCO are registered trademarks of Cisco Systems, Inc. and/or its affiliates in the U.S. and
certain other countries.
All other trademarks mentioned in this document or Web site are the property of their respective owners. The use of the word partner does not imply
a partnership relationship between Cisco and any other company. (0106R)
Cisco IP Phone Productivity Services User Guide
Copyright © 2001, Cisco Systems, Inc.
All rights reserved.
Page 3

Audience vii
Organization viii
Related Documentation ix
Conventions ix
Obtaining Documentation xi
World Wide Web xi
Documentation CD-ROM xi
Ordering Documentation xii
Documentation Feedback xii
Obtaining Technical Assistance xiii
Cisco.com xiii
Technical Assistance Center xiii
Contacting TAC by Using the Cisco TAC Website xiv
Contacting TAC by Telephone xiv
CONTENTS
CHAPTER
CHAPTER
78-13565-01
1 Understanding Cisco IP Phone Productivity Services 1-1
CalendarView 1-2
MailView 1-3
Contacts Synchronization 1-4
2 Subscribing to Cisco IP Phone Productivity Services 2-1
Cisco IP Phone Productivity Services User Guide
iii
Page 4

Contents
CHAPTER
3 Using Cisco IP Phone Productivity Services 3-1
Navigating Cisco IP Phone Services 3-2
Tips for Using the LCD Display 3-3
Accessing Cisco IP Phone Productivity Services 3-4
Logging in to Cisco IP Phone Productivity Services 3-5
How Login Works 3-5
Ending a Session 3-8
Using CalendarView 3-9
Checking New Meetings 3-12
Checking Your Schedule for Today 3-14
Checking Your Weekly Schedule 3-17
Viewing Your Schedule for a Specific Date 3-20
Setting Your Meeting Reminder 3-21
Using MailView 3-24
Logging in to MailView 3-24
Changing your MailView Login 3-26
Checking your Cisco Unity Voice Mail 3-28
Using MailView’s Options for Cisco Unity Voice Mail 3-31
Checking your E-mail 3-34
CHAPTER
iv
Using Contacts Synchronization 3-37
4 Common Questions about Cisco IP Phone Productivity Services 4-1
Do I Have to Enter My Login PIN Every Time? 4-1
Why Can’t I Access Cisco IP Phone Productivity Services? 4-2
Service Subscription Parameters Error 4-2
Meeting Reminder Not Displaying 4-2
Authentication Error 4-3
Host Not Found Error 4-3
Phone Hangs On “Requesting...” 4-3
Cisco IP Phone Productivity Services User Guide
78-13565-01
Page 5

Why Can’t I Connect to MailView? 4-4
Validation Error 4-4
Sending Error 4-4
Can’t Connect To Mail Server 4-5
UserName or Password Error 4-5
Can’t Play Voice Mail 4-6
Reply Mail Not Delivered as Voice Mail 4-6
Deleting Error 4-6
Contents
78-13565-01
Cisco IP Phone Productivity Services User Guide
v
Page 6

Contents
vi
Cisco IP Phone Productivity Services User Guide
78-13565-01
Page 7

Preface
Cisco Personal Assistant provides Cisco IP Phone Productivity Services, a suite
of applications for Cisco
The Cisco IP Phone Productivity Services User Guide provides instructions for
subscribing to and using Cisco
will help you to:
• Understand Cisco IP Phone Productivity Services and how its features work.
• Subscribe to Cisco IP Phone Productivity Services.
• Use Cisco IP Phone Productivity Services.
• Resolve any problems with using Cisco IP Phone Productivity Services.
IP Phone Models 7960 and 7940.
IP Phone Productivity Services. This document
Audience
78-13565-01
The Cisco IP Phone Productivity Services User Guide is written for users of
Cisco
IP Phone Productivity Services.
Cisco IP Phone Productivity Services Administrator’s Guide
vii
Page 8

Organization
Organization
This guide is organized as follows:
Chapter Title Description
Chapter 1 Understanding Cisco IP
Chapter 2 Subscribing to
Chapter 3 Using Cisco IP Phone
Chapter 4 Common Questions about
Phone Productivity
Services
Cisco IP Phone
Productivity Services
Productivity Services
Cisco IP Phone
Productivity Services
Preface
A general overview of
Cisco
IP Phone
Productivity Services.
Sequenced procedures for
subscribing to Cisco
Productivity Services.
Information on how to use
Cisco
IP Phone
Productivity Services.
Answers to common questions and
how to resolve error messages.
IP Phone
viii
Cisco IP Phone Productivity Services Administrator’s Guide
78-13565-01
Page 9

Preface
Related Documentation
For information about using the Cisco IP Phones, refer to the following
documents:
• Cisco IP Phone Models 7960 and 7940 At a Glance
• Cisco IP Phone Models 7960 and 7940 User Guide
For information about Cisco CallManager, refer to the following documents:
• Cisco CallManager System Guide
• Cisco CallManager Configuration Guide
For information about using Personal Fast Dials, refer to the following document:
• Personal Directory Configuration Guide
Conventions
This document uses the following conventions:
Related Documentation
78-13565-01
Convention Description
boldface font Commands and keywords are in boldface.
italic font Arguments for which you supply values are in italics.
[ ] Elements in square brackets are optional.
{ x | y | z } Alternative keywords are grouped in braces and
separated by vertical bars.
[ x | y | z ] Optional alternative keywords are grouped in brackets
and separated by vertical bars.
string A nonquoted set of characters. Do not use quotation
marks around the string or the string will include the
quotation marks.
screen font Terminal sessions and information the system displays
are in
screen font.
boldface screen
font
Information you must enter is in boldface screen
font.
Cisco IP Phone Productivity Services Administrator’s Guide
ix
Page 10
Conventions
Preface
Convention Description
italic screen font Arguments for which you supply values are in italic
screen font.
^ The symbol ^ represents the key labeled Control—for
example, the key combination ^D in a screen display
means hold down the Control key while you press the
D key.
< > Nonprinting characters, such as passwords are in angle
brackets.
Notes use the following conventions:
Note Means reader take note. Notes contain helpful suggestions or references to
material not covered in the publication.
Timesavers use the following conventions:
Timesaver Means the described action saves time. You can save time by performing the
action described in the paragraph.
Tips use the following conventions:
Tips Means the following are useful tips.
Cautions use the following conventions:
Caution Means reader be careful. In this situation, you might do something that could
result in equipment damage or loss of data.
Cisco IP Phone Productivity Services Administrator’s Guide
x
78-13565-01
Page 11

Preface
Obtaining Documentation
Warnings use the following conventions:
Warning
This warning symbol means danger. You are in a situation that could cause
bodily injury. Before you work on any equipment, you must be aware of the
hazards involved with electrical circuitry and familiar with standard
practices for preventing accidents.
Obtaining Documentation
The following sections provide sources for obtaining documentation from
Cisco
Systems.
World Wide Web
You can access the most current Cisco Systems documentation on the World
Wide Web at the following sites:
• http://www.cisco.com
• http://www-china.cisco.com
• http://www-europe.cisco.com
Documentation CD-ROM
78-13565-01
Cisco documentation and additional literature are available in a CD-ROM
package, which ships with
updated monthly and may be more current than printed documentation. The
CD-ROM package is available as a single unit or as an annual
your product. The Documentation CD-ROM is
subscription.
Cisco IP Phone Productivity Services Administrator’s Guide
xi
Page 12

Obtaining Documentation
Ordering Documentation
Cisco Systems documentation is available in the following ways:
• Registered Cisco Direct Customers can order Cisco Product documentation
from the Networking Products MarketPlace:
http://www.cisco.com/cgi-bin/order/order_root.pl
• Registered Cisco.com users can order the Documentation CD-ROM through
the online Subscription Store:
http://www.cisco.com/go/subscription
• Nonregistered CCO users can order documentation through a local account
representative by calling Cisco corporate headquarters (California, USA) at
408
526-7208 or, in North America, by calling 800 553-NETS(6387).
Documentation Feedback
If you are reading Cisco product documentation on the World Wide Web, you can
submit technical comments electronically. Click Feedback in the toolbar and
select Documentation. After you complete the form, click Submit to send it to
Cisco.
You can e-mail your comments to bug-doc@cisco.com.
To submit your comments by mail, for your convenience many documents contain
a response card behind the front cover. Otherwise, you can mail your comments
to the following address:
Preface
xii
Cisco Systems, Inc.
Document Resource Connection
170 West Tasman Drive
San Jose, CA 95134-9883
We appreciate your comments.
Cisco IP Phone Productivity Services Administrator’s Guide
78-13565-01
Page 13

Preface
Obtaining Technical Assistance
Cisco provides Cisco.com as a starting point for all technical assistance.
Customers and partners can obtain documentation, troubleshooting tips, and
sample configurations from online tools. For Cisco.com registered users,
additional troubleshooting tools are available from the TAC website.
Cisco.com
Cisco.com is the foundation of a suite of interactive, networked services that
provides immediate, open access to Cisco information and resources at anytime,
from anywhere in the world. This highly integrated Internet application is a
powerful, easy-to-use tool for doing business with Cisco.
Cisco.com provides a broad range of features and services to help customers and
partners streamline business processes and improve productivity. Through
Cisco.com, you can find information about Cisco and our networking solutions,
services, and programs. In addition, you can resolve technical issues with online
technical support, download and test software packages, and order Cisco learning
materials and merchandise. Valuable online skill assessment, training, and
certification programs are also available.
Customers and partners can self-register on Cisco.com to obtain additional
personalized information and services. Registered users can order products, check
on the status of an order, access technical support, and view benefits specific to
their relationships with Cisco.
To access Cisco.com, go to the following website:
Obtaining Technical Assistance
http://www.cisco.com
Technical Assistance Center
The Cisco Technical Assistance Center (TAC) website is available to all
customers who need technical assistance with a Cisco product or technology that
is under warranty or covered by a maintenance contract.
Cisco IP Phone Productivity Services Administrator’s Guide
78-13565-01
xiii
Page 14

Obtaining Technical Assistance
Contacting TAC by Using the Cisco TAC Website
If you have a priority level 3 (P3) or priority level 4 (P4) problem, contact TAC
by going to the TAC website:
http://www.cisco.com/tac
P3 and P4 level problems are defined as follows:
• P3—Your network performance is degraded. Network functionality is
noticeably impaired, but most business operations continue.
• P4—You need information or assistance on Cisco product capabilities,
product installation, or basic product configuration.
In each of the above cases, use the Cisco TAC website to quickly find answers to
your questions.
To register for Cisco.com, go to the following website:
http://www.cisco.com/register/
If you cannot resolve your technical issue by using the TAC online resources,
Cisco.com registered users can open a case online by using the TAC Case Open
tool at the following website:
http://www.cisco.com/tac/caseopen
Preface
Contacting TAC by Telephone
If you have a priority level 1(P1) or priority level 2 (P2) problem, contact TAC
by telephone and immediately open a case. To obtain a directory of toll-free
numbers for your country, go to the following website:
http://www.cisco.com/warp/public/687/Directory/DirTAC.shtml
P1 and P2 level problems are defined as follows:
• P1—Your production network is down, causing a critical impact to business
operations if service is not restored quickly. No workaround is available.
• P2—Your production network is severely degraded, affecting significant
aspects of your business operations. No workaround is available.
Cisco IP Phone Productivity Services Administrator’s Guide
xiv
78-13565-01
Page 15

CHAPTER
1
Understanding Cisco IP Phone Productivity Services
Cisco Personal Assistant provides Cisco IP Phone Productivity Services, a suite
of applications for Cisco
markup language (XML)-based applications, you can check your calendar, e-mail
and voice mail, and you can synchronize contact information, using your phone's
LCD display and interactive soft keys.
Cisco IP Phone Productivity Services consist of these applications:
• CalendarView, page 1-2
• MailView, page 1-3
• Contacts Synchronization, page 1-4
IP Phone Models 7960 and 7940. With these extensible
78-13565-01
Cisco IP Phone Productivity Services User Guide
1-1
Page 16

CalendarView
CalendarView
With CalendarView, you can manage your appointments using your Cisco IP
Phone. From your phone, you can be notified of new meetings, view your
meetings for today, for the week. for any day of the current week, or for a specific
date.
You can view the details of a meeting and then accept, tentatively accept or
decline that meeting. If the meeting notice has a phone number included with it,
you can click a soft key to dial the number to join the meeting. If you are the
originator of the meeting notice, you can cancel the meeting from your phone.
CalendarView also allows you to set up reminders for meetings and choose how
to be notified of an upcoming event, by pager or e-mail or by the phone display.
CalendarView works with Cisco CallManager in conjunction with
Microsoft
Figure 1-1 shows your CalendarView main menu.
Figure 1-1 CalendarView Main Menu
Chapter 1 Understanding Cisco IP Phone Productivity Services
Exchange 5.5 or Windows 2000 server.
1-2
09:44 06/08/01
Calendar Menu
1New Meetings
2Today's Schedule
3Weekly Schedule
4Select a Date
5Meeting Reminder Setting
Select Exit
Cisco IP Phone Productivity Services User Guide
63018
78-13565-01
Page 17

Chapter 1 Understanding Cisco IP Phone Productivity Services
MailView
With MailView, you no longer have to rely on voice prompts to check your
messages. From your Cisco IP Phone Models 7960 or 7940, you now get a list of
the voice mail and e-mail messages that are in your inbox on your corporate
messaging server.
Using your phone’s soft keys, you can view, listen to, record a reply, forward, and
delete voice mail. You can scroll through your e-mail messages and read them
right on the screen. You can also forward and delete e-mails. Any operation you
perform on your messages using MailView is reflected in your PC-based e-mail
client or traditional voice mail interface automatically.
MailView provides you with a list of your Cisco Unity voice mail and Cisco Unity
e-mail and up to two additional IMAP-compliant e-mail accounts.
Note Many e-mail servers provide IMAP support. Contact your mail server
administrator if you require information about your supported e-mail servers.
In Figure 1-2, Driftwood is the IMAP-compliant e-mail server.
MailView
78-13565-01
Figure 1-2 MailView Main Menu
09:44 06/08/01
MailView
1 Check Unity Voice Mail
2 Check Unity Email
3 Driftwood Email Server
Make Your Selection
Select Reset Exit
Cisco IP Phone Productivity Services User Guide
1004
.
.
.
.
.
.
.
.
.
.
.
.
.
.
.
.
.
.
.
.
.
.
.
.
.
.
.
.
.
.
.
.
.
.
.
.
.
.
.
.
.
.
.
.
.
.
.
.
.
.
.
.
.
.
.
.
.
.
.
.
63089
1-3
Page 18

Contacts Synchronization
Contacts Synchronization
If you use Outlook, Contacts Synchronization allows you to synchronize the
entries in your Personal
Contacts stored in the Microsoft Exchange mail server.
You do not have to enter your contact list in the Cisco CallManager directory.
Contacts Synchronization automatically copies the information from the
Microsoft Exchange mail server to the Cisco
You can use Contacts Synchronization along with the Personal Fast Dials service
to quickly locate someone in your Personal
call that person. See the Personal Directory Configuration Guide for information
on using Personal Fast Dials.
Related Topics:
• Subscribing to Cisco IP Phone Productivity Services, page 2-1
• Using Cisco IP Phone Productivity Services, page 3-1
Address Book in Cisco CallManager with the Outlook
Chapter 1 Understanding Cisco IP Phone Productivity Services
CallManager directory.
Address Book and press a soft key to
1-4
Cisco IP Phone Productivity Services User Guide
78-13565-01
Page 19

CHAPTER
Subscribing to Cisco IP Phone Productivity Services
Before you can use Cisco IP Phone Productivity Services, you must first
subscribe to Cisco
Tips If you do not know the URL for the Cisco IP Phone User Options web page or
your user ID, password and PIN, contact your system administrator before you
proceed.
To subscribe to Cisco IP Phone Productivity Services, perform the following
steps:
Procedure
IP Phone Productivity Services in Cisco CallManager.
2
78-13565-01
Step 1 Go to your Cisco IP Phone User Options page and enter your userID and
password.
The Configure the Options for your Phone page displays.
Step 2 At the Configure the Options for your Phone page, select a device to configure,
such as your primary phone.
A new Configure the Options for your Phone page displays.
Cisco IP Phone Productivity Services User Guide
2-1
Page 20
Chapter 2 Subscribing to Cisco IP Phone Productivity Services
Step 3 Click Configure your Cisco IP Phone Services.
The Cisco IP Phone services page displays.
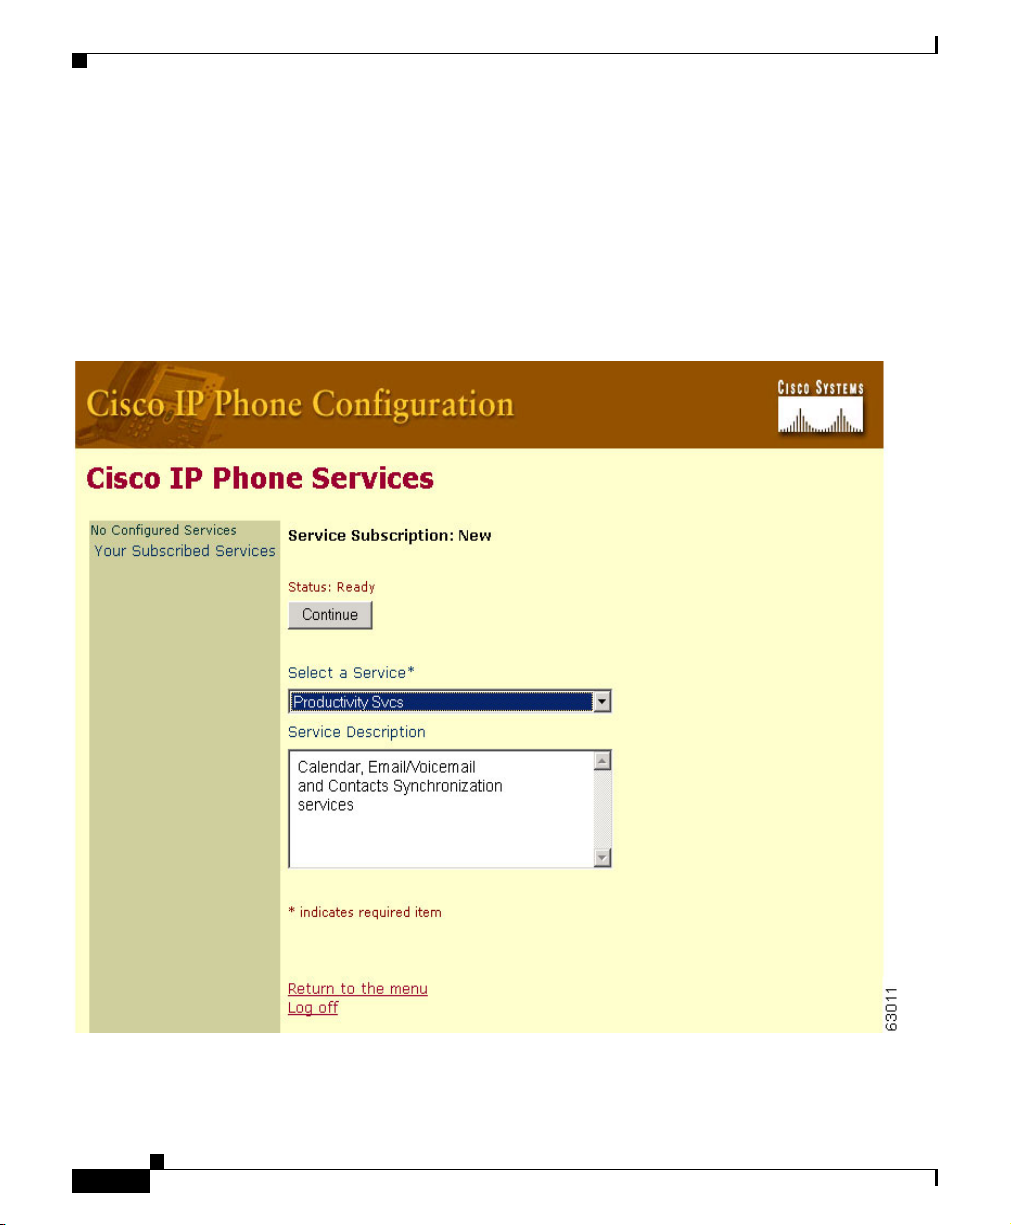
Step 4 From the Your Subscribed Services pane on the left side of the page, select
Productivity Svcs.
A new Cisco IP Phone Services page displays (see Figure 2-1).
Figure 2-1 Subscribing to Cisco IP Phone Productivity Services
2-2
Cisco IP Phone Productivity Services User Guide
78-13565-01
Page 21
Chapter 2 Subscribing to Cisco IP Phone Productivity Services
Step 5 Click Continue.
A new page displays.
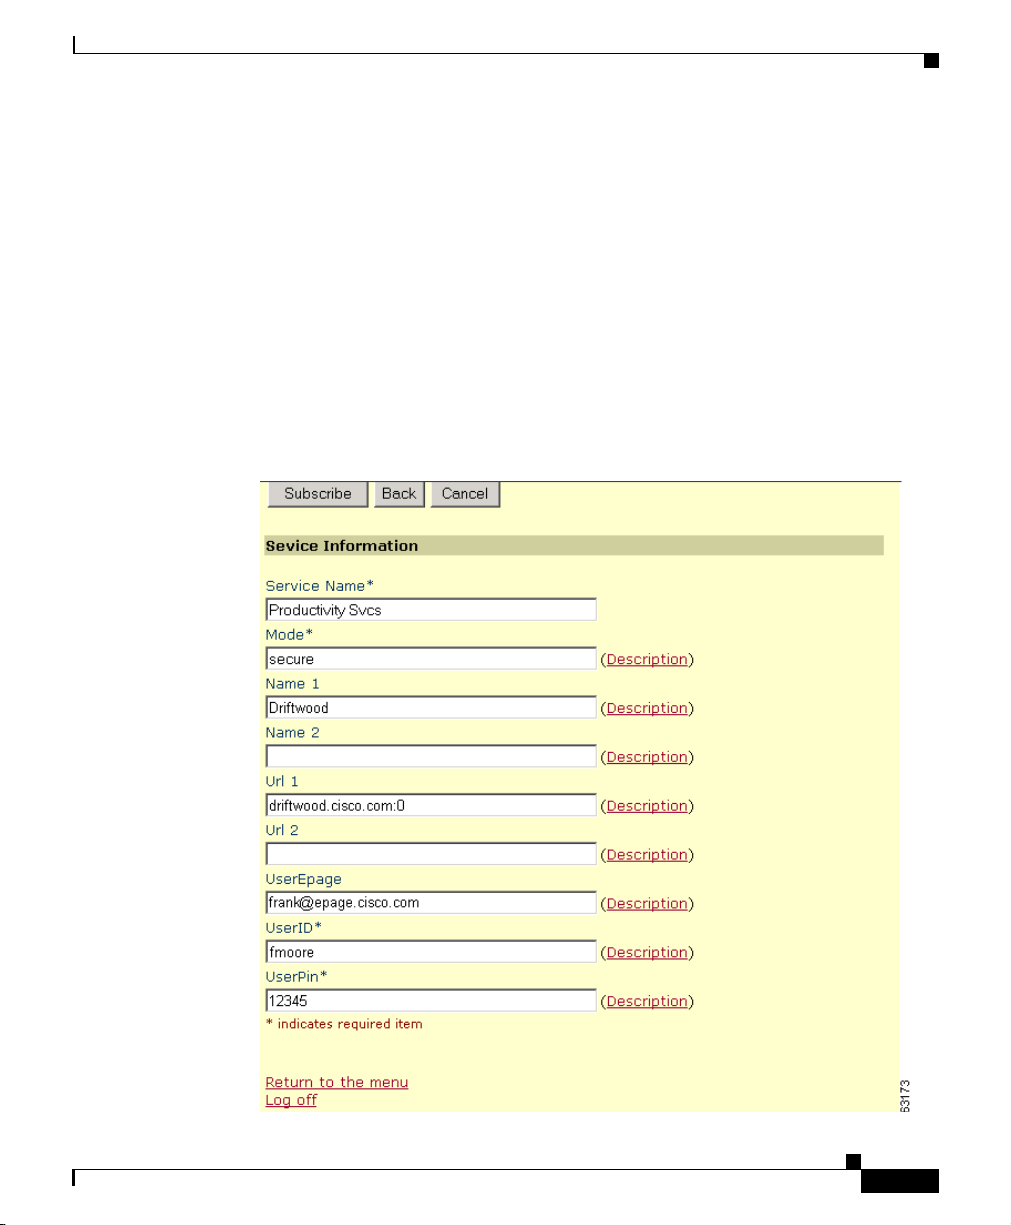
Step 6 Enter your service information for Cisco IP Phone Productivity Services.
Figure 2-2 shows the service fields completed. Use Table 2-1 to help you enter the
service information.
In the example shown in Figure 2-2, the user, Frank Moore, left the mode at secure
(the default). He will be prompted to enter his PIN when he logs in to
Cisco
IP Phone Productivity Services. Driftwood is his optional e-mail account
with an address of Cisco.com. Frank has an e-page account where he can be
notified of meeting reminders.
Figure 2-2 Entering Service Information
78-13565-01
Cisco IP Phone Productivity Services User Guide
2-3
Page 22

Chapter 2 Subscribing to Cisco IP Phone Productivity Services
Ta b l e 2-1 Entering Service Information
Service Field Description Required
Mode Enter secure (default value) to prevent others from
accessing your Cisco
IP Phone Productivity Services;
you are prompted to enter your UserPin each time you
access Cisco
IP Phone Productivity Services.
Enter non-secure if you do not want to be prompted
for your UserPin each time.
Name 1 Enter the name for e-mail account 1 No
Name 2 Enter the name for e-mail account 2 No
Url 1 Enter the IMAP-compliant MailView e-mail account
URL for IP: Port #1
For example:172.17.146.123:143
Url 2 Enter the IMAP-compliantMailView e-mail account
URL for IP:Port #2:
For example:172.17.146.123:143
UserEpage Enter your pager number or your e-mail number for
meeting reminders.
UserID Enter your Cisco CallManager UserID. Yes
UserPIN Enter your Cisco CallManager UserPin. Yes
Yes
No
No
No
2-4
Note MailView uses URL1 and URL2. For URL1 and URL2, use :0 for the default
port number or use :xxx for the custom port number. Contact your mail server
administrator for a port number if the default does not work.
Step 7 Click Subscribe.
You are now subscribed to Cisco IP Phone Productivity Services.
Related Topics:
• Understanding Cisco IP Phone Productivity Services, page 1-1
• Using Cisco IP Phone Productivity Services, page 3-1
Cisco IP Phone Productivity Services User Guide
78-13565-01
Page 23

CHAPTER
Using Cisco IP Phone Productivity Services
These sections help you use Cisco IP Phone Productivity Services:
• Navigating Cisco IP Phone Services, page 3-2
• Accessing Cisco IP Phone Productivity Services, page 3-4
• Logging in to Cisco IP Phone Productivity Services, page 3-5
• Ending a Session, page 3-8
• Using CalendarView, page 3-9
• Using MailView, page 3-24
• Using Contacts Synchronization, page 3-37
3
78-13565-01
Cisco IP Phone Productivity Services User Guide
3-1
Page 24

Chapter 3 Using Cisco IP Phone Productivity Services
Navigating Cisco IP Phone Services
Navigating Cisco IP Phone Services
You access Cisco IP Phone Services through the Services button on the
Cisco
IP Phone Models 7960 and 7940 (see Figure 3-1). The Services button on
your Cisco IP Phone works in tandem with the Cisco IP Phone User Options web
page. When you press the Services button, the phone displays a menu of services
that has been configured for that telephone.
You navigate around the services options and provide input using:
• soft keys to perform various tasks, such as select and submit
• a Navigation button to scroll up and down menu lists
• the dialing pad to enter a selection directly
Figure 3-1 Navigating Cisco IP Phone Services
1
3-2
Productivity Svcs
Cisco IP Phone Productivity Services User Guide
2
3
45
58682
78-13565-01
Page 25

Chapter 3 Using Cisco IP Phone Productivity Services
Tips for Using the LCD Display
Here are some tips for using the LCD screen on your Cisco IP Phone. These tips
can help you navigate menus and soft key options that display on your phone’s
LCD screen when you press the Services button.
• There are two ways to select menu items:
–
Using the Navigation button—Press the Navigation button (this is the
button with the up and down arrows) to select (or highlight) a menu item.
Then press the Select soft key.
–
Using an Item Number—You can press the number key on your phone’s
key pad that corresponds to the item number displayed on the LCD
screen. For example, to choose Productivity Svcs in
Use this method to select any menu item that has an item number to the
left of it.
• Press the Exit soft key to return to the previous menu.
• Soft keys correspond to the option tabs displayed along the bottom of your
LCD screen. Soft keys change depending on the status of your phone. For
example, you can see one set of soft key options when you pick up the
handset, and another set when the phone is not in use.
• The >> soft key allows you to re-position your cursor. The << soft key allows
you to delete a character or digit in an entry. Press the << soft key or the
Delete soft key if you make a mistake or need to edit an entry.
Navigating Cisco IP Phone Services
Figure 3-1, press 1.
78-13565-01
Related Topics:
• Using Cisco IP Phone Productivity Services, page 3-1
• Accessing Cisco IP Phone Productivity Services, page 3-4
Cisco IP Phone Productivity Services User Guide
3-3
Page 26

Chapter 3 Using Cisco IP Phone Productivity Services
Accessing Cisco IP Phone Productivity Services
Accessing Cisco IP Phone Productivity Services
To access Cisco IP Phone Productivity Services, perform these steps:
Procedure
Step 1 From your Cisco IP Phone, press the Services button.
The screen displays your list of services.
Step 2 Select Productivity Svcs in one of two ways:
• Use the Navigation button to scroll to Productivity Svcs and press the Select
soft key.
• Press the number key on your phone’s dialing pad that corresponds to the item
number displayed on the LCD screen.
Tips The item number next to Productivity Svcs varies depending on the number of
services you have configured on your phone.
3-4
The screen displays the services available with Cisco IP Phone
Productivity
Figure 3-2 Main Menu for Cisco IP Phone Productivity Services
09:44 06/18/01
Productivity Svcs
1 Login
2 CalendarView
3 MailView
4 Contacts Synchronization
5 Logout
Make your selection
Select
Note To check the version of Cisco IP Phone Productivity Services:
use the Navigation button to scroll to item 6 About Productivity Svcs and press
the Select soft key or enter 6 on the dialing pad.
Cisco IP Phone Productivity Services User Guide
Services (see Figure 3-2).
Exit
.
.
.
.
.
.
.
.
.
.
.
.
.
.
.
.
.
.
.
.
.
.
.
.
.
.
.
.
.
.
.
.
.
.
.
.
.
.
.
.
.
.
.
.
.
.
.
.
63101
78-13565-01
Page 27

Chapter 3 Using Cisco IP Phone Productivity Services
Logging in to Cisco IP Phone Productivity Services
Step 3 Proceed to the“Logging in to Cisco IP Phone Productivity Services” section on
page 3-5.
Related Topics:
• Navigating Cisco IP Phone Services, page 3-2
• Accessing Cisco IP Phone Productivity Services, page 3-4
Logging in to Cisco IP Phone Productivity Services
Cisco IP Phone Productivity Services Login allows you to access these services
from your own Cisco
Model
How Login Works
7960 or 7940 that is configured for Cisco IP Phone Productivity Services.
IP Phone Model 7960 or 7940 or any Cisco IP Phone
78-13565-01
Cisco Phone Productivity Services Login from your Cisco IP Phone:
• If you set your service mode to secure when you subscribe to Cisco IP Phone
Productivity
access Cisco
• If you set your service information to non-secure when you subscribe to
Cisco
PIN number.
Cisco IP Phone Productivity Services Login from another Cisco IP Phone:
• You can access your Cisco IP Phone Productivity Services by changing the
displayed UserID to your UserID and entering your PIN.
Services, you are prompted to enter your PIN each time you
IP Phone Productivity Services.
IP Phone Productivity Services, you are not prompted to enter your
Cisco IP Phone Productivity Services User Guide
3-5
Page 28

Logging in to Cisco IP Phone Productivity Services
To log in to Cisco IP Phone Productivity Services, perform these steps:
Procedure
Step 1 From the Cisco IP Phone Productivity Services main menu (see Figure 3-2),
select 1 Login in one of two ways:
• Use the Navigation button to scroll to 1 Login and press the Select soft key.
• Press the number key 1 on your phone’s dialing pad.
The UserID screen displays (see Figure 3-3).
Note If you have not already logged in to Cisco IP Phone Productivity Services, the
Login screen displays when you first select one of its applications:
2 CalendarView, 3 MailView or 4 Contacts Synchronization.
Figure 3-3 Login Screen
Chapter 3 Using Cisco IP Phone Productivity Services
3-6
09:44 06/08/01
Login
Your User ID:
Your PIN:
Please sign on
Submit << Cancel
Step 2 At the UserID screen:
a. If you are using your own Cisco IP Phone:
Enter your PIN (if prompted) and press the Submit soft key.
Cisco IP Phone Productivity Services User Guide
thomasj
1004
.
.
.
.
.
.
.
.
.
.
.
.
.
.
.
.
.
.
.
.
.
.
.
.
.
.
.
.
.
.
.
.
.
.
.
.
.
.
.
.
.
.
.
.
.
.
.
.
63017
78-13565-01
Page 29

Chapter 3 Using Cisco IP Phone Productivity Services
b. If you are using someone else’s Cisco IP Phone:
–
Use the << soft key to backspace and delete the displayed UserID.
–
Enter your UserID.
To enter your UserID, enter the letters of the alphabet using your dialing
pad. Press the phone key associated with a letter. To scroll through the
letters associated with each key, press the key rapidly. For example, press
2 to display the letter “a.” To enter the letter “b,” press 2 again without
pausing. Press the << soft key to back up.
–
Enter your PIN using the dialing pad.
–
Press the Submit soft key.
• If you logged in correctly, the phone displays:
Login successful for user <your user name> Please wait
Redirecting.....
• If you have made an error entering your information, the phone displays:
Login failed for user <userID>. Please make sure the UserID and
PIN are correct.
Logging in to Cisco IP Phone Productivity Services
78-13565-01
Re-enter your information. Contact your system administrator if you continue
to have password problems.
After you log in successfully, the Cisco IP Phone Productivity Services main
menu displays (see
Figure 3-2).
You are now ready to use your Cisco IP Phone Productivity Services.
Proceed to:
• Using CalendarView, page 3-9
• Using MailView, page 3-24
• Using Contacts Synchronization, page 3-37
Or, to log out of Cisco IP Phone Productivity Services, go to the “Ending a
Session” section on page 3-8.
Related Topics:
• Accessing Cisco IP Phone Productivity Services, page 3-4
Cisco IP Phone Productivity Services User Guide
3-7
Page 30

Ending a Session
Ending a Session
To end a session of Cisco IP Phone Productivity Services, perform the following
steps:
Step 1 To end a session of Cisco IP Phone Productivity Services, select 5 Logout.
You can select 5 Logout in one of two ways:
• Use the Navigation button to scroll to 5 Logout and press the Select soft key.
• Press the number key 5 on your phone’s dialing pad.
Step 2 When prompted, press the Services button to exit.
Note After 20 minutes, you are automatically logged out of Cisco IP Phone
Productivity
system administrator.
Chapter 3 Using Cisco IP Phone Productivity Services
Services. If you would like this time extended, contact your
3-8
Related Topics:
• Logging in to Cisco IP Phone Productivity Services, page 3-5
• Using CalendarView, page 3-9
• Using MailView, page 3-24
• Using Contacts Synchronization, page 3-37
Cisco IP Phone Productivity Services User Guide
78-13565-01
Page 31

Chapter 3 Using Cisco IP Phone Productivity Services
Using CalendarView
With CalendarView, you can keep track of your appointments on your
Cisco
IP Phone. You can be notified of new meetings, and you can view your
meetings for today, for a week, for any day of the current week, or for a specific
date.
You can define which of your meetings display and accept. tentatively accept or
decline meetings. If the meeting notice has a phone number included with it, you
can click a soft key to dial the number to join the meeting. If you are the originator
of the meeting notice, you can cancel the meeting from your phone.
CalendarView also allows you to set up reminders for meetings and choose how
to be notified of an upcoming event, by pager/e-mail or by the phone display.
To use CalendarView, perform these steps:
Procedure
Step 1 From your Cisco IP Phone, press the Services button.
The screen displays your list of services.
Step 2 Select Productivity Svcs in one of two ways:
Using CalendarView
78-13565-01
• Use the Navigation button to scroll to Productivity Svcs and press the Select
soft key.
• Press the number key on your phone’s dialing pad that corresponds to the item
number displayed on the LCD screen.
Tips The item number next to Productivity Services will vary depending on the
number of services you have configured on your phone.
The screen displays the services available with Cisco IP Phone
Productivity
Services (see Figure 3-2).
Cisco IP Phone Productivity Services User Guide
3-9
Page 32

Using CalendarView
Step 3 Select 2 CalendarView in one of two ways:
Note If you have not already logged in to Cisco IP Phone Productivity Services,
Chapter 3 Using Cisco IP Phone Productivity Services
• Use the Navigation button to scroll to 2 CalendarView and press the Select
soft key.
• Press the number key 2 on your phone’s dialing pad.
you may be prompted to enter your PIN now. See the
Cisco IP Phone Productivity Services” section on page 3-5.
The phone displays the CalendarView Main Menu (see Figure 3-4).
Figure 3-4 Calendar View Main Menu
09:44 06/08/01
Calendar Menu
1New Meetings
2Today's Schedule
3Weekly Schedule
4Select a Date
5Meeting Reminder Setting
“Logging in to
3-10
Select Exit
See Tabl e 3-1 to help you determine which CalendarView service you want to use.
Cisco IP Phone Productivity Services User Guide
63018
78-13565-01
Page 33

Chapter 3 Using Cisco IP Phone Productivity Services
Ta b l e 3-1 Using CalendarView
Using CalendarView
CalendarView
Service
From Your Cisco IP Phone You Can
To Use the
CalendarView Service
1 New Meetings Check new meetings and accept or decline them. See Checking New
Meetings, page 3-12
2 Today’s Schedule View your meetings for today and accept or decline
them.
See Checking Your
Schedule for Today,
page 3-14
3 Weekly Schedule Check your schedule for the current week displayed on
one screen, and view your schedule for the previous
week, and the following week.
See Checking Your
Weekly Schedule,
page 3-17
4 Select a Date Check your schedule quickly for a specific date. See Viewing Your
Schedule for a Specific
Date, page 3-20
5 Meeting
Reminder Setting
Set which meetings display, based on their importance,
and choose how you are notified of meetings: by
pager/e-mail or by phone display.
Related Topics:
• Logging in to Cisco IP Phone Productivity Services, page 3-5
See Setting Your
Meeting Reminder,
page 3-21
78-13565-01
• Checking New Meetings, page 3-12
Cisco IP Phone Productivity Services User Guide
3-11
Page 34

Using CalendarView
Checking New Meetings
With the New Meetings service, you can quickly view your new meeting notices.
You can accept, tentatively decline or decline them from your Cisco IP Phone. If
the meeting notice includes a phone number for the meeting, you can call into the
meeting with the click of the DialNum soft key.
To use this service, perform the following steps:
Procedure
Step 1 From the CalendarView Menu (see Figure 3-4), select 1 New Meetings in one of
two ways:
• Use the Navigation button to scroll to 1 New Meetings and press the Select
soft key.
• Press the number key 1 on your phone’s dialing pad.
The phone displays your new meetings (see Figure 3-5).
Chapter 3 Using Cisco IP Phone Productivity Services
3-12
Figure 3-5 New Meetings Menu
09:44 06/08/01
New Meetings
1. Kickoff meeting @ 8:00am
2. Project review @ 11:00am
Select meeting to see details
Select AcptAll
Cisco IP Phone Productivity Services User Guide
Exit
.
.
.
.
.
.
.
.
.
.
.
.
.
.
.
.
.
.
.
.
.
.
.
.
.
.
.
.
.
.
.
.
.
.
.
.
.
.
.
.
.
.
.
.
.
.
.
.
63378
78-13565-01
Page 35

Chapter 3 Using Cisco IP Phone Productivity Services
Step 2 On the New Meetings screen:
• Press the AcptAll soft key to respond that you will attend all the listed
meetings.
• Use the Navigation button to scroll to a meeting and press the Select soft key
or enter the item number of the meeting to see details for that meeting (see
Figure 3-6).
• Press the Exit soft key to return to the CalendarView main menu.
Figure 3-6 Meeting Detail Screen
09:44 06/08/01
Meeting Details
Sub: Safety Training
Loc: Training Room C
Time: 8/12/2001 4:00:00PM
- 8/12/2001 5:00:00PM
Sent by: J Smith
Scroll down for more details
Accept Unsure Decline
Step 3 On the Meeting Details screen, you can:
Exit
Using CalendarView
.
.
.
.
.
.
.
.
.
.
.
.
.
.
.
.
.
.
.
.
.
.
.
.
.
.
.
.
.
.
.
.
.
.
.
.
.
.
.
.
.
.
.
.
.
.
.
.
62225
78-13565-01
• Press the Accept soft key to accept the meeting. The phone displays:
You have accepted the meeting.
• Press the Unsure soft key to respond that you may not be able to attend the
meeting. The phone displays:
You have tentatively accepted the meeting.
• Press the Decline soft key to decline a meeting. The phone displays:
You have declined the meeting.
Step 4 Press Exit to return to the New Meetings menu (see Figure 3-5).
Related Topics:
• Checking Your Schedule for Today, page 3-14
Cisco IP Phone Productivity Services User Guide
3-13
Page 36

Using CalendarView
Checking Your Schedule for Today
To view your appointments for today, perform the following steps:
Procedure
Step 1 From the CalendarView Menu (see Figure 3-4), select 2 Today’s Schedule in one
of two ways:
• Use the Navigation button to scroll to 2 Today’s Schedule and press the Select
soft key.
• Press the number key 2 on your phone’s dialing pad.
Your scheduled meetings display on your phone (see Figure 3-7).
If you have no meetings scheduled, the phone displays:
No appointments scheduled.
Figure 3-7 Today’s Schedule Menu
Chapter 3 Using Cisco IP Phone Productivity Services
3-14
09:44 06/08/01
Today's Schedule
1. Luncheon meeting @ 11:30 am
2. Staff meeting @ 3:30 pm
Select a meeting to see details
Select
Step 2 Select the meeting for which you want to view information in one of two ways:
• Use the Navigation button to scroll to the meeting and press the Select soft
key.
• Press the number key on the dialing pad that corresponds to the meeting.
Cisco IP Phone Productivity Services User Guide
Exit
.
.
.
.
.
.
.
.
.
.
.
.
.
.
.
.
.
.
.
.
.
.
.
.
.
.
.
.
.
.
.
.
.
.
.
.
.
.
.
.
.
.
.
.
.
.
.
.
63172
78-13565-01
Page 37

Chapter 3 Using Cisco IP Phone Productivity Services
The Meeting Details screen displays the meeting subject, location, time, and
sender (see
Step 3 Use the Navigation button to scroll to view the complete message text.
Figure 3-8 Meeting Detail Screen
09:44 06/08/01
Meeting Details
Sub: Safety Training
Loc: Training Room C
Time: 8/12/2001 4:00:00PM
- 8/12/2001 5:00:00PM
Sent by: J Smith
Scroll down for more details
Accept Decline DialNum
In the Meeting Details screen, the first soft key may display a soft key of Accept
or Unsure, depending on how you have responded to the meeting notice. This
allows you to change your response to a meeting notice:
• If you have tentatively accepted the meeting, the screen displays an Accept
soft key (as shown in
Figure 3-8).
Exit
Figure 3-6).
Using CalendarView
.
.
.
.
.
.
.
.
.
.
.
.
.
.
.
.
.
.
.
.
.
.
.
.
.
.
.
.
.
.
.
.
.
.
.
.
.
.
.
.
.
.
.
.
.
.
.
.
63379
78-13565-01
• If you have already accepted the meeting, the screen displays an Unsure soft
key.
Step 4 To manage your meetings you can:
• Press the Accept soft key to accept a meeting that you tentatively accepted
before. The phone displays:
You have accepted the meeting.
• Press the Unsure soft key to respond that you may not be able to attend the
meeting. The phone displays:
You have tentatively accepted the meeting.
• Press the Decline soft key to decline a meeting. The phone displays:
You have declined the meeting.
• If the sender included a phone number in the meeting text, press the DialNum
soft key to call the meeting.
Cisco IP Phone Productivity Services User Guide
3-15
Page 38

Using CalendarView
Step 5 On the Meeting Detail screen (see Figure 3-9):
Chapter 3 Using Cisco IP Phone Productivity Services
• If you are the originator of the meeting, you can press the CnclMtg soft key
to cancel the meeting.
• Press the Exit soft key to return to the Today’s Schedule menu (Figure 3-7).
Figure 3-9 Meeting Detail Screen
09:44 06/08/01
Meeting Details
Sub: Safety Training
Loc: Training Room C
Time: 8/12/2001 4:00:00PM
- 8/12/2001 5:00:00PM
Sent by: J Smith
Scroll down for more details
CnclMtg DialNum
Exit
.
.
.
.
.
.
.
.
.
.
.
.
.
.
.
.
.
.
.
.
.
.
.
.
.
.
.
.
.
.
.
.
.
.
.
.
.
.
.
.
.
.
.
.
.
.
.
.
62215
3-16
Related Topics:
• Checking New Meetings, page 3-12
• Checking Your Weekly Schedule, page 3-17
Cisco IP Phone Productivity Services User Guide
78-13565-01
Page 39

Chapter 3 Using Cisco IP Phone Productivity Services
Checking Your Weekly Schedule
With the Weekly Schedule service, you can view your schedule for this week, next
week or last week on one screen. You can also choose to view your schedule for
a specific day of the week, from Monday to Friday. To check your weekly
schedule, perform the following steps:
Procedure
Step 1 From the CalendarView Menu (see Figure 3-4), select 3 Weekly Schedule in one
of two ways:
• Use the Navigation button to scroll to 3 Weekly Schedule and press the Select
soft key.
• Press 3 on the dialing pad.
You can select 1Current Week or any day from Monday to Friday. Use the
Navigation button to scroll to 6 Friday (
current day, if it falls Monday through Friday. In Figure 3-10, the current day is
Thursday.
Using CalendarView
Figure 3-10). “Today” displays next to the
78-13565-01
Figure 3-10 Weekly Schedule Menu
09:44 06/08/01
Calendar Menu
1 Current Week
2 Monday
3 Tuesday
4 Wednesday
5 Thursday - Today
Make your selection
Select
Step 2 Choose a menu item in one of two ways:
• Use the Navigation button to scroll to any of the days of the week (2 through
6), and press the Select soft key.
• Enter the number on the dialing pad.
Exit
Cisco IP Phone Productivity Services User Guide
.
.
.
.
.
.
.
.
.
.
.
.
.
.
.
.
.
.
.
.
.
.
.
.
.
.
.
.
.
.
.
.
.
.
.
.
.
.
.
.
.
.
.
.
.
.
.
.
63020
3-17
Page 40

Using CalendarView
Step 3 On the Calendar Menu screen:
Chapter 3 Using Cisco IP Phone Productivity Services
• Select one of the days of the week, you view your schedule for that day.
• Select 1 CurrentWeek to view an entire week of appointments in one screen
(see
Figure 3-11).
Figure 3-11 Current Week Menu
09:44 06/18/01
8:00
AM
5:00
Pm
Press key 1-5 (M-F) for details
Step 4 Keys 1 through 5 correspond to the days of the week.
Enter a number from 1 through 5 on the dialing pad to see details of your schedule
on that specific day. For example, enter 3 to see Wednesday’s schedule.
The screen displays the details of your meeting (see Figure 3-12).
Step 5 Use the Navigation button to scroll down and view meeting information.
Figure 3-12 Viewing Meeting Details
09:44 06/08/01
Sub: Benefits Overview
Loc: HR Conference Room
Time: 8/13/2001 9:00:00AM
- 8/13/2001 10:00:00 AM
Sent by: P Scott
Scroll down for more details
Accept Decline Exit
MTWThF
Prev Next Exit
Meeting Details
15270
DialNum
63096
.
.
.
.
.
.
.
.
.
.
.
.
.
.
.
.
.
.
.
.
.
.
.
.
.
.
.
.
.
.
.
.
.
.
.
.
.
.
.
.
.
.
.
.
.
.
.
.
62216
3-18
Cisco IP Phone Productivity Services User Guide
78-13565-01
Page 41

Chapter 3 Using Cisco IP Phone Productivity Services
In the Meeting Details screen, the first soft key may display Accept or Unsure,
depending on how you have responded to the meeting notice. This allows you to
change your previous response to a meeting notice:
• If you have tentatively accepted the meeting, the screen displays an Accept
soft key (as shown in
• If you have already accepted the meeting, the screen displays an Unsure soft
key.
Step 6 To manage your meetings you can:
• Press the Accept soft key to accept a meeting that you tentatively accepted
before. The phone displays:
You have accepted the meeting.
• Press the Unsure soft key to respond that you may not be able to attend the
meeting. The phone displays:
You have tentatively accepted the meeting.
• Press the Decline soft key to decline a meeting. The phone displays:
You have declined the meeting.
Using CalendarView
Figure 3-6).
78-13565-01
• If the sender included a phone number in the meeting text, you can Press the
DialNum soft key to call the sender.
• Press the Exit soft key to return to the Current Week menu (see Figure 3-11).
Step 7 From the Current Week screen:
• Press the Prev soft key to view your calendar for the previous week.
• Press the Next soft key to view your calendar for the following week.
• Press the Exit soft key to return to the Weekly Schedule menu (see
Figure 3-10).
Related Topics:
• Checking Your Schedule for Today, page 3-14
• Viewing Your Schedule for a Specific Date, page 3-20
Cisco IP Phone Productivity Services User Guide
3-19
Page 42

Chapter 3 Using Cisco IP Phone Productivity Services
Using CalendarView
Viewing Your Schedule for a Specific Date
With CalendarView’s Select a Date service, you can specify a date and view your
appointments for that date. To do this, perform the following steps:
Procedure
Step 1 From the CalendarView menu (see Figure 3-4), choose 3 Select a Date in one of
two ways:
• Use the Navigation button to scroll to 3 Select a Date and press the Select soft
key.
• Press 3 on your phone’s dialing pad.
The phone displays today’s date (see Figure 3-13).
Figure 3-13 Viewing Select a Date
09:44 06/08/01
Calendar Option
Date: 8
Month: 6
Year: 2001
Please enter a date
Submit
Cancel<<
.
.
.
.
.
.
.
.
.
.
.
.
.
.
.
.
.
.
.
.
.
.
.
.
.
.
.
.
.
.
.
.
.
.
.
.
.
.
.
.
.
.
.
.
.
.
.
.
63021
3-20
Step 2 Change the date to the calendar date you want to see:
Press the << soft key to backspace and delete the displayed date.
Use the dialing pad to enter the new date.
Use the Navigation button to scroll to the month and year and change them, if
necessary.
Cisco IP Phone Productivity Services User Guide
78-13565-01
Page 43

Chapter 3 Using Cisco IP Phone Productivity Services
Step 3 Press the Submit soft key.
Changing the date results in a phone display of:
Schedule for <xx/xx/xx>
and a list of your appointments for that date.
Step 4 Press the Exit soft key to return to the Select a Date menu.
Related Topics:
• Checking Your Weekly Schedule, page 3-17
• Setting Your Meeting Reminder, page 3-21
Setting Your Meeting Reminder
Use your Meeting Reminder Setting to choose:
• which meeting reminders you want displayed, based on the importance of the
meeting
Using CalendarView
78-13565-01
• how you are reminded of meetings, by e-paging or by phone display
Set up your Meeting Reminder Setting service when you first start using
Cisco
IP Phone Productivity Services. You must re-enter your setting choices any
time you change your PIN.
Tips If you are planning to change your PIN, change it before you set up your
Meeting Reminder Setting service.
To use this application, you must first define your meetings as High importance
and High and Normal importance in Microsoft Exchange.
Cisco IP Phone Productivity Services User Guide
3-21
Page 44

Using CalendarView
Step 1 From the CalendarView menu (see Figure 3-4), select 5 Meeting Reminder
Chapter 3 Using Cisco IP Phone Productivity Services
To use the Meeting Reminder Setting service, perform the following steps:
Procedure
Setting in one of two ways:
• Use the Navigation button to scroll to 5 Meeting Reminder Setting and press
the Select soft key.
• Press 5 on your phone’s dialing pad.
The Meeting Reminder Setting screen displays (see Figure 3-14).
Figure 3-14 Setting Meeting Display Criteria
09:44 06/08/01
Meeting Reminder Setting
1High
2High and Normal
3All
4None
Select the meeting importance
Submit
Exit
.
.
.
.
.
.
.
.
.
.
.
.
.
.
.
.
.
.
.
.
.
.
.
.
.
.
.
.
.
.
.
.
.
.
.
.
.
.
.
.
.
.
.
.
.
.
.
.
63022
3-22
Step 2 On the Meeting Reminder Setting screen:
• Select 1 High to be reminded of meetings of high importance only.
• Select 2 High and Normal to be reminded of meetings of high and normal
importance.
• Select 3 All to be reminded of all of your meetings.
• Select 4 None to cancel your previous Meeting Reminder Setting.
Step 3 Press the Submit soft key to set your choice of Meeting Reminder Setting.
The screen displays your choices meeting notification (see Figure 3-15).
Cisco IP Phone Productivity Services User Guide
78-13565-01
Page 45

Chapter 3 Using Cisco IP Phone Productivity Services
Figure 3-15 Setting Meeting Reminders
09:44 06/18/01
Meeting Reminder Setting
1By Pager/Email
2By Phone display
Select the reminder option
Select
Step 4 Select either 1 By Pager/Email or 2 By Phone display.
If you choose Reminder by Pager/Email, the service uses the e-mail account you
entered when you subscribed to Cisco
Chapter 2, “Subscribing to Cisco IP Phone Productivity Services”).
Once you make your selection, a message displays notifying you that your
meeting reminder is set.
Exit
Using CalendarView
.
.
.
.
.
.
.
.
.
.
.
.
.
.
.
.
.
.
.
.
.
.
.
.
.
.
.
.
.
.
.
.
.
.
.
.
.
.
.
.
.
.
.
.
.
.
.
.
63093
IP Phone Productivity Services (see
78-13565-01
Step 5 Press the Exit soft key to return to the CalendarView menu (see Figure 3-4).
Related Topics:
• Viewing Your Schedule for a Specific Date, page 3-20
• Using MailView, page 3-24
• Using Cisco IP Phone Productivity Services, page 3-1
Cisco IP Phone Productivity Services User Guide
3-23
Page 46

Using MailView
Using MailView
These topics help you use MailView from your Cisco IP Phone to access your
Cisco Unity voice mail, your Cisco Unity e-mail and up to two additional e-mail
accounts.
• Logging in to MailView, page 3-24
• Changing your MailView Login, page 3-26
• Checking your Cisco Unity Voice Mail, page 3-28
• Checking your E-mail, page 3-34
Logging in to MailView
When you access each of your MailView accounts the first time, you must enter
your MailView name and password for that account. The Login screen does not
display if you have already entered this information.
Contact your system administrator if you do not have your MailView name and
password.
To log in to MailView, perform the following steps:
Chapter 3 Using Cisco IP Phone Productivity Services
3-24
Procedure
Step 1 From your Cisco IP Phone, press the Services button.
The screen displays your list of services.
Step 2 Select Productivity Svcs in one of two ways:
• Use the Navigation button to scroll to Productivity Svcs and press the Select
soft key.
• Press the number key on your phone’s dialing pad that corresponds to the item
number displayed on the LCD screen.
Tips The item number next to Productivity Svcs will vary depending on the number
of services you have configured on your phone.
Cisco IP Phone Productivity Services User Guide
78-13565-01
Page 47

Chapter 3 Using Cisco IP Phone Productivity Services
Step 3 Select 3 MailView in one of two ways:
• Use the Navigation button to scroll to 3 MailView and press the Select soft
key.
• Press the number key 3 on your phone’s dialing pad.
Step 4 If you have not already logged in to Cisco IP Phone Productivity Services, enter
your PIN, when prompted. See the
Productivity Services” section on page 3-5 for details.
The phone displays the MailView main menu (see Figure 3-16).
Figure 3-16 MailView Main Menu
Using MailView
“Logging in to Cisco IP Phone
09:44 06/08/01
MailView
1 Check Unity Voice Mail
2 Check Unity Email
3 Driftwood Email Server
Make Your Selection
Select Reset Exit
Step 5 Select one of your accounts in one of two ways:
• Use the Navigation button to scroll to the item and press the Select soft key.
• Press the corresponding number key on your phone’s dialing pad.
Step 6 At the Login screen (see Figure 3-17), enter your username and password:
–
To enter your username, enter the letters of the alphabet using your
dialing pad. Press the phone key associated with a letter. To scroll
through the letters associated with each key, press the key rapidly. For
example, press 2 to display the letter “a.” To enter the letter “b,” press 2
again without pausing. Press the << soft key to back up.
–
For numeric entries, use the dialing pad.
1004
.
.
.
.
.
.
.
.
.
.
.
.
.
.
.
.
.
.
.
.
.
.
.
.
.
.
.
.
.
.
.
.
.
.
.
.
.
.
.
.
.
.
.
.
.
.
.
.
.
.
.
.
.
.
.
.
.
.
.
.
63089
78-13565-01
Cisco IP Phone Productivity Services User Guide
3-25
Page 48

Using MailView
Chapter 3 Using Cisco IP Phone Productivity Services
Figure 3-17 MailView Login Screen
09:44 07/12/01
MailView
Login:
Password:
Enter Mail Server Pass/Pin
Submit
Step 7 You are now logged in to MailView.
• To use MailView with your Cisco Unity voice mail, proceed to the“Checking
your E-mail” section on page 3-34.
• To use MailView with your e-mail accounts, proceed to the “Checking your
E-mail” section on page 3-34.
Related Topics:
• Changing your MailView Login, page 3-26
• Checking your Cisco Unity Voice Mail, page 3-28
• Checking your E-mail, page 3-34
<<
Cancel
1004
.
.
.
.
.
.
.
.
.
.
.
.
.
.
.
.
.
.
.
.
.
.
.
.
.
.
.
.
.
.
.
.
.
.
.
.
.
.
.
.
.
.
.
.
.
.
.
.
.
.
.
.
.
.
.
.
.
.
.
.
63452
Changing your MailView Login
If you change your MailView accounts or change your user name and password
for any of your MailView accounts, you must change them within MailView also.
To change your MailView login, perform the following steps:
Procedure
Step 1 From the MailView menu, press the Reset soft key to change or clear your login
information for a mail account (see
Cisco IP Phone Productivity Services User Guide
3-26
Figure 3-18).
78-13565-01
Page 49

Chapter 3 Using Cisco IP Phone Productivity Services
Figure 3-18 Meeting Reminder Setting Completed
Using MailView
09:44 06/08/01
MailView
1 Check Unity Voice Mail
2 Check Unity Email
3 Driftwood Email Server
Make Your Selection
Select Reset Exit
Step 2 Select the account to reset your Login information.
The Reset UserName and Pin screen displays (see Figure 3-19).
Figure 3-19 MailView Login Reset Display
09:44 07/12/01
Reset UserName and Pin
1 Enter Unity Voice Mail Pass/
Pin
2 Enter Unity Email Pass/Pin
3 Enter Driftwood Pass/Pin
Choose the server
Select Exit
1004
1004
.
.
.
.
.
.
.
.
.
.
.
.
.
.
.
.
.
.
.
.
.
.
.
.
.
.
.
.
.
.
.
.
.
.
.
.
.
.
.
.
.
.
.
.
.
.
.
.
.
.
.
.
.
.
.
.
.
.
.
.
63089
.
.
.
.
.
.
.
.
.
.
.
.
.
.
.
.
.
.
.
.
.
.
.
.
.
.
.
.
.
.
.
.
.
.
.
.
.
.
.
.
.
.
.
.
.
.
.
.
.
.
.
.
.
.
.
.
.
.
.
.
63453
78-13565-01
Step 3 Enter your new user name and new password. Press the Submit soft key.
Related Topics:
• Logging in to MailView, page 3-24
• Changing your MailView Login, page 3-26
• Checking your Cisco Unity Voice Mail, page 3-28
Cisco IP Phone Productivity Services User Guide
3-27
Page 50

Chapter 3 Using Cisco IP Phone Productivity Services
Using MailView
Checking your Cisco Unity Voice Mail
With MailView, you can view, listen to, record a reply, forward, and delete your
Cisco Unity voice mail, all from your Cisco IP Phone. Any operation you perform
on your messages using MailView is reflected in your PC-based traditional
voicemail interface automatically.
To review your Cisco Unity voice mail, perform these tasks:
Procedure
Step 1 From your Cisco IP Phone, press the Services button.
The screen displays your list of services.
Step 2 Select Productivity Svcs in one of two ways:
• Use the Navigation button to scroll to Productivity Svcs and press the Select
soft key.
• Press the number key on your phone’s dialing pad that corresponds to the item
number displayed on the LCD screen.
3-28
Tips The item number next to Productivity Svcs will vary depending on the number
of services you have configured on your phone.
Step 3 Select 3 MailView in one of two ways:
• Use the Navigation button to scroll to 3 MailView and press the Select soft
key.
• Press the number key 3 on your phone’s dialing pad.
Step 4 If you have not already logged in to Cisco IP Phone Productivity Services, enter
your PIN, when prompted. See the
“Logging in to Cisco IP Phone
Productivity Services” section on page 3-5 for details.
Cisco IP Phone Productivity Services User Guide
78-13565-01
Page 51

Chapter 3 Using Cisco IP Phone Productivity Services
The phone displays the MailView main menu (see Figure 3-20).
Figure 3-20 MailView Main Menu
Using MailView
09:44 06/08/01
MailView
1 Check Unity Voice Mail
2 Check Unity Email
3 Driftwood Email Server
Make Your Selection
Select Reset Exit
Step 5 Select 1 Check Unity Voice Mail in one of two ways:
• Use the Navigation button to scroll to 1 Check Unity Voice Mail and press the
Select soft key.
• Press the number key 1 on your phone’s dialing pad.
Step 6 If this is the first time you are accessing this MailView account, you are prompted
to log in. For details, see the
After successful login, the phone displays a list of your Cisco Unity voice mail
(see
Figure 3-21). By default, your voice mail first displays unheard messages.
Figure 3-21 Viewing Cisco Unity VoiceMail
09:39 06/08/01
<userID> Inbox (Page 1)
1 Michael Jones
Reply to your mail
Thu, 7 Jun 2001
2 Michael Jones
Message from Michael Jones
Thu, 31 May 2001
Make Your Selection
Select Exit
1004
.
.
.
.
.
.
.
.
.
.
.
.
.
.
.
.
.
.
.
.
.
.
.
.
.
.
.
.
.
.
.
.
.
.
.
.
.
.
.
.
.
.
.
.
.
.
.
.
.
.
.
.
.
.
.
.
.
.
.
.
63089
“Logging in to MailView” section on page 3-24.
1004
.
.
.
.
.
.
.
.
.
.
.
.
.
.
.
.
.
.
.
.
.
.
.
.
.
.
.
.
.
.
.
.
.
.
.
.
.
.
.
.
.
.
.
.
.
.
.
.
.
.
.
.
.
.
.
.
.
.
.
.
more
63016
78-13565-01
Cisco IP Phone Productivity Services User Guide
3-29
Page 52

Using MailView
Step 7 Press the more soft key to change the sort order or to select a message to review.
Chapter 3 Using Cisco IP Phone Productivity Services
The screen displays your voicemail inbox (see Figure 3-22).
Figure 3-22 Date Sort/Read Sort Display
09:44 07/12/01
<userID> Inbox (Page 1)
1 Chad Parr
Message from Chad Parr
Thu 12 Jul 2001
2 Chad Hawes
Message from Chad parr
Make Your Selection
DateSrt ReadSrt more
Step 8 From the DateSort/ReadSort screen:
a. Press the DateSrt soft key to view your voice mail in the order in which it
was received.
b. Press the ReadSrt soft key to view your voice mail in the order in which you
read it.
Step 9 If you do not want to change the sort order, select a voice mail from your voice
mail inbox (see
• Use the Navigation button to scroll to the voice mail and press the Select soft
key.
• On your phone’s dialing pad, press the number that is displayed to the left of
the voice mail.
Step 10 Proceed to the “Using MailView’s Options for Cisco Unity Voice Mail” section
on page 3-31.
Figure 3-21). Use one of two ways:
1004
.
.
.
.
.
.
.
.
.
.
.
.
.
.
.
.
.
.
.
.
.
.
.
.
.
.
.
.
.
.
.
.
.
.
.
.
.
.
.
.
.
.
.
.
.
.
.
.
.
.
.
.
.
.
.
.
.
.
.
.
63454
3-30
Related Topics:
• Using MailView, page 3-24
• Using MailView’s Options for Cisco Unity Voice Mail, page 3-31
Cisco IP Phone Productivity Services User Guide
78-13565-01
Page 53

Chapter 3 Using Cisco IP Phone Productivity Services
Using MailView’s Options for Cisco Unity Voice Mail
After you have selected a voice mail message, the MailView inbox screen displays
the following options for handling your Cisco Unity voice mail (see
Figure 3-23 MailView’s Cisco Unity VoiceMail Options
10:22 06/15/01 1004
Using MailView
Figure 3-23):
1
4
7
From: Michael Jiang
Inbox
1. play voice mail 2. reply to sender 3. forward to a third party
4. fast rewind 5. pause 6. fast forward
7. delete 8. stop 9. review next message
Use Table 3-2 to help you manage your Cisco Unity voice mail in MailView.
2
5
8
3
6
9
.
.
.
.
.
.
.
.
.
.
.
.
.
.
.
.
.
.
.
.
.
.
.
.
.
.
.
.
.
.
.
.
.
.
.
.
.
.
.
.
.
.
.
.
.
.
.
.
.
.
.
.
.
.
.
.
.
.
.
.
63085
78-13565-01
Cisco IP Phone Productivity Services User Guide
3-31
Page 54

Chapter 3 Using Cisco IP Phone Productivity Services
Using MailView
Ta b l e 3-2 Using MailView to Manage Cisco Unity Voice Mail
Voice Mail Options Instructions
Play Voice Mail 1. Press 1 on the dialing pad to play your voice mail.
2. Press 4 on the dialing pad to fast rewind the message.
3. Press 6 on the dialing pad to fast forward the message.
4. Press the Exit soft key to return to the voice mail inbox.
Pause Voice Mail 1. Press 5 on the dialing pad to pause a voice mail.
2. Press 1 on the dialing pad to resume playing the voice mail.
3. Press 8 to stop the voice mail.
4. Press the Exit soft key to return to the voice mail inbox.
Stop Voice Mail 1. Press 8 on the dialing pad to stop playing your voice mail.
2. Press the Exit soft key to return to the voice mail inbox.
Reply to Voice Mail 1. Press 2 on the dialing pad to record a reply to the voice mail sender.
2. Press the Send soft key to send the reply.
3-32
The phone displays a sent reply screen.
3. Press the Redo soft key record the reply then press the Send soft key to
change your reply.
4. Press the Cancel soft key to cancel your reply.
5. Press the Exit soft key to return to the voice mail inbox.
Cisco IP Phone Productivity Services User Guide
78-13565-01
Page 55

Chapter 3 Using Cisco IP Phone Productivity Services
Using MailView
Table 3-2 Using MailView to Manage Cisco Unity Voice Mail (continued)
Voice Mail Options Instructions
Forward Voice Mail 1. Press 3 on the dialing pad to forward a voice mail to someone other than
the originator.
2. Enter the recipient’s user name and e-mail address:
a. Enter the letters of the alphabet using your dialing pad.
b. Press the phone key associated with a letter.
Tips To scroll through the letters associated with each key, press the key
rapidly. For example, press 2 to display the letter “a.” To enter the
letter “b”, press 2 again without pausing. Press the << soft key to
back up and make corrections.
The phone displays a forwarded message screen.
3. Press the Exit soft key to return to the voice mail inbox.
Delete Voice Mail 1. Press 7 to delete a voice mail.
Your phone displays:
Mail deleted.
This message was successfully deleted.
2. Press the Exit soft key to return to the voice mail inbox.
Play All Voice Mail 1. Press 9.
78-13565-01
The screen displays the next voice mail message header and then automatically
plays the voice mail.
You can easily review all your voice mail without going back to the inbox.
2. Press the Exit soft key to stop playing the voice mail and to return to the
voice mail inbox.
Related Topics:
• Using MailView’s Options for Cisco Unity Voice Mail, page 3-31
• Checking your E-mail, page 3-34
Cisco IP Phone Productivity Services User Guide
3-33
Page 56

Using MailView
Checking your E-mail
With MailView, you can scroll through your e-mail messages and read them right
on the phone display. You can also forward and delete e-mails from your phone.
Any operation you perform on your messages using MailView is reflected in your
PC-based e-mail client automatically.
MailView provides you with a list of your Cisco Unity e-mail and up to two
additional IMAP-compliant e-mail accounts.
To check your e-mail using MailView, perform these steps:
Procedure
Step 1 From your Cisco IP Phone, press the Services button.
The screen displays your list of services.
Step 2 Select Productivity Svcs in one of two ways:
• Use the Navigation button to scroll to Productivity Svcs and press the Select
soft key.
• Press the number key on your phone’s dialing pad that corresponds to the item
number displayed on the LCD screen.
Chapter 3 Using Cisco IP Phone Productivity Services
3-34
Tips The item number next to Productivity Svcs will vary depending on the number
of services you have configured on your phone.
Step 3 Select 3 MailView in one of two ways:
• Use the Navigation button to scroll to 3 MailView and press the Select soft
key.
• Press the number key 3 on your phone’s dialing pad.
Step 4 If you have not already logged in to Cisco IP Phone Productivity Services, enter
your PIN, when prompted. See the
“Logging in to Cisco IP Phone
Productivity Services” section on page 3-5 for details.
The phone displays the MailView main menu (see Figure 3-24). Item 2 will
always be your Cisco Unity e-mail. Items 3 and 4 are your optional
(IMAP-compliant) e-mail accounts. In
Figure 3-24, Driftwood is the optional
e-mail account.
Cisco IP Phone Productivity Services User Guide
78-13565-01
Page 57

Chapter 3 Using Cisco IP Phone Productivity Services
Figure 3-24 MailView Main Menu
Using MailView
09:44 06/08/01
MailView
1 Check Unity Voice Mail
2 Check Unity Email
3 Driftwood Email Server
Make Your Selection
Select Reset Exit
Step 5 Select an e-mail service in one of two ways:
• Use the Navigation button to scroll to Productivity Svcs and press the Select
soft key.
• Press the number key on your phone’s dialing pad that corresponds to the item
number displayed on the LCD screen.
For example, in Figure 3-24, select 2 Check Unity Email or 3 Driftwood.
Step 6 If this is the first time you are accessing this MailView account, you are prompted
to login. For details, see the
After successful login, the phone displays your e-mail inbox with a list of your
e-mail (see
Figure 3-25 E-Mail Inbox
Figure 3-25).
1004
.
.
.
.
.
.
.
.
.
.
.
.
.
.
.
.
.
.
.
.
.
.
.
.
.
.
.
.
.
.
.
.
.
.
.
.
.
.
.
.
.
.
.
.
.
.
.
.
.
.
.
.
.
.
.
.
.
.
.
.
63089
“Logging in to MailView” section on page 3-24.
78-13565-01
09:44 06/08/01
tbaxter Inbox (Page 1)
1 Jeff C
New Mail # 3
Thu, 31 May 20013
2 Jeff C
New Mail # 3
Thu, 31 May 2001
Make Your Selection
Select Next Exit more
Cisco IP Phone Productivity Services User Guide
1004
.
.
.
.
.
.
.
.
.
.
.
.
.
.
.
.
.
.
.
.
.
.
.
.
.
.
.
.
.
.
.
.
.
.
.
.
.
.
.
.
.
.
.
.
.
.
.
.
.
.
.
.
.
.
.
.
.
.
.
.
63015
3-35
Page 58

Using MailView
Step 7 Select the e-mail that you want to read in one of two ways:
Chapter 3 Using Cisco IP Phone Productivity Services
• Use the Navigation button to scroll to the e-mail and press the Select soft key.
• Use the dialing pad to enter the number corresponding to the e-mail.
The screen displays the e-mail body screen (Figure 3-26).
Use the Navigation button to scroll down the screen to read the text of the
complete message below the dotted line.
Figure 3-26 E-mail Body
09:44 06/08/01
Email Body (Page 1)
From: Chad
<cparr@ccmlab-unity.abc>
Subject: Email with a LA
Fri, 8 Jun 2001 09:37:08
-------------------------------------------
Make Your Selection
Inbox ForwardDelete
Step 8 On the E-mail body screen:
• Press the Delete soft key to delete the e-mail.
Your phone displays:
Mail deleted.
This message was successfully deleted.
• Press the Forward soft key to forward the e-mail to a third party.
• Press the Inbox soft key to return to E-Mail inbox,
Related Topics:
• Checking your Cisco Unity Voice Mail, page 3-28
1004
.
.
.
.
.
.
.
.
.
.
.
.
.
.
.
.
.
.
.
.
.
.
.
.
.
.
.
.
.
.
.
.
.
.
.
.
.
.
.
.
.
.
.
.
.
.
.
.
.
.
.
.
.
.
.
.
.
.
.
.
63076
3-36
• Using Cisco IP Phone Productivity Services, page 3-1
Cisco IP Phone Productivity Services User Guide
78-13565-01
Page 59

Chapter 3 Using Cisco IP Phone Productivity Services
Using Contacts Synchronization
With Contacts Synchronization, you can synchronize the entries in the Personal
Address Book in Cisco
To set up synchronization of your directory entries, perform the following steps:
Procedure
Step 1 From your Cisco IP Phone, press the Services button.
The screen displays your list of services.
Step 2 Select Productivity Svcs in one of two ways:
• Use the Navigation button to scroll to Productivity Svcs and press the Select
soft key.
• Press the number key on your phone’s dialing pad that corresponds to the item
number displayed on the LCD screen.
CallManager with your Outlook Contacts.
Using Contacts Synchronization
78-13565-01
Tips The item number next to Productivity Services will vary depending on the
number of services you have configured on your phone.
The screen displays the services available with Cisco IP Phone
Productivity
Step 3 Select 4 Contacts Synchronization in one of two ways:
• Use the Navigation button to scroll to 4 Contacts Synchronization and press
Services (see Figure 3-2).
the Select soft key.
• Press the number key 4 on your phone’s dialing pad.
Note If you have not already logged in to Cisco IP Phone Productivity Services,
you may be prompted to enter your PIN now. See the
“Logging in to
Cisco IP Phone Productivity Services” section on page 3-5.
Cisco IP Phone Productivity Services User Guide
3-37
Page 60

Using Contacts Synchronization
The phone displays the Contacts Synchronization main menu with the choice of
three conflict resolution modes (see
Step 4 In the Contacts Synchronization main menu (see Figure 3-27), choose a conflict
resolution mode:
• Select 1Exchange overrides CCM PAB to write the Microsoft Exchange
• Select 2CCM PAB overrides Exchange to write the entry from the
• Select 3 Ignore conflicts to leave the Exchange entry and the
Note If the entries have the same first name, last name, e-mail, and work phone
number but have different mobile and home phone numbers, they are
considered conflicting entries.
Chapter 3 Using Cisco IP Phone Productivity Services
Figure 3-27).
entry to the Cisco
case of conflicting entries.
Cisco
CallManager (Personal Address Book) directory to the Microsoft
Exchange directory, in the case of conflicting entries.
Cisco
CallManager directory entry as they are.
CallManager (Personal Address Book) directory, in the
3-38
Figure 3-27 Setting Options for Contacts Synchronization
09:44 06/08/01
Contacts Synchronization
1Exchange overrides CCM PAB
2CCM PAB overrides Exchange
3Ignore conflicts
Select conflict resolution mode
Select
Step 5 When the synchronization is complete, a message displays to notify you that the
synchronization is done a nd the number of entries added to each directory.
Step 6 Press the Report soft key for details of the entries that have been added to the
directory.
Step 7 Press the Exit soft key to return to the Contacts Synchronization main menu.
Cisco IP Phone Productivity Services User Guide
Exit
.
.
.
.
.
.
.
.
.
.
.
.
.
.
.
.
.
.
.
.
.
.
.
.
.
.
.
.
.
.
.
.
.
.
.
.
.
.
.
.
.
.
.
.
.
.
.
.
63023
78-13565-01
Page 61

Chapter 3 Using Cisco IP Phone Productivity Services
Related Topics:
• Using Cisco IP Phone Productivity Services, page 3-1
• Common Questions about Cisco IP Phone Productivity Services, page 4-1
Using Contacts Synchronization
78-13565-01
Cisco IP Phone Productivity Services User Guide
3-39
Page 62

Using Contacts Synchronization
Chapter 3 Using Cisco IP Phone Productivity Services
3-40
Cisco IP Phone Productivity Services User Guide
78-13565-01
Page 63

CHAPTER
Common Questions about Cisco IP Phone Productivity Services
The following sections answer questions you may have about using
Cisco
IP Phone Productivity Services:
• Do I Have to Enter My Login PIN Every Time?, page 4-1
• Why Can’t I Access Cisco IP Phone Productivity Services?, page 4-2
• Why Can’t I Connect to MailView?, page 4-4
Do I Have to Enter My Login PIN Every Time?
Q.) How can I bypass typing in my login PIN?
A.) If the phone is assigned to you, you can set your login mode to non-secure.
This gives you access to all your subscribed services without logging in every
time. Keep in mind that anyone can access your information if your login mode is
set to non-secure.
4
78-13565-01
To bypass Login, set the mode to non-secure on the Cisco IP Phone Services page
in Cisco CallManager (see
Productivity Services”).
Chapter 2, “Subscribing to Cisco IP Phone
Cisco IP Phone Productivity Services User Guide
4-1
Page 64

Chapter 4 Common Questions about Cisco IP Phone Productivity Services
Why Can’t I Access Cisco IP Phone Productivity Services?
Why Can’t I Access Cisco IP Phone
Productivity
Services?
Use the following topics to clear errors in accessing Cisco IP Phone
Productivity Services:
• Service Subscription Parameters Error, page 4-2
• Meeting Reminder Not Displaying, page 4-2
• Host Not Found Error, page 4-3
Service Subscription Parameters Error
Q.) I changed my PIN using the Cisco IP Phone User Options page. Now when I
try to access Cisco
Service subscription parameters are wrong. Please update subscription.
What does this mean?
A.)You may have entered an incorrect UserID or PIN while subscribing to
Cisco
IP Phone Productivity Services or your Cisco CallManager PIN may have
been changed.
Log on to your Cisco IP Phone User Menu Options page and update the
subscription with the correct parameters (see the
Productivity Services” section on page 2-1).
Contact your system administrator if you don’t have the URL for your
Cisco
IP Phone User Options page.
IP Phone Productivity Services, I receive the message:
“Subscribing to Cisco IP Phone
Meeting Reminder Not Displaying
Q.) I changed my PIN using the Cisco IP Phone User Options Menu page. Now
my meeting reminder is not showing up in my phone's display.
A.) Whenever you change your PIN, you must re-enable the meeting reminder
notification from the phone (see the
page 3-21).
Cisco IP Phone Productivity Services User Guide
4-2
“Setting Your Meeting Reminder” section on
78-13565-01
Page 65

Chapter 4 Common Questions about Cisco IP Phone Productivity Services
Why Can’t I Access Cisco IP Phone Productivity Services?
Authentication Error
Q.) I received a message:
Authentication error.
A.) The Virtual Directories may have the wrong permissions.
Contact your administration to check the permissions.
Host Not Found Error
Q.) I received a message:
Host is not found.
A.) The host name is used in the services URL. The DNS is not set up to resolve
the host name address to an IP address.
Contact your administrator to have the DNS set up.
Phone Hangs On “Requesting...”
78-13565-01
Q.) My phone displays:
Requesting...
for a long time.
A.)The server for the Cisco IP Phone Productivity Services is busy servicing other
requests. Press the Cancel soft key and retry.
Cisco IP Phone Productivity Services User Guide
4-3
Page 66

Chapter 4 Common Questions about Cisco IP Phone Productivity Services
Why Can’t I Connect to MailView?
Why Can’t I Connect to MailView?
Use the following topics to clear errors you may encounter using MailView:
• Validation Error, page 4-4
• Sending Error, page 4-4
• Can’t Connect To Mail Server, page 4-5
• UserName or Password Error, page 4-5
• Can’t Play Voice Mail, page 4-6
• Reply Mail Not Delivered as Voice Mail, page 4-6
• Deleting Error, page 4-6
Validation Error
Q.) When accessing MailView, I receive the following error message:
Validation Error.
A.) Contact your system administrator to restart the UMClient Service.
Sending Error
Cisco IP Phone Productivity Services User Guide
4-4
Q.) I received the error message:
Sending error. Filename: filename IP:ip Port: port.
A.) The cache directory may not have the correct permissions. Contact your
system administrator to correct the problem.
78-13565-01
Page 67

Chapter 4 Common Questions about Cisco IP Phone Productivity Services
Can’t Connect To Mail Server
Q.) I received the error message:
Can’t connect to the Mail Server (ip Port: port). Change your setting
in the Call Manager User pages.
A.) You may have specified incorrect URLs in the service parameters.
1. Go to your Cisco IP Phone Options Menu page and check that you entered
the correct service parameters for URL1 or URL2 for access to the external
mail server (see the
section on page 2-1).
2. Check with your system administrator that the URLs that you entered contain
the proper IMAP port number.
Note MailView uses URL1 and URL2 in the service description in
Figure 2-2. For URL1 and URL2, use :0 for the default port number
or use :xxx for the custom port number.
“Subscribing to Cisco IP Phone Productivity Services”
Why Can’t I Connect to MailView?
3. Make any required corrections to the URLs in the Cisco IP Phone
Options
Menu page and click Subscribe.
UserName or Password Error
Q.) I know that my UserId and password are correct. Why does MailView give me
this error?
Error UserName (user) and/or Password (pin) are incorrect.
A.)You are connected to the ip port but the mail server has rejected the password
or PIN.
1. Verify that your current password is correct.
2. If you are still having problems, contact your system administrator.
78-13565-01
Cisco IP Phone Productivity Services User Guide
4-5
Page 68

Chapter 4 Common Questions about Cisco IP Phone Productivity Services
Why Can’t I Connect to MailView?
Can’t Play Voice Mail
Q.) I can’t play my voice mail? What do I do?
A.) Contact your system administrator.
Reply Mail Not Delivered as Voice Mail
Q.) I used the reply command to reply to a voice mail. It was not delivered as
voice mail.
A.) Contact your system administrator.
Deleting Error
Q.) I received this error message:
Error deleting the message.
A.)The IMAP server would not allow MailView to delete the mail.
4-6
Ask your system administrator to verify that you have access rights to the mail
server.
Cisco IP Phone Productivity Services User Guide
78-13565-01
Page 69

INDEX
C
CalendarView
main menu 3-10
overview 1-2
using 3-10, 3-11
checking your schedule
for a specific date 3-20
for today 3-14
new meetings 3-12
weekly 3-17
Cisco IP Phone Productivity Services
accessing 3-4
applications 1-1
checking version 3-4
common questions 4-1
logging in 3-5
logging out 3-8
main menu 3-4
navigating 3-2
navigating tips 3-3
overview 1-1
subscribing to 2-1
Cisco Unity Voice Mail
MailView options 3-31
Contacts Synchronization
overview 1-4
setting 3-37
E
e-mail
accessing accounts 3-34
forwarding 3-36
viewing inbox 3-35
viewing message 3-36
L
LCD display
using 3-3
M
MailView
changing login 3-26
logging in 3-24
overview 1-3
78-13565-01
Cisco IP Phone Productivity Services User Guide
IN-1
Page 70

Index
meeting reminders
choosing e-page or phone 3-23
setting meetings to display 3-21
N
Navigation button
using 3-3
S
Services button
using 3-2
V
voice mail
deleting 3-33
forwarding 3-33
pausing 3-32
playing 3-32
playing all 3-33
replying to 3-32
stopping 3-32
IN-2
Cisco IP Phone Productivity Services User Guide
78-13565-01
 Loading...