

Page 1

User Guide for Cisco Digital Media Player
Device Manager 5.2.x
March 13, 2012
Americas Headquarters
Cisco Systems, Inc.
170 West Tasman Drive
San Jose, CA 95134-1706
USA
http://www.cisco.com
Tel: 408 526-4000
800 553-NETS (6387)
Fax: 408 527-0883
Text Part Number: OL-15764-03
Page 2

CCSP, CCVP, the Cisco Square Bridge logo, Follow Me Browsing, and StackWise are trademarks of Cisco Systems, Inc.; Changing the Way We Work, Live, Play, and Learn, and
iQuick Study are service marks of Cisco Systems, Inc.; and Access Registrar, Aironet, BPX, Catalyst, CCDA, CCDP, CCIE, CCIP, CCNA, CCNP, Cisco, the Cisco Certified
Internetwork Expert logo, Cisco IOS, Cisco Press, Cisco Systems, Cisco Systems Capital, the Cisco Systems logo, Cisco Unity, Enterprise/Solver, EtherChannel, EtherFast,
EtherSwitch, Fast Step, FormShare, GigaDrive, GigaStack, HomeLink, Internet Quotient, IOS, IP/TV, iQ Expertise, the iQ logo, iQ Net Readiness Scorecard, LightStream,
Linksys, MeetingPlace, MGX, the Networkers logo, Networking Academy, Network Registrar, Pack e t, PIX, Post-Routing, Pre-Routing, ProConnect, RateMUX, ScriptShare,
SlideCast, SMARTnet, The Fastest Way to Increase Your Internet Quotient, and TransPath are registered trademarks of Cisco Systems, Inc. and/or its affiliates in the United States
and certain other countries.
All other trademarks mentioned in this document or Website are the property of their respective owners. The use of the word partner does not imply a partnership relationship
between Cisco and any other company. (0601R)
THE SPECIFICATIONS AND INFORMATION REGARDING THE PRODUCTS IN THIS MANUAL ARE SUBJECT TO CHANGE WITHOUT NOTICE. ALL
STATEMENTS, INFORMATION, AND RECOMMENDATIONS IN THIS MANUAL ARE BELIEVED TO BE ACCURATE BUT ARE PRESENTED WITHOUT
WARRANTY OF ANY KIND, EXPRESS OR IMPLIED. USERS MUST TAKE FULL RESPONSIBILITY FOR THEIR APPLICATION OF ANY PRODUCTS.
THE SOFTWARE LICENSE AND LIMITED WARRANTY FOR THE ACCOMPANYING PRODUCT ARE SET FORTH IN THE INFORMATION PACKET THAT
S
HIPPED WITH THE PRODUCT AND ARE INCORPORATED HEREIN BY THIS REFERENCE. IF YOU ARE UNABLE TO LOCATE THE SOFTWARE LICENSE
OR LIMITED WARRANTY, CONTACT YOUR CISCO REPRESENTATIVE FOR A COPY.
The Cisco implementation of TCP header compression is an adaptation of a program developed by the University of California, Berk
domain version of the UNIX operating system. All rights reserved. Copyright © 1981, Regents of the University of California.
NOTWITHSTANDING ANY OTHER WARRANTY HEREIN, ALL DOCUMENT FILES AND SOFTWARE OF THESE SUPPLIERS ARE PROVIDED “AS IS” WITH
AL
L FAULTS. CISCO AND THE ABOVE-NAMED SUPPLIERS DISCLAIM ALL WARRANTIES, EXPRESSED OR IMPLIED, INCLUDING, WITHOUT
L
IMITATION, THOSE OF MERCHANTABILITY, FITNESS FOR A PARTICULAR PURPOSE AND NONINFRINGEMENT OR ARISING FROM A COURSE OF
DEALING, USAGE, OR TRADE PRACTICE.
IN NO EVENT SHALL CISCO OR ITS SUPPLIERS BE LIABLE FOR ANY INDIRECT, SPECIAL, CONSEQUENTIAL, OR INCIDENTAL DAMAGES, INCLUDING,
WI
THOUT LIMITATION, LOST PROFITS OR LOSS OR DAMAGE TO DATA ARISING OUT OF THE USE OR INABILITY TO USE THIS MANUAL, EVEN IF CISCO
OR ITS SUPPLIERS HAVE BEEN ADVISED OF THE POSSIBILITY OF SUCH DAMAGES.
eley (UCB) as part of UCB’s public
Any Internet Protocol (IP) addresses used in this document are not intended to be actual addresses. Any examples, command display ou
document are shown for illustrative purposes only. Any use of actual IP addresses in illustrative content is unintentional and coincidental.
User Guide for Cisco Digital Media Player Device Manager 5.2.x
© 2007 – 2010 Cisco Systems, Inc. All rights reserved.
tput, and figures included in the
Page 3

PART
1 Before You Use DMPDM
CONTENTS
CHAPTER
CHAPTER
CHAPTER
1 Health and Safety Overview 1-1
General Precautions 1-2
Protect Against Electrostatic Discharge 1-2
Regulatory Compliance and Safety Information 1-2
2 DMP Specifications 2-1
Environmental Conditions 2-1
Site-Specific Conditions 2-3
Physical Interfaces (I/O Ports) 2-4
DMP 4305G 2-4
DMP 4310G 2-4
DMP 4400G 2-4
Power Cord Options 2-6
Internal LEDs 2-8
3 Welcome 3-1
Concepts 3-1
About This Guide 3-1
DMP Overview 3-2
DMPDM 3-2
TVzilla 3-3
Cisco Hinter 3-3
Optional DMP Accessories 3-4
Consider How You Will Use and Manage Your DMP 3-5
Understand DMP Modes 3-5
Manage One DMP in Isolation 3-5
Centrally Manage Digital Signage Services 3-6
Centrally Manage IPTV Services 3-6
Centrally Manage Sports and Entertainment Venue Services 3-7
CHAPTER
4 Connect to a Power Source 4-1
Concepts 4-1
OL-15764-03
User Guide for Cisco Digital Media Player Device Manager 5.2.x
iii
Page 4

Contents
DMP 4310G Notice Regarding Power over Ethernet (PoE) 4-1
Procedures 4-2
Receive Electrical Power from a 100V–240V AC Socket 4-2
Receive Electrical Power from 802.3af Power over Ethernet (PoE) 4-3
CHAPTER
CHAPTER
5 Connect to a Network 5-1
Concepts 5-1
Understand Whether the IP Address Will Be Static or Dynamic 5-1
Procedures 5-2
Connect Over Ethernet 5-2
Connect Over Wireless (802.11 b/g) 5-2
6 Connect to a Presentation System 6-1
Concepts 6-1
Understand S-Video Limitations 6-2
Understand How HDMI and DVI Differ 6-2
Understand Which Displays Work Best with DMPs 6-3
Understand How to Choose Media Signal Cables 6-3
Understand How to Work Around the Low Signal Quality of Composite Video 6-5
Procedures 6-5
Use an HDMI Connection 6-5
Use a Connection that Combines HDMI with DVI 6-6
Connect to a Touchscreen 6-7
Connect to an Analog Display or Projector 6-8
PART
2 Use DMPDM
CHAPTER
7 Log in to DMPDM 7-1
Procedures 7-1
Log in 7-1
CHAPTER
8 Start Here 8-1
Concepts 8-1
DMPDM Workflow 8-1
DMPDM Differences by Firmware Release and DMP Model 8-2
DMPDM on a DMP 4305G 8-2
DMPDM on a DMP 4310G 8-3
DMPDM on a DMP 4400G 8-4
User Guide for Cisco Digital Media Player Device Manager 5.2.x
iv
OL-15764-03
Page 5

Procedures 8-4
Save Configured Settings 8-5
Restart Your DMP 8-6
Rare but Essential Tasks 8-6
Configure NTP Settings for Time-Dependent Features, As Needed 8-6
Restore Factory Default Settings 8-7
Investigate Which DMP Firmware Updates Are Available 8-8
Upgrade (or Downgrade) DMP Firmware 8-10
View DMP Hardware and Firmware Versions 8-11
Reference 8-11
UI Reference Topics 8-11
Contents
CHAPTER
CHAPTER
9 DMP Access and Security Settings 9-1
Concepts 9-1
Understand DMP User Accounts and Passwords 9-1
Understand Whether to Change DMP Passwords Centrally 9-2
Procedures 9-2
Edit the Splash Screen Duration to Obscure the DMP IP Address 9-2
Protect Your DMP from Unauthorized Management 9-4
Manage and Edit Passwords 9-5
Enable or Disable Types of Access to Your DMP 9-6
Enable or Disable Centralized Management 9-7
Reference 9-7
SSL Encryption Ciphers That DMPs Support 9-7
UI Reference Topics 9-8
Elements to Define Centralized Management Settings 9-8
Elements to Define Management Services 9-8
Elements to Define DMPDM Login Credentials 9-9
10 Configure Settings for Touchscreens, Projectors, and Displays 10-1
Concepts 10-1
Overview 10-1
Example Settings for DMP Display Attributes 10-1
Procedures 10-2
Choose and Calibrate a Touchscreen Driver 10-2
Configure Video Output 10-4
Adjust DMP Display Attributes 10-5
Adjust Horizontal and Vertical Settings 10-6
Reprogram the Buttons on Your Handheld Remote Control 10-6
OL-15764-03
User Guide for Cisco Digital Media Player Device Manager 5.2.x
v
Page 6

Contents
Reference 10-7
UI Reference Topics 10-7
UI Reference: Elements to Define Attributes of a DMP Display 10-7
UI Reference: Elements to Define DMP Display Dimensions 10-10
CHAPTER
11 Configure Network Settings 11-1
Concepts 11-1
Glossary 11-1
Wi-Fi Protected Access. WPA is a standards-based, interoperable security enhancement that strongly
increases the level of data protection and access control for existing and future wireless LAN
systems. It is derived from and will be forward-compatible with the upcoming IEEE 802.11i standard.
WPA leverages TKIP for data protection and 802.1X for authenticated key management.
Understand WEP Keys and Passphrases 11-3
Workflow to Define Wi-Fi Settings 11-4
Partial Support for Cisco Medianet 2.1 Features 11-5
Understand Medianet Autoconfiguration for DMP 4310G Endpoints 11-5
Information That Medianet and DMPs Exchange 11-6
Restrictions 11-6
Procedures 11-8
Activate Medianet Support on a DMP 4310G 11-8
Configure HTTP Proxy Server Settings for a DMP 4310G 11-9
Configure a Wireless Network Connection 11-11
Prepare Your DMP to Use a Static IP Address Over Ethernet 11-14
Assign a Static IP Address to a Wireless DMP 4400G 11-16
Show the Assigned IP Address 11-16
11-3
CHAPTER
vi
Reference 11-16
Network Settings Reference 11-17
UI Reference: Elements to Define Basic Network Settings 11-17
FAQs and Troubleshooting 11-18
DMP Network Connectivity 11-18
12 File Storage 12-1
Concepts 12-1
Understand Internal Storage Capacity 12-1
Performance Guidelines for Local Storage 12-2
Local Storage Restrictions for DMP 4310G 12-2
Procedures 12-2
Define Storage Settings 12-2
Manage Permissions for Internal Storage 12-2
User Guide for Cisco Digital Media Player Device Manager 5.2.x
OL-15764-03
Page 7

Mount or Unmount a Network Share 12-3
Reference 12-3
UI Reference Topics 12-3
UI Reference: Elements to Define Internal Storage Settings 12-4
UI Reference: Elements to Define Network Share Settings 12-4
Contents
CHAPTER
13 Browser Settings (‘TVzilla’) 13-1
Concepts 13-1
Understand URL Behaviors 13-1
Understand Content Substitution (‘Failover’) 13-2
Stage 1: Sequence of Operations 13-2
Stage 2: Sequence of Operations 13-3
Stage 3: Sequence of Operations 13-4
Supported Fonts 13-4
Procedures 13-5
Adjust TVzilla Settings 13-5
Show TVzilla in Full-Screen Mode 13-5
Adjust Whether TVzilla is Transparent, Translucent, or Opaque 13-6
Specify Which URL to Load in TVZilla 13-6
Enable Syslog 13-7
Reference 13-7
UI Reference Topics 13-8
Browser Settings Reference 13-8
CHAPTER
OL-15764-03
14 Configure Video and Audio Settings 14-1
Concepts 14-1
Performance Factors 14-1
Understand Jitter 14-1
Understand the Jitter Buffer 14-1
Understand Presentation Time Stamp (PTS) Values 14-2
Understand System Time Clock (STC) Values 14-2
Understand Why PTS-STC Discrepencies Flood the Buffer and Cause Latency 14-2
Guidelines 14-2
Limit and Reduce Latency 14-2
Workflows 14-3
Workflow to Play Assets from the Memory Card 14-3
Procedures 14-3
Configure Settings 14-3
Adjust Jitter Buffer Control (Advanced Multicast) Settings 14-3
User Guide for Cisco Digital Media Player Device Manager 5.2.x
vii
Page 8

Contents
Turn Full-Screen Video Mode On or Off 14-4
Play Media 14-4
Play Assets from a USB Flash Drive 14-4
Watch or Stop Video from a UDP Multicast Stream 14-5
Watch or Stop Video from an HTTP URL 14-5
Watch or Stop Video from a File Stored on Your DMP 14-6
Reference 14-6
UI Reference Topics 14-6
UI Reference: Elements to Define Video Multicast Settings 14-6
UI Reference: Elements to Define Video URLs 14-7
UI Reference: Elements to Play Locally Stored Video 14-7
UI Reference: Elements to Define Jitter Buffer (Advanced Multicast) Settings 14-8
User Guide for Cisco Digital Media Player Device Manager 5.2.x
viii
OL-15764-03
Page 9

P
ART
1
Before You Use DMPDM
Page 10

Page 11

Warning
CHAPTER
1
Health and Safety Overview
Revised November 24, 2010
•
General Precautions, page 1-2
• Protect Against Electrostatic Discharge, page 1-2
• Regulatory Compliance and Safety Information, page 1-2
This warning symbol means danger. You are in a situation that could cause bodily injury. Before you work on any
equipment, be aware of the hazards involved with electrical circuitry and be familiar with standard practices for
preventing accidents. Use the statement number provided at the end of each warning to locate its translation in the
translated safety warnings that accompanied this device.
SAVE THESE INSTRUCTIONS
• Read the installation instructions before connecting the system to the power source. Statement 1004
• The device is designed to work with TN power systems. Statement 19
• The power supply must be placed indoors. Statement 331
• This equipment is intended to be grounded. Ensure that the host is connected to an earth ground during normal use.
• When installing the unit, always make the ground connection first and disconnect it last.
Use only the Cisco-supplied combination of power cord, plug, and adapter — if any — that shipped with the equipment, or which you
ordered separately. Otherwise, if you use other such supplies, including similar supplies that Cisco might sell for use with similar
equipment, you:
• Might damage or destroy data, equipment, or other property.
• Might cause any combination of electrical shock, electrical fire, injury, or loss of life.
• Will void the warranties for Cisco equipment.
• Do not work on the system or connect or disconnect cables during periods of lightning activity.
• This product relies on the building’s installation for short-circuit (overcurrent) protection. Ensure that the protective device
is rated not greater than: 120 VAC, 15A U.S. (240 VAC, 10A international)
• The plug-socket combination must be accessible at all times, because it serves as the main disconnecting device.
• To avoid electric shock, do not connect safety extra-low voltage (SELV) circuits to telephone-network voltage (TNV) circuits. LAN
ports contain SELV circuits, and WAN ports contain TNV circuits. Some LAN and WAN ports both use RJ-45 connectors. Use
caution when connecting cables.
• Installation of the equipment must comply with local and national electrical codes.
• Ultimate disposal of this product should be handled according to all national laws and regulations.
OL-15764-03
User Guide for Cisco Digital Media Player Device Manager 5.2.x
1-1
Page 12

General Precautions
General Precautions
Observe the following precautions.
• Never open the equipment. Only an authorized technician should service its components.
• If any of the following conditions occur, unplug the equipment and contact an authorized technician.
–
The power cable, extension cord, or plug is damaged.
–
Any foreign object has entered the equipment.
–
The equipment has been exposed to or any liquid.
–
The equipment has been dropped or damaged.
–
The equipment does not operate correctly when you follow its operating instructions.
• Do not spill anything on the equipment.
• Observe extension cord and power strip ratings. Make sure that the total ampere rating of all
products plugged into the extension cord or power strip does not exceed 80 percent of the extension
cord or power strip ampere ratings limit.
• Do not modify power cords or plugs. Consult a licensed electrician or your power company for site
modifications. Always follow your local and national wiring rules.
Chapter 1 Health and Safety Overview
Protect Against Electrostatic Discharge
Static electricity might harm sensitive components. To prevent this damage, discharge static electricity
from your body before you touch equipment. You can also take the following steps to prevent damage
that might result from electrostatic discharge.
• When transporting equipment, first place it in an antistatic container or packaging.
• Do not leave equipment where other people can handle and possibly damage it.
• Take additional care when handling equipment during cold weather. Heating reduces indoor
humidity and increases static electricity.
Regulatory Compliance and Safety Information
See http://cisco.com/en/US/products/ps7220/prod_installation_guides_list.html.
User Guide for Cisco Digital Media Player Device Manager 5.2.x
1-2
OL-15764-03
Page 13

DMP Specifications
Revised March 13, 2012
• Environmental Conditions, page 2-1
• Site-Specific Conditions, page 2-3
• Physical Interfaces (I/O Ports), page 2-4
• Internal LEDs, page 2-8
DMP 4305G DMP 4310G DMP 4400G
CHAPTER
2
Environmental Conditions
Table 2-1 describes the temperature, humidity, and altitude ranges that a DMP can tolerate.
Table 2-1 Environmental Tolerance Ranges
Measurable Condition Model Supported Range
Temperature (Ambient)
Operating — long-term or short-term
User Guide for Cisco Digital Media Player Device Manager 5.2.x
OL-15764-03
DMP 4305G
DMP 4310G
DMP 4400G
Min.
Max
Min.
Max.
Min.
Max
104°F 40°C
122°F 50°C
104°F 40°C
41°F 5°C
32°F 0°C
41°F 5°C
2-1
Page 14

Chapter 2 DMP Specifications
Environmental Conditions
Table 2-1 Environmental Tolerance Ranges (continued)
Measurable Condition Model Supported Range
Nonoperating or storage
Relative Humidity (Noncondensing; Ambient)
Operating
Nonoperating or storage
Altitude (Above sea level)
Operating, nonoperating, and storage
DMP 4305G
DMP 4310G
DMP 4400G
DMP 4305G
DMP 4310G
DMP 4400G
DMP 4305G
DMP 4310G
DMP 4400G
DMP 4305G
DMP 4310G
DMP 4400G
Min.
Max.
Min.
Max.
Min.
Max
Min.
Max.
Min.
Max.
Min.
Max.
Min.
Max.
Min.
Max.
Min.
Max.
Min.
Max.
Min.
Max.
Min.
Max.
140°F 60°C
158°F 70°C
140°F 60°C
13,780 ft 4,200 m
13,780 ft 4,200 m
13,780 ft 4,200 m
–4°F –20°C
–4°F –20°C
–4°F –20°C
20 percent
85 percent
10 percent
85 percent
20 percent
85 percent
0 percent
95 percent
0 percent
95 percent
0 percent
95 percent
0 ft 0 m
0 ft 0 m
0 ft 0 m
User Guide for Cisco Digital Media Player Device Manager 5.2.x
2-2
OL-15764-03
Page 15

Chapter 2 DMP Specifications
Site-Specific Conditions
Assess each location where you might want to use this equipment.
Site-Specific Conditions
Adequate Shelter
Supported Voltage
DHCP Access
Install and use this equipment indoors — or outdoors in a covered area.
• Never install or use it in a wet environment.
• Never install or use it near radiators or other heat sources.
There are — at most — only two supported methods to power this equipment.
• Use the standard electrical power cord that came with the equipment. Cord length determines
the maximum possible distance from the equipment to any AC electrical outlet that it can use. The
outlet itself must use standard voltage for your locale, within the range from 100V to 240V. We
ecommend that you use a surge suppressor, line conditioner, or uninterruptable power supply
r
(UPS). Please position all cables and power cords carefully. Route all cables, the power cord, and
the plug so that they cannot be stepped on or tripped over. Never allow anything to rest on
uipment cables or cords.
eq
OR
• Use 802.3af power over Ethernet (PoE), assuming that your equipment model supports
this feature. We describe PoE setup elsewhere in this guide. To learn if your equipment model
pports this feature, see its datasheet at http://cisco.com/go/dms/dmp/datasheets.
su
Each new DMP (and each DMP on which you restore factory-default settings) uses DHCP to obtain its
first IP address. Therefore, a DHCP server must be reachable from the site where you set up a DMP.
Later, after your DMP is fully configured, it can use either static or dynamic IP addressing.
Signal Integrity
OL-15764-03
When physical cables are too long, the signals that they carry can degrade. Signal loss can also affect
wireless connections —
including the infrared connection between a DMP and its remote control. When
signal integrity suffers, equipment performance suffers.
User Guide for Cisco Digital Media Player Device Manager 5.2.x
2-3
Page 16
Physical Interfaces (I/O Ports)
Physical Interfaces (I/O Ports)
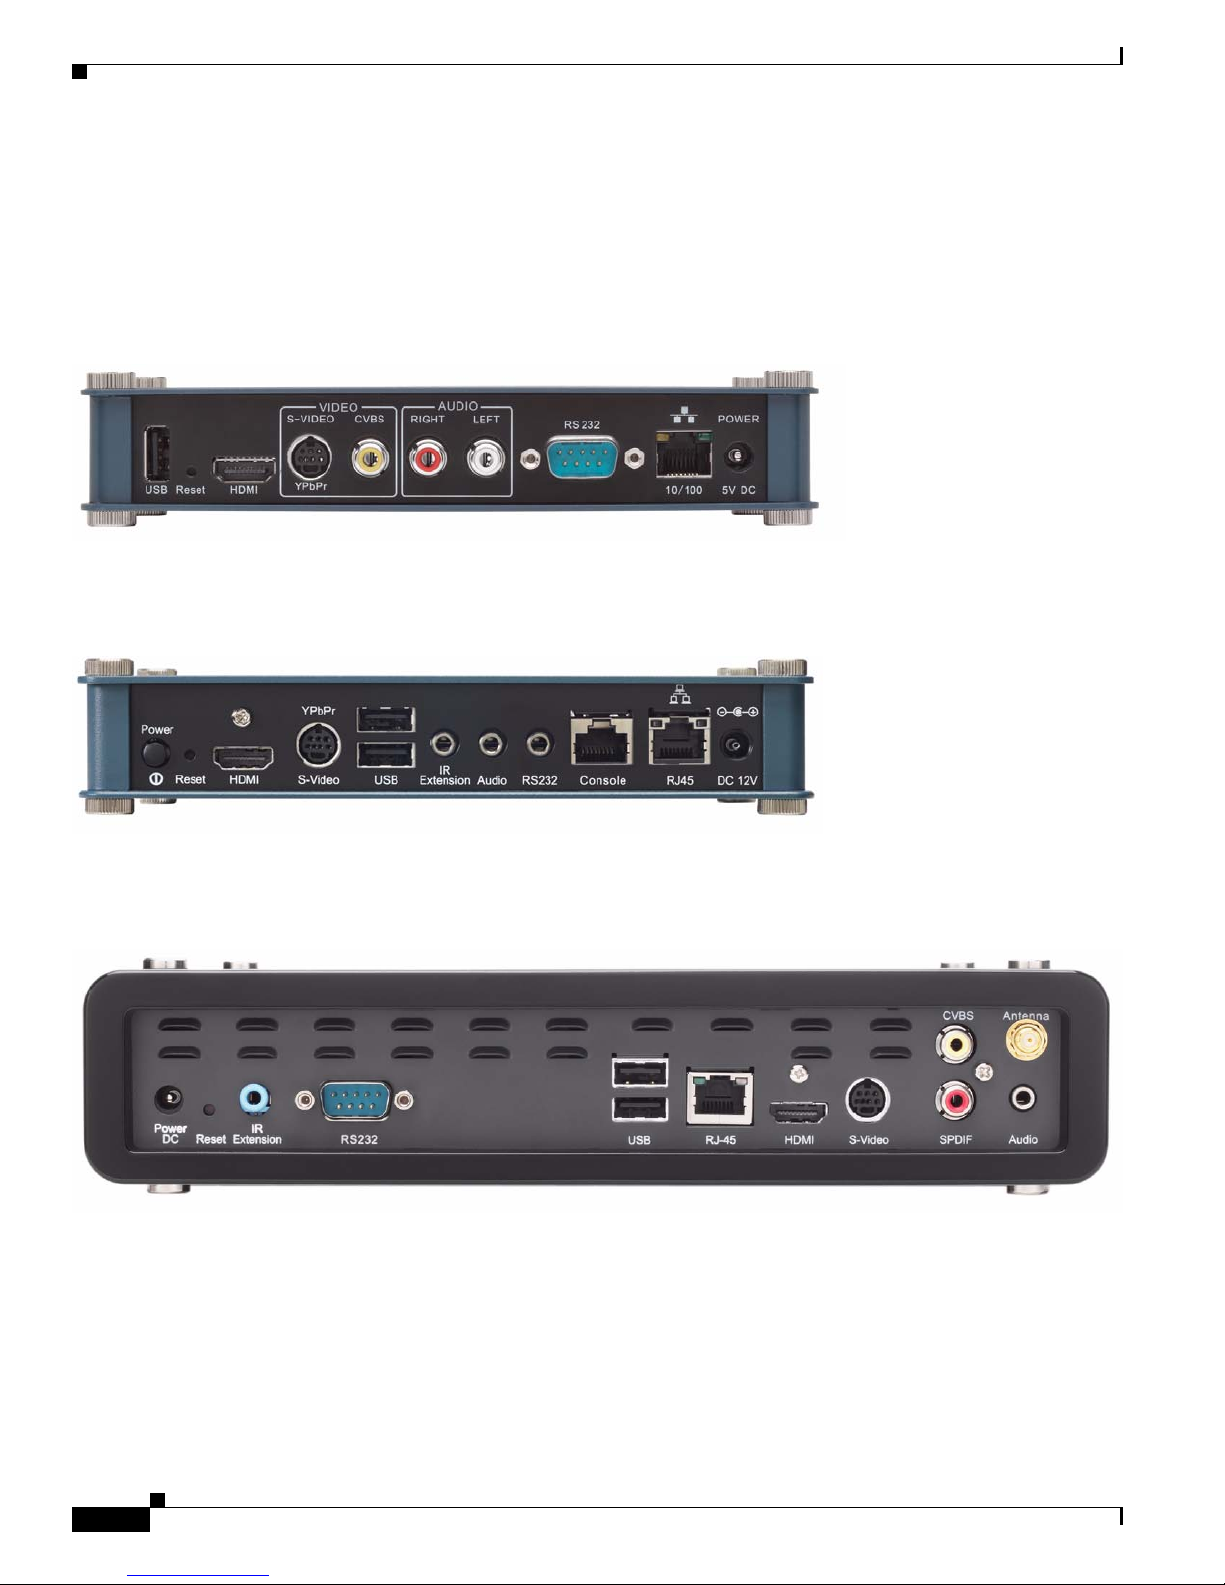
Table 2-2 on page 2-5 describes the connectors, sensors, and buttons on each DMP model.
DMP 4305G
DMP 4310G
Chapter 2 DMP Specifications
DMP 4400G
User Guide for Cisco Digital Media Player Device Manager 5.2.x
2-4
OL-15764-03
Page 17

Chapter 2 DMP Specifications
Table 2-2 DMP Interfaces
Physical Interfaces (I/O Ports)
Category and Subcategory Chassis Label
Electrical Power
DC input
voltage
1
PoE
Network Connectivity
2
Wired
Wireless
Debugging (for Cisco use only)
4
5V • POWER 5V DC 1 0 0
12V
• DC 12V 0 1 0
• Power DC 0 0 1
IEEE 802.3af • RJ-45 0 1 0
Fast Ethernet 10/100 • 10/100 1 0 0
• RJ45 0 1 0
Gigabit Ethernet
3
10/100/1000 • RJ-45 0 0 1
IEEE 802.11b/g • Antenna 0 0 1
— • CONSOLE 0 1 0
Media Signal
5
Wired
Video connectors HDMI 1.1 • HDMI 1 0 1
HDMI 1.3
Component
6
7
• YPbPr/
S-Video
• S-VIDEO/
YPbPr
• S-Video 0 0 1
Infrared
Composite
Audio connectors 3.5mm jack
RCA
8
10
• CVBS 1 0
• Audio 0 1 1
• SPDIF 0 0 1
• RIGHT 1 0 0
• LEFT 1 0 0
Wired Receiver extension 3.5 mm jack • IR Extension 0 1 1
11
Wireless Receiver Sensor for remote control
• — 1 1 1
DMP 4305G
DMP 4310G
0 1 0
0 1 0
1 0 0
9
DMP 4400G
1
OL-15764-03
User Guide for Cisco Digital Media Player Device Manager 5.2.x
2-5
Page 18
Physical Interfaces (I/O Ports)
120356
120357
Table 2-2 DMP Interfaces (continued)
Chapter 2 DMP Specifications
Category and Subcategory Chassis Label
DMP 4305G
DMP 4310G
Serial (Comm Ports)
Wired Data USB 1.0 • USB 1 0 0
USB 2.0
RS-232
12
• RS232 1 0 1
0 2 2
(9-pin DB9 to 9-pin DB9)
RS-232
0 1 0
(9-pin DB9 to 3.5 mm jack)
Human
Power On/Off Button • Power 0 1 0
Device Reset Recessed button
1. IEEE 802.3af interface with integrated switching regulator.
2. Category 5 or better. Maximum length: 328 ft (100 m). For any distance greater than 165 ft (50 m), we recommend that you use Category 5e or Category 6
certified Ethernet cabling. For installation behind walls, we recommend plenum-rated cabling unless it does not satisfy the requirements set forth in your
regional building code. We do not ship any Ethernet cable with any DMP model. You must obtain this cable separately.
3. Wake-on-LAN.
4. Supporting EAP-FAST, WEP, WPA, and WPA2.
5. For maximum supported media signal cable lengths, see the “Understand How to Choose Media Signal Cables” section on page 6-3. Each video and audio
signal cable that we ship with DMPs is 6 ft (approximately 1.83 m) long.
6. Backward-compatible to HDMI 1.1.
7. Use an S-Video signal cable with a YPbPr-to-S-Video adapter to transmit and receive YPbPr data signals.
8. When image signals are transmitted through a composite cable, image quality suffers. When you use a composite cable and your DMP shows any
web-based media, small text might be difficult to read in TVzilla. To work around this limitation, you can lower the browser resolution setting in DMPDM.
9. Although there is no Composite CVBS connector on a DMP 4310G, its YPbPr/S-Video connector supports Composite CVBS when you use an
S-Video-to-Composite adapter.
10. Stereo audio output, irrespective of the cable type for video output.
11. Maximum distance from remote control to DMP is 15 ft (5 m).
12. Maximum USB cable length is 15 ft (5 m).
• Reset 1 1 1
DMP 4400G
Power Cord Options
.
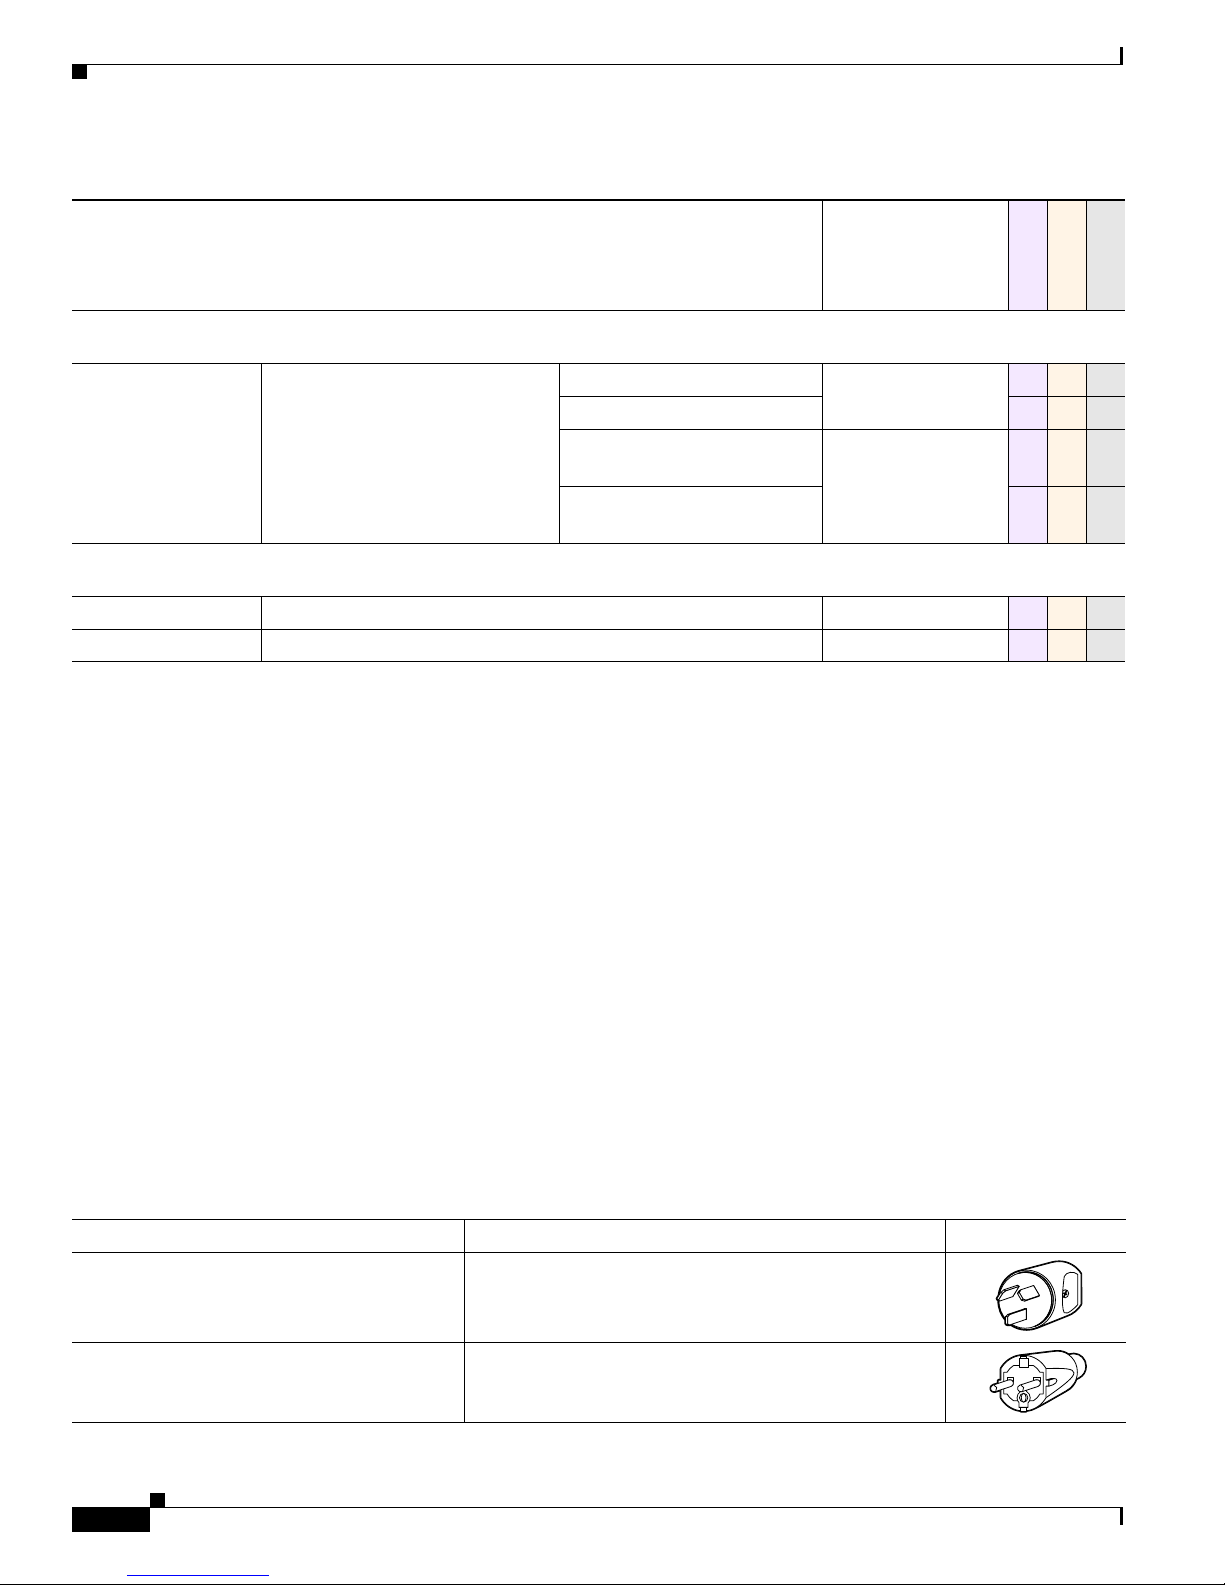
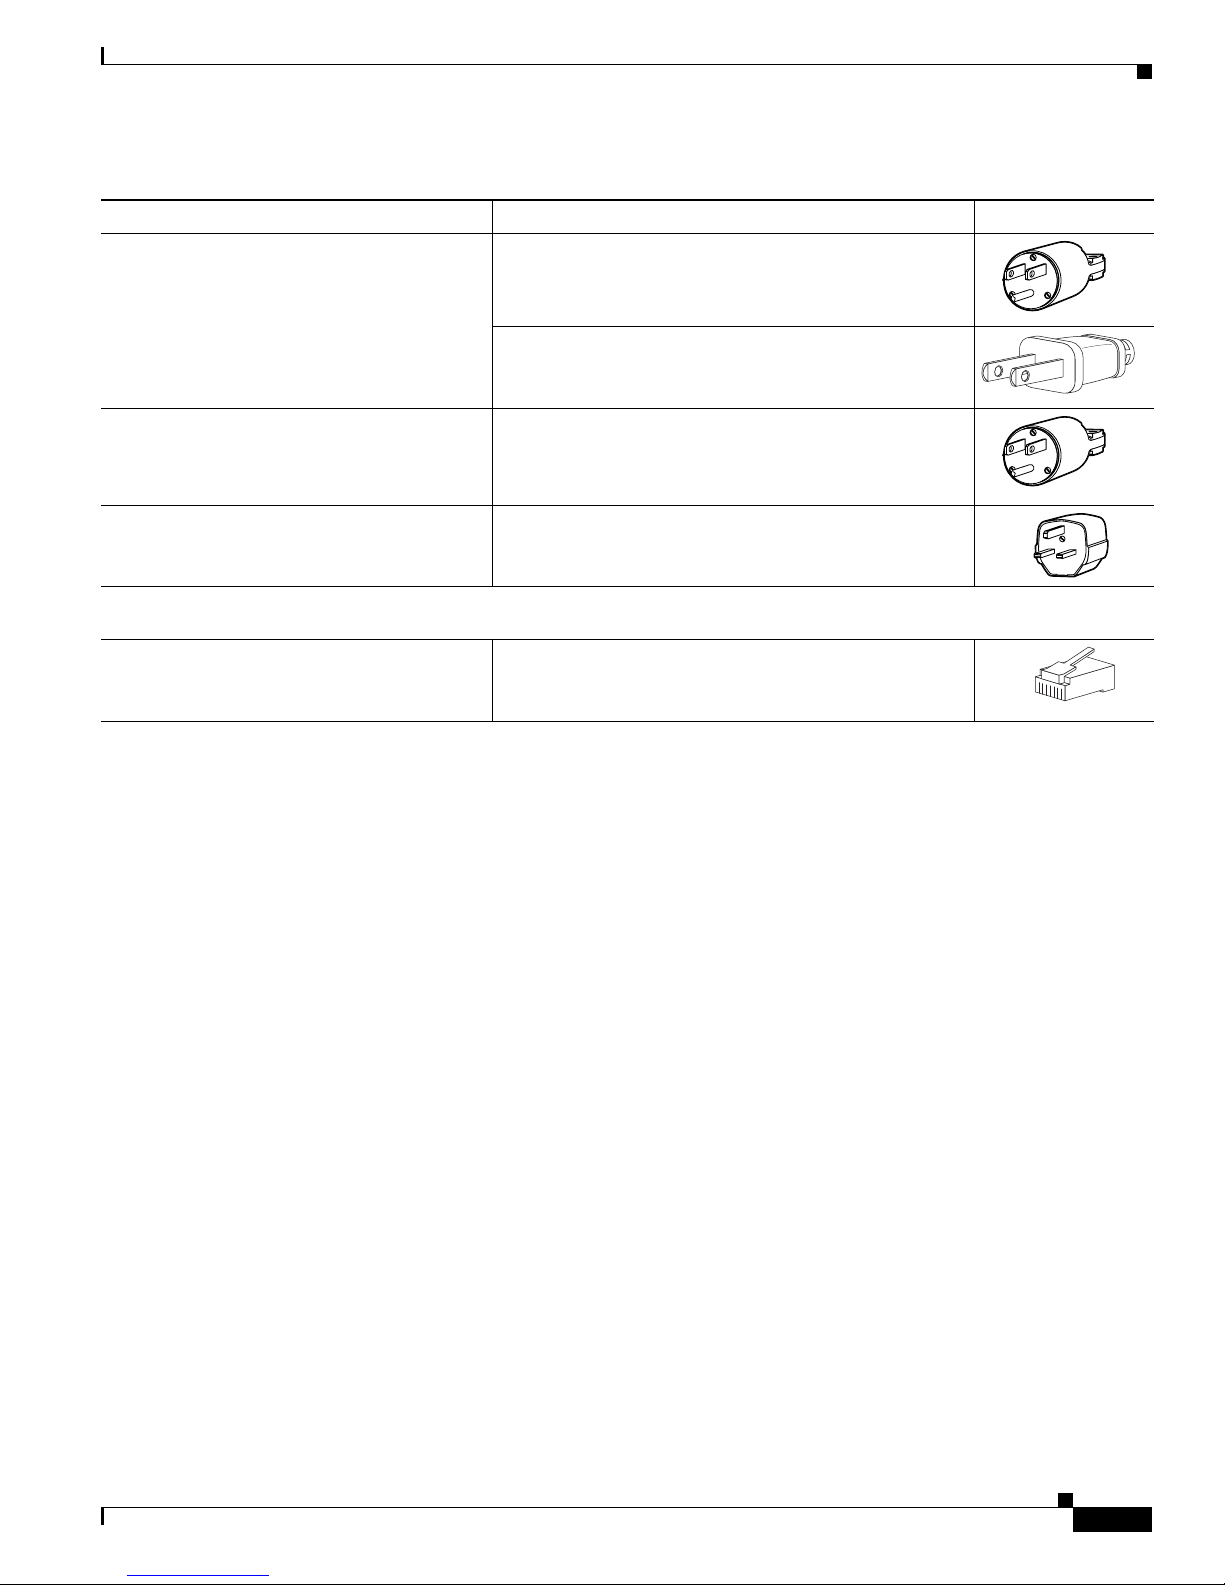
Table 2-3 International Power Cord Standards
Locale Standard Plug Type
• Australia
• New Zealand
• European Union (except Italy)
• Argentina
• Brazil
2-6
User Guide for Cisco Digital Media Player Device Manager 5.2.x
•
SAA/3
• AS/NZS 3112-1993
CEE 7/7
•
• VIIG
OL-15764-03
Page 19
Chapter 2 DMP Specifications
120354
120354
120359
Physical Interfaces (I/O Ports)
Table 2-3 International Power Cord Standards (continued)
Locale Standard Plug Type
• Japan
• JIS C8303 (NEMA 5-15P)
• JIS 38303
251248
• North America
• Central America
• Columbia
• Ecuador
• United Kingdom
Any Locale
• Power Over Ethernet (PoE)
Related Topics
• Physical Interfaces (I/O Ports), page 2-4
• Receive Electrical Power from a 100V–240V AC Socket, page 4-2
• Receive Electrical Power from 802.3af Power over Ethernet (PoE), page 4-3
• NEMA 5-15P
• CS22.2, No.42
BS89/13
•
• RJ-45
OL-15764-03
User Guide for Cisco Digital Media Player Device Manager 5.2.x
2-7
Page 20

Internal LEDs
Internal LEDs
The DMP chassis contains a green LED and a red LED. After your DMP is attached to its AC power
source, you should see light from both LEDs through the DMP front grille. The LEDs tell you when your
DMP has power and when it has an IP address. To work as designed, it must have both.
Table 2-4 Troubleshoot with LEDs
LED
Status
Chapter 2 DMP Specifications
Green
Troubleshooting Notes
Red
On On Your DMP is connected to its power source and is receiving electrical power. However, it has not yet obtained an
IP address to use. Your DMP should obtain its IP address within 2 minutes. When the red LED persists:
• For a wired network connection — Are both ends of the Ethernet cable plugged in?
• For a wireless network connection — Is the wireless network active?
• Does restarting your DMP resolve this problem?
• Was any IP address in effect previously for your DMP? If so, can you ping that IP address? If you do not
remember what the address was, there are ways to obtain it. Turn On a presentation system that is connected
to your DMP and is configured or calibrated as necessary, and then try one of these methods.
–
Press Show IP on the handheld remote control unit for your DMP. Write down the IP address that the
presentation system shows to you. (Remote controls for DMPs are sold separately.)
–
Restart the DMP. If its splash screen is configured in DMPDM to persist for any visible duration, write
down the IP address that the splash screen shows to you.
Tip Alternatively, you can check your router’s ARP table.
•
When your DMP uses dynamic IP addresses that it receives from a DHCP server:
–
Has anything disrupted network traffic flow between your DMP and its DHCP server?
–
Is the DHCP server turned On and working correctly?
–
Does the DHCP server issue IP address leases that expire?
On Off Your DMP is connected to its power source and is receiving electrical power. Furthermore, it has obtained and is
w using an IP address.
no
Off Off Your DMP does not have any electrical power and, thus, cannot obtain or use any IP address. Check that:
• You are not experiencing a local or regional power outage.
• All connectors are seated firmly.
• Cords, plugs, adapters, and sockets do not show any signs of physical damage.
• No one used software or sent commands to turn your DMP Off.
Blinking Infrared signal interference has affected your DMP. Investigate the source of this interference. Shield or move
uipment as necessary to restore normal operation.
eq
User Guide for Cisco Digital Media Player Device Manager 5.2.x
2-8
OL-15764-03
Page 21

Welcome
Revised November 24, 2010
• Concepts, page 3-1
Concepts
• About This Guide, page 3-1
• DMP Overview, page 3-2
• Consider How You Will Use and Manage Your DMP, page 3-5
About This Guide
CHAPTER
3
This guide describes Cisco software called Digital Media Player Device Manager (DMPDM).
DMPDM is preinstalled on every Dig
assumes that you already completed setup procedures for your DMP, and therefore:
• Your DMP is already connected to:
–
A network that includes a DHCP server.
–
Its public presentation system.
–
Its AC power source.
• You already:
–
Checked the LEDs to confirm that your DMP has power and has obtained an IP address.
–
Learned what dynamic IP address the DHCP server assigned to your DMP.
–
Used your browser to log in to the DMPDM administrative account.
–
Changed the factory-default passwords.
–
Used DMPDM to configure video output to the presentation system.
–
Used DMPDM to identify its trusted DMM appliance.
Caution Are any of the preceding statements not yet true for you? If so, you must set up your DMP before
you use this guide. See http://cisco.com/en/US/products/ps7220/prod_installation_guides_list.html.
ital Media Player (DMP) that supports Cisco DMS 5.2. This guide
OL-15764-03
User Guide for Cisco Digital Media Player Device Manager 5.2.x
3-1
Page 22
Concepts
DMP Overview
Cisco Digital Media Players (DMPs) are highly reliable, compact, solid-state devices for IP networks.
DMPs process High definition and Standard Definition video, multimedia and animations, web pages,
and other supported content types for playback. You expose targeted audiences to this programming
when you schedule its availability — live or on demand — on a public presentation system that is
attached to a DMP. The presentation system might be a display (monitor), touchscreen, video projector,
or video wall.
Chapter 3 Welcome
DMP 4305G DMP 4310G DMP 4400G
DMPDM
DMPs consume very little power and are designed for fast deployment throughout IP networks of any
ze, without the burden of high ongoing operational cost. DMPs are compatible with popular systems
si
for networked content distribution, including Cisco Application and Content Networking System
CNS) and Cisco Wide Area Application Services (W
(A
AAS).
Any two DMP models might differ in their features, attributes, strengths, limitations, and general
vailability. Some DMPs differ from others, for example, in their support for interactivity through touch.
a
To learn what your DMP supports, see its datasheet at http://cisco.com/go/dms/dmp/datasheets.
DMPs are a major component of Cisc
o Digital Media Suite (Cisco DMS) and Cisco StadiumVision, both
of which we describe elsewhere in this guide.
• DMPDM, page 3-2
• TVzilla, page 3-3
• Cisco Hinter, page 3-3
• Remote Controls, page 3-4
Tip We optimize and certify DMPs for use with centralized management solutions that we sell and
license separately. See the “Consider How You Will Use and Manage Your DMP” section on page 3-5.
A lightweight webserver on every DMP runs a web-based “craft interface” called Digital Media Player
Device Manager, or DMPDM. Because DMPDM is limited to the simplest functions and does not scale
beyond its own host DMP, we recommend that you manage all DMPs centrally.
DMPDM has two main purposes. With it, you can:
• Configure one DMP during its initial setup.
• Manage one DMP and one presentation system in isolation. Or, when you use signal splitters or
daisy chaining, your DMP can deliver media to multiple presentation systems that are close to it — as
th a video
wi
User Guide for Cisco Digital Media Player Device Manager 5.2.x
wall. Popular uses include:
3-2
OL-15764-03
Page 23

Chapter 3 Welcome
Concepts
–
Marketing — Describe products and services directly to your in-store customers.
–
Customer experience — Deliver entertainment and information to reduce perceived wait times.
–
Messaging — Broadcast executive and internal communications in real time.
–
Training — Deliver cost-effective, flexible training.
–
Information — Deliver real-time schedules, news, and way-faring information where people
need it.
–
Advertising — Sell advertising time and space to third parties.
–
Branding — Communicate about your brand consistently.
Note StadiumVision deployments should avoid DMPDM, except to check the firmware’s “build date”
or release version number. For other tasks, please use the management dashboard software and
documentation that came with your StadiumVision purchase.
Tip A software user guide for DMPDM is available on Cisco.com. See
http://cisco.com/go/dms/dmpdm.
TVzilla
Cisco Hinter
A Cisco-customized web browser is sometimes preinstalled on DMPs. We call this browser TVzilla.
Note Does your DMP model run TVzilla in this release? Some might not. See
http://cisco.com/go/dms/dmp/datasheets.
TVzilla uses code from the open source Mozilla project and supports JavaScript. TVzilla supports the
following file types.
• HTML and TXT
• GIF, JPEG, and PNG
• SWF (Shockwave Flash) — for supported versions, see your DMP datasheet at
http://cisco.com/go/dms/dmp/datasheets.
You cannot install browser plug-ins or any other software in TVzilla, whether to support additional file
ypes or for any other purpose. No Java Runtime Environment is installed.
t
A technique called interleaved RTP makes it possible for some centrally managed DMPs to play
delay-insensitive unicast MPEG streams through RTSP connections. A streaming server can then
transmit this “hinted” video to DMPs on demand. The key advantages of interleaved RTP are that data
loss is impossible inside the hinted program stream, and yet synchronization of audio to video never
suffers, even in high-definition.
Cisco Hinter i
s software to prepare and stage MPEG files for interleaved RTP transmission through the
open source Darwin Streaming Server component on a Cisco
OL-15764-03
Digital Media Manager (DMM) appliance.
User Guide for Cisco Digital Media Player Device Manager 5.2.x
3-3
Page 24

Concepts
Note Thus, this utility and this feature are not available in deployments that use Cisco StadiumVision.
There is no DMM appliance in StadiumVision.
Cisco Hinter versions for Windows and Linux users are freely downloadable from any DMM appliance
that is fully licensed for Cisco Digital Signs. T
see the DMM user guide on Cisco.com.
Optional DMP Accessories
Note We reserve the right to introduce, redesign, or discontinue any accessory as needed.
We have designed optional accessories to enhance your DMP experience. For example, you might order
ha
ndheld remote control units or VESA-compliant mount kits.
Remote Controls
Chapter 3 Welcome
o understand Cisco Hinter and Cisco Digital Signs fully,
Cisco sells handheld remote control units that you can use to operate DMPs. We sell these optional
remote control units separately to conserve natural resources and prevent needless waste.
• Consult the remote control datasheet to learn exactly the maximum distance from which your remote
control can control your DMP.
• To order remote controls, contact your Cisco sales partner.
• Remote control documentation is available on Cisco.com.
Tip Cisco Unified Communications Manager administrators can configure a service through which Cisco
IP Phones and mobile phones can emulate a remote control. Phone users can then operate the IPTV
features of Cisco Cast. To learn how to configure this service and use it, see the Cisco Cast
documentation on Cisco.com.
User Guide for Cisco Digital Media Player Device Manager 5.2.x
3-4
OL-15764-03
Page 25

Chapter 3 Welcome
Concepts
Mount Kits
Cisco sells fabricated sheet metal cases to stabilize and protect Cisco DMPs in any supported mounting
scenario. With these cases, you can mount DMPs securely to walls, pillars, suspended-grid ceiling
T-joints, metal poles, or VESA-compliant flat-panel displays. DMP mount kits are a versatile and
cost-effective alternative to complex cabinet-making and construction projects.
• To order DMP mount kits, contact your Cisco sales partner.
• Mount kit documentation is available on Cisco.com.
Consider How You Will Use and Manage Your DMP
An organization might buy and use one DMP in isolation but this is rarely the case. Almost every DMP
is part of a network that includes many other DMPs. The ideal DMP management system (or
combination of systems) for any particular organization depends on how many DMPs it has and how it
plans to use them. Beyond this, a management system might impose its own installation and setup
requirements for DMPs. To understand any such requirements, see the documentation on Cisco.com.
Topics in this section describe Cisco products to manage DMPs in various settings.
• Understand DMP Modes, page 3-5
• Manage One DMP in Isolation, page 3-5
• Centrally Manage Digital Signage Services, page 3-6
• Centrally Manage IPTV Services, page 3-6
• Centrally Manage Sports and Entertainment Venue Services, page 3-7
Understand DMP Modes
You can use a DMP in isolation, so that it operates independently of every other DMP. When you deploy
one DMP in isolation, you use DMPDM to configure it and control its daily operation.
Or, you can deploy multiple DMPs throughout a LAN or WAN. In this case, you use Ci
Manager or Cisco StadiumVision to configure and manage your DMPs centrally.
sco Digital Media
Manage One DMP in Isolation
This guide teaches you how. See DMPDM, page 3-2.
OL-15764-03
User Guide for Cisco Digital Media Player Device Manager 5.2.x
3-5
Page 26

Concepts
Centrally Manage Digital Signage Services
Cisco Digital Signs provides a flexible environment in which to create and centrally manage a local,
regional, or global IP network of DMPs and their attached presentation systems, such as Cisco-branded
displays in our LCD Professional s
• Simple but powerful design and publishing features in Digital Signs help you to create media
libraries, employ networked content distribution, schedule playback for programming, and prepare
reports to prove that playback occurred.
• Life-saving features support public emergency preparedness and response.
• Purely administrative features include those to:
–
Define and issue remote commands to DMPs and their attached presentation systems.
–
Poll the current and historical status of DMPs and their attached presentation systems.
–
Adjust the resolution, brightness, contrast, and related settings for presentation systems.
Commonly popular DMP deployment sites under Dig
service counters, exhibit halls, dining halls, waiting rooms, and offices. Used well, Digital Signs can help
your organization to enhance customer experience, educate students, and entertain patrons.
Chapter 3 Welcome
eries.
ital Signs include lobbies, classrooms, showrooms,
Centrally Manage IPTV Services
Cisco Cast features help your organization to deliver video-on-demand and live broadcast TV channels
over a local, regional, or global IP network of DMPs and their attached presentation systems, such as
Cisco-branded displays in our LCD Professional s
• Search the interactive on-screen menus and program guides.
• Show live or on-demand:
–
news
–
financial information
–
sales and marketing messages
–
educational or instructional media
–
corporate communications
–
entertainment
–
any other video asset that is suitable for your purpose
• Alternatively, hospitality and healthcare providers might use Cisco Cast features to support
in-room
IPTV.
eries.
User Guide for Cisco Digital Media Player Device Manager 5.2.x
3-6
OL-15764-03
Page 27

Chapter 3 Welcome
Centrally Manage Sports and Entertainment Venue Services
Cisco StadiumVision is an advanced solution for centralized IPTV video content management
and delivery. It integrates video from multiple sources — in Standard Definition (SD), High Definition
HD), or both — to automate video delivery in stadiums, arenas, and similar venues.
(
Platform services software and control panels help you to manage a network of DMPs. Combined with
sco video acquisition infrastructure at the head-end, these DMPs use new and existing video displays
Ci
in your venue to enhance patron enjoyment of live events and deliver in-house advertising. Your
deployment can leverage the displays in bleachers (terraces), restaurants, clubs, and luxury suites to
deliver a range of uniquely interactive messages automatically to patrons in various areas.
Concepts
With St
adiumVision, you can add, organize, combine, and deliver any supported combination of in-house
programming and external network channels for playback to your patrons.
OL-15764-03
User Guide for Cisco Digital Media Player Device Manager 5.2.x
3-7
Page 28

Concepts
Chapter 3 Welcome
User Guide for Cisco Digital Media Player Device Manager 5.2.x
3-8
OL-15764-03
Page 29

CHAPTER
Connect to a Power Source
Revised November 24, 2010
DMPs use electrical power to run. Your DMP model and geographic locale might both affect which
power plug your DMP uses.
• Concepts, page 4-1
• Procedures, page 4-2
Concepts
• DMP 4310G Notice Regarding Power over Ethernet (PoE), page 4-1
DMP 4310G Notice Regarding Power over Ethernet (PoE)
4
Starting in 2009, a handful of Cisco StadiumVision customers participated in a special program to
receive DMP 4310G endpoints whose hardware design was not yet utterly final. During this limited,
pre-release program, we manufactured such units under the Cisco product ID "DMP-4310G-SE-K9."
Partway through the limited release, we changed one physical component in the hardware design to
improve the Power over Ethernet (PoE) performance of a DMP 4310G.
Is even one of these statements true for you?
• Your DMP 4310G was manufactured in or after September 2010.
• Your DMP 4310G serial number is USI1434xxxx or greater.
• We manufactured your DMP 4310G under the Cisco product ID "DMP-4310G-52-K9."
When even one of these statements is true, your DMP 4310G uses the improved PoE component.
othing further about this topic applies to you or your DMP.
N
Otherwise, when even one statement is false, your DMP 4310G uses the original PoE component. We
have identified a corner case in which these DMPs might not receive full PoE power. Suppose that a very
long Ethernet cable connects the DMP 4310G to a network switch from the Cisco 3560 Series. And
suppose also that the Ethernet cable length is so great that the level of PoE power becomes noticeably
diminished after traveling its full distance to the DMP. In this scenario, your DMP cannot compensate
for the degraded power because switches in the Cisco 3560 Series do not permit adjustments to their
PoE power output.
OL-15764-03
User Guide for Cisco Digital Media Player Device Manager 5.2.x
4-1
Page 30

Procedures
We recommend that you do not obtain power for such DMPs from network switches in the Cisco 3560
Series. When you must do so, then take care to use the shortest possible Ethernet cord. Alternatively, you
might use network switches from the Cisco 3750 Series, which offer configurable PoE power output.
Procedures
• Receive Electrical Power from a 100V–240V AC Socket, page 4-2
• Receive Electrical Power from 802.3af Power over Ethernet (PoE), page 4-3
Receive Electrical Power from a 100V–240V AC Socket
Chapter 4 Connect to a Power Source
Warning
Use ONLY the power adapter, power cord, and plugs that we supply for your DMP model explicitly.
DO NOT USE OTHERS, even if they appear identical or appear to work with another DMP model.
Before You Begin
• Did your Cisco equipment ship with a power cord and AC adapter? Or did it ship with an AC adapter
and multiple, snap-on plugs? Your packing list states which supplies Cisco planned to ship.
(Alternatively, you might have purchased a Cisco power cord and AC adapter as accessories for your
equipment.)
• To learn which Cisco power cords and AC adapters are compatible with your DMP, see its datasheet
at http://www.cisco.com/go/dms/dmp/datasheets.
Procedure
Step 1 If your DMP power cord must be assembled, assemble it.
a. Identify the correct snap-on plug for your region.
b. Snap that plug onto the AC adapter.
Step 2 Connect the DMP power cable to the AC adapter.
Step 3 Connect the DC barrel connector to the DC power supply on the DMP chassis.
Step 4 Connect to an AC electrical outlet that you know is grounded. It must use the correct voltage level for
your locale. Supported levels range from 100V to 240V.
Note To protect your DMP from electrical surges, we recommend that you use a surge protector or an
uninterruptable power supply from a reputable manufacturer.
Step 5 Stop. You have completed this procedure.
Related Topics
• Physical Interfaces (I/O Ports), page 2-4
• Power Cord Options, page 2-6
• Receive Electrical Power from 802.3af Power over Ethernet (PoE), page 4-3
User Guide for Cisco Digital Media Player Device Manager 5.2.x
4-2
OL-15764-03
Page 31

Chapter 4 Connect to a Power Source
Receive Electrical Power from 802.3af Power over Ethernet (PoE)
Note • You can power a DMP 4310G through its Ethernet cable. Other DMP models do not support this feature.
• A DMP 4310G has two USB interfaces on its chassis. When you use PoE to power a DMP 4310G, we recommend that
you use no more than one of these USB interfaces at a time. IEEE 802.3af PoE is limited in its capacity and might not be
sufficient to power your DMP and two USB peripherals simultaneously.
• When both PoE power and AC power are detected, AC power overrides PoE and disconnects the PoE circuit.
Procedure
Step 1 Use the On/Off power button on the DMP chassis to verify that your DMP is turned Off.
Step 2 Connect a standard, Category 5 Ethernet cable to your DMP.
Step 3 Attach the other end of the Ethernet cable to a PoE-enabled network switch that operates inside
your network.
Step 4 Use the On/Off power switch on the DMP chassis to turn your DMP On.
Procedures
Step 5 Stop. You have completed this procedure.
Related Topics
• Physical Interfaces (I/O Ports), page 2-4
• Power Cord Options, page 2-6
• Receive Electrical Power from a 100V–240V AC Socket, page 4-2
OL-15764-03
User Guide for Cisco Digital Media Player Device Manager 5.2.x
4-3
Page 32

Procedures
Chapter 4 Connect to a Power Source
User Guide for Cisco Digital Media Player Device Manager 5.2.x
4-4
OL-15764-03
Page 33

Tip Physical Ethernet connections take priority over 802.11 b/g on DMPs where both are active. To learn
Concepts
CHAPTER
5
Connect to a Network
Revised November 24, 2010
Use a connection method — wired or wireless — that your DMP and topology both support.
which connection methods your DMP supports, see Ta ble 2-1 on page 2-4. Alternatively, if the table
does not describe your DMP model, see its datasheet at http://cisco.com/go/dms/dmp/datasheets.
• Concepts, page 5-1
• Procedures, page 5-2
• Understand Whether the IP Address Will Be Static or Dynamic, page 5-1
• Understand WEP Keys and Passphrases, page 11-3
Understand Whether the IP Address Will Be Static or Dynamic
The factory-default behavior for every DMP is to obtain and use a dynamic IP address from a DHCP
server in its local network segment.
Nonetheless, your DMP must have an IP address — even when you will deploy it where the local network
segment does not include any DHCP server among its nodes!
In this case, you must configure your DMP before you deploy it. This technique is sometimes called a
green field deployment. The configuration steps differ in Ethernet and wireless networks.
Related Topics
• Prepare Your DMP to Use a Static IP Address Over Ethernet, page 11-14
• Assign a Static IP Address to a Wireless DMP 4400G, page 11-16
OL-15764-03
User Guide for Cisco Digital Media Player Device Manager 5.2.x
5-1
Page 34

Procedures
Procedures
• Connect Over Ethernet, page 5-2
• Connect Over Wireless (802.11 b/g), page 5-2
Connect Over Ethernet
Before You Begin
• Does a security policy in your network restrict DHCP address assignments to known MAC
addresses? If so, locate the MAC address printed on a sticker that is affixed to your DMP. Then,
share this address with your security policy administrator.
• Does your DMP support wireless networking? If so, consider whether you might prefer to use that
method instead of this one.
Procedure
Chapter 5 Connect to a Network
Step 1 Plug one end of a standard Ethernet cable into the corresponding socket on your DMP.
Step 2 Plug the other end of this cable into a network hub, network switch, or router whose network uses DHCP
to allocate IP addresses dynamically.
Step 3 Stop. You have completed this procedure.
Related Topics
• Physical Interfaces (I/O Ports), page 2-4
• Connect Over Wireless (802.11 b/g), page 2
Connect Over Wireless (802.11 b/g)
Note You can configure wireless network settings during a later phase of DMP setup, if your DMP supports
this feature. However, there are other tasks that you must finish first. When you are ready to configure
reless settings, these topics say how.
wi
• Connect Over Wireless (802.11 b/g), page 5-2
• Assign a Static IP Address to a Wireless DMP 4400G, page 11-16
User Guide for Cisco Digital Media Player Device Manager 5.2.x
5-2
OL-15764-03
Page 35

CHAPTER
6
Connect to a Presentation System
Revised November 24, 2010
A DMP transmits signals to a public presentation system that you choose, such as a flat-panel display or
projector that is connected to the DMP.
• This system might use projection or display technologies that are analog or digital.
• It might support Standard Definition (SD) or High Definition (HD).
• Its output fidelity depends in part upon which signal cables (and adapters) connect it to your DMP.
Tip A DMP can detect automatically when some display brands and models are turned On or Off. To connect
one of these displays to your DMP, you must use an RS-232 serial cable in addition to the video
signal cable. Cisco Digital Signs do
your network.
Topics in this section teach you about these presentation systems, signal cables, and adapters.
cumentation on Cisco.com explains how to use this feature in
Concepts
• Concepts, page 6-1
• Procedures, page 6-5
• Understand S-Video Limitations, page 6-2
• Understand How HDMI and DVI Differ, page 6-2
• Understand Which Displays Work Best with DMPs, page 6-3
• Understand How to Choose Media Signal Cables, page 6-3
• Understand How to Work Around the Low Signal Quality of Composite Video, page 6-5
OL-15764-03
User Guide for Cisco Digital Media Player Device Manager 5.2.x
6-1
Page 36

Concepts
Understand S-Video Limitations
When you use an S-Video cable to pass High Definition video signals to a DMP, the picture quality is
not High Definition. This happens because the S-Video standard is engineered to pass analog video
signals in Standard Definition.
When you will use an S-Video signal cable, we recommend a maximum resolution of 728 x 576 @ 25Hz
d a maximum cable length of 10 feet (approximately 3 meters).
an
Understand How HDMI and DVI Differ
With most modern, digital presentation systems, you can use an HDMI cable for both video and audio.
Other such systems might not connect until you combine the HDMI cable with an HDMI-to-DVI adapter
for video. However, DVI does not support the transmission of audio signals. In this case, you can use the
provided audio cable for audio.
DMP 4310G Notice Regarding HDMI/DVI Effects on Autodetection
A corner case exists that is mildly disruptive. It is not likely to affect your organization. To understand
this corner case, assume that all of the following statements are true simultaneously.
• Your DMP model is 4310G.
Chapter 6 Connect to a Presentation System
• Your presentation system’s media signal interface is DVI, not HDMI.
• EDID data in the firmware for your presentation system misrepresents its native resolution.
• The falsely claimed resolution is an HDMI standard instead of a VESA standard.
In this case, your DMP 4310G proceeds as if the native resolution is low, to ensure that your digital sign
ws anything at all.
sho
Tip This constraint does not affect a DMP 4305G or a DMP 4400G. These models do not use the same
microprocessor that a DMP 4310G uses.
To work around this behavior, disable the autodetect feature in DMPDM and then choose the actual
resolution manually.
User Guide for Cisco Digital Media Player Device Manager 5.2.x
6-2
OL-15764-03
Page 37

Chapter 6 Connect to a Presentation System
Understand Which Displays Work Best with DMPs
We certify that DMPs work as designed with Cisco LCD flat-screen displays. All displays in this series
are engineered for intensive use in public settings. See http://cisco.com/go/dms/lcd.
In most cases, DMPs can use displays that comply with modern, international standards. We recommend
the following if you must use a third-party display.
• Digital, not analog.
• High-definition, not standard-definition.
• Professional-grade, not consumer-grade.
hours each day than a consumer-grade display is engineered to run. A consumer-grade system is
likely to fail years sooner than a professional-grade system would under these circumstances.
• LCD, not plasma. Digital signage uses static images more often than it uses full-motion video. Most
often, content is web-based or animated in Flash. The nature of these media types means that some
pixels are not updated frequently in digital signage. LCDs are less susceptible to burn-in than plasma
displays are. Even though image persistence is sometimes a problem on LCD displays, it is almost
always self-correcting and is unlikely to occur when you follow manufacturer guidelines for
managing your displays correctly.
Digital signs and public IPTV installations run many more
Concepts
• Built-in support for RS-232 signalling. This recommendation is important in direct proportion to the
number of displays that you will manage.
Understand How to Choose Media Signal Cables
Caution Poorly shielded cable can sometimes promote undesired signal leakage (egress), interference from
over-the-air signals (ingress), or crosstalk between cables that are in close physical proximity.
Special considerations apply when you obtain a signal cable that is longer or of a different type than
cables that we included in your product kit. For DMP models that support the following signal cable
types, the maximum supported lengths are:
• Composite — 10 ft (approximately 3 m)
• HDMI 1.1 — 16 ft (approximately 5 m)
• RCA — 10 ft (approximately 3 m)
• S-Video — 10 ft (approximately 3 m)
• SPDIF — 10 ft (approximately 3 m)
OL-15764-03
User Guide for Cisco Digital Media Player Device Manager 5.2.x
6-3
Page 38

Concepts
Professional (non-consumer) display resolution
Lower resolution Higher resolution
Proximity of display to your DMP
Far
Near
50 ft.
or more
6 ft.
480p
1080p
Low expense
High expense
Less need for high-end
signal cables
More need for high-end
signal cables
Strong error correction
Weak error correction
Your display - Engineering design quality
25 ft.
720p
More realistic need for low signal resistance
More realistic installation scenarios
196259
Chapter 6 Connect to a Presentation System
Cable Quality
The best signal cables objectively are those with the lowest signal resistance. Factors that affect signal
resistance include wire gauge, cable shielding quality, and cable connector quality. However, the same
materials and engineering designs that reduce signal resistance add to the cost of manufacturing. This
added cost is passed along to a consumer. So, it is useful to understand when signal resistance is not
relevant. Knowing this can help you to manage and reduce expenses without necessarily lowering
your standards. High cost is not inevitable. Nor is it proof of high quality. Sometimes, in fact, high
quality (low signal resistance) is irrelevant.
Even mediocre signal cables are sometimes sufficient, and such cables are often very affordable.
Figure 1 illustrates the most important factors to consider when you choose signal cables.
Figure 1 Signal Cable Purchasing Factors to Consider
User Guide for Cisco Digital Media Player Device Manager 5.2.x
6-4
OL-15764-03
Page 39

Chapter 6 Connect to a Presentation System
Procedures
Beyond the general guidelines that Figure 1 illustrates, two additional factors might constrain which
types of signal cable you can use.
• The technology, brand, and model of your display — Check its product documentation to
understand its compatibility with various signal cable types.
• The DMP model — Table 2-2 states which I/O ports are available on various DMP models.
(Alternatively, if the table does not describe your DMP model, see its datasheet at
http://www.cisco.com/go/dms/dmp/datasheets.) Your packing list states which signal cables Cisco
planned to ship with your DMP.
Related Topics
• Connect to a Presentation System, page 6-1
Understand How to Work Around the Low Signal Quality of Composite Video
Note When video signals are transmitted through a composite cable, image quality suffers. When you use a
composite cable and your DMP shows any web-based media, small text might be difficult to read in
TVzilla. To work around this limitation, you can lower the browser resolution setting in DMPDM.
Related Topics
• TVzilla, page 3-3
• Connect to a Presentation System, page 6-1
Procedures
• Use an HDMI Connection, page 6-5
• Use a Connection that Combines HDMI with DVI, page 6-6
• Connect to a Touchscreen, page 6-7
• Connect to an Analog Display or Projector, page 6-8
Use an HDMI Connection
Timesaver Is your display a touchscreen? If so, this topic is not for you. Instead, see the “Connect to a Touchscreen”
section on page 6-7.
Procedure
Step 1 Connect the HDMI cable to the HDMI interface on the back panel of your DMP.
Step 2 Connect the other end of the cable to your presentation system.
OL-15764-03
User Guide for Cisco Digital Media Player Device Manager 5.2.x
6-5
Page 40

Procedures
Step 3 Turn On the presentation system.
Step 4 Stop. You have completed this procedure.
Related Topics
• Physical Interfaces (I/O Ports), page 2-4
• Use a Connection that Combines HDMI with DVI, page 6-6
Use a Connection that Combines HDMI with DVI
Timesaver Is your display a touchscreen? If so, this topic is not for you. Instead, see the “Connect to a Touchscreen”
section on page 6-7.
HDMI and DVI differ in their support for audio signals and use connectors that are shaped differently,
but otherwise are identical. Thus, an adapter can help you to connect to your DMP any presentation
system that supports DVI but not HDMI. When you do this, however, you must also use a separate signal
cable to transmit audio signals, or there will not be any audio.
Chapter 6 Connect to a Presentation System
Before You Begin
• Obtain an HDMI-to-DVI adapter.
Procedure
Step 1 Make connections for video.
a. Connect the HDMI cable to the HDMI interface on the back panel of your DMP.
b. Fasten an HDMI-to-DVI adapter to the free end of the cable.
c. Connect the free end of the DVI adapter to the corresponding interface on your presentation system.
Step 2 Make connections for audio.
a. Plug the 3.5mm audio jack into the Audio interface on the back panel of your DMP.
b. Connect the other end of the audio cable to the corresponding interface on your presentation system.
Step 3 If the presentation system is not already turned on, turn it On now.
Step 4 Stop. You have completed this procedure.
Related Topics
• Physical Interfaces (I/O Ports), page 2-4
• Use an HDMI Connection, page 6-5
User Guide for Cisco Digital Media Player Device Manager 5.2.x
6-6
OL-15764-03
Page 41

Chapter 6 Connect to a Presentation System
Connect to a Touchscreen
Tip Some touchscreens work as designed only after they are calibrated manually. If your touchscreen is one
of these, its calibration occurs during a later stage of DMP setup. The list of related topics for this
procedure states where you can learn about calibration.
DMP connections to a touchscreen are mostly the same as for other digital displays. However,
to
uchscreens employ a special cable that supports interactivity through touch. This might be either an
RS-232 serial cable or a USB cable, depending on the touchscreen model. Although some models
support both cable types for interactivity, you can use only one type at a time.
Before You Begin
• Verify that your DMP model supports touchscreen technologies and that we support the touchscreen
brand, model, and device driver that you will use. See http://www.cisco.com/go/dms/compatibility.
• Check the documentation for your touchscreen to learn whether it requires a serial connection or a
USB connection to your DMP, or if it supports both.
Procedures
Procedure
Step 1 Connect an HDMI cable to the HDMI interface on the back panel of your DMP.
Step 2 Connect the other end to your touchscreen.
OR
If your touchscreen supports DVI connections and not HDMI connections:
• Fasten an HDMI-to-DVI adapter to the free end of the cable.
• Connect the free end of the DVI adapter to the corresponding interface on your touchscreen.
Tip You can use an HDMI splitter or other supported method to attach multiple presentation systems
to a DMP. However, only one of these systems can be a touchscreen.
Step 3 Do only one of the following.
• Connect a USB cable to the USB interface on the back panel of your DMP. Then, connect the other
end to your touchscreen.
If your DMP model has only one USB connector, you might prefer to connect an external hard drive
there for added local storage. In this case, an RS-232 serial cable would be the better choice for
connecting a touchscreen to your DMP.
• Connect an RS-232 serial cable to the RS232 interface on the back panel of your DMP. Then,
connect the other end to your touchscreen.
OL-15764-03
User Guide for Cisco Digital Media Player Device Manager 5.2.x
6-7
Page 42

Procedures
Step 4 Turn On the touchscreen.
Tip Does a message on the touchscreen say that it must download a “characterization” file? This
happens only when your touchscreen uses technologies from Elo TouchSystems and when you
have never turned it On previously (or after its CF card is reformatted). When you see this
message, please disregard it. The touchscreen will obtain its characterization file automatically
during a later stage of DMP setup.
Step 5 Stop. You have completed this procedure.
Related Topics
• Physical Interfaces (I/O Ports), page 2-4
• Choose and Calibrate a Touchscreen Driver, page 10-2
Connect to an Analog Display or Projector
Chapter 6 Connect to a Presentation System
Tip DMPs support connections to analog presentation systems,. However, we recommend strongly that you
use digital presentation systems whenever possible.
Procedure
Step 1 Make connections for video.
a. Plug one yellow jack from the RCA video cable into the CVBS interface on the back panel of
your DMP.
b. Connect the free end of this cable to the corresponding interface on your presentation system.
Step 2 Make connections for audio.
a. Plug the 3mm jack on the RCA audio cable into the AUDIO interface on the back panel of
your DMP.
b. Connect the free end of this cable to the corresponding interface on your presentation system.
Step 3 If the presentation system is not already turned on, turn it On now.
Step 4 Stop. You have completed this procedure.
Related Topics
• Physical Interfaces (I/O Ports), page 2-4
• Understand How to Work Around the Low Signal Quality of Composite Video, page 6-5
User Guide for Cisco Digital Media Player Device Manager 5.2.x
6-8
OL-15764-03
Page 43

P
ART
2
Use DMPDM
Page 44

Page 45

Procedures
Log in
CHAPTER
7
Log in to DMPDM
Revised: June 1, 2011
This section explains how to access DMPDM.
• Procedures, page 7-1
• Log in, page 7-1
Before You Begin
• Connect your DMP to its presentation system, and make sure both are turned On.
OL-15764-03
Procedure
Step 1 While your presentation system shows the Cisco logo and shows an IP address for your DMP, write down
the IP address.
Tip Later, you can change how long this splash screen is visible during startup. See the “Edit the Splash Screen
Duration to Obscure the DMP IP Address” section on page 9-2.
Step 2
Step 3 Respond to the prompt. It sometimes varies.
Point your browser to the IP address that you wrote down. Use HTTPS as the connection protocol.
The connection fails when you use HTTP instead of HTTPS. This failure occurs by design, to support
curity in your network.
se
User Guide for Cisco Digital Media Player Device Manager 5.2.x
7-1
Page 46

Procedures
• Does it ask you to EDIT a password before you can log in?
The first time that you start DMPDM, it prompts you to change its factory-defined master
password. You will never see this prompt again, unless you restore your DMP to its
factory-default settings.
a. Enter a new master password that contains at least eight characters, which combine uppercase
and lowercase letters with numerals
b. Click Activate.
• Does it ask you to ENTER a password so that you can log in?
a.
Use the login name admin.
b. Use whichever master password you saved most recently.
Step 4 Stop. Remain logged in. You have completed this procedure.
Related Topics
• Protect Your DMP from Unauthorized Management
Chapter 7 Log in to DMPDM
User Guide for Cisco Digital Media Player Device Manager 5.2.x
7-2
OL-15764-03
Page 47

Concepts
CHAPTER
Start Here
Revised: June 1, 2011
Topics in this section explain how to maintain and administer your DMP.
• Concepts, page 8-1
• Procedures, page 8-4
• Reference, page 8-11
• DMPDM Workflow, page 8-1
• DMPDM Differences by Firmware Release and DMP Model, page 8-2
8
DMPDM Workflow
The typical workflow in DMPDM assumes that you will test settings before you commit to them.
Settings in DMPDM might revert to their most recent state after your DMP restarts. This occurs by
sign, so that you can test new settings. If your changes cause unforseen problems, you can abandon
de
them without consequence. And, when your changes are satisfactory, you can commit to them.
• Click Apply to test new values for a condition or setting. After this click, the change takes effect.
However, this change is temporary and reversible. The values that you overwrote will return the next
time that your DMP restarts, unless you commit to them explicitly.
• Choose Administration > Save Configuration to store changed settings permanently. After this
click, the changes persist even after your DMP restarts. When the Save Configuration page appears,
you must click Save to actually save your work.
Related Topics
• “Save Configured Settings” section on page 8-5
OL-15764-03
User Guide for Cisco Digital Media Player Device Manager 5.2.x
8-1
Page 48

Concepts
DMPDM Differences by Firmware Release and DMP Model
Your DMP model and its installed firmware version dictate which elements and supported features you
see in DMPDM.
• DMPDM on a DMP 4305G, page 8-2
• DMPDM on a DMP 4310G, page 8-3
• DMPDM on a DMP 4400G, page 8-4
DMPDM on a DMP 4305G
Firmware Release 5.2.3 Firmware Release 5.2.2 Firmware Release 5.2.1
Chapter 8 Start Here
User Guide for Cisco Digital Media Player Device Manager 5.2.x
8-2
OL-15764-03
Page 49

Chapter 8 Start Here
DMPDM on a DMP 4310G
Firmware Release 5.2.3 Firmware Release 5.2.2 Firmware Release 5.2.1
Concepts
— N.A. —
OL-15764-03
User Guide for Cisco Digital Media Player Device Manager 5.2.x
8-3
Page 50

Procedures
DMPDM on a DMP 4400G
Firmware Release 5.2.3 Firmware Release 5.2.2 Firmware Release 5.2.1
Chapter 8 Start Here
Procedures
• Save Configured Settings, page 8-5
• Restart Your DMP, page 8-6
• Rare but Essential Tasks, page 8-6
User Guide for Cisco Digital Media Player Device Manager 5.2.x
8-4
OL-15764-03
Page 51

Chapter 8 Start Here
Save Configured Settings
You can save every change that you made to the values for every option in DMPDM since the last time
that you clicked Save or the last time that you restarted the DMP.
Tip Changes to some DMP configuration settings do not take effect until after the DMP restarts. Check the instructions for a
procedure to see if you must restart your DMP after you change a setting.
Procedure
Step 1 Complete whichever variation of this step applies to you. It can vary between any two DMP models, and
also between the model-specific firmware versions from any two maintenance releases.
DMP Model
Procedures
DMP 4310G DMP 4400G DMP 4305G
Firmware
rsion
Ve
5.2.3 a. Click Save and Restart DMP in the Administration list.
b. Click Save.
c. Click Restart.
5.2.2
a. Click Save and Restart
DMP in the
Administration list.
b. Click Save.
c. Click Restart.
5.2.1 —
1
5.2.0
1. This firmware release predates this DMP model.
The saved configuration persists even after your DMP restarts.
Step 2 Stop. You have completed this procedure.
Related Topics
• Restart Your DMP, page 8-6
• DMPDM Workflow, page 8-1
a. Click Save Configuration in the Administration list.
b. Click Save after the Save Configuration page loads.
OL-15764-03
User Guide for Cisco Digital Media Player Device Manager 5.2.x
8-5
Page 52

Procedures
Restart Your DMP
Procedure
Step 1 Complete whichever variation of this step applies to you. It can vary between any two DMP models, and
also between the model-specific firmware versions from any two maintenance releases.
Firmware
rsion
Ve
5.2.3 a. Click Save and Restart DMP in the Administration list.
5.2.2
DMP Model
DMP 4310G DMP 4400G DMP 4305G
b. Click Restart.
a. Click Save and Restart
DMP in the
Administration list.
Chapter 8 Start Here
a. Click Restart DMP in the Administration list.
b. Click Restart after the Restart DMP page loads.
b. Click Restart.
5.2.1 —
1
5.2.0
1. This firmware release predates this DMP model.
Step 2 Stop. You have completed this procedure.
Rare but Essential Tasks
• Configure NTP Settings for Time-Dependent Features, As Needed, page 8-6
• Restore Factory Default Settings, page 8-7
• Upgrade (or Downgrade) DMP Firmware, page 8-10
• View DMP Hardware and Firmware Versions, page 8-11
Configure NTP Settings for Time-Dependent Features, As Needed
IP-enabled devices including DMPs can use network time protocol (NTP) to synchronize themselves
with radio and atomic clocks located on the Internet. Thus, the accuracy of their local time-keeping is
ensured. NTP can synchronize distributed clocks within milliseconds over long time periods. You must
configure NTP settings on any DMP through which you will provide:
• IPTV services with Cisco Cast.
• Proof-of-play services with Cisco Digital Signs.
• Any other service that is dependent upon accurate Start and Stop times.
User Guide for Cisco Digital Media Player Device Manager 5.2.x
8-6
OL-15764-03
Page 53

Chapter 8 Start Here
Step 1 Click NTP in the Settings list.
Step 2 Choose On from the Enable NTP Service list.
Step 3 Use the fields marked Hostname 1, Hostname 2, and Hostname 3 to specify which NTP servers your
Procedures
Before You Begin
• Log in, page 7-1.
Procedure
DMP should use.
• Hostname 1 — Enter the DNS-resolvable name of the network time server to use by default. This
is your primary time server. Your DMP will not use any other time server while this one is available.
Note We recommend that you set the default NTP hostname to pool.ntp.org.
• Hostname 2 — Enter the DNS-resolvable name of a network time server to use whenever the primary
time server is not available.
• Hostname 3 — Enter the DNS-resolvable name of a network time server to use whenever the
secondary time server is not available.
Step 4 Choose from the Time Zone list the time zone that is correct and local for your DMP at its location.
Step 5 Enter in the Refresh Interval field the maximum number of milliseconds that are permitted to elapse
before your DMP retrieves a fresh time stamp from its NTP server. The factory-default maximum
is 17 ms.
Step 6 Click Apply to confirm and test your choices.
Your entries are recorded to volatile memory and take effect — but only until you change them or restart
r DMP.
you
Step 7 When you are satisfied that you chose the correct settings, click Save Configuration in the
Administration list, and then click Save.
Your entries take effect permanently and will persist even after your DMP restarts.
Step 8 Stop. You have completed this procedure.
Related Topics
• Log in, page 7-1
Restore Factory Default Settings
You can restore factory settings to your DMP.
Caution When you restore the factory settings to your DMP, you delete your configuration of every setting. If you delete your
settings accidentally, you must reenter every value manually.
OL-15764-03
User Guide for Cisco Digital Media Player Device Manager 5.2.x
8-7
Page 54

Procedures
Chapter 8 Start Here
Procedure
Step 1 Click Restore Default Settings in the Administration list.
Step 2 Click Restore when the Restore Default Settings page appears.
Your DMP restarts automatically and its factory settings are restored.
Step 3 (Optional) Will you deploy your DMP where there is no local DHCP server? If so, complete the
“Preconfigure a DMP To Run Without a Local DHCP Server” procedure in the getting started guide for
your DMP.
Step 4 Log in with the factory default username admin.
Step 5 Reconfigure your DMP and change its default passwords, when prompted.
To learn how, see G
http://cisco.com/en/US/docs/video/digital_media_systems/dmp/getting/started/guide/5_2_x/dmp5_2_x.html
Step 6 Stop. You have completed this procedure.
etting Started Guide for Cisco Digital Media Players at
.
Investigate Which DMP Firmware Updates Are Available
Procedure
Step 1 Log in to your Cisco.com account, and then go to http://cisco.com/cgi-bin/tablebuild.pl/dms.
Step 2 Click Digital Media Players in the far-right column.
User Guide for Cisco Digital Media Player Device Manager 5.2.x
8-8
OL-15764-03
Page 55

Chapter 8 Start Here
Step 3 Click the name of a DMP model to see a selection tree that lists its available firmware versions.
Procedures
The selector shifts all columns to the left by one slot. This movement exposes the options for another
navigation level in the far-right column.
Step 4 Expand the tree as needed, and then click a release number to see its details.
Note Every firmware file is DMP model-specific.
OL-15764-03
User Guide for Cisco Digital Media Player Device Manager 5.2.x
8-9
Page 56

Procedures
Chapter 8 Start Here
Tip Allow your pointer to hover for a moment over the Related Information link. Doing so reveals more options that you
might consider helpful.
Step 5 Follow the prompts to download your preferred firmware within a compressed archive file.
Step 6 Decompress the archive.
It contains a README file, which:
• States how the new firmware might affect your equipment and network.
• Includes installation procedures.
Step 7 Complete procedures that the README file recommends for you.
Step 8 Stop. You have completed this procedure.
Upgrade (or Downgrade) DMP Firmware
You can install an update to the firmware for your DMP.
OR
If your DMP firmware is so comparatively recent that it does not work well with older software on your
DMM server, you can install older firmware on your DMP.
Before You Begin
• Investigate which DMP firmware releases are available on Cisco.com.
• Confirm that the “Enable Cisco TAC Troubleshooting Access” feature is enabled in DMPDM. If you
must enable it manually, you must also restart your DMP before this change can take effect.
Procedure
Step 1 Click Upgrade Firmware in the Administration list.
Step 2 Click Browse — or its equivalent if your browser applies a different name to this button — when the
Upgrade Firmware page appears.
User Guide for Cisco Digital Media Player Device Manager 5.2.x
8-10
OL-15764-03
Page 57

Chapter 8 Start Here
Step 3 Navigate to the firmware update that you downloaded, and then choose it.
Step 4 Click Start Upgrade.
Note Do not close or browse away from this page until messages in DMPDM state that your DMP has loaded the
firmware image and started to burn it. Otherwise, upgrade fails.
Step 5 Stop. You have completed this procedure.
Related Topics
• Enable or Disable Types of Access to Your DMP, page 9-6
• UI Reference: Elements to Upgrade or Downgrade DMP Firmware, page 8-12
View DMP Hardware and Firmware Versions
Procedure
Reference
Step 1 Click Hardware and Firmware Versions to see information about your DMP.
You cannot change the information.
Step 2 Stop. You have completed this procedure.
Reference
• UI Reference Topics, page 8-11
UI Reference Topics
• UI Reference: Elements to Upgrade or Downgrade DMP Firmware, page 8-12
OL-15764-03
User Guide for Cisco Digital Media Player Device Manager 5.2.x
8-11
Page 58

Chapter 8 Start Here
Reference
UI Reference: Elements to Upgrade or Downgrade DMP Firmware
Table 8-1 Elements on the Upgrade Firmware Page
Field Description
Upgrade Firmware
Image File The full pathname to the binary file. If you do not know the full pathname, click Browse.
Upgrade Status
Status Indicates whether a firmware upgrade is in progress:
• Firmware upgrade not active — There is no upgrade in progress.
• Burn in progress — An upgrade is in progress.
Progress Status indicator for an upgrade in progress.
User Guide for Cisco Digital Media Player Device Manager 5.2.x
8-12
OL-15764-03
Page 59

CHAPTER
DMP Access and Security Settings
Revised: June 1, 2011
• Concepts, page 9-1
• Procedures, page 9-2
• Reference, page 9-7
Concepts
• Understand DMP User Accounts and Passwords, page 9-1
• Understand Whether to Change DMP Passwords Centrally, page 9-2
Understand DMP User Accounts and Passwords
9
You use the Web Account when you log in to DMPDM itself.
In contrast, the Se
on DMPs whose FTP service is enabled.
Note Unless or until you change these passwords individually, they are both identical to the master password that you
configured in the “Log in” section on page 7-1. You can change them when they should differ. However, they will become
identical again in the future if you edit the master password.
rvice Account is a user account with FTP and SFTP login privileges. It is available only
OL-15764-03
User Guide for Cisco Digital Media Player Device Manager 5.2.x
9-1
Page 60

Chapter 9 DMP Access and Security Settings
Procedures
Related Topics
• Understand Whether to Change DMP Passwords Centrally, page 9-2
• Manage and Edit Passwords, page 9-5
Understand Whether to Change DMP Passwords Centrally
Scenario Best Practice
You have very few DMPs and will
anage each of them in isolation.
m
You have many DMPs and will
anage them centrally.
m
Related Topics
• Manage and Edit Passwords, page 9-5
Use DMPDM to change their DMP Web Account and DMP Service Account passwords
one at a time, manually.
Use the fully licensed Cisco Digital Signs software on your Digital Media Manager
appliance to change both passwords globally for all of the DMPs that you have added to
a DMP group.
Note Before you can manage any DMP centrally, you must configure it to support
centralized management.
• Protect Your DMP from Unauthorized Management, page 9-4
Procedures
• Edit the Splash Screen Duration to Obscure the DMP IP Address, page 9-2
• Protect Your DMP from Unauthorized Management, page 9-4
• Manage and Edit Passwords, page 9-5
• Enable or Disable Types of Access to Your DMP, page 9-6
• Enable or Disable Centralized Management, page 9-7
Edit the Splash Screen Duration to Obscure the DMP IP Address
Timesaver Complete this optional procedure at your discretion.
You can change how long your DMP shows its splash screen during startup. This is useful when, for
example, your organization prefers not to reveal an IP address casually to all observers.
• A duration of 30,000 milliseconds (30 seconds) is the factory default.
• A duration of 1 millisecond turns off the splash screen.
• Any duration in the range from 2 to 5,000 milliseconds (5 seconds) does not have any effect.
User Guide for Cisco Digital Media Player Device Manager 5.2.x
9-2
OL-15764-03
Page 61

Chapter 9 DMP Access and Security Settings
Before You Begin
• Log in.
Procedure
Step 1 Click Browser in the Settings list.
Step 2 Enter a new duration in milliseconds in the Splash Screen Display Time (in milliseconds) field.
Step 3 Click Apply.
Step 4 Click Save Configuration in the Administration list, and then click Save.
Procedures
Step 5 Stop. You have completed this procedure.
OL-15764-03
User Guide for Cisco Digital Media Player Device Manager 5.2.x
9-3
Page 62

Procedures
Protect Your DMP from Unauthorized Management
Caution Configure your network firewall to restrict access to DMPs over TCP port 7777. Permit such access from only the DMM
appliance where your fully licensed copy of Cisco Digital Signs is installed. If you do not know how to define an access control list
(ACL), ask the security policy administrator for your network or see the manufacturer documentation for your firewall.
When you use Cisco Digital Signs to manage a network of DMPs centrally, you must configure each
DMP to secure and trust its communication with Cisco Digital Signs.
Before You Begin
• Log in.
Procedure
Step 1 Click Centralized Management in the Settings list.
Chapter 9 DMP Access and Security Settings
Step 2 Enter in the Digital Signs Server Timeout (sec) field the maximum number of seconds that your DMP
should wait for a response from your DMM appliance.
Step 3 Enter the routable DMM appliance IP address or DNS-resolvable hostname in the DMM Appliance
IP Address fi
Note Has Cisco Digital Signs autodiscovered your new DMP? If so, the DMM Appliance IP Address field might already
Step 4 Click Apply to confirm and test your choices.
eld.
be populated with the correct information for your DMM appliance.
Your entries are recorded to volatile memory and take effect — but only until you change them or restart
r DMP.
you
Step 5 When you are satisfied that you chose the correct settings, click Save Configuration in the
Administration list, and then click Save.
Your entries take effect permanently and will persist even after your DMP restarts.
Note Your DMM appliance and your DMP use HTTPS to communicate securely over TCP port 7777 when
centralized management is enabled.
Step 6 Stop. You have completed this procedure.
User Guide for Cisco Digital Media Player Device Manager 5.2.x
9-4
OL-15764-03
Page 63

Chapter 9 DMP Access and Security Settings
Related Topics
• Protect Your DMP from Unauthorized Management, page 9-4
• Log in, page 7-1
Manage and Edit Passwords
Note Until you change these passwords individually, they will be identical to the master password that you
configured in the “
You can change them when they should differ. However, they will become identical again in the future
if you edit the master password.
You can use DMPDM to change the DMP Web Account password and Service Account password on
one DMP.
Before You Begin
• Log in.
Log in” section on page 7-1.
Procedures
Procedure
Step 1 Change the Web Account password.
a. Click DMP Web Account in the Administration list.
b. Enter your new password in the Password field and again in the Repeat Password field.
c. Click Apply.
d. Click Save Configuration in the Administration list, and then click Save.
e. Click Restart DMP in the Administration list, and then click Restart.
OL-15764-03
User Guide for Cisco Digital Media Player Device Manager 5.2.x
9-5
Page 64

Procedures
Chapter 9 DMP Access and Security Settings
Note Because you changed the password, your trusted DMM appliance — if any — is prevented temporarily
from communicating with this DMP.
Step 2 Change the DMP Service Account password.
a. Click DMP Service Account in the Administration list.
b. Enter your new password in the Password field and again in the Repeat Password field.
c. Click Apply.
d. Click Save Configuration in the Administration list, and then click Save.
Step 3 (Optional) Is your DMP managed centrally? If so, repeat Step 3 in the “Protect Your DMP from
Unauthorized Management” section on page 9-4.
Step 4 Stop. You have completed this procedure.
Proper communication is restored between your DMP and your trusted DMM appliance.
Enable or Disable Types of Access to Your DMP
You can enable or disable various kinds of administrative access to your DMP.
Procedure
Step 1 Click Management Services in the Settings list.
Step 2 Enter or edit the required values, and then click Apply.
Step 3 Choose Administration > Save Configuration and, when the Save Configuration page appears,
click Save.
Step 4 Restart your DMP.
Step 5 Stop. You have completed this procedure.
Related Topics
• Elements to Define Management Services, page 9-8
• Restart Your DMP, page 8-6
User Guide for Cisco Digital Media Player Device Manager 5.2.x
9-6
OL-15764-03
Page 65

Chapter 9 DMP Access and Security Settings
Enable or Disable Centralized Management
You can enable a remote DMM appliance to manage your DMP as part of a digital signage network.
Procedure
Step 1 Click Centralized Management in the Settings list.
Step 2 Enter or edit the required values.
Step 3 Click Apply to confirm that you are satisfied with the entries or changes that you made and to record
them in volatile memory, .
After you click Apply, the entries or changes take effect. However, the previously defined values will
eturn the next time that your DMP restarts.
r
Step 4 (Optional) Would you like to put all changed values into effect permanently, so that they persist even
after your DMP restarts?
a. Choose Administration > Save Configuration.
b. Click Save when the Save Configuration page appears.
Procedures
Step 5 Stop. You have completed this procedure.
Related Topics
• Elements to Define Centralized Management Settings, page 9-8
Reference
• SSL Encryption Ciphers That DMPs Support, page 9-7
• UI Reference Topics, page 9-8
SSL Encryption Ciphers That DMPs Support
DMPs support the following SSL ciphers in HTTPS connections.
• ADH-AES128-SHA
• ADH-AES256-SHA
• ADH-DES-CBC3-SHA
• AES128-SHA
• AES256-SHA
• DES-CBC-MD5
• DHE-DSS-AES128-SHA
• DHE-DSS-AES256-SHA
• DHE-RSA-AES128-SHA
• DHE-RSA-AES256-SHA
• EDH-DSS-DES-CBC-SHA
• EDH-DSS-DES-CBC3-SHA
• EXP-EDH-RSA-DES-CBC-SHA
• EXP-RC2-CBC-MD5
• EXP-RC4-MD5
• IDEA-CBC-MD5
• IDEA-CBC-SHA
• RC2-CBC-MD5
• DES-CBC-SHA
• DES-CBC3-MD5
• DES-CBC3-SHA
OL-15764-03
• EDH-RSA-DES-CBC-SHA
• EDH-RSA-DES-CBC3-SHA
• EXP-DES-CBC-SHA
User Guide for Cisco Digital Media Player Device Manager 5.2.x
• RC4-MD5
• RC4-SHA
9-7
Page 66

Procedures
UI Reference Topics
• Elements to Define Centralized Management Settings, page 9-8
• Elements to Define Management Services, page 9-8
• Elements to Define DMPDM Login Credentials, page 9-9
Elements to Define Centralized Management Settings
Table 9-1 Elements on the Centralized Management Page
Element Description
Centralized Management
DMM-DSM Server
Timeout (in seconds)
DMM Appliance IP
dress
Ad
The maximum number of seconds that your DMP will wait for a response from the DMM appliance
that you identify in the DMM Host text box.
The routable IP address of the one DMM appliance that your DMP trusts. Alternatively, the DMP
loopback IP address, 127.0.0.1.
Chapter 9 DMP Access and Security Settings
Related Topics
• Enable or Disable Centralized Management, page 9-7
Elements to Define Management Services
Table 9-2 Elements on the Management Services Page
Element Description
Management Services
Enable Cisco TAC
Troubleshooting Access
Event Notifications Indicates whether you enabled or disabled the feature to send event notification messages to one,
Caution We recommend that you assign a strong password to the Cisco TAC account and never
reveal this password to anyone except your trusted support engineer after you open a
support case with Cisco. Later, after your support case is closed, we recommend that you
change the password.
Indicates whether DMP login access is enabled or disabled for Cisco technical support staff.
• Enabled — Your DMP allows Cisco technical support staff to log in.
• Disabled — Your DMP does not allow Cisco technical support staff to log in.
This feature is enabled by default but, in most cases, we do not support any use of this feature by
nyone except a Cisco employee.
a
Note This feature must be enabled during firmware upgrades.
rusted DMM appliance that you can choose.
t
• Enabled — Your DMP sends notification messages.
• Disabled — Your DMP does not send notification messages.
User Guide for Cisco Digital Media Player Device Manager 5.2.x
9-8
OL-15764-03
Page 67

Chapter 9 DMP Access and Security Settings
Procedures
Table 9-2 Elements on the Management Services Page (continued)
Element Description
FTP Server Indicates whether you enabled or disabled the feature to run an FTP server and an SFTP server from
y
our DMP. You might enable the FTP and SFTP services temporarily, for example, when you want
to create a local copy on your DMP of an asset that you stored at a remote site.
Note We recommend that you disable the FTP and SFTP services when you do not plan to
use them.
Mount WAAS Share on
tup
Star
TAC Account
Password The password for Cisco TAC to use while troubleshooting your DMP, if you chose Enabled from
Repeat Password
Indicates whether your DMP will use the CIFS protocol to automatically mount the network share
that you designated on the WAAS Share Settings page.
• On — Upon starting, your DMP mounts the network share automatically.
• Off — Upon starting, your DMP does not mount the network share automatically.
Note DMPs can mount only one shared volume at a time.
the Enable TAC Troubleshooting Access list. The password must contain at least 8 characters and,
these, at least one character must be an uppercase letter, at least one must be a lowercase letter,
of
and at least one must be a numeral.
Related Topics
• Enable or Disable Types of Access to Your DMP, page 9-6
• Upgrade (or Downgrade) DMP Firmware, page 8-10
• Enable or Disable Centralized Management, page 9-7
• Mount or Unmount a Network Share, page 12-3
Elements to Define DMPDM Login Credentials
Table 9-3 Elements on the DMP Web Account Page
Element Description
DMP Web Account
User Name The login name for DMPDM.
Password The password that is associated with the DMPDM username. You must enter the password two
imes on the DMP Web Account page to confirm that you typed it correctly. The password must
Repeat Password
t
contain at least 8 characters and, of these, at least one character must be an uppercase letter, at least
e must be a lowercase letter, and at least one must be a numeral.
on
Related Topics
• Manage and Edit Passwords, page 9-5
OL-15764-03
User Guide for Cisco Digital Media Player Device Manager 5.2.x
9-9
Page 68

Chapter 9 DMP Access and Security Settings
Procedures
UI Reference: Elements to Define DMP Service Account (ftp and sftp) Login Credentials
Table 9-4 Elements on the DMP Service Account Page
Element Description
FTP Server Account
User Name The login name for the DMP Service user account. The factory default is to use the login name ftp.
Password The password that is associated with the DMP Service account login name. The factory default is
o use the password admin, but we warned you to change it when you first set up your DMP. See
Repeat Password
t
the quick start guide for your DMP model type on Cisco.com.
You must enter the password two times on the FTP Service Account page — one time apiece in each
f these fields — to confirm that you typed it correctly. The password must contain at least
o
8 characters and, of these, at least one character must be an uppercase letter, at least one must be a
wercase letter, and at least one must be a numeral.
lo
Related Topics
• Manage and Edit Passwords, page 9-5
User Guide for Cisco Digital Media Player Device Manager 5.2.x
9-10
OL-15764-03
Page 69

Concepts
CHAPTER
10
Configure Settings for Touchscreens,
Projectors, and Displays
Revised: March 13, 2012
•
Concepts, page 10-1
• Procedures, page 10-2
• Reference, page 10-7
• Overview, page 10-1
• Example Settings for DMP Display Attributes, page 10-1
Overview
A DMP transmits signals to a public presentation system of some kind, such as a monitor or projector
that is connected to the DMP. This presentation system might use projection or display technologies that
are analog or digital, and its output fidelity depends in part upon which signal cables (and adapters)
connect it to your DMP.
Example Settings for DMP Display Attributes
When you use an HDMI cable to connect your DMP to a 1920 x1200 LCD flat panel display:
• Display Standard — VESA_1920x1200x60RB
• Display Output Interface — HDMI
• Color Space — RGB_16_235
• Color Component Order — RGB
OL-15764-03
User Guide for Cisco Digital Media Player Device Manager 5.2.x
10-1
Page 70

Procedures
Procedures
Chapter 10 Configure Settings for Touchscreens, Projectors, and Displays
When you use a composite/S-Video cable to connect your DMP to an analog display:
• Display Standard — NTSC_M
• Display Output Interface — Composite/S-Video
• Color Space — None
• Color Component Order — RGB
Related Topics
• Adjust DMP Display Attributes, page 10-5
• UI Reference: Elements to Define Attributes of a DMP Display, page 10-7
• Choose and Calibrate a Touchscreen Driver, page 10-2
• Configure Video Output, page 10-4
• Adjust DMP Display Attributes, page 10-5
• Adjust Horizontal and Vertical Settings, page 10-6
• Reprogram the Buttons on Your Handheld Remote Control, page 10-6
Choose and Calibrate a Touchscreen Driver
This procedure applies to you only if your DMP supports interactivity through touch and your
presentation system is a touchscreen. Furthermore, it assumes that you completed the “Connect to a
Touchscreen” section on page 6-7.
Before You Begin
• Verify that your DMP model supports touchscreen technologies and that we support the touchscreen
brand, model, and device driver that you will use. See http://www.cisco.com/go/dms/compatibility.
• Log in to DMPDM.
Procedure
Step 1 If your touchscreen shows a message that says it must download a touchscreen characterization file:
• Do not disturb or interrupt this process. It occurs only once, automatically.
• The process takes approximately 10 minutes to finish. When it is finished, your touchscreen will
clear the message automatically.
• Stop. You have completed this procedure and there is no need to perform any of its other steps.
Step 2 Because some touchscreen drivers cannot be calibrated on a DMP while it is playing video, use DMPDM
to stop all videos.
a. Click Video Multicast in the Display Actions list, and then click Stop.
b. Click Media URL in the Display Actions list, and then click Stop.
Step 3 Choose the browser rotation angle for your touchscreen.
User Guide for Cisco Digital Media Player Device Manager 5.2.x
10-2
OL-15764-03
Page 71

Chapter 10 Configure Settings for Touchscreens, Projectors, and Displays
Supported rotation angles are 0°, 90°, 180°, and 270°.
a. Click Browser in the Settings list.
b. Choose an option from the Screen Rotation Angle (clockwise) list, and then click Apply.
c. Click Save Configuration in the Administration list, and then click Save.
d. Click Restart DMP in the Administration list, and then click Restart.
Step 4 After your DMP restarts, log in again to DMPDM.
Step 5 Click Touch Screens in the Settings list.
Tip If you do not see this option in DMPDM, your DMP might not support this feature. If you believe
that its hardware design allows for the possibility of such support, check whether any firmware
upgrade is available for your DMP that adds support for this feature:
• Cisco DMS release notes — http://cisco.com/go/dms/releasenotes.
• Cisco DMS compatibility information — http://cisco.com/go/dms/compatibility.
If such firmware is available, obtain it and then complete the DMP firmware upgrade procedure
in the DMPDM user guide at http://cisco.com/go/dms/dmpdm. The nature of your Cisco DMS
service contract might limit:
• Which upgrades are available to you.
• Where and how you obtain upgrades.
• Whether you must pay anything to obtain upgrades.
To learn about Cisco service contracts, see http://cisco.com/go/cscc.
Procedures
a. Check the Currently Loaded Driver row to see which touchscreen driver, if any, is active on
your DMP.
The driver might be 3M, Zytronic, Elo, GeneralTouch, or possibly something else. As we test
various drivers, we might update this list between any two DMPDM releases.
Your DMP must use a driver that is compatible with your touchscreen.
b. If the active driver is not compatible with your touchscreen, choose the compatible driver from the
Choose Touch Screen to Activate list.
c. Click Apply.
d. Click Save Configuration in the Administration list, and then click Save.
e. Click Restart DMP in the Administration list, and then click Restart.
Tip The Elo and GeneralTouch drivers are self-calibrating.
Step 6 If you chose 3M, Zytronic, or another driver that must be calibrated manually:
a. After your DMP has restarted, log in again to DMPDM.
b. Click Touch Screens in the Settings list.
c. Click Calibrate <driver_name> Screen, where driver_name is the name of the driver that
you chose.
OL-15764-03
User Guide for Cisco Digital Media Player Device Manager 5.2.x
10-3
Page 72

Procedures
Chapter 10 Configure Settings for Touchscreens, Projectors, and Displays
• When messages appear on the touchscreen surface that prompt you to touch the surface in
various places, follow the prompts exactly. For example, the calibration utility might prompt
you to touch exactly five areas or exactly nine areas.
• If you do not complete this exercise within the brief period that is allotted for it, the calibration
utility times out automatically.
• Repeat these steps for manual calibration if the driver utility times out before you can calibrate
your driver.
Note You must repeat the calibration whenever you:
• Rotate a touchscreen or change its resolution.
• Replace a touchscreen.
Step 7 Stop. You have completed this procedure.
Related Topics
• Connect to a Touchscreen, page 6-7
Configure Video Output
Before You Begin
• Connect your DMP to its presentation system.
• Log in to DMPDM.
Procedure
Step 1 Click DMP Display Attributes in the Settings list.
The display autodetection feature is enabled by default. However, it fails unless you use either:
• An HDMI signal cable.
• An HDMI signal cable in combination with an HDMI-to-DVI adapter.
Note If you are satisfied with the choices and entries that DMPDM made for you as a result of its
DMP display autodetection, you are done with this section and you can go now to the “Protect
Your DMP from Unauthorized Management” section on page 9-4.
Otherwise, if you are not satisfied — or if your display does not support HDMI connections — do
the following.
a. Choose Disable from the DMP Display Autodetection (requires HDMI) list.
b. Choose a standard from the Display Standard list that applies in your country. For example, even
though our factory default selection is NTSC_M, your country might use PA L instead.
User Guide for Cisco Digital Media Player Device Manager 5.2.x
10-4
OL-15764-03
Page 73

Chapter 10 Configure Settings for Touchscreens, Projectors, and Displays
c. Choose your connector and signal type from the Interface (DMP display output) list. For example,
you might use SVIDEO.
If you do not know which options to choose, see the manufacturer documentation for your
presentation system.
Step 2 Choose from the Color Space list the absolute color space that your presentation system uses.
Step 3 (If you chose RGB as the color space) Choose an option from the Color Component Order list to define
the order in which to store red, green, and blue data.
The color component order is sometimes called the left-to-right additive color model.
Step 4 (Optional) Move any or all of the sliders to compensate for presentation system deficiencies in video
(brightness, contrast, or saturation) or audio (channel volume).
Step 5 Click Apply to confirm your choices and to implement them until you change them or until you restart
your DMP.
Step 6 Click Show IP — in the DMP Mode area — to test if your choices are suitable ones for your
presentation system.
Your presentation system should show a Cisco logo and should show the IP address for your DMP.
Step 7 Click Save Configuration in the Administration list, and then click Save.
Step 8 Stop. You have completed this procedure.
Procedures
Adjust DMP Display Attributes
Procedure
Step 1 Click DMP Display Attributes in the Settings list.
Step 2 Enter or edit the required values.
Step 3 Click Apply to confirm that you are satisfied with the entries or changes that you made and to record
them in volatile memory.
After you click Apply, the entries or changes take effect. However, the previously defined values will
eturn the next time that your DMP restarts.
r
Step 4 (Optional) Would you like to put all changed values into effect permanently, so that they persist even
after your DMP restarts?
a. Choose Administration > Save Configuration.
b. Click Save when the Save Configuration page appears.
Step 5 Stop. You have completed this procedure.
Related Topics
• UI Reference: Elements to Define Attributes of a DMP Display, page 10-7
• Example Settings for DMP Display Attributes, page 10-1
OL-15764-03
User Guide for Cisco Digital Media Player Device Manager 5.2.x
10-5
Page 74

Procedures
Adjust Horizontal and Vertical Settings
You can adjust the proportions, horizontal position, and vertical position of content that you show on a
DMP display.
Procedure
Step 1 In the Settings list, click DMP Display Dimensions.
Step 2 Enter or edit the required values.
Step 3 Click Apply to confirm that you are satisfied with the entries or changes that you made and to record
them in volatile memory.
After you click Apply, the entries or changes take effect. However, the previously defined values will
eturn the next time that your DMP restarts.
r
Step 4 (Optional) Would you like to put all changed values into effect permanently, so that they persist even
after your DMP restarts? Choose Administration > Save Configuration an
Configuration page appears, click Save.
Step 5 Stop. You have completed this procedure.
Chapter 10 Configure Settings for Touchscreens, Projectors, and Displays
d, when the Save
Related Topics
• UI Reference: Elements to Define DMP Display Dimensions, page 10-10
Reprogram the Buttons on Your Handheld Remote Control
Before You Begin
• Your DMP model must be 4310G.
Procedure
Step 1 Click Remote Mappings in the Settings list.
Step 2 Repeat this step for each button whose behavior should be changed.
a. Choose an option from the Remote Button list to designate which button you will reprogram.
b. Choose an option from the Action list to assign a new behavior to the designated button.
• Reset to Default — Restore our factory-default behavior to the designated button.
• Map to Key Value — Remap one button to another.
• Map to System Function — Choose among these functions.
~ Show IP
~ Mute
~ Volume Up
~ Volume Down
~ Power
• Custom — Enter a custom parameter.
User Guide for Cisco Digital Media Player Device Manager 5.2.x
10-6
OL-15764-03
Page 75

Chapter 10 Configure Settings for Touchscreens, Projectors, and Displays
Step 3 Click Apply to confirm that you are satisfied with the entries or changes that you made and to record
them in volatile memory.
After you click Apply, the entries or changes take effect. However, the previously defined values will
eturn the next time that your DMP restarts.
r
Step 4 (Optional) Would you like to put all changed values into effect permanently, so that they persist even
after your DMP restarts? Choose Administration > Save Configuration an
Configuration page appears, click Save.
Step 5 Stop. You have completed this procedure.
Reference
• UI Reference Topics, page 10-7
UI Reference Topics
Reference
d, when the Save
• UI Reference: Elements to Define Attributes of a DMP Display, page 10-7
• UI Reference: Elements to Define DMP Display Dimensions, page 10-10
UI Reference: Elements to Define Attributes of a DMP Display
Table 10-1 Elements on the DMP Display Attributes Page
Element Description
DMP Display Attributes
DMP Display Autodetection
(requires HDMI)
Autodetection Status Indicates whether autodetection succeeded.
Frame Rate Indicates whether your display uses PAL (50 Hz) or NTSC (60 Hz). Most displays that support
Indicates whether you have enabled automated detection of the DMP display type. Choose an
option:
• Enabled — Autodetection is enabled.
• Disabled — Autodetection is disabled.
DMI connections also support both the PAL and NTSC frame rate standards. If you choose
H
the wrong value, image quality is degraded.
OL-15764-03
User Guide for Cisco Digital Media Player Device Manager 5.2.x
10-7
Page 76

Chapter 10 Configure Settings for Touchscreens, Projectors, and Displays
Reference
Table 10-1 Elements on the DMP Display Attributes Page (continued)
Element Description
Composite Display Standard All DMP model types (4300G, 4305G, and 4400G) show at least these values:
• NTSC_M
• NTSC_M_714
• NTSC_M_Japan
• NTSC_M_Japan_714
• PAL _6 0
• PAL_60_714
• PAL_BG
• PAL_BG_702
• PAL_BG_704
• PAL_M
• PAL _M _7 14
• PAL_N
• PAL_N_702
• PAL_N-704
DMP 4400Gs show other values in addition to these.
Display Standard The name of the standard that your DMP display uses. Generally, this attribute names the
anufacturer and the type of display (such as plasma or LCD), in combination with other
m
information. To learn which option is the correct one for you to select, see the manual that
came with your DMP display.
Interface (DMP display
utput)
o
The type of video cable that connects your DMP to your DMP display. The options are:
• Composite/S-Video — Either of these:
–
Composite — Analog cable that binds three wires together and terminates in three
separate plugs. There is one plug each for:
~ The video signal.
~ Signals in the left audio channel.
~ Signals in the right audio channel.
–
S-Video — Analog cable with a 4-pin connector. Transmits separate
standard-definition video signals for brightness and color.
• HDMI — Digital cable with a 19-pin connector. Transmits standard-, enhanced-, or
high-definition video signals uncompressed and transmits multi-channel digital
audio signals.
Note You must use a composite/RCA cable for the left and right audio channels if you use
HDMI-to-DVI for the video signal.
User Guide for Cisco Digital Media Player Device Manager 5.2.x
10-8
OL-15764-03
Page 77

Chapter 10 Configure Settings for Touchscreens, Projectors, and Displays
Reference
Table 10-1 Elements on the DMP Display Attributes Page (continued)
Element Description
Color Space The absolute color space that your DMP display uses. To learn which option is the correct one
for you to select, see the manual that came with your DMP display. The options are:
• None
• RGB_16_235
• RGB_0_255
• YUV_601
• YUV_709
Color Component Order The order in which to store red, green, and blue data if you selected RGB as the color space.
he color component order is sometimes also known as a left-to-right additive color model.
T
Most modern displays use RGB. To learn which option is the correct one for you to select, see
the manual that came with your DMP display. The options are:
• RGB
• RBG
• GRB
• GBR
• BRG
• BGR
Brightness The setting that compensates for any deficiencies in the on-screen brightness of your
DMP display. Brightness compensation values can range from –128 to 127.
Contrast The setting that compensates for any deficiencies in the on-screen contrast of your
DMP display. Contrast compensation values can range from 0 to 255.
Saturation The setting that compensates for any deficiencies in the on-screen color saturation of your
DMP display. Saturation compensation values can range from 0 to 255.
Audio Channel Volume (left) The setting to control how loudly or softly your DMP delivers (to its attached DMP display)
he sound from the relevant audio channel. Volume can range from 0 to 100, where 0 is silent.
Audio Channel Volume
ight)
(r
t
This is separate from the volume setting for the DMP display, which you might adjust with a
ote control.
rem
• If you set the volume to 0 on your DMP, you cannot compensate for the silence by
adjusting the volume setting on your DMP display. Instead, you must set an audible
olume on the DMP.
v
• If you set the volume to 0 on your DMP display, you cannot compensate for the silence
by adjusting the volume setting on your DMP. Instead, you must set an audible volume on
the DMP display.
OL-15764-03
User Guide for Cisco Digital Media Player Device Manager 5.2.x
10-9
Page 78

Chapter 10 Configure Settings for Touchscreens, Projectors, and Displays
Reference
Table 10-1 Elements on the DMP Display Attributes Page (continued)
Element Description
HDMI Display Information
Manufacturer Shows the manufacturer name and the year in which your DMP display was manufactured.
Blank if you used any interface except HDMI to connect your DMP to its DMP display, or if
autodetection failed. You cannot edit this value.
HDMI
Description Shows the native resolution (width and height in pixels), the scan type (progressive or
erlace), and the frame rate in Hz. The value is blank if you used any interface except HDMI
int
to connect your DMP to its DMP display, or if HDMI autodetection failed. You cannot edit
is value.
th
Ve rs io n Shows the version number of the EDID protocol or the CEA protocol by which autodetection
ccurred. Blank if you used any interface except HDMI to connect your DMP to its
o
DMP display, or if HDMI autodetection failed. You cannot edit this value.
Connector Type Shows the connector type (HDMI or DVI) that is in use. Blank if you used any interface except
to connect your DMP to its DMP display, or if HDMI autodetection failed. You cannot
HDMI
it this value.
ed
Supported Standards Shows all of the standards that your DMP display supports and shows which standard you
elected. Blank if you used any interface except HDMI to connect your DMP to its
s
DMP display, or if HDMI autodetection failed. You cannot edit this value.
Related Topics
• Adjust DMP Display Attributes, page 10-5
• Example Settings for DMP Display Attributes, page 10-1
UI Reference: Elements to Define DMP Display Dimensions
Table 10-2 Elements on the DMP Display Dimensions Page
Element Description
DMP Display Dimensions
DMP Display X Axis
(abscissa) Center Point
(in relative units)
DMP Display Y Axis
rdinate) Center Point
(o
(in relative units)
The absolute center point of your DMP display, as measured from left to right (on the x-axis),
in pixels. The value by default is 204
• Reduce the value to move displayed content closer to the left edge.
• Increase the value to move displayed content closer to the right edge.
8 in all DMPDM 5.2.x releases.
The absolute center point of your DMP display, as measured from top to bottom (on the y-axis),
in pixels. The value by default is 204
8 in DMPDM 5.2.3. However, in all prior 5.2.x releases, the
default value was 1835.
• Reduce the value to move displayed content closer to the top edge.
• Increase the value to move content closer to the bottom edge.
User Guide for Cisco Digital Media Player Device Manager 5.2.x
10-10
OL-15764-03
Page 79

Chapter 10 Configure Settings for Touchscreens, Projectors, and Displays
Table 10-2 Elements on the DMP Display Dimensions Page (continued)
Element Description
Displayable Width (in
r
elative units)
Displayable Height (in
elative units)
r
The total width in pixels of your DMP display. The maximum value is 4096 pixels in
DMPDM 5.2.3. However, in all prior 5.2.x releases, the default value was 411
• Reduce the value to reduce the width of displayed content.
• Increase the value to increase the width of displayed content.
The total height in pixels of your DMP display. The maximum value is 4096 pixels in
DMPDM 5.2.3. However, in all prior 5.2.x releases, the default value was 370
• Reduce the value to reduce the height of displayed content.
• Increase the value to increase the height of displayed content.
Related Topics
• Adjust Horizontal and Vertical Settings, page 10-6
Reference
3.
5.
OL-15764-03
User Guide for Cisco Digital Media Player Device Manager 5.2.x
10-11
Page 80

Reference
Chapter 10 Configure Settings for Touchscreens, Projectors, and Displays
User Guide for Cisco Digital Media Player Device Manager 5.2.x
10-12
OL-15764-03
Page 81

Concepts
CHAPTER
Configure Network Settings
Revised: November 24, 2010
• Concepts, page 11-1
• Procedures, page 11-8
• Reference, page 11-16
• Glossary, page 11-1
• Understand WEP Keys and Passphrases, page 11-3
• Workflow to Define Wi-Fi Settings, page 11-4
• Partial Support for Cisco Medianet 2.1 Features, page 11-5
11
Glossary
Timesaver Go to terms that start with... [
numerals
802.11b
802.11g
• Understand Medianet Autoconfiguration for DMP 4310G Endpoints, page 11-5
• Information That Medianet and DMPs Exchange, page 11-6
• Restrictions, page 11-6
numerals
A wireless networking standard that specifies a maximum data transfer rate of 11Mbps and an operating
frequency of 2.4GHz.
A wireless networking standard that specifies a maximum data transfer rate of 54Mbps, an operating
frequency of 2.4GHz, and backward compatibilitywith 802.11b devices.
| A | C | E | P | S | T | W ].
OL-15764-03
User Guide for Cisco Digital Media Player Device Manager 5.2.x
11-1
Page 82

A
Chapter 11 Configure Network Settings
Concepts
AAA
access point
C
CCMP
E
EAP
EAP-FAST
Authentication, Authorization, and Accounting.
See also E
AP-FAST, EAP-MD5 server, LEAP server, and PEAP server.
A device that allows wireless-equipped computers and other devices to communicate with a wired
network. Also used to expand the range of a wireless network.
Return to Top
Based on the Advanced Encryption Standard (AES) defined in the National Institute of Standards and
Technology's FIPS Publication 197, AES-CCMP is a symmetric block cipher that can encrypt and
decrypt data using keys of 128, 192, and 256 bits. AES-CCMP is superior to WEP encryption and is
defined in the IEEE 802.11i standard.
See also WE
P keys.
Return to Top
EAP is the Extensible Authentication Protocol that WPA uses to authorize user access to wireless
networks. Common implementations include EAP-FAST and EAP-MD5.
EAP-FAST is a two-phase implementation of the EAP authentication protocol:
EAP-MD5 server
P
PEAP server
PSK
• Phase 0, provisioning. Provision client with a credential called PAC (Protected Access
Credentials).
• Phase 1, authentication. Use the PAC to establish a tunnel with the server and authenticate the
username and password.
See also AAA an
d EAP.
Servers that use EAP to provide dynamic, session-specific wireless encryption keys, central user
administration, and authentication between clients and access points. EAP-MD5 uses MD5 hashing on
client and challenge passwords.
See also AAA an
d EAP.
Return to Top
Protected EAP server, which combines centralized two-way authentication with dynamically generated
wireless equivalent privacy keys or WEP keys.
See also AAA, EAP
-MD5 server, and WEP keys.
Pre-Shared Key.
User Guide for Cisco Digital Media Player Device Manager 5.2.x
11-2
OL-15764-03
Page 83

Chapter 11 Configure Network Settings
Concepts
S
SSID
T
TKIP
W
WEP
WEP keys
WPA
Return to Top
Service Set ID. It is a unique identifier that client devices use to associate with the access point. The
SSID helps client devices distinguish among multiple wireless networks in the same vicinity. The SSID
can be any alphanumeric entry up to 32 characters long.
Return to Top
Temporal Key Integrity Protocol, also known as key hashing, is used as part of server-based EAP
authentication.
Return to Top
Wired Equivalent Privacy is a method to encrypt data transmitted on a wireless network.
Wired equivalent privacy (WEP) keys are the IEEE 802.11b standard that offers a mechanism for
securing wireless LAN data streams. The goals of WEP include access control to prevent unauthorized
users who lack a correct WEP key from gaining access to the network, and privacy to protect wireless
LAN data streams by encrypting them and allowing de-encryption only by users with the correct
WEP keys.
Wi-Fi Protected Access. WPA is a standards-based, interoperable security enhancement that strongly
increases the level of data protection and access control for existing and future wireless LAN systems.
It is derived from and will be forward-compatible with the upcoming IEEE 802.11i standard. WPA
leverages TKIP for data protection and 802.1X for authenticated key management.
Understand WEP Keys and Passphrases
Timesaver Does your wireless network use WPA instead of WEP? If so, you can ignore this topic.
Many 802.11 access points (wireless routers) accept only a hexadecimal passphrase for WEP-64 and
WE
P-128. And yet, DMPs accept only an ASCII passphrase for WEP. For this reason, it might be
necessary at times to translate your WEP passphrase from ASCII to hexadecimal.
Note Many third-party converters are available. We do not offer any Cisco converter for this purpose.
User Guide for Cisco Digital Media Player Device Manager 5.2.x
OL-15764-03
11-3
Page 84

Concepts
The typical WEP process is as follows.
1. Pick an ASCII passphrase. For example, PassphraseWEP128.
2. Convert your string of ASCII characters to the hexadecimal key or keys for your network.
• WEP-64 uses four short hexadecimal keys.
• WEP-128 uses one long hexadecimal key.
3. Configure your DMP to use the ASCII from which you derived the hexadecimal.
4. Configure your wireless router to use the appropriate hexadecimal key or keys.
Related Topics
• Configure a Wireless Network Connection, page 11-11
• Configure a Wireless Network Connection, page 11-11
Workflow to Define Wi-Fi Settings
It is not necessary, useful, or correct to restart a DMP immediately after you define its 802.11 settings.
Instead, the typical workflow is as follows.
Chapter 11 Configure Network Settings
1. Define
wireless
settings.
2. Save
wireless
settings.
3. Apply wireless settings.
a. Use DMPDM to restart the DMP.
b. Immediately unplug the
DMP Ethernet cable.
OR
a. Unplug the DMP power cord.
b. Unplug the DMP Ethernet cable.
c. Plug in the DMP power cord.
4. Get WLAN
IP address.
User Guide for Cisco Digital Media Player Device Manager 5.2.x
11-4
OL-15764-03
Page 85

Chapter 11 Configure Network Settings
Partial Support for Cisco Medianet 2.1 Features
NEW IN CISCO DMS 5.2.2 — Cisco Medianet is an end-to-end architecture for networks that deliver
rich-media experiences, and DMP 4310G endpoints support some Medianet features. These DMPs know
and can broadcast their own product type, model, and software version. In turn, they can receive their IP
address, VLAN assignment, and network configuration settings automatically, in anticipation of you
registering them to your DMM server.
Note These features are designed to simplify the largest deployments, whereas DMPDM is designed to
support the smallest deployments. If you manage your DMP primarily through DMPDM, your benefit
from Medianet integration will be minimal.
Understand Medianet Autoconfiguration for DMP 4310G Endpoints
DMP 4310G endpoints can use Cisco Discovery Protocol (CDP) to announce and identify themselves
on networks. And you might use Ethernet cables to connect such DMPs to access switches where the
autoconfiguration features of Medianet are enabled. When you do, these switches recognize from the
CDP announcements that the newly connected devices are DMPs.
Concepts
After recognizing that a DMP is attached to one of its Ethernet ports, the switch can apply to this port a
set of built-in configuration macros that are optimized specifically for DMPs. By configuring so many
settings automatically, Medianet can accelerate and simplify DMP mass deployments, QoS
configuration, and asset tracking. In turn, these simplified deployments can lower your operating costs.
OL-15764-03
User Guide for Cisco Digital Media Player Device Manager 5.2.x
11-5
Page 86

Concepts
Information That Medianet and DMPs Exchange
Medianet and a DMP 4310G can exchange these types of data.
• name of the chassis
• system name
• system object
• hardware revision
• firmware revision
• software revision
• seial number
• manufacturing name
• model name
• asset identifier
• CDP timeout
• VLAN assignment
Chapter 11 Configure Network Settings
Restrictions
• switch port assignment
• switch name and model
• switch IP address
• loation string
If you would like to learn more about Medianet, see h
Wireless Networks
• Ethernet connections take priority over Wi-Fi connections on DMPs where both are active.
• We do not support “open” Wi-Fi networks. They are a security risk.
• We do not support media streams to DMPs over Wi-Fi networks. The experience is poor.
• DMP 4305G endpoints do not support Wi-Fi.
Autoregistration
• Autoregistration depends upon the Cisco TAC Troubleshooting Access option for DMPs and fails
ttp://cisco.com/go/medianet.
unless this option is enabled.
Login Credentials
• All DMPs that you manage centrally in DMM must share one identical set of DMPDM
login credentials.
Medianet
• When a DMP 4310G relies upon a Medianet switch where more than one VLAN uses DHCP, the
DMP might come to use the wrong IP address. For this to occur, temporary conditions that do not
sever the DMP's AC power connection must nonetheless interrupt its network connection through
User Guide for Cisco Digital Media Player Device Manager 5.2.x
11-6
OL-15764-03
Page 87

Chapter 11 Configure Network Settings
the switch. (Thus, this problem cannot possibly occur while the DMP uses PoE.) Specifically, the
Medianet switch assigns its default VLAN to your DMP. But then — after your DMP’s network
nnection is interrupted and restored — your Medianet switch assigns to your DMP a dynamic IP
co
dress from another VLAN on your Medianet switch. This easily prevented mismatch disrupts
ad
centralized management of your DMP. To prevent this problem or to recover from it, you can
download and run the patch from Cisco.com.
Note DMP 4310G endpoints in this release do not support Medianet features for:
Concepts
• Discovery via DHCP.
• Autoregistration to your DMM server.
Nor do they know their physical location.
OL-15764-03
User Guide for Cisco Digital Media Player Device Manager 5.2.x
11-7
Page 88
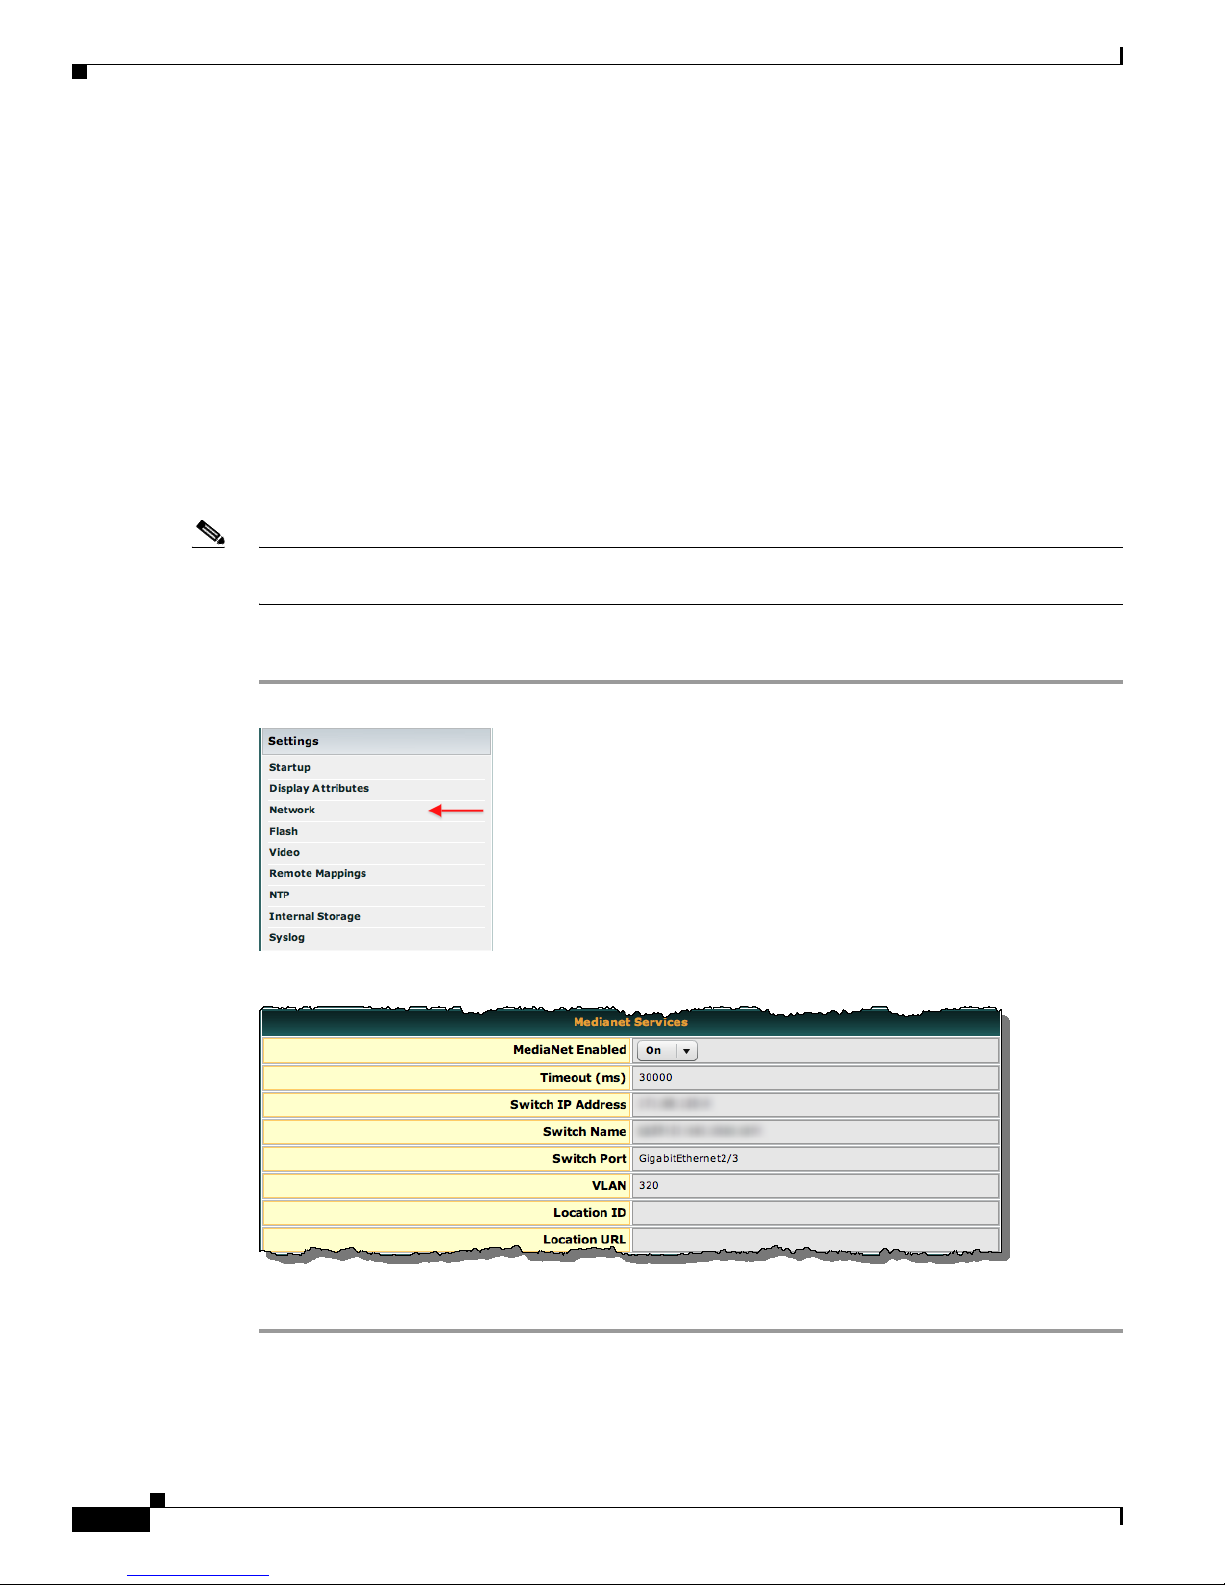
Procedures
Procedures
• Activate Medianet Support on a DMP 4310G, page 11-8
• Configure HTTP Proxy Server Settings for a DMP 4310G, page 11-9
• Configure a Wireless Network Connection, page 11-11
• Prepare Your DMP to Use a Static IP Address Over Ethernet, page 11-14
• Assign a Static IP Address to a Wireless DMP 4400G, page 11-16
• Show the Assigned IP Address, page 11-16
Activate Medianet Support on a DMP 4310G
Note This feature is available exclusively on DMP 4310G endpoints. No other DMP models supports this
feature in this release.
Chapter 11 Configure Network Settings
Procedure
Step 1 Click Network in the Settings area.
Step 2 Choose On from the Medianet Enabled list in the Medianet Services area.
Step 3 Save this changed setting, and then restart your DMP.
User Guide for Cisco Digital Media Player Device Manager 5.2.x
11-8
OL-15764-03
Page 89

Chapter 11 Configure Network Settings
Configure HTTP Proxy Server Settings for a DMP 4310G
Note • The only transport protocol that we can proxy in this release is HTTP over :80 or :8080.
• The only asset types that we can proxy in this release are video and SWF.
You can configure a DMP 4310G to use a proxy server and you can specify which of your content servers
should be exempt from this proxy service.
Procedure
Step 1 Click Network in the Settings area.
Procedures
Step 2 Choose Enabled from the Use HTTP Proxy list.
OL-15764-03
User Guide for Cisco Digital Media Player Device Manager 5.2.x
11-9
Page 90

Procedures
Step 3 Three fields become editable.
Proxy Server IP Address
•
To proxy the playback of video assets from an HTTP server, you must enter the routable IP address
of your proxy server. Do not enter a hostname. Do not use any wildcards.
• To proxy the playback of SWF assets from an HTTP server, you can enter either the routable IP
address or the FQDN (DNS-resolvable hostname) of your proxy server. Do not enter any wildcards.
Port — Enter either 80 or 8080. Do not enter any other value.
No Proxy List (IP addresses separated by commas)
• To bypass your proxy when you play video assets from particular HTTP servers, you must enter
comma-separated IP addresses. These identify each content server that should be excluded from
proxy. Nonetheless, we continue to proxy video playback from any other HTTP server. Do not enter
any hostnames. Do not enter any wildcards.
• To bypass your proxy when you play SWF assets from particular HTTP servers, you can enter either
comma-separated IP addresses or comma-separated FQDNs (DNS-resolvable hostnames). These
identify each content server that should be excluded from proxy. Nonetheless, we continue to proxy
video playback from any other HTTP server. Do not enter any wildcards.
Chapter 11 Configure Network Settings
Note Proxy settings do not have any effect on RSS traffic. When an RSS request crosses from one Internet
domain to another, your DMP is its own proxy.
Step 4 Click Apply.
Step 5 Click Save Configuration in the Administration list, and then click Save.
Step 6 Click Restart DMP in the Administration list, and then click Restart.
User Guide for Cisco Digital Media Player Device Manager 5.2.x
11-10
OL-15764-03
Page 91

Chapter 11 Configure Network Settings
Configure a Wireless Network Connection
Timesaver Complete this optional procedure at your discretion.
Before You Begin
• Do the hardware and firmware for your DMP support wireless networking? DMP 4305G and
DMP 4310G endpoints do no
–
To verify whether you must use an Ethernet cable, see Tabl e 2-2 on page 2-5.
–
Alternatively, if Table 2-2 on page 2-5 does not describe your DMP model, see its datasheet at
http://cisco.com/go/dms/dmp/datasheets.
• The Broadcast SSID setting must be enabled on your wireless access points (also known as wireless
routers or WLAN controllers). Otherwise, your DMPs cannot connect to your WLAN and are
prevented from obtaining IP addresses.
• We do not support “open” wireless networks. They are a security risk.
• Does a security policy in your network restrict DHCP address assignments to known MAC
addresses? If so, locate the WLAN address printed on a sticker that is affixed to your DMP. Then,
share this address with your security policy administrator.
t.
Procedures
• Verify that your wireless network is working correctly, is available, and you understand how it
authenticates connection requests.
• Connect Over Ethernet.
• Log in.
OL-15764-03
User Guide for Cisco Digital Media Player Device Manager 5.2.x
11-11
Page 92

Procedures
Chapter 11 Configure Network Settings
Procedure
Step 1 Click Wireless Configuration in the Settings list.
Tip Do you see this option in DMPDM? If not, your DMP might not support it. But you can learn whether any firmware
upgrade is available that adds this feature to your DMP model.
• See our release notes — http://cisco.com/go/dms/releasenotes.
• See our compatibility information — http://cisco.com/go/dms/compatibility.
If newer firmware is available, follow the published instructions to obtain it. Then, complete the firmware upgrade
procedure in your DMPDM user guide at http://cisco.com/go/dms/dmpdm.
The nature of your Cisco DMS service contract might limit:
• Which upgrades are available to you.
• Where and how you obtain upgrades.
• Whether you must pay anything to obtain upgrades.
To learn about Cisco service contracts, see http://cisco.com/go/cscc.
11-12
Step 2 Choose Enabled from the Wireless Interface list.
Each 802.11 wireless network is assigned a name to distinguish it from other networks. The technical
rm for this network name is Service Set Identifier, or SSID.
te
Step 3 Double-click the SSID for your network in the Detected Networks table.
OR
When you do not see your SSID in the Detected Networks table, do the following.
a. Enter in the Network SSID field the SSID for your network.
b. Choose from the Security list the security method for your network. Its options are:
• WEP-64bit
• WEP-128bit
• WPA-PSK
• WPA-EAP
User Guide for Cisco Digital Media Player Device Manager 5.2.x
OL-15764-03
Page 93

Chapter 11 Configure Network Settings
• WPA2-PSK
• WPA2-EAP
The security method that you choose controls, in part, which fields and options this DMPDM page
ws to you.
sho
• When you see the PSK field and you chose a WEP-based security method, enter in it the key
from which your 64-bit or 128-bit passphrase is cryptographically derived.
• When you see the PSK field and you chose a WPA-based or WPA-2-based security method,
enter in it the pre-shared key for your network.
• When you see the Encryption list, choose from it either TKIP or CCMP AES.
• When you see the EAP list, choose from it either FAST, MD5, or PEAP (ver.0).
• When you see the Username and Password fields, enter in them respectively a valid username
for your wireless network and the password for that username.
c. Choose Enabled from the Dynamic IP Addressing (DHCP) list.
Tip Will you ever deploy your DMP in a wireless network that does not have any DHCP server? If so, you can
configure your DMP to use a static IP address.
Procedures
d.
(Optional) Click Probe to check whether these settings work correctly with your wireless network.
e. When you are satisfied with your choices, Click Select.
f. Click Save Configuration in the Administration list, and then click Save.
Step 4 Disconnect the Ethernet cable from your DMP.
Step 5 Click Restart DMP in the Administration list, and then click Restart.
Step 6 Stop. You have completed this procedure.
Related Topics
• Physical Interfaces (I/O Ports), page 2-4
• Connect Over Ethernet, page 2
• Assign a Static IP Address to a Wireless DMP 4400G, page 11-16
OL-15764-03
User Guide for Cisco Digital Media Player Device Manager 5.2.x
11-13
Page 94

Chapter 11 Configure Network Settings
Procedures
Prepare Your DMP to Use a Static IP Address Over Ethernet
Timesaver Complete this optional procedure at your discretion. It explains what to do when a DMP’s ultimate deployment site does not
use DHCP.
Before You Begin
• Connect Over Ethernet, page 2.
OR
Obtain an Ethernet crossover cable.
• Do one of the following.
–
Transport your DMP to a site where the local network segment includes a DHCP server and
ensure that you have access there to a web browser.
–
Configure any system at your current location to run temporarily as a DHCP server and ensure
that you have access to a web browser.
Procedure
Step 1 Connect your DMP to its presentation system.
Step 2 Turn On the presentation system and then do one of the following.
• Use a standard, category 5 (RJ-45) Ethernet cable — either 10/100 or 10/100/1000, depending on
your DMP model — to connect your DMP to the network segment that includes the DHCP server.
• Use an Ethernet crossover cable to connect your DMP directly to the DHCP server.
Step 3 If the DHCP server process is not running yet on the DHCP server, start that process now — along with
any processes that it uses.
Step 4 Turn On your DMP and make a note of the IP address that it shows on its presentation system.
Step 5 Point your browser to the IP address.
Note Is your DMP brand-new? Or, have its settings been restored to factory defaults? If so, DMPDM prompts you to define
a master password for your DMP. You must do this before you can do anything else. See the “Log in” section on page 7-1.
Step 6 When prompted to log in, use the master username and password that you defined.
User Guide for Cisco Digital Media Player Device Manager 5.2.x
11-14
OL-15764-03
Page 95

Chapter 11 Configure Network Settings
DMPDM loads its basic settings page in your browser.
Procedures
Step 7 Choose Disabled from the Dynamic IP Addressing (DHCP) list, and then:
a. Enter in the IP Address field the static IP address that your DMP should use.
b. Enter in the Subnet Mask field the netmask that your DMP should use with its static IP address.
c. Enter in the Default Gateway field the network gateway that your DMP should use with its static
IP address.
d. Enter in the Primary DNS Server field the DNS server that your DMP should use with its static
IP address.
Step 8 (Optional) Will a network address translation (NAT) service give your DMP a private IP address? If so:
a. Choose Yes from the Using NAT list.
b. Enter in the NAT IP Address field the 1-to-1 public address (which is configured on the local router)
that corresponds to the private IP address.
Step 9 Click Apply.
Step 10 Click Save Configuration in the Administration list, and then click Save.
Step 11 Click Restart DMP in the Administration list, and then click Restart.
OL-15764-03
User Guide for Cisco Digital Media Player Device Manager 5.2.x
11-15
Page 96

Reference
Step 12 Ship or deliver the DMP to its deployment site, and then:
a. Connect it to its presentation system.
b. Connect it to its local network segment.
c. Connect it to its power source.
Step 13 Stop. You have completed this procedure.
Related Topics
• Assign a Static IP Address to a Wireless DMP 4400G, page 11-16
Assign a Static IP Address to a Wireless DMP 4400G
Procedure
Step 1 Log in to your wireless access point as an administrator.
Chapter 11 Configure Network Settings
Step 2 Use its administrative features to assign a static IP address to your DMP.
Step 3 Stop. You have completed this procedure.
Related Topics
• Prepare Your DMP to Use a Static IP Address Over Ethernet, page 11-14
Show the Assigned IP Address
Before You Begin
• If you have not yet obtained an IP address for your DMP, see the quick start guide for your DMP
model type to learn how to connect and set up your DMP.
Procedure
Step 1 Click to learn the IP address of your DMP.
The address is briefly visible on your DMP display.
Step 2 Stop. You have completed this procedure.
Reference
• Network Settings Reference, page 11-17
• FAQs and Troubleshooting, page 11-18
User Guide for Cisco Digital Media Player Device Manager 5.2.x
11-16
OL-15764-03
Page 97

Chapter 11 Configure Network Settings
Reference
Network Settings Reference
UI Reference: Elements to Define Basic Network Settings
Table 11-1 Elements on the Basic Page
Element Description
Startup URLs
Media The URL or local path that points to an encoded digital video file, which your DMP should load
automatically and show immediately after every restart. The URL or pathname cannot contain any
more than 254 characters, cannot contain any spaces, and must use ISO/IEC-8859 (Latin-1)
aracter encoding. The value that you enter is case-sensitive.
ch
Supported transport protocols and URL types are as follows:
• http://<ip_address>/<path_and_filename>
• udp://<ip_address_of_multicast_server>/<port_number>
• file:///tmp/ftproot/usb_1/<path_and_filename> — For files on the internal flash drive
•
file:///tmp/ftproot/usb_2/<path_and_filename> — For files on a mounted USB drive
• file:///tmp/ftproot/CIFS/<path_and_filename> — For files on a mounted network share
Note
Tip To simulate an audio-only file if your DMP does not support their use directly, play an
The video file must be encoded in a way that your DMP supports.
MPEG-2 file that contains all of the audio data that you want to play and contains just one
frame of video data.
Browser The HTTP URL of any document that the embedded browser should load automatically and show
ediately after each restart. For example, the URL that you enter might point to an HTML page
imm
with an embedded Flash file that animates the logo for your organization. The URL cannot contain
any more than 254 characters, cannot contain any spaces, and must use ISO/IEC-8859 (Latin-1)
aracter encoding.
ch
Tip We recommend that you do not point to any document or site that requires human
interaction to be useful, interesting, or entertaining, because there is no keyboard or mouse
that you can use to interact with what you show on your DMP display.
Wired Network Configuration
DMP MAC Address An uneditable representation of the MAC address that is associated with the NIC in your DMP.
Dynamic IP Addressing
CP)
(DH
Indicates whether your DMP uses a static IP address or a dynamic IP address. Options in the list
are as follows:
• Enabled — Your DMP uses a dynamic IP address that it obtained from a DHCP server.
• Disabled — Your DMP uses a static IP address.
IP Address The IP address that is assigned to your DMP.
Note If your DHCP server changes the IP address assignment for a centrally managed DMP while
the DMP is running, instead of waiting for the DMP to restart, you must restart the DMP.
Otherwise, you cannot use DMM-DSM to centrally manage that DMP.
OL-15764-03
User Guide for Cisco Digital Media Player Device Manager 5.2.x
11-17
Page 98

Chapter 11 Configure Network Settings
Reference
Table 11-1 Elements on the Basic Page (continued)
Element Description
Domain Name The DNS-resolvable domain name for your organization, such as ex
When you disable DHCP and assign a static IP address to your DMP, its configuration to resolve
cal hostnames is no longer completely automatic. You must specify the domain name so that your
lo
DNS server can convert local device names, such as server, to fully qualified domain names, such
as server.example.com — which are then resolvable to IP addresses for routing.
Subnet Mask The IPv4 netmask that the DMP-local network segment uses.
Default Gateway The IP address that is assigned to whatever router provides outside network access to and from
vices on the DMP-local network segment.
de
Primary DNS Server The routable IP address or DNS-resolvable hostname of the primary DNS server for whichever
work segment is local to your DMP. We recommend that you enter the IP address, not
net
the hostname.
Using NAT Indicates whether your DMP uses private IP addressing. Choose an option from the list.
• Ye s — Your DMP uses a private IP address.
• No — Your DMP does not use a private IP address.
NAT IP Address The globally routable IP address that DMM-DSM should use to manage your DMP, if your DMP
as a private IP address due to network address translation (NAT).
h
HTTP Proxy
Use HTTP Proxy Indicates whether your DMP uses a proxy server. Choose an option from the list.
• Enabled — Your DMP sends and receives HTTP traffic through the specified proxy.
ample.com.
• Disabled — Your DMP does not use a proxy.
Proxy Server IP
ddress or Hostname
A
The routable proxy server IP address or DMS-resolvable hostname. DMPDM ignores any address
that you enter unless you chose Enabled from the HTTP Proxy list.
Port The logical TCP port number through which the proxy server provides HTTP proxy services.
MPDM ignores any port that you enter unless you chose Enabled from the HTTP Proxy list.
D
FAQs and Troubleshooting
• DMP Network Connectivity, page 11-18
DMP Network Connectivity
Q.
What prevents me from centrally managing my DMP?
A.
Ask yourself these questions.
• Has your DHCP server changed the IP address assignment for your DMP?
• Was your DMP running when its address changed?
If these statements are true, do not wait for your DMP to restart automatically. Instead, restart it
anually. Until it is restarted, it cannot be centrally managed.
m
User Guide for Cisco Digital Media Player Device Manager 5.2.x
11-18
OL-15764-03
Page 99

Concepts
CHAPTER
File Storage
Revised: November 24, 2010
• Concepts, page 12-1
• Procedures, page 12-2
• Reference, page 12-3
• Understand Internal Storage Capacity, page 12-1
• Performance Guidelines for Local Storage, page 12-2
• Local Storage Restrictions for DMP 4310G, page 12-2
12
Understand Internal Storage Capacity
Internal storage media is formatted to this capacity:
• For a DMP 4305G — 2 GB
• For a DMP 4310G — 32 GB
• For a DMP 4400G — 4 GB
The total available space for internal file storage:
• For a DMP 4305G — 2 GB.
• DMP 4310G —
• For a DMP 4400G — 2.8 GB.
OL-15764-03
User Guide for Cisco Digital Media Player Device Manager 5.2.x
12-1
Page 100

Procedures
Performance Guidelines for Local Storage
We recommend that you do not upload files to the /tmp/ftproot subdirectory. Instead, use
/tmp/ftproot/usb_1.
If you upload files to /tmp/ftproot accidentally, and then DMP performance suffers, you can restore your
P to its normal operating condition easily. Just unplug it, wait 15 seconds, and then plug it in again.
DM
Note This method deletes the files that you uploaded.
Local Storage Restrictions for DMP 4310G
A DMP 4310G that uses an attached USB storage volume might corrupt or erase data on this attached
volume. Likewise, a DMP 4310G might lose its ability to mount this attached volume. After the DMP
reaches this general state, it sometimes reports incorrectly that the attached volume is still mounted
and working.
These problems can occur when you disconnect the external volume from the upper USB interface on a
MP 4310G and then, without any delay, plug it immediately into the lower USB interface on the same
D
DMP. However, these problems do not occur in every such case. In our tests, they occurred
approximately 1 percent of the time.
To reduce your possible exposure to these problems, wait no less than 3 seconds after you connect or
isconnect an attached volume, before you do the reverse. In our tests, this best practice eliminated
d
the risk.
Chapter 12 File Storage
Restart the DMP if it merely unmounts its attached volume.
There is no workaround after the attached volume is erased or its data becomes corrupted. All that you
an do after the fact is reformat the volume and restore its data from a recent backup.
c
Procedures
• Define Storage Settings, page 12-2
Define Storage Settings
• Manage Permissions for Internal Storage, page 12-2
• Mount or Unmount a Network Share, page 12-3
Manage Permissions for Internal Storage
You can set the permissions for internal storage in your DMP.
Procedure
Step 1 Click Internal Storage in the Settings list.
Step 2 View or edit the values, then click Apply.
User Guide for Cisco Digital Media Player Device Manager 5.2.x
12-2
OL-15764-03
 Loading...