

Page 1

Corporate Headquarters
Cisco Systems, Inc.
170 West Tasman Drive
San Jose, CA 95134-1706
USA
http://www.cisco.com
Tel: 408 526-4000
800 553-NETS (6387)
Fax: 408 526-4100
Cisco Digital Media System 3.5 Appliance
Administration Guide
Text Part Number: OL-11574-02
Page 2

THE SPECIFICATIONS AND INFORMATION REGARDING THE PRODUCTS IN THIS MANUAL ARE SUBJECT TO CHANGE WITHOUT NOTICE. ALL
STATEMENTS, INFORMATION, AND RECOMMENDATIONS IN THIS MANUAL ARE BELIEVED TO BE ACCURATE BUT ARE PRESENTED WITHOUT
WARRANTY OF ANY KIND, EXPRESS OR IMPLIED. USERS MUST TAKE FULL RESPONSIBILITY FOR THEIR APPLICATION OF ANY PRODUCTS.
THE SOFTWARE LICENSE AND LIMITED WARRANTY FOR THE ACCOMPANYING PRODUCT ARE SET FORTH IN THE INFORMATION PACKET THAT
SHIPPED WITH THE PRODUCT AND ARE INCORPORATED HEREIN BY THIS REFERENCE. IF YOU ARE UNABLE TO LOCATE THE SOFTWARE LICENSE
OR LIMITED WARRANTY, CONTACT YOUR CISCO REPRESENTATIVE FOR A COPY.
The Cisco implementation of TCP header compression is an adaptation of a program developed by the University of California, Berkeley (UCB) as part of UCB’s public
domain version of the UNIX operating system. All rights reserved. Copyright © 1981, Regents of the University of California.
NOTWITHSTANDING ANY OTHER WARRANTY HEREIN, ALL DOCUMENT FILES AND SOFTWARE OF THESE SUPPLIERS ARE PROVIDED “AS IS” WITH
ALL FAULTS. CISCO AND THE ABOVE-NAMED SUPPLIERS DISCLAIM ALL WARRANTIES, EXPRESSED OR IMPLIED, INCLUDING, WITHOUT
LIMITATION, THOSE OF MERCHANTABILITY, FITNESS FOR A PARTICULAR PURPOSE AND NONINFRINGEMENT OR ARISING FROM A COURSE OF
DEALING, USAGE, OR TRADE PRACTICE.
IN NO EVENT SHALL CISCO OR ITS SUPPLIERS BE LIABLE FOR ANY INDIRECT, SPECIAL, CONSEQUENTIAL, OR INCIDENTAL DAMAGES, INCLUDING,
WITHOUT LIMITATION, LOST PROFITS OR LOSS OR DAMAGE TO DATA ARISING OUT OF THE USE OR INABILITY TO USE THIS MANUAL, EVEN IF CISCO
OR ITS SUPPLIERS HAVE BEEN ADVISED OF THE POSSIBILITY OF SUCH DAMAGES.
CCVP, the Cisco Logo, and the Cisco Square Bridge logo are trademarks of Cisco Systems, Inc.; Changing the Way We Work, Live, Play, and Learn is a service mark of
Cisco Systems, Inc.; and Access Registrar, Aironet, BPX, Catalyst, CCDA, CCDP, CCIE, CCIP, CCNA, CCNP, CCSP, Cisco, the Cisco Certified Internetwork Expert logo,
Cisco IOS, Cisco Press, Cisco Systems, Cisco Systems Capital, the Cisco Systems logo, Cisco Unity, Enterprise/Solver, EtherChannel, EtherFast, EtherSwitch, Fast Step,
Follow Me Browsing, FormShare, GigaDrive, GigaStack, HomeLink, Internet Quotient, IOS, IP/TV, iQ Expertise, the iQ logo, iQ Net Readiness Scorecard, iQuick Study,
LightStream, Linksys, MeetingPlace, MGX, Networking Academy, Network Registrar, Packet, PIX, ProConnect, RateMUX, ScriptShare, SlideCast, SMARTnet, StackWise,
The Fastest Way to Increase Your Internet Quotient, and TransPath are registered trademarks of Cisco Systems, Inc. and/or its affiliates in the United States and certain other
countries.
All other trademarks mentioned in this document or Website are the property of their respective owners. The use of the word partner does not imply a partnership relationship
between Cisco and any other company. (0609R)
Any Internet Protocol (IP) addresses used in this document are not intended to be actual addresses. Any examples, command display output, and figures included in the
document are shown for illustrative purposes only. Any use of actual IP addresses in illustrative content is unintentional and coincidental.
Cisco Digital Media System 3.5 Appliance Administration Guide
© 2006 Cisco Systems, Inc. All rights reserved.
Page 3

i
Cisco Digital Media System 3.5 Appliance Administration Guide
OL-11574-02
CONTENTS
Preface iii
Objective iii
Audience iii
Document Organization iv
Document Conventions iv
Related Documentation v
Changes to This Document v
Obtaining Documentation v
Cisco.com v
Product Documentation DVD vi
Ordering Documentation vi
Documentation Feedback vi
Cisco Product Security Overview vi
Reporting Security Problems in Cisco Products vii
Product Alerts and Field Notices vii
Obtaining Technical Assistance viii
Cisco Technical Support & Documentation Website viii
Submitting a Service Request ix
Definitions of Service Request Severity ix
Obtaining Additional Publications and Information ix
CHAPTER
1 Introduction 1-1
Glossary 1-1
About the Cisco Digital Media System 1-1
Applications 1-2
Cisco Video Portal 1-2
Cisco Digital Media Manager 1-3
DMS 3.5 Requirements 1-3
DMS 3.5 Setup Prerequisites 1-5
CHAPTER
2 Setting up the Video Portal 2-1
Setting up the Video Portal 3.5 Server Appliance 2-1
Page 4

Contents
ii
Cisco Digital Media System 3.5 Appliance Administration Guide
OL-11574-02
CHAPTER
3 Installing and Configuring the Cisco Digital Media Manager 3.5 Appliance 3-1
Installing the Cisco Digital Media Manager 3.5 Appliance 3-1
Configuring the Cisco Digital Media Manager (DMM) 3.5 3-18
CHAPTER
4 Using the Cisco Video Portal AAI 4-1
CHAPTER
5 Using the DMM 5-1
Page 5

iii
Cisco Digital Media System 3.5 Appliance Administration Guide
OL-11574-02
Preface
This preface explains the objectives, intended audience, and organization of Cisco Digital Media System
3.5 Appliance Administration Guide and describes the conventions that convey instructions and other
information.
The preface contains the following sections:
• Objective
• Audience
• Document Organization
• Document Conventions
• Related Documentation
• Changes to This Document
• Obtaining Documentation
• Documentation Feedback
• Cisco Product Security Overview
• Product Alerts and Field Notices
• Obtaining Technical Assistance
• Obtaining Additional Publications and Information
Objective
This administration guide describes how to administer the DMS system.
Audience
This guide is intended for DMS administrators.
Page 6

iv
Cisco Digital Media System 3.5 Appliance Administration Guide
OL-11574-02
Preface
Document Organization
Document Organization
This guide contains the following chapters and appendixes:
• Chapter 1, “Introduction,” provides an introduction to DMS.
• Chapter 2, “Setting up the Video Portal,” details how to set up the Cisco Video Portal.
• Chapter 3, “Installing and Configuring the Cisco Digital Media Manager 3.5 Appliance,” describes
how to configure the DMM appliance.
• Chapter 4, “Using the Cisco Video Portal AAI,” provides information on the Video Portal AAI.
• Chapter 5, “Using the DMM,” provides instructions on how to use the Digital Media Manager.
Document Conventions
This guide uses the convention where the symbol ^ represents the key labeled Control. For example, the
key combination ^z means hold down the Control key while you press the z key.
Command descriptions use these conventions:
• Examples that contain system prompts denote interactive sessions, indicating the commands that
you should enter at the prompt. The system prompt indicates the current level of the EXEC
command interpreter. For example, the prompt
router> indicates that you should be at the user
level, and the prompt
router# indicates that you should be at the privileged level. Access to the
privileged level usually requires a password. Refer to the related software configuration and
reference documentation listed in “Related Documentation” for additional information.
• Commands and keywords are in boldface font.
• Arguments for which you supply values are in italic font.
• Elements in square brackets ([ ]) are optional.
• Alternative but required keywords are grouped in braces ({}) and separated by vertical bars (|).
Examples use these conventions:
• Terminal sessions and sample console screen displays are in screen font.
• Information you enter is in boldface screen font.
• Nonprinting characters, such as passwords, are in angle brackets (< >).
• Default responses to system prompts are in square brackets ([]).
• Exclamation points (!) at the beginning of a line indicate a comment line.
Caution Means reader be careful. You are capable of doing something that might result in equipment damage or
loss of data.
Note Means reader take note. Notes contain helpful suggestions or references to materials not contained in
this manual.
Page 7

v
Cisco Digital Media System 3.5 Appliance Administration Guide
OL-11574-02
Preface
Related Documentation
Timesaver Means the described action saves time. You can save time by performing the action described in the
paragraph.
Warning
This warning symbol means danger. You are in a situation that could cause bodily injury. Before you
work on any equipment, be aware of the hazards involved with electrical circuitry and be familiar
with standard practices for preventing accidents. To see translations of the warnings that appear in
this publication, refer to the Regulatory Compliance and Safety Information document that
accompanied this device.
Statement 1074
Related Documentation
Refer to the Cisco Digital Media System Documentation Roadmap for a list of related documentation:
http://www.cisco.com/en/US/products/ps6681/products_documentation_roadmap09186a0080720650.h
tml
Changes to This Document
Table 1 lists the technical changes made to this document since it was first printed.
Obtaining Documentation
Cisco documentation and additional literature are available on Cisco.com. This section explains the
product documentation resources that Cisco offers.
Cisco.com
You can access the most current Cisco documentation at this URL:
http://www.cisco.com/techsupport
You can access the Cisco website at this URL:
http://www.cisco.com
You can access international Cisco websites at this URL:
http://www.cisco.com/public/countries_languages.shtml
Table 1 Changes to This Document
Revision Date Change Summary
OL-11574-01 October, 2006 Initial release of the document
Page 8

vi
Cisco Digital Media System 3.5 Appliance Administration Guide
OL-11574-02
Preface
Documentation Feedback
Product Documentation DVD
The Product Documentation DVD is a library of technical product documentation on a portable medium.
The DVD enables you to access installation, configuration, and command guides for Cisco hardware and
software products. With the DVD, you have access to the HTML documentation and some of the
PDF files found on the Cisco website at this URL:
http://www.cisco.com/univercd/home/home.htm
The Product Documentation DVD is created and released regularly. DVDs are available singly or by
subscription. Registered Cisco.com users can order a Product Documentation DVD (product number
DOC-DOCDVD= or DOC-DOCDVD=SUB) from Cisco Marketplace at the Product Documentation
Store at this URL:
http://www.cisco.com/go/marketplace/docstore
Ordering Documentation
You must be a registered Cisco.com user to access Cisco Marketplace. Registered users may order
Cisco documentation at the Product Documentation Store at this URL:
http://www.cisco.com/go/marketplace/docstore
If you do not have a user ID or password, you can register at this URL:
http://tools.cisco.com/RPF/register/register.do
Documentation Feedback
You can provide feedback about Cisco technical documentation on the Cisco Technical Support &
Documentation site area by entering your comments in the feedback form available in every online
document.
Cisco Product Security Overview
Cisco provides a free online Security Vulnerability Policy portal at this URL:
http://www.cisco.com/en/US/products/products_security_vulnerability_policy.html
From this site, you will find information about how to do the following:
• Report security vulnerabilities in Cisco products
• Obtain assistance with security incidents that involve Cisco products
• Register to receive security information from Cisco
A current list of security advisories, security notices, and security responses for Cisco products is
available at this URL:
http://www.cisco.com/go/psirt
To see security advisories, security notices, and security responses as they are updated in real time, you
can subscribe to the Product Security Incident Response Team Really Simple Syndication (PSIRT RSS)
feed. Information about how to subscribe to the PSIRT RSS feed is found at this URL:
http://www.cisco.com/en/US/products/products_psirt_rss_feed.html
Page 9

vii
Cisco Digital Media System 3.5 Appliance Administration Guide
OL-11574-02
Preface
Product Alerts and Field Notices
Reporting Security Problems in Cisco Products
Cisco is committed to delivering secure products. We test our products internally before we release them,
and we strive to correct all vulnerabilities quickly. If you think that you have identified a vulnerability
in a Cisco product, contact PSIRT:
• For emergencies only—security-alert@cisco.com
An emergency is either a condition in which a system is under active attack or a condition for which
a severe and urgent security vulnerability should be reported. All other conditions are considered
nonemergencies.
• For nonemergencies —psirt@cisco.com
In an emergency, you can also reach PSIRT by telephone:
• 1 877 228-7302
• 1 408 525-6532
Tip We encourage you to use Pretty Good Privacy (PGP) or a compatible product (for example, GnuPG) to
encrypt any sensitive information that you send to Cisco. PSIRT ca n work with information that has been
encrypted with PGP versions 2.x through 9.x.
Never use a revoked encryption key or an expired encryption key. The correct public key to use in your
correspondence with PSIRT is the one linked in the Contact Summary section of the Security
Vulnerability Policy page at this URL:
http://www.cisco.com/en/US/products/products_security_vulnerability_policy.html
The link on this page has the current PGP key ID in use.
If you do not have or use PGP, contact PSIRT to find other means of encrypting the data before sending
any sensitive material.
Product Alerts and Field Notices
Modifications to or updates about Cisco products are announced in Cisco Product Alerts and Cisco Field
Notices. You can receive Cisco Product Alerts and Cisco Field Notices by using the Product Alert Tool
on Cisco.com. This tool enables you to create a profile and choose those products for which you want to
receive information.
To access the Product Alert Tool, you must be a registered Cisco.com user. (To register as a Cisco.com
user, go to this URL: http://tools.cisco.com/RPF/register/register.do) Registered users can access the
tool at this URL: http://tools.cisco.com/Support/PAT/do/ViewMyProfiles.do?local=en
Page 10

viii
Cisco Digital Media System 3.5 Appliance Administration Guide
OL-11574-02
Preface
Obtaining Technical Assistance
Obtaining Technical Assistance
Cisco Technical Support provides 24-hour-a-day award-winning technical assistance. The
Cisco Technical Support & Documentation website on Cisco.com features extensive online support
resources. In addition, if you have a valid Cisco service contract, Cisco Technical Assistance Center
(TAC) engineers provide telephone support. If you do not have a valid Cisco service contract, contact
your reseller.
Cisco Technical Support & Documentation Website
The Cisco Technical Support & Documentation website provides online documents and tools for
troubleshooting and resolving technical issues with Cisco products and technologies. The website is
available 24 hours a day at this URL:
http://www.cisco.com/techsupport
Access to all tools on the Cisco Technical Support & Documentation website requires a Cisco.com
user ID and password. If you have a valid service contract but do not have a user ID or password, you
can register at this URL:
http://tools.cisco.com/RPF/register/register.do
Note Use the Cisco Product Identification Tool to locate your product serial number before submitting a
request for service online or by phone. You can access this tool from the Cisco Technical Support &
Documentation website by clicking the Tools & Resources link, clicking the All Tools (A-Z) tab, and
then choosing Cisco Product Identification Tool from the alphabetical list. This tool offers three search
options: by product ID or model name; by tree view; or, for certain products, by copying and pasting
show command output. Search results show an illustration of your product with the serial number label
location highlighted. Locate the serial number label on your product and record the information before
placing a service call.
Tip Displaying and Searching on Cisco.com
If you suspect that the browser is not refreshing a web page, force the browser to update the web page
by holding down the Ctrl key while pressing F5.
To find technical information, narrow your search to look in technical documentation, not the entire
Cisco.com website. On the Cisco.com home page, click the Advanced Search link under the Search box
and then click the Technical Support & Documentation radio button.
To provide feedback about the Cisco.com website or a particular technical document, click Contacts &
Feedback at the top of any Cisco.com web page.
Page 11

ix
Cisco Digital Media System 3.5 Appliance Administration Guide
OL-11574-02
Preface
Obtaining Additional Publications and Information
Submitting a Service Request
Using the online TAC Service Request Tool is the fastest way to open S3 and S4 service requests. (S3 and
S4 service requests are those in which your network is minimally impaired or for which you require
product information.) After you describe your situation, the TAC Service Request Tool provides
recommended solutions. If your issue is not resolved using the recommended resources, your service
request is assigned to a Cisco engineer. The TAC Service Request Tool is located at this URL:
http://www.cisco.com/techsupport/servicerequest
For S1 or S2 service requests, or if you do not have Internet access, contact the Cisco TAC by telephone.
(S1 or S2 service requests are those in which your production network is down or severely degraded.)
Cisco engineers are assigned immediately to S1 and S2 service requests to help keep your business
operations running smoothly.
To open a service request by telephone, use one of the following numbers:
Asia-Pacific: +61 2 8446 7411
Australia: 1 800 805 227
EMEA: +32 2 704 55 55
USA: 1 800 553 2447
For a complete list of Cisco TAC contacts, go to this URL:
http://www.cisco.com/techsupport/contacts
Definitions of Service Request Severity
To ensure that all service requests are reported in a standard format, Cisco has established severity
definitions.
Severity 1 (S1)—An existing network is “down” or there is a critical impact to your business operations.
You and Cisco will commit all necessary resources around the clock to resolve the situation.
Severity 2 (S2)—Operation of an existing network is severely degraded, or significant aspects of your
business operations are negatively affected by inadequate performance of Cisco products. You and
Cisco will commit full-time resources during normal business hours to resolve the situation.
Severity 3 (S3)—Operational performance of the network is impaired while most business operations
remain functional. You and Cisco will commit resources during normal business hours to restore service
to satisfactory levels.
Severity 4 (S4)—You require information or assistance with Cisco product capabilities, installation, or
configuration. There is little or no effect on your business operations.
Obtaining Additional Publications and Information
Information about Cisco products, technologies, and network solutions is available from various online
and printed sources.
• The Cisco Online Subscription Center is the website where you can sign up for a variety of
Cisco e-mail newsletters and other communications. Create a profile and then select the
subscriptions that you would like to receive. To visit the Cisco Online Subscription Center,
go to this URL:
http://www.cisco.com/offer/subscribe
Page 12

x
Cisco Digital Media System 3.5 Appliance Administration Guide
OL-11574-02
Preface
Obtaining Additional Publications and Information
• The Cisco Product Quick Reference Guide is a handy, compact reference tool that includes brief
product overviews, key features, sample part numbers, and abbreviated technical specifications for
many Cisco products that are sold through channel partners. It is updated twice a year and includes
the latest Cisco channel product offerings. To order and find out more about the Cisco Product Quick
Reference Guide, go to this URL:
http://www.cisco.com/go/guide
• Cisco Marketplace provides a variety of Cisco books, reference guides, documentation, and logo
merchandise. Visit Cisco Marketplace, the company store, at this URL:
http://www.cisco.com/go/marketplace/
• Cisco Press publishes a wide range of general networking, training, and certification titles. Both new
and experienced users will benefit from these publications. For current Cisco Press titles and other
information, go to Cisco Press at this URL:
http://www.ciscopress.com
• Internet Protocol Journal is a quarterly journal published by Cisco Systems for engineering
professionals involved in designing, developing, and operating public and private internets and
intranets. You can access the Internet Protocol Journal at this URL:
http://www.cisco.com/ipj
• Networking products offered by Cisco Systems, as well as customer support services, can be
obtained at this URL:
http://www.cisco.com/en/US/products/index.html
• Networking Professionals Connection is an interactive website where networking professionals
share questions, suggestions, and information about networking products and technologies with
Cisco experts and other networking professionals. Join a discussion at this URL:
http://www.cisco.com/discuss/networking
• “What’s New in Cisco Documentation” is an online publication that provides information about the
latest documentation releases for Cisco products. Updated monthly, this online publication is
organized by product category to direct you quickly to the documentation for your products. You
can view the latest release of “What’s New in Cisco Documentation” at this URL:
http://www.cisco.com/univercd/cc/td/doc/abtunicd/136957.htm
• World-class networking training is available from Cisco. You can view current offerings at
this URL:
http://www.cisco.com/en/US/learning/index.html
Page 13

CHA P TER
1-1
Cisco Digital Media System 3.5 Appliance Administration Guide
OL-11574-02
1
Introduction
This document describes how to install, backup and recover the Cisco Digital Media System (DMS) 3.5
Appliances. The following appliances constitute a Cisco DMS 3.5 system:
• Cisco Video Portal 3.5 and Video Portal Reports 3.5 on MCS 7825-H2 or MCS 7835-H1
• Cisco Digital Media Manager 3.5 on MCS 7835-H1
Glossary
Table 1-1 lists the major terms used in this document and provides their definitions.
About the Cisco Digital Media System
The Cisco Digital Media System (DMS) is a suite of software applications running on dedicated Cisco
Media Convergence Server (MCS) appliances that help enable organizations of all sizes to effectively
create, manage and deliver live and on-demand video over an IP network to any audience. Leveraging
Cisco's best practices from more than a decade of video and Internet initiatives, DMS provides a
comprehensive, high-quality media experience for delivery of critical information to end users with
flexibility, clarity, and impact.
Table 1-1 Glossary
Term Definition
AAI Appliance administration interface for configuring each DMS server appliance
ACNS Cisco Application for Content and Networking Systems: software that runs on the
Cisco Wide Area Application Engine platform for content distribution.
DMM Cisco Digital Media Manager: A Web-based application that allows content authors
to easily manage and publish content to the Cisco Video Portal or other end devices.
DMS Cisco Digital Media System: product family containing the Video Portal and Digital
Media Manager.
IE Microsoft Internet Explorer browser.
WAE Cisco Wide Area Application Engine: hardware platform for application and content
services.
WM Windows Media player or code.
Page 14

1-2
Cisco Digital Media System 3.5 Appliance Administration Guide
OL-11574-02
Chapter 1 Introduction
About the Cisco Digital Media System
The Cisco DMS includes the following:
• Cisco Video Portal and Reporting Tool: A Web-based video portal audiences can use to browse,
search, and view content interactively and a Web-based reporting tool.
• Cisco Digital Media Manager (DMM): A Web-based application that allows content authors to
easily manage and publish content to the Cisco Video Portal or other end devices.
Applications
You can use the Cisco Digital Media System to perform the following functions:
• Communicate effectively to targeted customers, investors, press, and analysts.
• Offer live and on-demand events and meetings to geographically dispersed audiences.
• Deliver critical information and training to employees, suppliers, and partners.
• Provide educational content to students.
Cisco Video Portal
The Cisco Video Portal utilizes standard Web technologies to allow you to deliver a compelling live and
on-demand video experience to your audiences. The Video Portal fits easily into your organization's
existing IT infrastructure and supports established video formats including Windows Media, Real, and
Flash.
The interface allows users to conveniently and quickly browse, search, and view content interactively.
The Video Portal provides the following benefits for users:
• Program Guide Listing and Keyword Search—Easily locate media by content category, title, or
keyword.
• Customizable Play lists—A dynamic list of videos programmed by content publishers or
bookmarked by individual users.
• Supplemental Content—View supplemental information with each video such as tickers, further
reading, related videos, Web sites, and downloadable materials.
• Advanced Player Controls and Full Screen—Optimize the viewing experience with enhanced
control of video playback.
• Simultaneous Playback and Thumbnail Preview—Preview other videos during main video
playback.
• Tracking and Reporting—Capture, report, and export content usage.
The Video Portal is accessible to end users via a Web browser and is available in three templates:
1. Flash Only—Runs within a Flash browser plugin and supports video content encoded in the Flash
Sorenson codec.
2. Flash/Windows Media—Runs in a Flash browser plugin in conjunction with a Windows Media
browser plugin and supports video content encoded in the Windows Media codec.
3. Flash/Real—Runs in a Flash browser plugin in conjunction with a Real Player browser plugin and
supports video content encoded in the Real Player codec.
Page 15

1-3
Cisco Digital Media System 3.5 Appliance Administration Guide
OL-11574-02
Chapter 1 Introduction
About the Cisco Digital Media System
Cisco Digital Media Manager
The Cisco Digital Media Manager (DMM) is a Web-based, easy-to-use content management application
for organizing and publishing digital media. This tool is designed to help content authors upload,
catalogue, edit, package, and publish all video content to the Cisco Video Portal or other end device.
The Cisco DMM features allow content publishers to perform the following tasks:
• Easily customize the Cisco Video Portal look-and-feel.
• Add and archive content and assign metadata and keywords.
• Create and manage play lists, ticker alerts, messages, and promotional interstitials.
• Preview content and manage approval workflow.
• Schedule instant and future deployments.
• Take advantage of compatibility with Cisco ACNS and Cisco Wide Area Engines.
• Manage administrator accounts and permissions.
DMS 3.5 Requirements
Table 1-2 outlines the two possible DMS configurations: Class 1 can handle up to 500 concurrent
sessions, which uses an MCS-7825 as a hardware platform for the Video Portal and Video Portal Reports,
and Class 2 can handle up to 1,000 concurrent sessions, which uses an MCS-7835 for a Video Portal and
Video Portal Reports.
Table 1-3 outlines the client hardware and software requirements for operating components of the Cisco
DMS 3.5. It illustrates the different OS/browser/plugin/codec combinations supported by each Video
Portal template. The DMM client requirements are identical to the Video Portal client requirements. You
will need to know this information in order to properly configure the connected Cisco Video Portal.
Please refer to the DMS 3.5 Release Notes for any caveats and the Cisco Video Portal User Guide for
more information.
Table 1-2 DMS 3.5 Server Appliance Configuration Options
Configuration DMM 3.5
Cisco Video Portal 3.5 + Video
Portal Reports 3.5
Class 1 MCS-7835-H1 MCS-7825-H2
Maximum Threshold:
500 concurrent sessions
Class 2 MCS-7835-H1 MCS-7835-H1
Maximum Threshold:
1,000 concurrent sessions
Page 16

1-4
Cisco Digital Media System 3.5 Appliance Administration Guide
OL-11574-02
Chapter 1 Introduction
About the Cisco Digital Media System
The Cisco Video Portal Reporting Tool 3.5 Client Requirements for browsers are:
• Windows:
–
Internet Explorer 5.5 (Minimum) with Adobe SVG Plug-in 3.0 or greater
–
Firefox 1.5 or greater
• Linux/Unix:
–
Firefox 1.5 or greater required
• Mac:
–
Firefox 1.5 or greater required
Table 1-3 Cisco Video Portal Template and Cisco DMM 3.5 Client Requirements
Video Portal Template Required Browser Plug-ins Supported Browser Supported Codec
Flash Only Flash 7+ (Minimum) Flash 8 +
(Recommended)
Windows:
• Internet Explorer 6.0 or greater,
Mozilla 1.8 or greater, or Firefox
1.07 or greater (Recommended)
Linux/Unix:
• Mozilla 1.0 (Minimum) or
Firefox 1.5 (Minimum)
• Mozilla 1.8 or greater, or Firefox
1.07 or greater (Recommended)
Mac:
• Safari 2.0 (Minimum)
• Safari 2.0 or Firefox 1.5 or
greater (Recommended)
Flash 7+ Sorenson
Flash/Windows
Media
Flash 7+ and Windows Media 9+
(Minimum)
Flash 8+ and Windows Media 10+
(Recommended)
Windows:
• Internet Explorer 6.0 or greater,
Mozilla 1.8 or greater, or Firefox
1.5 or greater (Recommended)
Windows Media 9+
Flash/Real Player Flash 7+ and Real One+
(Minimum)
Flash 8+ and Real 10+
(Recommended)
Windows:
• Internet Explorer 6.0 or greater,
Mozilla 1.8 or greater, or Firefox
1.5 or greater (Recommended)
Linux/Unix:
• Mozilla 1.0 (Minimum) or
Firefox 1.0 (Minimum)
• Mozilla 1.8 or greater, or Firefox
1.5 or greater (Recommended)
Mac:
• Safari 2.0 (Minimum)
• Safari 2.0 or Firefox 1.5 or
greater (Recommended)
Real Player 8+
Page 17

1-5
Cisco Digital Media System 3.5 Appliance Administration Guide
OL-11574-02
Chapter 1 Introduction
About the Cisco Digital Media System
DMS 3.5 Setup Prerequisites
The following procedures must be completed before setting up a DMS Server Appliance:
1. Procure a separate computer and ensure that it will have network access to the DMS server
appliances.
2. On that computer, acquire the necessary client software according to the client requirements
specified for each application above.
3. Ensure Port 22 is not blocked between the Video Portal server appliance and the DMM server
appliance.
4. Ensure the DMM server appliance is not blocked on Port 8080 for authorized users.
5. Ensure that the Video Portal server appliance is not blocked on Port 80 for authorized users (Video
Portal) and Port 8080 for authorized users (Video Portal Reports).
Page 18

1-6
Cisco Digital Media System 3.5 Appliance Administration Guide
OL-11574-02
Chapter 1 Introduction
About the Cisco Digital Media System
Page 19

CHA P TER
2-1
Cisco Digital Media System 3.5 Appliance Administration Guide
OL-11574-02
2
Setting up the Video Portal
This chapter describes the procedure for setting up the Cisco Video Portal for the DMS 3.5 Server
Appliance as well as listing the requirements and prerequisites.
Setting up the Video Portal 3.5 Server Appliance
Before you begin to install and configure the Video Portal 3.5 Server Appliance, gather your network
configuration information: DHCP or Static (IP address, subnet mask, and gateway).
Step 1 Plug in the redundant power cables at the back of the server appliance.
Step 2 Plug in the network cable to Port 1 at the back of the server appliance.
Step 3 Connect the server appliance to a monitor using the VGA output in the back of the server appliance.
Step 4 Connect the server appliance to a standard PS2 keyboard using the purple PS2 port located in the back
of the server appliance.
Step 5 Power On the server appliance.
The First boot config tool screen automatically appears the first time you boot the Video Portal server
appliance and takes you to the DMS appliance administration interface (AAI).
Page 20
2-2
Cisco Digital Media System 3.5 Appliance Administration Guide
OL-11574-02
Chapter 2 Setting up the Video Portal
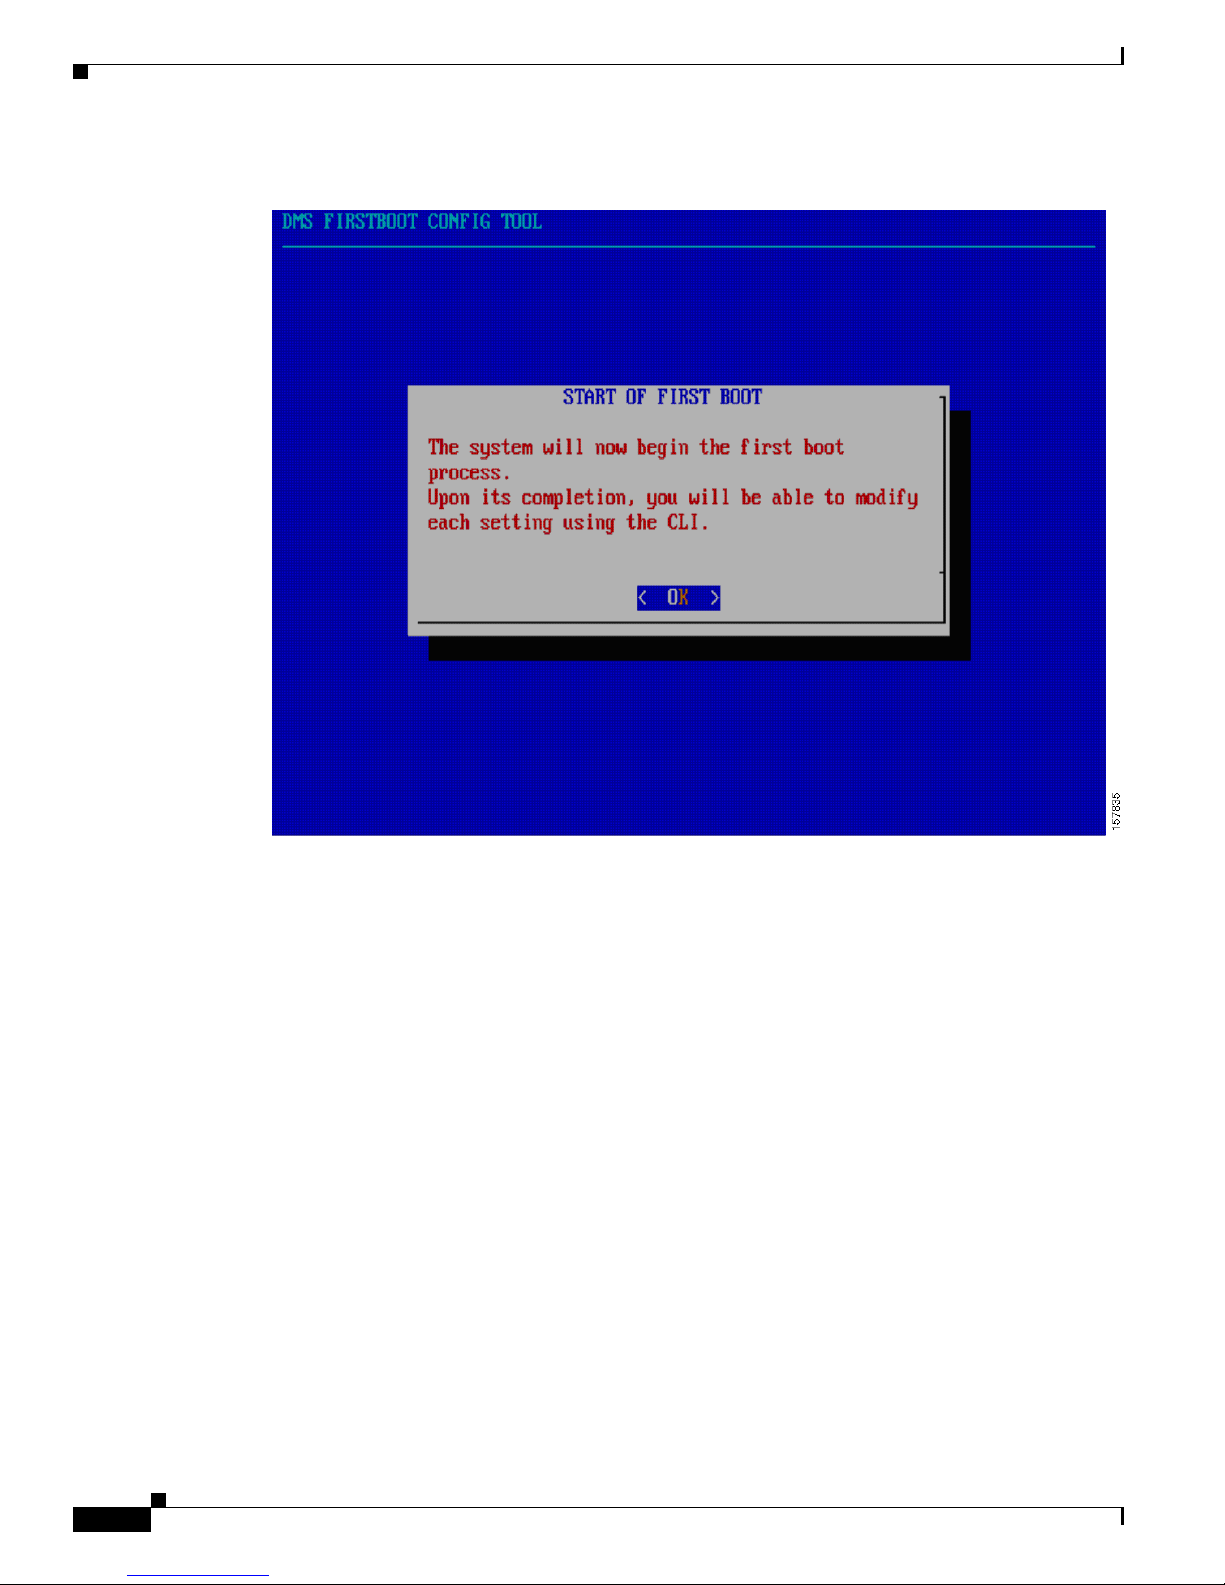
Step 6 Press Enter when you see this screen.
Page 21
2-3
Cisco Digital Media System 3.5 Appliance Administration Guide
OL-11574-02
Chapter 2 Setting up the Video Portal
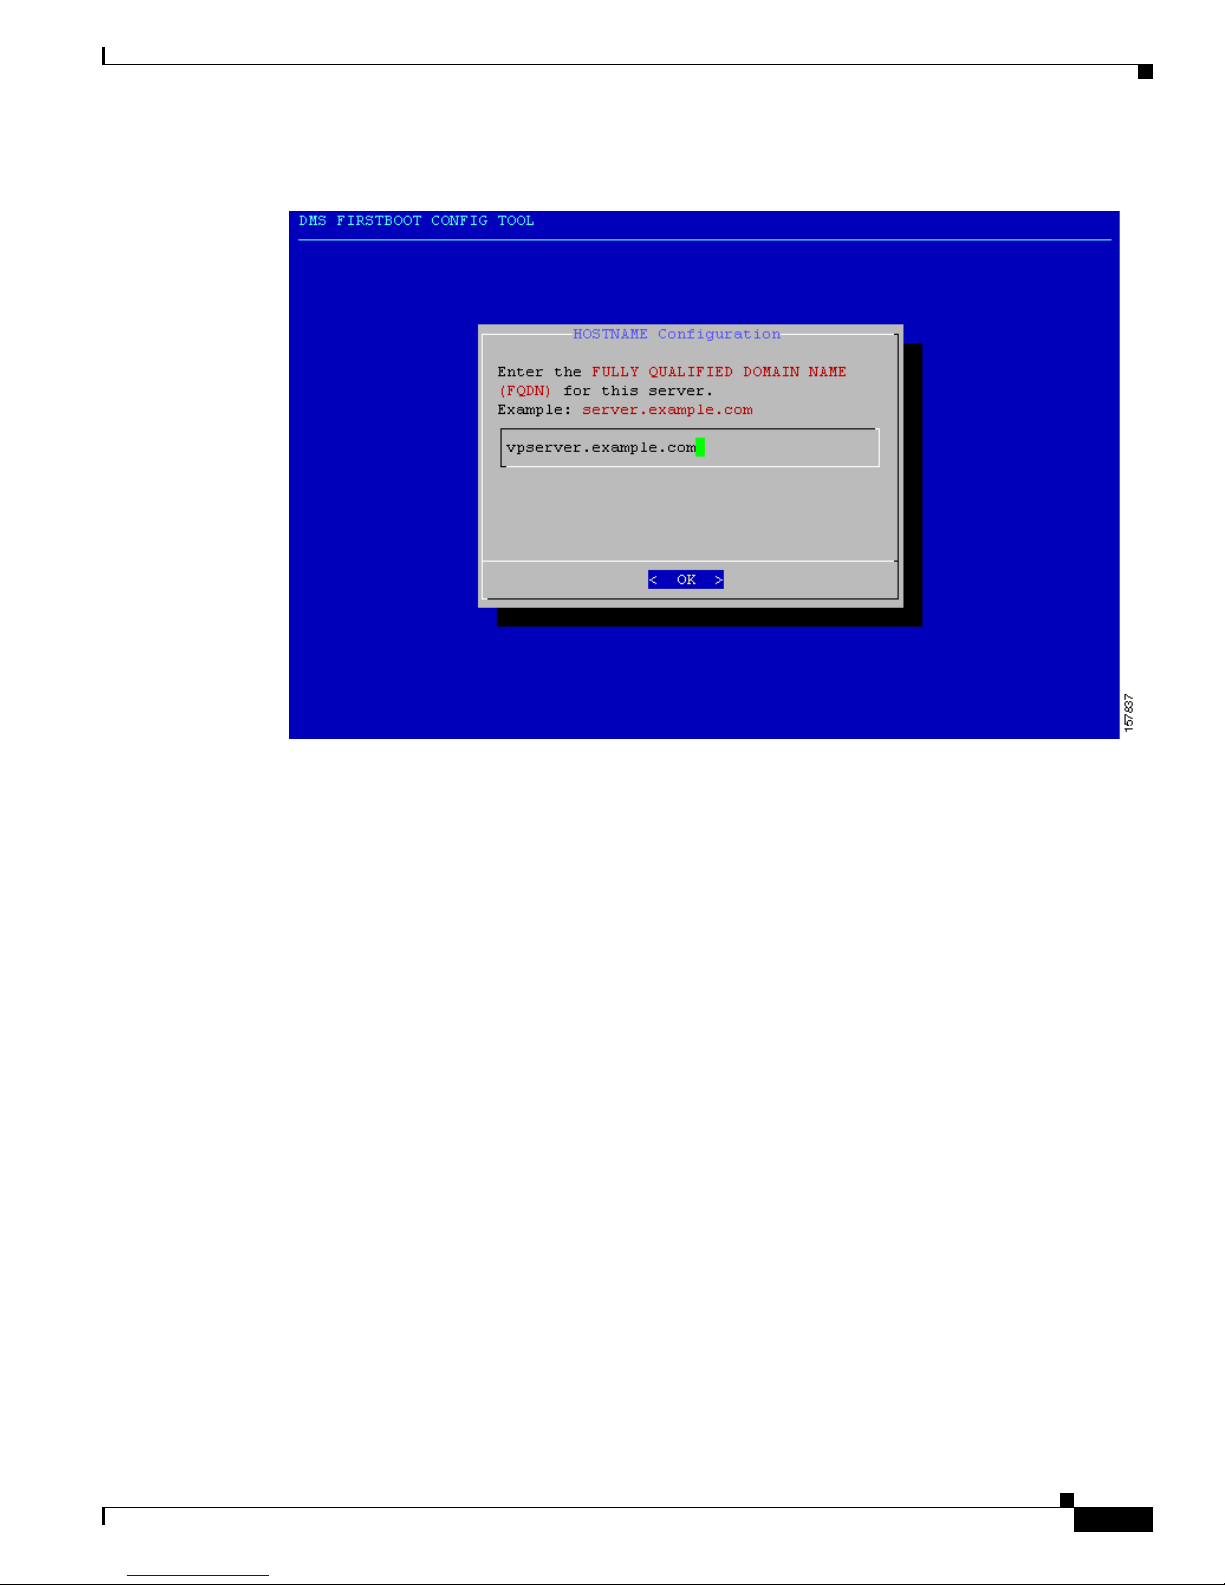
Step 7 Enter the appliance hostname in the HOSTNAME Configuration field and press Enter.
Page 22
2-4
Cisco Digital Media System 3.5 Appliance Administration Guide
OL-11574-02
Chapter 2 Setting up the Video Portal
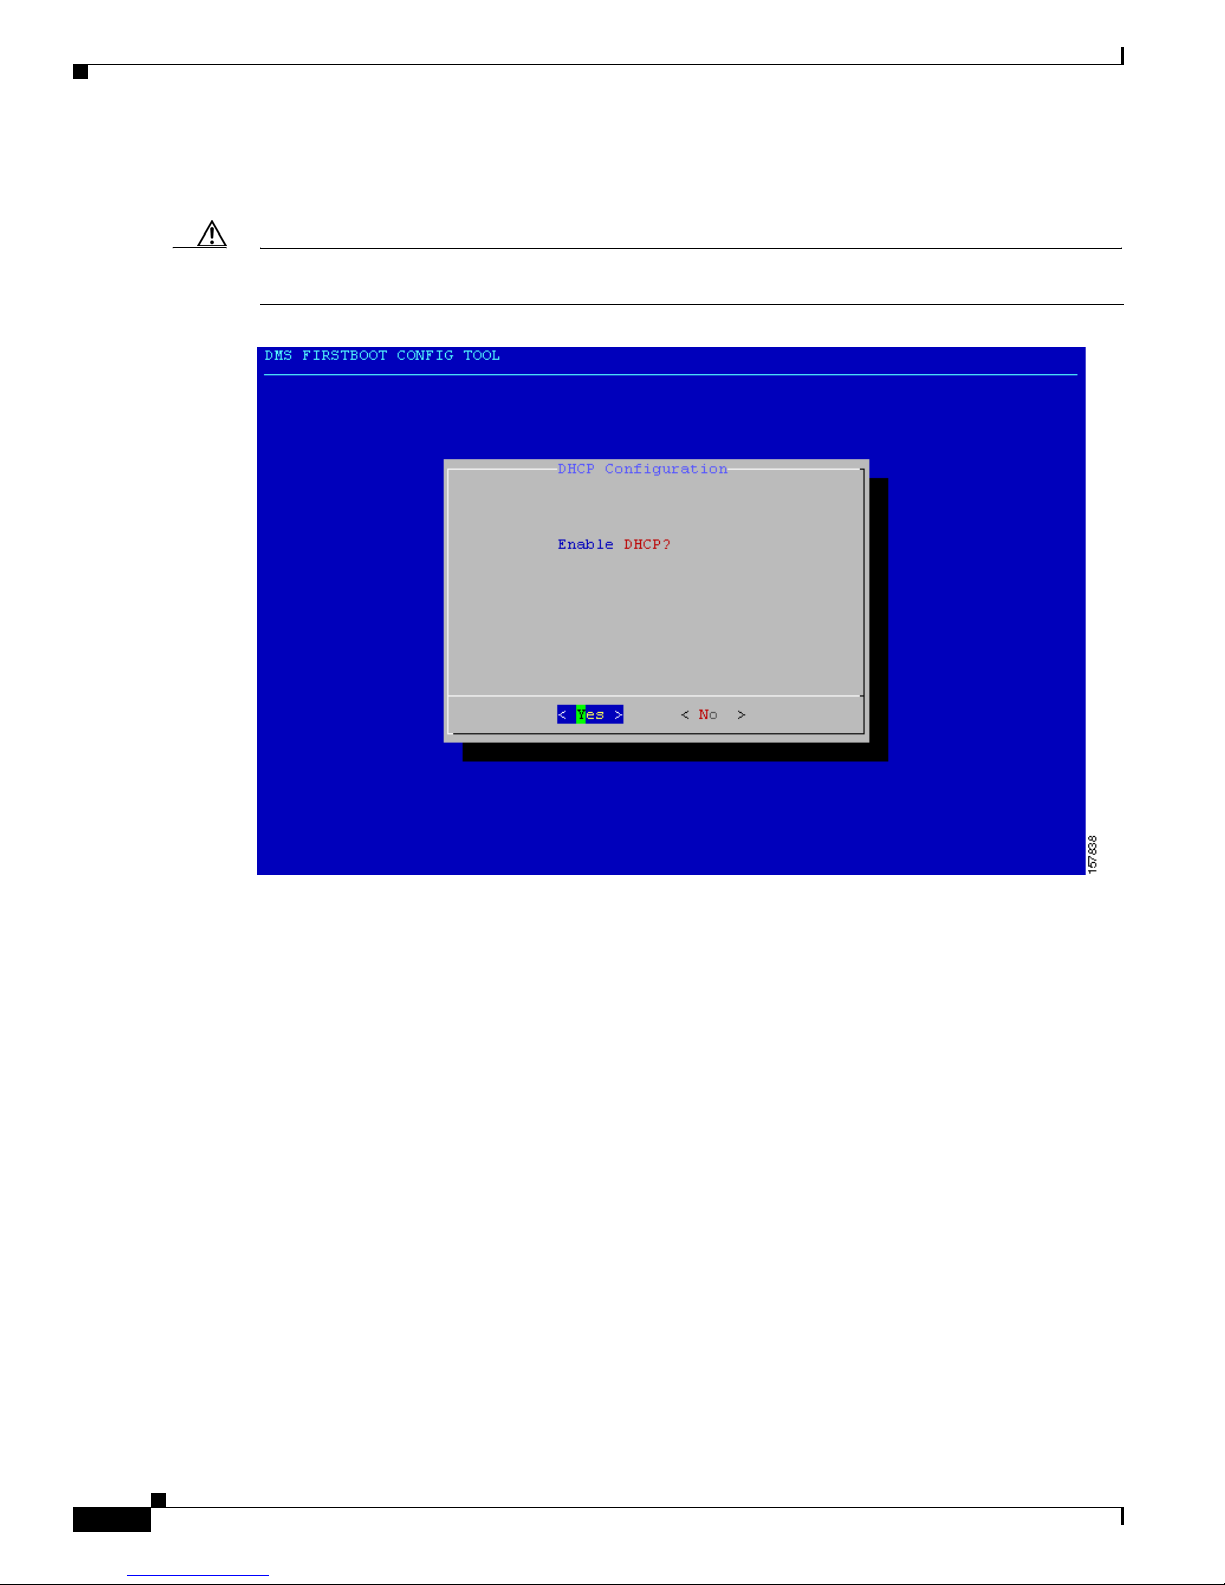
Step 8 The DHCP Configuration screen appears. If the server appliance gets the IP address automatically from
DHCP server, select Yes and press Enter; otherwise, select No and press Enter.
Caution DHCP is not recommended. If the IP address of the Video Portal server appliance expires, you must
reconfigure the DMM application for successful deployments.
Page 23
2-5
Cisco Digital Media System 3.5 Appliance Administration Guide
OL-11574-02
Chapter 2 Setting up the Video Portal
Step 9 If you selected DHCP, skip the following section and go to Time Zone configuration in Step 15. If DHCP
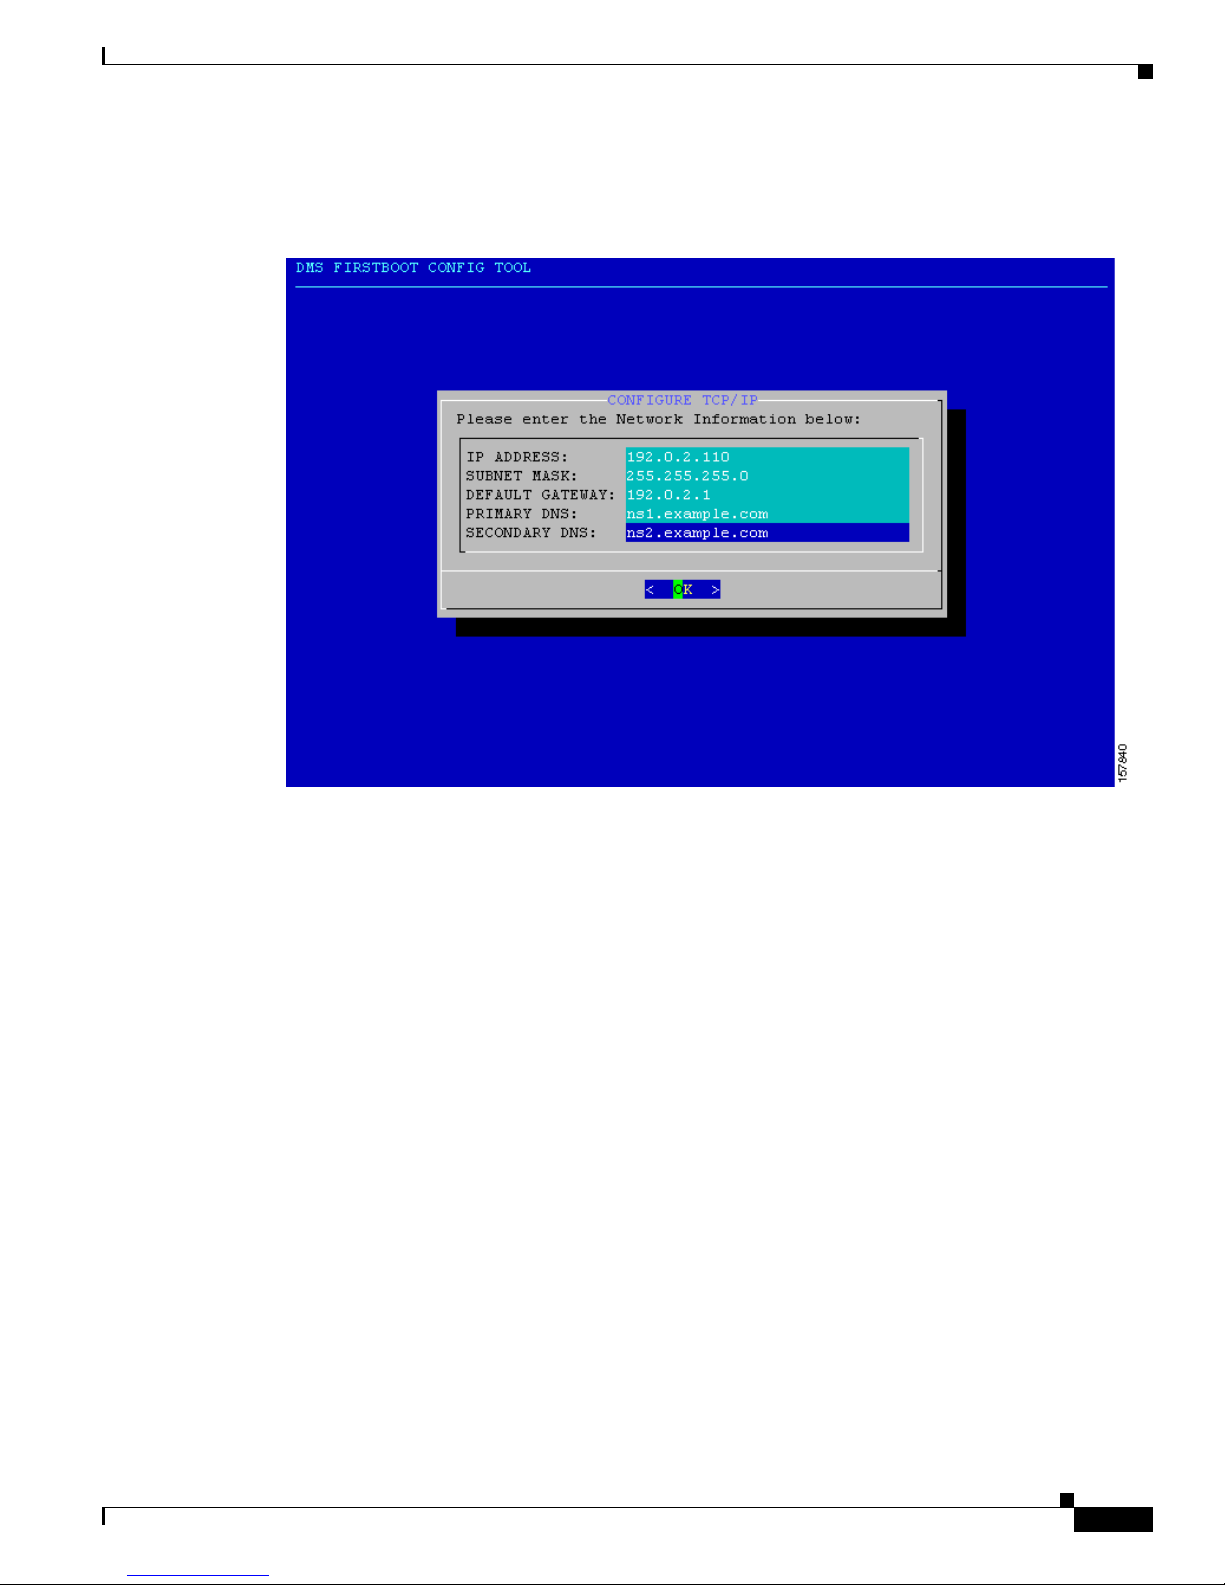
is not enabled, enter the IP address, subnetmask, default gateway, primary DNS and, if available, a
secondary DNS and press Enter.
Page 24

2-6
Cisco Digital Media System 3.5 Appliance Administration Guide
OL-11574-02
Chapter 2 Setting up the Video Portal
Step 10 Confirm the network settings. The example below reflects the sample configurations specified above.
Press Enter if all the information is correct. If it is incorrect, use the arrow keys to navigate to No and
press Enter.
Please standby until the network settings are applied.
Page 25
2-7
Cisco Digital Media System 3.5 Appliance Administration Guide
OL-11574-02
Chapter 2 Setting up the Video Portal
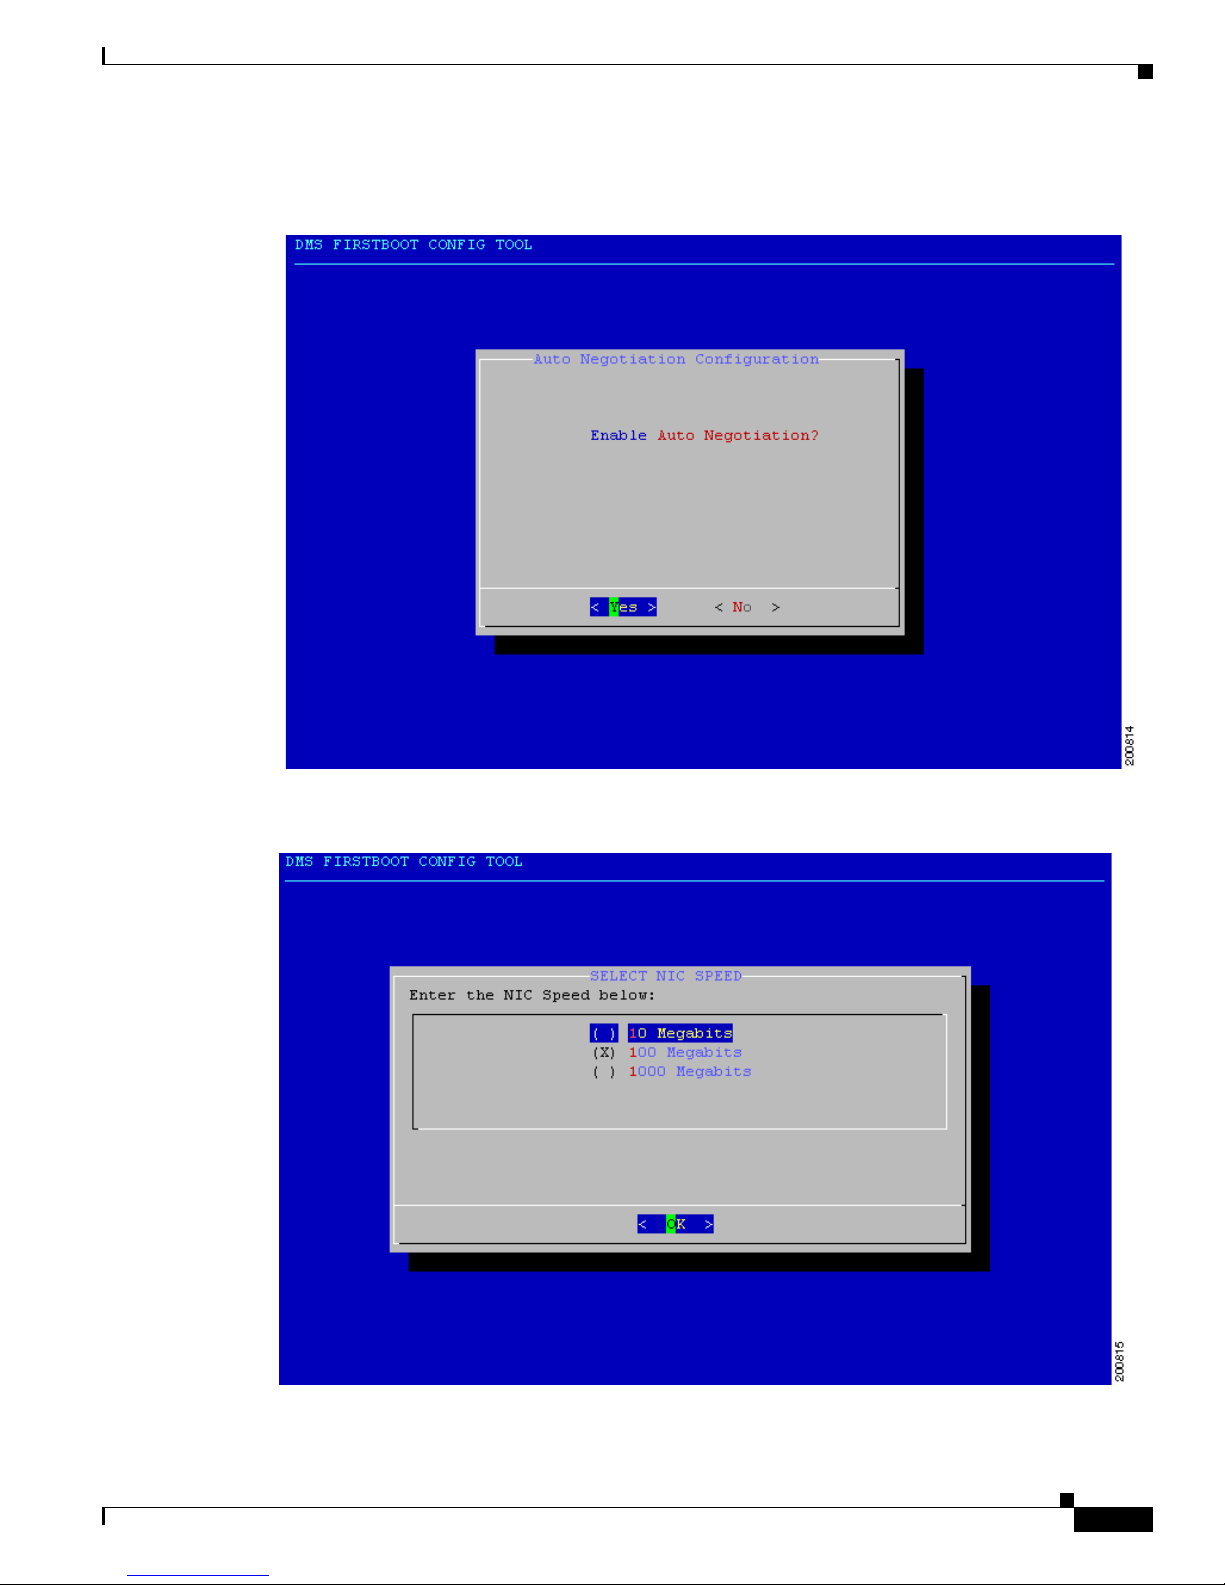
Step 11 Select No and press Enter to disable Auto Negotiation. Select Ye s and press Enter to enable Auto
Negotiation.
Step 12 If you turned on Auto Negotiation, go to Step 15. Set the NIC speed to 10, 100, or 1000Megabits.
Page 26
2-8
Cisco Digital Media System 3.5 Appliance Administration Guide
OL-11574-02
Chapter 2 Setting up the Video Portal
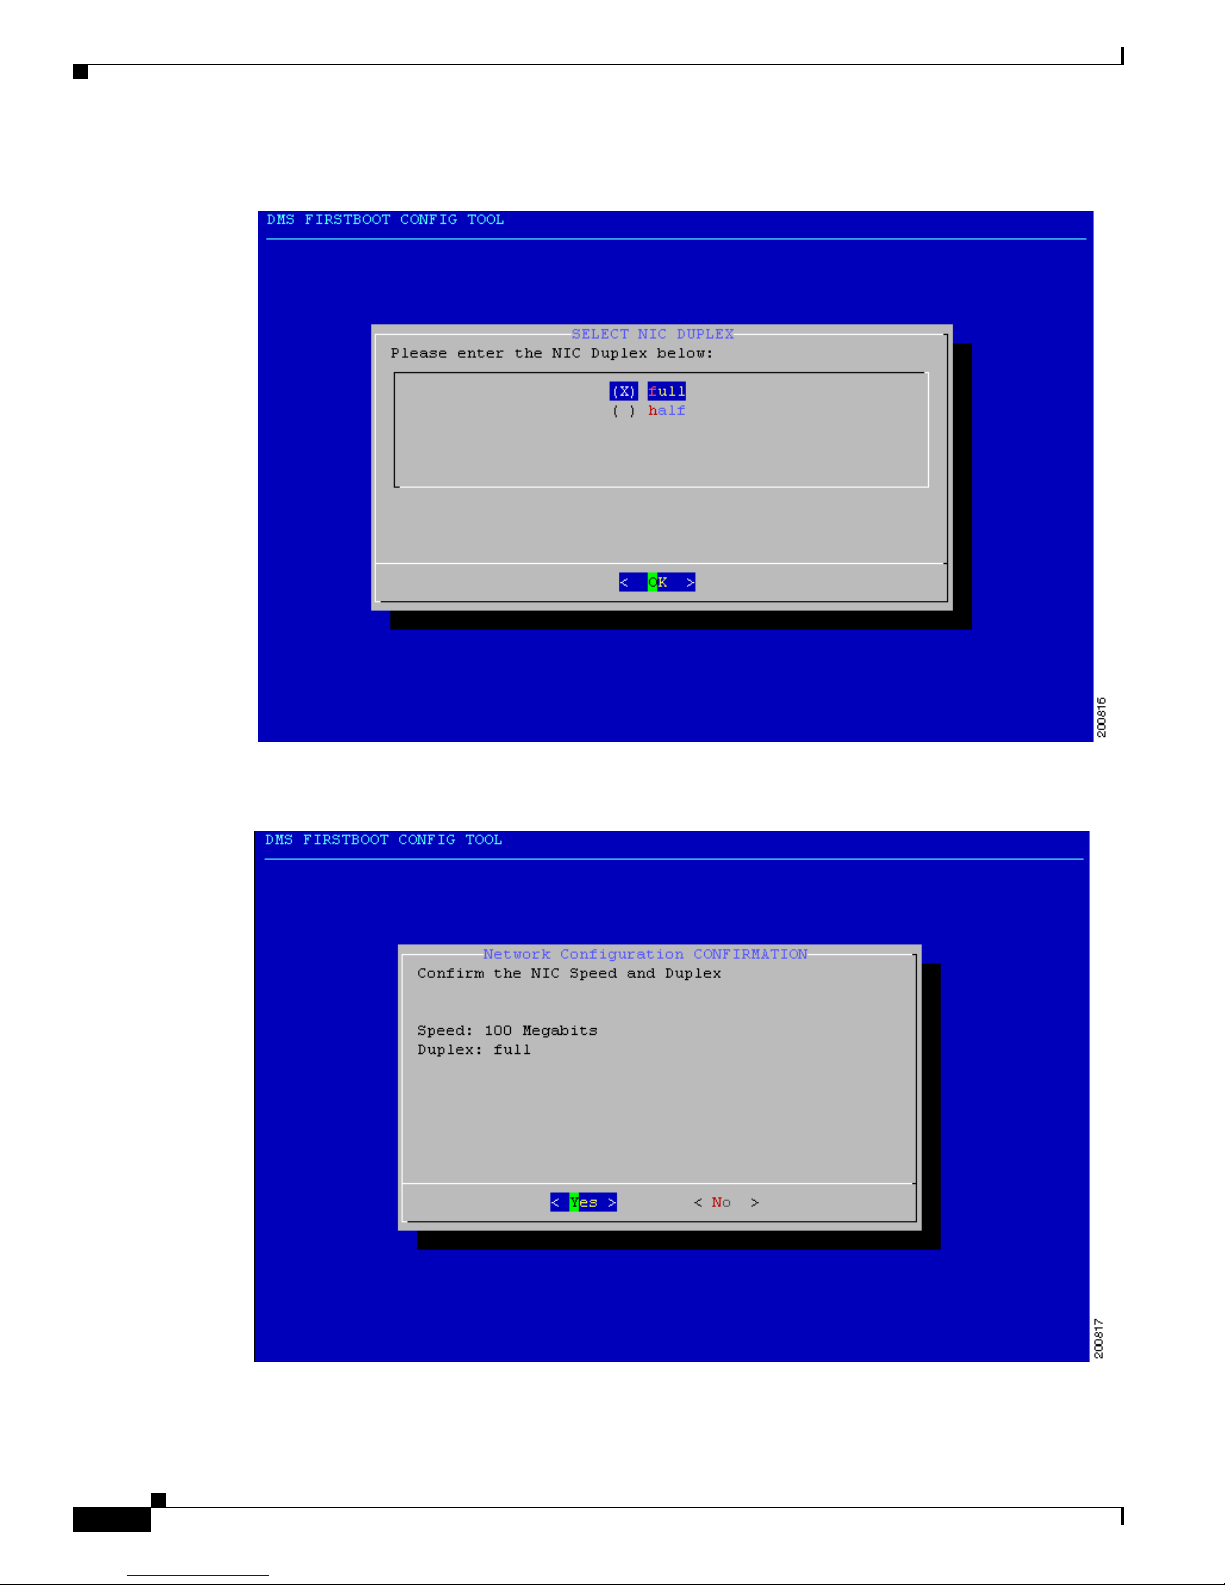
Step 13 Set your NIC to either full or half duplex.
Step 14 Confirm the NIC speed and duplex.
Page 27
2-9
Cisco Digital Media System 3.5 Appliance Administration Guide
OL-11574-02
Chapter 2 Setting up the Video Portal
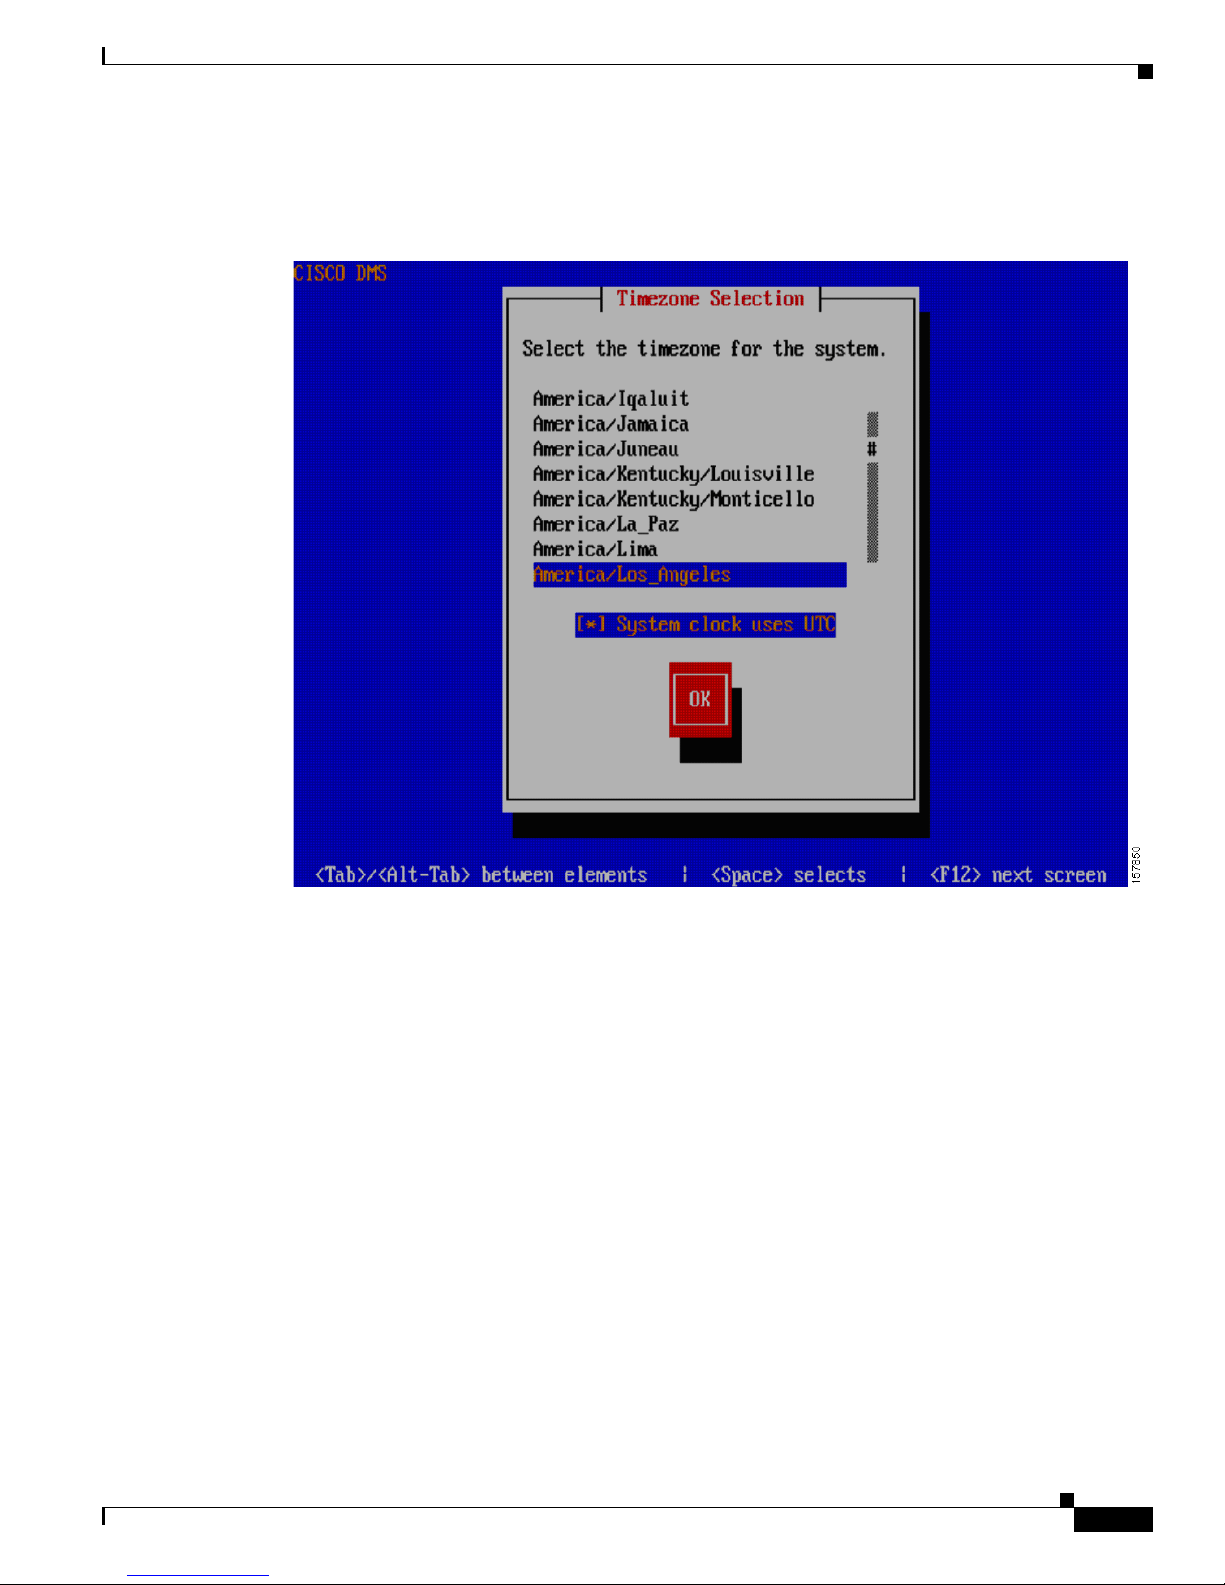
Step 15 At the Time Zone Selection screen, select the time zone by using the Up/Down arrow keys. Use the Tab
and press the Spacebar to select/deselect System clock uses UTC. Press the Tab again to navigate to the
OK button and press Enter.
Page 28

2-10
Cisco Digital Media System 3.5 Appliance Administration Guide
OL-11574-02
Chapter 2 Setting up the Video Portal
Step 16 Confirm the Time Zone. Press Enter if all the information is correct. If it is incorrect, use the arrow keys
to navigate to No and press Enter to reconfigure your settings.
Page 29
2-11
Cisco Digital Media System 3.5 Appliance Administration Guide
OL-11574-02
Chapter 2 Setting up the Video Portal
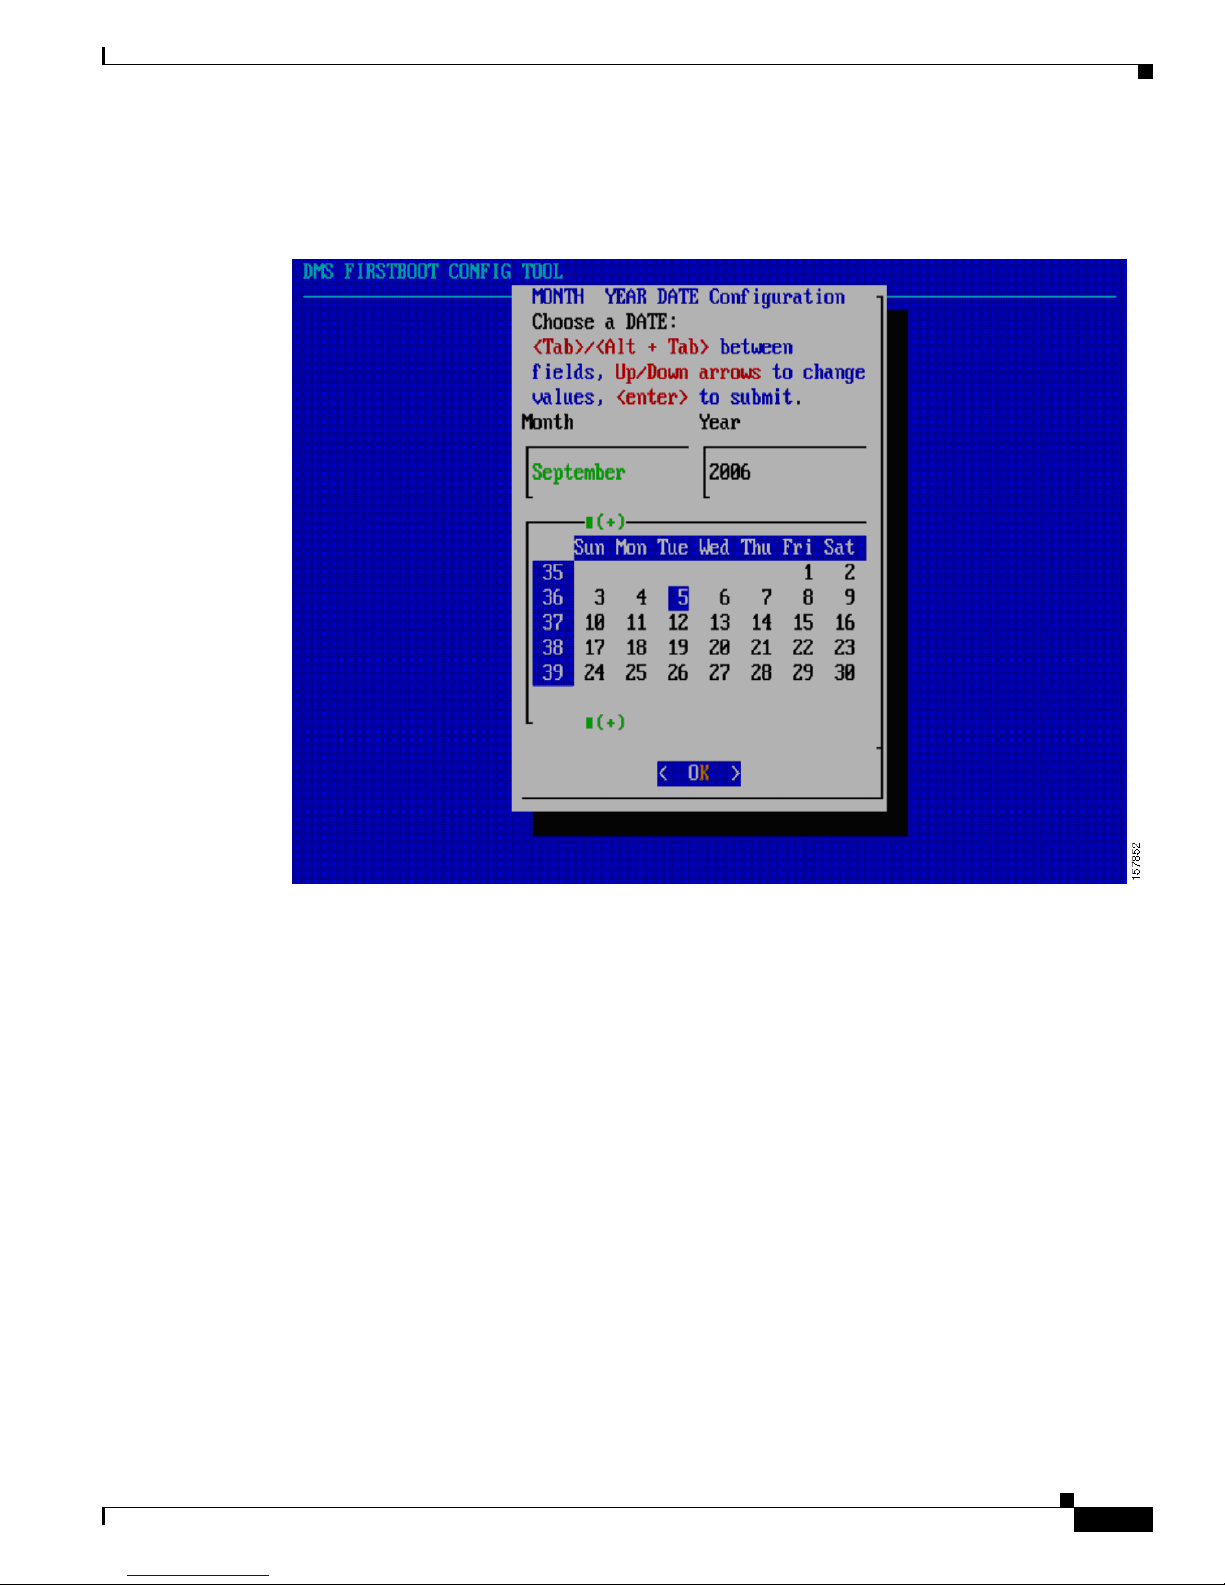
Step 17 Select the date and use the Ta b and Up/Down arrow keys to change the month and year. Tab and use
Up/Down and Left/Right arrow keys to select the day. Tab to the OK button and press Enter to submit
the changes.
Page 30
2-12
Cisco Digital Media System 3.5 Appliance Administration Guide
OL-11574-02
Chapter 2 Setting up the Video Portal
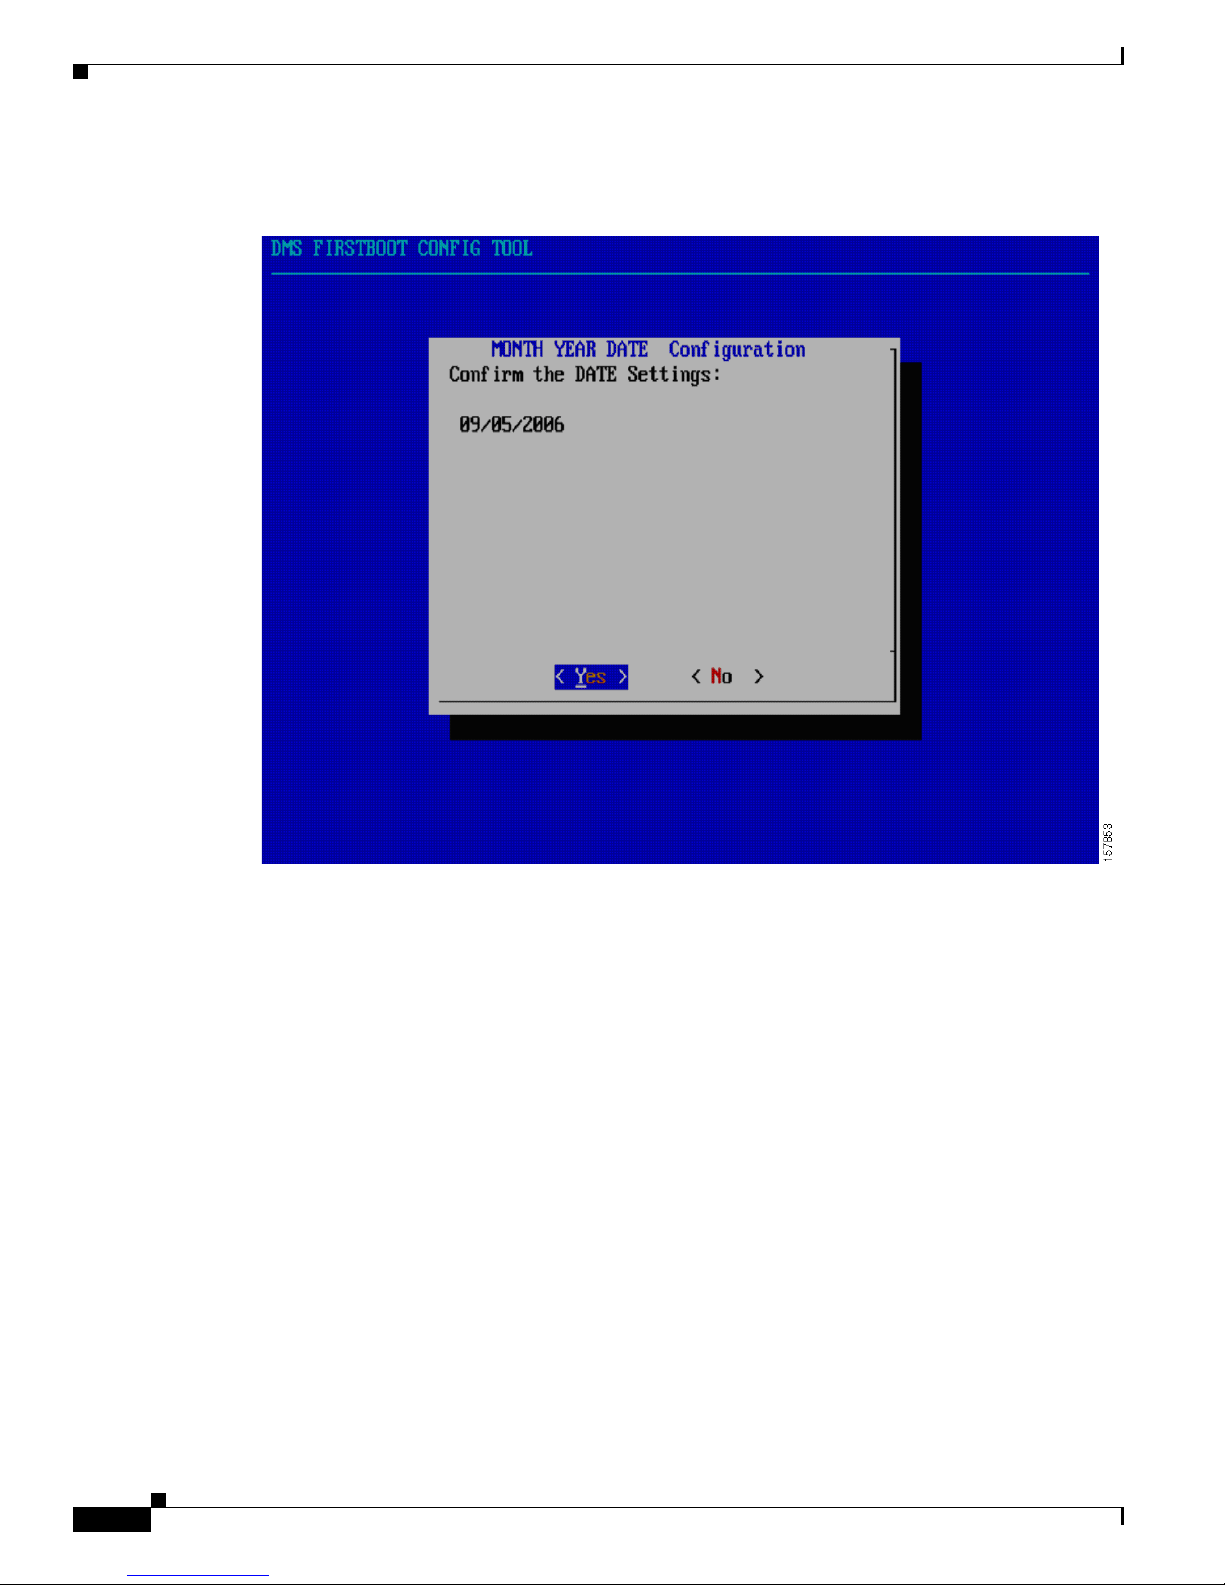
Step 18 Confirm the date. Press Enter if all the information is correct. If it is incorrect, use the arrow keys to
navigate to No and press Enter to reconfigure your settings.
Page 31

2-13
Cisco Digital Media System 3.5 Appliance Administration Guide
OL-11574-02
Chapter 2 Setting up the Video Portal
Step 19 Select the time in 24 hour format: Tab and use the Up/Down arrow keys to set the hour, minutes and
seconds. Tab to the OK button and press Enter to submit the changes.
Page 32

2-14
Cisco Digital Media System 3.5 Appliance Administration Guide
OL-11574-02
Chapter 2 Setting up the Video Portal
Step 20 Confirm the time. Press Enter if all the information is correct. If it is incorrect, use the arrow keys to
navigate to No and press Enter to reconfigure your settings.
Page 33

2-15
Cisco Digital Media System 3.5 Appliance Administration Guide
OL-11574-02
Chapter 2 Setting up the Video Portal
Step 21 Select the video portal supported formats. These are all the media formats your content will be encoded
in, hence the Video Portal template you will be supporting. By default, the Windows Media and Flash
Video is supported. Use the Up/Down arrow keys to highlight the media format, use the Spacebar to
select/deselect and press Enter to submit the changes.
Page 34

2-16
Cisco Digital Media System 3.5 Appliance Administration Guide
OL-11574-02
Chapter 2 Setting up the Video Portal
Step 22 If you selected two or more media formats to support, you will be prompted to select the primary media
format supported by the Video Portal. If a client machine accessing the Video Portal meets the
requirements of all of the media formats you chose to support, highlight the media type you prefer them
to receive by using the Up/Down arrow keys and press Enter.
Page 35

2-17
Cisco Digital Media System 3.5 Appliance Administration Guide
OL-11574-02
Chapter 2 Setting up the Video Portal
Step 23 If you selected three or more media types to support, you will be prompted to select the tertiary media
format supported by the Video Portal. If a client machine accessing the Video Portal does not meet the
requirements for the primary media type but meets the requirements for the two other types of supported
media, highlight the media format you would prefer them to receive by using the up and down arrows,
then press Enter.
Page 36

2-18
Cisco Digital Media System 3.5 Appliance Administration Guide
OL-11574-02
Chapter 2 Setting up the Video Portal
Step 24 If you select four or more media types to support, you are prompted with the following screen. Select
the tertiary media format supported by the Video Portal. If a client machine accessing the Video Portal
does not meet the requirements for the primary media type but meets the requirements for the two other
types of supported media, highlight the media format you would prefer them to receive by using the up
and down arrows, then press Enter.
Page 37

2-19
Cisco Digital Media System 3.5 Appliance Administration Guide
OL-11574-02
Chapter 2 Setting up the Video Portal
Step 25 The preferred media format order is now displayed for your information. Press Enter to submit the
changes.
Step 26 Enter the Video Portal instance name in the Video Portal Instance Name field Press Enter. This is used
to generate a direct URL for to the Video Portal.
Page 38

2-20
Cisco Digital Media System 3.5 Appliance Administration Guide
OL-11574-02
Chapter 2 Setting up the Video Portal
Step 27 The instance name now appears on the screen. Press Enter to confirm the name and continue. If you
made an error, you can go back into the AAI after the first boot process to modify these settings.
Page 39

2-21
Cisco Digital Media System 3.5 Appliance Administration Guide
OL-11574-02
Chapter 2 Setting up the Video Portal
Step 28 Set the password for admin user and press Enter. This user account is the default administrator account
for this server appliance. Your password cannot be null. The password should be at least six (6)
characters long.
Page 40

2-22
Cisco Digital Media System 3.5 Appliance Administration Guide
OL-11574-02
Chapter 2 Setting up the Video Portal
Step 29 Confirm the password for admin user.
Step 30 Press Enter to confirm the admin user password at the password confirmation screen.
Page 41

2-23
Cisco Digital Media System 3.5 Appliance Administration Guide
OL-11574-02
Chapter 2 Setting up the Video Portal
Step 31 Set the password for pwadmin user. The password admin account allows you to reset your admin user
password if you were to forget it. The password cannot be null. The password should be at least six (6)
characters long.
Page 42

2-24
Cisco Digital Media System 3.5 Appliance Administration Guide
OL-11574-02
Chapter 2 Setting up the Video Portal
Step 32 Press Enter to confirm the pwadmin user password at the password confirmation screen.
Step 33 You will receive confirmation of your pwadmin password change. Press Enter to continue.
Page 43

2-25
Cisco Digital Media System 3.5 Appliance Administration Guide
OL-11574-02
Chapter 2 Setting up the Video Portal
You will see the following screen indicating the end of the first boot.
Page 44

2-26
Cisco Digital Media System 3.5 Appliance Administration Guide
OL-11574-02
Chapter 2 Setting up the Video Portal
The Cisco DMS login screen appears. You can now login using the AAI by using the admin username
and new password, or to the pwadmin AAI by using the pwadmin username and new password.
Page 45

CHA P TER
3-1
Cisco Digital Media System 3.5 Appliance Administration Guide
OL-11574-02
3
Installing and Configuring the Cisco Digital
Media Manager 3.5 Appliance
Installing the Cisco Digital Media Manager 3.5 Appliance
Before you begin to install the Digital Media Manager (DMM) 3.5 Server Appliance, gather your
network configuration information: DHCP or Static (IP address, subnet mask, and gateway).
Step 1 Plug in the redundant power cables at the back of the server appliance.
Step 2 Plug in the network cable to the port 1 at the back of the server appliance.
Step 3 Connect the server appliance to a monitor using the VGA output in the back of the server appliance.
Step 4 Connect the server appliance to a standard PS2 keyboard using the purple PS2 port located in the back
of the server appliance.
Step 5 Power On the server appliance.
Page 46

3-2
Cisco Digital Media System 3.5 Appliance Administration Guide
OL-11574-02
Chapter 3 Installing and Configuring the Cisco Digital Media Manager 3.5 Appliance
Step 6 The first boot config tool starts automatically the first time you boot the DMM server appliance, taking
you into the DMS appliance administration interface (AAI). Press Enter when you see the screen below.
Step 7 Enter the appliance hostname in the HOSTNAME Configuration field and press Enter.
Page 47

3-3
Cisco Digital Media System 3.5 Appliance Administration Guide
OL-11574-02
Chapter 3 Installing and Configuring the Cisco Digital Media Manager 3.5 Appliance
Step 8 The DHCP configuration screen follows. If the server appliance gets the IP address automatically from
the DHCP server, select Yes .
Caution DHCP is not recommended. If the IP address of the Video Portal server appliance expires, you must
reconfigure the DMM application for successful deployments.
Page 48

3-4
Cisco Digital Media System 3.5 Appliance Administration Guide
OL-11574-02
Chapter 3 Installing and Configuring the Cisco Digital Media Manager 3.5 Appliance
Step 9 If DHCP is selected, skip the following section and go to the Time Zone configuration in Step 15. If
DHCP is not enabled, enter the IP address, subnetmask, default gateway, primary dns and, if available,
a secondary dns.
Page 49

3-5
Cisco Digital Media System 3.5 Appliance Administration Guide
OL-11574-02
Chapter 3 Installing and Configuring the Cisco Digital Media Manager 3.5 Appliance
Step 10 Confirm the network settings. The example below reflects the sample configurations specified above.
Press Enter if all the information is correct. If it is incorrect, use the arrow keys to navigate to No and
press Enter.
Please standby until the network settings are applied.
Page 50

3-6
Cisco Digital Media System 3.5 Appliance Administration Guide
OL-11574-02
Chapter 3 Installing and Configuring the Cisco Digital Media Manager 3.5 Appliance
Step 11 If your network infrastructure requires you to manually specify network negotiation settings, select No
and press Enter.
Step 12 If you turned on Auto Negotiation, go to Step 15. Set the NIC speed to 10, 100, or 1000Megabits.
Page 51

3-7
Cisco Digital Media System 3.5 Appliance Administration Guide
OL-11574-02
Chapter 3 Installing and Configuring the Cisco Digital Media Manager 3.5 Appliance
Step 13 Set your NIC to either full or half duplex.
Step 14 Confirm the NIC speed and duplex.
Page 52

3-8
Cisco Digital Media System 3.5 Appliance Administration Guide
OL-11574-02
Chapter 3 Installing and Configuring the Cisco Digital Media Manager 3.5 Appliance
Step 15 At the Time Zone Selection screen, select the time zone by using the Up/Down arrow keys. Use the Ta b
and press the Spacebar to select/deselect System clock uses UTC. Press the Tab again to navigate to
the OK button and press Enter.
Page 53

3-9
Cisco Digital Media System 3.5 Appliance Administration Guide
OL-11574-02
Chapter 3 Installing and Configuring the Cisco Digital Media Manager 3.5 Appliance
Step 16 Confirm the Time Zone. Press Enter if all the information is correct. If it is incorrect, use the arrow keys
to navigate to No and press Enter to reconfigure your settings.
Page 54

3-10
Cisco Digital Media System 3.5 Appliance Administration Guide
OL-11574-02
Chapter 3 Installing and Configuring the Cisco Digital Media Manager 3.5 Appliance
Step 17 Select the date. Ta b and use the Up/Down arrow keys to change the month and year. Ta b and use the
Up/Down and Left/Right arrow keys to select the day. Ta b to the OK button and press Enter to submit.
Page 55

3-11
Cisco Digital Media System 3.5 Appliance Administration Guide
OL-11574-02
Chapter 3 Installing and Configuring the Cisco Digital Media Manager 3.5 Appliance
Step 18 Confirm the date. Press Enter if all the information is correct. If it is incorrect, use the arrow keys to
navigate to No and press Enter to reconfigure your settings.
Page 56

3-12
Cisco Digital Media System 3.5 Appliance Administration Guide
OL-11574-02
Chapter 3 Installing and Configuring the Cisco Digital Media Manager 3.5 Appliance
Step 19 Select the time in 24 hour format. Tab and use Up/Down arrow keys to set the hour, minutes, and
seconds. Tab to the OK button and press Enter to submit.
Page 57

3-13
Cisco Digital Media System 3.5 Appliance Administration Guide
OL-11574-02
Chapter 3 Installing and Configuring the Cisco Digital Media Manager 3.5 Appliance
Step 20 Confirm the time. Press Enter if all the information is correct. If it is incorrect, use the arrow keys to
navigate to No and press Enter to reconfigure your settings.
Page 58

3-14
Cisco Digital Media System 3.5 Appliance Administration Guide
OL-11574-02
Chapter 3 Installing and Configuring the Cisco Digital Media Manager 3.5 Appliance
Step 21 Enter the password for admin user and press Enter. This user account is the default administrator
account for this server appliance. Your password cannot be null and must be at least 6characters long.
Step 22 Confirm the password for admin user by pressing Enter.
Page 59

3-15
Cisco Digital Media System 3.5 Appliance Administration Guide
OL-11574-02
Chapter 3 Installing and Configuring the Cisco Digital Media Manager 3.5 Appliance
Step 23 You will receive confirmation of your admin password change. Press Enter to continue.
Step 24 Set the password for pwadmin user and press Enter. The password admin account allows you to reset
your admin user password if you were to forget it. The password cannot be null and must be at least
6characters long.
Page 60

3-16
Cisco Digital Media System 3.5 Appliance Administration Guide
OL-11574-02
Chapter 3 Installing and Configuring the Cisco Digital Media Manager 3.5 Appliance
Step 25 Confirm the password for pwadmin user by pressing Enter.
Step 26 You will receive confirmation of your pwadmin password change. Press Enter to continue.
Page 61

3-17
Cisco Digital Media System 3.5 Appliance Administration Guide
OL-11574-02
Chapter 3 Installing and Configuring the Cisco Digital Media Manager 3.5 Appliance
You will see the following screen indicating the end of the first boot.
Page 62

3-18
Cisco Digital Media System 3.5 Appliance Administration Guide
OL-11574-02
Chapter 3 Installing and Configuring the Cisco Digital Media Manager 3.5 Appliance
Step 27 You can now login using the AAI by using the admin username and new password, or to the pwadmin
AAI by using the pwadmin username and new password.
Configuring the Cisco Digital Media Manager (DMM) 3.5
Before you begin to install and configure the Digital Media Manager (DMM) 3.5 Server Appliance, you
will need the following information:
• Gather Video Portal information:
–
Login to the Video Portal AAI using the username admin.
–
Take note of the Video Portal IP Address displayed on the home page.
–
Take note of the Video Portal instance name displayed on the home page.
• Gather Digital Media Manager information:
–
Login to the Digital Media Manager AAI using the username admin.
–
Take note of the Digital Media Manager URL displayed on the home page.
Page 63

3-19
Cisco Digital Media System 3.5 Appliance Administration Guide
OL-11574-02
Chapter 3 Installing and Configuring the Cisco Digital Media Manager 3.5 Appliance
Perform the following steps to configure the DMM:
Step 1 In your browser, enter the Digital Media Manager URL:
http://<DMM_IPAddress>:8080/DMM/
The DMM Installation Configuration screen appears.
Step 2 Superuser Email field—Enter an email address for the user who is the DMM superuser.
Step 3 Superuser Password field—Enter a password for the superuser.
Step 4 Superuser Password Confirm field—Confirm the password you entered in the superuser password
field.
The password must meet the following conditions:
• Be at least 6 characters long.
• Use mixed case (upper and lower).
• Contain at least one numerical digit.
Step 5 Server Base URL for DMM Application Server—The DMM will pre-populate this field with the path
in which it was installed. Verify this URL and modify if it is incorrect.
Step 6 Software License Key—Enter your DMM software license key and validate it by clicking on the orange
Validate button.
Note To use the Cisco DMS Software, you must activate the software license on the device by entering
the software key when prompted. To obtain the license key:
Contact the technical support team trained to support DMS products at:
dms-softwarekeys@cisco.com.
Or
If a CD shipped with your Cisco hardware device, it may contain the required license file and
instructions for activating the license on your device.
Page 64

3-20
Cisco Digital Media System 3.5 Appliance Administration Guide
OL-11574-02
Chapter 3 Installing and Configuring the Cisco Digital Media Manager 3.5 Appliance
Step 7 IP or fully qualified domain name—This is the IP address that shows up on the Video Portal AAI in
blue right next to the red IP.
Step 8 Installed Instance Name—This is the instance name that shows up on the Video Portal AAI in blue right
next to the red Instance.
Step 9 Click Proceed with DMM Installation and wait while the DMM database tables are created. Once the
database is complete, the next page will confirm and summarize the database creation results.
Step 10 Verify that your installation was successful by clicking on the link entitled “launching the Cisco Video
Portal link.” This will launch the plugin detector page of the Video Portal (in your production
environment), subsequently launching the Video Portal itself.
Step 11 Return to the DMM window and click Logout located in the upper right-hand corner. Log into DMM
using the password you just created for the superuser account to verify:
Username:superuser
Password:<yournewpassword>
Once you are logged in to the DMM, perform the following steps to establish your DMM configuration
settings:
Step 1 Click on the Setup tab in the DMM’s navigation bar. You will be directed to the DMM sub-tab.
Step 2 Modify the following Global Variables:
a. Application Administrator Contact Email—The mailto email address to which users of this
application send help requests.
b. Deployment Email Reply To—The reply to email address for all Deployment Notification emails
(when DMM users want to reply to the automated deployment notification emails).
c. Deployment CC Email Recipient—The CC email address for all Deployment Notification emails.
d. Password Retrieval Email—The email address to which users will send a password retrieval
request.
e. Metadata Checkout Duration—The time, in minutes, for which metadata gets locked by a user
while another user is editing it.
Page 65

3-21
Cisco Digital Media System 3.5 Appliance Administration Guide
OL-11574-02
Chapter 3 Installing and Configuring the Cisco Digital Media Manager 3.5 Appliance
f. Scheduled Deployment Interval—The interval, in minutes, at which the Digital Media Manager
checks to see if a scheduled deployment needs to be processed. This applies to scheduled future
deployments. Immediate deployments occur instantly.
g. Default Content Provider—This is the default Content Provider name assigned to a Program when
a new Program is created.
h. E-mail Server—The DMM generates automatic deployment and approval emails that require
notifications that require an SMTP mail server. Enter your mail server's domain.
i. Application Server Base—The base domain of the URL to your application server hosting the
Digital Media Manager.
j. Upload URL—The absolute URL to the temporary upload directory for binary assets (maps to
variable #11) where uploaded files can be accessed in the browser.
k. Upload Path on Local File System—The local file system path to the temporary upload directory
for binary assets (maps to variable #10) required to specify where all uploaded files will reside on
the DMM's server.
l. Preview URL—The absolute URL to the temporary staging directory for storing binary assets
(maps to variable #13) required to enable the DMM's preview function.
m. Preview Path on Local File System—The local file system path for storing files to be previewed
in the Preview Digital Media. This path can be the same as variable #11.
Step 3 Click Save Configuration Parameters to commit your settings.
Page 66

3-22
Cisco Digital Media System 3.5 Appliance Administration Guide
OL-11574-02
Chapter 3 Installing and Configuring the Cisco Digital Media Manager 3.5 Appliance
Step 4 Specify the appropriate Video Portal configuration settings.
Step 5 Click the Video Portal sub-tab.
Step 6 Modify the following Video Portal settings:
a. Video Portal Server Base—The base domain of the URL to your server hosting the Video Portal.
b. The URL to the live video portal—The URL to the video portal instance.
c. Default Audio Only Image (400x300 pixels)—The default image that is displayed globally for any
content offering that does not have its own when a piece of content is an audio file. This only applies
to the Flash version of the Digital Media.
Note Ensure that the file being referenced resides in the path specified in the Upload Path on File
System in the Global Variables, variable #11.
Note The JPG format must be non-progressive JPG.
Page 67

3-23
Cisco Digital Media System 3.5 Appliance Administration Guide
OL-11574-02
Chapter 3 Installing and Configuring the Cisco Digital Media Manager 3.5 Appliance
d. Default Preview Image (100x75 pixels)—The default image that is displayed globally for any
content offering that does not have its own preview animation or image.
Note The JPG format must be non-progressive JPG.
e. Supported Media Types—Determine which formats will be available for the content offerings in
the Video Portal. Check off all applicable options (Flash, Windows Media, and Real).
f. The Default Preview Format—Determines which version of the Video Portal (Flash, Windows
Media, or Real) and consequently, the content format gets displayed in the DMM's preview function.
Select the appropriate format. There can be only one chosen preview format at any given time.
Note These formats must match those set in the Video Portal Supported Media Formats in the Video
Portal AII.
g. Click Save Portal Parameters to commit all your Video Portal settings.
Step 7 Specify the appropriate Deployment Locations for all file types.
a. From the Configuration Manager module, select the Deployment Locations sub-tab or locate the
“Deploy Locations” page in your browser at
http://<DMM_AppServer:8080>/DMM/DeploymentLocations.jsp.
The file types are defined as follows:
• Flash Video Files: All Flash Video files (in the form of .flv) that serve as the Flash Video
alternative of a video offering, and all files specified as the video preview (in the form of .swf
or non-progressive .jpg).
• Windows Media Video Files—All Windows Media video files (in the form of .wmv) that serve
as the Windows Media alternative of a video offering.
• Real Video Files—Real Player files (in the form of .rm) that serve as the Real Player alternative
for a video offering.
• Support Files—All non-video binary files that serve as supporting images (in the form of .swf
or non-progressive .jpg).
• Video Portal Metadata Files—Contains information pertinent to the video portal appliance,
should be setup as sftp with the password of the Video Portal admin user set in the Video Portal
AAI.
Note You must populate all media format types with a valid Root File Directory and valid Root URL path in
order to successfully deploy files of any type. You cannot change the connection type login name and
root file directory for Video Portal Metadata Files.
Step 8 For each file type listed above specify the location to which the files will be deployed. You have the
option to deploy files to the local server or to a remote location.
a. Select a Connection Type—LOCAL, FTP, SFTP, or SCP.
Local deployments will deploy files to the local server. FTP, SFTP, or SCP deployments will transfer
files to a remote server.
b. If the Connection Type is FTP, SFTP, or SCP enter the following additional information:
Page 68

3-24
Cisco Digital Media System 3.5 Appliance Administration Guide
OL-11574-02
Chapter 3 Installing and Configuring the Cisco Digital Media Manager 3.5 Appliance
• Enter the IP Address—The address or Hostname of the remote destination server where the
files will be deployed to.
• Enter the Login Name—The login name to use for logging into the destination server through
FTP, SFTP, or SCP.
• Enter the Login Password—The password used to log in to the destination server for the login
name specified earlier.
c. Enter the Root File Directory—The absolute directory path to where the files will be deployed to.
d. Enter the Root URL Path—Absolute URL that maps to where the files will be hosted and
referenced by the Video Portal and select the Deployment.
Step 9 Click Save Deployment Locations for all File Types.
Step 10 Test the deployment:
a. Select the DMM’s Video Portal tab.
b. Click the Schedule New Deployment link.
c. Under the Video Part Selection section (section #1), select the check box for the Program > Video
> Video Part entitled Cisco Digital Media System > Powerful Tools for Media Delivery > Part 1.
d. Under the Deployment Time section (section #4), click on the Schedule Immediately button to
deploy the pre-loaded content and metadata immediately.
e. Click Create Deployment to deploy the content.
Note You must have popup blockers disabled.
f. Access the Video Portal you installed to ensure that the content and metadata was appropriately
deployed.
The installation and configuration of the DMM 3.5 Appliance is now complete.
Page 69

CHA P TER
4-1
Cisco Digital Media System 3.5 Appliance Administration Guide
OL-11574-02
4
Using the Cisco Video Portal AAI
This chapter contains information for installing and configuring the Cisco Video Portal appliance
administration interface (AAI).
Perform the following steps to install the Cisco Video Portal AAI:
Step 1 At the boot prompt enter the username “admin” and the password you setup earlier at firstboot.
Page 70

4-2
Cisco Digital Media System 3.5 Appliance Administration Guide
OL-11574-02
Chapter 4 Using the Cisco Video Portal AAI
The Main Window appears.
Page 71

4-3
Cisco Digital Media System 3.5 Appliance Administration Guide
OL-11574-02
Chapter 4 Using the Cisco Video Portal AAI
Perform the following steps to configure the system information for the Cisco Video Portal AII.
Step 1 Highlight the SHOW_INFO menu item from the main screen and press Enter.
Page 72

4-4
Cisco Digital Media System 3.5 Appliance Administration Guide
OL-11574-02
Chapter 4 Using the Cisco Video Portal AAI
The Cisco Video Portal information displays on the screen.
Page 73

4-5
Cisco Digital Media System 3.5 Appliance Administration Guide
OL-11574-02
Chapter 4 Using the Cisco Video Portal AAI
Perform the following steps to configure Cisco Video Portal Control.
Step 1 Highlight VP_CONTROL and press Enter.
Page 74

4-6
Cisco Digital Media System 3.5 Appliance Administration Guide
OL-11574-02
Chapter 4 Using the Cisco Video Portal AAI
Step 2 Select Supported Media and press Enter.
Page 75

4-7
Cisco Digital Media System 3.5 Appliance Administration Guide
OL-11574-02
Chapter 4 Using the Cisco Video Portal AAI
Step 3 Select the video portal supported formats. These are all the formats you would like your video portal to
support. By default Windows Media and Flash Video is supported. Press the Up/Down arrow keys to
highlight video, press Spacebar to select/deselect, press Enter to submit.
Step 4 Select the video portal supported formats. These are all the media formats your content will be encoded
in, hence the Video Portal template you will be supporting. By default, the Windows Media and Flash
Video is supported. Use the Up/Down arrow keys to highlight the media format, use the Spacebar to
select/deselect, and use Enter to submit.
Page 76

4-8
Cisco Digital Media System 3.5 Appliance Administration Guide
OL-11574-02
Chapter 4 Using the Cisco Video Portal AAI
Step 5 If you selected two or more media formats to support, you will be prompted to select the primary media
format supported by the Video Portal. If a client machine accessing the Video Portal meets the
requirements of all of the media formats you chose to support, highlight the media type you would prefer
them to receive by using the Up/Down arrow keys and press Enter.
Page 77

4-9
Cisco Digital Media System 3.5 Appliance Administration Guide
OL-11574-02
Chapter 4 Using the Cisco Video Portal AAI
Step 6 If you selected three or more media types to support, you will be prompted to select the secondary media
format supported by the Video Portal. If a client machine accessing the Video Portal does not meet the
requirements for the primary media type, but meets the requirements for the two other types of supported
media, highlight the media format you would prefer them to receive by using the Up/Down arrow keys
and press Enter.
Page 78

4-10
Cisco Digital Media System 3.5 Appliance Administration Guide
OL-11574-02
Chapter 4 Using the Cisco Video Portal AAI
Step 7 If you select four or more media types to support, you are prompted with the following screen. Select
the tertiary media format supported by the Video Portal. If a client machine accessing the Video Portal
does not meet the requirements for the primary media type but meets the requirements for the two other
types of supported media, highlight the media format you would prefer them to receive by using the up
and down arrows, then press Enter.
Page 79

4-11
Cisco Digital Media System 3.5 Appliance Administration Guide
OL-11574-02
Chapter 4 Using the Cisco Video Portal AAI
Step 8 The preferred media format order is now displayed for your confirmation. Press Enter to submit. If you
made an error, you can go back into the appliance administrative interface (AAI) after the first boot
process to modify these settings.
Page 80

4-12
Cisco Digital Media System 3.5 Appliance Administration Guide
OL-11574-02
Chapter 4 Using the Cisco Video Portal AAI
Step 9 Select INSTANCE NAME and press Enter.
Step 10 Enter the Video Portal instance name. This is used to generate a direct URL for to the Video Portal.
Page 81

4-13
Cisco Digital Media System 3.5 Appliance Administration Guide
OL-11574-02
Chapter 4 Using the Cisco Video Portal AAI
Step 11 The instance name is now displayed for your record keeping. Press Enter to continue.
Page 82

4-14
Cisco Digital Media System 3.5 Appliance Administration Guide
OL-11574-02
Chapter 4 Using the Cisco Video Portal AAI
Perform the following steps to configure Section III Apliance_Control.
Step 1 Select APLLIANCE_CONTROL and press Enter.
Step 2 Configure the Control Appliance Settings as follows:
g. GET_SYSLOG—For troubleshooting and to provide a syslog to TAC.
h. RESET_PASSWORD—To reset the admin password.
i. UPDATE_APPLIANCE—To patch the server appliance using a DMSDMS-approved patch or
update from a CD.
j. REBOOT—To reboot the server appliance.
k. SHUTDOWN—To shut down the server appliance.
Page 83

4-15
Cisco Digital Media System 3.5 Appliance Administration Guide
OL-11574-02
Chapter 4 Using the Cisco Video Portal AAI
Step 3 Select GET SYSLOG and press Enter.
Page 84

4-16
Cisco Digital Media System 3.5 Appliance Administration Guide
OL-11574-02
Chapter 4 Using the Cisco Video Portal AAI
Step 4 You can get the Syslog by plugging in a USB drive to the server appliance and selecting USB or by using
SFTP to copy the Syslog to a SFTP server accessible by the server appliance. Select the method you want
and press Enter.
Page 85

4-17
Cisco Digital Media System 3.5 Appliance Administration Guide
OL-11574-02
Chapter 4 Using the Cisco Video Portal AAI
This screen shows a sample of a successful USB syslog.
Step 5 If you prefer to use FTP to copy the syslog, select FTP and press Enter.
Page 86

4-18
Cisco Digital Media System 3.5 Appliance Administration Guide
OL-11574-02
Chapter 4 Using the Cisco Video Portal AAI
Step 6 If you prefer to use SFTP to copy the syslog, select SFTP and press Enter.
Step 7 When using SFTP to copy the syslog, you are prompted to provide the SFTP server IP address or FQDN
and press Enter.
Page 87

4-19
Cisco Digital Media System 3.5 Appliance Administration Guide
OL-11574-02
Chapter 4 Using the Cisco Video Portal AAI
Step 8 Enter your Username in the Login Name field and press Enter.
Step 9 Enter your password in the Password field and press Enter.
Page 88

4-20
Cisco Digital Media System 3.5 Appliance Administration Guide
OL-11574-02
Chapter 4 Using the Cisco Video Portal AAI
Step 10 If the SFTP is successful you will see a screen similar to the one below. The file will be in the default
directory for which you logged in. Press Enter.
Page 89

4-21
Cisco Digital Media System 3.5 Appliance Administration Guide
OL-11574-02
Chapter 4 Using the Cisco Video Portal AAI
Step 11 Use the Control Appliance Settings screen to reset the password of the admin user. Select
RESET_PASSWORD and press Enter.
Page 90

4-22
Cisco Digital Media System 3.5 Appliance Administration Guide
OL-11574-02
Chapter 4 Using the Cisco Video Portal AAI
Step 12 Set the password for admin user and press Enter. This user account is the default administrator account
for this server appliance. Your password cannot be null. There are no other password rules.
Step 13 Confirm the password for admin user by pressing Enter.
Page 91

4-23
Cisco Digital Media System 3.5 Appliance Administration Guide
OL-11574-02
Chapter 4 Using the Cisco Video Portal AAI
Step 14 This screen prompts you to update the Login password field in the Video Portal Metadata section of the
Deploy Locations. Press Enter.
Step 15 At the Video Portal Metadata field, update your login password in the Login password field.
Page 92

4-24
Cisco Digital Media System 3.5 Appliance Administration Guide
OL-11574-02
Chapter 4 Using the Cisco Video Portal AAI
Step 16 To update the video portal, select SOFTWARE_UPDATE and press Enter.
Page 93

4-25
Cisco Digital Media System 3.5 Appliance Administration Guide
OL-11574-02
Chapter 4 Using the Cisco Video Portal AAI
Step 17 Insert the approved DMS CDROM specific to your version of the Video Portal Appliance and press
Enter.
Page 94

4-26
Cisco Digital Media System 3.5 Appliance Administration Guide
OL-11574-02
Chapter 4 Using the Cisco Video Portal AAI
Step 18 To Reboot the appliance, select Reboot and press Enter.
Step 19 Select Ye s to reboot the server appliance and press Enter.
Page 95

4-27
Cisco Digital Media System 3.5 Appliance Administration Guide
OL-11574-02
Chapter 4 Using the Cisco Video Portal AAI
Step 20 To shut down the appliance, select SHUTDOWN and press Enter.
Step 21 Select Ye s to confirm you wish to shutdown the server appliance and press Enter to continue.
Page 96

4-28
Cisco Digital Media System 3.5 Appliance Administration Guide
OL-11574-02
Chapter 4 Using the Cisco Video Portal AAI
Perform the following steps to configure Section IV Network_Settings:
Step 1 Select NETWORK_SETTINGS to change network settings and press Enter.
Page 97

4-29
Cisco Digital Media System 3.5 Appliance Administration Guide
OL-11574-02
Chapter 4 Using the Cisco Video Portal AAI
Step 2 Configure the network settings using the following fields:
a. HOST_NAME—To change the Video Portal server appliance's Hostname.
b. TCP_IP—To configure DHCP or static IP.
c. DNS—To change the DNS settings.
d. AUTO_NEGOTIATION—To change the NIC settings.
e. NETWORK_TOOLS—To troubleshoot the network.
Page 98

4-30
Cisco Digital Media System 3.5 Appliance Administration Guide
OL-11574-02
Chapter 4 Using the Cisco Video Portal AAI
Step 3 To change the hostname, enter the Hostname of the appliance in the HOSTNAME Configuration field
and press Enter.
Step 4 You will be prompted to check that the correct hostname is used in the DMM web application.
Page 99

4-31
Cisco Digital Media System 3.5 Appliance Administration Guide
OL-11574-02
Chapter 4 Using the Cisco Video Portal AAI
Step 5 Confirm the change by pressing Enter.
Page 100

4-32
Cisco Digital Media System 3.5 Appliance Administration Guide
OL-11574-02
Chapter 4 Using the Cisco Video Portal AAI
Step 6 To change network settings, select TCP_IP and hit enter.
 Loading...