

Page 1

User Guide for
Cisco
Part 1 – Manage Platform Services
Part 2 – Manage Network and Endpoint Settings
Part 3 – Manage Content for Cisco Digital Signs
Part 4 – Manage IPTV Programming for Cisco Cast
Revised: September 17, 2012
Americas Headquarters
Cisco Systems, Inc.
170 West Tasman Drive
San Jose, CA 95134-1706
USA
http://www.cisco.com
Tel: 408 526-4000
Fax: 408 527-0883
Digital Media Manager 5.4.x
800 553-NETS (6387)
Text Part Number: OL-15762-05
Page 2

THE SPECIFICATIONS AND INFORMATION REGARDING THE PRODUCTS IN THIS MANUAL ARE SUBJECT TO CHANGE WITHOUT NOTICE. ALL
STATEMENTS, INFORMATION, AND RECOMMENDATIONS IN THIS MANUAL ARE BELIEVED TO BE ACCURATE BUT ARE PRESENTED WITHOUT
WARRANTY OF ANY KIND, EXPRESS OR IMPLIED. USERS MUST TAKE FULL RESPONSIBILITY FOR THEIR APPLICATION OF ANY PRODUCTS.
THE SOFTWARE LICENSE AND LIMITED WARRANTY FOR THE ACCOMPANYING PRODUCT ARE SET FORTH IN THE INFORMATION PACKET THAT
SHIPPED WITH THE PRODUCT AND ARE INCORPORATED HEREIN BY THIS REFERENCE. IF YOU ARE UNABLE TO LOCATE THE SOFTWARE LICENSE
OR LIMITED WARRANTY, CONTACT YOUR CISCO REPRESENTATIVE FOR A COPY.
The Cisco implementation of TCP header compression is an adaptation of a program developed by the University of California, Berkeley (UCB) as part of UCB’s public
domain version of the UNIX operating system. All rights reserved. Copyright © 1981, Regents of the University of California.
NOTWITHSTANDING ANY OTHER WARRANTY HEREIN, ALL DOCUMENT FILES AND SOFTWARE OF THESE SUPPLIERS ARE PROVIDED “AS IS”
WITH ALL FAULTS. CISCO AND THE ABOVE-NAMED SUPPLIERS DISCLAIM ALL WARRANTIES, EXPRESSED OR
WITHOUT LIMITATION, THOSE OF MERCHANTABILITY, FITNESS FOR A PARTICULAR PURPOSE AND NONINFRINGEMENT OR ARISING FROM
A COURSE OF DEALING, USAGE, OR TRADE PRACTICE.
IN NO EVENT SHALL CISCO OR ITS SUPPLIERS BE LIABLE FOR ANY INDIRECT, SPECIAL, CONSEQUENTIAL, OR INCIDENTAL DAMAGES,
INCLUDING, WITHOUT LIMITATION, LOST PROFITS OR LOSS OR DAMAGE TO DATA ARISING OUT OF THE USE OR INABILITY TO USE THIS
MANUAL, EVEN IF CISCO OR ITS SUPPLIERS HAVE BEEN ADVISED OF THE POSSIBILITY OF SUCH DAMAGES.
Cisco and the Cisco logo are trademarks or registered trademarks of Cisco and/or its affiliates in the U.S. and other countries. To view a list of Cisco trademarks, go to this
URL:
www.cisco.com/go/trademarks. Third-party trademarks mentioned are the property of their respective owners. The use of the word partner does not imply a partnership
relationship between Cisco and any other company. (1110R)
Any Internet Protocol (IP) addresses and phone numbers used in this document are not intended to be actual addresses and phone numbers. Any examples, command display
output, network topology diagrams, and other figures included in the document are shown for illustrative purposes only. Any use of actual IP addresses or phone numbers in
illustrative content is unintentional and coincidental.
User Guide for Cisco Digital Media Manager 5.4.x
© 2002-2012 Cisco Systems, Inc. All rights reserved.
IMPLIED, INCLUDING,
Page 3

PART
1 Manage Platform Services
CONTENTS
CHAPTER
CHAPTER
1
2
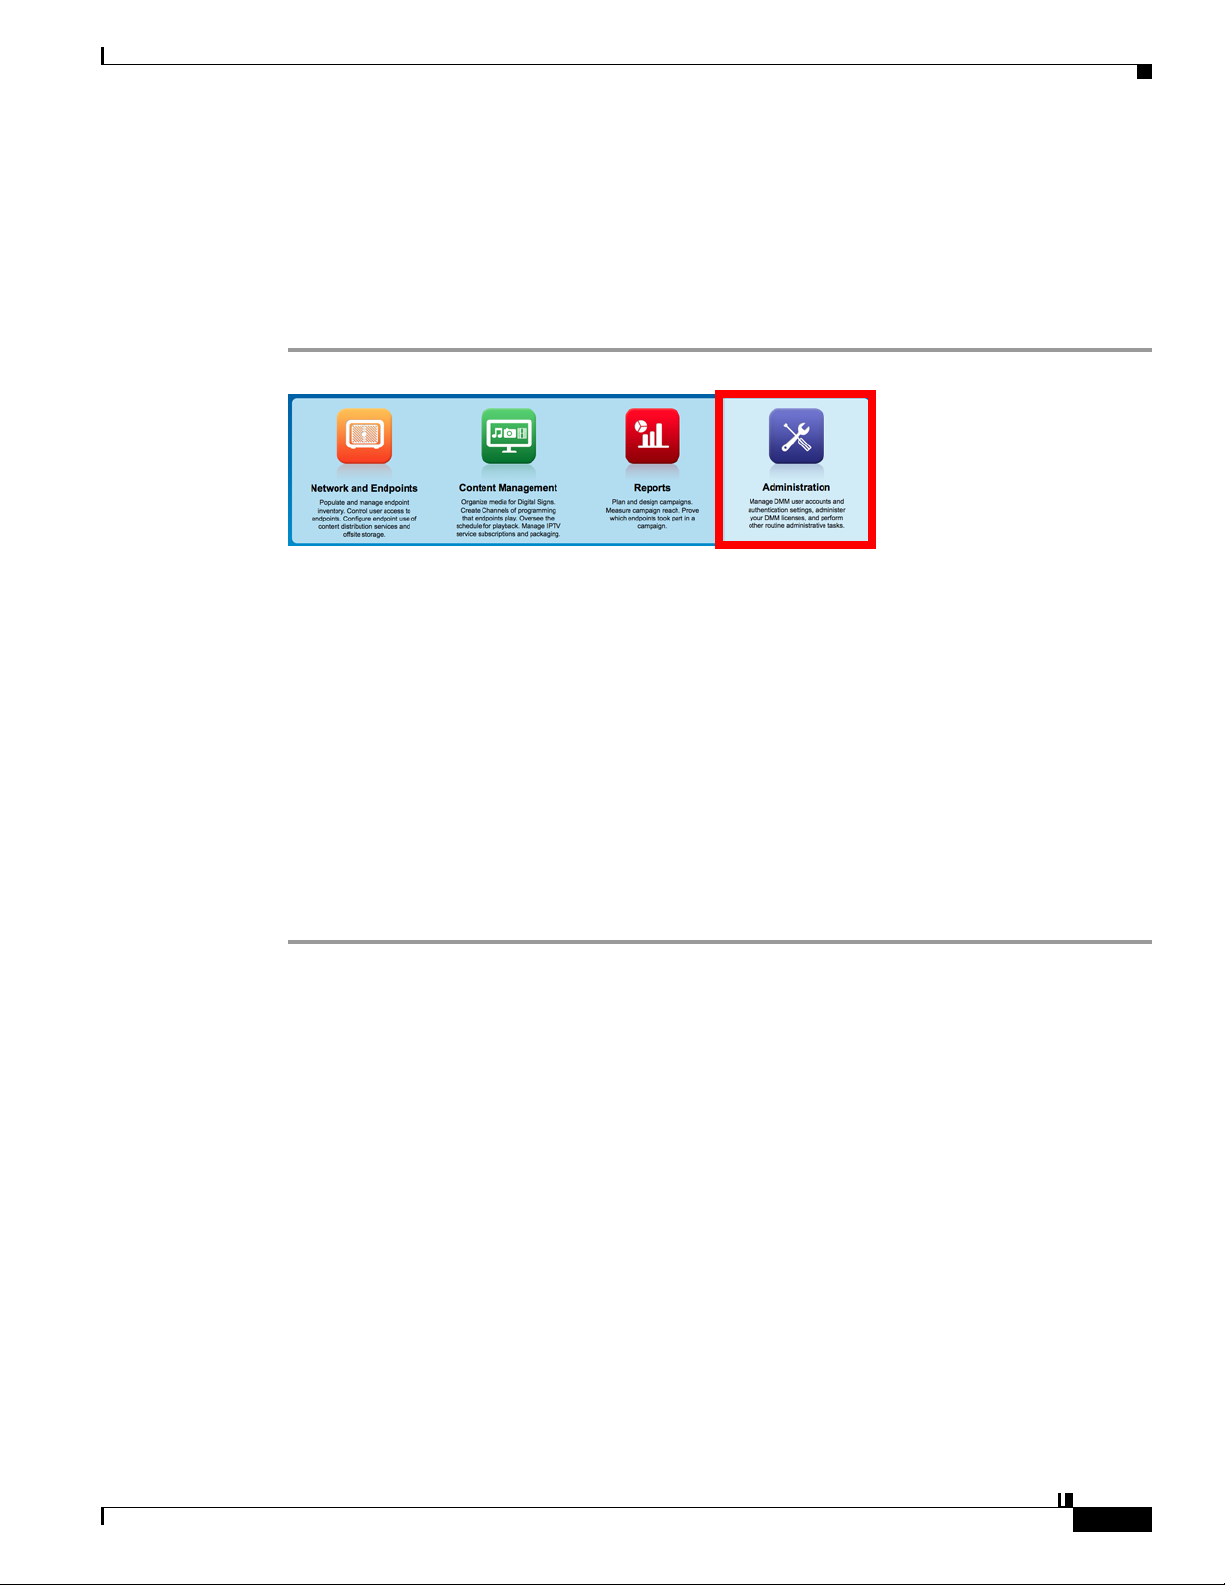
Administration Overview
Concepts
Glossary
1-1
1-2
Logical Ports That Cisco DMS Components Use
Procedures
Log in to DMM
1-4
1-4
Start DMS-Admin
Learn Your DMM Appliance Serial Number
Set a User Session Timeout for Components of Cisco DMS
Reference
1-7
FAQs and Troubleshooting
FAQs
1-7
Administration Dashboard
Concepts
2-1
Dashboard Overview
Understand the Alerts Gauge
Understand the System Information Gauge
Understand the Status Gauge
Understand the Licensed Features Gauge
Understand the Users Logged In Gauge
1-1
1-2
1-5
1-6
1-6
1-7
2-1
2-1
2-2
2-3
2-3
2-4
2-4
CHAPTER
OL-15762-05
Procedures
View Dashboard Gauges
3
Licenses
Concepts
Understand Licenses
Procedures
Request License Keys
Install License Keys
View Installed Licenses
Check the Dashboard Gauge for Licenses
2-5
2-5
3-1
3-1
3-1
3-2
3-2
3-4
3-5
3-5
User Guide for Cisco Digital Media Manager 5.4.x
iii
Page 4

Contents
CHAPTER
CHAPTER
CHAPTER
Reference
Automatically Licensed Features on Cisco DMS Appliances and Endpoints
Optional Module Licenses
4
Server Operations
Procedures
Check DMM Server Processes Remotely
Restart Appliances Remotely
Reference
Server Processes
5
Analyze Cisco DMS System Logs
Procedures
Enable Syslog Analysis
Disable Syslog Analysis
6
Configure Failover
3-6
3-6
3-7
4-1
4-1
4-1
4-3
4-4
4-4
5-1
5-1
5-1
5-2
6-1
CHAPTER
CHAPTER
7
8
Cisco Hinter for RTSP
Concepts
7-1
Overview
Workflow
Restrictions
Procedures
7-3
Download Cisco Hinter
Windows
7-1
7-1
7-2
7-2
7-3
7-4
Install Cisco Hinter on Windows
Run Cisco Hinter on Windows
Linux
7-5
Install Cisco Hinter on Linux
Run Cisco Hinter on Linux
Reference
FAQs and Troubleshooting
7-6
7-6
Troubleshoot RTP Over RTSP
Authentication and Federated Identity
7-4
7-4
7-5
7-5
7-6
8-1
iv
Concepts
Overview
User Guide for Cisco Digital Media Manager 5.4.x
8-1
8-1
OL-15762-05
Page 5

Contents
Glossary
Understand the Requirement to Authenticate Users
Decide Which Authentication Method to Use
LDAP and Active Directory Concepts
Federated Identity and Single Sign-on (SSO) Concepts
8-2
8-9
8-10
8-10
LDAP is Highly Complex
Plan Ahead
Restrictions
8-11
8-11
Synchronization Concepts
LDAP Concepts
8-14
Password Concepts
8-11
8-11
8-16
Understand Authentication Property Sheets for LDAP
IdP Requirements
8-17
8-17
8-17
Configuration Workflow to Activate Federation (SSO) Mode
Authentication Scenarios for User Sessions in Federation (SSO) Mode
Migration Between Authentication Methods
8-20
Understand Migration (from Either LDAP or SSO) to Embedded
Understand Migration (from Embedded) to Either LDAP or SSO
8-18
8-18
8-20
8-21
Procedures
8-21
Export the Root CA X.509 Certificate from Your Active Directory Server
Configure DMM to Trust the Active Directory Root CA
Choose an Authentication Method
Configure LDAP (Active Directory) Settings
Define LDAP (Active Directory) Filters
8-23
8-24
8-24
8-22
Import User Accounts that Match an LDAP (Active Directory) Filter
Resynchronize User Accounts that Match an LDAP (Active Directory) Filter
Sever All Existing Ties to a User Base or an LDAP (Active Directory) Server
Define the LDAP (Active Directory) Synchronization Schedule
Manage LDAP (Active Directory) Attributes
8-29
Configure Automatic LDAP (Active Directory) Synchronization
Derive User Group Membership Dynamically from an LDAP (Active Directory) Filter
Configure Federation Services for SSO
IdP Configuration Examples
Export SP Metadata from DMM
Import IdP Metadata into DMM
8-33
8-33
8-43
8-43
Bypass External Authentication During Superuser Login, as Needed
8-22
8-25
8-26
8-27
8-28
8-30
8-31
8-45
OL-15762-05
Reference
8-45
Software UI and Field Reference Tables
Elements to Choose and Enable an Authentication Mode
Elements to Define, Validate, and Add LDAP Filters
8-45
8-46
8-48
User Guide for Cisco Digital Media Manager 5.4.x
v
Page 6

Contents
CHAPTER
Elements to Use LDAP Bookmarks for Synchronization
Elements to Schedule Synchronization
Elements to Manage Attributes
Sample SP Configuration File from DMM
Summary Configuration Sample (PingFederate)
Sample IdP Metadata
8-55
Exported IdP Metadata Sample from OpenAM
8-50
8-51
8-52
8-53
8-56
Exported IdP Metadata Sample from Shibboleth
Exported IdP Metadata Sample from PingFederate
FAQs and Troubleshooting
FAQs
9
User Group Assignments
Concepts
8-59
9-1
9-1
Understand User Accounts
Understand User Roles
Procedures
9-2
Create User Groups
Delete User Groups
Create User Accounts Manually
Assign Users to User Groups
Edit User Accounts Manually
Delete User Accounts Manually
Remove Users from a User Group
Manage User Access Rights to DMPs
8-59
9-1
9-2
9-3
9-4
9-4
9-6
9-7
9-8
9-9
9-10
8-49
8-57
8-58
CHAPTER
vi
Reference
9-10
Software UI and Field Reference Tables
Elements to Configure User Account Settings
FAQs and Troubleshooting
FAQs
10
SNMP, Events, and Notifications
Concepts
10-1
Overview
Restrictions
Understand SNMP Concepts
Understand MIB and NMS Concepts
Understand IP Address Conflict Events
Understand Supported Event Types
User Guide for Cisco Digital Media Manager 5.4.x
9-10
9-10
9-11
9-11
10-1
10-1
10-2
10-2
10-2
10-3
10-3
OL-15762-05
Page 7

Contents
Global Event Categories
DMP Event Categories
10-3
10-3
Failover Cluster Event Categories
WAAS Event Categories
10-4
Understand Notification Methods
Workflow
Procedures
Enable or Disable Email
10-4
10-4
10-5
Configure SNMP Server Settings for Your DMM Appliance
Populate the MIB Browser in Your NMS
Configure Alert Reports and Notification Settings
Define Alert Report Parameters
Define Notification Rules
Reference
FAQs and Troubleshooting
PART
2 Manage Network and Endpoint Settings
FAQs
10-9
10-9
10-9
10-4
10-4
10-6
10-6
10-7
10-7
10-8
CHAPTER
CHAPTER
11
12
Network and Endpoints Overview
Concepts
Overview
Procedures
11-1
11-1
11-2
View Network and Endpoint Options in DMM
Register DMPs
Concepts
Overview
Glossary
12-1
12-1
12-1
12-2
Partial Support for Cisco Medianet 2.1 Features
DHCP Server Configuration Notes for MSI Service Discovery
dhcpd Example
12-6
Windows Server Example
Understand Medianet Autoconfiguration for DMPs
Information That Medianet and DMPs Exchange
Medianet Activation Workflow for a DMP 4310G or 4400G
Restrictions
Guidelines
12-10
12-11
11-1
11-2
12-5
12-5
12-6
12-7
12-8
12-9
OL-15762-05
User Guide for Cisco Digital Media Manager 5.4.x
vii
Page 8

Contents
Limit Your Use of Manual Registration
12-11
General Best Practices for Non-Medianet Autoregistration
Best Practices to Schedule Non-Medianet Autoregistration Events
Understand the Sequence of Operations for Non-Medianet Autoregistration
Procedures
Use DMPDM to Prepare a DMP for Manual Registration
Use a System Task to Normalize DMP Passwords
12-13
12-13
12-14
Establish Trust Between Digital Signs and your Centrally Managed DMPs
Add or Edit Address Ranges for Non-Medianet Autoregistration
Delete Address Ranges for Non-Medianet Autoregistration
Add or Edit One DMP Manually
12-21
Delete DMPs Manually from Your Device Inventory
Reference
Software UI and Field Reference Tables
12-23
Elements to Autoregister DMPs
12-23
12-23
Elements to Add or Edit One DMP Manually
Elements to Delete One DMP Manually
12-24
Elements to Configure Non-Medianet Autoregistration
Prevent DHCP Address Assignments to the Wrong VLAN
FAQs and Troubleshooting
FAQs
12-30
12-30
12-22
12-24
12-20
12-25
12-25
12-11
12-11
12-12
12-17
12-18
CHAPTER
13
Organize DMPs in Groups
Concepts
Overview
13-1
13-1
Understand the Effect of Nesting One DMP Group Inside Another
Procedures
13-3
Add and Edit DMP Groups
Delete DMP Groups
Add DMPs Manually to DMP Groups
Remove DMPs Manually from DMP Groups
Filter the DMP List Table
Reference
13-7
Software UI and Field Reference Tables
Top-Level Elements to Manage DMPs and DMP Groups
Elements to Add or Edit DMP Groups
Elements to Delete DMP Groups
Elements to Remove a DMP from a DMP Group
FAQs and Troubleshooting
13-1
13-2
13-3
13-4
13-5
13-5
13-6
13-7
13-7
13-9
13-9
13-10
13-10
viii
User Guide for Cisco Digital Media Manager 5.4.x
OL-15762-05
Page 9

Contents
CHAPTER
CHAPTER
14
15
FAQs
Configure DMP Wi-Fi Settings
Concepts
Glossary
13-10
14-1
14-1
14-1
ASCII Passphrases and Hexadecimal Keys for WEP
Workflow
Restrictions
Procedures
14-4
14-5
14-5
Establish a Wired Network Connection
Establish a Wireless Network Connection (802.11)
Reference
DMP Network Interfaces
FAQs and Troubleshooting
FAQs
14-7
14-8
14-8
14-8
Touchscreens, Projectors, and Displays
Concepts
Overview
15-1
15-1
Presentation System Concepts
Understand Which Displays Work Best with DMPs
Understand How to Choose Media Signal Cables
Understand and Prevent Image Retention (Burn-in)
14-3
14-5
14-6
15-1
15-2
15-2
15-3
15-5
OL-15762-05
Procedures
Connect to a Digital Display or Projector
Connect to a Touchscreen
Connect to an Analog Display or Projector
15-6
15-6
15-8
15-9
Use RS-232 Signals to Control Presentation Systems
Prepare Cisco Displays to Support RS-232 Syntax
Bootstrap DMTech Displays to Enable Their RS-232 Support
Bootstrap NEC Displays to Enable Their RS-232 Support
Use RS-232 Syntax to Control Digital Signs
15-17
Delete Equipment Settings That Use RS-232 Syntax
DVI
15-21
Prepare a 40- or 52-inch Cisco LCD to Support Centralized Management through DVI
HDMI
15-22
Activate or Deactivate HDMI Autodetection
Activate or Deactivate Resolution Autodetection
Use Predefined Tasks to Configure and Manage Equipment
User Guide for Cisco Digital Media Manager 5.4.x
15-10
15-11
15-14
15-16
15-20
15-21
15-22
15-23
15-23
ix
Page 10

Contents
CHAPTER
16
Define or Edit DMP Output Settings for A/V
Delete DMP Output Settings for A/V
Use Simple Menus to Control A/V Settings
Reference
15-29
Video and Audio Signal Interfaces
Supported Touchscreen Drivers in Cisco DMS 5.4
Software UI and Field Reference Tables
Elements to Choose A/V Settings from Menus
Elements to Configure DMP Audio/Video Settings
Elements to Control HDMI Display Autodetection
Elements to Control Screen Resolution Autodetection
Elements to Activate RS-232 for Supported LCD Display Brands (except DMTech)
Elements to Activate RS-232 for LCD Displays by DMTech
FAQs and Troubleshooting
FAQs
15-38
15-38
Troubleshoot Cisco Professional Series LCD Displays
DMP User Permissions (Authorization)
15-23
15-25
15-26
15-30
15-33
15-34
15-34
15-36
15-36
15-37
15-37
15-38
15-40
16-1
Concepts
Overview
16-1
16-1
Scenarios That Illustrate Typical User Permissions
Scenario A: Basic Administrator Permissions
Scenario B: Basic Network and Endpoint Permissions
Scenario C: Basic Content Permissions
Scenario D: Basic Reporting Permissions
Procedures
16-3
Configure User Rights and Permissions
PART
3 Manage Content for Cisco Digital Signs
CHAPTER
17
Media Assets and Embedded Software
Concepts
Overview
Restrictions
17-1
17-1
17-1
User Permission Restrictions
Media Restrictions
17-2
File Size and Storage Restrictions
Local Storage Restrictions
16-1
16-2
16-2
16-2
16-3
16-3
17-1
17-2
17-5
17-5
User Guide for Cisco Digital Media Manager 5.4.x
x
OL-15762-05
Page 11

Contents
CHAPTER
18
Procedures
Reference
Playlists
Concepts
Procedures
Understand HTTP ‘HEAD’ Request Timeout
17-10
17-7
Work with Assets and Categories in Your Media Library
Add One Asset at a Time to Your Media Library
17-11
Add Multiple Assets Simultaneously to Your Media Library
17-14
Software UI and Field Reference Tables
Elements to Manage Assets and Categories
Elements to Add Categories and Rename Them
Elements to Add Assets and Edit Their Attributes
Elements To Describe and Preview One Asset
18-1
18-1
Guidelines
18-1
17-14
17-14
17-16
17-17
17-18
Best Practices to Optimize DMP Settings for Playlists
Restrictions
Create and Organize Playlists
Change the Sequence of Playback
18-2
18-2
18-2
18-3
17-10
17-12
18-1
CHAPTER
19
Reference
18-3
Software UI and Field Reference Tables
Elements to Define a Playlist
Content Distribution and Delivery
Concepts
Overview
19-1
19-1
Understand DMP Support for the CIFS Protocol
Choose a Content Delivery System to Use with DMPs
DMS-CD Concepts
19-4
DMS-CD Overview
Retry Timeout
19-4
Concurrent Deployments
DMS-CD Performance Factors
Understand Shared Scheduling Features for Deployments
Understand DMS-CD Alert Reports
Guidelines
19-8
DMS-CD Guidelines
Restrictions
19-12
18-3
18-3
19-1
19-2
19-2
19-4
19-4
19-5
19-6
19-7
19-8
OL-15762-05
User Guide for Cisco Digital Media Manager 5.4.x
xi
Page 12

Contents
DMS-CD Restrictions
CIFS Restrictions
ACNS Restrictions
ECDS Restrictions
Example Scenario
19-14
19-12
19-13
19-13
19-13
Organizational Logic at Acme
Deployment Scheduling Logic at Acme
Procedures
19-16
Configure DMM to Use ACNS, WAAS, or ECDS
Configure DMS-CD
19-18
Configure Deployment Threshold Preferences for DMS-CD
Check Disk Space Capacity for Deployments
Create a Deployment Package
Edit a Deployment Package
19-23
Delete a Deployment Package
Reference
19-26
Software UI and Field Label Reference Tables
Elements to Define Deployment Thresholds
Elements to Define a DMS-CD Deployment Package
Elements to Define WAAS, ACNS, or ECDS Settings
FAQs and Troubleshooting
Troubleshoot DMS-CD
FAQs for ACNS
FAQs for WAAS
Troubleshoot ACNS
19-31
19-31
19-34
19-34
19-34
19-14
19-15
19-17
19-19
19-20
19-21
19-25
19-26
19-26
19-29
19-30
CHAPTER
xii
20
Use Channels to Play Rich Media
Concepts
20-1
Overview
Glossary
20-2
Channel Examples
Airport Example
Healthcare Example
Retail Banking Example
Retail Shopping Example
Education Example
Manufacturing Example
Understand How Channels Prioritize Their Content
Understand Time Basis Concepts
User Guide for Cisco Digital Media Manager 5.4.x
20-1
20-1
20-3
20-4
20-5
20-6
20-7
20-8
20-9
20-10
20-10
OL-15762-05
Page 13

Contents
Procedures
20-11
Work with Channels Generally
View and Filter Channels
Add a Channel
Tag a Channel
Edit a Channel
20-13
20-15
20-16
Duplicate a Channel
Delete a Channel
Work with Channel Details
Channel Properties
Default Content
Time-specific Content
Play Now Content
Work with Channel Events
Add an Event to a Channel
Duplicate an Event from a Channel
Delete an Event from a Channel
Work with Channel Subscriptions
Subscribe Endpoints to a Channel
Unsubscribe Endpoints from a Channel
20-37
20-11
20-12
20-17
20-18
20-19
20-19
20-21
20-23
20-27
20-33
20-33
20-33
20-34
20-35
20-35
20-36
CHAPTER
21
Proof of Play
Concepts
Overview
Restrictions
Glossary
Campaigns (Formerly, Insertions)
Workflow
Procedures
Prepare DMPs to Support Proof of Play
Create Requestors
Create Campaigns
Run a Report
21-1
21-1
21-1
21-1
Implications of Changing the DMM Appliance Hostname
Implications of Changing the User Authentication Method
Implications of Changing Which Assets a Playlist Includes
21-3
21-3
21-4
21-4
21-4
Enable Syslog and NTP
Enable Proof of Play Features in DMM
21-7
21-8
21-9
21-5
21-6
21-2
21-2
21-3
OL-15762-05
User Guide for Cisco Digital Media Manager 5.4.x
xiii
Page 14

Contents
CHAPTER
22
Export a Report
View Previous Reports
21-9
21-10
Use the Proof of Play Dashboard
Reference
21-10
FAQs and Troubleshooting
FAQs
Troubleshooting
21-11
21-12
Plan for and Manage Emergencies
Concepts
Overview
Procedures
22-1
22-1
22-2
Create Deployment Packages for Emergencies
Provision Emergency Assets to DMP Local Storage
Start Playback of an Emergency Message
Stop Playback of an Emergency Message
21-10
21-10
22-1
22-2
22-4
22-5
22-6
PART
4 Manage IPTV Programming for Cisco Cast
CHAPTER
23
Cisco Cast Overview
Concepts
23-1
Overview
Restrictions
23-1
23-1
23-2
User Permissions Restrictions
Feature License Restrictions
CHAPTER
24
Centralized Administration
On-Premises Operation
Workflow
Procedures
23-4
Start Cisco Cast
Redistribute Live TV
Concepts
24-1
Guidelines
23-4
23-4
24-1
24-1
23-2
23-3
Site Assessment for Live Video Programming
Restrictions
24-2
User Permissions Restrictions
Channel Count Restrictions
24-2
23-2
23-2
24-1
24-2
xiv
User Guide for Cisco Digital Media Manager 5.4.x
OL-15762-05
Page 15

Contents
CHAPTER
25
Codec Restrictions
Procedures
Add Channels
Edit Channels
Reassign Channel Numbers
Delete Channels
List Only the Defined (Active) or Undefined (Inactive) TV Channels
Reference
Software UI and Field Reference Tables
Elements to Manage TV Channels
Elements to Define Channel Settings
Video on Demand
Concepts
25-1
Overview
Guidelines
Site Assessment for VoD Programming
Restrictions
User Permissions Restrictions
Channel Count Restrictions
Workflow to Stage VoD Assets to DMP Local Storage
24-2
24-2
24-3
24-4
24-5
24-6
24-7
24-8
24-8
24-8
24-10
25-1
25-1
25-1
25-1
25-2
25-2
25-2
25-2
CHAPTER
26
Procedures
25-2
Add a New VoD Category
Add a New VoD Subcategory
Edit a VoD Category
Delete a VoD Category
Map a Video to a VoD Category
Organize Videos in VoD Categories
Remove a Video from a Category
Stage an EPG to DMP Local Storage
Reference
25-9
Software UI and Field Reference Tables
Elements to Manage VoD Categories
Electronic Program Guide
Concepts
Overview
Guidelines
Restrictions
26-1
26-1
26-2
26-2
25-3
25-3
25-4
25-5
25-6
25-7
25-7
25-8
25-9
25-9
26-1
OL-15762-05
User Guide for Cisco Digital Media Manager 5.4.x
xv
Page 16

Contents
CHAPTER
27
Understand EPG Data Formats
Understand Methods to Describe EPG Channels
Procedures
Add or Edit Subscriptions to Data from an EPG Provider
Delete Settings That Define a Subscription
Synchronize EPG Channel Schedules and Program Descriptions
Reference
Software UI and Field Reference Tables
FAQs and Troubleshooting
Look and Feel
Concepts
Overview
Restrictions
User Permissions Restrictions
XMLTV
26-2
Tribune Media Services
26-5
26-8
26-2
26-2
26-3
26-8
Elements to Define EPG Provider Settings
26-9
Troubleshoot EPG Highlighting
27-1
27-1
27-1
27-1
User Permissions Restrictions
26-9
27-1
26-4
26-5
26-6
26-7
26-8
CHAPTER
28
Procedures
Choose the Color Scheme for Your Menu System
27-2
27-2
Specify Which Features Your Menu System Should Include
Show a Custom Logo in Your Menu System
Show the Cisco Logo in Your Menu System
27-4
27-5
Choose the Date and Time Formats for Your Menu System
Deploy Menu System Customizations to Your DMPs
Emulate the DMP Remote Control for Use with Cisco Cast
Concepts
Overview
Restrictions
28-1
28-1
28-2
Audio Muting Restrictions
Channel-Changing Restrictions
User Permissions Restrictions
DMP Model Restrictions
28-2
28-2
28-2
28-2
Workflow to Provision Emulator Service for IP Phones
Procedures
Activate Services
28-4
28-4
27-3
27-5
27-7
28-1
28-3
xvi
User Guide for Cisco Digital Media Manager 5.4.x
OL-15762-05
Page 17

Contents
Start Services
Configure URL Parameters
Enable IP Phone Autoregistration
Define IP Phone Service Attributes
Expose the Service to IP Phones
Configure Emulator Settings in Cast
28-5
28-5
28-6
28-6
28-7
28-8
Configure an IP Phone to Emulate the Remote Control
Start the Emulator on an IP Phone
Start the Emulator on a Mobile Phone
28-10
28-11
Use the Emulator on an IP Phone or a Mobile Phone
28-10
28-12
OL-15762-05
User Guide for Cisco Digital Media Manager 5.4.x
xvii
Page 18

Contents
xviii
User Guide for Cisco Digital Media Manager 5.4.x
OL-15762-05
Page 19

P
ART
1
Manage Platform Services
Page 20

Page 21

Audience
Concepts
CHAPTER
Administration Overview
Revised: September 17, 2012
OL-15762-05
Concepts, page 1-1
•
•
Procedures, page 1-4
•
Reference, page 1-7
We prepared this material with specific expectations of you.
You will administer Cisco DMS.
1
•
Glossary, page 1-2
•
Logical Ports That Cisco DMS Components Use, page 1-2
OL-15762-05
User Guide for Cisco Digital Media Manager 5.4.x
1-1
Page 22

Concepts
Glossary
Chapter 1 Administration Overview
Timesaver Go to terms that start with...[A|D
A
AAI
D
DMS-Admin
].
Appliance Administration Interface. Console application (text-based; menu-driven) and command shell
on all Cisco DMM appliances. Administrators use AAI to set up and connect a new DMM appliance
and maintain it thereafter. Although its scope is far narrower than DMS-Admin, AAI supports
priviliged operations that DMS-Admin does not support.
Return to Top
Digital Media Suite Administration. Web-based graphical user interface on a DMM appliance.
Administrators use DMS-Admin to:
•
Activate and monitor features throughout the full range of Cisco DMS products.
•
Exchange information with network entities outside Cisco DMS.
•
Centrally manage user accounts for Cisco DMS products.
Compare to AAI.
Logical Ports That Cisco DMS Components Use
Make sure to keep these logical ports open to traffic exchanged among Cisco DMS components.
Port
No. From To Bidir? Protocol Description
20 DMM DMP N FTP DMM server deploying content to DMP using FTP
20 DMP FTP server Y FTP transfer of content files
21 DMM DMP N FTP DMM server deploying content to DMP using FTP
21 DMP FTP server Y FTP transfer of content files
22 DMM DMP N SFTP DMM server deploying content to DMP using SFTP
53 DMP DNS server N DNS DNS services
80 DMP content server N HTTP
123 DMP NTP server Y NTP NTP services
139 DMP content server N CIFS CIFS services
161 SNMP client DMM N SNMP SNMP services
389 DMM Active Directory
(LDAP)
N LDAP user database creation or updates
1-2
User Guide for Cisco Digital Media Manager 5.4.x
OL-15762-05
Page 23

Chapter 1 Administration Overview
Concepts
Port
No. From To Bidir? Protocol Description
443 Admin Client DMP N SSL
443 User DMM N HTTPS
445 DMP content server N CIFS CIFS services
514 DMP syslog server N syslog syslog services
554 DMP content server N RTSP DMP requesting WMV streaming from external
Windows Media Streaming Server
636 DMM Active Directory
(LDAPS)
694 DMM primary DMM secondary Y (UDP) Heartbeat for failover health monitoring
843 User DMM N proof of play
7777 Admin Client DMP N SSL
7777 DMM DMP Y SSL
7849 DMM primary DMM secondary Y DRBD (failover)
9161 Y SNMP SNMP services
9999 DMM Show and Share Y JMX communication
30865 All failover
nodes
User
User deployment
Config
User
DMP content server N HTTP
All failover
nodes
server
Config
N LDAPS user database creation or updates
Y CSYNC synchronize config files between nodes in a cluster
(failover).
N HTTP user requesting content from external server
Legend
DMM=Digital Media Manager
DMP=Digital Media Player
OL-15762-05
User Guide for Cisco Digital Media Manager 5.4.x
1-3
Page 24

Procedures
Procedures
Log in to DMM
•
Learn Your DMM Appliance Serial Number, page 1-6
•
Start DMS-Admin, page 1-5
Procedure
Chapter 1 Administration Overview
Step 1
Step 2
Step 3
Step 4
Point your browser at your DMM appliance.
•
Use HTTPS and specify port 8443
OR
Use HTTP and specify port 8080— which redirects immediately to the secured HTTPS connection.
•
Be sure to use the fully qualified appliance DNS name and not merely its IP address. For example,
https://dmm.example.com:8443.
When the login page loads, sign in to your account.
Click Log In.
The DMM landing page loads in your browser.
Stop. You have completed this procedure.
What to Do Next
•
1-4
User Guide for Cisco Digital Media Manager 5.4.x
OL-15762-05
Page 25
Chapter 1 Administration Overview
Start DMS-Admin
Before You Begin
•
Procedure
Procedures
Log in to DMM.
Step 1
Step 2
Click Administration on the landing page.
What happens next depends on what happened before.
•
Is your
appliance
No licenses are installed.
We take you first to the page where you can install a license key.
factory-new or
recently
restored?
•
Have you
activated even
one licensed
At least one license is installed.
We take you first to the DMS-Admin Dashboard, whose gauges can inform you
at a glance.
feature?
Stop. You have completed this procedure.
OL-15762-05
Related Topics
•
Log in to DMM, page 1-4
User Guide for Cisco Digital Media Manager 5.4.x
1-5
Page 26
Procedures
Learn Your DMM Appliance Serial Number
Caution You cannot obtain any Cisco DMS software feature licenses until you know your DMM appliance serial number.
Before You Begin
•
Log in to DMM and click Administration.
Procedure
Chapter 1 Administration Overview
Step 1
Step 2
Step 3
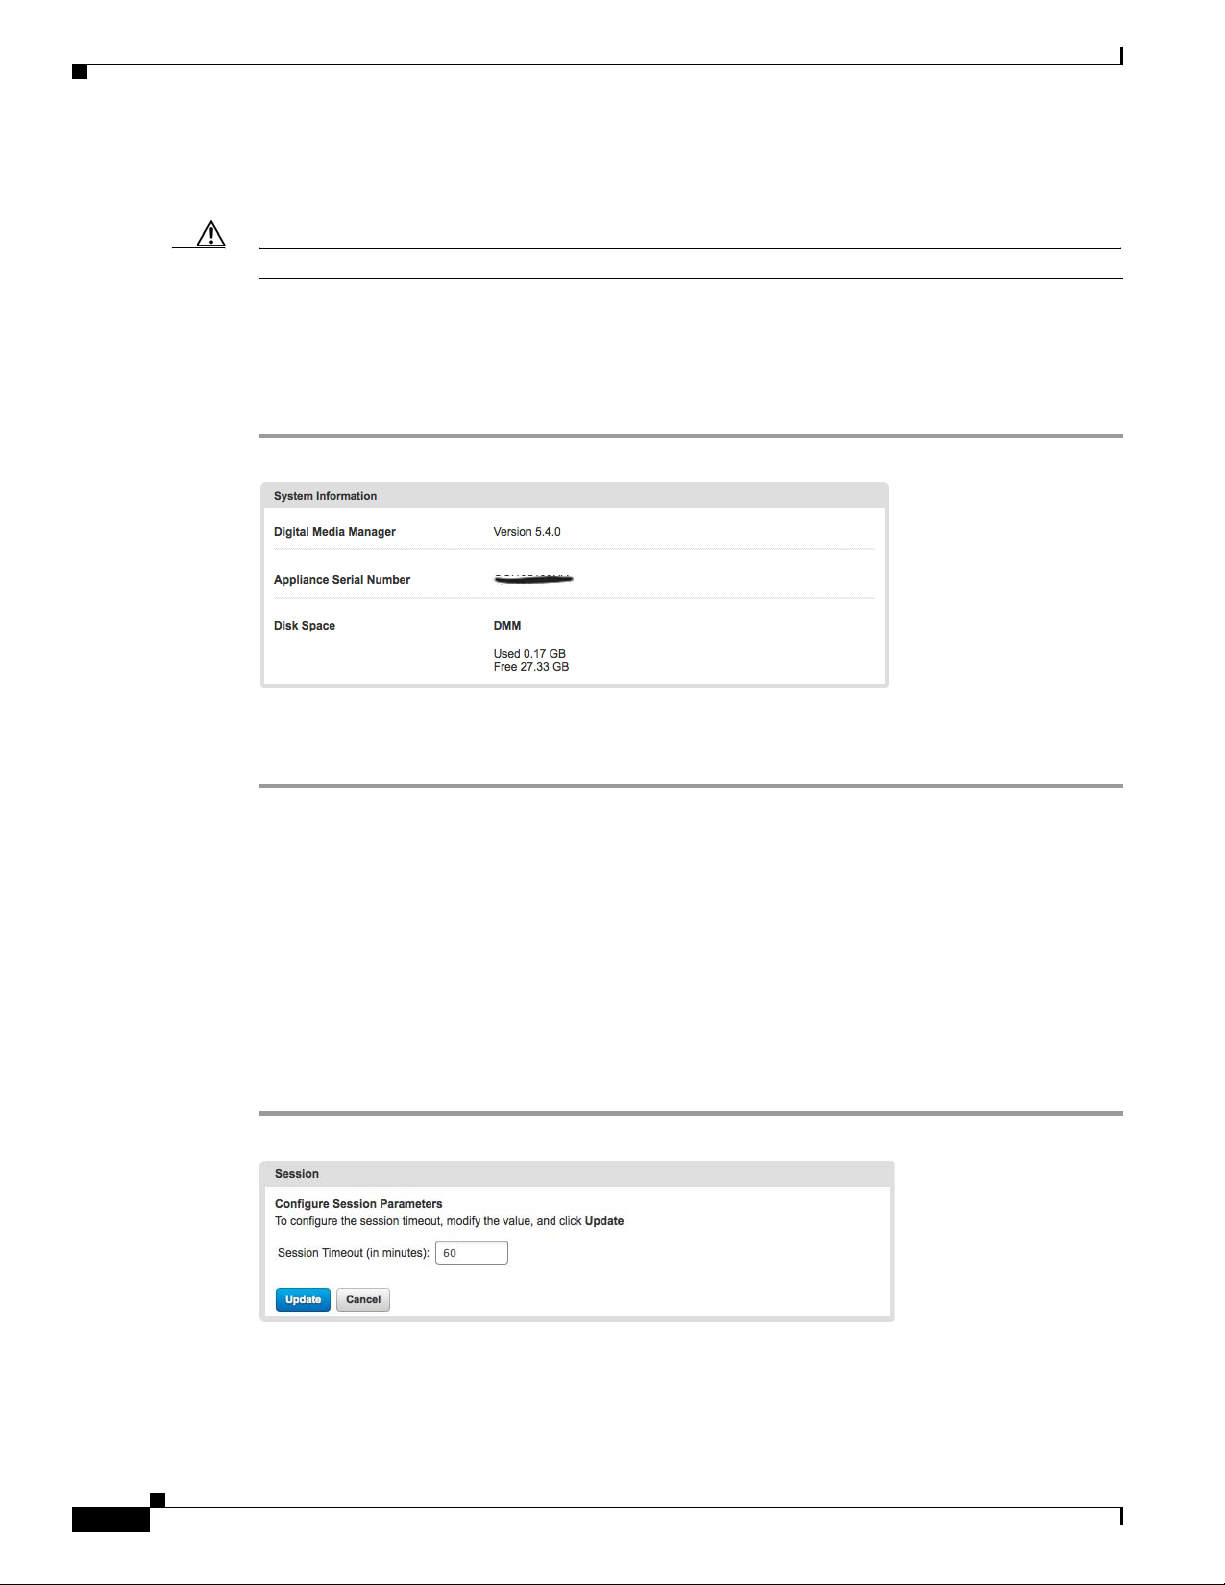
Find the System Information gauge on your Administration dashboard.
Make note of your appliance serial number.
Stop. You have completed this procedure.
Set a User Session Timeout for Components of Cisco DMS
We log inactive users out of their sessions automatically after an interval, which you control, has
elapsed. This interval applies to all users without exception.
Before You Begin
•
Log in to DMM and click Administration.
1-6
Procedure
Step 1
Step 2
User Guide for Cisco Digital Media Manager 5.4.x
Choose Security > Session.
Use the Session Timeout (in minutes) field to enter or edit a session timeout value.
OL-15762-05
Page 27

Chapter 1 Administration Overview
Reference
Step 3
Step 4
Click Update.
Stop. You have completed this procedure.
Reference
•
FAQs and Troubleshooting, page 1-7
FAQs and Troubleshooting
•
FAQs, page 1-7
FAQs
Q.
What might prevent me from logging in?
A.
Check the following, and then try again to log in.
•
Is your username wrong or mistyped?
•
Is your password wrong, mistyped, or expired?
•
Is your user account suspended?
•
Is your user account locked after too many failed login attempts?
OL-15762-05
User Guide for Cisco Digital Media Manager 5.4.x
1-7
Page 28

Reference
Chapter 1 Administration Overview
1-8
User Guide for Cisco Digital Media Manager 5.4.x
OL-15762-05
Page 29

Audience
Concepts
CHAPTER
Administration Dashboard
Revised: September 17, 2012
OL-15762-05
Concepts, page 2-1
•
•
Procedures, page 2-5
We prepared this material with specific expectations of you.
You will administer Cisco DMS.
You have already installed at least the license key to activate one Cisco DMS software feature module.
2
•
Dashboard Overview, page 2-1
Dashboard Overview
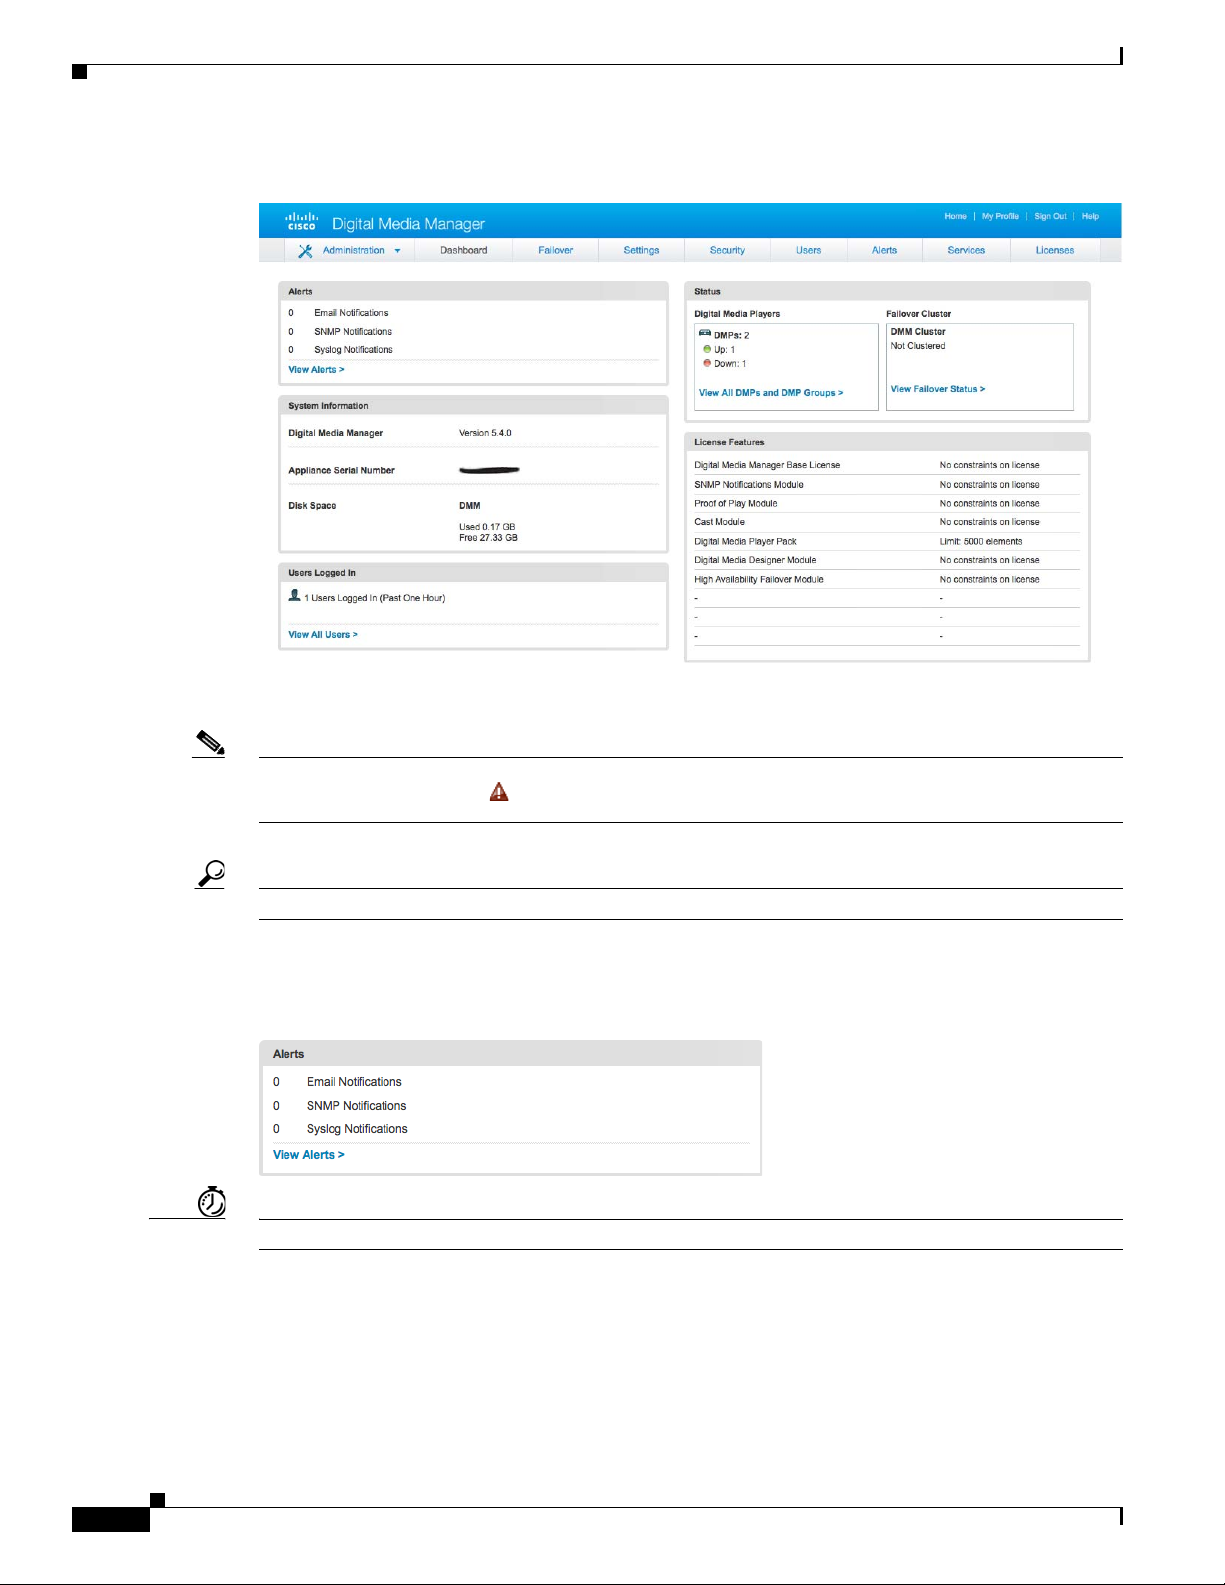
The dashboard for DMS-Admin centralizes many features for system monitoring and log collection.
When problems of any kind interfere with the data-collection processes that populate its gauges, they
show question marks in addition to the best available data. In this case, check that your systems and
network are configured and working correctly.
OL-15762-05
User Guide for Cisco Digital Media Manager 5.4.x
2-1
Page 30
Concepts
Chapter 2 Administration Dashboard
These are the dashboard gauges.
The Failover Cluster gauge monitors your use, if any, of failover.
Note Sometimes, a monitoring gauge might leave out a value that you expect it to show. When this occurs, we mark any missing
values with a placeholder symbol ( ) to indicate which values we could not show.
Tip Until you install at least one license key, the DMS-Admin dashboard cannot retrieve data to populate its gauges.
Understand the Alerts Gauge
This gauge shows the total count of notification messages delivered in the past 1 hour.
Timesaver Click View Alerts to open the Alerts page.
2-2
User Guide for Cisco Digital Media Manager 5.4.x
OL-15762-05
Page 31

Chapter 2 Administration Dashboard
Understand the System Information Gauge
The System Information gauge:
•
Tells you the installed release version of your DMM server software.
•
Tells you the serial number of your DMM appliance.
•
Measures free space and used space for the content partition on your DMM appliance hard drive.
Understand the Status Gauge
Concepts
Tip Refresh your browser to update the data that this gauge shows.
Digital Media Players
Failover Cluster
Timesaver Click...
Have you set up the hardware and activated the separately licensed software features for DMM server
failover and your inventory of DMPs?
If so, this gauge summarizes their current state in two summaries, side-by-side.
•
Counts the total number of registered DMPs.
•
Specifies how many DMPs were reachable or unreachable when this gauge loaded in your browser.
•
Indicates the status of Cisco DMM appliances in your failover cluster.
OL-15762-05
• View All DMPs and DMP Groups to open the DMP Manager page.
• View Failover Status to open the Failover Configuration page.
User Guide for Cisco Digital Media Manager 5.4.x
2-3
Page 32

Concepts
Understand the Licensed Features Gauge
This gauge lists software feature module licenses that are installed on your DMM appliance and
describes constraints that your licenses impose.
Understand the Users Logged In Gauge
Chapter 2 Administration Dashboard
This gauge counts how many users were logged in to your Cisco DMM appliance over the past 1 hour.
Timesaver Click View All Users to open the Users page.
2-4
User Guide for Cisco Digital Media Manager 5.4.x
OL-15762-05
Page 33

Chapter 2 Administration Dashboard
Procedures
•
View Dashboard Gauges, page 2-5
View Dashboard Gauges
Before You Begin
•
Log in to DMM.
Procedure
Procedures
Step 1
Step 2
Step 3
Click Administration.
Click the Dashboard tab.
Stop. You have completed this procedure.
OL-15762-05
User Guide for Cisco Digital Media Manager 5.4.x
2-5
Page 34

Procedures
Chapter 2 Administration Dashboard
2-6
User Guide for Cisco Digital Media Manager 5.4.x
OL-15762-05
Page 35

Audience
Concepts
CHAPTER
3
Licenses
Revised: September 17, 2012
OL-15762-05
Concepts, page 3-1
•
•
Procedures, page 3-2
•
Reference, page 3-6
We prepared this material with specific expectations of you.
You will administer Cisco DMS.
You have already purchased the license key to activate at least one Cisco DMS software feature module.
•
Understand Licenses, page 3-1
Understand Licenses
Features of Cisco DMS are licensed and activated separately. Until you obtain and install license keys,
their corresponding features are hidden from all users— including you, the administrator.
Note Even then, some features remain hidden from users whose privilege levels are low.
What to Do Next
• OPTIONAL—
See http://www.cisco.com/go/dms.
• MANDATORY—
See the “Request License Keys” section on page 3-2.
• MANDATORY—
See the “Install License Keys” section on page 3-4.
Would you like to learn which feature licenses we sell?
Would you like to obtain license keys?
Would you like to install feature licenses?
OL-15762-05
User Guide for Cisco Digital Media Manager 5.4.x
3-1
Page 36

Procedures
Procedures
•
Request License Keys, page 3-2
•
Install License Keys, page 3-4
•
View Installed Licenses, page 3-5
•
Check the Dashboard Gauge for Licenses, page 3-5
Request License Keys
Features of Cisco DMS are sold and licensed separately. After you purchase the right to use a feature,
you must request and install a unique license key. Your key activates the feature on your server.
Before You Begin
•
Log in to DMM.
Procedure
Chapter 3 Licenses
Step 1
Step 2
Click Administration.
Choose Licenses > Request Licenses.
3-2
User Guide for Cisco Digital Media Manager 5.4.x
OL-15762-05
Page 37

Chapter 3 Licenses
Procedures
Step 3
Enter all requested values in the Request Licenses form.
Step 4
Step 5
Step 6
Choose a method to send your license request as an email message to dms-softwarekeys@cisco.com.
•
Export your request to a file that you can email later.
•
Send your request immediately, assuming that your DMM server is configured to enable SMTP.
After you receive a license key file from Cisco, save a local copy of it.
Note Make sure that your local copy does not include any spaces in its filename. (CSCtj60727)
Stop. You have completed this procedure.
What to Do Next
• MANDATORY—
Install License Keys, page 3-4
Related Topics
•
Learn Your DMM Appliance Serial Number, page 1-6
•
View Installed Licenses, page 3-5
OL-15762-05
User Guide for Cisco Digital Media Manager 5.4.x
3-3
Page 38

Procedures
Install License Keys
Before You Begin
•
Log in to DMM.
Procedure
Chapter 3 Licenses
Step 1
Step 2
Step 3
Step 4
Step 5
Step 6
Step 7
Step 8
Click Administration.
Choose Licenses > Install/Upgrade Licenses.
Click Browse or Choose File, depending on your installed browser.
Find and click the license file where you saved it.
Click Open.
Click Install License.
Repeat these steps until all of your licenses are installed.
Features that you licensed are now activated.
Stop. You have completed this procedure.
Related Topics
•
Start DMS-Admin, page 1-5
3-4
•
View Installed Licenses, page 3-5
User Guide for Cisco Digital Media Manager 5.4.x
OL-15762-05
Page 39

Chapter 3 Licenses
View Installed Licenses
Before You Begin
•
Install at least one license key.
•
Log in to DMM.
Procedure
Procedures
Step 1
Step 2
Step 3
Tip The Licensed Features gauge summarizes this information on your DMS-Admin dashboard.
Click Administration.
Choose Licenses > View Licenses.
Stop. You have completed this procedure.
Related Topics
•
Start DMS-Admin, page 1-5
•
Install License Keys, page 3-4
Check the Dashboard Gauge for Licenses
OL-15762-05
Step 1
Step 2
Before You Begin
•
Install at least one license key.
•
Log in to DMM.
Procedure
Click Administration.
Click Dashboard.
User Guide for Cisco Digital Media Manager 5.4.x
3-5
Page 40

Reference
Chapter 3 Licenses
Step 3
Check the Licensed Features gauge on your dashboard.
It tells you which of your:
•
Licensed features are activated.
•
Feature licenses impose restrictions.
Step 4
Stop. You have completed this procedure.
Reference
•
Automatically Licensed Features on Cisco DMS Appliances and Endpoints, page 3-6
•
Optional Module Licenses, page 3-7
Automatically Licensed Features on Cisco DMS Appliances and Endpoints
We license many fundamental features at no additional cost with your purchase of any Cisco DMM
appliance or DMP endpoint. These licenses are unit-specific and perpetual, in the sense that you can
always use the provided software version on the same equipment where we preinstalled it. We do not
impose any subscription fees or non-support fees for this software and do not obligate you to purchase
other licenses.
DMM appliance
DMP endpoint
With the automatically licensed features of a DMM appliance, you can:
•
Install any separately purchased feature licenses.
•
Gain access to features after you license them.
•
Create user accounts and user groups.
•
Configure a user authentication framework.
•
Configure event notifications and alarms.
•
Check processes remotely.
•
Monitor and restart servers remotely.
With a DMP endpoint base license, you can set up the DMP itself1 from its embedded device
manager, DMPDM.
1. Managed in isolation, without involving DMM or any other DMPs.
3-6
User Guide for Cisco Digital Media Manager 5.4.x
OL-15762-05
Page 41

Chapter 3 Licenses
Optional Module Licenses
Note To obtain and activate any license for any component of Cisco DMS, you must have a DMM appliance.
Reference
Module or Pack Part Number
DMS-Admin
Features
DMM Features
Centralized DMP
Management
1. During your initial order, use part numbers that omit the = character. Only later, when you want to extend what you ordered initially, should you use part
numbers that end with =.
SNMP
Notifications
Digital Signs
Module
Cast Module
1 DMP
10 DMPs
50 DMPs
500 DMPs
1,000 DMPs
•
DMM-SNMP52-K9
•
DMM-SNMP52-K9=
•
DMM-SIGNSM52-K9
•
DMM-SIGNSM52-K9=
•
DMM-CAST52-K9
•
DMM-CAST52-K9=
•
DMP-FL-1
•
DMP-FL-1=
•
DMP-FL-10
•
DMP-FL-10=
•
DMP-FL-50
•
DMP-FL-50=
•
DMP-FL-500
•
DMP-FL-500=
•
DMP-FL-1000
•
DMP-FL-1000=
1
Description
Activates support for SNMP interaction with network
monitoring applications. Also activates support for event
notifications and alerts.
Activates DMM baseline features to centrally manage and
operate a digital signage network with Cisco DMPs.
Activates DMM abilities to deliver on-demand video and
live broadcast TV channels over IP networks to DMPs and
their attached presentation systems.
To centrally manage DMPs from DMM, you must
combine a Digital Signs Module license with at least one
DMP feature license.
DMP feature licenses are cumulative. If you are already
licensed to manage 500 DMPs before you install an
additional 50-unit license, your DMM installation will
support managing as many as 550 DMPs.
OL-15762-05
User Guide for Cisco Digital Media Manager 5.4.x
3-7
Page 42

Reference
Chapter 3 Licenses
3-8
User Guide for Cisco Digital Media Manager 5.4.x
OL-15762-05
Page 43

Audience
Procedures
CHAPTER
Server Operations
Revised: September 17, 2012
OL-15762-05
Procedures, page 4-1
•
•
Reference, page 4-4
We prepared this material with specific expectations of you.
You administer Cisco DMS.
•
Check DMM Server Processes Remotely, page 4-1
4
•
Restart Appliances Remotely, page 4-3
Check DMM Server Processes Remotely
Before You Begin
•
Log in to DMM.
Procedure
Step 1
Step 2
Step 3
Click Administration.
Click Services.
Click DMM Server in the far-left column.
OL-15762-05
User Guide for Cisco Digital Media Manager 5.4.x
4-1
Page 44

Procedures
Chapter 4 Server Operations
A list tells you which processes are running or stopped.
Step 4
Note Any process whose name includes the phrase “Web Application” is actually a child of the Tomcat process.
You can restart the Tomcat process in AAI and simultaneously restart all of its children. The path to do this in AAI is
APPLIANCE_CONTROL > RESTART_OPTIONS > RESTART_WEB_SERVICES.
Similarly, you can restart Postgresql in AAI by choosing APPLIANCE_CONTROL > RESTART_OPTIONS >
RESTART_DATABASE_SERVICES.
Stop. You have completed this procedure.
4-2
User Guide for Cisco Digital Media Manager 5.4.x
OL-15762-05
Page 45

Chapter 4 Server Operations
Restart Appliances Remotely
Before You Begin
•
Log in to DMM.
Procedure
Procedures
Step 1
Step 2
Step 3
Step 4
Click Administration.
Click Services.
Click a server in the far-left column.
Choose Options > Restart Server.
OL-15762-05
Step 5
Stop. You have completed this procedure.
User Guide for Cisco Digital Media Manager 5.4.x
4-3
Page 46

Reference
Reference
•
Server Processes
These server processes runs on a DMM appliance.
•
•
•
•
•
•
•
•
Chapter 4 Server Operations
Server Processes, page 4-4
ActiveMQ
Event Management System
Nginx HTTP Server
Postgresql
Scheduled Backup Services
Soir Advanced Search Core
Soir Tagging Service Core
Tomcat
–
Cast Admin Web Application
–
Cast EPG Collector Web Application
–
Cast Flash Web Application
–
Cast Remote Control Web Application
–
DMS-Admin Web Application
–
DSM Web Application
–
IFMS Web Application
–
OpenAM Web Application
4-4
User Guide for Cisco Digital Media Manager 5.4.x
OL-15762-05
Page 47

Audience
Procedures
CHAPTER
Analyze Cisco DMS System Logs
Revised: September 17, 2012
OL-15762-05
Procedures, page 5-1
•
We prepared this material with specific expectations of you.
You have a working syslog server and you understand its operation.
•
Enable Syslog Analysis, page 5-1
•
Disable Syslog Analysis, page 5-2
5
Enable Syslog Analysis
Before You Begin
•
Log in to DMM.
Procedure
Step 1
Step 2
Step 3
Step 4
Click Administration.
Choose Settings > External Servers > Syslog.
Click Enabled.
Enter the routable IP address or DNS-resolvable hostname of your syslog server.
OL-15762-05
User Guide for Cisco Digital Media Manager 5.4.x
5-1
Page 48

Procedures
Chapter 5 Analyze Cisco DMS System Logs
Step 5
Enter the logical port number where your syslog server accepts incoming logfiles.
The standard port number, 514, is prepopulated for your convenience.
Step 6
Step 7
Click Save.
Stop. You have completed this procedure.
Disable Syslog Analysis
Before You Begin
•
Log in to DMM.
•
Enable syslog.
Procedure
Step 1
Click Administration.
Step 2
Step 3
Step 4
Step 5
Choose Settings > External Servers > Syslog.
Click Disabled.
Click Save.
Stop. You have completed this procedure.
5-2
User Guide for Cisco Digital Media Manager 5.4.x
OL-15762-05
Page 49

Configure Failover
Revised: September 17, 2012
OL-15762-05
CHAPTER
6
OL-15762-05
See Failover Configuration Guide for Cisco Digital Media Suite 5.4.x on Cisco.com.
User Guide for Cisco Digital Media Manager 5.4.x
6-1
Page 50

Chapter 6 Configure Failover
6-2
User Guide for Cisco Digital Media Manager 5.4.x
OL-15762-05
Page 51

Audience
Concepts
CHAPTER
Cisco Hinter for RTSP
Revised: September 17, 2012
OL-15762-05
Concepts, page 7-1
•
•
Procedures, page 7-3
•
Reference, page 7-6
We prepared this material with specific expectations of you.
You administer Cisco DMS.
7
Overview
•
Overview, page 7-1
•
Workflow, page 7-2
•
Restrictions, page 7-2
A streaming media framework called RTP over RTSP makes it possible for DMPs to play streaming
video on demand through RTSP connections. This framework prevents data loss inside streams and
maintains proper synchronization of audio to video, even in high-definition.
You must maintain two data files for each VoD that you will stream in this way.
•
An MPEG2-TS source file, which uses the filename extension MPG. Its program stream might be
encoded as MPEG-1, MPEG-2, or MPEG-4 Part 10 (H.264).
•
A “hinted” MOV file, which is derived from your MPG source file and imposes order upon it.
You must use our Cisco Hinter utility to output each hinted MOV file.
Cisco Hinter prepares MPEG2-TS files for interleaved RTP transmission through open source software
called Darwin Streaming Server (DSS). Hinter adds delivery information to a media track, which tells
DSS how to pack and stream (multiplex, or mux) data from the audio channel and the video channel. This
method improves audiovisual synchronization because these channels traverse the network together.
Your DSS can then deliver such hinted video to your DMPs upon demand, after you stage the MPG-MOV
pair to its media serving directory.
OL-15762-05
User Guide for Cisco Digital Media Manager 5.4.x
7-1
Page 52

Concepts
Note We do not develop, maintain, sell, or support Darwin Streaming Server. Nor do we warrant its suitability for any purpose.
Workflow
Chapter 7 Cisco Hinter for RTSP
Cisco Hinter versions for Windows and Linux users are downloadable from your DMM appliance.
1.
Download and set up Cisco Hinter.
2.
Download Darwin Streaming Server (DSS).
Note The official repository for DSS is http://dss.macforge.org. Alternatively, you can use
http://developer.apple.com/opensource/server/streaming/index.html.
3.
Install and configure DSS on equipment other than any Cisco DMS server appliance.
4.
Process each of your MPG files with Cisco Hinter to output a small, hinted MOV file.
5.
Stage your MPG and MOV files together in the DSS serving directory.
Restrictions
6.
Request streams from rtsp://<DSS_IP_address>:<optional_port_number>/<filename>.mov.
In DMPDM
a.
Enter your stream’s address in the URL field at Display Actions > Media URL.
b.
Click Start.
In Digital Signs
Click the URL (recommended) radio button on the Simple property sheet in the Add Asset
a.
dialog box.
b.
Enter your stream’s address in the URL field.
c.
Choose RTSP from the File Type list.
d.
Click Save.
RTSP Variants
•
There are many variants of RTSP and we support only one of them. You must use RTP over RTSP,
which is also called RTP over TCP or Interleaved TCP. In this variant, RTP, RTCP, and RTSP data
stream together over one logical port— typically, port 554.
•
Our RTSP does not support live streaming (multicast or unicast) in this release.
7-2
•
Our RTSP does not support “trick mode.” This means that you cannot pause video during playback,
fast-forward through it, or fast-rewind through it. You can merely start or stop playback.
Darwin Streaming Server
•
DSS cannot read any file whose file size is greater than 2.1 GB. You must split such large files into
smaller ones before you derive hinted MOV output from them. (CSCtb27324)
•
Although DSS is an open source streaming media platform and available for multiple operating
systems, we have tested DSS on Linux exclusively.
User Guide for Cisco Digital Media Manager 5.4.x
OL-15762-05
Page 53

Chapter 7 Cisco Hinter for RTSP
Cisco Hinter
Protocols
Procedures
•
Cisco Hinter software is available for Windows and Linux, exclusively.
•
We do not support any other hinter.
•
We do not support playback of hinted files that you output from any other hinter.
•
We do not support User Datagram Protocol (UDP).
•
We do not support Session Announcement Protocol (SAP).
•
We do not support Session Description Protocol (SDP) or its announcements.
•
Download Cisco Hinter, page 7-3
•
Windows, page 7-4
•
Linux, page 7-5
Procedures
Download Cisco Hinter
Before You Begin
•
Log in to DMM.
Procedure
Step 1
Step 2
Click Administration.
Choose Settings > Hinter.
OL-15762-05
Step 3
Click to download either the Windows or the Linux version.
User Guide for Cisco Digital Media Manager 5.4.x
7-3
Page 54

Procedures
•
Cisco-Hinter-Windows.zip
•
Cisco-Hinter-Linux.tar.gz
Chapter 7 Cisco Hinter for RTSP
Step 4
Step 5
Decompress the archive.
Stop. You have completed this procedure.
Windows
•
Install Cisco Hinter on Windows, page 7-4
•
Run Cisco Hinter on Windows, page 7-4
Install Cisco Hinter on Windows
Procedure
Step 1
Step 2
Step 3
Step 4
Open a command prompt where you decompressed the archive.
Type the command cd CiscoHinter, and then press Enter.
Type the command install.bat, and then press Enter.
Stop. You have completed this procedure.
Run Cisco Hinter on Windows
Procedure
Step 1
Step 2
Step 3
Step 4
Step 5
Step 6
Step 7
Open a command prompt where you decompressed the archive.
Type the command runHinter.bat, and then press Enter.
Enter the MPEG2-TS filename in the Source MPEG field.
OR
Click Browse or Choose File (depending on which browser you use) to find your MPEG2-TS file.
We populate the Output Name field automatically. It is identical to the name in the Source MPEG field,
except that the filename extension is MOV and not MPG.
Click Generate, and then wait for the “Hinting finished successfully” message.
Find your hinted MOV output file in the ..\hinted-files subdirectory.
Move or copy both the MPG file and its MOV derivative to the DSS root directory.
Stop. You have completed this procedure.
7-4
User Guide for Cisco Digital Media Manager 5.4.x
OL-15762-05
Page 55

Chapter 7 Cisco Hinter for RTSP
Linux
•
Install Cisco Hinter on Linux, page 7-5
•
Run Cisco Hinter on Linux, page 7-5
Install Cisco Hinter on Linux
Procedure
Procedures
Step 1
Step 2
Step 3
Open a command prompt where you decompressed the archive.
Type the command run Install.sh, and then press Enter.
Stop. You have completed this procedure.
Run Cisco Hinter on Linux
Procedure
Step 1
Step 2
Step 3
Step 4
Step 5
Open a command prompt where you decompressed the archive.
Type the command run runHinter.sh, and then press Enter.
Enter the MPEG2-TS filename in the Source MPEG field.
OR
Click Browse or Choose File (depending on your browser) to find your MPEG2-TS file.
We populate the Output Name field automatically. It is identical to the name in the Source MPEG field
except that the filename extension is MOV and not MPG.
Click Generate, and then wait for the “Hinting finished successfully” message.
Find your hinted MOV output file in the ../hinted-files subdirectory.
OL-15762-05
Step 6
Step 7
Move or copy both the MPG file and its MOV derivative to the DSS root directory.
Stop. You have completed this procedure.
User Guide for Cisco Digital Media Manager 5.4.x
7-5
Page 56

Reference
Reference
•
FAQs and Troubleshooting, page 7-6
FAQs and Troubleshooting
•
Troubleshoot RTP Over RTSP, page 7-6
Troubleshoot RTP Over RTSP
These general troubleshooting ideas might help you to diagnose and resolve problems with this feature.
•
Verify that both the MPG source file and its hinted MOV derivative are present together in the media
root directory on your DSS.
•
Use a utility like openRTSP to test both the MPG source file and its hinted MOV derivative. The
correct Linux command line syntax in this case is
openRTSP -V -v -t rtsp://DSS_server_IP_address/filename.mov
Chapter 7 Cisco Hinter for RTSP
•
Use HexEdit, WinHex, or a similar utility to open your hinted MOV file and verify that it contains:
–
An explicit reference to the full and literal filename of your MPG source.
–
The signature for MOV output from Cisco Hinter:
Hinted MPEG1 Muxed Track
–
The signature for interleaved RTP:
m=OTHER 0 RTP/AVP 96
•
Check the system logs on your DSS.
Note • openRTSP— http://www.live555.com/openRTSP/
• HexEdit — http://hexedit.sourceforge.net/
•WinHex— http://www.winhex.com/winhex/
7-6
User Guide for Cisco Digital Media Manager 5.4.x
OL-15762-05
Page 57

Audience
CHAPTER
8
Authentication and Federated Identity
Revised: September 17, 2012
OL-15762-05
Concepts, page 8-1
•
•
Procedures, page 8-21
•
Reference, page 8-45
We prepared this material with specific expectations of you.
Embedded Mode—You understand fundamental principles of user authentication.
LDAP Mode—you are a Microsoft Active Directory expert with real-world experience in its configuration and administration.
Federation Mode—you are a SAML 2.0 expert with real-world experience in its configuration and administration, including
import and export of SAML 2.0-compliant IdP and SP configuration files.
Concepts
Overview
•
Overview, page 8-1
•
Glossary, page 8-2
•
Understand the Requirement to Authenticate Users, page 8-9
•
Decide Which Authentication Method to Use, page 8-10
•
LDAP and Active Directory Concepts, page 8-10
•
Federated Identity and Single Sign-on (SSO) Concepts, page 8-17
•
Migration Between Authentication Methods, page 8-20
User authentication features of DMS-Admin help you to:
•
Authenticate all user sessions. (We prevent you from disabling mandatory authentication, even
though we allowed this in Cisco DMS 5.1.x and prior releases.)
•
Choose and configure an authentication method.
•
Import user account settings from an Active Directory server.
OL-15762-05
User Guide for Cisco Digital Media Manager 5.4.x
8-1
Page 58

Concepts
Glossary
Chapter 8 Authentication and Federated Identity
•
Synchronize user groups from an Active Directory server. Microsoft Active Directory is the only
LDAP implementation that we support in this release.
•
Use federation services with a SAML 2.0-compliant IdP to support SP-initiated “single sign-on”
login authentication in your network (following an initial synchronization to a Microsoft Active
Directory Server that populates the DMM user database).
Note We support your use of one— and only one — IdP server with Cisco DMS 5.4.
Timesaver Go to terms that start with...[A|C|D|F|I|L|O|P|R|S|U|X
A
Active Directory
Active Directory
forest
Active Directory
tree
].
Microsoft implementation of LDAP. A central authentication server and user store. Active Directory is
the only LDAP implementation that we support in this release.
A domain-straddling combination of Active Directory trees within an organization that operates
multiple Internet domains. Thus, the forest at “Amalgamated Examples, LLC” might straddle all trees
across example
.com
, example
.net
, and example
.org
.
Or, to use Cisco as a real-world case-study, one forest could straddle cisco.com and webex.com,
among others.
Note This Cisco DMS release does not support Active Directory forests.
A subdomain-straddling combination of IdPs throughout one Internet domain. These IdPs operate
collectively on behalf of the Internet domain’s constituent subdomains. Thus, the “tree” at
example.com might encompass all of the IdPs to authenticate user sessions within subdomains such
as these:
•legal
•sales
• support
.example.com
.example.com
.example.com
8-2
User Guide for Cisco Digital Media Manager 5.4.x
OL-15762-05
Page 59

Chapter 8 Authentication and Federated Identity
Concepts
administrator DN
authentication
C
The DN to authenticate your Active Directory server’s administrator.
Note
This release is more strict than most prior releases in its enforcement of proper LDAP syntax.
Now, when you specify the administrator DN, you must use proper syntax, which conforms
exactly to LDIF grammar.
•
Proper syntax:
•
Poor syntax:
OTHERWISE
CN=admin1,OU=Administrators,DC=example,DC=com
EXAMPLE\admin1
When you use poor syntax here for the first time while your DMM appliance runs DMS 5.3,
we show you, the administrator, this error message: “Invalid username or password.”
But if you used and validated poor syntax here before upgrading to Cisco DMS 5.3, we do not
repeat the validation process. Therefore—even though we do not show an error message
to anyone —
Note An LDAP expression must never include a space immediately to either side of a “=” sign. Similarly, it must
never include a space immediately to either side of an “objectClass” attribute. Otherwise, validation fails.
LDAP users simply cannot log in
.
The process to verify if a directory service entity has correctly claimed its own identity.
Return to Top
CA
CN
CoT
certification authority. Authority that issues and manages security credentials and public keys, which
any directory service entity relies upon to encrypt and decrypt messages exchanged with any other
directory service entity. As part of a public key infrastructure (PKI), a CA checks with a registration
authority (RA) to verify information that certificate requestors provide. After the RA verifies requestor
information, the CA can then issue a certificate.
common name. An attribute-value pair that names one directory service entity but indicates nothing
about its context or position in a hierarchy. For example, you might see
cn=administrator
is so commonplace in theory that it might possibly recur many times in an Active
cn=administrator
. But
Directory forest, while referring to more than just one directory service entity. An absence of context
means that you cannot know which device, site, realm, user group, or other entity type requires the
implied “administration” or understand why such “administration” should occur.
Therefore, use of a standalone CN is limited in the LDIF grammar. Absent any context, a standalone
CN is only ever useful as an RDN.
Note An LDAP expression must never include a space immediately to either side of a “=” sign. Similarly, it must
never include a space immediately to either side of an “objectClass” attribute. Otherwise, validation fails.
circle of trust. The various SP that all authenticate against one IdP in common.
OL-15762-05
User Guide for Cisco Digital Media Manager 5.4.x
8-3
Page 60

Concepts
Chapter 8 Authentication and Federated Identity
D
DC
digital certificate
Return to Top
domain component. An attribute to designate one constituent part of a fully-qualified domain name
(FQDN). Suppose for example that you manage a server whose FQDN is americas.example.com. In
this case, you would link together three DC attribute-value pairs:
Note An LDAP expression must never include a space immediately to either side of a “=” sign. Similarly, it must
never include a space immediately to either side of an “objectClass” attribute. Otherwise, validation fails.
DC=Americas,DC=example,dc=com.
Uniquely encrypted digital representation of one directory service entity, whether physical or logical.
This trustworthy representation certifies that the entity is not an imposter when it sends or receives data
through a secured channel. The CA normally issues the certificate upon request by the entity or its
representative. The requestor is then held accountable as the “certificate holder.” To establish and retain
credibility, a certificate must conform to requirements set forth in International Organization for
Standardization (ISO) standard X.509. Most commonly, a digital certificate includes the following.
•
One DN to authenticate the directory service entity.
•
One DN to authenticate the CA.
•
A serial number to identify the digital certificate itself.
•
An expiration date, after which any entity that receives the certificate should reject it.
•
A copy of the certificate holder’s public key.
•
The CA’s digital signature, so recipients can verify that the certificate is not forged.
8-4
User Guide for Cisco Digital Media Manager 5.4.x
OL-15762-05
Page 61

Chapter 8 Authentication and Federated Identity
Concepts
directory service
entity
DN
Any single, named unit at any level within a nested hierarchy of named units, relative to a network. An
entity’s essence depends upon its context. This context, in turn, depends upon interactions between at
least two service providers— one apiece for the naming service and the directory service—in your
network. Theoretically, an entity might represent any tangible thing or logical construct.
•
By “tangible thing,” we mean something that a person could touch, which occupies real space in
the physical world. For example, this entity type might represent one distinct human being, device,
or building.
•
By “logical construct,” we mean a useful abstraction whose existence is assumed or agreed upon
but is not literally physical. For example, this entity type might represent one distinct language,
subnet, protocol, time zone, or ACL.
An entity’s purpose is broad and flexible within the hierarchical context that defines it.
distinguished name. A sequence of attributes that help a CA to distinguish a particular directory service
entity uniquely for authentication. Distinct identity in this case arises from a text string of
comma-delimited attribute-value pairs. Each attribute-value pair conveys one informational detail
about the entity or its context. The comma-delimited string is the actual DN. It consists of the entity’s
own CN, followed by at least one OU, and then concludes with at least one DC. For example:
CN=username,OU=California,OU=west,OU=sales,DC=Americas,DC=example,DC=com
Note An LDAP expression must never include a space immediately to either side of a “=” sign. Similarly, it must
never include a space immediately to either side of an “objectClass” attribute. Otherwise, validation fails.
Thus, each DN represents more than merely one isolated element. A DN also associates the element to
its specific context within the Active Directory user base that your IdP depends upon.
F
federation
Tip Any DN might change over the lifespan of its corresponding entity. For example, when you move entries in a tree,
you might introduce new OU attributes or deprecate old ones that are elements of a DN. However, you can assign to any
entity a reliable and unambiguous identity that persists beyond such changes to its context. To accomplish this, merely
include a universally unique identifier (UUID) among the entity’s set of operational attributes.
Return to Top
The whole collection of authentication servers that make SSO possible in a network by synchronizing
their user bases to one IdP in common. This mutualized pooling of user bases bestows each valid user
with a “federated identity” that spans an array of your SPs.
OL-15762-05
User Guide for Cisco Digital Media Manager 5.4.x
8-5
Page 62

Concepts
Chapter 8 Authentication and Federated Identity
I
IdP
Return to Top
identity provider. One SAML 2.0-compliant server (synchronized to at least one Active Directory
user base), that authenticates user session requests upon demand for SPs in one network subdomain.
Furthermore, an IdP normalizes data from a variety of directory servers (user stores).
Users send their login credentials to an IdP over HTTPS, so the IdP can authenticate them to whichever
SPs they are authorized to use. As an example, consider how an organization could use three IdPs.
•
An IdP in
legal
.example.com might authenticate user sessions for one SP, by comparing user
session requests to the user base records from one Active Directory server.
•
An IdP in
sales
.example.com might authenticate user sessions for 15 SPs, by comparing user
session requests to the user base records from three Active Directory servers.
•
An IdP in
support
.example.com might authenticate user sessions for four SPs, by comparing
user session requests to the user base records from two Active Directory servers.
Caution Only a well known CA can issue the digital certificate for your IdP. Otherwise, you cannot use SSL, HTTPS,
or LDAPS in Federation mode and, thus, all user credentials are passed in the clear.
Tip We have tested Cisco DMS federation features successfully against OpenAM, PingFederate, and
Shibboleth. We recommend that you use an IdP that we have tested with Cisco DMS. We explicitly DO NOT support
Novell E-Directory or Kerberos-based custom directories.
L
LDAP
LDAPS
LDIF
If your IdP fails, you can switch your authentication mode to LDAP or Embedded.
Return to Top
Lightweight Directory Access Protocol. A highly complex data model and communications protocol for
user authentication. LDAP provides management and browser applications with access to directories
whose data models and access protocols conform to X.500 series (ISO/IEC 9594) standards.
Note Microsoft Active Directory is the only LDAP implementation that we support in this release.
Secure LDAP. The same as ordinary LDAP, but protected under an added layer of SSL encryption.
Note Before you try to configure SSL encryption and before you let anyone log in with SSL, you MUST:
• Activate SSL on your Active Directory server and then export a copy of the server’s digital certificate.
• Import into DMM the SSL certificate that you exported from Active Directory.
• Restart Web Services (Tomcat) in AAI.
Caution Is your DMM appliance one half of a failover pair?
If so, you will trigger immediate failover when you submit the command in AAI to restart Web Services. This occurs
by design, so there is no workaround.
LDAP Data Interchange Format. A strict grammar that SPs and IdPs use to classify and designate
named elements and levels in Active Directory.
8-6
User Guide for Cisco Digital Media Manager 5.4.x
OL-15762-05
Page 63

Chapter 8 Authentication and Federated Identity
Concepts
O
OpenAM
OU
P
PingFederate
Return to Top
SAML 2.0-compliant identity and access management server platform written in Java. OpenAM is open
source software available under the Common Development and Distribution (CDDL) license. OpenAM
is derived from and replaces OpenSSO Enterprise, which also used CDDL licensing. See
http://www.forgerock.com/openam.html.
organizational unit. An LDIF classification type for a logical container within a hierarchical system.
In LDIF grammar, the main function of an OU value is to distinguish among superficially identical CNs
that might otherwise be conflated. For example:
• CN=John Doe,OU=sales,DN=example,DN=com
• CN=John Doe,OU=marketing,DN=example,DN=com
Note An LDAP expression must never include a space immediately to either side of a “=” sign. Similarly, it must
never include a space immediately to either side of an “objectClass” attribute. Otherwise, validation fails.
Return to Top
SAML 2.0-compliant identity and access management server platform written in Java. PingFederate is
proprietary, commercial software. See http://www.pingidentity.com.
R
RDN
S
SAML
Shibboleth
Return to Top
relative distinguished name. The CN for a directory service entity, as used exclusively (and still without
any explicit context) by the one IdP that has synchronized this entity against an Active Directory user
base. When an IdP encounters any RDN attribute in an LDIF reference, the IdP expects implicitly that
its SAML 2.0-synchronized federation is the only possible context for the CN. It expects this because
an IdP cannot authenticate— and logically should never encounter— a directory service entity whose
RDN is meaningful to any other federation.
Return to Top
Security Assertion Markup Language. XML-based open standard that security domains use to exchange
authentication and authorization data, including assertions and security tokens.
We support SAML 2.0.
A SAML 2.0-compliant architecture for federated identity-based authentication and authorization.
OL-15762-05
User Guide for Cisco Digital Media Manager 5.4.x
8-7
Page 64

Concepts
Chapter 8 Authentication and Federated Identity
SP
SSO
U
user base
user base DN
service provider. Server that requests and receives information from an IdP. For example, your DMM
server is an SP for Cisco DMS.
single sign on. (And sometimes “single sign off.”) The main user-facing benefit of federation mode is
that SPs begin— and end, in some implementations — user sessions on behalf of their entire federation.
SSO is a convenience for users, who can log in only once per day as their work takes them between
multiple servers that are related but independent. Furthermore, SSO is a convenience to IT staff, who
spend less time on user support, password fatigue, compliance audits, and so on.
• We DO NOT support single sign off in Cisco DMS 5.3.
• We support only SP-initiated SSO in Cisco DMS 5.3.
Return to Top
The location of the user subtree in the LDAP directory tree. For example,
Note An LDAP expression must never include a space immediately to either side of a “=” sign. Similarly, it must
never include a space immediately to either side of an “objectClass” attribute. Otherwise, validation fails.
DC=ad,DC=com
.
The DN for an Active Directory user base.
Note An LDAP expression must never include a space immediately to either side of a “=” sign. Similarly, it must
never include a space immediately to either side of an “objectClass” attribute. Otherwise, validation fails.
user filter
X
X-509
A user filter limits the scope of an agreement to import filtered records from an Active Directory
user base.
Note An LDAP expression must never include a space immediately to either side of a “=” sign. Similarly, it must
never include a space immediately to either side of an “objectClass” attribute. Nor can a group name include any spaces.
Otherwise, validation fails.
Return to Top
A standard for public key infrastructure. X.509 specifies, among other things, standard formats for
public key certificates and a certification path validation algorithm.
8-8
User Guide for Cisco Digital Media Manager 5.4.x
OL-15762-05
Page 65

Chapter 8 Authentication and Federated Identity
Understand the Requirement to Authenticate Users
Although Cisco DMS always authenticates users, we support three authentication methods.
•
Embedded authentication is completely native to Cisco DMS. It does not depend on any
external servers.
•
LDAP authentication causes Cisco DMS products to rely on one — and only one — Microsoft
Active Directory server and a Microsoft Internet Information Server (IIS). Thus, setup and
operation with this method are more complex than with embedded authentication.
Concepts
•
Federation mode — also known as single sign-on (SSO) causes Cisco DMS products to rely on a
SAML 2.0-compliant IdP in combination with a Microsoft Active Directory server and IIS. Thus,
setup and operation with this method are more complex than with LDAP authentication.
Note You must choose one of these methods. The method that you use determines which login screen your users will see.
Tip • After a user session times out, we prompt the affected user to log in twice.
• Migration from one mode to another takes as long as 1 minute to finish (CSCtn22370).
• An unresponsive Active Directory server can hang a login prompt for 20 minutes without any error message.
EMBEDDED MODE LDAP MODE FEDERATION (SSO) MODE
IdP-specific login screen
1
OL-15762-05
1. When any of your federation servers uses a self-signed certificate, we show your users two SSL warnings during login.
Related Topics
•
LDAP and Active Directory Concepts, page 8-10
•
Federated Identity and Single Sign-on (SSO) Concepts, page 8-17
User Guide for Cisco Digital Media Manager 5.4.x
8-9
Page 66

Concepts
Decide Which Authentication Method to Use
Chapter 8 Authentication and Federated Identity
LDAP and Active Directory Concepts
Note Microsoft Active Directory is the only LDAP implementation that we support in this release.
•
LDAP is Highly Complex, page 8-11
•
Plan Ahead, page 8-11
•
Restrictions, page 8-11
User Guide for Cisco Digital Media Manager 5.4.x
8-10
OL-15762-05
Page 67

Chapter 8 Authentication and Federated Identity
•
Synchronization Concepts, page 8-11
•
LDAP Concepts, page 8-14
•
Password Concepts, page 8-16
•
Understand Authentication Property Sheets for LDAP, page 8-17
LDAP is Highly Complex
Caution LDAP-related features of Cisco DMS are meant for use by qualified and experienced administrators of
Microsoft Active Directory. Unless you are an Active Directory and LDAP expert, we recommend that you use
embedded authentication.
Plan Ahead
•
Install and configure Active Directory and Internet Information Services (IIS) before you try to
configure LDAP authentication mode or federation mode in DMS-Admin.
Concepts
Tip We support IIS 6 on Windows Server 2003.
•
Make sure that you have generated or imported certificates as necessary and activated SSL on the
Active Directory server before you try to configure SSL encryption.
Restrictions
Cisco DMS Release
5.3.0 Yes No
Synchronization Concepts
•
Synchronization (Replication) Overview, page 8-12
•
Synchronization Types, page 8-12
•
Understand Manual Synchronization, page 8-13
•
Understand Automatic Synchronization, page 8-13
•
Guidelines for Synchronization, page 8-14
Support for
Active Directory
Trees Forests
OL-15762-05
User Guide for Cisco Digital Media Manager 5.4.x
8-11
Page 68

Concepts
Synchronization (Replication) Overview
Note Microsoft Active Directory is the only LDAP implementation that we support in this release.
When you choose LDAP authentication or SSO authentication, user account data originates from your
Active Directory server. However, Cisco DMS does not synchronize (replicate) this data automatically,
in real time. Instead, we cache it. Therefore, you must resynchronize user account data when you think
it is appropriate to do so. You can:
•
Resynchronize manually.
•
Schedule synchronizations to recur in the future at set intervals.
DMS-Admin synchronizes all user accounts in the Active Directory “user base” that your filter specifies,
except users whose accounts are disabled on your Active Directory server.
Synchronization Types
Chapter 8 Authentication and Federated Identity
Note Microsoft Active Directory is the only LDAP implementation that we support in this release.
We support four types of Active Directory synchronization in LDAP mode or federation mode.
Initial Update Overwrite Delete
Runs a one-time
synchronization for a
new filter that you never
synchronized
previously.
Runs an incremental,
fast update to find and
make up for any
differences between
user accounts that
match your
Active Directory filter
and your local copy of
those user accounts.
Overwrites your local
copy of user accounts
that correspond to your
Active Directory filter
with new copies of
those user accounts. In
addition, deletes your
local copy of each user
account that has been
Deletes your local copy
of user accounts that
correspond to a defined
Active Directory filter
and deletes the entry for
that filter from
DMS-Admin.
deleted from
Active Directory since
the last time that you ran
a synchronization.
8-12
User Guide for Cisco Digital Media Manager 5.4.x
OL-15762-05
Page 69

Chapter 8 Authentication and Federated Identity
Understand Synchronization of a DMM Group to an LDAP Filter
Note Microsoft Active Directory is the only LDAP implementation that we support in this release.
Concepts
Is the Active Directory Filter
Associated to a DMM
User Group?
Yes
No
•
In most cases, you can associate one LDAP filter apiece to one DMM user group. Likewise, in most
cases, you can associate one DMM user group apiece to one LDAP filter. The Digital Signs user
group is an exception to both of these principles. It is built-in to Cisco DMS.
•
After you associate a DMM user group to an LDAP filter, you cannot use features on the Users tab
to delete the DMM user group until after you delete the LDAP filter. However, even when you delete
an LDAP filter, there is no requirement to delete its associated DMM user group. Furthermore,
there is no way for you to delete the Digital Signs user group. It is built-in to Cisco DMS.
Understand Manual Synchronization
Note Microsoft Active Directory is the only LDAP implementation that we support in this release.
Manual synchronization mode requires you to choose Administration > Settings > Authentication >
Synchronize Users > LDAP Bookmarks during all future synchronizations. Afterward, you must
click Update.
Manual synchronization mode deletes your schedule for automatic synchronizations.
We Sync All Matching LDAP User Accounts to the
‘All Users’ Group in DMM Associated User Group in DMM
Ye s Ye s
Ye s N.A.
Understand Automatic Synchronization
Note Microsoft Active Directory is the only LDAP implementation that we support in this release.
Automatic synchronization mode automates and schedules incremental updates to user accounts that
match Active Directory filters that you defined in DMS-Admin. When you use automatic
synchronization mode, new fields and elements become available to you. These help you to configure
the settings for automatic synchronization.
See the “Understand Synchronization of a DMM Group to an LDAP Filter” section on page 8-13.
OL-15762-05
User Guide for Cisco Digital Media Manager 5.4.x
8-13
Page 70

Concepts
Guidelines for Synchronization
Note Microsoft Active Directory is the only LDAP implementation that we support in this release.
We recommend that you synchronize your LDAP bookmarks periodically. Synchronization ensures that
user and group membership associations are current and correct.
Sync
Type Best Practices
Initial
Update
Overwrite Note The Overwrite option is CPU-intensive for your DMM appliance and might lower its
Chapter 8 Authentication and Federated Identity
The Initial option is CPU-intensive for your DMM appliance and might lower performance
temporarily. We recommend that you use it during off-peak hours only.
We recommend that you use the Update option whenever:
•
A new user account in Active Directory should have login access to DMM.
•
User attributes1 change in Active Directory for a user account in DMM.
•
A user account is disabled in Active Directory and should be deleted from DMM.
performance temporarily. We recommend that you use this option during off-peak hours only.
LDAP Concepts
•
After a user account is deleted from Active Directory, this option deletes the
corresponding user account from DMM.
•
After a user account is associated to a new first name, last name, or username, this
option overwrites the outdated user account attributes.
Delete
Caution The Delete option is destructive by design. We advise that you use it sparingly and with
great caution.
Note Typically, the deletion process takes about 1 minute to finish. However, when there are more than
50,000 users in the Active Directory database, this process might run in the background and take about
30 minutes to finish. In this case, the user interface in DMS-Admin can show that a bookmark was deleted
even though the actual process has not finished. If you observe this behavior, simply allow 30 minutes for
the operation to finish.
1. Attributes that you entered on the Manage Attributes property sheet in DMS-Admin.
Related Topics
•
Manage LDAP (Active Directory) Attributes, page 8-29
•
Understand LDAP Attributes, page 8-15
•
Guidelines for LDAP Filters, page 8-15
8-14
User Guide for Cisco Digital Media Manager 5.4.x
OL-15762-05
Page 71

Chapter 8 Authentication and Federated Identity
Understand LDAP Attributes
Note Microsoft Active Directory is the only LDAP implementation that we support in this release.
Ordinarily, DMS-Admin will not import any user account record from your Active Directory server
when the value in it is blank for any of these attributes:
Concepts
• Login User Name
•First Name
•Last Name
However, you can import and synchronize all of the Active Directory user account records that match
your filters. You can do this even when some of the user account records are incomplete because one or
more of their attributes have blank values.
To prevent these undefined attributes from blocking the import of the user accounts they are meant to
describe, you can enter generic values for most attributes in the Values to Use by Default column.
DMS-Admin takes the generic values that you enter, and then inserts them automatically where they
are needed.
Tip Nonetheless, you cannot enter a default value for the Login User Name attribute. Usernames are unique.
Guidelines for LDAP Filters
Note Microsoft Active Directory is the only LDAP implementation that we support in this release.
•
•
—This required value always must be unique.
—This required value might be identical for multiple users.
—This required value might also be identical for multiple users.
Use “OU” values to impose rough limits on a filter, page 8-15
Use “memberOf” values to pinpoint a filter more precisely, page 8-16
OL-15762-05
•
Use “objectClass” values to match all user records, page 8-16
Use “OU” values to impose rough limits on a filter
•
Never use a filter that defines the user base at the domain level. For example, this filter is
not acceptable.
DC=example,DC=com
•
Instead, use filters that define the user base at a lower level, as this one does.
OU=SanJose,DC=example,DC=com
User Guide for Cisco Digital Media Manager 5.4.x
8-15
Page 72

Concepts
Chapter 8 Authentication and Federated Identity
•
LDAP returns matched records from all levels within the user base that your filter defines.
Would a filter for “
OU=RTP,DC=example,DC=com
OU=Milpitas,OU=SanJose,DC=example,DC=com
OU=Sunnyvale,OU=SanJose,DC=example,DC=com
1. Research Triangle Park, NC, does not have any physical connection to San José, CA.
2. Milpitas, CA and Sunnyvale, CA, are suburbs of San José, CA, which affects them directly and in multiple ways.
OU=SanJose,DC=example,DC=com
” ever include any users from...?
Use “memberOf” values to pinpoint a filter more precisely
•
But what if you did not want to include any members of Milpitas or Sunnyvale? If your
Active Directory server considered these cities (organizational units) to be subsets of San José, how
could you exclude their members? To do so, you would use the
memberOf
attribute. It stops LDAP from matching records at any lower level than the one you name explicitly.
In this scenario for example, you would use
memberOf=OU=SanJose,DC=example,DC=com
to match only the direct members of the “SanJose” OU.
Use “objectClass” values to match all user records
•
You can define a comprehensive filter that matches all user records.
objectClass=user
No
Ye s
Ye s
1
2
2
Password Concepts
•
Understand the Effects of a Changed Password in Active Directory, page 8-16
•
Understand the Effects of a Blank Password in Active Directory, page 8-17
Understand the Effects of a Changed Password in Active Directory
Note Microsoft Active Directory is the only LDAP implementation that we support in this release.
After you change a user password on your Active Directory server, there is no requirement to
resynchronize the affected user account in DMS-Admin.
8-16
User Guide for Cisco Digital Media Manager 5.4.x
OL-15762-05
Page 73

Chapter 8 Authentication and Federated Identity
Understand the Effects of a Blank Password in Active Directory
Note Microsoft Active Directory is the only LDAP implementation that we support in this release.
Even though it is possible in Active Directory to use a blank value for a password, Cisco DMS does
•
not allow it.
•
When you choose LDAP authentication, any user whose Active Directory password is blank is
prevented from logging in to any component of Cisco DMS.
•
Access is enabled or restored after the password is populated on the Active Directory server.
Understand Authentication Property Sheets for LDAP
Note Microsoft Active Directory is the only LDAP implementation that we support in this release.
The Authentication page contains four tabbed property sheets.
Concepts
Select
Mode
1
Embedded, LDAP or SSO
Select Mode is by default the only active tab. Your choices on the Select Mode property sheet
determine whether you have access to the other three property sheets.
Define
Filter
Synchronize
Users
Manage
Attributes
1. In most production environments, you can expect to use the Select Mode property sheet only one time.
LDAP or SSO
Your choices on the Define Filter property sheet help you to configure and add a new agreement.
LDAP or SSO
Your choices on the Synchronize Users property sheet help you to submit a new agreement.
LDAP or SSO
Federated Identity and Single Sign-on (SSO) Concepts
•
IdP Requirements, page 8-17
•
Configuration Workflow to Activate Federation (SSO) Mode, page 8-18
•
Authentication Scenarios for User Sessions in Federation (SSO) Mode, page 8-18
IdP Requirements
OL-15762-05
To use federation (SSO) mode in Cisco DMS, you must have access to an IdP that meets our
requirements. Your IdP must meet
•
Support SAML 2.0.
•
Support these two SAML profiles:
–
Web Br ow s e r SSO Profile
–
Enhanced Client or Proxy (ECP) Profile
ALL OF THESE CRITERIA IN COMBINATION
User Guide for Cisco Digital Media Manager 5.4.x
:
8-17
Page 74

Concepts
•
Generate assertions in which the SAML “UID” attribute is mapped to the local portion of an
authenticated user’s username.
•
Generate SAML responses that are no larger than 16K bytes. (CSCua10799)
•
Use a digital certificate from a well-known CA (but only if you will use HTTPS).
•
Include a “<SingleSignOnService>” entry with SOAP binding in its IdP metadata. For example:
<SingleSignOnService Location=http://idp.example.com/idp/SSO.sml2”
Binding=”urn:oasis:names:tc:SAML:2.0:bindings:SOAP”/>
In practice, these requirements limit your IdP to ones that we certify and
NO OTHER. We certify OpenAM, PingFederate, and Shibboleth.
Configuration Workflow to Activate Federation (SSO) Mode
1.
Configure and set up an Active Directory server.
2.
Configure and set up a SAML 2.0-compliant IdP.
Chapter 8 Authentication and Federated Identity
(CSCua29696)
Note When you use a “fresh install” of Cisco DMS 5.3 (as opposed to an upgrade), your DMM appliance is configured
to use embedded authentication mode by default. But when you upgrade a DMM server that was already
configured for an earlier Cisco DMS release, it might use either embedded mode or LDAP mode.
Obtain a digital certificate from a trusted CA and install it on your IdP.
3.
4.
Use DMS-Admin to configure Cisco DMS for federation mode.
5.
Export SAML 2.0-compliant metadata from your DMM server and import it into your IdP.
6.
Export SAML 2.0-compliant metadata from your IdP and import it into your DMM server.
7.
Configure Active Directory exactly as you would in LDAP mode.
8.
Click Update to save your work, and then advance to the Synchronize Users property sheet.
9.
Synchronize DMM with your Active Directory server to populate the DMM user database.
Note You MUST configure at least one LDAP bookmark.
10.
Synchronize users exactly as you would in LDAP mode.
Note Whenever you change any setting or value on your IdP or any of your SPs, you must reestablish their
pairing to restore mutual trust among them.
Click Update to save your work.
11.
Authentication Scenarios for User Sessions in Federation (SSO) Mode
•
SSO Scenario 1— Trusted + Valid + Authorized
•
SSO Scenario 2 —Trusted + Valid + NOT Authorized
•
SSO Scenario 3— Nothing Known
User Guide for Cisco Digital Media Manager 5.4.x
8-18
OL-15762-05
Page 75

Chapter 8 Authentication and Federated Identity
SSO Scenario 1— Trusted + Valid + Authorized
1.
A web browser requests access to a protected resource on an SP.
Yo ur federation will not approve or deny this request until it knows more.
2.
The SP asks its IdP if the browser is currently authenticated to any valid user account in the CoT.
3.
The IdP verifies that:
•
The browser is already connected to an SP elsewhere in the CoT, having authenticated
successfully to a valid user account and having received a SAML “token” or “passport” that
authorizes at least some access.
• The user account has sufficient permissions to access the protected resource.
4.
The IdP acts on the SP’s behalf and redirects the browser immediately to the protected resource.
SSO Scenario 2— Trusted + Valid + NOT Authorized
Concepts
1.
A web browser requests access to a protected resource on an SP.
Yo ur federation will not approve or deny this request until it knows more.
2.
The SP asks its IdP if the browser is currently authenticated to any valid user account in the CoT.
3.
The IdP verifies that:
•
The browser is already connected to an SP elsewhere in the CoT, having authenticated
successfully to a valid user account and having received a SAML “token” or “passport” that
authorizes at least some access.
• The user account DOES NOT have sufficient permissions.
4.
The IdP redirects the browser to the SP, where an
HTTP 403 Forbidden
message states that the user is
not authorized to access the protected resource.
OL-15762-05
User Guide for Cisco Digital Media Manager 5.4.x
8-19
Page 76

Concepts
SSO Scenario 3— Nothing Known
1.
A web browser requests access to a protected resource on an SP.
Yo ur federation will not approve or deny this request until it knows more.
2.
The SP asks its IdP if the browser is currently authenticated to any valid user account in the CoT.
3.
The IdP reports that:
•
The browser is not yet connected to any SP in the CoT.
•
The browser is not yet authenticated to any valid user account.
• We cannot tell if the browser’s human operator is a valid and authorized user, a valid but confused user,
or an intruder.
4.
The SP redirects the browser automatically to an HTTPS login prompt on the IdP, where one of
the following occurs.
• The browser’s human operator successfully logs in to a valid user account.
“token” or “passport” to the browser session, authorizing at least some access. And:
Chapter 8 Authentication and Federated Identity
The IdP attaches a SAML
– The user account has permission to access the protected resource. So, the IdP acts on
the SP’s behalf and redirects the browser immediately to the protected resource.
OR
– The user account DOES NOT have permission to access the protected resource. So, the
IdP redirects the browser to the SP, where an
is not authorized to access the protected resource.
• The browser’s human operator fails to log in.
So, lacking any proof that this person is authorized,
we block access to every protected resource until the human operator can log in successfully.
Migration Between Authentication Methods
•
Understand Migration (from Either LDAP or SSO) to Embedded, page 8-20
•
Understand Migration (from Embedded) to Either LDAP or SSO, page 8-21
Understand Migration (from Either LDAP or SSO) to Embedded
When you migrate from LDAP (via Active Directory) or federation mode to embedded authentication
mode, you must explicitly choose whether to keep local copies of the:
HTTP 403 Forbidden
message states that the user
8-20
•
User accounts that were associated to LDAP filters.
•
Groups and policies that were associated to LDAP filters.
User Guide for Cisco Digital Media Manager 5.4.x
OL-15762-05
Page 77

Chapter 8 Authentication and Federated Identity
Note • Unless you choose explicitly to keep the local copy of a user, a group, or a policy, we discard the local copy.
• Migration from one mode to another takes as long as 1 minute to finish (CSCtn22370).
The result varies according to the combination of your choices.
When You
Keep Local
Copies of
Procedures
Users
Groups
Ye s Ye s Ye s
The Result
Policies
•
•
•
We preserve all local information.
We overwrite all LDAP-derived user account passwords with
CiscoDMMvp99999.
1
We preserve all local user accounts. However, we overwrite all LDAP-derived
user account passwords with CiscoDMMvp99999.
Ye s No No
No Ye s Ye s
•
We discard all LDAP-derived groups.
•
We discard all LDAP-derived policies.
•
We discard all LDAP-derived user accounts.
•
We preserve all LDAP-derived groups. However, they are empty.
•
We preserve all LDAP-derived policies. Although they no longer apply to anyone,
you can reuse them and apply them to any remaining user accounts and any future
user accounts as you see fit.
No No No
1. This security feature protects your network and user data. If anyone gains unauthorized access to the exported file and tries
to use it, Active Directory rejects the invalid passwords.
•
We discard all LDAP-derived users, groups, and policies.
Understand Migration (from Embedded) to Either LDAP or SSO
1
Note • Before you migrate from embedded authentication mode to federation mode, you must install a digital certificate
Procedures
OL-15762-05
from a trusted CA on your IdP server. Otherwise, you cannot migrate to federation mode at all.
• After you migrate from embedded authentication mode to either LDAP (Active Directory) mode or federation mode, the locked
property sheets become unlocked. You must use them.
• Migration from one mode to another takes as long as 1 minute to finish (CSCtn22370).
•
Export the Root CA X.509 Certificate from Your Active Directory Server, page 8-22
•
Configure DMM to Trust the Active Directory Root CA, page 8-22
•
Choose an Authentication Method, page 8-23
User Guide for Cisco Digital Media Manager 5.4.x
8-21
Page 78

Chapter 8 Authentication and Federated Identity
Procedures
•
Configure LDAP (Active Directory) Settings, page 8-24
•
Configure Federation Services for SSO, page 8-33
Export the Root CA X.509 Certificate from Your Active Directory Server
Procedure
Step 1
Step 2
Step 3
Step 4
Open a web browser on your Active Directory server and connect to http://localhost/certsrv.
Click Download a CA certificate.
Choose the current CA certificate.
Choose DER encoded.
The X.509 certificate that you export must be DER-encoded, and it can be binary or printable (Base64).
However, when you use Base64, the certificate file must include these lines:
-----BEGIN CERTIFICATE-----
-----END CERTIFICATE-----
Step 5
Step 6
Click Download CA certificate.
Save this certificate in a file.
For example, you might call the certificate ADcertificate.cer.
Step 7
Stop. You have completed this procedure.
Configure DMM to Trust the Active Directory Root CA
Before You Begin
•
Log in to DMM.
8-22
Procedure
Step 1
Step 2
User Guide for Cisco Digital Media Manager 5.4.x
Click Administration.
Choose Security > Authentication > Select Mode.
OL-15762-05
Page 79

Chapter 8 Authentication and Federated Identity
Procedures
Step 3
Step 4
Step 5
Step 6
Step 7
Step 8
Choose LDAP.
Check the Use SSL Encryption check box.
Additional user interface elements now appear, which are relevant to SSL and digital certificates.
Upload the root CA certificate file that you saved locally.
a.
Click Upload, and then click Add.
b.
Browse to the file on a local volume.
c.
Click the filename and press Enter.
d.
Click OK to save your work and dismiss the dialog box.
Enter the details for your Active Directory server.
Tip Be sure to use the logical port where your Active Directory server actually listens for SSL connections. The
standard port number for LDAPS is 636. However, your Active Directory server might be configured to use some other port.
As prompted, use DMS-Admin to restart Web Services (Tomcat).
The installed certificate cannot take effect until after you restart Tomcat.
Stop. You have completed this procedure.
Choose an Authentication Method
Before You Begin
•
Log in to DMM.
Procedure
Step 1
Step 2
Step 3
Step 4
Click Administration.
Choose Security > Authentication.
Use elements on the Select Mode property sheet to choose an authentication mode.
Click Update.
OL-15762-05
User Guide for Cisco Digital Media Manager 5.4.x
8-23
Page 80

Procedures
Chapter 8 Authentication and Federated Identity
Note Migration from one mode to another takes as long as 1 minute to finish (CSCtn22370).
The authentication settings that you changed are now in effect.
Step 5
Stop. You have completed this procedure.
What to Do Next
• OPTIONAL —
Did you choose LDAP (Active Directory) or SSO?
Proceed to the “Define LDAP (Active Directory) Filters” section on page 8-24
Related Topics
•
Elements to Choose and Enable an Authentication Mode, page 8-46
Configure LDAP (Active Directory) Settings
•
Define LDAP (Active Directory) Filters, page 8-24
•
Import User Accounts that Match an LDAP (Active Directory) Filter, page 8-25
•
Resynchronize User Accounts that Match an LDAP (Active Directory) Filter, page 8-26
•
Sever All Existing Ties to a User Base or an LDAP (Active Directory) Server, page 8-27
•
Define the LDAP (Active Directory) Synchronization Schedule, page 8-28
•
Manage LDAP (Active Directory) Attributes, page 8-29
•
Configure Automatic LDAP (Active Directory) Synchronization, page 8-30
•
Derive User Group Membership Dynamically from an LDAP (Active Directory) Filter, page 8-31
Define LDAP (Active Directory) Filters
Before You Begin
•
Log in to DMM.
•
Choose LDAP or federation as your authentication method.
Procedure
Step 1
Step 2
Step 3
Click Administration.
Choose Security > Authentication.
Click Define Filter.
8-24
User Guide for Cisco Digital Media Manager 5.4.x
OL-15762-05
Page 81

Chapter 8 Authentication and Federated Identity
Procedures
Step 4
Do the following.
a.
Use elements on the Define Filter property sheet to define, validate, and add one LDAP filter.
b.
Click Update.
c.
Repeat this step for each filter to be added.
The authentication settings that you changed are now in effect.
Step 5
Stop. You have completed this procedure.
Related Topics
•
Elements to Define, Validate, and Add LDAP Filters, page 8-48
Import User Accounts that Match an LDAP (Active Directory) Filter
Before You Begin
•
Log in to DMM.
•
Choose LDAP or SSO as your authentication method.
•
Define LDAP filters that will match the user accounts that you want to import.
Procedure
Step 1
Step 2
Step 3
Step 4
Step 5
Step 6
Click Administration.
Choose Security > Authentication > Synchronize Users.
Tip Is the Synchronize Users tab disabled (dimmed), so that you cannot click it? If so, refresh your browser.
Find the relevant bookmark among all your saved bookmarks.
Choose Initial as the synchronization type.
Click Submit.
Note Please wait. Your request might take as long as 1 minute to process (CSCtn22370).
Stop. You have completed this procedure.
OL-15762-05
User Guide for Cisco Digital Media Manager 5.4.x
8-25
Page 82

Procedures
Chapter 8 Authentication and Federated Identity
What to Do Next
• OPTIONAL —
Proceed to the “Derive User Group Membership Dynamically from an LDAP (Active Directory)
Filter” section on page 8-31.
Would you like to associate a set of imported users with a new group?
• OPTIONAL —
Would you like to configure the schedule for synchronization?
Proceed to the “Define the LDAP (Active Directory) Synchronization Schedule” section on
page 8-28.
Related Topics
•
Define LDAP (Active Directory) Filters, page 8-24
•
Derive User Group Membership Dynamically from an LDAP (Active Directory) Filter, page 8-31
•
Elements to Use LDAP Bookmarks for Synchronization, page 8-49
Resynchronize User Accounts that Match an LDAP (Active Directory) Filter
Before You Begin
•
Log in to DMM.
•
Choose LDAP or SSO as your authentication method.
•
Define LDAP filters.
Procedure
Step 1
Click Administration.
8-26
Step 2
Step 3
Step 4
Step 5
Step 6
User Guide for Cisco Digital Media Manager 5.4.x
Choose Security > Authentication > Synchronize Users.
Tip Is the Synchronize Users tab disabled (dimmed), so that you cannot click it? If so, refresh your browser.
Find the relevant bookmark among all your saved bookmarks.
Choose Update as the synchronization type.
Click Submit.
Note Please wait. Your request might take as long as 1 minute to process (CSCtn22370).
Stop. You have completed this procedure.
OL-15762-05
Page 83

Chapter 8 Authentication and Federated Identity
What to Do Next
• OPTIONAL —
Would you like to associate a set of imported users with a new group?
Proceed to the “Derive User Group Membership Dynamically from an LDAP (Active Directory)
Filter” section on page 8-31.
Procedures
• OPTIONAL —
Would you like to configure the schedule for synchronization?
Proceed to the “Define the LDAP (Active Directory) Synchronization Schedule” section on
page 8-28.
Related Topics
•
Define LDAP (Active Directory) Filters, page 8-24
•
Derive User Group Membership Dynamically from an LDAP (Active Directory) Filter, page 8-31
•
Elements to Use LDAP Bookmarks for Synchronization, page 8-49
Sever All Existing Ties to a User Base or an LDAP (Active Directory) Server
Before You Begin
•
Log in to DMM.
•
Choose LDAP or SSO as your authentication method.
•
Define LDAP filters.
Procedure
Step 1
Click Administration.
OL-15762-05
Step 2
Step 3
Step 4
Step 5
Step 6
Choose Security > Authentication > Synchronize Users.
Tip Is the Synchronize Users tab disabled (dimmed), so that you cannot click it? If so, refresh your browser.
Click LDAP Bookmarks,
Delete all relevant filters from DMS-Admin.
Click Update.
Note Please wait. Your request might take as long as 1 minute to process (CSCtn22370).
The authentication settings that you changed are now in effect.
Stop. You have completed this procedure.
User Guide for Cisco Digital Media Manager 5.4.x
8-27
Page 84

Procedures
Chapter 8 Authentication and Federated Identity
What to Do Next
• OPTIONAL —
Proceed to the “Derive User Group Membership Dynamically from an LDAP (Active Directory)
Filter” section on page 8-31.
Would you like to associate a set of imported users with a new group?
• OPTIONAL —
Would you like to configure the schedule for synchronization?
Proceed to the “Define the LDAP (Active Directory) Synchronization Schedule” section on
page 8-28.
Related Topics
•
Define LDAP (Active Directory) Filters, page 8-24
•
Derive User Group Membership Dynamically from an LDAP (Active Directory) Filter, page 8-31
•
Elements to Use LDAP Bookmarks for Synchronization, page 8-49
Define the LDAP (Active Directory) Synchronization Schedule
Before You Begin
•
Log in to DMM.
•
Choose LDAP or SSO as your authentication method.
•
Define LDAP filters and bookmarks.
Procedure
Step 1
Click Administration.
8-28
Step 2
Step 3
Step 4
Choose Security > Synchronize Users > Scheduling,
Choose between manual synchronization and automatic synchronization.
Note You will not see any of the elements that the “Elements for Bookmarks” table describes until after you define
at least one filter on the Define Filter property sheet.
Click Update.
The authentication settings that you changed are now in effect.
Step 5
Stop. You have completed this procedure.
What to Do Next
• OPTIONAL —
Would you like to associate attribute names in DMS-Admin and Active Directory?
If so, proceed to the “Manage LDAP (Active Directory) Attributes” section on page 8-29.
User Guide for Cisco Digital Media Manager 5.4.x
OL-15762-05
Page 85

Chapter 8 Authentication and Federated Identity
Procedures
• OPTIONAL —
Should Cisco DMS expect that your Active Directory server uses factory-preset attribute
names? If so, proceed to the “Manage LDAP (Active Directory) Attributes” section on page 8-29.
• OPTIONAL —
Should Cisco DMS expect that your Active Directory server uses custom attribute
names? If so, proceed to the “Manage LDAP (Active Directory) Attributes” section on page 8-29.
Related Topics
•
Define LDAP (Active Directory) Filters, page 8-24
•
Elements to Schedule Synchronization, page 8-50
Manage LDAP (Active Directory) Attributes
Before You Begin
•
Log in to DMM.
•
Choose LDAP or SSO as your authentication method.
•
Define LDAP filters and bookmarks.
•
Configure the LDAP synchronization schedule.
Procedure
Step 1
Click Administration.
OL-15762-05
Step 2
Step 3
Click Security > Authentication > Manage Attributes.
Tip Is the Manage Attributes tab disabled (dimmed), so that you cannot click it? If so, refresh your browser.
Use elements on the Manage Attributes property sheet to:
•
Set the associations between DMS-Admin attribute names and their corresponding Active Directory
attribute names.
•
Use the predefined and typical names for Active Directory attributes (shown in grey text) or edit
those attribute names so they match the names that your Active Directory server uses.
•
Enter the values to use by default in DMS-Admin when a user account attribute is not defined on
your Active Directory server.
You must enter a value for each mandatory attribute. You cannot enter a value to use by default for user
names, because each user name is unique.
User Guide for Cisco Digital Media Manager 5.4.x
8-29
Page 86

Procedures
Chapter 8 Authentication and Federated Identity
Step 4
Click Update.
The authentication settings that you changed are now in effect.
Step 5
Stop. You have completed this procedure.
Related Topics
•
Define the LDAP (Active Directory) Synchronization Schedule, page 8-28
•
Elements to Manage Attributes, page 8-51
Configure Automatic LDAP (Active Directory) Synchronization
Before You Begin
•
Log in to DMM.
•
Choose LDAP or SSO as your authentication method.
•
Define LDAP filters and bookmarks.
•
Configure the LDAP synchronization schedule.
Procedure
Step 1
Click Administration.
8-30
Step 2
Step 3
Step 4
Choose Security > Authentication > Synchronize Users > Scheduling.
Click the calendar icon ( ) to choose the start date for synchronization.
Choose the hour and minute when synchronization should begin. Then, choose either AM or PM as
the period.
Step 5
From the Repeat Interval list, choose the interval of recurrence:
Interval Description
Never Synchronization occurs once and does not recur.
Every Day Synchronization recurs once every 24 hours. You must set the hour and
Every Week Synchronization recurs once every 7 days. You must set the hour and
User Guide for Cisco Digital Media Manager 5.4.x
minute when it should start.
minute when it should start.
OL-15762-05
Page 87

Chapter 8 Authentication and Federated Identity
Interval Description
Every Month Synchronization recurs once each month. You must set the hour and
Custom Synchronization recurs at an interval of your choosing. You must set the
Procedures
minute when it should start.
hour and minute when it should start.
Choose Days, Weeks, or Months as the interval type.
•
Choose a day of the month from 1 to 30 when the interval type
is Days.
•
Choose a day of the week when the interval type is Weeks.
•
Choose an interval of recurrence from 1 to 6 when the interval type
is Months.
Step 6
(Optional)
•
Did you click the Automatic Synchronization radio button?
•
And should a one-time synchronization start immediately, in addition to the start date and time that
you specified?
If so, check the Synchronize users immediately check box.
Step 7
Click Update.
The authentication settings that you changed are now in effect.
Step 8
Stop. You have completed this procedure.
Derive User Group Membership Dynamically from an LDAP (Active Directory) Filter
You can populate a user group with the returned output from a User Base DN query. However, a group
of this kind differs in important ways from a group that you populate manually.
Note • Membership of such groups is dynamic— based on shared characteristics among the group of Active Directory
users who match your query.
• We update and clean these groups automatically during synchronization. Their membership will change after
synchronization runs, when the corresponding records in Active Directory show that a user's membership should start
or stop.
• An imported Active Directory group is always read-only in DMS-Admin. By protecting it, we ensure that it is always correct,
relative to the original and subject to any delay between synchronizations. For this reason, you cannot edit their memberships
rolls manually.
• When you try to delete a user from a group of this type, DMS-Admin shows an error message: “You cannot remove any
user from a group associated with an LDAP bookmark.”
OL-15762-05
User Guide for Cisco Digital Media Manager 5.4.x
8-31
Page 88

Procedures
Before You Begin
•
Log in to DMM.
•
Choose LDAP as your authentication method.
Procedure
Chapter 8 Authentication and Federated Identity
Step 1
Step 2
Step 3
Step 4
Click Administration.
Choose Security > Authentication > Define Filter.
Tip Is the Define Filter tab disabled (dimmed), so that you cannot click it? If so, refresh your browser.
Use elements on the Define Filter property sheet to define, validate, and add one LDAP filter.
Would you like to add users to a group that exists already? If so, choose that group name from the User
Group (in DMM) list.
OR
Would you like to create and populate an entirely new group? If so, choose Create a New User Group
from the User Group (in DMM) list. Then, give the new user group a name.
•
Group names in DMM can include alphanumeric characters (
underscores (
_
), and periods (.).
0–9; a–z; A-Z
), hyphens (-),
8-32
•
Spaces are forbidden.
•
Other forbidden characters include:
~‘!@#$%^&*()+={[}]|\:;”"’'<>?/
Step 5
Step 6
Step 7
User Guide for Cisco Digital Media Manager 5.4.x
Click Vali da te .
Click Add.
Note Please wait. Your request might take as long as 1 minute to process (CSCtn22370).
Stop. You have completed this procedure.
OL-15762-05
Page 89

Chapter 8 Authentication and Federated Identity
Configure Federation Services for SSO
•
IdP Configuration Examples, page 8-33
•
Export SP Metadata from DMM, page 8-43
•
Import IdP Metadata into DMM, page 8-43
•
Bypass External Authentication During Superuser Login, as Needed, page 8-45
IdP Configuration Examples
This section includes configuration examples from IdP implementations that have passed internal Cisco
tests for interoperability with Cisco DMS.
Note • We provide these rough examples as a courtesy only. We do not endorse any IdP by name, including any whose setup
we mention by name in these examples. Likewise, we do not influence the development of any IdP. We do not know when or
how its configuration workflows, daily operation, or overall quality might change in the future. For these reasons, we cannot
know beforehand when or how the natural course of its ongoing development might invalidate one or more of the examples
in this section. Therefore: Obtain all necessary IdP documentation from your IdP vendor, not Cisco.
• You are free to choose, configure, and use an IdP at your own discretion— and your own risk. We do not develop,
maintain, or support any IdP. Nor do we warrant that your choice of IdP is free of defects, non-infringing, or fit for any purpose.
Procedures
•
Example: Configure OpenAM to Interoperate with Cisco DMS, page 8-34
•
Example: Configure Shibboleth to Interoperate with Cisco DMS, page 8-36
•
Example: Configure PingFederate to Interoperate with Cisco DMS, page 8-40
OL-15762-05
User Guide for Cisco Digital Media Manager 5.4.x
8-33
Page 90

Procedures
Example: Configure OpenAM to Interoperate with Cisco DMS
Before You Begin
•
Obtain a digital identity certificate from a well-known CA, install it on your IdP host system, and
then enable SSL.
Procedure
Chapter 8 Authentication and Federated Identity
Step 1
Configure
OpenAM to use
a datastore from
Active Directory,
unless it already
does so.
Note In Federation mode, we use a synchronization process to learn which usernames are valid in
your organization. Later and separately, we use an authentication process to verify user-login credentials. And
even though we expect most IdPs will source both of these services from a Microsoft Active Directory server,
your organization might use some other other LDAP system to authenticate user sessions. When this is the case,
you must install and configure an Active Directory server for synchronization use by Cisco DMS.
Otherwise, we cannot learn which usernames are valid. In turn, ordinary users cannot log in to Cisco DMS. To
prevent this outcome, you must replicate and synchronize a datastore between your new Active Directory server
and your existing LDAP server. Afterward, Cisco DMS can synchronize with the Active Directory datastore.
In OpenAM Web, choose Access Control > Top Level Realm > Data Stores.
a.
b.
Enter values to define the attributes of your Active Directory DataStore.
You might enter values for some of the attributes (like these ones, for example)...
LDAP Server: <IP_ADDRESS>:389
LDAP Bind DN: CN=Administrator,CN=Users,DC=win2003esx,DC=example,DC=com
LDAP Bind Password: *********
LDAP Organization DN: OU=SystemTest,DC=win2003esx,DC=example,DC=com
LDAP Users Search Attribute: sAMAccountName
LDAP Users Search Filter: (objectclass=user)
Authentication Naming Attribute: sAMAccountName
... while leaving other attribute values undefined.
Attribute Name Mapping: <Empty>
LDAP Groups Search Attribute: <Empty>
LDAP Groups Search Filter: <Empty>
LDAP Groups container Naming Attribute: <Empty>
LDAP Groups Container Value: <Empty>
Attribute Name of Unqiue Member: <Empty>
LDAP People Container Naming Attribute: <Empty>
LDAP People Container Value: <Empty>
Persistent Search Base DN: <Empty>
Persistent Search Filter: <Empty>
8-34
Note These are merely examples.
c.
Click Federation, and then click your IdP server instance— for example, dmsIdp.
d.
Click Assertion Processing.
e.
Change the IDP Attribute Map value from UID=uid to UID=sAMAccountName.
User Guide for Cisco Digital Media Manager 5.4.x
OL-15762-05
Page 91

Chapter 8 Authentication and Federated Identity
Procedures
Step 2
Step 3
Step 4
Install Enhanced
Client or Proxy
(ECP), a SAML
profile plugin, if
you will make
API system calls
to OpenAM
1
.
Export SP
metadata from
Cisco DMS.
Import SP
metadata from
Cisco DMS.
a.
Log in to your Cisco.com user account.
b.
Go to http://cisco.com/cisco/software/release.html?mdfid=280171249&softwareid=
282100271&release=5.3&rellifecycle=&relind=AVAILABLE&reltype=all, navigate to the
download page for our implementation of ECP
c.
Use Maven or another method to download release 1.2.14 of the open source logging
2
, and then download it.
framework called log4j.
d.
Copy your downloaded ECP and log4j files to
e.
Restart your servlet container— for example, tomcat.
f.
In OpenAM Web, click Federation, and then click your IdP server instance— for
/$OPENSSO_HOME/WEB-INF/lib
, .
example, dmsIdp.
g.
Click Advanced.
h.
In the ECP Configuration area, set the IDP Session Mapper value to
com.cisco.dms.core.security.aaa.sso.saml2.ecp.idp.plugin.DmsIDPECPSessionMapper.
i.
Click Save.
Export metadata from each SP that will participate in your OpenAM CoT.
Tip
a.
b.
c.
For Cisco DMS, see the “Export SP Metadata from DMM” topic.
Go to the console page and click Register Remote Service Provider.
Check the File check box.
Click Upload, and then navigate to the SP metadata that you exported from DMS-Admin and
saved as dms_sp_config.xml.
d.
Click Configure, and then click Federation.
Step 5
Make sure that
OpenAM is
configured to
issue the
Principal
attribute.
e.
Make sure that dmsServiceProvider (SAMLv2 SP Remote) has a defined value.
a.
In OpenAM Web, click Federation, and then click your IdP server instance— for
example, dmsIdp.
b.
Click Assertion Processing.
c.
In the Attribute Mapper area, set the Attribute Map value to UID=uid.
d.
Click Back.
e.
Click the SP entity instance for your DMM appliance.
The Assertion Content tab is selected automatically.
f.
In the Request/Response Signing area, check both of these check boxes:
•
Authentication Requests Signed
•
Assertions Signed
g.
Choose Access Control > / (Top Level Realm) > Authentication.
h.
Click All Core Settings.
i.
Make sure that the User Profile value is set to Required.
This will cause OpenAM to pass the user IDs of logged-in users to DMM and your other SPs.
j.
Click Save, and then click Back to Authentication.
k.
Log out of OpenAM Web.
OL-15762-05
User Guide for Cisco Digital Media Manager 5.4.x
8-35
Page 92

Procedures
Chapter 8 Authentication and Federated Identity
Step 6
Cause
See the “Import IdP Metadata into DMM” topic.
Cisco DMS to
trust OpenAM.
Step 7
Step 8
1. Also, DMS-Admin includes a feature to test the configuration of your IdP. In the case of OpenAM, this testing feature uses ECP and fails in its absence.
2. We provide a downloadable ECP implementation as a courtesy to you. Alternatively, you can obtain ECP from another source at your discretion.
Use the Linux
CLI to export IdP
metadata.
wget --no-check-certificate
https://<IdP_serverip>:<service_port>/opensso/saml2/jsp/exportmetadata.jsp -O
dms_idp_config.xml
Stop. You have completed this procedure.
Example: Configure Shibboleth to Interoperate with Cisco DMS
Before You Begin
•
Obtain a digital identity certificate from a well-known CA, install it on your IdP host system, and
then enable SSL.
Procedure
Step 1
Obtain and install
Shibboleth.
a.
Go to http://www.shibboleth.net/downloads/identity-provider/latest/.
b.
Download the latest Identity Provider software package, such as
shibboleth-identityprovider-2.3.0-bin.zip.
c.
Extract the downloaded archive, and then make the installer script within it, named
install.sh, executable. For example:
$ unzip shibboleth-identityprovider-2.3.0-bin.zip
$ cd shibboleth-identityprovider-2.3.0
$ chmod u+x install.sh
8-36
d.
Run the script to install Shibboleth.
$ ./install.sh
•
The installer will prompt you to specify the installation directory. Its default is
/opt/shibboleth-idp.
•
In addition, it will prompt you to enter your Shibboleth system’s FQDN, such as
shibboleth.example.com.
Respond appropriately to these prompts.
Shibboleth is now installed and you have completed its basic configuration. Your new
Shibboleth system contains these subfolders.
/opt/shibboleth-idp/bin/
/opt/shibboleth-idp/conf/
/opt/shibboleth-idp/credentials/
/opt/shibboleth-idp/lib/
/opt/shibboleth-idp/logs/
/opt/shibboleth-idp/metadata/
/opt/shibboleth-idp/war/
User Guide for Cisco Digital Media Manager 5.4.x
OL-15762-05
Page 93

Chapter 8 Authentication and Federated Identity
Procedures
Step 2
Step 3
Step 4
Step 5
Step 6
Export SP
metadata from
Cisco DMS.
Import SP
metadata from
Export metadata from each SP that will participate in your Shibboleth CoT.
Tip
For Cisco DMS, see the “Export SP Metadata from DMM” topic.
Use SFTP or another method to save imported metadata where Shibboleth will access it:
/opt/shibboleth-idp/metadata/
.
Cisco DMS.
Log in remotely. Use SSH, remote desktop, VNC, or a direct console connection to log in remotely to the system
where you installed Shibboleth.
Edit the attribute
filter file.
Edit the attribute
resolver file.
a.
Open /opt/shibboleth-idp/conf/attribute-filter.xml for editing.
b.
Change the attributeID value (at or near line 24) to uid.
<afp:AttributeRule attributeID="uid">
a.
Open /opt/shibboleth-idp/conf/attribute-resolver.xml for editing.
b.
Find this section:
<!- ========================================== ->
<!- Attribute Definitions ->
<!- ========================================== ->
c.
Enter these lines after the Attribute Definitions section heading, at or near line 29.
<resolver:AttributeDefinition xsi:type="ad:Simple" id="uid"
sourceAttributeID="sAMAccountName">
<resolver:Dependency ref="myLDAP" />
<resolver:AttributeEncoder xsi:type="enc:SAML2String"
name="urn:oid:0.9.2342.19200300.100.1.1" friendlyName="uid" />
<resolver:AttributeEncoder xsi:type="enc:SAML2StringNameID"
nameFormat="urn:oasis:names:tc:SAML:2.0:nameid-format:transient" />
</resolver:AttributeDefinition>
d.
Find this section:
<!- ========================================== ->
<!- Data Connectors ->
<!- ========================================== ->
e.
Enter these lines after the Data Connectors section heading, at or near line 288.
<resolver:DataConnector id="myLDAP" xsi:type="dc:LDAPDirectory"
xmlns="urn:mace:shibboleth:2.0:resolver:dc"
ldapURL="ldap://<YOUR_ACTIVE_DIRECTORY_SERVER_IP>"
baseDN="cn=<USERBASE>, dc=<HOSTNAME>, dc=<EXAMPLE>, dc=<COM>"
principal="cn=<ADMINISTRATOR_CN>, cn=<USERBASE>, dc=<HOSTNAME>,
dc=<EXAMPLE>, dc=<COM>"
principalCredential="<ADMINISTTRATOR_PASSWORD>">
<dc:FilterTemplate>
<![CDATA[
(sAMAccountName=$requestContext.principalName)
]]>
</dc:FilterTemplate>
<LDAPProperty name="java.naming.referral" value="follow"/>
</resolver:DataConnector>
OL-15762-05
User Guide for Cisco Digital Media Manager 5.4.x
8-37
Page 94

Procedures
Chapter 8 Authentication and Federated Identity
Step 7
Step 8
Step 9
Edit the
handler file.
Edit the login
config file.
Edit the replying
party file.
a.
Open /opt/shibboleth-idp/conf/handler.xml for editing.
b.
Uncomment line 109.
<!-- Username/password login handler -->
<ph:LoginHandler xsi:type="ph:UsernamePassword"
jaasConfigurationLocation="file:///opt/shibboleth-idp/conf/login.config">
<ph:AuthenticationMethod>urn:oasis:names:tc:SAML:2.0:ac:classes:PasswordProtect
edTransport</ph:AuthenticationMethod>
</ph:LoginHandler>
a.
Open /opt/shibboleth-idp/conf/login.config for editing.
b.
Find this string, at or near line 45:
};
c.
Enter this material immediately before }; .
edu.vt.middleware.ldap.jaas.LdapLoginModule optional
ldapUrl="ldap://<YOUR_ACTIVE_DIRECTORY_SERVER_IP>:389"
bindDn="cn=<ADMINISTRATOR_CN>, cn=<USERBASE>, dc=<HOSTNAME>, dc=<EXAMPLE>,
dc=<COM>"
bindCredential="<ADMINISTTRATOR_PASSWORD>"
baseDn="cn=<USERBASE>, dc=<HOSTNAME>, dc=<EXAMPLE>, dc=<COM>"
ssl="false"
tls="false"
userFilter="sAMAccountName={0}";
a.
Open /opt/shibboleth-idp/conf/replying-party.xml for editing.
b.
Find this section:
<!-- ========================================== -->
<!- Metadata Configuration ->
<!-- ========================================== -->
c.
Enter these lines after the Metadata Configuration section heading, at or near line 123.
<metadata:MetadataProvider
id="<HOSTNAME_ONLY_FOR_YOUR_SP>"
xsi:type="FilesystemMetadataProvider"
xmlns="urn:mace:shibboleth:2.0:metadata"
metadataFile="/opt/shibboleth-idp/metadata/<EXPORTED_SP_SETTINGS_FILENAME>.xml"
maintainExpiredMetadata="true"
/>
</metadata:MetadataProvider>
8-38
User Guide for Cisco Digital Media Manager 5.4.x
OL-15762-05
Page 95

Chapter 8 Authentication and Federated Identity
Procedures
Step 10
Step 11
Step 12
Step 13
Step 14
Prepare your
Shibboleth config
for use by
Cisco DMS.
a.
Open /opt/shibboleth-idp/metadata/opt/shibboleth-idp/metadata/Idp-metadata.xml
for editing.
b.
Delete lines 9 through 11.
<Extensions>
<shibmd:Scope regexp="false"><EXAMPLE>.<COM></shibmd:Scope>
</Extensions>
c.
Delete lines 67 through 69.
<Extensions>
<shibmd:Scope regexp="false"><EXAMPLE>.<COM></shibmd:Scope>
</Extensions>
d.
Find this string:
</IDPSSODescriptor>
e.
Enter this new binding immediately before </IDPSSODescriptor>.
<SingleSignOnService Binding="urn:oasis:names:tc:SAML:2.0:bindings:SOAP"
Location="https://<YOUR_SHIBBOLETH_SERVER_FQDN>:8443/idp/profile/SAML2/SOAP/ECP
" />
f.
Append :8443 to the end of every FQDN in this file.
g.
Save your edited copy of this file to your local system.
Be sure to use your Shibboleth hostname in the local filename. For example, you might name
this local copy idp-shibboleth.xml.
Cause
See the “Import IdP Metadata into DMM” topic.
Cisco DMS to
trust Shibboleth.
Deploy
cp /opt/shibboleth-idp/war/idp.war /usr/local/tomcat/webapps/
Shibboleth.
Test your work.
a.
Restart Tomcat.
b.
Check for the “OK” message at http://<hostname>:8080/idp/profile/Status.
Stop. You have completed this procedure.
OL-15762-05
User Guide for Cisco Digital Media Manager 5.4.x
8-39
Page 96

Procedures
Example: Configure PingFederate to Interoperate with Cisco DMS
Before You Begin
•
Install PingFederate and configure it with at least one Adapter instance to your authentication server,
such as LDAP or OAM.
Procedure
Chapter 8 Authentication and Federated Identity
Step 1
Step 2
Export SP
metadata from
Cisco DMM.
Import SP
metadata into
PingFederate.
Export metadata from each SP that will participate in your PingFederate CoT.
Tip
a.
b.
c.
For Cisco DMS, see the “Export SP Metadata from DMM” topic.
Log in to PingFederate as its administrator.
Find the SP Connections area in the My IdP Configuration column and click Create New.
Click Do not use a template for this connection on the Configuring SP
Connection/Connection Template page, and then click Next.
d.
Check the Browser SSO Profiles check box on the Configuring SP Connection/Connection
Type page, choose SAML 2.0 from the Protocols list, and then click Next.
e.
Check the Browser SSO check box, and then click Next.
f.
Click Choose File on the Configuring SP Connection/Import Metadata page, and then
navigate to the SP metadata that you exported from DMS-Admin as dms_sp_config.xml.
g.
Click Open, and then click Next THREE TIMES.
8-40
User Guide for Cisco Digital Media Manager 5.4.x
OL-15762-05
Page 97

Chapter 8 Authentication and Federated Identity
Procedures
Step 3
Configure SAML
profile settings
and IdP
assertions.
a.
Click Configure Browser SSO on the Configuring SP Connection/Browser SSO page.
b.
Check the SP Initiated SSO check box on the Browser SSO/SAML Profiles page, and then
click Next TWO TIMES.
c.
Click Configure Assertion Creation on the Browser SSO/Assertion Creation page.
d.
Click Tra nsient on the Assertion Creation/Identity Mapping page, check the Include
attributes in addition to the transient identifier check box, and then click Next.
e.
Set these attribute-value relationships in the Extend the Contract area on the Assertion
Creation/Attribute Contract page.
•
SAML_AUTHN_CTX
urn:oasis:names:tc:SAML:2.0:attrname-format:uri
•
UID
urn:oasis:names:tc:SAML:2.0:attrname-format:uri
f.
Click Next.
g.
Click Map New Adapter Instance on the Assertion Creation/IdP Adapter Mapping page.
h.
Choose your appropriate authentication type and adapter instance from the next two pages.
i.
Click Next.
The username attribute that you need next is probably part of the adapter contract. Therefore:
j.
Click Use only the Adapter Contract values in the SAML assertion on the IdP Adapter
Mapping/Assertion Mapping page, and then click Next.
Step 4
Configure
protocol settings.
k.
On the IdP Adapter Mapping/Attribute Contract Fulfillment page:
•
Set the source to Text for the SAML_AUTHN_CTX attribute contract. Then, set its
value to
•
Set the source to Adapter for the UID attribute contract. Then:
–
–
l.
Click Next > Done > Next > Done > Next.
a.
Click Configure Protocol Settings on the Browser SSO/Protocol Settings page.
b.
Make sure that the default binding value is set to POST on the Protocol Settings/Assertion
urn:oasis:names:tc:SAML:2.0:ac:classes:PasswordProtectedTransport
Locate an adapter value, such as subject or userId, that maps to the username.
Set the UID attribute contract value to match the adapter value that you just found.
Consumer Service URL page, delete all other bindings, and then click Next.
c.
Clear the Artifact check box on the Protocol Settings/Allowable SAML Bindings page, and
then click Next.
d.
Check these check boxes on the Protocol Settings/Signature Policy page, and then
click Next.
•
Require AuthN requests to be signed when received via the POST or Redirect bindings.
•
Always sign the SAML Assertion.
e.
Click None on the Protocol Settings/Encryption Policy page.
f.
Click Next > Done > Next > Done > Next.
OL-15762-05
User Guide for Cisco Digital Media Manager 5.4.x
8-41
Page 98

Procedures
Chapter 8 Authentication and Federated Identity
Step 5
Configure
credentials and
their digital
signatures.
a.
Click Configure Credentials on the SP Connection/Credentials page.
b.
Click Configure on the Credentials/Back-Channel Authentication page.
c.
Check the Use Digital Signatures to guarantee payload in Browser SSO profile check box on
the Back-Channel Authentication/Inbound SOAP Authentication Type page, and then
click Next.
d.
Click Done on the Back-Channel Authentication/Summary page.
e.
Choose the appropriate certificate on the Credentials/Digital Signature Settings page, check
the Include the certificate in the signature <KeyInfo> Element check box, and then
click Next.
f.
Click Manage Signature Verification Settings... on the Credentials/Signature Verification
Settings page.
g.
Click Unanchored on the Signature Verification/Trust Model page, and then click Next.
h.
Choose your DMM certificate (example: dmm.example.com) from the Primary list on the
Signature Verification/Signature Verification Certificate page, and then click Next.
Note DO NOT choose any secondary certificate.
OR
If the Primary list does not include your DMM certificate, do the following.
1.
Click Manage Certificates on the Signature Verification/Signature Verification
Certificate page.
2.
Click Choose File on the Import Certificate/Import Certificate page, and then navigate
to the X509 digital certificate file (*.cer) that you output from DMM.
Step 6
Step 7
Note Make sure that your certificate file includes the preamble and postscript that are mandatory for
PEM-formatted certificates. The preamble and postscript look like this.
-----BEGIN CERTIFICATE-----
-----END CERTIFICATE-----
3.
Click Open, and then click Next THREE TIMES.
4.
Check the Make this the active certificate check box on the Import Certificate/Summary
page, and then click Done.
i.
Click Done on the Certificate Management/Manage Digital Verification Certificates page.
j.
Click Next on the Signature Verification/Signature Verification Certificate page.
k.
Click Done on the Signature Verification/Summary page.
l.
Click Next on the Credentials/Signature Verification Settings page.
m.
Click Done on the Credentials/Summary page.
n.
Click Next on the SP Connection page.
Activate and save
the new settings.
Set the Connection Status to Active on the SP Connection/Activation & Summary page, and then
click Save.
Stop. You have completed this procedure.
8-42
User Guide for Cisco Digital Media Manager 5.4.x
OL-15762-05
Page 99

Chapter 8 Authentication and Federated Identity
Export SP Metadata from DMM
Before you can use Cisco DMS in federation mode, you must export data from DMS-Admin in the form
of an SP configuration file. Later, you will import this file into your IdP.
Before You Begin
•
Make sure that your DMM appliance is running in embedded authentication mode or LDAP mode.
•
Log in to DMM as its superuser.
Procedure
Procedures
Step 1
Step 2
Step 3
Step 4
Step 5
Step 6
Click Administration.
Choose Security > Authentication.
Check the Federation check box.
Click Export.
Save the exported file to your client PC or laptop computer as dms_sp_config.xml.
Note See the technical documentation or tutorials for your IdP to understand how it imports SP configuration files.
Alternatively, see the topic for your IdP platform in this chapter’s “IdP Configuration Examples” section.
Stop. You have completed this procedure.
Related Topics
•
Import IdP Metadata into DMM, page 8-43
Import IdP Metadata into DMM
Before you can use Cisco DMS in federation mode, you must export data from your IdP in the form of
an IdP configuration file. This topic explains how to use the exported file after you generate and save it.
Before You Begin
•
See the technical documentation or tutorials for your IdP to understand how it exports configuration
files for an SP (such as DMM) to import. Alternatively, see the topic for your IdP platform this
chapter’s “IdP Configuration Examples” section.
OL-15762-05
User Guide for Cisco Digital Media Manager 5.4.x
8-43
Page 100

Procedures
Chapter 8 Authentication and Federated Identity
•
Rename the exported IdP configuration file idp_<type>.xml. For example:
–
idp_openam.xml
–
idp_shibboleth.xml
–
idp_pingfederate.xml
•
Make sure that your DMM appliance is running in embedded authentication mode or LDAP mode.
•
Log in to DMM as its superuser.
Procedure
Step 1
Step 2
Step 3
Step 4
Step 5
Step 6
Step 7
Click Administration.
Choose Security > Authentication.
Click Federation to choose it as your authentication mode.
Click Import.
Choose and upload the IdP file (idp_<type>.xml) that you saved previously.
Enter the necessary LDAP information to use your Active Directory server.
Stop. You have completed this procedure.
Related Topics
•
Define LDAP (Active Directory) Filters
•
Export SP Metadata from DMM, page 8-43
8-44
User Guide for Cisco Digital Media Manager 5.4.x
OL-15762-05
 Loading...