

Page 1

DLPs D200 to D299
DLP-D201 Apply a Lock-On
Purpose This task prevents traffic from being switched from one card to another.
Tools/Equipment None
Prerequisite Procedures DLP-D60 Log into CTC, page 17-49
Required/As Needed As needed
Onsite/Remote Onsite or remote
Security Level Maintenance or higher
Note To apply a lock-on to a protect card in a 1:1 or 1:N protection group, the protect card must be active. If
the protect card is in standby, the Lock On button is disabled. To make the protect card active, you must
switch traffic from the working card to the protect card (Step 4). When the protect card is active, you can
apply the lock-on.
CHA PTER
19
October 2007
Step 1 Use the following rules to determine if you can apply a lock-on:
• For a 1:1 electrical protection group, the working or protect cards can be placed in the Lock On state.
• For a 1:N electrical protection group, the working or protect cards can be placed in the Lock On
state.
• For a 1+1 optical protection group, only the working port can be placed in the Lock On state.
Step 2 In node view, click the Maintenance > Protection tabs.
Step 3 In the Protection Groups list, click the protection group where you want to apply the Lock On state.
Step 4 If you determine that the protect card is in standby mode and you want to apply the Lock On state to the
protect card, make the protect card active:
a. In the Selected Group list, click the protect card.
b. In the Switch Commands area, click Force.
Step 5 In the Selected Group list, click the active card where you want to lock traffic.
Step 6 In the Inhibit Switching area, click Lock On.
Step 7 Click Ye s in the confirmation dialog box.
Cisco ONS 15454 SDH Procedure Guide, R7.2
19-1
Page 2

DLP- D202 Apply a Lockout
The Lock On state has been applied and traffic cannot be switched to the working card. To clear the
Lock On state, see the “DLP-D203 Clear a Lock-On or Lockout” task on page 19-3.
Step 8 Return to your originating procedure (NTP).
DLP-D202 Apply a Lockout
Purpose This task switches traffic from one card to another using a lockout,
Tools/Equipment None
Prerequisite Procedures DLP-D60 Log into CTC, page 17-49.
Required/As Needed As needed
Onsite/Remote Onsite or remote
Security Level Maintenance or higher
Chapter 19 DLPs D200 to D299
which is a switching mechanism that overrides other external switching
commands (Force, Manual, and Exercise).
Note Multiple lockouts in the same protection group are not allowed.
Step 1 Use the following rules to determine if you can put the intended card in a Lock Out state:
• For a 1:1 electrical protection group, you can apply a lockout to the working or protect cards.
• For a 1:N electrical protection group, you can apply a lockout to the working or protect cards.
• For a 1+1 optical protection group, you can apply a lockout to the protect port.
Step 2 In node view, click the Maintenance > Protection tabs.
Step 3 In the Protection Groups list, click the protection group that contains the card where you want to apply
the lockout.
Step 4 In the Selected Group list, click the card where you want to lock out traffic.
Step 5 In the Inhibit Switching area, click Lock Out.
Step 6 Click Ye s in the confirmation dialog box.
The lockout has been applied and traffic is switched to the opposite card. To clear the lockout, see the
“DLP-D203 Clear a Lock-On or Lockout” task on page 19-3.
Note Provisioning a Lock Out state raises a LOCKOUT-REQ or an FE-LOCKOUT-PR condition in
Cisco Transport Controller (CTC). Clearing the lockout switch request clears these conditions.
Step 7 Return to your originating procedure (NTP).
19-2
Cisco ONS 15454 SDH Procedure Guide, R7.2
October 2007
Page 3

Chapter 19 DLPs D200 to D299
DLP-D203 Clear a Lock-On or Lockout
Purpose This task removes a Lock On or Lockout state.
Tools/Equipment None
Prerequisite Procedures DLP-D201 Apply a Lock-On, page 19-1 or
DLP-D202 Apply a Lockout, page 19-2
DLP-D60 Log into CTC, page 17-49
Required/As Needed As needed
Onsite/Remote Onsite or remote
Security Level Maintenance or higher
Step 1 In node view, click the Maintenance > Protection tabs.
Step 2 In the Protection Groups list, click the protection group that contains the card you want to clear.
Step 3 In the Selected Group list, click the card you want to clear.
Step 4 In the Inhibit Switching area, click Unlock.
Step 5 Click Ye s in the confirmation dialog box.
The lock-on or lockout state is cleared.
DLP- D203 Clear a Lock-On or Lockout
Step 6 Return to your originating procedure (NTP).
DLP-D204 Scope and Clean Fiber Connectors and Adapters with Alcohol and
Dry Wipes
Purpose This task cleans the fiber connectors and adapters with alcohol and dry
wipes.
Tools/Equipment Compressed air/duster
Isopropyl alcohol 70 percent or higher
Optical swab
Optical receiver cleaning stick
Prerequisite Procedures None
Required/As Needed Required
Onsite/Remote Onsite
Security Level None
Warning
Invisible laser radiation may be emitted from disconnected fibers or connectors. Do not stare into
beams or view directly with optical instruments.
Statement 1051
October 2007
Step 1 Remove the dust cap from the fiber connector.
Step 2 Wipe the connector tip with the premoistened alcohol wipe.
Cisco ONS 15454 SDH Procedure Guide, R7.2
19-3
Page 4

DLP- D205 Clean Fiber Connectors with CLETOP
Step 3 Blow-dry using filtered air.
Step 4 Use an inspection microscope to inspect each fiber connector for dirt, cracks, or scratches. If the
connector is not clean, repeat Steps 1 to 3.
Step 5 Insert the fiber connector into the applicable adapter or attach a dust cap to the fiber connector.
Note If you must replace a dust cap on a connector, first verify that the dust cap is clean. To clean the
dust cap, wipe the outside of the cap using a dry, lint-free wipe and the inside of the dust cap
using a CLETOP stick swab (14100400).
Step 6 Return to your originating procedure (NTP).
DLP-D205 Clean Fiber Connectors with CLETOP
Purpose This task cleans the fiber connectors with CLETOP.
Tools/Equipment “Type A” Fiber Optic Connector Cleaner (CLETOP reel)
Chapter 19 DLPs D200 to D299
Optical receiver cleaning stick
Prerequisite Procedures None
Required/As Needed Required
Onsite/Remote Onsite
Security Level None
Step 1 Remove the dust cap from the fiber connector.
Step 2 Press the lever down to open the shutter door. Each time you press the lever, you expose a clean wiping
surface.
Step 3 Insert the connector into the CLETOP cleaning cassette slot, rotate one quarter turn, and gently swipe
downwards.
Step 4 Use an inspection microscope to inspect each fiber connector for dirt, cracks, or scratches. If the
connector is not clean, repeat Steps 1 to 3.
Step 5 Insert the fiber connector into the applicable adapter or attach a dust cap to the fiber connector.
Note If you must replace a dust cap on a connector, first verify that the dust cap is clean. To clean the
dust cap, wipe the outside of the cap using a dry, lint-free wipe and the inside of the dust cap
using a CLETOP stick swab (14100400).
Step 6 Return to your originating procedure (NTP).
19-4
Cisco ONS 15454 SDH Procedure Guide, R7.2
October 2007
Page 5

Chapter 19 DLPs D200 to D299
DLP-D206 Clean the Fiber Adapters
Purpose This task cleans the fiber adapters.
Tools/Equipment CLETOP stick swab
Prerequisite Procedures None
Required/As Needed Required
Onsite/Remote Onsite
Security Level None
Step 1 Remove the dust plug from the fiber adapter.
Step 2 Insert a CLETOP stick swab (14100400) into the adapter opening and rotate the swab.
Step 3 Place dust plugs on the fiber adapters when not in use.
Step 4 Return to your originating procedure (NTP).
DLP- D206 Clean the Fiber Adapters
DLP-D207 Delete a Server Trail
Purpose This task deletes a server trail.
Tools/Equipment None
Prerequisite Procedures See Chapter 6, “Create Circuits and Low-Order Tunnels” for server trail
Required/As Needed As needed
Onsite/Remote Onsite or remote
Security Level Provisioning or higher
Step 1 From the View menu, choose Go to Network View.
Step 2 Click the Provisioning > Server Trails tabs.
Step 3 Click the server trail that you want to delete.
Step 4 Click Delete.
Step 5 In the confirmation dialog box, click Yes .
Step 6 Return to your originating procedure (NTP).
creation procedures.
October 2007
Cisco ONS 15454 SDH Procedure Guide, R7.2
19-5
Page 6

DLP- D208 Change External Alarms Using the AIC-I Card
DLP-D208 Change External Alarms Using the AIC-I Card
Purpose This task changes the external alarm settings on the AIC-I card.
Tools/Equipment None
Prerequisite Procedures DLP-D60 Log into CTC, page 17-49
Required/As Needed As needed
Onsite/Remote Onsite or remote
Security Level Provisioning or higher
Step 1 Confirm that external-device relays are wired to the ENVIR ALARMS IN pins on the MIC-A/P Front
Mount Electrical Connection (FMEC). See the “DLP-D324 Install Alarm Cables on the MIC-A/P” task
on page 20-12 for more information.
Step 2 In node view, double-click the AIC-I card to display it in card view.
Step 3 Click the Provisioning > External Alarms tabs.
Step 4 Modify any of the following fields for each external device wired to the ONS 15454 SDH MIC-A/P card.
For definitions of these fields, see the “NTP-D247 Provision External Alarms and Controls on the Alarm
Interface Controller–International” procedure on page 9-8.
• Enabled
Chapter 19 DLPs D200 to D299
• Alarm Type
• Severity
• Vir tu al Wire
• Raised When
• Description
Step 5 To provision additional devices, complete Step 4 for each additional device.
Step 6 Click Apply.
Step 7 Return to your originating procedure (NTP).
DLP-D209 Change External Controls Using the AIC-I Card
Purpose This task changes the external control settings on the AIC-I card.
Tools/Equipment None
Prerequisite Procedures DLP-D60 Log into CTC, page 17-49
Required/As Needed As needed
Onsite/Remote Onsite or remote
Security Level Provisioning or higher
19-6
Step 1 Verify the external control relays to the MIC-A/P card connector. See the “DLP-D324 Install Alarm
Cables on the MIC-A/P” task on page 20-12 for more information.
Step 2 In node view, double-click the AIC-I card to display it in card view.
Cisco ONS 15454 SDH Procedure Guide, R7.2
October 2007
Page 7

Chapter 19 DLPs D200 to D299
Step 3 On the External Controls subtab, modify any of the following fields for each external control wired to
the ONS 15454 SDH MIC-A/P card. For definitions of these fields, see the “NTP-D247 Provision
External Alarms and Controls on the Alarm Interface Controller–International” procedure on page 9-8.
• Enabled
• Trigger Type
• Control Type
• Description
Step 4 To provision additional controls, complete Step 3 for each additional device.
Step 5 Click Apply.
Step 6 Return to your originating procedure (NTP).
DLP-D210 Change AIC-I Card Orderwire Settings
DLP- D210 Change AIC-I Card Orderwire Settings
Purpose This task changes the orderwire settings on the AIC-I card.
Tools/Equipment None
Prerequisite Procedures DLP-D60 Log into CTC, page 17-49
Required/As Needed As needed
Onsite/Remote Onsite or remote
Security Level Provisioning or higher
Caution When provisioning orderwire for ONS 15454 SDHs residing in a ring, do not provision a complete
orderwire loop. For example, a four-node ring typically has east and west ports provisioned at all four
nodes. However, to prevent orderwire loops, provision two orderwire ports (east and west) at all but one
of the ring nodes.
Tip Before you begin, make a list of the ONS 15454 SDH slots and ports that require orderwire
communication.
Step 1 In node view, double-click the AIC-I card to display it in card view.
Step 2 Click the Provisioning > Local Orderwire tabs or the Provisioning > Express Orderwire tabs,
depending on the orderwire path that you want to create.
Step 3 If needed, adjust the transmit (Tx) and receive (Rx) decibel referred to one milliwatt (dBm) by moving
the slider to the right or left for the headset type (four-wire or two-wire) that you will use. In general,
you should not need to adjust the dBm.
October 2007
Step 4 If you want to turn on the audible alert (buzzer) for the orderwire, check the Buzzer On check box.
Step 5 Click Apply.
Step 6 Return to your originating procedure (NTP).
Cisco ONS 15454 SDH Procedure Guide, R7.2
19-7
Page 8

DLP- D211 Provision CE-1000-4 Ethernet Ports
DLP-D211 Provision CE-1000-4 Ethernet Ports
Purpose This task provisions CE-1000-4 Ethernet ports to carry traffic.
Tools/Equipment None
Prerequisite Procedures DLP-D60 Log into CTC, page 17-49
Required/As Needed As needed
Onsite/Remote Onsite or remote
Security Level Provisioning or higher
Note You can provision SONET contiguous concatenated (CCAT) or virtual concatenated (VCAT) circuits for
the CE-1000-4 before or after provisioning the card’s Ethernet ports and/or packet-over-SDH (POS)
ports. See the “NTP-D323 Create an Automatically Routed High-Order Circuit” procedure on page 6-55
or the “NTP-D283 Create an Automatically Routed VCAT Circuit” procedure on page 6-97, as needed.
Step 1 In node view, double-click the CE-1000-4 card graphic to open the card.
Step 2 Click the Provisioning > Ether Ports tabs.
Step 3 For each CE-1000-4 port, provision the following parameters:
Chapter 19 DLPs D200 to D299
• Port Name—If you want to label the port, enter the port name.
• Admin State—Select the service state for the port. See the “DLP-D214 Change the Service State for
a Port” task on page 19-10 for more information.
• Flow Control—Select the flow control for the port. Possible values are None, Symmetrical, and
Pass Through.
• Auto Negotiation—Click this check box to enable autonegotiation on the port (default). If you do
not want to enable autonegotiation control, uncheck the box.
• MTU—If you want to permit the acceptance of jumbo size Ethernet frames, choose 10004 (default).
If you do not want to permit jumbo size Ethernet frames, choose 1548.
• Watermark—Select the flow control watermark for the port. To provision the Low Latency flow
control watermark, choose Low Latency from the drop-down list. The Flow Ctrl Lo and Flow Ctrl
Hi values change. To provision a Custom flow control watermark, choose Custom from the
drop-down list.
En te r values in th e Flow Ctrl Hi an d Flow Ctrl Lo columns. The Flow Ctrl Lo val ue has a valid ra nge
from 1 to 510 and the Flow Ctrl Hi value has a valid range from 2 to 511. The Flow Ctrl Lo value
must be lower than the Flow Ctrl Hi value.
Step 4 Click Apply.
Step 5 Refresh the Ethernet statistics:
a. Click the Performance > Ether Ports > Statistics tabs.
b. Click Refresh.
19-8
Cisco ONS 15454 SDH Procedure Guide, R7.2
October 2007
Page 9

Chapter 19 DLPs D200 to D299
Note Reprovisioning an Ethernet port on the CE-1000-4 card does not reset the Ethernet statistics for
that port.
Step 6 Return to your originating procedure (NTP).
DLP-D212 Create a User Data Channel Circuit
Purpose This task creates a user data channel (UDC) circuit on the
ONS 15454 SDH. A UDC circuit allows you to create a dedicated data
channel between nodes.
Tools/Equipment STM cards must be installed.
Prerequisite Procedures NTP-D24 Verify Card Installation, page 4-2
DLP-D60 Log into CTC, page 17-49
Required/As Needed As needed
Onsite/Remote Onsite or remote
Security Level Provisioning or higher
DLP- D212 Create a User Data Channel Circuit
Step 1 In network view, click the Provisioning > Overhead Circuits tabs.
Step 2 Click Create.
Step 3 In the Overhead Circuit Creation dialog box, complete the following fields in the Circuit Attributes area:
• Name—Assign a name to the circuit. The name can be alphanumeric and up to 48 characters
(including spaces).
• Type—Choose either User Data-F1 or User Data D4-D12 from the drop-down list.
Step 4 Click Next.
Step 5 In the Circuit Source area, complete the following:
• Node—Choose the source node.
• Slot—Choose the source slot.
• Port—If displayed, choose the source port.
Step 6 Click Next.
Step 7 In the Circuit Destination area, complete the following:
• Node—Choose the destination node.
• Slot—Choose the destination slot.
• Port—If displayed, choose the destination port.
Step 8 Click Finish.
Step 9 Return to your originating procedure (NTP).
October 2007
Cisco ONS 15454 SDH Procedure Guide, R7.2
19-9
Page 10

Chapter 19 DLPs D200 to D299
DLP- D213 Provision the Card Mode for ML-Series Ethernet Cards
DLP-D213 Provision the Card Mode for ML-Series Ethernet Cards
Purpose This task provisions the card mode for ML-Series Ethernet cards
Tools/Equipment None
Prerequisite Procedures DLP-D60 Log into CTC, page 17-49
Required/As Needed As needed
Onsite/Remote Onsite or remote
Security Level Provisioning or higher
Step 1 In node view, double-click the ML-Series Ethernet card graphic to open the card.
Step 2 Click the Provisioning > Card tabs.
Step 3 For the ML-Series Ethernet card, select an option from the drop-down Mode menu:
• HDLC—High-level data link control. (Does not support VLAN trunking, which is standard on most
Cisco data devices.)
• GFP-F—Frame-mapped generic framing procedure, a PDU-oriented adaptation mode that maps a
client frame into one GFP frame.
• RPR 802.17—802.17 Resilient Packet Ring, which is IEEE compliant
Note For more details about the interoperabilty of Optical Networking System (ONS) Ethernet
cards, refer to the Ethernet Card Software Feature and Configuration Guide for the
Cisco ONS 15454, Cisco ONS 15454 SDH, and Cisco ONS 15327.
Step 4 Click Apply.
Step 5 Return to your originating procedure (NTP).
DLP-D214 Change the Service State for a Port
Purpose This task puts a port in service or removes a port from service.
Tools/Equipment None
Prerequisite Procedures DLP-D60 Log into CTC, page 17-49
Required/As Needed As needed
Onsite/Remote Onsite or remote
Security Level Provisioning or higher
19-10
Note To provision E-Series or G-Series Ethernet ports, see the “DLP-D220 Provision E-Series Ethernet Ports”
task on page 19-19 or the “DLP-D222 Provision G-Series Ethernet Ports” task on page 19-22.
Step 1 In node view on the shelf graphic, double-click the card with the ports you want to put in or out of
service. The card view appears.
Cisco ONS 15454 SDH Procedure Guide, R7.2
October 2007
Page 11

Chapter 19 DLPs D200 to D299
Step 2 Click the Provisioning > Line tabs for all cards except the G-Series card. For the G-Series card, click
the Provisioning > Port tabs.
Step 3 In the Admin State column for the target port, choose one of the following from the drop-down list:
For more information about service states, refer to the “Administrative and Service States” appendix of
the Cisco ONS 15454 SDH Reference Manual.
Step 4 If the port is in loopback (Locked-enabled,loopback & maintenance) and you set the Admin State to
Unlocked-enabled, a confirmation window appears indicating that the loopback will be released and that
the action could be service affecting. To continue, click Yes .
DLP- D215 Consolidate Links in Network View
• Unlocked—Puts the port in the Unlocked-enabled service state.
• Locked,disabled—Puts the port in the Locked-enabled,disabled service state. In this service state,
traffic is not passed on the port until the service state is changed to Unlocked-enabled;
Locked-enabled,maintenance; or Unlocked-disabled,automaticInService.
• Locked,maintenance—Puts the port in the Locked-enabled,maintenance service state. This service
state does not interrupt traffic flow and loopbacks are allowed, but alarm reporting is suppressed.
Raised fault conditions, whether or not their alarms are reported, can be retrieved on the
CTC Conditions tab or by using the TL1 RTRV-COND command. Use the
Locked-enabled,maintenance service state for testing or to suppress alarms temporarily. A port must
be in this service state before you can apply a loopback. Change to the Unlocked-enabled or
Unlocked-disabled,automaticInService when testing is complete.
• Unlocked,automaticInService—Puts the port in the Unlocked-disabled,automaticInService
service state. In this service state, alarm reporting is suppressed, but traffic is carried and loopbacks
are allowed. After the soak period passes, the port changes to Unlocked-enabled. Raised fault
conditions, whether their alarms are reported or not, can be retrieved on the CTC Conditions tab or
by using the TL1 RTRV-COND command.
Step 5 If you set Admin State to Unlocked,automaticInService, set the soak period time in the AINS Soak field.
This is the amount of time that the port will stay in Unlocked-disabled,automaticInService service state
after the signal is continuously received before changing to Unlocked-enabled.
Step 6 Click Apply.
Step 7 As needed, repeat this task for each port.
Step 8 Return to your originating procedure (NTP).
DLP-D215 Consolidate Links in Network View
Purpose This task consolidates the data communications channel (DCC), GSS, OTS,
provisionable patchcord (PPC), and server trail links in network view.
Tools/Equipment None
Prerequisite Procedures DLP-D60 Log into CTC, page 17-49
Required/As Needed As needed
Onsite/Remote Onsite or remote
Security Level Retrieve or higher
Note Global consolidation persists when CTC is re-launched but local consolidation does not.
October 2007
Cisco ONS 15454 SDH Procedure Guide, R7.2
19-11
Page 12
DLP- D215 Consolidate Links in Network View
Step 1 From the View menu, choose Go to Network View. CTC shows the link icons by default.
Step 2 As needed, perform one or more of the following steps:
• To toggle link icons on and off, go to Step 3.
• To combine all the links in network view, go to Step 4.
• To consolidate a link or links between two nodes, go to Step 5.
• To view information about a consolidated link, go to Step 6.
• To access an individual link within a consolidated link, go to Step 7.
• To expand consolidated links, go to Step 8.
• To filter links by class, go to Step 9.
Step 3 Right-click the network map and select Show Link Icons to toggle the link icons on and off.
Step 4 To consolidate all the links on the network map (global consolidation):
a. Right-click anywhere on the network map.
b. Choose Collapse/Expand Links from the shortcut menu. The Collapse/Expand Links dialog box
appears.
Chapter 19 DLPs D200 to D299
c. Select the check boxes for the link classes that you want to consolidate.
d. Click OK. The selected link classes are consolidated on the network map.
Step 5 To consolidate a link or links between two nodes:
a. Right-click the link on the network map.
b. Choose Collapse Link from the shortcut menu. The selected link type consolidates to show only
one link.
Note The links consolidate by class. For example, if you select a DCC link for consolidation only the
DCC links will consolidate, leaving any other link classes expanded.
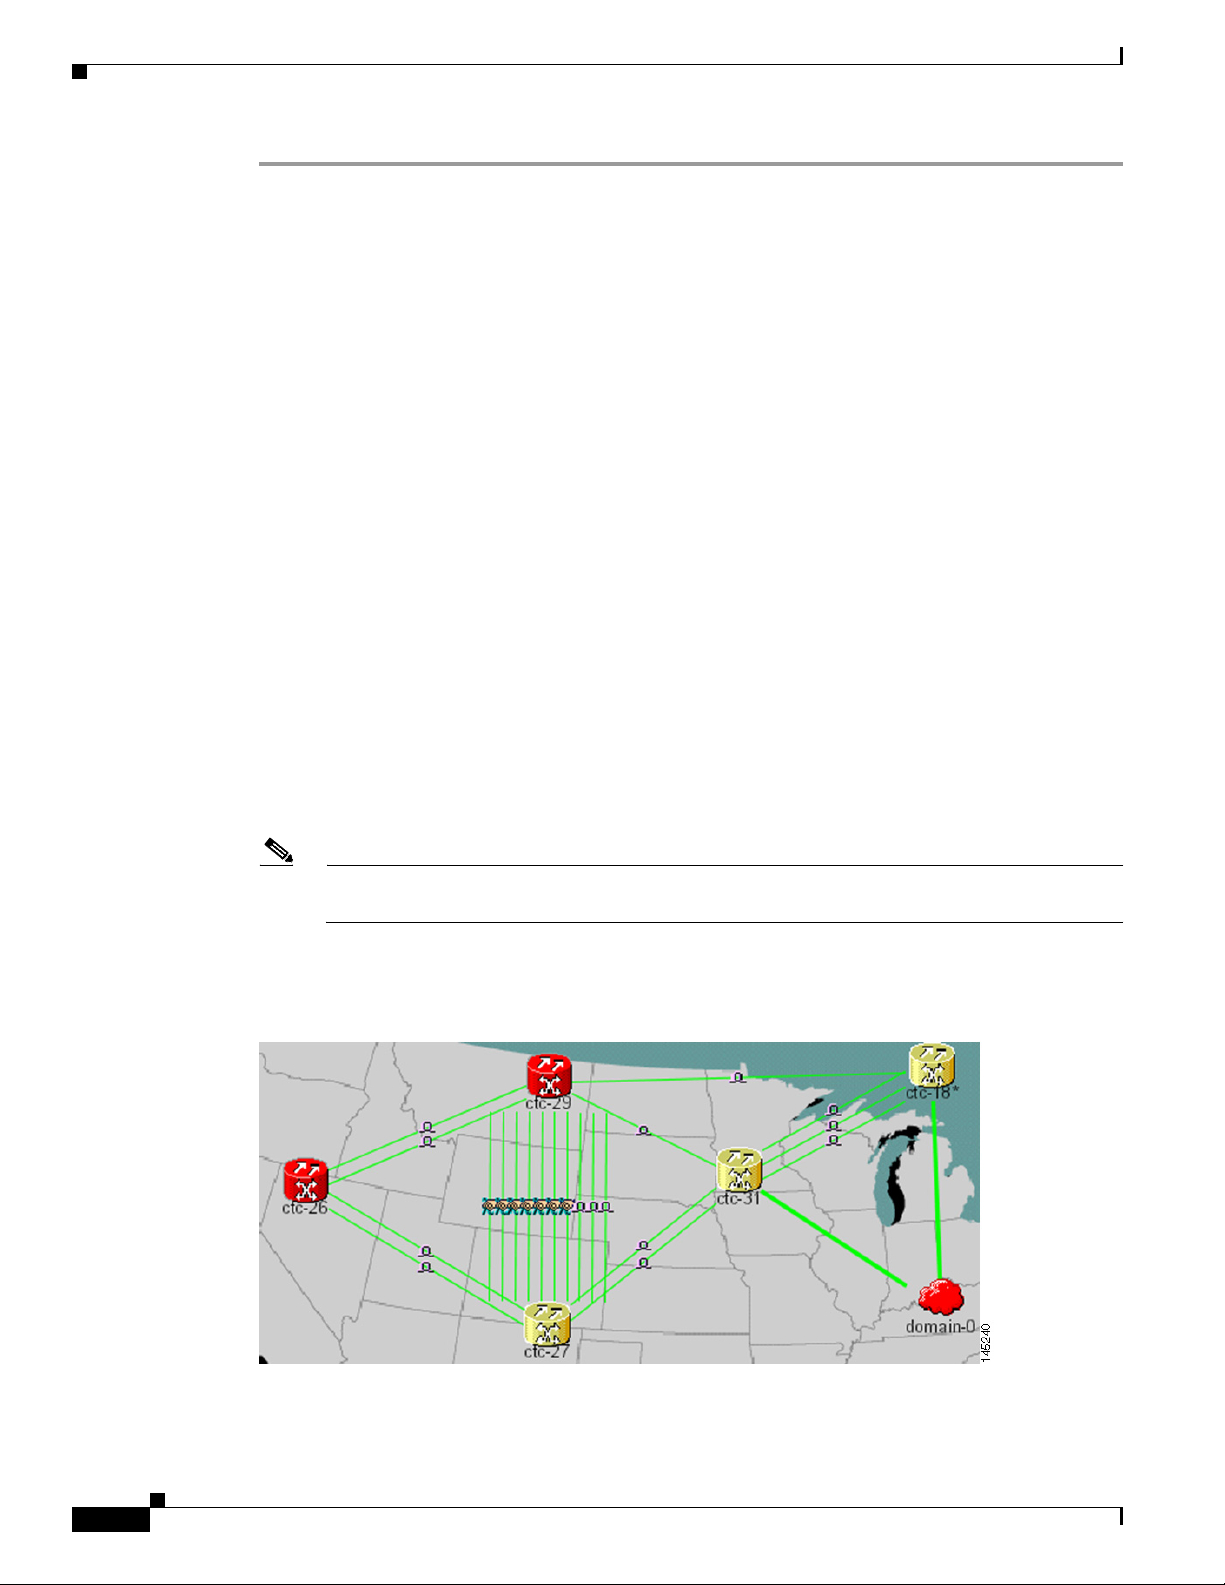
Figure 19-1 shows a network view with unconsolidated DCC and PPC links.
Figure 19-1 Unconsolidated Links in Network View
19-12
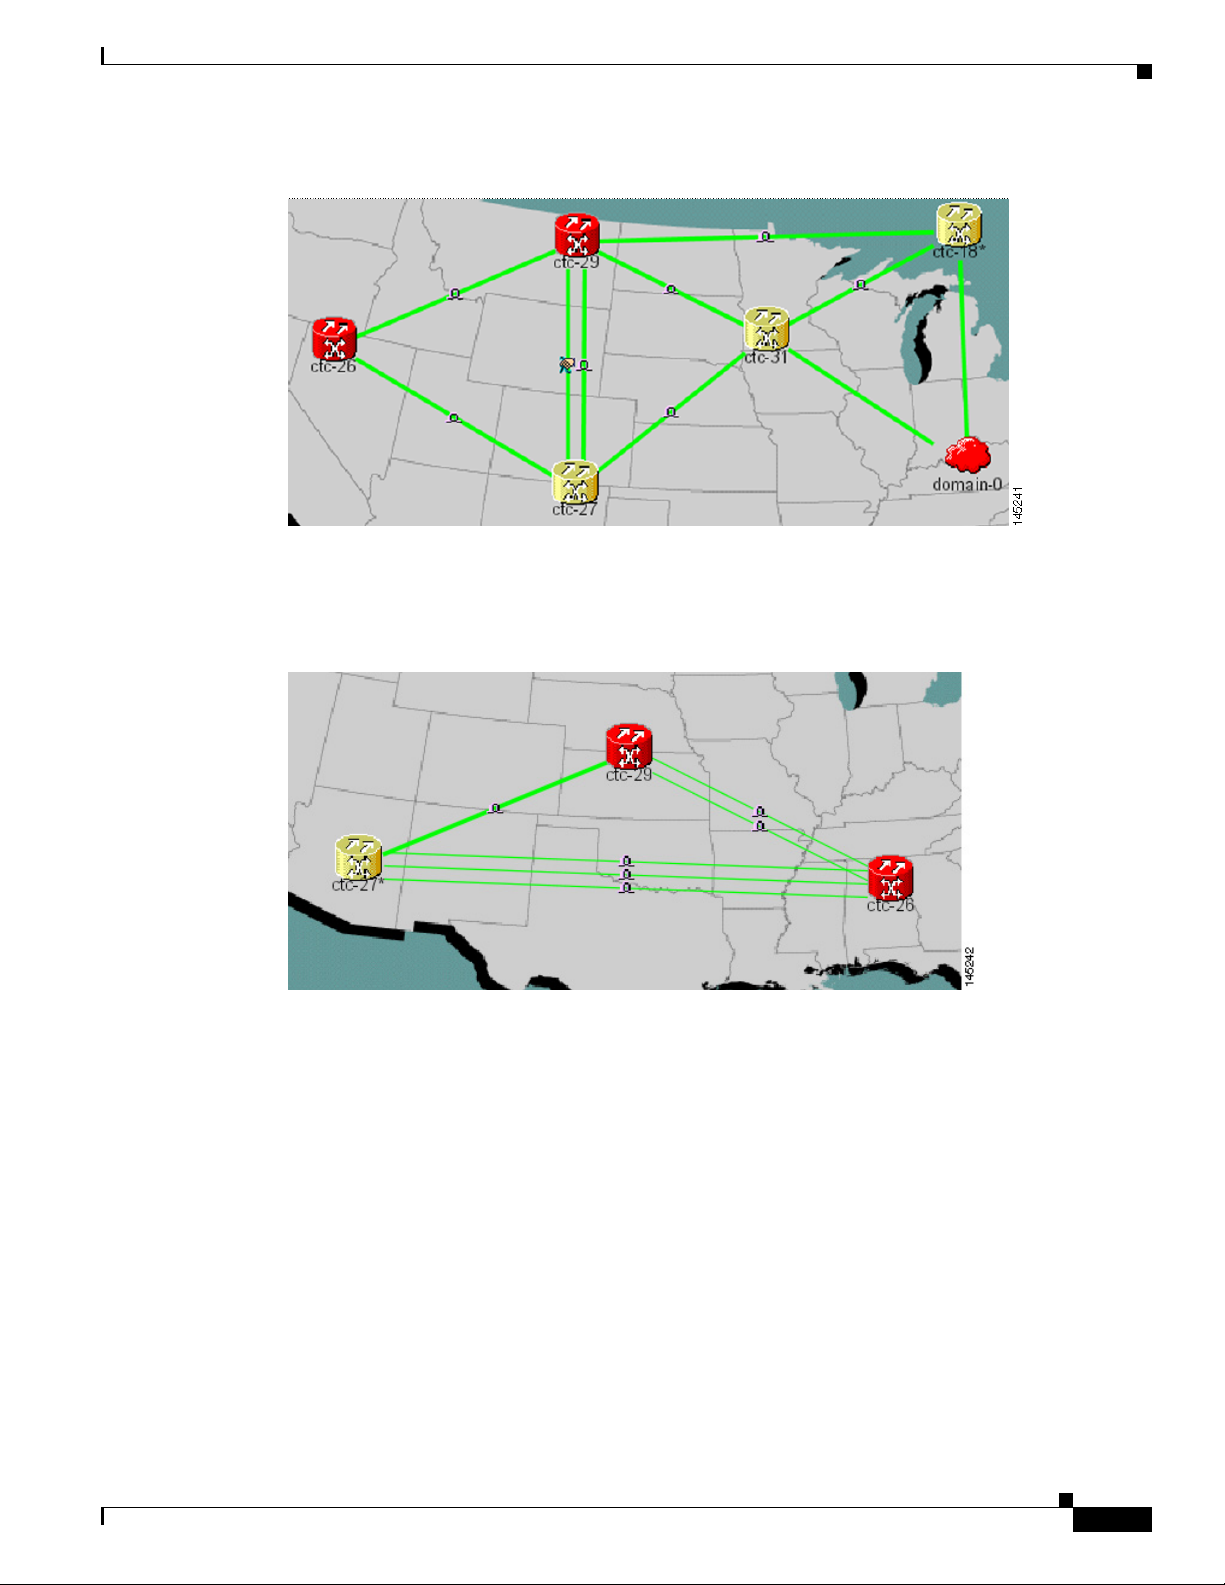
Figure 19-2 shows a network view with globally consolidated links.
Cisco ONS 15454 SDH Procedure Guide, R7.2
October 2007
Page 13
Chapter 19 DLPs D200 to D299
Figure 19-2 Consolidated Links in Network View
Figure 19-3 shows a different network view with local DCC link consolidation between two nodes.
DLP- D215 Consolidate Links in Network View
Figure 19-3 Network View with Local Link Consolidation
Step 6
To view information about the consolidated link, either move the mouse over the link (the tooltip
displays the number of links and the link class) or click the link to display detailed link information on
the left side of the window.
Step 7 To access an individual link within a consolidated link (for span upgrades, for example):
a. Right-click the consolidated link. A shortcut menu appears that lists the individual links.
b. Hover the mouse over the selected link. A cascading menu appears where you can select an action
for the individual link or navigate to one of the nodes where the link is attached.
October 2007
Step 8 To expand locally consolidated links, right-click the consolidated link and choose Expand [link class]
Links from the shortcut menu where link class is DCC, GCC, OTS, PPC, or Server Trail.
Step 9 To filter the links by class:
a. Click the Link Filter button in the upper right area of the window. The Link Filter dialog box
appears.
The link classes that appear in the Link Filter are determined by the selected Network Scope
(Table 19-1).
Cisco ONS 15454 SDH Procedure Guide, R7.2
19-13
Page 14

DLP- D216 Change the STM-N Card ALS Maintenance Settings
Table 19-1 Link Classes By Network Scope
Network Scope Displayed Link Classes
ALL DCC, GCC, OTS, PPC, Server Trail
DWDM GCC, OTS, PPC
TDM DCC, PPC, Server Trail
b. Check the check boxes next to the links that you want to display.
c. Click OK.
Step 10 Return to your originating procedure (NTP).
DLP-D216 Change the STM-N Card ALS Maintenance Settings
Chapter 19 DLPs D200 to D299
Purpose This task changes the automatic laser shutdown (ALS) maintenance
settings for the STM-N cards. This feature is available for STM-64 and
MRC-12 cards.
Tools/Equipment None
Prerequisite Procedures DLP-D60 Log into CTC, page 17-49
Required/As Needed As needed
Onsite/Remote Onsite or remote
Security Level Provisioning or higher
Note For the default values and domains of user-provisionable card settings, refer to the “Network Element
Defaults” appendix in the Cisco ONS 15454 SDH Reference Manual.
Step 1 In node view, double-click the STM-N card where you want to change the ALS maintenance settings.
Step 2 Click the Maintenance > ALS tabs.
Step 3 Modify any of the settings described in Table 19-2 by clicking in the field you want to modify. In some
fields you can choose an option from a drop-down list; in others you can type a value or select or deselect
a check box. The provisionable parameters are listed in the options column in the table.
19-14
Cisco ONS 15454 SDH Procedure Guide, R7.2
October 2007
Page 15

Chapter 19 DLPs D200 to D299
Table 19-2 STM-N Maintenance Settings
Parameter Description Options
Port number (Display only) Port number —
ALS Mode Automatic laser shutdown mode.
Recovery Pulse
Duration
Recovery Pulse
Interval
Currently
Shutdown
Request Laser
Restart
DLP- D216 Change the STM-N Card ALS Maintenance Settings
ALS provides the ability to shut
down the TX laser when the RX
detects a loss of signal (LOS).
Sets the recovery laser pulse
duration, in seconds, for the initial,
recovery optical power pulse
following a laser shutdown.
Sets the recovery laser pulse
interval, in seconds. This is the
period of time that must past before
the recover pulse is repeated.
(Display only) Displays the current
status of the laser.
If checked, allows you to restart the
laser for maintenance.
Note Restarting a laser might be
traffic-affecting.
From the drop-down list, choose one of the
following:
• Disable—Deactivates ALS.
• Auto Restart—(Default) ALS is
active. The power is automatically shut
down when needed and automatically
tries to restart using a probe pulse until
the cause of the failure is repaired.
• Manual Restart—ALS is active, but
the laser must be manually restarted
when conditions that caused the outage
are resolved.
• Manual Restart for Test—Manually
restarts the laser for testing.
Numeric. For the default values and
domains of user-provisionable card
settings, refer to the “Network Element
Defaults” appendix in the Cisco ONS 15454
SDH Reference Manual.
Numeric. For the default values and
domains of user-provisionable card
settings, refer to the “Network Element
Defaults” appendix in the Cisco ONS 15454
SDH Reference Manual.
Numeric. For the default values and
domains of user-provisionable card
settings, refer to the “Network Element
Defaults” appendix in the Cisco ONS 15454
SDH Reference Manual.
Checked or unchecked
October 2007
Step 4 Click Apply. If the change affects traffic, a warning message displays. Click Ye s to complete the change.
Step 5 Return to your originating procedure (NTP).
Cisco ONS 15454 SDH Procedure Guide, R7.2
19-15
Page 16
DLP- D217 MS-SPRing Exercise Ring Test
DLP-D217 MS-SPRing Exercise Ring Test
Purpose This task tests the multiplex section-shared protection ring (MS-SPRing)
functionality without switching traffic. Ring exercise conditions (including
the K-byte pass-through) are reported and cleared within 10 to 15 seconds.
Tools/Equipment None
Prerequisite Procedures DLP-D60 Log into CTC, page 17-49
Required/As Needed As needed
Onsite/Remote Onsite or remote
Security Level Provisioning or higher
Step 1 From the View menu, choose Go to Network View.
Step 2 Click the Provisioning > MS-SPRing tabs.
Step 3 Click the row of the MS-SPRing you will exercise, then click Edit.
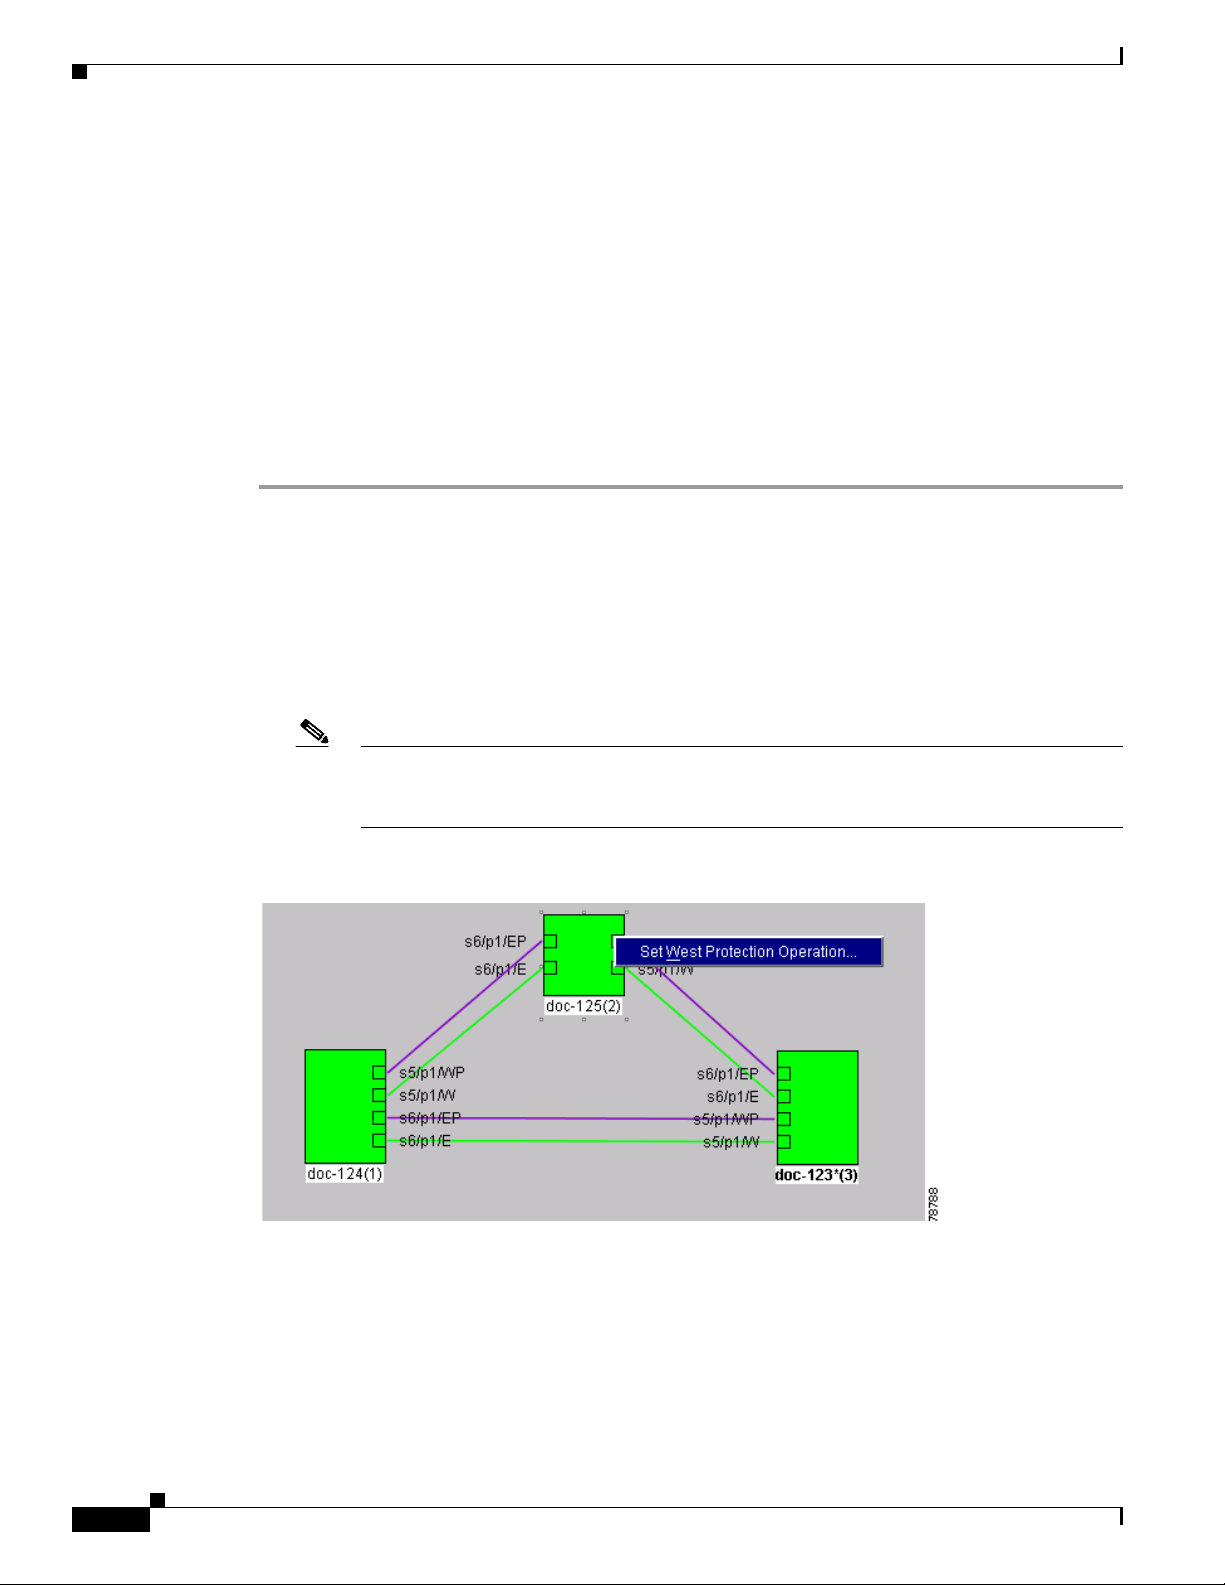
Step 4 Exercise the west port:
a. Right-click the west port of any MS-SPRing node and choose Set West Protection Operation.
Figure 19-4 shows an example. (To move a graphic icon, press Ctrl while you drag and drop it to a
new location.)
Chapter 19 DLPs D200 to D299
Note For two fiber MS-SPRings, the squares on the node icons represent the MS-SPRing working
and protect channels. You can right-click either channel. For four-fiber MS-SPRings, the
squares represent ports. Right-click either working or protect ports.
Figure 19-4 Protection Operation on a Three-Node MS-SPRing
b.
In the Set West Protection Operation dialog box, choose EXERCISE RING from the drop-down
list.
c. Click OK.
19-16
d. In the Confirm MS-SPRing Operation dialog box, click Yes.
On the network view graphic, an E appears on the MS-SPRing channel where you invoked the
exercise. The E will appear for 10 to 15 seconds, then disappear.
Cisco ONS 15454 SDH Procedure Guide, R7.2
October 2007
Page 17

Chapter 19 DLPs D200 to D299
Step 5 Exercise the east port:
a. Right-click the east port of any MS-SPRing node and choose Set East Protection Operation.
b. In the Set East Protection Operation dialog box, choose EXERCISE RING from the drop-down list.
c. Click OK.
d. In the Confirm MS-SPRing Operation dialog box, click Yes.
Step 6 In the CTC window, click the History tab. Verify that an EXERCISE-RING (Exercising Ring
Successfully) condition appears for the node where you exercised the ring. Other conditions that appear
include EXERCISE-RING-REQ, KB-PASSTHR, and FE-EXERCISING-RING.
If you do not see any MS-SPRing exercise conditions, click the Filter button and verify that filtering is
not turned on. Also, check that alarms and conditions are not suppressed for a node or MS-SPRing drop
cards. See the “NTP-D72 Suppress Alarms or Discontinue Alarm Suppression” procedure on page 9-7
for more information.
Step 7 Click the Alarms tab.
a. Verify that the alarm filter is not on. See the “DLP-D227 Disable Alarm Filtering” task on
DLP- D217 MS-SPRing Exercise Ring Test
Note For two fiber MS-SPRings, the squares on the node icons represent the MS-SPRing working
and protect channels. You can right-click either channel. For four-fiber MS-SPRings, the
squares represent ports. Right-click either the working or protect ports.
On the network view graphic, an E appears on the MS-SPRing channel where you invoked the
exercise. The E will appear for 10 to 15 seconds, then disappear.
page 19-26 as necessary.
b. Verify that no unexplained alarms appear on the network. If unexplained alarms appear, resolve
them before continuing. Refer to the Cisco ONS 15454 SDH Troubleshooting Guide if necessary.
Step 8 From the File menu, choose Close to close the MS-SPRing window.
Step 9 Return to your originating procedure (NTP).
October 2007
Cisco ONS 15454 SDH Procedure Guide, R7.2
19-17
Page 18

Chapter 19 DLPs D200 to D299
DLP- D218 Provision SNCP Ring Selectors During Circuit Creation
DLP-D218 Provision SNCP Ring Selectors During Circuit Creation
Purpose This task provisions subnetwork connection protection (SNCP) ring
selectors during circuit creation. Use this task only if the circuit will be
routed on an SNCP ring.
Tools/Equipment None
Prerequisite Procedures DLP-D60 Log into CTC, page 17-49
You must have the Circuit Attributes page of the Circuit Creation wizard
open.
Required/As Needed As needed
Onsite/Remote Onsite or remote
Security Level Provisioning or higher
Note Provisioning SD-P or SF-P thresholds on the Circuit Attributes page of the Circuit Creation wizard sets
the values only for SNCP-protected spans. The circuit source and destination use the node default values
of 10E-4 for SD-P and 10E-6 for SF-P for unprotected circuits and for the source and drop of SNCP
circuits.
Step 1 In the SNCP area of the Circuit Attributes page, set the SNCP path selectors:
• Provision working go & return on primary path—Check this box to route the working path on one
fiber pair and the protect path on a separate fiber pair. This feature only applies to bidirectional
SNCP circuits.
• Revertive—Check this box if you want traffic to revert to the working path when the conditions that
diverted it to the protect path are repaired. If you do not choose Revertive, traffic remains on the
protect path after the switch.
• Reversion time—If Revertive is checked, click the Reversion time field and choose a reversion time
from the drop-down list. The range is 0.5 to 12.0 minutes. The default is 5.0 minutes. This is the
amount of time that will elapse before the traffic reverts to the working path. Traffic can revert when
conditions causing the switch are cleared.
• SF threshold—For high-order circuits, set the SNCP path-level signal failure (SF) bit error rate
(BER) thresholds. Unavailable for low-order circuits.
• SD threshold—For high-order circuits, set the SNCP path-level signal degrade (SD) BER
thresholds. Unavailable for low-order circuits.
• Switch on PDI-P—For high-order circuits, check this box if you want traffic to switch when an
high-order payload defect indicator (PDI) is received. Unavailable for low-order circuits.
Step 2 Return to your originating procedure (NTP).
19-18
Cisco ONS 15454 SDH Procedure Guide, R7.2
October 2007
Page 19

Chapter 19 DLPs D200 to D299
DLP-D219 Provision a Low-Order Tunnel Route
Purpose This task provisions the route for a manually routed low-order tunnel.
Tools/Equipment None
Prerequisite Procedures DLP-D60 Log into CTC, page 17-49
You must have the Route Review and Edit page of the Circuit Creation
wizard open.
Required/As Needed As needed
Onsite/Remote Onsite or remote
Security Level Provisioning or higher
Step 1 In the Circuit Creation wizard in the Route Review and Edit area, click the source node icon if it is not
already selected. Arrows indicate the available spans for routing the tunnel from the source node.
Step 2 Click the arrow of the span that you want the low-order tunnel to travel. The arrow turns white. In the
Selected Span area, the From and To fields show the slot and port that will carry the tunnel. The source
VC4 appears.
Step 3 If you want to change the source VC4, change it in the Source VC4 field; otherwise, continue with
Step 4.
Step 4 Click Add Span. The span is added to the Included Spans list and the span arrow turns blue.
DLP- D219 Provision a Low-Order Tunnel Route
Step 5 Repeat Steps 3 and 4 until the tunnel is provisioned from the source to the destination node through all
intermediary nodes.
Step 6 Return to your originating procedure (NTP).
DLP-D220 Provision E-Series Ethernet Ports
Purpose This task enables Ethernet ports for the E-Series cards.
Tools/Equipment None
Prerequisite Procedures DLP-D60 Log into CTC, page 17-49
Required/As Needed As needed
Onsite/Remote Onsite or remote
Security Provisioning or higher
Step 1 In node view, double-click the Ethernet card that you want to provision.
Step 2 Click the Provisioning > Port tabs.
Step 3 For each Ethernet port, provision the following parameters:
• Port Name—If you want to label the port, type a port name.
October 2007
• Mode—Choose the appropriate mode for the Ethernet port:
–
Valid choices for the E100T-G card are Auto, 10 Half, 10 Full, 100 Half, or 100 Full.
–
Valid choices for the E1000-2-G card are 1000 Full or Auto.
Cisco ONS 15454 SDH Procedure Guide, R7.2
19-19
Page 20

DLP- D221 Provision E-Series Ethernet Ports for VLAN Membership
Note Both 1000 Full and Auto modes set the E1000-2-G port to the 1000 Mbps and Full duplex
operating mode; however, flow control is disabled when 1000 Full is selected. Choosing
Auto mode enables the E1000-2-G card to autonegotiate flow control. Flow control is a
mechanism that prevents network congestion by ensuring that transmitting devices do not
overwhelm receiving devices with data. The E1000-2-G port handshakes with the connected
network device to determine if that device supports flow control.
• Enabled—Check this check box to activate the corresponding Ethernet port.
• Priority—Choose a queuing priority for the port. Options range from 0 (Low) to 7 (High). Priority
queuing (IEEE 802.1Q) reduces the impact of network congestion by mapping Ethernet traffic to
different priority levels. Refer to the priority queuing information in the Ethernet Card Software
Feature and Configuration Guide for the Cisco ONS 15454, Cisco ONS 15454 SDH, and
Cisco ONS 15327. This parameter does not apply to an E-Series card in port-mapped mode.
• Stp Enabled—Click this check box to enable Spanning Tree Protocol (STP) on the port. This
parameter does not apply to an E-Series card in port-mapped mode. Refer to the spanning tree
information in the Ethernet Card Software Feature and Configuration Guide for the
Cisco ONS 15454, Cisco ONS 15454 SDH, and Cisco ONS 15327.
Step 4 Click Apply.
Chapter 19 DLPs D200 to D299
Step 5 Repeat Steps 1 through 4 for all other cards in the VLAN or in port-mapped mode.
Step 6 Repeat Steps 1 through 4 for the other card in the point-to-point circuit.
Step 7 Return to your originating procedure (NTP).
DLP-D221 Provision E-Series Ethernet Ports for VLAN Membership
Purpose This task provisions E-Series Ethernet ports for VLAN membership. It
does not apply to E-Series cards in port-mapped mode.
Tools/Equipment None
Prerequisite Procedures DLP-D60 Log into CTC, page 17-49
DLP-D221 Provision E-Series Ethernet Ports for VLAN Membership,
page 19-20
Required/As Needed As needed
Onsite/Remote Onsite or remote
Security Level Provisioning or higher
Step 1 In node view, double-click the E-Series card graphic to open the card.
Step 2 Click the Provisioning > VLAN tabs.
19-20
Step 3 To put a port in a VLAN, click the port and choose either Tagged or Untag. Table 19-3 describes valid
port settings.
Cisco ONS 15454 SDH Procedure Guide, R7.2
October 2007
Page 21

Chapter 19 DLPs D200 to D299
Table 19-3 VLAN Settings
Setting Description
-- A port marked with this symbol does not belong to the VLAN.
Untag The ONS 15454 SDH tags ingress frames and strips tags from egress frames.
Tagged The ONS 15454 SDH processes ingress frames according to the VLAN ID;
DLP- D221 Provision E-Series Ethernet Ports for VLAN Membership
egress frames do not have their tags removed.
• If a port is a member of only one VLAN, choose Untag from the Port column in the VLAN’s row.
Choose -- for all the other VLAN rows in that Port column.
Note The VLAN with Untag selected can connect to the port, but other VLANs cannot access that
port.
• Choose Tagged at all VLAN rows tha t need to be trunked . Choose Untag at VLAN rows that do not
need to be trunked, for example, the default VLAN.
Note Each Ethernet port must be attached to at least one untagged VLAN. A trunk port connects
multiple VLANs to an external device, such as a switch, which also supports trunking. A
trunk port must have tagging (IEEE 802.1Q) enabled for all the VLANs that connect to that
external device.
Step 4 After each port is in the appropriate VLAN, click Apply. Table 19-3 lists the VLAN settings.
Note If Tagged is chosen, the attached external Ethernet devices must recognize IEEE 802.1Q
VLANs.
Note Both ports on an E1000-2-G card cannot be members of the same VLAN.
Step 5 Return to your originating procedure (NTP).
October 2007
Cisco ONS 15454 SDH Procedure Guide, R7.2
19-21
Page 22

DLP- D222 Provision G-Series Ethernet Ports
DLP-D222 Provision G-Series Ethernet Ports
Purpose This task provisions G-Series Ethernet ports.
Tools/Equipment None
Prerequisite Procedures DLP-D60 Log into CTC, page 17-49
Required/As Needed As needed
Onsite/Remote Onsite or remote
Security Level Provisioning or higher
Step 1 In node view, double-click the G-Series card graphic to open the card.
Step 2 Click the Provisioning > Port tabs.
Step 3 For each G-Series port, provision the following parameters:
• Port Name—If you want to label the port, type the port name.
• Admin State—Complete the “DLP-D214 Change the Service State for a Port” task on page 19-10.
• Auto Negotiation—Click this check box to enable autonegotiation on the port (default). If you do
not want to enable autonegotiation control, uncheck the box.
• Flow Control—Click this check box to enable flow control on the port (default). If you do not want
to enable flow control, uncheck the box. To set custom flow control watermarks, see the “DLP-D353
Provision G-Series Flow Control Watermarks” task on page 20-58.
• Max Size—To permit the acceptance of jumbo size Ethernet frames, choose Jumbo (default). If you
do not want to permit jumbo size Ethernet frames, choose 1548.
Chapter 19 DLPs D200 to D299
Note The maximum frame size of 1548 bytes enables the port to accept valid Ethernet frames that
use protocols, such as Inter-Switch Link (ISL) protocol. ISL adds 30 bytes of overhead and
might cause the frame size to exceed the traditional 1518 byte maximum.
• Payload Type—Click in the Payload Type field and select a cyclic redundancy check (CRC) size to
set the G-Series card’s LEX encapsulation:
–
LEX-FCS-16 is 16-bit (2 byte) CRC.
–
LEX-FCS-32 is 32-bit (4 byte) CRC.
Note An Encapsulation Mismatch Path alarm appears when a point-to-point circuit is created between two
Ethernet card ports with incompatible Encapsulation payload types.
Step 4 Click Apply.
Step 5 Refresh the Ethernet statistics:
a. Click the Performance > Statistics tabs.
b. Click the Refresh button.
19-22
Cisco ONS 15454 SDH Procedure Guide, R7.2
October 2007
Page 23

Chapter 19 DLPs D200 to D299
Note Reprovisioning an Ethernet port on the G-Series card does not reset the Ethernet statistics for
that port.
Step 6 Return to your originating procedure (NTP).
DLP-D223 Download an Alarm Severity Profile
Purpose This task downloads a custom alarm severity profile from a network-drive
accessible CD-ROM, floppy disk, or hard disk location.
Tools/Equipment None
Prerequisite Procedures DLP-D60 Log into CTC, page 17-49
Required/As Needed As needed
Onsite/Remote Onsite or remote
Security Level Provisioning or higher
DLP- D223 Download an Alarm Severity Profile
Step 1 To access the alarm profile editor from network view, click the Provisioning > Alarm Profiles tabs.
Step 2 To access the profile editor from node view, click the Provisioning > Alarm Profiles >
Alarm Profile Editor tabs.
Step 3 To access the profile editor from a card view, click the following tabs:
• If the card is an E-Series Ethernet, G-Series Ethernet, STM-N, or electrical (DS3i-N-12, E1-N-14,
E1-42, or E3-12) card, click the Provisioning > Alarm Profiles > Alarm Profile Editor tabs.
• If the card is an ML-Series Ethernet (traffic) card, click the Provisioning > Ether Alarming >
Alarm Profile Editor tabs if you want to apply the profile to the front physical ports, or the
Provisioning > POS Alarming > Alarm Profile Editor tabs if you want to apply the profile to the
packet over SDH (POS) ports. For more information about ML-Series card ports and service, refer
to the Ethernet Card Software Feature and Configuration Guide for the Cisco ONS 15454,
Cisco ONS 15454 SDH, and Cisco ONS 15327.
• If the card is an FC_MR-4 card, click the Provisioning > Alarm Profiles > Alarm Profile Editor
tabs.
Step 4 Click Load.
Step 5 If you want to download a profile that exists on the node, click From Node in the Load Profile(s)
dialog box.
a. Click the node name you are logged into in the Node Names list.
b. Click the name of the profile in the Profile Names list, such as Default.
Step 6 If you want to download a profile that is stored locally or on a network drive, click From File in the
Load Profile(s) dialog box.
a. Click Browse.
October 2007
b. Navigate to the file location in the Open dialog box.
c. Click Open.
Cisco ONS 15454 SDH Procedure Guide, R7.2
19-23
Page 24

DLP- D224 Adjust the Java Virtual Memory Heap Size
Note The Default alarm profile list contains alarm and condition severities that correspond when
applicable to default values established in Telcordia GR-253-CORE.
Note All default or user-defined severity settings that are Critical (CR) or Major (MJ) are demoted to
Minor (MN) in Non-Service-Affecting (NSA) situations as defined in Telcordia GR-474.
Step 7 Click OK.
The downloaded profile appears at the right side of the Alarm Profiles window.
Step 8 Right-click anywhere in the downloaded profile column to view the profile editing shortcut menu.
Step 9 Click Store in the shortcut menu.
Step 10 In the Store Profile(s) dialog box, click To N ode (s).
a. Choose the node(s) where you want to save the profile:
–
If you want to save the profile to only one node, click the node in the Node Names list.
–
If you want to save the profile to all nodes, click Select All.
–
If you do not want to save the profile to any nodes, click Select None.
Chapter 19 DLPs D200 to D299
–
If you want to update alarm profile information, click Synchronize.
b. Click OK.
Step 11 Return to your originating procedure (NTP).
DLP-D224 Adjust the Java Virtual Memory Heap Size
Purpose This task allows you to adjust the Java Virtual Memory (JVM) heap size
from the default 256 MB to the maximum of 512 MB in order to improve
CTC performance.
Tools/Equipment None
Prerequisite Procedures None
Required/As Needed As needed
Onsite/Remote Onsite or remote
Security Level Provisioning or higher
Step 1 From the Windows task bar, click Start > Settings > Control Panel. The Windows Control Panel
appears.
Step 2 Double-click System. The System Properties window appears.
Step 3 Click the Advanced tab.
19-24
Step 4 Click Environmental Variables. The Environmental Variables dialog box appears.
Step 5 In the User Variables area, click New. The New User Variable dialog box appears.
Step 6 Type CTC_HEAP in the Variable Name field.
Cisco ONS 15454 SDH Procedure Guide, R7.2
October 2007
Page 25

Chapter 19 DLPs D200 to D299
Step 7 Type 512 in the Variable Value field.
Step 8 Click OK.
Step 9 Reboot your PC.
Step 10 Return to your originating procedure (NTP).
DLP-D225 Enable Alarm Filtering
Purpose This task enables alarm filtering for alarms, conditions, or event history in
Tools/Equipment None
Prerequisite Procedures DLP-D60 Log into CTC, page 17-49
Required/As Needed As needed
Onsite/Remote
Security Level
DLP- D225 Enable Alarm Filtering
all network nodes.
Onsite or remote
Retrieve or higher
Step 1 At node, network, or card view, click the Alarms tab.
Step 2 Click the Filter tool at the lower-right side of the bottom toolbar.
Alarm filtering is enabled if the tool is selected and disabled if the tool is raised (not selected).
Alarm filtering will be enabled in the card, node, and network views of the Alarms tab at the current node
and for all other nodes in the network. If, for example, the Alarm Filter tool is enabled in the Alarms tab
of node view at one node, the Alarms tab in the network and card views of that node will also show the
tool enabled. All other nodes in the network will also have the tool enabled.
If you filter an alarm in card view, the alarm will still be displayed in node view. In this view, the card
will display the color of the highest-level alarm. The alarm is also shown for the node in network view.
Step 3 If you want alarm filtering enabled when you view conditions, repeat Steps 1 and 2 using the Conditions
window.
Step 4 If you want alarm filtering enabled when you view alarm history, repeat Steps 1 and 2 using the History
window.
Step 5 Return to your originating procedure (NTP).
October 2007
Cisco ONS 15454 SDH Procedure Guide, R7.2
19-25
Page 26

DLP- D227 Disable Alarm Filtering
DLP-D227 Disable Alarm Filtering
Purpose This task turns off specialized alarm filtering in all network nodes so that
all severities are reported in CTC.
Tools/Equipment None
Prerequisite Procedures DLP-D225 Enable Alarm Filtering, page 19-25
DLP-D60 Log into CTC, page 17-49
Required/As Needed As needed
Onsite/Remote
Security Level
Step 1 At node, network, or card view, click the Alarms tab.
Step 2 Click the Filter tool at the lower-right side of the bottom toolbar.
Alarm filtering is enabled if the tool is indented and disabled if the tool is raised (not selected).
Step 3 If you want alarm filtering disabled when you view conditions, click the Conditions tab and click the
Filter tool.
Onsite or remote
Retrieve or higher
Chapter 19 DLPs D200 to D299
Step 4 If you want alarm filtering disabled when you view alarm history, click the History tab and click the
Filter tool.
Step 5 Return to your originating procedure (NTP).
DLP-D229 View Circuits on a Span
Purpose This task allows you to view circuits on an ONS 15454 SDH span.
Tools/Equipment None
Prerequisite Procedures Circuits must be created on the span. See Chapter 6, “Create Circuits and
Low-Order Tunnels.”
DLP-D60 Log into CTC, page 17-49
Required/As Needed As needed
Onsite/Remote Onsite or remote
Security Level Retrieve or higher
Step 1 From the View menu at node view, choose Go to Network View. If you are already in network view,
continue with Step 2.
Step 2 Right-click the green line containing the circuits that you want to view and choose one of the following:
• Circuits—To view MS-SPRing, SNCP ring, 1+1, virtual concatenated (VCAT), or unprotected
circuits on the span.
19-26
• PCA Circuits—To view circuits routed on an MS-SPRing protected channel. (This option does not
appear if the span you right-clicked is not an MS-SPRing span.)
Cisco ONS 15454 SDH Procedure Guide, R7.2
October 2007
Page 27

Chapter 19 DLPs D200 to D299
In the Circuits on Span dialog box, you can view the following information about the circuits that
traverse the span. The information that appears depends on the circuit type. For low-order and high-order
circuits provisioned on the span, the following information appears:
Note You can perform other procedures from the Circuits on Span dialog box. If the span is in an
DLP- D230 Change a Circuit State
• VC4—Displays VC4s used by the circuits.
• VC3/TUG3—Displays VC3s and TUG3s used by the circuits.
• TUG2—Displays TUG2s used by the circuits.
• VC12—Displays VC12s used by the circuits.
• VC11—Displays VC11s used by the circuits.
• SNCP—(SNCP span only) If checked, SNCP circuits are on the span.
• Circuit—Displays the circuit name.
• Switch State—(SNCP span only) Displays the switch state of the circuit, that is, whether any span
switches are active. For SNCP spans, switch types include: CLEAR (no spans are switched),
MANUAL (a manual switch is active), FORCE (a force switch is active), and LOCKOUT OF
PROTECTION (a span lockout is active).
SNCP, you can switch the span traffic. See the “DLP-D197 Initiate an SNCP Force Switch” task
on page 18-84 for instructions. If you want to edit a circuit on the span, double-click the circuit.
See the “DLP-D231 Edit a Circuit Name” task on page 19-28 or the “DLP-D233 Edit SNCP
Circuit Path Selectors” task on page 19-30 for instructions.
Step 3 Return to your originating procedure (NTP).
DLP-D230 Change a Circuit State
Purpose This task changes the state of a circuit.
Tools/Equipment None
Prerequisite Procedures DLP-D60 Log into CTC, page 17-49
Required/As Needed As needed
Onsite/Remote Onsite or remote
Security Level Provisioning or higher
Step 1 From the View menu, choose Go to Network View.
Step 2 Click the Circuits tab.
Step 3 Click the circuit with the state you want to change.
Note You cannot edit the circuit state if the circuit is routed to nodes with Software Release 3.3. These
circuits are automatically in service (Unlocked).
October 2007
Step 4 From the Tools menu, choose Circuits > Set Circuit State.
Cisco ONS 15454 SDH Procedure Guide, R7.2
19-27
Page 28

DLP- D231 Edit a Circuit Name
Step 5 In the Set Circuit State dialog box, choose the administrative state from the Target Circuit Admin State
drop-down list:
• Unlocked—Puts the circuit cross-connects in the Unlocked-enabled service state.
• Locked,disabled—Puts the circuit cross-connects in the Locked-enabled,disabled service state.
• Unlocked,automaticInService—Puts the circuit cross-connects in the
• Locked,maintenance—Puts the circuit cross-connects in the Locked-enabled,maintenance service
• Locked,outOfGroup—(VCAT circuits only; future use) Puts the member cross-connects in the
For additional information about circuit service states, refer to the “Circuits and Tunnels” chapter in the
Cisco ONS 15454 SDH Reference Manual.
Step 6 If you want to apply the state to the circuit source and destination ports, check the Apply to Drop Ports
check box.
Chapter 19 DLPs D200 to D299
Traffic is not passed on the circuit.
Unlocked-disabled,automaticInService service state and suppresses alarms and conditions. When
the connections receive a valid signal, the service state automatically changes to Unlocked-enabled.
state. The maintenance state does not interrupt traffic flow; it suppresses alarms and conditions and
allows loopbacks to be performed on the circuit. Use Locked,maintenance for circuit testing or to
suppress circuit alarms temporarily. Change the administrative state to Unlocked;
Unlocked,automaticInService; or Locked,disabled when testing is complete.
Locked-enabled,outOfGroup service state. This administrative state is used to place a member
circuit out of the group and to stop sending traffic. Locked-enabled,outOfGroup only applies to the
cross-connects on an end node where the VCAT resides. The cross-connects on intermediate nodes
are in the Locked-enabled,maintenance service state.
Step 7 Click Apply.
Step 8 If the Apply to Ports Results dialog box appears, view the results and click OK.
CTC will not change the service state of the circuit source and destination port in certain circumstances.
For example, if a port is in loopback (Locked-enabled,loopback & maintenance), CTC will not change
the port to Unlocked-enabled. In another example, if the circuit size is smaller than the port, CTC will
not change the port service state from Unlocked-enabled to Locked-enabled,disabled. If CTC cannot
change the port service state, you must change the port service state manually. For more information,
see the “DLP-D214 Change the Service State for a Port” task on page 19-10.
Step 9 Return to your originating procedure (NTP).
DLP-D231 Edit a Circuit Name
Purpose This task edits a circuit name, including VCAT circuit member names.
Tools/Equipment None
Prerequisite Procedures DLP-D60 Log into CTC, page 17-49
Required/As Needed As needed
Onsite/Remote Onsite or remote
Security Level Provisioning or higher
19-28
Step 1 Click the Circuits tab in node or network view.
Cisco ONS 15454 SDH Procedure Guide, R7.2
October 2007
Page 29

Chapter 19 DLPs D200 to D299
Step 2 Click the circuit you want to rename, then click Edit.
Step 3 If you want to edit a VCAT circuit member name, complete the following steps in the Edit Circuit
window to access the Edit Member window. If not, continue with the Step 4.
a. Click the Members tab.
b. Click the VCAT member that you want to edit, then click Edit Member. The Edit Member window
Step 4 In the General tab of the Edit Circuit or Edit Member window, click the Name field and edit or rename
the circuit. Names can contain up to 48 alphanumeric and/or special characters.
Note If you will create a monitor circuit on this circuit, do not make the name longer than
Step 5 Click Apply.
Step 6 From File menu, choose Close.
Step 7 If you changed the name of a VCAT circuit member, repeat Step 6 for the Edit Circuit window.
Step 8 In the Circuits window, verify that the circuit was correctly renamed.
Step 9 Return to your originating procedure (NTP).
DLP- D232 Change Active and Standby Span Color
appears.
44 characters, because monitor circuits add “_MON” (four characters) to the circuit name.
DLP-D232 Change Active and Standby Span Color
Purpose This task changes the color of active (working) and standby (protect)
circuit spans shown on the detailed circuit map of the Edit Circuits
window. By default, working spans are green and protect spans are purple.
Tools/Equipment None
Prerequisite Procedures DLP-D60 Log into CTC, page 17-49
Required/As Needed As needed
Onsite/Remote Onsite or remote
Security Level Provisioning or higher
Step 1 From the Edit menu in node, network, or card view, choose Preferences.
Step 2 In the Preferences dialog box, click the Circuit tab.
Step 3 Complete one or more of the following steps, as required:
• To change the color of the active (working) span, continue with Step 4.
• To change the color of the standby (protect) span, continue with Step 5.
• To return active and standby spans to their default colors, continue with Step 6.
Step 4 As needed, change the color of the active span:
a. In the Span Colors area, click the colored square that is near the word Active.
b. In the Pick a Color dialog box, click the color for the active span, or click Reset if you want the
active span to display the last applied (saved) color.
October 2007
Cisco ONS 15454 SDH Procedure Guide, R7.2
19-29
Page 30

DLP- D233 Edit SNCP Circuit Path Selectors
c. Click OK to close the Pick a Color dialog box. If you want to change the standby span color,
continue with Step 5. If not, click OK to save the change and close the Preferences dialog box, or
click Apply to save the change and keep the Preferences dialog box open.
Step 5 As needed, change the color of the standby span:
a. In the Span Colors area, click the colored square that is near the word Standby.
b. In the Pick a Color dialog box, click the color for the standby span, or click Reset if you want the
standby span to show the last applied (saved) color.
c. Click OK to save the change and close the Preferences dialog box, or click Apply to save the change
and keep the Preferences dialog box open.
Step 6 As needed, return the active and standby spans to their default colors:
a. From the Edit menu, choose Preferences.
b. In the Preferences dialog box, click the Circuits tab.
c. Click Reset to Defaults.
d. Click OK to save the change and close the Preferences dialog box, or click Apply to save the change
and keep the Preferences dialog box open.
Step 7 Return to your originating procedure (NTP).
Chapter 19 DLPs D200 to D299
DLP-D233 Edit SNCP Circuit Path Selectors
Purpose This task changes the SNCP signal fail and signal degrade thresholds, the
reversion and reversion time, and the PDI-P settings for one or more SNCP
circuits.
Tools/Equipment None
Prerequisite Procedures NTP-D44 Provision SNCP Nodes, page 5-22
DLP-D60 Log into CTC, page 17-49
Required/As Needed As needed
Onsite/Remote Onsite or remote
Security Level Provisioning or higher
Step 1 From the View menu, choose Go to Network View.
Step 2 Click the Circuits tab.
Step 3 In the Circuits tab, click the SNCP circuit(s) that you want to edit. To change the settings for multiple
circuits, press the Shift key (to choose adjoining circuits) or the Ctrl key (to choose nonadjoining
circuits) and click each circuit that you want to change.
Step 4 From the Tools menu, choose Circuits > Set Path Selector Attributes.
Step 5 In the Path Selectors Attributes dialog box, edit the following SNCP selectors, as needed:
19-30
• Revertive—If checked, traffic reverts to the working path when conditions that diverted it to the
protect path are repaired. If not checked, traffic does not revert.
• Reversion time (min.)—If Revertive is checked, sets the amount of time that will elapse before
traffic reverts to the working path. The range is 0.5 to 12 minutes in 0.5 minute increments.
Cisco ONS 15454 SDH Procedure Guide, R7.2
October 2007
Page 31

Chapter 19 DLPs D200 to D299
DLP- D234 Roll the Source or Destination of One Optical Circuit
• (VC4 circuits only) In the VC LO Circuits Only area, set the following thresholds:
–
SF threshold—Sets the SNCP signal failure BER threshold.
–
SD threshold—Sets the SNCP signal degrade BER threshold.
• (VC4 circuits only) In the VC4 Circuits Only area, set the following thresholds:
–
SF Ber Level—Sets the SNCP signal failure BER threshold.
–
SD Ber Level—Sets the SNCP signal degrade BER threshold.
–
Switch on PDI-P—When checked, traffic switches if an VC4 payload defect indication is
received.
Step 6 Click OK and verify that the changed values are correct in the Circuits window.
Step 7 Return to your originating procedure (NTP).
DLP-D234 Roll the Source or Destination of One Optical Circuit
Purpose This task reroutes traffic from one source or destination to another on the
same circuit, thus changing the original source or destination.
Tools/Equipment None
Prerequisite Procedures DLP-D60 Log into CTC, page 17-49
Required/As Needed As needed
Onsite/Remote Onsite or remote
Security Level Provisioning or higher
Step 1 From the View menu, choose Go To Network View.
Step 2 Click the Circuits tab.
Step 3 Click the circuit that you want to roll. The circuit must have a DISCOVERED status for you to start a
roll.
Step 4 From the Tools menu, choose Circuits > Roll Circuit.
Step 5 In the Roll Attributes area, complete the following (Figure 19-5):
a. From the Circuit Roll Mode drop-down list, choose Auto to create an automatic roll (required for a
1-way source roll) or Manual to create a manual roll (required for a 1-way destination roll).
b. From the Circuit Roll Type drop-down list, choose Single to indicate that you want to roll one
cross-connect on the chosen circuit.
October 2007
Cisco ONS 15454 SDH Procedure Guide, R7.2
19-31
Page 32

DLP- D234 Roll the Source or Destination of One Optical Circuit
Figure 19-5 Selecting Single Roll Attributes
Chapter 19 DLPs D200 to D299
Step 6
Click Next.
Step 7 In the Pivot/Fixed Point 1 window, click the square in the graphic image that represents the facility that
you want to keep (Figure 19-6).
This facility is the fixed location in the cross-connect involved in the roll process. The identifier appears
in the text box below the graphic image. The facility that is not selected is the Roll From path. The
Roll From path is deleted after the roll is completed.
Figure 19-6 Selecting a Path
HOP
HOP
VC4-*
VC4-*
VC4-*
VC4-*
VC4-*
VC4-*
19-32
HOP
134351
Step 8
VC4-*
Click Next.
Step 9 In the Select New End Point area, choose the Slot, Port, and VC4 from the drop-down lists to select the
Roll To facility (Figure 19-7).
Cisco ONS 15454 SDH Procedure Guide, R7.2
October 2007
Page 33

Chapter 19 DLPs D200 to D299
Figure 19-7 Selecting a New Endpoint
Step 10 Click Finish. On the Circuits tab, the circuit status for the Roll From port changes from DISCOVERED
to ROLL_PENDING.
Step 11 Click the Rolls tab (Figure 19-8). For the pending roll, view the Roll Valid Signal status. When one of
the following conditions is met, continue with Step 12.
HOP
HOP
DLP- D234 Roll the Source or Destination of One Optical Circuit
VC4-*
VC4
134352
• If the Roll Valid Signal status is true, a valid signal was found on the new port.
• If the Roll Valid Signal status is false, a valid signal was not found. Wait until the signal is found
before continuing with the next step. If the signal is not found, refer to the Circuits and Timing
section of the Cisco ONS 15454 SDH Troubleshooting Guide. To cancel the roll, see the “DLP-D240
Cancel a Roll” task on page 19-44.
• The roll is a one-way destination roll and the Roll Valid Signal is false. It is not possible to get a
Roll Valid Signal status of true for a one-way destination roll.
Note You cannot cancel an automatic roll after a valid signal is found.
• You can force a signal onto the Roll To circuit by using the Force Valid Signal button. If you choose
Force Valid Signal, traffic on the circuit that is involved in the roll might drop depending on
conditions at the other end of the circuit when the roll is completed. You must force a signal if the
circuits do not have a signal or have a bad signal and you want to complete the roll.
Note For a one-way destination roll in manual mode, you do not need to force the valid signal.
October 2007
Cisco ONS 15454 SDH Procedure Guide, R7.2
19-33
Page 34

DLP- D235 Roll One Cross-Connect from an Optical Circuit to a Second Optical Circuit
Figure 19-8 Viewing the Rolls Tab
Step 12 If you selected Manual in Step 5, click the rolled facility on the Rolls tab and then click Complete. If
you selected Auto, continue with Step 13.
Step 13 For both Manual and Auto rolls, click Finish to complete the circuit roll process. The roll clears from
the Rolls tab and the rolled circuit now appears on the Circuits tab in the DISCOVERED status.
Step 14 Return to your originating procedure (NTP).
Chapter 19 DLPs D200 to D299
DLP-D235 Roll One Cross-Connect from an Optical Circuit to a Second Optical
Circuit
Purpose This task reroutes a cross-connect on one circuit onto another circuit,
resulting in a new destination.
Tools/Equipment None
Prerequisite Procedures DLP-D60 Log into CTC, page 17-49
DLP-D363 Provision Regenerator-Section DCC Terminations, page 20-68
for the ports involved in the roll
Required/As Needed As needed
Onsite/Remote Onsite or remote
Security Level Provisioning or higher
Step 1 From the View menu, choose Go To Network View.
Step 2 Click the Circuits tab.
Step 3 Press Ctrl and click the two circuits that you want to use in the roll process.
The circuits must have a DISCOVERED status; in addition, they must be the same size and direction for
you to start a roll. The planned Roll To circuit must not carry traffic. The Roll To facility should be DCC
connected to the source node of the Roll To circuit.
Step 4 From the Tools menu, choose Circuits > Roll Circuit.
19-34
Step 5 In the Roll Attributes area, complete the following (Figure 19-9):
a. From the Circuit Roll Mode drop-down list, choose Auto to create an automatic roll (required for a
1-way source roll) or Manual to create a manual roll (required for 1-way destination roll).
Cisco ONS 15454 SDH Procedure Guide, R7.2
October 2007
Page 35

Chapter 19 DLPs D200 to D299
b. From the Circuit Roll Type drop-down list, choose Single to indicate that you want to roll a single
c. In the Roll From Circuit area, click the circuit that contains the Roll From connection.
Figure 19-9 Selecting Roll Attributes for a Single Roll onto a Second Circuit
DLP- D235 Roll One Cross-Connect from an Optical Circuit to a Second Optical Circuit
connection from the Roll From circuit to the Roll To circuit.
HOP
HOP
134353
Step 6
Step 7 In the Pivot/Fixed Point 1 window, click the square representing the facility that you want to keep
Click Next.
(Figure 19-6 on page 19-32).
This facility is the fixed location in the cross-connect involved in the roll process. The identifier appears
in the text box below the graphic image. The facility that is not selected is the Roll From path. The
Roll From path is deleted after the roll is completed.
Step 8 Click Next.
Step 9 In the Select New End Point area, choose the Slot, Port, and VC4 from the drop-down lists to identify
the Roll To facility on the connection being rolled.
Step 10 Click Finish.
The statuses of the Roll From and Roll To circuits change from DISCOVERED to ROLL_PENDING in
the Circuits tab.
Step 11 Click the Rolls tab. For the pending roll, view the Roll Valid Signal status. When one of the following
conditions is met, continue with Step 12.
• If the Roll Valid Signal status is true, a valid signal was found on the new port.
• If the Roll Valid Signal status is false, a valid signal was not found. Wait until the signal is found
before continuing with the next step. If the signal is not found, refer to the Circuits and Timing
section of the Cisco ONS 15454 SDH Troubleshooting Guide. To cancel the roll, see the “DLP-D240
Cancel a Roll” task on page 19-44.
• The roll is a one-way destination roll and the Roll Valid Signal is false. It is not possible to get a
“true” Roll Valid Signal status for a one-way destination roll.
October 2007
Note You cannot cancel an automatic roll after a valid signal is found.
Cisco ONS 15454 SDH Procedure Guide, R7.2
19-35
Page 36

Chapter 19 DLPs D200 to D299
DLP- D236 Roll Two Cross-Connects on One Optical Circuit Using Automatic Routing
• A roll can be forced onto the Roll To Circuit destination without a valid signal by using the
Force Valid Signal button. If you choose Force Valid Signal, traffic on the circuit that is involved in
the roll will be dropped when the roll is completed.
Step 12 If you selected Manual in Step 5, click the roll on the Rolls tab and click Complete to route the traffic
to the new port. If you selected Auto, continue with Step 13.
Step 13 For both manual and automatic rolls, click Finish to complete the circuit roll process.
The roll is cleared from the Rolls tab and the new rolled circuit on the Circuits tab returns to the
DISCOVERED status.
Step 14 Return to your originating procedure (NTP).
DLP-D236 Roll Two Cross-Connects on One Optical Circuit Using Automatic
Routing
Purpose This task reroutes the network path while maintaining the same source and
destination. This task allows CTC to automatically select a Roll To path.
Tools/Equipment None
Prerequisite Procedures DLP-D60 Log into CTC, page 17-49
Required/As Needed As needed
Onsite/Remote Onsite or remote
Security Level Provisioning or higher
Note This task optionally uses automatic routing. Automatic routing is not available if both the Automatic
Circuit Routing NE default and the Network Circuit Automatic Routing Overridable NE default are set
to FALSE. For a full description of these defaults see the “Network Element Defaults” appendix in the
Cisco ONS 15454 SDH Reference Manual.
Step 1 From the View menu, choose Go To Network View.
Step 2 Click the Circuits tab.
Step 3 Click the circuit that has the connections that you want to roll. The circuit must have a DISCOVERED
status for you to start a roll.
Step 4 From the Tools menu, choose Circuits > Roll Circuit.
Step 5 In the Roll Attributes area, complete the following (Figure 19-10):
a. From the Circuit Roll Mode drop-down list, choose Auto to create an automatic roll or Manual to
create a manual roll.
b. From the Circuit Type drop-down list, choose Dual to indicate that you want to roll two connections
on the chosen circuit.
19-36
Cisco ONS 15454 SDH Procedure Guide, R7.2
October 2007
Page 37

Chapter 19 DLPs D200 to D299
Figure 19-10 Selecting Dual Roll Attributes
DLP- D236 Roll Two Cross-Connects on One Optical Circuit Using Automatic Routing
Step 6
Step 7 In the Pivot/Fixed Point 1 window, click the square representing the fixed path of the first connection to
Click Next.
be rolled (Figure 19-6 on page 19-32).
This path is a fixed point in the cross-connect involved in the roll process. The path identifier appears in
the text box below the graphic image. The path that is not selected contains the Roll From path. The Roll
From path is deleted after the roll is completed.
Step 8 Click Next.
Step 9 Complete one of the following:
• If multiple Roll From paths exist, the Select Roll From dialog box appears. Select the path from
which you want to roll traffic and click OK.
• If multiple Roll From paths do not exist, continue with Step 10. The circuit status for the Roll To
path changes states from DISCOVERED to ROLL_PENDING.
Step 10 In the Pivot/Fixed Point 2 window, click the square that represents the fixed path of the second
connection to be rolled.
The path that is not selected is the Roll From path. The Roll From path is deleted after the roll is
completed. The path identifier appears in the text box below the graphic image.
Step 11 Click Next.
Step 12 In the Circuit Routing Preferences area, check Route Automatically to allow CTC to find the route
(Figure 19-11). If you check Route Automatically, the following options are available:
• Using Required Nodes/Spans—If checked, you can specify nodes and spans to include or exclude
in the CTC-generated circuit route in Step 15.
• Review Route Before Creation—If checked, you can review and edit the circuit route before the
circuit is created.
October 2007
Cisco ONS 15454 SDH Procedure Guide, R7.2
19-37
Page 38

DLP- D236 Roll Two Cross-Connects on One Optical Circuit Using Automatic Routing
Figure 19-11 Setting Roll Routing Preferences
HOP
HOP
VC4-*
VC4-*
Chapter 19 DLPs D200 to D299
134354
Step 13 To route the circuit over a protected path, check Fully Protected Path. (If you do not want to route the
circuit on a protected path, continue with Step 14.) CTC creates a primary and alternate circuit route
(virtual SNCP) based on the following nodal diversity options. Select one of the following choices and
follow subsequent window prompts to complete the routing:
• Nodal Diversity Required—Ensures that the primary and alternate paths within extended SNCP
portions of the complete circuit path are nodally diverse.
• Nodal Diversity Desired—Specifies that node diversity should be attempted, but if node diversity
is not possible, CTC creates link diverse paths for the extended SNCP portion of the complete circuit
path.
• Link Diversity Only—Specifies that only link-diverse primary and alternate paths for extended
SNCP portions of the complete circuit path are needed. The paths might be node-diverse, but CTC
does not check for node diversity.
Step 14 If you checked Route Automatically in Step 12:
• If you checked Using Required Nodes/Spans, continue with Step 15.
• If you checked only Review Route Before Creation, continue with Step 16.
• If you did not check Using Required Nodes/Spans or Review Route Before Creation, continue with
Step 17.
Step 15 If you checked Using Required Nodes/Spans in Step 12:
a. In the Roll Route Constraints area, click a node or span on the circuit map.
b. Click Include to include the node or span in the circuit. Click Exclude to exclude the node/span
from the circuit. The order in which you select included nodes and spans sets the circuit sequence.
Click spans twice to change the circuit direction.
19-38
c. Repeat Step b for each node or span that you wish to include or exclude.
d. Review the circuit route. To change the circuit routing order, select a node in the Required
Nodes/Lines or Excluded Nodes Links lists, then click the Up or Down buttons to change the circuit
routing order. Click Remove to remove a node or span.
Cisco ONS 15454 SDH Procedure Guide, R7.2
October 2007
Page 39

Chapter 19 DLPs D200 to D299
Step 16 If you checked Review Route Before Creation in Step 12:
a. In the Roll Route Review and Edit area, review the circuit route. To add or delete a circuit span,
b. If the provisioned circuit does not reflect the routing and configuration you want, click Back to
Caution If the termination card is a DS3i-N-12, E1-N-14, E1-42 or E3-12 card, a roll will occur even if a valid
signal is not detected on the Roll To port. The absence of a PDI-P downstream for loss of signal (LOS),
loss of frame alignment (LOF), and alarm indication signal (AIS) line defects causes the roll to continue
without a valid signal. This is only seen with DUAL roll mode when both ends of the circuit use the
card(s) that are listed in this statement.
Step 17 Click Finish.
In the Circuits tab, verify that a new circuit appears. This circuit is the Roll To circuit. It is designated
with the Roll From circuit name appended with ROLL**.
Step 18 Click the Rolls tab. Two new rolls now appear. For each pending roll, view the Roll Valid Signal status.
When one of the following requirements is met, continue with Step 19.
DLP- D236 Roll Two Cross-Connects on One Optical Circuit Using Automatic Routing
select a node on the circuit route. Blue arrows show the circuit route. Green arrows indicate spans
that you can add. Click a span arrowhead, then click Include to include the span or Remove to
remove the span.
verify and change circuit information.
• If the Roll Valid Signal status is true, a valid signal was found on the new port.
• If the Roll Valid Signal status is false, a valid signal was not found. Wait until the signal is found
before continuing with the next step. If a valid signal is not found, refer to the
Cisco ONS 15454 SDH Troubleshooting Guide. To cancel the roll, see the “DLP-D240 Cancel a
Roll” task on page 19-44.
• The roll is a one-way destination roll and the Roll Valid signal status is false. It is not possible to
get a Roll Valid Signal status of true for a one-way destination roll.
Note If you have completed a roll, you cannot cancel the sibling roll. You must cancel the two
rolls together.
Note You cannot cancel an automatic roll after a valid signal is found.
• A roll can be forced onto the Roll To Circuit destination without a valid signal by using the
Force Valid Signal button. If you choose Force Valid Signal, traffic on the circuit that is involved in
the roll will be dropped when the roll is completed.
Step 19 If you selected Manual in Step 5, click both rolls on the Rolls tab and click Complete to route the traffic
to the new port. If you selected Auto, continue with Step 20.
Note You cannot complete a roll if you cancelled the sibling roll. You must complete the two rolls
together.
October 2007
Step 20 For both manual and automatic rolls, click Finish to complete circuit roll process.
Step 21 Return to your originating procedure (NTP).
Cisco ONS 15454 SDH Procedure Guide, R7.2
19-39
Page 40

Chapter 19 DLPs D200 to D299
DLP- D237 Roll Two Cross-Connects on One Optical Circuit Using Manual Routing
DLP-D237 Roll Two Cross-Connects on One Optical Circuit Using Manual
Routing
Purpose This task reroutes a network path of an optical circuit using manual
routing.
Tools/Equipment None
Prerequisite Procedures DLP-D60 Log into CTC, page 17-49
Required/As Needed As needed
Onsite/Remote Onsite or remote
Security Level Provisioning and higher
Step 1 From the View menu, choose Go To Network View.
Step 2 Click the Circuits tab.
Step 3 Click the circuit that you want to roll to a new path. The circuit must have a DISCOVERED status for
you to start a roll.
Step 4 From the Tools menu, choose Circuits > Roll Circuit.
Step 5 In the Roll Attributes area, complete the following (Figure 19-10 on page 19-37):
a. From the Circuit Roll Mode drop-down list, choose Auto to create an automatic roll or Manual to
create a manual roll.
b. From the Circuit Type drop-down list, choose Dual to indicate that you want to roll two connections
on the chosen circuit.
Step 6 Click Next.
Step 7 In the Pivot/Fixed Point 1 window, click the square representing the fixed path of the first cross-connect
to be rolled (Figure 19-6 on page 19-32).
This path is a fixed point in the cross-connect involved in the roll process. The path identifier appears in
the text box below the graphic image. The path that is not selected contains the Roll From path. The
Roll From path is deleted after the roll is completed.
Step 8 Click Next.
Step 9 Complete one of the following:
• If multiple Roll From paths exist, the Select Roll From dialog box appears. Select the path from
which you want to roll traffic and click OK, then click Next.
• If multiple Roll From paths do not exist, click Next and continue with Step 10. The circuit status for
the Roll From path changes from DISCOVERED to ROLL_PENDING.
Step 10 In the Pivot/Fixed Point 2 window, click the square that represents the fixed path of the second
connection to be rolled.
The path that is not selected is the Roll From path. The Roll From path is deleted after the roll is
complete. The path identifier appears in the text box below the graphic image.
Step 11 Click Next.
19-40
Step 12 In the Circuit Routing Preferences area, uncheck Route Automatically.
Cisco ONS 15454 SDH Procedure Guide, R7.2
October 2007
Page 41

Chapter 19 DLPs D200 to D299
Step 13 Set the circuit path protection:
Step 14 If you checked Fully Protected Path, choose one of the following:
Step 15 Click Next. Beneath Route Review and Edit, node icons appear for you to route the circuit manually.
The green arrows pointing from the source node to other network nodes indicate spans that are available
for routing the circuit.
Step 16 Complete the “DLP-D98 Provision a High-Order Circuit Route” task on page 17-96, or the “DLP-D3
Provision a Low-Order VC12 Circuit Route” task on page 17-2.
DLP- D237 Roll Two Cross-Connects on One Optical Circuit Using Manual Routing
• To route the circuit on a protected path, leave Fully Protected Path checked and continue with
Step 14.
• To create an unprotected circuit, uncheck Fully Protected Path and continue with Step 15.
• Nodal Diversity Required—Ensures that the primary and alternate paths within the SNCP portions
of the complete circuit path are nodally diverse.
• Nodal Diversity Desired—Specifies that node diversity is preferred, but if node diversity is not
possible, CTC creates fiber-diverse paths for the SNCP portion of the complete circuit path.
• Link Diversity Only—Specifies that only fiber-diverse primary and alternate paths for SNCP
portions of the complete circuit path are needed. The paths might be node-diverse, but CTC does not
check for node diversity.
Caution The following is only seen with DUAL roll mode when both ends of the circuit use the card(s) mentioned
in this statement. If the termination card is a DS3i-N-12, E1-N-14, E1-42 or E3-12 card, a roll will occur
even if a valid signal is not detected on the Roll To port. The absence of a PDI-P downstream for LOS,
LOF, and AIS line defects causes the roll to continue without a valid signal.
Step 17 Click Finish. In the Circuits tab, verify that a new circuit appears.
This circuit is the Roll To circuit. It is designated with the Roll From circuit name appended with
ROLL**.
Step 18 Click the Rolls tab. Two new rolls now appear on the Rolls tab. For each pending roll, view the Roll Valid
Signal status. When one of the following conditions is met, continue with Step 19.
• If the Roll Valid Signal status is true, a valid signal was found on the new port.
• If the Roll Valid Signal status is false, a valid signal was not found. Wait until the signal is found
before continuing with the next step. If the signal is not found, refer to the Circuits and Timing
section of the Cisco ONS 15454 SDH Troubleshooting Guide. To cancel the roll, see the “DLP-D240
Cancel a Roll” task on page 19-44.
• The roll is a one-way destination roll and the Roll Valid signal status is false. It is not possible to
get a Roll Valid Signal status of true for a one-way destination roll.
Note You cannot cancel an automatic roll after a valid signal is found.
• A roll can be forced onto the Roll To Circuit destination without a valid signal by using the
Force Valid Signal button. If you choose Force Valid Signal, traffic on the circuit that is involved in
the roll will be dropped when the roll is completed.
October 2007
Step 19 If you selected Manual in Step 5, click each roll and click Complete to route the traffic to the new port.
If you selected Auto, continue with Step 20.
Cisco ONS 15454 SDH Procedure Guide, R7.2
19-41
Page 42

Chapter 19 DLPs D200 to D299
DLP- D238 Roll Two Cross-Connects from One Optical Circuit to a Second Optical Circuit
Note You cannot complete a roll if you cancelled the sibling roll. You must complete the two rolls
together.
Step 20 For both manual and automatic rolls, click Finish to complete the circuit roll process.
Step 21 Return to your originating procedure (NTP).
DLP-D238 Roll Two Cross-Connects from One Optical Circuit to a Second
Optical Circuit
Purpose This task reroutes a network path using two optical circuits by allowing
CTC to select the Roll To path on the second circuit automatically.
Tools/Equipment None
Prerequisite Procedures DLP-D60 Log into CTC, page 17-49
Required/As Needed As needed
Onsite/Remote Onsite or remote
Security Level Provisioning and higher
Step 1 From the View menu, choose Go To Network View.
Step 2 Click the Circuits tab.
Step 3 Press Ctrl and click the two circuits that you want to use in the roll process.
The Roll From path will be on one circuit and the Roll To path will be on the other circuit. The circuits
must have a DISCOVERED status and must be the same size and direction for you to start a roll. The
planned Roll To circuit must not carry traffic. The first Roll To path must be DCC connected to the source
node of the Roll To circuit, and the second Roll To path must be DCC connected to the destination node
of the Roll To circuit.
Step 4 From the Tools menu, choose Circuits > Roll Circuit.
Step 5 In the Roll Attributes area, complete the following:
a. From the Circuit Roll Mode drop-down list, choose Auto to create an automatic roll (required for a
1-way source roll) or Manual to create a manual roll (required for 1-way destination roll).
b. From the Circuit Roll Type drop-down list, choose Dual.
c. In the Roll From Circuit area, click the circuit that contains the Roll From path.
Step 6 Click Next.
Step 7 In the Pivot/Fixed Point 1 window, click the square representing the fixed path of the first cross-connect
to be rolled (Figure 19-6 on page 19-32).
This path is a fixed point in the cross-connect involved in the roll process. The path identifier appears in
the text box below the graphic image. The path that is not selected contains the Roll From path. The
Roll From path is deleted after the roll is completed.
19-42
Step 8 Click Next.
Cisco ONS 15454 SDH Procedure Guide, R7.2
October 2007
Page 43

Chapter 19 DLPs D200 to D299
Step 9 Complete one of the following:
The circuit status for the Roll From path changes from DISCOVERED to ROLL PENDING.
Step 10 In the Pivot/Fixed Point 2 window, click the square that represents the fixed path of the second
connection to be rolled.
The path that is not selected is the Roll From path. The Roll From path is deleted after the roll is
completed. The path identifier appears in the text box below the graphic image.
Step 11 Click Next.
Caution If the termination card is a DS3i-N-12, E1-N-14, E1-42 or E3-12 card, a roll will occur even if a valid
signal is not detected on the Roll To port. The absence of PDI-P downstream for LOS, LOF, and AIS line
defects causes the roll to continue without a valid signal. This is only seen with DUAL roll mode when
both ends of the circuit use the card(s) listed in this statement.
DLP- D238 Roll Two Cross-Connects from One Optical Circuit to a Second Optical Circuit
• If multiple Roll From paths exist, the Select Roll From dialog box appears. Select the path from
which you want to roll traffic and click OK.
• If multiple Roll From paths do not exist, continue with Step 10.
Step 12 Click Finish. In the Circuits tab, the Roll From and Roll To circuits change from the DISCOVERED
status to ROLL PENDING.
Step 13 Click the Rolls tab. Two new rolls now appear on the Rolls tab. For each pending roll, view the Roll Valid
Signal status. When one of the following conditions is met, continue with Step 14.
• If the Roll Valid Signal status is true, a valid signal was found on the new port.
• If the Roll Valid Signal status is false, a valid signal was not found. Wait until the signal is found
before continuing with the next step. If the signal is not found, refer to the Circuits and Timing
section of the Cisco ONS 15454 SDH Troubleshooting Guide. To cancel the roll, see the “DLP-D240
Cancel a Roll” task on page 19-44.
• The roll is a one-way destination roll and the Roll Valid signal status is false. It is not possible to
get a Roll Valid Signal status of true for a one-way destination roll.
Note You cannot cancel an automatic roll after a valid signal is found.
• A roll can be forced onto the Roll To Circuit destination without a valid signal by using the
Force Valid Signal button. If you choose Force Valid Signal, traffic on the circuit that is involved in
the roll will be dropped when the roll is completed.
Step 14 If you selected Manual in Step 5, click both rolls on the Rolls tab and click Complete to route the traffic
to the new port. If you selected Auto, continue with Step 15.
Note You cannot complete a roll if you cancelled the sibling roll. You must complete the two rolls
together.
October 2007
Step 15 For both manual and automatic rolls, click Finish to complete the circuit roll process.
Step 16 Return to your originating procedure (NTP).
Cisco ONS 15454 SDH Procedure Guide, R7.2
19-43
Page 44

DLP- D239 Delete a Roll
DLP-D239 Delete a Roll
Purpose This task deletes a roll. Use caution when selecting this option, traffic
Tools/Equipment None
Prerequisite Procedures DLP-D60 Log into CTC, page 17-49
Required/As Needed As needed
Onsite/Remote Onsite or remote
Security Level Provisioning or higher
Step 1 From the View menu, choose Go To Network View.
Step 2 Click the Circuits > Rolls tabs.
Step 3 Click the rolled circuit that you want to delete.
Step 4 From the Tools menu, choose Circuits > Delete Rolls.
Chapter 19 DLPs D200 to D299
might be affected. Delete a roll only if it cannot be completed or cancelled
in normal ways. Circuits might have a PARTIAL status when this option is
selected. See Table 20-31 on page 20-77 for a description of circuit
statuses.
NTP-D332 Bridge and Roll Traffic, page 7-9
Step 5 In the confirmation dialog box, click Yes .
Step 6 Return to your originating procedure (NTP).
DLP-D240 Cancel a Roll
Purpose This task cancels a roll. When the roll mode is Manual, you can only cancel
Tools/Equipment None
Prerequisite Procedures DLP-D60 Log into CTC, page 17-49
Required/As Needed As needed
Onsite/Remote Onsite or remote
Security Level Provisioning or higher
Caution If you click cancel while performing a Dual roll in Manual mode and have a valid signal detected on both
rolls, you will see a dialog box stating that this can cause a traffic hit and asking if you want to continue
with the cancellation. Cisco does not recommend cancelling a dual roll when a valid signal has been
detected. To return the circuit to the original state, Cisco recommends completing the roll, then using
bridge and roll again to roll the circuit back.
a roll before you click the Complete button. When the roll mode is Auto,
cancel roll is only allowed before a good signal is detected by the node or
before clicking the Force Valid Signal button. A dual or single roll can be
cancelled before the roll state changes to ROLL_COMPLETED.
NTP-D332 Bridge and Roll Traffic, page 7-9
19-44
Cisco ONS 15454 SDH Procedure Guide, R7.2
October 2007
Page 45

Chapter 19 DLPs D200 to D299
DLP- D241 Clear an MS-SPRing Manual Ring Switch
Step 1 From node or network view, click the Circuits > Rolls tabs.
Step 2 Click the rolled circuit that you want to cancel.
Step 3 Click Cancel.
Step 4 Return to your originating procedure (NTP).
DLP-D241 Clear an MS-SPRing Manual Ring Switch
Purpose This task clears a Manual ring switch.
Tools/Equipment None
Prerequisite Procedures DLP-D60 Log into CTC, page 17-49
Required/As Needed As needed
Onsite/Remote Onsite or remote
Security Level Provisioning or higher
Step 1 From the View menu, choose Go to Network View.
Step 2 Click the Provisioning > MS-SPRing tabs.
Step 3 Choose the MS-SPRing that the Manual ring switch that you want to clear and click Edit.
Tip To move an icon to a new location, for example, to see MS-SPRing channel (port) information more
clearly, click an icon on the Edit MS-SPRing network graphic and while pressing Ctrl, drag the icon to
a new location.
Step 4 Right-click the MS-SPRing node channel (port) where the Manual ring switch was applied and choose
Set West Protection Operation or Set East Protection Operation, as applicable.
Step 5 In the dialog box, choose CLEAR from the drop-down list. Click OK.
Step 6 Click Yes in the Confirm MS-SPRing Operation dialog box. The letter “M” is removed from the channel
(port) and the span turns green.
Step 7 From the File menu, choose Close.
Step 8 Return to your originating procedure (NTP).
October 2007
Cisco ONS 15454 SDH Procedure Guide, R7.2
19-45
Page 46

DLP- D242 Create an MS-SPRing on a Single Node
DLP-D242 Create an MS-SPRing on a Single Node
Purpose This task creates an MS-SPRing on a single node. The task is used when
you add a node to an existing MS-SPRing or when you delete and then
recreate an MS-SPRing temporarily from one node.
Tools/Equipment None
Prerequisite Procedures DLP-D60 Log into CTC, page 17-49
Required/As Needed As needed
Onsite/Remote Onsite
Security Level Provisioning or higher
Step 1 In node view, click the Provisioning > MS-SPRing tabs.
Step 2 In the Suggestion dialog box, click OK.
Step 3 In the Create MS-SPRing dialog box, enter the MS-SPRing information:
• Ring Type—Enter the ring type (either 2 Fiber or 4 Fiber) of the MS-SPRing.
• Ring ID—Enter the MS-SPRing ring ID.
Chapter 19 DLPs D200 to D299
• Node ID—Enter the node ID. If the node is being added to an MS-SPRing, use an ID that is not used
by other MS-SPRing nodes.
• Ring Reversion—Enter the ring reversion time of the existing MS-SPRing.
• West Line—Enter the slot on the node that will connect to the existing MS-SPRing through the
node’s west line (port).
• East Line—Enter the slot on the node that will connect to the existing MS-SPRing through the
node’s east line (port).
If you are adding the node to a four-fiber MS-SPRing, complete the following for the second set of
fibers:
• Span Reversion—Enter the span reversion time of the existing MS-SPRing.
• West Line—Enter the slot on the node that will connect to the existing MS-SPRing through the
node’s west line (port).
• East Line—Enter the slot on the node that will connect to the existing MS-SPRing through the
node’s east line (port).
Step 4 Click OK.
Note The MS-SPRing is incomplete and alarms appear until the node is connected to other
MS-SPRing nodes.
Step 5 Return to your originating procedure (NTP).
19-46
Cisco ONS 15454 SDH Procedure Guide, R7.2
October 2007
Page 47

Chapter 19 DLPs D200 to D299
DLP-D243 Create a VLAN
Purpose This task creates a new VLAN.
Tools/Equipment None
Prerequisite Procedures See Chapter 6, “Create Circuits and Low-Order Tunnels” for circuit
Required/As Needed As needed
Onsite/Remote Onsite or remote
Security Level Provisioning or higher
Step 1 From the View menu, choose Go to Network View.
Step 2 From the Tools menu, choose Manage VLANS.
Step 3 In the All VLANs dialog box, click Create.
Step 4 In the Define New VLAN dialog box, complete the following:
• VLAN Name—Assign an easily identifiable name to your VLAN.
DLP- D243 Create a VLAN
creation procedures.
• VLAN ID—Assign a VLAN ID. The VLAN ID should be the next available number between 2 and
4093 that is not already assigned to an existing VLAN. Each ONS 15454 SDH network supports a
maximum of 509 user-provisionable VLANs.
• Topology Host—Choose the node to serve as the topology host from the drop-down list. The
topology host is used to discover the VLAN topology. The login node is the default.
Step 5 Click OK.
Step 6 Click Close.
Step 7 Return to your originating procedure (NTP).
October 2007
Cisco ONS 15454 SDH Procedure Guide, R7.2
19-47
Page 48

Chapter 19 DLPs D200 to D299
DLP- D244 Use the Reinitialization Tool to Clear the Database and Upload Software (Windows)
DLP-D244 Use the Reinitialization Tool to Clear the Database and Upload
Software (Windows)
Purpose This task reinitializes the ONS 15454 SDH using the CTC
reinitialization tool on a Windows computer. Reinitialization uploads a
new software package to the TCC2/TCC2P cards, clears the node
database, and restores the factory default parameters.
Tools/Equipment ONS 15454 SDH System Software CD, Version 7.2
Java Runtime Environment (JRE) 1.4.2 or JRE 5.0 must be installed on
the computer to log into the node at the completion of the
reinitialization. The reinitialization tool can run on JRE 1.3.1_02, JRE
1.4.2, or JRE 5.0.
Prerequisite Procedures DLP-D60 Log into CTC, page 17-49
Required/As Needed As needed
Onsite/Remote Onsite or remote
Security Level Superuser
Caution Restoring a node to the factory configuration deletes all cross-connects on the node.
Step 1 Insert the system software CD into the computer CD-ROM drive. If the CTC Installation Wizard appears,
click Cancel.
Step 2 From the Windows Start menu, choose Run. In the Run dialog box, click Browse and navigate to the
CISCO15454SDH folder on the software CD.
Step 3 In the Browse dialog box Files of Type field, choose All Files.
Step 4 Choose the RE-INIT.jar file and click Open. The NE Re-Initialization window appears (Figure 19-12).
Figure 19-12 Reinitialization Tool
19-48
Step 5
Complete the following fields:
• GNE IP—If the node you are reinitializing is accessed through another node configured as a gateway
network element (GNE), enter the GNE IP address. If you have a direct connection to the node, leave
this field blank.
• Node IP—Enter the node name or IP address of the node that you are reinitializing.
Cisco ONS 15454 SDH Procedure Guide, R7.2
October 2007
Page 49

Chapter 19 DLPs D200 to D299
DLP- D244 Use the Reinitialization Tool to Clear the Database and Upload Software (Windows)
• User ID—Enter the user ID needed to access the node.
• Password—Enter the password for the user ID.
• Upload Package—Check this box to send the software package file to the node. If unchecked, the
software stored on the node is not modified.
• Force Upload—Check this box to send the software package file to the node even if the node is
running the same software version. If unchecked, reinitialization will not send the software package
if the node is already running the same version.
• Activate/Revert—Check this box to activate the uploaded software (if the software version is later
than the one installed) or revert to the uploaded software (if the software version is earlier than the
one installed) as soon as the software file is uploaded. If unchecked, the software is not activated or
reverted after the upload, allowing you to initiate the functions later from the node view
Maintenance > Software tab.
• Re-init Database—Check this box to send a new database to the node. (This is equivalent to the CTC
database restore operation.) If unchecked, the node database is not modified.
• Confirm—Check this box if you want a warning message displayed before any operation is
performed. If unchecked, reinitialization does not display a warning message.
• Search Path—Enter the path to the CISCO15454SDH folder on the CD drive.
Step 6 Click Go.
Caution Before continuing with the next step, verify that the database to upload is correct. You cannot reverse
the upload process after you click Yes.
Step 7 Review the information on the Confirm NE Re-Initialization dialog box, then click Yes to start the
reinitialization.
The reinitialization begins. After the software is downloaded and activated, and the database is uploaded
to the TCC2/TCC2P cards, “Complete” appears in the status bar and the TCC2/TCC2P cards will reboot.
Wait a few minutes for the reboot to complete.
Step 8 After the reboot is complete, log into the node using the “DLP-D60 Log into CTC” task on page 17-49.
Step 9 Complete the “NTP-D316 Set Up Name, Date, Time, and Contact Information” procedure on page 4-4
and the “NTP-D169 Set Up CTC Network Access” procedure on page 4-7 for information on setting the
node name, IP address, subnet mask and gateway, and Internet Inter-ORB Protocol (IIOP) port.
Step 10 Return to your originating procedure (NTP).
October 2007
Cisco ONS 15454 SDH Procedure Guide, R7.2
19-49
Page 50

Chapter 19 DLPs D200 to D299
DLP- D245 Use the Reinitialization Tool to Clear the Database and Upload Software (UNIX)
DLP-D245 Use the Reinitialization Tool to Clear the Database and Upload
Software (UNIX)
Purpose This task reinitializes the ONS 15454 SDH using the CTC
reinitialization (reinit) tool on a UNIX computer. Reinitialization
uploads a new software package to the TCC2/TCC2P cards, clears the
node database, and restores the factory default parameters.
Tools/Equipment ONS 15454 SDH System Software CD, Version 7.2
JRE 1.4.2 or JRE 5.0 must be installed on the computer to log into the
node at the completion of the reinitialization. The reinitialization tool
can run on JRE 1.3.1_02, JRE 1.4.2, or JRE 5.0.
Prerequisite Procedures DLP-D60 Log into CTC, page 17-49
Required/As Needed As needed
Onsite/Remote Onsite or remote
Security Level Superuser
Step 1 Insert the system software CD containing the reinit tool, software, and defaults database into the
computer CD-ROM drive. If the CTC Installation Wizard appears, click Cancel.
Step 2 To find the recovery tool file, go to the CISCO15454SDH directory on the CD (usually
/cdrom/cdrom0/CISCO15454SDH).
Step 3 If you are using a file explorer, double-click the RE-INIT.jar file. If you are working with a command
line, run java -jar RE-INIT.jar. The NE Re-Initialization window appears (Figure 19-12).
Step 4 Complete the following fields:
• GNE IP—If the node you are reinitializing is accessed through another node configured as a GNE,
enter the GNE IP address. If you have a direct connection to the node, leave this field blank.
• Node IP—Enter the node name or IP address of the node that you are reinitializing.
• User ID—Enter the user ID needed to access the node.
• Password—Enter the password for the user ID.
• Upload Package—Check this box to send the software package file to the node. If unchecked, the
software stored on the node is not modified.
• Force Upload—Check this box to send the software package file to the node even if the node is
running the same software version. If unchecked, reinitialization will not send the software package
if the node is already running the same version.
• Activate/Revert—Check this box to activate the uploaded software (if the software version is later
than the one installed) or revert to the uploaded software (if the software version is earlier than the
one installed) as soon as the software file is uploaded. If unchecked, the software is not activated or
reverted after the upload, allowing you to initiate the functions later from the node view
Maintenance > Software tab.
• Re-init Database—Check this box to send a new database to the node. (This is equivalent to the CTC
database restore operation.) If unchecked, the node database is not modified.
• Confirm—Check this box if you want a warning message displayed before any operation is
performed. If unchecked, reinitialization does not display a warning message.
19-50
• Search Path—Enter the path to the CISCO15454SDH folder on the CD drive.
Cisco ONS 15454 SDH Procedure Guide, R7.2
October 2007
Page 51

Chapter 19 DLPs D200 to D299
Step 5 Click Go.
Caution Before continuing with the next step, verify that the database to upload is correct. You cannot reverse
the upload process after you click Yes.
Step 6 Review the information on the Confirm NE Re-Initialization dialog box, then click Yes to start the
reinitialization.
The reinitialization begins. After the software is downloaded and activated and the database is uploaded
to the TCC2/TCC2P cards, “Complete” appears in the status bar and the TCC2/TCC2P cards reboot.
Wait a few minutes for the reboot to complete.
Step 7 After the reboot is complete, log into the node using the “DLP-D60 Log into CTC” task on page 17-49.
Step 8 Complete the “NTP-D81 Change Node Management Information” procedure on page 11-2 and the
“NTP-D201 Change CTC Network Access” procedure on page 11-2 for information on provisioning the
node name, IP address, subnet mask and gateway, and IIOP port.
Step 9 Return to your originating procedure (NTP).
DLP- D246 Provision E-Series Ethernet Card Mode
DLP-D246 Provision E-Series Ethernet Card Mode
Purpose This task provisions an E-Series Ethernet card for Multicard EtherSwitch
Group, Single-card EtherSwitch, or Port-mapped mode.
Tools/Equipment E-Series Ethernet cards must be installed.
Prerequisite Procedures DLP-D60 Log into CTC, page 17-49
Required/As Needed As needed
Onsite/Remote Onsite or remote
Security Level Provisioning or higher
Caution You cannot change the mode while the Ethernet card is carrying circuits. If you want change the card
mode, delete any circuits that it carries first. See the “NTP-D288 Modify and Delete Overhead Circuits
and Server Trails” procedure on page 7-4.
Step 1 In network view, double-click the node containing the E-Series Ethernet card that you want to provision,
then double-click the Ethernet card.
Step 2 Click the Provisioning > Card tabs.
Step 3 In the Card Mode area, choose one of the following:
• For multicard EtherSwitch circuit groups, choose Multicard EtherSwitch Group.
• For single-card EtherSwitch circuits, choose Single-card EtherSwitch.
October 2007
• For port-mapped circuits, choose Port-mapped.
Step 4 Click Apply.
Step 5 If you are using multicard EtherSwitch circuits, repeat Steps 2 through 4 for all other Ethernet cards in
the node that will carry the multicard EtherSwitch circuits.
Cisco ONS 15454 SDH Procedure Guide, R7.2
19-51
Page 52

DLP- D247 Change an STM-N Card
Step 6 Repeat Steps 1 through 5 for other nodes, as necessary.
Step 7 Return to your originating procedure (NTP).
DLP-D247 Change an STM-N Card
Purpose This task changes an STM-N card while maintaining existing provisioning,
including DCCs/generic communications channels (GCCs), circuits,
protection, timing, and rings. This task is intended to be used when you are
replacing a card with a card of identical type and line rate, when a slot is
preprovisioned and you want to change the optical speed of the card, or
when you have backed out of an automatic span upgrade.
Tools/Equipment None
Prerequisite Procedures DLP-D60 Log into CTC, page 17-49
Required/As Needed As needed
Onsite/Remote Onsite
Security Level Provisioning or higher
Chapter 19 DLPs D200 to D299
Caution Physically removing an STM-N card can cause a loss of working traffic or a protection switch. See
Chapter 12, “Upgrade Cards and Spans” for information on upgrading traffic to a higher speed.
Note You can replace a multiport card with a card with a smaller number of ports only if the new card has the
same line rate as the multiport card. (The MRC-12 card can be replaced with either a single-port STM-4
card or a single-port STM-16 card.)
Step 1 If the card is the active card in a 1+1 protection group, switch traffic away from the card:
a. Log into a node on the network. If you are already logged in, go to Step b.
b. Display the CTC node (login) view.
c. Click the Maintenance > Protection tabs.
d. Double-click the protection group that contains the reporting card.
e. Click the active card of the selected group.
f. Click Switch and Yes in the Confirmation dialog box.
Step 2 In CTC, right-click the card that you want to remove and choose Change Card.
Step 3 From the Change Card drop-down list, choose the card type and click OK. An MEA alarm appears until
you replace the card.
Step 4 Physically remove the card:
a. Open the card latches/ejectors.
b. Use the latches/ejectors to pull the card forward and away from the shelf.
19-52
Cisco ONS 15454 SDH Procedure Guide, R7.2
October 2007
Page 53

Chapter 19 DLPs D200 to D299
Step 5 Complete the “NTP-D16 Install STM-N Cards and Connectors” procedure on page 2-7.
Step 6 Return to your originating procedure (NTP).
DLP-D248 Delete VLANs
Purpose This task removes VLANs from a domain.
Tools/Equipment None
Prerequisite Procedures See Chapter 6, “Create Circuits and Low-Order Tunnels” for circuit
Required/As Needed As needed
Onsite/Remote Onsite or remote
Security Level Provisioning or higher
Note VLANs in use will not be deleted.
DLP- D248 Delete VLANs
creation procedures.
Step 1 From the View menu, choose Go to Network View.
Step 2 From the Tools menu, choose Manage VLANS.
Step 3 In the All VLANs dialog box, click the VLAN that you want to remove.
Step 4 Click Delete.
Step 5 In the confirmation dialog box, click Yes .
Step 6 Return to your originating procedure (NTP).
DLP-D249 Provision IP Settings
Purpose This task provisions IP settings, which includes the IP address, default
Tools/Equipment None
Prerequisite Procedures DLP-D60 Log into CTC, page 17-49
Required/As Needed Required
Onsite/Remote Onsite or remote
Security Level Superuser
router, Dynamic Host Configuration Protocol (DHCP) access, firewall
access, and proxy server settings for an ONS 15454 SDH node.
October 2007
Caution All network changes should be approved by your network (or LAN) administrator.
Step 1 If you are in network view, switch to node view by double-clicking the node you want to turn up on the
network map.
Cisco ONS 15454 SDH Procedure Guide, R7.2
19-53
Page 54

DLP- D249 Provision IP Settings
Step 2 Click the Provisioning > Network > General tabs.
Step 3 Complete the following information in the fields listed:
• IP Address—Type the IP address assigned to the ONS 15454 SDH node.
• Suppress CTC IP Display—Select this check box if you want to prevent the node IP address from
• LCD IP Display—Choose one of the following:
Chapter 19 DLPs D200 to D299
Note If TCC2P cards are installed, secure mode is available. When secure mode is off (sometimes
called repeater mode), the IP address entered in the IP Address field applies to the TCC2P
RJ-45 TCP/IP (LAN) port. When secure mode is on, the IP Address field shows the address
assigned to the MIC-C/T/P LAN port, and the Superuser can enable or disable display of the
MIC-C/T/P IP address. See the “DLP-D84 Enable Node Secure Mode” task on page 17-77
as needed. Refer to the “Management Network Connectivity” chapter in the
Cisco ONS 15454 SDH Reference Manual for more information about secure mode.
being displayed in CTC to users with Provisioner, Maintenance, or Retrieve security levels. (The IP
address suppression is not applied to users with Superuser security level.)
–
Allow Configuration—(Default) Displays the node IP on the front panel LCD and allows it to
be changed using the ONS 15454 SDH LCD. This option enables the “DLP-D64 Set the IP
Address, Default Router, and Network Mask Using the LCD” task on page 17-53.
–
Display Only—Displays the node IP address on the front panel LCD but does not allow it to be
changed.
–
Suppress Display—Suppresses the node IP address display on the front panel LCD.
• Default Router—If the ONS 15454 SDH is connected to a LAN, enter the IP address of the default
router. The default router forwards packets to network devices that the ONS 15454 SDH cannot
directly access. This field is ignored if any of the following are true:
–
The ONS 15454 SDH is not connected to a LAN.
–
SOCKS proxy server is enabled and the ONS 15454 SDH is provisioned as an end network
element (ENE).
–
Open Shortest Path First (OSPF) is enabled on both the ONS 15454 SDH and the LAN where
the ONS 15454 SDH is connected.
• Forward DHCP Request To—Select this check box to enable DHCP. Also, enter the DHCP server IP
address in the Request To field. The box is unchecked by default. If you will enable any of the
gateway settings to implement the ONS 15454 SDH proxy server features, leave this field blank.
Note If you enable DHCP, computers connected to an ONS 15454 SDH node can obtain
temporary IP addresses from an external DHCP server. The ONS 15454 SDH only forwards
DHCP requests; it does not act as a DHCP server.
• MAC Address—(Display only) Displays the ONS 15454 SDH IEEE 802 MAC address.
Note In secure mode, the Ethernet ports are assigned different MAC addresses, and the
MIC-C/T/P LAN information can be hidden or revealed by a Superuser.
19-54
Cisco ONS 15454 SDH Procedure Guide, R7.2
October 2007
Page 55

Chapter 19 DLPs D200 to D299
DLP- D249 Provision IP Settings
• Net/Subnet Mask Length—Type the subnet mask length (decimal number representing the subnet
mask length in bits) or click the arrows to adjust the subnet mask length. The subnet mask length is
the same for all ONS 15454 SDH nodes in the same subnet.
• TCC CORBA (IIOP) Listener Port—Sets the ONS 15454 SDH IIOP listener port used to
communicate between the ONS 15454 SDH and CTC computers. This field is generally not changed
unless the ONS 15454 SDH resides behind a firewall that requires a different port. See the
“NTP-D27 Set Up the ONS 15454 SDH for Firewall Access” procedure on page 4-8 for more
information.
• Gateway Settings—Provisions ONS 15454 SDH SOCK proxy server features. Do not select any of
these options until you review the SOCKS proxy server scenario in the “Management Network
Connectivity” chapter in the Cisco ONS 15454 SDH Reference Manual. In proxy server networks,
the ONS 15454 SDH is either an ENE, a GNE, or a SOCKS proxy-only server. Provisioning must
be consistent for each network element (NE) type.
• Enable proxy server on port—If checked, the ONS 15454 SDH serves as a proxy for connections
between CTC clients and ONS 15454 SDH nodes that are connected by DCCs to the proxy
ONS 15454 SDH. The CTC client establishes connections to DCC-connected nodes through the
proxy node. The CTC client does not require IP connectivity to the DCC-connected nodes, only to
the proxy ONS 15454 SDH. If Enable SOCKS proxy server on port is off, the node does not proxy
for any CTC clients. When this box is checked, you can provision one of the following options:
–
External Network Element (ENE)—Choose this option when the ONS 15454 SDH is not
connected to a LAN but has DCC connections to other ONS nodes. A CTC computer connected
to the ENE through the TCC2/TCC2P CRAFT or LAN port can manage nodes that have DCC
connections to the ENE. However, the CTC computer does not have direct IP connectivity to
these nodes or to any LAN/WAN that those nodes might be connected to.
–
Gateway Network Element (GNE)—Choose this option when the ONS 15454 SDH is
connected to a LAN and has DCC connections to other nodes. A CTC computer connected to
the LAN can manage all nodes that have DCC connections to the GNE, but the CTC computer
does not have direct IP connectivity to them. The GNE option isolates the LAN from the DCC
network so that IP traffic originating from the DCC-connected nodes and any CTC computers
connected to them is prevented from reaching the LAN.
–
SOCKS Proxy-Only—Choose this option when the ONS 15454 SDH is connected to a LAN
and the LAN is separated from the node by a firewall. The SOCKS Proxy Only is the same as
the GNE option, except the SOCKS Proxy Only option does not isolate the DCC network from
the LAN.
Step 4 Click Apply.
Step 5 Click Ye s in the confirmation dialog box.
Both TCC2/TCC2P cards reboot, one at a time. During this time (approximately 5 minutes), the active
and standby TCC2/TCC2P card LEDs go through the cycle shown in Table 19-4. Eventually, a “Lost
node connection, switching to network view” message appears.
October 2007
Cisco ONS 15454 SDH Procedure Guide, R7.2
19-55
Page 56

Chapter 19 DLPs D200 to D299
DLP- D249 Provision IP Settings
Table 19-4 LED Behavior During TCC2/TCC2P Reboot
Reboot Activity Active TCC2/TCC2P LEDs Standby TCC2/TCC2P LEDs
Standby TCC2/TCC2P card updated
with new network information.
Memory test (1 to 2 minutes).
ACT/STBY: Flashing green.
1. ACT/STBY: Flashing yellow.
2. FAIL L ED : Solid r ed .
3. All LEDs on except ACT/STBY.
4. CRIT turns off.
5. MAJ and MIN turn off.
6. REM, SYNC, and ACO turn off.
7. All LEDs except A&B PWR:
turn off (1 to 2 minutes)
8. ACT/STBY: Solid yellow.
If an AIC or AIC-I card is installed, the
AIC is updated.
The standby TCC2/TCC2P becomes
the active TCC2/TCC2P.
Memory test (1 to 2 minutes).
TCC2/TCC2P updated with new
network information.
TCC2/TCC2P becomes the standby
TCC2/TCC2P.
AIC FAIL and alarm LEDs light up briefly.
1. All LEDs: Turn off (1 to 2 minutes).
CTC displays “Lost node connection,
switching to network view” message.
2. FAIL LED: Solid red.
3. FAIL LED: Flashing red.
4. All LEDs on except ACT/STBY.
5. CRIT turns off.
6. MAJ and MIN turn off.
7. REM, SYNC, and ACO turn off; all
LEDs are off.
8. ACT/STBY: Solid yellow.
9. ACT/STBY: Flashing yellow.
10. ACT/STBY: Solid yellow.
9. Alarm LEDs: Flash once.
10. ACT/STBY: Solid green.
ACT/STBY: Solid green
19-56
Step 6 Click OK. The network view appears. The node icon appears in gray, during which time you cannot
access the node.
Step 7 Double-click the node icon when it becomes green. As necessary, complete the “DLP-D65 Create a
Static Route” task on page 17-56 or the “DLP-D250 Set Up or Change Open Shortest Path First
Protocol” task on page 19-57. If you do not need to create a static route or set up OSPF, continue with
the “NTP-D28 Set Up Timing” procedure on page 4-9.
Step 8 Return to your originating procedure (NTP).
Cisco ONS 15454 SDH Procedure Guide, R7.2
October 2007
Page 57

Chapter 19 DLPs D200 to D299
DLP- D250 Set Up or Change Open Shortest Path First Protocol
DLP-D250 Set Up or Change Open Shortest Path First Protocol
Purpose This task enables the OSPF routing protocol on the ONS 15454 SDH.
Perform this task if you want to include the ONS 15454 SDH in
OSPF-enabled networks.
Tools/Equipment None
Prerequisite Procedures DLP-D60 Log into CTC, page 17-49
You will need the OSPF Area ID, Hello and Dead intervals, and
authentication key (if OSPF authentication is enabled) provisioned on the
router to which the ONS 15454 SDH is connected.
Required/As Needed As needed
Onsite/Remote Onsite or remote
Security Level Provisioning or higher
Step 1 In node view, click the Provisioning > Network > OSPF tabs.
Step 2 On the top left side of the OSPF tab, complete the following:
• DCC/GCC OSPF Area ID Table—Enter the number that identifies the ONS 15454 SDH nodes as a
unique OSPF area ID entered in dotted decimal format. It can be any number between
000.000.000.000 and 255.255.255.255. The number must be unique to the LAN OSPF area.
• RS-DCC Metric—This value is normally not changed. It sets a cost for sending packets across the
regenerator-section DCC (RS-DCC), which is used by OSPF routers to calculate the shortest path.
This value should always be higher than the LAN metric. The default RS-DCC metric is 100.
• MS-DCC Metric—Sets a cost for sending packets across the multiplex section DCC (MS-DCC).
This value should always be lower than the RS-DCC metric. The default MS-DCC metric is 33. It
is usually not changed.
Step 3 In the OSPF on LAN area, complete the following:
• OSPF active on LAN—When checked, enables the ONS 15454 SDH OSPF topology to be
advertised to OSPF routers on the LAN. Enable this field on ONS 15454 SDH nodes that directly
connect to OSPF routers.
• LAN Port Area ID—Enter the OSPF area ID (dotted decimal format) for the router port where the
ONS 15454 SDH is connected. (This number is different from the DCC OSPF area ID.)
Step 4 By default, OSPF is set to No Authentication. If the OSPF router requires authentication, complete the
following steps. If not, continue with Step 5.
a. Click the No Authentication button.
b. In the Edit Authentication Key dialog box, complete the following:
• Type—Choose Simple Password.
• Enter Authentication Key—Enter the password.
• Confirm Authentication Key—Enter the same password to confirm it.
c. Click OK.
The authentication button label changes to Simple Password.
October 2007
Cisco ONS 15454 SDH Procedure Guide, R7.2
19-57
Page 58

DLP- D250 Set Up or Change Open Shortest Path First Protocol
Step 5 Provision the OSPF priority and interval settings:
The OSPF priority and interval defaults are ones most commonly used by OSPF routers. Verify that these
defaults match the ones used by the OSPF router where the ONS 15454 SDH is connected:
• Router Priority—Selects the designated router for a subnet.
• Hello Interval (sec)—Sets the number of seconds between OSPF hello packet advertisements sent
by OSPF routers. Ten seconds is the default.
• Dead Interval—Sets the number of seconds that will pass while an OSPF router’s packets are not
visible before its neighbors declare the router down. Forty seconds is the default.
• Transit Delay (sec)—Indicates the service speed. One second is the default.
• Retransmit Interval (sec)—Sets the time that will elapse before a packet is resent. Five seconds is
the default.
• LAN Metric—Sets a cost for sending packets across the LAN. This value should always be lower
than the DCC metric. Ten is the default.
Step 6 Under OSPF Area Range Table, create an area range table if one is needed:
Note Area range tables consolidate the information that is outside an OSPF area border. One
ONS 15454 SDH in the ONS 15454 SDH OSPF area is connected to the OSPF router. An area
range table on this node points the router to the other nodes that reside within the
ONS 15454 SDH OSPF area.
Chapter 19 DLPs D200 to D299
a. Under OSPF Area Range Table, click Create.
b. In the Create Area Range dialog box, enter the following:
• Range Address—Enter the area IP address for the ONS 15454 SDH nodes that reside within the
OSPF area. For example, if the ONS 15454 SDH OSPF area includes nodes with IP addresses
10.10.20.100, 10.10.30.150, 10.10.40.200, and 10.10.50.250, the range address would be
10.10.0.0.
• Range Area ID—Enter the OSPF area ID for the ONS 15454 SDH nodes. This is either the ID
in the DCC OSPF Area ID field or the ID in the Area ID for LAN Port field.
• Mask Length—Enter the subnet mask length. In the Range Address example, this is 16.
• Advertise—Check if you want to advertise the OSPF range table.
c. Click OK.
Step 7 All OSPF areas must be connected to Area 0. If the ONS 15454 SDH OSPF area is not physically
connected to Area 0, use the following steps to create a virtual link table that will provide the
disconnected area with a logical path to Area 0:
a. Under OSPF Virtual Link Table, click Create.
b. In the Create Virtual Link dialog box, complete the following fields. OSPF settings must match
OSPF settings for the ONS 15454 SDH OSPF area.
• Neighbor—The router ID of the Area 0 router.
• Transit Delay (sec)—The service speed. One second is the default.
• Hello Int (sec)—The number of seconds between OSPF hello packet advertisements sent by
OSPF routers. Ten seconds is the default.
• Auth Type—If the router where the ONS 15454 SDH is connected uses authentication, choose
Simple Password. Otherwise, choose No Authentication.
19-58
Cisco ONS 15454 SDH Procedure Guide, R7.2
October 2007
Page 59

Chapter 19 DLPs D200 to D299
DLP- D251 Set Up or Change Routing Information Protocol
• Retransmit Int (sec)—Sets the time that will elapse before a packet is resent. Five seconds is the
default.
• Dead Int (sec)—Sets the number of seconds that will pass while an OSPF router’s packets are
not visible before its neighbors declare the router down. Forty seconds is the default.
c. Click OK.
Step 8 After entering ONS 15454 SDH OSPF area data, click Apply.
If you changed the Area ID, the TCC2/TCC2P cards reset, one at a time. The reset takes approximately
10 to 15 minutes. Table 19-4 on page 19-56 shows the LED behavior during the TCC2/TCC2P reset.
Step 9 Return to your originating procedure (NTP).
DLP-D251 Set Up or Change Routing Information Protocol
Purpose This task enables Routing Information Protocol (RIP) broadcasting on the
ONS 15454 SDH. Perform this task if you want to include the
ONS 15454 SDH in RIP-enabled networks.
Tools/Equipment None
Prerequisite Procedures DLP-D60 Log into CTC, page 17-49
You need to create a static route to the router adjacent to the
ONS 15454 SDH for the ONS 15454 SDH to communicate its routing
information to non-DCC-connected nodes.
Required/As Needed As needed
Onsite/Remote Onsite or remote
Security Level Provisioning or higher
October 2007
Step 1 In node view, click the Provisioning > Network > RIP tabs.
Step 2 Check the RIP Active check box if you are activating RIP.
Step 3 Choose either RIP Version 1 or RIP Version 2 from the drop-down list, depending on which version is
supported in your network.
Step 4 Set the RIP metric. The RIP metric can be set to a number between 1 and 15 and represents the number
of hops.
Step 5 By default, RIP is set to No Authentication. If the router that the ONS 15454 SDH is connected to
requires authentication, complete the following steps. If not, continue with Step 6.
a. Click the No Authentication button.
b. In the Edit Authentication Key dialog box, complete the following:
• Type—Choose Simple Password.
• Enter Authentication Key—Enter the password.
• Confirm Authentication Key—Enter the same password to confirm it.
c. Click OK.
The authentication button label changes to Simple Password.
Cisco ONS 15454 SDH Procedure Guide, R7.2
19-59
Page 60

DLP- D254 TCC2/TCC2P Card Active/Standby Switch Test
Step 6 If you want to complete an address summary, complete the following steps. If not, continue with Step 7.
Complete the address summary only if the ONS 15454 SDH is a gateway NE with multiple external
ONS 15454 SDH NEs attached with IP addresses in different subnets.
a. In the RIP Address Summary area, click Create.
b. In the Create Address Summary dialog box, complete the following:
• Summary Address—Enter the summary IP address.
• Mask Length—Enter the subnet mask length using the up and down arrows.
• Hops—Enter the number of hops. The smaller the number of hops, the higher the priority.
c. Click OK.
Step 7 Return to your originating procedure (NTP).
DLP-D254 TCC2/TCC2P Card Active/Standby Switch Test
Chapter 19 DLPs D200 to D299
Purpose This task verifies that the TCC2/TCC2P cards can effectively switch from
one to another.
Tools/Equipment The test set specified by the acceptance test procedure, connected and
configured as specified in the acceptance test procedure.
Prerequisite Procedures DLP-D60 Log into CTC, page 17-49
Required/As Needed Required
Onsite/Remote Onsite
Security Level Provisioning or higher
Step 1 From the View menu, choose Go to Network View.
Step 2 Click the Alarms tab.
a. Verify that the alarm filter is not on. See the “DLP-D227 Disable Alarm Filtering” task on
page 19-26 as necessary.
b. Verify that no unexplained alarms appear on the network. If unexplained alarms appear, resolve
them before continuing. Refer to the Cisco ONS 15454 SDH Troubleshooting Guide if necessary.
Step 3 Click the Conditions tab. Verify that no unexplained conditions appear on the network. If unexplained
conditions appear, resolve them before continuing. Refer to the Cisco ONS 15454 SDH Troubleshooting
Guide.
Step 4 On the network view map, double-click the node containing the TCC2/TCC2P cards that you are testing
to open the node in node view.
19-60
Step 5 Make a note of which TCC2/TCC2P card is active and which is standby by examining the LEDs on the
shelf graphic. TCC2/TCC2P cards are installed in Slot 7 and Slot 11. The active TCC2/TCC2P card has
a green ACT LED, and the standby TCC2/TCC2P card has an amber SBY LED.
Step 6 On the shelf graphic, right-click the active TCC2/TCC2P card and choose Reset from the shortcut menu.
Step 7 In the Resetting Card dialog box, click Yes. After 20 to 40 seconds, a “lost node connection, changing
to network view” message appears.
Step 8 Click OK. On the network view map, the node where you reset the TCC2/TCC2P card will be gray.
Cisco ONS 15454 SDH Procedure Guide, R7.2
October 2007
Page 61

Chapter 19 DLPs D200 to D299
Step 9 After the node icon turns green (within 1 to 2 minutes), double-click it. On the shelf graphic, observe
the following:
• The previous standby TCC2/TCC2P card has a green ACT LED.
• The previous active TCC2/TCC2P card LEDs go through the following LED sequence: NP (card not
present), Ldg (software is loading), amber SBY LED (TCC2/TCC2P card is in standby mode). The
LEDs should complete this sequence within 5 to 10 minutes.
Step 10 Verify that traffic on the test set connected to the node is still running. If a traffic interruption occurs, do
not continue, refer to your next level of support.
Step 11 Repeat Steps 2 through 10 to return the active/standby TCC2/TCC2P cards to their configuration at the
start of the procedure.
Step 12 Verify that the TCC2/TCC2P cards appear as noted in Step 5.
Step 13 Return to your originating procedure (NTP).
DLP-D255 Cross-Connect Card Side Switch Test
DLP- D255 Cross-Connect Card Side Switch Test
Purpose This task verifies that the XC-VXL-10G, and XC-VXL-2.5G, or
XC-VXC-10G cards can effectively switch service (active to standby and
standby to active).
Tools/Equipment The test set specified by the acceptance test procedure, connected and
configured as specified in the acceptance test procedure.
Prerequisite Procedures DLP-D60 Log into CTC, page 17-49
Required/As Needed Required
Onsite/Remote Onsite
Security Level Provisioning or higher
Caution Always wait 60 seconds between cross-connect card (side) switches to allow the system to stabilize. This
is applicable to all the types of side switches (soft reset or manual switch using CTC or TL1). This
condition is also applicable to all the cross-connect types (XC-10G / XC-VXC-10G / XC-VXL-2.5G /
XC-VXL-10G / XC-VT).
Step 1 From the View menu, choose Go to Network View.
Step 2 Click the Alarms tab.
a. Verify that the alarm filter is not on. See the “DLP-D227 Disable Alarm Filtering” task on
page 19-26 as necessary.
b. Verify that no unexplained alarms appear on the network. If unexplained alarms appear, resolve
them before continuing. Refer to the Cisco ONS 15454 SDH Troubleshooting Guide if necessary.
Step 3 Click the Conditions tab. Verify that no unexplained conditions appear on the network. If unexplained
conditions appear, resolve them before continuing. Refer to the Cisco ONS 15454 SDH Troubleshooting
Guide if necessary.
October 2007
Step 4 On the network map, double-click the node containing the cross-connect cards that you are testing to
open it in node view.
Cisco ONS 15454 SDH Procedure Guide, R7.2
19-61
Page 62

DLP- D256 View Ethernet Statistics PM Parameters
Step 5 Click the Maintenance > Cross-Connect tabs.
Step 6 In the Cross-Connect Cards area, make a note of the active and standby slots.
Step 7 On the shelf graphic, verify that the active cross-connect card shows a green ACT LED and the standby
cross-connect card shows an amber SBY LED. If these conditions are not present, review the
“DLP-D333 Install the XC-VXL-10G, XC-VXL-2.5G, or XC-VXC-10G Cards” task on page 20-25 or
contact your next level of support.
Step 8 Click Switch.
Step 9 In the Confirm Switch dialog box, click Yes .
Step 10 Verify that the active slot noted in Step 6 becomes the standby slot, and that the standby slot becomes
the active slot. The switch should appear within 1 to 2 seconds.
Step 11 Verify that traffic on the test set connected to the node is still running. Some bit errors are normal, but
traffic flow should not be interrupted. If a traffic interruption occurs, do not continue. Refer to your next
level of support.
Note A cross-connect side-switch performed using XC-VXC-10G cards and TCC2/TCC2P cards is
errorless.
Chapter 19 DLPs D200 to D299
Step 12 Wait 60 seconds, then repeat Steps 7 through 9 to return the active/standby slots to their configuration
at the start of the procedure.
Step 13 Verify that the cross-connect cards appear as you noted in Step 6.
Step 14 Return to your originating procedure (NTP).
Note During a maintenance side switch or soft reset of an active XC10G card, the 1+1 protection
group might display a protection switch. To disallow the protection switch from being displayed,
the protection group should be locked at the node where XC switch or soft reset of an active XC
switch is in progress.
DLP-D256 View Ethernet Statistics PM Parameters
Purpose This task enables you to view current statistical performance monitoring
(PM) counts on an Ethernet card and port in order to detect possible
performance problems.
Tools/Equipment None
Prerequisite Procedures DLP-D60 Log into CTC, page 17-49
Required/As Needed As needed
Onsite/Remote Onsite or remote
Security Level Retrieve or higher
19-62
Step 1 In node view, double-click the E-Series or G-Series Ethernet card where you want to view PM counts.
The card view appears.
Step 2 Click the Performance tab.
Cisco ONS 15454 SDH Procedure Guide, R7.2
October 2007
Page 63

Chapter 19 DLPs D200 to D299
Step 3 Click the Statistics subtab.
Step 4 Click Refresh. Performance monitoring statistics appear for each port on the card.
Step 5 View the PM parameter names in the Param column. The current PM parameter values appear in the
Port # columns. For PM parameter definitions, refer to the “Performance Monitoring” chapter in the
Cisco ONS 15454 SDH Reference Manual.
Note To clear PM counts, see “DLP-D459 Clear Selected PM Counts” task on page 21-37.
Step 6 Return to your originating procedure (NTP).
DLP-D257 View Ethernet Utilization PM Parameters
Purpose This task enables you to view line utilization PM counts on an Ethernet
card and port in order to detect possible performance problems.
Tools/Equipment None
Prerequisite Procedures DLP-D60 Log into CTC, page 17-49
Required/As Needed As needed
Onsite/Remote Onsite or remote
Security Level Retrieve or higher
DLP- D257 View Ethernet Utilization PM Parameters
Step 1 In node view, double-click the E-Series or G-Series Ethernet card where you want to view PM counts.
The card view appears.
Step 2 Click the Performance > Utilization tabs.
Step 3 Click Refresh. Performance monitoring utilization values appear for each port on the card.
Step 4 View the Port # column to find the port you want to monitor.
Step 5 The Tx and Rx bandwidth utilization values for the previous time intervals appear in the Prev-n columns.
For PM parameter definitions, refer to the “Performance Monitoring” chapter in the
Cisco ONS 15454 SDH Reference Manual.
Note To clear PM counts, see the “DLP-D459 Clear Selected PM Counts” task on page 21-37.
Step 6 Return to your originating procedure (NTP).
October 2007
Cisco ONS 15454 SDH Procedure Guide, R7.2
19-63
Page 64

DLP- D258 View Ethernet History PM Parameters
DLP-D258 View Ethernet History PM Parameters
Purpose This task enables you to view historical PM counts at selected time
intervals on an Ethernet card and port to detect possible performance
problems.
Tools/Equipment None
Prerequisite Procedures DLP-D60 Log into CTC, page 17-49
Required/As Needed As needed
Onsite/Remote Onsite or remote
Security Level Retrieve or higher
Step 1 In node view, double-click the E-Series or G-Series Ethernet card where you want to view PM counts.
The card view appears.
Step 2 Click the Performance tab.
Step 3 Click the History subtab.
Step 4 Click Refresh. Performance monitoring statistics appear for each port on the card.
Step 5 View the PM parameter names that appear in the Param column. The PM parameter values appear in the
Port # columns. For PM parameter definitions, refer to the “Performance Monitoring” chapter in the
Cisco ONS 15454 SDH Reference Manual.
Chapter 19 DLPs D200 to D299
Note To clear PM counts, see “DLP-D459 Clear Selected PM Counts” task on page 21-37.
Step 6 Return to your originating procedure (NTP).
DLP-D259 Refresh Ethernet PM Counts at a Different Time Interval
Purpose This task changes the view to display specified PM counts in selected
time intervals.
Tools/Equipment None
Prerequisite Procedures DLP-D60 Log into CTC, page 17-49
Required/As Needed As needed
Onsite/Remote Onsite or remote
Security Level Retrieve or higher
Step 1 In node view, double-click the Ethernet card where you want to view PM counts. The card view appears.
Step 2 Click the Performance tab.
Step 3 Click the Utilization tab or the History tab.
Step 4 From the Interval drop-down list, choose one of the following options:
19-64
• 1 min: This option displays the specified PM counts in one-minute time intervals.
Cisco ONS 15454 SDH Procedure Guide, R7.2
October 2007
Page 65

Chapter 19 DLPs D200 to D299
DLP- D260 Set Auto-Refresh Interval for Displayed PM Counts
• 15 min: This option displays the specified PM counts in fifteen-minute time intervals.
• 1 hour: This option displays the specified PM counts in one-hour time intervals.
• 1 day: This option displays the specified PM counts in one-day (24 hours) time intervals.
Step 5 Click Refresh. The PM counts refresh with values based on the selected time interval.
Step 6 Return to your originating procedure (NTP).
DLP-D260 Set Auto-Refresh Interval for Displayed PM Counts
Purpose This task changes the auto-refresh intervals for updating the displayed
PM counts in a window.
Tools/Equipment None
Prerequisite Procedures DLP-D60 Log into CTC, page 17-49
Required/As Needed As needed
Onsite/Remote Onsite or remote
Security Level Retrieve or higher
Step 1 In node view, double-click the card where you want to view PM counts. The card view appears.
Step 2 Click the Performance tab.
Step 3 Click the Auto-refres h drop-down list and choose one of the following options:
• None: This option disables the auto-refresh feature.
• 15 Seconds: This option sets the window auto-refresh at 15-second time intervals.
• 30 Seconds: This option sets the window auto-refresh at 30-second time intervals.
• 1 Minute: This option sets the window auto-refresh at 1-minute time intervals.
• 3 Minutes: This option sets the window auto-refresh at 3-minute time intervals.
• 5 Minutes: This option sets the window auto-refresh at 5-minute time intervals.
Step 4 Click Refresh. The PM counts for the newly selected auto-refresh time interval appear.
Depending on the selected auto-refresh interval, the PM counts are automatically updated when each
refresh interval completes. If the auto-refresh interval is set to None, the PM counts that appear are not
updated unless you click Refresh.
Step 5 Return to your originating procedure (NTP).
October 2007
Cisco ONS 15454 SDH Procedure Guide, R7.2
19-65
Page 66

DLP- D261 Refresh PM Counts for a Different Port
DLP-D261 Refresh PM Counts for a Different Port
Purpose This task changes the window view to display PM counts for another
port on a multiport card.
Tools/Equipment None
Prerequisite Procedures DLP-D60 Log into CTC, page 17-49
Required/As Needed As needed
Onsite/Remote Onsite or remote
Security Level Retrieve or higher
Step 1 In node view, double-click the STM-N card where you want to view PM counts. The card view appears.
Step 2 Click the Performance tab.
Step 3 In the Port drop-down list, choose a port.
Step 4 Click the Refresh button. The PM counts for the newly selected port appear.
Step 5 Return to your originating procedure (NTP).
Chapter 19 DLPs D200 to D299
DLP-D262 Filter the Display of Circuits
Purpose This task filters the display of circuits in the Circuits window. The filtered
display appears in network, node, or card view.
Tools/Equipment None
Prerequisite Procedures DLP-D60 Log into CTC, page 17-49
Required/As Needed As needed
Onsite/Remote Onsite or remote
Security Level Retrieve or higher
Step 1 Navigate to the appropriate CTC view:
• To filter network circuits, from the View menu, choose Go to Network View.
• To filter circuits that originate, terminate, or pass through a specific node, from the View menu,
choose Go to Other Node, then choose the node you want to filter and click OK.
• To filter circuits that originate, terminate, or pass through a specific card, double-click the card on
the shelf graphic in node view to show the card in card view.
Step 2 Click the Circuits tab.
Step 3 Set the attributes for filtering the circuit display:
a. Click Filter.
b. In the General tab of the Circuit Filter dialog box, set the following filter attributes, as necessary:
• Name—Enter a complete or partial circuit name to filter circuits based on the circuit name;
otherwise leave the field blank.
19-66
Cisco ONS 15454 SDH Procedure Guide, R7.2
October 2007
Page 67

Chapter 19 DLPs D200 to D299
DLP- D262 Filter the Display of Circuits
• Direction—Choose one to filter circuits based on direction: Any (direction not used to filter
circuits), 1-way (display only one-way circuits), or 2-way (display only two-way circuits).
• OCHNC Dir—(DWDM optical channel network connections [OCHNCs] only) Refer to the
Cisco ONS 15454 DWDM Procedure Guide for dense wavelength division multiplexing
(DWDM) information.
• OCHNC Wlen—(DWDM OCHNCs only) Refer to the Cisco ONS 15454 DWDM Procedure
Guide for DWDM information.
• Status—Choose a circuit status to filter the circuits. For more information about circuit statuses,
see Table 20-32 on page 20-78.
• State—Choose one to filter circuits based on state: Locked (display only out-of-service
circuits), Unlocked (display only in-service circuits; OCHNCs have Unlocked status only), or
Locked-partial (display only circuits with cross-connects in mixed service states).
• Protection—Choose a protection type to filter the circuits. For more information about
protection types, see Table 20-31 on page 20-77.
• Slot—Enter a slot number to filter circuits based on the source or destination slot; otherwise
leave the field blank.
• Port—Enter a port number to filter circuits based on the source or destination port; otherwise
leave the field blank.
• Type—Choose one to filter circuits based on type: Any (type not used to filter circuits),
VC_HO_PATH_CIRCUIT (displays VC4 and VC4-Nc circuits), VC_LO_PATH_CIRCUIT
(displays only VC3, VC11, and VC12 circuits), VC_LO_PATH_TUNNEL (displays only
low-order tunnels), VC_LO_PATH_AGGREGATION (displays only low-order aggregation
points), VC_HO_PATH_VCAT_CIRCUIT (displays high-order VCAT circuits),
VC_LO_PATH_VCAT_CIRCUIT (displays low-order VCAT circuits), or OCHNC (displays
only OCHNCs; refer to the Cisco ONS 15454 DWDM Procedure Guide for DWDM
information).
• Size—Click the appropriate check boxes to filter circuits based on size: VC11, VC12, VC3,
VC4, VC4-2c, VC4-3c, VC4-4c, VC4-6c, VC4-8c, VC4-9c, VC4-16c, VC4-64c,
10 Gbps FEC, Equipped non specific, Multi-rate, 2.5 Gbps No FEC, 10 Gbps No FEC, and
2.5 Gbps FEC. The check boxes shown depend on what you chose in the Type field.
If you chose Any, all sizes are available. If you chose LO_PATH_CIRCUIT, only VC3, VC11,
and VC12 sizes are available. If you chose LO_PATH_TUNNEL or
LO_PATH_AGGREGATION, only VC4 is available. If you chose
VC_HO_PATH_VCAT_CIRCUIT, only VC4 and VC4-4c are available. If you chose
VC_LO_PATH_VCAT_CIRCUIT, only VC3 is available.
Step 4 To set the filter for ring, node, link, and source and drop type, click the Advanced tab and complete the
following. If you do not want to make advanced filter selections, continue with Step 5.
a. If you made selections on the General tab, click Ye s in the confirmation box to apply the settings.
b. In the Advanced tab of the Circuit Filter dialog box, set the following filter attributes as necessary:
• Ring—Choose the ring from the drop-down list.
• Node—Click the check boxes by each node in the network to filter circuits based on node.
October 2007
• Link—Choose the desired link in the network.
• Source/Drop—Choose one of the following to filter circuits based on whether they have one or
multiple sources and drops: One Source and One Drop Only or Multiple Sources or Multiple
Drops.
Cisco ONS 15454 SDH Procedure Guide, R7.2
19-67
Page 68

Chapter 19 DLPs D200 to D299
DLP- D263 Edit SNCP Dual-Ring Interconnect Circuit Hold-Off Timer
Step 5 Click OK. Circuits matching the attributes in the Filter Circuits dialog box appear in the Circuits
window.
Step 6 To turn filtering off, click the Filter icon in the lower right corner of the Circuits window. Click the icon
again to turn filtering on, and click the Filter button to change the filter attributes.
Step 7 Return to your originating procedure (NTP).
DLP-D263 Edit SNCP Dual-Ring Interconnect Circuit Hold-Off Timer
Purpose This task changes the amount of time a path selector switch is delayed for
circuits routed on an SNCP dual-ring interconnect (DRI) topology. In
DRIs, switching contention might occur depending upon the relative
switching speed of the path selector and the transmission delay on the
alternative routes. The hold-off time (HOT) allows you to change switch
times to prevent the switching contention.
Tools/Equipment None
Prerequisite Procedures NTP-D44 Provision SNCP Nodes, page 5-22
DLP-D60 Log into CTC, page 17-49
Required/As Needed As needed
Onsite/Remote Onsite or remote
Security Level Provisioning or higher
Step 1 From the View menu, choose Go to Network View.
Step 2 Click the Circuits tab.
Step 3 Click the SNCP circuit you want to edit, then click Edit.
Step 4 In the Edit Circuit window, click the SNCP Selectors tab.
Step 5 In the Hold-off Timer column, double-click the cell of the circuit span you want to edit, then type the
new hold-off time. The range is 0 to 10,000 ms in increments of 100.
Step 6 Repeat Step 5, as needed, to adjust the hold-off timer for each circuit span.
Step 7 Click Apply, then close the Edit Circuit window by choosing Close from the File menu.
Step 8 Return to your originating procedure (NTP).
19-68
Cisco ONS 15454 SDH Procedure Guide, R7.2
October 2007
Page 69

Chapter 19 DLPs D200 to D299
DLP- D264 Provision a J1 Path Trace on Circuit Source and Destination Ports
DLP-D264 Provision a J1 Path Trace on Circuit Source and Destination Ports
Purpose This task creates a J1 path trace on VC3 or VC4 circuit source ports and
destination ports or a VCAT circuit member.
Tools/Equipment ONS 15454 SDH cards capable of transmitting and/or receiving J1 path
trace must be installed at the circuit source and destination ports. See
Table 19-5 on page 19-69 for a list of cards.
Prerequisite Procedures DLP-D60 Log into CTC, page 17-49
Required/As Needed As needed
Onsite/Remote Onsite or remote
Security Level Provisioning or higher
Note This task assumes that you are setting up path trace on a bidirectional circuit and setting up transmit
strings at the circuit source and destination.
Step 1 From the View menu, choose Go to Network View.
Step 2 Click the Circuits tab.
Step 3 For the VC3 or VC4 circuit you want to monitor, verify that the source and destination ports are on a
card that can transmit and receive the path trace string. See Table 19-5 for a list of cards.
Table 19-5 ONS 15454 SDH Cards Capable of J1 Path Trace
J1 Function Cards
Transmit and receive E1-42
STM1E-12
E3-12
DS3i-N-12
Receive only OC3 IR 4/STM1 SH 1310
OC3 IR 4/STM1 SH 1310-8
OC12/STM4-4
OC48 IR/STM16 SH AS 1310
OC48 LR/STM16 LH AS 1550
OC192 SR/STM64 IO 1310
OC192 LR/STM64 LH 1550
OC192 IR/STM SH 1550
ML100T-12
ML1000-2
FC_MR-4
October 2007
Note For FC_MR-4 cards, the path trace string must be identical for all members of the VCAT circuit.
Cisco ONS 15454 SDH Procedure Guide, R7.2
19-69
Page 70

DLP- D264 Provision a J1 Path Trace on Circuit Source and Destination Ports
Note If neither port is on a transmit/receive card, you will not be able to complete this procedure. If
one port is on a transmit/receive card and the other is on a receive-only card, you can set up the
transmit string at the transmit/receive port and the receive string at the receive-only port, but you
will not be able to transmit in both directions.
Step 4 Choose the VC3 or VC4 circuit you want to trace, then click Edit.
Step 5 If you chose a VCAT circuit, complete the following. If not, continue with Step 6.
a. In the Edit Circuit window, click the Members tab.
b. Click Edit Member and continue with Step 6.
Step 6 In the Edit Circuit window, click the Show Detailed Map check box at the bottom of the window. A
detailed map of the source and destination ports appears.
Step 7 Provision the circuit source transmit string:
a. On the detailed circuit map, right-click the circuit source port (the square on the left or right of the
source node icon) and choose Edit J1 Path Trace (port) from the shortcut menu.
b. Choose the format of the transmit string by clicking either the 16 byte or the 64 byte selection
button.
c. In the New Transmit String field, enter the circuit source transmit string. Enter a string that makes
the source port easy to identify, such as the node IP address, node name, circuit name, or another
string. If the New Transmit String field is left blank, the J1 transmits a string of null characters.
d. Click Apply, then click Close.
Chapter 19 DLPs D200 to D299
Step 8 Provision the circuit destination transmit string:
a. On the detailed circuit map, right-click the circuit destination port and choose Edit Path Trace from
the shortcut menu.
b. In the New Transmit String field, enter the string that you want the circuit destination to transmit.
Enter a string that makes the destination port easy to identify, such as the node IP address, node
name, circuit name, or another string. If the New Transmit String field is left blank, the J1 transmits
a string of null characters.
c. Click Apply.
Step 9 Provision the circuit destination expected string:
a. In the Circuit Path Trace window, enable the path trace expected string by choosing Auto or Manual
from the Path Trace Mode drop-down list:
• Auto—The first string received from the source port is automatically provisioned as the current
expected string. An alarm is raised when a string that differs from the baseline is received.
• Manual—The string entered in Current Expected String is the baseline. An alarm is raised when
a string that differs from the Current Expected String is received.
b. If you set the Path Trace Mode field to Manual, enter the string that the circuit destination should
receive from the circuit source in the New Expected String field. If you set Path Trace Mode to Auto,
skip this step.
c. Click the Disable AIS and RDI if TIM-P is detected check box if you want to suppress the AIS
and remote defect indication (RDI) when the VC3 or VC4 High-Order Path Trace Identifier
Mismatch (HP-TIM) or Low-Order Path Trace Identifier Mismatch (LP-TIM) alarm appears. Refer
to the Cisco ONS 15454 SDH Troubleshooting Guide for descriptions of alarms and conditions.
19-70
Cisco ONS 15454 SDH Procedure Guide, R7.2
October 2007
Page 71

Chapter 19 DLPs D200 to D299
d. (Check box visibility depends on card selection) Click the Disable AIS on C2 Mis-Match check
e. Click Apply, then click Close.
Note It is not necessary to set the format (16 or 64 bytes) for the circuit destination expected string;
Step 10 Provision the circuit source expected string:
a. In the Edit Circuit window (with Show Detailed Map chosen), right-click the circuit source port and
b. In the Circuit Path Trace window, enable the path trace expected string by choosing Auto or Manual
DLP- D264 Provision a J1 Path Trace on Circuit Source and Destination Ports
box if you want to suppress the AIS when a C2 mismatch occurs.
the path trace process automatically determines the format.
choose Edit Path Trace from the shortcut menu.
from the Path Trace Mode drop-down list:
• Auto—Uses the first string received from the port at the other path trace end as the current
expected string. An alarm is raised when a string that differs from the baseline is received.
• Manual—Uses the Current Expected String field as the baseline string. An alarm is raised when
a string that differs from the Current Expected String is received.
c. If you set the Path Trace Mode field to Manual, enter the string that the circuit source should receive
from the circuit destination in the New Expected String field. If you set Path Trace Mode to Auto,
skip this step.
d. Click the Disable AIS and RDI if TIM-P is detected check box if you want to suppress the AIS
and RDI when the VC3 or VC4 HP-TIM or LP-TIM alarm appears. Refer to the
Cisco ONS 15454 SDH Troubleshooting Guide for descriptions of alarms and conditions.
e. (Check box visibility depends on card selection) Click the Disable AIS on C2 Mis-Match check
box if you want to suppress the AIS when a C2 mismatch occurs.
f. Click Apply.
Note It is not necessary to set the format (16 or 64 bytes) for the circuit source expected string; the
path trace process automatically determines the format.
Step 11 After you set up the path trace, the received string appears in the Received field on the path trace setup
window. The following options are available:
• Click Hex Mode to display path trace in hexadecimal format. The button name changes to
ASCII Mode. Click it to return the path trace to ASCII format.
• Click Reset to reread values from the port.
• Click Default to return to the path trace default settings (Path Trace Mode is set to Off and the
New Transmit and New Expected Strings are null).
October 2007
Caution Clicking Default generates alarms if the port on the other end is provisioned with a different string.
The expect and receive strings are updated every few seconds whether the Path Trace Mode field is set
to Auto or Manual.
Step 12 Click Close.
Cisco ONS 15454 SDH Procedure Guide, R7.2
19-71
Page 72

DLP- D265 Change the Login Legal Disclaimer
When you display the detailed circuit window, path trace is indicated by an M (manual path trace) or an
A (automatic path trace) at the circuit source and destination ports.
Step 13 Return to your originating procedure (NTP).
DLP-D265 Change the Login Legal Disclaimer
Purpose This task modifies the legal disclaimer statement shown in the CTC login
window so that it will display customer-specific information when users
log into the network.
Tools/Equipment None
Prerequisite Procedures DLP-D60 Log into CTC, page 17-49
Required/As Needed As needed
Onsite/Remote Onsite or remote
Security Level Superuser
Chapter 19 DLPs D200 to D299
Step 1 In node view, click the Provisioning > Security > Legal Disclaimer > HTML tabs.
Step 2 The existing statement is a default, non-customer-specific disclaimer. If you want to edit this statement
with specifics for your company, you can change the text. Use the HTML commands in Table 19-6 to
format the text as needed.
Table 19-6 HTML Commands for Formatting Legal Disclaimer
Command Description
<b> Begins boldface font
</b> Ends boldface font
<center> Aligns type in the center of the window
</center> Ends the center alignment
<font=n, where n = point size> Changes the font to the new size
</font> Ends the font size command
<p> Creates a line break
<sub> Begins subscript
</sub> Ends subscript
<sup> Begins superscript
</sup> Ends superscript
<u> Starts underline
</u> Ends underline
19-72
Step 3 If you want to preview your changed statement and formatting, click the Preview subtab.
Cisco ONS 15454 SDH Procedure Guide, R7.2
October 2007
Page 73

Chapter 19 DLPs D200 to D299
Step 4 Click Apply.
Step 5 Return to your originating procedure (NTP).
DLP-D266 Change IP Settings
Purpose This task changes the IP address, subnet mask, default router, DHCP
Tools/Equipment None
Prerequisite Procedures DLP-D60 Log into CTC, page 17-49
Required/As Needed As needed
Onsite/Remote Onsite or remote
Security Level Superuser
Caution Changing the node IP address, subnet mask, or IIOP listener port causes the TCC2/TCC2P cards to
reboot. If Ethernet circuits using STP originate or terminate on E-Series Ethernet cards installed in the
node, circuit traffic will be lost for several minutes while the spanning trees reconverge. Other circuits
are not affected by TCC2/TCC2P card reboots.
DLP- D266 Change IP Settings
access, firewall access, and proxy server settings for the ONS 15454 SDH.
Note If the node contains TCC2P cards and is in default (repeater) mode, the node IP address refers to the
TCC2P front-access TCP/IP (LAN) port. If the node is in secure mode, this task will only change the
MIC-C/T/P LAN address. If the node is in secure mode and has been locked, the IP address cannot be
changed unless the lock is removed by Cisco Technical Support
Step 1 In node view, click the Provisioning > Network > General tabs.
Step 2 Change any of the following:
• IP Address
• Suppress CTC IP Display
• LCD IP Setting
• Default Router
• Forward DHCP Requests To
• MAC Address
• Net/Subnet Mask Length
• TCC CORBA (IIOP) Listener Port
• Gateway Settings
See the “DLP-D249 Provision IP Settings” task on page 19-53 for detailed field descriptions. For more
information about secure mode, refer to the “Management Network Connectivity” chapter of the
Cisco ONS 15454 SDH Reference Manual.
October 2007
Step 3 Click Apply.
Cisco ONS 15454 SDH Procedure Guide, R7.2
19-73
Page 74

DLP- D268 Apply a Custom Network View Background Map
If you changed a network field that will cause the node to reboot, the Change Network Configuration
confirmation dialog box appears. If you changed a gateway setting, a confirmation appropriate to the
gateway field appears.
Step 4 If a confirmation dialog box appears, click Yes.
If you changed an IP address, subnet mask length, or TCC CORBA (IIOP) Listener Port, both
ONS 15454 SDH TCC2/TCC2P cards will reboot, one at a time.
Step 5 Confirm that the changes appear. Refer to the Cisco ONS 15454 SDH Troubleshooting Guide as
necessary.
Step 6 Return to your originating procedure (NTP).
DLP-D268 Apply a Custom Network View Background Map
Purpose This task changes the background image or map on the CTC network view.
Tools/Equipment None
Prerequisite Procedures DLP-D60 Log into CTC, page 17-49
Required/As Needed As needed
Onsite/Remote Onsite or remote
Security Level Retrieve or higher
Chapter 19 DLPs D200 to D299
Note You can replace the network view background image with any JPEG or GIF image that is accessible on
a local or network drive. If you apply a custom image, the change is stored in your CTC user profile on
the computer. The change does not affect other CTC users.
Step 1 From the Edit menu, choose Preferences > Map and uncheck the Use Default Map check box.
Step 2 From the View menu, choose Go to Network View.
Step 3 Right-click the network or domain map and select Set Background Image.
Step 4 Click Browse. Navigate to the graphic file you want to use as a background.
Step 5 Select the file. Click Open.
Step 6 Click Apply and then click OK.
Step 7 If the ONS 15454 SDH icons are not visible, right-click the network view and choose Zoom Out. Repeat
this step until all the ONS 15454 SDH icons are visible.
Step 8 If you need to reposition the node icons, drag and drop them one at a time to a new location on the map.
Step 9 If you want to change the magnification of the icons, right-click the network view and choose Zoom In.
Repeat until the ONS 15454 SDH icons appear at the magnification you want.
Step 10 At the network view, use the CTC toolbar Zoom buttons (or right-click the graphic area and select a
Zoom command from the shortcut menu) to set the area of the image you want to view.
Step 11 Return to your originating procedure (NTP).
19-74
Cisco ONS 15454 SDH Procedure Guide, R7.2
October 2007
Page 75

Chapter 19 DLPs D200 to D299
DLP- D269 Enable Dialog Box Do-Not-Display Option
DLP-D269 Enable Dialog Box Do-Not-Display Option
Purpose This task enables a user-selected do-not-display dialog box preference for
subsequent sessions. It can also be used to disable the do-not-display
option.
Tools/Equipment None
Prerequisite Procedures DLP-D60 Log into CTC, page 17-49
Required/As Needed As needed
Onsite/Remote Onsite or remote
Security Level Provisioning or higher
Note If any user who has rights to perform an operation (for example, creating a circuit) selects the “Do not
show this dialog again” check box on a dialog box, the dialog box is not displayed for any other users
who perform that operation on the network from the same computer unless the command is overridden
using the following task. (The preference is stored on the CTC computer, not in the node database.)
Step 1 From the Edit menu, choose Preferences.
Step 2 In the Preferences dialog box, click the General tab.
The Preferences Management area lists all dialog boxes where “Do not show this dialog again” is
enabled.
Step 3 Choose one of the following options, or uncheck the individual dialog boxes that you want to appear:
• Don’t Show Any—Hides all do-not-display check boxes.
• Show All—Overrides do-not-display check box selections and displays all dialog boxes.
Step 4 Click OK.
Step 5 Return to your originating procedure (NTP).
DLP-D271 Change Node Security Policy on a Single Node
Purpose This task changes the security policy for a single node, including idle user
timeouts, user lockouts, password changes, and concurrent login policies.
Tools/Equipment None
Prerequisite Procedures DLP-D60 Log into CTC, page 17-49
Required/As Needed As needed
Onsite/Remote Onsite or remote
Security Level Superuser
October 2007
Step 1 In node view, click the Provisioning > Security > Policy tabs.
Cisco ONS 15454 SDH Procedure Guide, R7.2
19-75
Page 76

DLP- D271 Change Node Security Policy on a Single Node
Step 2 If you want to modify the idle user timeout period, click the hour (H) and minute (M) arrows in the Idle
User Timeout area for the security level you want to provision: RETRIEVE, MAINTENANCE,
PROVISIONING, or SUPERUSER ONLY. The idle period time range is 0 and 16 hours, and 0 and 59
minutes. The user is logged out after the idle user timeout period is reached.
Step 3 In the User Lockout area, you can modify the following:
• Failed Logins Before Lockout—The number of failed login attempts a user can make before the user
is locked out from the node. You can choose a value between 0 and 10.
• Manual Unlock by Superuser only—Allows a user with SUPERUSER ONLY privileges to manually
unlock a user who has been locked out from a node.
• Lockout Duration—Sets the amount of time the user will be locked out after a failed login. You can
choose a value between 0 and 10 minutes, and 0 and 55 seconds (in five-second intervals).
Step 4 In the Password Change area, you can modify the following:
• Prevent Reusing Last [ ] Passwords—Choose a value between 1 and 10 to set the number of different
passwords the user must create before they can reuse a password.
• New Password must Differ from the Old Password—Choose the number of characters that must
differ between the old and new password. The default number is 1.
Chapter 19 DLPs D200 to D299
• Cannot Change New Password for [ ] days—If checked, prevents users from changing their
password for the specified period. The range is 20 to 95 days.
• Require Password Change on First Login to New Account—If checked, requires users to change
their password the first time they log into their account.
Step 5 To require users to change their password at periodic intervals, check the Enforce Password Aging check
box in the Password Aging area. If checked, provision the following parameters:
• Aging Period—Sets the amount of time that must pass before the user must change their password
for each security level: RETRIEVE, MAINTENANCE, PROVISIONING, SUPERUSER ONLY.
The range is 20 to 95 days.
• Warning—Sets the number days the user will be warned to change his or her password for each
security level. The range is 2 to 20 days.
Step 6 In the Other area, you can provision the following:
• Single Session Per User—If checked, limits users to one login session at one time.
• Disable Inactive User—If checked, disables users who do not log into the node for the period of time
specified in the Inactive Duration box. The Inactive Duration range is 45 to 90 days.
Step 7 Click Apply.
Step 8 Return to your originating procedure (NTP).
19-76
Cisco ONS 15454 SDH Procedure Guide, R7.2
October 2007
Page 77

Chapter 19 DLPs D200 to D299
DLP- D272 Change Node Security Policy on Multiple Nodes
DLP-D272 Change Node Security Policy on Multiple Nodes
Purpose This task changes the security policy for multiple nodes including idle user
timeouts, user lockouts, password change, and concurrent login policies.
Tools/Equipment None
Prerequisite Procedures DLP-D60 Log into CTC, page 17-49
Required/As Needed As needed
Onsite/Remote Onsite or remote
Security Level Superuser
Step 1 From the View menu, choose Go to Network View.
Step 2 Click the Provisioning > Security > Policy tabs. A read-only table of nodes and their policies appears.
Step 3 Click a node in the table that you want to modify, then click the Change button.
Step 4 If you want to modify the idle user timeout period, click the hour (H) and minute (M) arrows in the Idle
User Timeout area for the security level you want to provision: RETRIEVE, MAINTENANCE,
PROVISIONING, or SUPERUSER ONLY. The idle period time range is 0 and 16 hours, and 0 and 59
minutes. The user is logged out after the idle user timeout period is reached.
Step 5 In the User Lockout area, you can modify the following:
• Failed Logins Before Lockout—The number of failed login attempts a user can make before the user
is locked out from the node. You can choose a value between 0 and 10.
• Manual Unlock by Superuser only—Allows a user with Superuser only privileges to manually
unlock a user who has been locked out from a node.
• Lockout Duration—Sets the amount of time the user will be locked out after a failed login. You can
choose a value between 0 and 10 minutes, and 0 and 55 seconds (in five-second intervals).
Step 6 In the Password Change area, you can modify the following:
• Prevent Reusing Last [ ] Passwords—Choose a value between 1 and 10 to set the number of different
passwords the user must create before they can reuse a password.
• New Password must Differ from the Old Password—Choose the number of characters that must
differ between the old and new password. The default number is 1.
• Cannot Change New Password for [ ] days—If checked, prevents users from changing their
password for the specified period. The range is 20 to 95 days.
• Require Password Change on First Login to New Account—If checked, requires users to change
their password the first time they log into their account.
Step 7 To require users to change their password at periodic intervals, check the Enforce Password Aging check
box in the Password Aging area. If checked, provision the following parameters:
• Aging Period—Sets the amount of time that must pass before the user must change their password
for each security level: RETRIEVE, MAINTENANCE, PROVISIONING, and SUPERUSER ONLY.
The range is 20 to 95 days.
• Warning—Sets the number days the user will be warned to change their password for each security
level. The range is 2 to 20 days.
October 2007
Step 8 In the Other area, you can provision the following:
• Single Session Per User—If checked, limits users to one login session at one time.
Cisco ONS 15454 SDH Procedure Guide, R7.2
19-77
Page 78

DLP- D273 Modify SNMP Trap Destination
• Disable Inactive User—If checked, disables users who do not log into the node for the period of time
specified in the Inactive Duration box. The Inactive Duration range is 45 to 90 days.
Step 9 In the Select Applicable Nodes area, uncheck any nodes where you do not want to apply the changes.
Step 10 Click OK.
Step 11 In the Security Policy Change Results dialog box, confirm the changes and click OK.
Step 12 Return to your originating procedure (NTP).
DLP-D273 Modify SNMP Trap Destination
Purpose This task modifies the Simple Network Management Protocol (SNMP) trap
destination on an ONS 15454 SDH including community name, default
User Datagram Protocol (UDP) port, SNMP trap version, and maximum
traps per second.
Tools/Equipment None
Prerequisite Procedures DLP-D60 Log into CTC, page 17-49
Required/As Needed As needed
Onsite/Remote Onsite or remote
Security Level Provisioning or higher
Chapter 19 DLPs D200 to D299
Step 1 In node view, click the Provisioning > SNMP tabs.
Step 2 Select a trap in the Trap Destinations dialog box.
For a description of SNMP traps, see the “SNMP” chapter in the Cisco ONS 15454 SDH Reference
Manual.
Step 3 Type the new SNMP community name in the Community field.
Note The community name is a form of authentication and access control. The community name
assigned to the ONS 15454 SDH is case-sensitive and must match the community name of the
network management system.
Note The default UDP port for SNMP is 162.
Step 4 Set the Trap Version field for either SNMPv1 or SNMPv2.
Refer to your NMS documentation to determine whether to use SNMPv1 or SNMPv2.
Step 5 If you want to allow the ONS 15454 SDH SNMP agent to accept SNMP SET requests on certain MIBs,
check the Allow SNMP Sets check box. If the box is not checked, SET requests are rejected.
Step 6 If you want to allow the ONS 15454 SDH SNMP agent to serve as a proxy (that is, it relays the traps to
an ONS 15454 SDH that is directly connected to an SNMP destination), check the Allow SNMP Proxy
check box. If the box is not checked, the ONS 15454 SDH will not relay the traps.
Step 7 If you want to allow using generic SNMP MIBs, check the Use Generic MIB check box.
Step 8 Click Apply.
19-78
Cisco ONS 15454 SDH Procedure Guide, R7.2
October 2007
Page 79

Chapter 19 DLPs D200 to D299
DLP- D293 Perform a Manual Span Upgrade on a Two-Fiber MS-SPRing
Step 9 SNMP settings are now configured. To view SNMP information for each node, highlight the node IP
address in the Trap Destinations area of the SNMP window. Confirm that the changes appear; if not
repeat the task.
Step 10 Return to your originating procedure (NTP).
DLP-D293 Perform a Manual Span Upgrade on a Two-Fiber MS-SPRing
Purpose This task upgrades a two-fiber MS-SPRing span to a higher optical rate.
To downgrade an optical span in a two-fiber MS-SPRing, repeat this task
but choose a lower-rate card in Step 5.
Tools/Equipment Higher-rate cards
Compatible hardware necessary for the upgrade
Prerequisite Procedures DLP-D60 Log into CTC, page 17-49
Required/As Needed As needed
Onsite/Remote Onsite
Security Level Provisioning or higher
Warning
Note All spans connecting the nodes in an MS-SPRing must be upgraded before the bandwidth is available.
Note If you are upgrading a span on an MS-SPRing, a MSSP-OSYNC alarm will appear in the alarms list.
Do not reach into a vacant slot or chassis while you install or remove a module or a fan. Exposed
circuitry could constitute an energy hazard.
Statement 206
Refer to the Cisco ONS 15454 SDH Troubleshooting Guide for information about this alarm.
Step 1 Apply a Force switch to both span endpoints (nodes) on the span that you will upgrade first. See the
“DLP-D303 Initiate an MS-SPRing Force Ring Switch” task on page 20-3.
Step 2 Remove the fiber from both endpoints and ensure that traffic is still running.
Step 3 Remove the STM-N cards from both endpoints.
Step 4 From both endpoints, in node view right-click each STM-N slot and choose Change Card.
Step 5 In the Change Card dialog box, choose the new STM-N card type.
Step 6 Click OK.
Step 7 Complete the “NTP-D16 Install STM-N Cards and Connectors” procedure on page 2-7 to install the new
STM-N cards in both endpoints.
Step 8 Verify that the transmit signal falls within the acceptable range. See Table 2-4 on page 2-17 for STM-N
card transmit and receive levels.
October 2007
Step 9 Complete the “DLP-D338 Install Fiber-Optic Cables for MS-SPRing Configurations” task on
page 20-37 to attach the fiber to the cards. Wait for the IMPROPRMVL alarm to clear and the cards to
become active.
Cisco ONS 15454 SDH Procedure Guide, R7.2
19-79
Page 80

Chapter 19 DLPs D200 to D299
DLP- D294 Perform a Manual Span Upgrade on a Four-Fiber MS-SPRing
Step 10 When cards in both endpoint nodes have been successfully upgraded and all the facility alarms (LOS,
SD, or SF) are cleared, remove the Force switch from both endpoints on the upgraded span. See the
“DLP-D194 Clear an MS-SPRing Force Ring Switch” task on page 18-82.
Step 11 Repeat this task for each span in the MS-SPRing. When you are done with all of the spans, the upgrade
is complete.
Step 12 Return to your originating procedure (NTP).
DLP-D294 Perform a Manual Span Upgrade on a Four-Fiber MS-SPRing
Purpose This task upgrades a four-fiber MS-SPRing span to a higher optical rate.
Repeat the task to upgrade each span in the ring to the higher optical
rate. To downgrade an optical span in a four-fiber MS-SPRing, repeat
this task but choose a lower-rate card in Step 5.
Tools/Equipment Higher-rate cards
Compatible hardware necessary for the upgrade
Prerequisite Procedures DLP-D60 Log into CTC, page 17-49
Required/As Needed As needed
Onsite/Remote Onsite
Security Level Provisioning or higher
Warning
Note All spans connecting the nodes in an MS-SPRing must be upgraded before the bandwidth is available.
Note If you are upgrading a span on an MS-SPRing, a MSSP-OSYNC alarm will appear in the alarms list.
Do not reach into a vacant slot or chassis while you install or remove a module or a fan. Exposed
circuitry could constitute an energy hazard.
Statement 206
Refer to the Cisco ONS 15454 SDH Troubleshooting Guide for information about this alarm.
Step 1 Apply a Force switch to both span endpoints (nodes) on the span that you will upgrade first. See the
“DLP-D303 Initiate an MS-SPRing Force Ring Switch” task on page 20-3.
Step 2 Remove the fiber from both working and protect cards at both span endpoints (nodes) and ensure that
traffic is still running.
Step 3 Remove the STM-N cards from both endpoints.
Step 4 For both ends of the span endpoints, in node view right-click each STM-N slot and choose
Change Card.
Step 5 In the Change Card dialog box, choose the new STM-N card type.
Step 6 Click OK.
Step 7 Complete the “NTP-D16 Install STM-N Cards and Connectors” procedure on page 2-7 to install the new
STM-N cards in both endpoints.
19-80
Cisco ONS 15454 SDH Procedure Guide, R7.2
October 2007
Page 81

Chapter 19 DLPs D200 to D299
DLP- D295 Perform a Manual Span Upgrade on an SNCP
Step 8 Verify that the transmit signal falls within the acceptable range. See Table 2-4 on page 2-17 for STM-N
card transmit and receive levels.
Step 9 Complete the “DLP-D338 Install Fiber-Optic Cables for MS-SPRing Configurations” task on
page 20-37 to attach the fiber to the cards. Wait for the IMPROPRMVL alarm to clear and the cards to
become active.
Step 10 When cards in both endpoint nodes have been successfully upgraded and all the facility alarms (LOS,
SD, or SF) are cleared, remove the Force switch from both endpoints (nodes) on the upgraded span. See
the “DLP-D194 Clear an MS-SPRing Force Ring Switch” task on page 18-82.
Step 11 Repeat these steps for each span in the MS-SPRing. When all spans in the MS-SPRing have been
upgraded, the ring is upgraded.
Step 12 Return to your originating procedure (NTP).
DLP-D295 Perform a Manual Span Upgrade on an SNCP
Purpose This task upgrades SNCP spans to a higher optical speed. Repeat the
task to upgrade each span, and thus the entire ring, to the higher optical
rate. To downgrade an optical span in an SNCP ring, repeat this task but
choose a lower-rate card in Step 5.
Tools/Equipment Higher-rate cards
Compatible hardware necessary for the upgrade
Prerequisite Procedures DLP-D60 Log into CTC, page 17-49
Required/As Needed As needed
Onsite/Remote Onsite
Security Level Provisioning or higher
Warning
Step 1 Complete the “DLP-D197 Initiate an SNCP Force Switch” task on page 18-84 to apply a Force switch
Do not reach into a vacant slot or chassis while you install or remove a module or a fan. Exposed
circuitry could constitute an energy hazard.
Statement 206
on the span that you will upgrade.
Step 2 Remove the fiber from both endpoint nodes in the span and ensure that traffic is still running.
Step 3 Remove the STM-N cards from both span endpoints.
Step 4 For both ends of the span, in node view right-click each STM-N slot and choose Change Card.
Step 5 In the Change Card dialog box, choose the new STM-N card type.
October 2007
Step 6 Click OK.
Step 7 Complete the “NTP-D16 Install STM-N Cards and Connectors” procedure on page 2-7 to install the new
STM-N cards in both endpoints.
Step 8 Verify that the transmit signal falls within the acceptable range. See Table 2-4 on page 2-17 for STM-N
card transmit and receive levels.
Step 9 Complete the “DLP-D337 Install Fiber-Optic Cables for SNCP Configurations” task on page 20-33 to
attach the fiber to the cards. Wait for the IMPROPRMVL alarm to clear and the cards to become active.
Cisco ONS 15454 SDH Procedure Guide, R7.2
19-81
Page 82

Chapter 19 DLPs D200 to D299
DLP- D296 Perform a Manual Span Upgrade on a 1+1 Protection Group
Step 10 Complete the “DLP-D198 Clear an SNCP Force Switch” task on page 18-85 when cards in both endpoint
nodes have been successfully upgraded and all the facility alarms (LOS, SD, or SF) are cleared.
Step 11 Return to your originating procedure (NTP).
DLP-D296 Perform a Manual Span Upgrade on a 1+1 Protection Group
Purpose This task upgrades a 1+1 protection group span. To downgrade an
optical span, repeat this task but choose a lower-rate card in Step 6.
Tools/Equipment Higher-rate cards
Compatible hardware necessary for the upgrade
Prerequisite Procedures DLP-D60 Log into CTC, page 17-49
Required/As Needed As needed
Onsite/Remote Onsite
Security Level Provisioning or higher
Warning
Step 1 Initiate a Force switch on the ports you will upgrade, beginning with the protect port:
Do not reach into a vacant slot or chassis while you install or remove a module or a fan. Exposed
circuitry could constitute an energy hazard.
Note If the switching mode is bidirectional in the 1+1 protection group, apply the Force command to
Statement 206
only one end of the span. If the Force command is applied to both ends when the switching mode
is bidirectional, it will cause a switch of more than 50 ms in duration.
a. In node view, click the Maintenance > Protection tabs.
b. Choose the protection group from the Protection Groups area. In the Selected Group area, the
working and protect spans appear.
c. In the Selected Group area, click the protect STM-N port.
d. In Switch Commands, choose Force.
e. Click Yes in the confirmation dialog box.
FORCE-SWITCH-TO-WORKING appears next to the forced span.
Step 2 Repeat Step 1 for each port you will upgrade.
Step 3 Remove the fiber from both ends of the span and ensure that traffic is still running.
Step 4 Remove the STM-N cards from both span endpoints.
19-82
Step 5 At both ends of the span, in node view, right-click the STM-N slot and choose Change Card.
Step 6 In the Change Card dialog box, choose the new STM-N card type.
Step 7 Click OK.
Step 8 Complete the “NTP-D16 Install STM-N Cards and Connectors” procedure on page 2-7 to install the new
STM-N cards in both endpoints.
Cisco ONS 15454 SDH Procedure Guide, R7.2
October 2007
Page 83

Chapter 19 DLPs D200 to D299
Step 9 Verify that the transmit signal falls within the acceptable range. See Table 2-4 on page 2-17 for STM-N
card transmit and receive levels.
Step 10 Complete the “NTP-D19 Install Fiber-Optic Cables on Optical Cards” procedure on page 2-16 to attach
the fiber to the cards. Wait for the IMPROPRMVL alarm to clear and the cards to become active.
Step 11 When cards on each end of the span have been successfully upgraded and all the facility alarms (LOS,
SD, or SF) are cleared, remove the Force switch:
a. In node view, click the Maintenance > Protection tabs.
b. In the Protection Groups area, click the protection group that contains the card/port you want to
c. In the Selected Group area, click the card you want to clear.
d. In the Switch Commands area, choose Clear.
e. Click Yes in the confirmation dialog box.
Step 12 Repeat this task for any other spans in the 1+1 linear configuration.
Step 13 Return to your originating procedure (NTP).
DLP- D297 Perform a Manual Span Upgrade on an Unprotected Span
clear.
DLP-D297 Perform a Manual Span Upgrade on an Unprotected Span
Purpose This task manually upgrades unprotected spans to a higher optical rate.
Tools/Equipment Higher-rate cards
Compatible hardware necessary for the upgrade
Prerequisite Procedures DLP-D60 Log into CTC, page 17-49
Required/As Needed As needed
Onsite/Remote Onsite
Security Level Provisioning or higher
Warning
Caution Upgrading unprotected spans will cause all traffic running on those spans to be lost.
Caution Removing the fiber will cause all traffic on the unprotected span to be lost.
Step 1 Remove the fiber from both endpoint nodes in the span.
Step 2 Remove the STM-N cards from both span endpoints.
Step 3 For both ends of the span, in node view, right-click each STM-N slot and choose Change Card.
Do not reach into a vacant slot or chassis while you install or remove a module or a fan. Exposed
circuitry could constitute an energy hazard.
Statement 206
October 2007
Step 4 In the Change Card dialog box, choose the new STM-N type.
Step 5 Click OK.
Cisco ONS 15454 SDH Procedure Guide, R7.2
19-83
Page 84

DLP- D298 Check the Network for Alarms and Conditions
Step 6 When you have finished Steps 3 through 5 for both nodes, install the new STM-N cards in both endpoints
and attach the fiber to the cards. Wait for the IMPROPRMVL alarm to clear and the cards to become
active.
Step 7 Return to your originating procedure (NTP).
DLP-D298 Check the Network for Alarms and Conditions
Purpose This task verifies that no alarms or conditions exist on the network.
Tools/Equipment None
Prerequisite Procedures DLP-D60 Log into CTC, page 17-49
Required/As Needed As needed
Onsite/Remote Onsite or remote
Security Level Retrieve or higher
Chapter 19 DLPs D200 to D299
Step 1 From the View menu, choose Go to Network View. Verify that all affected spans on the network map
are green.
Step 2 Verify that the affected spans do not have active switches on the network map. Span ring switches are
represented by the letters “L” for lockout ring, “F” for Force ring, “M” for Manual ring, and “E” for
Exercise ring.
Step 3 A second verification method can be performed from the Conditions tab. Click Retrieve Conditions and
verify that no switches are active. Make sure the Filter button is not selected.
Step 4 Click the Alarms tab.
a. Verify that the alarm filter is not on. See the “DLP-D227 Disable Alarm Filtering” task on
page 19-26 as necessary.
b. Verify that no unexplained alarms appear on the network. If alarms appear, investigate and resolve
them before continuing. Refer to the Cisco ONS 15454 Troubleshooting Guide for procedures.
Step 5 Return to your originating procedure (NTP).
19-84
Cisco ONS 15454 SDH Procedure Guide, R7.2
October 2007
Page 85

Chapter 19 DLPs D200 to D299
DLP-D299 Initiate an MS-SPRing Span Lockout
Purpose This task performs an MS-SPRing span lockout, which prevents traffic
from switching to the locked-out span.
Tools/Equipment None
Prerequisite Procedures DLP-D60 Log into CTC, page 17-49
Required/As Needed As needed
Onsite/Remote Onsite or remote
Security Level Provisioning or higher
Caution Traffic is not protected during a span lockout.
Step 1 From the View menu, choose Go to Network View.
Step 2 Click the Provisioning > MS-SPRing tabs.
Step 3 Choose the MS-SPRing and click Edit.
DLP- D299 Initiate an MS-SPRing Span Lockout
Tip To move an icon to a new location, for example, to see MS-SPRing channel (port) information more
clearly, click an icon on the Edit MS-SPRing network graphic and while pressing Ctrl, drag the icon to
a new location.
Step 4 To lock out a west span:
a. Right-click any MS-SPRing node west channel (port) and choose Set West Protection Operation.
Figure 19-4 shows an example.
Note For two-fiber MS-SPRings, the squares on the node icons represent the MS-SPRing working
and protect channels. You can right-click either channel. For four-fiber MS-SPRings, the
squares represent ports. Right-click either working port.
b. In the Set West Protection Operation dialog box, choose LOCKOUT SPAN from the drop-down
list. Click OK.
c. In the Confirm MS-SPRing Operation dialog box, click Ye s. An “L” indicating the lockout appears
on the selected channel (port) where you invoked the protection switch.
Performing a lockout switch generates LKOUTPR-S and FE-LOCKOUTOFPR-SPAN conditions.
Step 5 To lock out an east span:
a. Right-click the node’s east channel (port) and choose Set East Protection Operation.
b. In the Set East Protection Operation dialog box, choose LOCKOUT SPAN from the drop-down list.
Click OK.
c. In the Confirm MS-SPRing Operation dialog box, click Ye s. An “L” indicating the lockout appears
on the selected channel (port) where you invoked the protection switch.
October 2007
Performing a lockout switch generates LKOUTPR-S and FE-LOCKOUTOFPR-SPAN conditions.
Cisco ONS 15454 SDH Procedure Guide, R7.2
19-85
Page 86

DLP- D299 Initiate an MS-SPRing Span Lockout
Step 6 From the File menu, choose Close.
Step 7 Return to your originating procedure (NTP).
Chapter 19 DLPs D200 to D299
19-86
Cisco ONS 15454 SDH Procedure Guide, R7.2
October 2007
 Loading...