

Page 1
Cisco TelePresence System Prole-series, C-series codecs, Quick Set C20 User guide
Contents
Advanced settings
Getting started
Making calls
Phone book usage
In-call features
Scheduled meetings
Codec C90
Codec C60
Codec C40
Codec C20
Quick Set C20 / C20 Plus
SX20 Quick Set
Prole 65” Dual
Prole 65”
Prole 52” Dual
Prole 52”
TC 5 .1
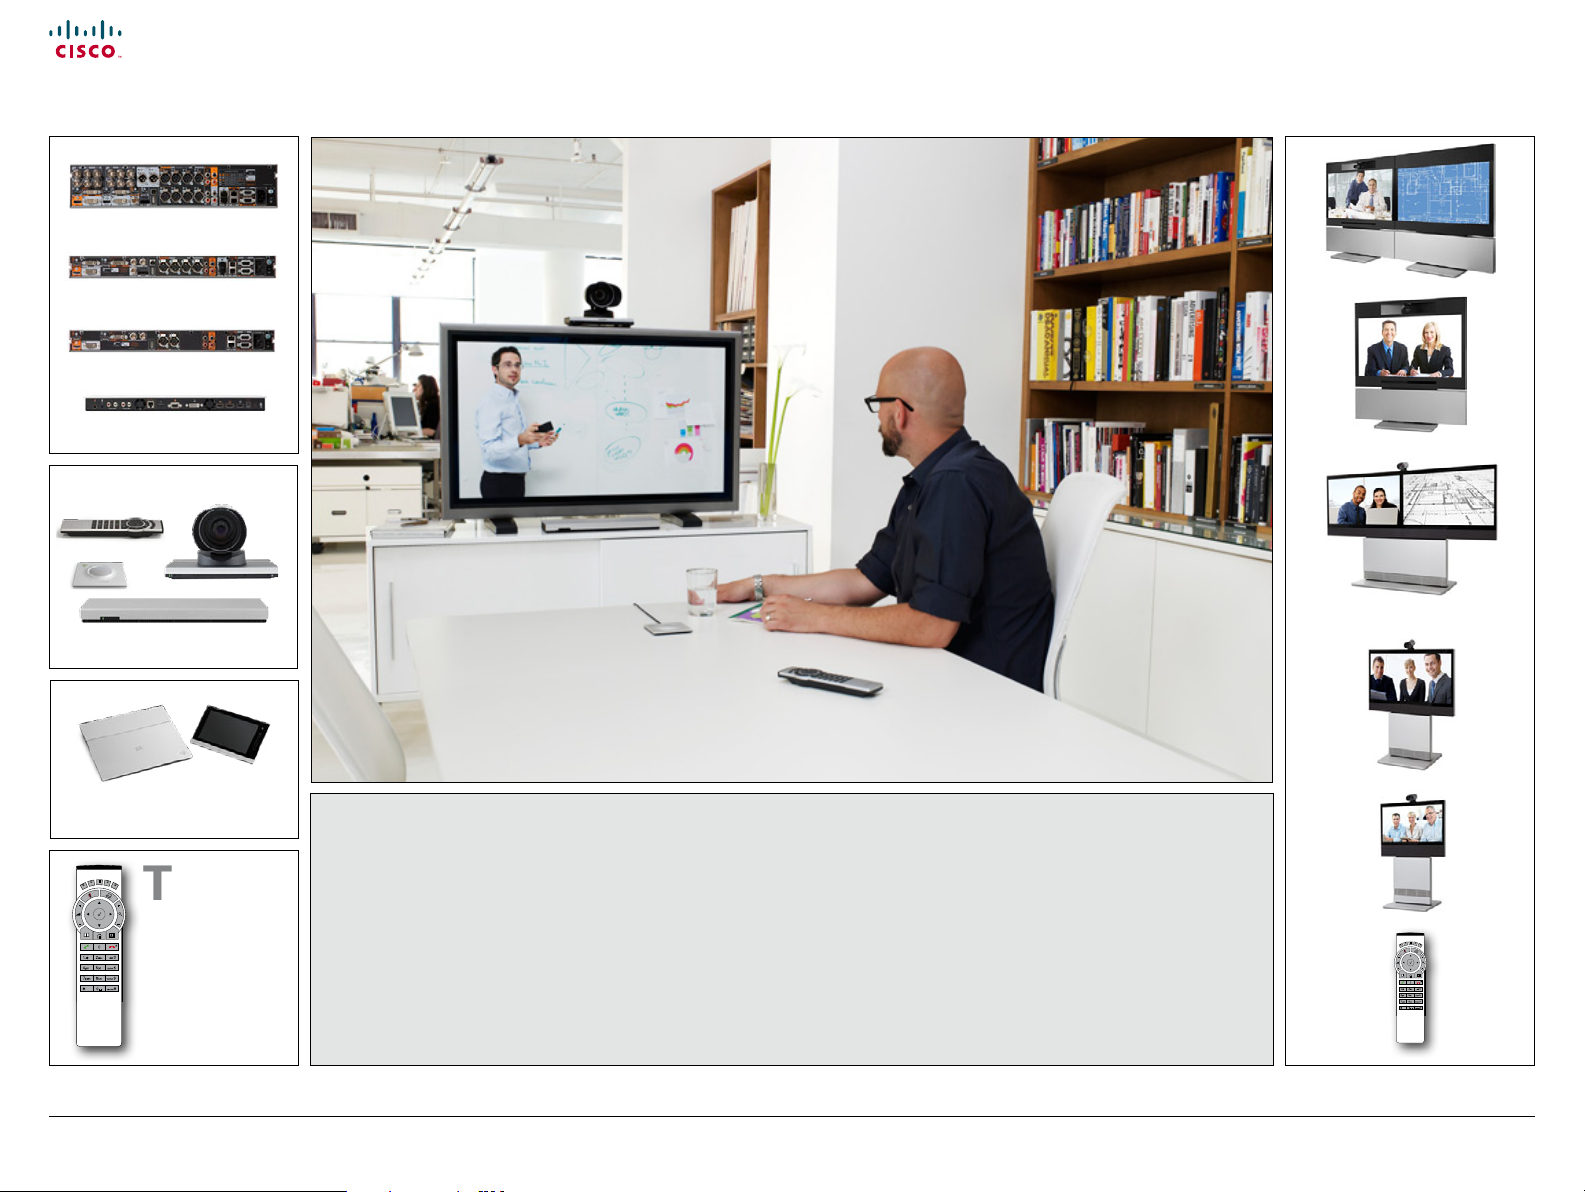
Cisco TelePresence System Prole Series
Cisco TelePresence System Codec C-Series
Cisco Telepresence System Quick Set C20 / C20 Plus
Use with TRC5
D1485 2.0 3 User guide Cisco TelePresence Prole, C-series codecs, Q uick Set C20, February 2012
All contents are copyright © 2010–2012 Cisco Systems, Inc. All rights reserved.
Cisco Telepresence SX20 Quick Set
User Guide
1
Prole 42”
www.cisco.com
Page 2

Cisco TelePresence System Prole-series, C-series codecs, Quick Set C20 User guide
Contents
Advanced settings
Getting started
Making calls
Phone book usage
In-call features
Scheduled meetings
Contents
What’s in
this guide?
The top menu bar and the entries in the Table of Contents
are all hyperlinks. Just click on them to go to the topic.
We recommend that you visit the Cisco web site regularly for
updated versions of this guide. Go to: http://www.cisco.com
Getting started
Waking up the system ..................................................... 4
Overview of the remote control ....................................... 5
Navigating in the menus .................................................. 6
Entering text in text elds ................................................ 7
Text entry essentials .................................................... 7
Invoking the virtual keyboard ....................................... 7
Virtual keyboard details ............................................... 7
Screen layout ................................................................... 8
Tip: Adding a wallpaper to your screen ....................... 8
Layout control .............................................................. 8
Camera presets ............................................................... 9
Where to nd camera presets ..................................... 9
Using the presets ......................................................... 9
Adding a new camera preset..................................... 10
Editing an existing camera preset...............................12
Camera settings .............................................................14
Adjusting the exposure of the camera .......................14
Adjusting the whitebalance of the camera .................14
Main source ................................................................... 15
Main source settings.................................................. 15
Call settings—an overview ............................................. 15
The call settings options ............................................ 15
Call settings—auto answer options ................................ 16
The options in detail................................................... 16
Call settings—default call rate ........................................ 16
The default call rate options ...................................... 16
Language settings ..........................................................17
Language settings options .........................................17
About the setting of date and time .................................17
Date and time settings overview ................................17
Setting date and time yourself ...................................... 18
Deactivated NTP server ............................................. 18
Setting date and time automatically .............................. 18
Activated NTP server ................................................. 18
Selecting ring tone ........................................................ 19
Ring tone selection .................................................... 19
Setting ring tone volume ............................................... 19
Ring tone volume settings ......................................... 19
Setting key tone to on or o .......................................... 20
Key tone setting ......................................................... 20
Setting wallpaper on your screen .................................. 20
Wallpaper setting options .......................................... 20
Inserting your own wallpaper ........................................ 21
System information ........................................................ 21
Entering the Advanced conguration ............................ 22
Advanced conguration entering............................... 22
Restarting the system .................................................... 22
Restarting .................................................................. 22
Making calls
Placing calls by specifying the name,
number or address .................................................... 24
Placing calls using the phone book ........................... 25
Placing calls by means of the Recent calls list .......... 26
When someone is calling you .................................... 27
Terminating an ongoing call ....................................... 27
Management systems booking list ............................ 27
Calling more than one (optional) ................................... 28
Setting up a list of whom to call before calling them .... 28
Calling participants one by one ................................. 28
Terminating a video conference ................................ 28
Using Multiway™ to call more than one .......................... 29
Using Multiway, Case 1 ............................................. 29
Using Multiway, Case 2 ............................................. 29
Which codec does my system have? ............................ 30
Phone book usage
Basic phone book features ............................................ 32
Navigating in the phone book .................................... 32
Calling an entry in the phone book ............................ 32
Opening the phone book ........................................... 32
Searching in the phone book ........................................ 33
How to search for an entry ........................................ 33
Adding new contacts to the phone book ...................... 34
Adding an entry from recent calls or the phone book ...34
Adding an entry manually to My contacts ................. 34
Editing existing entries in the phone book .................... 35
Editing entries in the phone book .............................. 35
In-call features
Sharing contents ........................................................... 37
Dual video stream ...................................................... 37
Sharing PC contents .................................................. 37
If the shared contents fail to show ............................. 37
Selecting the source .................................................. 37
Controlling the cameras ................................................ 38
Controlling your own camera (near side) ................... 38
Controlling far end camera (far side) ......................... 38
Scheduled meetings
Joining a meeting .......................................................... 40
To join a meeting or not ............................................. 40
Learning more about a meeting .................................... 40
Viewing meeting details ............................................. 40
Displaying a list of upcoming meetings ..........................41
To display a meetings list you can navigate within .....41
Meeting details of any upcoming meeting .....................41
Viewing details of any meeting ...................................41
Joining when already in a call........................................ 42
Joining the meeting ................................................... 42
Parallel meetings (concurrency) .................................... 42
Selecting which meeting to join ................................. 42
Extending a scheduled meeting .................................... 43
Extending the meeting ............................................... 43
Advanced settings
About the Administrator settings ................................... 45
Entering the Administrator settings............................ 45
Administrator settings & password ............................ 45
Assigning softbutton functions ...................................... 46
Assigning a function to a softbutton .......................... 46
Creating softbutton for Main source selection .............. 47
Assigning Main source selection softbutton.............. 47
Creating softbutton for Camera Preset ......................... 47
Assigning Camera preset softbutton ......................... 47
Softbutton—Speed dials ................................................ 48
Assigning Camera preset softbutton ......................... 48
Customized softbuttons—how they appear ................... 48
Example of customized softbuttons .......................... 48
Softbutton—Clearing softbuttons ................................... 49
D1485 2.0 3 User guide Cisco TelePresence Prole, C-series codecs, Q uick Set C20, February 2012
All contents are copyright © 2010–2012 Cisco Systems, Inc. All rights reserved.
2
www.cisco.com
Page 3
Cisco TelePresence System Prole-series, C-series codecs, Quick Set C20 User guide
Contents
Advanced settings
Getting started
Making calls
Phone book usage
In-call features
Scheduled meetings
Getting started
D1485 2.0 3 User guide Cisco TelePresence Prole, C-series codecs, Q uick Set C20, February 2012
All contents are copyright © 2010–2012 Cisco Systems, Inc. All rights reserved.
Chapter 1
Getting started
3
www.cisco.com
Page 4
Cisco TelePresence System Prole-series, C-series codecs, Quick Set C20 User guide
Contents
Advanced settings
Getting started
Making calls
Phone book usage
In-call features
Scheduled meetings
Getting started
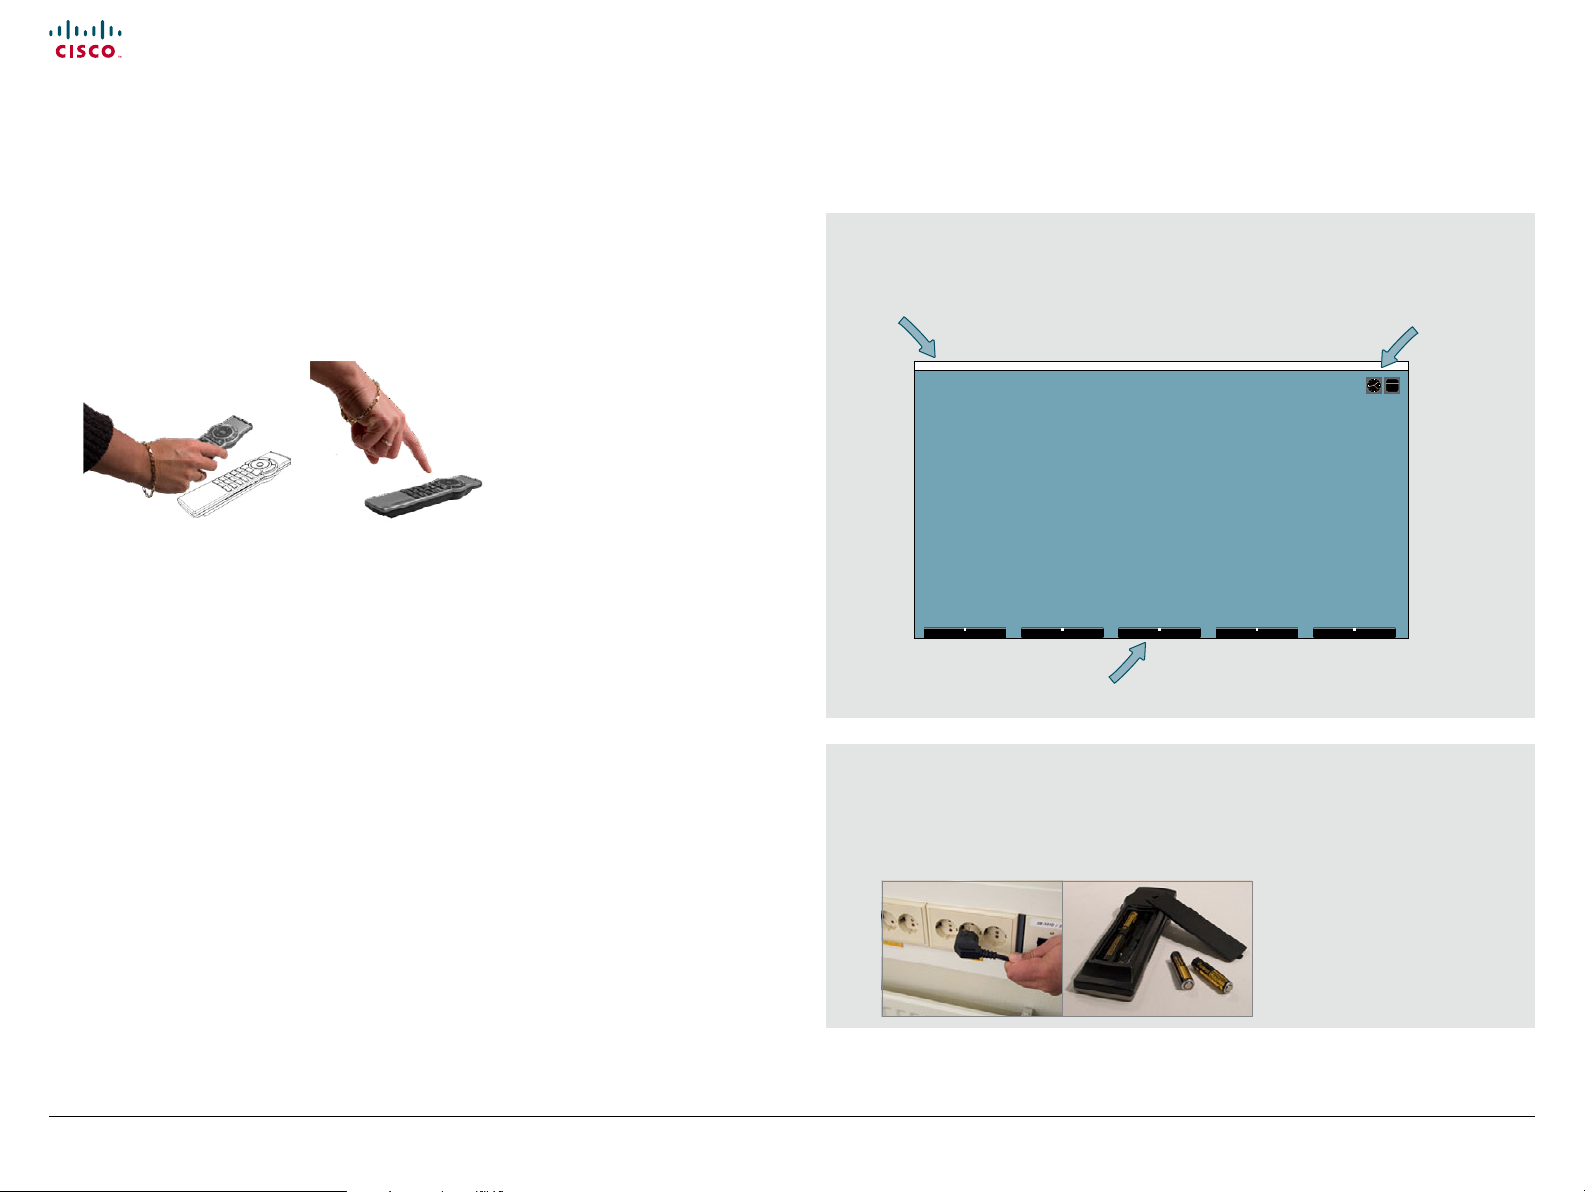
Waking up the system
To make a call you need to wake up the system from standby. However, if someone
calls you, the system will wake up by itself.
• To wake up the system just pick up the TRC5 remote control or press any key. You
may have to point the remote control towards the system to make sure it discovers
you.
• The system will now display the wallpaper.
• The dial-in address or dial-in number of your system is displayed in the upper left
corner. If you have questions about the dial-in address or number, contact your
system administrator.
• The screen will also indicate if there are any calls you have missed.
After wake-up, the screen will typically look like this:
The dial-in address or dial-in number of your system
is displayed in the upper left corner.
norah.dollhouse@somecompany.com
Softkeys (described on the following pages).
Date and time of day.
Sept
20
.
If the system fails to respond to the remote control or to incoming calls, make sure that:
• The system is connected to line voltage.
• The remote control has working batteries.
• The internal cables, such as the monitor cable and/or the camera cables are properly
connected, see the installation sheet for details, if needed.
D1485 2.0 3 User guide Cisco TelePresence Prole, C-series codecs, Q uick Set C20, February 2012
All contents are copyright © 2010–2012 Cisco Systems, Inc. All rights reserved.
4
www.cisco.com
Page 5
Cisco TelePresence System Prole-series, C-series codecs, Quick Set C20 User guide
Quick Reference Guide TRC 5
Contents
Advanced settings
Getting started
Making calls
Phone book usage
In-call features
Scheduled meetings
Getting started
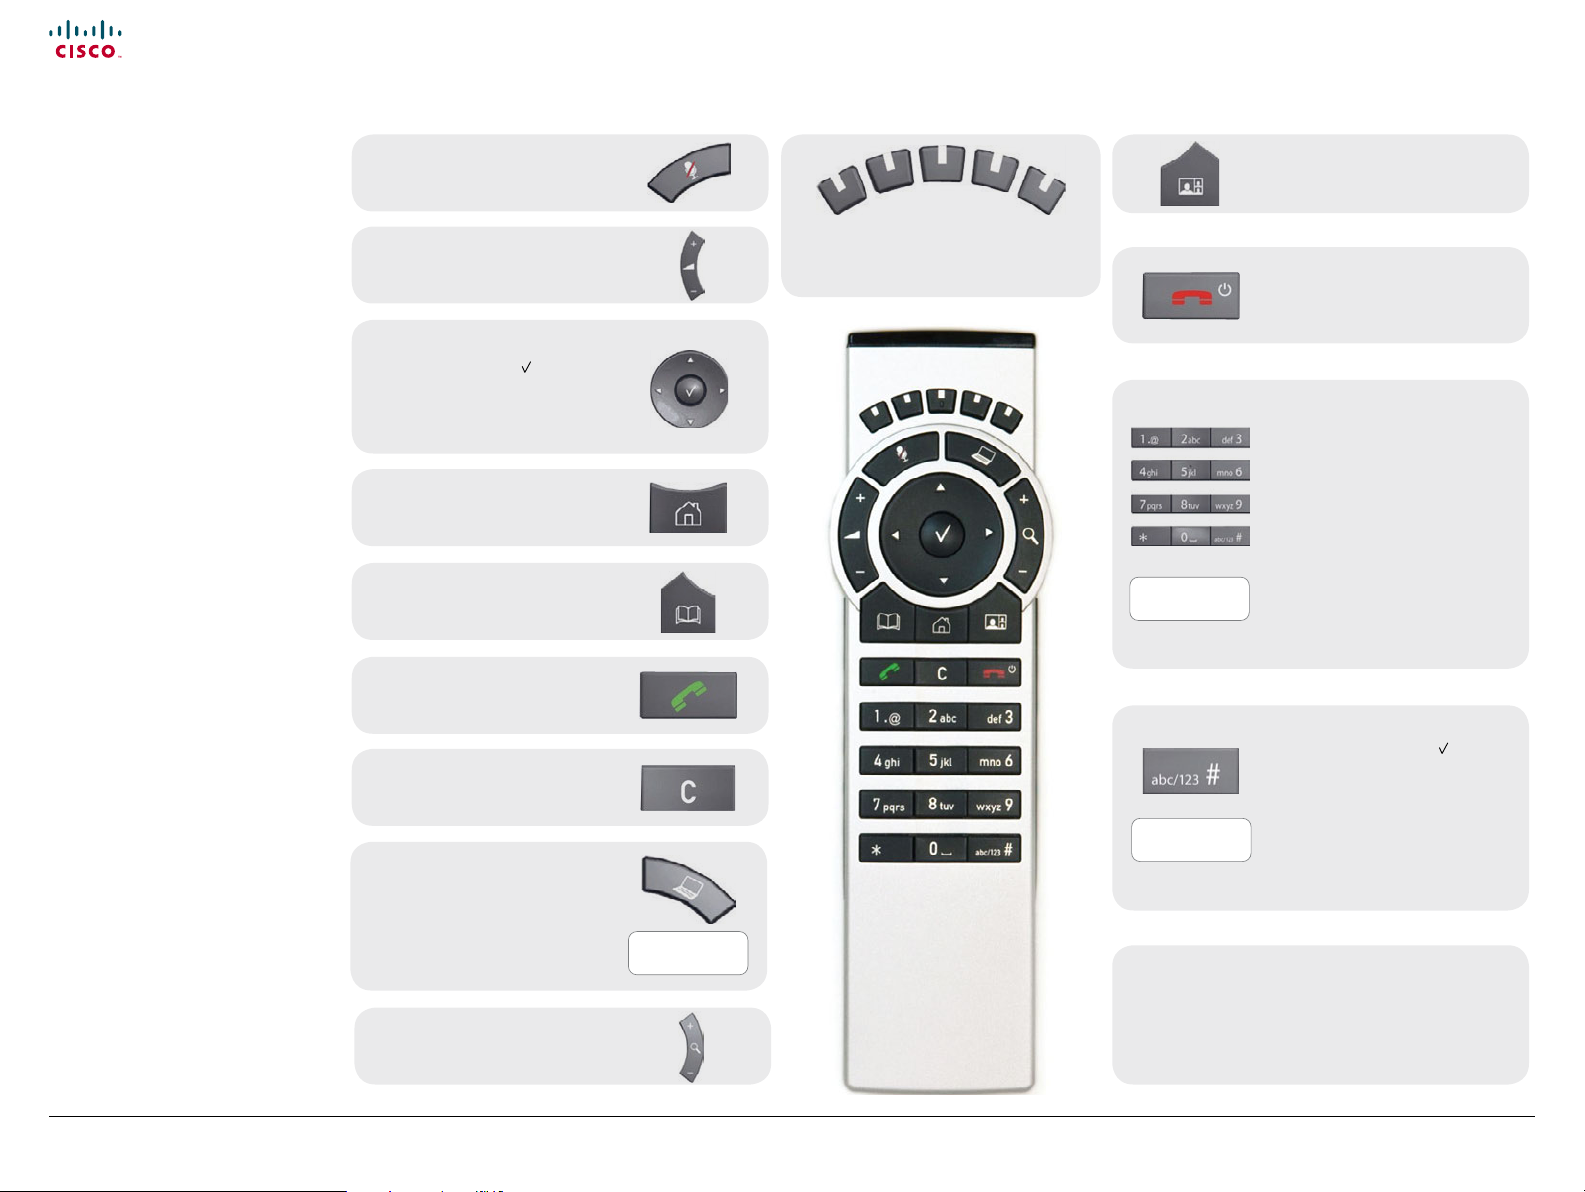
Overview of the remote control
Microphone On/O.
Adjust loudspeaker volume.
Use the Arrow keys to navigate in the
menus and the center
your choice or selection.
When no menu is open, Arrow keys
can be used to move the camera.
Use this key to display the Main
menu on the screen.
Use this key to display the Phone
book (your contacts) on the screen.
Place a call.
Use this key to remove characters in
a text eld.
Switch to show PC screen on the
system. Press again to go back to the
main camera.
key to conrm
These keys correspond to the ve context
sensitive softkeys along the bottom
of the screen.
Press and hold
Press and hold
Use this key to change the layout on
the screen.
Use this key to end an ongoing call.
Outside a call, press and hold to enter
the standby mode.
Use the keypad to enter letters and
numbers, as with a mobile phone.
Press a key repeatedly to access the
characters displayed on each key.
Press and hold the # key to switch
between touch tone mode (press
and hold), lower case characters and
numbers.
Use this key to enter touch tone mode
(DTMF) in a call. Press the
done.
When entering text this key is used to
toggle between upper and lower case
letters.
Press and hold to change between
characters and numerics.
key when
Open the Presentation menu to
select other sources.
Zoom the camera.
D1485 2.0 3 User guide Cisco TelePresence Prole, C-series codecs, Q uick Set C20, February 2012
All contents are copyright © 2010–2012 Cisco Systems, Inc. All rights reserved.
Press and hold
Waking up the system
Grab the remote control and make sure your hand
touches the rubber line sensors located on both sides of
the remote control, or just touch any key on the remote
control.
5
www.cisco.com
Page 6
Cisco TelePresence System Prole-series, C-series codecs, Quick Set C20 User guide
View Recent calls
Delete call history
Call rate 768 kbps
Contents
Advanced settings
Getting started
Making calls
Phone book usage
In-call features
Scheduled meetings
Getting started
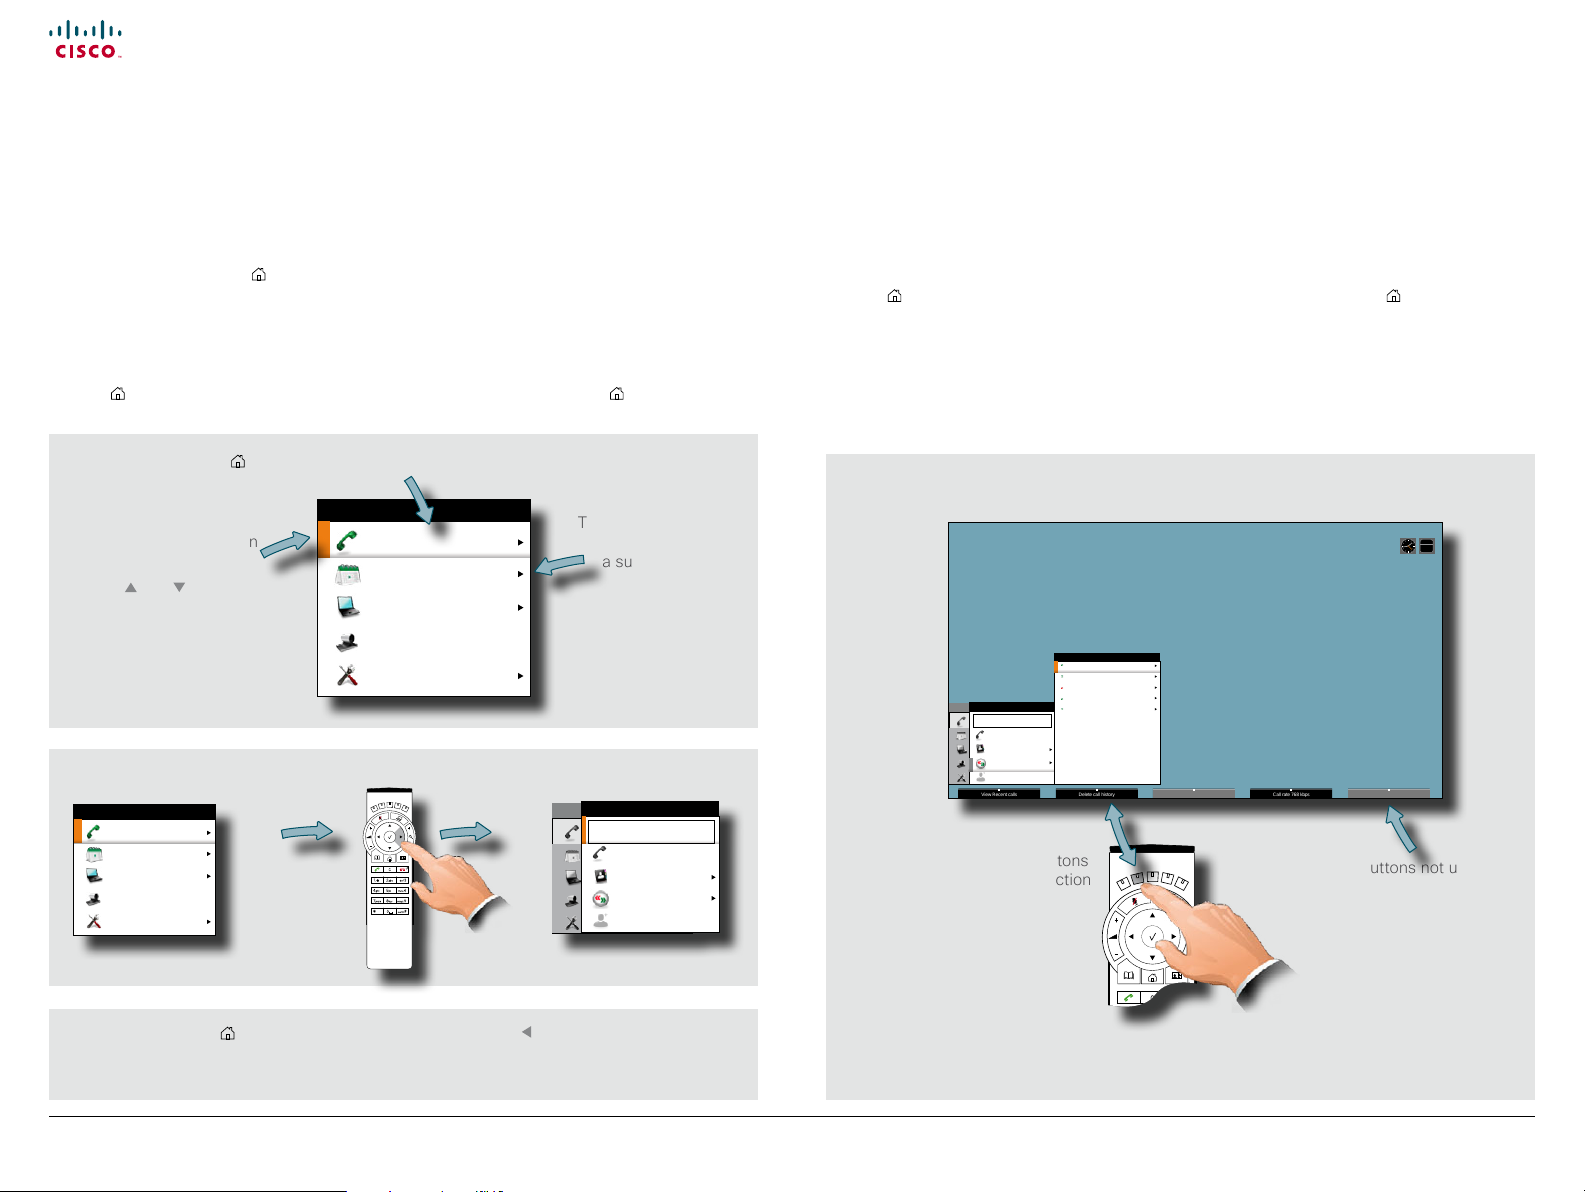
Navigating in the menus
Use the remote control to operate your video system. A few basic navigation
principles are all you need to know to get started.
• Press the Home key (
) to show the Home menu or wake up the system by lifting
the remote control.
• The Arrow keys in the center of the upper part of the remote control are used to
navigate in the menus.
• When the system shows the Home menu only (see the Fig. below), pressing Home
) will hide the menu. To bring it back, press the Home key ( ) again.
key (
Press the key to display the Home menu on the screen.
The element currently
selected is indicated by an
orange rectangle.
Use the
and Arrow
keys to navigate up and
Call
Meetings
Presentation
down in a menu.
Camera control
Settings
Example showing a submenu displayed by pressing the right arrow key.
HOME
Call
Meetings
Presentation
Camera control
Settings
HOME
The little triangle
indicates that
a submenu is
available.
HOME
Enter contact...
Call
Call
Meetings
Call
Presentation
Phone book
Presentation
Camera control
Recent ca lls
Camera control
Settings
Add another participant
Settings
CALL
123
• In an input eld, pressing C will delete characters/numbers to the left of the cursor
position.
• When the system shows the Home menu only (see the Fig. below), pressing Home
key (
) will hide the menu. To bring it back, press the Home key ( ) again.
• In an input eld, pressing C will delete characters/numbers to the left of the cursor
position.
Sept
20
alice.wonderland@company.co.nla
Received 20.09.11 16.29
hedda.gabler@somecompany.org
Placed 20.09.11 15 .10
dorian.grey@myself.net
Missed 20.09.11 14.55
frodo,b.aggins@myshire.org
Received 20.09.11 12.20
CALL
HOME
floria.tosca@somecompany.org
Call
Meetings
Call
Presentation
Presentation
Camera control
Camera control
Settings
Settings
Call
Phone book
Recent calls
Add another participant
Placed 20.09.11 08 .17
Context sensitive softbuttons
corresponding to the function
keys of the
remote control.
RECENT CALLS
Softbuttons not used in a
given context are shown
ghosted (gray).
Use the Home key
( ) to exit all menus
and return to showing the Home menu
Use the Arrow key to collapse the
menu expansion (to go back one
only.
D1485 2.0 3 User guide Cisco TelePresence Prole, C-series codecs, Q uick Set C20, February 2012
All contents are copyright © 2010–2012 Cisco Systems, Inc. All rights reserved.
level).
6
www.cisco.com
Page 7
Cisco TelePresence System Prole-series, C-series codecs, Quick Set C20 User guide
Contents
Advanced settings
Getting started
Making calls
Phone book usage
In-call features
Scheduled meetings
Getting started
Entering text in text elds
Some menu elds expect text information to be entered. This is used to enter the
name, number or address of the person you want to call as well as for such things as
to search in the phone book and to maintain your list of contacts (the My contacts).
Text entry essentials
• If you press a number key when you are not in a call, the Call menu will be shown.
• The system will automatically switch to text mode (abc) inside entry elds expecting
text entries. The easiest and most convenient way of entering letters is by invoking
the on-screen virtual keyboard. Do as shown below to invoke the keyboard.
• You may also use the keypad in the same manner as when composing text
messages on a mobile phone, but the virtual keypad is by far more convenient and
it is also faster to use.
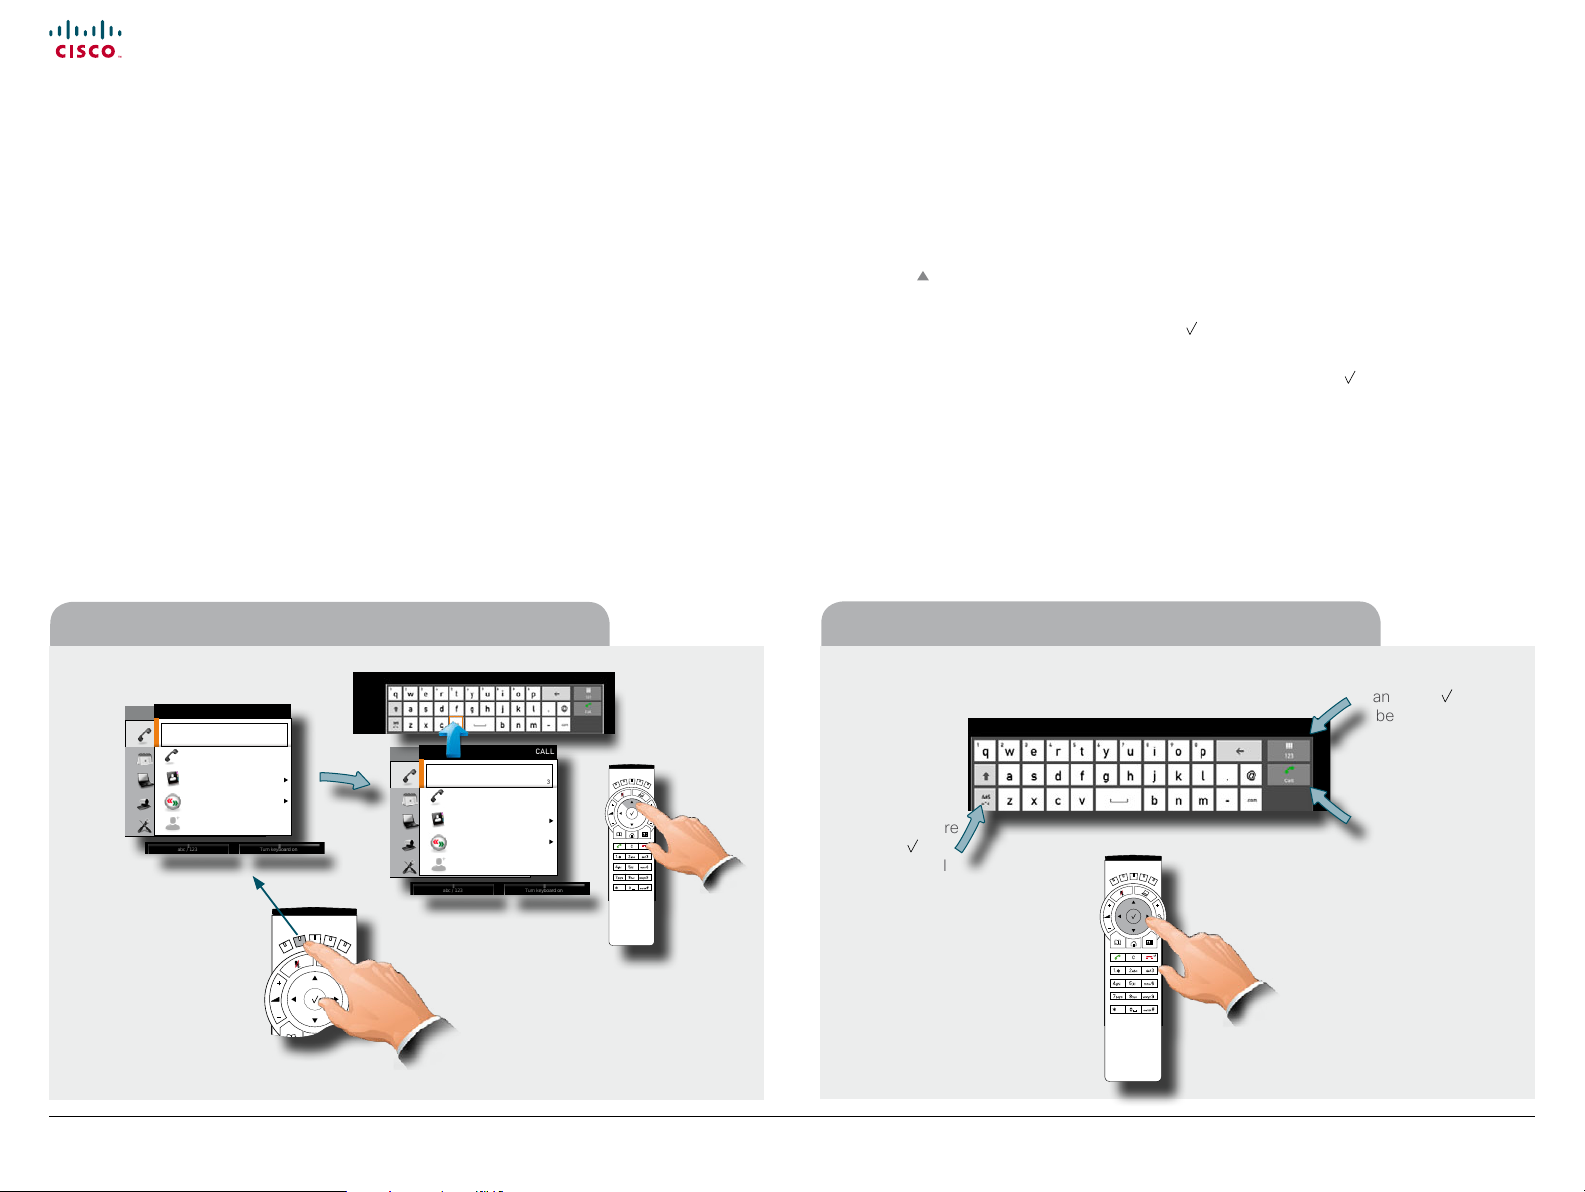
Invoking the virtual keyboard
CALL
HOME
Enter contact...
Call
Call
Meetings
Call
Presentation
Phone book
Presentation
Camera control
Recent ca lls
Camera control
Settings
Add another participant
Settings
abc / 123 Turn keyboard on
Press as shown to
produce the virtual
keyboard.
Press again to hide
the virtual keyboard.
123
Enter contact...
Call
Call
Meetings
Call
Presentation
Phone book
Presentation
Camera control
Recent ca lls
Camera control
Settings
Add another participant
Settings
abc / 123 Turn keyboard on
HOME
CALL
123
• Press Function key number two from the left to invoke the virtual keyboard if it
does not appear by itself.
• Use the
Arrow key to move the cursor inside the keyboard.
• Use all four Arrow keys to move about the keyboard.
• When the required key is reached, press
to have the letter or digit inserted in the
entry eld.
• If you navigate to the alpha/numeric selection eld, pressing
will take you to
numeric from alpha and vice versa. Navigate and select inside here to the extent
needed. The same principle applies if you need to enter special characters.
• Once entered, press the Function key to hide the keyboard. This will put your entry
into eect.
Virtual keyboard details
Navigate to here
and click to switch
Navigate to here
and click
to
access special
characters.
between letters and
Context sensitive
elds will appear
here. In this example
you may start a call
digits.
from here.
D1485 2.0 3 User guide Cisco TelePresence Prole, C-series codecs, Q uick Set C20, February 2012
All contents are copyright © 2010–2012 Cisco Systems, Inc. All rights reserved.
7
www.cisco.com
Page 8
Cisco TelePresence System Prole-series, C-series codecs, Quick Set C20 User guide
Remote layout
Contents
Advanced settings
Getting started
Making calls
Phone book usage
In-call features
Scheduled meetings
Getting started
Screen layout
The layout of the screen can be changed as shown to the right.
To show the display options screen, press the Layout (
may get to it through Settings > Layout.
• Use the Arrow keys to move between the alternatives and use
alternative you want to use.
• You may—or may not—include selfview (to show the outgoing video signal from
your own system). This will show you what others will see from your system.
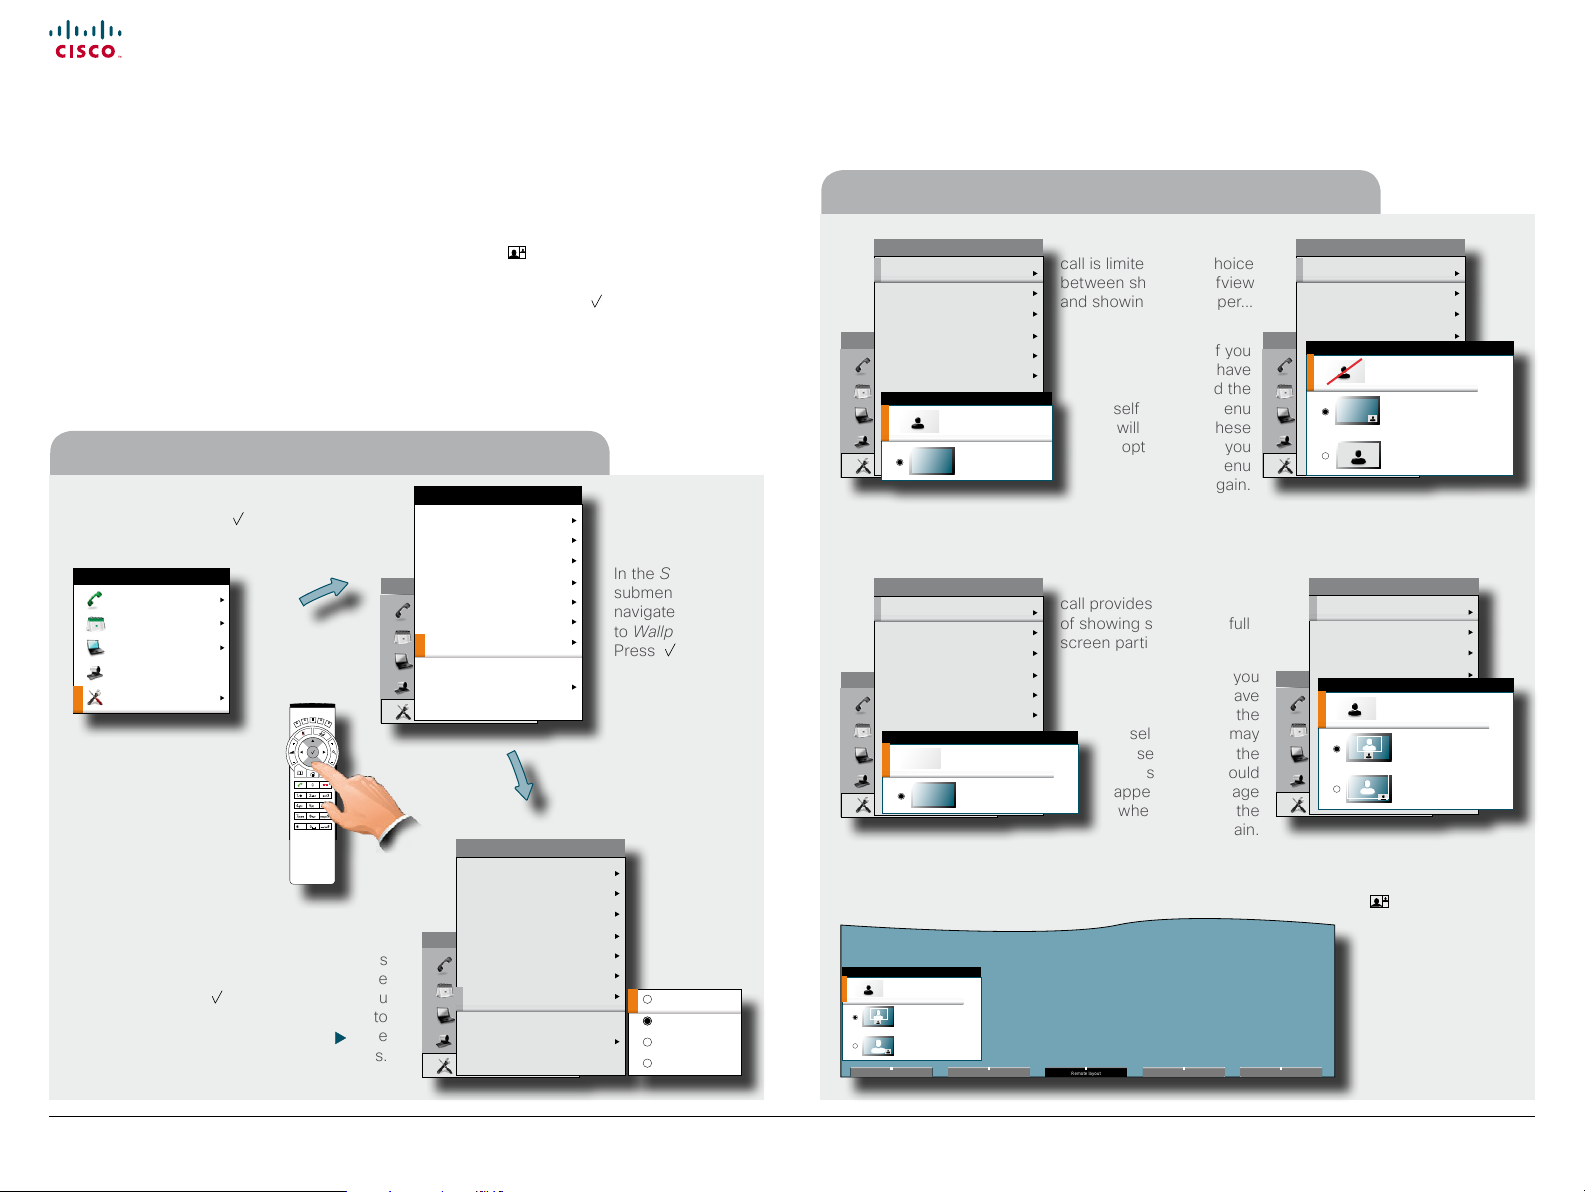
Tip: Adding a wallpaper to your screen
In the Home menu, navigate down to
Settings and press the
Call
Meetings
Presentation
Camera control
Settings
key.
HOME
Select between the options
available and press the
key to leave the menu
putting your choice into
eect. See also page
20 for more on this.
Layout
Main sour ce: Camera
Call settings
Language: English
Date and t ime
Call
Sounds a nd alerts
Meetings
Wallpaper: Growing
Presentation
System information
Camera control
Administrator settings
Restart
Settings
Call
Meetings
Presentation
Camera control
Settings
) key. Alternatively, you
to select the
SETTINGS
HOME
SETTINGS
Layout
Main sour ce: Camera
Call settings
Language: English
Date and t ime
Sounds a nd alerts
Wallpaper: Growing
System information
Administrator settings
Restart
HOME
In the Settings
submenu
navigate down
to Wallpaper.
Press again.
None
Growing
Summersky
Custom
Layout control
SETTINGS
Layout
Main sour ce: Camera
Call settings
Language: English
Date and t ime
Call
Sounds a nd alerts
Meetings
Wallpaper: Growing
Presentation
System information
Camera control
Advanced
Restart
Settings
Layout
Main sour ce: Camera
Call settings
Language: English
Date and t ime
Call
Sounds a nd alerts
Meetings
Wallpaper: Growing
Presentation
System information
Camera control
Advanced
Restart
Settings
HOME
LAYOUT CONTROL
Show selfview
Wallpaper
SETTINGS
HOME
Show selfview
Full screen participant
Change remote layout (the outgoing video) when hosting
MultiSite Conference...
LAYOUT CONTROL
Show selfview
Speaker participant
Full screen participant
Layout control outside a
call is limited to the choice
between showing selfview
and showing a wallpaper...
However, if you
selfview, the menu
will give you these
options when you
enter the menu
Layout control when in a
call provides the choice
of showing selfview or full
screen participant...
However, if you
LAYOUT CONTROL
selfview, you may
select where the
selfview should
appear in the image
when you enter the
already have
activated the
again.
already have
activated the
menu again.
Layout
Main sour ce: Camera
Call settings
Language: English
Date and t ime
Call
Sounds a nd alerts
Meetings
Wallpaper: Growing
Presentation
System informatio n
Camera control
Advanced
Restart
Settings
Layout
Main sour ce: Camera
Call settings
Language: English
Date and t ime
Call
Sounds a nd alerts
Meetings
Wallpaper: Growing
Presentation
System informatio n
Camera control
Advanced
Restart
Settings
SETTINGS
HOME
LAYOUT CONTROL
Hide selfview
Wallpaper with selfview
Full scr een selfvi ew
SETTINGS
HOME
LAYOUT CONTROL
Show selfview
Speaker participant
Full screen participant
Pressing Layout
( ) will produce a
softkey letting you
choose the layout
of the outgoing
video. Select among
all dened layouts
available. Note that
you have no inuence
on the actual layout on
the remote system.
D1485 2.0 3 User guide Cisco TelePresence Prole, C-series codecs, Q uick Set C20, February 2012
All contents are copyright © 2010–2012 Cisco Systems, Inc. All rights reserved.
8
www.cisco.com
Page 9
Cisco TelePresence System Prole-series, C-series codecs, Quick Set C20 User guide
Camera presets
Camera settings
Main source
Exit
Contents
Advanced settings
Getting started
Making calls
Phone book usage
In-call features
Scheduled meetings
Getting started
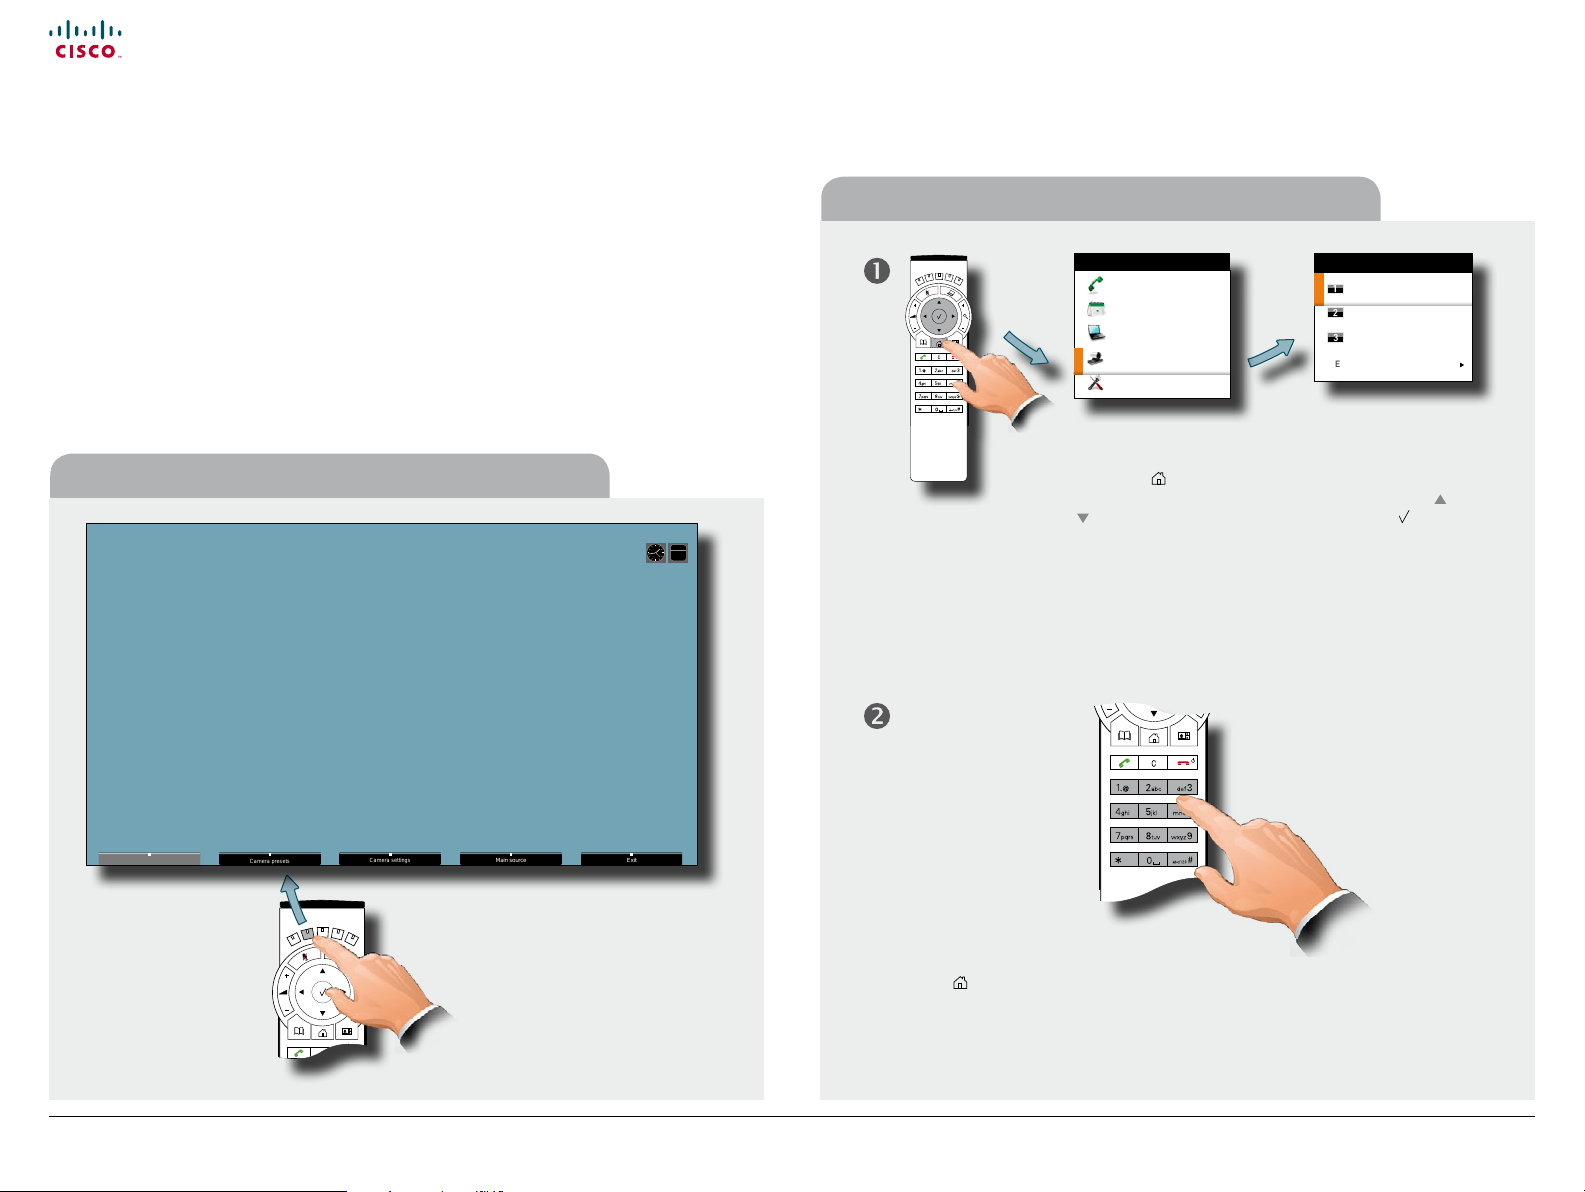
Camera presets
You may create predened settings of where the camera points and the zoom. This
is referred to as camera presets. See the next page for more.
Where to nd camera presets
Sept
20
Using the presets
HOME
Call
Meetings
Presentation
Camera control
Settings
CAMERA PRESETS
Pos. 1
Pos. 2
Pos. 3
Edit camera preset
Camera presets must have been dened before you
do this.
Press the
key on the remote control to display the
Home menu and select Camera control. Use the and
Arrow keys to navigate in the menu. Use to select
a preset. The camera will now move accordingly. Note
that this feature may be used any time.
D1485 2.0 3 User guide Cisco TelePresence Prole, C-series codecs, Q uick Set C20, February 2012
All contents are copyright © 2010–2012 Cisco Systems, Inc. All rights reserved.
Camera presets must have been dened
before you do this.
Press the
key on the remote control to
display the Home menu and select Camera
control. Use the 0~9 keys to select a preset.
The camera will now move accordingly. Note
that this feature may be used any time.
9
www.cisco.com
Page 10
Cisco TelePresence System Prole-series, C-series codecs, Quick Set C20 User guide
Camera presets
Camera settings
Main source
Exit
Contents
Advanced settings
Getting started
Making calls
Phone book usage
In-call features
Scheduled meetings
Getting started
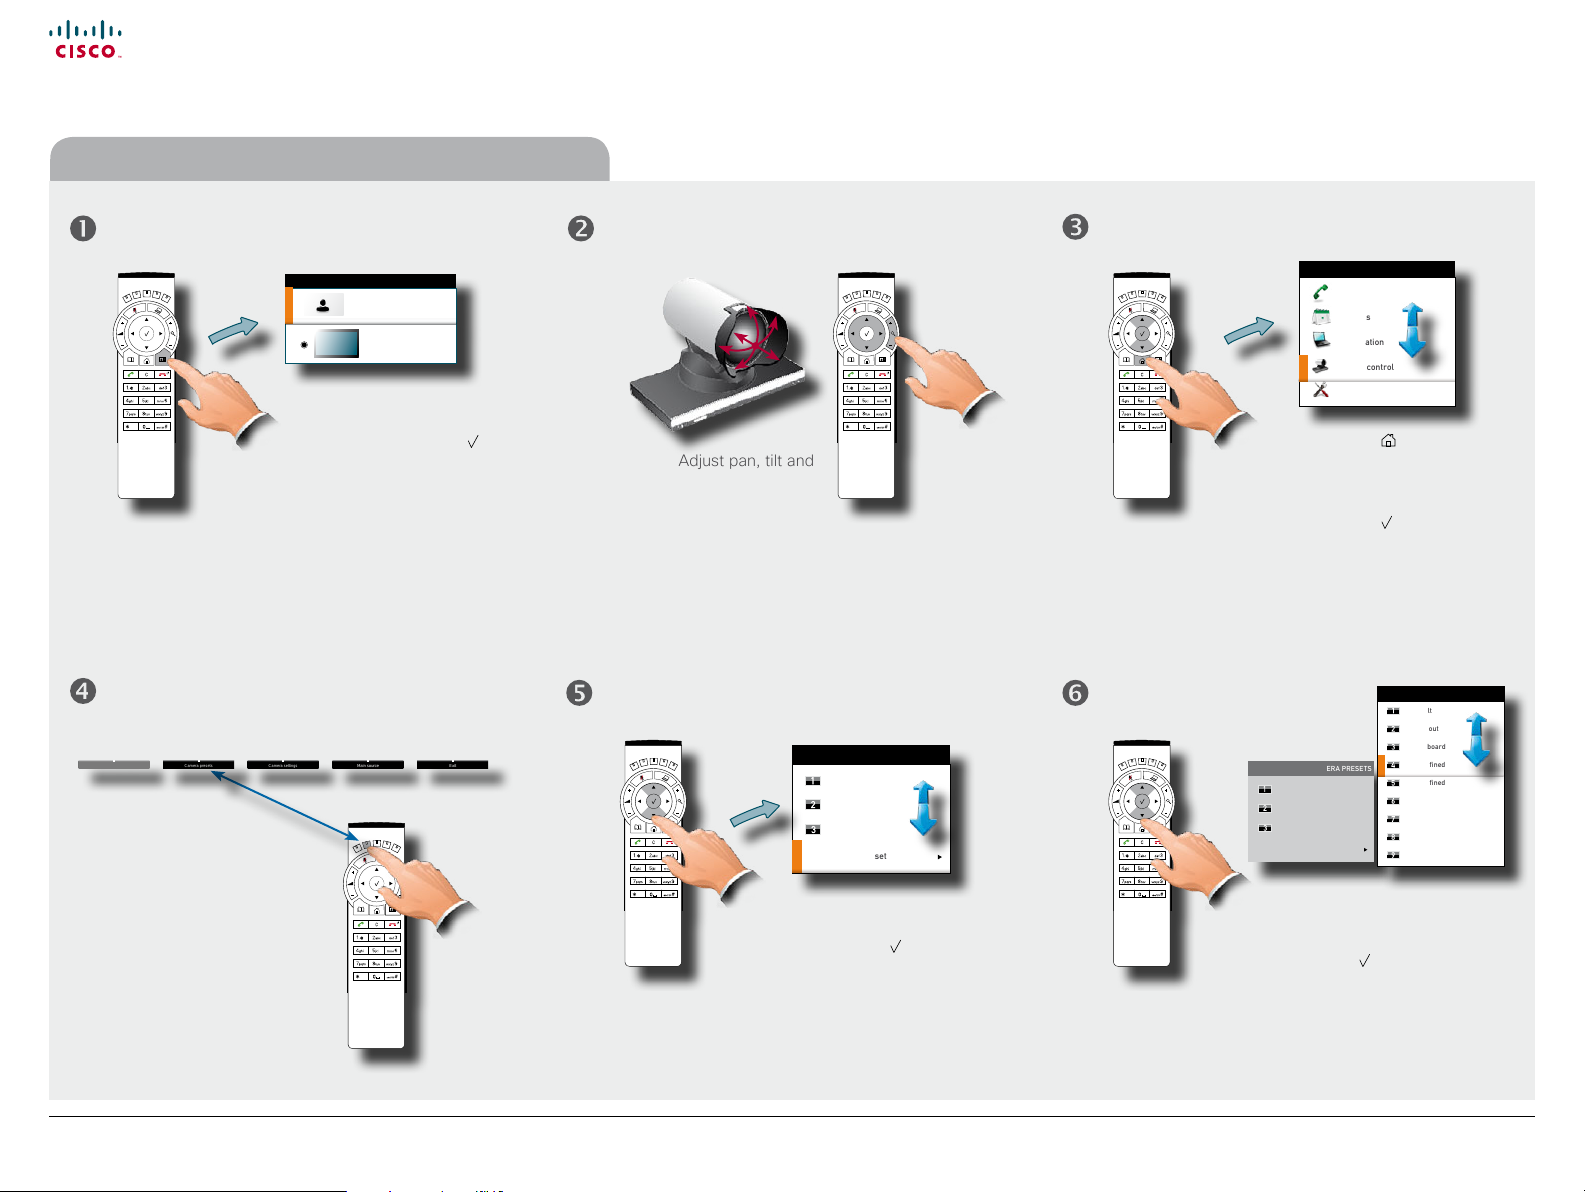
Adding a new camera preset (I)
LAYOUT CONTROL
Show selfview
Wallpaper
Outside a call, press the
Layout key and select Show
selfview followed by the
key, if needed. You will now
see the outgoing video from
your system.
This will display the softkeys along the bottom of the
screen, as shown.
Display the Camera presets
menu by pressing the Function
key corresponding to the
Camera presets softkey on
the remote control to open the
menu.
HOME
Call
Meetings
Presentation
Camera control
Settings
Adjust pan, tilt and
zoom, as required.
Press the key to display
the Main menu and
navigate to
Camera control.
CAMERA PRESETS
Pos. 2
Pos. 2
Pos. 3
Edit camera preset
In the Camera presets menu
navigate to Edit camera preset
and press the key.
Any presets already existing are
Press the
CAMERA PRESETS
Default
Zoom out
Whiteboard
Edit camera preset
Navigate to the undened
preset you would like to dene.
When you have located it,
press the
key.
SET CAME RA PRES ETS
Default
Zoom out
Whiteboard
Not defined
Not defined
Not defined
Not defined
Not defined
Not defined
key.
listed here.
D1485 2.0 3 User guide Cisco TelePresence Prole, C-series codecs, Q uick Set C20, February 2012
All contents are copyright © 2010–2012 Cisco Systems, Inc. All rights reserved.
10
www.cisco.com
Page 11
Cisco TelePresence System Prole-series, C-series codecs, Quick Set C20 User guide
Contents
Advanced settings
Getting started
Making calls
Phone book usage
In-call features
Scheduled meetings
Getting started
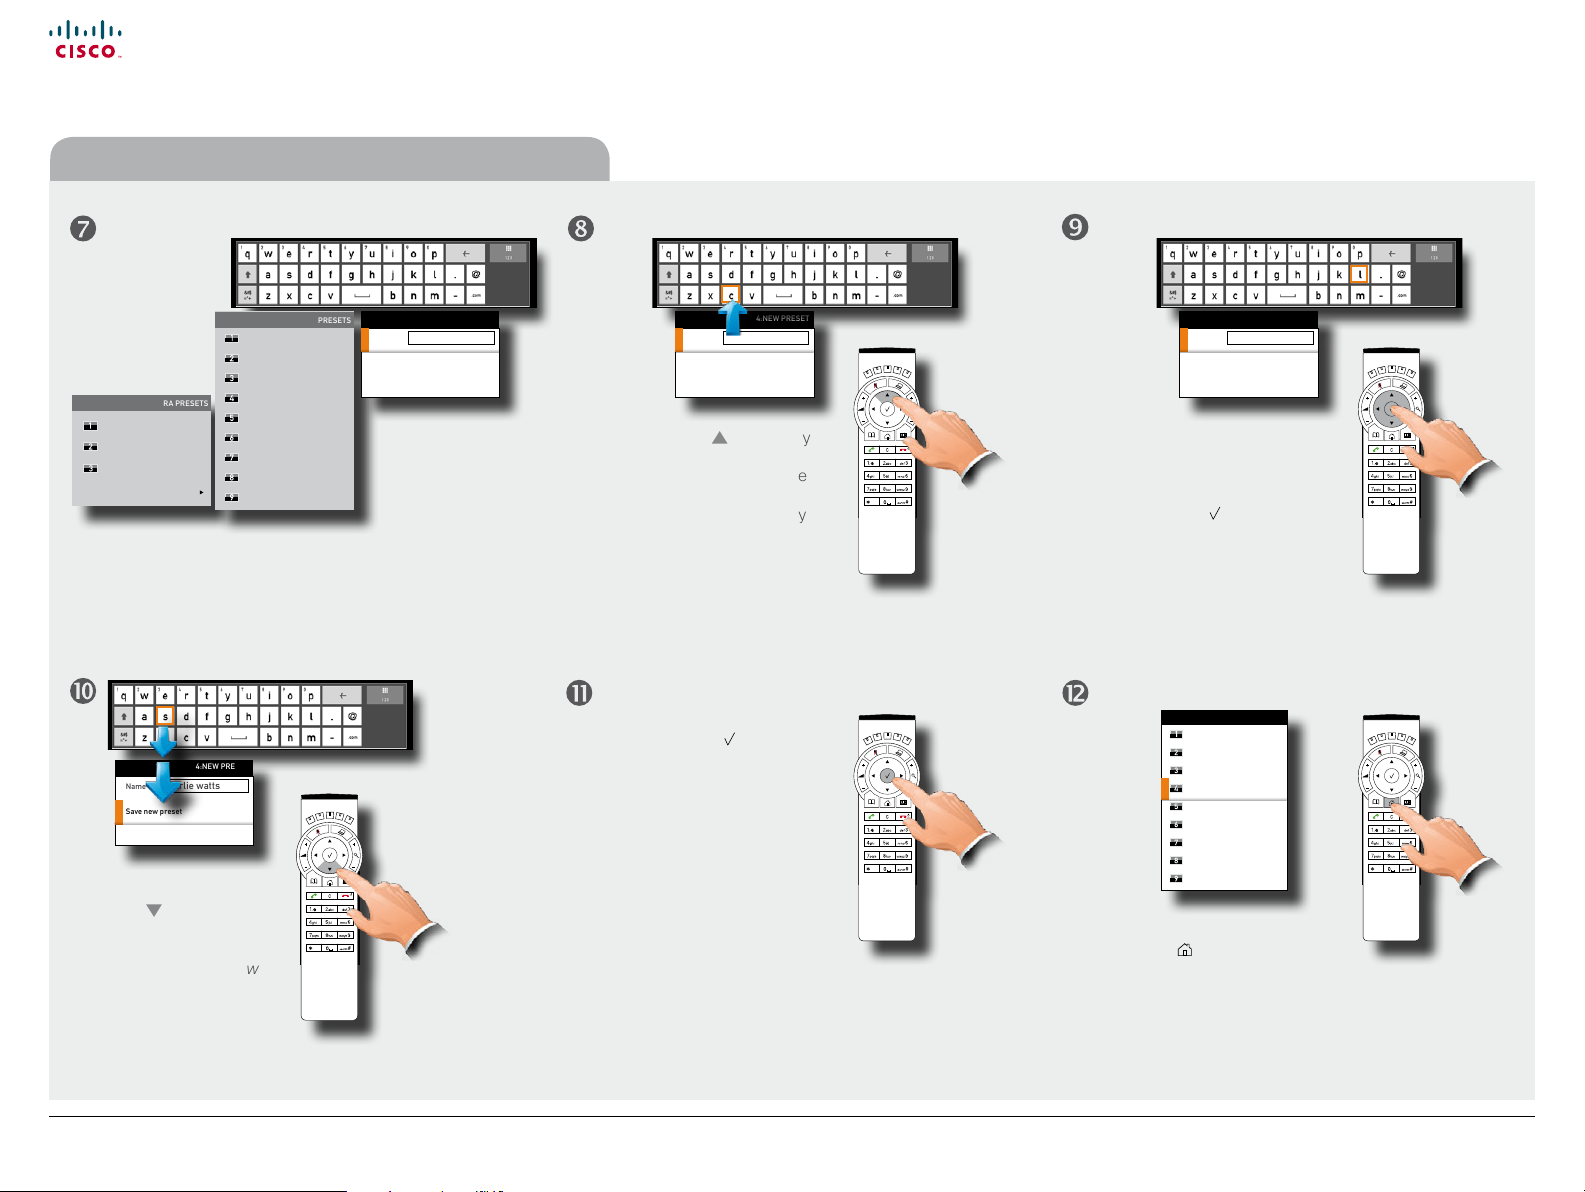
Adding a new camera preset (II)
The virtual
keyboard will now
automatically be
invoked by the
system.
CAMERA PRESETS
Default
Zoom out
Whiteboard
Edit camera preset
EDIT CA MERA PRE SETS
Default
Zoom out
Whiteboard
Not defined
Not defined
Not defined
Not defined
Not defined
Not defined
Name
Save new pr eset
Cancel
4:NEW PRESET
4:NEW PRESET
abc
Name
Save new pr eset
Cancel
abc
Use the Arrow key
as shown to move
the cursor up into the
virtual keyboard (the
cursor is indicated by
an orange square).
Name
Save new pr eset
Cancel
Give the new preset a
descriptive name.
Use the Arrow keys to
move about the keyboard
and the
character.
4:NEW PRESET
charl
abc
key to select a
Access special characters
and numerics by means of
the corresponding keys.
abc
4:NEW PRESET
Name
charl ie watts
Save new pr eset
Cancel
Press the
Arrow
key a sucient number
of times to move the
cursor down to Save new
preset, as shown.
D1485 2.0 3 User guide Cisco TelePresence Prole, C-series codecs, Q uick Set C20, February 2012
All contents are copyright © 2010–2012 Cisco Systems, Inc. All rights reserved.
Press the
key to put your
changes into eect. This
will be conrmed by the
system.
11
SET CAME RA PRES ETS
Default
Zoom out
Whiteboard
charlie w atts
Not defined
Not defined
Not defined
Not defined
Not defined
To leave the menu, press
the key.
Alternatively, you may
dene another preset or
redene existing (see the
following page for more).
www.cisco.com
Page 12
Cisco TelePresence System Prole-series, C-series codecs, Quick Set C20 User guide
Camera presets
Camera settings
Main source
Exit
Contents
Advanced settings
Getting started
Making calls
Phone book usage
In-call features
Scheduled meetings
Getting started
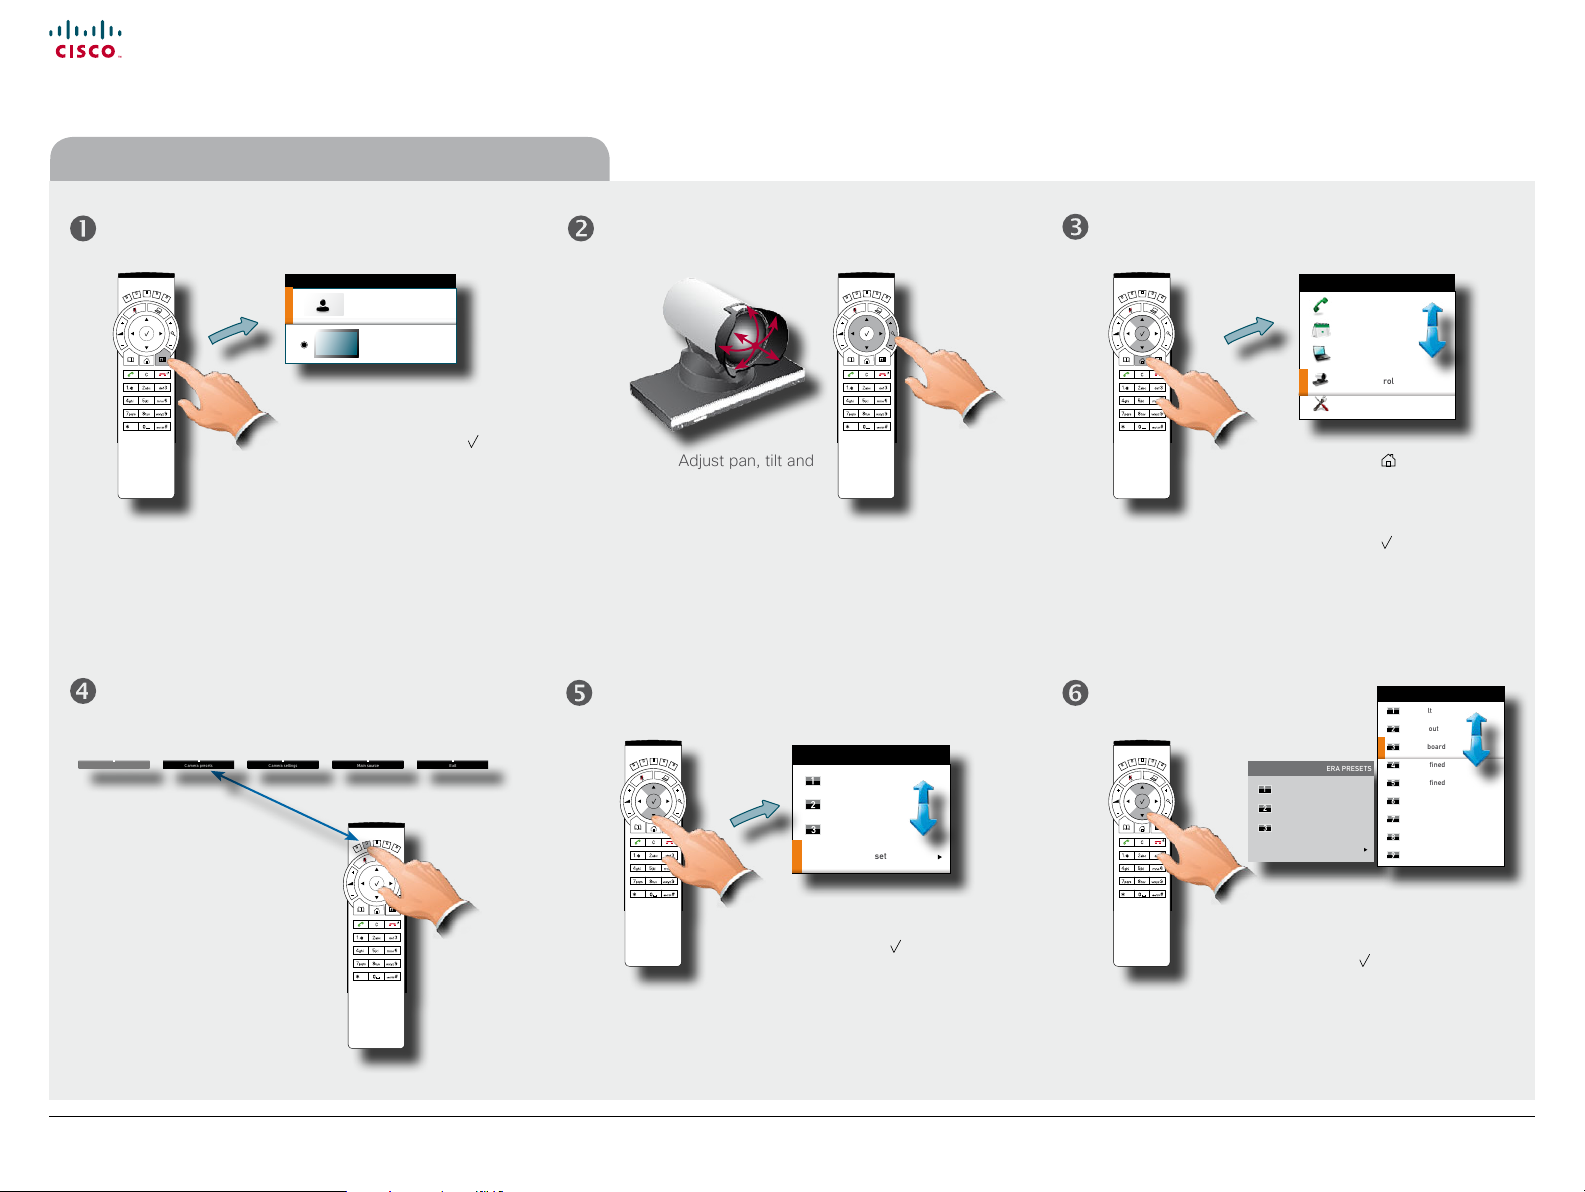
Editing an existing camera preset (I)
LAYOUT CONTROL
Show selfview
Wallpaper
Outside a call, press the
Layout key and select Show
selfview followed by the
key, if needed. You will now
see the outgoing video from
your system.
This will display the softkeys along the bottom of the
screen, as shown.
Display the Camera presets
menu by pressing the Function
key corresponding to the
Camera presets softkey on
the remote control to open the
menu.
HOME
Call
Meetings
Presentation
Camera control
Settings
Adjust pan, tilt and
zoom, as required.
Press the key to display
the Main menu and
navigate to
Camera control.
CAMERA PRESETS
Pos. 2
Pos. 2
Pos. 3
Edit camera preset
In the Camera presets menu
navigate to Edit camera preset
and press the key.
Any presets already existing are
Press the
CAMERA PRESETS
Default
Zoom out
Whiteboard
Edit camera preset
Navigate to the existing preset
that you would like to redene.
When you have located it,
press the
key.
SET CAME RA PRES ETS
Default
Zoom out
Whiteboard
Not defined
Not defined
Not defined
Not defined
Not defined
Not defined
key.
listed here.
D1485 2.0 3 User guide Cisco TelePresence Prole, C-series codecs, Q uick Set C20, February 2012
All contents are copyright © 2010–2012 Cisco Systems, Inc. All rights reserved.
12
www.cisco.com
Page 13
Cisco TelePresence System Prole-series, C-series codecs, Quick Set C20 User guide
Contents
Advanced settings
Getting started
Making calls
Phone book usage
In-call features
Scheduled meetings
Getting started
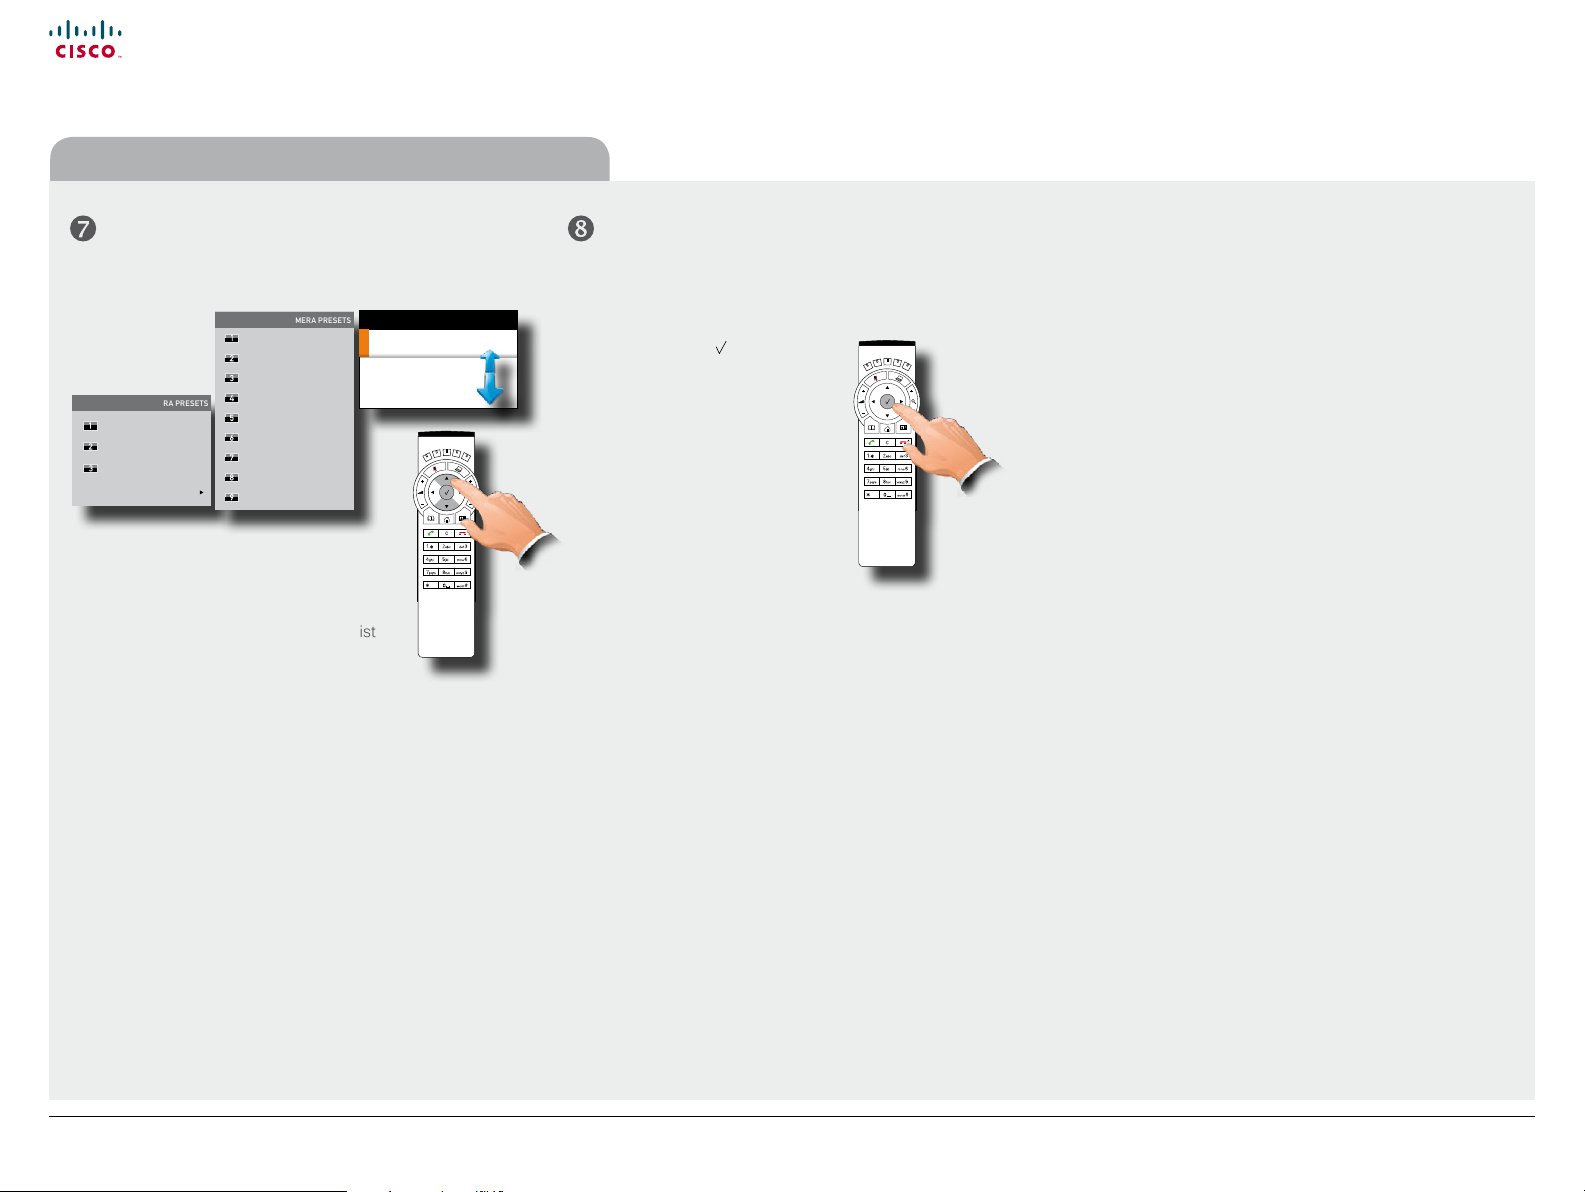
Editing an existing camera preset (II)
EDIT CA MERA PRE SETS
Default
Zoom out
Whiteboard
CAMERA PRESETS
Default
Zoom out
Whiteboard
Edit camera preset
Not defined
Not defined
Not defined
Not defined
Not defined
Not defined
Navigate to:
• Update to current camera position to
redene the preset
• Delete preset to remove it from the list
• Cancel to prepare to leave the menu
undoing any updates.
3:WHITEBOARD
Update to c urrent came ra position
Delete preset
Cancel
Press the key to put your
changes into eect. This
will be conrmed by the
system.
D1485 2.0 3 User guide Cisco TelePresence Prole, C-series codecs, Q uick Set C20, February 2012
All contents are copyright © 2010–2012 Cisco Systems, Inc. All rights reserved.
13
www.cisco.com
Page 14
Cisco TelePresence System Prole-series, C-series codecs, Quick Set C20 User guide
Contents
Advanced settings
Getting started
Making calls
Phone book usage
In-call features
Scheduled meetings
Getting started
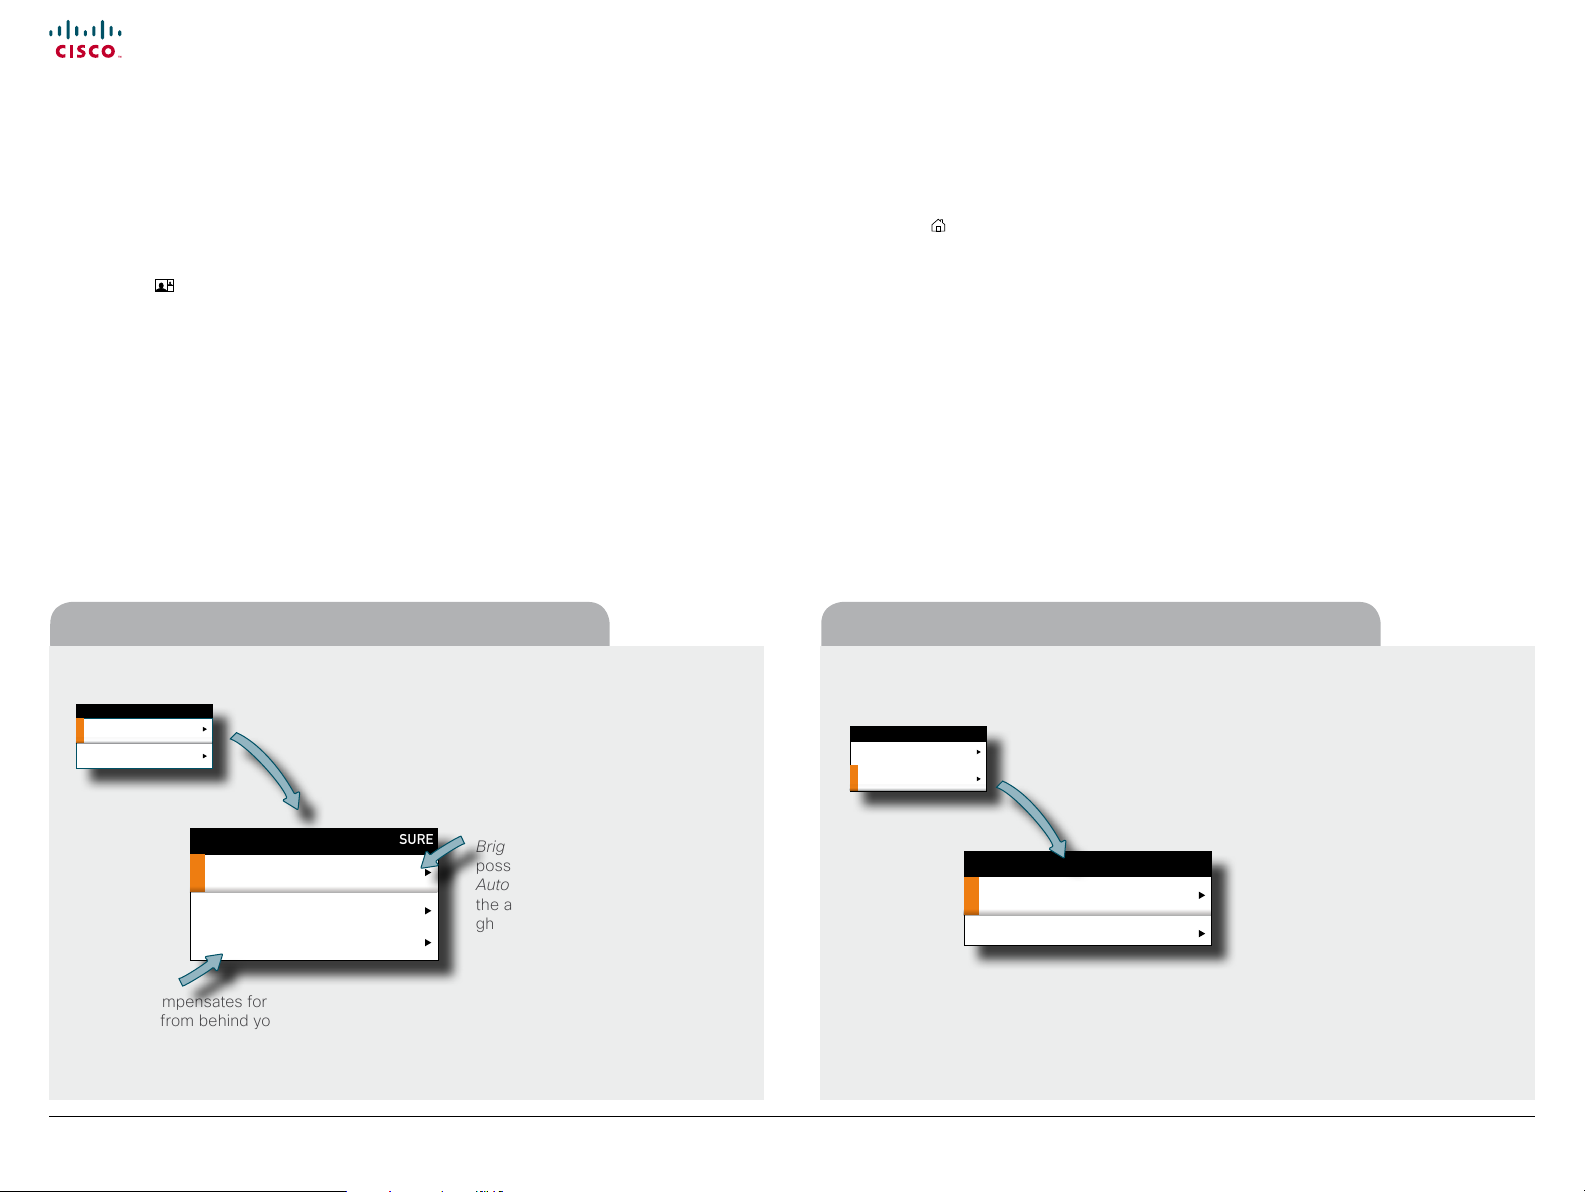
Camera settings
Camera settings let you adjust the exposure and whitebalance.
Do as follows:
1. Press the
key on the remote control to display the Layout menu. Select Selfview
to be shown as required.
CAMERA SETT INGS
Exposure
Whitebalance
If you change the Brightness
EXPOSURE
Brightness mode: Auto
Brightness level: 1
Backlight: Off
mode to Manual, the
Brightness level becomes
possible for you to set. Since
Auto has been chosen here,
the actual level is shown
ghosted.
2. Press the
key to display the Home menu and select Camera control.
3. This will cause softbuttons to appear. Press the Function key corresponding to
Camera settings (Function key number 2 from the left).
4. Follow the procedures outlined below.
Adjusting the whitebalance of the cameraAdjusting the exposure of the camera
CAMERA SETT INGS
Exposure
Whitebalance
WHITEBALANCE
Whitebalance mode: Manual
Whitebalance level: 1
Backlight compensates for any backlight shining on
the camera from behind you. Such light conditions
will tend to make you appear darker than needed.
D1485 2.0 3 User guide Cisco TelePresence Prole, C-series codecs, Q uick Set C20, February 2012
All contents are copyright © 2010–2012 Cisco Systems, Inc. All rights reserved.
Since the whitebalance has been set to Manual in this case, you will have access to
setting the whitebalance in the usual manner. Use Automatic if that is more convenient.
14
www.cisco.com
Page 15
Cisco TelePresence System Prole-series, C-series codecs, Quick Set C20 User guide
Contents
Advanced settings
Getting started
Making calls
Phone book usage
In-call features
Scheduled meetings
Getting started
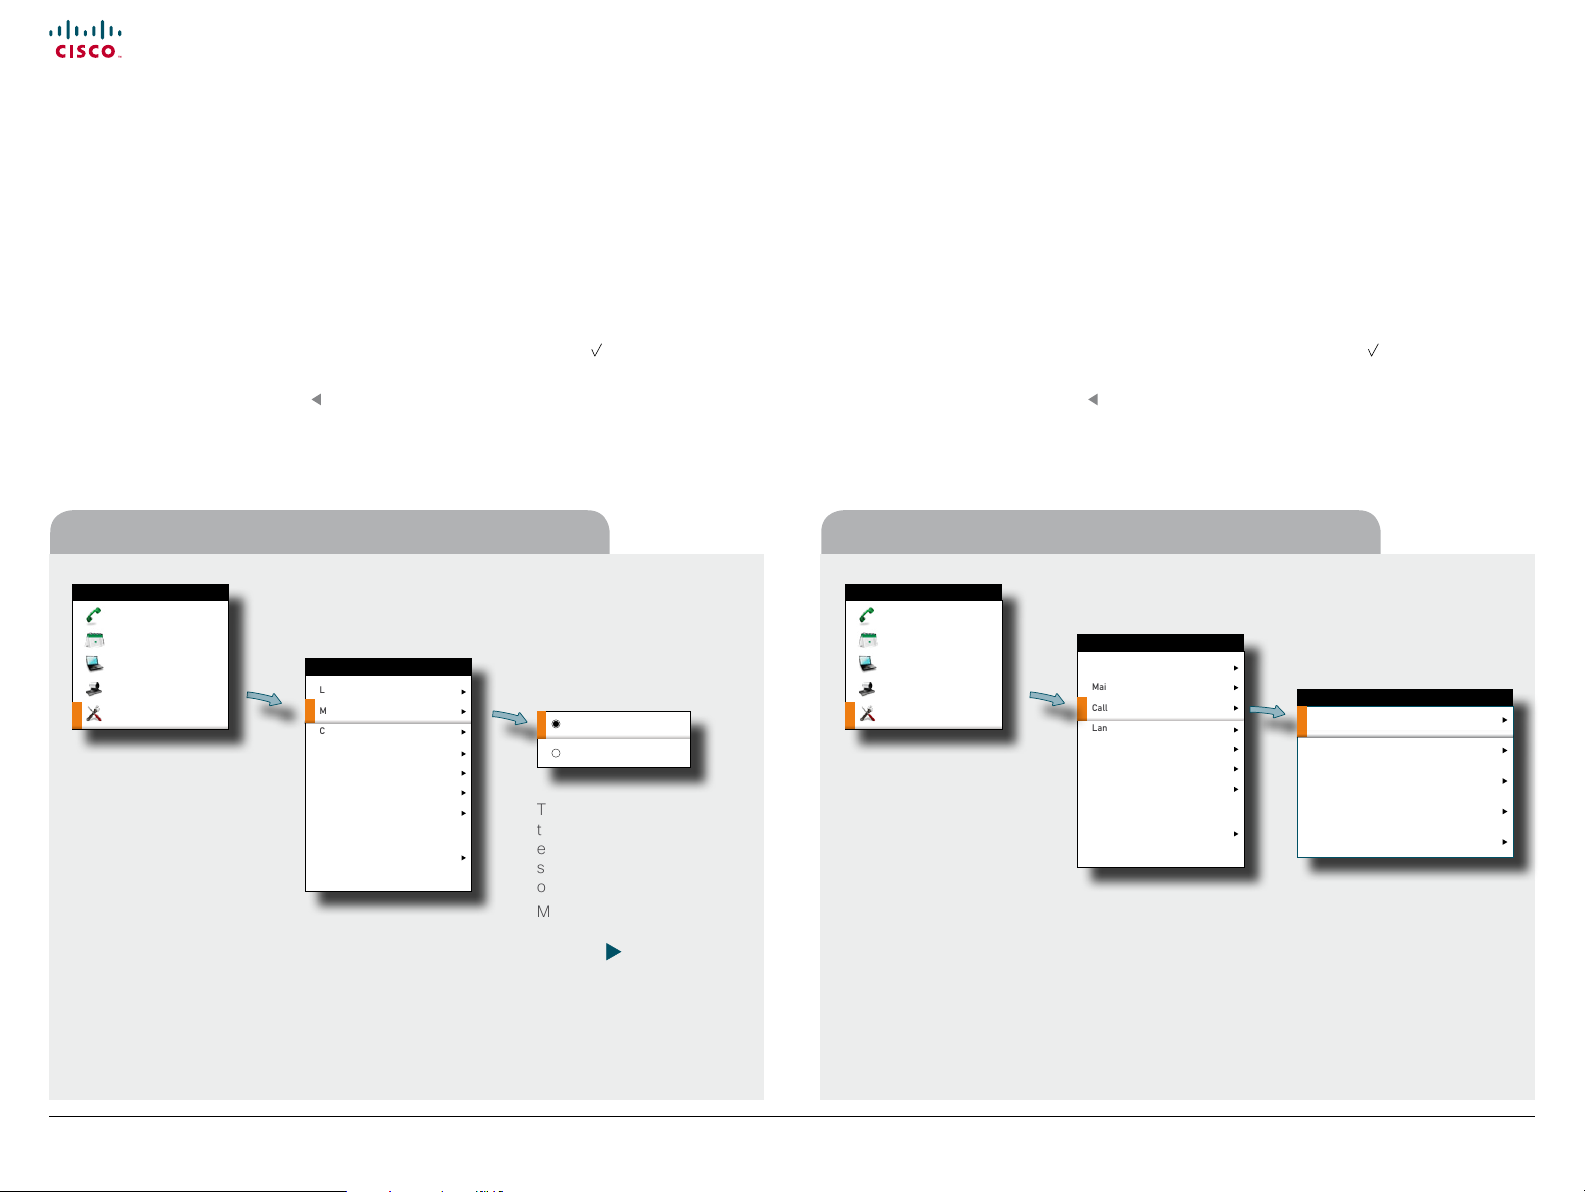
Main source
You may choose what to use as the main input source. This will typically be the
camera, a secondary camera (if applicable), the PC input or other sources such as a
DVD player.
Do as follows:
1. In the menu select Settings > Main source and expand the submenu.
2. Use the Arrow keys to move between the alternatives and use
alternative you want to use.
3. Collapse the menu using the
HOME
Call
Meetings
Presentation
Camera control
Settings
Arrow key.
SETTINGS
Layout
Main sour ce: Camera
Call settings
Language: English
Date and ti me
Sounds a nd alerts
Wallpaper: Growing
System information
Administrator settings
Restart
to select the
Camera
PC
This example has been
taken from a Codec C20
equipped Prole. Larger
systems may have more
options.
More on Prole systems
and their codecs can be
found on
page 30.
Call settings—an overview
Use the Call settings menu to set the default bit rate and how the system shall answer
incoming calls. Answering can be set to automatic or to manual. More on this can be
found on the next page.
Do as follows:
1. In the menu select Settings > Call settings and expand the submenu.
2. Use the Arrow keys to move between the alternatives and use
alternative you want to use.
3. Collapse the menu using the
Arrow key.
The call settings optionsMain source settings
HOME
Call
Meetings
Presentation
Camera control
Settings
Layout
Main sour ce: Camera
Call settings
Language: English
Date and ti me
Sounds a nd alerts
Wallpaper: Growing
System information
Administrator settings
Restart
SETTINGS
to select the
CALL SETTINGS
Auto an swer mod e: On
Auto an swer de lay: 5 se c
Auto an swer mute: Of f
Do not di stur b mode: O ff
Default cal lrate: 40 00 kbp s
D1485 2.0 3 User guide Cisco TelePresence Prole, C-series codecs, Q uick Set C20, February 2012
All contents are copyright © 2010–2012 Cisco Systems, Inc. All rights reserved.
15
www.cisco.com
Page 16

Cisco TelePresence System Prole-series, C-series codecs, Quick Set C20 User guide
Contents
Advanced settings
Getting started
Making calls
Phone book usage
In-call features
Scheduled meetings
Getting started
Call settings—auto answer options
You may set up your system to answer automatically whenever someone calls you.
If you choose to do so, you may also specify how long time it shall take before your
system connects you.
For privacy reasons you may want your microphone to be muted (turned o) when the
system answers automatically. Alternatively, you may set the system to Do not disturb.
The options in detail
CALL SETTINGS
Auto ans wer mode: On
Auto ans wer delay: 5 se c
Auto ans wer mute: Off
Do not dis turb mode: Of f
Defau lt callrate : 4000 kbp s
Auto ans wer mode: On
Auto ans wer delay: 5 se c
Auto ans wer mute: Off
Do not dis turb mode: Of f
Defau lt callrate : 4000 kbp s
Auto ans wer mode: On
Auto ans wer delay: 5 se c
Auto ans wer mute: Off
Do not dis turb mode: Of f
Defau lt callrate : 4000 kbp s
Auto ans wer mode: On
Auto ans wer delay: 5 se c
Auto ans wer mute: Off
Do not dis turb mode: Of f
Defau lt callrate : 4000 kbp s
On
Off
CALL SETTINGS
CALL SETTINGS
On
Off
CALL SETTINGS
On
Off
Set to On to have your
system answer incoming
calls automatically and O to
answer them manually.
Use the and Arrow keys
to alter how long time it shall
take before your system
connects you. Interval is 0–50
seconds.
For privacy you may set the
microphone to be muted upon
autoanswer. You will then have to
activate the microphone yourself
(press
).
To further enhance your privacy
you may set the system to Do
not disturb. Your system will then
not respond to incoming calls. As
soon as you disable the Do not
disturb any call attempts made
while the feature was enabled
will be listed as missed calls.
Call settings—default call rate
The Call settings menu lets you set the default call rate expressed as default number
of kilobits per second.
You may want to consult your system administrator to discuss the best setting in your
environment.
The default call rate options
SETTINGS
Layout
Main source: C amera
Call settings
Language: English
Date and t ime
Auto answer mod e: On
Call
Sounds and aler ts
Auto answer delay: 5 se c
Meetings
Wallpaper: Growing
Auto answer mute: Off
Presentation
System information
Do not disturb mode: Of f
Camera control
Advanced
Default callrate: 4000 kbp s
Settings
Restart
HOME
CALL SETTINGS
Options are 128, 256, 384, 512, 768 (initial default), 1152, 1472, 1920,
2560, 3072, 4000 and 6000 bits (not shown in Fig.) per second.
128
256
384
512
768
1152
1472
1920
2560
3072
4000
Scroll with the and Arrow
keys to access settings not
shown.
D1485 2.0 3 User guide Cisco TelePresence Prole, C-series codecs, Q uick Set C20, February 2012
All contents are copyright © 2010–2012 Cisco Systems, Inc. All rights reserved.
16
www.cisco.com
Page 17

Cisco TelePresence System Prole-series, C-series codecs, Quick Set C20 User guide
Contents
Advanced settings
Getting started
Making calls
Phone book usage
In-call features
Scheduled meetings
Getting started
Language settings
This will allow you to specify the language used in the menus and settings shown. The
following languages are supported: English, Norwegian, Swedish, German, French,
Italian, Japanese, Russian, Spanish, Korean, Finnish, Chinese (Simplied), Turkish,
Polish, Hungarian, Czech.
Do as follows:
1. Start from the Home menu and navigate down to Settings and press the
2. Then navigate to Language and press the
key again. Use the and Arrow keys
to select.
3. Press the
key to exit the menu putting changes into eect or the
Arrow key to leave the menu going one step back.
Language settings options
Layout
Main source: C amera
Call settings
Language: English
Call
Date and t ime
Sounds and aler ts
Meetings
Wallpaper: Growing
Presentation
System information
Camera control
Administrator settings
Restart
Settings
SETTINGS
HOME
Chinese
English
French
German
Italian
Japanese
Korean
Norwegian
Portuguese
Russian
Spanish
Scroll with the and Arrow
keys to access languages not
shown.
key.
About the setting of date and time
You may have the system pick date and time for you or you may specify date and time
zone settings along with date and time format and the date and time of day itself.
Do as follows:
1. Start from the Home menu and navigate down to Settings and press the
Then navigate to Date and time and press the
key. Select between NTP mode O,
Auto and Manual.
O: NTP mode is disabled—you will then have to specify date and time
Auto: The system locates the NTP server itself
Manual: You must specify the path to the NTP server.
2. Press the
key to exit the menu putting changes into eect or the
Arrow key to leave the menu going one step back.
Further details are shown on the next page.
Date and time settings overview
SETTINGS
Layout
Main source: C amera
Call settings
Language: English
Call
Date and t ime
NTP mode: Auto
Sounds and aler ts
Meetings
NTP server: 2.ntp.somewhere.cu.no
Wallpaper: Growing
Presentation
Time zone: GMT–12:00 (Internationa l
System information
Camera control
Date format: Day, Month, Year
Advanced
Settings
Restart
Time format: 2 4 hours
HOME
DATE AND TIME
Off
Auto
Manual
key.
D1485 2.0 3 User guide Cisco TelePresence Prole, C-series codecs, Q uick Set C20, February 2012
All contents are copyright © 2010–2012 Cisco Systems, Inc. All rights reserved.
17
www.cisco.com
Page 18

Cisco TelePresence System Prole-series, C-series codecs, Quick Set C20 User guide
Contents
Advanced settings
Getting started
Making calls
Phone book usage
In-call features
Scheduled meetings
Getting started
Setting date and time yourself
You may specify date and time zone settings along with date and time format and the
date and time of day itself.
Do as follows:
1. Start from the Home menu and navigate down to Settings and press the
Then navigate to Date and time and press the
2. Use Arrow keys and the
NTP server: Off
NTP server: 2.ntp.somewhere.cu.no
Day: 10
Month: September
Year: 2010
Time: 13:37
Date format: Day, Month, Year
Time format: 2 4 hours
The options shown here are
available when NTP server O has
been chosen only.
key to set everything as required.
CALL SETTINGS
key.
10
February
2010
13:37
Year.Month.Day (yy yy.mm.dd)
Month.Day.Year (mm.dd.yyyy)
Day.Month.Year (dd.mm.yyyy)
24 hours
12 hours (am/pm)
key.
Setting date and time automatically
You may have the date and time of day set automatically. If you set NTP server to
Auto, the system will take care of the connection to the NTP server itself.
If you set it to Manual, you must specify the path to the NTP server.
At any rate, you must still specify time and date formats as well as the time zone.
Activated NTP serverDeactivated NTP server
Scroll with the
and Arrow keys
to access settings
DATE AND TIME
NTP server: Auto
NTP server: 2.ntp.somewhere.cu.no
Time zon e: GMT–11:00 (M idway Isla nd
Date fo rmat: Day, Mont h, Year
Time fo rmat: 24 hour s
DATE AND TIME
NTP se rver: Manual
NTP server: 2.ntp.somewhere.cu.no
Time zon e: GMT–11:00 (M idway Isla nd
Date fo rmat: Day, Mont h, Year
Time fo rmat: 24 hour s
not shown.
2.ntp.somewhere.cu.no
Save
Cancel
GMT- 12:0 0
International Da te Line West
GMT- 11:0 0
Midway Island, Sa moa
GMT- 10:0 0
Hawaii
GMT-09:00
Alaska
GMT- 08: 00
Pacific time
GMT- 07:0 0
Arizona
GMT- 07:0 0
Mountain Time
GMT- 07:0 0
Chihuahua, La Paz, Mazattan
GMT-06:00
Central America
GMT-06:00
Saskatchewan
GMT-06:00
Guadalajara, Mexico City, Monterrey
Year.Month.Day (yy yy.mm.dd)
Month.Day.Year (mm.dd.yyyy)
Day.Month.Year (dd.mm.yyyy)
24 hours
12 hour s (am/pm)
Setting NTP server to Manual
lets you specify the path to
the NTP server. Otherwise
nothing is dierent from the
Auto setting.
TIME ZONES
D1485 2.0 3 User guide Cisco TelePresence Prole, C-series codecs, Q uick Set C20, February 2012
All contents are copyright © 2010–2012 Cisco Systems, Inc. All rights reserved.
18
www.cisco.com
Page 19

Cisco TelePresence System Prole-series, C-series codecs, Quick Set C20 User guide
Contents
Advanced settings
Getting started
Making calls
Phone book usage
In-call features
Scheduled meetings
Getting started
Selecting ring tone
The system lets you choose between a multitude of ring tones.
Do as follows:
1. Start from the Home menu and navigate down to Settings and press the
2. Then navigate to Sounds and alerts and press the
key. Navigate to Ring tone and
press the key. Use the and Arrow keys to move among the ring tones. Each
ring tone will be played when you position the cursor at it.
3. Press the
key to exit the menu putting changes into eect or the
Arrow key to leave the menu going one step back.
SETTINGS
Layout
Main source: C amera
Call settings
Language: English
Call
Date and t ime
Sounds and aler ts
Meetings
Wallpaper: Growing
Presentation
Ring tone: Marbles
System information
Camera control
Ring tone volume: 40
Advanced
Key tone: On
Restart
Settings
HOME
SOUNDS AND ALERTS
Marbles
IceCrystals
Polaris
Alert
Discreet
Fantasy
Jazz
Nordic
Echo
Rhythmic
key.
Setting ring tone volume
The system lets you set the ring tone volume.
Do as follows:
1. Start from the Home menu and navigate down to Settings and press the
2. Then navigate to Sounds and alerts and press the
volume and press the key. Use the and Arrow keys to set the volume.
3. Press the
key to exit the menu putting changes into eect or the
Arrow key to leave the menu going one step back.
Ring tone volume settingsRing tone selection
SETTINGS
Layout
Main source: C amera
Call settings
Language: English
Date and t ime
Call
Sounds and aler ts
Meetings
Wallpaper: Growing
Presentation
Ring tone: Marbles
System information
Ring tone volume: 40
Camera control
Advanced
Key tone: On
Restart
Settings
HOME
SOUNDS AND ALERTS
key. Navigate to Ring tone
key.
D1485 2.0 3 User guide Cisco TelePresence Prole, C-series codecs, Q uick Set C20, February 2012
All contents are copyright © 2010–2012 Cisco Systems, Inc. All rights reserved.
19
www.cisco.com
Page 20

Cisco TelePresence System Prole-series, C-series codecs, Quick Set C20 User guide
Contents
Advanced settings
Getting started
Making calls
Phone book usage
In-call features
Scheduled meetings
Getting started
Setting key tone to on or o
The system may be set to emit a sound when you press a key on the remote control
inside the dialing dialog menu.
Do as follows:
1. Start from the Home menu and navigate down to Settings and press the
2. Then navigate to Sounds and alerts and press the
key. Navigate to Key tone and
press the key. Use the and Arrow keys to select.
3. Press the
key to exit the menu putting changes into eect or the Arrow key to
leave the menu going one step back.
SETTINGS
Layout
Main source: C amera
Call settings
Language: English
Date and t ime
Sounds and aler ts
Call
Wallpaper: Growing
Presentation
Ring tone: Marbles
System information
Camera control
Ring tone volume: 40
Advanced
Key tone: On
Settings
Restart
HOME
SOUNDS AND ALERTS
On
Off
key.
Setting wallpaper on your screen
The system lets you set a wall paper on your screen. This is shown in idle condition
only.
Do as follows:
1. Start from the Home menu and navigate down to Settings and press the
2. Then navigate to Wallpaper and press the
key. Use the and Arrow keys to
select wall paper. Uploading and inserting a custom wallpaper is explained overleaf.
3. Press the
key to exit the menu putting changes into eect or the Arrow key to
leave the menu going one step back.
Wallpaper setting optionsKeytone setting
SETTINGS
Layout
Main source: C amera
Call settings
Language: English
Date and t ime
Call
Sounds and aler ts
Meetings
Wallpaper: Growing
Presentation
System information
Camera control
Administrator settings
Restart
Settings
HOME
None
Growing
Summersky
Custom
key.
D1485 2.0 3 User guide Cisco TelePresence Prole, C-series codecs, Q uick Set C20, February 2012
All contents are copyright © 2010–2012 Cisco Systems, Inc. All rights reserved.
20
www.cisco.com
Page 21

Cisco TelePresence System Prole-series, C-series codecs, Quick Set C20 User guide
Contents
Advanced settings
Getting started
Making calls
Phone book usage
In-call features
Scheduled meetings
Getting started
Inserting your own wallpaper
The system lets you upload and use your own wallpaper (for example your logo) on
your screen. This custom wallpaper picture can be any size up to 1920×1200 pixels.
The custom wallpaper is uploaded by means of the system’s web interface. See the
Appendices section of the Administrator Guide for your system for further details
about the web interface.
Do as follows:
1. Open a web browser and enter the IP address of the codec/endpoint of your
system.
2. Select Wallpaper from the menu bar on the left side of the screen.
3. Browse for the le and click the Upload button.
4. Close the web browser.
5. Select Custom wallpaper (see the previous page) to put the change into eect.
Note that access to the system’s web interface may have been password protected
by your administrator.
System information
System information can be listed.
Do as follows:
1. Start from the Home menu and navigate down to Settings and press the
2. Then navigate to System information and press the
3. To exit this screen, press the Home key (
A shortcut to this function is available. Make sure the system displays the Home
menu (press the key on the remote control to display this menu). Then press the
rightmost softbutton to display the System information.
key again.
).
key.
D1485 2.0 3 User guide Cisco TelePresence Prole, C-series codecs, Q uick Set C20, February 2012
All contents are copyright © 2010–2012 Cisco Systems, Inc. All rights reserved.
21
www.cisco.com
Page 22

Cisco TelePresence System Prole-series, C-series codecs, Quick Set C20 User guide
Contents
Advanced settings
Getting started
Making calls
Phone book usage
In-call features
Scheduled meetings
Getting started
Entering the Advanced conguration
Your video system has a separate set of Advanced conguration settings intended
to be used by system administrators only. These settings may be protected by a
password.
Aspects of the Administrator settings are discussed in more detail in the section
“Advanced settings” on page 44.
A full presentation of the Administrator settings can be found in the Administrator
Guide for your system, available separately for download from Cisco.com.
SETTINGS
HOME
Layout
Main source: C amera
Call settings
Language: English
Date and t ime
Call
Sounds and aler ts
Meetings
Wallpaper: Growing
Presentation
System information
Camera control
Administrator settings
Restart
Settings
HOME
SETTINGS
Layout
Main source: C amera
Call settings
Language: English
Date and t ime
Call
ADMINISTRATOR PASSWORD
Sounds and aler ts
Meetings
Please enter your
Wallpaper: Growing
Administrator password:
Presentation
System information
***
Camera control
Advanced
OK
Restart
Settings
Cancel
Restarting the system
Some changes in the system settings, network settings and the infrastructure
congurations may call for a system restart.
Do as follows:
1. Start from the Home menu and navigate down to Settings and press the
2. Then navigate to Restart and press the
3. Use Arrow keys and the
key to make your selection.
key.
RestartingAdvanced conguration entering
SETTINGS
Layout
Main source: C amera
Call settings
Language: English
Date and t ime
Call
Sounds and aler ts
Meetings
Wallpaper: Growing
Presentation
System information
Camera control
Administrator settings
Restart
Settings
HOME
key.
D1485 2.0 3 User guide Cisco TelePresence Prole, C-series codecs, Q uick Set C20, February 2012
All contents are copyright © 2010–2012 Cisco Systems, Inc. All rights reserved.
22
Restart
Do you re ally want to res tart the sy stem?
Restart
Cancel
www.cisco.com
Page 23

Cisco TelePresence System Prole-series, C-series codecs, Quick Set C20 User guide
Contents
Advanced settings
Getting started
Making calls
Phone book usage
In-call features
Scheduled meetings
Making calls
D1485 2.0 3 User guide Cisco TelePresence Prole, C-series codecs, Q uick Set C20, February 2012
All contents are copyright © 2010–2012 Cisco Systems, Inc. All rights reserved.
Chapter 2
Making calls
23
www.cisco.com
Page 24

Cisco TelePresence System Prole-series, C-series codecs, Quick Set C20 User guide
Contents
Advanced settings
Getting started
Making calls
Phone book usage
In-call features
Scheduled meetings
Making calls
Placing calls by specifying the name, number or address
Call
Meetings
Presentation
Camera control
Settings
Press the key to display
the Main menu.
Call
a
Meetings
alice.wonderland@every where.co.nl
norah.dollhouse@somecompany.com
Presentation
Dorian Grey
Camera control
Hedda Gabler
Settings
Fl oria To sca
Recent calls
My contacts
Phone book
HOME
HOME
CALL
CALL
HOME
Enter contact...
Call
Call
Meetings
Call
Presentation
Phone book
Presentation
Camera control
Recent c alls
Camera control
Settings
Add another participant
Settings
abc / 123 Turn keyboard on
123
Press as outlined to invoke
the virtual keyboard.
Enter contact...
Call
Call
Meetings
Call
Presentation
Phone book
Presentation
Camera control
Recent c alls
Camera control
Settings
Add another participant
Settings
Use the Arrow key, as shown, to
move the cursor up into the virtual
HOME
CALL
123
keyboard (indicated by an orange
square).
CALL
HOME
Call
abc
a
Meetings
alice.wonderland@every where.co.nl
norah.dollhouse@somecompany.com
Presentation
Dorian Grey
Camera control
Hedda Gabler
Settings
Fl oria To sca
Recent calls
My contacts
Phone book
CALL
abc
Hedda Gabler
Call
Call
Meetings
Phone book
Presentation
Recent c alls
Camera control
Add another participant
Settings
HOME
Use the Arrow keys to move about the
keyboard and the
key to select a character.
Access special characters and numerics by
means of the corresponding keys.
Matches will appear as you write.
D1485 2.0 3 User guide Cisco TelePresence Prole, C-series codecs, Q uick Set C20, February 2012
All contents are copyright © 2010–2012 Cisco Systems, Inc. All rights reserved.
Press the Arrow key a sucient
number of times to exit the keyboard
and enter the list of matches (if such
a list appears). Then use the Arrow
keys to navigate to the one to call and
press the key.
24
Press
or the key to
actually place the call.
www.cisco.com
Page 25

Cisco TelePresence System Prole-series, C-series codecs, Quick Set C20 User guide
Contents
Advanced settings
Getting started
Making calls
Phone book usage
In-call features
Scheduled meetings
Making calls
Placing calls using the phone book
Search
My conta cts
0.1 - Beijing O ffice
0.2 - Lond on Office
0.3 - New York O ffice
0.4 - Oslo O ffice
0.5 - San Jo se Office
0.5 - Washin gton Offic e
PHONE BOOK
Press the key to display the Phone book.
This will also invoke the virtual keyboard.
Your phone book may contain folders, as
outlined.
Any search you make will include current
folder and any subfolders, so if you stay at
the top level (sometimes referred to as the
root level), your search will be made within
all (sub)folders.
Search
a
Abraham Anderson
Adrian Jo nes
Harry P. Ot ter
Hedda Gabler
Norah Dollhouse
Peer A. Gy nt
Roberta Nielsen
PHONE BOOK
Exit the virtual keyboard as explained on the
previous page.
Navigate to the entry to be called and press
key or the Arrow key to produce the
the
options available.
Search
My conta cts
0.1 - Beijing O ffice
0.2 - Lond on Office
0.3 - New York O ffice
0.4 - Oslo O ffice
0.5 - San Jo se Office
0.5 - Washin gton Offic e
PHONE BOOK
Use the Arrow key, as shown, to
move the cursor up into the virtual
keyboard (indicated by an orange
square).
Harr y P. Ott er
harry.p.otter@somecompany.com
Call
Edit before call
Save to m y conta cts
Add to participants list
View dialing method
Search
a
Abraham Anderson
Adrian Jo nes
Harry P. Ot ter
Hedda Gabler
Norah Dollhouse
Peer A. Gy nt
Roberta Nielsen
Use the Arrow keys to move about
the keyboard and the key to
select a character.
Access special characters
and numerics by means of the
corresponding keys.
Matches will appear as you write,
as outlined.
Call the entry selected (press or the key).
Edit the entry (for example insert a prex)
and then call.
Save the entry to your
personal list of contacts.
Add to list of participants in a multisite call
(optional feature).
View dialing method options
(H.323 and SIP wherever applicable).
PHONE BOOK
More about the phone book can be found in the section “Phone book usage”—click on the topic on the menu line at the top of this page.
D1485 2.0 3 User guide Cisco TelePresence Prole, C-series codecs, Q uick Set C20, February 2012
All contents are copyright © 2010–2012 Cisco Systems, Inc. All rights reserved.
25
www.cisco.com
Page 26

Cisco TelePresence System Prole-series, C-series codecs, Quick Set C20 User guide
Contents
Advanced settings
Getting started
Making calls
Phone book usage
In-call features
Scheduled meetings
Making calls
Placing calls by means of the Recent calls list
Call
Meetings
Presentation
Camera control
Settings
Press the key to display
the Main menu.
Harr y P. Ott er
harry.p.otter@somecompany.com
Call
Edit before call
Save to m y conta cts
Add to participants list
View dialing method
HOME
CALL
Call
Phone book
Recent c alls
Add another participant
Navigate down to Recent calls
and then press the key.
Call the entry selected (press or the key).
Edit the entry (for example insert a prex)
and then call.
Save the entry to your
personal list of contacts.
Add to list of participants in a multisite call
(optional feature).
harry.p.otter@somecompany.com
Received 20.06.11 16.29
hedda.gabler@somecompany.org
Placed 20.06.11 15.10
dorian.grey@myself.net
Missed 20.06.11 14.55
frodo,b.aggins@myshire.org
Received 20.06.11 12.20
floria.tosca@somecompany.org
Placed 20.06.11 08.17
RECENT CALLS
Use the Arrow keys to navigate in
the list.
View dialing method options
(H.323 and SIP wherever applicable).
D1485 2.0 3 User guide Cisco TelePresence Prole, C-series codecs, Q uick Set C20, February 2012
All contents are copyright © 2010–2012 Cisco Systems, Inc. All rights reserved.
26
www.cisco.com
Page 27

Cisco TelePresence System Prole-series, C-series codecs, Quick Set C20 User guide
Contents
Advanced settings
Getting started
Making calls
Phone book usage
In-call features
Scheduled meetings
Making calls
When someone is calling you Management systems booking list
If your video network makes use of the Cisco Telepresence Management System
(TMS), your video system may be set up for scheduled meetings from remote.
Press the key
on the remote
control to answer
an incoming call.
Press the
key on the
remote control to
reject an incoming
call.
Typically, the TMS works with tools like Microsoft Outlook, permitting employees to
book and schedule video calls and conferences.
Any bookings applicable to your system will appear on the screen as shown in the
below example.
Terminating an ongoing call
Press the key on the remote
control to terminate an ongoing
call.
john.doe@videocompany.co.nl a
NOW - 14:3 0
Align weekly
14:30 - 1 5:00
Sales meeting planning
15:00 - 1 5:30
Release planning
TODAY’S BOOKINGS
Sept
20
D1485 2.0 3 User guide Cisco TelePresence Prole, C-series codecs, Q uick Set C20, February 2012
All contents are copyright © 2010–2012 Cisco Systems, Inc. All rights reserved.
27
www.cisco.com
Page 28

Cisco TelePresence System Prole-series, C-series codecs, Quick Set C20 User guide
Contents
Advanced settings
Getting started
Making calls
Phone book usage
In-call features
Scheduled meetings
Making calls
Calling more than one (optional)
Provided that your video endpoint is equipped with the optional built-in Multisite
feature, any point-to-point video call (a call involving two parties only) may be
expanded to include additional participants. The call will then become a video
conference.
Any ongoing video call can then be expanded to a video conference by adding more
participants at all times (see the right example).
Alternatively, you may set up a list of whom to call before you actually call them and
then call them all in one go (see the below example).
Note that your video network may have an infrastructure permitting video conferencing—
even if your video system itself does not. This will require the presence of an external
Multipoint Control Unit (MCU).
The most advanced video systems (those using Codec C60 or C90) can—when
equipped with Multisite—set up video meetings with four participants (yourself
included). External MCUs may let you set up conferences with many more
participants.
Systems equipped with Codec C20 have no Multisite feature (see
nd out which type of codec your system has). However, all products described in this
user guide come with Multiway™ installed (see the next page for more on this).
Contact your system administrator for details on how to use external MCUs.
Setting up a list of whom to call before calling them
page 30 to
Calling participants one by one
During a call, open the Call menu again…
Then call someone in the usual manner—
by keying in the name, number or address
(in this case “542”) or by means of the
phone book. Invoke the virtual keyboard
“Entering text in text elds” on
(see
page 7), if convenient.
Finally, navigate down to
place the call…
If you want to add another participant,
repeat the process. The maximum
number of participants possible
depends on your system’s conguration.
Call and
alice.wonderland@mycompany.com
Enter contact...
Call
Meetings
Call
Phone book
Presentation
Recent c alls
Camera control
Add another participant
Settings
alice.wonderland@mycompany.com
542
Call
Call
Meetings
Phone book
Presentation
Recent c alls
Camera control
Add another participant
Settings
alice.wonderland@mycompany.com
542
Call
Call
Meetings
Phone book
Presentation
Recent c alls
Camera control
Add another participant
Settings
HOME
HOME
HOME
CALL
123
CALL
123
CALL
This is the
participant
you already
are in a call
with.
The next
participant
you are
going to
call.
Use this
to place
the call.
This example shows two entries made before any
calls are placed.
To do this start by entering the rst person to call
(directly, via the recent calls list or from the phone
book), then select Add another participant and add
a second person. When all have been entered,
press Call on the remote control or select the Call
icon in the menu.
For units equipped with MultiSite capabilities, up to
three participants can be called simultaneously, if
no external MCUs are used.
After you have entered the participants, press
the
key to place the calls. Any of these may,
alice.wonderland@mycompany.com
Call
john.doe
Meetings
Call
Presentation
Phone book
Camera control
Recent c alls
Add another participant
Settings
of course, be fetched from the phone book in the
usual manner.
D1485 2.0 3 User guide Cisco TelePresence Prole, C-series codecs, Q uick Set C20, February 2012
All contents are copyright © 2010–2012 Cisco Systems, Inc. All rights reserved.
HOME
CALL
Terminating a video conference
abc
The host of a video conference is the
one who initiated the conference. This
is the endpoint to which all the others
are connected.
The host has the right to terminate the
connection to any of the participants.
The participants cannot control any
of the others, but may disconnect
themselves from the meeting at all
times.
28
End call
Do you really want to disconnect this call?
Disconnect all
Disconnect alice.wonderland@mycompany.com
Disconnect 542
Cancel
www.cisco.com
Page 29

Cisco TelePresence System Prole-series, C-series codecs, Quick Set C20 User guide
Resume
Join calls
Hold
Resume
Join calls
Hold
Contents
Advanced settings
Getting started
Making calls
Phone book usage
In-call features
Scheduled meetings
Making calls
Using Multiway™ to call more than one
All systems described in this User guide oer Multiway as a means to call more
than one. Note that successful use of Multiway requires the presence of certain
infrastructure products. If in doubt check with your system administrator.
Using Multiway, Case 1
Assume that you already are in a call and that you would like to expand the call to include
someone else.
Do as follows:
Start calling someone else by pressing the or the key on the remote control.
HOME
Call
Meetings
Presentation
Camera control
Settings
Recent calls
alice.wonderland@everyw here.co.nl
norah.dollhouse@somecompany.com
My contacts
Dorian Grey
Hedda Gabler
Phone book
Flo ria To sca
Enter the number or URI of the person to be included, either directly or by means of the
phone book or the list displayed) and place the call by pressing the key. This will put
the current call on Hold. When the new participant replies, select Join Calls.
CALL
abc
Using Multiway, Case 2
Someone calls you while you are in a call. You will need to decide whether the calling party
shall be invited to join the current call or not.
Someone calls you while you are in a call. A dialog box giving you three options will be
shown.
Incoming call
norah.dollhouse@somecompany.com
550092
Accept (put current call on hold)
Accept (disconnect current call)
Reject
Select Accept (put current call on hold).
When you are ready to create the conference, select Join Calls.
Call o n hold
Your call with
james.dowe@somecompany.com
is on hold.
All three of you will now be in the same meeting.
Call o n hold
Your call with
james.dowe@somecompany.com
is on hold.
All three of you will now be in the same meeting.
Repeat to include more participants if needed.
D1485 2.0 3 User guide Cisco TelePresence Prole, C-series codecs, Q uick Set C20, February 2012
All contents are copyright © 2010–2012 Cisco Systems, Inc. All rights reserved.
Case 2 options: If you do not want to set up a Multiway conference, you have the following
choices in 2. above:
• If you want to accept the incoming call instead of the current call, select Accept
(disconnect current call).
• If you do not want to respond to the incoming call, select Reject.
The maximum number of participants in a Multiway call is limited by the capabilities of the
infrastructure of your network only. The two cases described on this page may be combined
as much as you want.
29
www.cisco.com
Page 30

Cisco TelePresence System Prole-series, C-series codecs, Quick Set C20 User guide
Contents
Advanced settings
Getting started
Making calls
Phone book usage
In-call features
Scheduled meetings
Making calls
Which codec does my system have?
The optional ability to call more than one participant—the MultiSite feature— does
not apply to all video endpoints. This depends on the type of codec your system is
equipped with. The following applies:
• Endpoints using Codec C40, C60 and C90 support MultiSite and MultiWay.
• Endpoints using Codec C20 do not support MultiSite, but MultiWay.
• Quick Set C20 / C20 Plus both use the Codec C20. Consequently, they do not
support MultiSite, but MultiWay.
Looking for codec type:
At any rate, MultiSite is an optional feature that may—or may not—be present in your
endpoint.
If you need to see which type of codec your system is equipped with, open the
bottom module lid of the system.
Prole series codecs:
Codec C90
Open the bottom module lid as
shown, to see which type of
codec you have.
D1485 2.0 3 User guide Cisco TelePresence Prole, C-series codecs, Q uick Set C20, February 2012
All contents are copyright © 2010–2012 Cisco Systems, Inc. All rights reserved.
30
Codec C60
Codec C40
Codec C20
www.cisco.com
Page 31

Cisco TelePresence System Prole-series, C-series codecs, Quick Set C20 User guide
Contents
Advanced settings
Getting started
Making calls
Phone book usage
In-call features
Scheduled meetings
Phone book usage
D1485 2.0 3 User guide Cisco TelePresence Prole, C-series codecs, Q uick Set C20, February 2012
All contents are copyright © 2010–2012 Cisco Systems, Inc. All rights reserved.
Chapter 3
Phone book usage
31
www.cisco.com
Page 32

Cisco TelePresence System Prole-series, C-series codecs, Quick Set C20 User guide
Contents
Advanced settings
Getting started
Making calls
Phone book usage
In-call features
Scheduled meetings
Phone book usage
Basic phone book features
Your video system contains a phone book. The phone book is organized in a way very
similar to what you nd in a mobile phone.
It contains a section where you can add your own list of contacts, and most corporate
solutions will also include a corporate phone list.
This corporate phone list is normally installed and maintained from remote by your
system administrator through a management system like the Cisco Telepresence
Management Suite (TMS), which is available separately.
You cannot edit the corporate list yourself, but you may add entries to My Contacts.
These may be edited as much as you want.
Navigating in the phone book
Navigate in the phone book with the
Arrow and
keys.
The phone book may contain folders
indicated by folder icons (
). Press
the Arrow key to display the
contents of a folder. Repeat, if needed,
if there are more folder levels.
Whenever you are at a lower level, use
the
Arrow key to move one level
back.
Searching for an entry is explained on
the next page.
Search
My conta cts
0.1 - Beijing Of fice
0.2 - Londo n Office
0.3 - New York O ffice
0.4 - Oslo O ffice
0.5 - San Jos e Office
0.5 - Washin gton Offic e
PHONE BOOK
Opening the phone book
Press the
... the Phone book menu will now open…
Folders contain
phone book
entries (and they
may even contain
subfolders).
The phone book typically contains your own My contacts and a corporate phone book.
You may create your own list of contacts in My contacts.
key…
PHONE BOOK
Search
My contacts
0.1 - Beijing Off ice
0.2 - Lo ndon Of fice
0.3 - New Yor k Office
0.4 - Oslo Off ice
0.5 - San Jose Of fice
0.5 - Washingto n Off ice
Calling an entry in the phone book
Search
When an entry is located, just press
key to place the call.
the
D1485 2.0 3 User guide Cisco TelePresence Prole, C-series codecs, Q uick Set C20, February 2012
All contents are copyright © 2010–2012 Cisco Systems, Inc. All rights reserved.
a
Abraham Anderson
Adrian Jo nes
Harry P. Ott er
Hedda Gabler
Norah Dollhouse
Peer A. Gy nt
Roberta Nielsen
PHONE BOOK
32
The phone book can
also be accessed
from the Call menu.
CALL
Call
Phone book
Recen t call s
Add another participant
www.cisco.com
Page 33

Cisco TelePresence System Prole-series, C-series codecs, Quick Set C20 User guide
Contents
Advanced settings
Getting started
Making calls
Phone book usage
In-call features
Scheduled meetings
Phone book usage
Searching in the phone book
The My contacts may contain up to 200 entries, but the entire phone book can be
virtually unlimited in size. Consequently, using the arrow keys as the only navigation
device can easily mean a lot of work. What to do?
Enter the search function. By means of a virtual keyboard the search procedure is a
simple and convenient way of locating an entry.
Your phone book may contain folders, as outlined. Searches made will include current
folder and any subfolders, so if you stay at the top level (sometimes referred to as the
root level), your search will be made within all the (sub)folders.
How to search for an entry
Search
Search
My contac ts
0.1 - Beijing Of fice
0.2 - London O ffice
0.3 - New York Of fice
0.4 - Oslo Of fice
0.5 - San Jose O ffice
0.5 - Washingt on Office
My contac ts
0.1 - Beijing Of fice
0.2 - London O ffice
0.3 - New York Of fice
0.4 - Oslo Of fice
0.5 - San Jose O ffice
0.5 - Washingt on Office
PHONE BOOK
PHONE BOOK
Press the key to display
the Phone book. This will also
invoke the virtual keyboard.
Use the
Arrow key as
shown to move the cursor
up into the virtual keyboard
(indicated by an orange
square).
D1485 2.0 3 User guide Cisco TelePresence Prole, C-series codecs, Q uick Set C20, February 2012
All contents are copyright © 2010–2012 Cisco Systems, Inc. All rights reserved.
Use the Arrow keys to move
about the keyboard and the
key to select a character.
Access special characters
and numerics by means of the
corresponding keys.
Matches will appear as you
write, as outlined.
How to call the selected
Search
a
Abraham Anderson
Adrian Jone s
Harry P. Otte r
Hedda Gabler
Norah Dollhouse
Peer A. Gyn t
Roberta Nielsen
PHONE BOOK
entry is shown in the section
“Making calls”.
Add more letters to narrow and rene your search.
Example: Keying in da, will return entries like Dave Olson and David Jones, but also John
Dahl and Vittorio Dalmazzino. There is no case sensitivity.
33
www.cisco.com
Page 34

Cisco TelePresence System Prole-series, C-series codecs, Quick Set C20 User guide
Contents
Advanced settings
Getting started
Making calls
Phone book usage
In-call features
Scheduled meetings
Phone book usage
Adding new contacts to the phone book
New contacts can be added to My contacts only. Other entries must be entered by
your system administrator.
Adding an entry from recent calls or the phone book
While you are inside the phone book or inside the list of recent calls, navigate to the entry
you would like to copy to My contacts and press the
Options menu:
harry.p.otter@somecompany.com
Received 20.06.11 16.29
hedda.gabler@somecompany.org
Placed 20.06.11 15.10
dorian.grey@myself.net
Missed 20.06.11 14.55
frodo,b.aggins@myshire.org
Received 20.06.11 12.20
floria.tosca@somecompany.org
Placed 20.06.11 08.17
RECENT CALLS
key or the Arrow key to show the
Harr y P. Otter
harry.p.otter@somecompany.com
Call
Edit before call
Save to my c ontacts
Add to participants list
View dialing method
Adding an entry manually to My contacts
Open the phone book by pressing the key on the remote control and
navigate to My contacts:
PHONE BOOK
Search
My contacts
0.1 - Beijing Off ice
0.2 - Lo ndon Of fice
0.3 - New Yor k Office
0.4 - Oslo Off ice
0.5 - San Jose Of fice
0.5 - Washingto n Off ice
Press the key to show the contents of My contacts:
MY C ONTACT S
Search My contacts
Add new co ntac t
10.47.148.797
Adrian Jones
Alice Wonderl and
Hedda Gabler
Norah Dollhouse
abc
SAVE TO M Y CONTACTS
Navigate down to Save to my contacts and press the
Name
Number / U RI
Save
Cancel
key to open the dialog box that allows
Harr y P. Ott er
H323:harry.p.otter
you to edit the entry, if needed.
This is similar to entering a new contact manually (see right for details), but in this case the
name and number or address (URI) of the copied contact has already been lled in for you
by the system. If you want to edit the information entered, you may do so. Remember to save
before leaving the menu.
D1485 2.0 3 User guide Cisco TelePresence Prole, C-series codecs, Q uick Set C20, February 2012
All contents are copyright © 2010–2012 Cisco Systems, Inc. All rights reserved.
Navigate to Add new contact and press the key:
abc
Shown
ghosted
because
nothing
has been
entered yet.
Name
Number / U RI
Save
Cancel
NEW CON TACT
Abc
Enter name and number or address (URI) of the new contact. After you have entered
this information, the Save eld will no longer appear ghosted and you may navigate
down to this eld and press the
Alternatively, navigate down to Cancel and press the
key to save your new entr y.
key to exit the dialog box
without saving the new entry.
34
www.cisco.com
Page 35

Cisco TelePresence System Prole-series, C-series codecs, Quick Set C20 User guide
Contents
Advanced settings
Getting started
Making calls
Phone book usage
In-call features
Scheduled meetings
Phone book usage
Editing existing entries in the phone book
You may edit and delete entries in My contacts any time. Since updates in the
corporate phone book(s) made by your system administrator will fail to aect My
contacts, you may have to use this feature from time to time if corporate phone book
changes are made.
Editing entries in the phone book
PHONE BOOK
Search
My contacts
0.1 - Beijing Off ice
0.2 - Lo ndon Of fice
0.3 - New Yor k Office
0.4 - Oslo Off ice
0.5 - San Jose Of fice
0.5 - Washingto n Off ice
Open the phone book by pressing the key
and then navigate to My contacts. Press the
key to open My contacts.
hedda.gabler@somecompany.com
hedda.gabler@somecompany.com
Call
Edit before call
Add to participant list
View dialing methods
Remove f rom list
Edit contact details
MY C ONTACT S
Search My contacts
Add new co ntac t
10.47.148.797
Adrian Jones
Alice Wonderl and
Hedda Gabler
Norah Dollhouse
abc
Navigate to the entry to be edited
and press the
key.
You may call the entry directly.
You may edit the number or URI.
You may add the entry to participants list when setting up a
conference.
If the entry is listed with more dialing methods than the default, you
may use this to, for example use H.323 instead default SIP (or the
other way around).
You may remove the entry from the list.
You may edit contact details.
Name
Number / U RI
Save
Cancel
EDIT CONTACTS
Hedda Gabler
hedda.gabler@some
abc
D1485 2.0 3 User guide Cisco TelePresence Prole, C-series codecs, Q uick Set C20, February 2012
All contents are copyright © 2010–2012 Cisco Systems, Inc. All rights reserved.
35
www.cisco.com
Page 36

Cisco TelePresence System Prole-series, C-series codecs, Quick Set C20 User guide
Contents
Advanced settings
Getting started
Making calls
Phone book usage
In-call features
Scheduled meetings
In-call features
D1485 2.0 3 User guide Cisco TelePresence Prole, C-series codecs, Q uick Set C20, February 2012
All contents are copyright © 2010–2012 Cisco Systems, Inc. All rights reserved.
Chapter 4
In-call features
36
www.cisco.com
Page 37

Cisco TelePresence System Prole-series, C-series codecs, Quick Set C20 User guide
Contents
Advanced settings
Getting started
Making calls
Phone book usage
In-call features
Scheduled meetings
In-call features
Sharing contents
General recommendations tips for making your video meeting room as good as
possible are described in the Administrator guide for this product. The Administrator
guide may be downloaded from www.cisco.com/go/telepresence/docs.
Dual video stream
With dual video stream you can view two dierent live video streams simultaneously—
the main video and one additional source. This could for example be both a PC
presentation and the person who gives the presentation.
If a video system does not support dual video stream, no second video stream will be
established for this system and the PC presentation will be shown as the main video.
Sharing PC contents
Make sure the PC does not cover your line of sight to any of the microphones.
This will reduce the perceived audio quality at the far end.
Locate the DVI cable and connect the PC to the video system.
Connect the audio mini-jack output from the PC, or any other
source—including Ipod—to the mini-jack socket of the cable to
get sound. Connect the RCA connectors to the corresponding
sockets on the codec/endpoint.
The default presentation source will be activated when you press
the Presentation button ( ) on the remote control, as outlined.
The DVI / VGA input is compliant with VESA Extended Display
Identication Data (EDID) and will be able to notify the PC of the
supported output formats.
If the shared contents fail to show
• Normally you must press a special key combination to switch the PC image from the PC
screen to the video screen.
• Check that the presentation source is correctly dened. Access to this setting may be
password protected by your system administrator. The procedure is described in the
Administrator guide for this product.
• Make sure your PC is set to activate your VGA output.
D1485 2.0 3 User guide Cisco TelePresence Prole, C-series codecs, Q uick Set C20, February 2012
All contents are copyright © 2010–2012 Cisco Systems, Inc. All rights reserved.
Selecting the source
To specify which source to serve as presentation source select it as shown here. Note that
the name of each source can be changed, consult your administrator for details on this. All
options shown are not available to all systems.
37
Call
Meetings
Presentation
Camera control
Settings
HOME
Call
Second ary camer a (no signal)
Meetings
PC
Presentation
DVD
Document camera
Camera control
No presentation
Settings
HOME
PRESENTATION
www.cisco.com
Page 38

Cisco TelePresence System Prole-series, C-series codecs, Quick Set C20 User guide
Contents
Advanced settings
Getting started
Making calls
Phone book usage
In-call features
Scheduled meetings
In-call features
Controlling the cameras
During a call, you may control where your own camera is pointing (i.e. pan and tilt)
and the zoom. However, far end systems with remotely controllable cameras may
also permit you to control their camera’s panning and zooming. This is called Far end
camera control.
Controlling your own camera (near side)
In a call use the Arrow keys of the remote control to enter the camera
control mode. Softbuttons will now appear as shown below.
Use the Arrow keys and the Zoom keys to pan, tilt and zoom your
camera.
Exit the mode when nished.
For video conferences with more than two participants, far end is an ambiguous term.
If you are the initiator of a conference the only far end camera controllable by you will
be the rst participant you called. The other participants may all control your camera,
but they cannot control each other.
Controlling far end camera (far side)
In a call use the Arrow keys of the remote control to enter the camera
control mode. Softbuttons will now appear as shown below.
Press the leftmost Function key to access the far end camera.
Proceed as for near end camera control.
Access to far
end camera (if
far end camera
is remotely
controllable).
D1485 2.0 3 User guide Cisco TelePresence Prole, C-series codecs, Q uick Set C20, February 2012
All contents are copyright © 2010–2012 Cisco Systems, Inc. All rights reserved.
Access to your
own camera
presets, if
dened.
Access to your
own camera’s
settings.
Access to your
own system’s
main source
setting.
Exit this
mode.
38
Back to near end
camera control.
Exit this
mode.
www.cisco.com
Page 39

Cisco TelePresence System Prole-series, C-series codecs, Quick Set C20 User guide
Contents
Advanced settings
Getting started
Making calls
Phone book usage
In-call features
Scheduled meetings
Scheduled meetings
D1485 2.0 3 User guide Cisco TelePresence Prole, C-series codecs, Q uick Set C20, February 2012
All contents are copyright © 2010–2012 Cisco Systems, Inc. All rights reserved.
Chapter 5
Scheduled meetings
39
www.cisco.com
Page 40

Cisco TelePresence System Prole-series, C-series codecs, Quick Set C20 User guide
Contents
Advanced settings
Getting started
Making calls
Phone book usage
In-call features
Scheduled meetings
Scheduled meetings
Joining a meeting
Your system may be connected to a management system capable of scheduling
meetings for your video systems. Any meetings scheduled will then appear in the Tab l e of
Meetings as outlined below. You cannot navigate in that table with the remote control. To
produce a list in which you can navigate with the remote control, see “Displaying a list
of upcoming meetings” on the next page.
The Table of Meetings contains 14 days of scheduled meetings. The list is sorted
using Grouping headers. The main grouping category is by day (e.g.: TODAY,
TOMORROW, then WEDNESDAY, July 20, 2011 etc).
On your video system the Meeting Reminder will appear once it is possible to join a
meeting. Exactly when that will be depends on the Start time buer setting, which
has been set by your system administrator. Default buer setting is 10 minutes.
The meeting reminder contains a time indicator stating when the meeting starts, or
alternatively for how long the meeting has been going on (an ongoing meeting is
referred to as a Meeting in progress).
The text Starting now will be shown during a time interval spanning from 30 seconds
before to 30 seconds after the scheduled start time of the meeting.
Learning more about a meeting
You may use the Reminder to learn more about the announced meeting—just navigate
down to Meeting details and expand the item.
Meeting details will typically include who the organizer is; whether the meeting will be
recorded or not; a description of the meeting; whether it may be extended, if needed
(see
information etc.
Observe that when a scheduled meeting appears as Private meeting it will contain
information about the organizer only. There will be no title, no expandable meeting
outline nor will there be any dial-in information.
See
“Extending a scheduled meeting” on page 43 for more on this); dial in
the next page for an example of how the Meeting details are presented.
To join a meeting or not Viewing meeting details
• Select the Join meeting and press OK. This connects you to the “dial in“ address. .
• Select Snooze and press OK to temporarily hide the Reminder for 5 minutes..
• Select Dismiss and press OK to close the Reminder.
• In the Reminder navigate down to Meeting details and expand this menu item to see
meeting details. An example of Meeting details is shown on the next page.
Example of
Meeting Reminder
D1485 2.0 3 User guide Cisco TelePresence Prole, C-series codecs, Q uick Set C20, February 2012
All contents are copyright © 2010–2012 Cisco Systems, Inc. All rights reserved.
Example of
Table of
Meetings
40
www.cisco.com
Page 41

Cisco TelePresence System Prole-series, C-series codecs, Quick Set C20 User guide
Contents
Advanced settings
Getting started
Making calls
Phone book usage
In-call features
Scheduled meetings
Scheduled meetings
Displaying a list of upcoming meetings
If you want to take a closer look on any of the upcoming meetings including your video
system, you will need to look in a List of Meetings that lets you navigate in it with the
remote control.
Otherwise this list is identical to the table of upcoming meetings, as can be seen below.
Meeting details of any upcoming meeting
Once you have selected one of the upcoming meetings in the list, you may look into
the details of that meeting.
Even from this menu you may join the meeting, provided that you are inside the time
window allowing you to join. The length of this time window depends on the Start
time buer dened by your system administrator. See
on this.
An upcoming meeting will be shown in the Meeting Reminder, which pops up by itself
on the screen, see
the previous page for more on this.
To display a meetings list you can navigate within Viewing details of any meeting
• In the Home menu, navigate down Meetings and expand the item to produce a List of
Meetings.
1. Navigate to the meeting to be looked into and expand the menu item.
2. Then navigate down to Meeting details and expand this menu item to see meeting details.
the previous page for more
D1485 2.0 3 User guide Cisco TelePresence Prole, C-series codecs, Q uick Set C20, February 2012
All contents are copyright © 2010–2012 Cisco Systems, Inc. All rights reserved.
41
www.cisco.com
Page 42

Cisco TelePresence System Prole-series, C-series codecs, Quick Set C20 User guide
Contents
Advanced settings
Getting started
Making calls
Phone book usage
In-call features
Scheduled meetings
Scheduled meetings
Joining when already in a call
If you already are in a call (a video meeting), the Join meeting eld will change to reect
the new situation.
Joining the meeting
• If you already are in a call, the Join meeting button will change to JOIN & END CURRENT.
• Select JOIN & END CURRENT button to join the new meeting, ending the current.
• Select Join & Hold Current to temporarily join the meeting.
• Select Snooze to temporarily hide the Reminder for 5 minutes.
• Select Dismiss to go on with your current meeting.
• You can always look into the meeting details to help you make up your mind, select
Meeting details for this.
Parallel meetings (concurrency)
When Parallel meetings occur (two or more meetings taking place simultaneously), an
alert will appear, as outlined.
Selecting View meetings followed by pressing OK will produce the List of Meetings,
with the parallel meetings shown at the top of the list as outlined below.
Selecting which meeting to join
1. Expand View meetings as outlined.
2. Then navigate down to the meeting you want to join and join in the usual way.
D1485 2.0 3 User guide Cisco TelePresence Prole, C-series codecs, Q uick Set C20, February 2012
All contents are copyright © 2010–2012 Cisco Systems, Inc. All rights reserved.
42
www.cisco.com
Page 43

Cisco TelePresence System Prole-series, C-series codecs, Quick Set C20 User guide
Contents
Advanced settings
Getting started
Making calls
Phone book usage
In-call features
Scheduled meetings
Scheduled meetings
Extending a scheduled meeting
Scheduled meetings have a xed start and end time. When you are in a scheduled
meeting, a Meeting will end notication appears 10 minutes, 5 minutes and 2 minutes
before the meeting is brought to an end by the management system.
You may want to extend an ongoing meeting. This will be accepted by the system
provided that no other meeting is scheduled on the video system during the period of
extension.
Extending the meeting
• If an extension is sustainable, the Meeting will end notication will include an Extend and
a Dismiss option.
• To extend a meeting, make sure the Extend eld is selected, as outlined, and then press
OK.
• If you do not want to extend the meeting, navigate to Dismiss and press OK.
D1485 2.0 3 User guide Cisco TelePresence Prole, C-series codecs, Q uick Set C20, February 2012
All contents are copyright © 2010–2012 Cisco Systems, Inc. All rights reserved.
43
www.cisco.com
Page 44

Cisco TelePresence System Prole-series, C-series codecs, Quick Set C20 User guide
Contents
Advanced settings
Getting started
Making calls
Phone book usage
In-call features
Scheduled meetings
Advanced settings
D1485 2.0 3 User guide Cisco TelePresence Prole, C-series codecs, Q uick Set C20, February 2012
All contents are copyright © 2010–2012 Cisco Systems, Inc. All rights reserved.
Chapter 6
Advanced settings
44
www.cisco.com
Page 45

Cisco TelePresence System Prole-series, C-series codecs, Quick Set C20 User guide
Contents
Advanced settings
Getting started
Making calls
Phone book usage
In-call features
Scheduled meetings
Advanced settings
About the Administrator settings
The Administrator settings lets you dene extra softbutton functions; change the IP
settings of the system; use the advanced conguration options and change the menu
access password.
Your video system can be congured through its web interface, but it may also be
congured through the Advanced conguration. This is all normally done by your
system administrator, who may have password protected the access to the Advanced
conguration.
Entering the Administrator settings
HOME
Call
Meetings
Presentation
Camera control
Settings
Starting from the Home menu,
navigate down to Settings and
press the key.
Layout
Main source: C amera
Call settings
Language: English
Call
Date and time
Sound s and alerts
Meetings
Wallpaper: Growing
Presentation
System information
Camera control
Administrator settings
Restart
Settings
Administrator settings & password
The Advanced conguration settings are aimed at system administrators only and may
have been password protected by your system administrator. Unless you are the system
administrator you should normally leave these settings as they are.
The IP settings (not shown) are also aimed at system administrators.
The Advanced conguration settings and the IP settings are described in the Administrator
Guide applying to your video system. This guide can be downloaded from ww w.cisco.com/
go/telepresence/docs.
The password may not have been set. If you decide to give your system a password, take
care. If you forget your password contact your Cisco representative for help.
SETTINGS
HOME
HOME
SETTINGS
Layout
Main source: C amera
Call settings
Language: English
Date and time
Call
ADMINISTR ATOR PASSWORD
Sound s and ale rts
Meetings
Please enter y our
Wallpaper: Growing
Administrator password:
Presentation
System information
***
Camera control
Advanced
OK
Restart
Settings
Cancel
D1485 2.0 3 User guide Cisco TelePresence Prole, C-series codecs, Q uick Set C20, February 2012
All contents are copyright © 2010–2012 Cisco Systems, Inc. All rights reserved.
Then navigate to Administrator settings
and press the key again to display the
options available.
45
Enter the password. Invoke the virtual keyboard, if
needed (see “Placing calls by specifying the name,
number or address” on page 24 for details on this).
Navigate to OK to enter the Administrator settings menu.
www.cisco.com
Page 46

Cisco TelePresence System Prole-series, C-series codecs, Quick Set C20 User guide
!
Contents
Advanced settings
Getting started
Making calls
Phone book usage
In-call features
Scheduled meetings
Advanced settings
Assigning softbutton functions
The Function keys of the system’s remote control are used to control the softbuttons
appearing along the lower end of the screen—see also ”Navigating in the menus”
on page 6 for more.
Assigning a function to a softbutton
SETTINGS
Layout
Main sour ce: Camera
Call settings
Language: English
Date and t ime
Programmable softbuttons
Call
Sounds a nd alerts
Audio input levels
Meetings
Wallpaper: Growing
Conne ct to Cisco C allway
Presentation
System informatio n
IP settings
Camera control
Advanced
Set menu password
Restart
Pairing
Settings
Advanced confi guration
Navigate to Programmable softbuttons, as outlined, and
press the key. Se also the previous page, if needed.
Layout
Main sour ce: Camera
Call settings
Language: English
Date and t ime
Programmable softbuttons
Call
Sounds a nd alerts
Audio input levels
Meetings
Wallpaper: Growing
Conne ct to Callwa y
Presentation
System informatio n
IP settings
Camera control
Advanced
Advanced confi guration
In idle
Restart
Change password
Settings
In call
Navigate to select which softbutton to assign a function
to. Press the key.
ADMINISTRATOR SET TINGS
HOME
SETTINGS
ADMINISTRATOR SET TINGS
HOME
Softb utton 1: Not set
Softb utton 2: Not se t
Softb utton 3: Not se t
SYSTEM MODE
Softb utton 4: Not s et
Softb utton 5: Not se t
Navigate to select whether the softbutton function shall
apply to idle or to in-call conditions. Press the
IN CALL
Select among the options available and press the key. The
options are presented in detail on the following pages.
The softbuttons are context sensitive, which means that they appear only when
needed and not else. You may enhance your system’s perceived performance by
assigning your own functionalities to the softbuttons.
If you want a softbutton assignment to apply
to both idle and in-call situations, you must
assign a function twice.
There must be one setting for idle and
another one for in-call mode.
Note that any softbutton may be assigned to
any of the functions available.
Consequently, setting one softbutton to a
specic function for idle situations does
not require that the same function must be
assigned to the same softbutton for in-call
situations.
However, doing so may appear more logical in
many cases.
The description presented on this page
assumes that you are already inside the
Administrator settings, as described on the
previous page.
The access to the Administrator settings
may have been password protected by your
system administrator. Contact your system
administrator, if in doubt.
Layout
Main sour ce: Camera
Call settings
Language: English
Date and t ime
Programmable softbuttons
Call
Sounds a nd alerts
Audio input levels
Meetings
Wallpaper: Growing
Conne ct to Callwa y
Presentation
System informatio n
IP settings
Camera control
Advanced
Advanced confi guration
In idle
Restart
Change password
Settings
In call
Layout
Main sour ce: Camera
Call settings
Language: English
Date and t ime
Programmable softbuttons
Call
Sounds a nd alerts
Audio input levels
Meetings
Presentation
Camera control
Settings
Softb utton 1: Not set
Wallpaper: Growing
Conne ct to Callwa y
Softb utton 2: Not se t
System informatio n
IP settings
Main source selection
Softb utton 3: Not se t
Advanced
Advanced confi guration
Camera preset
Softb utton 4: Not s et
In idle
Restart
Change password
Speed dials
Softb utton 5: Not se t
In call
SETTINGS
ADMINISTRATOR SET TINGS
HOME
SYSTEM MODE
SETTINGS
ADMINISTRATOR SET TINGS
HOME
SYSTEM MODE
key.
IN CALL
SOFTBUT TON 1
D1485 2.0 3 User guide Cisco TelePresence Prole, C-series codecs, Q uick Set C20, February 2012
All contents are copyright © 2010–2012 Cisco Systems, Inc. All rights reserved.
46
www.cisco.com
Page 47

Cisco TelePresence System Prole-series, C-series codecs, Quick Set C20 User guide
!
Contents
Advanced settings
Getting started
Making calls
Phone book usage
In-call features
Scheduled meetings
Advanced settings
Creating softbutton for Main source selection
If you want direct access (via the softbuttons along the bottom line of the screen) to
the source used, you should assign the function Main source selection to one of the
softbuttons. Below we use Softbutton 1 as an example, but the function may, of course,
be assigned to any of the ve softbuttons.
How to get to the menus shown below
left and below right is described on
the previous page.
Assigning Main source selection softbutton
If you have set Softbutton 1 to PC as main
source, you may want to set Softbutton 2 to
Camera (or the other way around) in order to
be able to conveniently switch between the
two.
Creating softbutton for Camera Preset
If you want direct access (via the softbuttons along the bottom line of the screen) to
predened camera presets, you should assign the function Camera preset to one or
more of the softbuttons.
Note that camera presets must have been dened before you start assigning presets
to any of the softbuttons—see
camera presets.
Below we use Softbutton 4 as an example, but the function may, of course, be
assigned to any of the ve softbuttons
Assigning Camera preset softbutton
“Camera presets” on page 9 for more on
SETTINGS
Layout
Main sour ce: Camera
Call settings
Language: English
Date and t ime
Programmable softbuttons
Call
Sounds a nd alerts
Audio input levels
Meetings
Wallpaper: Growing
Conne ct to Callwa y
Presentation
System informatio n
IP settings
Camera control
Advanced
Advanced confi guration
In idle
Restart
Change password
Settings
In call
ADMINISTRATOR SET TINGS
HOME
Softb utton 1: Not set
Softb utton 2: Not se t
Main source selection
Softb utton 3: Not se t
SYSTEM MODE
Camera preset
Softb utton 4: Not s et
Speed dials
Softb utton 5: Not se t
IN CALL
SOFTBUT TON 1
MAIN SOURCE SELECTION
Camera
PC
The number of sources
available will depend on
your system.
D1485 2.0 3 User guide Cisco TelePresence Prole, C-series codecs, Q uick Set C20, February 2012
All contents are copyright © 2010–2012 Cisco Systems, Inc. All rights reserved.
SETTINGS
Layout
Main sour ce: Camera
Call settings
Language: English
Date and t ime
Programmable softbuttons
Call
Sounds a nd alerts
Audio input levels
Meetings
Wallpaper: Growing
Conne ct to Callwa y
Presentation
System informatio n
IP settings
Camera control
Advanced
Advanced confi guration
In idle
Restart
Change password
Settings
In call
47
ADMINISTRATOR SET TINGS
HOME
Softb utton 1: Not set
Softb utton 2: Not se t
Main source selection
Softb utton 3: Not se t
SYSTEM MODE
Camera preset
Softb utton 4: Not s et
Speed dials
Softb utton 5: Not se t
Clear softbutton
IN CALL
SOFTBUT TON 4
CAMERA PRESET SELECT ION
Pos. 1
Zoom out
Whiteboard
www.cisco.com
Page 48

Cisco TelePresence System Prole-series, C-series codecs, Quick Set C20 User guide
!
Camera
PC
Zoom in
Zoom out
Norah Dollhouse
Contents
Advanced settings
Getting started
Making calls
Phone book usage
In-call features
Scheduled meetings
Advanced settings
Softbutton—Speed dials
If you want direct access (via the softbuttons along the bottom line of the screen) to
contacts in the phone book, you should assign the function Speed dials to one or more
Customized softbuttons—how they appear
The below illustration shows how the video system screen may look with ve
customized softbuttons dened.
of the softbuttons.
Note that assignments can be made to existing contacts only (My contacts as well as
the corporate phone book). To add a contact to your list of contacts, see
page 34.
Below we use Softbutton 5 as an example, but the function may, of course, be
assigned to any of the ve softbuttons.
How to get to the menu shown below is described two pages back.
Assigning Camera preset softbutton Example of customized softbuttons
SETTINGS
Layout
Main sour ce: Camera
Call settings
Language: English
Date and t ime
Programmable softbuttons
Call
Sounds a nd alerts
Audio input levels
Meetings
Wallpaper: Growing
Conne ct to Callwa y
Presentation
System informatio n
IP settings
Camera control
Advanced
Advanced confi guration
In idle
Restart
Change password
Settings
In call
D1485 2.0 3 User guide Cisco TelePresence Prole, C-series codecs, Q uick Set C20, February 2012
All contents are copyright © 2010–2012 Cisco Systems, Inc. All rights reserved.
ADMINISTRATOR SET TINGS
HOME
Softb utton 1: Not set
Softb utton 2: Not se t
Main source selection
Softb utton 3: Not se t
SYSTEM MODE
Camera preset
Softb utton 4: Not s et
Speed dials
Softb utton 5: Not se t
Clear softbutton
IN CALL
SOFTBUT TON 5
Search
My contacts
0.1 - Beijing Off ice
0.2 - Lo ndon Of fice
0.3 - New Yor k Office
0.4 - Oslo Off ice
0.5 - San Jose Of fice
0.5 - Washingto n Off ice
PHONE BOOK
48
Sept
20
www.cisco.com
Page 49

Cisco TelePresence System Prole-series, C-series codecs, Quick Set C20 User guide
Contents
Advanced settings
Getting started
Making calls
Phone book usage
In-call features
Scheduled meetings
Advanced settings
Softbutton—Clearing softbuttons
You may clear softbuttons that you no longer want to appear. This is done via the
Clear softbutton at the bottom of the menu. You do not have to clear a softbutton
function before assign the same softbutton to another function. That may be done
right away.
For more on how to get to the below menu—see
“Assigning softbutton functions”
on page 46 for details.
Make sure you select the right softbutton (idle mode or in-call mode).
SETTINGS
Layout
Main source: C amera
Call settings
Language: English
Date and t ime
Programmable softbuttons
Call
Sounds and aler ts
Audio input levels
Meetings
Wallpaper: Growing
Presentation
System information
Camera control
Advanced
Restart
Settings
Soft button 1: Not set
Conne ct to C allway
Softbutton 2: Not set
IP sett ings
Soft button 3: Not se t
Advanced configuration
Soft button 4: Not set
In idle
Change password
Soft button 5: Not set
In call
HOME
ADMINISTR ATOR SETTINGS
Main source sel ection
SYSTEM MODE
Camera preset
Speed dials
Clear softbutton
IN CALL
SOFTBUT TON 1
D1485 2.0 3 User guide Cisco TelePresence Prole, C-series codecs, Q uick Set C20, February 2012
All contents are copyright © 2010–2012 Cisco Systems, Inc. All rights reserved.
49
www.cisco.com
Page 50

Cisco TelePresence System Prole-series, C-series codecs, Quick Set C20 User guide
Contents
Advanced settings
Getting started
Making calls
Phone book usage
In-call features
Scheduled meetings
Advanced settings
THE SPECIFICATIONS AND INFORMATION REGARDING THE PRODUCTS
IN THIS MANUAL ARE SUBJECT TO CHANGE WITHOUT NOTICE. ALL
STATEMENTS, INFORMATION, AND RECOMMENDATIONS IN THIS MANUAL
ARE BELIEVED TO BE ACCURATE BUT ARE PRESENTED WITHOUT
WARRANTY OF ANY KIND, EXPRESS OR IMPLIED. USERS MUST TAKE FULL
RESPONSIBILITY FOR THEIR APPLICATION OF ANY PRODUCTS.
THE SOFTWARE LICENSE AND LIMITED WARRANTY FOR THE
ACCOMPANYING PRODUCT ARE SET FORTH IN THE INFORMATION PACKET
THAT SHIPPED WITH THE PRODUCT AND ARE INCORPORATED HEREIN BY
THIS REFERENCE. IF YOU ARE UNABLE TO LOCATE THE SOFTWARE LICENSE
OR LIMITED WARRANTY, CONTACT YOUR CISCO REPRESENTATIVE FOR A
COPY.
The Cisco implementation of TCP header compression is an adaptation of a
program developed by the University of California, Berkeley (UCB) as part of
UCB’s public domain version of the UNIX operating system. All rights reserved.
Copyright © 1981, Regents of the University of California.
NOTWITHSTANDING ANY OTHER WARRANTY HEREIN, ALL DOCUMENT
FILES AND SOFTWARE OF THESE SUPPLIERS ARE PROVIDED “AS IS” WITH
ALL FAULTS. CISCO AND THE ABOVE-NAMED SUPPLIERS DISCLAIM ALL
WARRANTIES, EXPRESSED OR IMPLIED, INCLUDING, WITHOUT LIMITATION,
THOSE OF MERCHANTABILITY, FITNESS FOR A PARTICULAR PURPOSE AND
NONINFRINGEMENT OR ARISING FROM A COURSE OF DEALING, USAGE, OR
TRADE PRACTICE.
IN NO EVENT SHALL CISCO OR ITS SUPPLIERS BE LIABLE FOR ANY
INDIRECT, SPECIAL, CONSEQUENTIAL, OR INCIDENTAL DAMAGES,
INCLUDING, WITHOUT LIMITATION, LOST PROFITS OR LOSS OR DAMAGE TO
DATA ARISING OUT OF THE USE OR INABILITY TO USE THIS MANUAL, EVEN
IF CISCO OR ITS SUPPLIERS HAVE BEEN ADVISED OF THE POSSIBILITY OF
SUCH DAMAGES.
Cisco and the Cisco Logo are trademarks of Cisco Systems, Inc. and/or its
affiliates in the U.S. and other countries. A listing of Cisco’s trademarks can
be found at www.cisco.com/go/trademarks. Third party trademarks mentioned
are the property of their respective owners. The use of the word partner does
not imply a partnership relationship between Cisco and any other company.
(1005R)
On our web site you will nd an overview of the worldwide Cisco
contacts.
Go to: http://www.cisco.com/web/siteassets/contacts/index.html
Corporate Headquarters
Ciso Systems, Inc.
170 West Tasman Dr.
San Jose, CA 95134 USA
Any Internet Protocol (IP) addresses and phone numbers used in this document
are not intended to be actual addresses and phone numbers. Any examples,
command display output, network topology diagrams, and other figures
included in the document are shown for illustrative purposes only. Any use of
actual IP addresses or phone numbers in illustrative content is unintentional and
coincidental.
D1485 2.0 3 User guide Cisco TelePresence Prole, C-series codecs, Q uick Set C20, February 2012
All contents are copyright © 2010–2012 Cisco Systems, Inc. All rights reserved.
50
www.cisco.com
 Loading...