

Page 1

Corporate Headquarters
Cisco Systems, Inc.
170 West Tasman Drive
San Jose, CA 95134-1706
USA
http://www.cisco.com
Tel: 408 526-4000
800 553-NETS (6387)
Fax: 408 526-4100
AP1010 Cisco Aironet 1000 Series IEEE
802.11a/b/g Lightweight Access Points
with Internal Antennas - Quic k Start Guide
Text Part Number: 78-17146-01
Page 2

THE SPECIFICATIONS AND INFORMATION REGA RDING THE P RODUCTS IN THIS MANUAL ARE SUBJECT TO CHANGE W ITH OUT NOT ICE. A LL
STATEMENTS, INFORMATION, AND RECOMMENDATIONS IN THIS MANUAL ARE BELIEVED TO BE ACCURATE BUT ARE PRESENTED WITHOUT
WARRANTY OF ANY KIND, EXPRESS OR IMPLIED. USERS MUST TAKE FULL RESPONSIBILIT Y FOR THEIR APPLICATION OF ANY PRODUCTS.
THE SOFTWARE LICENSE AND LIMITED WARRA NTY FO R THE A CCOMPA NYING PRODUCT A RE SET FORTH IN T HE INFORM ATION P ACKET THAT
SHIPPED WITH THE PRODUCT AND ARE INCORPORATED HEREIN BY THIS REFERENCE. IF YOU ARE UNABLE TO LOCATE THE SOFTWARE LICENSE
OR LIMITED WARRANTY, CONTACT YOUR CISCO REPRESENTATIVE FOR A COPY.
The following information is for FCC compliance of Class A devices: This equipment has been tested and found to comply with the limits for a Class A di gital device, pursuant
to part 15 of the FCC rules. These limits are designed to provide reasonable protection against harmful interference when the equipment is operated in a commercial
environment. This equipment generates, uses, and can radiate radio-frequency energy and, if not installed and used in accordance with the instruction manual, may cause
harmful interference to radio communications. Operation of this equipment in a residential area is likely to cause harmful interference, in which case users will be required
to correct the interference at their own expense.
The following information is for FCC compliance of Class B devices: The equipment described in this manual generates and may radiate radio-frequency energy. If it is not
installed in accordance with Cisco’s installation instructions, it may cause interference with radio and television reception. This equipment has been tested and found to
comply with the limits for a Class B digital device in accordance with the specifications in part 15 of the FCC rules. These specifications are designed to provide reasonable
protection against such interference in a residential installation. However, there is no guarantee that interference will not occur in a particular installation.
Modifying the equipment without Cisco’s written authorization may result in the equipment no longer complying with FCC requirements for Class A or Class B digital
devices. In that event, your right to use the equipment may be limited by FCC regulations, and you may be required to correct any interference to radio or television
communications at your own expense.
You can determine whether your equipment is causing interference by turning it off. If the interference stops, it was pr obabl y caused by the Cisco equipment or one of its
peripheral devices. If the equipment causes interference to radio or television reception, try to correct the interference by using one or more of the following measures:
• Turn the television or radio antenna until the interference stops.
• Move the equipment to one side or the other of the television or radio.
• Move the equipment farther away from the television or radio.
• Plug the equipment into an outlet that is on a different circuit from the television or radio. (That is, make certain the equipment and the television or radio are on circuits
controlled by different circuit breakers or fuses.)
Modifications to this product not authorized by Ci sco Systems, Inc. could void the FCC approval and negate your auth ority to op erate the product.
The Cisco implementation of TCP header compression is an adaptation of a program developed by the University of California, Berkeley (UCB) as part of UCB’s public
domain version of the UNIX operating system. All rights reserved. Copyright © 1981, Regents of the University of California.
NOTWITHSTANDING ANY OTHER WARRANTY HEREIN, ALL DO CUMENT FILES AND SOFTW ARE OF THESE SUPPL IERS ARE PROVIDED “AS IS” WITH
ALL FAULTS. CISCO AND THE ABOVE-NAMED SUPPLIERS DISCLAI M ALL WARRANTIE S, EXPRESSED OR IMPLIED, INCLUDING, WITHOUT
LIMITATION, THOSE OF MERCHANTABILITY, FITNESS FOR A PARTICUL AR PURPOS E AND NONINFRINGE MENT OR ARISING FROM A COURSE OF
DEALING, USAGE, OR TRADE PRACTICE.
IN NO EVENT SHALL CISCO OR ITS SUPPLIERS BE LIABLE FOR ANY INDIRECT, SPECIAL, CONSEQUENTIAL, OR INCIDENTAL DAMAGES, INCLUDING,
WITHOUT LIMITATION, LOS T PROFITS OR LOSS OR DAMAGE TO DATA ARISIN G OUT OF THE US E OR INABILI TY TO USE THIS MA NUAL, EVEN I F CISCO
OR ITS SUPPLIERS HAVE BEEN ADVISED OF THE POSSIBILITY OF SU CH DAMA GES.
AP1010 Cisco Aironet 1000 Series IEEE 802.11a/b/g Lightweight Access Points with Internal Antennas - Quick Start Guide
© 2005 Cisco Systems, Inc. All rights reserved.
CCSP, CCVP, the Cisco Square Bridge logo, Follow Me Browsing, and StackWise are trademarks of Cisco Systems, Inc.; Changing the Way We Work, Live, Play, and Learn, and
iQuick Study are service marks of Cisco Systems, Inc.; and Access Registrar, Aironet, ASIST, BPX, Catalyst, CCDA, CCDP, CCIE, CCIP, CCNA, CCNP, Cisco, the Cisco
Certified Internetwork Expert logo, Cisco IOS, Cisco Press, Cisco Systems, Cisco Systems Capital, the Cisco Systems logo, Cisco Unity, Empowering the Internet Generation,
Enterprise/Solver, EtherChannel, EtherFast, EtherSwitch, Fast Step, FormShare, GigaDrive, GigaStack, HomeLink, Internet Quotient, IOS, IP/TV, iQ Expertise, the iQ logo, iQ
Net Readiness Scorecard, LightStream, Linksys, MeetingPlace, MGX, the Networkers logo, Networking Academy, Network Registrar, Packet, PIX, Post-Routing, Pre-Routing,
ProConnect, RateMUX, ScriptShare, SlideCast, SMARTnet, StrataView Plus, TeleRouter, The Fastest Way to Increase Your Internet Quotient, and TransPath are registered
trademarks of Cisco Systems, Inc. and/or its affiliates in the United States and certain other countries.
All other trademarks mentioned in this document or Website are the property of their respective owners. The use of the word partner does not imply a partnership relationship
between Cisco and any other company. (0502R)
Page 3

iii
AP1010 Cisco Aironet 1000 Series IEEE 802.11a/b/g Lightweight Access Points with Internal Antennas - Quick Start Guide
78-17146-01
CONTENTS
Preface v
Organization v
Conventions vi
Obtaining Documentation vi
Cisco.com vi
Documentation DVD vii
Ordering Documentation vii
Documentation Feedback vii
Cisco Product Security Overview viii
Reporting Security Problems in Cisco Products viii
Obtaining Technical Assistance ix
Cisco Technical Support Website ix
Submitting a Service Request ix
Definitions of Service Request Severity x
Obtaining Additional Publications and Information x
Installation and Configuration 1
Overview 1
Important Guidelines 2
Collecting Required Tools and Supplies 2
Pre-Installation Configuration 3
Configuration Setup 3
Preparing Mounting Locations 5
Mounting the Access Points 7
Ceiling Mount Base 7
Ceiling-Mount Clips 8
Projection Wall Mount 10
Flush Wall Mount 11
Returning MAC Information 13
APPENDIX
A Planning Notes A-1
Cables A-1
External Antennas A-2
Mounting Options A-2
Page 4

Contents
iv
AP1010 Cisco Aironet 1000 Series IEEE 802.11a/b/g Lightweight Access Points with Internal Antennas - Quick Start Guide
78-17146-01
Physical Security A-3
FCC Statements for Cisco Aironet 1000 Series Lightweight Access Points A-3
Class A Statement A-3
RF Radiation Hazard Warning A-3
Non-Modification Statement A-3
External Antennas A-4
Deployment Statement A-4
EU Regulatory Information A-4
Industry Canada Required User Information for Cisco Aironet 1000 Series Lightweight Access
Points
A-5
Safety Considerations A-5
I
NDEX
Page 5

v
AP1010 Cisco Aironet 1000 Series IEEE 802.11a/b/g Lightweight Access Points with Internal Antennas - Quick Start Guide
78-17146-01
Preface
This Guide will help you to install AP1010 internal-antenna Cisco Aironet 1000 Series 802.11a/b/g
lightweight access points. This model has internal 802.11a and 802.11b/g antennas and have no
connectors for optional external antennas.
If you are installing AP1020 and AP1030 Cisco Aironet 1000 Series 802.11a/b/g lightweight access points
with internal 802.11a and 802.11b/g antennas and connectors for optional external 802.11a and 802.11b/g
antennas, please refer to the AP1020 and AP1030 Cisco Aironet 1000 Series IEEE 802.11a/b/g Lightweight
Access Points with External Antennas - Quick Start Guide
.
Note All references to Acccess Points (APs) in this guide refer to Cisco Aironet 1000 Series 802.11a/b/g
lightweight access points, unless otherwise stated.
Organization
This guide is organized into the following sections:
• Overview, page 1
• Collecting Required Tools and Supplies, page 2
• Pre-Installation Configuration, page 3
• Preparing Mounting Locations, page 5
• Mounting the Access Points, page 7
• Returning MAC Information, page 13
Page 6
Preface
Conventions
vi
AP1010 Cisco Aironet 1000 Series IEEE 802.11a/b/g Lightweight Access Points with Internal Antennas - Quick Start Guide
78-17146-01
Conventions
This publication uses these conventions to convey instructions and information:
Notes, cautions, and timesavers use these conventions and symbols:
Tip Means the following will help you solve a problem. The tips information might not be troubleshooting
or even an action, but could be useful information.
Note Means reader take note. Notes contain helpful suggestions or references to materials not contained in
this manual.
Caution Means reader be careful. In this situation, you might do something that could result equipment damage
or loss of data.
Warning
This warning symbol means danger. You are in a situation that could cause bodily injury. Before you
work on any equipment, be aware of the hazards involved with electrical circuitry and be familiar
with standard practices for preventing accidents.
Obtaining Documentation
Cisco documentation and additional literature are available on Cisco.com. Cisco also provides several
ways to obtain technical assistance and other technical resources. These sections explain how to obtain
technical information from Cisco Systems.
Cisco.com
You can access the most current Cisco documentation at this URL:
http://www.cisco.com/univercd/home/home.htm
You can access the Cisco website at this URL:
http://www.cisco.com
You can access international Cisco websites at this URL:
http://www.cisco.com/public/countries_languages.shtml
Page 7

Preface
Obtaining Documentation
vii
AP1010 Cisco Aironet 1000 Series IEEE 802.11a/b/g Lightweight Access Points with Internal Antennas - Quick Start Guide
78-17146-01
Documentation DVD
Cisco documentation and additional literature are available in a Documentation DVD package, which
may have shipped with your product. The Documentation DVD is updated regularly and may be more
current than printed documentation. The Documentation DVD package is available as a single unit.
Registered Cisco.com users (Cisco direct customers) can order a Cisco Documentation DVD (product
number DOC-DOCDVD=) from the Ordering tool or Cisco Marketplace.
Cisco Ordering tool:
http://www.cisco.com/en/US/partner/ordering/
Cisco Marketplace:
http://www.cisco.com/go/marketplace/
Ordering Documentation
Ordering Documentation
You can find instructions for ordering documentation at this URL:
http://www.cisco.com/univercd/cc/td/doc/es_inpck/pdi.htm
You can order Cisco documentation in these ways:
• Registered Cisco.com users (Cisco direct customers) can order Cisco product documentation from
the Ordering tool:
http://www.cisco.com/en/US/partner/ordering/
• Nonregistered Cisco.com users can order documentation through a local account representative by
calling Cisco Systems Corporate Headquarters (California, USA) at 408 526-7208 or, elsewhere in
North America, by calling 1 800 553-NETS (6387).
Documentation Feedback
You can send comments about technical documentation to bug-doc@cisco.com.
You can submit comments by using the response card (if present) behind the front cover of your
document or by writing to the following address:
Cisco Systems
Attn: Customer Document Ordering
170 West Tasman Drive
San Jose, CA 95134-9883
We appreciate your comments.
Page 8

Preface
Obtaining Documentation
viii
AP1010 Cisco Aironet 1000 Series IEEE 802.11a/b/g Lightweight Access Points with Internal Antennas - Quick Start Guide
78-17146-01
Cisco Product Security Overview
Cisco Product Security Overview
Cisco provides a free online Security Vulnerability Policy portal at this URL:
http://www.cisco.com/en/US/products/products_security_vulnerability_policy.html
From this site, you can perform these tasks:
• Report security vulnerabilities in Cisco products.
• Obtain assistance with security incidents that involve Cisco products.
• Register to receive security information from Cisco.
A current list of security advisories and notices for Cisco products is available at this URL:
http://www.cisco.com/go/psirt
If you prefer to see advisories and notices as they are updated in real time, you can access a Product
Security Incident Response Team Really Simple Syndication (PSIRT RSS) feed from this URL:
http://www.cisco.com/en/US/products/products_psirt_rss_feed.html
Reporting Security Problems in Cisco Products
Reporting Security Problems in Cisco Products
Cisco is committed to delivering secure pro ducts. W e test our products internally before we release them,
and we strive to correct all vulnerabilities quickly. If you think that you might have identified a
vulnerability in a Cisco product, c ontact PSIRT:
• Emergencies — security-alert@cisco.com
• Nonemergencies — psirt@cisco.com
Tip We encourage you to use Pretty Good Privacy (PGP) or a compatible product to encrypt any sensitive
information that you send to Cisco. PSIRT can work from en crypted information that is compatible with
PGP versions 2.x through 8.x.
Never use a re voked or an expired encrypt ion ke y. The correct public key to use in your correspondence
with PSIRT is the one that has the most recent creation date in this public key server list:
http://pgp.mit.edu:11371/pks/lookup?search=psirt%40cisco.com&op=index&exact=on
In an emergency, you can also reach PSIRT by telephone:
• 1 877 228-7302
• 1 408 525-6532
Page 9

Preface
Obtaining Technical Assistance
ix
AP1010 Cisco Aironet 1000 Series IEEE 802.11a/b/g Lightweight Access Points with Internal Antennas - Quick Start Guide
78-17146-01
Obtaining Technical Assistance
Obtaining Technical Assistance
For all customers, partners, resellers, and distributors who hold valid Cisco service contracts, Cisco
Technical Support provides 24-hour-a-day, award-winning technical assistance. The Cisco Technical
Support W e bsite on Cisco.com features e xtensi v e online sup port resources. In addi tion, Cisco Technical
Assistance Center (TAC) engineers provide telephone support. If you do not hold a valid Cisco service
contract, contact your reseller.
Cisco Technical Support Website
The Cisco Technical Support Website provides online documents and tools for troubleshooting and
resolving technical issues with Cisco products and technologies. The website is a v ailable 24 hours a day,
365 days a year, at this URL:
http://www.cisco.com/techsupport
Access to all tools on the Cisco Technical Support Website requires a Cisco.com user ID and password.
If you have a valid service contract but do not have a user ID or password, you can register at this URL:
http://tools.cisco.com/RPF/register/register.do
Note Use the Cisco Product Identification (CPI) tool to locate your product serial number before submitting a web
or phone request for service. You can access the CPI tool from the Cisco Technical Support Website by
clicking the Tools & Resources link under Documentation & Tools. Choose Cisco Product Identification
Tool from the Alphabetical Index drop-down list, or click the Cisco Product Identification Tool link under
Alerts & RMAs. The CPI tool offers three search options: by product ID or model name; by tree view; or for
certain products, by copying and pasting show command output. Search results show an illustration of your
product with the serial number label location highlighted. Locate the serial number label on your product and
record the information before placing a service call.
Submitting a Service Request
Using the online TAC Service Request Tool is the fastest way to open S3 and S4 service requests. (S3
and S4 service requests are those in which your netw ork is minimally impaired o r for wh ich you require
product information.) After you describe your situation, the TAC Service Request Tool provides
recommended solutions. If your issue is not resolved using the recommended resources, your service
request is assigned to a Cisco TAC engineer. The TAC Service Request Tool is located at this URL:
http://www.cisco.com/techsupport/servicerequest
For S1 or S2 service requests or if you do not have Internet access, contact the Cisco TAC by telephone.
(S1 or S2 service requests are those in which your production network is down or severely degraded.)
Cisco TA C engineers are assigned immediately to S1 an d S2 service r equests to help k eep your bu siness
operations running smoothly.
Page 10

Preface
Obtaining Additional Publications and Information
x
AP1010 Cisco Aironet 1000 Series IEEE 802.11a/b/g Lightweight Access Points with Internal Antennas - Quick Start Guide
78-17146-01
To open a service request by telephone, use one of the following numbers:
Asia-Pacific: +61 2 8446 7411 (Australia: 1 800 805 227)
EMEA: +32 2 704 55 55
USA: 1 800 553-2447
For a complete list of Cisco TAC contacts, go to this URL:
http://www.cisco.com/techsupport/contacts
Definitions of Service Request Severity
To ensure that all service requests are reported in a standard format, Cisco has established severity
definitions.
• Severity 1 (S1)—Your network is “down,” or there is a critical impact to your business operations.
You and Cisco will commit all necessary resources around the clock to resolve the situation.
• Severity 2 (S2)—Operation of an existing network is severely degraded, or significant aspects of
your business operation are negatively affected by inadequate performance of Cisco products. You
and Cisco will commit full-time resources during normal business hours to resolve the situation.
• Severity 3 (S3)—Operational performance of your network is impaired, but most business
operations remain functional. You and Cisco will commit resources during normal business hours
to restore service to satisfactory levels.
• Severity 4 (S4)—You require information or assistance with Cisco product capabilities, installation,
or configuration. There is little or no effect on your business operations.
Obtaining Additional Publications and Information
Information about Cisco products, technologies, and network solu tio ns is available from v a rious online
and printed sources.
• Cisco Marketplace provides a v ariety of Cisco boo ks, reference guides, and logo merchandise. Visit
Cisco Marketplace, the company store, at this URL:
http://www.cisco.com/go/marketplace/
• Cisco Press publishes a wide range of general networking, training and certification titles. Both new
and experienced users will benefit from these publications. For current Cisco Press titles and other
information, go to Cisco Press at this URL:
http://www.ciscopress.com
• Packet magazine is the Cisco Systems technical user magazine for maximizing Internet and
networking investments. Each quarter, Packet delivers coverage of the latest industry trends,
technology breakthroughs, and Cis co products an d solutions, as well as network deployment and
troubleshooting tips, configuration examples, customer case studies, certification and training
information, and links to scores of in-depth online resources. You can access Packet magazine at
this URL:
http://www.cisco.com/packet
Page 11

Preface
Obtaining Additional Publications and Information
xi
AP1010 Cisco Aironet 1000 Series IEEE 802.11a/b/g Lightweight Access Points with Internal Antennas - Quick Start Guide
78-17146-01
• iQ Magazine is the quarterly publication from Cisco Systems designed to help growing companies
learn how they can use technology to increase revenue, streamline their business, and expand
services. The publication identifies the challenges facing these companies and the technologies to
help solve them, using real-world case studies and business strategies to help readers make sound
technology investment decisions. You can access iQ Magazine at this URL:
http://www.cisco.com/go/iqmagazine
• Internet Protocol Journal is a quarterly journal published by Cisco Systems for engineering
professionals involved in designing, developing, and operating public and private internets and
intranets. You can access the Internet Protocol Journal at this URL:
http://www.cisco.com/ipj
• World-class networking training is available from Cisco. You can view current offerings at
this URL:
http://www.cisco.com/en/US/learning/index.html
Page 12

Preface
Obtaining Additional Publications and Information
xii
AP1010 Cisco Aironet 1000 Series IEEE 802.11a/b/g Lightweight Access Points with Internal Antennas - Quick Start Guide
78-17146-01
Page 13

1
AP1010 Cisco Aironet 1000 Series IEEE 802.11a/b/g Lightweight Access Points with Internal Antennas - Quick Start Guide
7817146-01
Installation and Configuration
This guide is designed to provide you with the in formation needed to instal l AP1010 Cisco Aironet 1000
Series 802.11a/b/g lightweight access points. These Access Points (AP) are part of the Cisco Wireless
LAN Solution, and require no manual configuration after they are mounted.
Overview
This document assumes that a site survey has b een performed as described in the Cisco 1000 Series IEEE
802.11a/b/g Lightweight Access Point Deployment Guide , that AP locat ions an d mou nting optio ns have
been selected, and that you have one AP per indicated location.
After the site survey is done, you should have a map indicating the following:
• AP locations.
• AP mounting options: hanging from a ceiling, in the ceiling plenum, projecting a way from the w all,
flat against the wall, or using the Ceiling-Mount Bezel Kit.
• AP power options: power supplied by the AC-to-DC power supply orderable from the factory, or
PoE from a network device or a PoE injector/hub (usually located in a wiring closet).
Note Plenum-mounted APs MUST BE powered using PoE to comply with safety regulations.
If you do not hav e a map, mak e one so y ou can record the MAC addresses from each locat ion and retu rn
them to the person who is planning or managing this wireless network.
Note When mounting the APs, be sure to maintain a 20 cm (8 in.) separation between the APs and bystanders
to comply with FCC RF exposure regulations. Refer to the: “FCC Statements for Cisco Aironet 1000
Series Lightweight Access Points” section for more information
For more details about AP installations, refer to the “ Planning Notes” section at the end of this document
.
Page 14

Installation and Configuration
Collecting Required Tools and Supplies
2
AP1010 Cisco Aironet 1000 Series IEEE 802.11a/b/g Lightweight Access Points with Internal
7817146-01
Important Guidelines
Even though APs have been engineered for easy installation, there are some very important guidelines
to keep in mind:
• PLACE the AP NO MORE THAN 140 FEET APART. Placing them farther apart almost always
results in poor coverage.
• DO NOT MOUNT APs OUTDOORS.
• DO NOT MOUNT the APs ON BUILDING PERIMETER WALLS UNLESS THE OPERATOR
WANTS TO PROVIDE COVERAGE OUTSIDE THE BUILDING.
• BE SURE that plenum-mounted APs are powered using Po wer o ver Ethernet ( PoE) and use only the
metal brackets (not the Ceiling-Mount Base or the Hanging-Ceiling Clips) to comply with safety
regulations.
• BE SURE THAT the APs ARE INSTALLED VERTICALLY.
Installing them vertically standing up in a plenum or hanging
from a ceiling creates the largest coverage area per AP. Hanging
the APs from the ceiling provides the best RF coverage.
• DO NOT MOUNT the AP ANTENNAS WITHIN ONE METER
(3 FT.) OF ANY METAL OBSTRUCTIONS. THE RF WAVES
FROM the APs ARE BLOCKED AND/OR REFLECTED BY
METAL OBJECTS such as metal HVAC ducts, conduit, pipes,
bookcases, elevator shafts, stairwells, and metal walls. REFER
TO THE Cisco 1000 Series IEEE 802.11a/b/g Lightweight
Access Point Deployment Guide
BEFORE MOUNTING the APs
NEAR METAL OBSTRUCTIONS.
• WHEN MOUNTING the APs IN THE CORNER OF A
RIGHT-ANGLE HALLWAY INTERSECTION, MOUNT THE
them AT A 45-DEGREE ANGLE TO THE TWO HALLWAYS.
The AP internal antennas are not omnidirectional and cover a
larger area when mounted this way.
When AP is configured with an IP address and is mo ve d to a dif ferent
IP segment, it attempts to join a Ci sco Wireless LAN Controller. If it
is unable to join a Cisco Wireless LAN Controller after a number of attempts, it does an arp for the
default configured gateway. If the AP is on the wrong subnet, it will not be able to resolve the gateway
arp and it will attempt to contact a DHCP server. This is the AP IP address fallback feature. However , if
the destination IP segment does not have a DHCP server, the AP retains its original IP address and can
never join the network.
Collecting Required Tools and Supplies
Listed below are the pre-installation tool required:
• One AP per location.
• AP Mounting Kits, factory-supplied with each AP.
• Optional AP Mounting Kits, factory-orderable.
135662
135659
1 meter (3 ft.)
clearance
135660
Page 15

Installation and Configuration
Pre-Installation Configuration
3
AP1010 Cisco Aironet 1000 Series IEEE 802.11a/b/g Lightweight Access Points with Internal
7817146-01
• Optional AC-to-DC external power supplies, factory-orderable. Note that this option requires the
power cable to be run through the plenum in a metal conduit to meet safety requirements.
• Map showing APs locations and mounting and power options.
• Screwdrivers, drills, and ladder.
• An assortment of sheet metal and drywall screws and toggle bolts.
• CAT-5 (or higher) cables to connect the AP locations and other network devices.
• Optional Kensington MicroSaver Security Cable to secure each AP.
Continue with “Pre-Installation Configuration”.
Pre-Installation Configuration
The following procedures are designed to ensure that your AP installation and initial operation go as
expected. If you are unable to prepare your AP fo r deployment, this section also describes RMA (Return
Material Authorization) procedures.
Note Perform the following procedure on each AP BEFORE deploying it in its final location.
Note This procedure assumes that you are preparing a version 3.0 or later APs to operate with a Cisco W ireless
LAN Controller.
Configuration Setup
The figure below explains the configuration setup.
Figure 1 Configuration Setup
onfiguration Setup
Controller
Layer 2/3
devices
Access
points
135670
Page 16

Installation and Configuration
Pre-Installation Configuration
4
AP1010 Cisco Aironet 1000 Series IEEE 802.11a/b/g Lightweight Access Points with Internal
7817146-01
Configuration Steps for an AP prior to installation
Step 1 Configure the Cisco Wireless LAN Controller in LWAPP Layer 3 Mode and be sure its DS Port is
connected to the network. Use CLI, Web User Interface or Cisco WCS procedures as described in the
appropriate Cisco Wireless LAN Controller Guide.
a. Be sure AP ports are available through the Cisco Wireless LAN Controller
Management/AP-Manager Interface.
b. Set the Cisco Wireless LAN Controller as the Master so that new AP always associate with it.
Step 2 Take the AP out of the box and plug it into the same subnet as the Cisco Wireless LAN Controller.
Step 3 Apply power to the AP:
a. Use 802.3af-compatible PoE from an orderable inline power injector. If you do not have PoE
available, use an orderable AC-to-48 VDC External Power Supply plugged into the side of the AP.
Note These APs support 802.3af Power over Ethernet (PoE). These access points do not support Cisco
prestandard PoE. Please use Cisco 802.3af capable PoE switches or power injectors.
b. After you power up the AP, the RED Alarm LED comes on for about 15-20 seconds and then all the
LEDs blink sequentially back and forth, indicating that the AP is trying to find a Cisco Wireless
LAN Controller to associate with. This can continue for up to fi v e minutes. If the AP r emains in this
mode for more than five minutes, the AP is unable to find the Master Cisco Wireless LAN
Controller. Check the connection between the AP and the Cisco Wireless LAN Controller and be
sure the AP and the Cisco Wireless LAN Controller are on the same subnet.
c. If the power light does not come on, check the power (it can be powered either with PoE or fro m an
orderable AP External Power Supply.
d. Be sure that a DHCP server is configured in the Cisco Wireless LAN Controller for both the
Management Interface and AP-Manager Interface using the CLI, Web User Interface, or Cisco WCS
interface, and that the DHCP server is operating correctly.
e. After the AP finds the Cisco Wireless LAN Controller, it attempts to download the new Operating
System code if the AP code version differs from the Cisco Wireless LAN Controller code version.
While this is happening, the LEDs on the top of the AP blink simultaneously.
Step 4 After the Operating System code download is successful, the AP reboots. The GREEN LED turns on and
the two YELLOW LEDs indicate the states of the 802.11a and 802.11b/g networks. If any part of the
network is disabled in the Cisco Wireless LAN Controller, the corresponding YELLOW LED remains
off.
• Note that the Red LED can light for about 10-20 seconds when the AP reboots. If the RED LED
comes on AND STAYS ON for more than a minute, disconnect the Cisco Aironet 1000 Series
lightweight access point and call Cisco Technic al Assistance Center (TAC).
• From the CLI, Web User Interface or Cisco WCS interface, configure the AP with its Primar y,
Secondary, and Tertiary Cisco Wireless LAN Controller names.
• If required, use the CLI, Web User Interface or Cisco WCS interface to customize the AP-specific
802.11a, 802.11b and 802.11g network settings. Once again, the two YELLOW LEDs indicate the
states of the 802.11a and 802.11b/g networks. If any part of the network is disabled, the
corresponding YELLOW LED remains off.
Page 17

Installation and Configuration
Preparing Mounting Locations
5
AP1010 Cisco Aironet 1000 Series IEEE 802.11a/b/g Lightweight Access Points with Internal
7817146-01
Step 5 If everything works (the GREEN LED is on and the RED LED is off), disconnect the AP and take it to
its final destination and install it as described later in this document . If your AP fails this visual test, refer
to “Obtaining Technical Assistance” to return your AP.
Note When you are installing a Layer 3 AP on a dif ferent subnet than the Cisco Wireless LAN Controller, BE
SURE that a DHCP server is available on the subnet where you will be installing the AP, and that the
subnet has a route back to the Cisco Wireless LAN Controller. Also be sure that the route back to the
Cisco Wireless LAN Controller has destination UDP ports 12222 and 12223 open for LWAPP
communications. Ensure the route back to the Primary, Secondary, and Tertiary Cisco Wireless LAN
Controller allows IP packet fragments. Finally, be sure that if address translation is used, that the AP and
the Cisco Wireless LAN Controller have a static 1-to-1 NAT to an outside address. (Port Address
Translation is not supported.)
Step 6 When yo u have installed and powered up th e AP in its final dest inatio n, verify tha t the LEDs a re in the
same state they were in at the end of Step 4. If no LEDs are on, the AP is most lik ely not receiving power .
If all the LEDs blink sequentially for more than five minutes, the AP is unable to find its Primary,
Secondary, and Tertiary Cisco Wireless LAN Controller. Check the connection between the AP and the
Cisco Wireless LAN Controller, and be sure the AP and the Cisco Wireless LAN Controller are either
on the same subnet or that the AP has a route back to i ts Primary, Second ary , an d T er tiary Cisco W ireles s
LAN Controller. Also, if the AP is not on the same subnet as the Cisco W ireless LAN Controller, be sure
there is a DHCP server on the same subnet as the AP.
Step 7 After you have prepared all APs, reconfigure the Cisco Wireless LAN Controller so it is not the Mast er.
A Master Cisco Wireless LAN Controll er sh ould only be used fo r conf ig uring APs an d not in a w orking
network. Note that the Master Cisco Wireless LAN Controller is normally not used in a deployed
network, so the Master Cisco Wireless LAN Controller setting is automatical ly disabled upon reb oot or
OS upgrade.
After completing “Pre-Installation Configuration” for all APs, continue with “Preparing Mounting
Locations”.
Preparing Mounting Locations
On your map, you should have the AP locations, mounting options, and power options.
Note BE SURE that plenum-mounted APs use only the metal Projection-Mount and Flush-Mount brackets
(not the Ceiling-Mount Base or the Hanging-Ceiling Clips) and are powered using PoE to comply with
safety regulations.
1. Find the required mounting locations and prepare them in one of these ways:
–
Use the ceiling-mount base to mark the wall or ceiling locations for sheet metal, drywal l, or
other screws. Be sure you leav e enough space arou nd the AP and base to plug the CAT-5 cable,
optional power supply cable, and o ptional K ensington MicroSa ver Security Cable into the sides
of the AP.
Page 18

Installation and Configuration
Preparing Mounting Locations
6
AP1010 Cisco Aironet 1000 Series IEEE 802.11a/b/g Lightweight Access Points with Internal
7817146-01
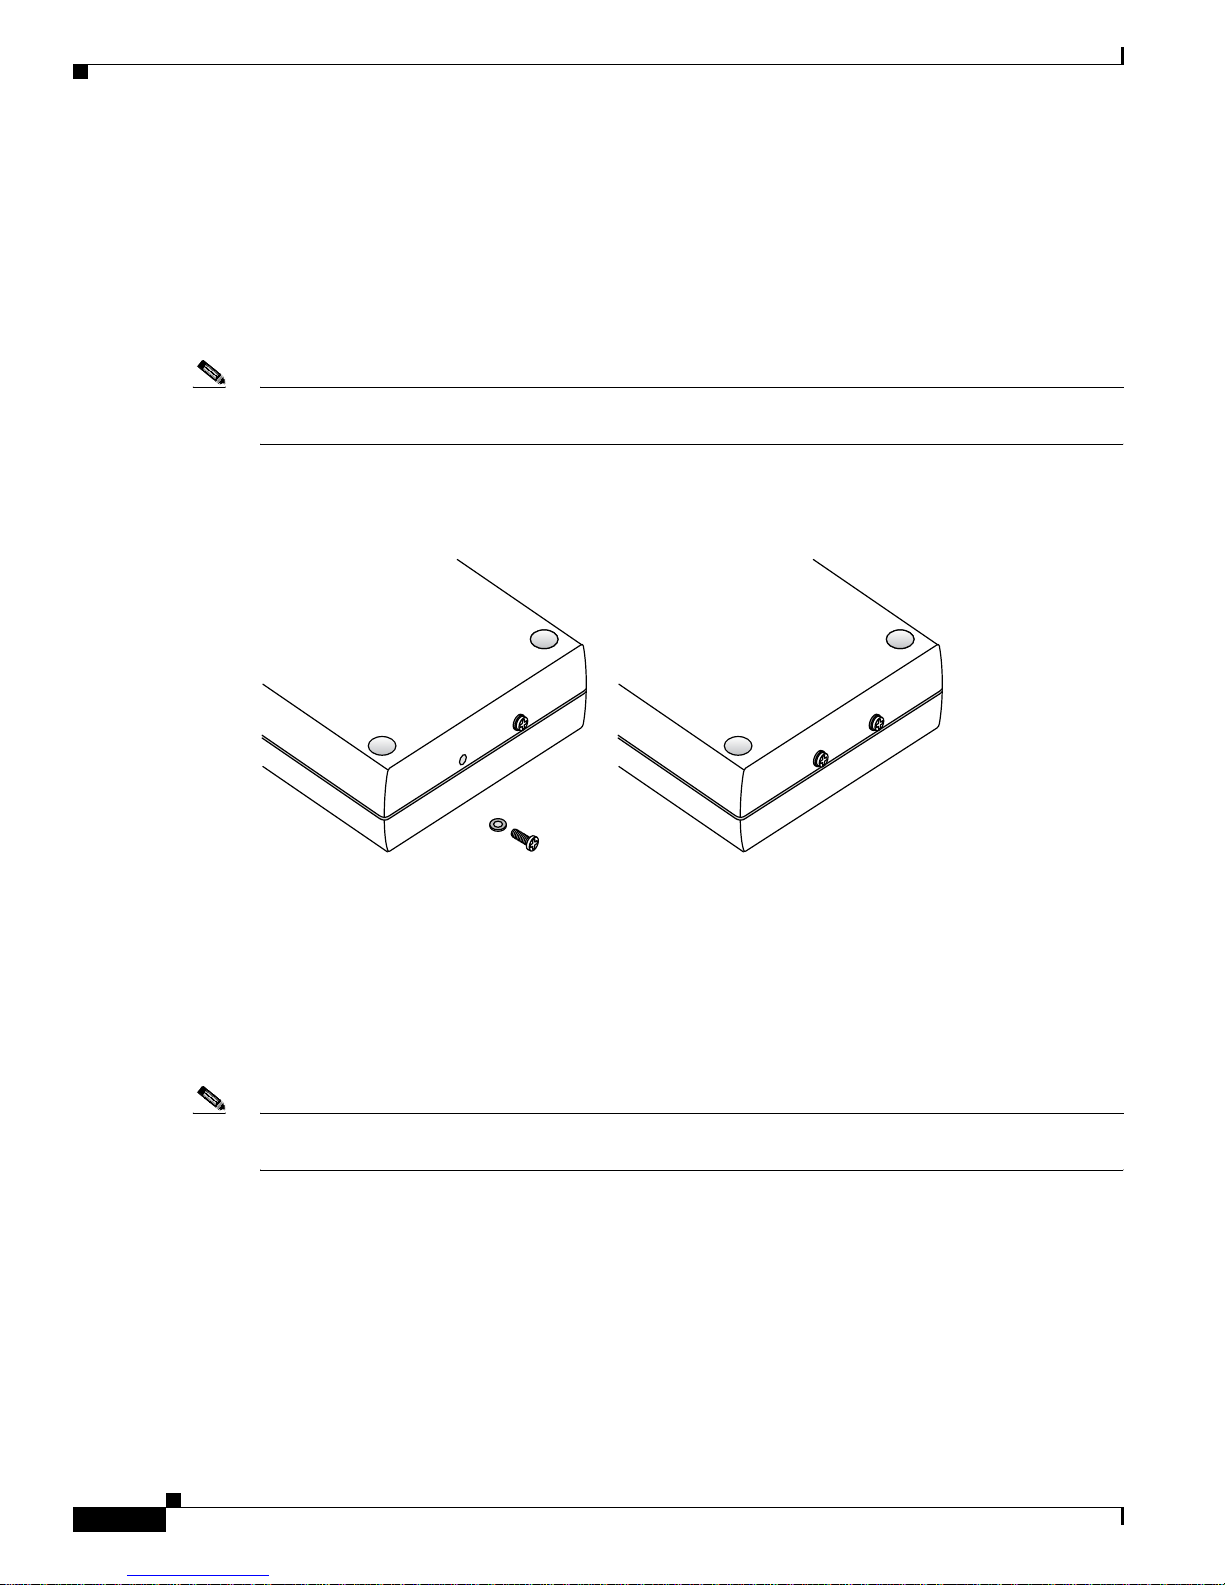
Figure 2 Factory-Supplied Mounti ng Optio ns
–
Attach the hanging ceiling clips to the AP. Be sure you leave enough space around the AP to
plug the CAT-5 cable, optional power supply cable, and optional Kensington MicroSaver
Security Cable into the sides of the AP.
–
Use the optional mounting bases and/or brackets to mark the w all or ceiling locations for sheet
metal, drywall, or other screws. Be sure you leave enough space around the AP and brackets to
plug the CAT-5 cable, optional power supply cable, and optional Kensington MicroSaver
Security Cable into the sides of the AP.
Figure 3 Facto ry-Orderable Mounting Brackets
2.
If necessary, drill holes for the various cables where they can be mostly hidden from casual view.
When you are mounting the AP using an optional separately orderable projection-mount L-bracket
(the one with two long legs), the cables can be routed through the 5/8-inch (15.9 mm) holes in the
bracket.
3. Route the CAT-5, optional power supply and optional Kensington MicroSaver Security cables to
where they can plug into the AP. Be sure to leave about 6 inches (15 cm) of slack in the cables for
future modifications.
4. Attach the brackets to the wall or ceiling, or install screws for ceiling-mount base:
–
Where you are going to use the projection-mount or flush-mount bracket, use customer -supplied
sheet metal, drywall, or other screws to attach the bracket to the ceiling or wall.
–
Where you are going to use the ceiling-mount base, install customer-supplied sheet metal,
drywall, or other screws with 1/4 inch (6.35 m m) or smaller h eads prot ruding from the ceilin g
about 0.1 inch (2.5 mm).
You are now ready to install the AP. Continue with “Mounting the Access Points”.
135663
A. Ceiling-mount base
B. Hanging-ceiling clips
135661
A. Projection-mount bracket
B. Flush-mount bracket
Page 19

Installation and Configuration
Mounting the Access Points
7
AP1010 Cisco Aironet 1000 Series IEEE 802.11a/b/g Lightweight Access Points with Internal
7817146-01
Mounting the Access Points
Using the supplied or optional orderable AP mounting kits, mount each AP in its indicated location,
oriented as shown on the map. Note t hat you can mount the AP in the ceiling plenum or belo w the ceiling,
but that they perform best when mounted below the ceiling.
Note that the AP supports Antenn a Sectoriz ation, which can be used to increase the number of clients
and client throughput in a given air space. Installers can mount two APs back-to-back and the Network
operator can disable the second antenna in both APs to create a 360-degree coverage area with two
sectors.
The APs can be mounted in any one of the following configurations:
• Ceiling Mount Base, page 7.
• Ceiling-Mount Clips, page 8.
• Projection Wall Mount, page 1 0.
• Flush Wall Mount, page 11.
• Ceiling-Mount Bezel -- Refer to the Ceiling Mount Bezels for Cisco Air onet 1000 Series Lightweight
Access Points - Quick Start Guide.
Ceiling Mount Base
When you are mounting the AP in the middle of a ceiling (flat sides toward the room or hallway), use
the ceiling-mount base to mount the AP as shown in the following figure and as described below:
Figure 4 Attaching the AP and Ceiling-Mount Base
1.
Copy the MAC address(es) from the label(s) on the AP onto the corresponding location on the map.
MAC addresses have the format 00xxxxxxxxxx.
2. Attach the ceiling-mount base to the bottom of the AP using the factory-supplied machine screws
and washers.
3. Position the ceiling-mount base so its keyhole slots are partly on the drywall, sheet metal, or other
screw heads installed in “Preparing Mounting Locations”.
135664
Page 20

Installation and Configuration
Mounting the Access Points
8
AP1010 Cisco Aironet 1000 Series IEEE 802.11a/b/g Lightweight Access Points with Internal
7817146-01
Note If the screws do not securely hold the ceiling-moun t base, remov e the AP and adjust the scre ws until they
hold the ceiling-mount base securely.
4. Attach the cables to the sides of the AP.
Note When the AP is powered up and is associated with a Cisco Wireless LAN Controller (Green/Power and
Yellow/802.11b/g and/or Yellow or Amber/802.11a LEDs lit), the AP is broadcasting its beacon
signal(s). When this happens, complete the installation as quickly as possible to remove yourself from
within 8 inches (20 cm) of the AP to comply with FCC RF radiation exposure guidelines.
5. Slide the ceiling-mount base onto the drywall, sheet metal, or other screw heads until it fits snugly
in place.
You have installed the AP . Repeat “Mounting the Access Points” for each AP location, and then continue
with “Returning MAC Information”.
Ceiling-Mount Clips
When you are mounting the AP on the extruded aluminium rails of a hanging ceiling, use the
ceiling-mount clips to mount the AP as shown in the following figure and as described below:
Figure 5 Assembling the AP and Ceiling-Mount Clips
1.
Copy the MAC address(es) from the label(s) on the AP onto the correspon ding location on the map.
MAC addresses have the format 00xxxxxxxxxx.
2. Attach the ceiling-mount clips to the bottom of the AP using the factory-supplied machine screws
and washers.
3. Snap the ceiling-mount clips onto a hanging ceiling rail.
135665
Page 21

Installation and Configuration
Mounting the Access Points
9
AP1010 Cisco Aironet 1000 Series IEEE 802.11a/b/g Lightweight Access Points with Internal
7817146-01
Figure 6 Clipping the AP and Ceiling-Mount Clips to a Hanging-Ceiling Rail
4.
Attach the cables to the sides of the AP.
Note Be sure the cables are routed away from the AP antennas.
Note When the AP is powered up and is associated with a Cisco Wireless LAN Controller (Green/Power and
Yellow/802.11b/g and/or Yellow or Amber/802.11a LEDs lit), the AP is broadcasting its beacon
signal(s). When this happens, complete the installation as quickly as possible to remove yourself from
within 8 inches (20 cm) of the AP to comply with FCC RF radiation exposure guidelines.
You have installed the AP . Repeat “Mounting the Access Points” for each AP location, and then continue
with “Returning MAC Information”.
135662
Page 22
Installation and Configuration
Mounting the Access Points
10
AP1010 Cisco Aironet 1000 Series IEEE 802.11a/b/g Lightweight Access Points with Internal
7817146-01
Projection Wall Mount
When you are mounting the AP out from a wall (flat sides along the wall or hallway), use an optional
factory-orderable projection-mount L-bracket.
1. Before proceeding, g ently screw the two factory-supplied scre ws and spring washers into the bottom
of the AP. Be sure the spring washers have their convex (high center sections) pointing toward the
screw heads.
Note The AP threaded holes have precision-depth threads. Do not overtighten the screws, or the bracket will
not fit under the screw heads.
Figure 7 Attaching the Mounting Screws and Spring Washers to the AP
2.
Copy the MAC address(es) from the label(s) on the AP onto the correspon ding location on the map.
MAC addresses have the format 00xxxxxxxxxx.
3. You have already attached the projection-mount L-bracket to the wall in “Mounting the Access
Points”.
4. Slide the screws into the keyhole slots on the mounting bracket as shown in the following figure.
Note If the screws do not securely hold the bracket, remove the AP and adjust the screws until they securely
hold the bracket.
135667
A. Screws and spring washers B. Completed assembly
Page 23

Installation and Configuration
Mounting the Access Points
11
AP1010 Cisco Aironet 1000 Series IEEE 802.11a/b/g Lightweight Access Points with Internal
7817146-01
Figure 8 Attaching the AP to the Projection-Mount Bracket
5. Attach the cables to the sides of the AP.
Note Be sure the cables are routed away from the AP antennas.
Note When the AP is powered up and is associated with a Cisco Wireless LAN Controller (Green/Power and
Yellow/802.11b/g and/or Yellow or Amber/802.11a LEDs lit), the AP begins broadcasting its beacon
signal(s). When this happens, complete the installation as quickly as possible to remove yourself from
within 8 inches (20 cm) of the AP to comply with FCC RF radiation exposure guidelines.
You have installed the AP. Repeat “Mounting the Access Points” for each AP location, and then continue
with “Returning MAC Information”.
Flush Wall Mount
When you are mounting the AP against a wal l (flat side tow ard the inside of the b uilding), use an optional
separately orderable flush-mount bracket.
1. Before proceeding, g ently screw the two factory-supplied screws and spr ing washers into the bottom
of the AP. Be sure the spring washers have their convex (high center sections) pointing toward the
screw heads.
Note The AP threaded holes have precision-depth threads. Do not overtighten the screws, or the bracket will
not fit under the screw heads.
135668
Page 24

Installation and Configuration
Mounting the Access Points
12
AP1010 Cisco Aironet 1000 Series IEEE 802.11a/b/g Lightweight Access Points with Internal
7817146-01
Figure 9 Attaching the Mounting Screws and Spring Washers to the AP
2.
Copy the MAC address(es) from the label(s) on the AP onto the correspon ding location on the map.
MAC addresses have the format 00xxxxxxxxxx.
3. You have already attached the flush-mount bracket to the wall in “Preparing Mounting Locations”.
4.
Slide the screws into the keyhole slots on the mounting bracket as shown in the following figure.
Note Be sure the side of the AP with the door is facing away from the wall (flat Side A toward the inside of
the building). This ensures that the correct antenna is facing the building, and makes future upgrades
easier.
Note If the screws do not securely hold the bracket, remove the AP and adjust the screws until they securely
hold the bracket.
Figure 10 Attaching the AP to the Flush-Mount Bracket
5.
Attach the cables to the sides of the AP.
135667
A. Screws and spring washers B. Completed assembly
135669
Page 25

Installation and Configuration
Returning MAC Information
13
AP1010 Cisco Aironet 1000 Series IEEE 802.11a/b/g Lightweight Access Points with Internal
7817146-01
Note Be sure the cables are routed away from the AP antennas.
Note When the AP is powered up and is associated with a Cisco Wireless LAN Controller (Green/Power and
Yellow/802.11b/g and/or Yellow or Amber/802.11a LEDs lit), the AP begins broadcasting its beacon
signal(s). When this happens, complete the installation as quickly as possible to remove yourself from
within 8 inches (20 cm) of the AP to comply with FCC RF radiation exposure guidelines.
Y o u hav e installed the AP. Repeat “Preparing Mounting Locations” for each AP location, and then continue with
“Returning MAC Information”.
Returning MAC Information
When you have completed the installati ons as outlined in “Mounting the Access Poi nts”, return the MAC
addresses and their locations on the maps or floor plans to the network planner or manager. The Network
operators will use the MAC address and location information to create maps for precise wireless
Operating System management.
Also return any unused mounting kit hardware and external power supplies to the network planner or
manager for use in future deployments.
Note Please remind the Network Planner or Manager that now is a good time to register the APs.
Page 26

Installation and Configuration
Returning MAC Information
14
AP1010 Cisco Aironet 1000 Series IEEE 802.11a/b/g Lightweight Access Points with Internal
7817146-01
Page 27

A-1
AP1010 Cisco Aironet 1000 Series IEEE 802.11a/b/g Lightweight Access Points with Internal Antennas - Quick Start Guide
78-17146-01
APPENDIX
A
Planning Notes
This appendix contains the following sections:
• Cables, page A-1
• External Antennas, page A-2
• Mounting Options, page A-2
• Physical Security, page A-3
• FCC Statements for Cisco Aironet 1000 Series Lightweight Access Points, page A-3
• Safety Considerations, page A-5
Cables
This section contains the cable information.
• You will run one CAT-5 Ethernet cable from the AP to a network device or a PoE injector/hub.
• When a AP will be mounted below the ceiling using the ceiling mount or wall mount brackets, you
may have to drill a hole into the ceiling plenum to run the CAT-5 cable to the wiring closet. When
the CAT-5 cable cannot be run through the ceiling plenum, find another path to route the cable from
the AP to the wiring closet.
• When the AP will be mounted above the ceiling using the ceiling mount or wall mo unt brackets, run
the CAT-5 cable to the wiring closet through the ceiling plenum. When the CAT-5 cable cannot be
run through the ceiling plenum, f ind another pat h to route the cable from t he AP to the wiring closet.
• When you are powering the AP from A C po wer , route the po wer suppl y cable from the A C electrical
outlet to the AP. Be sure you secure the AC power plug so it will be difficult for people to pull on
the power cord or unplug the power supply from the AC power outlet.
• When you are powering the AP from a PoE source (a network device, or a PoE injector/hub), you
do not need to route a separate power cable to the AP, because the AP will receive its power across
the CAT-5 Ethernet cable. R eturn the power supply to the wireless network planner/manager.
Page 28

A-2
AP1010 Cisco Aironet 1000 Series IEEE 802.11a/b/g Lightweight Access Points with Internal Antennas - Quick Start Guide
78-17146-01
Appendix A Planning Notes
External Antennas
The APs are designed to be used exclusiv ely with the internal high-gain antennas and hav e no pro visions
for external antennas.
Note As described in the AP1020 and AP1030 Cisco Aironet 1000 Series 802.11a/b/g Lightweight Access Points
with External Antennas - Quick Start Guide, the AP1020 and AP1030 APs have jacks for external
antennas.
Mounting Options
This section contains the mounting information.
Note Because the AP internal antennas have been designed to reduce inter-floor interference, it is strongly
recommended that you mount the AP standing or hanging straight up or down.
Note You can mount the AP in the ceiling plenum or below the ceiling using the ceiling mount base or wall
mount brackets, but the APs perform best when mounted below the ceiling.
Caution Plenum-mounted APs MUST BE powered using PoE to comply with safety regulations.
• When you are mounting the AP in the middle of a ceiling, ceiling plenum, or hallway, you will
typically use the color-coordinated ceiling-mount base to stabilize the AP after it is mounted. Us e
the mounting base to mark the sheet metal, drywall, or other screw locations.
• The mounting base attaches to the bottom of the AP with tw o supplied screws, an d then the assembly
slides and locks onto two sheet metal, drywall, or other screws.
• When you are mounting the AP out from a wall (flat sides along the room or hallway), use the
projection-mount L-bracket supplied with the AP. Use the L-bracket to mark the sheet metal,
drywall, or other screw locations.
• When you are mounting the AP against a wall (flat Side A toward the inside of the building), use
the flush-mount bracket supplied with the AP. The flush-mount L-bracket is the one with one long
and one short leg. Use the L-bracket to mark the sheet metal, drywall, or other screw locations.
Page 29

A-3
AP1010 Cisco Aironet 1000 Series IEEE 802.11a/b/g Lightweight Access Points with Internal Antennas - Quick Start Guide
78-17146-01
Appendix A Planning Notes
Physical Security
Regardless of the mounting type selected, the AP can be secured with a K ensington MicroSa ver Security
Cable. If required, use any MicroSaver Security Cable to attach either side of your AP to a solid beam,
pipe, or support.
FCC Statements for Cisco Aironet 1000 Series Lightweight Access Points
FCC Statements for Cisco Aironet 1000 Series Lightweight Access Points
This section includes the follo wing FCC statements for the Cisco Aironet 1000 Series lightweight access
point:
• Class A Statement, page A-3
• RF Radiation Hazard Warning, page A-3
• Non-Modification Statement, page A-3
• External Antennas, page A-4
• Deployment Statement, page A-4
Class A Statement
Class A Statement
This equipment has been tested and found to comply with the limits for a Class A di gital device, pursuant
to Part 15 of the FCC Rules. These limits are designed to provide reasonable protection against harmful
interference when the equipment is operated in a commercial environment. This equipment generates,
uses, and can radiate radio frequency energy and, if not installed and used in accordance with the
instruction manual, may cause harmful interference to radio communications. Operation of this
equipment in a residential area is likely to cause harmful interference in which case the user will be
required to correct the interference at his own expense. [cfr reference 15.105]
RF Radiation Hazard Warning
RF Radiation Hazard Warning
To ensure compliance with FCC RF exposure requirements, this device must be installed in a location
such that the antenna of the device will be greater than 20 cm (8 in.) from all persons. Using higher gain
antennas and types of antennas not covered under the FCC certification of this product is not allowed.
Installers of the radio and end users of the Cisco Wireless LAN Solution must adhere to the installation
instructions provided in this manual.
Non-Modification Statement
Non-Modification Statement
Use only the supplied internal antenna, or external antennas suppli ed by the manufact urer . Unauthorized
antennas, modifications, or attachments could damage the badge and could violate FCC regulations and
void the user’s authority to operate the equipment.
Page 30

A-4
AP1010 Cisco Aironet 1000 Series IEEE 802.11a/b/g Lightweight Access Points with Internal Antennas - Quick Start Guide
78-17146-01
Appendix A Planning Notes
External Antennas
The AIR-AP1020-A-K9, AIR-AP1020-E-K9, AIR-AP1020-J-K9, AIR-AP1030-A-K9,
AIR-AP1030-E-K9, and AIR-AP1030-J-K9 Cisco Aironet 1000 Series IEEE 802.11a/b/g lightweight
access points can be used with external antennas with the following characteristics:
• 5 GHz patch antenna: 6 dBi net gain.
• 2.4 GHz patch antenna: 6 dBi net gain.
Deployment Statement
This product is certified for indoor deployment only. Do not install or use this product outdoors.
EU Regulatory Information
Compliance Information for Cisco Aironet 1000 Series IEEE 802.11a/b/g lightweight access points:
1. Standards met:
–
Radio: EN 301 328, EN 301 893
–
EMC: EN 301489-1, EN 301 489-17
–
Safety: EN 60950
–
RF Safety: EN 50371
2. CE Marking: Cisco Aironet 1000 Series 802.11a/b/g lightweight access points are identified with
this CE marker:
3. EU Country Restriction:
Note • The Cisco Aironet 1000 Series IEEE 802.11a/b/g lightweight access point is intended for indoor use
only.
• The Cisco Aironet 1000 Series IEEE 802.11a/b/g lightweight access point meets EU DFS
requirement.
Generally, the 5150-5350 MHz, 5470-5750 MHz, and 2400-2483.5 MHz bands are allowed in most EU
countries. However, there are several country specific restrictions that apply to different bands on a
country-by-country basis.
The following entries specify countries with specific restrictions:
Note These restrictions may evolve. It is recommended that you check with their local authorities for latest
requirements
• Austria - Only transmission with in the freq uency band 515 0-5250 MHz is allowed. The band
5470-5750 MHz is not allowed.
• Belgium - The frequency band 5470-5750 MHz is not allowed.
Page 31

A-5
AP1010 Cisco Aironet 1000 Series IEEE 802.11a/b/g Lightweight Access Points with Internal Antennas - Quick Start Guide
78-17146-01
Appendix A Planning Notes
• France - The frequency band 5470-5750 MHz is not allowed.
• Portugal - Integral antenna is required.
• Switzerland - The frequency band 5470-5750 MHz is not allowed.
• Czech - The frequency band 5470-5750 MHz is not allowed.
• Slovak Republic - The frequency band 5470-5750 MHz is not allowed.
Industry Canada Required User Information for Cisco Aironet 1000 Series
Lightweight Access Points
Industry Canada Required User Information for Cisco Aironet 1000 Series Lightweight Access Points
This device has been designed to operate with antennae ha ving maximum gains of 7.8 dBi (2.4 GHz) and
7.4 dBi (5 GHz).
Antennae having higher gains is strictly prohibited per regulations of Industry Canada. The required
antenna impedance is 50 ohms.
To reduce potential radio interference to other users, the antenna type and its gain should be so chosen
that the equivalent isotropically radiated power (EIRP) is not more than that required for successful
communication.
Safety Considerations
Warning
This warning symbol means danger. You are in a situation that could cause bodily injury. Before you
work on any equipment, be aware of the hazards involved with electrical circuitry and be familiar
with standard practices for preventing accidents. Use the statement number provided at the end of
each warning to locate its translation in the translated safety warnings that accompanied this device.
Statement 1071
Safety Considerations
• The AP1010, AP1020, and AP1030 Cisco Aironet 1000 Series IEEE 802.11a/b/g lightweight access
points with or without external antenn a ports are on ly int ended for install ation in Environment A as
defined in IEEE 802.3af. All interconnected equipment must be contained within the same building
including the interconnected equipment's associated LAN connections.
• For AP1020 and AP1020 Cisco Aironet 1000 Series IEEE 802.11a/b/g lightweight access points
provided with optional ext ernal antenna ports, be su re that all exter nal antennas and their associated
wiring are located entirely indoors. The Cisco Aironet 1000 Series 802.11a/b/g lightweight access
points and their optional external antennas are not suitable for outdoor use.
• BE SURE that plenum-mounted Cisco Aironet 1000 Series 802.11a/b/g lightweight access points
are powered using PoE to comply with safety regulations.
• Suitable for use in environmental air space in accordance with Section 300.22.C of the National
Electrical Code, and Sections 2-128, 12-010(3) and 12-100 of the Canadian Electrical Code, Part 1,
C22.1.
• When used below dropped ceiling use a UL Listed ITE power adapter (QQGQ) marked LPS or a
Listed Direct Plug-in Adapter (EPBU) marked Class 2 with output rated 48 V, 0.4 A.
Page 32

A-6
AP1010 Cisco Aironet 1000 Series IEEE 802.11a/b/g Lightweight Access Points with Internal Antennas - Quick Start Guide
78-17146-01
Appendix A Planning Notes
Warning
DGT statement for products that operate at both 2.4 GHz band and 5 GHz band:
Warning
This equipment must be grounded. Never defeat the ground conductor or operate the
equipment in the absence of a suitably installed ground condu ctor. Contact the appropriate
electrical inspection authority or an electrician if you are uncertain that suitable
grounding is available.
Statement 1024
Waarschuwing
Deze apparatuur dient geaard te zijn. De aardingsleiding mag nooit buiten we rking worden
gesteld en de apparatuur mag nooit bediend worden zonder dat er een op de juiste wijze
geïnstalleerde aardingsleiding aanwezig is. Neem contact op met de bevoegde instantie
voor elektrische inspecties of met een elektricien als u er niet zeker van bent dat er voor
passende aarding gezorgd is.
Varoitus
Laitteiden on oltava maadoitettuja. Älä koskaan ohita maajohdinta ta i käytä laitteita i lman
oikein asennettua maajohdinta. Ota yhteys sähkötarkastusviranomaiseen tai
sähköasentajaan, jos olet epävarma maadoituksen sopivuudesta.
Attention
Cet équipement doit être mis à la masse. Ne jamais rendre inopérant le conducteur de
masse ni utiliser l'équipement sans un conducteur de masse adéquatement installé. En cas
de doute sur la mise à la masse appropriée disponible, s'adresser à l'organisme
responsable de la sécurité électrique ou à un électricien.
Warnung
Dieses Gerät muss geerdet sein. Auf keinen Fall den Erdungsleiter unwirksam machen oder
das Gerät ohne einen sachgerecht installierten Erdungsleiter verwenden. Wenn Sie sich
nicht sicher sind, ob eine sachgerechte Erdung vorhanden ist, wenden Sie sich an die
zuständige Inspektionsbehörde oder einen Elektriker.
Avvertenza
Questa apparecchiatura deve essere dotata di messa a terra. Non escludere mai il
conduttore di protezione né usare l'apparecchiatura in assenza di un conduttore di
protezione installato in modo corretto. Se non si è certi della disponibilità di un adeguato
collegamento di messa a terra, richiedere un controllo elettrico presso le autorità
competenti o rivolgersi a un elettricista.
Page 33

A-7
AP1010 Cisco Aironet 1000 Series IEEE 802.11a/b/g Lightweight Access Points with Internal Antennas - Quick Start Guide
78-17146-01
Appendix A Planning Notes
Advarsel
Dette utstyret må jordes. Omgå aldri jordingslederen og bruk aldri utstyret uten riktig
montert jordingsleder. Ta kontakt med fagfolk innen elektrisk inspeksjon eller med en
elektriker hvis du er usikker på om det finnes velegnet jordning.
Aviso
Este equipamento deve ser aterrado. Nunca anule o fio terra nem opere o equipamento sem
um aterramento adequadamente instalado. Em caso de dúvida com relação ao sistema de
aterramento disponível, entre em contato com os serviços locais de inspeção elétrica ou
um eletricista qualificado.
¡Advertencia!
Este equipo debe estar conectado a tierra. No inhabilite el conductor de tierra ni haga
funcionar el equipo si no hay un conductor de tierra instalado correctamente. Póngase en
contacto con la autoridad correspondiente de inspección eléctrica o con un electricista si
no está seguro de que haya una conexión a tierra adecuada.
Varning!
Denna utrustning måste jordas. Koppla aldrig från jordledningen och använd aldrig
utrustningen utan en på lämpligt sätt installerad jordledning. Om det föreligger osäkerhet
huruvida lämplig jordning finns skall elektrisk besiktningsauktoritet eller elektriker
kontaktas.
Page 34

A-8
AP1010 Cisco Aironet 1000 Series IEEE 802.11a/b/g Lightweight Access Points with Internal Antennas - Quick Start Guide
78-17146-01
Appendix A Planning Notes
Page 35

IN-1
AP1010 Cisco Aironet 1000 Series IEEE 802.11a/b/g Lightweight Access Points with Internal Antennas - Quick Start Guide
78-17146-01
INDEX
C
Cables A-1
Ceiling Mount Base 7
Ceiling-Mount Clips 8
Collecting Required Tools and Supplies 2
Configuration Setup 3
Configuration Steps for an AP prior to installation 4
Conventions vi
E
External Antennas A-2
F
FCC Statements for Cisco Aironet 1000 Seri es Lightweight
Access Points
A-3
Flush Wall Mount 11
I
Important Guidelines 2
M
Mounting Options A-2
Mounting the Access Points 7
O
Obtaining Documentation vi
P
Physical Security A-3
Planning Notes A-1
Preface v
Pre-Installation Configuration 3
Preparing Mounting Locations 5
Projection Wall Mount 10
R
Returning MAC Information 13
Page 36

Index
IN-2
AP1010 Cisco Aironet 1000 Series IEEE 802.11a/b/g Lightweight Access Points with Internal Antennas - Quick Start Guide
78-17146-01
 Loading...